#1
![]()
Posted 19 April 2017 — 02:09 AM
So I’ve just recently signed up for the account, and after hitting submit I received a webpage error, 5-0-something or other. Well, after that, assuming it didn’t finish I tried signing back up and was told that the email and username were already taken. So I tried logging assuming it had actually gone through. To which it responded saying that,
- This account has not been activated yet. Please follow the activation link sent to you by e-mail.
Well, okay, that makes sense. Guess I gotta activate it. So I went to me email and found nothing. Checked my separated inboxes, my spam, refreshed, searched for keywords like «command and conquer,» or «verification,» and found nothing. Confused I hit this forum with searches and saw a few with similar issues in the past. Someone mentioned that their forum account worked, so I tried to see if mine did, and it did. They also mentioned that they were able to re-verify their account via the forums ability to change email and resend verification. So I did that, using gmails «+(something)» tag on existing emails and was able to change and resend the accounts email to the modified one and back to the existing email I’d started off with.
It was all working on here so I went back to the main site, tried logging in and am still receiving the red text posted above. I just wanna play with my friends and am trying to figure this out for them as well as they’re not too familiar with programs and tools like these. So if at all possible it’d be awesome to get this issue sorted as well as receive a tip or two on how my friends can avoid this issue in their registration.
- Back to top
#2
![]()
ToxicShock
ToxicShock
-

- Division Leaders
-
- 9,683 posts
Gamereplays.org Staff

- Location:London, England
- Projects:Shatabrick C&C Player Database
- I have blue text?
- Division:C&C:Online
- Job:C&C:Online Leader
Posted 19 April 2017 — 04:11 AM
I’ve activated your account manually. Please could you go back to the Web Site, make sure you can log in (using your credentials here) and set up your server account.
Let me know how you get on.
- Back to top
#3
![]()
Removed_DoctorZimZam
Posted 19 April 2017 — 08:22 AM
I am still getting the same error message that my account has not yet been activated:
- This account has not been activated yet. Please follow the activation link sent to you by e-mail.
I used the same credentials, my username and the password I’ve set up as those haven’t changed since first making the account.
- Back to top
#4
![]()
ToxicShock
ToxicShock
-
- Division Leaders
-
- 9,683 posts
Gamereplays.org Staff
- Location:London, England
- Projects:Shatabrick C&C Player Database
- I have blue text?
- Division:C&C:Online
- Job:C&C:Online Leader
Posted 19 April 2017 — 11:02 AM
Sorry about this. Could you try to log into the site again?
- Back to top
#5
![]()
Removed_DoctorZimZam
Posted 19 April 2017 — 07:38 PM
I’ve tried again just a moment ago as well while I was on mobile an hour or two ago and both times I’ve received the same error about the account not being activated yet. To be sure, I checked again and still there are no emails anywhere in my inbox.
- Back to top
#6
![]()
Siera20Bravo
Posted 20 April 2017 — 05:53 PM
I am having the very same problem. The first e-mail I used never received the verification so I changed e-mails and then I did receive verification, but CNC:Online will not let me log in
- Back to top
#7
![]()
ToxicShock
ToxicShock
-
- Division Leaders
-
- 9,683 posts
Gamereplays.org Staff
- Location:London, England
- Projects:Shatabrick C&C Player Database
- I have blue text?
- Division:C&C:Online
- Job:C&C:Online Leader
Posted 20 April 2017 — 06:18 PM
I am having the very same problem. The first e-mail I used never received the verification so I changed e-mails and then I did receive verification, but CNC:Online will not let me log in
I have caused another verification email to be sent to you. Please could you try verifying with that one? Be sure to check your junk folder for the email.
———————
Your account appears to have been activated now. Please could you attempt to log into the web site again and let me know how you get on?
- Back to top
#8
![]()
Siera20Bravo
Posted 20 April 2017 — 06:49 PM
Thanks for trying Toxic Shock, yes my Revora Forums Account is active and I have validated my e-mail address, but I still cannot log into CNC Online. I am still getting the
- This account has not been activated yet. Please follow the activation link sent to you by e-mail.
- Back to top
#9
![]()
Siera20Bravo
Posted 20 April 2017 — 06:53 PM
ToxicShock, I don’t know if this helps, but I am using Chrome as my browser, my operating system is Windows 7 32 bit, I have a dynamic IP address, and my location information is and will always be turned off.
- Back to top
#10
![]()
DeltaForceChuck
Posted 12 October 2017 — 10:38 AM
I had the very same issue > Server 500 error when attempting to register. I changed my email (in the ‘My Settings’ section of this forum) from a .com email to a Hotmail email and it worked. Hope this helps
- Back to top
#11
![]()
DeltaForceChuck
Posted 12 October 2017 — 10:53 AM
I thought i was good. Clicked on the link = failed. Manually entered the user ID and Validation key = got the =’Oops! Something went wrong!, page.
Will try again some other time
- Back to top
#12
![]()
ToxicShock
ToxicShock
-
- Division Leaders
-
- 9,683 posts
Gamereplays.org Staff
- Location:London, England
- Projects:Shatabrick C&C Player Database
- I have blue text?
- Division:C&C:Online
- Job:C&C:Online Leader
Posted 12 October 2017 — 06:17 PM
I thought i was good. Clicked on the link = failed. Manually entered the user ID and Validation key = got the =’Oops! Something went wrong!, page.
Will try again some other time
I believe I have activated your account manually. Please could you try to log into the site and then report back.
If anyone else is having similar problems PLEASE MAKE YOUR OWN TOPIC. I will be closing this topic once this issue is solved.
- Back to top
#13
![]()
DeltaForceChuck
Posted 13 October 2017 — 03:14 AM
Thanks for your help on this but no luck.
1. I tried logging in to C& Online but got = «This account has not been activated yet. Please follow the activation link sent to you by e-mail». Despite being able to log in to this forum with the same credentials.
2. Used the ‘activate your account’ link from the email and got = «We could not find the validation request you are attempting to verify. This is likely because you have already validated your account, or an administrator has validated your account for you. Please try to login with your registration details now. #10120.»
3.So i tried step 1 again — no luck
3. tried the second «user id number and validation key» link in teh email and got the same error in step 2.
4. tried all of the above in different browsers
Any other options?
- Back to top
#14
![]()
ToxicShock
ToxicShock
-
- Division Leaders
-
- 9,683 posts
Gamereplays.org Staff
- Location:London, England
- Projects:Shatabrick C&C Player Database
- I have blue text?
- Division:C&C:Online
- Job:C&C:Online Leader
Posted 13 October 2017 — 05:31 AM
OK. I have removed you from the server database entirely. Please could you try to log in there again. That should should copy your credentials from these forums onto there afresh. When you have logged in there or attempted to log in there, please get back to me and let me know in here.
- Back to top
#15
![]()
DeltaForceChuck
Posted 14 October 2017 — 02:58 AM
Thanks -tried logging in again but same result. Tried using email links again but same result. I lost patients and registered another account and it all went smoothly (yipeee). You can remove account with the user name DeltaForceChuck if you want. My new account that works has user name DeltaForceChuck2.
Half the problem i suspect was that is was attempting to initially activate my account from the ‘change email address’ email and not from the original email because i never received that one.
You can close the issue now — thanks
- Back to top
#16
![]()
ToxicShock
ToxicShock
-
- Division Leaders
-
- 9,683 posts
Gamereplays.org Staff
- Location:London, England
- Projects:Shatabrick C&C Player Database
- I have blue text?
- Division:C&C:Online
- Job:C&C:Online Leader
Posted 14 October 2017 — 08:41 AM
Do you want me to change the name of your new account to DeltaForceChuck and dispose of account you are posting from? One of the problems now is that you have two forum accounts, which (aside from being against the forum rules) could get confusing.
- Back to top
#17
![]()
Crew0X
Posted 16 October 2017 — 05:45 PM
- i just bought Command & Conquer™ The Ultimate Collection from origin and tried to long in and create account from inside the game so i want to the website c&c online to register ( i already have an account on revora ) and they said that a an activation link sent and i waited and waited and i didnt get the mail and i tried to resend it from revora account and i still didnt get the massage ( the revora account is activated )
- when i try to log in the massage apper
- This account has not been activated yet. Please follow the activation link sent to you by e-mail.
- Back to top
Summary: in this tutorial, you’ll learn how to verify the new account’s email address securely using an activation link.
Introduction to the PHP email verification for new accounts
In previous tutorials, you learned how to create a registration form that allows users to register for accounts. And you also learned how to build a login form that will enable users to use the username and password to sign in.
When users register for new accounts, they enter their email addresses. However, users can enter any email address because the system does not verify email.
To verify users’ email addresses, you can send a verification email to these email addresses and request users to open their emails and click an activation link.
To do it, you follow the following steps when users register accounts:
- Generate a unique activation code and set an expiration time, e.g., one day.
- Save the user record into the database and mark the user’s status as inactive. Also, save the hash of the activation code & expiration time.
- Send an email with the activation link to the user’s email address. The activation link will contain the email address and activation code, e.g.,
https://app.com/activate.php?email=email&activation_code=abcd - Inform the user to activate the account via email.
Hashing the activation code ensures that only the user who owns the email address can activate the account, not anyone else, even the admin, who can access the database.
If users have not activated account, they will not be able to log in.
When users click the activation link in the email, you need to perform the following steps:
- Sanitize and validate the email and activation code.
- Find the inactive user with the email address. If no user record exists, redirect to the registration form.
- If a user record exists and the activation code is expired, delete the user record from the database and redirect to the registration form.
- Otherwise, match the activation code with the hash of the activation code stored in the database. If they match, mark the user record as active and redirect to the login page.
Recreate the users table
First, drop the users table from the auth database:
Code language: SQL (Structured Query Language) (sql)
DROP TABLE users;
Second, create the users table with the new columns active, activation_code, activation_at, activation_expiry:
Code language: SQL (Structured Query Language) (sql)
CREATE TABLE users ( id int auto_increment PRIMARY KEY, username varchar(25) NOT NULL, email varchar(255) NOT NULL, password varchar(255) NOT NULL, is_admin tinyint(1) NOT NULL DEFAULT 0, active tinyint(1) DEFAULT 0, activation_code varchar(255) NOT NULL, activation_expiry datetime NOT NULL, activated_at datetime DEFAULT NULL, created_at timestamp NOT NULL DEFAULT current_timestamp(), updated_at datetime DEFAULT current_timestamp() ON UPDATE current_timestamp() );
The following explains the meaning of the new columns.
The value of the active column defaults to 0. This means that users who register for accounts but haven’t verified their email addresses will be inactive by default.
The activation_code column will store the hash of the activation code. Its length should be sufficient to store the string returned by the password_hash() function.
It’s important to notice that the hash will be truncated if the activation_code column doesn’t have a long enough size. It’ll cause the password_verify() function to fail to match the activation code with the hash.
The activation_expiry column stores the expiration time to use the activation code before expiry. The expiration time ensures that the activation code cannot be used if the email address is compromised after the expiration time.
The activated_at column stores the date and time when users activate their accounts.
Project structure
Let’s review the current project structure before adding the email verification functions:
Code language: PHP (php)
├── config | ├── app.php | └── database.php ├── public | ├── index.php | ├── login.php | ├── logout.php | └── register.php └── src ├── auth.php ├── bootstrap.php ├── inc | ├── footer.php | └── header.php ├── libs | ├── connection.php | ├── filter.php | ├── flash.php | ├── helpers.php | ├── sanitization.php | └── validation.php ├── login.php └── register.php
Modify the functions in auth.php file
The following adds the activation code and expiry parameter to the register_user() function. By default, the expiration time is one day ( 1 * 24 * 60 * 60).
Code language: PHP (php)
function register_user(string $email, string $username, string $password, string $activation_code, int $expiry = 1 * 24 * 60 * 60, bool $is_admin = false): bool { $sql = 'INSERT INTO users(username, email, password, is_admin, activation_code, activation_expiry) VALUES(:username, :email, :password, :is_admin, :activation_code,:activation_expiry)'; $statement = db()->prepare($sql); $statement->bindValue(':username', $username); $statement->bindValue(':email', $email); $statement->bindValue(':password', password_hash($password, PASSWORD_BCRYPT)); $statement->bindValue(':is_admin', (int)$is_admin, PDO::PARAM_INT); $statement->bindValue(':activation_code', password_hash($activation_code, PASSWORD_DEFAULT)); $statement->bindValue(':activation_expiry', date('Y-m-d H:i:s', time() + $expiry)); return $statement->execute(); }
The register_user() function uses the password_hash() function to hash the activation code.
The find_user_by_username() function includes the active column in the result:
Code language: PHP (php)
function find_user_by_username(string $username) { $sql = 'SELECT username, password, active, email FROM users WHERE username=:username'; $statement = db()->prepare($sql); $statement->bindValue(':username', $username); $statement->execute(); return $statement->fetch(PDO::FETCH_ASSOC); }
The following defines a new function is_user_active() that returns true if a user is active:
Code language: PHP (php)
function is_user_active($user) { return (int)$user['active'] === 1; }
The login() function should allow only active users to sign in:
Code language: PHP (php)
function login(string $username, string $password): bool { $user = find_user_by_username($username); if ($user && is_user_active($user) && password_verify($password, $user['password'])) { // prevent session fixation attack session_regenerate_id(); // set username in the session $_SESSION['user_id'] = $user['id']; $_SESSION['username'] = $user['username']; return true; } return false; }
Define functions that deal with email verification
We’ll add the functions that deal with email verification to the auth.php file.
First, create a new file app.php in the config folder and define the following constants:
Code language: PHP (php)
<?php const APP_URL = 'http://localhost/auth'; const SENDER_EMAIL_ADDRESS = 'no-reply@email.com';
We’ll use these constants for sending activation emails to users. To use these constants, you need to include the app.php file in the bootstrap.php file:
Code language: PHP (php)
<?php session_start(); require_once __DIR__ . '/../config/app.php'; require_once __DIR__ . '/../config/database.php'; require_once __DIR__ . '/libs/helpers.php'; require_once __DIR__ . '/libs/flash.php'; require_once __DIR__ . '/libs/sanitization.php'; require_once __DIR__ . '/libs/validation.php'; require_once __DIR__ . '/libs/filter.php'; require_once __DIR__ . '/libs/connection.php'; require_once __DIR__ . '/auth.php';
Second, define a function that generates a uniquely random activation code:
function generate_activation_code(): string { return bin2hex(random_bytes(16)); }Code language: PHP (php)
Third, define a function that sends an email verification with an activation link.
Code language: PHP (php)
function send_activation_email(string $email, string $activation_code): void { // create the activation link $activation_link = APP_URL . "/activate.php?email=$email&activation_code=$activation_code"; // set email subject & body $subject = 'Please activate your account'; $message = <<<MESSAGE Hi, Please click the following link to activate your account: $activation_link MESSAGE; // email header $header = "From:" . SENDER_EMAIL_ADDRESS; // send the email mail($email, $subject, nl2br($message), $header); }
Suppose the app’s URL is http://localhost/auth, the activation URL will look like this:
Code language: PHP (php)
http://localhost/auth/activate.php?email=john@phptutorial.net&activation_code=e01e5c9a028d58d888ff2555b971c882
The send_activation_email() function uses the built-in mail() function for sending emails.
Fourth, define a function that deletes a user by id and status. By default, it deletes an inactive user by id.
Code language: PHP (php)
function delete_user_by_id(int $id, int $active = 0) { $sql = 'DELETE FROM users WHERE id =:id and active=:active'; $statement = db()->prepare($sql); $statement->bindValue(':id', $id, PDO::PARAM_INT); $statement->bindValue(':active', $active, PDO::PARAM_INT); return $statement->execute(); }
Fifth, define a function that finds an unverified user by an email and activation code. If the activation code is expired, the function also deletes the user record by calling the delete_user_by_id() function.
Code language: PHP (php)
function find_unverified_user(string $activation_code, string $email) { $sql = 'SELECT id, activation_code, activation_expiry < now() as expired FROM users WHERE active = 0 AND email=:email'; $statement = db()->prepare($sql); $statement->bindValue(':email', $email); $statement->execute(); $user = $statement->fetch(PDO::FETCH_ASSOC); if ($user) { // already expired, delete the in active user with expired activation code if ((int)$user['expired'] === 1) { delete_user_by_id($user['id']); return null; } // verify the password if (password_verify($activation_code, $user['activation_code'])) { return $user; } } return null; }
Sixth, define a new activate_user() function that activates a user by an id:
Code language: PHP (php)
function activate_user(int $user_id): bool { $sql = 'UPDATE users SET active = 1, activated_at = CURRENT_TIMESTAMP WHERE id=:id'; $statement = db()->prepare($sql); $statement->bindValue(':id', $user_id, PDO::PARAM_INT); return $statement->execute(); }
Modify the register.php page
The src/register.php needs to incorporate the logic to handle the email verification logic.
Code language: PHP (php)
<?php if (is_user_logged_in()) { redirect_to('index.php'); } $errors = []; $inputs = []; if (is_post_request()) { $fields = [ 'username' => 'string | required | alphanumeric | between: 3, 25 | unique: users, username', 'email' => 'email | required | email | unique: users, email', 'password' => 'string | required | secure', 'password2' => 'string | required | same: password', 'agree' => 'string | required' ]; // custom messages $messages = [ 'password2' => [ 'required' => 'Please enter the password again', 'same' => 'The password does not match' ], 'agree' => [ 'required' => 'You need to agree to the term of services to register' ] ]; [$inputs, $errors] = filter($_POST, $fields, $messages); if ($errors) { redirect_with('register.php', [ 'inputs' => escape_html($inputs), 'errors' => $errors ]); } $activation_code = generate_activation_code(); if (register_user($inputs['email'], $inputs['username'], $inputs['password'], $activation_code)) { // send the activation email send_activation_email($inputs['email'], $activation_code); redirect_with_message( 'login.php', 'Please check your email to activate your account before signing in' ); } } else if (is_get_request()) { [$errors, $inputs] = session_flash('errors', 'inputs'); }
How it works.
First, generate an activation code:
Code language: PHP (php)
$activation_code = generate_activation_code();
Second, register the user with the activation code:
Code language: PHP (php)
register_user($inputs['email'], $inputs['username'], $inputs['password'], $activation_code)
Third, send an email to the user’s email address by calling the send_activation_email() function:
send_activation_email($inputs['email'], $activation_code);Code language: PHP (php)
Finally, redirect the user to the login page and show a flash message that requests the user to activate the account via email:
Code language: PHP (php)
redirect_with_message( 'login.php', 'Please check your email to activate your account before signing in' );
Create the activate.php page
To allow users to activate their accounts after registration, you can create a new activate.php page in the public folder and use the following page:
Code language: PHP (php)
<?php require __DIR__ . '/../src/bootstrap.php'; if (is_get_request()) { // sanitize the email & activation code [$inputs, $errors] = filter($_GET, [ 'email' => 'string | required | email', 'activation_code' => 'string | required' ]); if (!$errors) { $user = find_unverified_user($inputs['activation_code'], $inputs['email']); // if user exists and activate the user successfully if ($user && activate_user($user['id'])) { redirect_with_message( 'login.php', 'You account has been activated successfully. Please login here.' ); } } } // redirect to the register page in other cases redirect_with_message( 'register.php', 'The activation link is not valid, please register again.', FLASH_ERROR );
How the activate.php works.
First, sanitize and validate the email and activation code:
Code language: PHP (php)
[$inputs, $errors] = filter($_GET, [ 'email' => 'string | required | email', 'activation_code' => 'string | required' ]);
Second, find the unverified user based on the email and verification code if there are no validation errors. The find_unverified_user() will also delete the unverified user if the expiration time is expired.
Code language: PHP (php)
$user = find_unverified_user($inputs['activation_code'], $inputs['email']);
Third, activate the user and redirect to the login.php page:
Code language: PHP (php)
if ($user && activate_user($user['id'])) { redirect_with_message( 'login.php', 'You account has been activated successfully. Please login here.' ); }
Finally, redirect to the registration.php if there’s an error:
Code language: PHP (php)
redirect_with_message( 'register.php', 'The activation link is not valid, please register again.', FLASH_ERROR );
In this tutorial, you’ve learned how to implement email verification for user accounts in PHP.
Did you find this tutorial useful?
Как разблокировать аккаунт после 5 неудачных попыток входа
Как разблокировать аккаунт после 5 неудачных попыток входа
Наверное, каждый сталкивался с ошибкой при попытке авторизации с не валидными данными, которая по-английски звучит так
Sorry, there have been more than 5 failed login attempts for this account. It is temporarily blocked. Try again later or request a new password.
а по-русски
Аккаунт временно заблокирован по причине более чем 5 неудачных попыток входа. Попробуйте войти позже, или запросите новый пароль.
Это простая самооборона Друпала, которая активируется после 5 (по умолчанию) попыток входа. Таким образом, система не позволяет злоумышленникам забрутофорсить (англ. brute force. Cм. Полный перебор) сайт. Работает она достаточно просто: во время каждой авторизации, Друпал сохраняет ip-адрес пользователя, запоминая при этом, точную дату события и дату окончания «срока годности» попытки.
Вот некоторые нюансы:
- По умолчанию «срок годности» составляет 1 земной час.
- Количество возможных, неудачных попыток входа — 5.
- Эти значения могут быть изменены.
- Вместо ip-адреса может быть сохранено имя хоста.
- Данные, у которых истек «срок годности» очищаются только по крону.
- Вы можете войти в систему, в любом случае если пройдете процедуру «Сброса пароля»!
Вот еще один интересный факт:
Вы можете имя пользователя указать верно, но при этом 5 раз ошибиться с паролем. В таком случае, попытки авторизации будут запрещены на 6 часов. При этом, через 60 минут можно будет повторить попытку входа, но с другого ip-адреса.
Что касается простых смертных — мы разобрались. Администраторы, же или программисты могут сталкиваться с этой проблемой чаще, т.к. им хлеб в рот не клади, дай только что-нибудь сломать. К счастью, для тех у кого есть доступ к Драшу или напрямую к базе могут обойтись без сброса пароля или часового ожидания. Нужно просто почистить таблицу flood
. Вот восемь способов это сделать.
# Очистить все.
 drush sqlq "DELETE FROM flood"
;
# Снять блокировку для существующего пользователя с id=1.
 drush sqlq "DELETE FROM flood WHERE event = 'failed_login_attempt_user' AND identifier LIKE '1-%'"
;
# Очистить данные для определенного ip адреса.
 drush sqlq "DELETE FROM flood WHERE event = 'failed_login_attempt_user' AND identifier LIKE '127.0.0.1'"
;
# Если вы не имеете установленного Drush, тогда заходим в консоль базы и выполняем запросы "на живую".
 mysql> DELETE FROM flood;
 mysql> DELETE FROM flood WHERE event
=
'failed_login_attempt_user'
 AND identifier LIKE '1-%'
;
 mysql> DELETE FROM flood WHERE event
=
'failed_login_attempt_user'
 AND identifier LIKE '127.0.0.1'
;
Проблемы, ошибки, неточности в тексте пишите в комментах.
Оценка статьи:
 (пока оценок нет)
![]() Загрузка…
Загрузка…
1. Overview
This article continues the ongoing Registration with Spring Security series with one of the missing pieces of the registration process – verifying the user’s email to confirm their account.
The registration confirmation mechanism forces the user to respond to a “Confirm Registration” email sent after successful registration to verify his email address and activate their account. The user does this by clicking a unique activation link sent to them over email.
Following this logic, a newly registered user will not be able to log into the system until this process is completed.
2. A Verification Token
We will make use of a simple verification token as the key artifact through which a user is verified.
2.1. The VerificationToken Entity
The VerificationToken entity must meet the following criteria:
- It must link back to the User (via a unidirectional relation)
- It will be created right after registration
- It will expire within 24 hours following its creation
- Has a unique, randomly generated value
Requirements 2 and 3 are part of the registration logic. The other two are implemented in a simple VerificationToken entity like the one in Example 2.1.:
Example 2.1.
@Entity
public class VerificationToken {
    private static final int EXPIRATION = 60 * 24;

    @Id
    @GeneratedValue(strategy = GenerationType.AUTO)
    private Long id;

    private String token;

    @OneToOne(targetEntity = User.class, fetch = FetchType.EAGER)
    @JoinColumn(nullable = false, name = "user_id")
    private User user;

    private Date expiryDate;

    private Date calculateExpiryDate(int expiryTimeInMinutes) {
        Calendar cal = Calendar.getInstance();
        cal.setTime(new Timestamp(cal.getTime().getTime()));
        cal.add(Calendar.MINUTE, expiryTimeInMinutes);
        return new Date(cal.getTime().getTime());
    }

    // standard constructors, getters and setters
}
Note the nullable = false on the User to ensure data integrity and consistency in the VerificationToken<->User association.
2.2. Add the enabled Field to User
Initially, when the User is registered, this enabled field will be set to false. During the account verification process – if successful – it will become true.
Let us start by adding the field to our User entity:
public class User {
    ...
    @Column(name = "enabled")
    private boolean enabled;

    public User() {
        super();
        this.enabled=false;
    }
    ...
}
Note how we also set the default value of this field to false.
3. During Account Registration
Let’s add two additional pieces of business logic to the user registration use case:
- Generate the VerificationToken for the User and persist it
- Send out the email message for account confirmation – which includes a confirmation link with the VerificationToken’s value
3.1. Using a Spring Event to Create the Token and Send the Verification Email
These two additional pieces of logic should not be performed by the controller directly because they are “collateral” back-end tasks.
The controller will publish a Spring ApplicationEvent to trigger the execution of these tasks. This is as simple as injecting the ApplicationEventPublisher and then using it to publish the registration completion.
Example 3.1. shows this simple logic:
Example 3.1.
@Autowired
ApplicationEventPublisher eventPublisher

@PostMapping("/user/registration")
public ModelAndView registerUserAccount(
  @ModelAttribute("user") @Valid UserDto userDto,
  HttpServletRequest request, Errors errors) {

    try {
        User registered = userService.registerNewUserAccount(userDto);

        String appUrl = request.getContextPath();
        eventPublisher.publishEvent(new OnRegistrationCompleteEvent(registered,
          request.getLocale(), appUrl));
    } catch (UserAlreadyExistException uaeEx) {
        ModelAndView mav = new ModelAndView("registration", "user", userDto);
        mav.addObject("message", "An account for that username/email already exists.");
        return mav;
    } catch (RuntimeException ex) {
        return new ModelAndView("emailError", "user", userDto);
    }

    return new ModelAndView("successRegister", "user", userDto);
}
One additional thing to notice is the try catch block surrounding the publishing of the event. This piece of code will display an error page whenever there is an exception in the logic executed after the publishing of the event, which in this case is the sending of the email.
3.2. The Event and the Listener
Let’s now see the actual implementation of this new OnRegistrationCompleteEvent that our controller is sending out, as well as the listener that is going to handle it:
Example 3.2.1. – The OnRegistrationCompleteEvent
public class OnRegistrationCompleteEvent extends ApplicationEvent {
    private String appUrl;
    private Locale locale;
    private User user;

    public OnRegistrationCompleteEvent(
      User user, Locale locale, String appUrl) {
        super(user);

        this.user = user;
        this.locale = locale;
        this.appUrl = appUrl;
    }

    // standard getters and setters
}
Example 3.2.2. – The RegistrationListener Handles the OnRegistrationCompleteEvent
@Component
public class RegistrationListener implements
  ApplicationListener<OnRegistrationCompleteEvent> {

    @Autowired
    private IUserService service;

    @Autowired
    private MessageSource messages;

    @Autowired
    private JavaMailSender mailSender;

    @Override
    public void onApplicationEvent(OnRegistrationCompleteEvent event) {
        this.confirmRegistration(event);
    }

    private void confirmRegistration(OnRegistrationCompleteEvent event) {
        User user = event.getUser();
        String token = UUID.randomUUID().toString();
        service.createVerificationToken(user, token);

        String recipientAddress = user.getEmail();
        String subject = "Registration Confirmation";
        String confirmationUrl
          = event.getAppUrl() + "/regitrationConfirm?token=" + token;
        String message = messages.getMessage("message.regSucc", null, event.getLocale());

        SimpleMailMessage email = new SimpleMailMessage();
        email.setTo(recipientAddress);
        email.setSubject(subject);
        email.setText(message + "rn" + "http://localhost:8080" + confirmationUrl);
        mailSender.send(email);
    }
}
Here, the confirmRegistration method will receive the OnRegistrationCompleteEvent, extract all the necessary User information from it, create the verification token, persist it, and then send it as a parameter in the “Confirm Registration” link.
As was mentioned above, any javax.mail.AuthenticationFailedException thrown by JavaMailSender will be handled by the controller.
3.3. Processing the Verification Token Parameter
When the user receives the “Confirm Registration” link they should click on it.
Once they do – the controller will extract the value of the token parameter in the resulting GET request and will use it to enable the User.
Let’s see this process in Example 3.3.1.:
Example 3.3.1. – RegistrationController Processing the Registration Confirmation
@Autowired
private IUserService service;

@GetMapping("/regitrationConfirm")
public String confirmRegistration
  (WebRequest request, Model model, @RequestParam("token") String token) {

    Locale locale = request.getLocale();

    VerificationToken verificationToken = service.getVerificationToken(token);
    if (verificationToken == null) {
        String message = messages.getMessage("auth.message.invalidToken", null, locale);
        model.addAttribute("message", message);
        return "redirect:/badUser.html?lang=" + locale.getLanguage();
    }

    User user = verificationToken.getUser();
    Calendar cal = Calendar.getInstance();
    if ((verificationToken.getExpiryDate().getTime() - cal.getTime().getTime()) <= 0) {
        String messageValue = messages.getMessage("auth.message.expired", null, locale)
        model.addAttribute("message", messageValue);
        return "redirect:/badUser.html?lang=" + locale.getLanguage();
    }

    user.setEnabled(true);
    service.saveRegisteredUser(user);
    return "redirect:/login.html?lang=" + request.getLocale().getLanguage();
}
The user will be redirected to an error page with the corresponding message if:
- The VerificationToken does not exist, for some reason or
- The VerificationToken has expired
See Example 3.3.2. to see the error page.
Example 3.3.2. – The badUser.html
<html>
<body>
    <h1 th:text="${param.message[0]}>Error Message</h1>
    <a th:href="@{/registration.html}"
      th:text="#{label.form.loginSignUp}">signup</a>
</body>
</html>
If no errors are found, the user is enabled.
There are two opportunities for improvement in handling the VerificationToken checking and expiration scenarios:
- We can use a Cron Job to check for token expiration in the background
- We can give the user the opportunity to get a new token once it has expired
We’ll defer the generation of a new token for a future article and assume that the user does indeed successfully verify their token here.
4. Adding Account Activation Checking to the Login Process
We need to add the code that will check if the user is enabled:
Let’s see this in Example 4.1. which shows the loadUserByUsername method of MyUserDetailsService.
Example 4.1.
@Autowired
UserRepository userRepository;

public UserDetails loadUserByUsername(String email)
  throws UsernameNotFoundException {

    boolean enabled = true;
    boolean accountNonExpired = true;
    boolean credentialsNonExpired = true;
    boolean accountNonLocked = true;
    try {
        User user = userRepository.findByEmail(email);
        if (user == null) {
            throw new UsernameNotFoundException(
              "No user found with username: " + email);
        }

        return new org.springframework.security.core.userdetails.User(
          user.getEmail(),
          user.getPassword().toLowerCase(),
          user.isEnabled(),
          accountNonExpired,
          credentialsNonExpired,
          accountNonLocked,
          getAuthorities(user.getRole()));
    } catch (Exception e) {
        throw new RuntimeException(e);
    }
}
As we can see, now MyUserDetailsService not uses the enabled flag of the user – and so it will only allow enabled the user to authenticate.
Now, we will add an AuthenticationFailureHandler to customize the exception messages coming from MyUserDetailsService. Our CustomAuthenticationFailureHandler is shown in Example 4.2.:
Example 4.2. – CustomAuthenticationFailureHandler:
@Component
public class CustomAuthenticationFailureHandler extends SimpleUrlAuthenticationFailureHandler {

    @Autowired
    private MessageSource messages;

    @Autowired
    private LocaleResolver localeResolver;

    @Override
    public void onAuthenticationFailure(HttpServletRequest request,
      HttpServletResponse response, AuthenticationException exception)
      throws IOException, ServletException {
        setDefaultFailureUrl("/login.html?error=true");

        super.onAuthenticationFailure(request, response, exception);

        Locale locale = localeResolver.resolveLocale(request);

        String errorMessage = messages.getMessage("message.badCredentials", null, locale);

        if (exception.getMessage().equalsIgnoreCase("User is disabled")) {
            errorMessage = messages.getMessage("auth.message.disabled", null, locale);
        } else if (exception.getMessage().equalsIgnoreCase("User account has expired")) {
            errorMessage = messages.getMessage("auth.message.expired", null, locale);
        }

        request.getSession().setAttribute(WebAttributes.AUTHENTICATION_EXCEPTION, errorMessage);
    }
}
We will need to modify login.html to show the error messages.
Example 4.3. – Display error messages at login.html:
<div th:if="${param.error != null}"
  th:text="${session[SPRING_SECURITY_LAST_EXCEPTION]}">error</div>
5. Adapting the Persistence Layer
Let’s now provide the actual implementation of some of these operations involving the verification token as well as the users.
We’ll cover:
- A new VerificationTokenRepository
- New methods in the IUserInterface and its implementation for new CRUD operations needed
Examples 5.1 – 5.3. show the new interfaces and implementation:
Example 5.1. – The VerificationTokenRepository
public interface VerificationTokenRepository
  extends JpaRepository<VerificationToken, Long> {

    VerificationToken findByToken(String token);

    VerificationToken findByUser(User user);
}
Example 5.2. – The IUserService Interface
public interface IUserService {

    User registerNewUserAccount(UserDto userDto)
      throws UserAlreadyExistException;

    User getUser(String verificationToken);

    void saveRegisteredUser(User user);

    void createVerificationToken(User user, String token);

    VerificationToken getVerificationToken(String VerificationToken);
}
Example 5.3. The UserService
@Service
@Transactional
public class UserService implements IUserService {
    @Autowired
    private UserRepository repository;

    @Autowired
    private VerificationTokenRepository tokenRepository;

    @Override
    public User registerNewUserAccount(UserDto userDto)
      throws UserAlreadyExistException {

        if (emailExist(userDto.getEmail())) {
            throw new UserAlreadyExistException(
              "There is an account with that email adress: "
              + userDto.getEmail());
        }

        User user = new User();
        user.setFirstName(userDto.getFirstName());
        user.setLastName(userDto.getLastName());
        user.setPassword(userDto.getPassword());
        user.setEmail(userDto.getEmail());
        user.setRole(new Role(Integer.valueOf(1), user));
        return repository.save(user);
    }

    private boolean emailExist(String email) {
        return userRepository.findByEmail(email) != null;
    }

    @Override
    public User getUser(String verificationToken) {
        User user = tokenRepository.findByToken(verificationToken).getUser();
        return user;
    }

    @Override
    public VerificationToken getVerificationToken(String VerificationToken) {
        return tokenRepository.findByToken(VerificationToken);
    }

    @Override
    public void saveRegisteredUser(User user) {
        repository.save(user);
    }

    @Override
    public void createVerificationToken(User user, String token) {
        VerificationToken myToken = new VerificationToken(token, user);
        tokenRepository.save(myToken);
    }
}
6. Conclusion
In this article, we’ve expanded the registration process to include an email based account activation procedure.
The account activation logic requires sending a verification token to the user via email so that they can send it back to the controller to verify their identity.
The implementation of this Registration with Spring Security tutorial can be found in the GitHub project – this is an Eclipse based project, so it should be easy to import and run as it is.
I just announced the new Learn Spring Security course, including the full material focused on the new OAuth2 stack in Spring Security 5:
>> CHECK OUT THE COURSE
Содержание
- Устранение ошибки «Сбой проверки, не удалось выполнить вход»
- Способ 1: Перезагрузка
- Способ 2: Проверка серверов Apple
- Способ 3: Проверка соединения
- Способ 4: Проверка даты
- Способ 5: Проверка версии приложения
- Способ 6: Проверка версии iOS
- Способ 7: Вход через сайт
- Вопросы и ответы

Большинство обладателей современных гаджетов сталкиваются с некоторыми ошибками во время процесса пользования девайсом. Пользователи устройств на системе iOS исключением не стали. Проблемы с устройствами от Apple не редко заключаются в невозможности войти в свой Apple ID.
Apple ID — единый аккаунт, который используется для связи между всеми сервисами компании Apple (iCloud, iTunes, App Store и т.д.). Однако очень часто возникают трудности с подключением, регистрацией или входом в свой аккаунт. Ошибка «Сбой проверки, не удалось выполнить вход» — одна из таких трудностей. Данная статья укажет на пути решения появившейся ошибки, избавление от которой позволит использовать возможности устройства на сто процентов.
Устранение ошибки «Сбой проверки, не удалось выполнить вход»
Ошибка возникает при попытке входа в аккаунт при использовании официальных приложений Apple. Существует несколько способов, которыми можно решить появившуюся проблему. Заключаются они, в основном, в проведении стандартных процедур по оптимизации некоторых настроек вашего устройства.
Способ 1: Перезагрузка
Стандартный метод решения большинства проблем, не вызывающий никаких вопросов и трудностей. В случае с обсуждаемой ошибкой, перезагрузка позволит перезапустить проблемные приложения, через которые производится вход в аккаунт Apple ID.
Читайте также: Как перезагрузить iPhone
Способ 2: Проверка серверов Apple
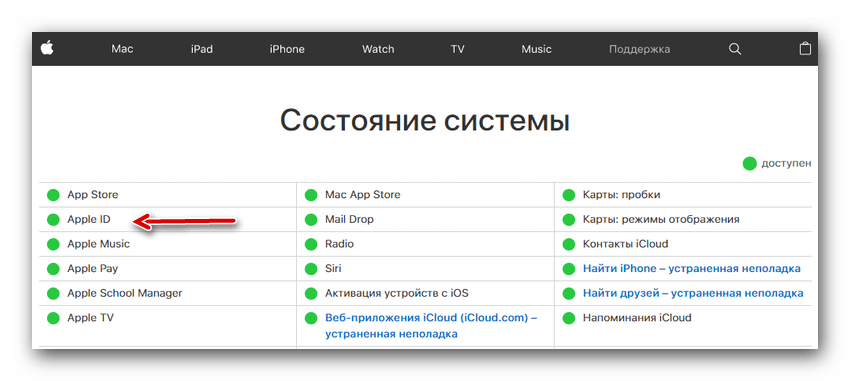
Подобная ошибка часто появляется в том случае, если на серверах Apple ведутся какие-то технические работы или если сервера временно отключены в связи с неправильной работой. Проверить работоспособность серверов довольно просто, для этого необходимо:
- Перейти через браузер в раздел «Состояние системы», который находится на официальном сайте Apple.
- Найти среди многочисленных сервисов необходимый нам Apple ID и проверить его работоспособность. В случае, если с серверами все хорошо — значок рядом с названием будет зеленого цвета. Если же сервера находятся на технических работах или временно не функционируют, то иконка будет красного цвета и тогда придется искать решение через другие способы.

Способ 3: Проверка соединения
Проверьте ваше интернет-соединение. Сделать это можно различными методами, самый простой — зайти в любое другое приложение, требующее постоянное подключение к интернету. При условии, что проблема действительно кроется в плохом соединении, достаточно будет узнать причину нестабильной работы интернета, а настройки устройства можно будет и не трогать вовсе.
Способ 4: Проверка даты
Неправильные установки даты и времени на устройстве могли повлиять на работоспособность Apple ID. Для проверки существующих установок даты и дальнейших изменений необходимо:
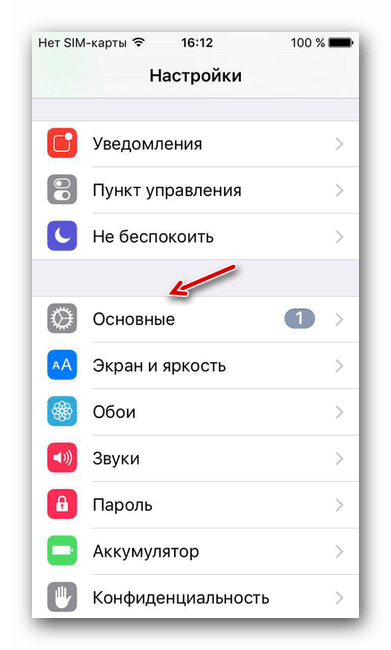
- Открыть «Настройки» из соответствующего меню.
- Найти раздел «Основные» и зайти в него.

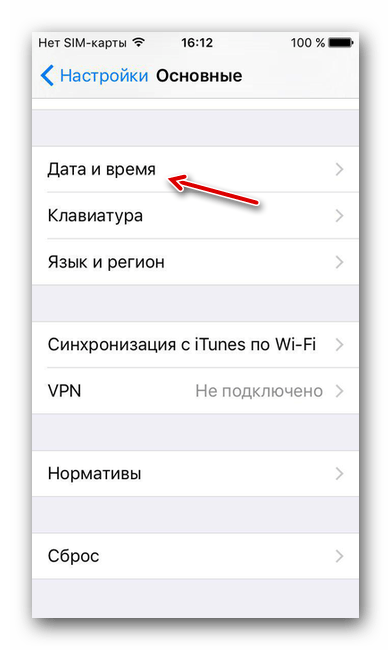
- Пролистать список вниз до пункта «Дата и время», нажать на этот пункт.
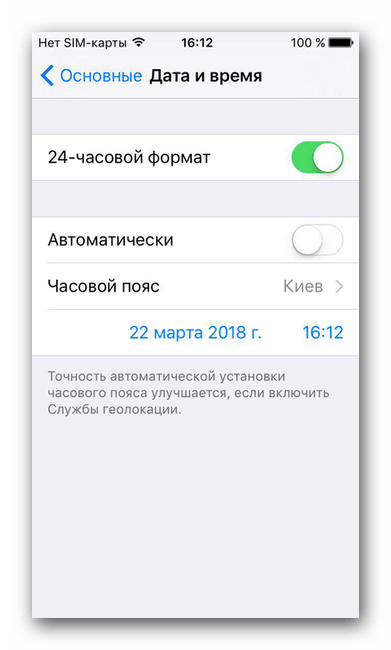
- Проверить, действительно ли на устройстве стоят неактуальные настройки даты и времени и в случае чего поменять их на действительные. При желании, можно оптимизировать этот аспект автоматически, достаточно тапнуть по соответствующей кнопке.
Способ 5: Проверка версии приложения
Ошибка может возникнуть из-за устаревшей версии приложения, через которое производится вход в Apple ID. Проверить, обновлено ли приложение до последней версии довольно легко, для этого необходимо сделать следующее:
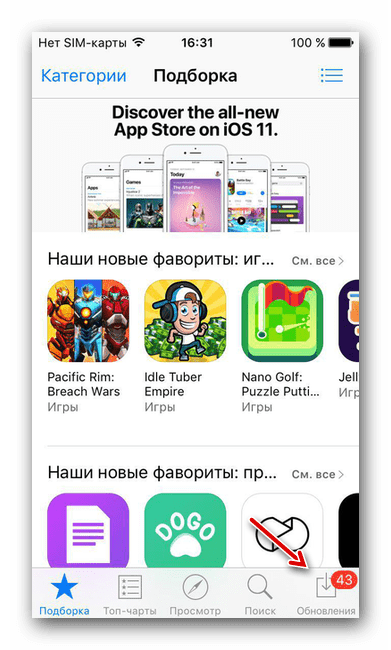
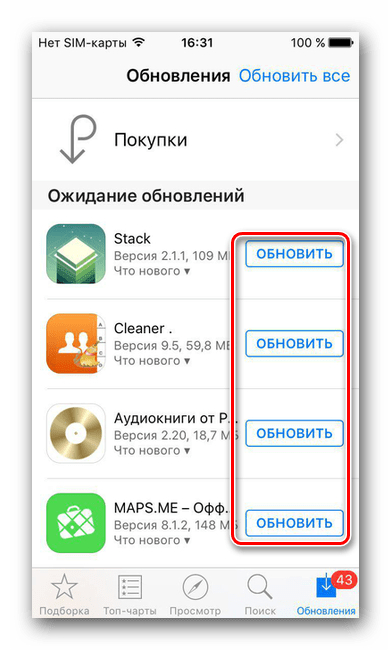
- Открыть «App Store» на своем устройстве.
- Перейти во вкладку «Обновления».
- Напротив необходимого приложения нажать на кнопку «Обновить», тем самым установив последнюю версию программы.
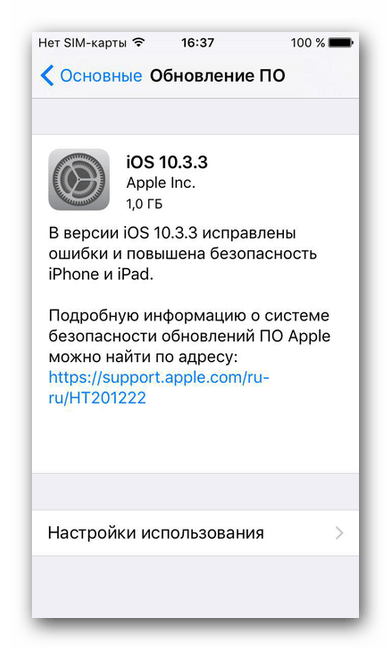
Способ 6: Проверка версии iOS
Для нормальной работы многих приложений необходимо периодически проверять устройство на наличие новых обновлений. Обновить операционную систему iOS можно, если:
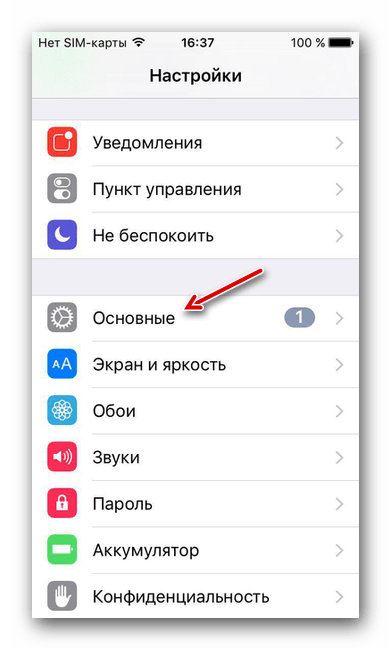
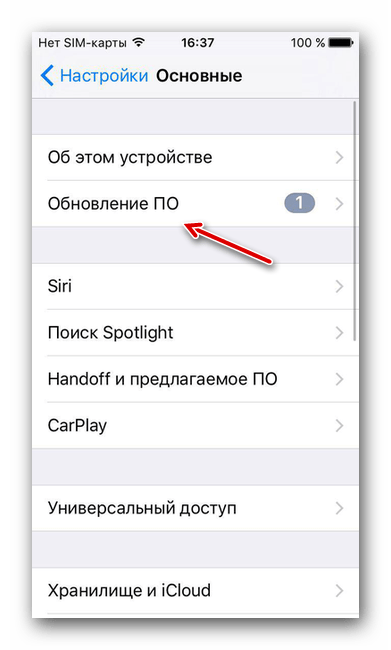
- Открыть «Настройки» из соответствующего меню.
- Найти раздел «Основные» и зайти в него.
- Нажать на пункт «Обновление ПО».
- Следуя инструкции, произвести обновление устройства до актуальной версии.
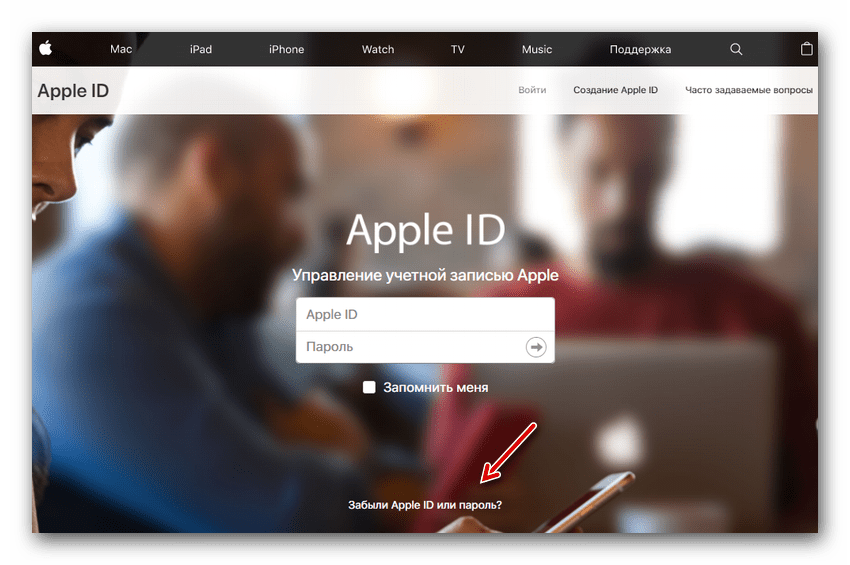
Способ 7: Вход через сайт
Определить, в чем именно заключается неисправность — в приложении, через которое производится вход в аккаунт, или в самой учетной записи, можно очень просто. Для этого требуется:
- Перейти на официальный сайт компании Apple.
- Произвести попытку входа в свой аккаунт. В случае, если вход был успешно выполнен, то проблема исходит со стороны приложения. Если же войти в свой аккаунт не получилось, то следует обратить внимание на свою учетную запись. На этом же экране можно воспользоваться кнопкой «Забыли Apple ID или пароль?», которая поможет восстановить доступ к аккаунту.

Некоторые или даже все из этих способов, скорее всего, помогут избавиться от появившейся неприятной ошибки. Надеемся, что статья помогла вам.

Еще статьи по данной теме: