XAMPP is a helpful development tool. However, you may run into problems at some point, such as receiving the notification: “Apache shutdown unexpectedly”. This error might seem to come out of nowhere, so identifying the cause – let alone the solution – can be puzzling.
Fortunately, there is a common explanation for Apache’s sudden shutdown. With a few simple modifications, you should be able to fix the problem and get Apache up and running again. All you have to do is update some settings in the configuration files.
In this article, we’ll discuss the common cause of this Apache error in XAMPP and then walk you through four steps to fix it, both on Windows and macOS.
Let’s get started!
An Introduction to the XAMPP “Apache Shutdown Unexpectedly” Error
XAMPP is a free, open source server stack that includes the Apache server and MariaDB database:

It runs PHP and Perl scripts, and is used to develop and test dynamic websites on local machines. This means that if you are building a website, you can install WordPress locally on your computer. You can use XAMPP without having to upload your site’s files to your web hosting service.
If you’re reading this article, we’ll assume you’re already at least somewhat familiar with XAMPP. However, what may be new to you is the “Apache shutdown unexpectedly” error you’re seeing.
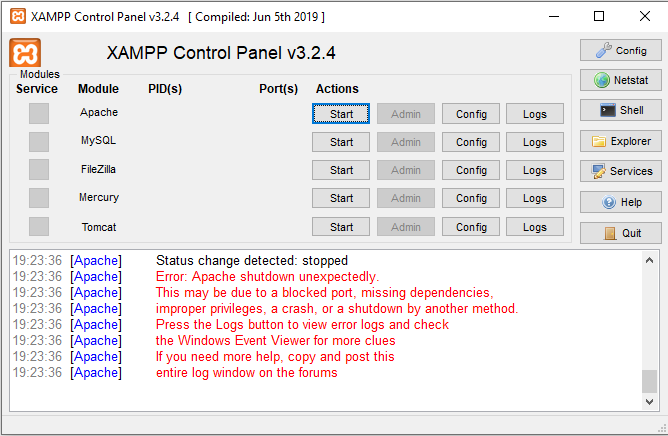
This message is most commonly caused by a blocked port. Usually, it means that another application installed on your computer, such as Skype, is using the same port as XAMPP. Additionally, you may notice that the error message indicates the problem may also be attributed to “missing dependencies, improper privileges, a crash, or a shutdown by another method.”
In any event, the easiest fix is to simply modify the XAMPP default settings. However, the method for resolving the error varies slightly between Windows and macOS. Also, the interface may look a bit different depending on the XAMPP version you’re using. We will provide instructions for both operating systems below, starting with Windows.
How to Fix the XAMPP Error “Apache Shutdown Unexpectedly” in Windows
If you’re using a Windows device, you can follow these four steps to update your default port settings in XAMPP.
Step 1: Open the Configuration Settings from the XAMPP Control Panel
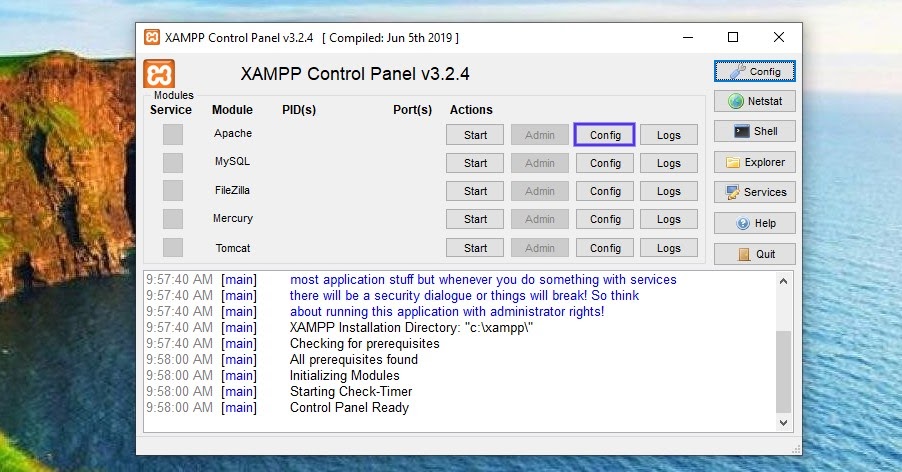
The first step is, of course, to launch XAMPP. This will open the XAMPP control panel. From here, you can update the configuration settings for the server stack.
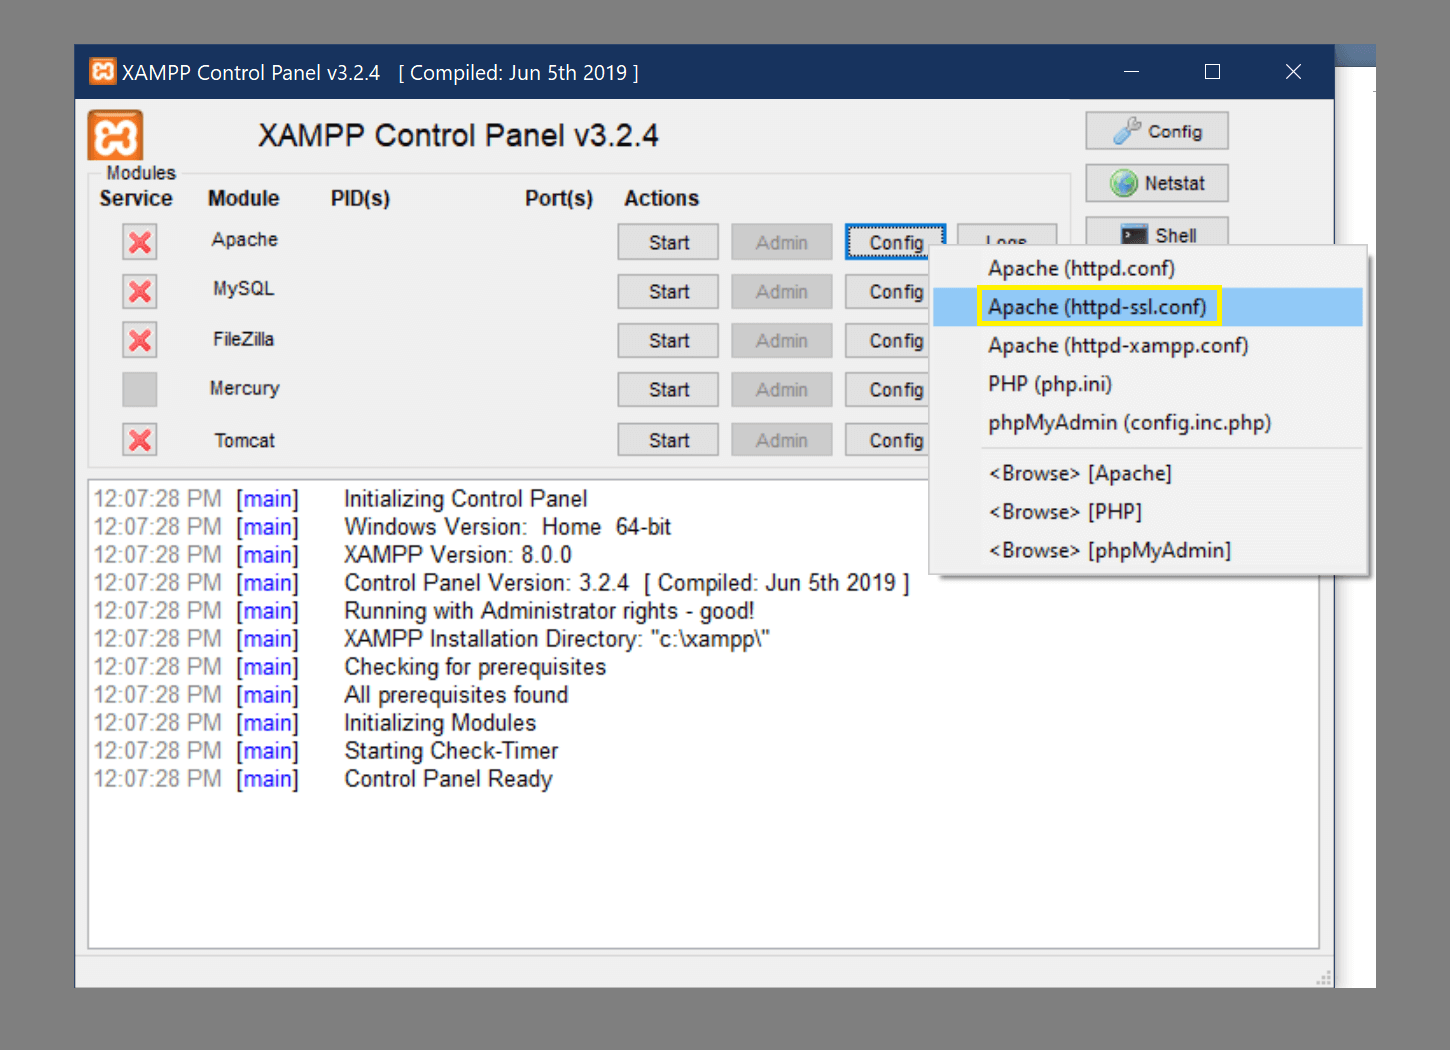
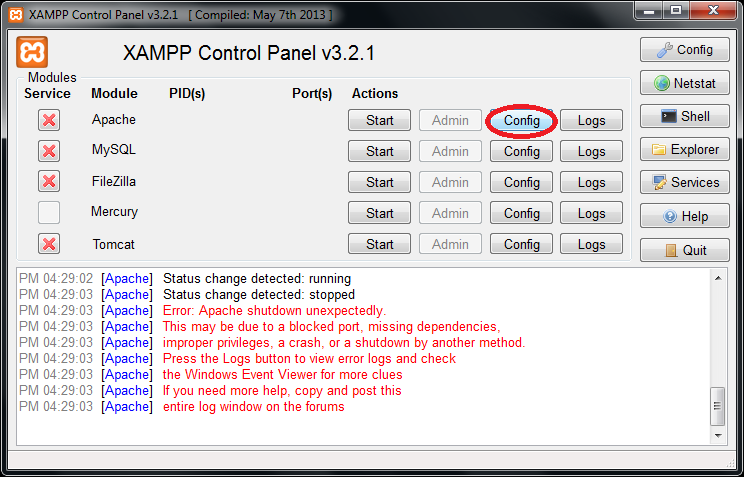
Since this error is related to Apache, we’ll focus on those settings. In the “Apache” row of options, click on the Config button.
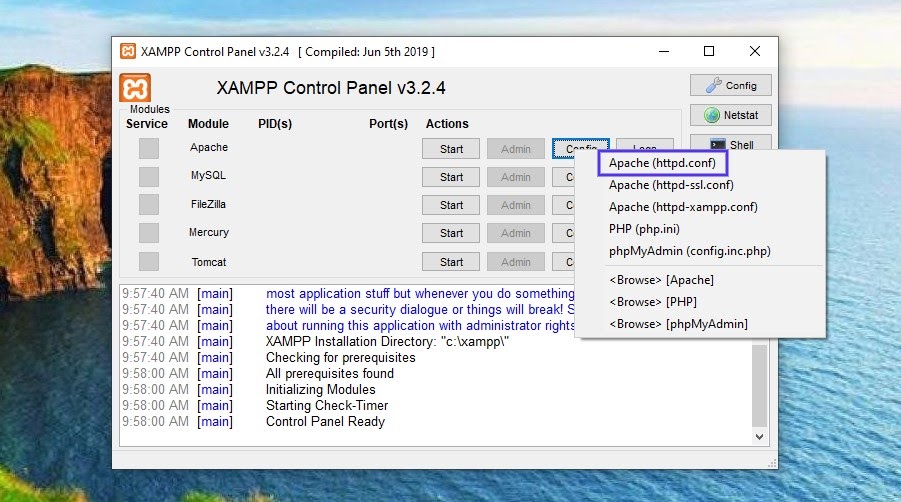
This will open a drop-down menu of files. We’re going to be editing two of these files, starting with httpd.conf.
Step 2: Change the Default Port Settings of the httpd.conf File
From the menu of files, click on Apache (httpd.conf). Once you do, the file will open in your computer’s default text editor:
Within this file, there are three settings you’ll want to update. To get started, press Ctrl + F, then enter “80” in the search field:
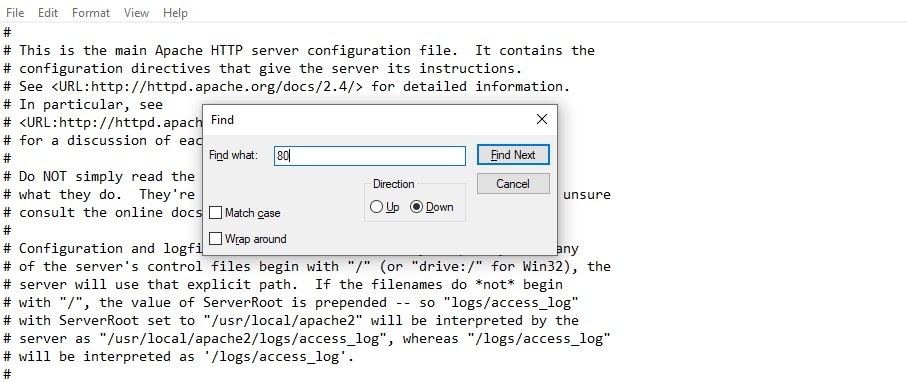
This will display all instances of the number 80 in the file. Locate “Port 80” and change it to “Port 8080”. Once the port setting is updated, search for “Listen 80” and update it to “Listen 8080”.
Finally, search for “servername localhost:80”. Once you find it, modify it to “servername localhost:8080”. When you’re finished, save and close the file.
Step 3: Update the Default Port Settings in the http-ssl.conf File
Now it’s time to move on to the second file. To do so, you can return to the XAMPP control panel, then select Config under the Apache settings again. This time, open the Apache (http-ssl.conf) file.
When the file opens in your text editor, press Ctrl + F, and then enter 443 in the search field. Locate “Listen 443” and update this to “Listen 4433”.
Next, search the file for the next instance of “443”. It should be “<VirtualHost _default_:443>”. Once you find it, you can go ahead and change it to “<VirtualHost _default_:4433>”. When you’re finished, remember to save and close the file.
Step 4: Restart Apache
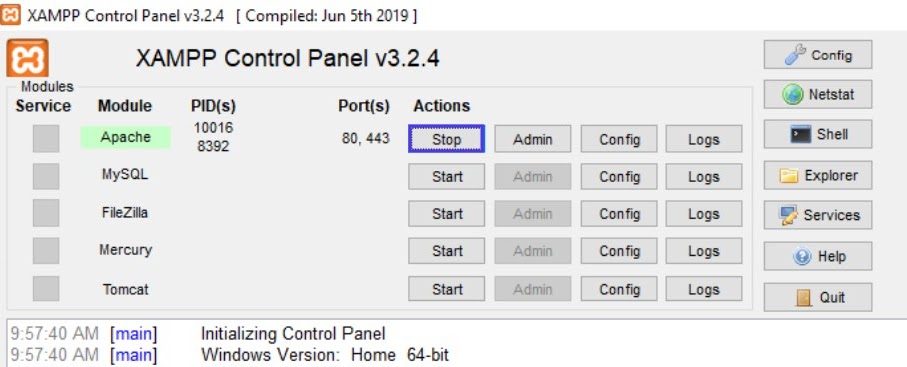
Once you’ve updated the settings in both files, the final step is to stop Apache. You can do this by clicking on the Stop button along the same Apache row. After Apache has been stopped, click the Start button to complete the restart process.
That’s it! Your port numbers will be updated and Apache should now run without error.
How to Fix the XAMPP Error “Apache Shutdown Unexpectedly” in macOS
Depending on what version of macOS you’re running, you may already have Apache installed on your computer. This default application of Apache will use the same default port settings as the Apache server in XAMPP, so this may be the cause of the “Apache shutdown unexpectedly” error.
If you’re using macOS, you can follow these four steps to update the default port settings.
Step 1: Open the XAMPP Apache Configuration
To start, open the XAMPP Application Manager if you haven’t already done so:

Next, select the Manage Servers tab next to the Welcome tab at the top:

On this screen, you’ll find a list of options. You can click on Apache Web Server, followed by the Configure button.
Step 2: Open the Conf File
From the Configure Apache Web Server box, select Open Conf File:

A warning box will appear, stating that the file is for advanced users:

You can click on Yes to continue. This will open the httpd.conf file.
Step 3: Update the Port Settings
Once the file opens in your text editor, the next step is to update the port settings. To do so, you can hit Ctrl + F, and then enter “80” in the search field. This will display instances of the number 80:

Locate the these lines:
#Listen 12.34.56.78:80
Listen 80
Once you do, go ahead and change them to the following:
#Listen 12.34.56.78:8080
Listen 8080
When you’re done, you can save and close the file. In the Configure Apache Web Server box, click on OK.
Step 4: Restart Apache
The final step is to stop and restart Apache, which you can do from the XAMPP Application Manager’s Manage Servers tab. Once Apache is stopped, click on Start to restart:

That’s it! Your port numbers will be updated and Apache should now run without error.
Summary
The XAMPP error “Apache shutdown unexpectedly” is commonly caused by another program, such as Skype, using the default Apache port. While this can be frustrating, it usually has a simple resolution.
As we discussed in this article, the easiest way to fix this problem is to update XAMPP’s Apache configuration settings. You can do this by editing the httpd.conf file and the http-ssl.conf file (for Windows users). Once this is done, you should stop and restart Apache to resume normal operation.
Get all your applications, databases and WordPress sites online and under one roof. Our feature-packed, high-performance cloud platform includes:
- Easy setup and management in the MyKinsta dashboard
- 24/7 expert support
- The best Google Cloud Platform hardware and network, powered by Kubernetes for maximum scalability
- An enterprise-level Cloudflare integration for speed and security
- Global audience reach with up to 35 data centers and 275 PoPs worldwide
Test it yourself with $20 off your first month of Application Hosting or Database Hosting. Explore our plans or talk to sales to find your best fit.
XAMPP is a helpful development tool. However, you may run into problems at some point, such as receiving the notification: “Apache shutdown unexpectedly”. This error might seem to come out of nowhere, so identifying the cause – let alone the solution – can be puzzling.
Fortunately, there is a common explanation for Apache’s sudden shutdown. With a few simple modifications, you should be able to fix the problem and get Apache up and running again. All you have to do is update some settings in the configuration files.
In this article, we’ll discuss the common cause of this Apache error in XAMPP and then walk you through four steps to fix it, both on Windows and macOS.
Let’s get started!
An Introduction to the XAMPP “Apache Shutdown Unexpectedly” Error
XAMPP is a free, open source server stack that includes the Apache server and MariaDB database:
It runs PHP and Perl scripts, and is used to develop and test dynamic websites on local machines. This means that if you are building a website, you can install WordPress locally on your computer. You can use XAMPP without having to upload your site’s files to your web hosting service.
If you’re reading this article, we’ll assume you’re already at least somewhat familiar with XAMPP. However, what may be new to you is the “Apache shutdown unexpectedly” error you’re seeing.
This message is most commonly caused by a blocked port. Usually, it means that another application installed on your computer, such as Skype, is using the same port as XAMPP. Additionally, you may notice that the error message indicates the problem may also be attributed to “missing dependencies, improper privileges, a crash, or a shutdown by another method.”
In any event, the easiest fix is to simply modify the XAMPP default settings. However, the method for resolving the error varies slightly between Windows and macOS. Also, the interface may look a bit different depending on the XAMPP version you’re using. We will provide instructions for both operating systems below, starting with Windows.
How to Fix the XAMPP Error “Apache Shutdown Unexpectedly” in Windows
If you’re using a Windows device, you can follow these four steps to update your default port settings in XAMPP.
Step 1: Open the Configuration Settings from the XAMPP Control Panel
The first step is, of course, to launch XAMPP. This will open the XAMPP control panel. From here, you can update the configuration settings for the server stack.
Since this error is related to Apache, we’ll focus on those settings. In the “Apache” row of options, click on the Config button.
This will open a drop-down menu of files. We’re going to be editing two of these files, starting with httpd.conf.
Step 2: Change the Default Port Settings of the httpd.conf File
From the menu of files, click on Apache (httpd.conf). Once you do, the file will open in your computer’s default text editor:
Within this file, there are three settings you’ll want to update. To get started, press Ctrl + F, then enter “80” in the search field:
This will display all instances of the number 80 in the file. Locate “Port 80” and change it to “Port 8080”. Once the port setting is updated, search for “Listen 80” and update it to “Listen 8080”.
Finally, search for “servername localhost:80”. Once you find it, modify it to “servername localhost:8080”. When you’re finished, save and close the file.
Step 3: Update the Default Port Settings in the http-ssl.conf File
Now it’s time to move on to the second file. To do so, you can return to the XAMPP control panel, then select Config under the Apache settings again. This time, open the Apache (http-ssl.conf) file.
When the file opens in your text editor, press Ctrl + F, and then enter 443 in the search field. Locate “Listen 443” and update this to “Listen 4433”.
Next, search the file for the next instance of “443”. It should be “<VirtualHost _default_:443>”. Once you find it, you can go ahead and change it to “<VirtualHost _default_:4433>”. When you’re finished, remember to save and close the file.
Step 4: Restart Apache
Once you’ve updated the settings in both files, the final step is to stop Apache. You can do this by clicking on the Stop button along the same Apache row. After Apache has been stopped, click the Start button to complete the restart process.
That’s it! Your port numbers will be updated and Apache should now run without error.
How to Fix the XAMPP Error “Apache Shutdown Unexpectedly” in macOS
Depending on what version of macOS you’re running, you may already have Apache installed on your computer. This default application of Apache will use the same default port settings as the Apache server in XAMPP, so this may be the cause of the “Apache shutdown unexpectedly” error.
If you’re using macOS, you can follow these four steps to update the default port settings.
Step 1: Open the XAMPP Apache Configuration
To start, open the XAMPP Application Manager if you haven’t already done so:
Next, select the Manage Servers tab next to the Welcome tab at the top:
On this screen, you’ll find a list of options. You can click on Apache Web Server, followed by the Configure button.
Step 2: Open the Conf File
From the Configure Apache Web Server box, select Open Conf File:
A warning box will appear, stating that the file is for advanced users:
You can click on Yes to continue. This will open the httpd.conf file.
Step 3: Update the Port Settings
Once the file opens in your text editor, the next step is to update the port settings. To do so, you can hit Ctrl + F, and then enter “80” in the search field. This will display instances of the number 80:
Locate the these lines:
#Listen 12.34.56.78:80
Listen 80
Once you do, go ahead and change them to the following:
#Listen 12.34.56.78:8080
Listen 8080
When you’re done, you can save and close the file. In the Configure Apache Web Server box, click on OK.
Step 4: Restart Apache
The final step is to stop and restart Apache, which you can do from the XAMPP Application Manager’s Manage Servers tab. Once Apache is stopped, click on Start to restart:
That’s it! Your port numbers will be updated and Apache should now run without error.
Summary
The XAMPP error “Apache shutdown unexpectedly” is commonly caused by another program, such as Skype, using the default Apache port. While this can be frustrating, it usually has a simple resolution.
As we discussed in this article, the easiest way to fix this problem is to update XAMPP’s Apache configuration settings. You can do this by editing the httpd.conf file and the http-ssl.conf file (for Windows users). Once this is done, you should stop and restart Apache to resume normal operation.
Get all your applications, databases and WordPress sites online and under one roof. Our feature-packed, high-performance cloud platform includes:
- Easy setup and management in the MyKinsta dashboard
- 24/7 expert support
- The best Google Cloud Platform hardware and network, powered by Kubernetes for maximum scalability
- An enterprise-level Cloudflare integration for speed and security
- Global audience reach with up to 35 data centers and 275 PoPs worldwide
Test it yourself with $20 off your first month of Application Hosting or Database Hosting. Explore our plans or talk to sales to find your best fit.
As I am working in a corporate environment where developers faces firewall issues, none of the other answers resolved my issue.
As the port is not used by Skype, but by some other internal applications,
I followed the below steps to resolve the issue:
Step 1 — From the XAMPP Control Panel, under Apache, click the Config button, and select the Apache (httpd.conf).
Inside the httpd.conf file, somehow I found a line that says:
Listen 80
And change the 80 into any number / port you want. In my scenario I’m using port 8080.
Listen 8080
Still from the httpd.conf file, I found another line that says:
ServerName localhost:80
Change 80 to 8080.
ServerName localhost:8080
Step 2 — From the XAMPP Control Panel, under Apache, click the Config button again, but this time select the Apache (httpd-ssl.conf). Inside the httpd-ssl.conf file, find line that says
Listen 443
And change the 443 into any number / port you want. I’ll using 4433 as the new port number.
Listen 4433
Still from the httpd-ssl.conf file, find another line that says
<VirtualHost _default_:443>

ServerName localhost:443
And change 443 to 4433.
<VirtualHost _default_:4433>

ServerName localhost:4433
Remember to save the httpd.conf and httpd-ssl.conf files after performing some changes. Then restart the Apache service.
Themeisle content is free. When you purchase through referral links on our site, we earn a commission. Learn More
Technical errors are rarely a welcome sight, especially if they interrupt your workflow. If you’re using XAMPP for local development, you might have run into a particularly confusing message that reads, “XAMPP error Apache Shutdown Unexpectedly”. Finding a way to quickly resolve this vague issue so you can get back to work can be frustrating.
Fortunately, troubleshooting it is often actually quite simple. All you need is a text editor to reconfigure a few simple settings in your XAMPP files. In a few moments, you can eliminate this error and get back to building your latest project.
In this article, we’ll cover what the “XAMPP error Apache shutdown unexpectedly” message means so you can better understand it. Then, we’ll take you through four simple steps to fix the problem with tools that are likely already at your disposal. Let’s dive right in!
XAMPP is a powerful and popular development tool. You can use it to build a site on a local server. This is useful for creating new websites, as well as testing out changes, updates, and new plugins or themes on existing websites.
Unfortunately, this doesn’t mean that XAMPP always works perfectly. Despite being well-designed, there’s always a chance that something will go wrong. In the case of the “XAMPP error Apache shutdown unexpectedly” message, this problem can be particularly frustrating.
This warning appears when you try to boot up XAMPP. Moreover, that’s not always the only error message you’ll see. You could also receive some debugging information, such as text similar to the following:
Error: Apache shutdown unexpectedly. This may be due to a blocked port, missing dependencies, improper privileges, a crash, or a shutdown by another method. Check the "/xampp/apache/logs/error.log" file and the Windows Event Viewer for more clues.That’s a lot of information in one message. As such, it’s easy to become intimidated by all the possible causes of this issue. Furthermore, knowing how to interpret all these details can be even harder if you’re not well-versed in the relevant technology.
Fortunately, the root issue is typically pretty simple. This error message usually means that there’s another program that’s using the same port that XAMPP does by default.
A port is a network connection point used by a variety of programs. Each port only supports one program at a time. Therefore, if another application is blocking the port XAMPP typically connects to, it will prevent the platform from starting up.
Oftentimes, the culprit in this situation is Skype, as it uses the same default port as XAMPP. However, it might be another program. Trying to troubleshoot exactly which application is causing the issue can be a headache. That’s why we’ll be going straight to XAMPP’s files to fix this issue.
How to resolve the “XAMPP Error Apache Shutdown Unexpectedly” message (in 4 steps)
If you’ve never dealt with configuration files before, don’t worry. This process should be fairly simple. Additionally, all you’ll need is your XAMPP installation and a text or code editor.
Step 1: Launch the XAMPP Apache configuration settings
First, go ahead and launch the XAMPP dashboard. The program itself doesn’t have to operate. As long as you can access your dashboard, you should be able to resolve the error.
Additionally, try running XAMPP as an administrator. You can do this by right-clicking on the program and selecting Run as administrator. This isn’t crucial for this walkthrough, but it can prevent occasional unrelated errors.
Once you’ve launched XAMPP, navigate to the row titled Apache under the heading Module. Under Actions, select Config:

Note that when you see the “XAMPP error Apache shutdown unexpectedly” message, that means that the issue is specifically related to Apache. Therefore, you’ll need to click on that specific Config button to properly fix it. None of the other rows in this window will work.
Clicking on the Config button will open a dropdown menu listing a few file names. Each represents a configuration file for the program. Choose the first option, titled Apache (httpd.conf):

You can either open it with your default text editor, or a specialized code editor. As long as you can make changes to the file and save them, how you do so doesn’t really matter. We’ll be using Notepad.
Once you open the httpd.conf file, you’ll see some text similar to the following:
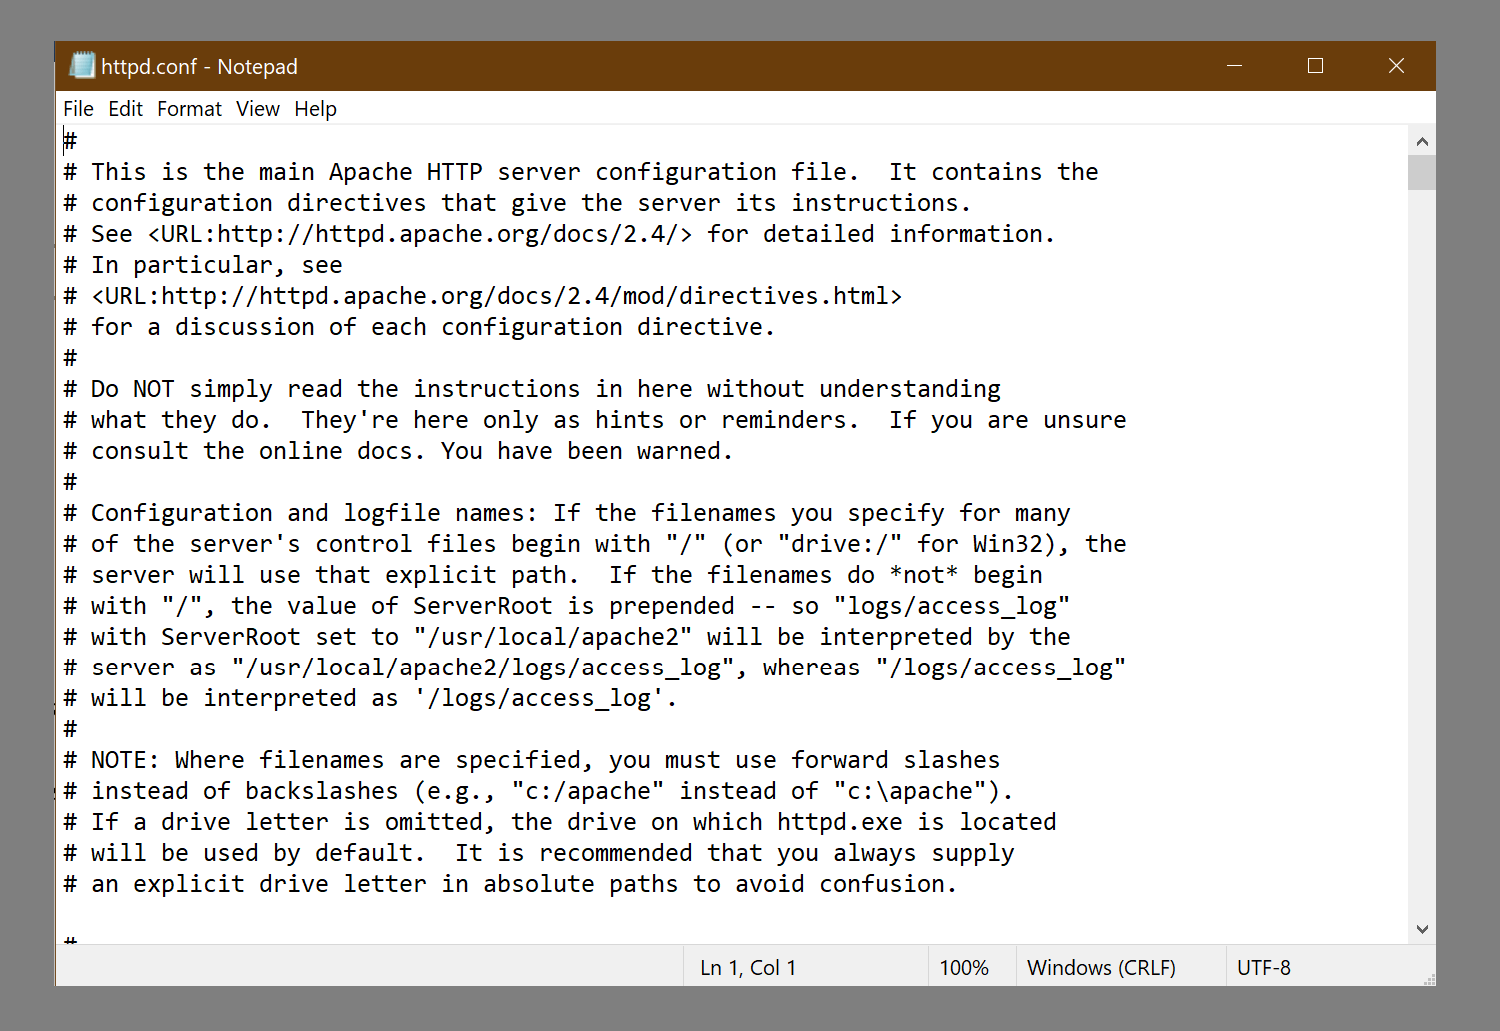
Once again, this can be a bit intimidating if you’re new to editing configuration files. The good news is that you’ll only need to modify a few simple things.
However, we do recommend that you proceed with caution. Configuration files often carry information that is essential for a program’s normal operation. Therefore, try not to edit anything that you don’t understand. You may also want to save a backup of this file before you proceed to the next step.
Step 2: Change your default port settings in httpd.conf
As we already mentioned, when you see the “XAMPP error Apache shutdown unexpectedly” message, it’s almost always a problem with a blocked port. As such, we’ll be changing the ports that the program normally uses to connect to your network.
Unless you’ve changed it before, the default port for Apache is 80. Port 80 is specifically for HTTP programs. However, it’s not just the default for Apache. Many other programs will use port 80 as well, which can lead to conflicts if you try to run multiple programs on this port at once.
To solve this issue, you need to redirect Apache to port 8080. This is an alternate HTTP-specific port. As such, XAMPP will continue to work as normal, but with less likelihood that its port will become blocked again in the future. As such, this is also a preventative measure against future port conflict errors.
Let’s get back to the configuration file. Press Ctrl + F to open a search dialogue. Enter 80 into the field to find every instance of the number in the file:

There will probably be a handful of instances where 80 occurs. However, you only need to change a few of them. Specifically, you’ll need to change three items:
- Change
Port 80toPort 8080 - Change
Listen 80toListen 8080 - Change
servername localhost: 80toservername localhost: 8080
Once again, we encourage you to only change these three items. Not only will modifying unrelated lines not solve this error, but it could also cause another one. If you accidentally edit the wrong element, you can restore your own backup or find the default Apache file on Github.
Save the httpd.conf file and close it when you’re finished making these changes. Then go back to your XAMPP control panel for the last step.
Step 3: Update your default port settings in http-ssl.conf
Lastly, we’ll be editing one final configuration file. To access it, repeat the instructions from Step 1. Go to the Apache row under Module and select Config. However, this time, click on the second option in the dropdown menu, titled Apache (httpd-ssl.conf):
Open up the text file in your preferred editor. However, this time you won’t be searching for 80. Instead, hit Ctrl + F and search for the number 443.
Port 443 is the port that is typically used for secure web transactions. However, Apache also needs it. Therefore, you need to change two instances of 443 to the alternative port – 4433:
- Change
Listen 443toListen 4433 - Change
<VirtualHost_default_:443>to<VirtualHost_default_:4433>
Be sure to save your work in this file as well. Once you’re done, close your text or code editor.
Step 4: Restart Apache
The next thing you want to do is restart Apache. This will reset the processes so that Apache can use the new alternate ports you’ve specified.
How to restart Apache on XAMPP
Restarting Apache is easy to do and somewhat intuitive:
- Click the Stop button on the Apache row.
- After Apache stops, click the Start button to restart it again.
If for some reason that doesn’t work, then you might need to completely shut down XAMPP and relaunch it. In most cases that shouldn’t be necessary though. The stop-start method should do the trick.
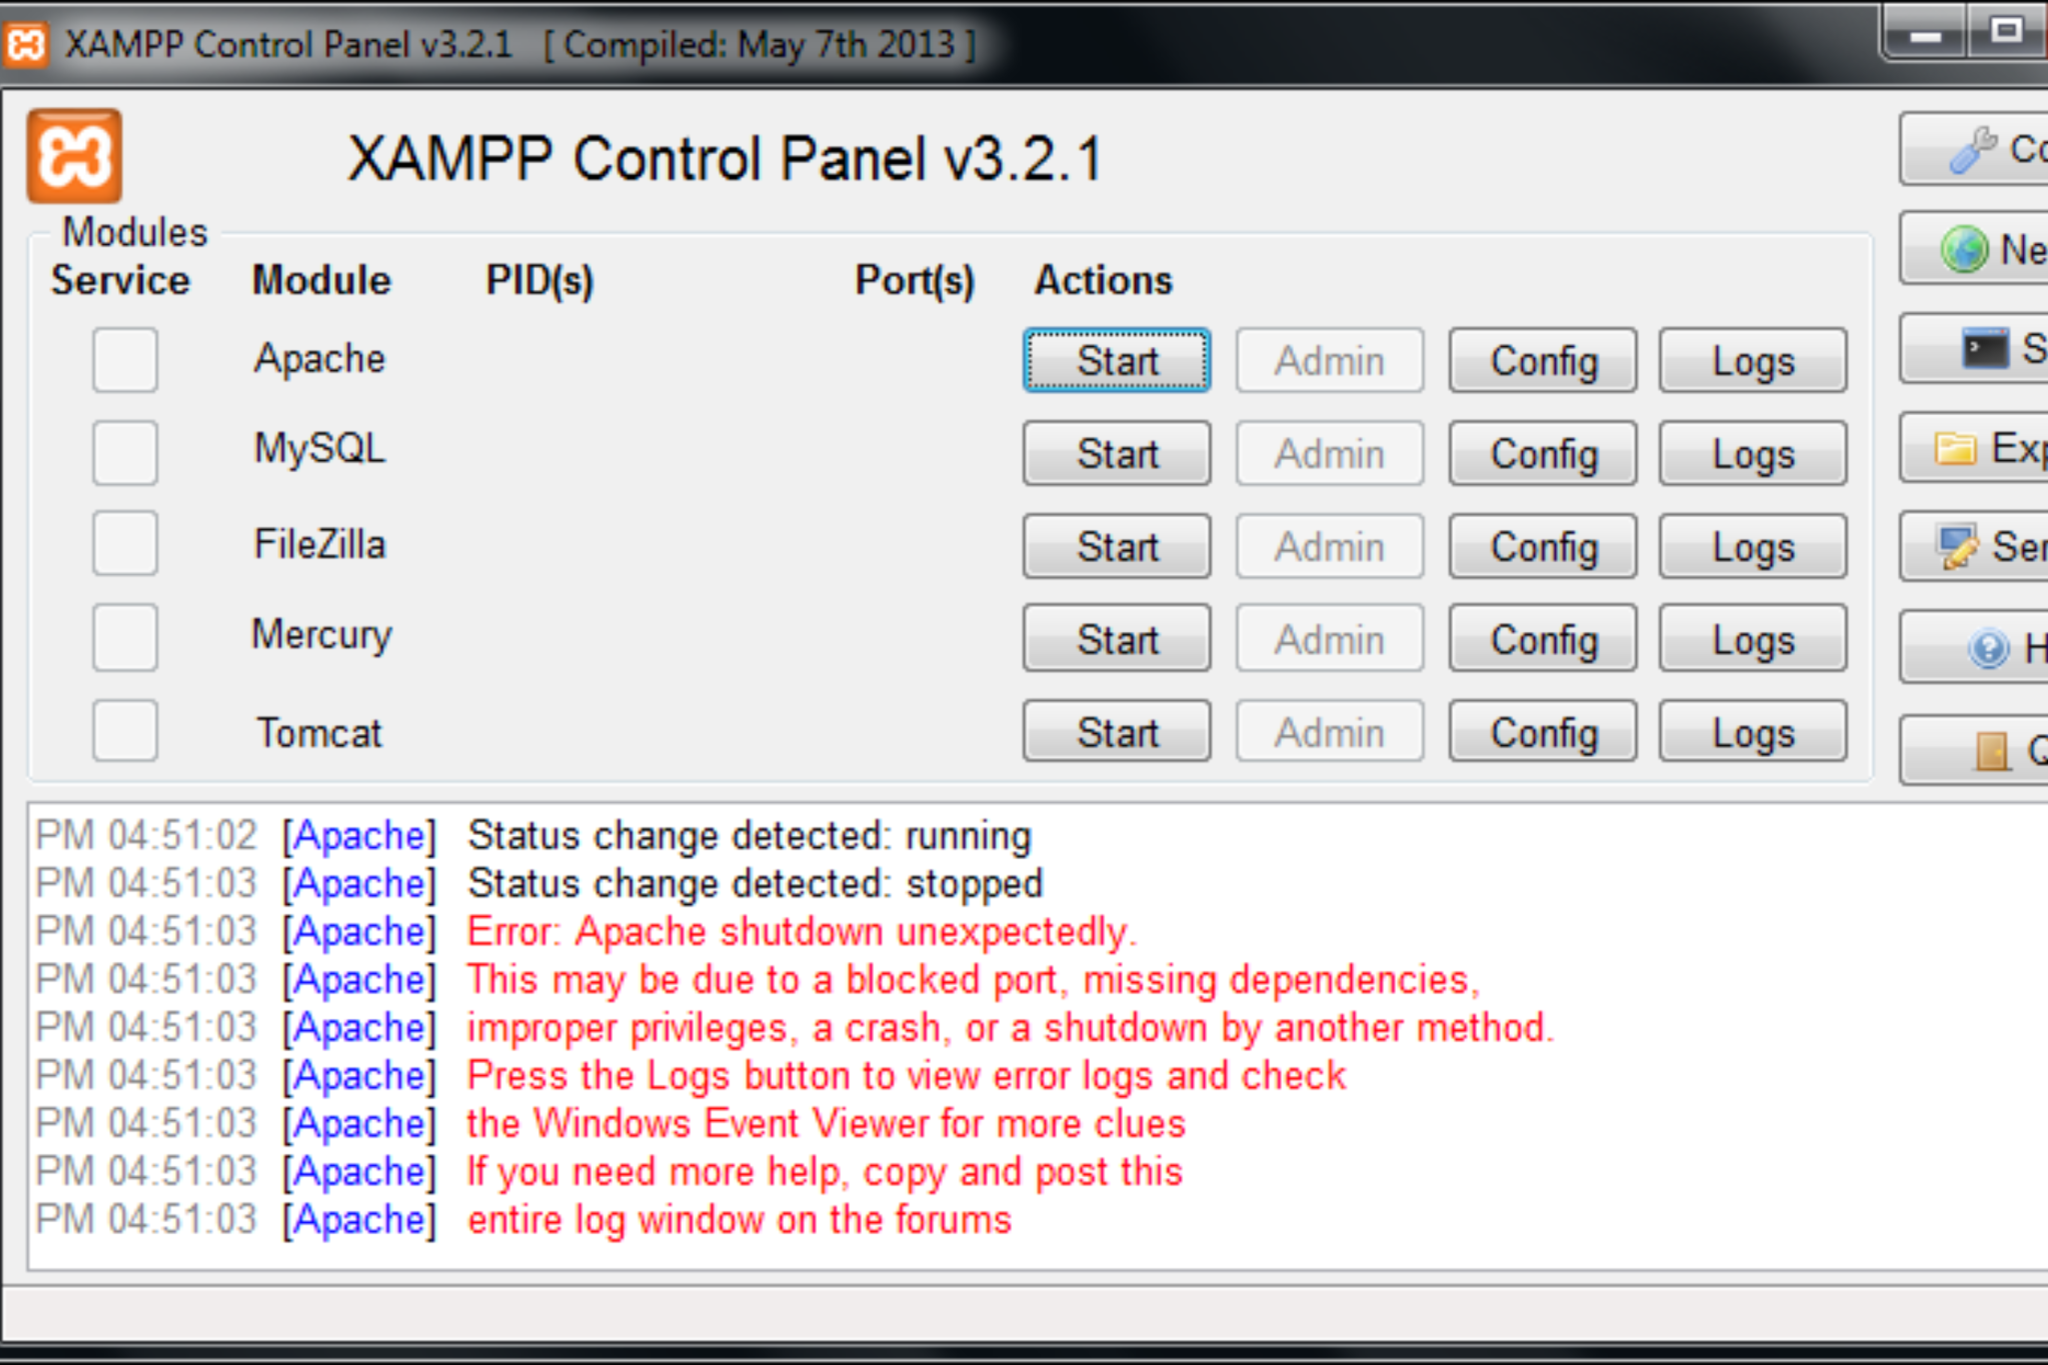
Upon restart, everything should work normally. Your control panel should look something like this:

From here, you should be able to click on Start next to Apache and continue with your work on your local site. Remember to not use ports 8080 or 4433 for any other programs, or you may have to repeat this process.
Once you have resolved this error, you may want to investigate other programs to see which one is taking up Apache’s default ports. If you decide to adjust another program’s settings to disconnect it, you can repeat these steps to reconnect XAMPP to ports 80 and 443.
Conclusion
Having to troubleshoot an error when you’re in the middle of a development project is annoying and eats up valuable time. Apache errors in particular can be aggravating. Fortunately, by altering a few configuration files, you can quickly resolve this frustrating roadblock.
In this article, we covered four easy steps to resolve the “XAMPP error Apache shutdown unexpectedly” message:
- Launch the Apache configuration settings from the XAMPP dashboard.
- Open the httpd.conf file and change the default port from
80to8080. - Open the http-ssl.conf file and change the default port from
443to4433. - Restart Apache.
Finally, if you regularly have problems with XAMPP, there are lots of other local development tools that you can consider, such as DesktopServer, Docker, or Vagrant.
Do you have any questions about resolving the “XAMPP error Apache shutdown unexpectedly” message? Let us know in the comments section below!
Free guide
5 Essential Tips to Speed Up
Your WordPress Site
Reduce your loading time by even 50-80%
just by following simple tips.
Download free guide
Are you getting the error “Apache shutdown unexpectedly”? Well, this article will help you sort this problem and carry on with your work.
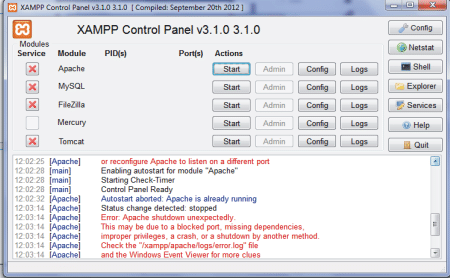
PM 04:22:16 [Apache] Attempting to start Apache app…
PM 04:22:18 [Apache] Status change detected: running
PM 04:22:20 [Apache] Status change detected: stopped
PM 04:22:20 [Apache] Error: Apache shutdown unexpectedly.
PM 04:22:20 [Apache] This may be due to a blocked port, missing dependencies,
PM 04:22:20 [Apache] improper privileges, a crash, or a shutdown by another method.
PM 04:22:20 [Apache] Press the Logs button to view error logs and check
PM 04:22:20 [Apache] the Windows Event Viewer for more clues
PM 04:22:20 [Apache] If you need more help, copy and post this
PM 04:22:20 [Apache] entire log window on the forums
First, check which process is running in your port 80. try the following command in your terminal
net stop http
The above command will stop the process which is using your port 80.
If you are not interested in stopping that process and you want it to be running. Then you have to change the port for apache server. Below are the steps to change the port of apache
STEP #1:
Open the XAMPP Control Panel as administrator.
STEP #2:
In the XAMPP Control Panel, Left click on the Config button corresponding to Apache
STEP #3:
Select ‘Apache (httpd.conf)’ from the drop-down menu. Notepad will open.
STEP #4:
Find Listen 80 and convert it to Listen 81.(or some other port number as per your wish)
NOTE: When you try to run xampp you should use “localhost:81/dashboard/” instead of “localhost/dashboard/”
STEP #5:
Find ServerName localhost:80 to ServerName localhost:81
STEP #6:
Save the notepad. Be sure that you can save the notepad file only if you open the XAMPP control panel as an Administrator. Now, start the Apache. It will run now.
If you have any problem regarding this, mention it in comments. I will try to solve your problem.
Update:
If you are using Skype, do the following steps:
Open Skype
Tools -> Options -> Advanced -> Connection
Uncheck the “Use port 80 and 443 for alternatives for incoming connections” checkbox
Sign Out and Close all Skype windows
Restart your Apache
I tried to use the XAMPP server for my college projects, when I tried to start Apache from the XAMPP control panel in my Windows 10, I started getting “Apache shutdown unexpectedly” error message. Tried to fix it from several methods, unfortunately, failed. At last, I got one solution to fix this issue. This simple fix will surely help you to fix Apache shutdown unexpectedly easily. Error: Apache shutdown unexpectedly is mostly caused due to blocked port in XAMPP server. So in this post, we are going to explain how to fix Apache shutdown unexpectedly error easily.
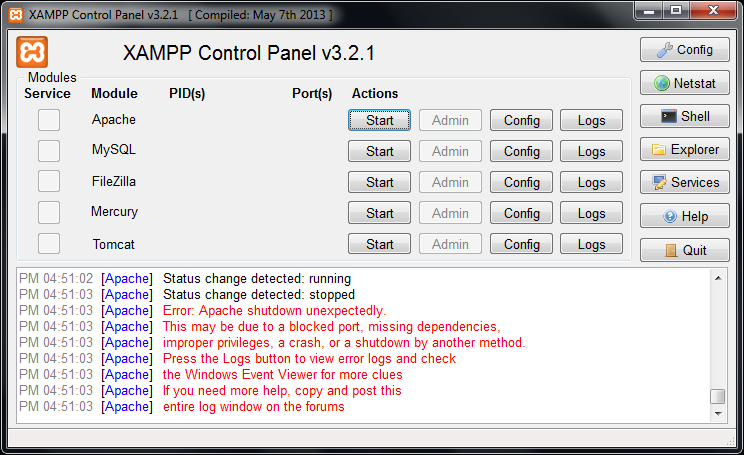
If you are getting the below error when you click on the start button of the Apache in XAMPP, then this article will surely help you to come out with this problem. So try the mentioned method to fix it.
[Apache] Status change detected: running

[Apache] Status change detected: stopped

[Apache] Error: Apache shutdown unexpectedly.

[Apache] This may be due to a blocked port, missing dependencies,

[Apache] improper privileges, a crash, or a shutdown by another method.

[Apache] Press the Logs button to view error logs and check

[Apache] the Windows Event Viewer for more clues

[Apache] If you need more help, copy and post this

[Apache] entire log window on the forums
How to Fix Apache Shutdown Unexpectedly in XAMPP?
- Open XAMPP control panel and click on “Config” of the Apache
- Now select the “httpd:conf”
- You have to edit some texts here, firstly search for “Listen 80” using CTRL + F
- Now change it to Listen 8080
- Now look for “ServerName localhost:80”
- Change it to “ServerName localhost:8080”
- Now save edited texts using CTRL + S or click on File -> Save
- After saving it, close the notepad
- Now click on “Config” again and select “http-ssl.conf”
- Find for “Listen 443” and change it to “Listen 4433”
- Then again find “VirtualHost_default_:443” and change it to “VirtualHost_default_:4433”
- At last, save it and close the windows
- Again go to XAMPP control panel and click on main “Config”
- Select Service and Port settings
- Now you have to change port 80 to 8080 and 443 to 4433 and save
- You are done. Restart the XAMPP control center
- Now start the Apache to check localhost working or not!
- Also Read:- How to Fix ‘Please install Skype from the Windows Store for the best experience’ Error?
How to Fix Xampp Apache Not Starting in Windows 10?
- Press Windows + R and type services.msc and hit enter
- Scroll down and search for World Wide Web Publishing Service
- Right-click on World Wide Web Publishing Service
- Now select Startup type and disable
- Also Read: – 8 Easy Ways To Speed Up Your Windows
Fix a Blocked Port in XAMPP
You can also fix the error: Apache shutdown unexpectedly messages by closing the applications which use the port 80. Some apps which use port 80 are Skype, IIS, etc. To close them to allow port 80 for your XAMPP by following the below method.
Fix Skype XAMPP Port Problem
- Open Skype and go to tools
- Click on options -> Advance -> Connection
- Now untick the checkbox “use port 80 and 443 for additional incoming connections”
- That’s it. You are done!
Bottom Line
So, guys, these are the best and working methods available to fix Apache shutdown unexpectedly error in XAMPP. I hope this method helps you to fix the Apache shutdown unexpectedly error in XAMPP. This method will 100% work to fix XAMPP localhost problem in your Windows. Do share this post with your friend who is also facing the same problem and keep visiting us.
Freelancer and writer who keeps a close eye on new technologies. He writes about the best apps/games, how-to tips, tutorials especially on Android, iPhone, computers, Windows, Linux, and Mac.
После установки панели управления XAMPP в Windows 10 многие пользователи сообщали об ошибке при запуске Apache . Эта проблема обычно возникает, когда такой процесс, как World Wide Publishing Service, продолжает работать на 80-м порту вашего устройства. Из-за этого операционная система Windows 10 не позволяет серверу Apache работать, и это вызывает ошибку.
5:38:38 PM  [Apache]    Error: Apache shutdown unexpectedly.
5:38:38 PM  [Apache]    This may be due to a blocked port, missing dependencies,
5:38:38 PM  [Apache]    improper privileges, a crash, or a shutdown by another method.
5:38:38 PM  [Apache]    Press the Logs button to view error logs and check
5:38:38 PM  [Apache]    the Windows Event Viewer for more clues
5:38:38 PM  [Apache]    If you need more help, copy and post this
5:38:38 PM  [Apache]    entire log window on the forums
Фактически, порт 80 на компьютере также был портом TCP / IP по умолчанию, который модуль Apache использует на XAMPP. А поскольку два разных приложения не могут использовать один и тот же сетевой порт, вам необходимо остановить его перед запуском сервера Apache XAMPP. Если вы также столкнулись с этой проблемой на своем устройстве, есть несколько простых способов, которые я упомянул в этом руководстве. Итак, начнем.
Очистка службы публикации в World Wide Web была бы лучшим подходом, чтобы снова запустить Apache. Однако вы также можете получить его, изменив номер порта TCP / IP или остановив службу, если это необходимо. Итак, чтобы исправить запуск Apache на панели управления XAMPP, выполните следующие возможные действия:
- Clear World Wide Web Services
- Изменить порт Apache TCP/IP по умолчанию
- Остановите World Wide Web Publishing Service
Давайте посмотрим на них подробно.
1] Clear World Wide Web Services
Чтобы решить начальную проблему службы Apache, вам необходимо очистить всемирную паутину от вашего устройства. Но прежде чем начать, убедитесь, что у вас нет приложений, использующих этот сервис.
Если все в порядке, откройте панель управления в вашей системе Windows.
После того, как он откроется, выберите для просмотра панели управления параметр «Большие значки» или «Маленькие значки», чтобы можно было видеть все элементы панели управления.
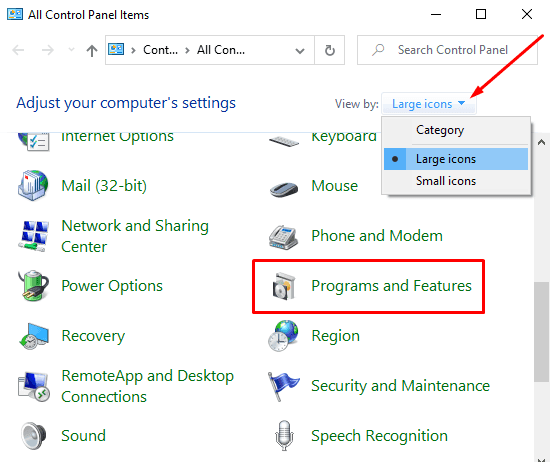
Из доступных элементов выберите Программы и компоненты.
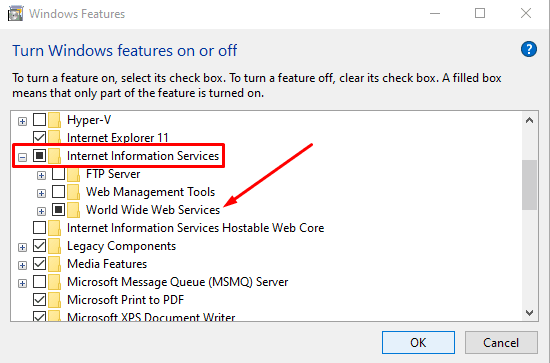
В левой боковой панели есть ссылка «Включение или отключение функций Windows», нажмите на нее.

В диалоговом окне «Функции Windows» разверните Информационные службы Интернета.
Теперь снимите флажок «World Wide Web Services» и нажмите кнопку «ОК», чтобы сохранить изменения.
Выполнив вышеуказанные действия, перезагрузите устройство. После этого откройте панель управления XAMPP и нажмите кнопку «Пуск» в Apache. Теперь он должен работать в порту 80 на вашем компьютере.
2] Изменить порт Apache TCP/IP по умолчанию
Если по какой-либо причине вышеуказанный обходной путь не работает для вас, вам необходимо настроить Apache для выполнения на другом порту TCP/IP. Итак, следуйте этим советам:
Откройте панель управления XAMPP на вашем устройстве Windows.
Нажмите на кнопку Config модуля Apache.
Выберите пункт Apache (httpd.conf) в списке всплывающего меню.
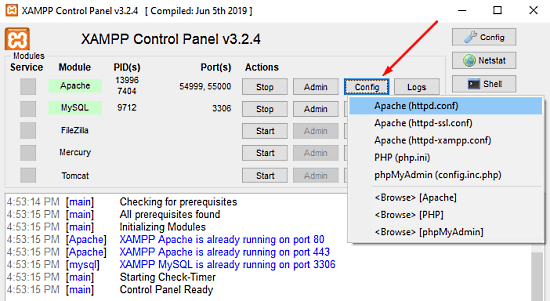
На следующей странице блокнота вам нужно найти Listen 80.
Чтобы упростить поиск, нажмите сочетание клавиш Ctrl + F. Во всплывающем меню введите то, что вы хотите найти. Марк Wrap вокруг флажка, оставить дело Match бесконтрольно, а затем нажмите на Find Next кнопку.
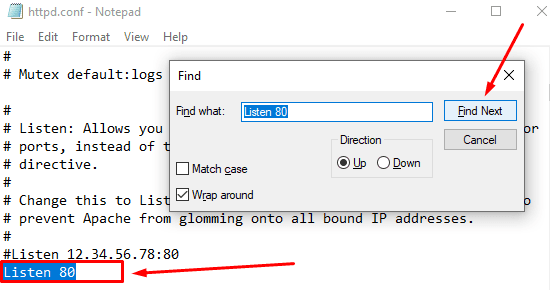
Как только вы найдете соответствующую строку, измените номер порта на любой произвольный номер по вашему выбору.
Например, вы можете попробовать порт 121. Тогда соответствующий результат для номера порта TCP/IP будет что-то вроде — Listen 121.
Нажмите сочетание клавиш Ctrl + S, чтобы сохранить изменения в блокноте.
Примечание. Обратите внимание, что при использовании этой конфигурации вам всегда нужно добавить номер порта TCP/IP в URL, который вы хотите подключить к своему сайту. Например, чтобы получить доступ к серверу Apache в вашем браузере, вам нужно будет ввести: localhost:121/dashboard, а не localhost/dashboard.
После правильного выполнения вышеуказанных шагов, проблема запуска Apache в XAMPP будет исправлена.
3] Остановите издательский сервис World Wide Web
В качестве альтернативы вам необходимо остановить службу публикации в Интернете и изменить ее параметры, чтобы она могла быть запущена только вручную. Итак, начнем:
Чтобы остановить службу публикации в Интернете, сначала необходимо открыть диспетчер служб Windows на компьютере с Windows 10.
На экране «Службы» найдите параметр «Служба публикации в Интернете» в столбце «Имя».
Как только вы найдете, дважды щелкните по нему, чтобы открыть окно свойств.
В окне свойств по умолчанию открывается вкладка Общие.
На вкладке General найдите тип запуска и переключите его на Manual. Это позволит вам запустить службу вручную, когда это потребуется.
Продвигаясь вперед, остановите статус работающей службы и нажмите Apply > кнопку OK.
Теперь откройте панель управления XAMPP и нажмите кнопку «Пуск», чтобы запустить сервер Apache.
Вот и все. Я надеюсь, что это руководство поможет вам исправить проблему запуска службы Apache на панели управления XAMPP.
This tutorial guides you on how to resolve XAMPP Error: Apache shutdown unexpectedly. Did you open XAMPP Control Panel and run Apache server which resulted in Error: Apache shutdown unexpectedly ? Then you are at the right place.
I had just started Apache server from XAMPP Control Panel and got the following errors. This error says Apache shutdown unexpectedly due to a blocked port, missing dependencies, improper privileges, a crash, or a shutdown by another method.
Note, you may get this error if you are running any other program or application which is using ports 80 and 443. Then you need to Sign Out and close all the program or applications which is using these ports.
For example, if you are running Skype on your Windows machine which may run on port 80, then you need to close this application and try restarting your Apache server from XAMPP Control Panel.
If the port 80 is not used by any applications like Skype, the you need to follow the below section to resolve XAMPP Error: Apache shutdown unexpectedly.
Solved: XAMPP Error: Apache shutdown unexpectedly
If you are in business environment i.e., behind the corporate firewall some of the ports are disabled by default. Therefore, the corporate firewall blocks the ports 80 and 443. Make sure that you get these firewall ports enabled to access the Apache server.
In case if you are unable to access these ports or get it enabled you can follow the below steps to resolve XAMPP Error: Apache shutdown unexpectedly.
1. First, from XAMPP Control Panel click config button of the Apache server module, then select “httpd.conf” file.
You need to look for the following lines
Listen 80

ServerName localhost:80
Then replace with
Listen 8080

ServerName localhost:8080
Basically, you are changing Apache server’s Http port from 80 -> 8080. Most of the corporate firewall would open 8080 port by default. Once you make changes, make sure that you save the file opened in notepad and close.
2. Secondly, you need to select “httpd-ssl.conf” file from XAMPP Control Panel -> Apache server module -> config button.
Then you need to look for the following lines in that file.
Listen 443

<VirtualHost _default_:443>

ServerName localhost:443
Then replace with
Listen 4432

<VirtualHost _default_:4432>

ServerName localhost:4432
Basically, you can change port from 443 to any other port. Once you make changes, make sure that you save the file opened in notepad and close.
3. Finally restart Apache server, the XAMPP Error: Apache shutdown unexpectedly should have gone away !!
That’s it. Hope it helped 🙂
Also See:
- XAMPP browser redirects to localhost/dashboard
- Guide to check XAMPP version on Windows.
- Default .htaccess file for WordPress website ?
- Error: MySQL shutdown unexpectedly XAMPP
- PHP-FastCGI on Windows in XAMPP for PHP Performance
- PHP FPM – Check if Installed and Running
- How to configure XAMPP PHP to send mail from localhost ?
- With UAC please avoid installing XAMPP to C:Program Files warning ?
- Best way to delete components in Angular 9 with CLI
- Dynamic and conditional CSS classes with ngClass : Angular
- Best way to delete components in Angular 9 with CLI ?
- HTML Property Binding in Angular : Data Binding
- Quickly create div classes in Visual Studio Code editor
- Global Angular CLI version is greater than your local version
- Create custom events and fire in Angular 9 with EventEmitter – Example
- Bind selected element from drop down to an object in Angular 9
References:
- apachefriends
- XAMPP wiki
I have been using XAMPP as my developmental server for years now. I have come to love it simplicity and effectiveness which is why I still haven’t use other alternatives like Wamp and EasyPHP.
Few days ago, I started Apache on XAMPP and to my surprise it will run and stop and afterward displays the below error message;
Error: Apache shutdown unexpectedly.
This may be due to a blocked port, missing dependencies,
improper privileges, a crash, or a shutdown by another method.
Check the “/xampp/apache/logs/error.log” file
and the Windows Event Viewer for more clues
From the error message my hypothesis was another program is already using the port 80. My hypothesis was proven to be true reading this stackoverflow thread.
If you are experiencing this problem with XAMPP, I am going to share two simple yet effective methods that solved this problem for me.
-
Changing XAMPP Default Port
If you are desperate to get XAMPP up and running, you should consider changing the port from the default 80 to say 7777.
✔ In the XAMPP Control Panel, click on the Apache – Config button which is located next to the ‘Logs’ button.
✔ Select ‘Apache (httpd.conf)’ from the drop down. (Notepad should open)
✔ Do Ctrl+F to find ’80’ and change line Listen 80 to Listen 7777
✔ Find again and change line ServerName localhost:80 to
ServerName localhost:7777✔ Save and re-start Apache. It should be running by now.
The only demerit to this technique is, you have to explicitly include the port number in the localhost url. Rather than
http://localhostit becomeshttp://localhost:7777. -
Stop the application / service using the 80 port
If you do not want to run XAMPP in another port, and still want to continue using the default port 80, you need to find and stop the program or application already using the port.
One of such program is the popular Skype.
Navigate to Tools -> Options… -> Advanced -> Connection; uncheck / un-tick the use port 80 and 443 as alternative for incoming connection.
Quit Skype for the change to take effect and then re-start Apache in XAMPP.
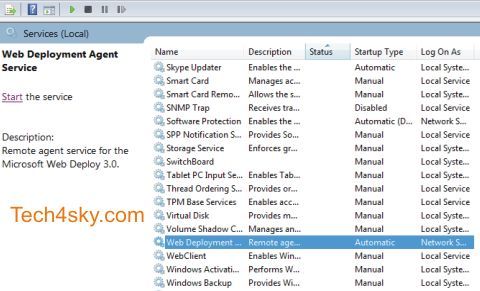
It should be up and running.If after performing the ritual above and it Apache refuse to run just like I experienced, then it is very likely that another program is still using the port 80. It was Microsoft IIS’s Web Deployment Agent Service in my case.
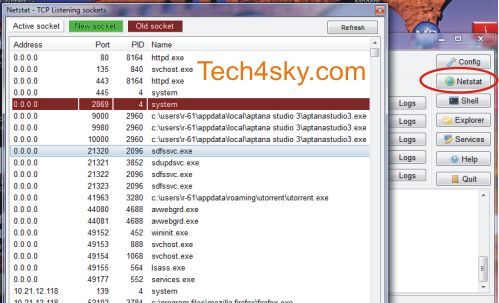
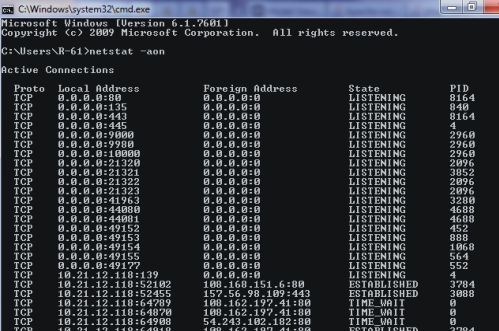
To find the program running port 80 conflicting with XAMPP, click the Netstat button at the far-right. You will see a list of programs together with their respective running port and PID.

Alternatively run CMD and enter netstat -aon

Find the program running port “80” and take note of it PID.
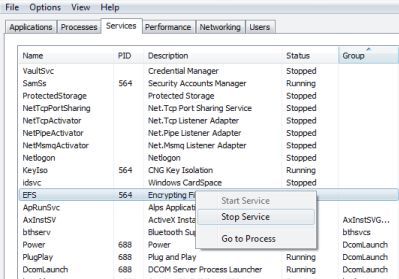
Open Windows Task Manger (Ctrl+Alt+Del), take cognizance of program name with the PID.To stop the conflicting program, just Open SERVICES.MSC (in windows 7, it just “services” with a gear icon) or run CMD, enter
services.mscand stop the program.

Mind you, if you find the conflicting program in Windows Task Manger, you can just right-click and stop the service.

Now that the program has been stopped, re-start Apache and XAMPP should work fine.
Don’t miss out!
Subscribe To Newsletter
Receive the best WordPress, Git, Web development and programming tutorials.
Give it a try. You can unsubscribe at any time.

Error: Apache shutdown unexpectedly :
If you use XAMPP software, then you must also have seen this “error: apache shutdown unexpectedly”. This is a very common error. Whenever you use any software related to the server or network, then such errors can be found for you to see. There can be many reasons for such errors in any software. But basically, such errors come due to the block of the network port of the software. In Xampp also, are caused by network port blocking in most of the cases. This is because many times we are also using some other software in the computer which works on the same network port on which the port is connected like – port 80 or port 443 etc. Hence this error comes due to a port clash.
Now we explain to you that if you see this error too, then how can you solve apache shutdown unexpectedly in xampp?
Solution for apache shutdown unexpectedly:
Step 1: Open Xampp software and click on the Apache server’s config button and then “Apache (httpd.conf)” button. A text document named “httpd” will open.

Step 2: Press Ctrl + H key for Replace window. Type 80 in the “Find What” text box and type a number greater than 1024 in the “Replace with” text box. For example, let me type “7882” here. After this, click on the “REPLACE ALL” button.

Step 3: Save these changes by pressing Ctrl + S or from the File à Save option and close the document.
Step 4: Now again go to the XAMPP control panel by double-clicking on the Xampp icon. Click on the config button of Apache. Now you click on the “Apache (httpd-ssl.conf)” option.

Step 5: A text document named “httpd-ssl” will open. Press Ctrl + H key for Replace window. Type 443 in the “Find What” text box and here also type a number greater than 1024 in the “Replace with” text box. For example, let me type “8278” here. After this, click on the “REPLACE ALL” button.

Step 6: Save these changes by pressing Ctrl + S or from the File à Save option and close the document.
Step 7: Restart Your Xampp. Now you will be able to use the XAMPP software without apache error.