0
1
У меня при этом выходит следующее:
[root@mail mail]# doveadm mailbox list -A
doveadm(systemd-bus-proxy): Error: user systemd-bus-proxy: Initialization failed: Namespace '': mkdir(//mailboxes) failed: Permission denied (euid=999(systemd-bus-proxy) egid=997(systemd-bus-proxy) missing +w perm: /, dir owned by 0:0 mode=0555)
doveadm(systemd-bus-proxy): Error: User init failed
doveadm(systemd-network): Error: user systemd-network: Initialization failed: Namespace '': mkdir(//mailboxes) failed: Permission denied (euid=998(systemd-network) egid=996(systemd-network) missing +w perm: /, dir owned by 0:0 mode=0555)
doveadm(systemd-network): Error: User init failed
doveadm(dovenull): Error: user dovenull: Initialization failed: Namespace '': mkdir(/usr/libexec/dovecot/mailboxes) failed: Permission denied (euid=997(dovenull) egid=995(dovenull) missing +w perm: /usr/libexec/dovecot, dir owned by 0:0 mode=0755)
doveadm(dovenull): Error: User init failed
vmail Drafts
vmail Junk
vmail Trash
vmail Sent
vmail INBOX
doveadm(postgrey): Error: chown(/var/spool/postfix/postgrey/mailboxes, group=89(postfix)) failed: Operation not permitted (egid=994(postgrey), group based on /var/spool/postfix/postgrey - see http://wiki2.dovecot.org/Errors/ChgrpNoPerm)
doveadm(postgrey): Error: user postgrey: Initialization failed: Namespace '': mkdir(/var/spool/postfix/postgrey/mailboxes) failed: Operation not permitted
doveadm(postgrey): Error: User init failed
doveadm(postgrey): Error: User listing returned failure
doveadm: Error: Failed to iterate through some users
[root@mail mail]#
Такое впечатление, что он перебирает неких локальных пользователей (systemd-bus-proxy, systemd-network, dovenull, postgrey) и для них пытается выполнить list. Соответственно, два вопроса: как отговорить его смотреть локальных и как обучить его брать виртуальных?
Собственно несложно получить список пользователей самому и выполнять для каждого в списке, но это выглядит не совсем правильным. «Не по феншую».
This is part 2 of building your own secure email server on Ubuntu from scratch tutorial series. In part 1, we showed you how to set up a basic Postfix SMTP server. In this tutorial, we are going to configure our email server so that we can receive and send emails using a desktop email client like Mozilla Thunderbird or Microsoft Outlook.
To be able to send emails using a desktop email client, we need to enable the submission service in Postfix. To receive emails using a desktop email client, we can install an open-source IMAP server named Dovecot on the Ubuntu server. And to encrypt our communications, we need a TLS certificate.
Open Ports in Firewall
Ubuntu doesn’t enable firewall by default. If you have enabled the UFW firewall, then you need to run the following command to open email related ports in firewall.
sudo ufw allow 80,443,587,465,143,993/tcp
If you use POP3 to fetch emails (I personally don’t), then also open port 110 and 995.
sudo ufw allow 110,995/tcp
Securing Email Server Traffic with TLS Certificate
When we configure our desktop email clients, It’s always a good idea to enable TLS encryption to prevent hackers from snooping on our emails. We can easily obtain a free TLS certificate from Let’s Encrypt. Issue the following commands to install Let’s Encrypt client (certbot) on Ubuntu server from the default software repository.
sudo apt update

sudo apt dist-upgrade

sudo apt install certbot
If you don’t have a web server running yet, I recommend you install one (Apache or Nginx), because it’s easier to obtain and install TLS certificate with a web server than using other methods. And in a later tutorial, I will show you how to set up webmail, which requires running a web server.
If you use Apache web server, you need to install the Apache plugin. (The following command will install Apache web server if it’s not already installed on your system.)
sudo apt install python3-certbot-apache
If you use Nginx web server, then install the Nginx plugin. (The following command will install Nginx web server if it’s not already installed on your system.)
sudo apt install python3-certbot-nginx
Obtaining TLS Certificate with Apache Web Server
You need to have an Apache virtual host for mail.your-domain.com before obtaining Let’s Encrypt TLS certificate. Create the virtual host file:
sudo nano /etc/apache2/sites-available/mail.your-domain.com.conf
Then paste the following text into the file.
<VirtualHost *:80>
        ServerName mail.your-domain.com

        DocumentRoot /var/www/html/
</VirtualHost>
Save and close the file. Enable this virtual host.
sudo a2ensite mail.your-domain.com.conf
Then disable the default virtual host, because it might interfere with other virtual hosts.
sudo a2dissite 000-default
Reload Apache for the changes to take effect.
sudo systemctl reload apache2
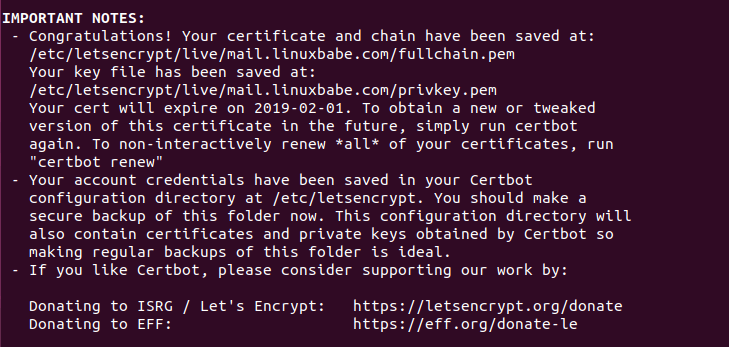
Once the virtual host is created and enabled, run the following command to obtain Let’s Encrypt TLS certificate.
sudo certbot certonly -a apache --agree-tos --no-eff-email --staple-ocsp --email [email protected] -d mail.your-domain.com
Where:
-a apache: Use the Apache plugin for authentication--agree-tos: Agree to terms of service.--no-eff-email: Don’t receive emails from EFF foundation.--staple-ocsp: Enables OCSP Stapling. A valid OCSP response is stapled to the certificate that the server offers during TLS.--email: Enter your email address, which is used for important notifications and account recovery.-d: domain, aka your mail server hostname.
Substitute the red text with your actual data. You should see the following which means the certificate is successfully obtained. You can also see the directory under which your cert is stored.

If there’s a problem when trying to obtain the TLS certificate, please read the following article to learn how to troubleshoot.
- How to Fix Common Let’s Encrypt/Certbot Errors
Obtaining TLS Certificate with Nginx Web Server
You need to have an Nginx virtual host for mail.your-domain.com before obtaining Let’s Encrypt TLS certificate. Create the virtual host file:
sudo nano /etc/nginx/conf.d/mail.your-domain.com.conf
Next, paste the following text into the file.
server {
      listen 80;
      listen [::]:80;
      server_name mail.your-domain.com;

      root /usr/share/nginx/html/;

      location ~ /.well-known/acme-challenge {
         allow all;
      }
}
Save and close the file. Make sure the /usr/share/nginx/html/ directory exists on your server.
sudo mkdir -p /usr/share/nginx/html/
Reload Nginx for the changes to take effect.
sudo systemctl reload nginx
Once the virtual host is created and enabled, run the following command to obtain Let’s Encrypt certificate with Nginx plugin.
sudo certbot certonly -a nginx --agree-tos --no-eff-email --staple-ocsp --email [email protected] -d mail.your-domain.com
Where:
-a nginx: Use the Nginx plugin for authentication--agree-tos: Agree to terms of service.--no-eff-email: Don’t receive emails from EFF foundation.--staple-ocsp: Enables OCSP Stapling. A valid OCSP response is stapled to the certificate that the server offers during TLS.--email: Enter your email address, which is used for important notifications and account recovery.-d: domain, aka your mail server hostname.
You should see the following which means the certificate is successfully obtained. You can also see the directory under which your cert is stored.
If there’s a problem when trying to obtain the TLS certificate, please read the following article to learn how to troubleshoot.
- How to Fix Common Let’s Encrypt/Certbot Errors
Enable Submission Service in Postfix
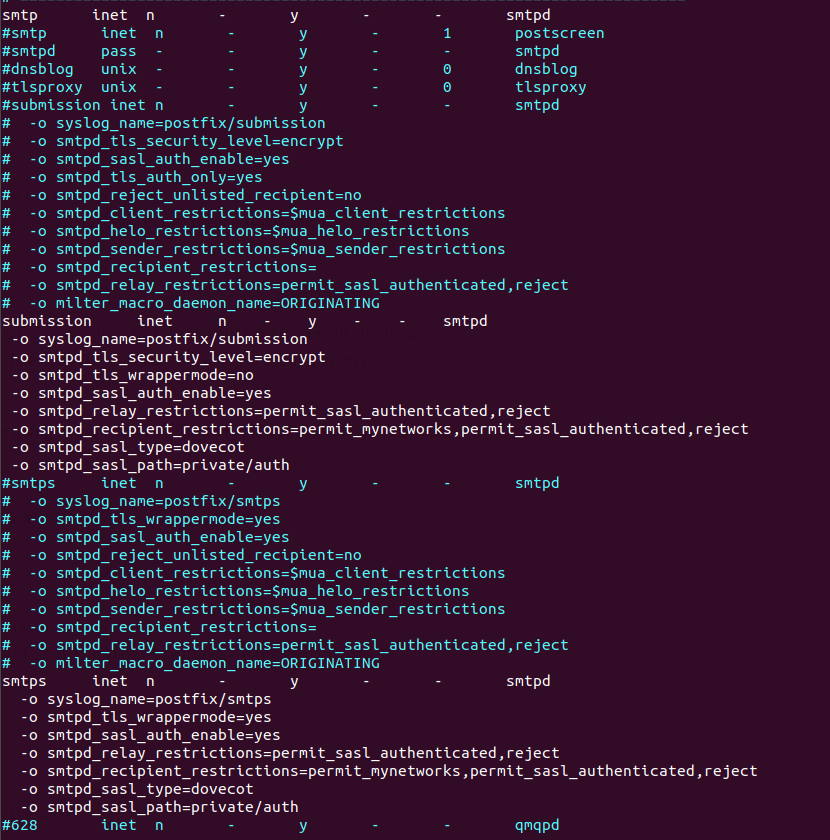
To send emails from a desktop email client, we need to enable the submission service of Postfix so that the email client can submit emails to Postfix SMTP server. Edit the master.cf file.
sudo nano /etc/postfix/master.cf
In submission section, uncomment or add the following lines. Please allow at least one whitespace (tab or spacebar) before -o. In postfix configurations, a preceding whitespace character means that this line is continuation of the previous line. (By default the submission section is commented out. You can copy the following lines and paste them into the file, so you don’t have to manually uncomment or add new text.)
submission     inet     n    -    y    -    -    smtpd
  -o syslog_name=postfix/submission
  -o smtpd_tls_security_level=encrypt
  -o smtpd_tls_wrappermode=no
  -o smtpd_sasl_auth_enable=yes
  -o smtpd_relay_restrictions=permit_sasl_authenticated,reject
  -o smtpd_recipient_restrictions=permit_mynetworks,permit_sasl_authenticated,reject
  -o smtpd_sasl_type=dovecot
  -o smtpd_sasl_path=private/auth
The above configuration enables the submission daemon of Postfix and requires TLS encryption. So later on our desktop email client can connect to the submission daemon in TLS encryption. The submission daemon listens on TCP port 587. STARTTLS is used to encrypt communications between email client and the submission daemon.
Microsoft Outlook mail client only supports submission over port 465. If you are going to use Microsoft Outlook, then you also need to enable submission service on port 465 by adding the following lines in the file.
smtps     inet  n       -       y       -       -       smtpd
  -o syslog_name=postfix/smtps
  -o smtpd_tls_wrappermode=yes
  -o smtpd_sasl_auth_enable=yes
  -o smtpd_relay_restrictions=permit_sasl_authenticated,reject
  -o smtpd_recipient_restrictions=permit_mynetworks,permit_sasl_authenticated,reject
  -o smtpd_sasl_type=dovecot
  -o smtpd_sasl_path=private/auth
Save and close the file.
Hint: The SMTP protocol is used when an email client submits emails to an SMTP server.
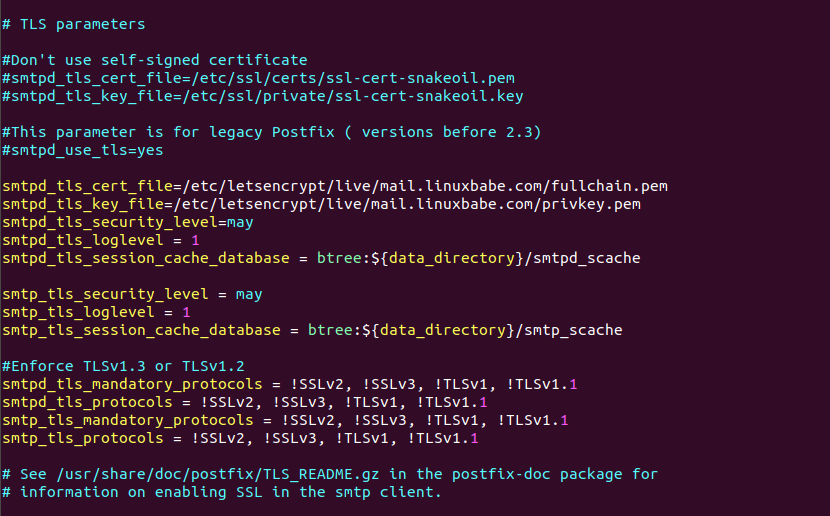
Next, we need to specify the location of TLS certificate and private key in Postfix configuration file. Edit main.cf file.
sudo nano /etc/postfix/main.cf
Edit the TLS parameter as follows. Remember to replace mail.your-domain.com with your real hostname.
#Enable TLS Encryption when Postfix receives incoming emails
smtpd_tls_cert_file=/etc/letsencrypt/live/mail.your-domain.com/fullchain.pem
smtpd_tls_key_file=/etc/letsencrypt/live/mail.your-domain.com/privkey.pem
smtpd_tls_security_level=may
smtpd_tls_loglevel = 1
smtpd_tls_session_cache_database = btree:${data_directory}/smtpd_scache

#Enable TLS Encryption when Postfix sends outgoing emails
smtp_tls_security_level = may
smtp_tls_loglevel = 1
smtp_tls_session_cache_database = btree:${data_directory}/smtp_scache

#Enforce TLSv1.3 or TLSv1.2
smtpd_tls_mandatory_protocols = !SSLv2, !SSLv3, !TLSv1, !TLSv1.1
smtpd_tls_protocols = !SSLv2, !SSLv3, !TLSv1, !TLSv1.1
smtp_tls_mandatory_protocols = !SSLv2, !SSLv3, !TLSv1, !TLSv1.1
smtp_tls_protocols = !SSLv2, !SSLv3, !TLSv1, !TLSv1.1
Your Let’s Encrypt certificate and private key are stored under /etc/letsencrypt/live/mail.your-domain.com/ directory.
Save and close the file. Then restart Postfix.
sudo systemctl restart postfix
If you run the following command, you will see Postfix is now listening on port 587 and 465.
sudo ss -lnpt | grep master

Installing Dovecot IMAP Server
Enter the following command to install Dovecot core package and the IMAP daemon package on Ubuntu server.
sudo apt install dovecot-core dovecot-imapd
If you use POP3 to fetch emails, then also install the dovecot-pop3d package.
sudo apt install dovecot-pop3d
Check Dovecot version:
dovecot --version
Sample output:
2.3.16 (7e2e900c1a)
Enabling IMAP/POP3 Protocol
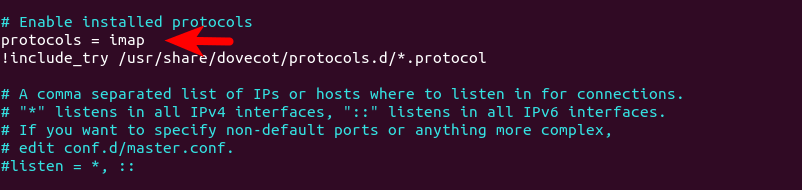
Edit the main config file.
sudo nano /etc/dovecot/dovecot.conf
Add the following line to enable IMAP protocol.
protocols = imap
If you use POP3 to fetch emails, then also add POP3 protocol.
protocols = imap pop3
Save and close the file.
Configuring Mailbox Location
By default, Postfix and Dovecot use mbox format to store emails. Each user’s emails are stored in a single file /var/mail/username. You can run the following command to find the mail spool directory.
postconf mail_spool_directory
Sample output:
mail_spool_directory = /var/mail
However, nowadays it’s almost always you want to use the Maildir format to store email messages. The config file for mailbox location is /etc/dovecot/conf.d/10-mail.conf.
sudo nano /etc/dovecot/conf.d/10-mail.conf
The default configuration uses mbox mail format.
mail_location = mbox:~/mail:INBOX=/var/mail/%u
Change it to the following to make Dovecot use the Maildir format. Email messages will be stored under the Maildir directory under each user’s home directory.
mail_location = maildir:~/Maildir
We need to add the following line in the file. (On Ubuntu 18.04 and 20.04, this line is already in the file.)
mail_privileged_group = mail
Save and close the file. Then add dovecot to the mail group so that Dovecot can read the INBOX.
sudo adduser dovecot mail
Using Dovecot to Deliver Email to Message Store
Although we configured Dovecot to store emails in Maildir format, by default, Postfix uses its built-in local delivery agent (LDA) to move inbound emails to the message store (inbox, sent, trash, Junk, etc), and it will be saved in mbox format.
We need to configure Postfix to pass incoming emails to Dovecot, via the LMTP protocol, which is a simplified version of SMTP, so incoming emails will saved in Maildir format by Dovecot. LMTP allows for a highly scalable and reliable mail system. It also allows us to use the sieve plugin to filter inbound messages to different folders.
Install the Dovecot LMTP Server.
sudo apt install dovecot-lmtpd
Edit the Dovecot main configuration file.
sudo nano /etc/dovecot/dovecot.conf
Add lmtp to the supported protocols.
protocols = imap lmtp
Save and close the file. Then edit the Dovecot 10-master.conf file.
sudo nano /etc/dovecot/conf.d/10-master.conf
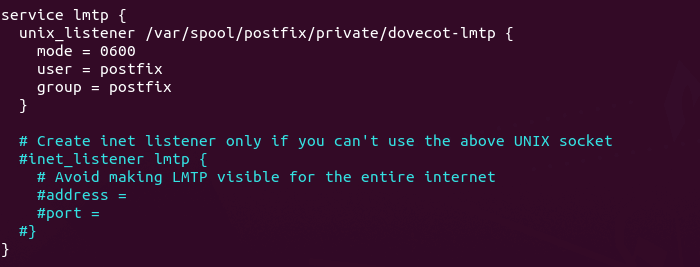
Change the lmtp service definition to the following.
service lmtp {
 unix_listener /var/spool/postfix/private/dovecot-lmtp {
   mode = 0600
   user = postfix
   group = postfix
  }
}
Next, edit the Postfix main configuration file.
sudo nano /etc/postfix/main.cf
Add the following lines at the end of the file. The first line tells Postfix to deliver incoming emails to local message store via the Dovecot LMTP server. The second line disables SMTPUTF8 in Postfix, because Dovecot-LMTP doesn’t support this email extension.
mailbox_transport = lmtp:unix:private/dovecot-lmtp
smtputf8_enable = no
Save and close the file.
Configuring Authentication Mechanism
Edit the authentication config file.
sudo nano /etc/dovecot/conf.d/10-auth.conf
Uncomment the following line.
disable_plaintext_auth = yes
It will disable plaintext authentication when there’s no SSL/TLS encryption. Then find the following line,
#auth_username_format = %Lu
Uncomment it and change its value to %n.
auth_username_format = %n
By default, when Dovecot tries to find or deliver emails for a user, it uses the full email address. Since in this part, we only set up canonical mailbox users (using OS users as mailbox users), Dovecot can’t find the mailbox user in full domain format ([email protected]), so we need to set auth_username_format = %n to drop the domain part, then Dovecot should be able to find the mailbox user. This also allows us to use the full email address ([email protected]) to log in.

Next, find the following line.
auth_mechanisms = plain
This line only enables the PLAIN authentication mechanism. LOGIN is another authentication mechanism you probably want to add to support older email clients.
auth_mechanisms = plain login
Save and close the file.
Configuring SSL/TLS Encryption
Next, edit SSL/TLS config file.
sudo nano /etc/dovecot/conf.d/10-ssl.conf
Change ssl = yes to ssl = required to enforce encryption.
ssl = required
Then find the following lines.
ssl_cert = </etc/dovecot/private/dovecot.pem
ssl_key = </etc/dovecot/private/dovecot.key
By default, Dovecot uses a self-signed TLS certificate. Replace them with the following values, which specify the location of your Let’s Encrypt TLS certificate and private key. Don’t leave out the < character. It’s necessary.
ssl_cert = </etc/letsencrypt/live/mail.your-domain.com/fullchain.pem
ssl_key = </etc/letsencrypt/live/mail.your-domain.com/privkey.pem
Find the following line.
#ssl_prefer_server_ciphers = no
It’s a good practice to prefer the server’s order of ciphers over client’s. So uncomment this line and change the value to yes.
ssl_prefer_server_ciphers = yes
If you use Ubuntu 20.04 or Ubuntu 22.04, disable insecure SSLv3, TLSv1 and TLSv1.1 by adding the following line.
ssl_min_protocol = TLSv1.2
If you are using Dovecot version 2.2.x (as in Ubuntu 18.04), you should add the following line to disable insecure TLS.
ssl_protocols = !SSLv3 !TLSv1 !TLSv1.1
Save and close the file.
Disable the FIPS Providers in OpenSSL on Ubuntu 22.04
Ubuntu 22.04 ships with OpenSSL 3.0, which features a FIPS provider. However, it won’t work with Dovecot. We need to diable the FIPS provider.
sudo nano /etc/ssl/openssl.cnf
Find the following line (line 54).
providers = provider_sect
Add a # character to comment it out.
#providers = provider_sect
Save and close the file.
If you don’t disable the FIPS provider in OpenSSL, Dovecot would produce the following error.
imap-login: Error: Failed to initialize SSL server context: Can't load SSL certificate: error:25066067:DSO support routines:dlfcn_load:could not load the shared library: filename(libproviders.so)
Configuring SASL Authentication
Edit the following file.
sudo nano /etc/dovecot/conf.d/10-master.conf
Change service auth section to the following so that Postfix can find the Dovecot authentication server. Please be careful about the syntax. Every opening bracket should be terminated by a closing bracket.
service auth {
    unix_listener /var/spool/postfix/private/auth {
      mode = 0660
      user = postfix
      group = postfix
    }
}

Save and close the file.
Auto-create Sent and Trash Folder
Edit the below config file.
sudo nano /etc/dovecot/conf.d/15-mailboxes.conf
To auto-create a folder, simply add the following line in the mailbox section.
auto = create
Example:
 mailbox Trash {
    auto = create
    special_use = Trash
 }
Some common folders you will want to create includes: Drafts, Junk, Trash and Sent. The Sent folder will be created under the user’s home directory when the user send the first email. The Trash folder will be created when the user deletes an email for the first time, etc. After you save and close all above config files, restart Postfix and Dovecot.
sudo systemctl restart postfix dovecot
Dovecot will be listening on port 143 (IMAP) and 993 (IMAPS), as can be seen with:
sudo ss -lnpt | grep dovecot

If there’s a configuration error, dovecot will fail to restart, so it’s a good idea to check if Dovecot is running with the following command.
systemctl status dovecot
Configure Desktop Email Client
Now open up your desktop email client such as Mozilla Thunderbird. Go to Edit -> Account Settings -> Account Actions -> Add Mail Account to add a mail account.
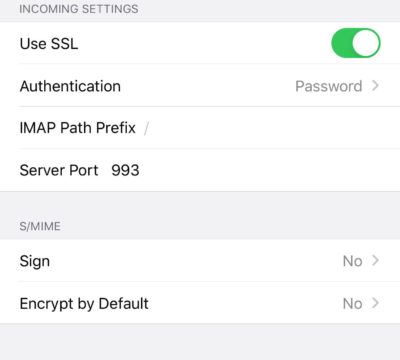
- In the incoming server section, select IMAP protocol, enter
mail.your-domain.comas the server name, choose port 143 and STARTTLS. Choosenormal passwordas the authentication method. - In the outgoing section, select SMTP protocol, enter
mail.your-domain.comas the server name, choose port 587 and STARTTLS. Choosenormal passwordas the authentication method.
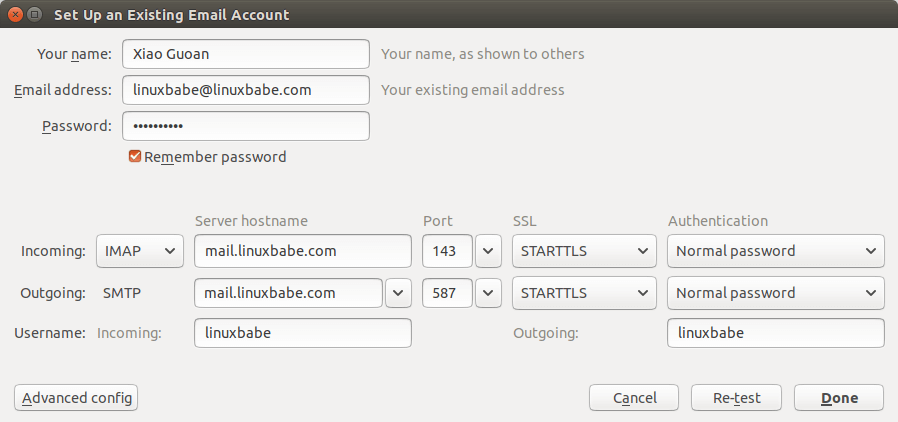
Hint 1: You can also use port 993 with SSL/TLS encryption for IMAP, and use port 465 with SSL/TLS encryption for SMTP. You should NOT use port 25 as the SMTP port in mail clients to submit outgoing emails.
Hint 2: If you use Microsoft 365 Outlook email client, then you shouldn’t enable Secure Password Authentication (SPA), which is a proprietary Microsoft protocol. Your password is already encrypted by TLS.
You should now be able to connect to your own email server and also send and receive emails with your desktop email client!
We use local Unix accounts as email addresses, as we did in part 1. For example, if you have a user called user1 on your Ubuntu server, then you have an email address: [email protected], and the password for the email address is the same password for the user1 user. To create a local Unix account, run
sudo adduser user1
Note: Dovecot doesn’t allow you to log in with the root account. You need to create separate user accounts.
You can list all available mailbox users with:
sudo doveadm user '*'
It’s recommended to restart Dovecot after adding users, so Dovecot can recognize new mailbox users.
sudo systemctl restart dovecot
Troubleshooting Tips
As a rule of thumb, you should always check the mail log (/var/log/mail.log) on your mail server when an error happens. The following is a list of specific errors and troubleshooting tips.
Can’t login from Mail Clients
If you can’t log into your mail server from a desktop mail client, scan your mail server to find if the ports (TCP 587, 465, 143, and 993) are open. Note that you should run the following command from another Linux computer or server. If you run it on your mail server, then the ports will always appear to be open.
sudo nmap mail.your-domain.com
And check if Dovecot is running.
systemctl status dovecot
You can also check the mail log (/var/log/mail.log), which may give you some clues. If Dovecot fails to start, the error might not be logged to the /var/log/mail.log file, you can run the following command to see what’s wrong.
sudo journalctl -eu dovecot
For example, some folks may have the following error in the journal.
doveconf: Fatal: Error in configuration file /etc/dovecot/conf.d/10-master.conf line 78: Unknown setting
Most of the time, it’s a simple syntax error, like a missing curly bracket. Open the configuration file, go to the specified line and fix the error.
If you find the following error message in the mail log
imap-login: Error: Failed to initialize SSL server context: Can't load DH parameters: error:1408518A:SSL routines:ssl3_ctx_ctrl:dh key too small
Then open the Dovecot TLS configuration file.
sudo nano /etc/dovecot/conf.d/10-ssl.conf
Add the following line in this file.
ssl_dh = </etc/dovecot/dh.pem
Save and close the file. Then generate the DH parameter file with:
sudo openssl dhparam -out /etc/dovecot/dh.pem 4096
Restart Dovecot for the changes to take effect.
Cloudflare DNS
As I said in part 1, if you use Cloudflare DNS service, you should not enable the CDN (proxy) feature when creating DNS A record and AAAA record for the hostname of your mail server. Cloudflare doesn’t support SMTP or IMAP proxy.
Relay Access Denied
If you see the “relay access denied” error when trying to send emails from a mail client, it’s most likely that you use port 25 as the SMTP port in your mail client. As I said a while ago, you should use port 587 or 465 as the SMTP port in mail clients (Mozilla Thunberbird, Microsoft Outlook, etc) to submit outgoing emails. Port 25 should be used for SMTP server to SMTP server communications.
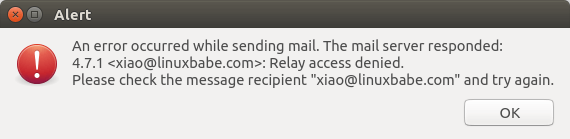
If you see the following “relay access denied” error in the /var/log/mail.log file when trying to send emails from other mail services like Gmail to your own mail server, it’s likely that yourdomain.com is not in the list of $mydestination parameter.
NOQUEUE: reject: RCPT from mail-il1-f180.google.com[209.85.166.180]: 454 4.7.1 <[email protected]>: Relay access denied; from=<[email protected]> to=<[email protected]> proto=ESMTP helo=<mail-il1-f180.google.com>
You can display the current value of $mydestination with:
postconf mydestination
Some folks might not have the main domain name in the list like so:
mydestination = $myhostname, localhost.$mydomain, localhost
Then run the following command to add the main domain name to the list.
sudo postconf -e "mydestination = yourdomain.com, $myhostname, localhost.$mydomain, localhost"
Reload Postfix for the changes to take effect.
sudo systemctl reload postfix
User Doesn’t Exist
If you see the following error message in the mail log (/var/log/mail.log), it’s likely that you forgot to set auth_username_format = %n In /etc/dovecot/conf.d/10-auth.conf file.
mail postfix/lmtp[2256]: 68E00FC1A5: to=, relay=mail.example.com[private/dovecot-lmtp], delay=509, delays=509/0.03/0.03/0.02, dsn=5.1.1, status=bounced (host mail.example.com[private/dovecot-lmtp] said: 550 5.1.1 User doesn't exist: [email protected] (in reply to RCPT TO command))
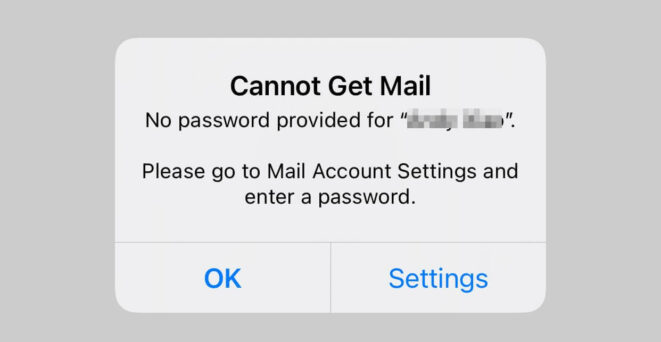
iOS Mail App
If you use the iOS Mail app to log into your mail server and encounter the following error.
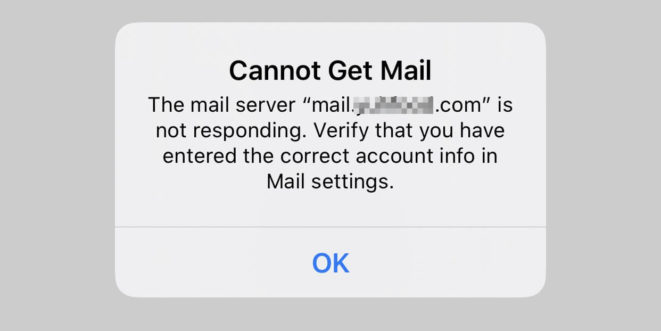
You can try to fix it by enforcing SSL encryption, for both SMTP and IMAP.
Fun fact: It seems the iOS Mail app has difficulty in supporting STARTTLS on IMAP port 143, but it supports STARTTLS on the submission port 587.
If you encounter the “No password provided” error in the iOS Mail app, it’s likely that you have a typo when entering the username in the Mail account settings, or you didn’t enable SSL in the Mail account settings.
Unable to Receive Email From Gmail, Hotmail, Yahoo Mail, etc
If you can’t receive emails from Gmail, Hotmail, Yahoo Mail, etc, here are the possible causes:
- Your MX record is wrong, or not propagated to the Internet yet.
- Your mail server hostname doesn’t have DNS A record, or is not propagated to the Internet yet.
- Your firewall doesn’t allow incoming connections to port 25. Maybe your mail server is behind a NAT?
- Postfix isn’t listening on the public IP address.
- Check the mail log (
/var/log/mail.log) to find out if there are other errors in your Postfix and Dovecot configuration.
You can use the Network Tools Email Checker to test if your SMTP server is reachable from the Internet. Just enter your domain email address and click the Go button. As you can see from the screenshot below, it successfully found my domain’s MX record and my SMTP server is reachable from the Internet.
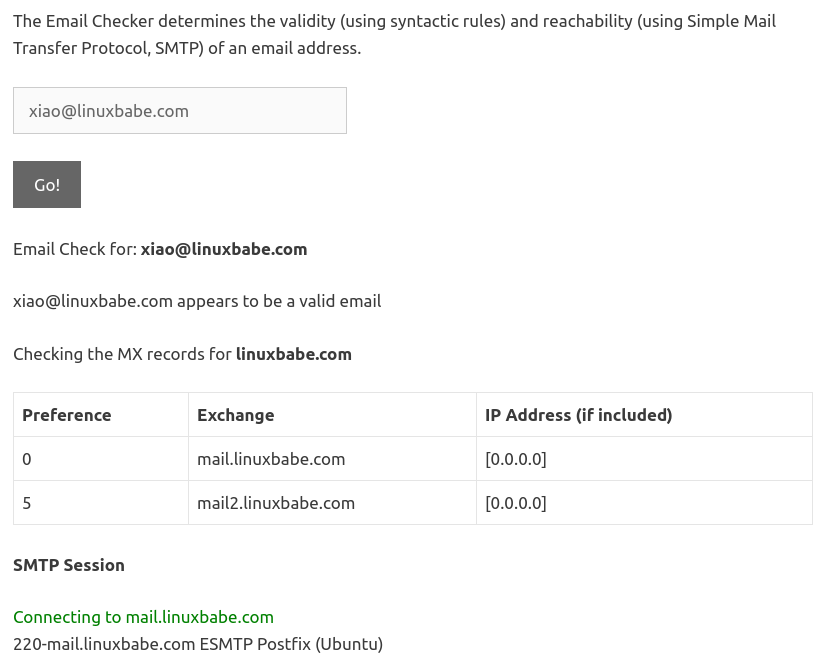
If your SMTP servers isn’t reachable from the Internet, then you have a problem in the first 4 items. If your SMTP server is reachable from the Internet, but you still can’t receive emails, check the mail log (/var/log/mail.log) to find out if there is any errors in your Postfix and Dovecot configuration.
Auto-Renew TLS Certificate
You can create Cron job to automatically renew TLS certificate. Simply open root user’s crontab file.
sudo crontab -e
If you use Apache web server, add the following line at the bottom of the file.
@daily certbot renew --quiet && systemctl reload postfix dovecot apache2
If you are using Nginx web server, then add the following line.
@daily certbot renew --quiet && systemctl reload postfix dovecot nginx
Reloading Postfix, Dovecot and the web server is necessary to make these programs pick up the new certificate and private key.
Dovecot Automatic Restart
If for any reason your Dovecot process is killed, you need to run the following command to restart it.
sudo systemctl restart dovecot
Instead of manually typing this command, we can make Dovecot automatically restart by editing the dovecot.service systemd service unit. To override the default systemd service configuration, we create a separate directory.
sudo mkdir -p /etc/systemd/system/dovecot.service.d/
Then create a file under this directory.
sudo nano /etc/systemd/system/dovecot.service.d/restart.conf
Add the following lines in the file, which will make Dovecot automatically restart 5 seconds after a failure is detected.
[Service]
Restart=always
RestartSec=5s
Save and close the file. Then reload systemd for the changes to take effect.
sudo systemctl daemon-reload
To check if this would work, kill Dovecot with:
sudo pkill dovecot
Then check Dovecot status. You will find Dovecot automatically restarted.
systemctl status dovecot
Next Step
I hope this article helped you set up Postfix and Dovecot on Ubuntu server. In part 3, I will show you how to create virtual mailboxes.
If you prefer to use MariaDB/MySQL database server, then follow this PostfixAdmin tutorial.
- Part 3: PostfixAdmin – Create Virtual Mailboxes on Ubuntu Mail Server (MariaDB/MySQL)
If you prefer to use PostgreSQL database server, then follow this PostfixAdmin tutorial.
- Part 3: PostfixAdmin – Create Virtual Mailboxes on Ubuntu Mail Server (PostgreSQL)
As always, if you found this post useful, subscribe to our newsletter to get more tips and tricks. Take care 🙂
I have been working on this for hours and I have little idea what is wrong. I have dovecot setup to authenticate via PAM. I am sure that the PAM authentication is correct as a wrong password returns a bad auth error. However, when the initial authentication happens it feels like PAM isn’t returning my UID.
Config:
protocols = imap

mail_location = maildir:~/.mail

passdb {
    driver = pam
    #<DEBUG>
    args = failure_show_msg=yes dovecot
    #</DEBUG>
}

ssl = required
ssl_cert = </etc/ssl/certs/dovecot.pem
ssl_key = </etc/ssl/private/dovecot.pem
ssl_cipher_list = ECDHE-ECDSA-AES256-GCM-SHA384:HIGH

#<DEBUG>
auth_verbose=yes
auth_debug=yes
#</DEBUG>
Error:
Apr 30 21:43:39 example.org dovecot[20497]: auth: Debug: Loading modules from directory: /usr/lib/dovecot/modules/auth
Apr 30 21:43:39 example.org dovecot[20497]: auth: Debug: Read auth token secret from /var/run/dovecot/auth-token-secret.dat
Apr 30 21:43:39 example.org dovecot[20497]: auth: Debug: auth client connected (pid=20500)
Apr 30 21:43:40 example.org dovecot[20497]: auth: Debug: client in: AUTH        1        PLAIN        service=imap        secured        session=gbQRcUn41gDH1CFX        lip=192.168.1.1        rip=172.16.1.1        lport=993        rport=35286        resp=<hidden>
Apr 30 21:43:40 example.org dovecot[20497]: auth-worker(20503): Debug: Loading modules from directory: /usr/lib/dovecot/modules/auth
Apr 30 21:43:40 example.org dovecot[20497]: auth-worker(20503): Debug: pam(myusername,172.16.1.1): lookup service=dovecot
Apr 30 21:43:40 example.org dovecot[20497]: auth-worker(20503): Debug: pam(myusername,172.16.1.1): #1/1 style=1 msg=Password:
Apr 30 21:43:40 example.org dovecot[20497]: auth: Debug: client passdb out: OK        1        user=myusername
Apr 30 21:43:40 example.org dovecot[20497]: auth: Debug: master in: REQUEST        158597121        20500        1        8026dcae28bb986805dfea459a9879da        session_pid=20504        request_auth_token
Apr 30 21:43:40 example.org dovecot[20497]: auth: Debug: master userdb out: USER        158597121        myusername                auth_token=de32f97064bc1c4215b205d41ad36fd9eb8d466a
Apr 30 21:43:40 example.org dovecot[20497]: imap-login: Login: user=<myusername>, method=PLAIN, rip=172.16.1.1, lip=192.168.1.1, mpid=20504, TLS, session=<gbQRcUn41gDH1CFX>
Apr 30 21:43:40 example.org dovecot[20497]: imap(keller): Error: user myusername: Couldn't drop privileges: User is missing UID (see mail_uid setting)
Apr 30 21:43:40 example.org dovecot[20497]: imap(keller): Error: Internal error occurred. Refer to server log for more information.
/ect/pam.d/dovecot
auth    required pam_unix.so nullok
account required pam_unix.so
Solution: Authentication is not authorization! I didn’t have a userdb setup.
Added to /ect/dovecot/dovecot.conf
userdb {
    driver = passwd
}
Last edited by Nycroth (2014-04-30 22:34:45)
Background … I had an HDD go bad in an Ubuntu 20 server. I build an Ubuntu 20 server in a completely new machine, then moved as much as I could from the errored HDD to the brand new RAID.
Part of the move was postfix/dovecot. The postfix part of the move was successful, mail is coming in and being added to the correct mail file inboxes.
The dovecot part of the move wasn’t quite so successful though. All email is being shown correctly in the inbox, mail filtering with Thunderbird appears to work but with a BUT.
What happens is the mail gets moved to the correct folder and disappears from the inbox. Selecting the mailbox with the moved email shows the email in the folder until the inbox is selected again. Then all moved mail shows up again as new BUT there is a copy of the email still in the target folder. Running the filters again will move (copy) the files back to the correct folder, causing multiple copies of the same email in the target folder.
All efforts to find an issue show that the problem is restricted to emails in the inbox.
The issue is apparent not only with Thunderbird filtering but also when using the delete key. The only way to delete email is to avoid moving the email to the deleted folder by using Shift + delete.
Configuration of dovecot
mike@wilma:/var/imap$ sudo dovecot -n
# 2.3.7.2 (3c910f64b): /etc/dovecot/dovecot.conf
# Pigeonhole version 0.5.7.2 ()
# OS: Linux 5.4.0-96-generic x86_64 Ubuntu 20.04.3 LTS ext4
# Hostname: wilma.example.com
auth_debug = yes
auth_verbose = yes
auth_verbose_passwords = plain
debug_log_path = /var/log/dovecot/debug.log
disable_plaintext_auth = no
info_log_path = /var/log/dovecot/info.log
log_path = /var/log/dovecot/warnings.log
mail_access_groups = mail
mail_debug = yes
mail_gid = mail
mail_location = mbox:/var/imap/%d/%n/mail/:INBOX=/var/virtual/%d/%n:LAYOUT=fs
mail_privileged_group = mail
mail_uid = nobody
namespace inbox {
  inbox = yes
  location =
  mailbox Drafts {
    special_use = Drafts
  }
  mailbox Junk {
    special_use = Junk
  }
  mailbox Sent {
    special_use = Sent
  }
  mailbox "Sent Messages" {
    special_use = Sent
  }
  mailbox Trash {
    special_use = Trash
  }
  prefix =
}
passdb {
  driver = passwd
}
passdb {
  args = username_format=%n /etc/virtual/%d/passwd
  driver = passwd-file
}
plugin {
  mail_log_events = delete undelete expunge copy mailbox_delete mailbox_rename
  sieve = file:~/sieve;active=~/.dovecot.sieve
}
protocols = " imap pop3"
service auth {
  unix_listener /var/spool/postfix/private/auth {
    mode = 0666
  }
}
service imap-postlogin {
  executable = script-login /etc/dovecot/lastLogin.sh
  unix_listener imap-postlogin {
    user = root
  }
}
service imap {
  executable = imap imap-postlogin
}
ssl_cert = </etc/letsencrypt/live/Email_cert/fullchain.pem
ssl_client_ca_dir = /etc/ssl/certs
ssl_dh = # hidden, use -P to show it
ssl_key = # hidden, use -P to show it
verbose_ssl = yes
File system snapshot …
mike@wilma:/var/imap$ sudo find . ! -user nobody -o ! -group mail -ls
-- no output --
mike@wilma:/var/imap$ sudo ls -l example.com/mike/mail/Facebook
-rw-rw-r-- 1 nobody mail 16689445 Jan 25 11:26 example.com/mike/mail/Facebook
mike@wilma:/var/imap$ sudo ls -ld example.com/mike/mail
drwxrwxr-x 13 nobody mail 4096 Jan 25 12:03 example.com/mike/mail
mike@wilma:/var/imap$ sudo ls -ld example.com/mike
drwxrwxr-x 3 nobody mail 4096 Jan 23 21:19 example.com/mike
mike@wilma:/var/imap$ sudo ls -ld example.com
drwx-wx--x 5 nobody mail 4096 Jan 23 21:20 example.com
I’m not too sure what other information would be useful to you
TIA
Mike
Tried this but it didn’t have the desired result, emails still popped back with 2 seconds of being deleted …
root@wilma:/var/imap# doveadm -v -D force-resync -u mike@example.com INBOX
Debug: Loading modules from directory: /usr/lib/dovecot/modules/doveadm
Debug: Skipping module doveadm_acl_plugin, because dlopen() failed: /usr/lib/dovecot/modules/doveadm/lib10_doveadm_acl_plugin.so: undefined symbol: acl_user_module (this is usually intentional, so just ignore this message)
Debug: Skipping module doveadm_expire_plugin, because dlopen() failed: /usr/lib/dovecot/modules/doveadm/lib10_doveadm_expire_plugin.so: undefined symbol: expire_set_deinit (this is usually intentional, so just ignore this message)
Debug: Skipping module doveadm_quota_plugin, because dlopen() failed: /usr/lib/dovecot/modules/doveadm/lib10_doveadm_quota_plugin.so: undefined symbol: quota_user_module (this is usually intentional, so just ignore this message)
Debug: Module loaded: /usr/lib/dovecot/modules/doveadm/lib10_doveadm_sieve_plugin.so
Debug: Skipping module doveadm_fts_lucene_plugin, because dlopen() failed: /usr/lib/dovecot/modules/doveadm/lib20_doveadm_fts_lucene_plugin.so: undefined symbol: lucene_index_iter_deinit (this is usually intentional, so just ignore this message)
Debug: Skipping module doveadm_fts_plugin, because dlopen() failed: /usr/lib/dovecot/modules/doveadm/lib20_doveadm_fts_plugin.so: undefined symbol: fts_user_get_language_list (this is usually intentional, so just ignore this message)
Debug: Skipping module doveadm_mail_crypt_plugin, because dlopen() failed: /usr/lib/dovecot/modules/doveadm/libdoveadm_mail_crypt_plugin.so: undefined symbol: mail_crypt_box_get_pvt_digests (this is usually intentional, so just ignore this message)
doveadm(mike@example.com)<59647><>: Debug: auth-master: userdb lookup(mike@example.com): Started userdb lookup
doveadm(mike@example.com)<59647><>: Debug: auth-master: conn unix:/var/run/dovecot/auth-userdb: Connecting
doveadm(mike@example.com)<59647><>: Debug: auth-master: conn unix:/var/run/dovecot/auth-userdb: Client connected (fd=10)
doveadm(mike@example.com)<59647><>: Debug: auth-master: userdb lookup(mike@example.com): auth USER input: mike@example.com
doveadm(mike@example.com)<59647><>: Debug: auth-master: userdb lookup(mike@example.com): Finished userdb lookup (username=mike@example.com )
doveadm(mike@example.com)<59647><>: Debug: Added userdb setting: plugin/=yes
doveadm(mike@example.com): Debug: Effective uid=65534, gid=8, home=
doveadm(mike@example.com): Debug: Namespace inbox: type=private, prefix=, sep=, inbox=yes, hidden=no, list=yes, subscriptions=yes location=mbox:/var/imap/example.com/mike/mail/:INBOX=/var/virtual/example.com/mike:LAYOUT=fs
doveadm(mike@example.com): Debug: fs: root=/var/imap/example.com/mike/mail, index=, indexpvt=, control=, inbox=/var/virtual/example.com/mike, alt=
doveadm(mike@example.com): Debug: Mailbox INBOX: Mailbox opened because: force-resync
doveadm(mike@example.com): Debug: auth-master: conn unix:/var/run/dovecot/auth-userdb: Disconnected: Connection closed (fd=10)
Log files only show the following
Jan 27 09:20:49 imap(mike@example.com)<60062><0OOA3IHWZozAqAGO>: Debug: Mailbox Trash: Mailbox opened because: UID move
Jan 27 09:20:49 imap(mike@example.com)<60062><0OOA3IHWZozAqAGO>: Debug: Mailbox INBOX: UID 229597: Opened mail because: copying
Jan 27 09:20:49 imap(mike@example.com)<60062><0OOA3IHWZozAqAGO>: Debug: Mailbox INBOX: UID 229597: Opened mail because: full mail
Tried this to no avail …
root@wilma:/var/imap/example.com# chmod -R o+w *
root@wilma:/var/imap/example.com# systemctl restart dovecot
Also tried unsubscribing from all folders. Deleted an email, it bounced back. Subscribed again, deleted again, email bounced back again.
Postfix предоставляет 4 простых параметра проверки контента.
Postfix проверит все входящие электронные письма, когда используется какой-либо из вышеперечисленных параметров. Каждый параметр указывает на таблицу поиска, содержащую шаблоны и действия регулярного выражения. Шаблоны сравниваются со строками в сообщениях электронной почты (заголовок и тело). Если Postfix находит совпадение, указанное действие выполняется. Проверка заголовка и тела выполняется демоном Postfix — cleanup.
Postfix может использовать два типа регулярных выражений.
Postfix устанавливается с поддержкой POSIX по умолчанию, но PCRE намного шустрее. Чтобы использовать PCRE в Postfix, необходимо установить пакет postfix-pcre
apt install postfix-pcre
Чтобы убедится, что pcre теперь поддерживается в postfix, выполним следующею команду:
postconf -m

Установка, как всегда, проста до безобразия:
apt-get install spamassassin spamc
Во время установки пользователь и группа debian-spamd будут созданы автоматически. Демон spamassassin будет прослушивать 783 TCP-порт на локальном хосте.
По умолчанию служба spamassassin в systemd отключена, добавляем ее в автоматический запуск и стартуем.
systemctl enable spamassassin.service
systemctl start spamassassin.service
Далее, нужно настроить Postfix, чтобы он передавал входящие электронные письма Spamassassin. Для этого, откроем главный конфигурационный файл /etc/postfix/master.cf, ищем строку
smtp inet n - y - - smtpd
и добавляем опцию
-o content_filter=spamassassin
Чтобы включить фильтрацию содержимого после очереди, добавим в конец файл следующие строки:
spamassassin unix -     n       n       -       -       pipe
     user=debian-spamd argv=/usr/bin/spamc -f -e
     /usr/sbin/sendmail -oi -f ${sender} ${recipient}
Обновляем spamassassin
sa-update --nogpg --verbose
Перезапустим Postfix, чтобы изменения вступили в силу:
systemctl restart postfix
Spamassassin устанавливается с большим комплектом правилами обнаружения спама. Правила находятся в каталоге /usr/share/spamassassin/. Разберем некоторые из них.
В файле /usr/share/spamassassin/20_head_tests.cf видим следующие две строки
header MISSING_HEADERS       eval:check_for_missing_to_header()
describe MISSING_HEADERS     Missing To: header
Первая строка проверяет, существует ли заголовок To: в сообщении электронной почты. Вторая строка, которая является необязательной, объясняет, что делает первая строка. Заглавные буквы — это название этого теста.
Следующие три строки предназначены для проверки наличия заголовка Date: в сообщении электронной почты.
header __HAS_DATE            exists:Date
meta MISSING_DATE            !__HAS_DATE
describe MISSING_DATE        Missing Date: header
А эти три строки предназначены для проверки наличия заголовка From: в сообщении электронной почты.
header __HAS_FROM            exists:From
meta MISSING_FROM            !__HAS_FROM
describe MISSING_FROM        Missing From: header
Если есть потребность обновлять правила spamassassin ежедневно, то для этого отредактируем файл /etc/default/spamassassin и изменим значение CRON=0 на CRON=1
В файлах 50_scores.cf и 72_scores.cf, можно увидеть результаты для различных тестов по умолчанию. Если считаете, что оценка по умолчанию слишком низкая, или наоборот слишком высокая для определенного теста, то можно установить пользовательскую оценку в файле /etc/spamassassin/local.cf.
Например, RFC 5322 требует, чтобы каждое почтовое сообщение имело поля заголовка From: и Date:, поэтому можно установить очень высокий балл, если какой-либо из них отсутствует в сообщении электронной почты, добавив следующие две строки в /etc/spamassassin/local.cf
score MISSING_FROM   5.0
score MISSING_DATE   5.0
Хотя поле заголовка To: не является обязательным в RFC 5322, я предпочитаю установить высокий балл, если он отсутствует в сообщении электронной почты, поскольку кране редко встречаю электронного письма, в котором не заполнено это поле.
score MISSING_HEADERS 3.0
Некоторые спамеры используют два e-mail адреса в поле заголовка From: как показано ниже.
From: "tonywei_darefly_mold@aliyun.com" <sales10@darefly-mould.com>
Думаю, что оценка по умолчанию для этого вида электронной почты низкая, предпочитаю установить ее на 3.0.
score PDS_FROM_2_EMAILS 3.0
Некоторые спамеры часто просят, отправить сообщение о прочтении, для этого вида электронной почты, поставим оценку 2.0.
score FREEMAIL_DISPTO 2.0
Еще спамеры используют разные доменные имена в заголовках From: и Reply-To: дадим им 3.5 балла.
score FREEMAIL_FORGED_REPLYTO 3.5
Есть свидетельства, что эти черти используют черную магию несуществующее доменное имя в поле заголовка From :. Установим оценку 5.0 для такого типа электронной почты.
score DKIM_ADSP_NXDOMAIN 5.0
За убийство раненых, мародерство и каннибализм подделку домена gmail.com в поле заголовка From : караются 2.5 баллами святой ярости
score FORGED_GMAIL_RCVD 2.5
Собственные правила можно добавлять в файл /etc/spamassassin/local.cf
Некоторые активные почтальоны, тот же адрес e-mail в заголовках From: и To:. Добавим данные строки в конец файла, чтобы добавить оценки к таким письмам.
header   FROM_SAME_AS_TO   ALL=~/nFrom: ([^n]+)nTo: 1/sm
describe FROM_SAME_AS_TO   From address is the same as To address.
score    FROM_SAME_AS_TO   2.0
Электронное письмо состоит из конверта (envelope), заголовков (headers) и тела письма (message body). Некоторые спамеры используют пустой адрес для адреса конверта (он же заголовок пути возврата). Хотя это и допустимо, для отправки сообщений об отказе, но все же есть смысл дать оценку такому сообщению.
header    EMPTY_RETURN_PATH    ALL =~ /<>/i
describe  EMPTY_RETURN_PATH    empty address in the Return Path header.
score     EMPTY_RETURN_PATH    3.0
Если на сервере настроен DMARC, то можно добавить в конфигуратор следующие строки, чтобы дать оценку сообщениям, которые не прошли проверку DMARC.
header    CUSTOM_DMARC_FAIL   Authentication-Results =~ /dmarc=fail/
describe  CUSTOM_DMARC_FAIL   This email failed DMARC check
score     CUSTOM_DMARC_FAIL   3.0
Приведенный выше код говорит spamfssassin проверить, содержит ли заголовок Authentication-Results строку dmarc = fail. Если совпадение будет найдено, счет увеличится на 3.0.
Еще можно настроить, чтобы spamfssassin увеличивал баллы, если в теле письма содержится определенная фраза. Например, многие спамеры используют адрес электронной почты получателя в первой строке тела, как показано ниже.
Здравствуйте vasyn@domen.ru
привет vasyn@domen.ru
Уважаемый vasyn@domen.ru
Мой мальчик. Правилом хорошего тона, является написанное в первой строке письма имя адресата. Если отправитель, не утруждают себя написанием имени, то мы позаботимся о письмах, присланных к нам без уважения.
body      BE_POLITE       /(Здравствуйте|привет|Уважаемый) vasyn@domen.ru/i
describe  BE_POLITE       This email doesn't use a proper name for the recipient
score     BE_POLITE       5.0
По умолчанию, в spamassassin регулярное выражение чувствительно к регистру, добавим опцию i в конце, чтобы сделать его не чувствительным к регистру.
Например, маловероятно, что спамеры будут включать в себя такие слова, как Debian, Ubuntu, Linux Mint и т.д., в теле письма. Чтобы избежать ложных срабатываний, можно добавить отрицательную оценку к таким сообщениям. Для этого создадим такое правило.
body      GOOD_EMAIL    /(debian|ubuntu|linux mint|centos|red hat|RHEL|OpenSUSE|Fedora|Arch Linux|Raspberry Pi|Kali Linux)/i
describe  GOOD_EMAIL    I don't think spammer would include these words in the email body.
score     GOOD_EMAIL    -1.5
Если тело письма содержит имя дистрибутива Linux, добавляется отрицательный результат (-1.5).
Есть несколько распространенных фраз, которые включены в сообщения, вызывающие отказ, поэтому можно добавить негативные баллы к таким сообщениям.
body      BOUNCE_MSG    /(Undelivered Mail Returned to Sender|Undeliverable|Auto-Reply|Automatic reply)/i
describe  BOUNCE_MSG    Undelivered mail notifications or auto-reply messages
score     BOUNCE_MSG    -1.5
Для добавления определенного адреса электронной почты или домена в белый список spamassassin, следует использовать параметр whitelist_from. Адреса добавляются в конец файла /etc/spamassassin/local.cf. Например так:
whitelist_from vasyn@example.com
whitelist_from *@example.com
Адреса находящиеся в белом списке, имеет оценку по умолчанию (-100). Письма этих адресатов по-прежнему будут проверяться правилами spamassassin, но им весьма сложно будет набрать 5.0 баллов.
Для добавления отправителя в черный список, используется параметр blacklist_from, который имеет тот же формат, что и whitelist_from.
blacklist_from dick@example.com
blacklist_from *@spam.org
После сохранения файла /etc/spamassassin/local.cf, нужно выполнить команду spamassassin в режиме lint, чтобы выполнить проверку на синтаксические ошибки.
spamassassin - lint
Для вступления изменений в силу, перезапустим демон
systemctl restart spamassassin.service
Стоит обратить внимание на то, что spamassasin имеет свои собственные белые списки. Они располагаются в директории /usr/share/spamassassin/, название списков начинается на 60_whitelist
60_whitelist_auth.cf
60_whitelist.cf
60_whitelist_dkim.cf
60_whitelist_spf.cf
60_whitelist_subject.cf
Например, файл 60_whitelist_spf.cf содержит список адресов, которые часто неправильно помечается как спам.
Для начала, нужно убедиться, что клиент IMAP подписан на папку, в которую будет перемещен спам. Чтобы подписать пользователей на несколько специальных папок IMAP, нужно отредактировать файл /etc/dovecot/conf.d/15-mailboxes.conf. Директории которые автоматически монтируются, будут выглядеть так:
namespace inbox {
  mailbox Drafts {
    special_use = Drafts
    auto = subscribe
  }
  mailbox Junk {
    special_use = Junk
    auto = subscribe
  }
  mailbox Trash {
    special_use = Trash
    auto = subscribe
  }
  mailbox Archive {
    special_use = Archive
    auto = subscribe
  }
  mailbox Sent {
    special_use = Sent
    auto = subscribe
  }
  mailbox "Sent Messages" {
    special_use = Sent
  }
}
У Dovecot есть плагин Sieve, который обрабатывает правила. На самом деле, Sieve является языком программирования, разработанным для правил фильтрации почты. Установим его:
apt install dovecot-sieve
Данный пакет, установит два конфигурационных файла в директорию /etc/dovecot/conf.d/: 90-sieve.conf и 90-sieve-extprograms.conf. Отредактируем файл /etc/dovecot/conf.d/15-lda.conf, добавим плагин sieve к местному агенту доставки (LDA):
protocol lda {
    # Space separated list of plugins to load (default is global mail_plugins).
    mail_plugins = $mail_plugins sieve
}
Если в директории /etc/dovecot/conf.d/ находится файл — 20-lmtp.conf, то sieve следует включить и в нем:
protocol lmtp {
      mail_plugins = quota sieve
}
Затем, препарируем /etc/dovecot/conf.d/90-sieve.conf. На строке 79 добавим вот такую директиву:
sieve_before = /var/mail/SpamToJunk.sieve
Затем создадим сценарий для sieve:
require "fileinto";

if header :contains "X-Spam-Flag" "YES"
{
   fileinto "Junk";
   stop;
}
Чтобы ускорить работу этого скрипта, его нужно скомпилировать:
sievec /var/mail/SpamToJunk.sieve
sievec(root): Debug: Effective uid=0, gid=0, home=/root
Теперь, имеет место быть бинарный файл /var/mail/SpamToJunk.svbin. Наконец, перезапустим голубятню, чтобы все заработало.
Для проверки, можно отправить письмо, содержащие в теле следующие послание:
XJS*C4JDBQADN1.NSBN3*2IDNEN*GTUBE-STANDARD-ANTI-UBE-TEST-EMAIL*C.34X
Для того, чтобы отчистить директорию «Спам», выполним команду:
# Для отдельно взятого пользователя
doveadm expunge -u user1@example.com mailbox Junk  OLD

# Для всех почтовых ящиков
doveadm expunge -A mailbox Junk all

# Очищаем священным онем сектор Trash
doveadm expunge -A mailbox Trash all
Подробнее о командах Dovecot можно почитать здесь
Ну а теперь прикрутим немножечко автоматизации. Добавьте следующую строку для отчистки директорий Хлам и Помойка еженедельно:
crontab -e
@weekly doveadm expunge -A mailbox Junk all;doveadm expunge -A mailbox Trash all
Или вывоз будем осуществлять ежемесячно:
@monthly doveadm expunge -A mailbox Junk all;doveadm expunge -A mailbox Trash all
По умолчанию, spamassassin не проверяет сообщения с вложениями размером более 500 КБ. В этом можно убедится, посмотрев лог — /var/log/mail.log. Там мы найдем такие строки:
Nov 26 11:14:41 mx spamc[1957]: skipped message, greater than max message size (512000 bytes)
Дефолтное значение max-sizeу установлено 512000 (байт). Установка более высокое значения, может увеличить нагрузку на сервер. Но мы же из РечФлота ебать! Увеличим максимальный размер проверяемого файла. Для этого отредактируем файл /etc/default/spamass-milter. В системе должен присутствовать пакет — spamass-milter. Добавим в конце файла такую строку:
# Spamc options
OPTIONS="${OPTIONS} -- --max-size=5120000"
Пустая опция - -, указывает spamass-milter передавать все оставшиеся опции в spamc, который знает, что делать с опцией - -max-size. В данном случае, проверяемый объем был увеличен до 5000 КБ. Перезапустим демон spamass-milter.
systemctl restart spamass-milter
После установки spamassassin получил ошибку
sa-compile
E: Sub-process /usr/bin/dpkg returned an error code (1)
Исправилось изменением sh на bash в /etc/passwd у пользователя debian-spamd
После запуска spamassassin, при отправке письма получаем ошибку
Our system has detected that this 550-5.7.1 message does not meet IPv6 sending guidelines regarding PTR records 550-5.7.1 and authentication
Либо создаем PTR запись для адреса IPv6, либо в postfix оставляем поддержку только IPv6. Для этого редактируем /etc/postfix/main.cf, приводим строку inet_protocols к виду:
inet_protocols = ipv4
При получении сообщения, ошибка. Письмо не получаем
Postfix fatal: open /etc/postfix/main.cf: Permission denied
Spamassassin не может получить доступ к main.cf postfix. Даем разрешение
chmod 755 /etc/postfix
doveadm не выполнял итерации. При попытке выполнить doveadm expunge -A mailbox Junk all получали ошибки
Error: User listing returned failure
doveadm: Error: Failed to iterate through some users
Помогла команда doveadm log errors, в логе было замечено
Ignoring changed iterate_query in /etc/dovecot/dovecot-sql.conf.ext, because userdb sql not used.
Решилась данная канитель добавлением в /etc/dovecot/conf.d/auth-sql.conf.ext дополнительной директивы userdb
userdb {
  driver = sql
  args = /etc/dovecot/dovecot-sql.conf
}