Теперь у меня траблы с запуском в инет
Лс и гс запущены, но гс не видит лс. Че может быть? (на локалхесте запускается без проблем)
Код:
[19.10.16 12:30:37:785]  INFO authcomm.AuthServerCommunication: Connecting to authserver on 95.31.50.44:9014
[19.10.16 12:30:38:787] ERROR authcomm.AuthServerCommunication: AuthServer I/O error: Connection refused: no further information
Гейм
Код:
# IP на который биндить геймсервер, * - на все возможные
GameserverHostname = *
GameserverPort = 7777
# Внешний IP
ExternalHostname = 95.31.50.44
# Внутренний IP
InternalHostname = 127.0.0.1

# Адреспорт логинсервера
LoginPort = 9014
LoginHost = 95.31.50.44
LoginUseCrypt = true
# Какой ID запрашивать у логинсервера
RequestServerID = 1
# Разрешать брать другой ид, если запрашиваемый занят
AcceptAlternateID = true
Логин
Код:
# Хост и порт для клиентских соединений
LoginserverHostname = *
LoginserverPort = 2106

# Хост и порт для игровых серверов
LoginHost = *
LoginPort = 9014

# Принимать новый игровой сервер в свободный слот
AcceptNewGameServer = trueQuite recently a lot of reports have been coming in of users encountering the error “io.netty.channel.AbstractChannel$AnnotatedConnectException: Connection refused: no further information” while trying to connect to a server. This error is not limited to a single server and persists across all of them.
What Causes the Connection Refused Error?
After receiving numerous reports from multiple users we investigated the issue and devised a set of solutions that solved the problem for most of the users. Also, we looked into the reasons due to which the error is triggered and listed them below. For that:
- IP issue: In some cases, the problem is caused due to the wrong IP address or the port listed while trying to connect to a server. The IP address along with the correct port is used to forward your connection to the server and connection is established once the server approves. Unless you are using a static IP address, that is quite rare, the IP address assigned to you by the ISP changes from time to time, and multiple users might be allocated the same IP address. Therefore, the IP address needs to be edited from time to time.
- Firewall: Also it is possible that the Windows Firewall that you are using might be blocking your connection to the server. Both the Java files and the game directory is to be added to the exclusion list of the Windows Firewall in order for the game to connect to the server properly.
- Outdated Java: Minecraft requires the Java software to be updated to the latest version in order for it to work properly. If the Java is outdated on your device and the launcher has been updated to the latest version it might cause conflicts with certain elements of the game and prevent proper connection to the server.
- Incompatible Software: There is a list of software that is not compatible with Minecraft and causes issues if they are installed on the computer on which you are trying to connect to the server. Minecraft has an official list of software that is not compatible with the game and causes conflicts.
Now that you have a basic understanding of the nature of the issue we will move on towards the solutions. It is recommended that you try these solutions in the specific order in which they are provided to ensure that no conflicts occur.
Power-Cycle your Network
Whenever the internet router is reset the IP address that is provided by the ISP is changed unless you are using a static IP address. Therefore, in this step, we will be reinitializing the internet settings and the DNS cache by completely power cycling the Internet Router. For that:
- Disconnect the power from the internet router.

Disconnecting Power cord - Wait for 5 minutes and reconnect the power.
- When internet access is granted try to connect to the server and check to see if the issue persists.

Reset your Network Configurations
Your Windows Network configurations can also be a culprit here, as it’s possible that your Network settings are configured incorrectly. For resetting network configurations, follow the steps below:-
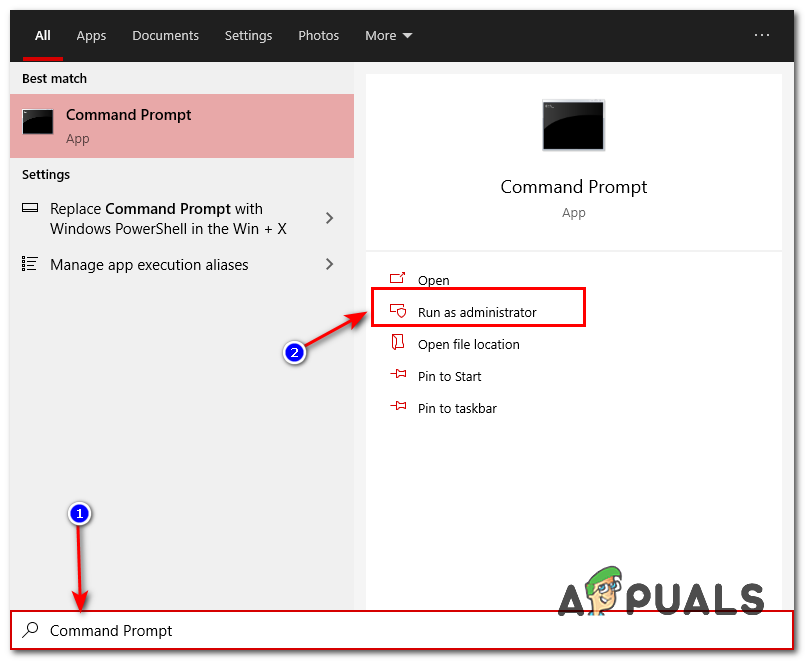
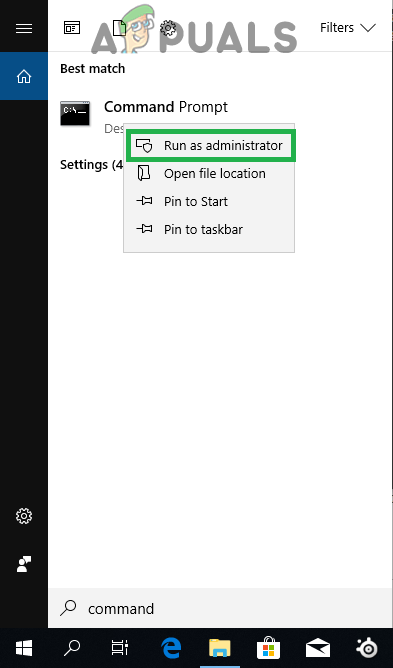
- Search for the Command Prompt in the Windows Search bar then click “run as administrator”.

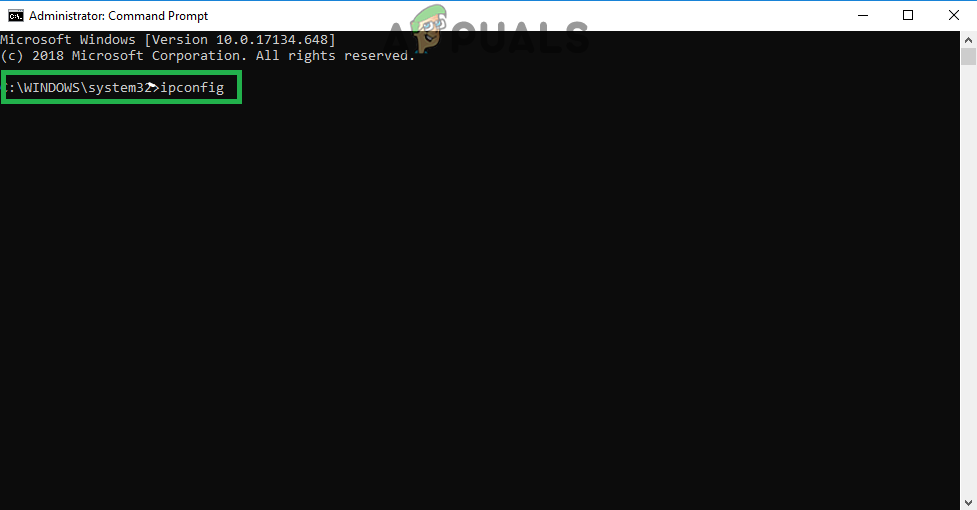
Running Command Prompt - Once the Command Prompt window is opened, type the following commands one by one:-
ipconfig /flushdns
ipconfig /release
ipconfig /renew
netsh winsock reset
netsh int ip reset
- Restart your computer and check to see if the issue persists.
Add Exception in Firewall
It is possible that the Windows Firewall that you are using might be blocking your connection to the server. Therefore, in this step, we will be adding an exception in the Firewall for some executables in the Minecraft folder that need internet access. For that:
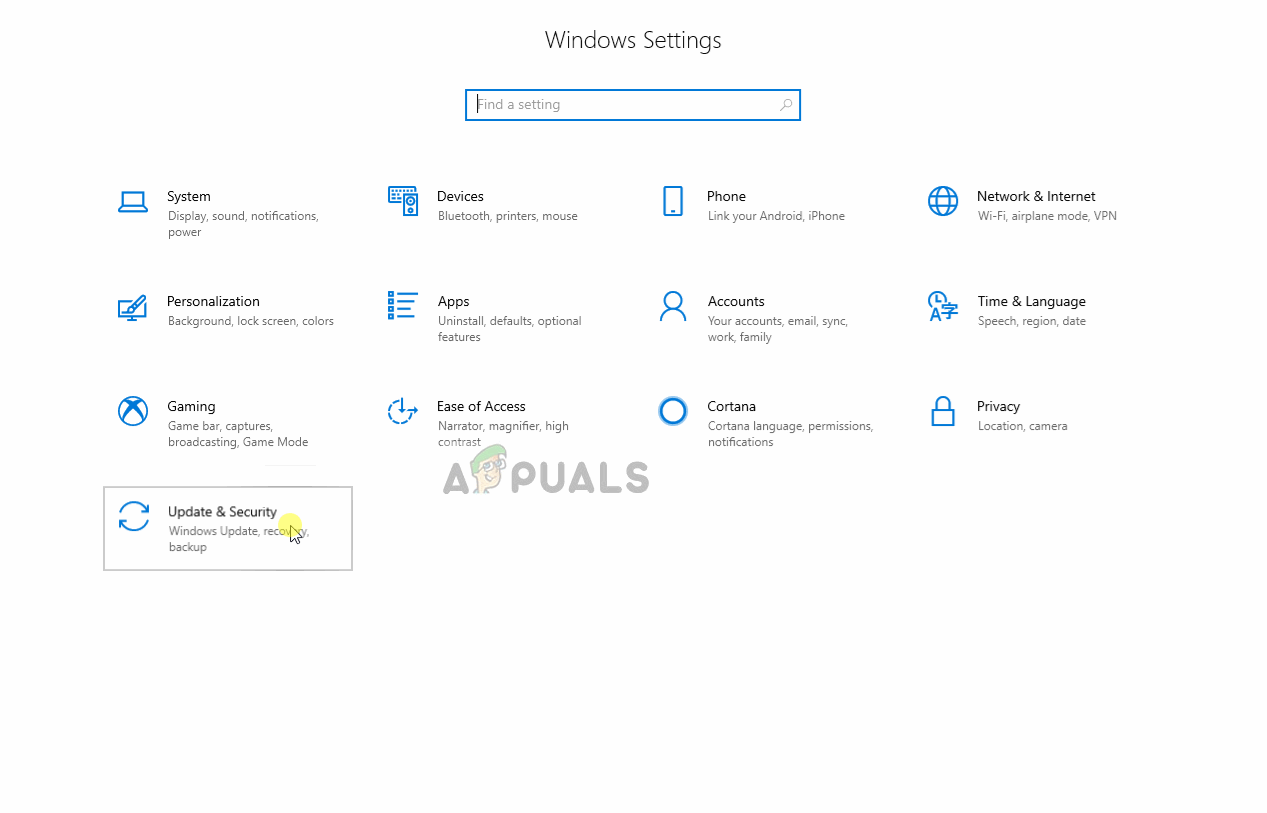
- Click on the start menu and select the Settings icon.
- In the Settings, click on the “Updates & Security” option.
- Select the “Windows Security” from the left pane and select the “Firewall & Network Protection” option.
- Scroll down and select the “Allow an App through Firewall” option.
- Click on “Change Settings” and select “Yes” on the warning prompt.
- Select the “Allow another app” from the options and click on “Browse“
- Navigate to the game installation directory and select the game and the launcher executable.
- Now repeat the above process again and this time navigate to the directory where you have the Minecraft servers installed.
- Open the “Maxwell” folder and then the “MinecraftServer” folder.
- Now allow both the Java executables located inside the folder in the same way.
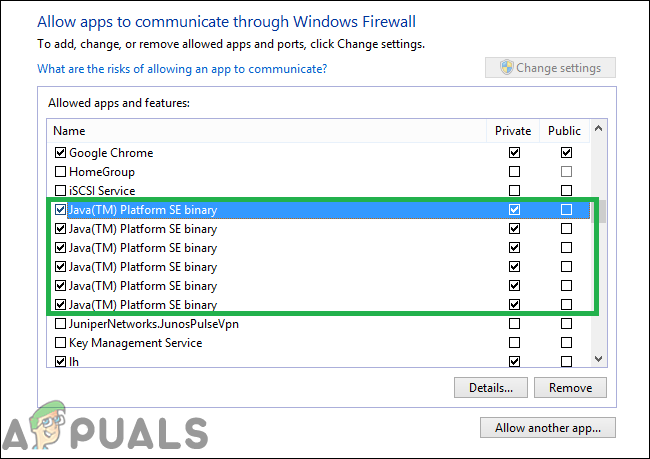
- Now repeat the process again and instead of clicking “Allow another app” after selecting the “change” option simply scroll down the list of apps available and allow all the “Java Platform SE Binary” options through both the “Private” and “Public” networks.

The applications that need to be allowed through the firewall - Open the Minecraft launcher, try to connect to the server, and check to see if the issue persists.

Allowing an application through the firewall
Add the IP address and Port Before Connecting
If the IP address that you are using is not a static one, it will change every couple of days or whenever the Internet Connection is reset. Therefore, in this step, we are going to be checking the IP address and the correct port for the game and add it to the Minecraft Launcher. For that:
- Click on the search bar on the Windows toolbar and type in “Command Prompt“.
- Right–click on the icon and select “Run as Administrator“.

Right-clicking on the Command Prompt icon and selecting Run as Administrator - Type in “ipconfig” and note down the “IPV4 Address“.

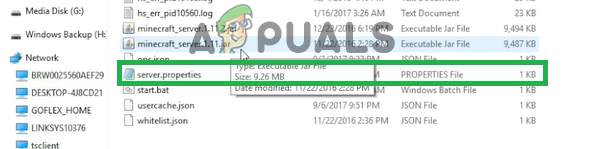
Typing in ipconfig in the command prompt - Also, Navigate to the “Minecraft Servers folder>Maxwell (some random numbers)> MinecraftServer” and open the “Server Properties” text document.

Opening the “Server Properties” text document and noting down the server port - Note down the “Server Port” listed there. In our case it was “25565” it should be similar in most cases however in some it is not.
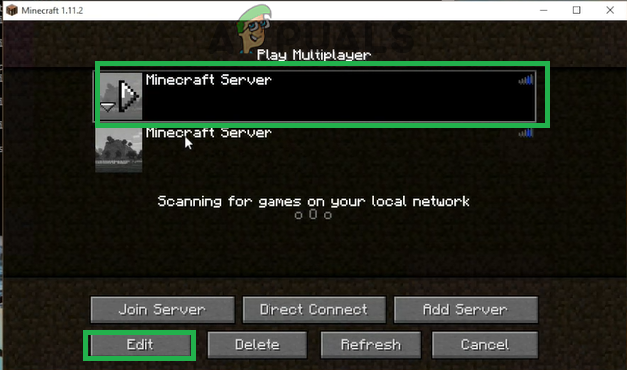
- Now open up Minecraft and navigate to the “Play Multiplayer” option.
- Select the server which you want to join by clicking on it and select “Edit” from the below options.

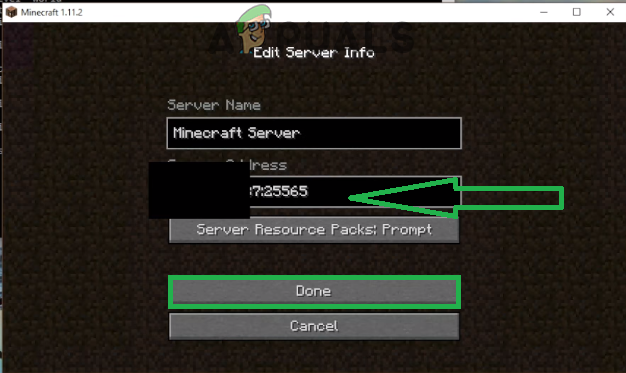
Clicking on the server and selecting “Edit” - The server name can be according to your preference but the “Address” needs to be the IPV4 address that we noted and the port number for example “XXX.XXX.X.X:25565” the “25565” is the port number and it may vary.

Editing the Server Address and clicking on Done - Click on “Done“, click on “Refresh” and check to see if the issue persists.
Note: There are some applications that are generally incompatible with certain elements of Minecraft and cause issues with it. The list of applications is available here. If these are installed on the computer on which the server is running from or on your computer you will continue to face issues with the game.
Check for Port Filtering
We came across numerous instances where users were accidentally filtering ports. Even though the port forwarding was working alright, the filtering automatically nullifies it and you will not be able to connect to Minecraft servers.
Here, what you can do is check your router’s and your local machine’s network configurations and make sure that port filtering isn’t turned on and if it is, the correct ports are being filtered.
Check ISP Network Access
If none of the above methods work, you should check your ISP’s network access. ISPs sometimes block network access to specific domains and don’t allow you to go through. Contact your ISP and verify that internet access isn’t indeed blocked.
Furthermore, you can also change your internet connection to your smartphone’s 3G and see how that works out for you. If it does, it probably means that your ISP is blocking you and you need to change your network.
If Minecraft is working with the Mobile Data it means that your ISP is blocking the connection. If that’s the case please contact your ISP to get your issue resolved.

Kevin Arrows
Kevin is a dynamic and self-motivated information technology professional, with a Thorough knowledge of all facets pertaining to network infrastructure design, implementation and administration. Superior record of delivering simultaneous large-scale mission critical projects on time and under budget.
Содержание
- Java.net.ConnectException: Connection timed out: no further information — Решение
- Connection timed out: no further information – особенности дисфункции
- Как исправить «Java.net.ConnectException: Connection timed out»
- How to Fix ‘Connection refused: no further information’ Error on Minecraft
- Fix: ‘io.netty.channel.AbstractChannel$AnnotatedConnectException’ Error on Minecraft
- What Causes the Connection Refused Error?
- Power-Cycle your Network
- Reset your Network Configurations
- Add Exception in Firewall
- Add the IP address and Port Before Connecting
- Check for Port Filtering
- Check ISP Network Access
Java.net.ConnectException: Connection timed out: no further information — Решение
При попытке подключения к серверу «Майнкрафт» пользователь может столкнуться с сообщением «Java.net.ConnectException: Connection timed out: no further information». Появление данного сообщения обычно сигнализирует о возникновении различного рода сетевых проблем при получении доступа к игровому серверу, из-за чего желание пользователя насладиться игровыми мирами «Майнкрафт» остаётся нереализованным. Ниже я разберу суть данной дисфункции, опишу её причины, а также поясню, как исправить ошибку Java.net.ConnEctexception на вашем ПК.
Connection timed out: no further information – особенности дисфункции
В переводе текст данного сообщения выглядит примерно как «Сетевой сбой Java. Время соединения истекло: дальнейшая информация отсутствует».
Указанная ошибка Java.net.ConnectException обычно возникает во время подключения к серверу игры «Майнкрафт», но также фиксировались спорадические случаи появления данной ошибки при работе других продуктов, использующих «Java» (к примеру, на «Azure notification hub»).
Появление проблемы «Java.net.ConnectException: Connection timed out: no further information» имеет следующие причины:
- Пользователь использует нестабильное сетевое соединение с медленным интернетом;
- На ПК пользователя установлена устаревшая версия «Java»;
- Пользователь пользуется устаревшей версией «Майнкрафт»;
- Наблюдаются сбои в работе игрового сервера, к которому пробует подключиться пользователь (ресурс не доступен, проходят технические работы и др.);
- Антивирус или брандмауэр блокирует подключения к игровому серверу;
- Пользователь использует динамический IP;
- Пользовательский роутер работает некорректно.
Как исправить «Java.net.ConnectException: Connection timed out»
Существуют несколько способов избавиться от ошибки Java.net.ConnectException. Рассмотрим их по порядку:
- Перезагрузите ваш PC. В некоторых случаях данный простой метод позволял решить ошибку java.net.connectexception connection refused;
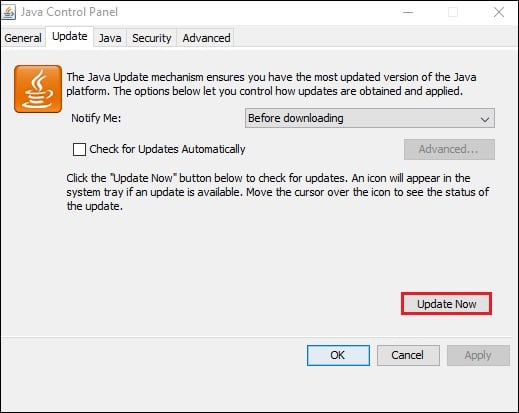
- Установите на ПК свежую версию «Java». Довольно частой причиной рассматриваемой проблемы является устаревшая версия «Java» на пользовательском ПК. Перейдите в Панель управления, затем в «Программы», там найдите «Java» и кликните на неё. После появления окна её настроек перейдите на вкладку «Update», нажмите там на кнопку «Update Now», и установите в системе требуемые обновления.
Данную процедуру необходимо провести как на вашей машине, так и на машине того пользователя, с которым вы собираетесь играть в «Майнкрафт» по сети;
- Внесите «Майнкрафт» в исключения брандмауэра и антивируса на вашем ПК. Запустите Панель управления, перейдите в «Система и безопасность», там найдите «Брандмауэр Виндовс» и кликните на него. В открывшемся окне настроек брандмауэра слева сверху выберите опцию «Разрешения взаимодействия…».
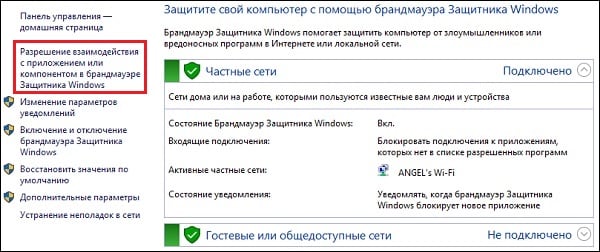
В открывшемся окне разрешённых для внешнего подключения программ найдите программы с упоминанием «Java», и поставьте им галочки для разрешения подключения (поможет кнопка «Изменить параметры»). Нажимаем на «Ок» для сохранения результата, перезагружаемся и пробуем подключиться к серверу. С антивирусом необходимо проделать аналогичные операции, внеся «Java» и «Майнкрафт» в его исключения;
Установите самую свежую версию программы
Источник
How to Fix ‘Connection refused: no further information’ Error on Minecraft
Fix: ‘io.netty.channel.AbstractChannel$AnnotatedConnectException’ Error on Minecraft
Quite recently a lot of reports have been coming in of users encountering the error “io.netty.channel.AbstractChannel$AnnotatedConnectException: Connection refused: no further information” while trying to connect to a server. This error is not limited to a single server and persists across all of them.
Error message “io.netty.channel.AbstractChannel$AnnotatedConnectException: Connection refused: no further information” while trying to connect to the server
What Causes the Connection Refused Error?
After receiving numerous reports from multiple users we investigated the issue and devised a set of solutions that solved the problem for most of the users. Also, we looked into the reasons due to which the error is triggered and listed them below. For that:
- IP issue: In some cases, the problem is caused due to the wrong IP address or the port listed while trying to connect to a server. The IP address along with the correct port is used to forward your connection to the server and connection is established once the server approves. Unless you are using a static IP address, that is quite rare, the IP address assigned to you by the ISP changes from time to time, and multiple users might be allocated the same IP address. Therefore, the IP address needs to be edited from time to time.
- Firewall: Also it is possible that the Windows Firewall that you are using might be blocking your connection to the server. Both the Java files and the game directory is to be added to the exclusion list of the Windows Firewall in order for the game to connect to the server properly.
- Outdated Java: Minecraft requires the Java software to be updated to the latest version in order for it to work properly. If the Java is outdated on your device and the launcher has been updated to the latest version it might cause conflicts with certain elements of the game and prevent proper connection to the server.
- Incompatible Software: There is a list of software that is not compatible with Minecraft and causes issues if they are installed on the computer on which you are trying to connect to the server. Minecraft has an official list of software that is not compatible with the game and causes conflicts.
Now that you have a basic understanding of the nature of the issue we will move on towards the solutions. It is recommended that you try these solutions in the specific order in which they are provided to ensure that no conflicts occur.
Power-Cycle your Network
Whenever the internet router is reset the IP address that is provided by the ISP is changed unless you are using a static IP address. Therefore, in this step, we will be reinitializing the internet settings and the DNS cache by completely power cycling the Internet Router. For that:
- Disconnect the power from the internet router.
 Disconnecting Power cord
 - Wait for 5 minutes and reconnect the power.
- When internet access is granted try to connect to the server and check to see if the issue persists.
Reset your Network Configurations
Your Windows Network configurations can also be a culprit here, as it’s possible that your Network settings are configured incorrectly. For resetting network configurations, follow the steps below:-
- Search for the Command Prompt in the Windows Search bar then click “run as administrator”. Running Command Prompt
- Once the Command Prompt window is opened, type the following commands one by one:-
- Restart your computer and check to see if the issue persists.
Add Exception in Firewall
It is possible that the Windows Firewall that you are using might be blocking your connection to the server. Therefore, in this step, we will be adding an exception in the Firewall for some executables in the Minecraft folder that need internet access. For that:
- Click on the start menu and select the Settings icon.
- In the Settings, click on the “Updates & Security” option.
- Select the “Windows Security” from the left pane and select the “Firewall & Network Protection” option.
- Scroll down and select the “Allow an App through Firewall” option.
- Click on “Change Settings” and select “Yes” on the warning prompt.
- Select the “Allow another app” from the options and click on “Browse“
- Navigate to the game installation directory and select the game and the launcher executable.
- Now repeat the above process again and this time navigate to the directory where you have the Minecraftservers installed.
- Open the “Maxwell” folder and then the “MinecraftServer” folder.
- Now allow both the Javaexecutables located inside the folder in the same way.
- Now repeat the process again and instead of clicking “Allow another app” after selecting the “change” option simply scroll down the list of apps available and allow all the “Java Platform SE Binary” options through both the “Private” and “Public” networks. The applications that need to be allowed through the firewall
- Open the Minecraft launcher, try to connect to the server, and check to see if the issue persists. Allowing an application through the firewall
Add the IP address and Port Before Connecting
If the IP address that you are using is not a static one, it will change every couple of days or whenever the Internet Connection is reset. Therefore, in this step, we are going to be checking the IP address and the correct port for the game and add it to the Minecraft Launcher. For that:
- Click on the search bar on the Windows toolbar and type in “Command Prompt“.
- Right–click on the icon and select “Runas Administrator“. Right-clicking on the Command Prompt icon and selecting Run as Administrator
- Type in “ipconfig” and note down the “IPV4Address“. Typing in ipconfig in the command prompt
- Also, Navigate to the “Minecraft Servers folder>Maxwell (some random numbers)> MinecraftServer” and open the “Server Properties” text document. Opening the “Server Properties” text document and noting down the server port
- Note down the “Server Port” listed there. In our case it was “25565” it should be similar in most cases however in some it is not.
- Now open up Minecraft and navigate to the “Play Multiplayer” option.
- Select the server which you want to join by clicking on it and select “Edit” from the below options. Clicking on the server and selecting “Edit”
- The server name can be according to your preference but the “Address” needs to be the IPV4 address that we noted and the port number for example “XXX.XXX.X.X:25565” the “25565” is the port number and it may vary. Editing the Server Address and clicking on Done
- Click on “Done“, click on “Refresh” and check to see if the issue persists.
Note: There are some applications that are generally incompatible with certain elements of Minecraft and cause issues with it. The list of applications is available here. If these are installed on the computer on which the server is running from or on your computer you will continue to face issues with the game.
Check for Port Filtering
We came across numerous instances where users were accidentally filtering ports. Even though the port forwarding was working alright, the filtering automatically nullifies it and you will not be able to connect to Minecraft servers.
Here, what you can do is check your router’s and your local machine’s network configurations and make sure that port filtering isn’t turned on and if it is, the correct ports are being filtered.
Check ISP Network Access
If none of the above methods work, you should check your ISP’s network access. ISPs sometimes block network access to specific domains and don’t allow you to go through. Contact your ISP and verify that internet access isn’t indeed blocked.
Furthermore, you can also change your internet connection to your smartphone’s 3G and see how that works out for you. If it does, it probably means that your ISP is blocking you and you need to change your network.
If Minecraft is working with the Mobile Data it means that your ISP is blocking the connection. If that’s the case please contact your ISP to get your issue resolved.
Источник
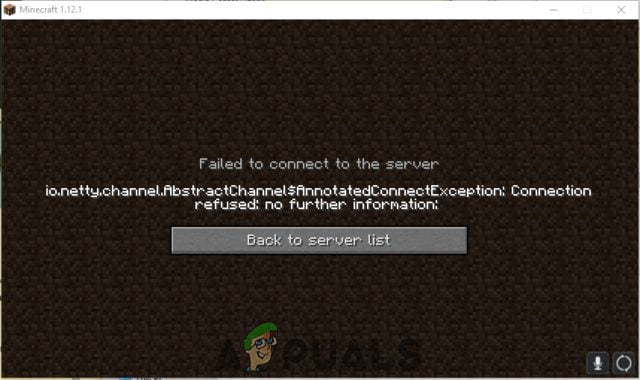
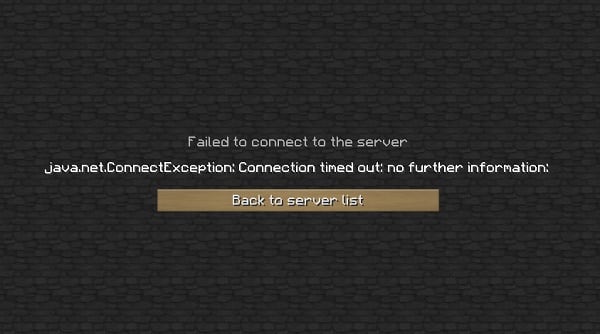
Some Minecraft users are not able to join a server. The issue is not limited to a particular server but is experienced across the board. The following is the exact error message that the victims are seeing.
Failed to connect to the server
io.netty.channel.AbstractChannel$AnnotatedConnectException: Connection refused: no further information:

Now, let us see what you need to do to resolve Connection refused: no further information on Minecraft.
Why does it say Connection refused No further information?
The error code in question means that Minecraft is not able to create a connection to the server. The problem can occur because of various things. Usually, the reason is network glitches. Your network protocols or the network devices can have some issues that we are oblivious of, but the good news is, that they can be resolved. Other than that, there are some other reasons such as a firewall blocking Minecraft. So, you should go to the troubleshooting guide and resolve the issue.
Failed to connect to the server, Connection refused, No further information Minecraft error
If you are seeing Connection refused: no further information on Minecraft, try the following solutions to resolve the issue.
- Restart your computer and network devices
- Allow Minecraft Server through Firewall
- Reset Network Protocols
- Disable Mods
- Check Port Filtering
- Update Java
Let us talk about them in detail.
1] Restart your computer and network devices
First up, we need to try and restart all the devices that are responsible for handling your network. So, go ahead and restart your computer first. If that doesn’t help, go ahead and restart the router and if possible, your modem. Follow the prescribed steps to restart your router.
- Turn off your Router and remove all the cables.
- Wait for 30 seconds.
- Plug your router back and restart it.
Now, check if the issue persists.
Related: Failed to connect to the server, Not Authenticated with Minecraft.net
2] Allow Minecraft Server through your Firewall
Your antivirus can block you from accessing your server. Usually, it’s the server that’s blocked, but it’s a good option to add the Minecraft launcher to the exception as well. So, if you have a third-party antivirus, just whitelist the app, Windows Defender users can allow the app through the firewall.
Related: Could not Connect, Outdated Server error in Minecraft
3] Reset Network Protocols
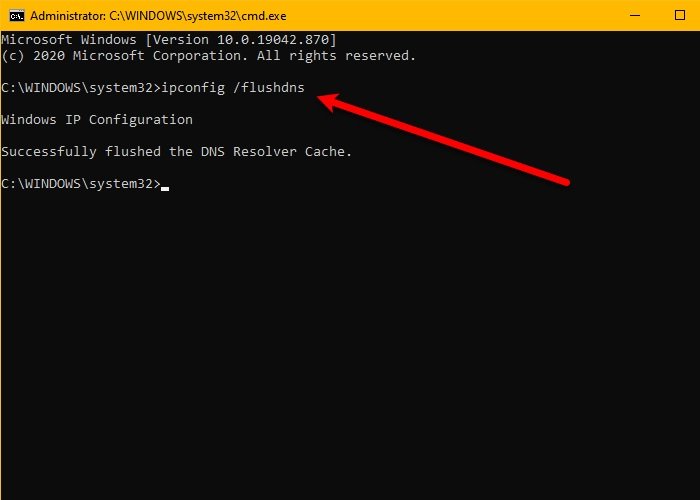
The issue can be a result of a glitch in your network protocols. To reset the protocols, we are going to run some commands, so, open Command Prompt as an administrator and run the following commands.
ipconfig /flushdns
ipconfig /release
ipconfig /renew
netsh winsock reset
netsh int ip reset
After running the commands, close cmd and try connecting to the Minecraft server.
Related: Minecraft unable to connect to world
4] Disable Mods
You may also see the error code in question because of a corrupted mod. Since we are not sure which one is the culprit here, you should disable all of them at once and then try enabling them one by one. If you see the error code after disabling a particular mod, removing it will resolve the issue for you.
5] Check Port Filtering
You need to check whether you are accidentally filtering ports. Port filtering will revert back the Port Forwarding and stop you from connecting to the server. So, disable Port Filtering and then try connecting to the server. Hopefully, this will do the job for you.
6] Update Java
Java is crucial for Minecraft, we are pretty sure you are well aware of this. You need to make sure that Java is up-to-date. So, go ahead and update the Java Runtime Environment. Then, check if the issue persists.
Hopefully, you are able to resolve the issue with these solutions.
Also Read: Minecraft keeps crashing or freezing
What does IO Netty channel AbstractChannel AnnotatedConnectException Connection refused No further information?
The error code basically means that the connection is not established between your Minecraft client and the server you were trying to connect to. This issue, more often than not, is nothing but a network issue. You should try and execute the solutions mentioned here and see if it works.
That’s it!
Read Next: OH NO, Something went wrong Minecraft error.
Note: This tutorial applies to Windows users only.
The io.netty.channel.AbstractChannel$AnnotatedConnectException: Connection refused: no further information error is usually caused by an issue with the firewall. In order to fix it, you will need to allow Minecraft to bypass the firewall.
To allow Minecraft to bypass the firewall, you can follow these steps:
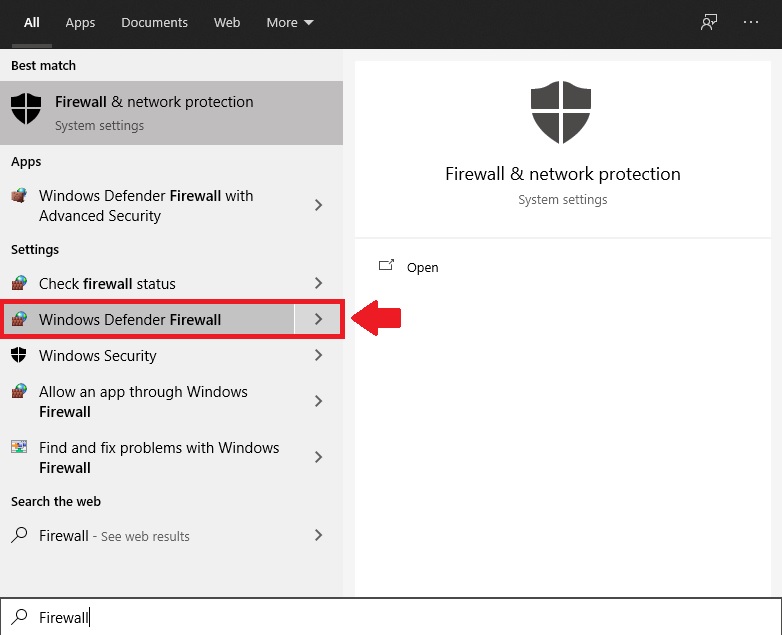
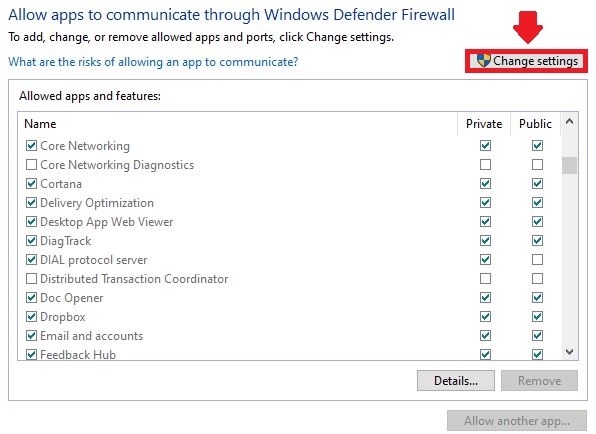
- At the bottom-left corner of your screen, in the search bar, search firewall. Select the option that matches Windows Defender Firewall
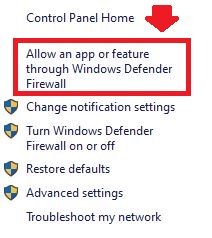
- When the new window opens, in the left-hand pane, select Allow an app or feature through Windows Defender Firewall
- At the top, click Change Settings
- Find any app/feature with the name Java(TM) Platform SE binary (there may be multiple) and ensure both Public and Private are checked for each one, along with the left-most checkbox.
- At the bottom of the window, click OK and close it.
- Restart Minecraft and try to connect to your server.


If you have followed these steps correctly, you should no longer experience the aforementioned error when attempting to connect to your server; however, should you continue to see this error, you can try using a different version of Minecraft using our guide on changing server types or contact your internet provider to see if it is an issue with your network.
If you require any further assistance, please contact our support at: https://shockbyte.com/billing/submitticket.php
The issue is usually caused by an issue with your firewall, and to fix the issue, you will have to allow Minecraft to bypass the Firewall. Keep in mind that this guide only applies to Windows users only.
The first step is to open up the search option on the left corner of your screen, and type in «Firewall».
Select the option that matches «Windows Defender Firewall».
When the «Windows Defender Firewall» window opens up, look for «Allow an app or feature through Windows Defender Firewall» and enter it.
At the top right, click on «Change Settings».
Scroll around until you find any app labeled «Java(TM) Platform SE binary» and make sure both «Public» and «Private» boxes are ticked, along with the left boxes. Keep in mind there may be multiple of them.

After the changes are made, click OK to save the changes.

Restart Minecraft and try connecting to your server.
If the issue is not resolved, make sure the guidelines were followed correctly and the settings were saved. For more information, feel free to contact us through the ticket section.
Congratulations! You now know How to Fix Connection “Refused No Further Information Error” on Minecraft
Summary:
- Locate Windows Defender Firewall
- Select Allow an app or feature through Windows Defender Firewall
- Click on Change Settings
- Tick the boxes for Private and Public for all «Java(TM) Platform SE binary»
- Save