![]()
Error handling is an essential part of RxJs, as we will need it in just about any reactive program that we write.
Error handling in RxJS is likely not as well understood as other parts of the library, but it’s actually quite simple to understand if we focus on understanding first the Observable contract in general.
In this post, we are going to provide a complete guide containing the most common error handling strategies that you will need in order to cover most practical scenarios, starting with the basics (the Observable contract).
Table Of Contents
In this post, we will cover the following topics:
- The Observable contract and Error Handling
- RxJs subscribe and error callbacks
- The catchError Operator
- The Catch and Replace Strategy
- throwError and the Catch and Rethrow Strategy
- Using catchError multiple times in an Observable chain
- The finalize Operator
- The Retry Strategy
- Then retryWhen Operator
- Creating a Notification Observable
- Immediate Retry Strategy
- Delayed Retry Strategy
- The delayWhen Operator
- The timer Observable creation function
- Running Github repository (with code samples)
- Conclusions
So without further ado, let’s get started with our RxJs Error Handling deep dive!
The Observable Contract and Error Handling
In order to understand error handling in RxJs, we need to first understand that any given stream can only error out once. This is defined by the Observable contract, which says that a stream can emit zero or more values.
The contract works that way because that is just how all the streams that we observe in our runtime work in practice. Network requests can fail, for example.
A stream can also complete, which means that:
- the stream has ended its lifecycle without any error
- after completion, the stream will not emit any further values
As an alternative to completion, a stream can also error out, which means that:
- the stream has ended its lifecycle with an error
- after the error is thrown, the stream will not emit any other values
Notice that completion or error are mutually exclusive:
- if the stream completes, it cannot error out afterwards
- if the streams errors out, it cannot complete afterwards
Notice also that there is no obligation for the stream to complete or error out, those two possibilities are optional. But only one of those two can occur, not both.
This means that when one particular stream errors out, we cannot use it anymore, according to the Observable contract. You must be thinking at this point, how can we recover from an error then?
RxJs subscribe and error callbacks
To see the RxJs error handling behavior in action, let’s create a stream and subscribe to it. Let’s remember that the subscribe call takes three optional arguments:
- a success handler function, which is called each time that the stream emits a value
- an error handler function, that gets called only if an error occurs. This handler receives the error itself
- a completion handler function, that gets called only if the stream completes
Completion Behavior Example
If the stream does not error out, then this is what we would see in the console:
HTTP response {payload: Array(9)}
HTTP request completed.
As we can see, this HTTP stream emits only one value, and then it completes, which means that no errors occurred.
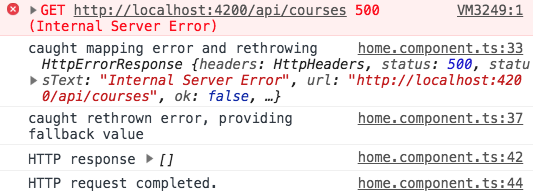
But what happens if the stream throws an error instead? In that case, we will see the following in the console instead:

As we can see, the stream emitted no value and it immediately errored out. After the error, no completion occurred.
Limitations of the subscribe error handler
Handling errors using the subscribe call is sometimes all that we need, but this error handling approach is limited. Using this approach, we cannot, for example, recover from the error or emit an alternative fallback value that replaces the value that we were expecting from the backend.
Let’s then learn a few operators that will allow us to implement some more advanced error handling strategies.
The catchError Operator
In synchronous programming, we have the option to wrap a block of code in a try clause, catch any error that it might throw with a catch block and then handle the error.
Here is what the synchronous catch syntax looks like:
This mechanism is very powerful because we can handle in one place any error that happens inside the try/catch block.
The problem is, in Javascript many operations are asynchronous, and an HTTP call is one such example where things happen asynchronously.
RxJs provides us with something close to this functionality, via the RxJs catchError Operator.
How does catchError work?
As usual and like with any RxJs Operator, catchError is simply a function that takes in an input Observable, and outputs an Output Observable.
With each call to catchError, we need to pass it a function which we will call the error handling function.
The catchError operator takes as input an Observable that might error out, and starts emitting the values of the input Observable in its output Observable.
If no error occurs, the output Observable produced by catchError works exactly the same way as the input Observable.
What happens when an error is thrown?
However, if an error occurs, then the catchError logic is going to kick in. The catchError operator is going to take the error and pass it to the error handling function.
That function is expected to return an Observable which is going to be a replacement Observable for the stream that just errored out.
Let’s remember that the input stream of catchError has errored out, so according to the Observable contract we cannot use it anymore.
This replacement Observable is then going to be subscribed to and its values are going to be used in place of the errored out input Observable.
The Catch and Replace Strategy
Let’s give an example of how catchError can be used to provide a replacement Observable that emits fallback values:
Let’s break down the implementation of the catch and replace strategy:
- we are passing to the catchError operator a function, which is the error handling function
- the error handling function is not called immediately, and in general, it’s usually not called
- only when an error occurs in the input Observable of catchError, will the error handling function be called
- if an error happens in the input stream, this function is then returning an Observable built using the
of([])function - the
of()function builds an Observable that emits only one value ([]) and then it completes - the error handling function returns the recovery Observable (
of([])), that gets subscribed to by the catchError operator - the values of the recovery Observable are then emitted as replacement values in the output Observable returned by catchError
As the end result, the http$ Observable will not error out anymore! Here is the result that we get in the console:
HTTP response []
HTTP request completed.
As we can see, the error handling callback in subscribe() is not invoked anymore. Instead, here is what happens:
- the empty array value
[]is emitted - the
http$Observable is then completed
As we can see, the replacement Observable was used to provide a default fallback value ([]) to the subscribers of http$, despite the fact that the original Observable did error out.
Notice that we could have also added some local error handling, before returning the replacement Observable!
And this covers the Catch and Replace Strategy, now let’s see how we can also use catchError to rethrow the error, instead of providing fallback values.
The Catch and Rethrow Strategy
Let’s start by noticing that the replacement Observable provided via catchError can itself also error out, just like any other Observable.
And if that happens, the error will be propagated to the subscribers of the output Observable of catchError.
This error propagation behavior gives us a mechanism to rethrow the error caught by catchError, after handling the error locally. We can do so in the following way:
Catch and Rethrow breakdown
Let’s break down step-by-step the implementation of the Catch and Rethrow Strategy:
- just like before, we are catching the error, and returning a replacement Observable
- but this time around, instead of providing a replacement output value like
[], we are now handling the error locally in the catchError function - in this case, we are simply logging the error to the console, but we could instead add any local error handling logic that we want, such as for example showing an error message to the user
- We are then returning a replacement Observable that this time was created using throwError
- throwError creates an Observable that never emits any value. Instead, it errors out immediately using the same error caught by catchError
- this means that the output Observable of catchError will also error out with the exact same error thrown by the input of catchError
- this means that we have managed to successfully rethrow the error initially thrown by the input Observable of catchError to its output Observable
- the error can now be further handled by the rest of the Observable chain, if needed
If we now run the code above, here is the result that we get in the console:

As we can see, the same error was logged both in the catchError block and in the subscription error handler function, as expected.
Using catchError multiple times in an Observable chain
Notice that we can use catchError multiple times at different points in the Observable chain if needed, and adopt different error strategies at each point in the chain.
We can, for example, catch an error up in the Observable chain, handle it locally and rethrow it, and then further down in the Observable chain we can catch the same error again and this time provide a fallback value (instead of rethrowing):
If we run the code above, this is the output that we get in the console:
As we can see, the error was indeed rethrown initially, but it never reached the subscribe error handler function. Instead, the fallback [] value was emitted, as expected.
The Finalize Operator
Besides a catch block for handling errors, the synchronous Javascript syntax also provides a finally block that can be used to run code that we always want executed.
The finally block is typically used for releasing expensive resources, such as for example closing down network connections or releasing memory.
Unlike the code in the catch block, the code in the finally block will get executed independently if an error is thrown or not:
RxJs provides us with an operator that has a similar behavior to the finally functionality, called the finalize Operator.
Note: we cannot call it the finally operator instead, as finally is a reserved keyword in Javascript
Finalize Operator Example
Just like the catchError operator, we can add multiple finalize calls at different places in the Observable chain if needed, in order to make sure that the multiple resources are correctly released:
Let’s now run this code, and see how the multiple finalize blocks are being executed:

Notice that the last finalize block is executed after the subscribe value handler and completion handler functions.
The Retry Strategy
As an alternative to rethrowing the error or providing fallback values, we can also simply retry to subscribe to the errored out Observable.
Let’s remember, once the stream errors out we cannot recover it, but nothing prevents us from subscribing again to the Observable from which the stream was derived from, and create another stream.
Here is how this works:
- we are going to take the input Observable, and subscribe to it, which creates a new stream
- if that stream does not error out, we are going to let its values show up in the output
- but if the stream does error out, we are then going to subscribe again to the input Observable, and create a brand new stream
When to retry?
The big question here is, when are we going to subscribe again to the input Observable, and retry to execute the input stream?
- are we going to retry that immediately?
- are we going to wait for a small delay, hoping that the problem is solved and then try again?
- are we going to retry only a limited amount of times, and then error out the output stream?
In order to answer these questions, we are going to need a second auxiliary Observable, which we are going to call the Notifier Observable. It’s the Notifier
Observable that is going to determine when the retry attempt occurs.
The Notifier Observable is going to be used by the retryWhen Operator, which is the heart of the Retry Strategy.
RxJs retryWhen Operator Marble Diagram
To understand how the retryWhen Observable works, let’s have a look at its marble diagram:

Notice that the Observable that is being re-tried is the 1-2 Observable in the second line from the top, and not the Observable in the first line.
The Observable on the first line with values r-r is the Notification Observable, that is going to determine when a retry attempt should occur.
Breaking down how retryWhen works
Let’s break down what is going in this diagram:
- The Observable 1-2 gets subscribed to, and its values are reflected immediately in the output Observable returned by retryWhen
- even after the Observable 1-2 is completed, it can still be re-tried
- the notification Observable then emits a value
r, way after the Observable 1-2 has completed - The value emitted by the notification Observable (in this case
r) could be anything - what matters is the moment when the value
rgot emitted, because that is what is going to trigger the 1-2 Observable to be retried - the Observable 1-2 gets subscribed to again by retryWhen, and its values are again reflected in the output Observable of retryWhen
- The notification Observable is then going to emit again another
rvalue, and the same thing occurs: the values of a newly subscribed 1-2 stream are going to start to get reflected in the output of retryWhen - but then, the notification Observable eventually completes
- at that moment, the ongoing retry attempt of the 1-2 Observable is completed early as well, meaning that only the value 1 got emitted, but not 2
As we can see, retryWhen simply retries the input Observable each time that the Notification Observable emits a value!
Now that we understand how retryWhen works, let’s see how we can create a Notification Observable.
Creating a Notification Observable
We need to create the Notification Observable directly in the function passed to the retryWhen operator. This function takes as input argument an Errors Observable, that emits as values the errors of the input Observable.
So by subscribing to this Errors Observable, we know exactly when an error occurs. Let’s now see how we could implement an immediate retry strategy using the Errors Observable.
Immediate Retry Strategy
In order to retry the failed observable immediately after the error occurs, all we have to do is return the Errors Observable without any further changes.
In this case, we are just piping the tap operator for logging purposes, so the Errors Observable remains unchanged:
Let’s remember, the Observable that we are returning from the retryWhen function call is the Notification Observable!
The value that it emits is not important, it’s only important when the value gets emitted because that is what is going to trigger a retry attempt.
Immediate Retry Console Output
If we now execute this program, we are going to find the following output in the console:

As we can see, the HTTP request failed initially, but then a retry was attempted and the second time the request went through successfully.
Let’s now have a look at the delay between the two attempts, by inspecting the network log:

As we can see, the second attempt was issued immediately after the error occurred, as expected.
Delayed Retry Strategy
Let’s now implement an alternative error recovery strategy, where we wait for example for 2 seconds after the error occurs, before retrying.
This strategy is useful for trying to recover from certain errors such as for example failed network requests caused by high server traffic.
In those cases where the error is intermittent, we can simply retry the same request after a short delay, and the request might go through the second time without any problem.
The timer Observable creation function
To implement the Delayed Retry Strategy, we will need to create a Notification Observable whose values are emitted two seconds after each error occurrence.
Let’s then try to create a Notification Observable by using the timer creation function. This timer function is going to take a couple of arguments:
- an initial delay, before which no values will be emitted
- a periodic interval, in case we want to emit new values periodically
Let’s then have a look at the marble diagram for the timer function:

As we can see, the first value 0 will be emitted only after 3 seconds, and then we have a new value each second.
Notice that the second argument is optional, meaning that if we leave it out our Observable is going to emit only one value (0) after 3 seconds and then complete.
This Observable looks like its a good start for being able to delay our retry attempts, so let’s see how we can combine it with the retryWhen and delayWhen operators.
The delayWhen Operator
One important thing to bear in mind about the retryWhen Operator, is that the function that defines the Notification Observable is only called once.
So we only get one chance to define our Notification Observable, that signals when the retry attempts should be done.
We are going to define the Notification Observable by taking the Errors Observable and applying it the delayWhen Operator.
Imagine that in this marble diagram, the source Observable a-b-c is the Errors Observable, that is emitting failed HTTP errors over time:

delayWhen Operator breakdown
Let’s follow the diagram, and learn how the delayWhen Operator works:
- each value in the input Errors Observable is going to be delayed before showing up in the output Observable
- the delay per each value can be different, and is going to be created in a completely flexible way
- in order to determine the delay, we are going to call the function passed to delayWhen (called the duration selector function) per each value of the input Errors Observable
- that function is going to emit an Observable that is going to determine when the delay of each input value has elapsed
- each of the values a-b-c has its own duration selector Observable, that will eventually emit one value (that could be anything) and then complete
- when each of these duration selector Observables emits values, then the corresponding input value a-b-c is going to show up in the output of delayWhen
- notice that the value
bshows up in the output after the valuec, this is normal - this is because the
bduration selector Observable (the third horizontal line from the top) only emitted its value after the duration selector Observable ofc, and that explains whycshows up in the output beforeb
Delayed Retry Strategy implementation
Let’s now put all this together and see how we can retry consecutively a failing HTTP request 2 seconds after each error occurs:
Let’s break down what is going on here:
- let’s remember that the function passed to retryWhen is only going to be called once
- we are returning in that function an Observable that will emit values whenever a retry is needed
- each time that there is an error, the delayWhen operator is going to create a duration selector Observable, by calling the timer function
- this duration selector Observable is going to emit the value 0 after 2 seconds, and then complete
- once that happens, the delayWhen Observable knows that the delay of a given input error has elapsed
- only once that delay elapses (2 seconds after the error occurred), the error shows up in the output of the notification Observable
- once a value gets emitted in the notification Observable, the retryWhen operator will then and only then execute a retry attempt
Retry Strategy Console Output
Let’s now see what this looks like in the console! Here is an example of an HTTP request that was retried 5 times, as the first 4 times were in error:

And here is the network log for the same retry sequence:

As we can see, the retries only happened 2 seconds after the error occurred, as expected!
And with this, we have completed our guided tour of some of the most commonly used RxJs error handling strategies available, let’s now wrap things up and provide some running sample code.
Running Github repository (with code samples)
In order to try these multiple error handling strategies, it’s important to have a working playground where you can try handling failing HTTP requests.
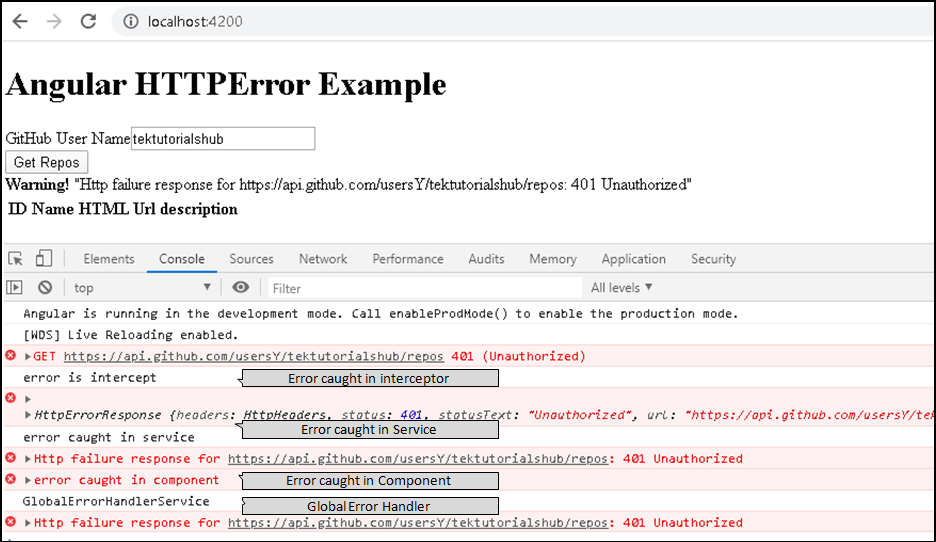
This playground contains a small running application with a backend that can be used to simulate HTTP errors either randomly or systematically. Here is what the application looks like:

Conclusions
As we have seen, understanding RxJs error handling is all about understanding the fundamentals of the Observable contract first.
We need to keep in mind that any given stream can only error out once, and that is exclusive with stream completion; only one of the two things can happen.
In order to recover from an error, the only way is to somehow generate a replacement stream as an alternative to the errored out stream, like it happens in the case of the catchError or retryWhen Operators.
I hope that you have enjoyed this post, if you would like to learn a lot more about RxJs, we recommend checking the RxJs In Practice Course course, where lots of useful patterns and operators are covered in much more detail.
Also, if you have some questions or comments please let me know in the comments below and I will get back to you.
To get notified of upcoming posts on RxJs and other Angular topics, I invite you to subscribe to our newsletter:
If you are just getting started learning Angular, have a look at the Angular for Beginners Course:

In this guide, we learn about Angular HTTP Error Handling. Whenever the error occurs in an HTTP operation, the Angular wraps it in an httpErrorResponse Object before throwing it back. We catch the httpErrorResponse either in our component class or in the data service class or globally. The Global HTTP error handling is done using the Angular HTTP Interceptor.
Suggested Reading: Error Handling in Angular
Table of Contents
- HttpErrorResponse
- Catching Errors in HTTP Request
- Catch Errors in Component
- Catch Errors in Service
- Catch error globally using HTTP Interceptor
- HTTP Error Handling
- HTTP Error handling example
- References
- Summary
HttpErrorResponse
The HttpClient captures the errors and wraps it in the generic HttpErrorResponse, before passing it to our app. The error property of the HttpErrorResponse contains the underlying error object. It also provides additional context about the state of the HTTP layer when the error occurred.
The HTTP errors fall into two categories. The back end server may generate the error and send the error response. Or the client-side code may fail to generate the request and throw the error (ErrorEvent objects).
The server might reject the request for various reasons. Whenever it does it will return the error response with the HTTP Status Codes such as Unauthorized (401), Forbidden (403), Not found (404), internal Server Error (500), etc. The Angular assigns the error response to error property of the HttpErrorResponse.
The client-side code can also generate the error. The error may be due to a network error or an error while executing the HTTP request or an exception thrown in an RxJS operator. These errors produce JavaScript ErrorEvent objects. The Angular assigns the ErrorEvent object to error property of the HttpErrorResponse.
In both the cases, the generic HttpErrorResponse is returned by the HTTP Module. We will inspect the error property to find out the type of Error and handle accordingly.
Catching Errors in HTTP Request
We can catch the HTTP Errors at three different places.
- Component
- Service
- Globally
Catch Errors in Component
Refer to our tutorial on Angular HTTP Get Request. We created a GitHubService, where we made a GET request to the GitHub API to get the list of Repositories. The following is the getRepos() method from the service. We have intentionally changed the URL (uersY) so that it will result in an error.
|
getRepos(userName: string): Observable<any> { return this.http.get(this.baseURL + ‘usersY/’ + userName + ‘/repos’) } |
We subscribe to the httpClient.get method in the component class
|
1 2 3 4 5 6 7 8 9 10 11 12 13 14 15 16 17 18 19 20 |
public getRepos() { this.loading = true; this.errorMessage = «»; this.githubService.getReposCatchError(this.userName) .subscribe( (response) => { //Next callback console.log(‘response received’) this.repos = response; }, (error) => { //Error callback console.error(‘error caught in component’) this.errorMessage = error; this.loading = false; //throw error; //You can also throw the error to a global error handler } ) } |
The subscribe method has three callback arguments.
|
.subscribe(success, error, completed); |
The observable invokes the first callback success, when the HTTP request successfully returns a response. The third call back completed is called when the observable finishes without any error.
The second callback error, is invoked when the HTTP Request end in an error. We handle error here by figuring out the type of error and handle it accordingly. It gets the error object which is of type HttpErrorResponse.
|
(error) => { //Error callback console.error(‘error caught in component’) this.errorMessage = error; this.loading = false; } |
Catch Errors in Service
We can also catch errors in the service, which makes the HTTP Request using the catchError Operator as shown below. Once you handle the error, you can re-throw it back to the component for further handling.
|
getRepos(userName: string): Observable<repos[]> { return this.http.get<repos[]>(this.baseURL + ‘usersY/’ + userName + ‘/repos’) .pipe( catchError((err) => { console.log(‘error caught in service’) console.error(err); //Handle the error here return throwError(err); //Rethrow it back to component }) ) } |
Catch error globally using HTTP Interceptor
The type of error we may encounter vary. But some of those errors are common to every HTTP request. For Example
- You are unauthorized to access the API Service,
- You are authorized, but forbidden to access a particular resource
- The API End Point is invalid or does not exist
- Network error
- Server down
We can check all these errors in the service or in component, but our app may contain many such service or components. Checking for common errors in each and every method is inefficient and error-prone.
The Right thing to do is to handle only the errors specific to this API call in this component/service and move all the common errors to one single place. This is where we use the HTTP Interceptor.
The HTTP Interceptor is a service, which we create and register it globally at the root module using the Angular Providers. Once defined, it will intercept all the HTTP requests passing through the app. It intercepts when we make the HTTP request and also intercepts when the response arrives. This makes it an ideal place to catch all the common errors and handle it
We create the Interceptor by creating a Global Service class, which implements the HttpInterceptor Interface. Then we will override the intercept method in that service.
The following code shows a simple GlobalHttpInterceptorService
|
1 2 3 4 5 6 7 8 9 10 11 12 13 14 15 16 17 18 19 20 21 22 23 24 |
import {Injectable} from «@angular/core»; import {HttpEvent, HttpHandler, HttpInterceptor,HttpRequest,HttpResponse,HttpErrorResponse} from ‘@angular/common/http’; import {Observable, of, throwError} from «rxjs»; import {catchError, map} from ‘rxjs/operators’; @Injectable() export class GlobalHttpInterceptorService implements HttpInterceptor { constructor(public router: Router) { } intercept(req: HttpRequest<any>, next: HttpHandler): Observable<HttpEvent<any>> { return next.handle(req).pipe( catchError((error) => { console.log(‘error is intercept’) console.error(error); return throwError(error.message); }) ) } } |
The caching of the Error is done using the catchError RxJS operator. We then re-throw it to the subscriber using the throwError
The catchError is added to the request pipeline using the RxJs pipe operator . When the error occurs in the HTTP Request it is intercepted and invokes the catchError. Inside the catchError you can handle the error and then use throwError to throw it to the service.
We then register the Interceptor in the Providers array of the root module using the injection token HTTP_INTERCEPTORS. Note that you can provide more than one Interceptor (multi: true).
|
providers: [ GitHubService, { provide: HTTP_INTERCEPTORS, useClass: GlobalHttpInterceptorService, multi: true } ] |
Next, step is what to do with the errors
The server-side errors return status codes, we can take appropriate actions based on that. For Example for Status code 401 Unauthorized, we can redirect the user to the login page, for 408 Request Timeout, we can retry the operation, etc.
The following example code shows how to check for status codes 401 & 403 and redirect to the login page.
|
1 2 3 4 5 6 7 8 9 10 11 12 13 14 15 16 17 18 19 20 21 |
if (error instanceof HttpErrorResponse) { if (error.error instanceof ErrorEvent) { console.error(«Error Event»); } else { console.log(`error status : ${error.status} ${error.statusText}`); switch (error.status) { case 401: //login this.router.navigateByUrl(«/login»); break; case 403: //forbidden this.router.navigateByUrl(«/unauthorized»); break; } } } else { console.error(«some thing else happened»); } return throwError(error); |
For Server errors with status codes 5XX, you can simply ask the user to retry the operation. You can do this by showing an alert box or redirect him to a special page or show the error message at the top of the page bypassing the error message to a special service AlertService.
For other errors, you can simply re-throw it back to the service.
|
return throwError(error); |
You can further handle the error in service or throw it back to the component.
The component must display the error message to the user. You can also throw it back to a global error handler in Angular.
|
.subscribe( (response) => { this.repos = response; }, (error) => { //Handle the error here //If not handled, then throw it throw error; } ) |
HTTP Error handling example
The complete code of this example
app.component.html
|
1 2 3 4 5 6 7 8 9 10 11 12 13 14 15 16 17 18 19 20 21 22 23 24 25 26 27 28 29 30 31 32 33 34 35 36 37 38 39 |
<h1 class=«heading»><strong>Angular HTTP</strong>Error Example</h1> <div class=«form-group»> <label for=«userName»>GitHub User Name</label> <input type=«text» class=«form-control» name=«userName» [(ngModel)]=«userName»> </div> <div class=«form-group»> <button type=«button» (click)=«getRepos()»>Get Repos</button> </div> <div *ngIf=«loading»>loading...</div> <div *ngIf=«errorMessage» class=«alert alert-warning»> <strong>Warning!</strong> {{errorMessage | json}} </div> <table class=‘table’> <thead> <tr> <th>ID</th> <th>Name</th> <th>HTML Url</th> <th>description</th> </tr> </thead> <tbody> <tr *ngFor=«let repo of repos;»> <td>{{repo.id}}</td> <td>{{repo.name}}</td> <td>{{repo.html_url}}</td> <td>{{repo.description}}</td> </tr> </tbody> </table> — <pre>{{repos | json}}</pre> |
app.component.ts
|
1 2 3 4 5 6 7 8 9 10 11 12 13 14 15 16 17 18 19 20 21 22 23 24 25 26 27 28 29 30 31 32 33 34 35 36 37 38 39 40 |
import { Component } from ‘@angular/core’; import { GitHubService } from ‘./github.service’; import { repos } from ‘./repos’; @Component({ selector: ‘app-root’, templateUrl: ‘./app.component.html’, }) export class AppComponent { userName: string = «tektutorialshub» repos: repos[]; loading: boolean = false; errorMessage; constructor(private githubService: GitHubService) { } public getRepos() { this.loading = true; this.errorMessage = «»; this.githubService.getReposCatchError(this.userName) .subscribe( (response) => { //Next callback console.log(‘response received’) this.repos = response; }, (error) => { //Error callback console.error(‘error caught in component’) this.errorMessage = error; this.loading = false; throw error; } ) } } |
github.service.ts
|
1 2 3 4 5 6 7 8 9 10 11 12 13 14 15 16 17 18 19 20 21 22 23 24 25 26 27 28 29 30 31 32 33 34 35 36 37 |
import { Injectable } from ‘@angular/core’; import { HttpClient, HttpParams, HttpHeaders } from ‘@angular/common/http’; import { Observable, throwError } from ‘rxjs’; import { map, catchError } from ‘rxjs/operators’; import { repos } from ‘./repos’; @Injectable( {providedIn:‘root’}) export class GitHubService { baseURL: string = «https://api.github.com/»; constructor(private http: HttpClient) { } //Any Data Type getRepos(userName: string): Observable<any> { return this.http.get(this.baseURL + ‘usersY/’ + userName + ‘/repos’) } //With catchError getReposCatchError(userName: string): Observable<repos[]> { return this.http.get<repos[]>(this.baseURL + ‘usersY/’ + userName + ‘/repos’) .pipe( catchError((err) => { console.log(‘error caught in service’) console.error(err); return throwError(err); }) ) } } |
global-http-Interceptor.service.ts
|
1 2 3 4 5 6 7 8 9 10 11 12 13 14 15 16 17 18 19 20 21 22 23 24 25 26 27 28 29 30 31 32 33 34 35 36 37 38 39 40 41 42 43 44 45 46 47 48 49 50 51 52 53 54 55 56 57 58 59 60 61 62 63 64 65 66 67 68 69 70 71 72 73 74 75 76 77 78 79 80 81 82 83 84 85 86 |
import { Injectable } from «@angular/core»; import { HttpEvent, HttpHandler, HttpInterceptor, HttpRequest, HttpErrorResponse } from ‘@angular/common/http’; import { Observable, of, throwError } from «rxjs»; import { catchError, map } from ‘rxjs/operators’; import { Router } from ‘@angular/router’; @Injectable() export class GlobalHttpInterceptorService implements HttpInterceptor { constructor(public router: Router) { } //1. No Errors intercept1(req: HttpRequest<any>, next: HttpHandler): Observable<HttpEvent<any>> { return next.handle(req).pipe( catchError((error) => { console.log(‘error in intercept’) console.error(error); return throwError(error.message); }) ) } //2. Sending an Invalid Token will generate error intercept(req: HttpRequest<any>, next: HttpHandler): Observable<HttpEvent<any>> { const token: string = ‘invald token’; req = req.clone({ headers: req.headers.set(‘Authorization’, ‘Bearer ‘ + token) }); return next.handle(req).pipe( catchError((error) => { console.log(‘error in intercept’) console.error(error); return throwError(error.message); }) ) } intercept3(req: HttpRequest<any>, next: HttpHandler): Observable<HttpEvent<any>> { const token: string = ‘invald token’; req = req.clone({ headers: req.headers.set(‘Authorization’, ‘Bearer ‘ + token) }); return next.handle(req).pipe( catchError((error) => { let handled: boolean = false; console.error(error); if (error instanceof HttpErrorResponse) { if (error.error instanceof ErrorEvent) { console.error(«Error Event»); } else { console.log(`error status : ${error.status} ${error.statusText}`); switch (error.status) { case 401: //login this.router.navigateByUrl(«/login»); console.log(`redirect to login`); handled = true; break; case 403: //forbidden this.router.navigateByUrl(«/login»); console.log(`redirect to login`); handled = true; break; } } } else { console.error(«Other Errors»); } if (handled) { console.log(‘return back ‘); return of(error); } else { console.log(‘throw error back to to the subscriber’); return throwError(error); } }) ) } } |
global-error-handler.service.ts
|
1 2 3 4 5 6 7 8 9 10 11 12 13 14 15 16 17 18 19 |
import { ErrorHandler, Injectable, Injector } from ‘@angular/core’; import { HttpErrorResponse } from ‘@angular/common/http’; import { throwError } from ‘rxjs’; @Injectable() export class GlobalErrorHandlerService implements ErrorHandler { constructor() { } handleError(error: Error | HttpErrorResponse) { console.log(‘GlobalErrorHandlerService’) console.error(error); } } |
app.module.ts
|
1 2 3 4 5 6 7 8 9 10 11 12 13 14 15 16 17 18 19 20 21 22 23 24 25 26 27 28 29 30 31 32 33 |
import { BrowserModule } from ‘@angular/platform-browser’; import { NgModule ,ErrorHandler } from ‘@angular/core’; import { HttpClientModule,HTTP_INTERCEPTORS} from ‘@angular/common/http’; import { FormsModule } from ‘@angular/forms’; import { AppComponent } from ‘./app.component’; import { GlobalHttpInterceptorService} from ‘./global-http-Interceptor.service’; import { AppRoutingModule } from ‘./app-routing.module’; import { GlobalErrorHandlerService } from ‘./global-error-handler.service’; @NgModule({ declarations: [ AppComponent ], imports: [ BrowserModule, HttpClientModule, FormsModule, AppRoutingModule ], providers: [ { provide: HTTP_INTERCEPTORS, useClass: GlobalHttpInterceptorService, multi: true }, { provide: ErrorHandler, useClass:GlobalErrorHandlerService} ], bootstrap: [AppComponent] }) export class AppModule { } |
app-routing.module.ts
|
import { NgModule } from ‘@angular/core’; import { Routes, RouterModule } from ‘@angular/router’; const routes: Routes = []; @NgModule({ imports: [RouterModule.forRoot(routes)], exports: [RouterModule] }) export class AppRoutingModule { } |
References
HttpErrorResponse
Summary
Using HTTP Interceptors you can catch HTTP Errors and handle it appropriately. Check the HTTP status codes and take appropriate actions like redirecting to the login page, or redirecting to an error page or else throw the error back to the subscriber for further handling of the error.
Since $http.get returns a ‘promise’ with the extra convenience methods success and error (which just wrap the result of then) you should be able to use (regardless of your Angular version):
$http.get('/someUrl')
    .then(function success(response) {
        console.log('succeeded', response); // supposed to have: data, status, headers, config, statusText
    }, function error(response) {
        console.log('failed', response); // supposed to have: data, status, headers, config, statusText
    })
Not strictly an answer to the question, but if you’re getting bitten by the «my version of Angular is different than the docs» issue you can always dump all of the arguments, even if you don’t know the appropriate method signature:
$http.get('/someUrl')
  .success(function(data, foo, bar) {
    console.log(arguments); // includes data, status, etc including unlisted ones if present
  })
  .error(function(baz, foo, bar, idontknow) {
    console.log(arguments); // includes data, status, etc including unlisted ones if present
  });
Then, based on whatever you find, you can ‘fix’ the function arguments to match.
November 26, 2018
This page will walk through Angular RxJS catchError example. RxJS catchError operator catches the error thrown by Observable and handles it by returning a new Observable or throwing user defined error. catchError is the changed name of catch starting from RxJS 5.5. Angular 6 integrates RxJS 6 and hence Angular 6 onwards we need to use RxJS catchError operator to handle error. catchError is the pipeable operator and it is used within pipe function of Observable. The parameter of catchError is a function that takes error as argument and returns Observable instance. catchError is imported as following.
import { catchError } from 'rxjs/operators';
Here we will provide catchError examples. We will understand the difference between catchError and subscribe error callback and we will also provide catchError examples with throwError and retry operators.
Contents
- Technologies Used
- Observable and catchError
- catchError and throwError
- retry and catchError
- Complete Example
- Run Application
- References
- Download Source Code
Technologies Used
Find the technologies being used in our example.
1. Angular 7.0.0
2. Angular CLI 7.0.3
3. TypeScript 3.1.1
4. Node.js 10.3.0
5. NPM 6.1.0
6. RxJS 6.3.3
7. In-Memory Web API 0.6.1
Observable and catchError
Observable works asynchronously and once there is an error in Observable for any element then it stops emitting other values. To handle Observable error, we can use catchError operator. We use catchError for logging a proper message and to throw user defined error or instance of Observable with default data. Using catchError does not mean that Observable will emit other values which have not been emitted because of error. Let us understand by example.
Look into the code.
of("A", "B", "C", "D", "E").pipe(
  map(el => {
    if (el === "C") {
	throw new Error("Error occurred.");
    }
    return el;
  })
).subscribe(el => console.log(el),
  	    err => console.error(err),
	    () => console.log("Processing Complete.")
);
Find the output.
A
B
Error: "Error occurred."
In the above code for the element «C», it throws error. The error is caught by subscribe. In the subscribe, first callback is to get result, second callback is to log error if any, third callback is to log completion. Once source Observable throws error, it stops emitting rest of the values it has.
In subscribe if second callback for error executes then the third callback for completion does not execute and if third callback for completion executes, it means there is no error or error is handled by catchError in source Observable. If we throw error from catchError then in subscribe, second callback for error will execute and third callback for completion will not execute.
If we want to handle error before subscribe then we need to use catchError that handles the error in source Observable and returns new instance of Observable that can be subscribed.
of("A", "B", "C", "D", "E").pipe(
 map(el => {
   if (el === "C") {
	throw new Error("Error occurred.");
   }
   return el;
 }),
 catchError(err => {
   console.error(err.message);
   console.log("Error is handled");
   return of("Z");
 })
).subscribe(el => console.log(el),
	    err => console.error(err),
	    () => console.log("Processing Complete.")
);
Find the output.
A
B
Error occurred.
Error is handled
Z
Processing Complete.
catchError and throwError
After caching error either we can return Observable instance with default data or can throw error using RxJS throwError. throwError emits error notification immediately. Find the code snippet using catchError and throwError.
of("A", "B", "C", "D", "E").pipe(
 map(el => {
   if (el === "C") {
	 throw new Error("Error occurred.");
   }
   return el;
 }),
 catchError(err => {
   console.error(err.message);
   console.log("Error is handled");
   return throwError("Error thrown from catchError");
 })
).subscribe(el => console.log(el),
	   err => console.error(err),
	   () => console.log("Processing Complete.")
);
Find the output.
A
B
Error occurred.
Error is handled
Error thrown from catchError
From the catchError block we have returned error using throwError. The error message is shown by error callback of subscribe.
retry and catchError
RxJS provides retry operator that resubscribes the Observable for the given number of count when there is an error. Before throwing error Observable is resubscribed for the given number of count by retry operator and if still there is an error, then error is thrown. retry is useful to hit the URL many times. It is possible that because of network bandwidth, URL does not return successful data in one time and when it reties, it may return data successfully. If after retying still there is error in Observable then catchError can be used to return Observable with user defined default data.
Find the sample code to use retry with catchError.
getBook(id: number): Observable<Book> {
  return this.http.get<Book>(this.bookUrl + "/" + id).pipe(
     retry(3),
     catchError(err => {
 	  console.log(err);
	  return of(null);
     })
  );
}
Complete Example
book.component.ts
import { Component, OnInit } from '@angular/core';
import { Observable, of, pipe, throwError } from 'rxjs';
import { map, switchMap, debounceTime, catchError } from 'rxjs/operators';

import { BookService } from './book.service';
import { Book } from './book';
import { FormControl, FormBuilder, FormGroup } from '@angular/forms';

@Component({
   selector: 'app-book',
   template: `
    <h3>Search Book</h3>
    <form [formGroup]="bookForm">
      ID: <input formControlName="bookId">
    </form>
    <br/>
    <div *ngIf="book">
      Id: {{book.id}}, Name: {{book.name}}, Category: {{book.category}}
    </div>
   `
})
export class BookComponent implements OnInit {
   book: Book;
   constructor(private bookService: BookService, private formBuilder: FormBuilder) { }
   ngOnInit() {
      this.searchBook();

      of("A", "B", "C", "D", "E").pipe(
        map(el => {
          if (el === "C") {
            throw new Error("Error occurred.");
          }
          return el;
        }),
        catchError(err => {
          console.error(err.message);
          console.log("Error is handled");
          return throwError("Error thrown from catchError");
        })
      ).subscribe(el => console.log(el),
                 err => console.error(err),
                 () => console.log("Processing Complete.")
      );

   }
   bookId = new FormControl();
   bookForm: FormGroup = this.formBuilder.group({
      bookId: this.bookId
     }
   );
   searchBook() {
    this.bookId.valueChanges.pipe(
      debounceTime(500),
      switchMap(id => {
        console.log(id);
        return this.bookService.getBook(id);
      })
    ).subscribe(res => this.book = res);
   }
}
book.service.ts
import { Injectable } from '@angular/core';
import { HttpClient } from '@angular/common/http';
import { Observable, of } from 'rxjs';
import { Book } from './book';
import { catchError, retry } from 'rxjs/operators';

@Injectable({
    providedIn: 'root'
})
export class BookService {
    bookUrl = "/api/books";

    constructor(private http: HttpClient) { }

    getBook(id: number): Observable<Book> {
      return this.http.get<Book>(this.bookUrl + "/" + id).pipe(
          retry(3),
          catchError(err => {
              console.log(err);
              return of(null);
          })
      );
    }
}
book.ts
export interface Book {
   id: number;
   name: string;
   category: string;
}
app.component.ts
import { Component } from '@angular/core';

@Component({
   selector: 'app-root',
   template: `
    <app-book></app-book>
   `
})
export class AppComponent {
}
test-data.ts
import { InMemoryDbService } from 'angular-in-memory-web-api';

export class TestData implements InMemoryDbService {
  createDb() {
    let bookDetails = [
      { id: 101, name: 'Angular by Krishna', category: 'Angular' },
      { id: 102, name: 'Core Java by Vishnu', category: 'Java' },
      { id: 103, name: 'NgRx by Rama', category: 'Angular' }
    ];
    return { books: bookDetails };
  }
}
app.module.ts
import { NgModule } from '@angular/core';
import { BrowserModule } from '@angular/platform-browser';
import { FormsModule, ReactiveFormsModule } from '@angular/forms';
import { HttpClientModule } from '@angular/common/http';

import { AppComponent }  from './app.component';
import { BookComponent }  from './book.component';

//For InMemory testing
import { InMemoryWebApiModule } from 'angular-in-memory-web-api';
import { TestData } from './test-data';

@NgModule({
  imports: [
      BrowserModule,
      HttpClientModule,
      FormsModule,
      ReactiveFormsModule,
      InMemoryWebApiModule.forRoot(TestData)
  ],
  declarations: [
      AppComponent,
      BookComponent
  ],
  providers: [
  ],
  bootstrap: [
      AppComponent
  ]
})
export class AppModule { }
Run Application
To run the application, find the steps.
1. Download source code using download link given below on this page.
2. Use downloaded src in your Angular CLI application. To install Angular CLI, find the link.
3. Install angular-in-memory-web-api@0.6.1
4. Run ng serve using command prompt.
5. Access the URL http://localhost:4200
Find the print screen of the output.

References
RxJS catchError
Angular: The RxJS library
Pipeable Operators
Download Source Code
Using observables to pass values
Observables provide support for passing messages between parts of your application.
They are used frequently in Angular and are a technique for event handling, asynchronous programming, and handling multiple values.
The observer pattern is a software design pattern in which an object, called the subject, maintains a list of its dependents, called observers, and notifies them automatically of state changes.
This pattern is similar (but not identical) to the publish/subscribe design pattern.
Observables are declarative —that is, you define a function for publishing values, but it is not executed until a consumer subscribes to it.
The subscribed consumer then receives notifications until the function completes, or until they unsubscribe.
An observable can deliver multiple values of any type —literals, messages, or events, depending on the context.
The API for receiving values is the same whether the values are delivered synchronously or asynchronously.
Because setup and teardown logic are both handled by the observable, your application code only needs to worry about subscribing to consume values, and when done, unsubscribing.
Whether the stream was keystrokes, an HTTP response, or an interval timer, the interface for listening to values and stopping listening is the same.
Because of these advantages, observables are used extensively within Angular, and for application development as well.
Basic usage and terms
As a publisher, you create an Observable instance that defines a subscriber function.
This is the function that is executed when a consumer calls the subscribe() method.
The subscriber function defines how to obtain or generate values or messages to be published.
To execute the observable you have created and begin receiving notifications, you call its subscribe() method, passing an observer.
This is a JavaScript object that defines the handlers for the notifications you receive.
The subscribe() call returns a Subscription object that has an unsubscribe() method, which you call to stop receiving notifications.
Here’s an example that demonstrates the basic usage model by showing how an observable could be used to provide geolocation updates.
Defining observers
A handler for receiving observable notifications implements the Observer interface.
It is an object that defines callback methods to handle the three types of notifications that an observable can send:
| Notification type | Details |
|---|---|
next |
Required. A handler for each delivered value. Called zero or more times after execution starts. |
error |
Optional. A handler for an error notification. An error halts execution of the observable instance. |
complete |
Optional. A handler for the execution-complete notification. Delayed values can continue to be delivered to the next handler after execution is complete. |
An observer object can define any combination of these handlers.
If you don’t supply a handler for a notification type, the observer ignores notifications of that type.
Subscribing
An Observable instance begins publishing values only when someone subscribes to it.
You subscribe by calling the subscribe() method of the instance, passing an observer object to receive the notifications.
In order to show how subscribing works, we need to create a new observable.
There is a constructor that you use to create new instances, but for illustration, we can use some methods from the RxJS library that create simple observables of frequently used types:
| RxJS methods | Details |
|---|---|
of(...items) |
Returns an Observable instance that synchronously delivers the values provided as arguments. |
from(iterable) |
Converts its argument to an Observable instance. This method is commonly used to convert an array to an observable. |
Here’s an example of creating and subscribing to a simple observable, with an observer that logs the received message to the console:
Alternatively, the subscribe() method can accept callback function definitions in line, for next, error, and complete handlers.
For example, the following subscribe() call is the same as the one that specifies the predefined observer:
In either case, a next handler is required.
The error and complete handlers are optional.
NOTE:
A next() function could receive, for instance, message strings, or event objects, numeric values, or structures, depending on context.
As a general term, we refer to data published by an observable as a stream.
Any type of value can be represented with an observable, and the values are published as a stream.
Creating observables
Use the Observable constructor to create an observable stream of any type.
The constructor takes as its argument the subscriber function to run when the observable’s subscribe() method executes.
A subscriber function receives an Observer object, and can publish values to the observer’s next() method.
For example, to create an observable equivalent to the of(1, 2, 3) above, you could do something like this:
To take this example a little further, we can create an observable that publishes events.
In this example, the subscriber function is defined inline.
Now you can use this function to create an observable that publishes keydown events:
Multicasting
A typical observable creates a new, independent execution for each subscribed observer.
When an observer subscribes, the observable wires up an event handler and delivers values to that observer.
When a second observer subscribes, the observable then wires up a new event handler and delivers values to that second observer in a separate execution.
Sometimes, instead of starting an independent execution for each subscriber, you want each subscription to get the same values —even if values have already started emitting.
This might be the case with something like an observable of clicks on the document object.
Multicasting is the practice of broadcasting to a list of multiple subscribers in a single execution.
With a multicasting observable, you don’t register multiple listeners on the document, but instead re-use the first listener and send values out to each subscriber.
When creating an observable you should determine how you want that observable to be used and whether or not you want to multicast its values.
Let’s look at an example that counts from 1 to 3, with a one-second delay after each number emitted.
Notice that if you subscribe twice, there will be two separate streams, each emitting values every second.
It looks something like this:
Changing the observable to be multicasting could look something like this:
Multicasting observables take a bit more setup, but they can be useful for certain applications.
Later we will look at tools that simplify the process of multicasting, allowing you to take any observable and make it multicasting.
Error handling
Because observables produce values asynchronously, try/catch will not effectively catch errors.
Instead, you handle errors by specifying an error callback on the observer.
Producing an error also causes the observable to clean up subscriptions and stop producing values.
An observable can either produce values (calling the next callback), or it can complete, calling either the complete or error callback.
myObservable.subscribe({
next(num) { console.log(‘Next num: ‘ + num)},
error(err) { console.log(‘Received an error: ‘ + err)}
});
Error handling (and specifically recovering from an error) is covered in more detail in a later section.
@reviewed 2022-02-28