I also struggled with this problem for quite a while.
I came accross this interesting thread from MySQL forum: http://forums.mysql.com/read.php?11,11388,11388#msg-11388
I also came accross (obviously) some good SO Q/A.
It seems that the message mentioned in «user948950» ‘s question can be coming from a wide range of reasons: log file too big, incorrect mysql.ini file values, spaces in the file path, security/acl issue, old entries in the registry, and so on.
So, after trying for 3h to fix this… I abandonned and decided to do a good old re-install.
This is where this post from (again) this MySQL thread came in useful, I quote:
Gary Williams wrote: Hi Guys,
I’ve had exactly the same problem and this is how I got it working
for me, starting with a non working installation.
Stop the windows service for any existing mysql installation.
Uninstall Mysql.
As with most uninstalls, old files are left behind. If your directory
is C:mysql etc then delete the innob, etc, files but leave the
directories themselves as well as any existing databases in ‘data’.
If your directory is C:Program Files etc, delete all the mysql
directories.
It’s now worth running regedit to make sure the old registry entries are deleted as well by the uninstall. If not, delete them.
It’s ok to use the new .msi installer (essential files only), however ….
Do not use their default install path! Some genius set a path with spaces in it! Choose the custom install and select a sensible path,
ie, C:mysql (note from Adrien: C:mysqldata for … the data)Do not choose to alter the security settings. Uncheck the relevant box and the install will complete without having to set a root
password.I think I have remembered everything.
Good luck
Gary
I did get into troubles when simply copy/pasting the databases I had in my previous «data» directory to the new one. So the work around I found was to export each database (I know… a lot of fun) and then re-import them one by one.
FYI: I used the following command to import C:/<MySQLInstallDir>/My SQL Server x.x/bin/mysql -u root -p <dbName> < "<dirPathOfDump><dumpName>.sql", that is for instance C:/mysql/MySQL Server 5.6/bin/mysql -u root -p mySupaCoolDb < "C:mySupaCoolDbDump20130901.sql"
MySQL — система управления базами данных (СУБД) с открытым исходным кодом от компании Oracle. Она была разработана и оптимизирована специально для работы веб-приложений. MySQL является неотъемлемой частью таких веб-сервисов, как Facebook, Twitter, Wikipedia, YouTube и многих других.
Эта статья расскажет, как определять, с чем связаны частые ошибки на сервере MySQL, и устранять их.
Не удаётся подключиться к локальному серверу
Одной из распространённых ошибок подключения клиента к серверу является «ERROR 2002 (HY000): Can’t connect to local MySQL server through socket ‘/var/run/mysqld/mysqld.sock’ (2)».

Эта ошибка означает, что на хосте не запущен сервер MySQL (mysqld) или вы указали неправильное имя файла сокета Unix или порт TCP/IP при попытке подключения.
Убедитесь, что сервер работает. Проверьте процесс с именем mysqld на хосте сервера, используя команды ps или grep, как показано ниже.
$ ps xa | grep mysqld | grep -v mysqldЕсли эти команды не показывают выходных данных, то сервер БД не работает. Поэтому клиент не может подключиться к нему. Чтобы запустить сервер, выполните команду systemctl.
$ sudo systemctl start mysql        #Debian/Ubuntu
$ sudo systemctl start mysqld       #RHEL/CentOS/Fedora
Чтобы проверить состояние службы MySQL, используйте следующую команду:
$ sudo systemctl status mysql       #Debian/Ubuntu
$ sudo systemctl status mysqld      #RHEL/CentOS/Fedora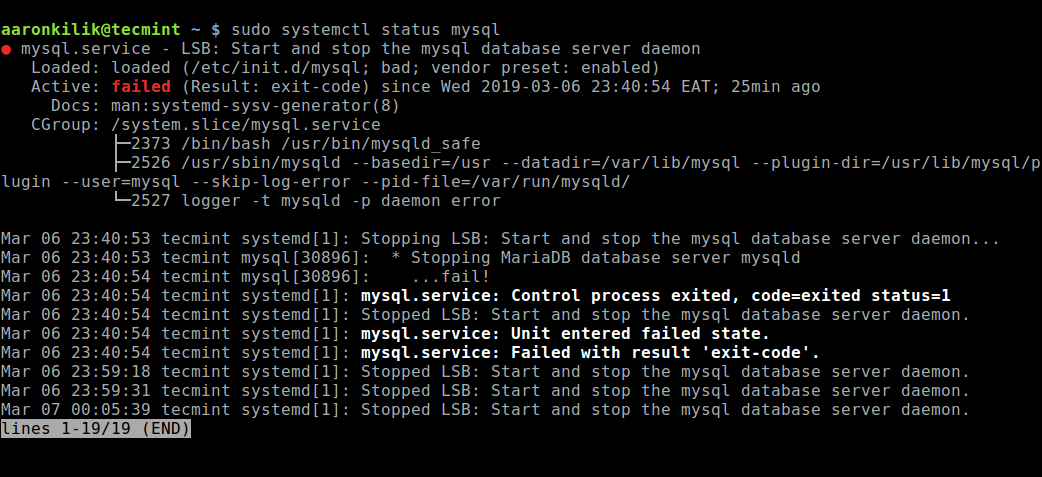
Если в результате выполнения команды произошла ошибка службы MySQL, вы можете попробовать перезапустить службу и ещё раз проверить её состояние.
$ sudo systemctl restart mysql
$ sudo systemctl status mysql
Если сервер работает (как показано) и вы по-прежнему видите эту ошибку, вам следует проверить, не заблокирован ли порт TCP/IP брандмауэром или любой другой службой блокировки портов.
Для поиска порта, который прослушивается сервером, используйте команду netstat.
$ sudo netstat -tlpn | grep "mysql"Ещё одна похожая и часто встречающаяся ошибка подключения — «(2003) Can’t connect to MySQL server on ‘server’ (10061)». Это означает, что в сетевом соединении было отказано.
Следует проверить, работает ли в системе сервер MySQL (смотрите выше) и на тот ли порт вы подключаетесь (как найти порт, можно посмотреть выше).
Похожие частые ошибки, с которыми вы можете столкнуться при попытке подключиться к серверу MySQL:
ERROR 2003: Cannot connect to MySQL server on 'host_name' (111)
ERROR 2002: Cannot connect to local MySQL server through socket '/tmp/mysql.sock' (111)
Ошибки запрета доступа в MySQL
В MySQL учётная запись (УЗ) определяется именем пользователя и клиентским хостом, с которого пользователь может подключиться. УЗ может также иметь данные для аутентификации (например, пароль).
Причин для запрета доступа может быть много. Одна из них связана с учётными записями MySQL, которые сервер разрешает использовать клиентским программам при подключении. Это означает, что имя пользователя, указанное в соединении, может не иметь прав доступа к базе данных.
В MySQL есть возможность создавать учётные записи, позволяющие пользователям клиентских программ подключаться к серверу и получать доступ к данным. Поэтому при ошибке доступа проверьте разрешение УЗ на подключение к серверу через клиентскую программу.
Увидеть разрешённые привилегии учётной записи можно, выполнив в консоли команду SHOW GRANTS
Входим в консоль (пример для Unix, для Windows консоль можно найти в стартовом меню):
В консоли вводим команду:
> SHOW GRANTS FOR 'tecmint'@'localhost';Дать привилегии конкретному пользователю в БД по IP-адресу можно, используя следующие команды:
> grant all privileges on *.test_db to 'tecmint'@'192.168.0.100';
> flush privileges;
Ошибки запрещённого доступа могут также возникнуть из-за проблем с подключением к MySQL (см. выше).
Потеря соединения с сервером MySQL
С этой ошибкой можно столкнуться по одной из следующих причин:
- плохое сетевое соединение;
- истекло время ожидания соединения;
- размер BLOB больше, чем
max_allowed_packet.
В первом случае убедитесь, что у вас стабильное сетевое подключение (особенно, если подключаетесь удалённо).
Если проблема с тайм-аутом соединения (особенно при первоначальном соединении MySQL с сервером), увеличьте значение параметра connect_timeout.
В случае с размером BLOB нужно установить более высокое значение для max_allowed_packet в файле конфигурации /etc/my.cnf в разделах [mysqld] или [client] как показано ниже.
[mysqld]
connect_timeout=100
max_allowed_packet=500M
Если файл конфигурации недоступен, это значение можно установить с помощью следующей команды.
> SET GLOBAL connect_timeout=100;
> SET GLOBAL max_allowed_packet=524288000;
Слишком много подключений
Эта ошибка означает, что все доступные соединения используются клиентскими программами. Количество соединений (по умолчанию 151) контролируется системной переменной max_connections. Устранить проблему можно, увеличив значение переменной в файле конфигурации /etc/my.cnf.
[mysqld]
max_connections=1000
Недостаточно памяти
Если такая ошибка возникла, это может означать, что в MySQL недостаточно памяти для хранения всего результата запроса.
Сначала нужно убедиться, что запрос правильный. Если это так, то нужно выполнить одно из следующих действий:
- если клиент MySQL используется напрямую, запустите его с ключом
--quick switch, чтобы отключить кешированные результаты; - если вы используете драйвер MyODBC, пользовательский интерфейс (UI) имеет расширенную вкладку с опциями. Отметьте галочкой «Do not cache result» (не кешировать результат).
Также может помочь MySQL Tuner. Это полезный скрипт, который подключается к работающему серверу MySQL и даёт рекомендации по настройке для более высокой производительности.
$ sudo apt-get install mysqltuner     #Debian/Ubuntu
$ sudo yum install mysqltuner         #RHEL/CentOS/Fedora
$ mysqltuner
MySQL продолжает «падать»
Если такая проблема возникает, необходимо выяснить, заключается она в сервере или в клиенте. Обратите внимание, что многие сбои сервера вызваны повреждёнными файлами данных или индексными файлами.
Вы можете проверить состояние сервера, чтобы определить, как долго он работал.
$ sudo systemctl status mysql       #Debian/Ubuntu
$ sudo systemctl status mysqld      #RHEL/CentOS/Fedora
Чтобы узнать время безотказной работы сервера, запустите команду mysqladmin.
$ sudo mysqladmin version -p 
Кроме того, можно остановить сервер, сделать отладку MySQL и снова запустить службу. Для отображения статистики процессов MySQL во время выполнения других процессов откройте окно командной строки и введите следующее:
$ sudo mysqladmin -i 5 statusИли
$ sudo mysqladmin -i 5 -r statusЗаключение
Самое важное при диагностике — понять, что именно вызвало ошибку. Следующие шаги помогут вам в этом:
- Первый и самый важный шаг — просмотреть журналы MySQL, которые хранятся в каталоге
/var/log/mysql/. Вы можете использовать утилиты командной строки вродеtailдля чтения файлов журнала. - Если служба MySQL не запускается, проверьте её состояние с помощью
systemctl. Или используйте командуjournalctl(с флагом-xe) в systemd. - Вы также можете проверить файл системного журнала (например,
/var/log/messages) на предмет обнаружения ошибок. - Попробуйте использовать такие инструменты, как Mytop, glances, top, ps или htop, чтобы проверить, какая программа использует весь ресурс процессора или блокирует машину. Они также помогут определить нехватку памяти, дискового пространства, файловых дескрипторов или какого-либо другого важного ресурса.
- Если проблема в каком-либо процессе, можно попытаться его принудительно остановить, а затем запустить (при необходимости).
- Если вы уверены, что проблемы именно на стороне сервера, можете выполнить команды:
mysqladmin -u root pingилиmysqladmin -u root processlist, чтобы получить от него ответ. - Если при подключении проблема не связана с сервером, проверьте, нормально ли работает клиент. Попробуйте получить какие-либо его выходные данные для устранения неполадок.
Перевод статьи «Useful Tips to Troubleshoot Common Errors in MySQL»
Scenario :
- The error occurs when trying to connect to a database from a website.
Cannot connect to Database Server.
Fix 1 :
Basic checks to be done for this error :
- Named pipe/TCP is enabled.
- Remote connections are allowed.
- Windows Firewall is off.
- Try to ping your own computer from another computer.
- Try disabling firewall / antivirus to arrive at successful pinging.
- Under windows Firewall create an exception for port 1433 as follows:
Go to Control Panel -> Click on Windows Firewall -> Go to exception tab as shown below.
4. Click on Add Port… and enter the port number and name.
5. Click on Add Program -> Add C:Program FilesMicrosoft SQL Server90Shared locationSQLBrowser.exe in exception list.
6. Click ok and save the changes.
Fix 2 :
Go to control panel -> Open Local services window -> select MSSQLSERVER service and restart.
( Or )
Go to run -> services.msc -> right click on SQL Server name and select “Restart” as shown below :
Fixes are applicable to the following versions of SQL Server:
- SQL Server 1.1 (16 bit)
- SQL Server 4.2A (16 bit)
- SQL Server 4.2B (16 bit)
- SQL Server 4.21a
- SQL Server 6.0
- SQL Server 6.5
- SQL Server 7.0
- SQL Server 7.0 OLAP Tools
- SQL Server 2000
- SQL Server 2000 64-bit Edition
- SQL Server 2005
- SQL Server 2008
- Azure SQL DB
- SQL Server 2008 R2
- SQL Server 2012
- SQL Server 2014
- SQL Server 2016
Related Error Tags :
- i get sql error 1326 when connect to other computer
- SQL Server 2008 R2 — Cannot Connect Remotely (Error 1326)
- Resolving could not open a connection to SQL Server errors
- Error (1326) in SQL Server 2008 R2
- How do I get this SQL Server ODBC Connection working?
- SQL Server 2008 — Connection Error 1326
- Sql Error 1326 : Cannot connect to Database server
Error Message
When connecting to ArcSDE for SQL Server Express by adding database server in ArcCatalog, the following error displays:
«Cannot connect to the database server. Failed to connect to Database Server.»
Cause
The SQL Server Express database service cannot be accessed by ArcCatalog with the specified credential information.
There are a few reasons causing the failed connection:
1. SQL Server Express service is not up and running.
2. The TCP/IP and/or Named Pipes protocols for the database server are disabled.
3. The SQL Server instance is using dynamic ports. The default port number for SQL Server Express is 1433.
4. SQL Server instance cannot accept the current Windows credentials.
Solution or Workaround
1. Ensure the SQL Server instance is running and configured to allow remote connections.
2. Enable TCP/IP and/or Named Pipes protocol in SQL Server Configuration Manager.
3. Enable SQL Server Browser Service.
4. Add the Windows domain account into the SQL Server instance.
Related Information
- Adding an ArcSDE database server
Last Published: 5/5/2016
Article ID: 000010194
Software: ArcGIS Image Server 9.3.1, 9.3, 9.2
Я тоже долгое время боролся с этой проблемой.
Я прошел через этот интересный поток из форума MySQL: http://forums.mysql.com/read.php?11,11388,11388#msg-11388
Я также набрал (очевидно) некоторый хороший SO Q/A.
Похоже, что сообщение, упомянутое в вопросе «user948950», может исходить из широкого круга причин: слишком большой файл журнала, неправильные значения файла mysql.ini, пробелы в пути к файлу, проблема безопасности /acl, старые записи в реестр и т.д.
Итак, после попытки за 3 часа исправить это… Я отказался и решил сделать старую старую переустановку.
Здесь этот пост из (снова) этот поток MySQL пришел в полезное, я цитирую:
Гэри Уильямс писал (а): Привет, ребята,
У меня была точно такая же проблема, и вот как я ее работаю для меня, начиная с нерабочей установки.
Остановите службу Windows для любой существующей установки mysql.
Удалите Mysql.
Как и при большинстве удалений, старые файлы остаются позади. Если ваш каталог это C:mysqletc, то удалите файлы innob и т.д., но оставьте сами каталоги, а также любые существующие базы данных в «данных». Если ваш каталог — C:Program Filesetc, удалите все mysql каталоги.
Теперь стоит запустить regedit, чтобы удалить старые записи реестра, а также удалить. Если нет, удалите их.
Хорошо использовать новый .msi-установщик (только для основных файлов), однако….
Не используйте свой путь установки по умолчанию! Некоторые гении устанавливают путь с пробелами в нем! Выберите пользовательскую установку и выберите разумный путь, т.е. C:mysql (примечание от Adrien: C:mysqldata для… данных)
Не следует изменять параметры безопасности. Снимите флажок в соответствующем поле, и установка завершится без установки root пароль.
Думаю, я все вспомнил.
Удачи.
Гэри
Я столкнулся с проблемами, когда просто копировал/вставлял базы данных, которые у меня были в предыдущем каталоге данных, в новый. Поэтому работа, которую я нашел, заключалась в том, чтобы экспортировать каждую базу данных (я знаю… много веселья), а затем повторно импортировать их по одному.
FYI: я использовал следующую команду для импорта C:/<MySQLInstallDir>/My SQL Server x.x/bin/mysql -u root -p <dbName> < "<dirPathOfDump><dumpName>.sql", например C:/mysql/MySQL Server 5.6/bin/mysql -u root -p mySupaCoolDb < "C:mySupaCoolDbDump20130901.sql"
Abstract
This topic was updated and moved into SQL Server Books Online in June. 2016. See
https://msdn.microsoft.com/library/mt750266.aspx
Original topic follows:
This is an exhaustive list of troubleshooting techniques to use when you cannot connect to the SQL Server Database Engine. These steps are not in the order of the most likely problems which you probably already tried. These steps
are in order of the most basic problems to more complex problems. These steps assume that you are connecting to SQL Server from another computer by using the TCP/IP protocol, which is the most common situation. These steps are written for SQL Server 2008 R2
with a client running Windows 7, however the steps generally apply to other versions of SQL Server and other operating systems with only slight modifications.
These instructions are particularly useful when troubleshooting the «Connect to Server» error, which can be Error Number: 11001 (or 53), Severity: 20, State: 0
- «A network-related or instance-specific error occurred while establishing a connection to SQL Server. The server was not found or was not accessible. Verify that the instance name is correct and that SQL Server is configured to allow remote connections.
» - «(provider: Named Pipes Provider, error: 40 — Could not open a connection to SQL Server) (Microsoft SQL Server, Error: 53)» or «(provider: TCP Provider, error: 0 — No such host is known.) (Microsoft SQL Server, Error: 11001)»
This error usually means that the SQL Server computer can’t be found or that the TCP port number is either not known, or is not the correct port number, or is blocked by a firewall.
Not included
- This topic does not include information about SSPI errors. For SSPI errors, see How to troubleshoot the «Cannot generate SSPI context» error message
- This topic does not include information about Kerberos errors. For help, see Microsoft Kerberos Configuration Manager for SQL Server.
- This topic does not include information about SQL Azure Connectivity.
Table of Contents
- Abstract
- Not included
- Gathering Information about the Instance of SQL Server
- Enable Protocols
- Testing TCP/IP Connectivity
- Testing a Local Connection
- Opening a Port in the Firewall
- Testing the Connection
- See Also
Gathering Information about the Instance of SQL Server
-
Confirm the instance of the SQL Server Database Engine is installed and running.
- Logon to the computer hosting the instance of SQL Server.
- On the Start menu, point to All Programs, point to Microsoft SQL Server 2008 R2, point to Configuration Tools, and then click SQL Server Configuration Manager.
- Using Configuration Manager, in the left pane select SQL Server Services. In the right-pane confirm that the instance of the Database Engine is present and running. The instance named MSSQLSERVER is
a default (unnamed) instance. There can only be one default instance. Other (named) instances will have their names listed between the parentheses. SQL Server Express uses the name SQLEXPRESS as the instance name unless someone named it something
else during setup. Make a note of the name of the instance that you are trying to connect to. Also, confirm that the instance is running, by looking for the green arrow. If the instance has a red square, right-click the instance and then click Start.
It should turn green. - If you are attempting to connect to a named instance, make sure the SQL Server Browser service is running.
- Get the IP Address of the computer.
- On the Start menu, click Run. In the Run window type cmd, and then click OK.
- In the command prompt window, type ipconfig and then press enter. Make a note of the IPv4 Address and the IPv6 Address. (SQL Server can connect using the older IP version 4 protocol
or the newer IP version 6 protocol. Your network could allow either or both. Most people start by troubleshooting theIPv4 address. It’s shorter and easier to type.)
- Get the TCP port number used by SQL Server. In most cases you are connecting to the Database Engine from another computer using the TCP protocol.
- Using SQL Server Management Studio on the computer running SQL Server, connect to the instance of SQL Server. In Object Explorer, expand Management, expand SQL Server Logs, and then double-click
the current log. - In the Log Viewer, click the Filter button on the toolbar. In the Message contains text box, type server is listening on, click Apply filter, and then click OK.
- A message similar to Server is listening on [ ‘any’ <ipv4> 1433] should be listed. This message indicates that this instance of SQL Server is listening on all the computers IP Addresses (for IP version 4) and
is listening to TCP port 1433. (TCP port 1433 is usually the port used by the Database Engine. Only one instance of SQL Server can use a port, so if there is more than one instance of SQL Server installed, some instances must use other port numbers.)
- Using SQL Server Management Studio on the computer running SQL Server, connect to the instance of SQL Server. In Object Explorer, expand Management, expand SQL Server Logs, and then double-click
Note: IP address 127.0.0.1 is probably listed. It is called the loopback adapter address and can only be connected to from processes on the same computer. It can be useful for troubleshooting, but you can’t use it to connect from another
computer.
Enable Protocols
In many installations of SQL Server, connecting to the Database Engine from another computer is not enabled unless an administrator uses Configuration Manager to enable it. To enable connections from another computer:
- On the Start menu, point to All Programs, point to Microsoft SQL Server 2008 R2, point to Configuration Tools, and then click SQL Server Configuration Manager.
- Using Configuration Manager, in the left pane expand SQL Server Network Configuration (or SQL Server Network Configuration (32bit)), and then select the instance of SQL Server that you want to
connect to. The right-pane lists the connection protocols available. Shared Memory is normally enabled. It can only be used from the same computer, so most installations leave Shared Memory enabled. To connect to SQL Server from another computer you will normally
use TCP/IP. If TCP/IP is not enabled, right-click TCP/IP, and then click Enable. - If you changed the enabled setting for any protocol you must restart the Database Engine. In the left pane select SQL Server Services. In the right-pane, right-click the instance of the Database Engine, and then
click Restart.
Testing TCP/IP Connectivity
Connecting to SQL Server by using TCP/IP requires that Windows can establish the connection.
- On the Start menu, click Run. In the Run window type cmd, and then click OK.
- In the command prompt window, type ping and then the IP Address of the computer that is running SQL Server. For example, ping 192.168.1.101 using an IPv4 address, or ping fe80::d51d:5ab5:6f09:8f48%11 using
an IPv6 address. (You must replace the numbers after ping with the IP addresses on your computer.) - If your network is properly configured you will receive a response such as Reply from <IP address>. If you receive an error such as «Destination host unreachable.» or «Request timed out.»
then TCP/IP is not correctly configured. (Check that the IP address was correct and was correctly typed.) Errors at this point could indicate a problem with the client computer, the server computer, or something about the network such as a router. For more
information, see How to Troubleshoot Basic TCP/IP Problems. - Next, if the ping test succeeded using the IP address, a test that the computer name can be resolved to the TCP/IP address. On the client computer, in the command prompt window, type ping and then the computer
name of the computer that is running SQL Server. For example, ping newofficepc. - If you receive an error such as «Destination host unreachable.» or «Request timed out.» you might have old (stale) name resolution information cached on the client computer. Type ipconfig
/flushdns to clear the DNS (Dynamic Name Resolution) cache. Then ping the computer by name again. With the DNS cache empty, the client computer will check for the newest information about the IP address for the server computer. - If your network is properly configured you will receive a response such as Reply from <IP address>. If you can successfully ping the server computer by IP address but receive an error such as «Destination
host unreachable.» or «Request timed out.» when pinging by computer name, then name resolution is not correctly configured. (For more information, see How to Troubleshoot Basic TCP/IP
Problems.) Successful name resolution is not required to connect to SQL Server, but if the computer name cannot be resolved, then connections must be made specifying the IP address. This is not ideal, but name resolution can be fixed later.
Testing a Local Connection
Before troubleshooting a connection problem from another computer, first test your ability to connect from a client application on the computer that is running SQL Server. This procedure
uses SQL Server Management Studio. Management Studio might not have been installed when you installed the Database Engine. You can install Management Studio from the SQL Server CD by running setup and selecting the Management Tools option. If you are running
SQL Server Express, you can download the free SQL Server Management Studio Express from http://www.microsoft.com/downloads/en/details.aspx?FamilyID=08e52ac2-1d62-45f6-9a4a-4b76a8564a2b.
(If Management Studio is not available you can test the connection using the sqlcmd.exe utility which is installed with the Database Engine.)
-
Logon to the computer where SQL Server is installed, using a login that has permission to access SQL Server. (SQL Server 2008 installation requires at least one login to be specified as a SQL Server Administrator. If you do not
know an administrator, see Troubleshooting: Connecting to SQL Server When System Administrators Are Locked Out.) -
On the Start menu, point to All Programs, point to Microsoft SQL Server 2008 R2, and then click SQL Server Management Studio.
-
In the Connect to Server dialog box, in the Server type box, select Database Engine. In the Authentication box, select Windows Authentication.
In the Server name box, type one of the following:Connecting to:
Type:
Example:
Default instance
The computer name
ACCNT27
Named Instance
The computer nameinstance name
ACCNT27PAYROLL
Note: When connecting to a SQL Server from a client application on the same computer, the shared memory protocol is used. Shared memory is a type of local named pipe, so sometimes errors regarding pipes are encountered.
If you receive an error at this point, you will have to resolve it before proceeding. There are many possible things that could be a problem. Your login might not be authorized to connect. Your default database might be missing.
Note: Some error messages passed to the client intentionally do not give enough information to troubleshoot the problem. This is a security feature to avoid providing an attacker with information about SQL Server.
To view the complete information about the error, look in the SQL Server error log. The details are provided there. If you are receiving error 18456 «Login failed for user», Books Online topic http://msdn.microsoft.com/en-us/library/cc645917.aspx contains
additional information about error codes. And Aaron Bertrand’s blog has a very extensive list of error codes athttp://www2.sqlblog.com/blogs/aaron_bertrand/archive/2011/01/14/sql-server-v-next-denali-additional-states-for-error-18456.aspx. -
If you can connect using shared memory, test connecting using TCP. You can force a TCP connection by specifying tcp: before the name. For example:
Connecting to:
Type:
Example:
Default instance
tcp: The computer name
tcp:ACCNT27
Named Instance
tcp: The computer name/instance name
tcp:ACCNT27PAYROLL
If you can connect with shared memory but not TCP, then you must fix the TCP problem. The most likely issue is that TCP is not enabled. To enable TCP, See the Enable Protocols steps above.
-
If your goal is to connect with an account other than an administrator account, once you can connect as an administrator, try the connection again using the Windows Authentication login or the SQL Server Authentication login that
the client application will be using.
Opening a Port in the Firewall
Beginning with Windows XP Service Pack 2, the Windows firewall is turned on and will block connections from another computer. To connect using TCP/IP from another computer, on the SQL Server computer you must configure the firewall
to allow connections to the TCP port used by the Database Engine. If you are connecting to a named instance or a port other than TCP port 1433, you must also open the UDP port 1434 for the SQL Server Browser service. For step by step instruction on opening
a port in the Windows firewall, see How to: Configure a Windows Firewall for Database Engine Access.
Testing the Connection
Once you can connect using TCP on the same computer, it’s time to try connecting from the client computer. You could theoretically use any client application, but to avoid additional complexity, install the SQL Server Management
tools on the client and make the attempt using SQL Server Management Studio.
1. On the client computer, using SQL Server Management Studio, attempt to connect using the IP Address and the TCP port number in the format IP address comma port number. For example, 192.168.1.101,1433 If this
doesn’t work, then you probably have one of the following problems:
- Ping of the IP address doesn’t work, indicating a general TCP configuration problem. Go back to the section Testing TCP/IP Connectivity.
- SQL Server is not listening on the TCP protocol. Go back to the section Enable Protocols.
- SQL Server is listening on a port other than the port you specified. Go back to the section Gathering Information about the Instance of SQL Server.
- The SQL Server TCP port is being blocked by the firewall. Go back to the section Opening a Port in the Firewall.
2. Once you can connect using the IP address and port number, attempt to connect using the IP address without a port number. For a default instance, just use the IP address. For a named instance, use the IP address and the instance
name in the format IP address backslash instance name, for example 192.168.1.101PAYROLL If this doesn’t work, then you probably have one of the following problems:
- If you are connecting to the default instance, it might be listening on a port other than TCP port 1433, and the client isn’t attempting to connect to the correct port number.
- If you are connecting to a named instance, the port number is not being returned to the client.
Both of these problems are related to the SQL Server Browser service, which provides the port number to the client. The solutions are:
- Start the SQL Server Browser service. Go back to the section Gathering Information about the Instance of SQL Server, section 1.b.
- The SQL Server Browser service is being blocked by the firewall. Open UDP port 1434 in the firewall. Go back to the section Opening a Port in the Firewall.
- The UDP port 1434 information is being blocked by a router. UDP communication (datagrams) are not designed to pass through routers. This keeps the network from getting filled with low priority traffic. You might be able to configure your router to forward
UDP traffic, or you can decide to always provide the port number when you connect. - If the client computer is using Window 7 or Windows Server 2008, (or a more recent operating system,) the UDP traffic might be dropped by the client operating system because the response from the server is returned from a different IP address than was queried.
This is a security feature blocking «loose source mapping.» For more information, see the Multiple Server IP Addresses section of the Books Online topic Troubleshooting: Timeout
Expired. You might be able to configure the client to use the correct IP address, or you can decide to always provide the port number when you connect.
3. Once you can connect using the IP address (or IP address and instance name), attempt to connect using the computer name (or computer name and instance name). Put tcp: in front of the computer name to force
a TCP/IP connection. For example, for a default instance use something like tcp:ACCNT27 For a named instance usesomething like tcp:ACCNT27PAYROLL If you could connect using the IP address but not using the computer name,
then you have a name resolution problem. Go back to the section Testing TCP/IP Connectivity, section 4.
4. Once you can connect using the computer name forcing TCP, attempt connecting using the computer name but not forcing TCP. For example, for a default instance use just the computer name such as ACCNT27 For a
named instance use the computer name and instance name like ACCNT27PAYROLL If you could connect using whileforcing TCP, but not without forcing TCP, then the client is probably using another protocol (such as named pipes).
a. On the client computer, using SQL Server Configuration Manager, in the left-pane expand SQL Native Client 10.0 Configuration, and then select Client Protocols.
b. On the right-pane, Make sure TCP/IP is enabled. If TCP/IP is disabled, right-click TCP/IP and then click Enable.
c. Make sure that the protocol order for TCP/IP is a smaller number that the named pipes or VIA protocols. Generally you should leave Shared Memory as order 1 and TCP/IP as order 2. Shared memory is only used when the client and
SQL Server are running on the same computer. All enabled protocols are tried in order until one succeeds, except that shared memory is skipped when the connection is not to the same computer.
See Also
Another important place to find an extensive amount of SQL Server General & Database Engine related articles is the TechNet Wiki itself. The best entry point is SQL
Server General & Database Engine Resources on the TechNet Wiki