
-
#21
В последней версии при запуске появляется ошибка: Error can’t find adb/fastboot. Способ решения очень простой:
- Скачиваем последнюю версию ADB (на момент создания поста).
- Распаковываем архив с ADB.
- Скачиваем последнюю версию Xiaomi ADB/Fastboot Tools и помещаем в папку с ADB. Запускаем Xiaomi ADB/Fastboot Tools. Все)
-
tools_r29.0.2-windows.zip
2,2 МБ
· Просмотры: 124
Последнее редактирование: 07.08.2019
-
#22
я все сделал по инструкции… но программа при запуске висит в режиме looking for devices и дальше не идет. в чем может быть проблема?
-
#23
я все сделал по инструкции… но программа при запуске висит в режиме looking for devices и дальше не идет. в чем может быть проблема?
Где у вас это висит?
Вы Отладку по usb включили?
-
#24
да отладку конечно включил..когда запускаю программу там идет как бы загрузка, она ищет устройство, и дальше ничего не происходит она так и висит.
-

Снимок.PNG
62,1 КБ
· Просмотры: 26

-
#25
да отладку конечно включил..когда запускаю программу там идет как бы загрузка, она ищет устройство, и дальше ничего не происходит она так и висит.
Попробуйте эту версию:
-
XiaomiADBFastbootTools.zip
18 МБ
· Просмотры: 108
-
#26
Ура все заработало, спасибо!!!
-
#27
Огромное Вам спасибо за инструкцию! Все, какие можно сайты перебрал. Один единственный работающий пост. На 8 pro работает.
-
#28
Огромное Вам спасибо за инструкцию! Все, какие можно сайты перебрал. Один единственный работающий пост. На 8 pro работает.
На любом аппарате Xiaomi работает данный способ.
-
#29
Скачивал все версии jar файла, скачивал jarfix, ADB устанавливал, но программа не видит телефон. Подскажите, что ещё сделать? Система Windws 8.1
-
#30
Скачивал все версии jar файла, скачивал jarfix, ADB устанавливал, но программа не видит телефон. Подскажите, что ещё сделать? Система Windws 8.1
А вы скачивали самую последнюю версию программы? На телефоне отладку включили?
-
#31
Скачивал разные программы. И ява и просто под винду. Судя по всему проблема была в версии винды. Попробовал под виндовс 10, после установки галочки «настройки безопасности» на телефоне появилось окно на сопряжение и программа для виндовс стала видеть телефон. Но она не смогла ничего удалить. Продолжу ещё с этим компьютером экспериментировать, установлю яву и попробую jar файл.
-
#32
Скачивал разные программы. И ява и просто под винду. Судя по всему проблема была в версии винды. Попробовал под виндовс 10, после установки галочки «настройки безопасности» на телефоне появилось окно на сопряжение и программа для виндовс стала видеть телефон. Но она не смогла ничего удалить. Продолжу ещё с этим компьютером экспериментировать, установлю яву и попробую jar файл.
Очень странно. Потому что я на чистую систему все запускал. Программа видела телефон и удаляла. Я даже драйвера сам не ставил.
-
#33
Я не смог открыть jar файл, видимо в системе нет явы. Сегодня установлю и попробую.
Для информации телефон Redmi 4x, MIUI Global11.0.2
-
#34
Я не смог открыть jar файл, видимо в системе нет явы. Сегодня установлю и попробую.
Для информации телефон Redmi 4x, MIUI Global11.0.2
JDK ставить надо обязательно! Без него ни как. Могу попробовать помочь удаленно по teamview.
-
#35
С jar файлом так и не удалось ничего достичь, но файл под windows сработал хорошо. Всё определилось, часть программ удалил.
-
#36
но файл под windows сработал хорошо
К сожалению автор уже давно перестал разрабатывать данное приложение под windows. Пишет на java. Так что возможно, вы не все приложения сможете удалить.
С jar файлом так и не удалось ничего достичь
Попробуйте удалить JDK. Почистить ПК, тем же Cleaner. И по новой поставить.
Я вот винду на ПК переустанавливал. Поставил сразу JDK и подключил девайс, все завелось без проблем. Может что-то где-то упускаете?
-
#37
Сколько не пробовал — так ничего и не получилось… XiaomiADBFastbootTools не запускается. тел.-Xiaomi Mi9T
-

2020-01-18_084552.jpg
136,4 КБ
· Просмотры: 15
-

Screenshot_2020-01-18-08-45-14-049_com.android.settings.png
190,2 КБ
· Просмотры: 13


-
#38
Сколько не пробовал — так ничего и не получилось… XiaomiADBFastbootTools не запускается. тел.-Xiaomi Mi9T
XiaomiADBFastbootTools у вас запустился. Программа не видит телефона.
У вас есть еще ПК? Ну или у знакомых, на работе? Попробуйте там это сделать. Интернет не нужен. JDK и архив с программой из шапки.
-
#39
XiaomiADBFastbootTools у вас запустился. Программа не видит телефона.
У вас есть еще ПК? Ну или у знакомых, на работе? Попробуйте там это сделать. Интернет не нужен. JDK и архив с программой из шапки.
Спасибо буду еще пробовать… Фарворвер может повлиять? На всех компах стоит Widows 7 Firewall Control.
-
#40
Спасибо буду еще пробовать… Фарворвер может повлиять? На всех компах стоит Widows 7 Firewall Control.
Попробуйте его отрубить. Может и поможет.
![]()
Issues:
When launching the XiaomiADBFastbootTools.jar, user receive error: can’t find adb/fastboot.
Pre-conditions:
Linux Mint 19
Java Run-time Environment is installed
Downloaded XiaomiADBFastbootTools-6.8.1-Linux.zip
ADB installed
Android SDK installed.
Steps:
- Extract .zip to ~/Home
- Navigate to ~/Home/XiaomiADBFastbootTools-6.8.1-Linux
- Right click on XiaomiADBFastbootTools.jar
- Select Properties.
- Select Permissions.
- Select the check box «Allow executing file as program»
- Run XiaomiADBFastbootTools.jar
Notice:
Once the user executes the .jar program, the user receives error message «Error: Can’t find ADB/Fastboot»
![]()

![]()
Did you read the FAQ / troubleshooting section on the front page? My best guess is that you don’t have Fastboot installed and the app cannot see the included binaries because double clicking the JAR will set the working directory to /home/user/ instead of the directory of the JAR. The solution is mentioned in the FAQ.
![]()
That’s an issue I was also encountering, and the solution is quite easy: take the *.exe and *.zip files from the bin folder, and move them to the same folder as the *.jar file.
I’m on Windows, and I run the program by double-clicking on the *.jar file.
Maybe a noticeable amount of people are encountering the same issue? How about making XAFT look into the bin folder in addition?
![]()
![]()
My mistake then.
I did encounter the «missing adb/fastboot» error previously, but probably I had used the *.jar only.
I confirm the «bin» lookup works. Thanks for clarifying.
![]()
I can confirm that placing the bin and .jar in /Home/user worked for me
…
On Thu, Nov 28, 2019 at 7:34 AM vlakoff ***@***.***> wrote:
My mistake then.
I did encounter the «missing adb/fastboot» error previously, but probably
I had used the *.jar only.
I confirm the «bin» lookup works. Thanks for clarifying.
—
You are receiving this because you authored the thread.
Reply to this email directly, view it on GitHub
<#108?email_source=notifications&email_token=ACPQNENTZDK6S3RQII74FRTQV7QHPA5CNFSM4JR4UPFKYY3PNVWWK3TUL52HS4DFVREXG43VMVBW63LNMVXHJKTDN5WW2ZLOORPWSZGOEFM5QWY#issuecomment-559536219>,
or unsubscribe
<https://github.com/notifications/unsubscribe-auth/ACPQNEPW77UE5VQ4G5527CDQV7QHPANCNFSM4JR4UPFA>
.
ADB and Fastboot are amazing command-line tools that let your computer connect with your Android device. ADB can communicate with your phone to debug and make changes. If you are getting “ADB is not recognized” or “ADB command not found”, or “Fastboot is not recognized” error while trying to use ADB commands, here are some easy fixes to make ADB detect your device.
Below is a list of just a few things that you can do using ADB commands.
- Change Android device name
- Uninstall system apps without root
- Turn Safe Mode On or Off
- Unlock Android bootloader
Possible Reasons behind ADB Error
There may be various reasons why you are encountering the “adb is not recognized…” error in the Command Prompt. Depending on the scenario, the error message you get may differ. Below is a screenshot of the error that deliberately I recreated on my Windows 10 PC.
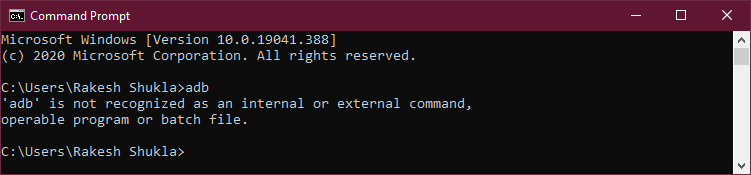
‘adb’ is not recognized as an internal or external command, operable program or batch file.
‘adb’ is not recognized as an internal or external command react-native.
The command a.exe was not found, but does exist in the current location.
or
The command adb was not found, but does exist in the current location.
‘adb’ is not recognized as an internal or external command android studio.
If you are using Windows PowerShell, you’ll get the following error.
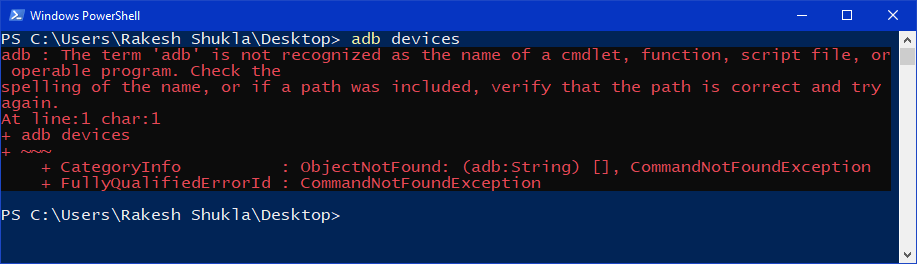
ADB : The term ‘adb’ is not recognized as the name of a cmdlet, function, script file, or operable program.
‘adb’ command not found
‘fastboot’ command not found
‘fastboot’ is not recognized as an internal or external command, operable program or batch file.
So, if you’re getting the “adb is not recognized as an internal or external command” error in the cmd window, it could be due to one of the following reasons.
- Many people think that ADB and Fastboot are present on their Windows PC by default. The reality is, you must download and set up the ADB and Fastboot drivers additionally.
- You may also get the “ADB command not found” error if you have an outdated version of ADB and Fastboot drivers. Installing the latest Android SDK Platform-tools on your PC might fix the problem.
- If you are trying to run ADB command from a location where ‘adb.exe’ and ‘fastboot.exe’ are not present.
- You haven’t set up system-wide ADB and Fastboot on your Windows 10 PC. That’s to say, you haven’t set the correct path under User variables or System variables.
- In case you are trying to flash an OTA update.zip, a factory image, or a custom recovery image (twrp.img, for instance), make sure you have saved the files to flash in the ‘platform-tools‘ folder along with ‘adb.exe’, ‘fastboot.exe’, etc.
In case you are getting ‘adb or fastboot command not found error’ on Mac, read my tutorial to solve the issue.
Now that we know what could be the reason behind the ‘adb’ is not recognized as an internal or external command error, let’s try to solve the problem.
Must Read: Use ADB Commands on Android Devices without Root
Fix 1: Download Latest SDK Platform Tools
If you have installed Koush’s Universal ADB Drivers, Minimal ADB and Fastboot, 15 seconds ADB Installer, or Minimal ADB Setup, it’s most likely that you have an outdated version of ADB and Fastboot drivers on your Windows PC. Moreover, most of such tools are unsafe as they may contain a Trojan virus.
You must remove and uninstall any such 3rd-party drivers if you have them installed. The best and safest source to download the latest ADB and Fastboot driver is Google itself. I would recommend you download the latest version of Android SDK Platform Tools zip for Windows directly from Google servers. In case you have a very old version of Platform-tools, you should update them.
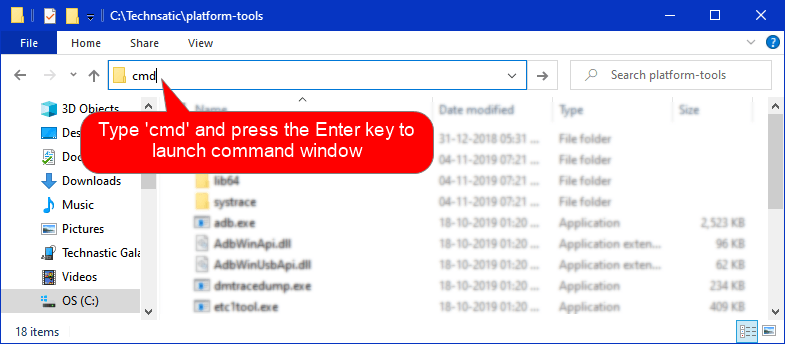
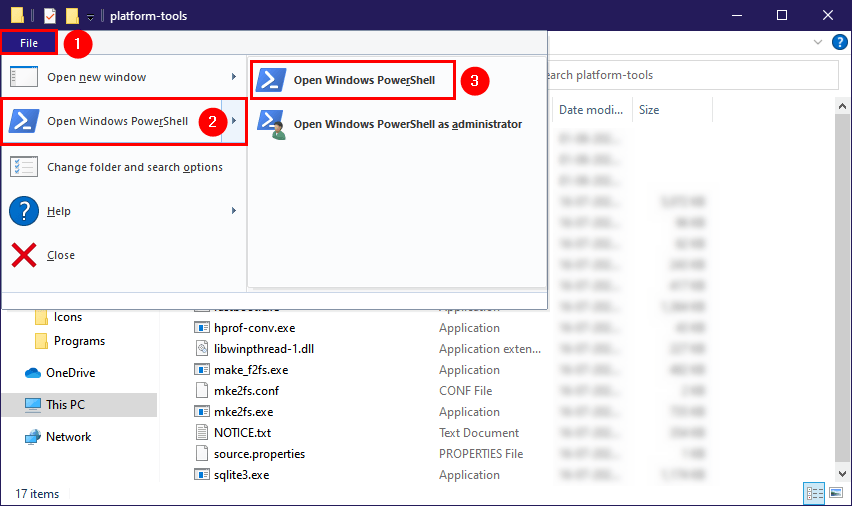
Fix 2: Execute ADB Command from the ‘platform-tools’ Folder
Since the official ADB and Fastboot drivers are not installer files, you are supposed to direct the Command Prompt to the exact path or location of the ‘platform-tools‘ directory. Now, there are 3 ways to do that.
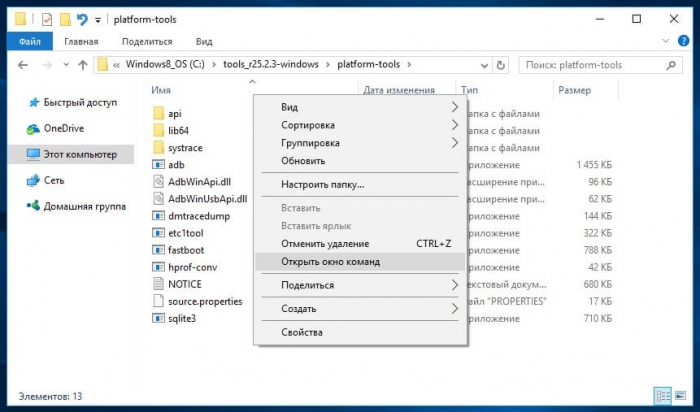
- Open the ‘platform-tools‘ or the folder that contains the ADB and Fastboot files. Click in the folder address bar, type “cmd” and press the Enter key.

- Open the ‘platform-tools‘ folder. Click on the file explorer’s File tab and select Open Windows PowerShell.

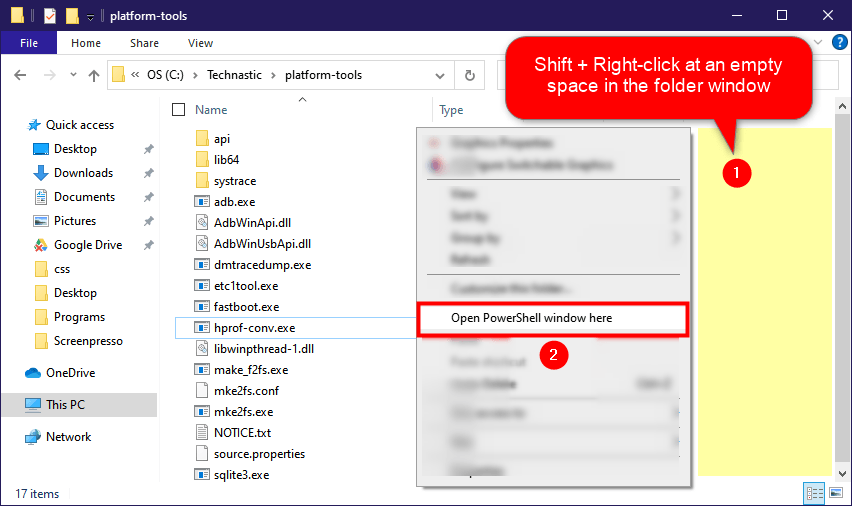
- While in the ‘platform-tools‘ folder, hold the Shift key and right-click at an empty or white space (highlighted with yellow) in the folder window. Select the Open PowerShell window here option from the context menu. If you want, you can add a permanent option to launch the command prompt to the Windows context menu.
Fix 3: Use ‘platform-tools’ Folder Path in CMD
Suppose you have saved the ABD and Fastboot drivers in the C Drive and you are trying to run an ADB command by launching the Command Prompt on your Desktop screen you’ll get the ‘adb’ is not recognized as an internal or external command error.
There’s a simple workaround to make the ADB command not found error go away by using cd or chdir (change directory) command. This command tells the Command Prompt to trigger ADB or Fastboot from a given path. Just launch the command window and type cd followed by the platform-tools folder path. as shown below.
cd c:technasticplatform-tools
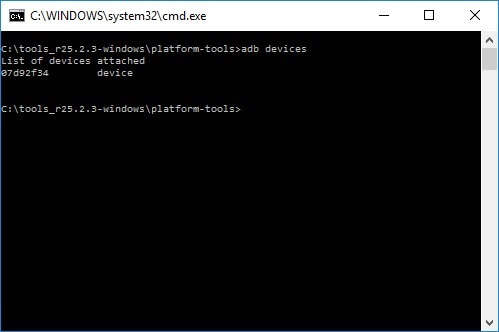
If you don’t know the path of the folder, here are 7 ways to find the path of a file or folder on Windows. As you can see in the screenshot below, when I executed the adb devices command I got the following result.
'adb' is not recognized as an internal or external command, operable program or batch file.
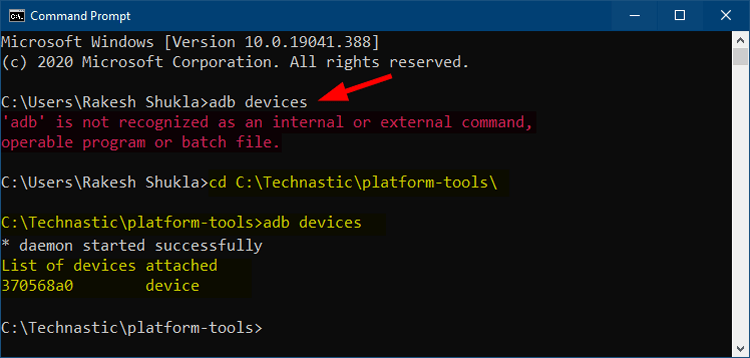
However, when I tried cd c:technasticplatform-tools followed by adb devices, there ADB is not found error disappeared.
Fix 4: Add a User or System Variable Path for ADB and Fastboot
Although the CD method gives the expected result, I find it a bit time taking as you need to type the folder path every time you use ADB or ADB Shell commands. The easiest way to access ADB and Fastboot universally from any screen on your Windows PC is to set up system-wide ADB and Fastboot.
This method involves adding System or User Variables for the path of the ‘platform-tools‘ folder and below we’ll see how to do that.
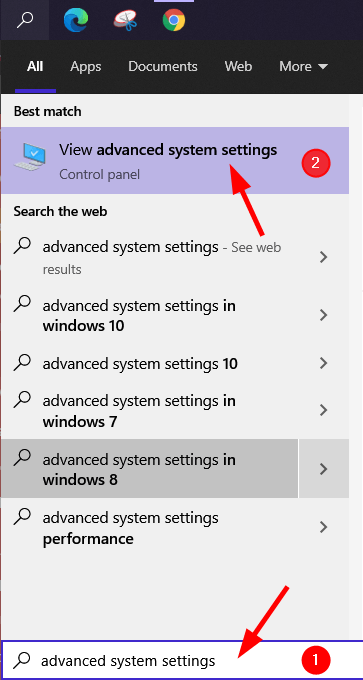
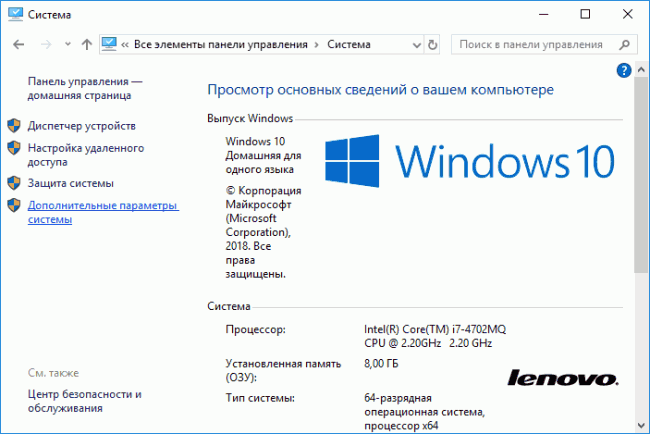
- Open Advanced system settings on your Windows PC. You can go to those settings in 3 ways.
- Type ‘Advanced system settings‘ in the Windows search bar and launch it.

- Right-click on This PC found on the right pane in the File Explorer window and click on Properties> Advanced system settings.

- Open the Control panel and navigate to System and Security> System> Advanced system settings.
- Type ‘Advanced system settings‘ in the Windows search bar and launch it.
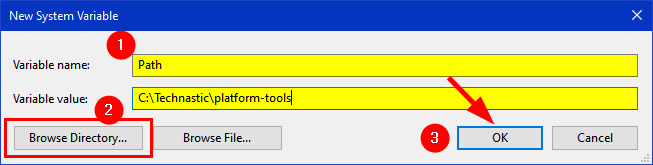
- Once you get to the System Properties pop-up window, click on Environment Variables.

- A new pop-up window named Environment Variables will appear. Click on any item under User variables or System variables and click on New.

- When the New User/System Variable pop-up appears, type “Path” under Variable name, then click on Browse Directory. Navigate to the ‘platform-tools‘ folder and click on the OK button.

- Finally, click on OK to add the path variable.
- When the new path variable is added, don’t forget to click on OK on the Environment Variables window to save it.


Done! You have successfully set up system-wide ADB and Fastboot on your Windows PC. Now, you are all set to execute ADB or Fastboot commands from any screen without navigating to the ‘platform-tools’ folder.
Fix ‘adb.exe: no devices/emulators found’ Error

If you are getting adb.exe: no devices/emulators found error it means that the ADB daemon is unable to detect your device. It might be due to the following reasons.
- Your Android phone or tablet is not connected to the computer.
- You haven’t turned on USB debugging from the Developer options on your device.
Take care of the above things, reconnect your device and try again. The error should have gone way.
Bonus Tip
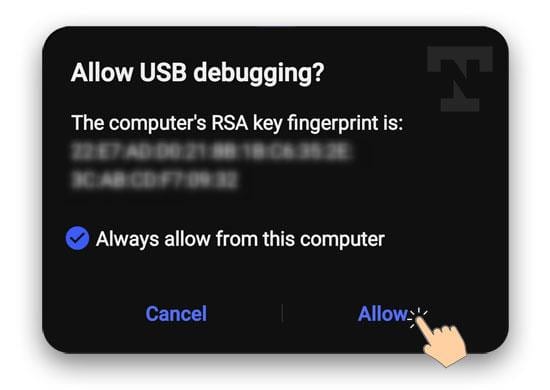
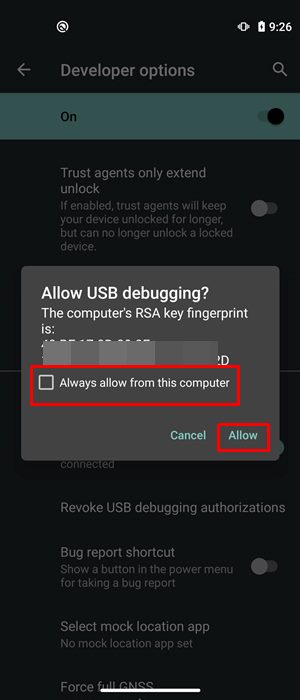
In order that your Windows computer can communicate with your Android device, you must keep USB debugging enabled on your device. Not just that, don’t forget to extend the screen timeout duration. As soon as you run the first ADB command, you’ll be prompted to Allow USB debugging on your device. You must select ‘Allow‘ to authorize ADB.
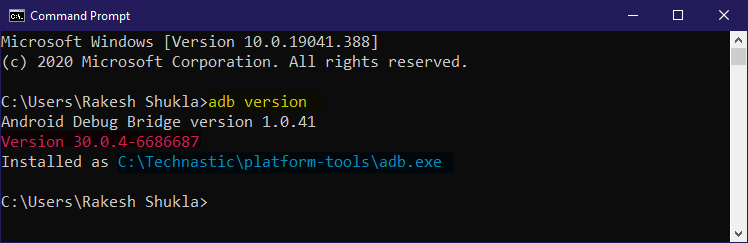
Launch the Command Prompt or Windows PowerShell again to check whether the ADB is not recognized… error is fixed or not. Try any of the following commands:
adb
adb devices
adb version
Fix Fastboot is not Recognized Error
The fixes I suggested above to solve ADB or ADB command not recognized error will also fix the following issue.
'fastboot' is not recognized as an internal or external command, operable program or batch file.
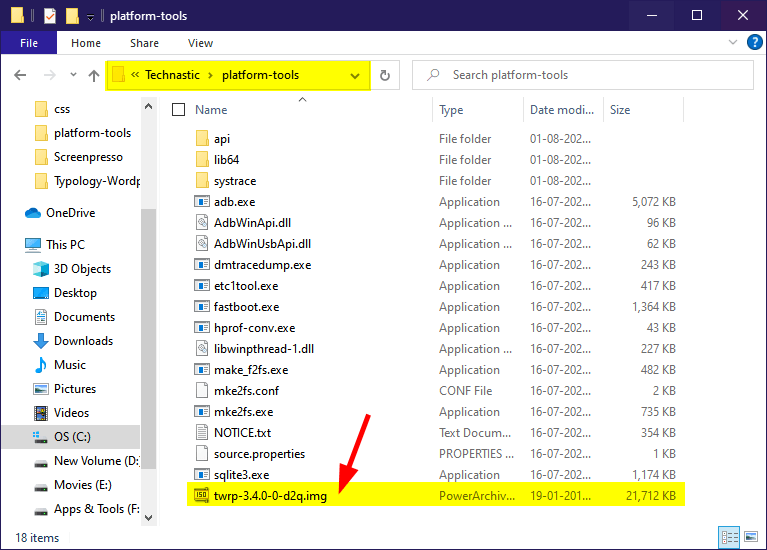
However, if you’re still getting the Fastboot is not recognized error while flashing TWRP.img file, a factory image, or root your Android device, here’s how to fix it. The solution should also work if Fastboot is not detecting a connected device.
- First of all, make sure you have downloaded the SDK Platform tools from above and extracted the downloaded zip file.
- Open the ‘platform-tools‘ folder.
- Now, copy or move the files you want to flash to your Android device to the same folder where ‘adb.exe‘ and ‘fastboot.exe‘ files are present.

- Reboot your Android device into the Fastboot Mode using the following command.
adb reboot fastboot
- While your device is in Fastboot Mode, use a compatible USB cable to connect it to the PC.
- Then launch a command window from the ‘platform-tools‘ folder. I have already described 3 ways to do that above.
- It’s time now to execute the following command.
fastboot devices
- If you get the list of attached devices in the command window, it means everything is fine. However, if encounter any of the following issues, try plugging out the USB cable and insert it again. If it still doesn’t help, try to reboot your phone and PC and try again.
- Fastboot not detecting device
- Fastboot devices not showing in cmd
- Fastboot waiting for device
The Fastboot is not recognized error should be gone.
If you are still getting any ADB or Fastboot related issues, please let us know!
Read Next: How to Disable Talkback on Android

Утилиты ADB и Fastboot входят в состав комплекта разработки Android SDK (не стоит путать с Android Studio и уж тем более скачивать ее громоздкий установочный файл, если вы, конечно, не собираетесь заниматься разработкой под Android). ADB является инструментом для отладки, который позволяет получить доступ к консоли Андроид с компьютера (подробнее →) подключив гаджет к ПК по USB. При этом должна быть включена отладка. Fastboot предназначена для работы с устройством, когда то загружено в одноименном режиме (если такой есть на вашем аппарате).
Содержание — Как установить ADB, Fastboot и драйвера:
- Как установить ADB и Fastboot: инструкция
- Устанавливаем драйверы ADB и Fastboot под Windows
- Как начать работать с Fastboot и ADB
При помощи ADB можно управлять смартфоном/планшетом с компьютера: сделать бэкап приложений, сбросить графический пароль, записать скринкаст, перевести смартфон в режим Recovery и многое другое. Кроме того с ADB можно работать и через Wi-Fi. Для этого на вашем устройстве должны быть получены root-права, а также понадобится специальное приложение, осуществляющее подключение к компу по сети. Например, ADB Wireless либо WiFi ADB. Но это уже материал для отдельной статьи.
Используя Fastboot, вы сможете устанавливать прошивки, кастомные Рекавери (TWRP или CWM), разблокировать Bootloader (на аппаратах HTC, Motorola, Sony, Nexus, Huawei, последних LG он заблокирован), очищать разделы системы.
Как установить ADB и Fastboot: инструкция
1. Первым делом переходим на официальный сайт, откуда можно скачать Android SDK: https://developer.android.com. Спускаемся вниз страницы к разделу «Command line tools only» и выбираем загрузку архива для Windows.

2. Установите галочку в чекбоксе «I have read and agree with the above terms and conditions» и нажмите кнопку «Download Android Command Line Tools for Windows». Начнется загрузка архива.

3. Скачайте его и разархивируйте в корень Диска «C:».
4. Также необходимо загрузить Java Development Kit с официальной страницы. Перейдите на сайт, согласитесь с условиями лицензионного соглашения, отметив пункт «Accept License Agreement», и скачайте версию JDK, соответствующую разрядности вашей системы.

После этого установите скачанный пакет. Дальше описаны несколько вариантов установки Fastboot и ADB – пользуйтесь тем, который для вас проще.
Первый способ
Вернитесь к папке c Android SDK, откройте «tools» и запустите «android».

Отметьте пункт «Android SDK Platform-tools» (а также «Google USB driver», если у вас устройство Nexus) и нажмите «Install Packages».

Про установку драйверов для других аппаратов читайте ниже.
Выберите «Accept License» и нажмите «Install».

Мой лог показал, что в процессе установки возникла ошибка. Но в итоге все завершилось успешно.

По завершении выполнения вышеописанных действий в папке «tools_версия-windows» появится «platform-tools», а в ней будут интересующие нас «ADB» и «Fastboot».


Второй способ
Перейдите в папку «sdk-tools-windows-версия» → «tools» → «bin» и, зажав клавишу «Shift», щелкните правой кнопкой мышки по пустой области. Выберите «Открыть окно команд» либо «Открыть окно PowerShell здесь», если на ПК или ноутбуке установлена одна из последних сборок Windows 10.

Вставьте команду в PowerShell или командную строку (в PowerShell добавьте ./ вначале):
sdkmanager platform-tools

Щелкните «Enter», чтобы выполнить команду. Произойдет загрузка файлов и появится запрос на установку:
Accept? (y/N)
")
Чтобы разрешить, введите y, то есть «yes», и нажмите «Enter», после чего начнется установка «platform-tools».

В конце в командной строке отобразится сообщение, что процедура завершилась успешно. А папка «platform-tools» с ADB и Fastboot внутри появится в «sdk-tools-windows-version».
(!) Если по какой-либо причине не удается установить ADB и Fastboot предыдущими способами, воспользуйтесь третьим вариантом – просто скачайте архив «platform-tools» и разархивируйте на диск «C:».
Устанавливаем драйверы ADB и Fastboot под Windows
Чтобы компьютер корректно распознавал смартфон либо планшет, необходимо загрузить драйвер USB:
- Samsung – драйвер входит в состав утилиты Kies: https://www.samsung.com либо же его можно скачать отдельно, выбрав нужную модель: https://www.samsung.com
- HTC – в составе HTC Sync Manager: https://www.htc.com
- Nexus – драйвер Android устанавливается вместе с Android SDK, о чем писалось выше.
- Huawei – совместно с утилитой HiSuite: https://consumer.huawei.com
- LG – установите LG PC Suite: https://www.lg.com
- Motorola – смотрите на этой странице: https://motorola-global-portal.custhelp.com
- Sony Xperia – драйверы FastBoot для всех моделей находятся здесь: https://developer.sonymobile.com
- Xiaomi – Mi PC Suite: https://pcsuite.mi.com
- MTK – для китайских аппаратов на чипах MediaTek: https://online.mediatek.com
- Lenovo – выберите модель смартфона, планшета и загрузите ADB драйвер: https://support.lenovo.com
- Решения для девайсов других производителей ищите на их официальных сайтах.
Существуют различные универсальные установщики ADB драйверов (к примеру, этот: https://adbdriver.com) – ими тоже можно пользоваться, например, когда по какой-то причине не удалось установить официальное решения.
Если для вашей модели идет драйвер без установщика, придется выполнить следующие действия:
1. Зайдите в «Панель управления» → «Диспетчер устройств». В Windows 10 достаточно нажать правой кнопкой мышки по меню «Пуск» и выбрать «Диспетчер устройств».

2. Найдите в списке девайс для которого нужно установить драйверы. Клацните правой кнопкой мышки и нажмите «Обновить драйверы».

Как видите, компьютер корректно распознает мой планшет Nexus 7. Если ваш ПК определяет смартфон неправильно или напротив устройства стоит желтый треугольник с восклицательным знаком внутри, «ручная» установка драйверов Android для вас обязательна.
3. Выберите пункт «Выполнить поиск драйверов на этом компьютере».

4. Укажите путь к папке с драйверами на ПК.

Дождитесь завершения установки и затем заново подключите гаджет к компьютеру по USB.
Как начать работать с Fastboot и ADB
Работа с ADB или Fastboot осуществляется из командной строки, зайти можно двумя способами:
Способ 1: Правой клавишей мышки клацните на «Пуск» и выберите «Командная строка (администратор)». Далее при помощи команд нужно перейти к папке с ADB и Fastboot (после ввода каждой нажимайте «Enter»).
Чтобы вернуться в корень диска «C:», используйте:
cd /Благодаря этой команде открываем нужную папку:
cdВ моем случае получилось так:
cd tools_версия-windowsplatform-tools
У вас выйдет (разработчики Google изменили название архива уже после написания первоначальной редакции этой инструкции):
cd sdk-tools-windows-versionplatform-tools
Путь к Fastboot и ADB указан, теперь работаем с ними из консоли.
Чтобы не выполнять эти действия каждый раз, добавьте путь к «platform-tools» в переменную «Path». Сначала зайдите в папку, в строке навигации щелкните правой кнопкой мыши по «platform-tools» и выберите «Копировать адрес».

Перейдите в «Панель управления». Для этого нажмите «Win» + «R» и в поле «Открыть:» вставьте control. Нажмите «ОК».

Выберите «Система» → «Дополнительные параметры системы» → «Переменные среды…».

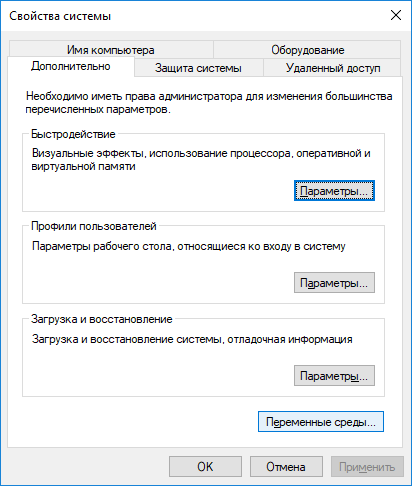
Найдите перемененную «Path», выделите ее и выберите «Изменить…».

Нажмите «Создать», вставьте путь к папке «platform-tools» и щелкните «ОК».

2: Зайдите в «sdk-tools-windows-version» → «platform-tools», затем, удерживая «Shift», щелкните правой кнопкой мыши по пустому месту и выберите пункт «Открыть окно команд» или «Открыть окно PowerShell здесь».
Введите следующее, чтобы проверить как ПК видит Android (в Windows PowerShell вставьте ./ перед командой):
adb devices
Не забывайте, что для работы с ADB должна быть включена отладка по USB! Больше полезных команд вы найдете в прошлой статье, ссылка есть в начале данного поста.

4 min read
August 17, 2020

Have you just gotten a new phone and is it already filled up with a bunch of spooky apps preinstalled? Have you tried long pressing and dragging them up your screen to uninstall? Alas! There isn’t any uninstall button. You have no choice; you feel like you are betrayed. Now you have had enough, you come up with all guns blazing- bold, determined and adamant about removing those apps. But it’s your new phone, you don’t want to root and temper. Disappointed? Don’t be! We have got you- here is how you can remove bloatware from MIUI without root.
Bloatware
Bloatware is the software that comes preinstalled and licensed on a device by the manufacturer itself. Most of the times, bloatware is merged as system app; hence the user does not have the administrative privileges to uninstall them. These apps can be useful sometimes but statistics shows otherwise.

Software vendors often make an agreement to integrate their products into the device’s system. These products are often tailored version of their original software. However, most of the time smartphone manufacturers slap apps into their system as per the demographic data. For example: apps like TikTok, Facebook, Instagram and Flipkart come preinstalled in Indian variants because of the demographic data. They are deemed as the most installed apps. Besides, company also add their own apps like browser, calculator, cleaner, documents, etc. as their trademark.
Bloatware occupy exceptional amount of your disk space and memory. Unless you use them, these apps just collide along to form a mound of debris. Moreover, they consume a lot of your battery and display advertisement. Even more- trojan, spyware, trackers and virus. Yes! These apps may be using, modifying or tracking our data under the hood. Just for record, Mi Browser was accused of sending user data report including browser history back into their main server, even in incognito mode. This is just a slight paradigm of what bloatware are pulling off beneath. These preloaded apps do not value your privacy and solitude. It is always better to get rid of them.
How to remove bloatware without root?
Here is a detailed guide on how you can remove bloatwares from your system. This method is only for Xiaomi devices, please do not perform it on other brands.
(While this method is a sure shot, we do not take liability of any damages. Even so, please comment down if you encounter any problem, we will try to help you as much as possible.)
Requirements
- Smartphone (with battery > 30%)
- A PC
- A USB data cable
Steps for Debloating
You have to perform a series of steps; be sure you check every one of them.
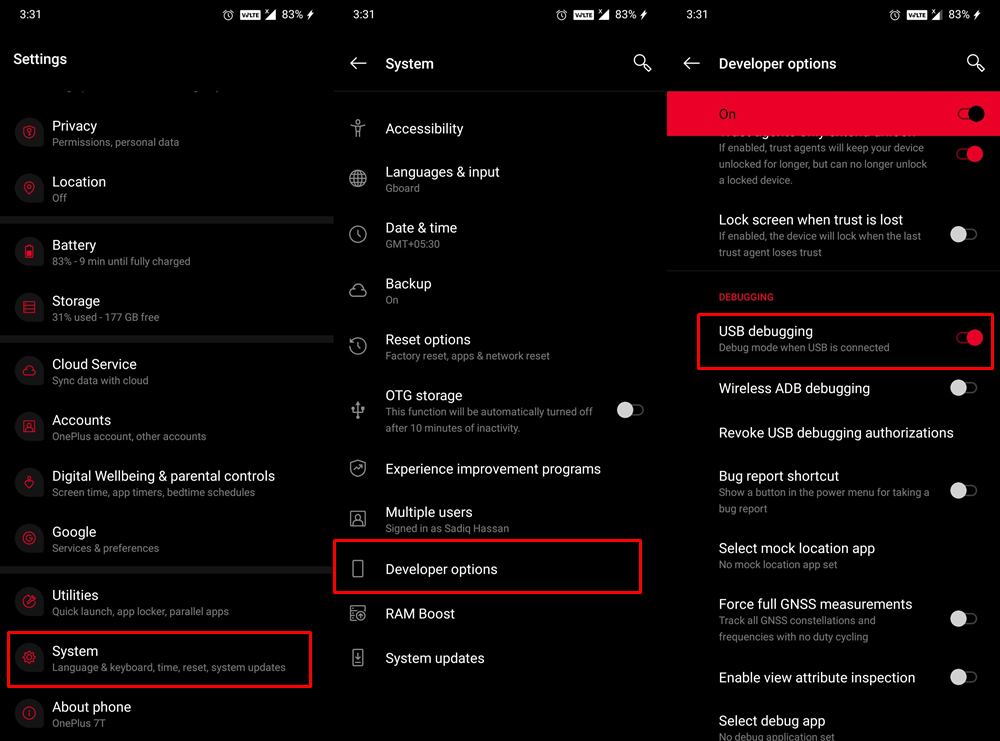
Step 1: Enable Developer Option
To enable developer option, go to your device Settings → About Phone. Now, you can see MIUI Version. Tap continuously on it until you get a toast that says ‘You are now a developer’.

Step 2: Turn on USB Debugging
To turn USB Debugging on, go to your device Settings → Additional Settings → Developer Option. Locate USB Debugging and toggle it on. (You might get security warnings, just accept them.)

Step 3: Confirmation
Below the USB Debugging, you can see three other options. Check enable Install via USB and check enable USB Debugging (Security Settings). Confirm your options with the screenshot below :-

(The steps are similar for MI A-series devices running on Android One. Go to Settings > System > Developer options and enable USB debugging.)
Now that we have enabled necessary settings on our phone, turn your PC on and follow these steps precisely.
Step 4: Downloading Files
Get your PC and download these files accordingly. Don’t freak out with their names, they are the easiest.
· Java SE Development Kit– for Windows, for Mac OS, for Linux
· Xiaomi ADB/Fastboot Tools– download here

Step 5: Installation
After you have downloaded the above files, store them in one folder. Now install the JDK-14.0.2.exe that we just downloaded.

Step 6: Open .JAR file
Now click on XiaomiADBFastbootTools.jar that we downloaded earlier. Then open it. (Give permissions if it asks). You will see a window like this :-

Step 7: Connect your Phone
After the application is opened, connect your phone to the PC via USB. Check your phone- the device is going to ask for authorization, which you will have to allow.
Then wait for the application to detect your phone. You will see the window like this once it gets detected :-

Step 8: Debloating
After your phone is connected, you will see a list of system apps on the screen. Now, check all the apps you want to uninstall from your phone.
At the bottom, you can see an Uninstall button. Just click on it.
(Do not tamper with other options if you are not familiar.)

Step 9: Restart
Once the uninstallation is complete, safely unplug your USB. Then restart your device.

Parting Words
So, this was how you remove bloatware from Xiaomi devices. If you encounter any problems or issues, do explain it in the comment section below. Share your screenshots if you have to. We are here to help you.
In this comprehensive tutorial, we will show you various methods to fix all the types of ADB and Fastboot Errors. When it comes to custom development, ADB and Fastboot Commands are literally unsung heroes. Their usage is so much important that you wouldn’t be able to carry out any of these in the first place had it not been for these commands. The first entry point to this domain requires you to unlock the device’s bootloader, which isn’t possible until you boot the device to the Fastboot Mode.
After this, be it for flashing custom ROMs, recoveries like TWRP, or even rooting the device via Magisk (either by flashing Magisk App or patching and flashing boot.img), all these make use of Fastboot Mode. And for booting your device to Fastboot– you will need to use the ADB Commands. So this is a vicious cycle that is extremely hard to escape, and one which tech enthusiasts would like to escape from as well.
With that said, these commands aren’t free from their fair share of issues. Talking about issues, there are a plethora of them. While I have covered the most important ones [refer to the end section of this guide], I still get a few more near about every other day in the comments. After doing a few research, I came to the conclusion that nearly all the ADB or Fastboot errors have the same set of fixes.
While there is no universal fix, (there are 5-6 methods to fix these issues), one thing stays the same. These five-six methods are known to rectify all these command errors. So rather than documenting each of them under separate guides, I decided to document them under one roof. Without any further ado, let’s get started with this tutorial to fix all the ADB and Fastboot Errors.
- How to Execute Android ADB Fastboot Commands Wirelessly
- Run ADB Fastboot Commands directly on Android without Root
- How to Use ADB and Fastboot Commands on Android Without PC
- List of Useful ADB and Fastboot Commands
Given below are the various methods to fix the ADB issues. However, there’s no universal fix as such. You will have to try each one of them until you are able to achieve success. Furthermore, we will start off with the basic fixes before moving on to the slightly advanced ones. Follow along.
Use USB 2.0 Port and Official USB cable
First and foremost, you should use the USB 2.0 Port of your PC or laptop. There have been numerous instances of the USB 3.0 Ports causing issues while executing ADB commands. So make sure you plug the device into a 2.0 Port. Since we are discussing USB, make sure to use the official USB cables that shipped with your device.
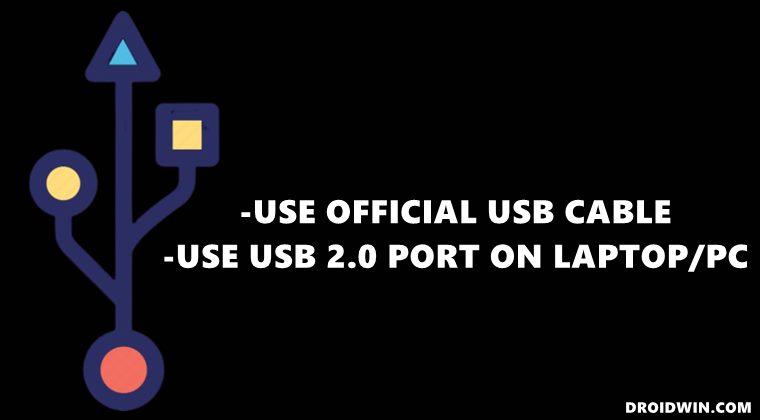
If that is not possible, then for alternatives use a cable that shipped in with other Android devices. Never try with a standalone USB cable as there are some that are only for charging purposes, and are unable to carry out any advanced functionalities. So use a USB 2.0 Port and an official USB cable and see if it fixes the ADB and Fastboot errors or not.
Enable USB Debugging
It goes without saying that to execute an ADB command, you will have to enable USB Debugging on your device beforehand. This helps your PC is identifying that the device is booted to this mode. So head over to Settings > About Phone > Tap on Build Number 7 times [MIUI Number in case of Xiaomi] > Go back to Settings > System > Advanced > Developer Options > Enable USB Debugging.
Install Android SDK Platform Tools
There are a plethora of ADB tools across the web. However, most of them have a missing binary or two. Hence you should always stick with the official ADB drivers provided by Google. So download the Android SDK Platform Tools on your PC and see if it fixes the ADB and Fastboot errors or not.
Launch CMD inside ADB directory
Firstly, maintain a safe distance from PowerShell and try executing all the commands in the Command Prompt itself. Furthermore, you should only launch the Command Prompt window inside the ADB directory. So once you have downloaded the Android SDK, extract it to any convenient location on your PC.
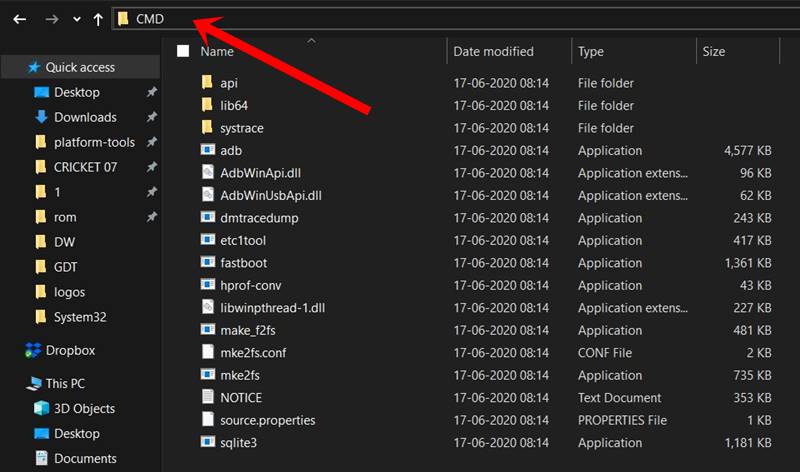
You should then get the platform-tools folder. Head over to its address bar, type in CMD, and hit Enter. This shall launch the Command Prompt window inside the ADB Directory (platform-tools). Now try executing the desired command and verify if it fixes the ADB and Fastboot errors or not.
Authorize USB Debugging
You might get an unauthorized ADB error when you haven’t responded to the prompt on your device to authorize the computer’s RSA key. So to authorize the connection, you could refer to our comprehensive guide on How to Fix Unauthorized Device with ADB Commands [3 methods]. The shorter instruction is to type in adb devices inside CMD and you should get the prompt on your device. Tap Allow and the connection stands authorized.
Restart ADB Server
- In some instances, you should consider killing the current running ADB server and relaunching its new instance.
- To do so, enter the following two commands in the CMD window that should be opened inside the platform-tools folder.
adb kill-server
adb start-server

- Once you have successfully executed both these commands, check if the ADB and Fastboot errors have been fixed or not.

Prefer PTP Mode over MTP
As strange as it may sound but the Media Transfer Protocol mode of USB connection has known to conflict with ADB commands. Hence you should consider switching over to the Picture Transfer Protocol mode. Here’s how it could be done:

- Head over to Settings on your Android device.
- Then go to System > Developer Options.
- Scroll to Default USB Configuration and select PTP.
Now try executing the desired command in the CMD window and see if it fixes the ADB and Fastboot errors or not.
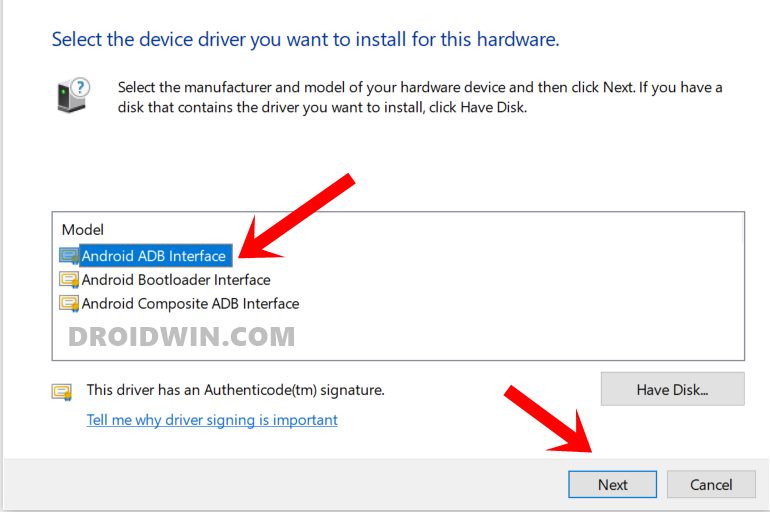
Install Android ADB Interface Drivers
Nowadays these drivers are automatically installed the first time you connect your device to the PC via USB cable. But there have been a few instances where the drivers needed to be manually installed. Maybe your PC falls in this domain as well. So refer to our detailed guide to How to Install Google’s Android Bootloader Interface Drivers. Once done, check if it was able to fix the underlying ADB and Fastboot errors or not.
Set Up ADB Environmental Variables
The first time the ADB and Fastboot Drivers are installed, they automatically pick up the system variables. However, if at any point in time you had another instance of any ADB-related tools, then the environmental variables would overlap. As a result, your PC wouldn’t ne able to understand which ADB.exe file should it use. The fix for that is fairly simple, though a little lengthy. You will have to manually provide the ADB Environmental Variables to your system and delete all the other ones. Here’s how it could be done:
- Head over to the Start menu and search for View Advanced System Settings.

- Go to the Advanced tab and click on the Environmental Variables button.

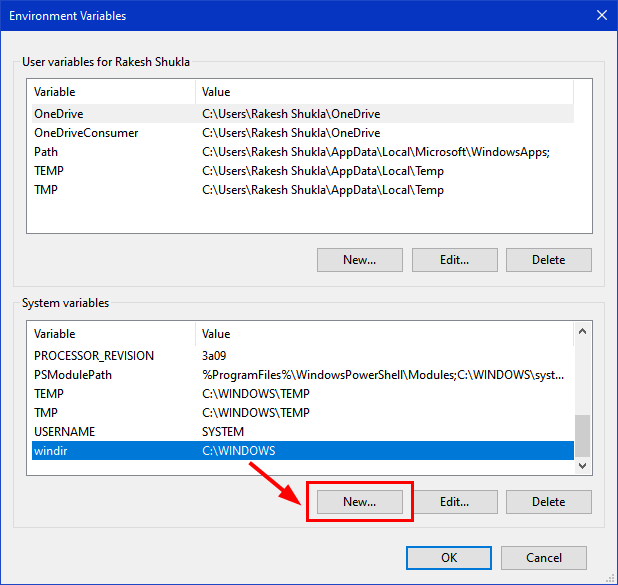
- You should now see two sections: User Variables and System variables. As for this guide, we would be dealing with the latter. So select Path from the System Variables and click on Edit.

- It will bring up the Edit environment variable option, click Browse from the right-hand side. [If you find any duplicate ADB path already added there, then select it and hit Delete].

- Now navigate to the location where you have installed the ADB and Fastboot binaries and select the platform-tools folder and click OK.

- You should now see this directory successfully added to the environment variables. Click OK to close the dialog box.

- Likewise, the path will also be visible in System variables under Environment Variables, as shown in the below image. Click OK to close this dialog box as well. That’s it. Your error now stands rectified.


So these were the various methods to fix all the ADB and Fastboot errors. We will be updating this guide with more fixes as and when get hold of the same. Likewise, if you are also aware of any other method, do share with us in the comments section below. Furthermore, all your queries pertaining to the aforementioned instructions are welcome in the comments.
Most Common ADB and Fastboot Errors and their Fixes
Here are some specific ADB and Fastboor Errors that I have covered separately since they are known to be among the most frequently faced ones.
- Fix Waiting for Device Error in ADB or Fastboot Commands
- How to Fix Android Device stuck in Fastboot Mode
- Fix adb server version doesn’t match this client; killing.
- How to fix ADB Device not found [List of Devices Attached is blank]
- Detailed Steps to Fix adb is not recognized Error
- How to Fix Unauthorized Device with ADB Commands [3 methods]
- How to Fix Nokia Device Stuck in No Command Screen
- Fix Failed (remote: ‘flashing is not allowed for critical partitions)
- Fix FAILED (remote: Partition should be flashed in fastbootd)
- How to Fix FAILED (remote: Command not allowed)
- Fix fastboot: error: Couldn’t parse partition size ‘0x’
- How to Fix FAILED (remote: Check device console)
- Fix Fastboot Erase System Command Not Working
About Chief Editor

Sadique Hassan
administrator
A technical geek by birth, he always has a keen interest in the Android platform right since the birth of the HTC Dream. The open-source environment always seems to intrigue him with the plethora of options available at his fingertips. “MBA by profession, blogger by choice!”
You need to install ADB and Fastboot drivers for a variety of reasons. If you are looking to install a factory image, for example, you need this — particularly helpful if you wish to try Android 11 on your Pixel device. However, it is also useful if you want to flash a TWRP recovery image file, or patched boot image (Magisk), sideloading an update, transfer files, and many other purposes.
The ADB and Fastboot toosl are pretty useful if you are interested in root and custom recovery stuff, let alone being able to install an update manually using the sideload command. Let’s see how to install ADB and fastboot driver on your PC, but also, how to use ADB and Fastboot without even installing them systemwide.
What’s ADB?
ADB stands for Android Debug Bridge. It works when the device is powered on and booted into OS or Recovery. The tool helps in sending basic Linux commands, and a variety of Android specific commands from PC to connected Android devices.
What’s Fastboot?
Fastboot is a more powerful tool than ADB and it works only in bootloader/fastboot mode. It allows you to re-flash system partitions on your Android device and requires a device with an unlocked bootloader. It’s particularly useful when you want to update your device manually or in a rare situation when you accidentally soft-brick your device and need to install a clean stock system image.
However, setting up ADB and Fastboot can be very tricky on a Windows machine. But thanks to XDA member Snoop05 who has developed a small program to quickly install both ADB and Fastboot files on your PC (system-wide) along with proper drivers. Downloads and installation instructions are given below.
How to use ADB and fastboot without setting up anything
- Download the latest ‘platform tools’ (ADB and fastboot drivers) from Google from here.
- Extract the content of the file. You will get a folder called ‘platform tools’. So, this is the folder where you have files like adb.exe and fastboot.exe.
- Copy the required file(s) into this folder. However, if no file is required, then simply ignore this step.
- Now, open a PowerShell window or a command window here using the shift+right-click trick.

- Run the command.
Note: If you get an error in PowerShell window, be sure to add . before the command without any space. (adb devices will be .adb devices).

That’s all. It’s that simple, actually!
Is it working?
If the above works for you, simply ignore all the content below. The content below is more about getting the ADB/fastboot to wokr everywhere on Windows so that you don’t need to copy the files into the ‘platform tools’ folder.
But if you insist on becoming a pro, here you go.
Method 1: Install the latest versions manually
Part 1: Get ADB and Fastboot driver
- Download the latest ‘platform tools’ (ADB and fastboot drivers) from Google from here.
- Extract the content of the file. You will get a folder called ‘platform tools’.
- Move the ‘platform tools’ folder to C drive so that you can easily access it anytime.


It’s done!
You can use the ADB and Fastboot commands from this folder by making sure your ADB/PowerShell window points to this folder. For this, simply open the command window or a PowerShell window from this folder only. Open the ‘platform tools’ folder, type cmd in its address bar, and then hit the enter key. A command window will open up and its location will be this folder only.
The next part, though, will help you run ADB and Fastboot from anywhere on PC. Which makes it very easy to use ADB and Fastboot commands.
Part 2: Get ADB and Fastboot driver everywhere on PC
This is not a must, BTW, as you can use the ADB and Fastboot from the platform tools folder anytime as explained above. See another guide on the bottom of the article, in a section called “How to use ADB and Fastboot from the ‘platform tools’ folder”.
- Copy the path (address) of the ‘platform tools’ folder. You can shift+right click to get the option called ‘Copy as Path’, using which will copy the path to PC’s clipboard. Mine is in the C drive, and here is its path: “C:platform-tools”

- Open Environment Variables settings by searching for it in Windows search. Otherwise, find it manually as given below:
- Right-click the Computer icon.
- Click Properties.
- Click Advanced system properties.
- In the window that pops up, click Advanced.
- Click Environment Variables.
- Under ‘System variables’ section, click Path option to select it.
- Click the Edit button.
- Add the path of the ‘platform tools’ folder:
- On Windows 10, click the New button, and then copy the path of your ‘platform tools’ folder.

- On the older version of Windows, you may need to copy the path after the current paths added there. Paths are separated by the use of semi-colon, so make sure there is a semi-colon before and after the path of your ‘platform tools’ folder.
- On Windows 10, click the New button, and then copy the path of your ‘platform tools’ folder.
- Click OK, then again OK, and then again OK to exit.
- Open a command window or a PowerShell window and type adb and then hit the enter key, you shall get a list of adb commands. Meaning, adb is working from everywhere on your Windows PC. Try the same with fastboot.


Method 2: 15 Second automatic installer
Note that as the ADB and Fastboot files installed by the automatic installer are quite old now, you need to update them, as given in step 4. So, make sure of that. The drivers installed automatically may cause you problems, for example, when trying to flash a factory image (Android 11 developer preview, for example) where the old ADB and Fastboot drivers will be unable to install the Android 11 ROM properly.
- Download the adb-setup-1.4.3.exe file from here.
- Double-click/run the adb-setup-1.4.3.exe file.
- You will see a command prompt window with blue background. Say YES to all the prompts on this screen.
└ To say YES, just type Y and hit enter.

- Update the installation with the latest drivers:
- Download the latest ‘platform tools’ (ADB and fastboot drivers) from Google from here.
- Extract the content of the file. You will get a folder called ‘platform tools’.
- Copy the content of the ‘platform tools’ folder to the ADB folder in the C drive that was created by the automatic installer.
- Yes, replace all the old files in ‘ADB’ with all the new files from ‘platform tools’ folder. Done!

Once ADB, Fastboot and Drivers are installed, the setup window will automatically close and you’ll have a working ADB and Fastboot setup throughout your system. Enjoy!
How to use ADB and Fastboot from the ‘platform tools’ folder
So, if you can’t add the path of the ADB and Fastboot files (the ‘platform tools’ folder, that is), here is how to use these tools.
Method 1: Open the CMD/PowerShell window in platform tools folder
- Open the ‘platform tools’ folder on your PC.

- Left-click on the empty space in the folder. (This is to remove any selection in the folder.)
- Now, shift+right-click on the empty space.
- Click ‘Open PowerShell Window here’ option.
- A PowerShell window will open up whose location will be the ‘platform tools’ folder only.

- Type the command adb devices to test it. (Make sure you have enabled USB Debugging on your Android device.)
- Run the command by hitting the enter key. You shall get a random serial number like below.
- That shows that ADB is working. Test a fastboot command too. Before you do that, reboot the device in fastboot mode (run the command adb reboot bootloader). When in fastboot mode, try a fastboot command like fastboot devices to confirm fastboot is also working alright.

- That’s all. To reboot the device, run the fastboot command fastboot reboot and it shall restart right away.


Done!
Method 2: Use the path of adb.exe or fastboot.exe as required anywhere
You can copy the path of adb.exe and fastboot.exe files for use in the command/PowerShell window that has been opened anywhere on Windows. Here is how we can use and run ADB/fastboot command:
- Open a PowerShell/command window. You can use Windows search for this.

- You can see the location of the PowerShell window above is nor the ‘platform tools’ folder. It’s opened in the user folder, where I don’t have the adb and fastboot files.
- To use adb, we need to copy the adb.exe’s path. Go to the folder where you have the adb.exe (the ‘platform tools’ folder), and shift+right-click on it.

- Click Copy as path.
- Paste it in the PowerShell window.
- Remove the invited commas from path address.
- Hit the space bar, and then type the rest of the command. For example, to run the adb devices command, we only need to add the ‘devices’ in the PowerShell window. Here’s how it will look.
- Hit the enter key now. It will run the adb devices command. Here’s the result:
- You can flash the files like this. For example, if you wish to install TWRP recovery, then download its .img file (let’s call it twrp.img), go to that folder, open a command windows in that folder using shoft+right click, and then use this command with the device in fastboot mode: C:platform-toolsfastboot.exe flash recovery twrp.img


Done. Let us know if you need any help in this regard.
Method 3: Use the path of the file on your PC
A quick workaround to Method 2 above is to use the path of the file in the ADB folder.
- Go to the folder where you have the adb.exe and fastboot.exe files. Basically, this is your ‘platform tools’ folder.
- Open a PowerShell/command window here using the shit+right click trick mentioned above.
-
Run the ADB commands as you like (in PowerShell, add . before adb without any space):
- For restarting the device into fastboot mode, simply type adb reboot bootloader and then hit the enter key. (In PowerShell, the command will become: .adb reboot bootloader)
- For restarting the device into recovery mode, simply type adb reboot recovery and then hit the enter key.
- To transfer a file, type adb push <insert path of the file on your windows PC> /sdcard/
- To sideload an update in recovery mode, type adb sideload <insert path of the file on your windows PC>
(Example: adb sideload “D:Downloads/walleye-rpp1.200123.016image-walleye-rpp1.200123.016.zip”)
-
Run the fastboot commands as you like (make sure the device is in fastboot/bootloader mode; and you will need to add . in PowerShell window)):
- For restarting the device, simply type fastboot reboot and then hit the enter key.
- To boot the device using TWRP file: fastboot boot <path of twrp recovery file on your PC>
- To flash the TWRP file in the boot partition (modern phones): fastboot flash boot <path of twrp recovery file on your PC>
- To flash the TWRP file in the recovery partition (older phones): fastboot flash boot <path of twrp recovery file on your PC>
- To install a factory image, extract the factory image zip file, and copy all files from it in the ‘platform tools’ folder. (Or, copy the files in the platform tool folder to the folder where you extracted the factory image file, so that all the files from factory image and platform tools (adb.exe, fastboot.exe, etc.) are in a single folder). And then, simply run the flash-all.bat to install the factory image.
That’s all.
Опытные пользователи любят настраивать смартфоны по своему усмотрению. В этом помогают специальные утилиты. Одна из таких программ — Xiaomi ADB Fastboot Tools. Это инструмент, позволяющий удалить ненужные системные приложения, очистить кэш, сбросить устройство до заводских настроек, заблокировать загрузчик и т. д. Сегодня мы подробно поговорим о данной утилите: выясним, как ее установить на компьютеры Windows, Linux, Mac и как правильно пользоваться.
ADB Fastboot Tools представляет собой служебное приложение с расширенными возможностями. Функционал больше всего оценят владельцы телефонов с активным бутлоадером и рут-правами. Если же у вас отсутствует root, а загрузчик заблокирован – возможности программы будут довольно ограничены.
При подключении смартфона утилита выдает подробную информацию о модели: серийный номер, кодовое имя и состояние бутлоадера.
Обратите внимание, что Xiaomi ABD/Fastboot Tools – это программа исключительно для опытных пользователей. Все действия в ней вы проводите на свой страх и риск. Убедитесь, что обладаете необходимыми навыками и знаниями.
Функции и особенности
Программа в основном используется для удаления системных приложений на Android. Но есть и другие функции:
- Перевод смартфона в режим Fastboot, Recovery или EDL.
- Очистка кэша или полное удаление данных (сброс до заводских настроек).
- Блокировка/разблокировка загрузчика – только для моделей из серии Android One.
- Включение Google камеры (с использованием TWRP Recovery).
- Прошивка через Фастбут.
Где скачать программу
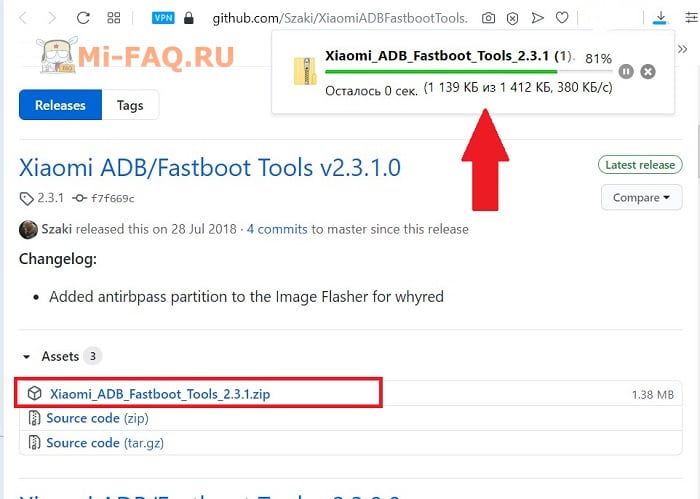
Официального сайта с Xiaomi ADB Fastboot Tools нет. Но программу можно без проблем загрузить по ссылкам ниже с репозитория Github. Есть как утилита только для Windows, так и универсальная версия java, которая рассчитана на операционные системы Windows, Linux и Mac.
Файл с расширением .jar обладает расширенным функционалом и чаще обновляется. Но если вы не знакомы с программным обеспечением java – рекомендуем скачать стандартную версию, которая подойдет для Windows 10 и более ранних сборок.
Последние сборки Xiaomi ADB/Fastboot Tools идут только в JAVA приложении, то есть с расширением .jar. Для включения утилиты нужно установить дополнительный компонент Oracle Java отсюда.
Установка программы на Windows 10
Нижеописанная инструкция подойдет, если вы скачивали Windows-версию (не java!).
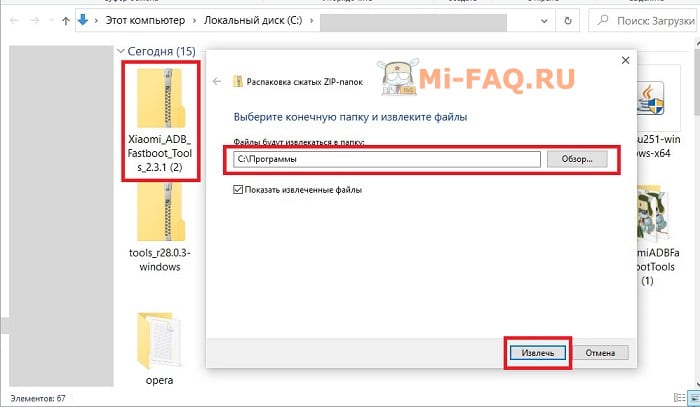
- Открываем Проводник и находим скачанный архив. Распаковываем его – желательно, на системный диск.

- Находим распакованный файл с расширением .exe и запускаем его. Утилита откроется сразу, установка не требуется. Теперь можно приступать непосредственно к использованию программы.


Рассмотрим правильное подключение смартфона и основные взаимодействия с утилитой. Инструкции представлены в ознакомительных целях, редакция не несет ответственности за ваши действия.
Проверка работоспособности adb и fastboot
Для начала нужно убедиться, что программа распознает подключенное мобильное устройство. Соединяем телефон с компьютером по USB-проводу и запускаем утилиту. Не забываем, что перед этим необходимо включить отладку по ЮСБ.
В программе кликаем по большой кнопке «Debloater». Начнется распознавание подключенного смартфона. Если синхронизация успешная, появится информация о модели. Надпись «No device found» сообщает об отсутствии необходимых драйверов. Установите универсальные драйвера adb и fastboot, и повторите попытку.
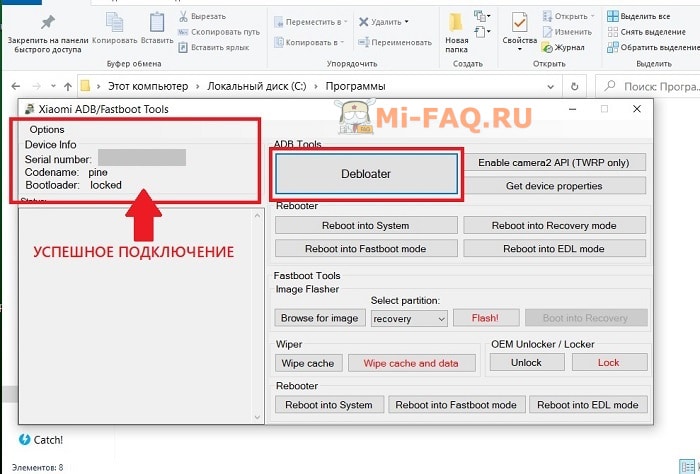
Еще сопряжение можно проверить, перезагрузив смартфон через вкладку «Reboot into system» (в пунктах «ADB Tools» и «Fastboot Tools»). Если телефон откликнулся на команду и перезагрузился, значит, подключение установлено.
Удаление системных приложений
Пользователи чаще всего используют утилиту, чтобы удалить ненужные предустановленные приложения. У нас есть подробная статья, в которой мы поэтапно рассказывали о процедуре, а также о том, какие приложения можно удалять на MIUI 10 и MIUI 11 без вреда для операционной системы. Этот перечень будет актуален и для Миюай 12. Здесь вкратце опишем весь процесс:
- Активируем режим для разработчиков и включаем отладку по USB.
- Ставим на компьютер все необходимые драйвера.
- С помощью кабеля подключаем смартфон к компьютеру.
- На телефоне в режиме работы ЮСБ выставляем «Передача файлов».
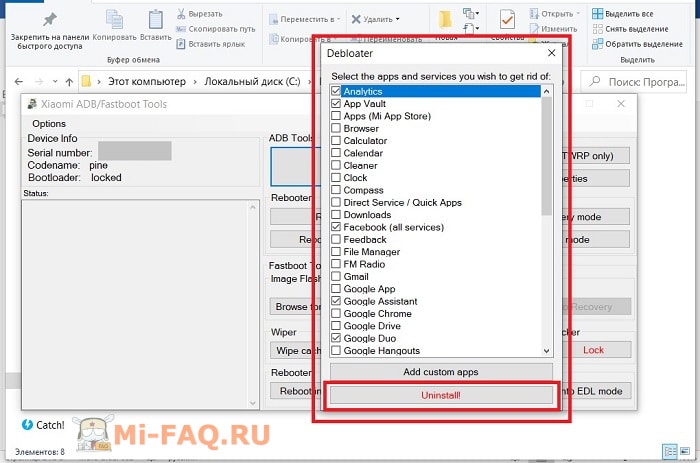
- В ADB Fastboot Tools кликаем «Debloater», а в смартфоне разрешаем отладку по USB (тапаем «ОК» в появившемся окне).
- Опять нажимаем «Debloater». Появляется список программ, которые можно удалить. Выставляем галочки напротив названий, и жмем «Uninstall».

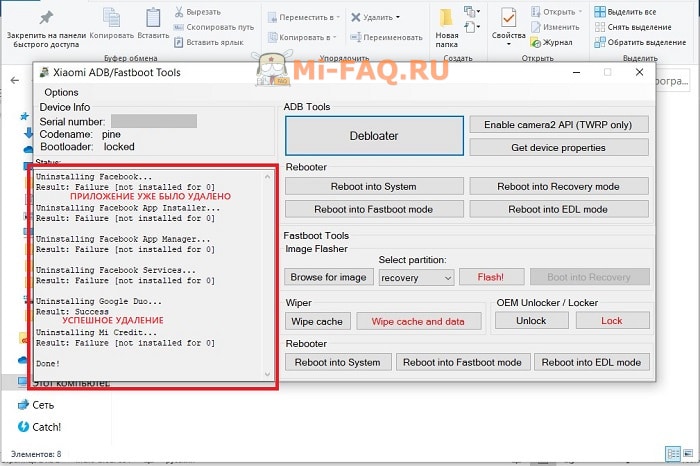
- Если удаление прошло успешно, в левой стороне экрана появится список операций, а внизу «Done».

- Отключаем мобильное устройство от ПК и перезагружаем.
Теперь вы знаете, как быстро и легко удалить системные приложения и игры на телефоне Xiaomi.
Дополнительные функции
С помощью Xiaomi ADB/Fastboot Tools вы можете:
- Перевести смартфон в режим расширенной перезагрузки: Fastboot, Recovery или EDL, кликнув по соответствующим вкладкам.
- На устройствах с разблокированным загрузчиком есть возможность включить Camera2 API.
- Прошить конкретный раздел или весь телефон через Фастбут.
- Владельцы смартфонов из линейки Android One могут разблокировать/заблокировать загрузчик, используя данную программу.
- Выполнить очистку кэша или удаление всех параметров и данных со смартфона.
Частые проблемы
- Ошибка «Cannot find Adb/Fastboot Xiaomi» возникает, если на компьютере не хватает драйверов. В видео «Универсальные драйвера на Xiaomi для подключения к ПК» мы рассказывали, как установить drivers на Windows. После данной процедуры приложения без проблем будут распознавать подключенный девайс.
- Программа не видит телефон, хотя драйвера стоят. Здесь может быть несколько причин: отладка по USB отключена, либо в типе подключения просто указана зарядка, а не передача файлов. Еще влияет версия утилиты: возможно, ее нужно обновить, как и программное обеспечение на телефоне. Если ничего не помогает, попробуйте воспользоваться java-версией.
- Приложение не удаляется. Проверьте, установлено ли оно на телефоне. Возможно, вы удаляли его ранее. Если ADB Fastboot Tools виснет на этапе удаления, просто закройте программу, отсоедините телефон и через некоторое время повторите попытку. Зависания часто случаются на Global ROM.
Видео-инструкция
Ответы на популярные вопросы
Что можно удалять из списка приложений в Xiaomi ADB Fastboot Tools?
Любое приложение теоретически можно удалить без вреда для телефона. Как вы могли заметить, в перечне нет важных сервисов, таких как Безопасность, Контакты, Звонки. Но пользователи отмечают, что удаление некоторых приложений, указанных в программе, все равно вызывает сбои в смартфоне. Более подробная информация есть в видео-инструкции.
Как восстановить системное приложение?
Большинство системных приложений есть в Google Play, например, Гугл Карты или Календарь. Загрузите их оттуда и установите стандартным способом. Либо сбросьте девайс до заводских настроек.
Чем отличаются отключенные программы от удаленных?
Отключенные программы продолжают потреблять оперативную память и занимать место на смартфоне. Также система может их включить без вашего ведома.
Мы рассмотрели скачивание, установку и основной функционал утилиты Xiaomi ADB Fastboot Tools. Как видим, этот инструмент точно понравится и пригодится опытному пользователю. Если у вас остались вопросы – обращайтесь за помощью в комментарии.