Содержание
- Adb error closed что это
- Android ADB Sideloading – Install & Update ROMs
- What Is Android Debug Bridge (ADB)?
- What is ADB Sideload?
- How To Install ADB?
- Download ADB & Fastboot Files Without Downloading The Whole SDK
- Before You Start Using ADB
- Using ADB The Right Way
- Testing Whether Your Phone Is Connected Properly
- Using ADB Sideload To Apply Update Packages And Flash ROMs
- Difference Between ADB Sideload Command And Fastboot Flash Command
- List Of Useful ADB Commands
- Common Error And Troubleshooting Tips
- ADB showing “error: closed”
- How to fix ADB sideload cannot read zip file error
- Final Words
- About Abhijith V M
Adb error closed что это
Platform-tools: r33.0.3
ADB: 1.0.41 (33.0.3-8952118)
Fastboot: 33.0.3-8952118
Make_f2fs (casefold): 1.15.0 (2022-05-20)
Mke2fs: 1.46.2 (28-Feb-2021)
Последнее обновление утилит в шапке: 23.08.2022
ADB (Android Debug Bridge — Отладочный мост Android) — инструмент, который устанавливается вместе с Android-SDK и позволяет управлять устройством на базе ОС Android.
Работает на всех Android-устройствах, где данный функционал не был намеренно заблокирован производителем.
Здесь и далее: PC — ПК, компьютер к которому подключено устройство.
ADB — консольное приложение для PC, с помощью которого производится отладка Android устройств, в том числе и эмуляторов.
Работает по принципу клиент-сервер. При первом запуске ADB с любой командой создается сервер в виде системной службы (демона), которая будет прослушивать все команды, посылаемые на порт 5037.
Официальная страница
ADB позволяет:
- Посмотреть какие устройства подключены и могут работать с ADB.
- Просматривать логи.
- Копировать файлы с/на аппарат.
- Устанавливать/Удалять приложения.
- Удалять (очищать) раздел data.
- Прошивать (перезаписывать) раздел data.
- Осуществлять различные скрипты управления.
- Управлять некоторыми сетевыми параметрами.
Поставляется ADB в составе инструментария разработчика Андроид (Android SDK), который, в свою очередь входит в состав Android Studio.
Если что-то неправильно, то в списке подключенных устройств (List of devices attached) будет пусто.
Скрытые команды ADB
adb -d Команда посылается только на устройство подключенное через USB.
Внимание: Выдаст ошибку, если подключено больше одного устройства.
adb -e Команда посылается на устройство в эмуляторе.
Внимание: Выдаст ошибку, если подключено больше одного эмулятора.
adb -s Команда посылается на устройство с указанным серийным номером:
adb -p Команда посылается на устройство с указанным именем:
Если ключ -p не указан, используется значение переменной ANDROID_PRODUCT_OUT.
adb devices Список всех подсоединенных устройств.
adb connect [: ] Подсоединиться к андроид хосту по протококу TCP/IP через порт 5555 (по умолчанию, если не задан).
adb disconnect [ [: ]] Отсоединиться от андроид подключенного через TCP/IP порт 5555 (по умолчанию, если не задан).
Если не задан ни один параметр, отключиться от всех активных соединений.
adb push Копировать файл/папку PC->девайс.
adb pull [ ] Копировать файл/папку девайс->PC.
adb sync [ ] Копировать PC->девайс только новые файлы.
Ключи:
-l Не копировать, только создать список.
adb shell Запуск упрощенного unix shell.
Примеры использования
adb emu Послать команду в консоль эмулятора
adb install [-l] [-r] [-s] Послать приложение на устройство и установить его.
Пример: adb install c:/adb/app/autostarts.apk Установить файл autostarts.apk лежащий в папке /adb/app/ на диске с:
Ключи:
-l Блокировка приложения
-r Переустановить приложение, с сохранением данных
-s Установить приложение на карту памяти
Установка split apk
adb uninstall [-k] Удаление приложения с устройства.
Ключи:
-k Не удалять сохраненные данные приложения и пользователя.
adb wait-for-device Ждать подключения устройства.
adb start-server Запустить службу/демон.
adb kill-server Остановить службу/демон.
adb get-state Получить статус:
offline Выключен.
bootloader В режиме начальной загрузки.
device В режиме работы.
adb get-serialno Получить серийный номер.
adb status-window Непрерывный опрос состояния.
adb remount Перемонтировать для записи. Требуется для работы скриптов, которые изменяют данные на.
adb reboot bootloader Перезагрузка в режим bootloader.
adb reboot recovery Перезагрузка в режим recovery.
adb root Перезапуск демона с правами root
adb usb Перезапуск демона, прослушивающего USB.
adb tcpip Перезапуск демона, прослушивающего порт TCP.
adb ppp [параметры] Запуск службы через USB.
Note: you should not automatically start a PPP connection. refers to the tty for PPP stream. Eg. dev:/dev/omap_csmi_tty1
Параметры:
defaultroute debug dump local notty usepeerdns
FastBoot — консольное приложение для PC. Используется для действий над разделами
fastboot devices Список присоединенных устройств в режиме fastboot.
fastboot flash Прошивает файл .img в раздел устройства.
fastboot erase Стереть раздел.
Разделы: boot, recovery, system, userdata, radio
Пример: fastboot erase userdata Стирание пользовательских данных.
fastboot update Прошивка из файла имя_файла.zip
fastboot flashall Прошивка boot + recovery + system.
fastboot getvar Показать переменные bootloader.
Пример: fastboot getvar version-bootloader Получить версию bootloader.
fastboot boot [ ] Скачать и загрузить kernel.
fastboot flash:raw boot [ ] Создать bootimage и прошить его.
fastboot devices Показать список подключенных устройств.
fastboot continue Продолжить с автозагрузкой.
fastboot reboot Перезагрузить аппарат.
f astboot reboot-bootloader Перезагрузить девайсв режим bootloader.
Перед командами fastboot можно использовать ключи:
-w стереть данные пользователя и кэш
-s Указать серийный номер устройства.
-p
Указать название устройства.
-c Переопределить kernel commandline.
-i Указать вручную USB vendor id.
-b Указать в ручную базовый адрес kernel.
-n
Указать размер страниц nand. по умолчанию 2048.
Команду logcat можно использовать с машины разработки
$ adb logcat
или из удаленного shell
# logcat Каждое сообщение лога в Android имеет тэг и приоритет
Тэг – это строка указывающая компонент системы, от которого принято сообщение (например: View для системы view)
Приоритет – имеет одно из нижеследующих значений (в порядке от меньшего к большему):
V — Verbose (Низший приоритет).
D — Debug
I — Info
W — Warning
E — Error
F — Fatal
S — Silent (Наивысший приоритет, при котором ничего не выводится).
Получить список тэгов, используемых в системе, вместе с их приоритетами можно запустив logcat. В первых двух столбцах каждого из выведенных сообщений будут указаны / .
Пример выводимого logcat сообщения:
I/ActivityManager( 585): Starting activity: Intent
Для уменьшения вывода лога до приемлемого уровня нужно использовать выражения фильтра. Выражения фильтра позволяют указать системе нужные комбинации и , остальные сообщения система не выводит.
Выражения фильтра имеют следующий формат : . где указывает нужный тэг, указывает минимальный уровень приоритета для выбранного тэга. Сообщения с выбранным тэгом и приоритетом на уровне или выше указанного записываются в лог. Можно использовать любое количество пар : в одном выражении фильтра. Для разделения пар : используется пробел.
Пример ниже выводит в лог все сообщения с тэгом «ActivityManager» с приоритетом «Info» или выше, и сообщения с тэгом «MyApp» и приоритетом «Debug» или выше:
adb logcat ActivityManager:I MyApp:D *:S
Последний элемент в выражении фильтра *:S устанавливает приоритет «silent» для всех остальных тэгов, тем самым обеспечивая вывод сообщений только для «View» и «MyApp». Использование *:S – это отличный способ для вывода в лог только явно указанных фильтров (т.е. в выражении фильтра указывается «белый список» сообщений, а *:S отправляет все остальное в «черный список»).
При помощи следующего выражения фильтра отображаются все сообщения с приоритетом «warning» или выше для всех тэгов:
adb logcat *:W
Если logcat запускается на машине разработчика (не через удаленный adb shell), можно также установить значение выражения фильтра по умолчанию задав переменную окружения ANDROID_LOG_TAGS:
export ANDROID_LOG_TAGS=»ActivityManager:I MyApp:D *:S»
Следует обратить внимание что задав переменную окружения ANDROID_LOG_TAGS она не будет работать в эмуляторе/устройстве, если вы будете использовать logcat в удаленном shell или используя adb shell logcat.
Вышеописанная команда export работает в ОС *nix и не работает в Windows.
Контроль формата вывода лога
Сообщения лога в дополнение к тэгу и приоритету содержат несколько полей метаданных. Можно изменять формат вывода сообщений показывая только конкретные поля метаданных. Для этого используется параметр -v и указывается один из ниже перечисленных форматов вывода.
brief Показывать приоритет/тэг и PID процесса (формат по умолчанию).
process Показывать только PID.
tag Показывать только приоритет/тэг.
thread Показывать только процесс:поток и приоритет/тэг.
raw Показать необработанное сообщение, без полей метаданных.
time Показывать дату, время вызова, приоритет/тэг и PID процесса.
long Показывать все поля метаданных и отдельно сообщения с пустыми строками.
При запуске logcat можно указать формат вывода используя параметр -v:
adb logcat [-v
Источник
Android ADB Sideloading – Install & Update ROMs
Last updated on November 13, 2019 By Abhijith V M Leave a Comment
ADB sideload is a feature in Android Debug Bridge (ADB) which allows you to flash a custom ROM or stock ROM zip file via entering the command on your computer.
Contents Of This Article
What Is Android Debug Bridge (ADB)?
The purpose of such a feature in the Android OS was to help developers and programmers to debug their applications with the help of their computer. You can connect your Android device to your PC via a USB cable and enter many terminal commands to control and manipulate data and update system files in your Android device. ADB works by running a software on your system (Windows, Linux, Mac) and the other one on your mobile device. The features of ADB ranges from controlling your device from your computer to sending files to your phone, installing apps from your computer and even running many advanced commands.
What is ADB Sideload?
Android sideloading feature was first added to JellyBean. The default recovery that comes with every Android phone now supports ADB. Over the years, many custom recovery tools like TWRP has come up with support for ADB sideloading. I have given you a brief explanation of what is sideloading in the first line of this article. If you are a geek and want to know more, you may keep reading. Otherwise, you should jump to the next headings or whatever it is that you came here for.
For a normal person, sideloading may not be that useful. But for custom ROM developer, it can be a life saver. Since all the development activities are conducted in a computer, and the developer (you) will be using your phone to test it out, ADB can be a lifesaver and a time saver in those occasions. When you have finished compiling your custom ROM and want to flash it to your device, all you have to do is enter a few commands (link to proper section) and your system will push the compiled ROM file to your device and flash it. This saves you tons of time. The alternate to this is, manually copying and pasting the custom ROM to your Android device storage, booting into recovery, entering the option to select the ZIP file to flash and then flashing it. ADB sideload saves you a lot of time by finishing all these individual tasks in a few keystrokes. You don’t have to be a developer to use ADB. Almost all the commands are available online and its pretty simple to understand too.
Warning: If and when you decide to test out ADB commands, you should keep in mind that if you don’t realize what you are doing, it could potentially damage and brick your device.
How To Install ADB?
Installing ADB in your system is pretty simple these days. When I say these days, what I really mean is, it was a gigantic pain in the butt back in the day. We had to download the complete Android Software Development Kit (SDK) to simply enable debug bridge on your PC. But Google released a standalone ZIP package which contains ADB and Fastboot files. So the process of installing ADB drivers and other necessary files in your system just got a lot less complicated.
Download ADB & Fastboot Files Without Downloading The Whole SDK
You can go to Google’s official SDK platform tools to download the ADB and Fastboot package.
You have to select the OS to download the proper ADB package. It’s only under 10 MB, so it won’t make your data drain like before.

Google will ask you to accept the terms and conditions. Simply tick the checkbox and click on the download button
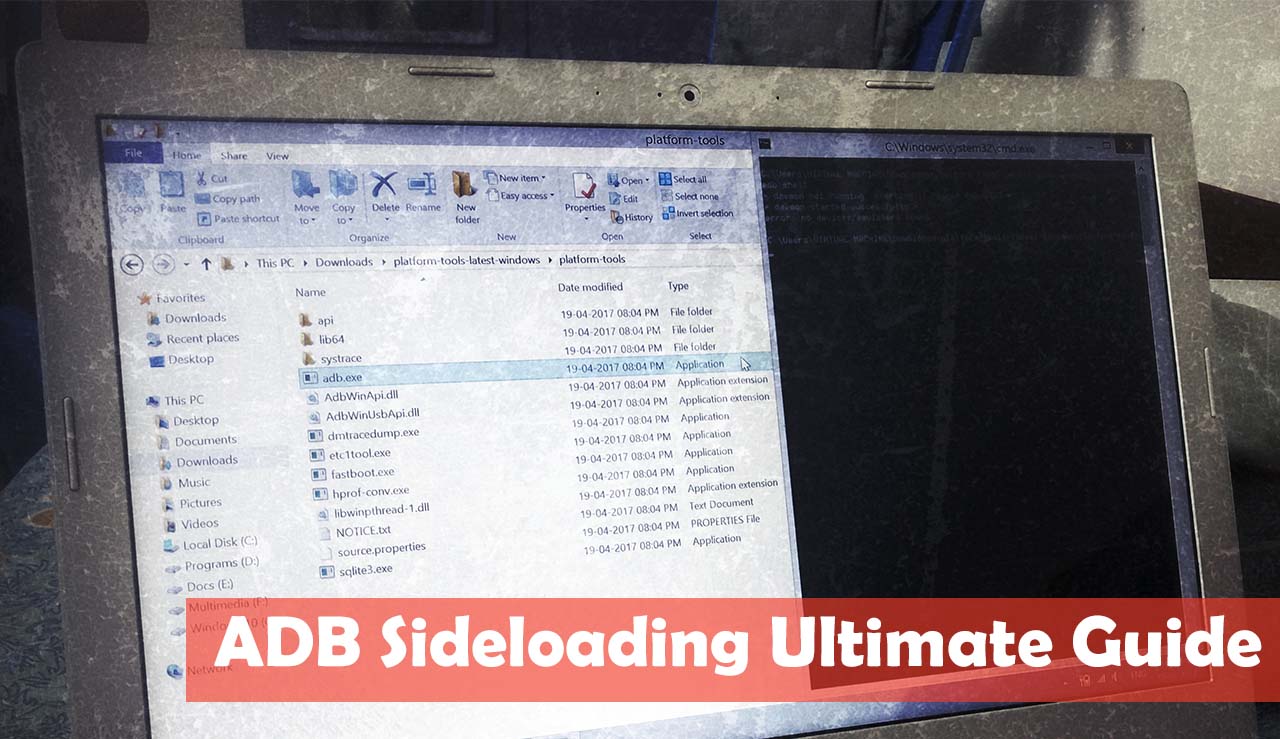
After downloading, extract the ZIP file to any folder. You will now notice that the folder contains almost all the files you need to run ADB commands.
Before You Start Using ADB
There are certain things you have to do before you start using ADB for sideloading and flashing ROMs. The first and foremost is enabling USB debugging mode on your phone.
You remember that ADB stands for Android Debug Bridge right?
Since debug is the key term here, you have to enable debugging over USB cable by going into your phone’s settings. You can follow the below steps.
- Go to settings.
- Go to developer options.
- If you don’t see this option, then go to Settings -> About ->. Tap on the “build number” 8 times or until you see “You are now a developer”. Now go back to settings and you will see developer options.
- Under developer options, you’ll see USB Debugging. Just enable the option. You’ll get a warning, message. Just tap OK and you’ll be fine.

The second thing you have to take care before using ADB is to make sure you have installed the proper drivers for your device. This is pretty basic. Your device cannot establish a successful connection unless your computer has all the necessary drivers needed to make that connection happen. You can get the drivers from your phone/tablet manufacturer’s website. Most of the modern Android devices installs drivers automatically upon connecting via USB.
Using ADB The Right Way
Testing Whether Your Phone Is Connected Properly
Since all the operations in ADB are via commands, we are going to use one of the very very useful ADB commands to test whether your phone is connected properly and ADB detects it.
I hope you have followed the step above to download ADB files. After downloading, you have to extract those files into a folder. Also before attempting to test the phone, make sure you have followed other steps mentioned above. Note that the below steps are explained for Windows users only.
- Go to the folder in which you have extracted the files.
- Hold down the shift key and right-click anywhere.
- Now select the option “Open command window here“
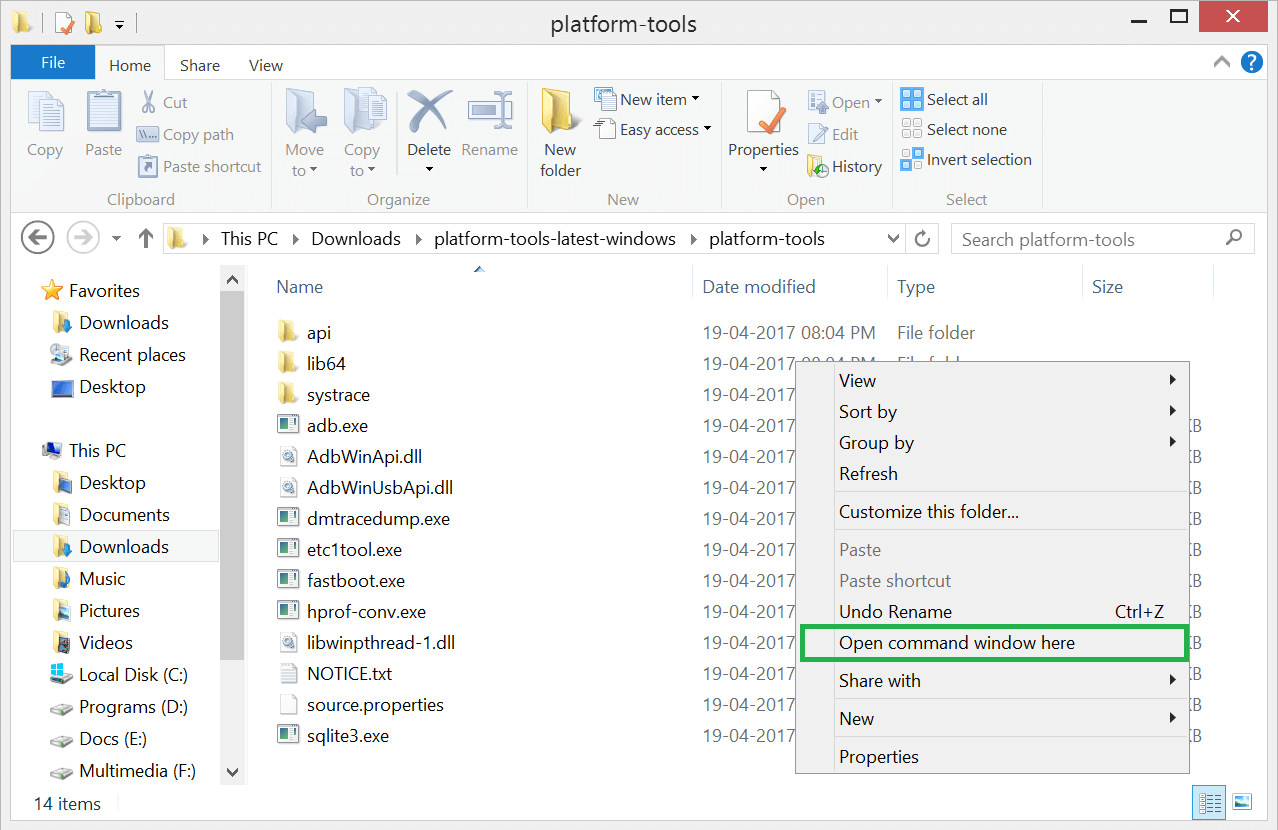
- You’ll see the command prompt opened.
- It’s time to enter the commands which we have been talking from the beginning
- Type the below code to see if your device is connected properly and is detected via ADB.
ADB devices

If you don’t see a list of devices on the screen, then you probably don’t have proper drivers or have missed any of the above steps.
Using ADB Sideload To Apply Update Packages And Flash ROMs
Let’s get to the core part of this tutorial. After all the testings are completed and you have made sure connection is established properly, let’s see how we can push the update ZIP package from your PC to your Android phone and run commands to flash the ZIP package from your computer.
The first thing you need is a recovery that supports ADB. No need to worry about having a custom recovery. The default one that comes with your phone already supports ADB. But those who are using a custom recovery which is found on sites like XDA developers should make sure that the custom recovery which you are using should support ADB and operation via ADB commands.
Once you have everything set up, follow the below steps to copy your ROM ZIP file to your phone and flash it.
Boot your device into fastboot mode
If you don’t know how to boot into fastboot mode, then I suggest you Google it. The method varies from device to device. There is no universal method to boot into fastboot mode.
Some devices like One Plus 3 have inbuilt option to reboot into bootloader. Check the screenshot below. I am able to boot into fastboot mode just by tapping on the reboot option. But some other devices don’t have this option. So you will have to search for how to enter into fastboot mode and then boot your phone into fastboot mode.

Once you are in fastboot mode, enter the below command to push the ROM zip file to your device
ADB sideload packagename.zip
Replace the packagename with the name of the custom ROM ZIP file you are flashing. This will send the package to your phone and flash it automatically.
Note: The ROM ZIP and the ADB files should be in the same folder for this to work.
Entering the above command will flash the package you sent. You might lose all your data. It is recommended to backup everything before you proceed. We are assuming you know what exactly you are flashing on your phone.
Difference Between ADB Sideload Command And Fastboot Flash Command
The main difference is that ADB sideload will send the ROM to the phone and flash it as a whole. But fastboot flash command can flash individual partitions. Fastboot commands are mainly used to flash stock ROMs. These ROMs comes in multiple files, instead of a single ZIP file. There are plenty of other commands supported by fastboot.
List Of Useful ADB Commands
This is a list of useful ADB commands. You can try out these after connecting your device. But be careful what commands you are entering, as the commands can modify system files, and might render your phone useless.
| Command | Function |
|---|---|
| adb version | Displays the version number of ADB you are using |
| adb devices | Displays the list of devices attached by their ID. Can be used for testing whether device is connected properly or not. |
| adb install %path of apk% | If you replace the path with a location of an APK file, the app will get installed. |
| adb logcat path | Replace the path with any folder location and you will get log data for your device. This command is not much useful to normal users. But developers can use this for debugging. |
| adb push %source path% %destination path% | Send a file located in the source path to the destination path. Source has to be on your PC and destination has to be on your phone. |
| adb pull %source path% %destination path% | Pulls a file from the source path to the destination path. Source is on the phone and destination is your computer. |
Common Error And Troubleshooting Tips
It is not uncommon, especially for beginners, to run into some kind of trouble when using ADB for the first time. Here are some of the most commons errors and their solutions. Since the problem could be due to a variety of issues, instead of describing each solution, useful external resources are given here. Do not hesitate comment in this post if you run into any trouble that is not described here.
ADB showing “error: closed”
How to fix ADB sideload cannot read zip file error
If yu are getting adb cannot read error while triying to flash, try the following methods. The reality is, this error could cause from a number of issues. So it’s upto you to indentify it. The best way to make sure you don’t get stuck in zip file read error is to make sure you follow the tutorial exactly as it is.
- Make sure the zip file is not corrupted. Download again if necessary.
- Make sure your phone is on the correct recovery tool.
- Ensure the zip file is in the correct directory. It should be put in the same folder where ADB tool are located.
- Try reinstalling the USB drivers
Final Words
We have tried our best to produce the ultimate tutorial you’ll ever require regarding ADB. If you think we have missed out anything, need clarification on any of the section, or have something to ask us, please use the comment section below. And always be cautious while running ADB commands, as it could possibly brick your phone. Thanks for the read. Subscribe for more in-depth tutorials.
About Abhijith V M
SEO by profession, blogger by passion and engineer by mistake. Follow me on Facebook and Twitter
Источник
I studied the source code of adb, debugged with gdb and finally found the root cause.
Basically, in order to respond to the host command adb shell, adbd (the daemon running on Android device) should open a pseudo terminal, and fork another child process for running shell. These are implemented in create_subproc_pty function in system/core/adb/services.c:
static int create_subproc_pty(const char *cmd, const char *arg0, const char *arg1, pid_t *pid)
{
    ....

    int ptm;

    ptm = unix_open("/dev/ptmx", O_RDWR | O_CLOEXEC); // | O_NOCTTY);
    if(ptm < 0){
        printf("[ cannot open /dev/ptmx - %s ]n",strerror(errno));
        return -1;
    }

    ....

    *pid = fork();
    if(*pid < 0) {
        printf("- fork failed: %s -n", strerror(errno));
        adb_close(ptm);
        return -1;
    }

    ....
}
And I found on my dev-board, the unix_open function failed. That’s because PTY driver was not built into kernel, so the device /dev/ptmx is not found on the system.
To solve this, just select Character Devices - Unix98 PTY driver and rebuild kernel, then adb shell will work.

ADB sideload, как пользоваться. Команда adb sideload очень прекрасна и с помощью ее можно легко выполнить обновление прошивки или выполнить восстановление Android в случае если он не загружается!
Еще раз о том для чего нужна команда ADB SIDELOAD — данная команда необходима для того чтобы выполнять прошивку ZIP архивов из меню recovery или если отсутствует bootloader. У данной команды есть аналог fastboot -w update, но у многих Android девайсов утилита fastboot не работает, соответственно adb sideload является универсальным средством.
Принцип работы ADB Sideload
ZIP архив-обновление находится в папке с утилитой adb, смартфон или планшет переводится в режим recovery или bootloader. Запускается утилита adb и прописывается командаadb sideload <название_файла>.zip, после чего архив копируется в Android и затем прошивается.
Необходимое для ADB Sideload
- Компьютер или ноутбук
- Скачать драйвер Android и после установить его
- Скачать программу — ADB RUN или ADB
- Заряд Android устройства не меньше 40% или больше
- Оригинальный, неповрежденный кабель MicroUSB
- Включить Отладка по USB на Android
- ZIP архив-обновление
Инструкция использования ADB Sideload
В данной статье будет предложено два варианта как можно воспользоваться adb sideload, первый способ — демонстрация как все работает от начала до конца, второй способ — автоматизированный, без лишних действий и писанины руками.
Способ №1
1. Подключаем устройство Android к компьютеру
2. Файл ZIP архив-обновление переместить по пути C:/adb/progbin
3. Запускаем программу ADB RUN или переходим в меню Manual Command -> ADB

4. Далее проверим «видит» ли adb ваш Android для этого наберем команду:
adb devicesИ должны получить следующий ответ:
C:/ADB/adb/progbin> adb devicesList of devices attached NA36XWxxxххххх
Если получим ответ (ошибка):
C:/ADB/adb/progbin> adb devices List of devices attached
NA36XWxxxххххх offline
То необходимо сделать компьютер доверенным.
Если получим ответ (ошибка):
C:/ADB/adb/progbin> adb devices List of devices attached
То есть ничего нет, после attached, то устройство не видно (переустанавливаем драйвера, меняем порт USB, меняем кабель USB)
5. Переводим устройство в режим Recovery или режим Bootloader
6. В зависимости от Recovery в некоторых случаях необходимо включать принудительно включать на устройстве режим передачи и установки Sideload:
Если у вас стандартное или CWM Recovery оно может называться
- install zip from sileload
- apply update from ADB
- ADB Sideload
и находится это меню может в главном разделе Recovery, раздел Advanced или Install ZIP.

Если у вас TWRP Recovery
Чтобы активировать sideload перейдите в Advanced -> ADB Sideload и потянуть нижний ползунок вправо:

Далее все остальные действия происходят на компьютере.
7. В ADB RUN пишем следующую команду:
adb sideload XXXXXXXX.zip
Где XXXXXXXX — точное название прошиваемого ZIP обновления (учитывая ЗаГЛАвные или строЧНЫЕ, как написано, названия иначе получите ошибку)
После чего начнется перемещение обновления (прошивки) на Android и обновление.
- Если вы получили ошибку error: closed — не активировали sideload на Android
- Если вы получили ошибку error: device not found — не видит Android, меняйте ядро, recovery, перезапустить Android и снова перевести в режим.
Способ №2
1. Подключаем устройство Android к компьютеру
2. Запускаем программу ADB RUN и переходим в меню Reboot Device -> выбрать Reboot Recovery или Reboot Bootloader (если нет на устройстве Recovery)
3. Активируем sideload на устройстве

4. Вернуться в главное меню и перейти в меню Move -> Sideload

5. Выбрать вначале пункт Copy ZIP to Directory, в открывшееся окно переместить ZIP архив-обновление, после закрыть окно
6. Выбрать Istall ZIP после чего, выбрать прошиваемый файл, после чего начнется прошивка.
- Если вы получили ошибку error: closed — не активировали sideload на Android;
- Если вы получили ошибку error: device not found — не видит Android, меняйте ядро, recovery, перезапустить Android и снова перевести в режим.
Hello! I’m trying to install LineageOS 15.1 on my Pixel (sailfish). I’ve been following the official steps, but I’m running into a problem with getting OpenGapps Pico installed.
Setup:
-
Windows 10
-
Latest USB drivers and platform-tools
-
Command prompt (admin mode)
-
July Oreo build of stock Android as base ( sailfish-opm4.171019.021.p1-factory-0bcf4315.zip )
-
LineageOS 15.1 ( lineage-15.1-20181113-nightly-sailfish-signed.zip )
-
OpenGapps Pico ( open_gapps-arm64-8.1-pico-20181113.zip )
-
TWRP ( twrp-3.2.3-1-sailfish.img )
Steps followed:
-
Booted to bootloader (slot B)
-
Flashed stock
-
Booted into stock, set up PIN, enabled USB debugging
-
Rebooted to bootloader
-
Switched to slot A (fastboot —set-active=a)
-
Flashed stock
-
Booted into stock, set up PIN, enabled USB debugging
-
Rebooted to bootloader
-
Booted to TWRP
-
Went into Wipe and clicked Format Data
-
Then went into Advanced Wipe and selected only the System partition, then wiped
-
Copied the latest LineageOS 15.1 build and OpenGapps to the phone via ADB push to /sdcard/
-
Flashed LineageOS
-
Rebooted to recovery, which took me to the LineageOS recovery
-
Flashed OpenGapps… which failed
I went to the «apply update section» and chose the ADB sideload method. Then I ran «adb devices» and verified it could see my device in sideload mode. I ran «adb sideload open_gapps-arm64-8.1-pico-20181113.zip», which I believe actually pulled from the folder I was in on my computer.
It briefly reported an error about being unable to mount /media. Then it gave a verification failed message, but I told it to try anyway. Then it gave me this:
«Error! Installer will now exit… Error Code: 70
-
Unmounting /data /persist
E:Error in /sideload/package.zip (Status 70) Restarting adb… Installation aborted.»
I started over from scratch and tried again, making sure that the /system partition wasn’t resized after LOS installed. This time when I entered sideload mode and after making sure the phone was being seen by ADB, I tried running «adb shell» and got this error: «error: closed«. This seems to be why OpenGapps couldn’t install, or at least part of the reason. I couldn’t find any solutions to getting past this. The most popular answers I was finding after a couple hours of Googling were «update your ADB to latest» and «use TWRP».
Edit: I forgot to mention I’ve also tried «adb kill-server» and «adb start-server», which didn’t do anything, as well as doing «adb kill-server» and «adb usb», which still gave me the «error: closed» message.
I know I’m not supposed to flash TWRP as the recovery, but do I have any other option here? Can I reboot to bootloader instead of recovery after flashing LOS, and then boot into TWRP again without screwing up the current partition setup? I’m trying to follow the official instructions as they’re written… is it possible that they’re wrong or outdated?
ADB sideload is a feature in Android Debug Bridge (ADB) which allows you to flash a custom ROM or stock ROM zip file via entering the command on your computer.
Contents Of This Article
- 1 What Is Android Debug Bridge (ADB)?
- 2 What is ADB Sideload?
- 3 How To Install ADB?
- 3.1 Download ADB & Fastboot Files Without Downloading The Whole SDK
- 3.2 Before You Start Using ADB
- 4 Using ADB The Right Way
- 4.1 Testing Whether Your Phone Is Connected Properly
- 4.2 Using ADB Sideload To Apply Update Packages And Flash ROMs
- 4.3 Difference Between ADB Sideload Command And Fastboot Flash Command
- 5 List Of Useful ADB Commands
- 6 Common Error And Troubleshooting Tips
- 6.1 ADB showing “error: closed”
- 6.2 How to fix ADB sideload cannot read zip file error
- 7 Final Words
What Is Android Debug Bridge (ADB)?
The purpose of such a feature in the Android OS was to help developers and programmers to debug their applications with the help of their computer. You can connect your Android device to your PC via a USB cable and enter many terminal commands to control and manipulate data and update system files in your Android device. ADB works by running a software on your system (Windows, Linux, Mac) and the other one on your mobile device. The features of ADB ranges from controlling your device from your computer to sending files to your phone, installing apps from your computer and even running many advanced commands.
Android sideloading feature was first added to JellyBean. The default recovery that comes with every Android phone now supports ADB. Over the years, many custom recovery tools like TWRP has come up with support for ADB sideloading. I have given you a brief explanation of what is sideloading in the first line of this article. If you are a geek and want to know more, you may keep reading. Otherwise, you should jump to the next headings or whatever it is that you came here for.
For a normal person, sideloading may not be that useful. But for custom ROM developer, it can be a life saver. Since all the development activities are conducted in a computer, and the developer (you) will be using your phone to test it out, ADB can be a lifesaver and a time saver in those occasions. When you have finished compiling your custom ROM and want to flash it to your device, all you have to do is enter a few commands (link to proper section) and your system will push the compiled ROM file to your device and flash it. This saves you tons of time. The alternate to this is, manually copying and pasting the custom ROM to your Android device storage, booting into recovery, entering the option to select the ZIP file to flash and then flashing it. ADB sideload saves you a lot of time by finishing all these individual tasks in a few keystrokes. You don’t have to be a developer to use ADB. Almost all the commands are available online and its pretty simple to understand too.
Warning: If and when you decide to test out ADB commands, you should keep in mind that if you don’t realize what you are doing, it could potentially damage and brick your device.
How To Install ADB?
Installing ADB in your system is pretty simple these days. When I say these days, what I really mean is, it was a gigantic pain in the butt back in the day. We had to download the complete Android Software Development Kit (SDK) to simply enable debug bridge on your PC. But Google released a standalone ZIP package which contains ADB and Fastboot files. So the process of installing ADB drivers and other necessary files in your system just got a lot less complicated.
Download ADB & Fastboot Files Without Downloading The Whole SDK
You can go to Google’s official SDK platform tools to download the ADB and Fastboot package.
You have to select the OS to download the proper ADB package. It’s only under 10 MB, so it won’t make your data drain like before.
Google will ask you to accept the terms and conditions. Simply tick the checkbox and click on the download button
After downloading, extract the ZIP file to any folder. You will now notice that the folder contains almost all the files you need to run ADB commands.
Before You Start Using ADB
There are certain things you have to do before you start using ADB for sideloading and flashing ROMs. The first and foremost is enabling USB debugging mode on your phone.
You remember that ADB stands for Android Debug Bridge right?
Since debug is the key term here, you have to enable debugging over USB cable by going into your phone’s settings. You can follow the below steps.
- Go to settings.
- Go to developer options.
- If you don’t see this option, then go to Settings -> About ->. Tap on the “build number” 8 times or until you see “You are now a developer”. Now go back to settings and you will see developer options.
- Under developer options, you’ll see USB Debugging. Just enable the option. You’ll get a warning, message. Just tap OK and you’ll be fine.
The second thing you have to take care before using ADB is to make sure you have installed the proper drivers for your device. This is pretty basic. Your device cannot establish a successful connection unless your computer has all the necessary drivers needed to make that connection happen. You can get the drivers from your phone/tablet manufacturer’s website. Most of the modern Android devices installs drivers automatically upon connecting via USB.
Using ADB The Right Way
Testing Whether Your Phone Is Connected Properly
Since all the operations in ADB are via commands, we are going to use one of the very very useful ADB commands to test whether your phone is connected properly and ADB detects it.
I hope you have followed the step above to download ADB files. After downloading, you have to extract those files into a folder. Also before attempting to test the phone, make sure you have followed other steps mentioned above. Note that the below steps are explained for Windows users only.
- Go to the folder in which you have extracted the files.
- Hold down the shift key and right-click anywhere.
- Now select the option “Open command window here“
- You’ll see the command prompt opened.
- It’s time to enter the commands which we have been talking from the beginning
- Type the below code to see if your device is connected properly and is detected via ADB.
ADB devices
If you don’t see a list of devices on the screen, then you probably don’t have proper drivers or have missed any of the above steps.
Using ADB Sideload To Apply Update Packages And Flash ROMs
Let’s get to the core part of this tutorial. After all the testings are completed and you have made sure connection is established properly, let’s see how we can push the update ZIP package from your PC to your Android phone and run commands to flash the ZIP package from your computer.
The first thing you need is a recovery that supports ADB. No need to worry about having a custom recovery. The default one that comes with your phone already supports ADB. But those who are using a custom recovery which is found on sites like XDA developers should make sure that the custom recovery which you are using should support ADB and operation via ADB commands.
Once you have everything set up, follow the below steps to copy your ROM ZIP file to your phone and flash it.
Boot your device into fastboot mode
If you don’t know how to boot into fastboot mode, then I suggest you Google it. The method varies from device to device. There is no universal method to boot into fastboot mode.
Some devices like One Plus 3 have inbuilt option to reboot into bootloader. Check the screenshot below. I am able to boot into fastboot mode just by tapping on the reboot option. But some other devices don’t have this option. So you will have to search for how to enter into fastboot mode and then boot your phone into fastboot mode.
Once you are in fastboot mode, enter the below command to push the ROM zip file to your device
ADB sideload packagename.zip
Replace the packagename with the name of the custom ROM ZIP file you are flashing. This will send the package to your phone and flash it automatically.
Note: The ROM ZIP and the ADB files should be in the same folder for this to work.
Entering the above command will flash the package you sent. You might lose all your data. It is recommended to backup everything before you proceed. We are assuming you know what exactly you are flashing on your phone.
Difference Between ADB Sideload Command And Fastboot Flash Command
The main difference is that ADB sideload will send the ROM to the phone and flash it as a whole. But fastboot flash command can flash individual partitions. Fastboot commands are mainly used to flash stock ROMs. These ROMs comes in multiple files, instead of a single ZIP file. There are plenty of other commands supported by fastboot.
List Of Useful ADB Commands
This is a list of useful ADB commands. You can try out these after connecting your device. But be careful what commands you are entering, as the commands can modify system files, and might render your phone useless.
| Command | Function |
|---|---|
| adb version | Displays the version number of ADB you are using |
| adb devices | Displays the list of devices attached by their ID. Can be used for testing whether device is connected properly or not. |
| adb install %path of apk% | If you replace the path with a location of an APK file, the app will get installed. |
| adb logcat path | Replace the path with any folder location and you will get log data for your device. This command is not much useful to normal users. But developers can use this for debugging. |
| adb push %source path% %destination path% | Send a file located in the source path to the destination path. Source has to be on your PC and destination has to be on your phone. |
| adb pull %source path% %destination path% | Pulls a file from the source path to the destination path. Source is on the phone and destination is your computer. |
Common Error And Troubleshooting Tips
It is not uncommon, especially for beginners, to run into some kind of trouble when using ADB for the first time. Here are some of the most commons errors and their solutions. Since the problem could be due to a variety of issues, instead of describing each solution, useful external resources are given here. Do not hesitate comment in this post if you run into any trouble that is not described here.
ADB showing “error: closed”
Solutions :
XDA Forum
Android Forums
How to fix ADB sideload cannot read zip file error
If yu are getting adb cannot read error while triying to flash, try the following methods. The reality is, this error could cause from a number of issues. So it’s upto you to indentify it. The best way to make sure you don’t get stuck in zip file read error is to make sure you follow the tutorial exactly as it is.
- Make sure the zip file is not corrupted. Download again if necessary.
- Make sure your phone is on the correct recovery tool.
- Ensure the zip file is in the correct directory. It should be put in the same folder where ADB tool are located.
- Try reinstalling the USB drivers
Final Words
We have tried our best to produce the ultimate tutorial you’ll ever require regarding ADB. If you think we have missed out anything, need clarification on any of the section, or have something to ask us, please use the comment section below. And always be cautious while running ADB commands, as it could possibly brick your phone. Thanks for the read. Subscribe for more in-depth tutorials.