Issue
- Running command ‘pcs cluster status’ there is a message ‘Error: cluster is not currently running on this node’ even when the cluster was started using command ‘pcs cluster start’
- In the logs there are messages like below
warning: Verify pacemaker and pacemaker_remote are not both enabled.lrmd[XXXXX]: error: Could not bind AF_UNIX (): Address already in use (98)attrd[XXXXX]: error: Could not bind AF_UNIX (): Address already in use (98)cib[XXXXX]: error: Could not bind AF_UNIX (): Address already in use (98)
Environment
- Red Hat Enterprise Linux 7 with High-Availability Pacemaker Add-on
Subscriber exclusive content
A Red Hat subscription provides unlimited access to our knowledgebase, tools, and much more.
Current Customers and Partners
Log in for full access
Log In
uses Corosync or heartbeat, (it seems) corosync is the one to go for.
Links
- Cluster Labs
- Pacemaker resource agents on github
- Linux-HA manpages
- pacemaker quickstart
- https://github.com/ClusterLabs/pacemaker/blob/master/doc/pcs-crmsh-quick-ref.md
- Pacemaker Architecture
- Pacemaker explained
- pcs command resference
- Pacemaker and pcs on Linux example, managing cluster resource
- Building a high-available failover cluster with Pacemaker, Corosync & PCS
- HIGH AVAILABILITY ADD-ON ADMINISTRATION
- How To Create a High Availability Setup with Corosync, Pacemaker, and Floating IPs on Ubuntu 14.04
- http://fibrevillage.com/sysadmin/304-pcs-command-reference
- http://wiki.lustre.org/Creating_Pacemaker_Resources_for_Lustre_Storage_Services
- Pacemaker and pcs on Linux example, managing cluster resource
- Cheatsheet
- Pacemaker cheat sheet
- PCS tips&tricks
- Mandatory and advisory ordering in Pacemaker
- http://clusterlabs.org/pacemaker/doc/en-US/Pacemaker/1.1/html/Clusters_from_Scratch/_specifying_a_preferred_location.html
- resource sets
- History of HA clustering
- The OCF Resource Agent Developer’s Guide
- https://clusterlabs.org/pacemaker/doc/en-US/Pacemaker/2.0/html/Pacemaker_Administration/_visualizing_the_action_sequence.html]
- Implications of Taking Down a Cluster Node
- Corosync + Pacemaker + CRMSH Build a web high available cluster
Notes
by specifying -INFINITY, the constraint is binding.
Quickstart
Keep in mind you might want to use dedicated IPs for sync, so define those in /etc/hosts On both nodes
- set password
passwd hacluster
systemctl start pcsd.service
systemctl enable pcsd.service
Commands/tools
- crm
- crmadmin
- cibadm
- pcs
- corosync
Useful commands
save entire config
pcs config backup configfile
Dump entire crm
cibadm -Q
HOWTO
Groups
Add existing resource to group
pcs resource group add GROUPID RESOURCEID
Stop resource group
pcs resource disable MYGROUP
See if entire group is disabled
pcs resource show MYGROUP
Meta Attrs: target-role=Stopped
FAQ
Update resource
pcs resource update resourcname variablename=newvalue
Current DC
In output of
pcs status
this is Designated Controller
Remove resource group + members
pcs resource delete whateverresource
Move resource to node
pcs resource move RES NODE
Show default resource stickiness
pcs resource default
Set resource stickiness
pcs resource meta <resource_id> resource-stickiness=100
and to check:
pcs resource show <resource_id>
Or better yet:
crm_simulate -Ls
Undo resource move
pcs constraint --full
Location Constraints:
  Resource: FOO
    Enabled on: santest-a (score:INFINITY) (role: Started) (id:cli-prefer-FOO)
pcs constraint remove cli-prefer-FOO
pcs status: Error: cluster is not currently running on this node
Don’t panic until after
sudo pcs status
show detailed resources
pcs resource --full
stop node (standby)
The following command puts the specified node into standby mode. The specified node is no longer able to host resources. Any resources currently active on the node will be moved to another node. If you specify the —all, this command puts all nodes into standby mode.
pcs cluster standby node-1
or
pcs node standby
on the node itself
and undo this with
pcs cluster unstandby node-1
or
pcs node unstandby
set maintenance mode
This sets the cluster in maintenance mode, so it stops managing the resources
pcs property set maintenance-mode=true
Error: cluster is not currently running on this node
pcs cluster start [<node name>]
Remove a constraint
pcs constraint list --full
to identify the constraints and then
pcs constraint remove <whatever-constraint-id>
Clear error messages
pcs resource cleanup
Call cib_replace failed (-205): Update was older than existing configuration
can be run only once
[Error signing on to the CIB service: Transport endpoint is not connected ]
probably selinux
Show allocation scores
crm_simulate -sL
Show resource failcount
pcs resource failcount show <resource>
export current configuration as commands
pcs config export pcs-commands
debug resource
pcs resource debug-start resource
*** Resource management is DISABLED *** The cluster will not attempt to start, stop or recover services
Cluster is in maintenance mode
Found meta data is «unclean», please apply-al first
Troubleshooting
- Debugging the policy engine
pcs status all resources stopped
probably a bad ordering constraint
Fencing and resource management disabled due to lack of quorum
Problably means you forgot to pcs cluster start the other node
Resource cannot run anywhere
Check if some stickiness was set
pcs resource update unable to find resource
Trying to unset stickiness:
pcs resource update ISCSIgroupTEST1 meta resource-stickiness=
caused: Error: Unable to find resource: ISCSIgroupTEST1
what his means is: try it on the host where stickiness was set 
Difference between maintenance-mode and standby
Still not clear
drbdadm create-md test3 ‘test3’ not defined in your config (for this host).
You’re supposed to use `hostname` in the ‘on …’ bit
corosync: active/disabled
As far as i can tell means some resources have been disabled
ocf-exit-reason:Undefined iSCSI target implementation
Install scsi-target-utils
moving RES away after 1000000 failures
If failcount is 0, try pcs resource cleanup
7.9.2.1. Резервное копирование настроек кластера
Проверьте состояние кластера Pacemaker выполнением команды (на УУ):
Если УУ не включен в кластер, будет выведено следующее сообщение:
Error: cluster is not currently running on this node
7.9.2.1.1. Контроллеры OpenStack (УУ)
На контроллерах (УУ) следует снимать копии следующих директорий и файлов:
/etc/keystone/
/etc/glance/
/etc/nova/
/etc/neutron/
/etc/cinder/
/etc/httpd/
/etc/openstack-dashboard/
/etc/tionix/
/etc/my.cnf
/etc/my.cnf.d/
/etc/haproxy/
/etc/tionix
/etc/rabbitmq
/var/lib/rabbitmq/
Ниже приведены типовые операции и команды, используемые для бэкапирования
(создания резервных копий).
Бекапирование базы данных:
mysqldump --all-databases | gzip > openstack.sql.gz
Регулярный бэкап по заданному расписанию (cron), без перерыва в обслуживании:
0 2 * * * mysqldump -u root --all-databases --single-transaction --quick --lock-tables=false > /var/lib/mysql/backup/all_db_backup.sql
Восстановление базы данных из файла, содержащего резервную копию БД:
gzip -cd openstack.sql.gz | mysql
Бекапирование конфигурации Pacemaker:
pcs config backup openstack
7.9.2.1.2. Вычислительные узлы (ВУ)
На вычислительных узлах следует снимать резервные копии следующих директорий:
/etc/nova/
/etc/neutron/
/etc/tionix
7.9.2.2. Восстановление ноды (после отказа)
При отказе какой-либо из нод проделайте следующие действия:
-
Переустановите операционную систему CentOS 7.
-
Настройте сетевые интерфейсы.
-
Подключите требуемые репозитории:
yum install epel-release centos-release-openstack-queens
Добавьте файл описания доступа к репозиторию Tionix:
Дальнейшие действия производятся в зависимости от типа восстанавливаемой
ноды (УУ или ВУ).
7.9.2.2.1. Контроллер Openstack (УУ)
Установите (из репозитория) требуемые пакеты:
yum install
haproxy memcached corosync pacemaker pcs
mariadb-galera-server  mariadb-galera-common  mariadb-server-galera
mariaDB-server rabbitmq-server
openstack-keystone httpd mod_wsgi
openstack-glance openstack-nova-api openstack-nova-conductor
openstack-nova-scheduler openstack-nova-novncproxy
openstack-nova-placement-api openstack-neutron openstack-neutron-ml2
openstack-neutron-openvswitch openstack-dashboard openstack-cinder
python-tionix_clientpython-tionix_dashboard python-tionix_licensing
python-tionix_monitor python-tionix_node_control
python-tionix_scheduler python-tionix_vdi_server
Разархивируйте зарезервированные ранее директории с конфигурационными
файлами по своим путям.
Включите системные службы:
systemctl enable
haproxy httpd memcached mariadb
openstack-glance-api openstack-glance-registry openstack-nova-api
openstack-nova-scheduler openstack-nova-conductor
openstack-nova-novncproxy neutron-server neutron-dhcp-agent
neutron-metadata-agent neutron-l3-agent neutron-openvswitch-agent
openstack-cinder-api openstack-cinder-scheduler
tionix-*
Восстановите кластер Pacemaker (Раздел 7.9.2.4) и
кластер Galera (Раздел 7.9.2.3).
Восстановите кластер RabbitMQ (Раздел 7.9.2.5).
7.9.2.2.2. Вычислительный узел
Установите на ВУ требуемые пакеты:
yum install openstack-nova-compute neutron-l3-agent
neutron-metadata-agent neutron-openvswitch-agent
Разархивируйте зарезервированные ранее директории сконфигурационными
файлами по своим путям.
Включите требуемые сервисы:
systemctl enable openstack-nova-compute neutron-l3-agent
neutron-metadata-agent neutron-openvswitch-agent
Перезагрузите ВУ (восстановленную ноду):
7.9.2.3. Восстановление кластера Galera
В случае одновременного отказа всех контроллеров (перезагрузка, либо иная
аварийная ситуация) возможна ситуация, когда ноды Galera отказываются
собираться в кластер без дополнительных действий.
Для восстановления необходимо на всех контроллерах запустить команду:
Будет выведен лог состояния ноды. Среди вывода будет строка следующего
формата:
WSREP: Recovered position <UUID>:1234
где
UUID – (в примере b95919ad-3b5e-48de-a102-516345783738) будет совпадать
между всеми нодами, а число после двоеточия (в примере 1234) является
номер последовательности, которую данная нода видела последней.
Из всех нод необходимо выбрать ту, на которой данный номер последовательности
наибольший (или же любую из нод, если он совпадает), и выполнить на ней
команду:
Выполнение этой команды произведет корректный bootstrap (конфигурацию запуска)
нового кластера.
Остальные ноды необходимо стартовать стандартным для ОС Linux путем:
Если Galera контролируем из Pacemaker, то для восстановления кластера
необходимо перезапустить ресурс Galera кластера. Выполните команду:
pcs resource restart galera_resource
Внимание.
После проделанных выше действий ноды должны присоединиться к новому кластеру.
Проверить состояние кластера можно выполнением SQL-запроса, присоединившись
к какой-либо из нод при помощи клиента СУБД (mysql):
mysql -p -u root -h controller1

> SHOW STATUS LIKE ‘wsrep%’;
7.9.2.4. Восстановление кластера PCS (при потере одной ноды)
Остановите работу кластера:
Удалите выведенную из эксплуатации ноду из кластера:
pcs cluster node remove old_node
Примечание.
Дальнейшие действия производятся на новой ноде (new_node).
Разархивируйте по соответствующим путям конфигурационные файлы для запуска
сервисов, обслуживаемых при помощи PCS.
Задайте пароль пользователю hacluster (на новой ноде):
Запустите и добавьте в автозапуск сервис pcsd:
systemctl start pcsd

systemctl enable pcsd
Аутентифицируйте в кластере новую ноду:
pcs cluster auth new_node
С любой действующей ноды кластера выполните команду:
pcs cluster node add new_node
На новой ноде (new_node) выполнить команду:
Выполните восстановление конфигурации сервисов Pacemaker (на новой ноде):
pcs config restore openstack.tar
На каждой из нод (УУ), включенных в кластер, выполните команду:
7.9.2.5. Восстановление кластера RabbitMQ
Способы решения проблем в работе очереди данных RabbitMQ могут быть найдены в
официальной документации OpenStack.
Разархивируйте каталоги с конфигурационными файлами в соответствующие пути.
Удостоверьтесь, что файлы /var/lib/rabbitmq/.erlang.cookie,
хранящиеся на всех узлах кластера, совпадают друг с другом.
Переименуйте узел кластера, если имя узла отличается:
rabbitmqctl rename_cluster_node <oldnode> <newnode>
Внимание.
Также, следует заменить имя узла во всех конфигурационных файлах.
Запустите службу rabbitmq:
systemctl start rabbitmq-server
Добавьте узел в кластер. Для этого выполните команду:
rabbitmqctl stop_app &&
rabbitmqctl join_cluster rabbit@имя_любого_узла_кластера &&
rabbitmqctl start_app
Удостоверьтесь, что новая нода появилась в кластере:
rabbitmqctl cluster_status
Дополнительная информация о кластеризованном обращении с очередью, влиянии
сетевых неполадок(пропаданием связи между нодами) и опциях восстановления,
может быть найдена в Интернет. Перейдите по ссылке:
In this article, we will see that how to configure two node Redhat cluster using pacemaker & corosync on REHL 7.2. Once you have installed the necessary packages, you need to enable the cluster services at the system start-up. You must start the necessary cluster services before kicking off the cluster configuration. “hacluster” user will be created automatically during the package installation with disabled password. Corosync will use this user to sync the cluster configuration, starting and stopping the cluster on cluster nodes.
Environment:
- Operating System: Redhat Enterprise Linux 7.2
- Type of Cluster : Two Node cluster – Failover
- Nodes: UA-HA & UA-HA2 (Assuming that packages have been installed on both the nodes)
- Cluster Resource : KVM guest (VirtualDomain) – See in Next Article.
Hardware configuration:
- CPU – 2
- Memory – 4GB
- NFS – For shared storage

Enable & Start the Services on both the Nodes:
1.Login to both the cluster nodes as root user.
2. Enable the pcsd daemon on both the nodes to start automatically across the reboot. pcsd is pacemaker configuration daemon. (Not a cluster service)
[root@UA-HA ~]# systemctl start pcsd.service
[root@UA-HA ~]# systemctl enable pcsd.service
Created symlink from /etc/systemd/system/multi-user.target.wants/pcsd.service to /usr/lib/systemd/system/pcsd.service.
[root@UA-HA ~]# systemctl status pcsd.service
● pcsd.service - PCS GUI and remote configuration interface
   Loaded: loaded (/usr/lib/systemd/system/pcsd.service; enabled; vendor preset: disabled)
   Active: active (running) since Sun 2015-12-27 23:22:08 EST; 14s ago
 Main PID: 18411 (pcsd)
   CGroup: /system.slice/pcsd.service
           ├─18411 /bin/sh /usr/lib/pcsd/pcsd start
           ├─18415 /bin/bash -c ulimit -S -c 0 >/dev/null 2>&1 ; /usr/bin/ruby -I/usr/lib/pcsd /usr/lib/pcsd/ssl.rb
           └─18416 /usr/bin/ruby -I/usr/lib/pcsd /usr/lib/pcsd/ssl.rb

Dec 27 23:22:07 UA-HA systemd[1]: Starting PCS GUI and remote configuration interface...
Dec 27 23:22:08 UA-HA systemd[1]: Started PCS GUI and remote configuration interface.
[root@UA-HA ~]#
3. Set the new password for cluster user “hacluster” on both the nodes.
[root@UA-HA ~]# passwd hacluster
Changing password for user hacluster.
New password:
Retype new password:
passwd: all authentication tokens updated successfully.
[root@UA-HA ~]#
[root@UA-HA2 ~]# passwd hacluster
Changing password for user hacluster.
New password:
Retype new password:
passwd: all authentication tokens updated successfully.
[root@UA-HA2 ~]#
Configure corosync & Create new cluster:
1. Login to any of the cluster node and authenticate “hacluster” user.
[root@UA-HA ~]# pcs cluster auth UA-HA UA-HA2
Username: hacluster
Password:
UA-HA: Authorized
UA-HA2: Authorized
[root@UA-HA ~]#
2.Create a new cluster using pcs command.
[root@UA-HA ~]# pcs cluster setup --name UABLR UA-HA UA-HA2
Shutting down pacemaker/corosync services...
Redirecting to /bin/systemctl stop  pacemaker.service
Redirecting to /bin/systemctl stop  corosync.service
Killing any remaining services...
Removing all cluster configuration files...
UA-HA: Succeeded
UA-HA2: Succeeded
Synchronizing pcsd certificates on nodes UA-HA, UA-HA2...
UA-HA: Success
UA-HA2: Success

Restaring pcsd on the nodes in order to reload the certificates...
UA-HA: Success
UA-HA2: Success
[root@UA-HA ~]#
3. Check the cluster status .
[root@UA-HA ~]# pcs status
Error: cluster is not currently running on this node
[root@UA-HA ~]#
You see the error because , cluster service is not started.
4. Start the cluster using pcs command. “–all” will start the cluster on all the configured nodes.
[root@UA-HA ~]# pcs cluster start --all
UA-HA2: Starting Cluster...
UA-HA: Starting Cluster...
[root@UA-HA ~]#
In the back-end , “pcs cluster start” command will trigger the following command on each cluster node.
# systemctl start corosync.service
# systemctl start pacemaker.service
5. Check the cluster services status.
[root@UA-HA ~]# systemctl status corosync
● corosync.service - Corosync Cluster Engine
   Loaded: loaded (/usr/lib/systemd/system/corosync.service; disabled; vendor preset: disabled)
   Active: active (running) since Sun 2015-12-27 23:34:31 EST; 11s ago
  Process: 18994 ExecStart=/usr/share/corosync/corosync start (code=exited, status=0/SUCCESS)
 Main PID: 19001 (corosync)
   CGroup: /system.slice/corosync.service
           └─19001 corosync

Dec 27 23:34:31 UA-HA corosync[19001]:  [VOTEQ ] Waiting for all cluster members. Current votes: 1 expected_votes: 2
Dec 27 23:34:31 UA-HA corosync[19001]:  [VOTEQ ] Waiting for all cluster members. Current votes: 1 expected_votes: 2
Dec 27 23:34:31 UA-HA corosync[19001]:  [QUORUM] Members[1]: 1
Dec 27 23:34:31 UA-HA corosync[19001]:  [MAIN  ] Completed service synchronization, ready to provide service.
Dec 27 23:34:31 UA-HA corosync[19001]:  [TOTEM ] A new membership (192.168.203.131:1464) was formed. Members joined: 2
Dec 27 23:34:31 UA-HA corosync[19001]:  [QUORUM] This node is within the primary component and will provide service.
Dec 27 23:34:31 UA-HA corosync[19001]:  [QUORUM] Members[2]: 2 1
Dec 27 23:34:31 UA-HA corosync[19001]:  [MAIN  ] Completed service synchronization, ready to provide service.
Dec 27 23:34:31 UA-HA systemd[1]: Started Corosync Cluster Engine.
Dec 27 23:34:31 UA-HA corosync[18994]: Starting Corosync Cluster Engine (corosync): [  OK  ]
[root@UA-HA ~]# systemctl status pacemaker
● pacemaker.service - Pacemaker High Availability Cluster Manager
   Loaded: loaded (/usr/lib/systemd/system/pacemaker.service; disabled; vendor preset: disabled)
   Active: active (running) since Sun 2015-12-27 23:34:32 EST; 15s ago
 Main PID: 19016 (pacemakerd)
   CGroup: /system.slice/pacemaker.service
           ├─19016 /usr/sbin/pacemakerd -f
           ├─19017 /usr/libexec/pacemaker/cib
           ├─19018 /usr/libexec/pacemaker/stonithd
           ├─19019 /usr/libexec/pacemaker/lrmd
           ├─19020 /usr/libexec/pacemaker/attrd
           ├─19021 /usr/libexec/pacemaker/pengine
           └─19022 /usr/libexec/pacemaker/crmd

Dec 27 23:34:33 UA-HA crmd[19022]:   notice: pcmk_quorum_notification: Node UA-HA2[2] - state is now member (was (null))
Dec 27 23:34:33 UA-HA crmd[19022]:   notice: pcmk_quorum_notification: Node UA-HA[1] - state is now member (was (null))
Dec 27 23:34:33 UA-HA stonith-ng[19018]:   notice: Watching for stonith topology changes
Dec 27 23:34:33 UA-HA crmd[19022]:   notice: Notifications disabled
Dec 27 23:34:33 UA-HA crmd[19022]:   notice: The local CRM is operational
Dec 27 23:34:33 UA-HA crmd[19022]:   notice: State transition S_STARTING -> S_PENDING [ input=I_PENDING cause=C_FSA_INTERNAL origin=do_started ]
Dec 27 23:34:33 UA-HA attrd[19020]:  warning: Node names with capitals are discouraged, consider changing 'UA-HA2' to something else
Dec 27 23:34:33 UA-HA attrd[19020]:   notice: crm_update_peer_proc: Node UA-HA2[2] - state is now member (was (null))
Dec 27 23:34:33 UA-HA stonith-ng[19018]:  warning: Node names with capitals are discouraged, consider changing 'UA-HA2' to something else
Dec 27 23:34:34 UA-HA stonith-ng[19018]:   notice: crm_update_peer_proc: Node UA-HA2[2] - state is now member (was (null))
[root@UA-HA ~]#
Verify Corosync configuration:
1. Check the corosync communication status.
[root@UA-HA ~]# corosync-cfgtool -s
Printing ring status.
Local node ID 1
RING ID 0
        id      = 192.168.203.134
        status  = ring 0 active with no faults
[root@UA-HA ~]#
In my setup, first RING is using interface “br0”.
[root@UA-HA ~]# ifconfig br0
br0: flags=4163<UP,BROADCAST,RUNNING,MULTICAST>  mtu 1500
        inet 192.168.203.134  netmask 255.255.255.0  broadcast 192.168.203.255
        inet6 fe80::84ef:2eff:fee9:260a  prefixlen 64  scopeid 0x20
        ether 00:0c:29:2d:3f:ce  txqueuelen 0  (Ethernet)
        RX packets 15797  bytes 1877460 (1.7 MiB)
        RX errors 0  dropped 0  overruns 0  frame 0
        TX packets 7018  bytes 847881 (828.0 KiB)
        TX errors 0  dropped 0 overruns 0  carrier 0  collisions 0

[root@UA-HA ~]#
We can have multiple RINGS to provide the redundancy for the cluster communication. (We use to call LLT links in VCS )
2. Check the membership and quorum API’s.
[root@UA-HA ~]# corosync-cmapctl  | grep members
runtime.totem.pg.mrp.srp.members.1.config_version (u64) = 0
runtime.totem.pg.mrp.srp.members.1.ip (str) = r(0) ip(192.168.203.134)
runtime.totem.pg.mrp.srp.members.1.join_count (u32) = 1
runtime.totem.pg.mrp.srp.members.1.status (str) = joined
runtime.totem.pg.mrp.srp.members.2.config_version (u64) = 0
runtime.totem.pg.mrp.srp.members.2.ip (str) = r(0) ip(192.168.203.131)
runtime.totem.pg.mrp.srp.members.2.join_count (u32) = 1
runtime.totem.pg.mrp.srp.members.2.status (str) = joined
[root@UA-HA ~]#
[root@UA-HA ~]# pcs status corosync

Membership information
----------------------
    Nodeid      Votes Name
         2          1 UA-HA2
         1          1 UA-HA (local)
[root@UA-HA ~]#
Verify Pacemaker Configuration:
1. Check the running pacemaker processes.
[root@UA-HA ~]# ps axf |grep pacemaker
19324 pts/0    S+     0:00  |       _ grep --color=auto pacemaker
19016 ?        Ss     0:00 /usr/sbin/pacemakerd -f
19017 ?        Ss     0:00  _ /usr/libexec/pacemaker/cib
19018 ?        Ss     0:00  _ /usr/libexec/pacemaker/stonithd
19019 ?        Ss     0:00  _ /usr/libexec/pacemaker/lrmd
19020 ?        Ss     0:00  _ /usr/libexec/pacemaker/attrd
19021 ?        Ss     0:00  _ /usr/libexec/pacemaker/pengine
19022 ?        Ss     0:00  _ /usr/libexec/pacemaker/crmd
2. Check the cluster status.
[root@UA-HA ~]# pcs status
Cluster name: UABLR
WARNING: no stonith devices and stonith-enabled is not false
Last updated: Sun Dec 27 23:44:44 2015          Last change: Sun Dec 27 23:34:55 2015 by hacluster via crmd on UA-HA
Stack: corosync
Current DC: UA-HA (version 1.1.13-10.el7-44eb2dd) - partition with quorum
2 nodes and 0 resources configured

Online: [ UA-HA UA-HA2 ]

Full list of resources:


PCSD Status:
  UA-HA: Online
  UA-HA2: Online

Daemon Status:
  corosync: active/disabled
  pacemaker: active/disabled
  pcsd: active/enabled
[root@UA-HA ~]#
3. You can see that corosync & pacemaker is active now and disabled across the system reboot. If you would like to start the cluster automatically across the reboot, you can enable it using systemctl command.
[root@UA-HA2 ~]# systemctl enable corosync
Created symlink from /etc/systemd/system/multi-user.target.wants/corosync.service to /usr/lib/systemd/system/corosync.service.
[root@UA-HA2 ~]# systemctl enable pacemaker
Created symlink from /etc/systemd/system/multi-user.target.wants/pacemaker.service to /usr/lib/systemd/system/pacemaker.service.
[root@UA-HA2 ~]# pcs status
Cluster name: UABLR
WARNING: no stonith devices and stonith-enabled is not false
Last updated: Sun Dec 27 23:51:30 2015          Last change: Sun Dec 27 23:34:55 2015 by hacluster via crmd on UA-HA
Stack: corosync
Current DC: UA-HA (version 1.1.13-10.el7-44eb2dd) - partition with quorum
2 nodes and 0 resources configured

Online: [ UA-HA UA-HA2 ]

Full list of resources:


PCSD Status:
  UA-HA: Online
  UA-HA2: Online

Daemon Status:
  corosync: active/enabled
  pacemaker: active/enabled
  pcsd: active/enabled
[root@UA-HA2 ~]#
4. When the cluster starts, it automatically records the number and details of the nodes in the cluster, as well as which stack is being used and the version of Pacemaker being used. To view the cluster configuration (Cluster Information Base – CIB) in XML format, use the following command.
[root@UA-HA2 ~]# pcs cluster cib
5. Verify the cluster information base using the following command.
[root@UA-HA ~]# crm_verify -L -V
   error: unpack_resources:     Resource start-up disabled since no STONITH resources have been defined
   error: unpack_resources:     Either configure some or disable STONITH with the stonith-enabled option
   error: unpack_resources:     NOTE: Clusters with shared data need STONITH to ensure data integrity
Errors found during check: config not valid
[root@UA-HA ~]#
By default pacemaker enables STONITH (Shoot The Other Node In The Head ) / Fencing in an order to protect the data. Fencing is mandatory when you use the shared storage to avoid the data corruptions.
For time being , we will disable the STONITH and configure it later.
6. Disable the STONITH (Fencing)
[root@UA-HA ~]#pcs property set stonith-enabled=false
[root@UA-HA ~]#
[root@UA-HA ~]#  pcs property show stonith-enabled
Cluster Properties:
 stonith-enabled: false
[root@UA-HA ~]#
7. Verify the cluster configuration again. Hope the errors will be disappear
[root@UA-HA ~]# crm_verify -L -V
[root@UA-HA ~]#
We have successfully configured two node redhat cluster on RHEL 7.2 with new components pacemaker and corosync. Hope this article is informative to you.
Share it ! Comment it !! Be Sociable !!!
We will see using Pacemaker and Corosync how we can mange a redundant HAProxy cluster using Virtual IP.
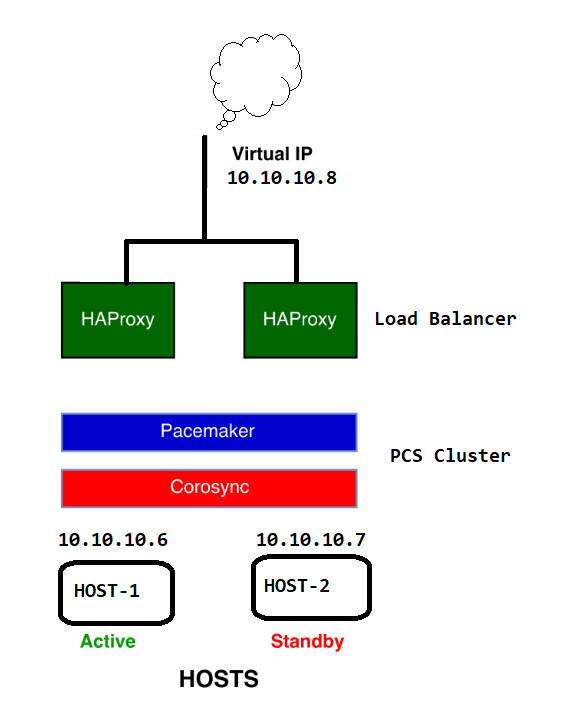
In this example have only Two Nodes Node-1 and Node-2 so we would have to Disable quorum and stonith.
Installing the necessary Packages on both nodes:
[root@HOST-1 ~]# sudo yum install corosync pcs pacemaker haproxy

[root@HOST-2 ~]# sudo yum install corosync pcs pacemaker haproxy
[root@HOST-1 ~]# pcs status
Error: cluster is not currently running on this node
Disable the firewall service to avoid any traffic blocking in both Hosts.
service firewalld stop
To access the multiple hosts using a single interface, we need to create a cluster of all nodes and that is managed by PCS. while Installing the PCS and other packages Yum also created a user “hacluster” which is used with PCS for configuring the cluster nodes. and Before we can use PCS we need to set the password for user “hacluster” on both nodes:
[root@HOST-1 ~]#passwd hacluster
Changingpasswordfor user hacluster.
Newpassword:
Retypenewpassword:
passwd: all authentication tokens updated successfully.
[root@HOST-2 ~]#passwd hacluster
Changingpasswordfor user hacluster.
Newpassword:
Retypenewpassword:
passwd: all authentication tokens updated successfully.
Now start the pcsd service on both nodes:
[root@HOST-1 ~]#systemctl start pcsd
[root@HOST-2 ~]#systemctl start pcsd
Now using the user “hacluser” and its password we need to authenticate the nodes for PCS cluster.
[root@HOST-1 ~]# sudo pcs cluster auth HOST-1 HOST-2
Username: hacluster
Password:
node01: Authorized
node02: Authorized
Now once we have successfully authenticated both nodes with PCS cluster we can manage the cluster configuration for any of one node, and not required to repeat the commands in all nodes. in this example we will use HOST-1.
Creating the cluster and adding nodes into it:
We will add both nodes to a cluster named web_cluster:
[root@HOST-1 ~]# pcs cluster setup --name web_cluster HOST-1 HOST-2
Destroying cluster on nodes: HOST-1, HOST-2...
HOST-1: Stopping Cluster (pacemaker)...
HOST-2: Stopping Cluster (pacemaker)...
HOST-1: Successfully destroyed cluster
HOST-2: Successfully destroyed cluster

Sending 'pacemaker_remote authkey' to 'HOST-1', 'HOST-2'
HOST-2: successful distribution of the file 'pacemaker_remote authkey'
HOST-1: successful distribution of the file 'pacemaker_remote authkey'
Sending cluster config files to the nodes...
HOST-1: Succeeded
HOST-2: Succeeded

Synchronizing pcsd certificates on nodes HOST-1, HOST-2...
HOST-2: Success
HOST-1: Success
Restarting pcsd on the nodes in order to reload the certificates...
HOST-2: Success
HOST-1: Success
Above command will add the cluster configuration under /etc/corosync/corosync.conf file in both nodes.
[root@HOST-2 ~]# cat /etc/corosync/corosync.conf
totem {
version: 2
cluster_name: web_cluster
secauth: off
transport: udpu
}

nodelist {
node {
ring0_addr: HOST-1
nodeid: 1
}

node {
ring0_addr: HOST-2
nodeid: 2
}
}

quorum {
provider: corosync_votequorum
two_node: 1
}

logging {
to_logfile: yes
logfile: /var/log/cluster/corosync.log
to_syslog: yes
}
Now we can start the cluster
[root@HOST-1 ~]# pcs cluster start --all
HOST-1: Starting Cluster (corosync)...
HOST-2: Starting Cluster (corosync)...
HOST-2: Starting Cluster (pacemaker)...
HOST-1: Starting Cluster (pacemaker)...
[root@HOST-1 ~]# pcs status cluster
Cluster Status:
Stack: corosync
Current DC: HOST-2 (version 1.1.20-5.el7_7.2-3c4c782f70) - partition with quorum
Last updated: Mon Jan 6 03:26:01 2020
Last change: Mon Jan 6 02:03:28 2020 by root via cibadmin on HOST-1
2 nodes configured
2 resources configured

PCSD Status:
HOST-1: Online
HOST-2: Online
[root@HOST-1 ~]# pcs status corosync
Membership information
----------------------
Nodeid Votes Name
1 1 HOST-1 (local)
2 1 HOST-2
[root@HOST-1 ~]# pcs status nodes
Pacemaker Nodes:
Online: HOST-1 HOST-2
Checking any configuration errors:
[root@HOST-1 ~]# crm_verify -L -V
error: unpack_resources: Resource start-up disabled since no STONITH resources have been defined
error: unpack_resources: Either configure some or disable STONITH with the stonith-enabled option
error: unpack_resources: NOTE: Clusters with shared data need STONITH to ensure data integrity
Errors found during check: config not valid
The above error is pop-upped because the STONITH is not configured in our setup which is required to avoid any split brain situation.
So will disable STONITH and quorum as we do have only two nodes and to enable it we at least needed 3 nodes (odd number).
[root@HOST-1 ~]# pcs property set stonith-enabled=false
[root@HOST-1 ~]# pcs property set no-quorum-policy=ignore

[root@HOST-1 ~]# pcs property
Cluster Properties:
cluster-infrastructure: corosync
cluster-name: web_cluster
dc-version: 1.1.20-5.el7_7.2-3c4c782f70
have-watchdog: false
no-quorum-policy: ignore
stonith-enabled: false
Next we will add a Virtual IP to our cluster that will be an Interface for our Nodes inside the cluster. The Virtual IP will be assigned to any of one node in the cluster, Later we will configure HAProxy with this VIP.
[root@HOST-1 ~]# sudo pcs resource create virtual_ip ocf:heartbeat:IPaddr2 ip=10.10.10.8 cidr_netmask=24 op monitor interval=30s

[root@HOST-1 ~]# pcs status resources
virtual_ip (ocf::heartbeat:IPaddr2): Started HOST-1

[root@HOST-1 ~]# ip a
3: enp0s8: <BROADCAST,MULTICAST,UP,LOWER_UP> mtu 1500 qdisc pfifo_fast state UP group default qlen 1000
link/ether 08:00:27:86:18:7f brd ff:ff:ff:ff:ff:ff
inet 10.10.10.6/24 brd 10.10.10.255 scope global noprefixroute enp0s8
valid_lft forever preferred_lft forever
inet 10.10.10.8/24 brd 10.10.10.255 scope global secondary enp0s8
valid_lft forever preferred_lft forever
Virtual IP got assigned to the HOST-1 which we can also check by “ip a” command.
Now the Virtual IP configuration is completed so we can go for HAProxy configuration. HAProxy package we have already installed so will will create a cluster resource for HAProxy hosts:
[root@HOST-1 heartbeat]# pcs resource create haproxy ocf:heartbeat:haproxy binpath=/usr/sbin/haproxy conffile=/etc/haproxy/haproxy.cfg op monitor interval=10s
We need also to ensure that HAProxy and the Virtual IP are running on just one node at a time. To do this we need to group the two resources.
[root@HOST-1 heartbeat]# pcs resource group add HAproxyGroup virtual_ip haproxy
[root@HOST-1 heartbeat]# pcs constraint order virtual_ip then haproxy
Adding virtual_ip haproxy (kind: Mandatory) (Options: first-action=start then-action=start)
That’s all.. We have now successfully configured HAProxy service and Virtual IP together and both services are running on HOST-1.
[root@HOST-1 heartbeat]# pcs status
Cluster name: web_cluster
Stack: corosync
Current DC: HOST-2 (version 1.1.20-5.el7_7.2-3c4c782f70) - partition with quorum
Last updated: Mon Jan 6 03:55:50 2020
Last change: Mon Jan 6 02:03:28 2020 by root via cibadmin on HOST-1

2 nodes configured
2 resources configured

Online: [ HOST-1 HOST-2 ]

Full list of resources:

Resource Group: HAproxyGroup
virtual_ip (ocf::heartbeat:IPaddr2): Started HOST-2
haproxy (ocf::heartbeat:haproxy): Started HOST-2
Testing with Httpd:
Now we will test the redundancy of HAproxy using Httpd. for that we have create individual index file under /var/www/html to check the Host Name.
[root@HOST-1 heartbeat]# cat /var/www/html/index.html
HOST-1
Next will have to define the cluster in HAProxy config file so that we can access the nodes in a Load Balancing fashion. we will user roundrobin method here in our example.
edit the /etc/haproxy/haproxy.cfg file in both Nodes and below lined at the end of the file.
listen web_server 10.10.10.8:81
mode http
balance roundrobin
server host1 10.10.10.6:80 check
server host2 10.10.10.7:80 check
Note: you can not bind the port 80 with Virtual IP as it is already used by httpd service so use any other port.
That’s it we have now finished all configuration now when you will try to access the http service using the Virtual IP the request will be delivered in round-robin fashion to both nodes.

Check PCS Resource:
[root@HOST-1 ~]# pcs resource standards
lsb
ocf
service
systemd
Resources
Clustered services consist of one or more resources. A resource can be an IP address, a file system, or a service like httpd, among others. All the bits required to provide a service to consumers are a resource.
| Agent | Purpose |
|---|---|
| LSB | Linux Standard Base-compatible init scripts residing in /etc/ init.d/. |
| OCF | Open Cluster Framework-compatible scripts that are extended LSB init scripts that can process additional input parameters to provide additional control over the cluster resource. |
| Systemd | Systemd unit files, which are the standard for defining and managing services on Red Hat Enterprise Linux 7. |
Check Resource Providers:
[root@HOST-1 ~]# pcs resource providers
heartbeat
openstack
pacemaker
rabbitmq
Check Resource Agents:
[root@HOST-1 ~]#pcs resource agents ocf:heartbeat
aliyun-vpc-move-ip
apache
aws-vpc-move-ip
awseip
awsvip
azure-lb
clvm
conntrackd
CTDB
db2
Delay
dhcpd
docker
Dummy
ethmonitor
exportfs
Filesystem
galera
garbd
haproxy
iface-vlan
IPaddr
IPaddr2
IPsrcaddr
iSCSILogicalUnit
iSCSITarget
LVM
LVM-activate
lvmlockd
MailTo
mysql
nagios
named
nfsnotify
nfsserver
nginx
NodeUtilization
oraasm
oracle
oralsnr
pgsql
portblock
postfix
rabbitmq-cluster
redis
Route
rsyncd
SendArp
slapd
Squid
sybaseASE
symlink
tomcat
vdo-vol
VirtualDomain
Xinetd
[root@HOST-1 ~]#
Commonly used resources
The following table has a list of some commonly used resources:
| Agent | Purpose |
|---|---|
| Filesystem | Used for mounting a file system. This can be a local file system, a file system on a iSCSI or Fibre Channel device, or a remote file system like a NFS export or an SMB share. |
| IPaddr2 | This resource is used to assign a floating IP address to a resource group. There is also a separate IPaddr resource that uses an older method of assigning a IP address. On Red Hat Enterprise Linux 7 IPaddr is a symbolic link to IPaddr2. |
| apache | This resource starts an apache httpd service. Unless otherwise configured this will use the configuration from /etc/httpd. |
| mysql | This resource controls a mysql database. Databases can be configured for standalone operation, a clone set with external replication, or as a full master/slave setup. |
# pcs resource describe apache
Since our ultimate goal is high availability, we should test failover of our new resource before moving on.
First, find the node on which the IP address is running.
[root@pcmk-1 ~]# pcs status
Cluster name: mycluster
Stack: corosync
Current DC: pcmk-2 (version 1.1.18-11.el7_5.3-2b07d5c5a9) - partition with quorum
Last updated: Mon Sep 10 16:55:26 2018
Last change: Mon Sep 10 16:53:42 2018 by root via cibadmin on pcmk-1

2 nodes configured
1 resource configured

Online: [ pcmk-1 pcmk-2 ]

Full list of resources:

 ClusterIP      (ocf::heartbeat:IPaddr2):       Started pcmk-1
You can see that the status of the ClusterIP resource is Started on a particular node (in this example, pcmk-1). Shut down Pacemaker and Corosync on that machine to trigger a failover.
[root@pcmk-1 ~]# pcs cluster stop pcmk-1
Stopping Cluster (pacemaker)...
Stopping Cluster (corosync)...
A cluster command such as pcs cluster stop can be run from any node in the cluster, not just the affected node.
nodename
Verify that pacemaker and corosync are no longer running:
[root@pcmk-1 ~]# pcs status
Error: cluster is not currently running on this node
Go to the other node, and check the cluster status.
[root@pcmk-2 ~]# pcs status
Cluster name: mycluster
Stack: corosync
Current DC: pcmk-2 (version 1.1.18-11.el7_5.3-2b07d5c5a9) - partition with quorum
Last updated: Mon Sep 10 16:57:22 2018
Last change: Mon Sep 10 16:53:42 2018 by root via cibadmin on pcmk-1

2 nodes configured
1 resource configured

Online: [ pcmk-2 ]
OFFLINE: [ pcmk-1 ]

Full list of resources:

 ClusterIP      (ocf::heartbeat:IPaddr2):       Started pcmk-2

Daemon Status:
  corosync: active/disabled
  pacemaker: active/disabled
  pcsd: active/enabled
Notice that pcmk-1 is OFFLINE for cluster purposes (its pcsd is still active, allowing it to receive pcs commands, but it is not participating in the cluster).
Also notice that ClusterIP is now running on pcmk-2 — failover happened automatically, and no errors are reported.
If a cluster splits into two (or more) groups of nodes that can no longer communicate with each other (aka. partitions), quorum is used to prevent resources from starting on more nodes than desired, which would risk data corruption.
A cluster has quorum when more than half of all known nodes are online in the same partition, or for the mathematically inclined, whenever the following equation is true:
total_nodes < 2 * active_nodes
For example, if a 5-node cluster split into 3- and 2-node paritions, the 3-node partition would have quorum and could continue serving resources. If a 6-node cluster split into two 3-node partitions, neither partition would have quorum; pacemaker’s default behavior in such cases is to stop all resources, in order to prevent data corruption.
Two-node clusters are a special case. By the above definition, a two-node cluster would only have quorum when both nodes are running. This would make the creation of a two-node cluster pointless, but corosync has the ability to treat two-node clusters as if only one node is required for quorum.
The pcs cluster setup command will automatically configure two_node: 1 in corosync.conf, so a two-node cluster will «just work».
If you are using a different cluster shell, you will have to configure corosync.conf appropriately yourself.
Now, simulate node recovery by restarting the cluster stack on pcmk-1, and check the cluster’s status. (It may take a little while before the cluster gets going on the node, but it eventually will look like the below.)
[root@pcmk-1 ~]# pcs cluster start pcmk-1
pcmk-1: Starting Cluster...
[root@pcmk-1 ~]# pcs status
Cluster name: mycluster
Stack: corosync
Current DC: pcmk-2 (version 1.1.18-11.el7_5.3-2b07d5c5a9) - partition with quorum
Last updated: Mon Sep 10 17:00:04 2018
Last change: Mon Sep 10 16:53:42 2018 by root via cibadmin on pcmk-1

2 nodes configured
1 resource configured

Online: [ pcmk-1 pcmk-2 ]

Full list of resources:

 ClusterIP      (ocf::heartbeat:IPaddr2):       Started pcmk-2

Daemon Status:
  corosync: active/disabled
  pacemaker: active/disabled
  pcsd: active/enabled
Since this is the second part of my previous article where I shared the steps to configure OpenStack HA cluster using pacemaker and corosync. In this article I will share the steps to configure HAProxy in Openstack and move our keystone endpoints to load balancer using Virtual IP.
")
Configure HAProxy in Openstack
To configure HAProxy in OpenStack, we will be using HAProxy to load-balance our control plane services in this lab deployment. Some deployments may also implement Keepalived and run HAProxy in an Active/Active configuration. For this deployment, we will run HAProxy Active/Passive and manage it as a resource along with our VIP in Pacemaker.
To start, install HAProxy on both nodes using the following command:
[root@controller1 ~]# yum install -y haproxy
[root@controller2 ~]# yum install -y haproxy
Verify installation with the following command:
[root@controller1 ~]# rpm -q haproxy
haproxy-1.5.18-7.el7.x86_64

[root@controller2 ~]# rpm -q haproxy
haproxy-1.5.18-7.el7.x86_64
Next, we will create a configuration file for HAProxy which load-balances the API services installed on the two controllers. Use the following example as a template, replacing the IP addresses in the example with the IP addresses of the two controllers and the IP address of the VIP that you’ll be using to load-balance the API services.
NOTE:
The IP Address which you plan to use for VIP must be free.
Take a backup of the existing config file on both the controller nodes
[root@controller1 ~]# mv /etc/haproxy/haproxy.cfg /etc/haproxy/haproxy.cfg.bkp
[root@controller2 ~]# mv /etc/haproxy/haproxy.cfg /etc/haproxy/haproxy.cfg.bkp
The following example /etc/haproxy/haproxy.cfg, will load-balance Horizon in our environment:
[root@controller1 haproxy]# cat haproxy.cfg
global
  daemon
  group  haproxy
  maxconn  40000
  pidfile  /var/run/haproxy.pid
  user  haproxy

defaults
  log  127.0.0.1 local2 warning
  mode  tcp
  option  tcplog
  option  redispatch
  retries  3
  timeout  connect 10s
  timeout  client 60s
  timeout  server 60s
  timeout  check 10s

listen horizon
  bind 192.168.122.30:80
  mode http
  cookie SERVERID insert indirect nocache
  option tcplog
  timeout client 180s
  server controller1 192.168.122.20:80 cookie controller1 check inter 1s
  server controller2 192.168.122.22:80 cookie controller2 check inter 1s
In this example, controller1 has an IP address of 192.168.122.20 and controller2 has an IP address of 192.168.122.22. The VIP that we’ve chosen to use is 192.168.122.30. Copy this file, replacing the IP addresses with the addresses in your lab, to /etc/haproxy/haproxy.cfg on each of the controllers.
ALSO READ: How to add or remove label from node in Kubernetes
To configure HAProxy in OpenStack we must copy this haproxy.cfg file to the second controller
[root@controller1 ~]# scp /etc/haproxy/haproxy.cfg controller2:/etc/haproxy/haproxy.cfg
In order for Horizon to respond to requests on the VIP, we’ll need to add the VIP as a ServerAlias in the Apache virtual host configuration. This is found at /etc/httpd/conf.d/15-horizon_vhost.conf in our lab installation. Look for the following line on controller1:
ServerAlias 192.168.122.20
and below line on controller2
ServerAlias 192.168.122.22
Add an additional ServerAlias line with the VIP on both controllers:
ServerAlias 192.168.122.30
You’ll also need to tell Apache not to listen on the VIP so that HAProxy can bind to the address. To do this, modify /etc/httpd/conf/ports.conf and specify the IP address of the controller in addition to the port numbers. The following is an example:
[root@controller1 ~]# cat /etc/httpd/conf/ports.conf
# ************************************
# Listen & NameVirtualHost resources in module puppetlabs-apache
# Managed by Puppet
# ************************************

Listen 0.0.0.0:8778
#Listen 35357
#Listen 5000
#Listen 80
Listen 8041
Listen 8042
Listen 8777
Listen 192.168.122.20:35357
Listen 192.168.122.20:5000
Listen 192.168.122.20:80
Here 192.168.122.20 is the IP of controller1
On controller2 repeat the same with the IP of the respective controller node
[root@controller2 ~(keystone_admin)]# cat /etc/httpd/conf/ports.conf
# ************************************
# Listen & NameVirtualHost resources in module puppetlabs-apache
# Managed by Puppet
# ************************************

Listen 0.0.0.0:8778
#Listen 35357
#Listen 5000
#Listen 80
Listen 8041
Listen 8042
Listen 8777
Listen 192.168.122.22:35357
Listen 192.168.122.22:5000
Listen 192.168.122.22:80
Restart Apache to pick up the new alias:
[root@controller1 ~]# systemctl restart httpd
[root@controller2 ~]# systemctl restart httpd
Next, add the VIP and the HAProxy service to the Pacemaker cluster as resources. These commands should only be run on the first controller node. This tells Pacemaker three things about the resource you want to add:
- The first field (
ocfin this case) is the standard to which the resource script conforms and where to find it. - The second field (
heartbeatin this case) is standard-specific; for OCF resources, it tells the cluster which OCF namespace the resource script is in. - The third field (
IPaddr2in this case) is the name of the resource script.
ALSO READ: How to connect virtual machine to internet connection in VMware/VirtualBox
[root@controller1 ~]# pcs resource create VirtualIP IPaddr2 ip=192.168.122.30 cidr_netmask=24
Assumed agent name 'ocf:heartbeat:IPaddr2' (deduced from 'IPaddr2')

[root@controller1 ~]# pcs resource create HAProxy systemd:haproxy
Co-locate the HAProxy service with the VirtualIP to ensure that the two run together:
[root@controller1 ~]# pcs constraint colocation add VirtualIP with HAProxy score=INFINITY
Verify that the resources have been started on both the controllers:
[root@controller1 ~]# pcs status
Cluster name: openstack
Stack: corosync
Current DC: controller2 (version 1.1.18-11.el7_5.3-2b07d5c5a9) - partition with quorum
Last updated: Tue Oct 16 12:44:27 2018
Last change: Tue Oct 16 12:44:23 2018 by root via cibadmin on controller1

2 nodes configured
2 resources configured

Online: [ controller1 controller2 ]

Full list of resources:

 VirtualIP      (ocf::heartbeat:IPaddr2):       Started controller1
 HAProxy        (systemd:haproxy):      Started controller1

Daemon Status:
  corosync: active/enabled
  pacemaker: active/enabled
  pcsd: active/enabled
At this point, you should be able to access Horizon using the VIP you specified. Traffic will flow from your client to HAProxy on the VIP to Apache on one of the two nodes.
Additional API service configuration
Now here configure HAProxy in Openstack is complete, the final configuration step is to move each of the OpenStack API endpoints behind the load balancer. There are three steps in this process, which are as follows:
- Update the HAProxy configuration to include the service.
- Move the endpoint in the Keystone service catalog to the VIP.
- Reconfigure services to point to the VIP instead of the IP of the first controller.
ALSO READ: Beginners guide to how LVM works in Linux (architecture)
In the following example, we will move the Keystone service behind the load balancer. This process can be followed for each of the API services.
First, add a section to the HAProxy configuration file for the authorization and admin endpoints of Keystone. So we are adding below template to our existing haproxy.cfg file on both the controllers
[root@controller1 ~]# vim /etc/haproxy/haproxy.cfg
listen keystone-admin
  bind 192.168.122.30:35357
  mode tcp
  option tcplog
  server controller1 192.168.122.20:35357 check inter 1s
  server controller2 192.168.122.22:35357 check inter 1s

listen keystone-public
  bind 192.168.122.30:5000
  mode tcp
  option tcplog
  server controller1 192.168.122.20:5000 check inter 1s
  server controller2 192.168.122.22:5000 check inter 1s
Restart the haproxy service on the active node:
[root@controller1 ~]# systemctl restart haproxy.service
You can determine the active node with the output from pcs status. Check to make sure that HAProxy is now listening on ports 5000 and 35357 using the following commands on both the controllers:
[root@controller1 ~]# curl http://192.168.122.30:5000
{"versions": {"values": [{"status": "stable", "updated": "2018-02-28T00:00:00Z", "media-types": [{"base": "application/json", "type": "application/vnd.openstack.identity-v3+json"}], "id": "v3.10", "links": [{"href": "http://192.168.122.30:5000/v3/", "rel": "self"}]}, {"status": "deprecated", "updated": "2016-08-04T00:00:00Z", "media-types": [{"base": "application/json", "type": "application/vnd.openstack.identity-v2.0+json"}], "id": "v2.0", "links": [{"href": "http://192.168.122.30:5000/v2.0/", "rel": "self"}, {"href": "htt

[root@controller1 ~]# curl http://192.168.122.30:5000/v3
{"version": {"status": "stable", "updated": "2018-02-28T00:00:00Z", "media-types": [{"base": "application/json", "type": "application/vnd.openstack.identity-v3+json"}], "id": "v3.10", "links": [{"href": "http://192.168.122.30:5000/v3/", "rel": "self"}]}}

[root@controller1 ~]# curl http://192.168.122.30:35357/v3
{"version": {"status": "stable", "updated": "2018-02-28T00:00:00Z", "media-types": [{"base": "application/json", "type": "application/vnd.openstack.identity-v3+json"}], "id": "v3.10", "links": [{"href": "http://192.168.122.30:35357/v3/", "rel": "self"}]}}

[root@controller1 ~]# curl http://192.168.122.30:35357
{"versions": {"values": [{"status": "stable", "updated": "2018-02-28T00:00:00Z", "media-types": [{"base": "application/json", "type": "application/vnd.openstack.identity-v3+json"}], "id": "v3.10", "links": [{"href": "http://192.168.122.30:35357/v3/", "rel": "self"}]}, {"status": "deprecated", "updated": "2016-08-04T00:00:00Z", "media-types": [{"base": "application/json", "type": "application/vnd.openstack.identity-v2.0+json"}], "id": "v2.0", "links": [{"href": "http://192.168.122.30:35357/v2.0/", "rel": "self"}, {"href": "https://docs.openstack.org/", "type": "text/html", "rel": "describedby"}]}]}}
All the above commands should output some JSON describing the status of the Keystone service. So all the respective ports are in listening state
ALSO READ: Steps to install Kubernetes Cluster with minikube
Next, update the endpoint for the identity service in the Keystone service catalogue by creating a new endpoint and deleting the old one. So you can source your existing keystonerc_admin file
[root@controller1 ~(keystone_admin)]# source keystonerc_admin
Below is the content from my keystonerc_admin
[root@controller1 ~(keystone_admin)]# cat keystonerc_admin
unset OS_SERVICE_TOKEN
    export OS_USERNAME=admin
    export OS_PASSWORD='redhat'
    export OS_AUTH_URL=http://192.168.122.20:5000/v3
    export PS1='[u@h W(keystone_admin)]$ '

export OS_PROJECT_NAME=admin
export OS_USER_DOMAIN_NAME=Default
export OS_PROJECT_DOMAIN_NAME=Default
export OS_IDENTITY_API_VERSION=3
As you see currently the OS_AUTH_URL reflects to the existing endpoint for the controller. We will update this in a while.
Get the list if current keystone endpoints on your active controller
[root@controller1 ~(keystone_admin)]# openstack endpoint list | grep keystone
| 3ded2a2faffe4fd485f6c3c58b1990d6 | RegionOne | keystone     | identity     | True    | internal  | http://192.168.122.20:5000/v3                 |
| b0f5b7887cd346b3aec747e5b9fafcd3 | RegionOne | keystone     | identity     | True    | admin     | http://192.168.122.20:35357/v3                |
| c1380d643f734cc1b585048b2e7a7d47 | RegionOne | keystone     | identity     | True    | public    | http://192.168.122.20:5000/v3                 |
Now since we want to move the endpoint in the keystone service to VIP, we will create new endpoints with the VIP url as below for admin, public and internal
[root@controller1 ~(keystone_admin)]# openstack endpoint create --region RegionOne identity public http://192.168.122.30:5000/v3
+--------------+----------------------------------+
| Field        | Value                            |
+--------------+----------------------------------+
| enabled      | True                             |
| id           | 08a26ace08884b85a0ff869ddb20bea3 |
| interface    | public                           |
| region       | RegionOne                        |
| region_id    | RegionOne                        |
| service_id   | 555154c5facf4e96a8677362c62b2ac9 |
| service_name | keystone                         |
| service_type | identity                         |
| url          | http://192.168.122.30:5000/v3    |
+--------------+----------------------------------+

[root@controller1 ~(keystone_admin)]# openstack endpoint create --region RegionOne identity admin http://192.168.122.30:35357/v3
+--------------+----------------------------------+
| Field        | Value                            |
+--------------+----------------------------------+
| enabled      | True                             |
| id           | ef210afef1da4558abdc00cc13b75185 |
| interface    | admin                            |
| region       | RegionOne                        |
| region_id    | RegionOne                        |
| service_id   | 555154c5facf4e96a8677362c62b2ac9 |
| service_name | keystone                         |
| service_type | identity                         |
| url          | http://192.168.122.30:35357/v3   |
+--------------+----------------------------------+

[root@controller1 ~(keystone_admin)]# openstack endpoint create --region RegionOne identity internal http://192.168.122.30:5000/v3
+--------------+----------------------------------+
| Field        | Value                            |
+--------------+----------------------------------+
| enabled      | True                             |
| id           | 5205be865e2a4cb9b4ab2119b93c7461 |
| interface    | internal                         |
| region       | RegionOne                        |
| region_id    | RegionOne                        |
| service_id   | 555154c5facf4e96a8677362c62b2ac9 |
| service_name | keystone                         |
| service_type | identity                         |
| url          | http://192.168.122.30:5000/v3    |
+--------------+----------------------------------+
Last, update the auth_uri, auth_url and identity_uri parameters in each of the OpenStack services to point to the new IP address. The following configuration files will need to be edited:
/etc/ceilometer/ceilometer.conf
/etc/cinder/api-paste.ini
/etc/glance/glance-api.conf
/etc/glance/glance-registry.conf
/etc/neutron/neutron.conf
/etc/neutron/api-paste.ini
/etc/nova/nova.conf
/etc/swift/proxy-server.conf
Next install openstack-utils to get the openstack tools which can help us restart all the services at once rather than manually restarting all the openstack related services
[root@controller1 ~(keystone_admin)]# yum -y install openstack-utils
After editing each of the files, restart the OpenStack services on all of the nodes in the lab deployment using the following command:
[root@controller1 ~(keystone_admin)]# openstack-service restart
Next update your keystonerc_admin file to point to the new OS_AUTH_URL with the VIP i.e. 192.168.122.30:5000/v3 as shown below
[root@controller1 ~(keystone_admin)]# cat keystonerc_admin
unset OS_SERVICE_TOKEN
    export OS_USERNAME=admin
    export OS_PASSWORD='redhat'
    export OS_AUTH_URL=http://192.168.122.30:5000/v3
    export PS1='[u@h W(keystone_admin)]$ '

export OS_PROJECT_NAME=admin
export OS_USER_DOMAIN_NAME=Default
export OS_PROJECT_DOMAIN_NAME=Default
export OS_IDENTITY_API_VERSION=3
Now re-source the updated keystonerc_admin file
[root@controller1 ~(keystone_admin)]# source keystonerc_admin
Validate the new changes if the OS_AUTH_URL is pointing to the new VIP
[root@controller1 ~(keystone_admin)]# echo $OS_AUTH_URL
http://192.168.122.30:5000/v3
Once the openstack services are restrated, delete the old endpoints for keystone service
[root@controller1 ~(keystone_admin)]# openstack endpoint delete b0f5b7887cd346b3aec747e5b9fafcd3
[root@controller1 ~(keystone_admin)]# openstack endpoint delete c1380d643f734cc1b585048b2e7a7d47
NOTE:
You may get below error while attempting to delete the old endpoints, these are most likely because the keystone database is still not properly refreshed so perform another round of «openstact-service restart» and then re-attempt to delete the endpoint
[root@controller1 ~(keystone_admin)]# openstack endpoint delete 3ded2a2faffe4fd485f6c3c58b1990d6
Failed to delete endpoint with ID '3ded2a2faffe4fd485f6c3c58b1990d6': More than one endpoint exists with the name '3ded2a2faffe4fd485f6c3c58b1990d6'.
1 of 1 endpoints failed to delete.

[root@controller1 ~(keystone_admin)]# openstack endpoint list | grep 3ded2a2faffe4fd485f6c3c58b1990d6
| 3ded2a2faffe4fd485f6c3c58b1990d6 | RegionOne | keystone     | identity     | True    | internal  | http://192.168.122.20:5000/v3                 |

[root@controller1 ~(keystone_admin)]# openstack-service restart

[root@controller1 ~(keystone_admin)]# openstack endpoint delete 3ded2a2faffe4fd485f6c3c58b1990d6
Repeat the same set of steps of controller2
ALSO READ: Reasons to migrate your app to AWS
After deleting the old endpoints and creating the new ones, below is the updated list of keystone endpoints on controller2
[root@controller2 ~(keystone_admin)]# openstack endpoint list | grep keystone
| 07fca3f48dba47cdbf6528909bd2a8e3 | RegionOne | keystone     | identity     | True    | public    | http://192.168.122.30:5000/v3                 |
| 37db43efa2934ce3ab93ea19df8adcc7 | RegionOne | keystone     | identity     | True    | internal  | http://192.168.122.30:5000/v3                 |
| e9da6923b7ff418ab7e30ef65af5c152 | RegionOne | keystone     | identity     | True    | admin     | http://192.168.122.30:35357/v3                |
The OpenStack services will now be using the Keystone API endpoint provided by the VIP and the service will be highly available.
Perform a Cluster Failover
Since our ultimate goal is high availability, we should test failover of our new resource.
Before performing a failover let us make sure our cluster is UP and running properly
[root@controller2 ~(keystone_admin)]# pcs status
Cluster name: openstack
Stack: corosync
Current DC: controller1 (version 1.1.18-11.el7_5.3-2b07d5c5a9) - partition with quorum
Last updated: Tue Oct 16 14:54:45 2018
Last change: Tue Oct 16 12:44:23 2018 by root via cibadmin on controller1

2 nodes configured
2 resources configured

Online: [ controller1 controller2 ]

Full list of resources:

 VirtualIP      (ocf::heartbeat:IPaddr2):       Started controller1
 HAProxy        (systemd:haproxy):      Started controller1

Daemon Status:
  corosync: active/enabled
  pacemaker: active/enabled
  pcsd: active/enabled
As we see both our controller are online so let us stop the second controller
[root@controller2 ~(keystone_admin)]# pcs cluster stop controller2
Stopping Cluster (pacemaker)...
Stopping Cluster (corosync)...
Now let us try to check the pacemaker status from controller2
[root@controller2 ~(keystone_admin)]# pcs status
Error: cluster is not currently running on this node
Since cluster service is not running on controller2 we cannot check the status. So let us get the status from controller1
[root@controller1 ~(keystone_admin)]# pcs status
Cluster name: openstack
Stack: corosync
Current DC: controller1 (version 1.1.18-11.el7_5.3-2b07d5c5a9) - partition with quorum
Last updated: Tue Oct 16 13:21:32 2018
Last change: Tue Oct 16 12:44:23 2018 by root via cibadmin on controller1

2 nodes configured
2 resources configured

Online: [ controller1 ]
OFFLINE: [ controller2 ]

Full list of resources:

 VirtualIP      (ocf::heartbeat:IPaddr2):       Started controller1
 HAProxy        (systemd:haproxy):      Started controller1

Daemon Status:
  corosync: active/enabled
  pacemaker: active/enabled
  pcsd: active/enabled
As expected it shows controller2 is offline. So now let us check if our endpoint from keystone is readable
[root@controller2 ~(keystone_admin)]# openstack endpoint list
+----------------------------------+-----------+--------------+--------------+---------+-----------+-----------------------------------------------+
| ID                               | Region    | Service Name | Service Type | Enabled | Interface | URL                                           |
+----------------------------------+-----------+--------------+--------------+---------+-----------+-----------------------------------------------+
| 06473a06f4a04edc94314a97b29d5395 | RegionOne | cinderv3     | volumev3     | True    | internal  | http://192.168.122.20:8776/v3/%(tenant_id)s   |
| 07ad2939b59b4f4892d6a470a25daaf9 | RegionOne | aodh         | alarming     | True    | public    | http://192.168.122.20:8042                    |
| 07fca3f48dba47cdbf6528909bd2a8e3 | RegionOne | keystone     | identity     | True    | public    | http://192.168.122.30:5000/v3                 |
| 0856cd4b276f490ca48c772af2be49a3 | RegionOne | gnocchi      | metric       | True    | internal  | http://192.168.122.20:8041                    |
| 08ff114d526e4917b5849c0080cfa8f2 | RegionOne | aodh         | alarming     | True    | admin     | http://192.168.122.20:8042                    |
| 1e6cf514c885436fb14ffec0d55286c6 | RegionOne | aodh         | alarming     | True    | internal  | http://192.168.122.20:8042                    |
| 20178fdd0a064b5fa91b869ab492d2d1 | RegionOne | cinderv2     | volumev2     | True    | internal  | http://192.168.122.20:8776/v2/%(tenant_id)s   |
| 3524908122a44d7f855fd09dd2859d4e | RegionOne | nova         | compute      | True    | public    | http://192.168.122.20:8774/v2.1/%(tenant_id)s |
| 37db43efa2934ce3ab93ea19df8adcc7 | RegionOne | keystone     | identity     | True    | internal  | http://192.168.122.30:5000/v3                 |
| 3a896bde051f4ae4bfa3694a1eb05321 | RegionOne | cinderv2     | volumev2     | True    | admin     | http://192.168.122.20:8776/v2/%(tenant_id)s   |
| 3ef1f30aab8646bc96c274a116120e66 | RegionOne | nova         | compute      | True    | admin     | http://192.168.122.20:8774/v2.1/%(tenant_id)s |
| 42a690ef05aa42adbf9ac21056a9d4f3 | RegionOne | nova         | compute      | True    | internal  | http://192.168.122.20:8774/v2.1/%(tenant_id)s |
| 45fea850b0b34f7ca2443da17e82ca13 | RegionOne | glance       | image        | True    | admin     | http://192.168.122.20:9292                    |
| 46cbd1e0a79545dfac83eeb429e24a6c | RegionOne | cinderv2     | volumev2     | True    | public    | http://192.168.122.20:8776/v2/%(tenant_id)s   |
| 49f82b77105e4614b7cf57fe1785bdc3 | RegionOne | cinder       | volume       | True    | internal  | http://192.168.122.20:8776/v1/%(tenant_id)s   |
| 4aced9a3c17741608b2491a8a8fb7503 | RegionOne | cinder       | volume       | True    | public    | http://192.168.122.20:8776/v1/%(tenant_id)s   |
| 63eeaa5246f54c289881ade0686dc9bb | RegionOne | ceilometer   | metering     | True    | admin     | http://192.168.122.20:8777                    |
| 6e2fd583487846e6aab7cac4c001064c | RegionOne | gnocchi      | metric       | True    | public    | http://192.168.122.20:8041                    |
| 79f2fcdff7d740549846a9328f8aa993 | RegionOne | cinderv3     | volumev3     | True    | public    | http://192.168.122.20:8776/v3/%(tenant_id)s   |
| 9730a44676b042e1a9f087137ea52d04 | RegionOne | glance       | image        | True    | public    | http://192.168.122.20:9292                    |
| a028329f053841dfb115e93c7740d65c | RegionOne | neutron      | network      | True    | internal  | http://192.168.122.20:9696                    |
| acc7ff6d8f1941318ab4f456cac5e316 | RegionOne | placement    | placement    | True    | public    | http://192.168.122.20:8778/placement          |
| afecd931e6dc42e8aa1abdba44fec622 | RegionOne | glance       | image        | True    | internal  | http://192.168.122.20:9292                    |
| c08c1cfb0f524944abba81c42e606678 | RegionOne | placement    | placement    | True    | admin     | http://192.168.122.20:8778/placement          |
| c0c0c4e8265e4592942bcfa409068721 | RegionOne | placement    | placement    | True    | internal  | http://192.168.122.20:8778/placement          |
| d9f34d36bd2541b98caa0d6ab74ba336 | RegionOne | cinder       | volume       | True    | admin     | http://192.168.122.20:8776/v1/%(tenant_id)s   |
| e051cee0d06e45d48498b0af24eb08b5 | RegionOne | ceilometer   | metering     | True    | public    | http://192.168.122.20:8777                    |
| e9da6923b7ff418ab7e30ef65af5c152 | RegionOne | keystone     | identity     | True    | admin     | http://192.168.122.30:35357/v3                |
| ea6f1493aa134b6f9822eca447dfd1df | RegionOne | neutron      | network      | True    | admin     | http://192.168.122.20:9696                    |
| ed97856952bb4a3f953ff467d61e9c6a | RegionOne | gnocchi      | metric       | True    | admin     | http://192.168.122.20:8041                    |
| f989d76263364f07becb638fdb5fea6c | RegionOne | neutron      | network      | True    | public    | http://192.168.122.20:9696                    |
| fe32d323287c4a0cb221faafb35141f8 | RegionOne | ceilometer   | metering     | True    | internal  | http://192.168.122.20:8777                    |
| fef852af4f0d4f0cacd4620e5d5245c2 | RegionOne | cinderv3     | volumev3     | True    | admin     | http://192.168.122.20:8776/v3/%(tenant_id)s   |
+----------------------------------+-----------+--------------+--------------+---------+-----------+-----------------------------------------------+
yes we are still able to read the endpoint list for keystone so all looks fine..
ALSO READ: How to create or configure NIC Teaming using nmcli (CentOS / RHEL 7/8)
Let us again start our cluster configuration on controller2
[root@controller2 ~(keystone_admin)]# pcs cluster start
Starting Cluster...
And check the status
[root@controller2 ~(keystone_admin)]# pcs status
Cluster name: openstack
Stack: corosync
Current DC: controller1 (version 1.1.18-11.el7_5.3-2b07d5c5a9) - partition with quorum
Last updated: Tue Oct 16 13:23:17 2018
Last change: Tue Oct 16 12:44:23 2018 by root via cibadmin on controller1

2 nodes configured
2 resources configured

Online: [ controller1 controller2 ]

Full list of resources:

 VirtualIP      (ocf::heartbeat:IPaddr2):       Started controller1
 HAProxy        (systemd:haproxy):      Started controller1

Daemon Status:
  corosync: active/enabled
  pacemaker: active/enabled
  pcsd: active/enabled
So all is back to green and we were successfully able to configure HAProxy in Openstack.
Lastly I hope the steps from the article to configure HAProxy in Openstack (High Availability between controllers) was helpful. So, let me know your suggestions and feedback using the comment section.