Содержание
- Что делать при ошибке 0x80041010 в Windows?
- Как исправить ошибку 0x80041010 в Windows?
- Fix CcmSetup failed with error code 0x80041010 in SCCM
- Fix CcmSetup failed with error code 0x80041010
- Solution 1: Repair WMI
- Solution 2: DNS Issues
- Error code 0x80041010 office 2019
- Answered by:
- Question
- Error code 0x80041010 office 2019
- Answered by:
- Question
- Error code 0x80041010 office 2019
- Answered by:
- Question
Что делать при ошибке 0x80041010 в Windows?
Существует не так много сведений об ошибке с кодом 0x80041010 в Windows, но нам удалось найти довольно старое, похоже, рабочее решение для систем на базе Server. Также в дальних уголках интернета всплыло весьма перспективное решение и для обычных версий Windows. Ниже мы рассмотрим их. Сама ошибка может выглядеть следующим образом:
Не удалось получить экземпляр CCM_ClientProvisioningConfig. Ошибка 0x80041010
Не удалось перевести клиент в режим подготовки перед запросом перезагрузки (0x80041010)
Не удалось запустить программу установки Windows. Код 0x80041010
Как исправить ошибку 0x80041010 в Windows?
Чтобы исправить ошибку 0x80041010 на рабочем сервере, вам следует сделать:
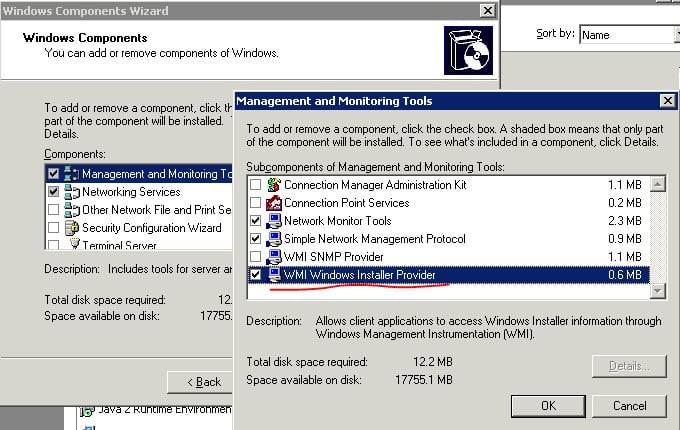
- Запускаем «Установка компонентов Windows».
- В блоке «Средства управления и мониторинга».
- Искомый пункт называется WMI Windows Installer Provider.

После установки должен появиться тот класс, который не удается найти серверу. Однако проблему могут вызывать и другие классы компонентов, что отсутствуют на определенном сервере. В этом направлении, возможно, придется провести дополнительное расследование.
Вот еще один способ решения проблемы для Windows:
- Останавливаем службу WMI (Панель управления – Администрирование – Службы).
- Идем по пути C:WindowsSystem32WBEM в командной строке.
- Запускаем следующие команды regsvr32 cimwin32.dll и mofcomp Cimwin32.mof.
- Снова запускаем службу WMI и устанавливаем новый пакет обновления.
Сама суть ошибки 0x80041010 часто сводится к запуску несуществующего класса или его объекта. В конкретных случаях, возможно, нужно будет заняться поиском проблемных участков кода. Надеемся, мы смогли хоть чем-то помочь. В любом случае, напишите, удалось ли исправить вашу проблему, что вы уже пробовали.
Источник
Fix CcmSetup failed with error code 0x80041010 in SCCM
This article covers multiple solutions to fix CcmSetup failed with error code 0x80041010 in SCCM. The ccmsetup.log file on the client computer contains a record of the error 0x80041010.
During the Configuration Manager client agent installation, you may encounter several errors. You can identify the cause of your client agent’s installation failure by reviewing the error code found in the SCCM log file.
Examining the ccmsetup.log file revealed the error code 0x80041010 when attempting to install the ConfigMgr client on a remote Windows computer. It should be noted that the error 0x80041010 only occurs on a few computers; it is not a widespread problem.
 Patch My PC Sponsored AD
The SCCM client error code 0x80041010 appears when you attempt to install the agent using the client push method or even manual client installation. We will look at the steps to troubleshoot this issue and find an appropriate solution.
Check out some useful guides related to some common client agent errors:
Fix CcmSetup failed with error code 0x80041010
During the SCCM client agent installation on a Windows device, the CcmSetup failed with error code 0x80041010 appears. The error code 0x80041010 in SCCM translates to an unknown error and there are multiple solutions associated with this error.
First, let’s take a look at the error CcmSetup failed with error code 0x80041010. This error is logged in the ccmsetup.log file on the client computer.
 CcmSetup failed with error code 0x80041010
Along with the other errors, there is another error which is OS is not Win10RS3+, ENDOK. While installing the SCCM client, there are few parameters that are checked and one among them is supported Windows OS. Definitely, in my case this seemed to be inapplicable because the client machine was running Windows 10 21H2.
If you encounter a similar error code during client install, you can translate SCCM error codes to error messages using error lookup tools. ConfigMgr provides these tools for free, and you can find more details about the error when you decode it.
Now I will be listing few solutions to fix CcmSetup failed with error code 0x80041010. If something else worked for you, please let me know in the comments section below.
Solution 1: Repair WMI
The first thing you should try when SCCM agent installation fails with the error code 0x80041010 is to repair WMI on the client. If the WMI is broken or corrupt, the client agent installation fails, and you see error code 0x80041010 in ccmsetup.log.
The below script can be used to fix WMI issues and repair WMI on the Windows computer. Copy the VB script and paste it in a text file. Save this file as RepairWMI.bat.
To run this script, launch the command prompt as administrator and run the below batch file. Type ‘Y‘ to continue stopping the required services and proceed with script execution.
 Repair WMI – Fix CcmSetup failed with error code 0x80041010
After the above script runs, it repairs the WMI on the client computer. Restart the computer once and now install the SCCM client agent and that should resolve the error code 0x80041010.
Solution 2: DNS Issues
At times, when you have DNS issues on the client computer, the client agent installation may fail with error code 0x80041010. From the ccmsetup.log, we see two errors: No MP or source location has been explicitly specified and No valid source or MP locations.
This may not mean that Management Point server is down. You have to run the nslookup command on the client computer and check if that resolves SCCM Management Point Server correctly. Furthermore, run the gpupdate command on the client computer and check if the computer policy and user policy updates successfully or not.

Prajwal Desai is a Microsoft MVP in Enterprise Mobility. He writes articles on SCCM, Intune, Configuration Manager, Microsoft Intune, Azure, Windows Server, Windows 11, WordPress and other topics, with the goal of providing people with useful information.
Источник
Error code 0x80041010 office 2019
This forum has migrated to Microsoft Q&A. Visit Microsoft Q&A to post new questions.
Answered by:
![]()
Question
![]()
![]()
This post is the only other post I could find and it is unanswered on this topic, so I thought I would ask against my specific problems.
My scripted install of Windows 7 has been failing to activate Office 2010 using these two commands:
cscript «c:program files (x86)microsoft officeoffice14ospp.vbs» /inpkey:XXXXX-XXXXX-XXXXX-XXXXX-XXXXX
cscript «c:program files (x86)microsoft officeoffice14ospp.vbs» /act
I tried these after the installation finished, and I’m getting the same error even when i try other arguments such as /dstatus.
—Processing—————————
ERROR CODE: 0x80041010
ERROR DESCRIPTION: Run the following: cscript ospp.vbs /ddescr:0x80041010
ERROR CODE: 0x
ERROR DESCRIPTION: Run the following: cscript ospp.vbs /ddescr:0x
—Exiting——————————
everything on that other post didn’t work, so I’m curious if anyone has any ideas on what could be the issue here.
Источник
Существует не так много сведений об ошибке с кодом 0x80041010 в Windows, но нам удалось найти довольно старое, похоже, рабочее решение для систем на базе Server. Также в дальних уголках интернета всплыло весьма перспективное решение и для обычных версий Windows. Ниже мы рассмотрим их. Сама ошибка может выглядеть следующим образом:
Не удалось получить экземпляр CCM_ClientProvisioningConfig. Ошибка 0x80041010
Не удалось перевести клиент в режим подготовки перед запросом перезагрузки (0x80041010)
Не удалось запустить программу установки Windows. Код 0x80041010
Как исправить ошибку 0x80041010 в Windows?
Чтобы исправить ошибку 0x80041010 на рабочем сервере, вам следует сделать:
- Запускаем «Установка компонентов Windows».
- В блоке «Средства управления и мониторинга».
- Искомый пункт называется WMI Windows Installer Provider.
После установки должен появиться тот класс, который не удается найти серверу. Однако проблему могут вызывать и другие классы компонентов, что отсутствуют на определенном сервере. В этом направлении, возможно, придется провести дополнительное расследование.
Вот еще один способ решения проблемы для Windows:
- Останавливаем службу WMI (Панель управления – Администрирование – Службы).
- Идем по пути C:WindowsSystem32WBEM в командной строке.
- Запускаем следующие команды regsvr32 cimwin32.dll и mofcomp Cimwin32.mof.
- Снова запускаем службу WMI и устанавливаем новый пакет обновления.
Сама суть ошибки 0x80041010 часто сводится к запуску несуществующего класса или его объекта. В конкретных случаях, возможно, нужно будет заняться поиском проблемных участков кода. Надеемся, мы смогли хоть чем-то помочь. В любом случае, напишите, удалось ли исправить вашу проблему, что вы уже пробовали.
- Remove From My Forums
-
Question
-
This post is the only other post I could find and it is unanswered on this topic, so I thought I would ask against my specific
problems.My scripted install of Windows 7 has been failing to activate Office 2010 using these two commands:
cscript «c:program files (x86)microsoft officeoffice14ospp.vbs» /inpkey:XXXXX-XXXXX-XXXXX-XXXXX-XXXXX
cscript «c:program files (x86)microsoft officeoffice14ospp.vbs» /act
I tried these after the installation finished, and I’m getting the same error even when i try other arguments such as /dstatus.
—Processing—————————
ERROR CODE: 0x80041010
ERROR DESCRIPTION: Run the following: cscript ospp.vbs /ddescr:0x80041010
ERROR CODE: 0x
ERROR DESCRIPTION: Run the following: cscript ospp.vbs /ddescr:0x
—Exiting——————————everything on that other post didn’t work, so I’m curious if anyone has any ideas on what could be the issue here.
Answers
-
Please run the following command to repair the WMI and try to activate again.
«C:WINDOWSsystem32WBEMmofcomp.exe» «C:Program FilesCommon FilesMicrosoft SharedOfficeSoftwareProtectionPlatformOSPPWMI.MOF»
Max Meng
TechNet Community Support
-
Marked as answer by
Tuesday, December 18, 2012 6:55 PM
-
Marked as answer by

Если на компьютере установлена пробная версия Microsoft Office 2010, 2013, или 2016, после окончания free-trial версии появится сбой активации продукта. Мастер активации будет говорить при каждом запуске, что Эта копия Microsoft Office не активирована. Код ошибки: 0x8007007B.
Убрать сбой активации можно двумя способами: купить лицензию или использовать активатор вроде KMSAUTO NET (для любой версии Office). Поскольку программа стоит действительно дорого, многие пользователи предпочитают использовать бесплатный активатор для Office. Это позволит избавиться от надоедливого сообщения о сбое активации продукта и пользоваться всеми возможностями программ из офисного пакета.
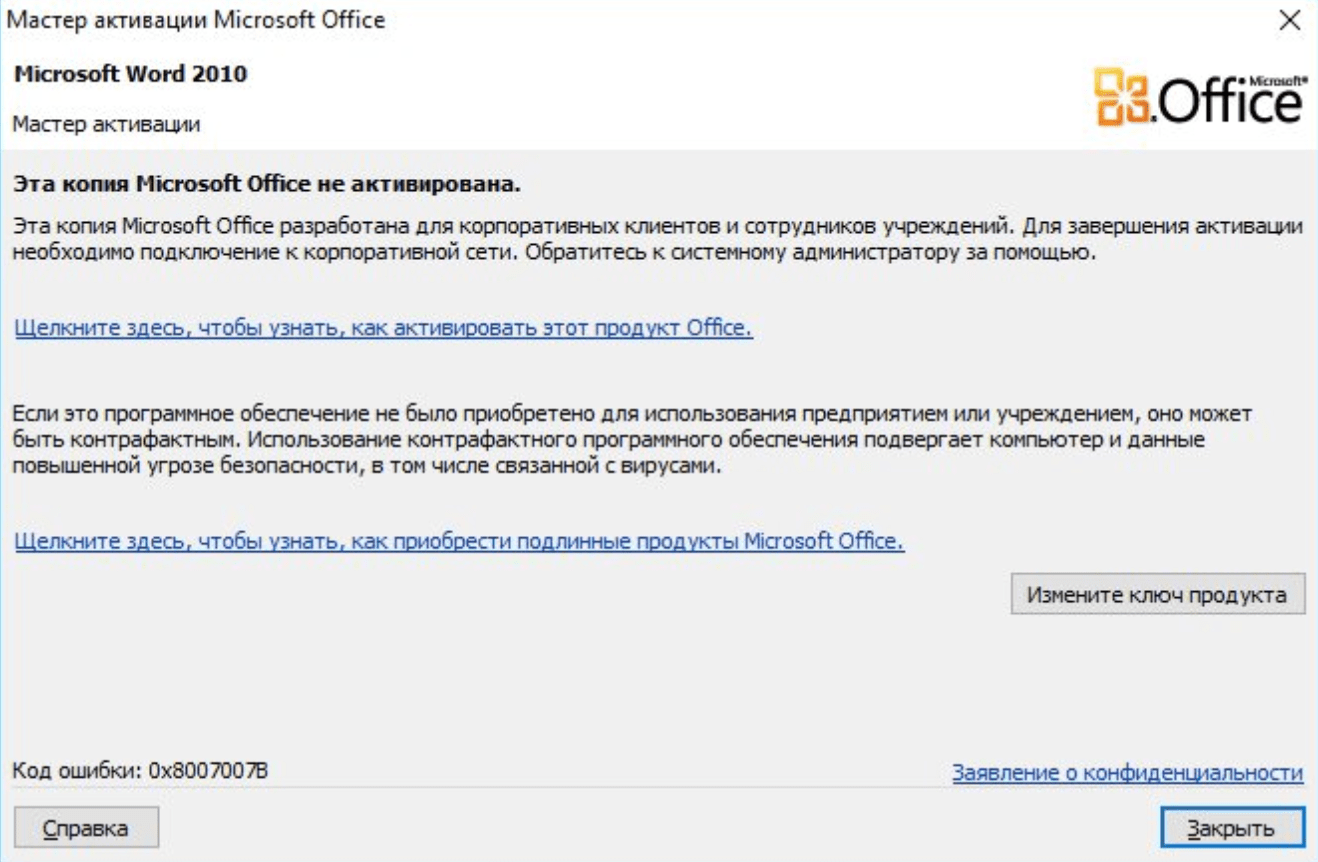
Сбой активации может произойти при запуске любого продукта из офисного пакета Microsoft Office: Word, Excel, PowerPoint. Обычно это происходит после окончания пробной версии программ. Система предлагает ввести лицензионный ключ при каждом запуске. Это изрядно надоедает пользователям, особенно вместе с урезанным функционалом Office.
Изредка ошибка при активации Microsoft Office может появляться на лицензионной версии, где ключ введен и раньше все было нормально. Это происходит в случае, если Windows не может подключиться к серверам Microsoft или проверка подлинности лицензии по каким-то причинам недоступна.
Основные причины сбоев:
- Настройки прокси или брандмауэра блокируют соединение.
- Да компьютере установленные неправильные дата и время, из за чего возможны сбои при синхронизации с серверами.
- Office давно не обновлялся. Касается всех версий: 2010, 2013, 2016 и других, менее популярных.
- Программа запущена не от имени администратора (зависит от настроек).
В реальности все гораздо проще — софт не активирован, потому что никто не приобретал лицензию.
Убрать сбой активации с KMSAuto Net
Проблема с активацией Office происходит из-за отсутствия лицензионного ключа. Если Windows тоже пиратская, то KMSAuto Net — единственный адекватный способ пользоваться системой без проблем с безопасностью и постоянных напоминаний о необходимости активировать Windows и Office.
KSM Auto — небольшая программа, которая создает виртуальный сервер. Виртуальный сервер представляет собой обычный процесс, практически не тратящий ресурсы компьютера. Процесс выдает себя за удаленный сервер Microsoft, подтверждающей лицензию. Получается, Windows сам себе отправляет запрос и получает ответ, что все в порядке (лицензия активна). Сбой активации продукта перестает появляться.
Убираем сбой активации продукта Microsoft Office с KMSAuto Net:
- Загрузить KMSAuto Net. Программа бесплатна и регулярно обновляется под разные версии Office.
- Временно отключить антивирус, защитник Windows и аналогичное ПО. KMSAuto вмешивается в работу системы, что по-умолчанию распознается антивирусами как вредоносное воздействие.
- Запустить KMSAuto_net от имени администратора. По-другому программа не будет корректно работать.
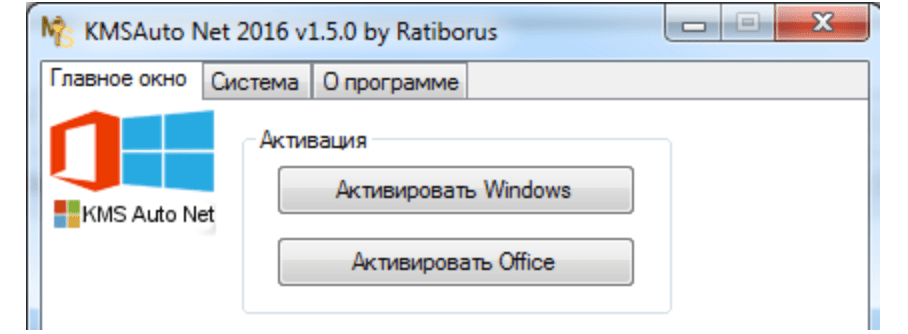
- После запуска программы появится две основные кнопки: активировать Windows целиком или только активировать Office. В зависимости от версии программы, в соседних окнах можно выставлять дополнительные настройки.
- Далее программа будет выводить информацию о своих действиях, время от времени спрашивая разрешение на установку драйверов и другие манипуляции. Во всех случаях нужно нажать Далее или Согласен, поскольку эти действия являются нормой для работы активатора.
- Дождаться, пока программа сообщит об успехе. Сообщение об ошибке активации продуктов Office больше не должны беспокоить.

Иногда KMSAuto NET не может в автоматическом режиме активировать лицензию. В этом случае появляется окно с сообщением «Программа не смогла активировать продукт в автоматическом режиме. Сейчас будет выполнена попытка установить новый GVLK-ключ, после чего необходимо повторить активацию снова.»
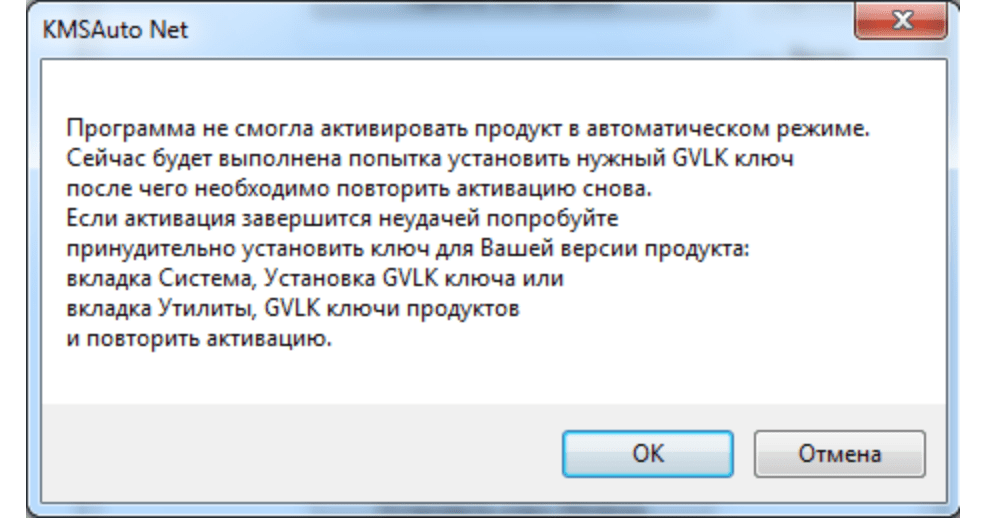
Это означает, что придется воспользоваться вторым — ручным способом активации. Он несколько сложнее, однако гарантирует результат практически в 100% случаев.
Ручная активация Office
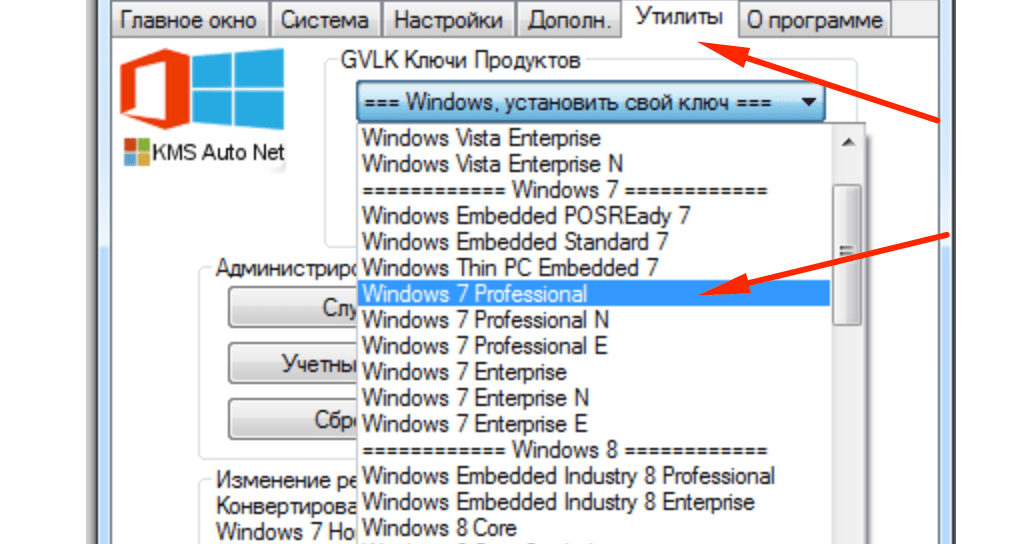
GVLK-ключ продукта — это тот самый лицензионный ключ, который проверяется на подлинность. Если к программы не получилось самостоятельно определить версию Windows и подобрать к ней ключ, сделать это можно самостоятельно. Нужно зайти в раздел Утилиты и выбрать активируемый продукт из выпадающего списка.
- Первым делом запускается сам KMS-Service — виртуальный сервер активации. В главном окне программы есть две кнопки: «Активировать Windows» и Активировать Office. Нажимаем вторую.
- Далее нужно перейти во вкладку Утилиты и в разделе GVLK Ключи Продуктов и выбрать свою версию операционной системы или активируемой версии Office.
- После выбора версии KMSAuto_NET выдаст лицензионный ключ. Его нужно скопировать в буфер обмена.
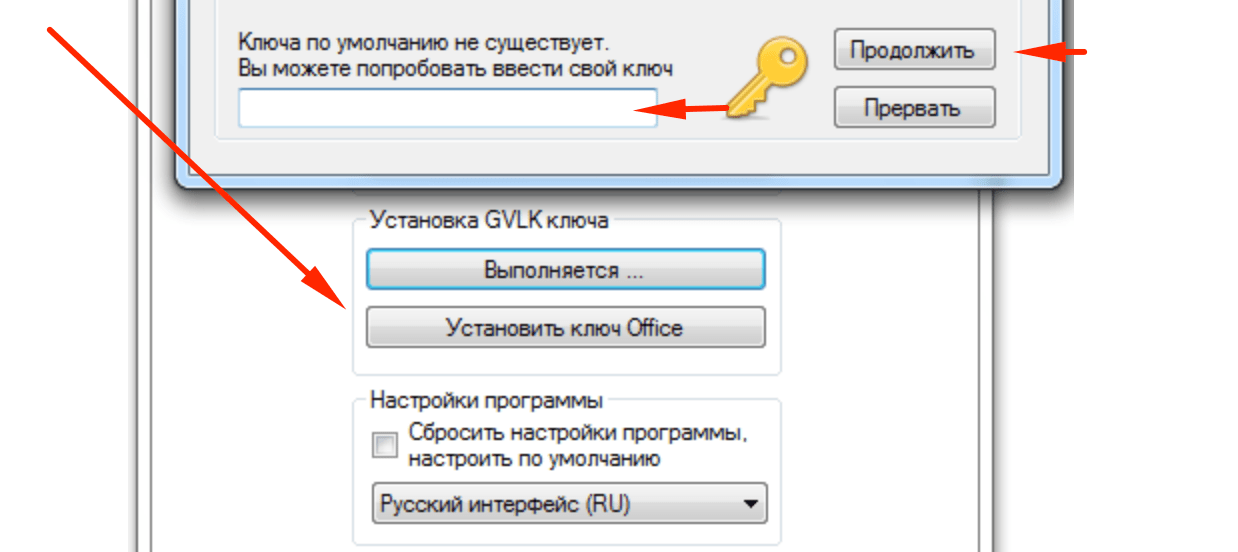
- Теперь, когда сервер KMS запущен и есть ключ, нужно открыть вкладку Система и в разделе Установка GVLK ключа нажать Установить ключ Office.
- В открывшемся окне вставить ключ в соответствующую строку.
- Нажать кнопку Продолжить и дождаться окончания процесса. На этом все — Office или Windows нужной версии будет активирован как лицензионный.
Хотя проблема решена, рано или поздно она появится снова. Уменьшить шанс можно, выставив повторную активацию продукта (реактивацию) каждые 10 дней. Но ключ все равно слетит, поскольку каждые 180 дней Windows проходит валидацию. Более того, колючи могут слететь при обновлении системы или обновлении безопасности Windows. Поэтому и программа, и инструкция еще могут пригодиться.
You can receive error 0x80041010 from multiple applications that call WMI. For my example it was received in SCCM while patches were being applied.

No matter where you got the error the underlying issue is probably with WMI. Here is how to check!
Confirm WMI is Broken:
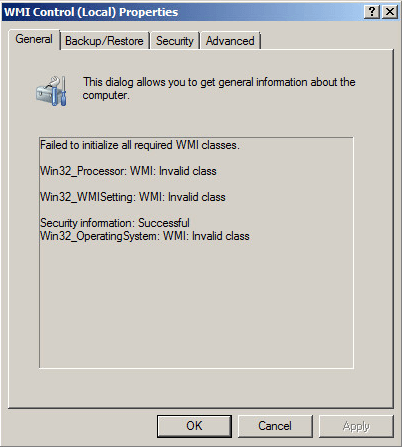
Launch the WMI MMC snapin by Start -> Run -> then enter WMIMGMT.MSC
Right click WMI Control (Local) and click Properties

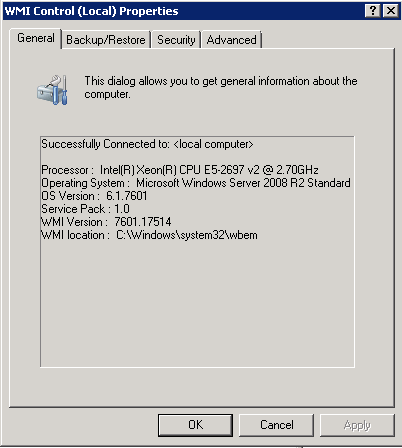
If WMI is working properly then it will show that Good Properties. If you see Invalid class then your WMI is not working correctly.
Troubleshooting:
The first step is to download the Microsoft WMIDiag Tool. It will analyze WMI and give you a report with any issues it finds.
When you run the downloaded .EXE it will ask you where to extract the files. Once extracted right click the WMIDiag VBScript and click Open with Command Prompt

Here is what the script looks like while it runs:

Once complete you will get a text file of the results. Here you should be able to narrow down the cause of your WMI issue. In my case there are issues with .MOF registrations.

Resolve MOF Registration Errors:
To resolve MOF Registration errors the following commands need to be ran from an elevated command prompt. It will reregister all .MOF files with WMI.
|
CD C:WindowsSystem32WBEM dir /b *.mof *.mfl | findstr /v /i uninstall > moflist.txt & for /F %s in (moflist.txt) do mofcomp %s |
Here is what the command looks like while it runs:

Once finished check WMIMGMT.MSC to see if it is populating the Properties correctly.

Если вы видите сообщение об ошибке Помощник по установке Windows 11 не работает, ошибка 0x80041010 при попытке установить или обновить Windows 11, этот пост может помочь вам решить проблему.
Следуйте этим советам, чтобы решить проблему Ошибка 0x80041010, Помощник по установке Windows 11 не работает на вашем ПК с Windows 11/10.
- Перезагрузите компьютер и запустите его снова
- Запустите средство устранения неполадок Центра обновления Windows
- Очистить папку распространения программного обеспечения
- Запустите средство устранения неполадок сети
- Временно отключить программное обеспечение безопасности
- Используйте инструмент для создания мультимедиа.
Убедитесь, что вы используете учетную запись администратора для выполнения этих предложений.
1]Перезагрузите компьютер и снова запустите его.
Необновляемая Windows может быть временной проблемой, и перезагрузка в большинстве случаев должна решить эту проблему. Поэтому, прежде чем мы приступим к каким-либо сложным исправлениям, перезагрузите компьютер, а затем попробуйте запустить обновление Windows вручную и посмотрите, работает ли оно. Если нет, перейдите к приведенным ниже исправлениям.
Читайте: Ошибка 0x800f0830-0x20003 при обновлении Windows 11
2]Запустите средство устранения неполадок Центра обновления Windows.
Средство устранения неполадок Windows встроено в Windows и помогает решить многие проблемы, которые требуют больших усилий вручную. Мы настоятельно рекомендуем запускать их для решения конкретных проблем. Тем не менее, даже если это не работает, это может дать вам какие-либо подсказки, почему ошибка вызывает ее, если не поможет вам с исправлением.
Этот инструмент может помочь вам диагностировать распространенные проблемы с обновлением Windows, а для его запуска выполните следующие действия:
- Перейдите в настройки Windows.
- Система > Устранение неполадок > Другие средства устранения неполадок.
- Нажмите кнопку «Выполнить» рядом с Центром обновления Windows.
Не позволяйте Windows запускать свою функцию устранения неполадок и посмотрите, поможет ли она вам с исправлением или какой-либо подсказкой для дальнейшего поиска.
Связанный: исправить ошибку 0x80072efe в помощнике по обновлению Windows
3]Очистить папку распространения программного обеспечения
Когда Windows или помощник по обновлению Windows загружают важные файлы, они сохраняются в папке распространения программного обеспечения. Множественные сбои или неправильная загрузка могут привести к повреждению обновлений Windows; следовательно, помощник по обновлению Windows может выйти из строя.
Таким образом, очистив его, вы заставите Windows воссоздать папку и, возможно, решить проблему на ходу. Чтобы очистить папку, выполните следующие действия:
- Щелкните правой кнопкой мыши меню «Пуск» и выберите «Терминал Windows (администратор)».
- В терминале Windows сначала введите эту команду и нажмите клавишу ВВОД, чтобы остановить службу обновления Windows.
чистая остановка
- Затем выполните следующую команду, чтобы отключить все фоновые интеллектуальные службы передачи:
чистые стоповые биты
- Теперь нажмите клавишу Windows + R, чтобы запустить «Выполнить».
- В «Выполнить» скопируйте и вставьте этот путь и нажмите Enter:
C:WindowsSoftwareDistribution
- Здесь выберите все файлы с помощью CTRL + A и удалите файлы.
- После этого вернитесь в терминал Windows и теперь запустите эти две команды одну за другой, чтобы включить модули, которые мы отключили во 2 и 3:
стартовые биты сети wuauserv
- Наконец, перезагрузите компьютер и повторно запустите помощник по обновлению, чтобы проверить, устранена ли проблема.
Связанный: ошибка помощника по обновлению Windows 0x80072f76
4]Запустите средство устранения неполадок сети
Возможно, проблема в вашей сети. В таком случае вы можете попробовать средство устранения неполадок сети, чтобы увидеть, есть ли какие-либо проблемы. Для этого выполните следующие шаги:
- Перейдите в настройки Windows.
- Система > Устранение неполадок > Другие средства устранения неполадок.
- Нажмите кнопку «Выполнить» рядом с сетевым адаптером.
- Позвольте Windows запустить поиск и посмотреть, поможет ли это вам с исправлением.
После этого перезапустите помощника, проверьте, может ли он загрузить все файлы, и завершите процесс.
Читать: Помощник по обновлению Windows завис на 99%
5]Временно отключить программное обеспечение безопасности
Также может быть проблема с вашим программным обеспечением безопасности. Если вы используете какой-либо антивирус или другое программное обеспечение для обеспечения безопасности, вы можете отключить его и проверить, работает ли помощник по обновлению Windows. Если он работает нормально, вы можете оставить его выключенным до завершения загрузки. Убедитесь, что вы ничего не делаете во время процесса загрузки.
6]Используйте инструмент для создания мультимедиа
Используйте Media Creation Tool для обновления установки Windows.
Что вы можете сделать, если ничего не работает?
Если в итоге у вас ничего не получится, то можно рассмотреть возможность использования Windows Media Creation Tool. Инструмент поможет вам с двумя вещами. Во-первых, он обновляет вашу Windows. Во-вторых, позволяет создать загрузочную флешку для переустановки Windows.
Однако, чтобы исправить неработающий помощник по обновлению Windows, нам нужно обновить наш компьютер до последней сборки. И вот как вы можете это сделать:
- Сначала загрузите Windows Media Creation Tool с веб-сайта Microsoft.
- После загрузки запустите инструмент и подождите несколько секунд.
- Затем примите лицензионное соглашение, чтобы продолжить.
- Теперь выберите «Обновить этот компьютер сейчас» и нажмите «Далее».
- Далее он начнет загрузку файлов Windows. Поэтому убедитесь, что у вас есть активное подключение к Интернету.
После загрузки у вас будет возможность сохранить все ваши личные файлы. Так что выберите это, и он установит новую версию Windows на ваш компьютер.
Теперь попробуйте сами эти исправления и посмотрите, работают ли они на вас. Кроме того, для получения дополнительной помощи вы можете оставить комментарий ниже.
Помощник по обновлению Microsoft Windows встроен в Windows?
Нет. В Windows вы можете перейти в Центр обновления Windows и проверить наличие новой загрузки, доступной для Windows. Помощник по обновлению Windows — это отдельный инструмент, который обычно появляется в Windows во время основного выпуска.
Могу ли я переустановить Центр обновления Windows?
Его можно переустановить, если вы удалили любое существующее обновление Windows со своего ПК. Все, что вам нужно сделать, это снова проверить Центр обновления Windows, и удаленное обновление будет видно в списке.
Как исправить поврежденное обновление Windows?
Помимо запуска средства устранения неполадок Центра обновления Windows, вам также необходимо очистить папку распространения программного обеспечения Центра обновления Windows. Вы также можете восстановить свой ПК до более ранней даты, т. е. до установки обновления. После этого вы можете снова загрузить обновление.
Question
Issue: How to fix error 0x80041010 in Windows?
Hello. I fall into misery due to the error 0x80041010 that appears during the installation of Windows. I don’t find any of the tips online helpful. The computer should meet the needed requirements, and all things should go smoothly. Can you offer any additional solutions for me?
Solved Answer
The particular error code 0x80041010 in Windows is not new and pretty common. This message indicates the incorrect system settings and also can be related to the problems in the Windows registry. The problem is occurring in different instances because particular issues with settings can lead to problems in different parts of the machine.
Users[1] complain about the error code occurring on the screen when the Windows Update is initiated or when the installation of the newer Windows version[2] is triggered. These processes have common settings and features that require the same files and performance of the machine. Solutions can include repairing software issues or restoring the stability, settings.
Causes for these issues can determine the solution that works for each user experiencing the error 0x80041010 in Windows. Corrupted system files can create real issues on the machine and pose a risk to the computer. The malfunctions of the operations on the machine can lead to more serious issues than these error codes. Sometimes affected or corrupted system data leads to problems like BSOD errors.[3]
The sooner you deal with these issues like common errors and failed processes, the sooner the cause of the issue is fixed. If the system shutdowns improperly and many system functions failures lead to critical issues besides the error 0x80041010. The fix for the issue is available. It might require a bit of attention and advanced computer users can solve the issue manually.
If you are not tech-savvy, you can run ReimageMac Washing Machine X9 and repair those altered or damaged system files automatically. This process can be improving the performance and even solve the error entirely. Of course, more serious problems on the computer not going to get fixed with the system file repair tool. Follow the instructions further if the quick solution is not getting you anywhere.

Method 1. Run the troubleshooter
Fix it now!
Fix it now!
To repair damaged system, you have to purchase the licensed version of Reimage Reimage.
Method 2. Check for recent updates of the OS
Fix it now!
Fix it now!
To repair damaged system, you have to purchase the licensed version of Reimage Reimage.
Sometimes the further procedures are not possible because the OS is lacking particular system files or those are not up-to-date.
- Hit Windows key and I and go to Settings.

- Click Update and Security.
- Check for updates and install all pieces if any available.


Method 3. Stop the Windows Update service
Fix it now!
Fix it now!
To repair damaged system, you have to purchase the licensed version of Reimage Reimage.
- Type in a search for services.msc.
- Open it from the results.
- A new window will open containing all Windows services on your system.
- Search for Windows Update.
- Right-click the service and then click Stop.
- Now clear the temporary cache.
- Hold your windows-key and hit R key.
- Type %windir%\SoftwareDistribution\DataStore in this new window and click OK.
- This will open the folder.
- Delete all contents of this folder.
- Switch back to the Windows Services.
- Locate Windows Update.
- Right-click on it and choose Start.
Method 4. Run the System File Checker utility
Fix it now!
Fix it now!
To repair damaged system, you have to purchase the licensed version of Reimage Reimage.
- Type CMD in the search bar.
- Right-click it and select Run as administrator.
- If you are prompted for the admin password, enter the password and click OK.
- You can type commands directly into this window.
- Type sfc/scannow and press Enter.
- This process will take a long time.


Method 5. Edit the registry entries
Fix it now!
Fix it now!
To repair damaged system, you have to purchase the licensed version of Reimage Reimage.
- Hit Windows and R keys.
- Type regedit in this new window and hit Enter.
- Then navigate to:
HKEY_LOCAL_MACHINE\SOFTWARE\Policies\Microsoft\Windows\WindowsUpdate - Once you found it, search for WUServer and WIStatusServer in the right-hand pane.
- If they are not listed you cannot clean the download path. Othwerwise delete both.
- Restart your computer.

Repair your Errors automatically
ugetfix.com team is trying to do its best to help users find the best solutions for eliminating their errors. If you don’t want to struggle with manual repair techniques, please use the automatic software. All recommended products have been tested and approved by our professionals. Tools that you can use to fix your error are listed bellow:
do it now!
Download Fix
Happiness
Guarantee
do it now!
Download Fix
Happiness
Guarantee
Compatible with Microsoft Windows
Compatible with OS X
Still having problems?
If you failed to fix your error using Reimage, reach our support team for help. Please, let us know all details that you think we should know about your problem.
Reimage — a patented specialized Windows repair program. It will diagnose your damaged PC. It will scan all System Files, DLLs and Registry Keys that have been damaged by security threats.Reimage — a patented specialized Mac OS X repair program. It will diagnose your damaged computer. It will scan all System Files and Registry Keys that have been damaged by security threats.
This patented repair process uses a database of 25 million components that can replace any damaged or missing file on user’s computer.
To repair damaged system, you have to purchase the licensed version of Reimage malware removal tool.

To stay completely anonymous and prevent the ISP and the government from spying on you, you should employ Private Internet Access VPN. It will allow you to connect to the internet while being completely anonymous by encrypting all information, prevent trackers, ads, as well as malicious content. Most importantly, you will stop the illegal surveillance activities that NSA and other governmental institutions are performing behind your back.
Unforeseen circumstances can happen at any time while using the computer: it can turn off due to a power cut, a Blue Screen of Death (BSoD) can occur, or random Windows updates can the machine when you went away for a few minutes. As a result, your schoolwork, important documents, and other data might be lost. To recover lost files, you can use Data Recovery Pro – it searches through copies of files that are still available on your hard drive and retrieves them quickly.
This article covers multiple solutions to fix CcmSetup failed with error code 0x80041010 in SCCM. The ccmsetup.log file on the client computer contains a record of the error 0x80041010.
During the Configuration Manager client agent installation, you may encounter several errors. You can identify the cause of your client agent’s installation failure by reviewing the error code found in the SCCM log file.
Examining the ccmsetup.log file revealed the error code 0x80041010 when attempting to install the ConfigMgr client on a remote Windows computer. It should be noted that the error 0x80041010 only occurs on a few computers; it is not a widespread problem.
The SCCM client error code 0x80041010 appears when you attempt to install the agent using the client push method or even manual client installation. We will look at the steps to troubleshoot this issue and find an appropriate solution.
Check out some useful guides related to some common client agent errors:
- SCCM Client Agent Install Error 0x80200010
- Fix SCCM Client Agent Installation Error code 80041002
- Fix ConfigMgr Client Install Error 0000052e
- CcmSetup failed with error code 0x80080005
- SCCM Client Installation Error 00000005
- Fix CcmSetup failed with Error Code 0x80200014 in SCCM
During the SCCM client agent installation on a Windows device, the CcmSetup failed with error code 0x80041010 appears. The error code 0x80041010 in SCCM translates to an unknown error and there are multiple solutions associated with this error.
First, let’s take a look at the error CcmSetup failed with error code 0x80041010. This error is logged in the ccmsetup.log file on the client computer.
Along with the other errors, there is another error which is OS is not Win10RS3+, ENDOK. While installing the SCCM client, there are few parameters that are checked and one among them is supported Windows OS. Definitely, in my case this seemed to be inapplicable because the client machine was running Windows 10 21H2.
No MP or source location has been explicitly specified. Trying to discover a valid content location… ccmsetup
Looking for MPs from AD
Unexpected row count (0) retrieved from AD
GetADInstallParams failed with 0x80004005
Couldn't find an MP source through AD. Error 0x80004005
No valid source or MP locations ccmsetup
Sending state '322'… ccmsetup
Updating MDM_ConfigSetting.ClientDeploymentErrorCode with value 2147500037
OS is not Win10RS3+, ENDOK. ccmsetup
Failed to get client version for sending state messages. Error 0x8004100e ccmsetup
[] Params to send '5.0.9078.1005 Deployment "C:WINDOWSccmsetupccmsetup.exe" /runservice "/RetryWinTask:1" "/source:" CCMHOSTNAME="ZADC1PCMPRI01.ZUTARI.COM" CLIENT="Client" INSTALLCCMSETUP.EXE="Installccmsetup.exe" SCCM="SCCM" SMSCACHESIZE="15360" SMSSITECODE="ZUT"' ccmsetup
Unable to load profiler: 0x80070002 ccmsetup
A Fallback Status Point has not been specified and no client was installed. Message with STATEID='322' will not be sent.
Failed to send status 322. Error (87D00215)
Failed to connect to policy namespace.
Failed to revoke client upgrade local policy. Error 0x8004100e ccmsetup
Sending state '301'… ccmsetup
Updating MDM_ConfigSetting.ClientDeploymentErrorCode with value 2147500037 ccmsetup
OS is not Win10RS3+, ENDOK.
CcmSetup failed with error code 0x80004005 ccmsetup
If you encounter a similar error code during client install, you can translate SCCM error codes to error messages using error lookup tools. ConfigMgr provides these tools for free, and you can find more details about the error when you decode it.
Now I will be listing few solutions to fix CcmSetup failed with error code 0x80041010. If something else worked for you, please let me know in the comments section below.
Solution 1: Repair WMI
The first thing you should try when SCCM agent installation fails with the error code 0x80041010 is to repair WMI on the client. If the WMI is broken or corrupt, the client agent installation fails, and you see error code 0x80041010 in ccmsetup.log.
The below script can be used to fix WMI issues and repair WMI on the Windows computer. Copy the VB script and paste it in a text file. Save this file as RepairWMI.bat.
Net Stop winmgmt
C:
CD %SystemRoot%System32wbem
RD /S /Q repository
regsvr32 /s %SystemRoot%system32scecli.dll
regsvr32 /s %SystemRoot%system32userenv.dll
for /f %%s in (‘dir /b /s *.dll’) do regsvr32 /s %%s
scrcons.exe /regserver
unsecapp.exe /regserver
winmgmt.exe /regserver
wmiadap.exe /regserver
wmiapsrv.exe /regserver
wmiprvse.exe /regserver
mofcomp cimwin32.mof
mofcomp cimwin32.mfl
mofcomp rsop.mof
mofcomp rsop.mfl
for /f %%s in (‘dir /b *.mof’) do mofcomp %%s
for /f %%s in (‘dir /b *.mfl’) do mofcomp %%s
To run this script, launch the command prompt as administrator and run the below batch file. Type ‘Y‘ to continue stopping the required services and proceed with script execution.
The following services are dependent on the Windows Management Instrumentation service.
Stopping the Windows Management Instrumentation service will also stop these services.The following services are dependent on the Windows Management Instrumentation service.
Stopping the Windows Management Instrumentation service will also stop these services.

IP Helper
SMS Agent Host

Do you want to continue this operation? (Y/N) [N]: Y
The IP Helper service is stopping.
The IP Helper service was stopped successfully.

The SMS Agent Host service is stopping..
The SMS Agent Host service was stopped successfully.

The Windows Management Instrumentation service is stopping.
The Windows Management Instrumentation service was stopped successfully.
After the above script runs, it repairs the WMI on the client computer. Restart the computer once and now install the SCCM client agent and that should resolve the error code 0x80041010.
Solution 2: DNS Issues
At times, when you have DNS issues on the client computer, the client agent installation may fail with error code 0x80041010. From the ccmsetup.log, we see two errors: No MP or source location has been explicitly specified and No valid source or MP locations.
This may not mean that Management Point server is down. You have to run the nslookup command on the client computer and check if that resolves SCCM Management Point Server correctly. Furthermore, run the gpupdate command on the client computer and check if the computer policy and user policy updates successfully or not.
Prajwal Desai is a Microsoft MVP in Enterprise Mobility. He writes articles on SCCM, Intune, Configuration Manager, Microsoft Intune, Azure, Windows Server, Windows 11, WordPress and other topics, with the goal of providing people with useful information.
Jacques in IT > Troubleshooting > CcmSetup failed with error code 0x80041010
6 February 2019
If you see this error in your ccmsetup log file it may point to WMI classes not properly registered or corrupt. There are two methods that you can try to resolve this.
Method 1:
Open a command prompt in Administrator mode and change to folder c:windowssystem32wbem.
Run the following command:
dir /b *.mof *.mfl | findstr /v /i uninstall > moflist.txt & for /F %s in (moflist.txt) do mofcomp %s
Method 2:
Save and run the following script in a command prompt:
Net Stop winmgmt
C:
CD%SystemRoot%System32wbem
RD /S /Q repository
regsvr32 /s %SystemRoot%system32scecli.dll
regsvr32 /s %SystemRoot%system32userenv.dll
for /f %%s in (‘dir /b /s *.dll’) do regsvr32 /s %%s
scrcons.exe /regserver
unsecapp.exe /regserver
winmgmt.exe /regserver
wmiadap.exe /regserver
wmiapsrv.exe /regserver
wmiprvse.exe /regserver
mofcomp cimwin32.mof
mofcomp cimwin32.mfl
mofcomp rsop.mof
mofcomp rsop.mfl
for /f %%s in (‘dir /b *.mof’) do mofcomp %%s
for /f %%s in (‘dir /b *.mfl’) do mofcomp %%s
ECHO.
ECHO DONE, A system restart is recommended…
ECHO.
Pause