После обновления билда Windows 10 до 1803 или выше (1809, 1903, 1909) некоторые пользователи заметили, что они теперь не могут подключиться к общим папкам сетевым папкам на соседних компьютерах в сети, или к каталогу на сетевом NAS хранилище.
Проводник Windows не может даже отобразить список общих сетевых папок на соседних компьютерах (как с Windows 10, так и с Windows 7). При попытке открыть любую сетевую папку появляется ошибка:
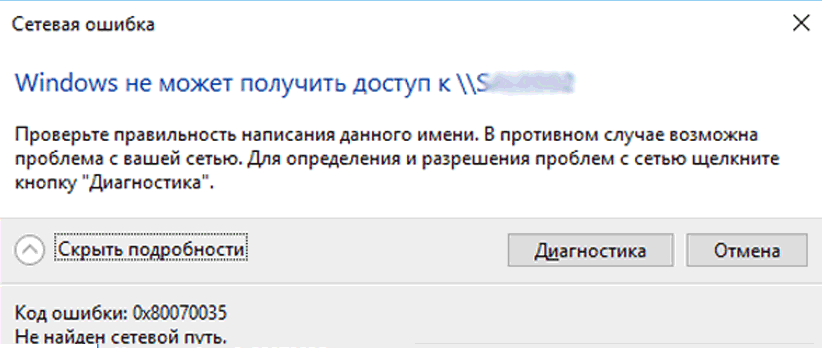
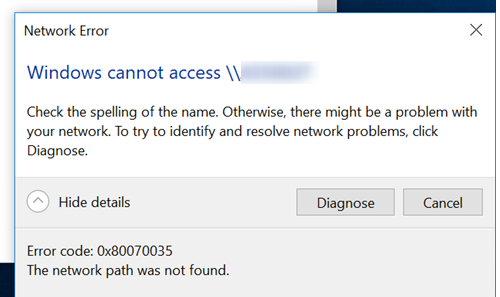
Сетевая ошибка
Windows не может получить доступ к \NAS
Проверьте правильность написания данного имени. В противном случае возможно проблема с вашей сетью. Для определения проблем с сетью щёлкните кнопку «Диагностика».
Код ошибки 0x80070035.
Не найден сетевой путь.
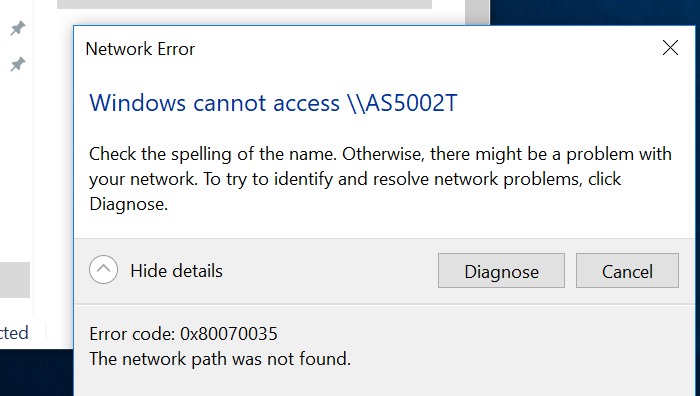
В английской версии Windows 10 эта ошибка выглядит так:
Windows cannot access \share
Error code: 0x80070035.
The network path not found.
При этом с других компьютеров (с более старыми версиями Windows 10, 8.1 или 7), телефонов и других устройств вы можете спокойно открывать и использовать сетевые папки в локальной сети.
Попробуем разобраться, как исправить ошибку с кодом “0x80070035. Не найден сетевой путь” в Windows 10.
Содержание:
- В Windows 10 по-умолчанию отключен протокол SMB v1
- Гостевой вход без проверки подлинности
- Отключение SMB1 и SMB2
- Настройки просмотра сетевого окружения в Windows 10
- Доступ к NAS или Samba хранилищу из Windows 10 с сохранённым паролем
В Windows 10 по-умолчанию отключен протокол SMB v1
В первую очередь нужно понять, связана ли проблема с тем, что в Windows 10 1709 и выше по умолчанию отключен устаревший и небезопасный протокол доступа к сетевым файлам и папкам – SMB v1.0. Если сетевое устройство, к которому вы подключаетесь поддерживает доступ к общим файлам только по протоколу SMBv1 (например, старая версия NAS хранилища, компьютер с Windows XP/Windows Server 2003), то последние билды Windows 10 по-умолчанию не смогут подключиться к сетевым папкам на таком устройстве. И при доступе к ресурсу
\SharedDeviceName
вы можете получить ошибку “0x80070035”.
В Windows 10 вы можете проверить, включен ли у вас протокол доступа к сетевым ресурсам SMBv1 с помощью команды:
Dism /online /Get-Features /format:table | find "SMB1Protocol"
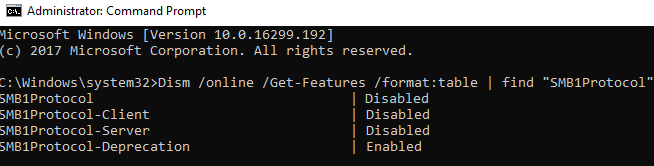
В нашем примере видно, что на компьютере отключен протокол SMB1:
SMB1Protocol                                 | Disabled
SMB1Protocol-Client                          | Disabled
SMB1Protocol-Server                          | Disabled
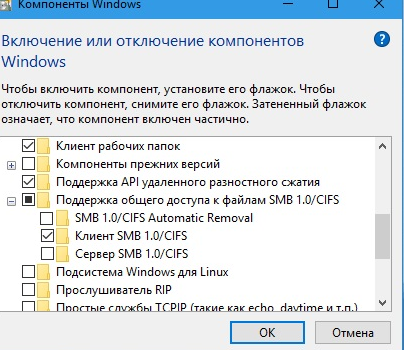
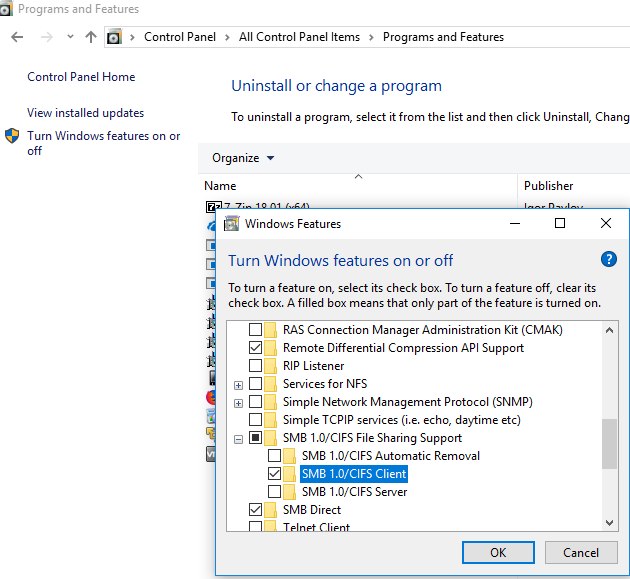
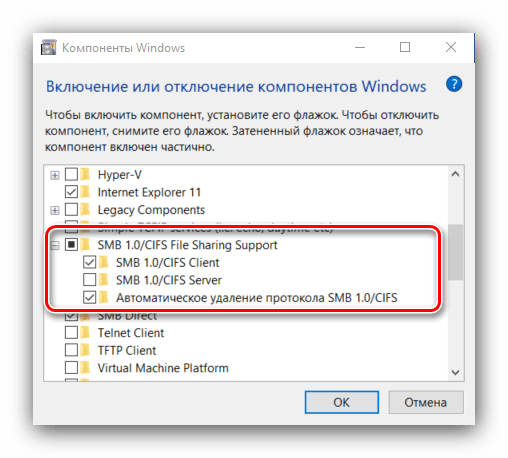
Вы можете включить клиент для доступа к сетевым устройствам с поддержкой протокола SMBv1 через Панель управления (Программы -> Программы и компоненты -> Включение или отключение компонентов Windows -> Поддержка общего доступа к файлам SMB 1.0 / CIFS -> Клиент SMB 1.0 / CIFS). Можно вызвать окно установки компонентов, выполнив команду optionalfeatures.exe.
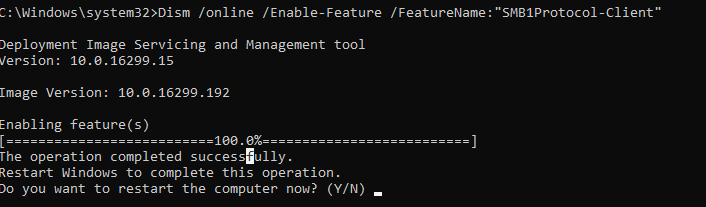
Либо вы можете включить клиент SMB 1 командой DISM:
Dism /online /Enable-Feature /FeatureName:"SMB1Protocol-Client"
После установки клиента SMBv1 нужно перезагрузить компьютер.
После перезагрузки проверьте, появился ли доступ к сетевой папке.
Важно! Нежелательно включать поддержку клиента SMB1, а тем более SMB1-Server, т.к. этот протокол является уязвимым и имеет большое количество инструментов удаленной эксплуатации уязвимости. Если вам не нужен протокол SMB v1 для доступа к старым устройствам, обязательно отключите его.
В Windows 10 17090 и выше клиент SMBv1 автоматически удаляется, если он не использовался более 15 дней.
Гостевой вход без проверки подлинности
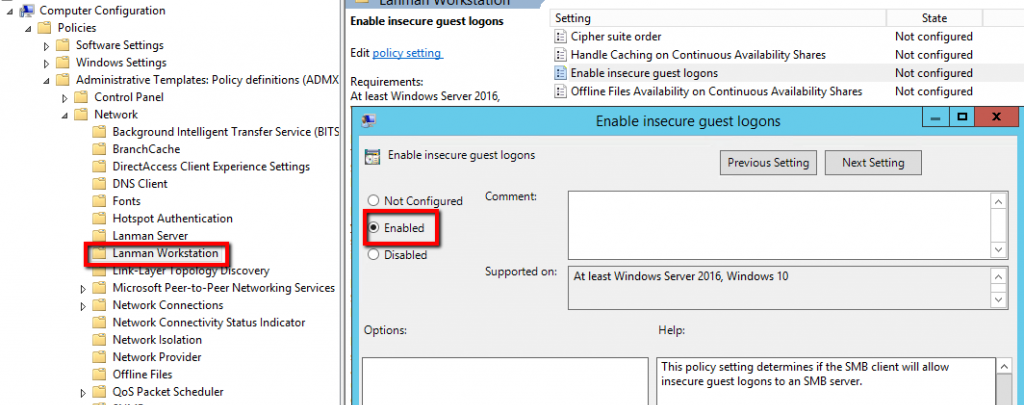
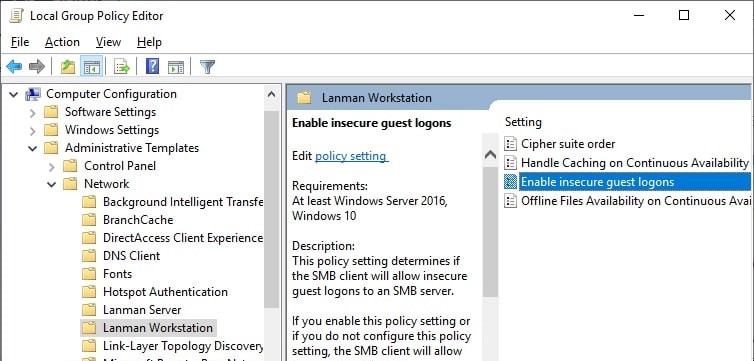
Если вы используете анонимный доступ к NAS хранилищам или другим компьютерам, нужно включить политику небезопасные гостевые входы. В Windows 1803/1709 она блокирует доступ к сетевым папкам по протоколу SMB 2.0 под анонимным (гостевым) аккаунтом. Для этого нужно в редакторе локальных политик Windows 10 (gpedit.msc) включить политику Enable insecure guest logons (Включить небезопасные гостевые входы) в секции GPO Computer Configuration -> Administrative templates -> Network (Сеть)-> Lanman Workstation.
Или вы можете разрешить сетевой доступ под гостевой записью командой:
reg add HKLMSYSTEMCurrentControlSetServicesLanmanWorkstationParameters /v AllowInsecureGuestAuth /t reg_dword /d 00000001 /f
Отключение SMB1 и SMB2
Если в вашей сети остались только устройства с поддержкой SMB v3 (Windows 8.1/Windows Server 2012 R2 и выше, см. таблицу версий SMB в Windows), вы можете исправить ошибку 0x80070035, отключив SMB1 и SMB2. Дело в том, что ваш компьютер может пытаться использовать протокол SMB 2.0 для доступа к сетевым папкам, которые разрешают только SMB 3.0 подключения (возможно с шифрованием трафика).
Сначала отключите протокол SMB 1 через Панель управления или командами:
sc.exe config lanmanworkstation depend= bowser/mrxsmb10/nsi
sc.exe config mrxsmb10 start= disabled
Dism /online /Disable-Feature /FeatureName:"SMB1Protocol"
Затем отключите протокол SMB2.0 в консоли PowerShell:
reg.exe add "HKLMSYSTEMCurrentControlSetservicesLanmanServerParameters" /v "SMB2" /t REG_DWORD /d "0" /f
sc.exe config lanmanworkstation depend= bowser/mrxsmb10/nsi
sc.exe config mrxsmb20 start= disabled
PowerShell -ExecutionPolicy Unrestricted
Set-SmbServerConfiguration –EnableSMB2Protocol $true
Вы можете проверить, что протоколы SMB 1 и SMB 2 отключены, выполнив команду PowerShell:
Get-SmbServerConfiguration | select "*enablesmb*"
EnableSMB1Protocol              : False
EnableSMB2Protocol              : False

Настройки просмотра сетевого окружения в Windows 10
Если ваши компьютеры находятся в рабочей группе, настоятельно советую выполнить рекомендации из статьи Windows 10 перестала видеть сетевое окружение. В частности:
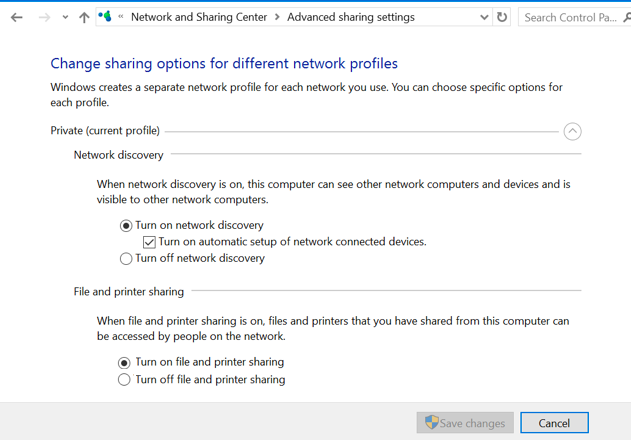
В разделе Network and Sharing Center панели управления на обоих компьютерах проверьте, что в качестве текущего сетевого профиля используется частный профиль – Private (Current profile). Убедитесь, что включены следующие опции:
- Turn on network discovery (Включить сетевое обнаружение) + Turn on automatic setup of network connected devices (Включить автоматическую настройку на сетевых устройствах);
- Turn on file and printer sharing (Включить общий доступ к файлам и принтерам).
В разделе All Networks (Все сети) включите опции:
- Turn off password Protect Sharing (Отключить парольную защиту)
- Turn on sharing (Включить общий доступ)
На обоих компьютерах сбросьте кэш DNS:
ipconfig /flushdns
И перезагрузите оба компьютера.
Что еще стоит проверить:
- В свойствах общей сетевой папки (как на уровне NTFS разрешений файловой системы, так и на уровне сетевой папки) проверьте, что у группы Everyone есть право на чтение содержимого папки;
- Проверьте, открывается ли сетевое хранилище по ip адресу. Для этого в окне проводника наберите \192.168.1.100 (замените на IP адрес вашего сетевого хранилища или компьютера);
- Если у вас на компьютере активно сразу два сетевых интерфейса (Wi-Fi и Ethernet), попробуйте временно отключить один из них и проверить доступ к ресурсам в локальной сети;
- Проверьте, что на вашем компьютере запущены следующие службы (откройте консоль управления службами services.msc). Попробуйте запустить данные службы и переведите их в режим автоматического запуска с задержкой (Automatic Delayed Start):
- Хост поставщика функции обнаружения (Function Discovery Provider Host — fdPHost)
- Публикация ресурсов обнаружения функции (Function Discovery Resource Publication — FDResPub)
- Служба обнаружения SSDP (SSDP Discovery — SSDPSRV)
- Узел универсальных PNP-устройств (UPnP Device Host — (upnphost)
- Служба DNS-клиента (dnscache)
- Попробуйте временно отключить антивирус и/или файервол и проверить, сохранилась ли проблема при доступе к сетевому ресурсу;
- Попробуйте изменить имя компьютера в свойствах системы и после перезагрузки проверить доступ к ресурсам сетевого хранилища;
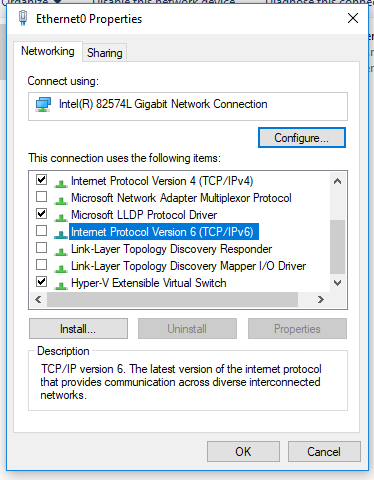
- Попробуйте отключить IPv6 протокол в свойствах вашего сетевого адаптера в Панели управления;

- Попробуйте выполнить параметров сброс сети TCP/IP командами:
netsh winsock reset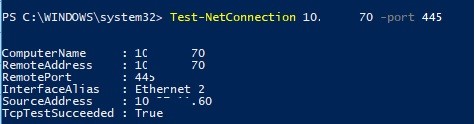
netsh int ip reset - Откройте консоль PowerShell и проверьте доступность удаленного компьютера по сети с помощью командлета Test-NetConnection (возможно доступ блокируется файерволом):
Test-NetConnection 192.168.1.90 -port 445
(если доступ не блокируется, должен появится статус TcpTestSucceeded : True) .
.
 .
.Доступ к NAS или Samba хранилищу из Windows 10 с сохранённым паролем
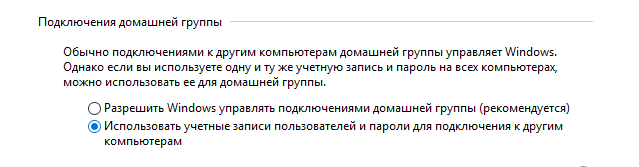
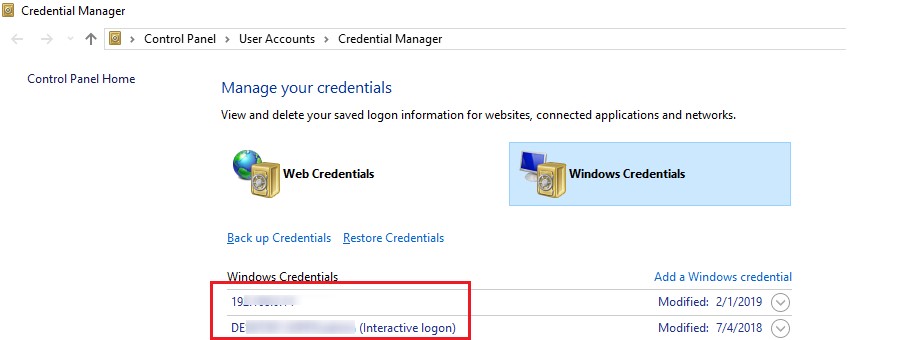
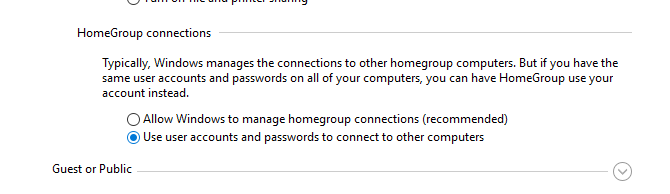
Если проблема возникает только при доступе к сетевому хранилищу NAS (или к Samba серверу на Linux), можно попробовать сохранить пароли для подключения к сетевому хранилищу NAS в менеджере паролей в Панели управления (Credential Manager: “Control Panel” -> “Credentials Manager” -> “Windows Credentials”). Затем в настройках Дополнительных параметров общего доступа включите опцию Использовать учетные записи пользователей и пароли для подключения к другим компьютерам (Use user accounts and passwords to connect to other computers).
«Error code: 0x80070035 The network path was not found» while trying to access another PC running Windows 7 Ultimate I searched and read dozens of similiar posts to try to resolve this issue with no success.
The situation is, I have a router in home with 4 PC’s connected. My central PC is running Windows 7 Ultimate. The others are Windows 7 Ultimate again, and 2 running XP Pro. No special Firewalls, just have Windows Firewall enabled on all PC’s, and am running KasperskyInternetSecurity2010 on all. (Have disabled these on all PC’s and tried to view/connect and it didnt make a difference, same error)
Fact one: not attempting a Homegroup connection at all, just simply wishing to connect in a basic network environment where I can drag and drop files between all PC’s in my Home Network or in my house , however its considered. But on the Windows 7 I am unable to view either of the XP’s only the other Win7, and when I try to access that one is when I get the «Error code: 0x80070035 The network path was not found».
Furthermore, while troubleshooting the problem I opened a Command Prompt in all computers, then an «ipconfig» to view each ip address. Then began to ping each machine to determin connectivity. Which resulted in partial success. My main Win7 machine (which i am on now) was able to ping successfully to all machines. But all other machines were unable to ping to me (main Win7). with a 100% loss.
So at least I determined this is most likely a helpful fact in resolving this. Going into «services.msc» I made sure that all the obvious services are started and running:
DCHP Client, Homegroup Listener, Homegroup Provider, Link-Layer Topology Discovery Mapper, NetTcp Port SHaring Service, Network Connections, Network List Service, Network Location Awareness, TCP/IP NetBIOS Helper
All strarted and running in Automactic mode.
Not sure what other information I can give at this point, to help assist in fixing this problem. Please dont hesitate to ask for me for more info if needed. Ready and willing to try anything to get this working, except for reinstalling the OS. All my programs work great and do not wish to go through the drama ao reinstalling all my programs and activating them and redoing all my Adobe settings and CAD settings.
Someone please help !
Apply these effective solutions to fix the error 80070035 on your PC
by Ivan Jenic
Passionate about all elements related to Windows and combined with his innate curiosity, Ivan has delved deep into understanding this operating system, with a specialization in drivers and… read more
Updated on January 17, 2023
Reviewed by
Vlad Turiceanu

Passionate about technology, Windows, and everything that has a power button, he spent most of his time developing new skills and learning more about the tech world. Coming… read more
- The error code 0x80070035 usually occurs if your computer can’t find the path of a network that it’s connected to.
- This can prevent proper collaboration between PCs and users of the same home network, thus restricting file sharing.
- Enabling SMB V1.0 may be the answer to quickly fixing Error code 0x80070035.
- You can also go through the other solutions mentioned in this guide to fix this problem.

XINSTALL BY CLICKING THE DOWNLOAD FILE
This software will repair common computer errors, protect you from file loss, malware, hardware failure and optimize your PC for maximum performance. Fix PC issues and remove viruses now in 3 easy steps:
- Download Restoro PC Repair Tool that comes with Patented Technologies (patent available here).
- Click Start Scan to find Windows issues that could be causing PC problems.
- Click Repair All to fix issues affecting your computer’s security and performance
- Restoro has been downloaded by 0 readers this month.
Internal networks should be simple to configure and use. Nonetheless, despite all advancements in the field, users are experiencing repeated connectivity issues.
Computers that run Microsoft’s operating system and share the same network should be able to access files on each other without any cable or program, yet this isn’t always the case.
There have been reports concerning the internal network related to the error code 0x80070035 and The network path was not found message.
In this guide, we will share with you some quick solutions to help you resolve the error code 0x80070035 problem on your Windows 10/11 PC.
What does error code 0x80070035 mean?
Usually, each error comes with a code and a message containing some details of the failure to identify what malfunctioned easily.
In this case, they pinpoint the network connectivity issues that arise when your device can’t find the trail of a connected network.
Even if this is an important detail, remember that the error can occur from different causes and locations within the operating system.
Because of this, it is tough for a person without technical knowledge or experience to fix the issue without help.
Why do I get the error code 0x80070035?
While there isn’t a precise answer to this question, for some users, simply changing the name of the computer they were trying to connect to into something shorter solved the issue.
Others say that corrupted registry entries resulted in this error and that fixing them also solved this problem.
Error code 0x80070035 may also be related to your antivirus or firewall settings, as the programs can block the resources and restrict Internet access.
While there can be a lot of causes for this message error, we have compiled a complete list of possible solutions to help you, so check them out below.
How do I fix error code 0x80070035 in Windows 11?
1. Run the Windows Update Troubleshooter
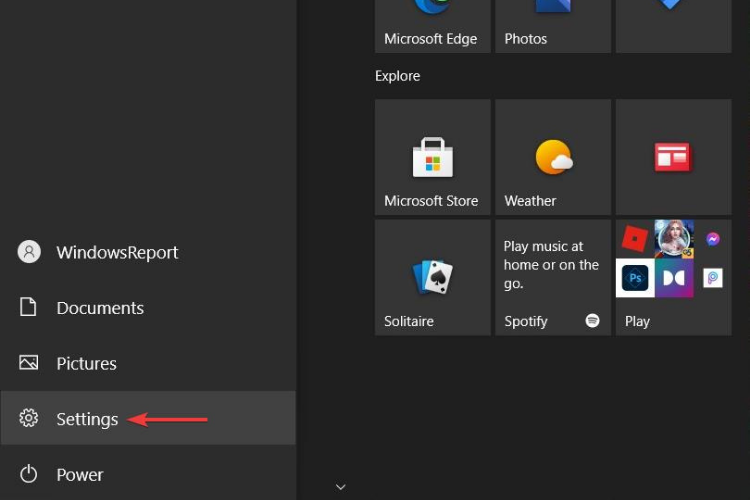
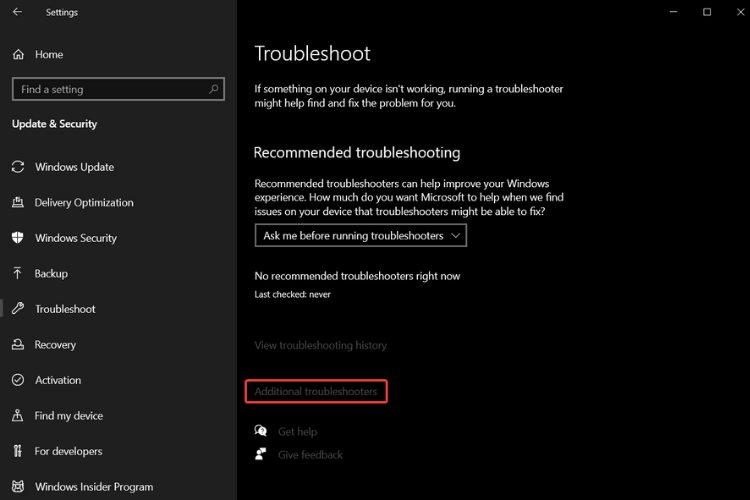
- Open the Settings app from the Start button.

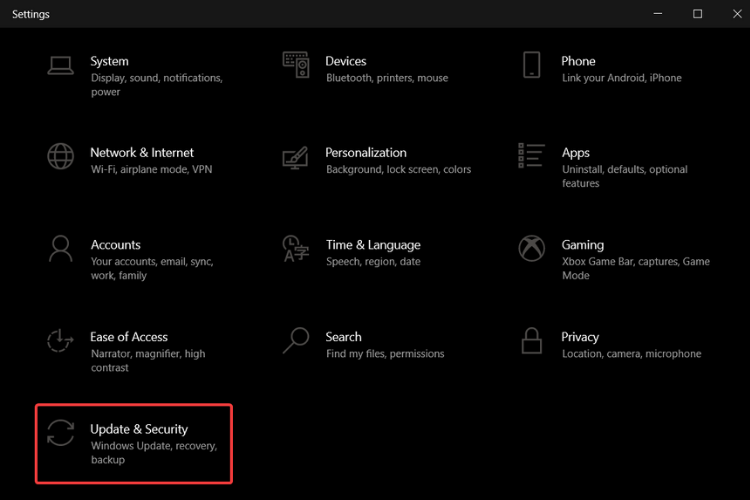
- Head over to Update & Security.
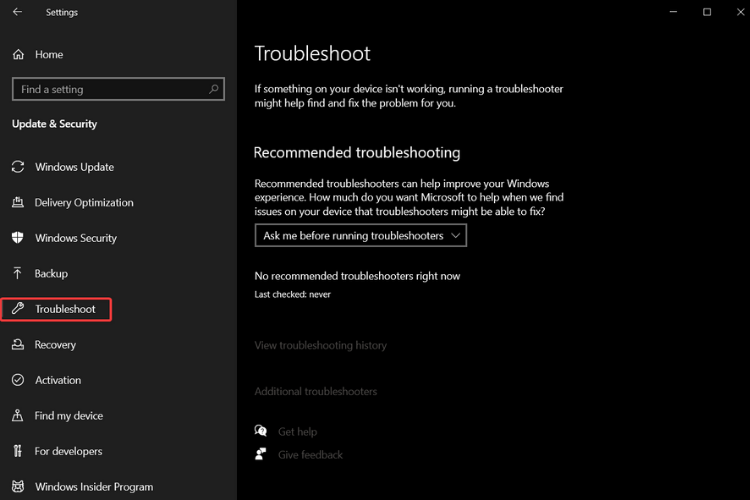
- Click on Troubleshoot.
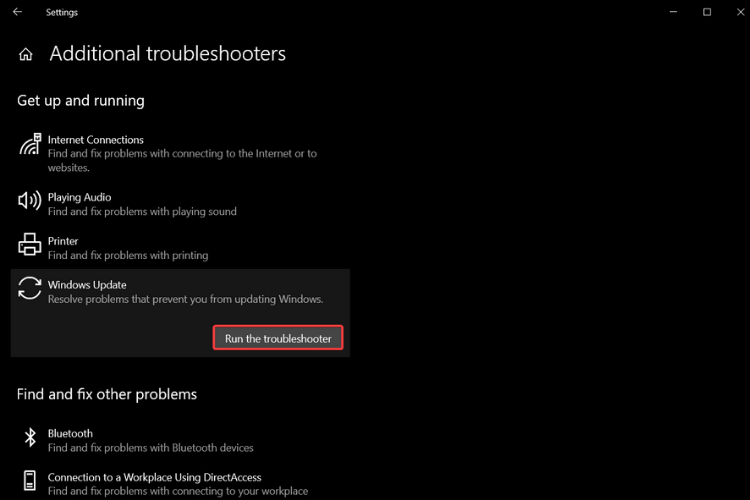
- Select Additional troubleshooters.
- Locate Windows Update and click on Run the troubleshooter.
- Follow further instructions, and let the wizard finish the process.
- Restart your computer.
2. Disable third-party firewall
If you’re 100% sure that the internal network configuration works as intended but the error keeps reappearing, you should consider disabling the third-party firewall.
Some modern antivirus suits come with third-party firewalls. This extra layer of protection is more than welcomed, but nothing can guarantee that it won’t interfere with the internal network.
By disabling it, some users sorted out the error 0x80070035 for good. So, make sure to give it a try and look for yourself.
You can also consider changing your firewall to avoid these errors. Check out this list, including the best two-way firewalls for your PC.
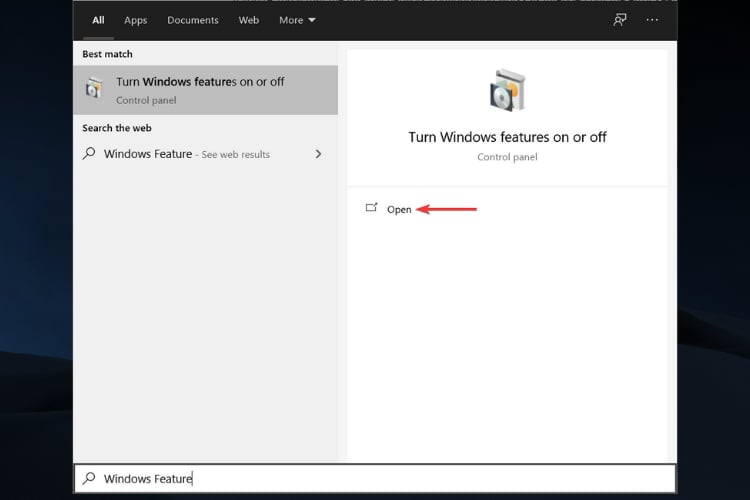
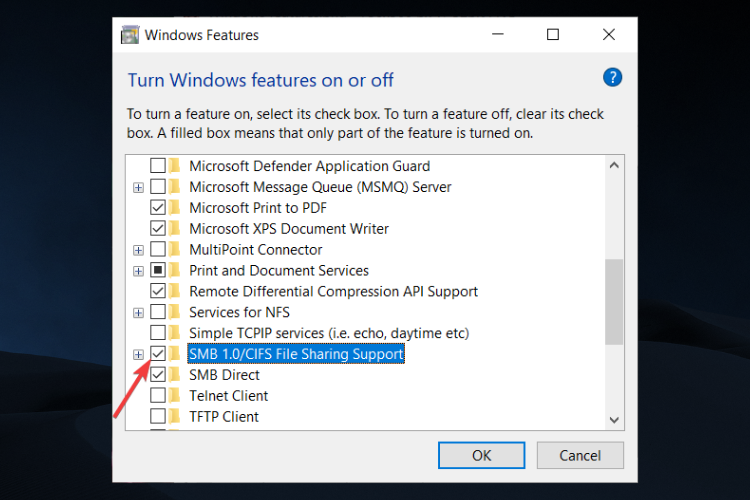
3. Enable SMB V1.0
- Open the Start menu, type Windows Feature, and turn Windows features on or off.
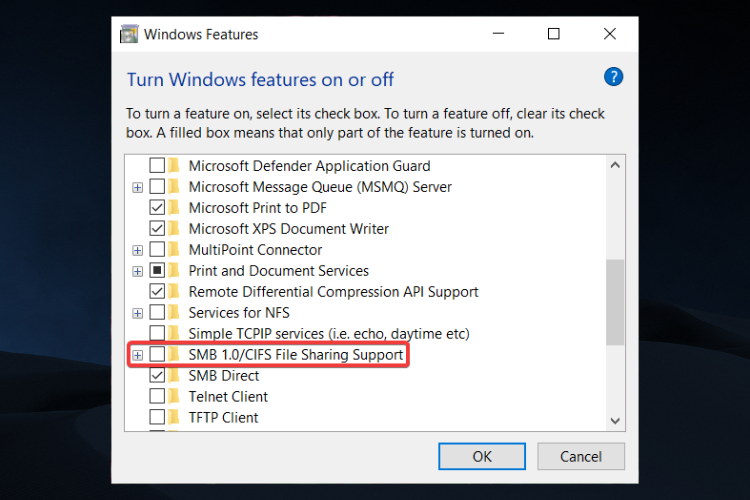
- Locate SMB 1.0/CIFS File Sharing Support.
- Check the box and click OK.
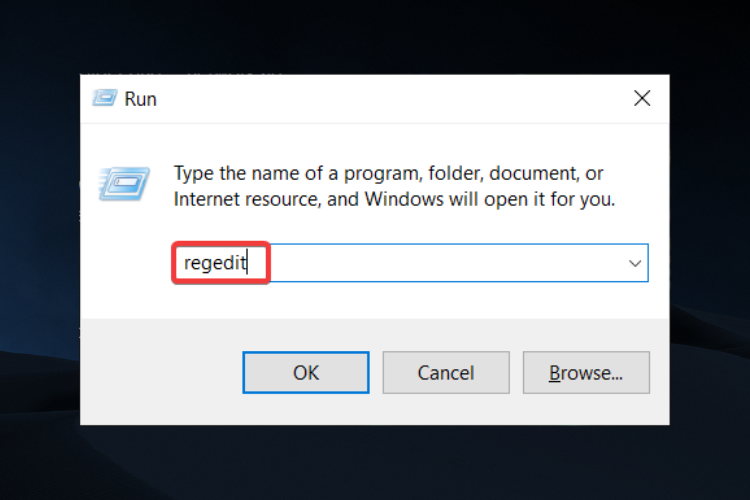
4. Change the value for AllowInsecureGuestAuth
- Press the Windows + R keys to open the Run dialogue.
- Type regedit and click on OK.
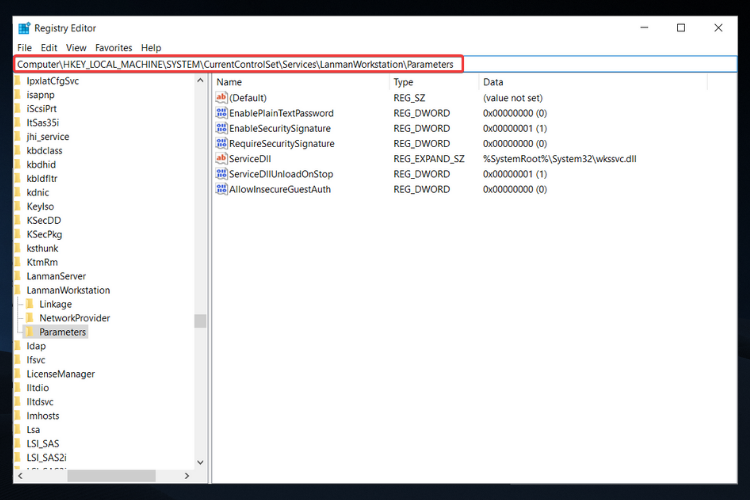
- Navigate to:
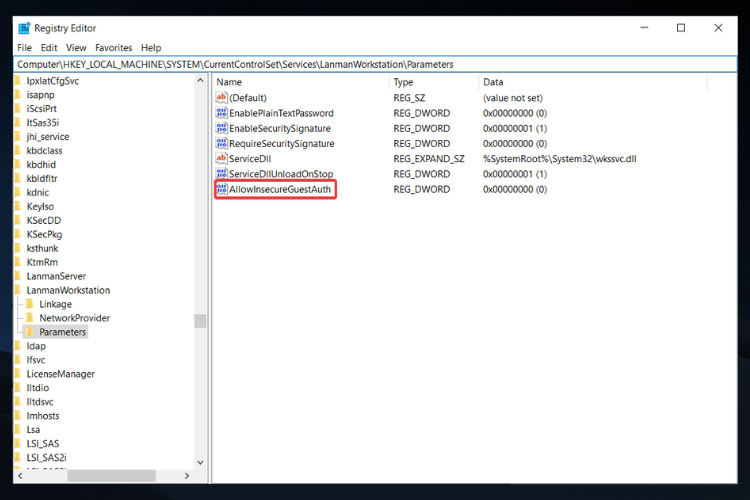
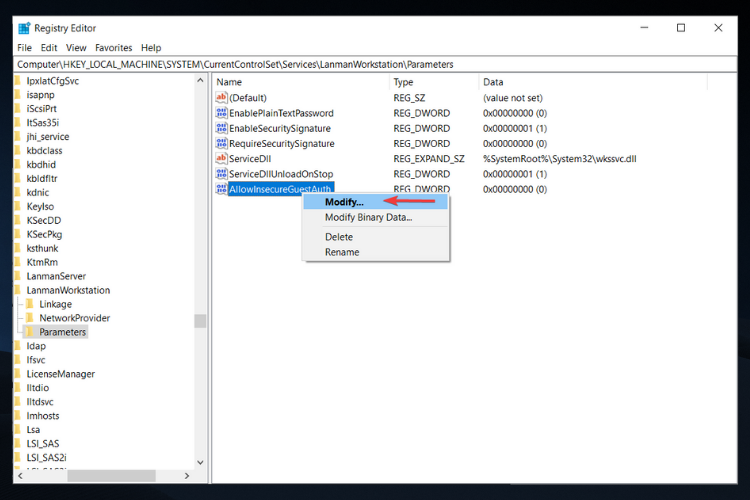
ComputerHKEY_LOCAL_MACHINESYSTEMCurrentControlSetServicesLanmanWorkstationParameters - Locate AllowInsecureGuestAuth.
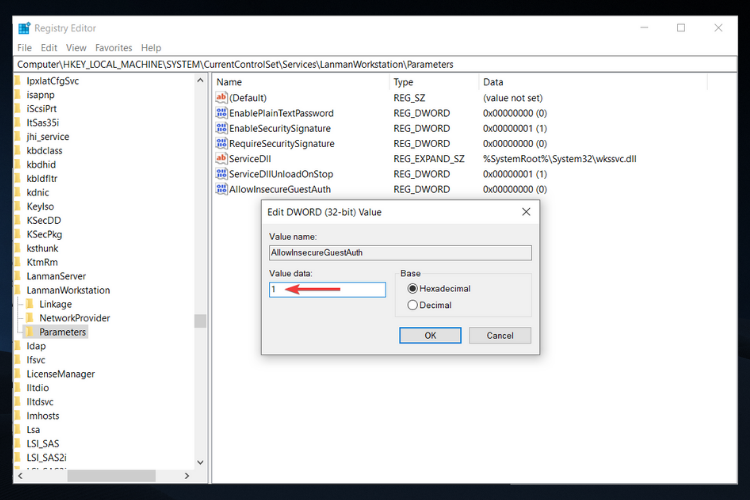
- Right-click on it and select Modify.
- Change the value to 1 from 0.
- Click on OK.
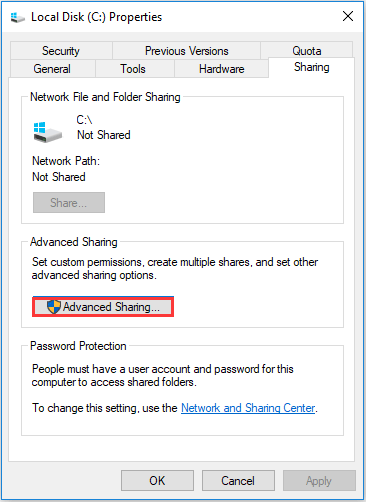
5. Enable advanced sharing
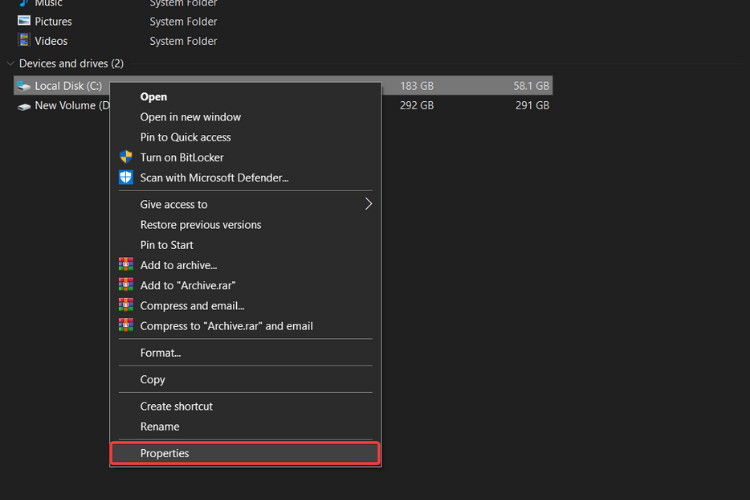
- Go to your Local disk (C:), right-click on it, and select Properties.
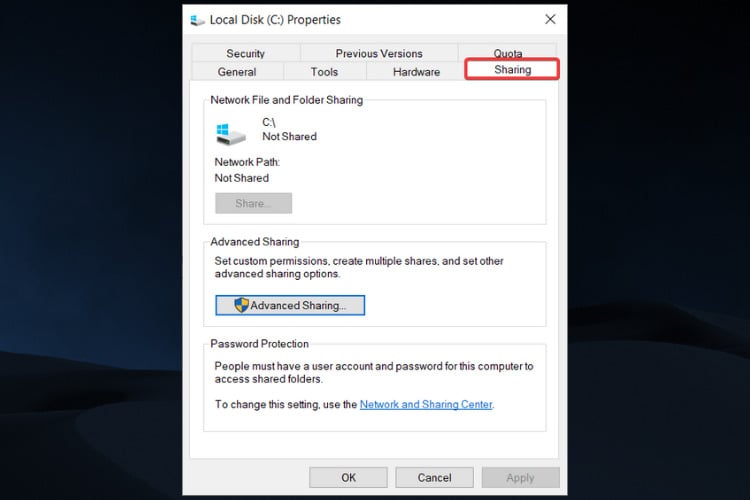
- Click on the Sharing tab.
- Go to Advanced sharing.
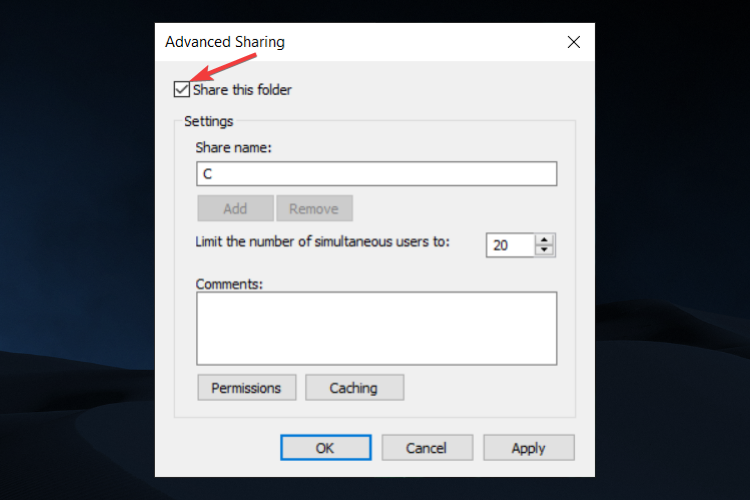
- Check the box for Share this folder.
- Click on Apply, then OK to save changes.
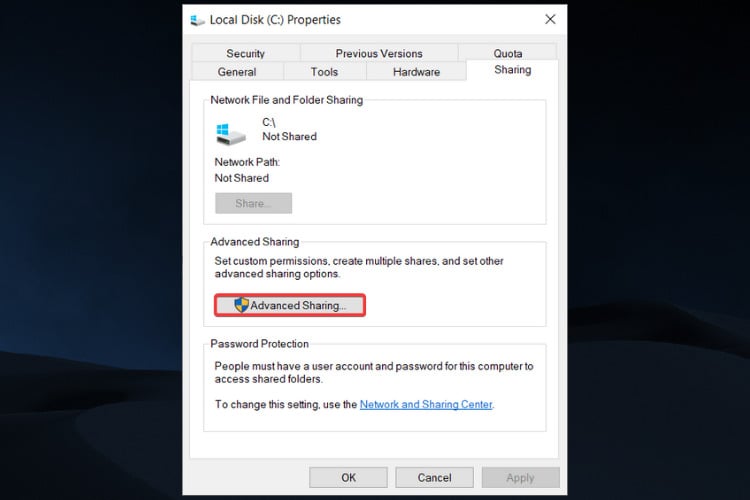
It is common to encounter this error if the sharing property isn’t enabled. This is because for computers to be able to send and receive files and data, you need to make sure your device can share its folders.
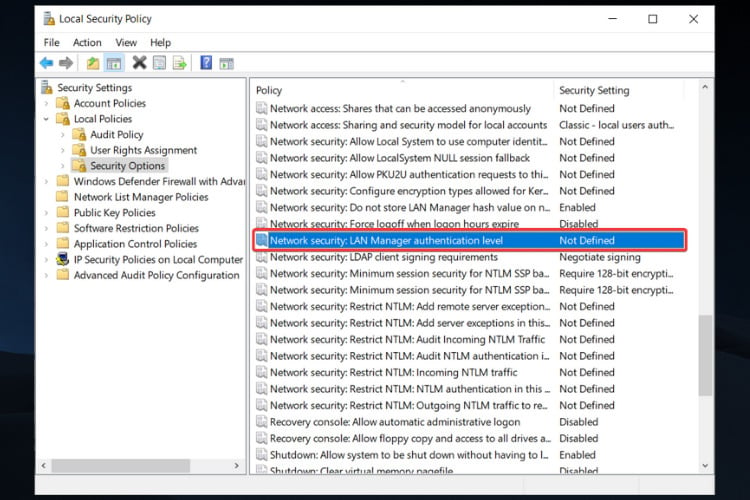
6. Change Network Security settings
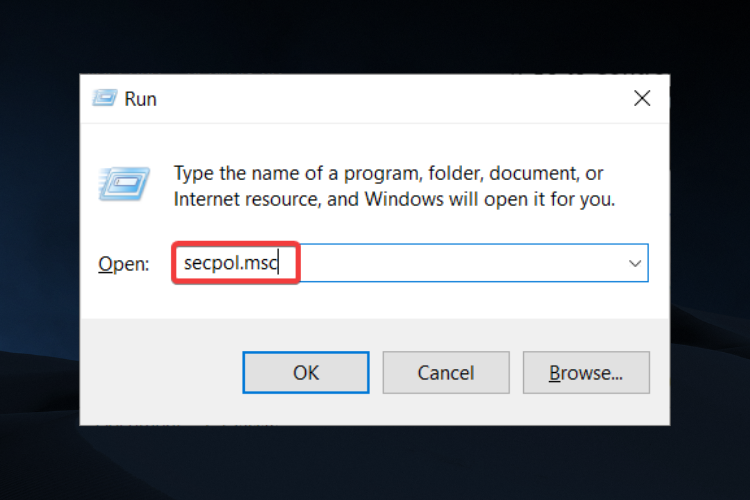
- Press Windows + R keys, type secpol.msc in the Run dialogue and click on OK.
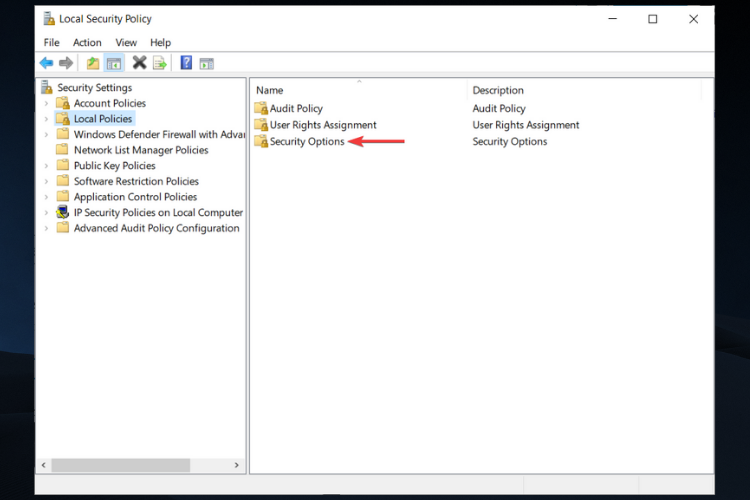
- Select Local Policies from the left pane.
- Double-click on Security Options from the right pane.
- Locate Network security: LAN Manager authentication level and double click it.
- From the drop-down menu, choose Send LM & NTLM-use NTLMv2 session security if negotiated.
- Then click on Apply and OK to save the changes.


7. Enable Network Discovery
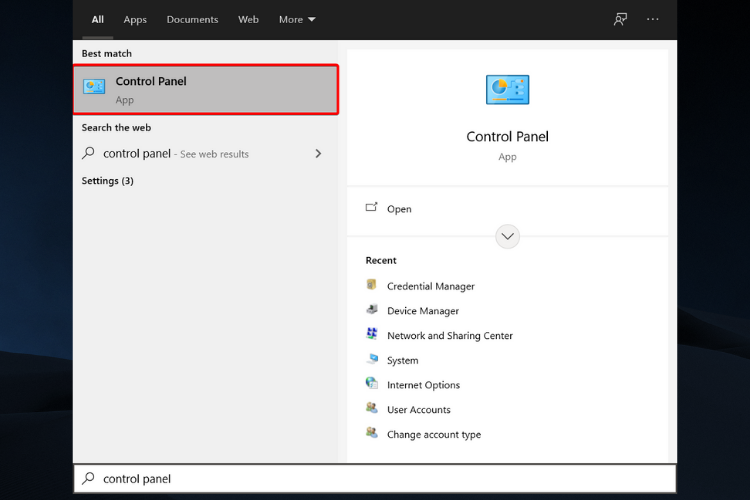
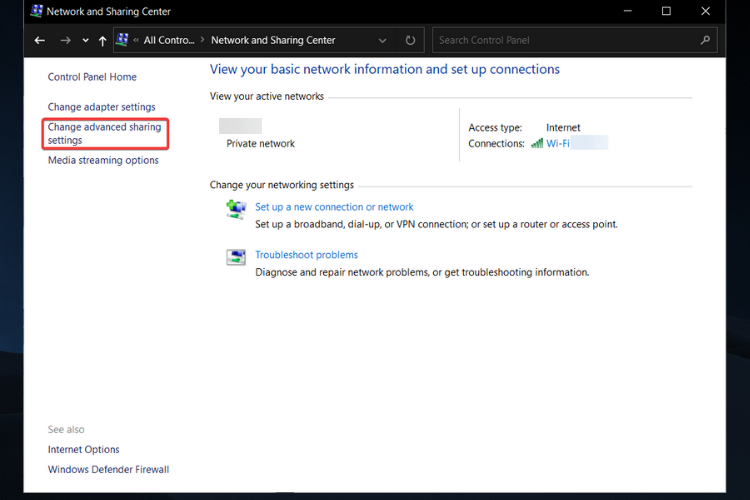
- Click the Start button, then type Control Panel and open it.
- Click on Network and Sharing Center.
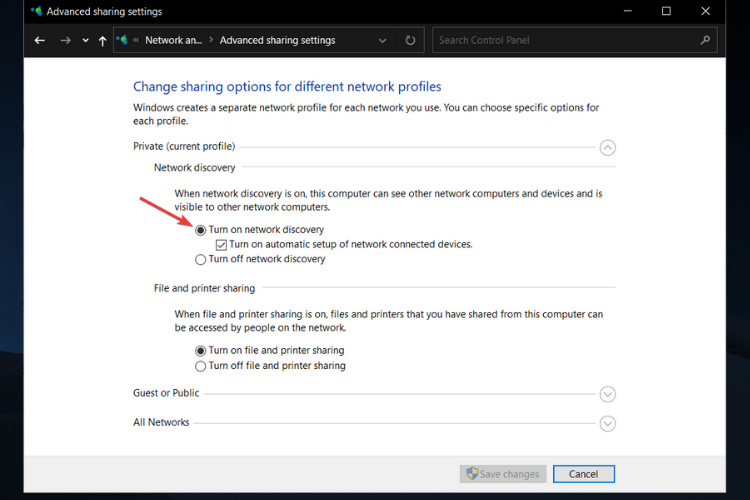
- From the left pane, choose Change advanced sharing settings.
- Select Turn on network discovery.
- Reboot your system and check if the error is fixed.

- Microsoft Edge Keeps Crashing: 4 Easy Ways to Stop That
- How to Change Boot Logo on Windows 10
- 6 Best CPU Temperature Monitoring Software [2023 List]
8. Reinstall your PC’s Network adapters
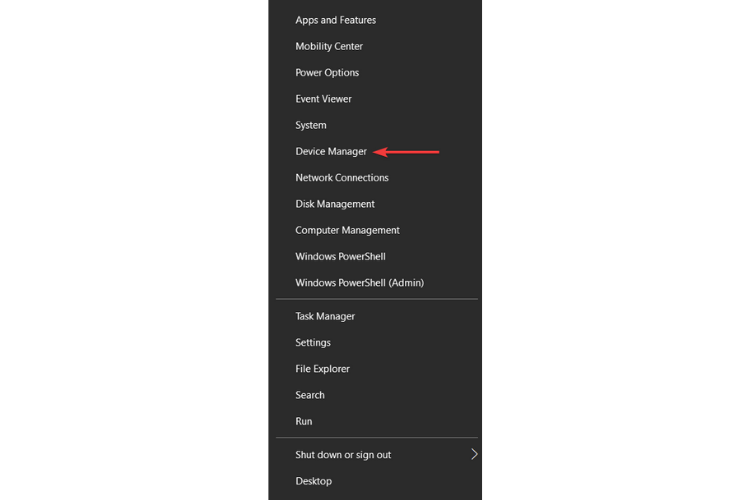
- Right-click on the Start button and select Device Manager.
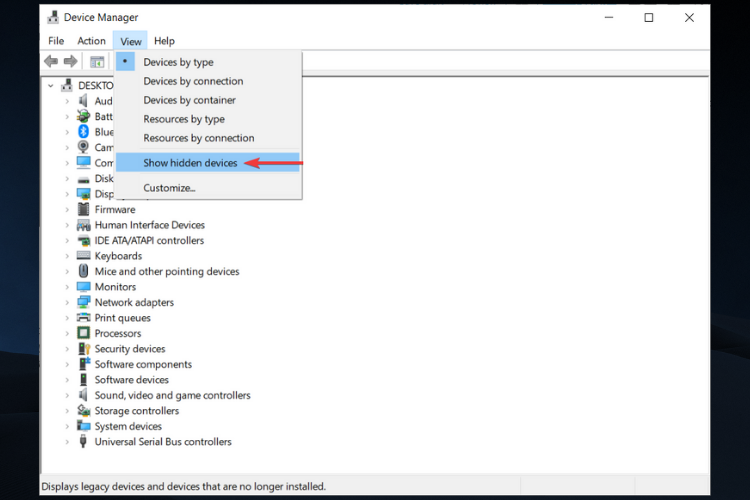
- Click on the View tab and select the Show hidden devices option.
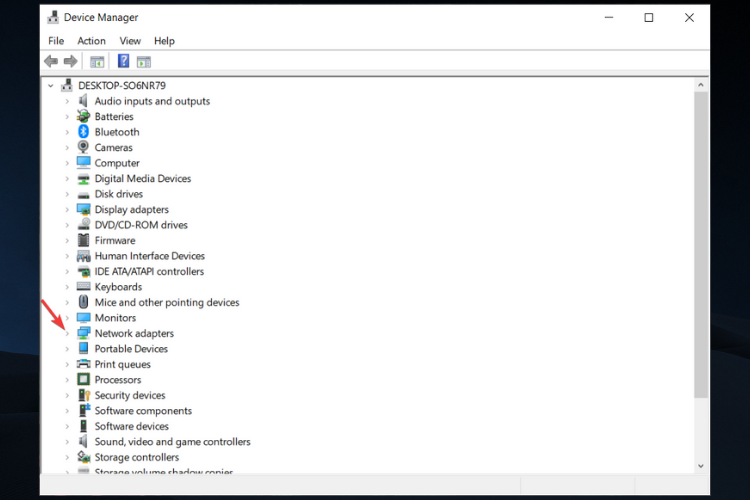
- Locate and expand Network adapters.
- Uninstall all the drivers by right-clicking on each one and selecting Uninstall Device.
- Reboot your PC and check if the error persists.
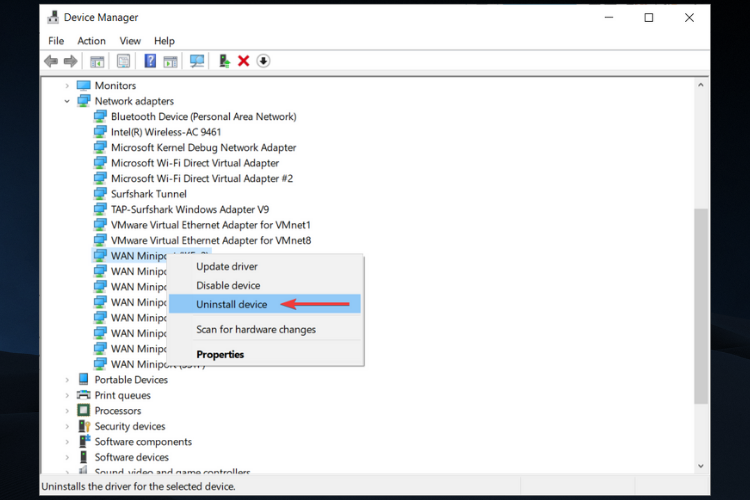

NOTE
The drivers will reinstall after you reboot your PC, so ensure you have a stable Internet connection.
9. Use the Local Group Policy Editor
9.1 Enable insecure guest logons
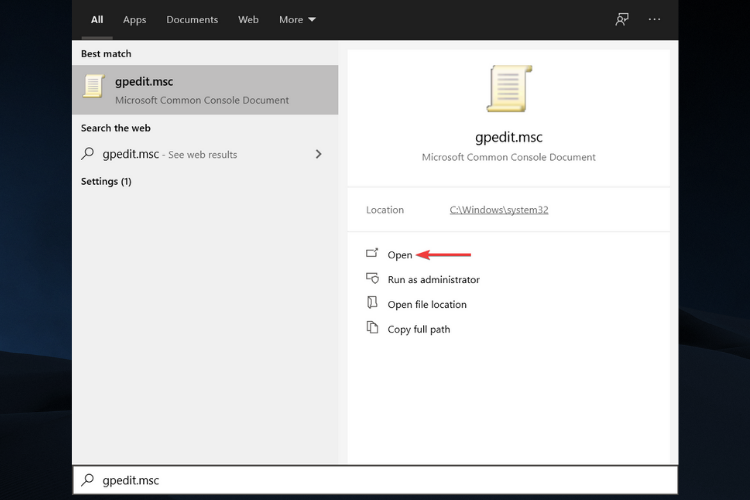
- Open the Start menu and type gpedit.msc to open the Local Group Policy Editor.
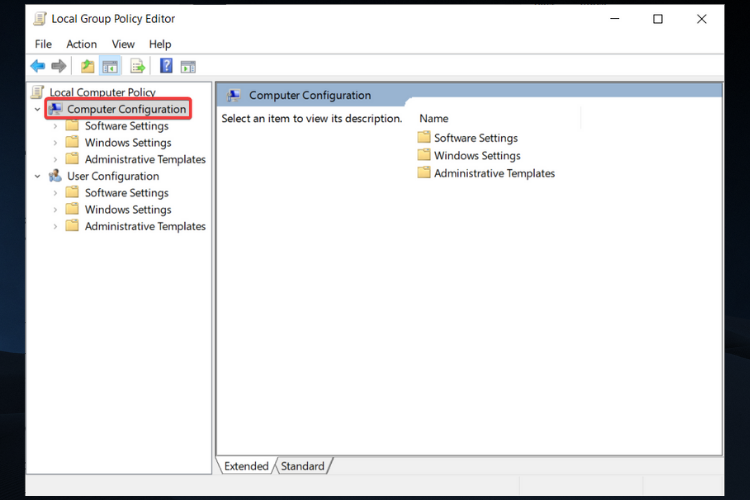
- Under Local Computer Policy, click on Computer Configuration.
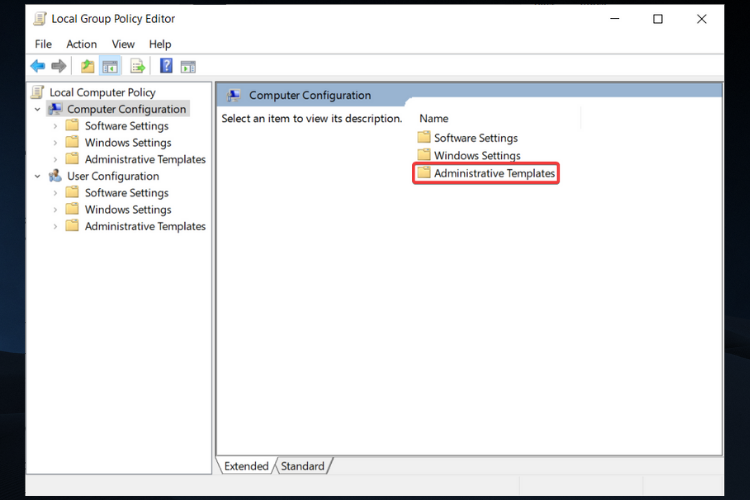
- Double-click on Administrative Templates.
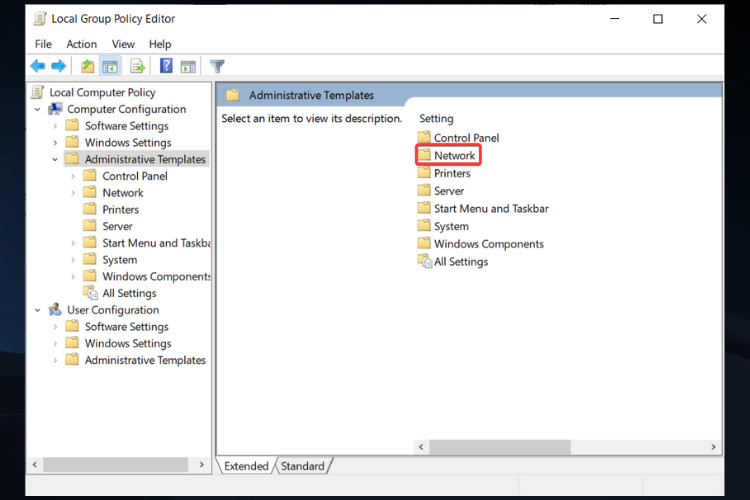
- Click on Network on the right side.
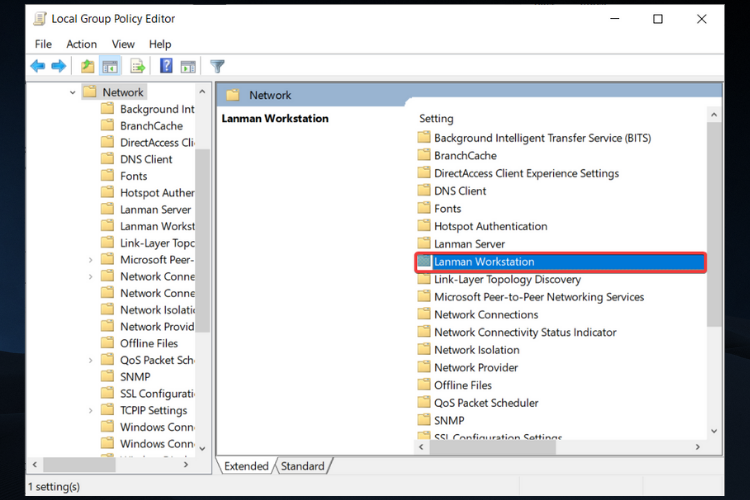
- Locate the Lanman Workstation and open it.
- Double click on Enable insecure guest logons.
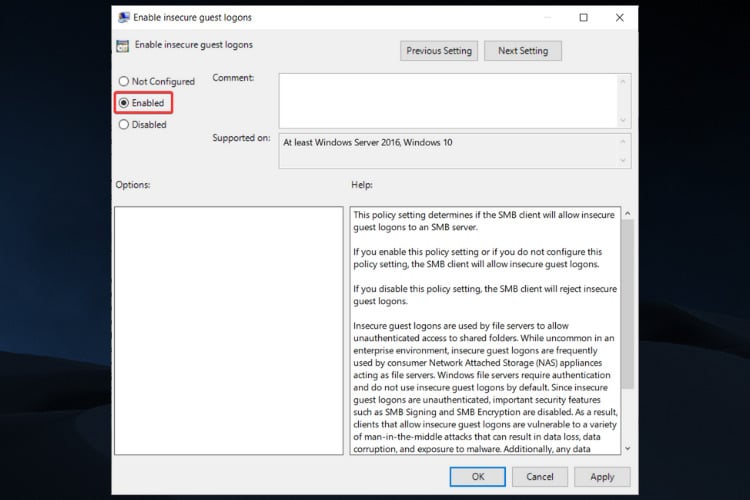
- Select the Enabled option to allow insecure guest logons to an SMB server.
- Click on Apply, then on OK to save the settings.
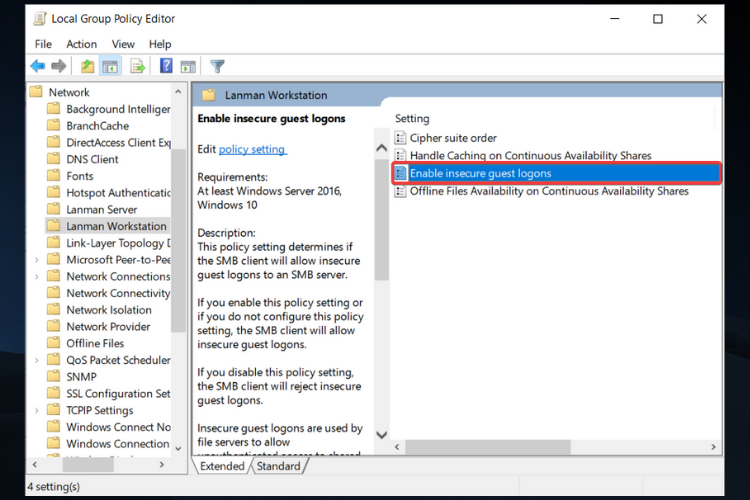
Keep in mind that, when enabling this policy setting, the SMB client will allow insecure guest logons, which will let unauthenticated access to shared folders.
9.2. Disable the Microsoft Network client
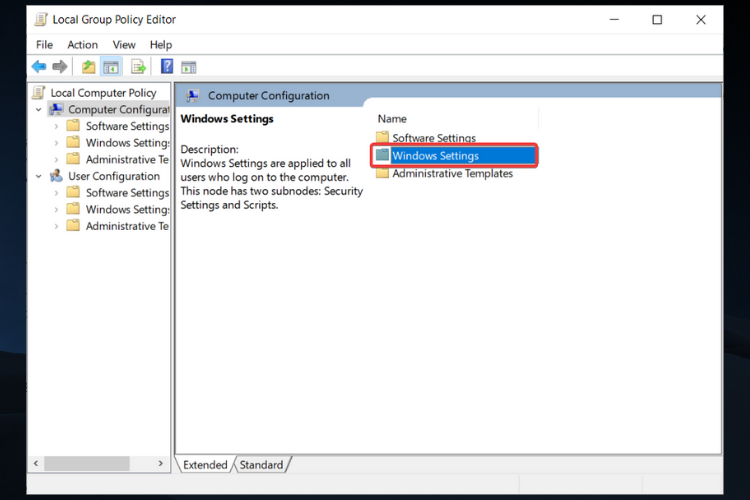
- Open Local Computer Policy.
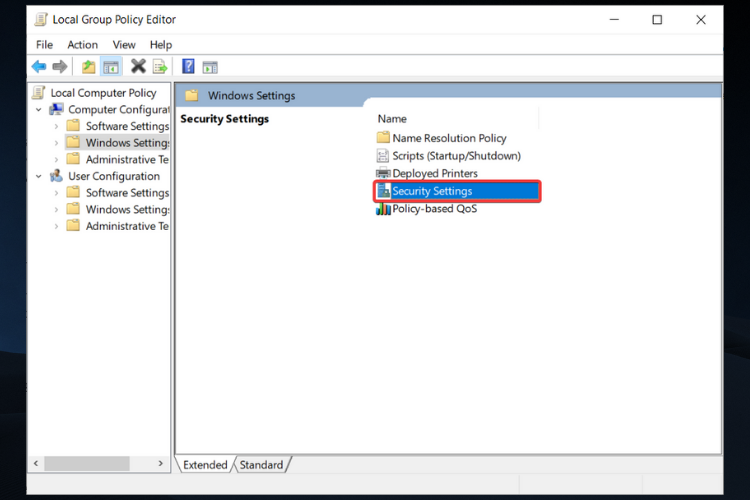
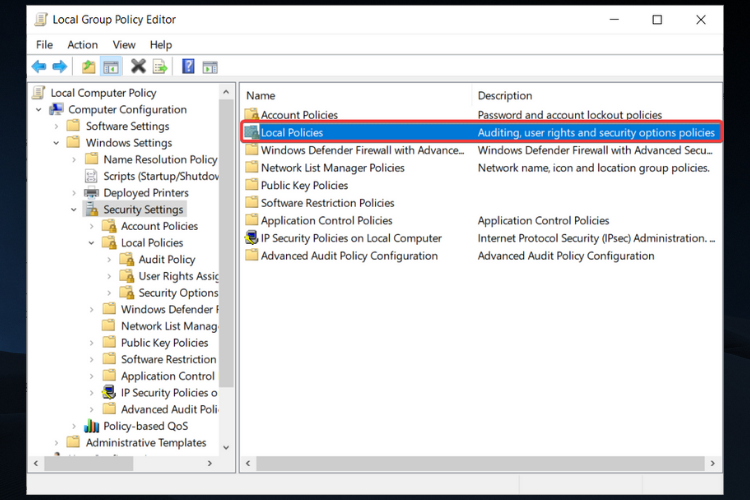
- Go to Computer Configuration, and this time choose Windows settings.
- Double-click on Security Settings.
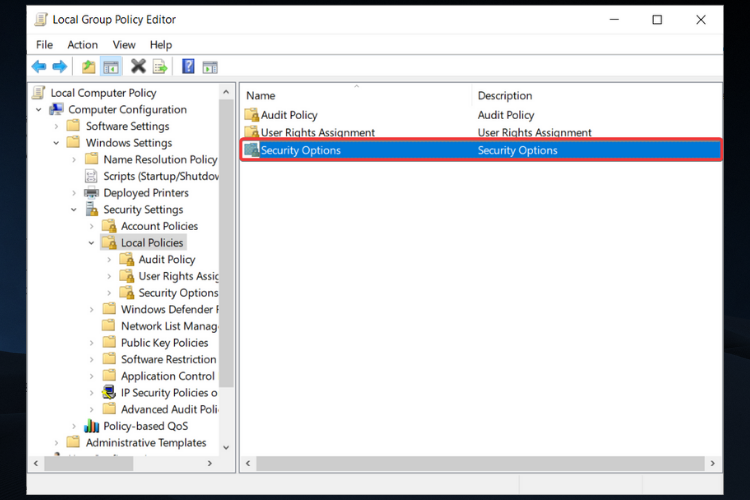
- Open Local Policies.
- Go to Security Options and open it.
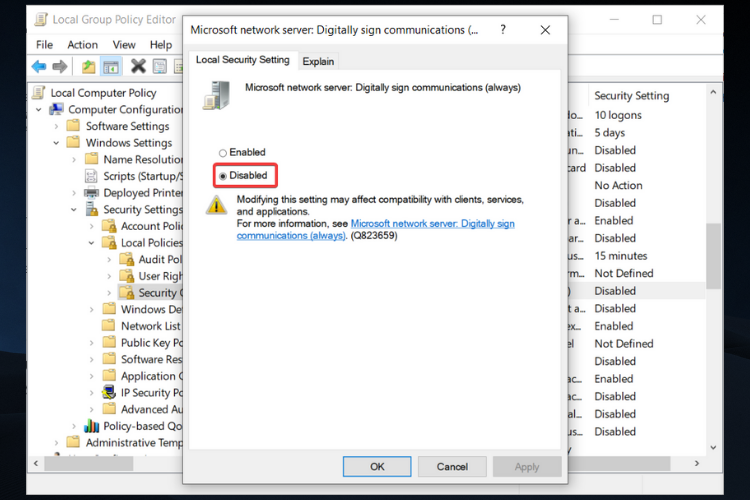
- Locate the Microsoft Network client: Digitally sign communications(always) option.
- Right-click on it, select Properties, and choose Disabled.
- Click Apply and then OK to save the settings and close the window.

10. Create a new Windows credential
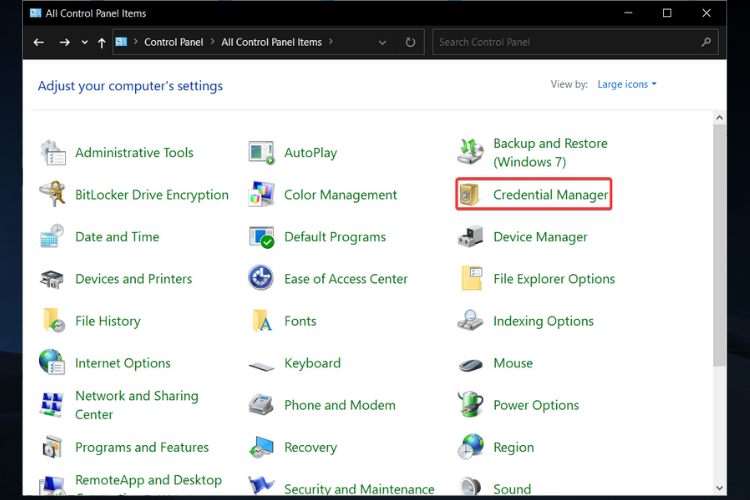
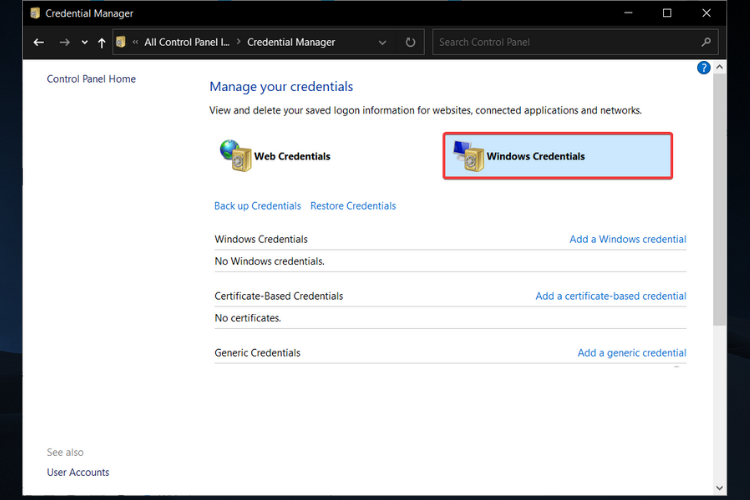
- Click the Start button, then type Control Panel and open it.
- Select Credential Manager.
- Click on Windows Credentials.
- Remove all the credentials in the Windows Credential section and restart the system.
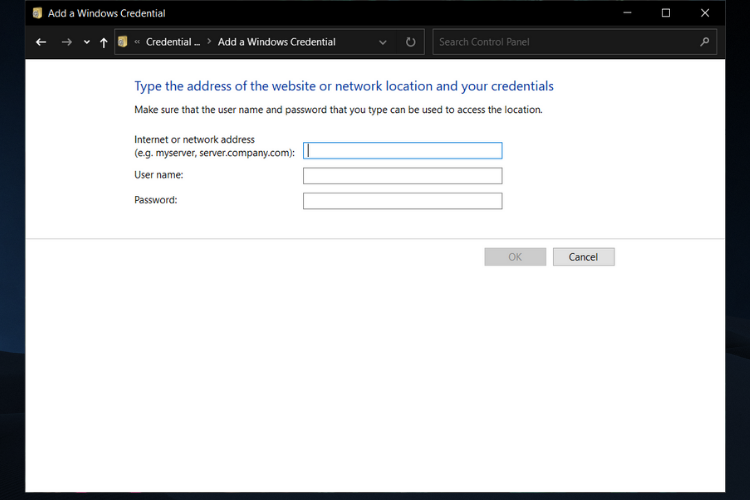
- After restarting, go back to the same page and click on Add a Windows credential.
- Now add the credentials manually.
- Click on OK to save the settings.

11. Check TCP/IP NetBIOS Helper service
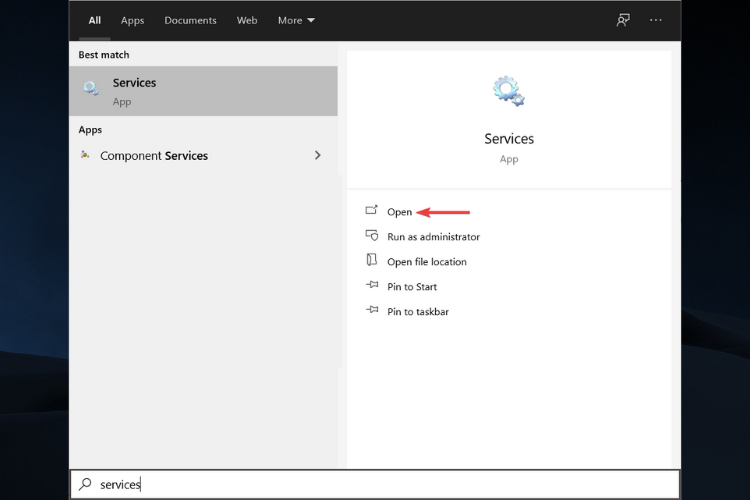
- Open the Start menu, type Services, and open it.
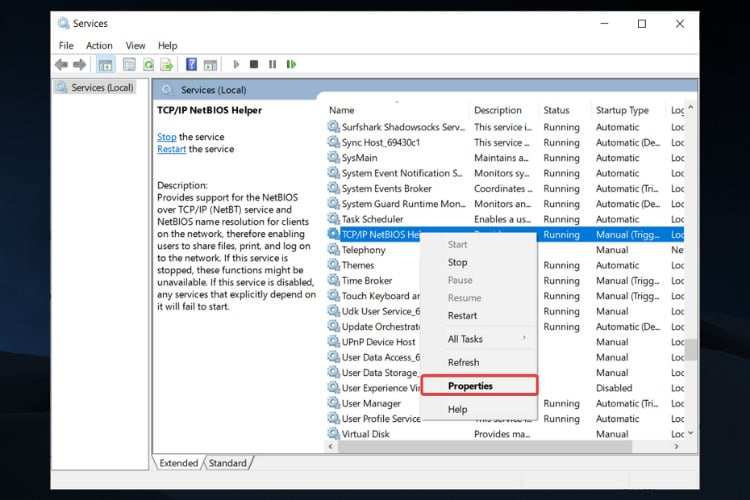
- Navigate to TCP/IP NetBIOS Helper.
- Right-click on it and open Properties.
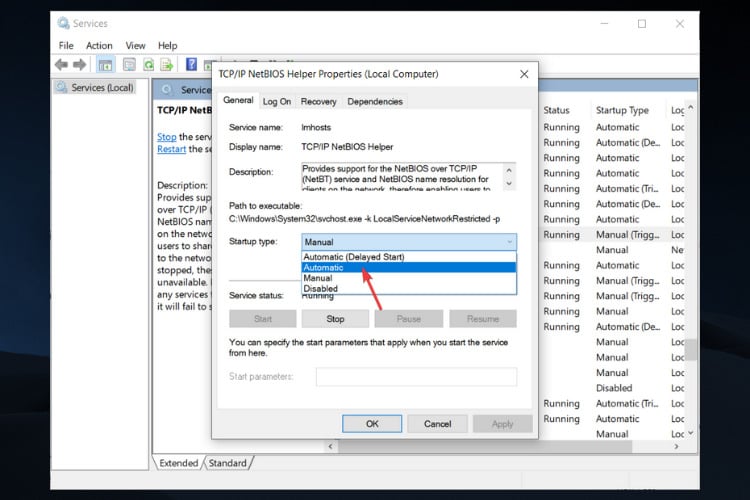
- Under the Startup type section, select Automatic and confirm changes.
- Restart your PC and look for changes.
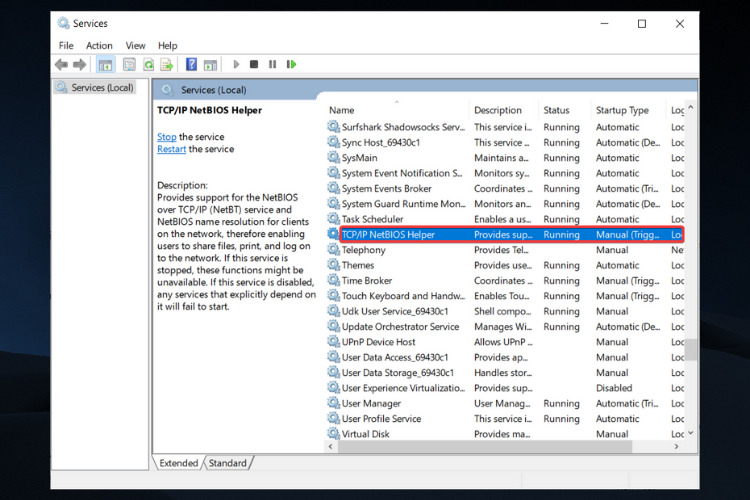
For an internal network to function seamlessly, you’ll need to confirm that the TCP/IP NetBIOS Helper service is running in the background at all times.
This service should be enabled to run with the system permanently, but there are reports that it stops after critical system changes imposed by Windows Updates.
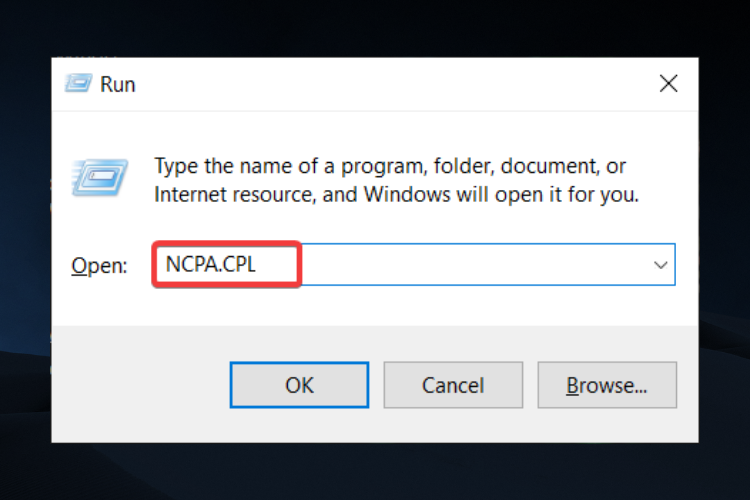
12. Enable NetBIOS
- Press Windows+ R to summon the Run dialogue.
- Type NCPA.CPL and press Enter.
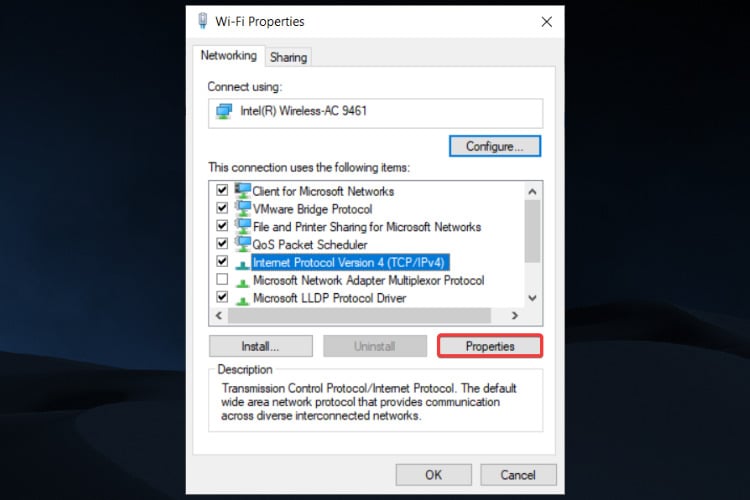
- Right-click on your default network and open Properties.
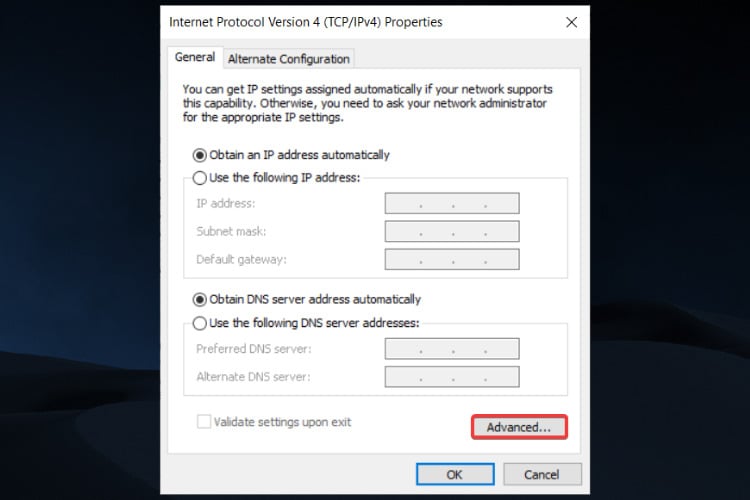
- Go to Internet Protocol Version 4 (TCP/IPv4) and click on Properties below.
- Click on Advanced.
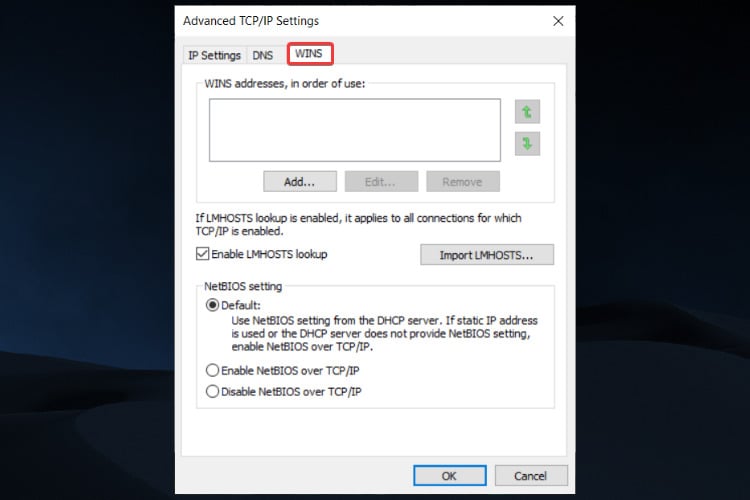
- Select the WINS tab.
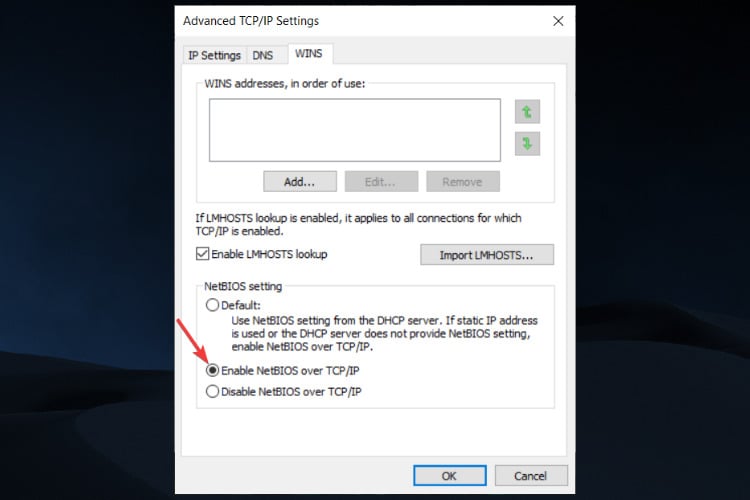
- Click on Enable NetBIOS over TCP.
- Confirm changes by clicking OK.
Some PC issues are hard to tackle, especially when it comes to corrupted repositories or missing Windows files. If you are having troubles fixing an error, your system may be partially broken.
We recommend installing Restoro, a tool that will scan your machine and identify what the fault is.
Click here to download and start repairing.
Error code 0x80070035 often implies that the NetBIOS over TCP feature is disabled and by enabling it, you should be able to address the error permanently.
13. Reset Windows 10 Update components
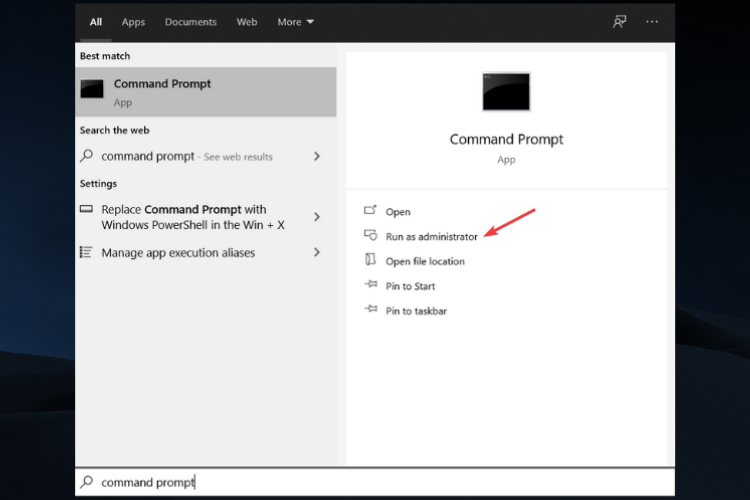
- Open the Start menu, type Command Prompt and click on Run as administrator.
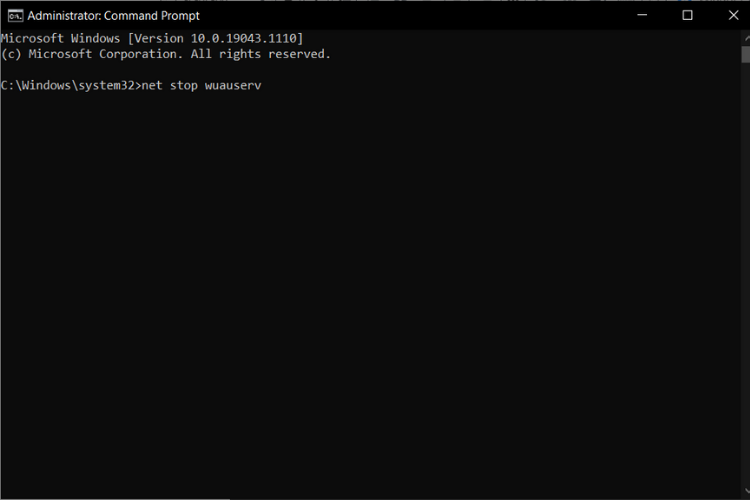
- Now, type in the following commands and press Enter after each one:
net stop wuauservnet stop cryptSvcnet stop bitsnet stop msiserver
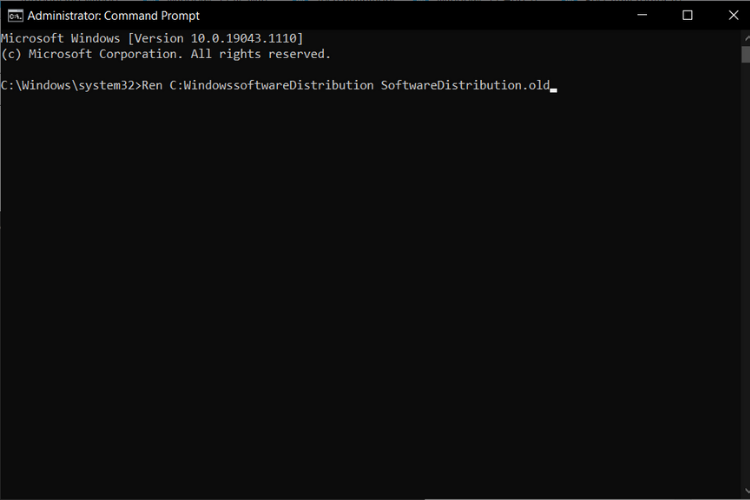
- Next, we will rename the SoftwareDistribution and Catroot2 folders by typing the commands below in the Command Prompt. Make sure to press Enter after each command you type:
- Ren C:WindowssoftwareDistribution SoftwareDistribution.old
- Ren C:WindowsSystem32catroot2 Catroot2.old
- Restart the BITS, Cryptographic, MSI Installer, and Windows Update Services by executing the below commands:
net stop wuauservnet stop cryptSvcnet stop bitsnet stop msiserver
- Now, close the Command Prompt and restart your computer.
This workaround is resetting the Windows 10 update components. As the name says, this is an assemblage of parts that makes downloading and installing Windows updates possible.
So, if we reset these components, there’s a good chance we’ll resolve our update problem.
14. Run SFC scan
- Open the Start menu, type Command Prompt and click on Run as Administrator.
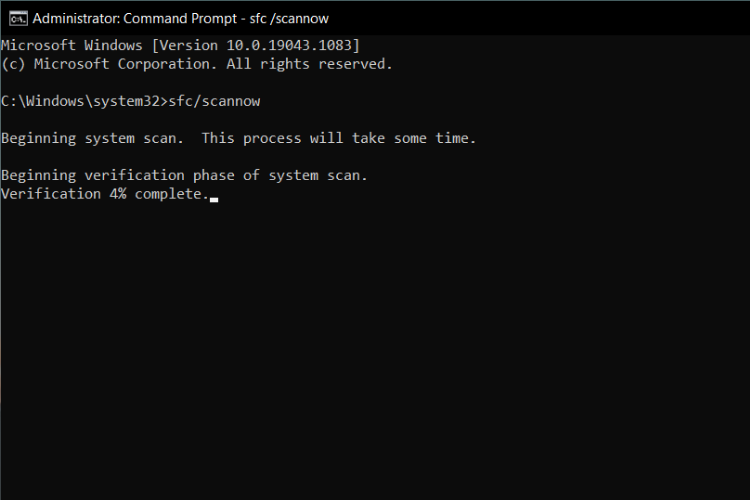
- Type in the following command and press Enter:
sfc/scannow - Wait for the process to finish, as it will take some time.
- Restart your computer.
If you want a quicker solution, then a specialized tool can be a great option. Restoro is a comprehensive repair software that allows you to run a full diagnostics scan. By doing so, you can instantly detect faulty apps and system files and eventually repair or replace them.
⇒ Get Restoro
15. Whitelist Windows Update servers
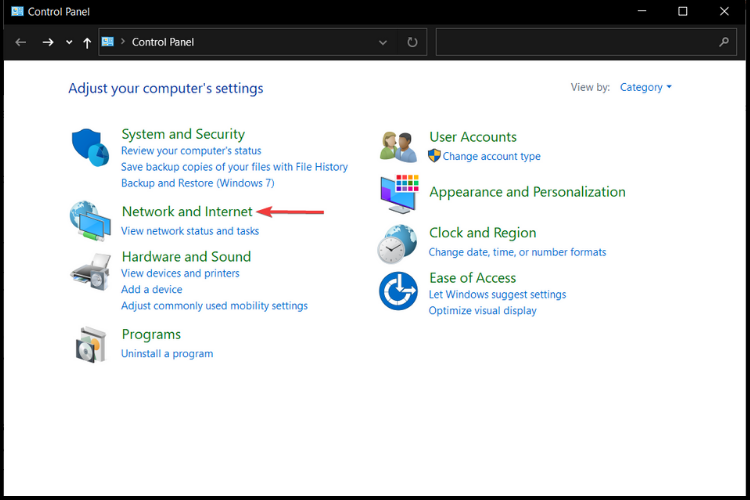
- Click the Start button, type Control Panel and open it.
- Select Network & Internet.
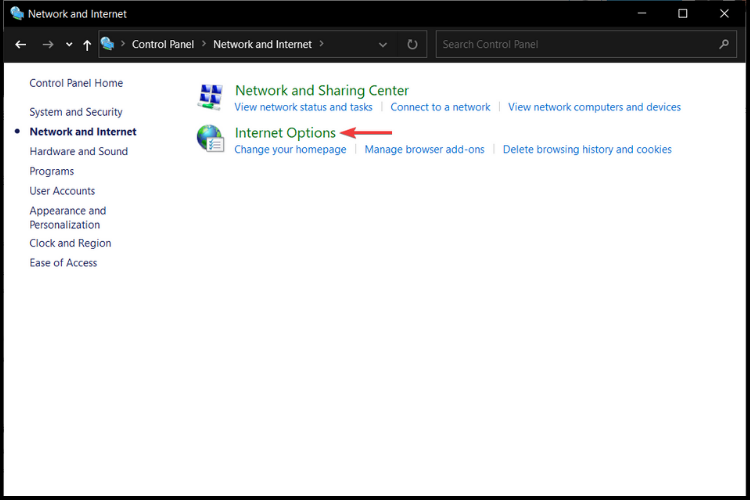
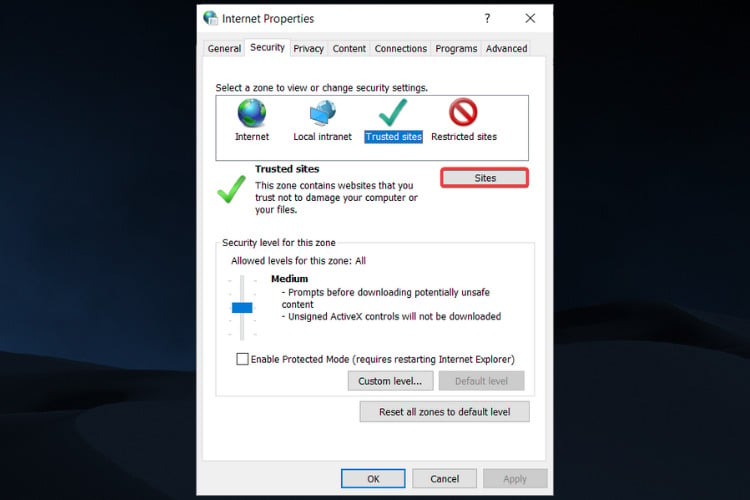
- Click on Internet Options.
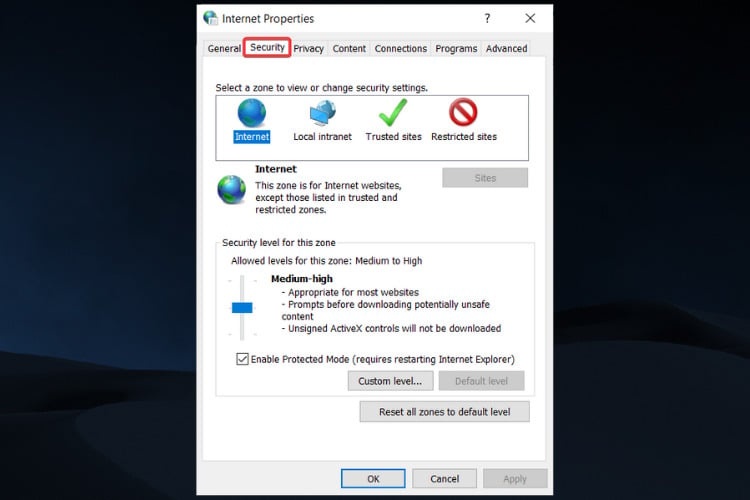
- Head over to the Security tab.
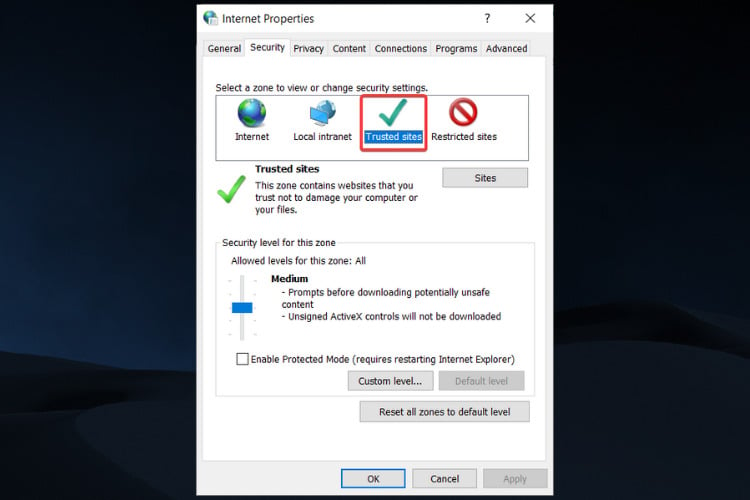
- Select the Trusted Sites option from the Security window.
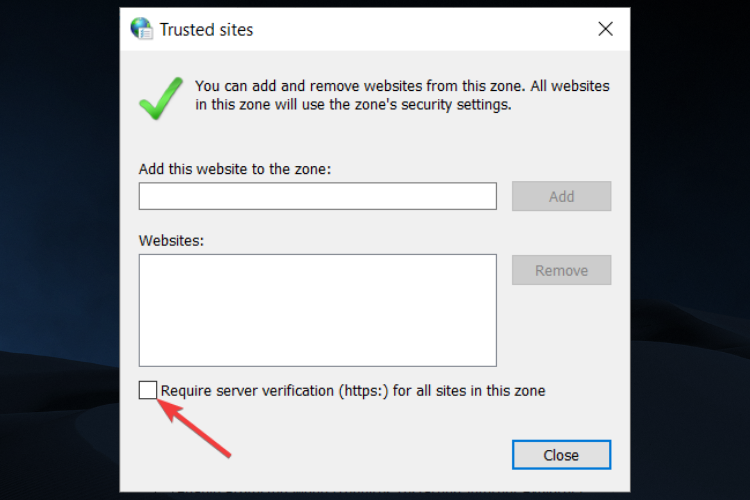
- Click on Sites.
- Uncheck the Require server verification (https:) for all sites in this zone feature.
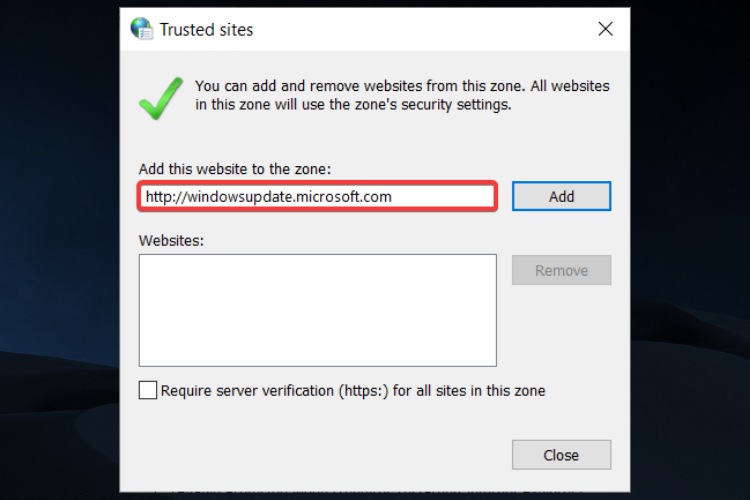
- You will now have a box that says Add this website to the zone. Type in the following addresses: http://windowsupdate.microsoft.com and http://update.microsoft.com.
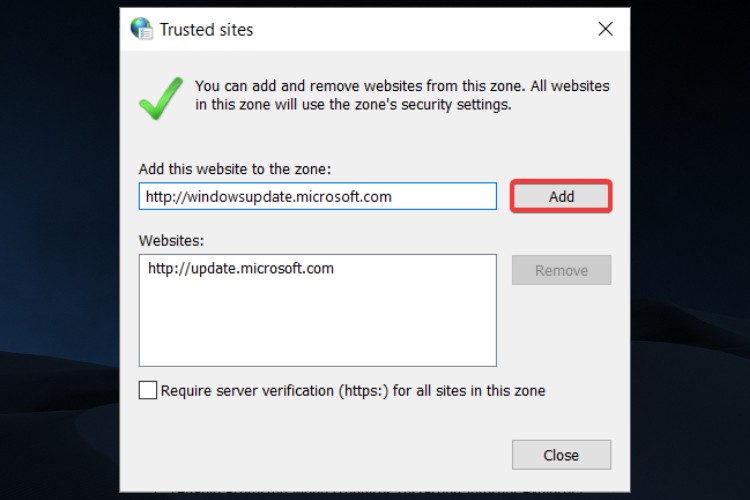
- Click the Add button after you type in the addresses above.
- Save the settings and restart your computer.
If you can’t install Windows updates, there’s also a chance your system blocks the Windows Update servers. So, make sure to whitelist them.
16. Run DISM
- Open Start menu, type Command Prompt, and click on Run as an administrator to open it.
- In the command line, copy-paste these lines one by one and press Enter after each:
- Wait until the procedure ends, as it might take up to 10 minutes.
- Restart your PC.
Since Deployment Image Servicing and Management (DISM) is a more powerful troubleshooter tool than SFC, there’s a high chance it will resolve the problem immediately.
How do I restore network path
The error code discussed above is connected to your network path. Hence, by using any of the solutions we have suggested in this article, you should be able to successfully restore your network path.
You should pick what seems the most appropriate solution for your specific case.
How can I fix error 0x80070035 on Windows 11?
Well, the solutions to fix the error 80070035 aren’t different for Windows 11 from Windows 10. Therefore, you can apply all the above explanations to your Windows 11 PC. However, here are a few more tips that could help you resolve the problem.
- Disable Windows Defender Firewall.
- Flush DNS cache.
- Check for the latest Windows update.
- Reset your router.
How can I avoid error code 0x80070035?
Being up-to-date with your OS’s updates and drivers is always a good place to start if you want to avoid any errors.
Always check for permission when trying to share files and data and disable any third-party apps that might stay in the way of that.
We recommend you use a troubleshooting tool as it’s friendlier, more efficient, and can help you deal with computer issues.
Don’t forget to verify if you have any network access problems and if the OS and the network services communications are enabled.
However, if you don’t want to go through all the trouble of setting up the PC and avoid dealing with any errors, we have another solution for you.
You should try a cloud storage service to share data known as Sync. It lets you send files of any size to anyone, and it’s up to you to choose from the available apps for Windows, Mac, iPhone, iPad, and Android.
So, there you have it. Even though encountering this error can be frustrating, these solutions will help you fix it in no time.
Make sure to bookmark this page in the unfortunate event you might need it again or to help someone in need if they ever find themselves dealing with this error.
Please find out more about Network locations, what they are, and how to use them in Windows 10. Doing so can also help you understand potential errors, see them faster in the future, and even prevent them.
If you have additional questions or suggestions, post them in the comments section below, and we’ll get back to you.
![]()
Newsletter
What is error code 0x80070035 the network path not found? What causes the network path not found? How to fix the network path not found Windows 10? This post shows you the answers. In addition, you can visit MiniTool to find more Windows tips and solutions.
Some computers complain that they encounter the error of the network path not found when trying to connect another computer in the same network. They will receive the error code 0x80070035. However, what may cause the error the network path not found?
In fact, error code 0x80070035 the network path not found may be caused by various reasons. Generally speaking, it may be caused by the Firewall or the antivirus software.
In the following section, we will show you how to solve the network path not found error. If you have the same problem, try these solutions.
5 solutions to the Network Path Not Found Windows 10
Now, the solutions to fix the network path not found will be demonstrated. Continue your reading to know more information.
Solution 1. Verify the Shared Drive
The first solution to solve the network path not found error is to verify whether the drive is shared.
Now, here is the tutorial.
Step 1: Right-click the drive on the target computer you want to access, and then choose Properties.
Step 2: In the pop-up window, go to the Sharing tab and choose Advanced Sharing… to continue.
Step 3: In the pop-up window, check the option Share this folder and confirm the Share name. Then click Apply and OK to confirm the changes.
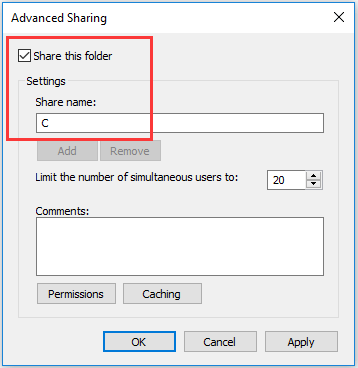
After that, you can check whether the issue the network path not found is solved.
Solution 2. Ping the IP Address of the Target Computer
The second solution is to check whether the network channel is connected correctly.
Now, here is the tutorial.
Step 1: On the target computer, press Windows key and R key together to open Run dialog, then type the cmd in the box and hit Enter to continue.
Step 2: In the command line window, type the command ipconfig /all and hit Enter to continue.
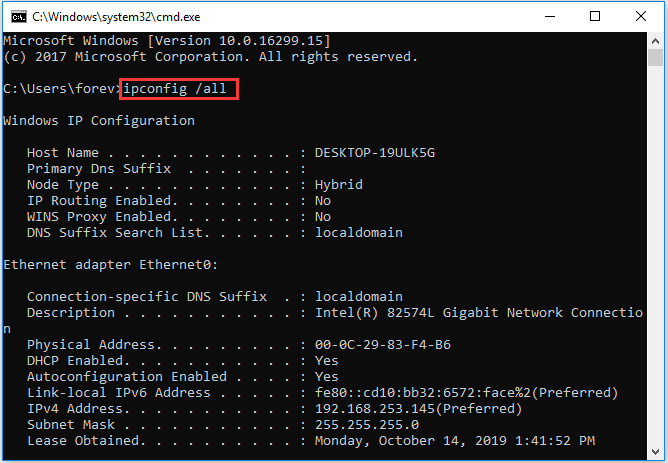
Step 3: Then scroll down to check the IPv4 address and remember it.
Step 4: Open the Command Prompt in the primary computer, then type the command ping <IPv4 address of the target computer> and hit Enter to continue. Next, check whether you will get 4 confirmation replies or not.
Step 5: If you don’t receive the 4 confirmation replies, you need to run the Network Adapter Troubleshoot. After that, run the system again to check whether the error code 0x80070035 the path not found is solved.
Solution 3. Modify the Network Security Settings
The third solution to solve the network path not found Windows 10 is to modify the network security settings.
Now, here is the tutorial.
Step 1: On the target computer, press Windows key and R key together to open Run dialog, then type the secpol.msc in the box and click OK to continue.
Step 2: In the pop-up window, navigate to the Local Policies > Security Options in the left panel. Then select the Network Security: LAN Manager authentication level and double-click it.

Step 3: From the drop-down menu, select Send LM & NTLM-use NTLMv2 session security if negotiated. Click Apply and OK to continue.

When all steps are finished, check whether the network path not found Windows 10 is solved.
Solution 4. Reinstall Network Adapter Drive
The fourth solution to solve the network path not found error is to reinstall network adapter driver.
Now, here is the tutorial.
Step 1: On the target computer, press Windows key and R key together to open Run dialog, then type the devmgmt.msc in the box and click OK to continue.
Step 2: In the pop-up window, expand the Network Adapters. Then right-click each adapter and choose Update driver to continue.

Then you can follow the instruction to continue. After that, reboot your computer to check whether the network path not found problem is solved.
Solution 5. Enable NetBIOS over TCP/IP
The fifth solution to solve error code 0x80070035 the network path not found is to enable NetBIOS over TCP/IP.
Now, here is the tutorial.
Step 1: On the target computer, press Windows key and R key together to open Run dialog, then type the ncpa.cpl in the box and click OK to continue.
Step 2: Right-click the network and choose Properties.
Step 3: Double-click on the Internal Protocol Version 4.
Step 4: In the pop-up window, click Advanced… to continue.
Step 5: In the pop-up window, go to the WINS tab. Then check the option Enable NetBIOS over TCP/IP. At last, click OK to continue

When all steps are finished, you can check whether the issue the network path not found is solved.
What Can You Do When Ethernet Not Working on Windows 7/10
Final Words
To sum up, this post has introduced 5 ways to fix the network path not found Windows 10 problem. If you have the same problem, try these solutions.
Windows OS Hub / Windows 10 / Error Code: 0x80070035 “The Network Path was not found” after Windows 10 Update
After upgrading the Windows 10 build to 1803 or higher (1809, 1903, 1909), some users noticed that they could no longer connect to shared network folders on neighboring computers or NAS devices.
Windows File Explorer cannot even display a list of shared folders on network computers (both running Windows 10 and Windows 7). When trying to open any network folder, an error appears:
Network Error
Windows cannot access \sharedNAS
Check the spelling of the name. Otherwise, there might be a problem with your network. To try identify and resolve network problems, click Diagnose.
Error code: 0x80070035.
The network path was not found.
At the same time, you can easily open and connect network shared folders from other computers (running older versions of Windows 10, 8.1, or 7), smartphones and other devices.
Let’s try to figure out how to fix the error with the code “0x80070035. Network path not found” in Windows 10.
Contents:
- SMBv1 is not Installed by Default in Windows 10
- Enable Insecure Guest Logons
- Disable SMB1 and SMB2 Protocols in Windows
- Check the Network Discovery Configuration on Windows 10
- Access NAS and Samba Storage from Windows 10 with Saved Credentials
SMBv1 is not Installed by Default in Windows 10
First of all, you need to understand whether the problem is related to the fact that in Windows 10 1709 and newer the unsafe legacy SMB v1.0 protocol is disabled by default (this protocol is used to access network shared files and folders in local network). If you try to connect to a network device that only supports access over SMBv1 protocol (for example, an old version of NAS storage, a computer running Windows XP/Windows Server 2003) from the latest Windows 10 builds, you won’t be able to connect to shared network folders on such a device. And when accessing the resource by the UNC path (\NASname), you can receive the error “0x80070035”.
To check if the SMBv1 protocol is enabled in Windows 10, use the following command:
Dism /online /Get-Features /format:table | find "SMB1Protocol"

As you can see, in this case the SMB1Protocol-Client feature is disabled.
SMB1Protocol                                 | Disabled
SMB1Protocol-Client                          | Disabled
SMB1Protocol-Server                          | Disabled
You can enable the legacy SMB client to access network devices using SMBv1 protocol via the Control Panel (Control Panel -> Programs and Features -> Turn Windows features on or off -> SMB 1.0 / CIFS File Sharing Support -> SMB 1.0 / CIFS Client). In addition, you can access the features installation dialog by running the optionalfeatures.exe command.
Or you can enable the SMB 1 client with the DISM command:
Dism /online /Enable-Feature /FeatureName:"SMB1Protocol-Client"

After installing the SMBv1 client, you need to restart the computer and check if access to the network folder has appeared.
Important! When you enable the SMB1 client, and especially SMB1-Server, keep in mind that this protocol is vulnerable and has a large number of remote exploitation vulnerabilities. If you don’t need the SMB v1 protocol to access legacy devices, be sure to disable it.
On Windows 10 1709 and newer the SMBv1 client is automatically removed if it has not been used for more than 15 days.
Enable Insecure Guest Logons
If you use anonymous access to connect NAS or other computers, you need to enable the insecure guest logon policy. In Windows 1803/1709 it blocks access to shared network folders over the SMB 2.0 protocol under an anonymous (guest) account. To do this, in the Windows 10 Local Policy Editor (gpedit.msc), enable the Enable insecure guest logons policy in the GPO section: Computer Configuration -> Administrative templates -> Network -> Lanman Workstation.
Or you can enable SMB network access under guest account via the registry using the command:
reg add HKLMSYSTEMCurrentControlSetServicesLanmanWorkstationParameters /v AllowInsecureGuestAuth /t reg_dword /d 00000001 /f
Disable SMB1 and SMB2 Protocols in Windows
If only SMB v3 devices are used on your network (Windows 8.1 / Windows Server 2012 R2 and newer, see the table of SMB versions in Windows), you can fix the 0x80070035 error by disabling legacy SMB1 and SMB2 protocols. The fact is that your computer may try to use the SMB 2.0 protocol to access network folders that allow only SMB 3.0 connections (possibly with traffic encryption).
First disable the SMB v1.0 protocol through the Control Panel or using the commands in the PowerShell console:
sc.exe config lanmanworkstation depend= bowser/mrxsmb10/nsi

sc.exe config mrxsmb10 start= disabled

Dism /online /Disable-Feature /FeatureName:"SMB1Protocol"
Then disable the SMB 2.0 protocol:
reg.exe add "HKLMSYSTEMCurrentControlSetservicesLanmanServerParameters" /v "SMB2" /t REG_DWORD /d "0" /f

sc.exe config lanmanworkstation depend= bowser/mrxsmb10/nsi

sc.exe config mrxsmb20 start= disabled

PowerShell -ExecutionPolicy Unrestricted

Set-SmbServerConfiguration –EnableSMB2Protocol $true
You can verify that the SMB 1 and SMB 2 protocols are disabled by running the following PowerShell command:
Get-SmbServerConfiguration | select "*enablesmb*"|fl
EnableSMB1Protocol              : False
EnableSMB2Protocol              : False

Check the Network Discovery Configuration on Windows 10
If your computers are joined to a workgroup, I strongly advise you to follow the recommendations from the article Network computers not showing in Windows 10.
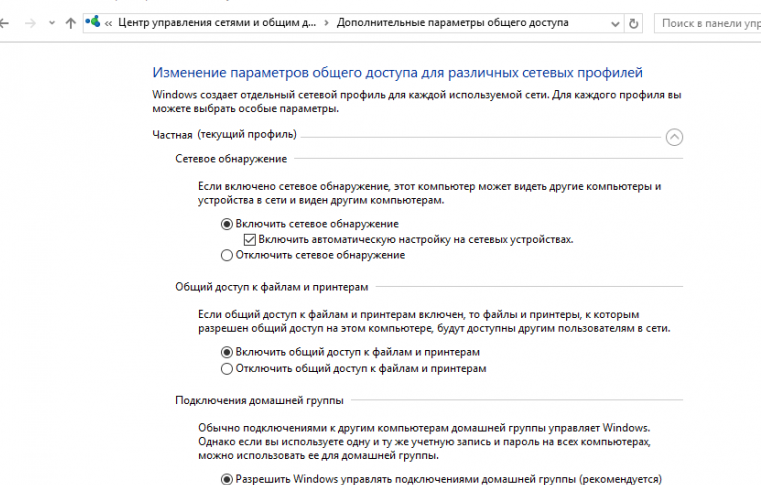
In the Network and Sharing Center section of the Control Panel on both computers, verify that the Private network profile is used as the current profile (Private (Current profile)). Make sure that the following options are enabled:
- Turn on network discovery + Turn on automatic setup of network connected devices;
- Turn on file and printer sharing.
In the All Networks section, enable the following options:
- Turn off password Protect Sharing;
- Turn on sharing.
On both computers, reset the DNS cache:
ipconfig /flushdns
And reboot both computers.
What else is worth checking out:
- In the properties of the shared network folder (both on the NTFS file system permissions and the shared folder level), verify that the Everyone group has the permissions to read the contents of the folder;
- Check if the network storage (computer with a shared folder) is accessible by an IP address. To do this, enter
\192.168.1.100in the File Explorer and press Enter (replace with the IP address of your network storage or remote computer); - If you simultaneously have two active network interfaces on your device (Wi-Fi and Ethernet), try to temporarily disable one of them and check access to your local network resources;
- Verify that the following services are running on your computer (open the
services.mscconsole). Try to start these services and change startup type to the Automatic Delayed Start:- Function Discovery Provider Host – fdPHost
- Function Discovery Resource Publication – FDResPub
- SSDP Discovery – SSDPSRV
- UPnP Device Host – upnphost
- DNS Client (dnscache)
- Try to temporarily disable your antivirus and/or firewall application and check if the problem persists while accessing the network resources;
- Try to change the computer name in the System properties;
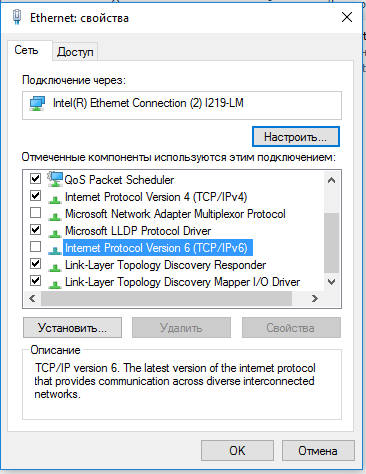
- Try to disable the IPv6 protocol in the properties of your network adapter in the Control Panel;
- Try to reset the TCP/IP network stack on the computer with commands:
netsh winsock reset

netsh int ip reset - Run the PowerShell console and check the availability of the SMB port on the remote computer using the Test-NetConnection cmdlet (network access may be blocked by a firewall):
Test-NetConnection 10.16.1.70 -port 445(if the firewall is not restricting SMB traffic, the status should appear TcpTestSucceeded : True).
Access NAS and Samba Storage from Windows 10 with Saved Credentials
If the problem occurs only when you accessing the NAS (or Samba server on Linux), you can try to save the NAS connecting password to the Windows Credential Manager (Control PanelAll Control Panel ItemsCredential ManagerAdd a generic credential).
Then in Network and Sharing Center in the Advanced sharing settings enable the option Use user accounts and passwords to connect to other computers.
I hope my article will be useful, and you will restore access to your shared folders on your LAN.
Содержание
- Устранение рассматриваемой ошибки
- Этап 1: Настройка протокола SMB
- Этап 2: Открытие доступа сетевым устройствам
- Этап 3: Отключение протокола IPv6
- Заключение
- Вопросы и ответы
Многие пользователи заметили преимущество сетевых хранилищ файлов, и уже не первый год ими пользуются. Переход на Windows 10 может неприятно удивить ошибкой «Не найден сетевой путь» с кодом 0x80070035 при попытке открытия сетевого хранилища. Впрочем, устранить этот сбой на самом деле достаточно просто.
Устранение рассматриваемой ошибки
В «десятке» версии 1709 и выше разработчики поработали над безопасностью, отчего некоторые доступные ранее сетевые возможности перестали работать. Следовательно, решать проблему с ошибкой «Не найден сетевой путь» следует комплексно.
Этап 1: Настройка протокола SMB
В Виндовс 10 1703 и новее вариант протокола SMBv1 отключён, отчего не выйдет просто так подключиться к NAS-хранилищу или компьютеру под управлением XP и старше. Если у вас именно такие накопители, SMBv1 следует активировать. Первым делом проверьте состояние протокола по следующей инструкции:
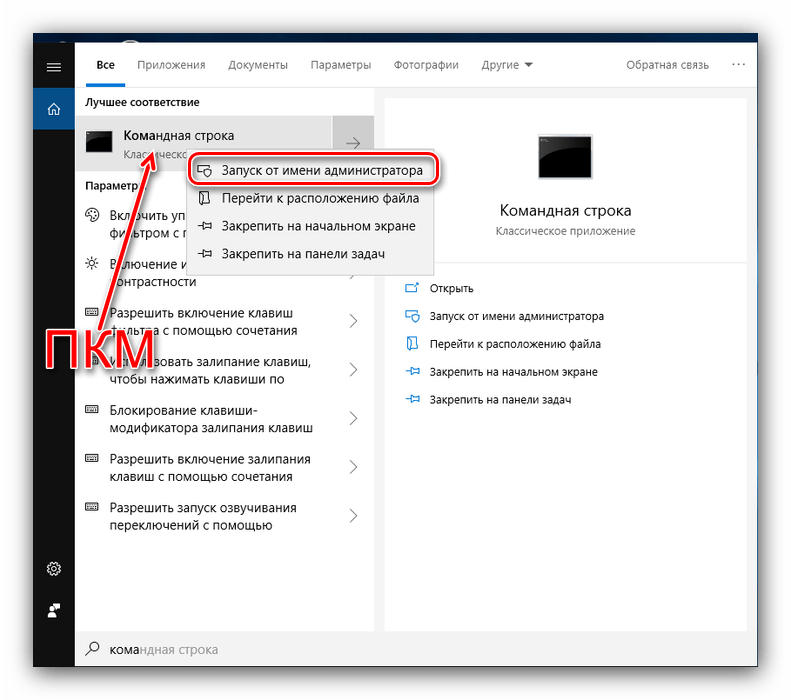
- Откройте «Поиск» и начните набирать Командная строка, которая должна появиться первым же результатом. Кликните по нему правой кнопкой мыши (далее ПКМ) и выберите вариант «Запуск от имени администратора».

Читайте также: Как открыть «Командную строку» на Windows 10
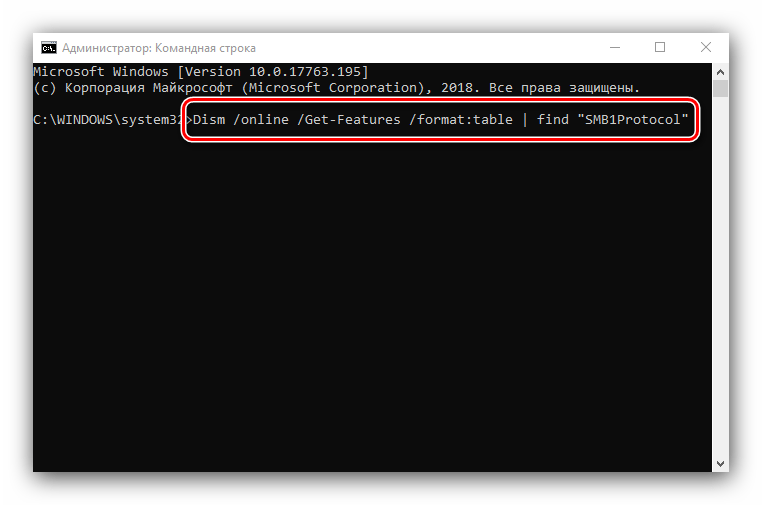
- Введите в окно следующую команду:
Dism /online /Get-Features /format:table | find "SMB1Protocol"И подтвердите её нажатием Enter.
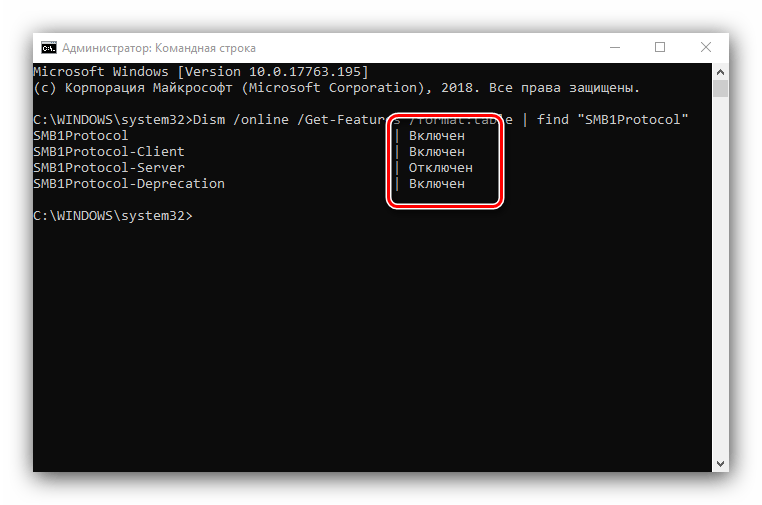
- Подождите некоторое время, пока система проверит состояние протокола. Если во всех графах, отмеченных на скриншоте, написано «Включен» – отлично, проблема заключается не в SMBv1, и можно переходить к следующему этапу. Но если присутствует надпись «Отключен», следуйте текущей инструкции.
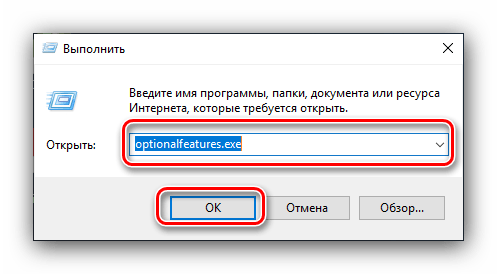
- Закрывайте «Командную строку» и воспользуйтесь сочетанием клавиш Win+R. В окошке «Выполнить» введите
optionalfeatures.exeи нажмите «ОК». - Найдите среди «Компонентов Windows» папки «Поддержка общего доступа к файлам SMB 1.0 / CIFS» или «SMB 1.0 / CIFS File Sharing Support» и отметьте пункт «Клиент SMB 1.0 / CIFS». Затем нажимайте «ОК» и перезагружайте машину.

Обратите внимание! Протокол SMBv1 является небезопасным (именно через уязвимость в нём и распространялся вирус WannaCry), поэтому рекомендуем отключить его после окончания работы с хранилищем!
Проверяйте возможность доступа к накопителям – ошибка должна исчезнуть. Если описанные действия не помогли, переходите к следующему этапу.
Этап 2: Открытие доступа сетевым устройствам
Если настройка SMB не принесла результатов, потребуется открыть сетевое окружение и проверить, выданы ли параметры доступа: если эта функция отключена, потребуется её включить. Алгоритм такой:
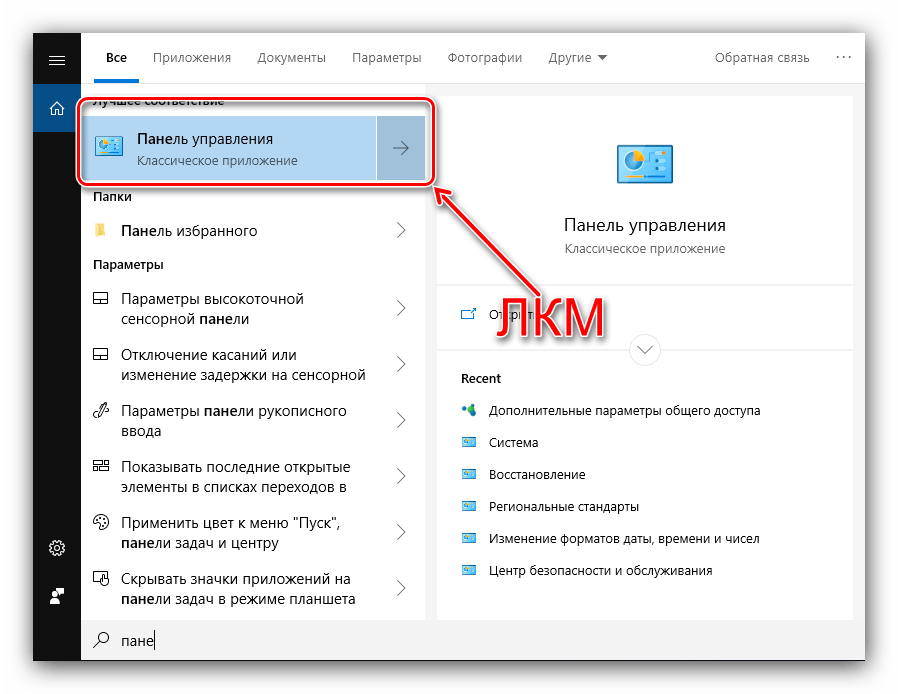
- Вызовите «Панель управления»: откройте «Поиск», начните вводить в него название искомого компонента, а когда он отобразится, щёлкните по нему левой кнопкой мыши.

Читайте также: Способы открытия «Панели управления» в Виндовс 10
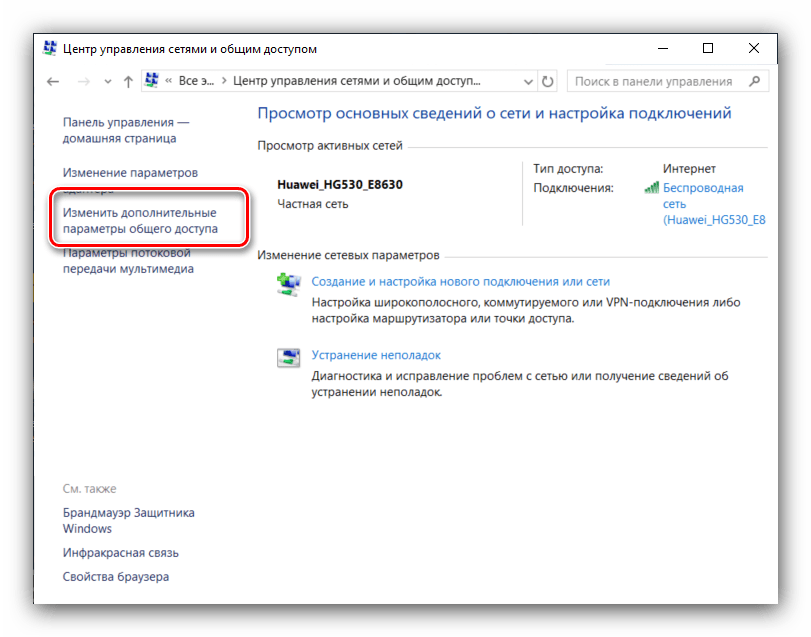
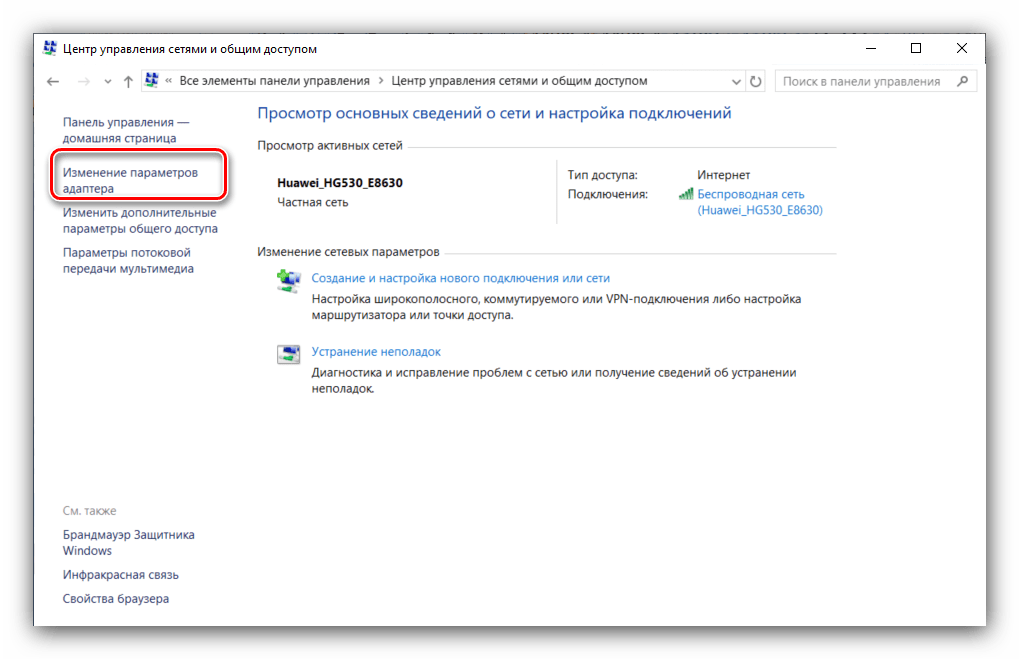
- Переключите «Панель управления» в режим отображения «Мелкие значки», после чего кликните по ссылке «Центр управления сетями и общим доступом».
- Слева расположено меню – найдите там пункт «Изменить дополнительные параметры общего доступа» и перейдите к нему.
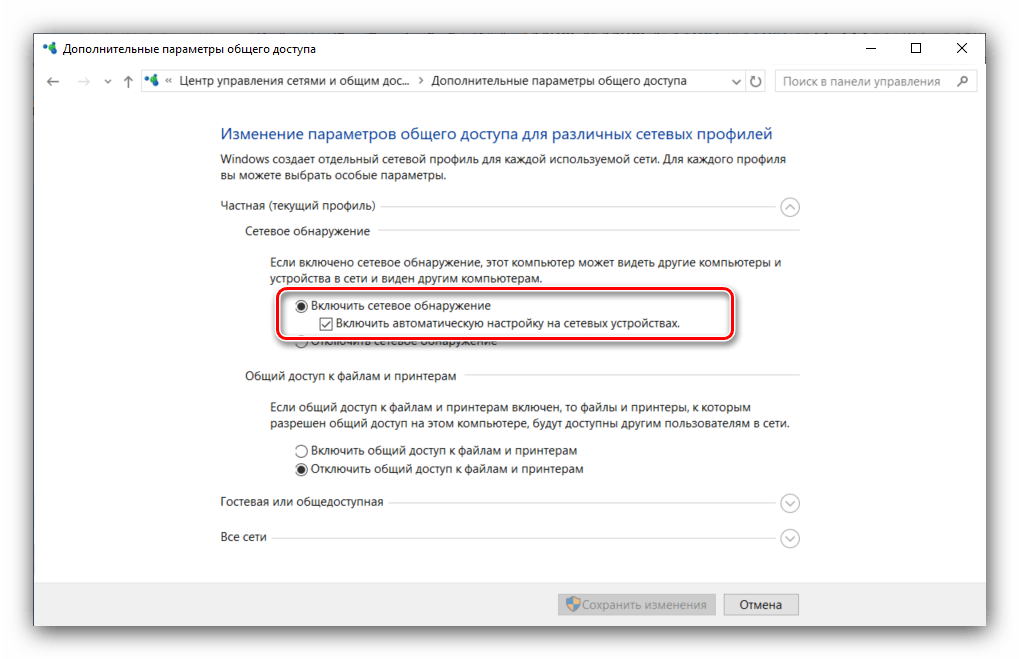
- В качестве текущего профиля должен быть отмечен вариант «Частный». Затем раскройте эту категорию и активируйте опции «Включить сетевое обнаружение» и «Включить автоматическую настройку на сетевых устройствах».

Затем в категории «Общий доступ к файлам и принтерам» установите вариант «Включить общий доступ к файлам и принтерам», после чего сохраните изменения, воспользовавшись соответствующей кнопкой. - Затем вызовите «Командную строку» (см. Этап 1), введите в нее команду
ipconfig /flushdns, после чего перезагрузите компьютер. - Проделайте шаги 1-5 на компьютере, во время подключения к которому возникает рассматриваемая ошибка.


Как правило, на этом этапе проблема решается. Однако если сообщение «Не найден сетевой путь» всё ещё появляется, переходите далее.
Этап 3: Отключение протокола IPv6
Протокол IPv6 появился относительно недавно, отчего проблемы с ним неизбежны, особенно если дело касается довольно старых сетевых хранилищ. Для их устранения подключение по этому протоколу следует отключить. Порядок действий такой:
- Проделайте шаги 1-2 второго этапа, после чего в перечне опций «Центра управления сетями…» воспользуйтесь ссылкой «Изменение параметров адаптера».
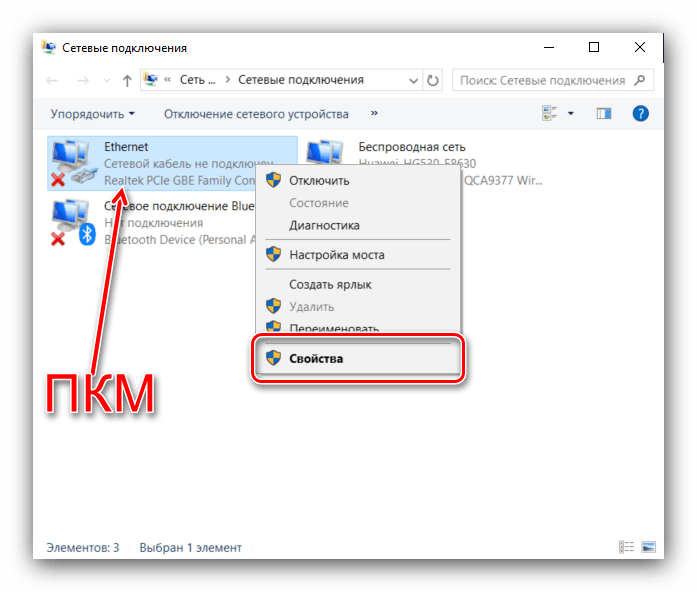
- Затем найдите LAN-адаптер, выделите его и щёлкните ПКМ, после чего выберите пункт «Свойства».
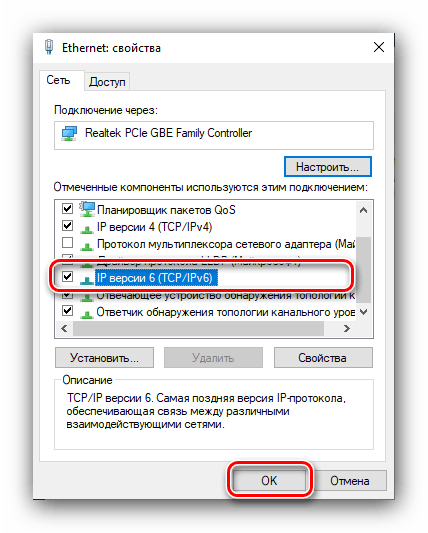
- В списке должен находится пункт «IP версии 6 (TCP/IPv6)», найдите его и снимите отметку, после чего нажмите «ОК».
- Проделайте шаги 2-3 и для адаптера Wi-Fi, если используете беспроводное соединение.
Стоит отметить, что отключение IPv6 может сказаться на возможности доступа к некоторым сайтам, поэтому после работы с сетевым хранилищем рекомендуем заново включить этот протокол.
Заключение
Мы рассмотрели комплексное решение ошибки «Не найден сетевой путь» с кодом 0x80070035. Описанные действия должны помочь, но если проблема всё равно наблюдается, попробуйте воспользоваться рекомендациями из следующей статьи:
Читайте также: Решение проблем с доступом к сетевым папкам в Windows 10
Еще статьи по данной теме: