I just shared the latest Nokia Online Service Tool v6.2.8 with detailed steps to patch it with the crack file. Once you have installed the Nokia OST Tool on your computer, you can easily flash the stock ROM or firmware with .nb0 and .mlf extension on the Nokia phones. Whether you own a Nokia 9 PureView, Nokia 8 Sirocco, Nokia 7.2. Nokia 7 Plus, Nokia 6.1, Nokia 5.1 Plus, Nokia 4.2, or any other Nokia smartphone, this tutorial is just for you.
Nokia OST Tool is a very simple firmware flash tool like Samsung Odin. In normal circumstances, you might never need to flash a stock ROM on your Nokia phone. Since Nokia devices come with the stock Android or Android One ROM, they get speedy updates. However, in certain situations, you might want to install the stock firmware.
Nokia OST Tool Update Options
The Nokia Online Service Tool offers a range of options that let you customize your Nokia firmware installation as per your preference.
- Normal Download
- Emergency Download
- Erase user data
- Erase error data
- Switch SKUID
- Only backup NV
- Erase FRP
- Unlock Screen Lock
- Check System AP Status
Using these firmware update options, you can flash the stock ROM on your Nokia phone.
- To manually update the software of your Nokia device.
- You can unroot your phone by installing the stock firmware.
- If you have installed a custom ROM or recovery, you can return your device to stock.
- You can flash the stock ROM to fix a boot loop.
- To erase all user data and settings for a clean installation of the OS.
- By flashing the stock ROM on your Nokia smartphone, you can also remove FRP or firmware reset protection on your device.
- If you are not able to get past the lock screen on your Nokia phone, you can unlock the screen lock by flashing the firmware using the Nokia OST tool.
- The Nokia Online Service tool has a feature that lets you backup your device’s NV (non-volatile) data that contains sensitive information like the IMEI, Serial number, Baseband, etc.
Please note that the Nokia OST Tool won’t perform all the above-listed tasks by default. You must select the appropriate options/s carefully while flashing the stock ROM.
Prerequisites to Flash the Stock ROM
Before you can flash the stock ROM on your Nokia device, here are a few things to download and some preparations to make.
- The first thing you need the stock ROM or flash file for your Nokia phone’s model. Unfortunately, there’s no firmware download tool like Frija for Nokia devices, but you can download Nokia firmware from sites like Easy Firmware, Hikaricalyx, or any other source. If the firmware file you downloaded is a ZIP archive, unzip it to get the .nb0 and .mlf flash file.
- Take a full backup of your apps and data.
- Make sure that your phone is amply charged and has at least 60-70% of battery level.
- Enable USB debugging on your Nokia phone.
- Download the latest Nokia OST Tool (crack) v.6.2.8 and set it up on your Windows PC.
- Since the Nokia Online Service Tool automatically installs the required drivers including the ones listed below, you don’t need to install them separately.
- Nokia Phone USB Driver
- Phone F USB Driver
- Phone M USB Driver
- Please note that to be able to flash the stock ROM on your Nokia phone, it must have an unlocked bootloader. Otherwise, you’ll get ‘SE_ERR_ADB_CMD_GET_FAIL_RESULT’ error. The bootloader unlock command for Nokia devices varies from model to model. You can search online for the command to unlock your Nokia smartphone.
Now that you have installed the Nokia OST Tool and have the firmware file for your phone, you can follow the instructions given below to flash it.
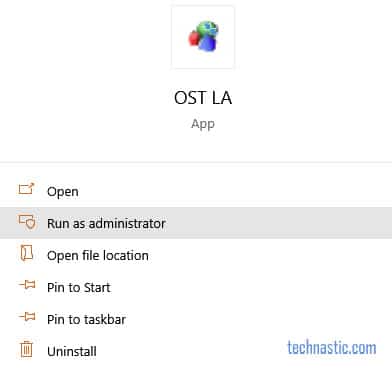
- Launch Nokia Online Service Tool (OST). There are 2 ways to do that.
- Click the Search icon on the Windows taskbar, type “OST LA” and click the Run as administrator option.

Nokia OST LA app
- Navigate to C:Program Files (x86)OST LA and double-click OnlineUpdateTool.exe.
- Click the Search icon on the Windows taskbar, type “OST LA” and click the Run as administrator option.
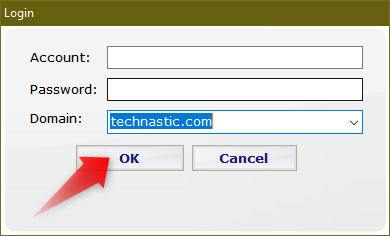
- When you see the Login screen asking you to type the Account ID and Password, just click the OK button.

Bypass login account and password
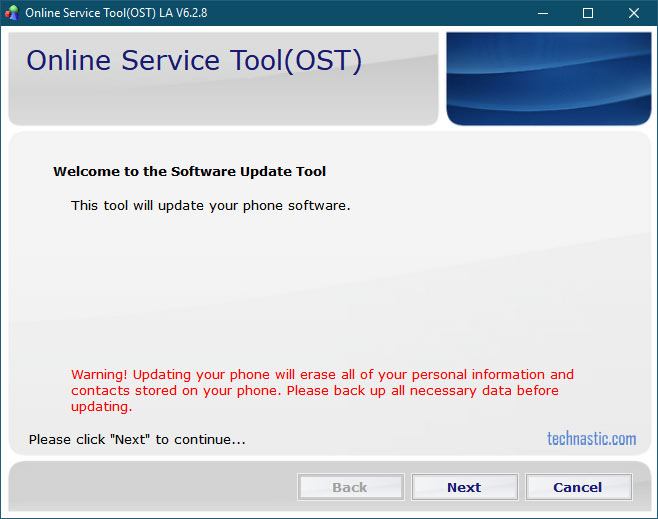
- You’ll then be greeted by the Online Service Tool (OST) welcome screen. Click the Next button.

Online Service Tool (OST) screen
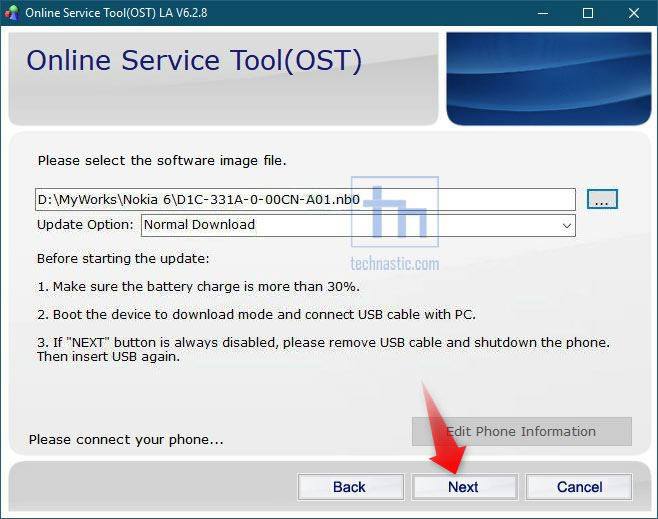
- Now, click the ‘…’ button, navigate to the folder where you have saved the firmware file with .mlf or .nb0 extension and click the Open button to select it.
Add stock ROM file to Nokia OST Tool
- It’s time to boot your Nokia device into the Download Mode and connect it to the PC. Some Nokia phones automatically boot into the Download Mode when connected to the PC via USB with Nokia OST Tool open. Of course, the phone needs to be turned off for that. Here’s how you can do that manually.
- Power off your Nokia device.
- Now, connect your phone to your PC using the USB cable.
- When it starts charging, press and hold the Volume Down + Power buttons at the same time. Keep both the buttons pressed until your phone vibrates and you see a screen with ‘Download Mode‘ written on the top-left corner.

Download Mode on Nokia
- In case the Next button is not enabled in the Nokia OST Tool, even after connecting your phone to the PC with the Download Mode on, click the Edit Phone Information button. Wait until you get an error message pop-up saying ‘Failed to reboot to FTM mode’. Just ignore that error and click OK. The Next button should now be enabled.
- If you want to install the firmware while retaining your phone’s data, apps and settings, just click the Next button on the Online Service Tool window. In case you want the tool to wipe your phone’s data, erase Firmware Reset Protection (FRP), click the down arrow ‘∨’ icon in the Update Option section. You’ll now have a range of options to select. Be careful while making a choice. For a normal clean installation, just select the Erase error data option.

OST Tool firmware update options
- When you have added the stock ROM to the OST Tool and selected the suitable update option, click the Next button to initiate the firmware flashing.
Firmware installation progress in Nokia OST Tool
- All you need to do now is to wait until the firmware file is flashed.
Once the stock ROM is flashed on your Nokia phone, it will reboot automatically with the newly installed firmware.
Fix OST Tool Error 0xC6DA
Some users have reported getting the following errors while using the OST Tool:
- 0xc6da (SE_ERR_ADB_CMD_GET_FAIL_RESULT (0xC6DA) error
- ERROR_INVALID_HANDLE (0x6)
- Reflash service bootloader
Full error message goes like this:
Error code : 0xc6da
Error : Download fails,
Error = SE_ERR_ADB_CMD_GET_FAIL_RESULT (0xC6DA)
If you get the 0xC6DA error in the OST Tool 6.0.4 and 6.1.2 while downloading the firmware on your Nokia phone, try the following fixes
- Install the latest Nokia USB driver
- Use the latest Nokia OST Tool 6.2.8
- Make sure you are flashing the correct firmware for your device model.
In case you are getting the variable product id error in the OST Tool, it means you got an MTK phone. The Online Service Tool supports only the Nokia devices with Qualcomm chipset.
Supported Nokia Devices
In short, we can say that the stock ROM flashing method described above works with all Android-powered Nokia smartphones that don’t have an MTK (MediaTek) chipset. I have made a list of all major Nokia phones on which you can flash stock firmware using the Nokia Online Service Tool.
- Nokia 2
- Nokia 4.2
- Nokia 5
- Nokia 5.1
- Nokia 5.1 Plus (X5)
- Nokia 5.3
- Nokia 6
- Nokia 6.1
- Nokia 6.1 Plus (X6)
- Nokia 6.2
- Nokia X71
- Nokia 7
- Nokia 7.1
- Nokia 7 Plus
- Nokia 7.2
- Nokia 8
- Nokia 8 Sirocco
- Nokia 8.1 (X7)
- Nokia 9 PureView
Finally, it’s time to stop typing. I have tried to be as detailed and clear while describing the steps. In case you still have any questions, blurt it out via comments.
Nokia 6 — Прошивки
 Nokia 6
Описание | Обсуждение » | Брак и ремонт » | Клуб любителей » | Обсуждение камеры » | Модификация и украшательства » | Энергопотребление (автономность) » | Прошивки »
Внимание! По умолчанию на Nokia 6 заблокирован загрузчик Android. При заблокированном загрузчике получить root права, установить кастомную прошивку или recovery можно, но это костыль.
Добиваться обновления системы на версиях телефона ТА-1021, путём сброса Google Services Framework, категорически запрещено. Это работает только на ТА-1000 и ТА-1003.
В теме нет куратора. Если в теме есть пользователь, желающий стать Куратором и соответствующий Требованиям для кандидатов, он может подать заявку, создав новую тему в разделе Хочу стать Куратором (предварительно изучив Правила и рекомендации для Кураторов).
До назначения куратора, по вопросам наполнения шапки, обращайтесь к модераторам раздела через кнопку  под сообщениями, на которые необходимо добавить ссылки.
Программа для установки сервисов гугл и активации русского языка (в прошивке он есть, но скрыт).
Пользоваться очень просто, включаете отладку по USB в опциях разработчика и подключаете телефон к компу, подтверждаете запрос на отладку и нажимаете кнопку «Install Morelocale pro» в нижнем правом углу окошка программы, после установки на экране выскочит окно с выбором языка.
Источник XDA Nokia_6_Utility_1.0.0.1.zip ( 2.07 МБ )
Данное рекавери устанавливается и работает только на TA-1000.TWRP+for+Nokia+6+-+R1.img ( 31.32 МБ )
I just shared the latest Nokia Online Service Tool v6.2.8 with detailed steps to patch it with the crack file. Once you have installed the Nokia OST Tool on your computer, you can easily flash the stock ROM or firmware with .nb0 and .mlf extension on the Nokia phones. Whether you own a Nokia 9 PureView, Nokia 8 Sirocco, Nokia 7.2. Nokia 7 Plus, Nokia 6.1, Nokia 5.1 Plus, Nokia 4.2, or any other Nokia smartphone, this tutorial is just for you.
Nokia OST Tool is a very simple firmware flash tool like Samsung Odin. In normal circumstances, you might never need to flash a stock ROM on your Nokia phone. Since Nokia devices come with the stock Android or Android One ROM, they get speedy updates. However, in certain situations, you might want to install the stock firmware.
The Nokia Online Service Tool offers a range of options that let you customize your Nokia firmware installation as per your preference.
Using these firmware update options, you can flash the stock ROM on your Nokia phone.
Please note that the Nokia OST Tool won’t perform all the above-listed tasks by default. You must select the appropriate options/s carefully while flashing the stock ROM.
Before you can flash the stock ROM on your Nokia device, here are a few things to download and some preparations to make.
Now that you have installed the Nokia OST Tool and have the firmware file for your phone, you can follow the instructions given below to flash it.
- Click the Search icon on the Windows taskbar, type “OST LA” and click the Run as administrator option.
Nokia OST LA app
Bypass login account and password
Online Service Tool (OST) screen
Add stock ROM file to Nokia OST Tool

Download Mode on Nokia

OST Tool firmware update options

Firmware installation progress in Nokia OST Tool
Once the stock ROM is flashed on your Nokia phone, it will reboot automatically with the newly installed firmware.
Fix OST Tool Error 0xC6DA
Some users have reported getting the following errors while using the OST Tool:
- 0xc6da (SE_ERR_ADB_CMD_GET_FAIL_RESULT (0xC6DA) error
- ERROR_INVALID_HANDLE (0x6)
- Reflash service bootloader
Full error message goes like this:
If you get the 0xC6DA error in the OST Tool 6.0.4 and 6.1.2 while downloading the firmware on your Nokia phone, try the following fixes
- Install the latest Nokia USB driver
- Use the latest Nokia OST Tool 6.2.8
- Make sure you are flashing the correct firmware for your device model.
In case you are getting the variable product id error in the OST Tool, it means you got an MTK phone. The Online Service Tool supports only the Nokia devices with Qualcomm chipset.
Supported Nokia Devices
In short, we can say that the stock ROM flashing method described above works with all Android-powered Nokia smartphones that don’t have an MTK (MediaTek) chipset. I have made a list of all major Nokia phones on which you can flash stock firmware using the Nokia Online Service Tool.
- Nokia 2
- Nokia 4.2
- Nokia 5
- Nokia 5.1
- Nokia 5.1 Plus (X5)
- Nokia 5.3
- Nokia 6
- Nokia 6.1
- Nokia 6.1 Plus (X6)
- Nokia 6.2
- Nokia X71
- Nokia 7
- Nokia 7.1
- Nokia 7 Plus
- Nokia 7.2
- Nokia 8
- Nokia 8 Sirocco
- Nokia 8.1 (X7)
- Nokia 9 PureView
Finally, it’s time to stop typing. I have tried to be as detailed and clear while describing the steps. In case you still have any questions, blurt it out via comments.
Источник
Error code 0xc6da nokia 5
По вопросам наполнения шапки, обращайтесь к куратору темы schtemp
Сообщение отредактировал snekt — 10.09.22, 20:08
 mfsrz, для 7.1 только тестовые сборки: ® Xposed, GravityBox не поддерживается.
Сообщение отредактировал destroyer71 — 02.07.20, 20:22
Сообщение отредактировал Бозон — 25.02.18, 10:42

Сообщение отредактировал burovikk26 — 13.12.17, 15:47


Что мешает поставить программу AnTuTu Officer
и проверить на подлинность
Нашел в тытернете иностранную статью как рутировать nokia 5 Клик
Сообщение отредактировал MaSaNA2013 — 06.09.17, 11:17
4. Now Boot to the CWM or TWRP Recovery.
4. Сейчас загружаемся в КлокворкМодРекавери или ТВРП.
Статья фейк.(причем она была ещё до выхода нокии 5)
Сообщение отредактировал crowrow — 07.09.17, 15:10
Итак прорыв. Слил со своего тела Nokia 5 qcn файл. Теперь можно играться со своим телефоном полностью и не бояться потерять связь
djhim, вопрос к Вам лишь один — как Вы ввели телефон в диагностический режим? И как законнектились с QPST.
Это действительно прорыв. Сейчас мы все USA Band вылечим.
И что за пароль на архиве?
Сообщение отредактировал vladpisarev — 07.09.17, 22:16
djhim, и инструкция готова? :yes2:
Что-то вопросов больше, чем ответов.
djhim, вопрос к Вам лишь один — как Вы ввели телефон в диагностический режим? И как законнектились с QPST.
Это действительно прорыв. Сейчас мы все USA Band вылечим.
И что за пароль на архиве?
djhim, неплохо. С рутом-то понятно, как сделать 🙂 А вот бы без рута. Но видимо никак
То, что здесь всё хитро, уже стало очевидно 🙂
Сообщение отредактировал vladpisarev — 08.09.17, 08:19
djhim, и инструкция готова?
Что-то вопросов больше, чем ответов.
Тебе потребуется режим 9008 (edl) и любая программа которая форматирует раздел frp в этом режиме. их много в свободном доступе или программатор для qualcomm
Добавлено 08.09.2017, 08:24:
djhim, неплохо. С рутом-то понятно, как сделать А вот бы без рута. Но видимо никак
То, что здесь всё хитро, уже стало очевидно
Без root никак (да и с Root он тоже хитро переходит. стандартные коды не подходят). даже программаторы не знают как перевести его в режим диагностики. сервисный код пока ожидаем
Сообщение отредактировал djhim — 08.09.17, 08:26
Вчера завалил трубу и поэтому начал эксперименты. вообще никак шЫться не хотел. Теперь имеем много нового)))
Есть еще оригинальная прошивка TA-1053 слитая до экспериментов. Заливаю на обменник скоро выложу
Оригинальная прошивка на TA-1053 без изменений
https://yadi.sk/d/rcNFNnPp3MhtMe
эта прошивка не для меню recovery. она для поднятия полного кирпича)))
Сообщение отредактировал djhim — 08.09.17, 14:25
Источник
Error code 0xc6da nokia 5
По вопросам наполнения шапки, обращайтесь к куратору темы schtemp
Сообщение отредактировал snekt — 10.09.22, 20:08
mfsrz, для 7.1 только тестовые сборки: ® Xposed, GravityBox не поддерживается.
Сообщение отредактировал destroyer71 — 02.07.20, 20:22
Сообщение отредактировал Бозон — 25.02.18, 10:42
Сообщение отредактировал burovikk26 — 13.12.17, 15:47
Что мешает поставить программу AnTuTu Officer
и проверить на подлинность
Нашел в тытернете иностранную статью как рутировать nokia 5 Клик
Сообщение отредактировал MaSaNA2013 — 06.09.17, 11:17
4. Now Boot to the CWM or TWRP Recovery.
4. Сейчас загружаемся в КлокворкМодРекавери или ТВРП.
Статья фейк.(причем она была ещё до выхода нокии 5)
Сообщение отредактировал crowrow — 07.09.17, 15:10
Итак прорыв. Слил со своего тела Nokia 5 qcn файл. Теперь можно играться со своим телефоном полностью и не бояться потерять связь
djhim, вопрос к Вам лишь один — как Вы ввели телефон в диагностический режим? И как законнектились с QPST.
Это действительно прорыв. Сейчас мы все USA Band вылечим.
И что за пароль на архиве?
Сообщение отредактировал vladpisarev — 07.09.17, 22:16
djhim, и инструкция готова? :yes2:
Что-то вопросов больше, чем ответов.
djhim, вопрос к Вам лишь один — как Вы ввели телефон в диагностический режим? И как законнектились с QPST.
Это действительно прорыв. Сейчас мы все USA Band вылечим.
И что за пароль на архиве?
djhim, неплохо. С рутом-то понятно, как сделать 🙂 А вот бы без рута. Но видимо никак
То, что здесь всё хитро, уже стало очевидно 🙂
Сообщение отредактировал vladpisarev — 08.09.17, 08:19
djhim, и инструкция готова?
Что-то вопросов больше, чем ответов.
Тебе потребуется режим 9008 (edl) и любая программа которая форматирует раздел frp в этом режиме. их много в свободном доступе или программатор для qualcomm
Добавлено 08.09.2017, 08:24:
djhim, неплохо. С рутом-то понятно, как сделать А вот бы без рута. Но видимо никак
То, что здесь всё хитро, уже стало очевидно
Без root никак (да и с Root он тоже хитро переходит. стандартные коды не подходят). даже программаторы не знают как перевести его в режим диагностики. сервисный код пока ожидаем
Сообщение отредактировал djhim — 08.09.17, 08:26
Вчера завалил трубу и поэтому начал эксперименты. вообще никак шЫться не хотел. Теперь имеем много нового)))
Есть еще оригинальная прошивка TA-1053 слитая до экспериментов. Заливаю на обменник скоро выложу
Оригинальная прошивка на TA-1053 без изменений
https://yadi.sk/d/rcNFNnPp3MhtMe
эта прошивка не для меню recovery. она для поднятия полного кирпича)))
Сообщение отредактировал djhim — 08.09.17, 14:25
Источник
melltoo
New member
- Joined
- Jan 8, 2019
- Messages
- 117
- Reaction score
- 0
- Points
- 0
-
#1
Nd1-617d-0-00ww-b04
need this file

dhanu yadav
GD Support Team
- Joined
- Dec 10, 2016
- Messages
- 1,868
- Reaction score
- 5
- Points
- 38
- Age
- 29
- Location
-
Hyderabad
-
#3
Nd1-617d-0-00ww-b04
need this file
This is the latest version found tested and working with OST la tool
StackPath
Sent from my GM1911 using Tapatalk
melltoo
New member
- Joined
- Jan 8, 2019
- Messages
- 117
- Reaction score
- 0
- Points
- 0
-
#4
ost
the update process failed
error code : oxc6a
error: downlod fails
error=se-err-adb_cmd_get_fail_result 0xc6da
dhanu yadav
GD Support Team
- Joined
- Dec 10, 2016
- Messages
- 1,868
- Reaction score
- 5
- Points
- 38
- Age
- 29
- Location
-
Hyderabad
-
#5
ost
the update process failed
error code : oxc6a
error: downlod fails
error=se-err-adb_cmd_get_fail_result 0xc6da
Install latest driver’s connect phone in power off condition when software asks for connection
Sent from my GM1911 using Tapatalk


-
#1
Сабж.Пришел в режиме download mode.Test-point нашел.Но что best2,что см2 qlm ругаются на загрузчик.Есть вариант зацепить?
Лог прилагаю:
Wait for phone…
Device Found!
Initialize …
Handshake passed!
BB_IDC_SWB : 00000000
ID_BLOCK_S : BC86E84A
ID_BLOCK_I : 000CC0E1
ID_BLOCK_L : D786B96E89CF47945C4CD10D8A1C7D0A
ID_BLOCK_L : E86845AB412BBD05C523AE27CD779E0E
Use BEST Internal LoaderError : Prepare target failed! Unsupported yet CPU!
Send log and report.log to support! Include device info also!Reconnect Power/Cable!


-
#2
Да можно зацепить, почему нет. Зачем?
DM это же и fastboot. Слот менять не пробовали? На **** есть что почитать.

-
#3
На саппорте ntool есть прошивка. Он же и прошьет, только за деньги…
-
#4
Да можно зацепить, почему нет. Зачем?
DM это же и fastboot. Слот менять не пробовали? На **** есть что почитать.
Пробовал.Reset проходит.Но все равно вываливается в fastboot и DM.По словам клиента при обновлении отключили эл.энергию и wi-fi сдох.
-
#5
А на fastboot getvar all что говорит?
Вообще, соберите максимум информации об этом ТА. Окирпичить еще глубже вы всегда успеете. Аттач вам в помощь.
-
199,3 КБ
Просмотры: 182
![]()
-
#6
Выложите пожалуйста фото тест поинта
Сабж.Пришел в режиме download mode.Test-point нашел.Но что best2,что см2 qlm ругаются на загрузчик.Есть вариант зацепить?
Лог прилагаю:можно фото теспоинта ?
Последнее редактирование модератором: 4/4/19

-
#7
Сабж.Пришел в режиме download mode.Test-point нашел.Но что best2,что см2 qlm ругаются на загрузчик.Есть вариант зацепить?
Лог прилагаю:
Можно фото testpoint в студию?

-
#8
День Добрый шил кто либо Nokia 7.1 NTool? TA-1095 Подниму аппарат? В Бутлупе., смена слотов не помогает.
В итоге тестпоинт найден колдуем с QcFire.

В общем пришел к выводу что нужен полный дамп с рабочего аппарата версия прошивки Device : FIH GSI-00WW
Software : 00WW_3_51F, 00WW_3_51F [Wed Feb 27 15:13:33 CST 2019]
Android Ver. : 9
Patch Level : 2019-03-01
NTool показывает версию СTL-353A-0-00WW-B01
Если есть у кого возможность слить фулл с рабочего аппарата просьба поделитесь!
Добавлю NTool на данный момент не шьёт аппараты с последней версией безопасности!!! (Новая ИНФА СЕГОДНЯ NTool НАЧАЛ шить!!!!)
АППАРАТ ВОССТАНОВЛЕН!
Остался полный бекап аппарата в Download Mode слитый QcFire и EFS
Последнее редактирование модератором: 29/5/19
![]()
-
#9
Где купить 20 кредитов. Вроде как временно недоступно.. И хватит ли 20 кредитов на решение проблемы «Download mode»?


-
#10
Кредиты не помогут. В данный момент Ntool работает только с картой защиты.
the_laser сказал(а):
карты отосланы дистрибутору, а когда продажи начнутся, ответить не могу — я этим не занимаюсь.


-
#11
Кредиты не помогут. В данный момент Ntool работает только с картой защиты.
это что и «с чем её едят»?
Давно желаю приобрести тот бокс/донгл, но инфы мало и какой именно не понятно.
-
#12
Автор программы — the_laser, официальный форум поддержки — мобайл файлз.
![]()
-
#13
День Добрый шил кто либо Nokia 7.1 NTool? TA-1095 Подниму аппарат? В Бутлупе., смена слотов не помогает.
В итоге тестпоинт найден колдуем с QcFire.Посмотреть вложение 330822
В общем пришел к выводу что нужен полный дамп с рабочего аппарата версия прошивки Device : FIH GSI-00WW
Software : 00WW_3_51F, 00WW_3_51F [Wed Feb 27 15:13:33 CST 2019]
Android Ver. : 9
Patch Level : 2019-03-01
NTool показывает версию СTL-353A-0-00WW-B01
Если есть у кого возможность слить фулл с рабочего аппарата просьба поделитесь!Добавлю NTool на данный момент не шьёт аппараты с последней версией безопасности!!! (Новая ИНФА СЕГОДНЯ NTool НАЧАЛ шить!!!!)
АППАРАТ ВОССТАНОВЛЕН!Остался полный бекап аппарата в Download Mode слитый QcFire и EFS
День добрый. Поделитесь плизз прошивкой. И подскажите как прошить через NTool. Проблема аналогичная, висит в DM, меняю слоты заходит в рекавери, жму ресет и аппарат уходит в перезагрузку, перезагружается несколько раз и опять в DM выходит.
![]()
-
#14
День Добрый шил кто либо Nokia 7.1 NTool? TA-1095 Подниму аппарат? В Бутлупе., смена слотов не помогает.
В итоге тестпоинт найден колдуем с QcFire.Посмотреть вложение 330822
В общем пришел к выводу что нужен полный дамп с рабочего аппарата версия прошивки Device : FIH GSI-00WW
Software : 00WW_3_51F, 00WW_3_51F [Wed Feb 27 15:13:33 CST 2019]
Android Ver. : 9
Patch Level : 2019-03-01
NTool показывает версию СTL-353A-0-00WW-B01
Если есть у кого возможность слить фулл с рабочего аппарата просьба поделитесь!Добавлю NTool на данный момент не шьёт аппараты с последней версией безопасности!!! (Новая ИНФА СЕГОДНЯ NTool НАЧАЛ шить!!!!)
АППАРАТ ВОССТАНОВЛЕН!Остался полный бекап аппарата в Download Mode слитый QcFire и EFS
можете скинуть инструкцию?такая же проблема


-
#15
Наковырял
купить чтобы получить доступ к скрытому контенту.
пару штук если прикроют я залью куда нибудь
CTL-345A-0-00WW-B01.nb0.zip
CTL-351F-0-00WW-B04.full.zip

-
#16
Наковырял
купить чтобы получить доступ к скрытому контенту.
пару штук если прикроют я залью куда нибудь
CTL-345A-0-00WW-B01.nb0.zip
CTL-351F-0-00WW-B04.full.zip
перезалей на яндекс или гугл
Перерыл весь интернет нашел 4 прошивки на данный аппарат, но возникла другая проблема — через что сейчас можно прошить данный аппарат? Через какую программу? Или через какой программатор?
Последнее редактирование модератором: 27/9/22
-
#17
купить чтобы получить доступ к скрытому контенту.
-
#18
Залил на
купить чтобы получить доступ к скрытому контенту.
Так что пробуйте Одна прошивка в nb0 вторая распечатанная пофайлово
![]()
-
#19
А теперь вопрос. Имеется Nokia 7.1 в ДМ, в рекавери не заходит, после всех обнов, версия установленного ПО выше, чем имеется в открытом доступе и при попытки прошивки через OST_LA 6.0.4 ,выскакивает ошибка 0xc6da, которая как я понял говорит о попытки прошить версию ниже чем установлена. Если шиться версией 6.1.2, то прошивка тупо зависает, оставлял на ночь, толку ноль. Есть ли версия та что именно после обнов у меня ctl-354j-0-00ww-b01. Конечно еще интересен вопрос чем из платных продуктов возможно поднять это устройство, справится ли UFI dongle, или сразу EasyBox брать?
-
#20
А теперь вопрос. Имеется Nokia 7.1 в ДМ, в рекавери не заходит, после всех обнов, версия установленного ПО выше, чем имеется в открытом доступе и при попытки прошивки через OST_LA 6.0.4 ,выскакивает ошибка 0xc6da, которая как я понял говорит о попытки прошить версию ниже чем установлена. Если шиться версией 6.1.2, то прошивка тупо зависает, оставлял на ночь, толку ноль. Есть ли версия та что именно после обнов у меня ctl-354j-0-00ww-b01. Конечно еще интересен вопрос чем из платных продуктов возможно поднять это устройство, справится ли UFI dongle, или сразу EasyBox брать?
Такая же проблема вчера через ufi хотел прошить. Он не поддерживает эту модель. Именно Nokia 7.1 нет в списке. Всего скорей только через Easy Box, но еще есть вариант Infinity Box, по крайней мере написано на их официальном сайте что он поддерживает данную модель, но у меня его нет и нет возможности протестировать. Если сделаешь напиши пожалуйста сюда как и через что прошил.
![]()
-
#21
Такая же проблема вчера через ufi хотел прошить. Он не поддерживает эту модель. Именно Nokia 7.1 нет в списке. Всего скорей только через Easy Box, но еще есть вариант Infinity Box, по крайней мере написано на их официальном сайте что он поддерживает данную модель, но у меня его нет и нет возможности протестировать. Если сделаешь напиши пожалуйста сюда как и через что прошил.
На популярном форуме есть человек который может помоч, его найти можно в ветке Nokia 7.1.
![]()
-
#22
Через ufi можно прошить эту модель через едл, фаилик загрузчика взять из любой фулл прошивки. Без проблем читаются и пишутся все разделы. Проблема в том что даже прошитая труба (прошивкой версией ниже) не заводится, а ругается на то что прошивка повреждена и опять падает в довнлоад. Перед любыми деиствиями нужно делать полный бэкап всех разделов, играясь можно убить как нефик делать и потом без родных разделов включения не добьешься, даже заливка любой фулл прошивки с неубранной галочкой на primarygpt убивает трубу в 9008й порт, вывести можно только родным разделом. Я убил кучу времени на эксперименты с этой трубой и мне кажется что если бы заиметь слитые разделы с рабочей трубы на свежей прошивке и залить через едл основное, вполне можно было бы выити из этого режима без всяких кредитов и программаторов. Проблема в отсутствии свежей фулл прошивки или дампа.
Единственное что я нарыл, если заформатить раздел persist либо modem a(или b если в b загрузка) труба прогружается дальше до надписи nokia, но опять подвисает. Если прошить этот раздел из любой другой прошивки, то имеем изначальное поведение(несколько перемаргиваний и довнлоад мод до тех пор пока не сменишь слот)
Может кому попадется такая живая нокиа, сделайте дамп.
На всякий случай прикреплю загрузчик
-
199,2 КБ
Просмотры: 57
Последнее редактирование: 19/10/19
-
#23
Прошить этот аппарат можно любым флешером куалкома.. имея какой либо бекап с такого аппарата но есть подозрения что он не заведется и будет так же висеть в DM даже с последним бекапом. Если посмотреть на лог того же нтула то он генерирует с сервака некий ключ на основе серийника которым возможно подписывается некий раздел при прошивке. Причем прошивка проходит поэтапно с переключением слотов и режимов аппарата. Поэтому говорить о том что аппарат можно поднять из dm тем же qfill ну или каким-то ufi по желанию) — рано) это всего лишь предложение)
Но бекап ефс через едл никогда не помешает, тот же фрп можно снять так же в едл. Но в остальном едл всего лишь для опытов.
Задумайся почему через ufi прошив версию ниже аппарат не заводится а через нтул сделав тоже самое аппарат в норме? Подсказка — ответ чуть выше)
Последнее редактирование: 21/10/19
Detailed guide to help you unlock the bootloader of your Nokia Android device. You can unlock bootloader on many Nokia smartphones, including Nokia 7 Plus, Nokia 8, Nokia 8 Sirocco, Nokia 8.1, Nokia 7, Nokia 6, Nokia 6.1, Nokia 5, Nokia 2, Nokia 2.1. etc.
Nokia does not offer any official way to unlock the bootloader of its Android phones. This doesn’t stop the developer community from trying out new ways to gain access. The same has borne some fruit, and now, an unofficial method to unlock the bootloader on Nokia Android phones is found. So, now you can unlock the bootloader on many old Nokia smartphones free of cost.
By unlocking the bootloader you can open up a whole new world of possibilities. An unlocked bootloader allows you to modify the system data such as the recovery or the operating system. You can not only root the smartphone to gain admin/superuser privileges, but also install a different ROM which can change the overall smartphone experience. That said, all these possibilities depend on the developer community, and some devices receive more development, while others receive lesser.
There are certain disadvantages as well. The most critical being the fact that your phone becomes slightly less secure. If you aren’t careful, then it is possible for a hacker to break into your phone by making you install malicious apps. Some apps (generally from banks) also limit parts of the app’s functionality on unlocked devices. Similarly, your Widevine level will downgrade to L3, causing DRM-protected apps (such as Netflix) to play video content only in lower quality. This does not impact non-DRM-protected apps (such as YouTube or offline video playback.
How to unlock the bootloader on Nokia Android phones? [Free method]
This guide applies to Nokia smartphones which use a Qualcomm Snapdragon processor.
The Nokia smartphones that can be unlocked are – Nokia 2, Nokia 2.1 (2V), Nokia 5, Nokia 6, Nokia 6.1 (Nokia 6 2018), Nokia 6.1 Plus, Nokia 6.2, Nokia 7, Nokia 7 Plus, Nokia 7.1, Nokia 7.2, Nokia 8, Nokia 8 Sirocco, Nokia 8.3 and Nokia X71. In addition to these, the Nokia 8.1 (Nokia X7) and Nokia 9 Pureview can also be unlocked by following an alternate method.
Dedicated unlock methods:
- Nokia 6.1, Nokia 6.1 Plus, Nokia 7, Nokia 7.1, Nokia 7 Plus, Nokia 8, Nokia 8 Sirocco [Free] – Follow the current guide
- Nokia 6.2 and Nokia 7.2, go here [Free]
- Nokia 8.1 and Nokia 9 PureView, go here. [Paid]
- Nokia 8.3 users can follow this xda guide [Free]
The free method for the aforementioned devices:
Nokia Mobile is not officially offering the bootloader unlock codes (except for the Nokia 8). So, we are using an alternate means to make it possible. Before we start, I’d like to thank Hikari Calyx – A Nokia & Microsoft enthusiast who was possibly the first one to discover this alternate method.
Warning:
- All data on your device will be erased. So, backup all important data before unlocking the bootloader.
- Your warranty may be void.
1.Install Nokia USB Drivers (required):
To ensure that the smartphone is properly detected by the bootloader unlock tool, make sure you install the required fastboot drivers. If you are not sure whether the drivers are installed or not, please run the drivers installer again.
Download official Nokia USB Drivers (ADB, Fastboot & others)
2.Download Nokia Bootloader Unlock Tool:
Download and extract the Nokia Bootloader Unlock tool from the link below. The tool offers a 1-click solution to unlock the bootloader on supported Nokia devices.
Download Unlock Tool
Use Windows Explorer, 7-zip, WinRAR, or any other zip management tool that you have to extract the Bootloader Unlock tool to a folder on your computer.
Tool requirements: Microsoft Windows 7 or later having Microsoft .Net Framework version 4.7.2 or higher. Not supported on Linux or Mac.
Recommended: Windows 10 with latest updates.
Allowed regions: Worldwide, except China, Taiwan, and Hong Kong.
3.Reboot the phone into bootloader (fastboot) mode:
Now boot your Nokia smartphone to the bootloader (or download) mode. Follow these steps for bootloader mode:
- Turn off your phone.
- Connect the USB cable to the device.
- Press and hold Volume Down + Power key together till you reach the screen reads that reads “Download mode”.
Alternatively, you can also use the command: adb reboot-bootloader to bring the phone to fastboot mode.
4.Generate OTP for the Unlock Tool:
To avoid misuse and limit usage, we are using an OTP system for the tool. You can generate an OTP from the following link:
Generate OTP
OTP details:
- The OTP is valid for 15 minutes from generation.
- Only 15 devices will be supported for unlocking in a day. After this further generation of OTPs will be disabled for the day.
- Please contact us in case you have a bulk requirement.
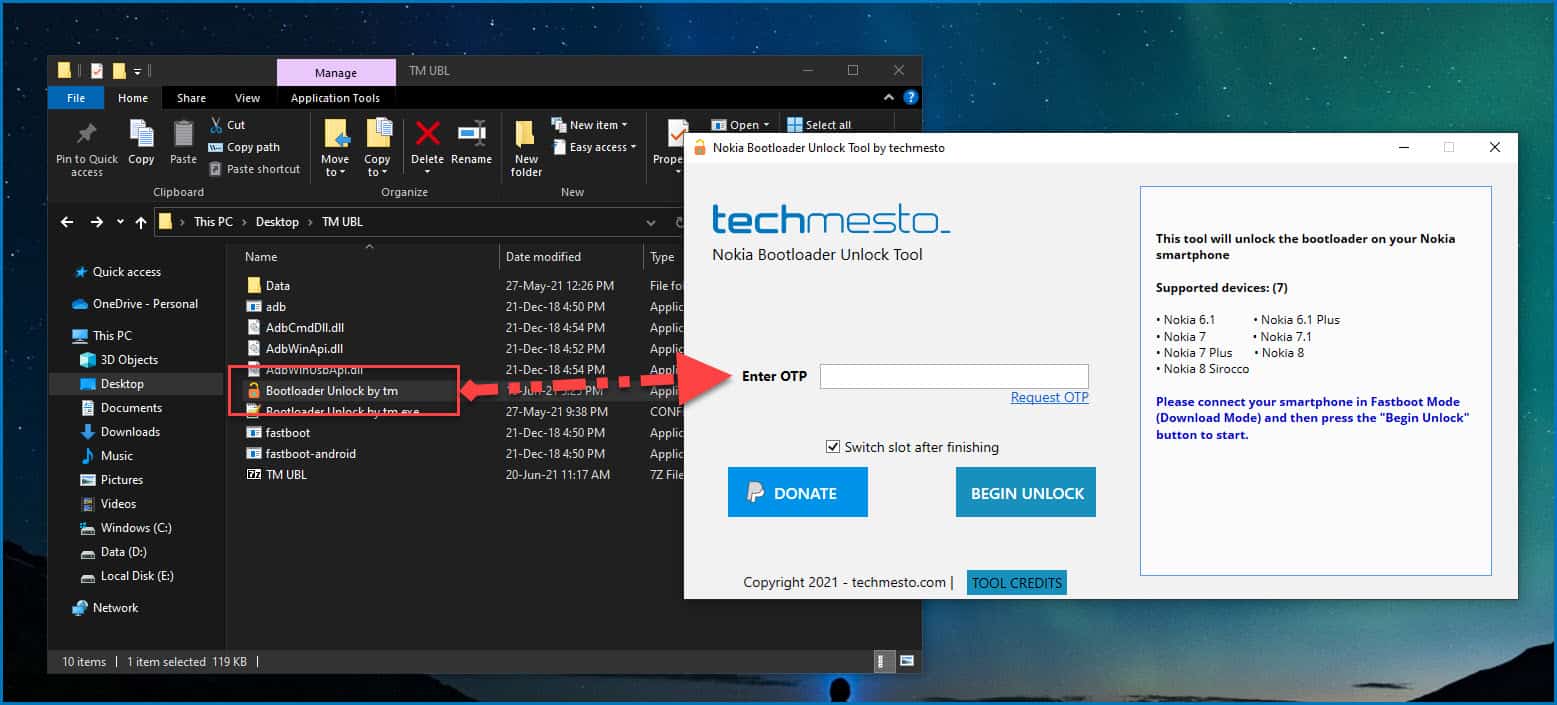
5.Run the Unlock Tool and unlock your phone
Now you can use the previously generated OTP to unlock the bootloader on your Nokia smartphone for free.
- Run Bootloader Unlock by tm.exe

- Paste the OTP (from step3) into the Enter OTP box in the Unlock Tool.
- Connect your smartphone in fastboot mode (download mode).
- Click on the Begin Unlock button.

- Wait for the process to complete. And follow the instructions shown in the output window.
- Confirm the unlock on the smartphone screen when prompted. In the standard process, you will get the unlock prompt two times.
PS: The tool will try to automatically lock the device in fastboot mode. However, sometimes (especially on Nokia 8 & Nokia 8 Sirocco) that can fail. Please put the phone to fastboot mode manually if that happens.

- Donate/contribute to support the tool (optional).

For 1st Gen devices (like Nokia 2, 5, 6)
Our unlock tool does not support the first-gen Nokia smartphones (like the Nokia 2, Nokia 5, and Nokia 6). So, until such support is added, you can follow the old method by buying the bootloader unlock key and downgrading your aboot.
1.Get unlock key (signature):
The bootloader unlock key is an encrypted file containing an encrypted string that gives the unlock permission. You can use the unlock key if your phone is on July 2018 or an older update. The price for the unlock key is $5 per request. You will need to send the following information:
- Your IMEI number for SIM1 slot (Dial *#06# to get it)
- Your phone serial (Find it in Settings > About phone > Status)
Buy Bootloader Unlock key
2.Enable OEM unlock:
Go to Settings > System> Developer options on your Nokia Android smartphone and enable OEM Unlocking. You should be able to unlock without making this setting change, but you ideally should enable it.
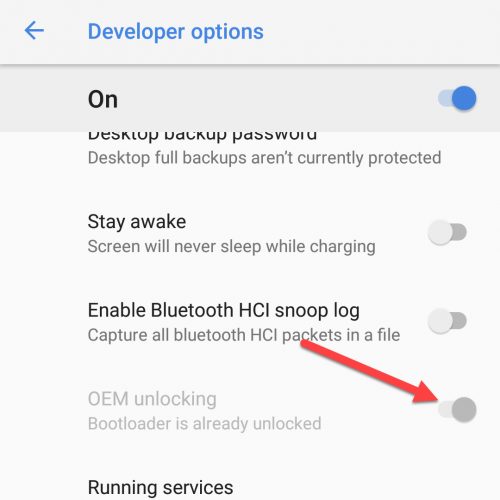
Alternatively, you can also use the command adb reboot bootloader in the adb interface to reboot the phone to bootloader mode.
3.Boot into bootloader mode:
Now boot your Nokia smartphone to the bootloader (or download) mode. Follow these steps for bootloader mode:
- Turn off your phone.
- Connect the USB cable to the device.
- Press and hold Volume Down + Power key together till you reach the screen reads that reads “Download mode”.
4.Unlock the bootloader:
The final step is to connect the Nokia phone to the PC and send the bootloader unlock command along with the unlock key which you acquired earlier. Here are the details:
- Ensure that your Nokia smartphone is detected by fastboot by running:
fastboot devices
- If your device is detected, then send the following command:
Note: Replace UnlockFile.bin with the name or full path of your unlock file.fastboot flash unlock UnlockFile.bin
- Now send the command to unlock the bootloader.
fastboot oem unlock-go
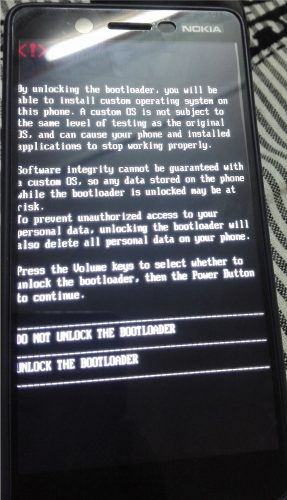
- On some Nokia devices, you will receive a bootloader unlock confirmation prompt. It looks like the following. Use the volume keys to select “Unlock the bootloader” and then press the power key to confirm.
Confirmation screen before unlock - Complete critical unlock – Allows bootloader to be re-flashed. Your device will be wiped again.
fastboot flash unlock UnlockFile.bin
fastboot flashing unlock_critical
- It will take a few moments to wipe all data on the device and unlock the bootloader. Be patient as the process completes.
Workaround for devices upgraded to August 2018 security release:
For Nokia 2, Nokia 5, and Nokia 6 (2017 versions) with A-only partitioning: Flash the July 2018 OTA update from recovery. Your application bootloader (aboot) will be downgraded. Then go back to step 2 above and proceed with the unlock.
Your bootloader should now be unlocked. If your device does not automatically reboot to Android, then use the soft reset keys to boot it back up. Here’s a screenshot of how your command prompt window will appear as you send the bootloader unlock commands.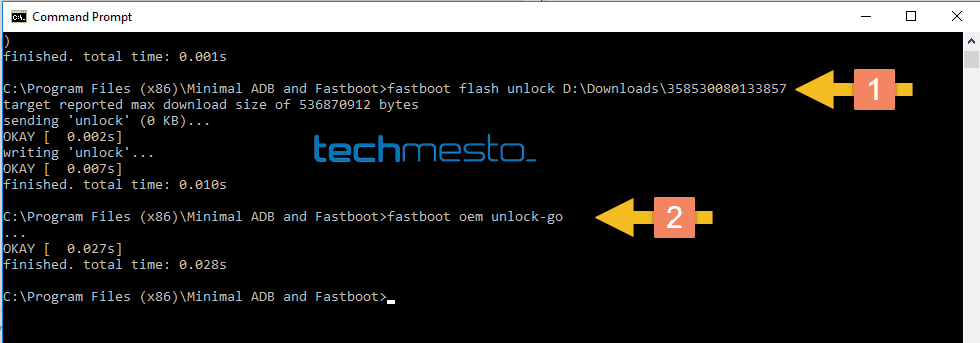
You can verify that the unlock is successful by following this guide. All unlocked phones will also show a 5-second warning before booting up. The text is similar to “Your device software can’t be checked for corruption. Please lock the bootloader.”
If you face any issues while using the tool, please send in your feedback to our Telegram group or as an email.
Download PC Repair Tool to quickly find & fix Windows errors automatically
On your Windows 11 or Windows 10 PC, you may encounter Error 0xc00d11d1 (0x8007007e) while playing music in Groove Music app, Error 0xc00d11d1 (0xc00d4e86) in Xbox Music, Movies & TV, WMP apps or Groove Music app error 0xc00d4e86. In this post, we provide the most suitable solutions to fix Error Code 0xc00d6d6f when opening media files on your system. Affected users reported the error started to occur with no audio or video output after updating Windows.

If you’re getting the Error Code 0xc00d6d6f when opening media files on your Windows 11/10 device, you can try our recommended solutions below in no particular order and see if that helps to resolve the issue on your system.
- Run Video Playback Troubleshooter and Audio Troubleshooter
- Update Sound and Video driver
- Uninstall Windows update
- Try another media player.
Let’s take a look at the description of the process involved concerning each of the listed solutions.
1] Run Video Playback Troubleshooter and Audio Troubleshooter
Since we are dealing with no audio or video output when the Error Code 0xc00d6d6f occurs when opening media files on your Windows 11/10 device, you can begin troubleshooting to resolve Video Playback issues, problems and errors by running the Video Playback Troubleshooter and Audio Troubleshooter to fix Sound and Audio problems and issues.
To run Video Playback Troubleshooter on your Windows 11 device, do the following:

- Press Windows key + I to open Settings app.
- Navigate to System > Troubleshoot > Other troubleshooters.
- Under the Other section, find Video Playback.
- Click Run button.
- Follow on-screen instructions and apply any recommended fixes.
To run Video Playback Troubleshooter on your Windows 10 device, do the following:

- Press Windows key + I to open Settings app.
- Go to Update and Security.
- Click the Troubleshooter tab.
- Scroll down and click on Video Playback.
- Click the Run the troubleshooter button.
- Follow on-screen instructions and apply any recommended fixes.
Similarly, to run Audio Troubleshooter on your Windows 11 device, do the following:

- Press Windows key + I to open Settings app.
- Navigate to System > Troubleshoot > Other troubleshooters.
- Under the Most frequent section, find Playing Audio.
- Click Run button.
- Follow on-screen instructions and apply any recommended fixes.
To run Audio Troubleshooter on your Windows 10 device, do the following:

- Press Windows key + I to open Settings app.
- Go to Update and Security.
- Click the Troubleshooter tab.
- Scroll down and click on Playing Audio.
- Click the Run the troubleshooter button.
- Follow on-screen instructions and apply any recommended fixes.
If after running both wizards but the issue in hand is unresolved, try the next solution.
Read: Another app is controlling your sound at the moment, Error 0xc101009b (0xc00d4e85)
2] Update Sound and Video driver

A missing or outdated audio/video driver may also trigger the error. In this case, you can update the audio/video driver under the Sound, video and game controllers section in Device Manager.
You can manually update audio/video drivers via Device Manager if you have already downloaded the .inf or .sys file for the driver, or update the driver via Command Prompt. You can as well get the driver updates on the Optional Updates section under Windows Update or you may also download the latest version of the driver from the manufacturer’s website or automatically update your drivers using any of the free Driver Update Software for Windows 11/10 PC.
3] Uninstall Windows update

Since the error in hand started to occur after installing a new Windows update on your system, a logical step you can take to resolve the issue is to perform System Restore or uninstall the update – but if you prefer not to do neither, you can proceed with the next solution.
4] Try another Media player
This is more of a workaround than a solution. Depending on the installed media player on your Windows 11/10 device, that you’re receiving the error when you try to open media file with; you can simply try another Media player on your device and see if the error reappears. If so, try the next solution.
Hope this helps!
Related post: Fix error code 0xc00d36c4 when playing media files
What to do when Windows Media Player Cannot play the file?
If you’re faced with the Windows Media Player cannot play the file issue on Windows 11/10, you can try the following suggestions to resolve the issue:
- Download Codecs Automatically.
- Install Codecs Separately.
- Set Correct Audio Device.
- Update Audio and Video Drivers.
- Update Windows.
- Disable/Enable WMP.
- Check Windows Registry.
- Use a Different Media Player.
How do I fix error code 0xc00d5212?
To fix This item was encoded in a format not supported (0xc00d5212) on your system, you can try the following solutions:
- Install Missing Codec.
- Update Display Drivers.
- Uninstall and Install Display Driver Again.
- Uninstall Audio Drivers.
- Update Windows OS.
- Play AVI Videos with VLC.
- Correct System Registries.
Happy computing!

Obinna Onwusobalu has studied Information & Communication Technology and is a keen follower of the Windows ecosystem. He has been a Windows Insider MVP (2020). He runs a computer software clinic.
- Remove From My Forums
-
Question
-
Hi,
Please Help…!
I got the below error while scheduling a package in SQL Server Agent
Connection manager «Excel Connection Manager» Description: The requested OLE DB provider Microsoft.Jet.OLEDB.4.0 is not registered. If the 64-bit driver is not installed, run the package in 32-bit mode. Error code: 0x00000000.
An OLE DB record is available. Source: «Microsoft OLE DB Service Components» Hresult: 0x80040154 Description: «Class not registered». End Error Error: 2017-11-30 10:40:54.17 Code: 0xC020801C
Source: Data Flow Task Excel Destination [12] Description: SSIS Error Code DTS_E_CANNOTACQUIRECONNECTIONFROMCONNECTIONMANAGER. The AcquireConnection method call to the connection manager «Excel Connection Manager»
failed with error code 0xC0209303. There may be error messages posted before this with more information on why the AcquireConnection method call failed. End Error Error: 2017-11-30 10:40:54.17 Code: 0xC0047017
Source: Data Flow Task SSIS.Pipeline Description: Excel Destination failed validation and returned error code 0xC020801C. End Error Error: 2017-11-30 10:40:54.17 Code: 0xC004700C Source:
Data Flow Task SSIS.Pipeline Description: One or more component failed validation. End Error Error: 2017-11-30 10:40:54.17 Code: 0xC0024107 Source: Data Flow Task Description:
There were errors during task validation. End Error DTExec: The package execution returned DTSER_FAILURE (1). Started: 10:40:53 AM Finished: 10:40:54 AM Elapsed: 0.406 seconds. The package execution failed.
The step failed.