При загрузке или обновлении приложения Adobe возникает ошибка 117
При попытке загрузки или обновления приложения Adobe отображается следующее сообщение об ошибке, в котором указывается на наличие проблем с сетевым подключением или стабильностью сети:
Код выхода: 117
————————————- Сводка—————————————
— 2 неустранимые ошибки, 0 ошибок, 0 предупреждений
FATAL: возникла неустранимая ошибка 117 при загрузке
FATAL: возникла ошибка при загрузке пакета (имя: <имя продукта> версия: <версия продукта>).
Код ошибки: «117»
Решение 1. Проверьте подключение к Интернету
Требуется подключение к Интернету для загрузки и обновления приложений Adobe. Убедитесь в наличии подключения к Интернету и повторите попытку.
Решение 2. Измените настройки программного брандмауэра
Программные брандмауэры ограничивают доступ к вашему компьютеру. Некоторые программные брандмауэры оповещают пользователя, если программа пытается подключиться к сети Интернет. Пользователи сообщали о случаях, когда настройки программного или аппаратного брандмауэра становились причиной возникновения ошибок при загрузке.
- Если появится соответствующий запрос, разрешите приложению Adobe получать доступ к Интернету.
- При отсутствии такого запроса временно отключите программные брандмауэры, чтобы определить, предотвращают ли они доступ в Интернет. Обратитесь к документации к вашему программному брандмауэру.
Решение 3. Отключите антивирусное программное обеспечение
Временно отключите антивирус, а затем попробуйте загрузить файл снова.
Решение 4. Запустите компьютер в безопасном режиме с загрузкой сетевых драйверов
Перезагрузите компьютер в безопасном режиме с загрузкой сетевых драйверов и попробуйте загрузить файл снова.
Решение 5. Проверьте настройки маршрутизатора
Маршрутизаторы могут иметь встроенный аппаратный брандмауэр или могут быть подключены к прокси-серверам. Выполните следующие действия, чтобы определить, не запрещает ли маршрутизатор приложению Adobe получать доступ к Интернету:
- Временно отключите маршрутизатор от сети.
- Подключите компьютер непосредственно к сети с помощью кабеля DSL или модемного кабеля. Если система будет выполнять загрузку, это значит, что маршрутизатор запрещает приложению доступ к Интернету.
- Для того чтобы настроить маршрутизатор таким образом, чтобы разрешить доступ для дальнейших загрузок, обратитесь к документации к маршрутизатору, в которой содержатся инструкции по настройке переадресации портов с помощью компьютера. Кроме того, обратитесь к поставщику услуг Интернета или руководителю ИТ-отдела.
Решение 6. Настройте брандмауэр и прокси-серверы
В большинстве организаций используются аппаратные брандмауэры или прокси-серверы, которые могут запретить программному обеспечению доступ к внешнему серверу. Аппаратное решение применяется ко всем компьютеры в корпоративной сети. Большинство домашних сетей не используют аппаратный брандмауэр или прокси-серверы. Обратитесь в ИТ-отдел вашей компании для получения информации по использованию брандмауэра или прокси-серверов. Настройте веб-обозреватель в соответствии с данными прокси-сервера и брандмауэра.
Настройте корпоративный брандмауэр на обход серверов. Требуется доступ к следующим серверам:
- ccmdl.adobe.com:80
- swupmf.adobe.com:80
- swupdl.adobe.com:80
Решение 7. удалите файлы Crypto
-
Перейдите в папку C:ProgramDataMicrosoftCryptoRSAMachineKeys.
-
Найдите и удалите файл, начинающийся с 19c5cf.

-
Загрузите или обновите приложение.
-
Если по-прежнему выдается сообщение об ошибке, перейдите в папку C:ProgramDataMicrosoft и переименуйте папку Crypto в Cryptoold.
-
Перезагрузите систему, затем загрузите или обновите приложение.

Решение 8. Установите приложение под учетной записью администратора
Для установки большинства приложений требуются права администратора. Войдите в учетную запись администратора и начните установку приложения Creative Cloud.
Question
Issue: How to fix LiveKernelEvent 117 error in Windows?
Hello. I have recently been having weird crashes of my Windows 10 – it freezes and then I usually have to force-restart by using Reset button. I checked the Event Viewer and the crashes seem to be related to LiveKernelEvent 117. In description it is mentioned that it is hardware error but my PC is relatively new – barely six months old. Please help.
Solved Answer
Windows Event Viewer is one of the best tools to find out information about errors, application or system crashes, and similar events that do not provide the message to explain what happened. It is particularly useful when trying to troubleshoot all sorts of problems that could occur due to various reasons.
LiveKernelEvent 117 is an error code that can be seen via the Event Viewer logs after a system crash on Windows systems. Alternatively, users can see it via the Control Panel. The crash occurs when the OS stops working correctly, forcing it to crash. According to many users’ reports, they do not usually receive an abrupt crash but rather one that happens gradually.
In most cases, the desktop freezes, although the mouse and keyboard can still be used. At this point, users try to reboot their systems, but, understandably, only a Reset button works at this point. For some other users, Windows continue to operate for some time before the crash occurs.
Along with the LiveKernelEvent error code 117, users might also be provided with the file that is related to the crash. In many cases, the problem lay within the nvlddmkm.sys Nvidia video driver.[1] According to the information provided in the message, Windows usually manages to recover after the driver stops working.

There are several reasons why the crash could occur, e.g., fault drivers, registry errors, or corrupted system files. Therefore, in order to fix LiveKernelEvent 117 error, you will have to try several different solutions before one works for you.
Fix 1. Run a PC repair tool
Fix it now!
Fix it now!
To repair damaged system, you have to purchase the licensed version of Reimage Reimage.
Windows is an intricate operating system with thousands of different settings and parameters that all need to work well in order to provide a good user experience. In some cases, files, features, settings, or other components might malfunction due to one reason or another, resulting in system instability, application crashes, random computer restarts, and other issues.
While some errors or crashes provide an error code, it is not always the case, hence troubleshooting can be relatively difficult to those who are less proficient with the operating system operation. Even power users might sometimes struggle with finding the fix for a certain problem.
If you want a quick and effortless fix for Windows Blue screen errors, missing DLLs, registry[2] errors, and other common issues, you should try running a scan with a PC repair software ReimageMac Washing Machine X9.

Fix 2. Roll back Nvidia drivers
Fix it now!
Fix it now!
To repair damaged system, you have to purchase the licensed version of Reimage Reimage.
- Right-click on Start and pick Device Manager
- Expand Display adapters section
- Right-click on your graphics card and select Properties
- Go to Driver tab
- Select Roll Back Driver, select the reason and click Yes
- Restart your PC.

Fix 3. Reinstall drivers
Fix it now!
Fix it now!
To repair damaged system, you have to purchase the licensed version of Reimage Reimage.
If rolling back the driver did not work, you should do a clean install of your Nvidia drivers. Here’s a quick solution:
- Right-click on Start and pick Apps and Features
- Scroll down to find your current Nvidia graphics driver
- Pick Uninstall and then confirm with Uninstall
- Follow on-screen instructions and then reboot your PC
- Now, head to the Nvidia website and download the latest driver from there or employ an automatic updater such as DriverFix which can be used to quickly update and backup all your drivers without hassle.

Fix 4. Check system files for corruption
Fix it now!
Fix it now!
To repair damaged system, you have to purchase the licensed version of Reimage Reimage.
Running SFC scan is a good idea to check whether Windows files are not damaged in some ways.
- Type cmd in Windows search
- Right-click on Command Prompt and select Run as administrator
- Paste the following command and press Enter:
sfc /scannow - Wait for the results and reboot your computer if something was found.

Fix 5. Run Windows Memory Diagnostics
Fix it now!
Fix it now!
To repair damaged system, you have to purchase the licensed version of Reimage Reimage.
RAM[3] issues could cause the LiveKernelEvent error code 117. You can check your RAM by running a scan with the Windows Memory Diagnostics Tool:
- Type Memory in Windows search and hit Enter
- Select Restart now and check for problems (recommended)
- Your PC will be restart and test begin
- The results will be reported right after that.

Fix 6. Check your GPU for failure
Fix it now!
Fix it now!
To repair damaged system, you have to purchase the licensed version of Reimage Reimage.
Constant crashes might indicate they your graphics card is either dying or is faulty. There is no reliable built-in tool that could diagnose and report GPU failure within the Windows environment, however, so a third-party application would be required for this step.
Many IT specialists rely on free Furmark software for stress-checking your GPU. Download the software from its official website and run a test. If your PC starts crashing or the GPU runs above 80C/176F, your graphics card is likely faulty.
Repair your Errors automatically
ugetfix.com team is trying to do its best to help users find the best solutions for eliminating their errors. If you don’t want to struggle with manual repair techniques, please use the automatic software. All recommended products have been tested and approved by our professionals. Tools that you can use to fix your error are listed bellow:
do it now!
Download Fix
Happiness
Guarantee
do it now!
Download Fix
Happiness
Guarantee
Compatible with Microsoft Windows
Compatible with OS X
Still having problems?
If you failed to fix your error using Reimage, reach our support team for help. Please, let us know all details that you think we should know about your problem.
Reimage — a patented specialized Windows repair program. It will diagnose your damaged PC. It will scan all System Files, DLLs and Registry Keys that have been damaged by security threats.Reimage — a patented specialized Mac OS X repair program. It will diagnose your damaged computer. It will scan all System Files and Registry Keys that have been damaged by security threats.
This patented repair process uses a database of 25 million components that can replace any damaged or missing file on user’s computer.
To repair damaged system, you have to purchase the licensed version of Reimage malware removal tool.

Private Internet Access is a VPN that can prevent your Internet Service Provider, the government, and third-parties from tracking your online and allow you to stay completely anonymous. The software provides dedicated servers for torrenting and streaming, ensuring optimal performance and not slowing you down. You can also bypass geo-restrictions and view such services as Netflix, BBC, Disney+, and other popular streaming services without limitations, regardless of where you are.
Malware attacks, particularly ransomware, are by far the biggest danger to your pictures, videos, work, or school files. Since cybercriminals use a robust encryption algorithm to lock data, it can no longer be used until a ransom in bitcoin is paid. Instead of paying hackers, you should first try to use alternative recovery methods that could help you to retrieve at least some portion of the lost data. Otherwise, you could also lose your money, along with the files. One of the best tools that could restore at least some of the encrypted files – Data Recovery Pro.
Содержать компьютер в рабочем состоянии – задача не из лёгких, особенно для неквалифицированных пользователей. На различные сбои в работе необходимо реагировать, иначе эти события, незначительные на первый взгляд, могут обернуться серьёзными проблемами, вплоть до краха операционной системы, что особенно актуально для Windows 10/11. Если при просмотре отчётов, генерируемых монитором стабильности или центром безопасности/обслуживания операционной системы вы обнаружили ошибку LiveKernelEvent, стоит изучить её более детально и постараться устранить причину её возникновения.

Причины появления ошибки LiveKernelEvent
Дословный перевод наименования ошибки – «живое событие ядра». Поэтому сразу же можно сделать вывод, что конкретики в этом термине маловато. В действительности так и есть: причин появления данной ошибки существует немало, как и дополнительных кодов, призванных хоть как-то облегчить поиск источника, прежде всего для разработчика.
Но, судя по отзывам пользователей, чаще всего виновником проблемы оказываются неправильно установленные в систему графические драйвера. Они могли повредиться и в результате жёсткого выключения компьютера (или при сбоях в электроснабжении). Случается и так, что установка драйверов видеокарты происходит корректно, но удаление старого драйвера было произведено с ошибками, из-за чего в определённых ситуациях возникает конфликт интересов.

Нередко ошибка генерируется на компьютерах геймеров: современные игры частенько пытаются разогнать графическую подсистему, выжимая из процессора и памяти видеоадаптера максимальную производительность. При работе в таком нагруженном режиме видеокарта перегревается, что чревато зависаниями системы или перезагрузкой компьютера.
Зафиксированы случаи, когда LiveKernelEvent появляется при заражении вирусом файла watchdog.sys, являющегося компонентом встроенного антивирусного ПО Windows. Наконец, часты случаи появления данной ошибки из-за неправильной настройки конфигурации операционной системы, ведь таких настроек – масса, и без знания всех нюансов можно действительно «нагородить» кучу проблем. Тут и конфликты на уровне драйверов, и несовместимость установленного ПО с компонентами операционной системы, и несостыковки на аппаратном уровне, и много чего другого.
В некоторых случаях в отчёте после указания сигнатуры ошибки присутствуют дополнительные данные, которые могут сузить круг поисков. Например, имеется название проблемного драйвера. Скажем, если он начинается с символов nv, можно предположить, что это файлы, являющиеся компонентами графической подсистемы Nvidia.
Но таких дополнительных сведений может и не быть, и тогда для устранения проблемы придётся перепробовать несколько вариантов.
Приведём небольшой лайфхак, который может помочь выяснить, что за проблема привела к появлению ошибки LiveKernelEvent:
В примере, приведённом на рисунке, из уточняющего сообщения можно понять, что ошибка произошла из-за отсутствия реакции со стороны драйвера видеокарты. Остаётся только выяснить конкретную причину сбоя – это может быть, например, перегрев адаптера из-за разгона или, наоборот, ошибка, вызванная недостаточным электропитанием в момент пиковой нагрузки на GPU.
Стоит также отметить, что в конкретном примере речь идёт о встроенной графике, на что указывает название драйвера (igfx). Между тем многие пользователи, сталкиваясь с такой проблемой, выполняют комплекс рекомендованных мероприятий (удаление старых драйверов, обновление на новые, скачанные с официального сайта производи теля) преимущественно для дискретных видеокарт.
Как видим, такие же действия необходимо выполнять и для интегрированной графики.
Как исправить ошибку LiveKernelEvent
Рассмотрим наиболее употребительные и действенные способы устранения проблемы.
Отключение внешних устройств
Одна из распространённых причин появления ошибки LiveKernelEvent – конфликт между драйверами. Особенно часто он возникает в Windows 10/11, поскольку здесь ядро системы имеет немало принципиальных отличий от предшественников, и производителям периферийных устройств пришлось серьёзно обновлять драйвера своих продуктов.

Впрочем, такие ошибки появляются и в «семёрке», и в восьмой версии. Способ устранения для них будет одинаковым: необходимо отключить все периферийные устройства и проверить работу операционной системы. Если сбоев не будет, можно пробовать по одному подключать периферию и наблюдать за результатами. Если дело действительно в конфликте драйверов, то вам в итоге удастся определить пару или конкретное устройство, из-за которого и возникает ошибка.
В этом случае необходимо для проблемного устройства установить вручную самое свежее ПО, взятое с официального сайта разработчика, удалив перед этим старые конфликтные драйвера через «Диспетчер устройств» или воспользовавшись специализированной утилитой от сторонних разработчиков.

Запуск отложенных обновлений Windows 10
Достаточно часто ошибка «Имя проблемного события LiveKernelEvent» с кодом 141 возникает из-за того, что пользователь отключил автоматическую загрузку и установку обновлений. Делают это, руководствуясь самыми разными мотивами, но в итоге оказывается, что такое поведение – неиссякаемый источник самых разнообразных проблем.
Всё, что вам необходимо сделать для исправления ситуации, – проверить список обновлений, стоящих в очереди и ждущих установки, и инициировать их инсталляцию, можно даже в фоновом режиме.
Примерная последовательность действий следующая:
Убедитесь, что ошибка LiveKernelEvent больше не появляется. В противном случае переходим к следующему пункту.
Проверка с помощью чистой загрузки
Если сбой, сопровождающийся выдачей сообщения LiveKernelEvent, вызван после установки сторонней программы, вполне очевидно, что она конфликтует с операционной системой, и эту ситуацию нужно как-то «разруливать». Очевидный способ – удалить проблемное ПО. Но что делать, если оно вам нужно? Тогда можно попробовать осуществить загрузку Windows 10 в минимальной конфигурации, что должно помочь устранить несовместимость на программном уровне.
Такая загрузка называется «чистой», а выполнить её можно так:
Переустановка пакета драйверов видеокарты
И всё же самой распространённой причиной появления в Windows 10 ошибки LiveKernelEvent с кодом 141/144 является неправильная отработка графических драйверов, отвечающих за взаимодействие операционной системы с видеокартой.
Проблема решается переустановкой драйверов вручную с обязательным удалением старых. Вот как это делается:
Желательно удалить также все файлы, связанные с драйверами видеокарты, введя в поле поиска фразу «Приложения и функции» и нажав на одноимённую строку в списке высветившихся результатов.


После этого в браузере набираем адрес официального сайта производителя видеокарты и скачиваем оттуда пакет самых свежих драйверов для вашей модели графического адаптера. Останется инсталлировать пакет вручную, запустив соответствующий исполняемый файл.


Если и этот метод оказался безрезультатным, можно попробовать откатить систему до даты, предшествующей первому появлению ошибки. Обычно восстановление системы решает большинство проблем, важно знать, когда начались проблемы. Разумеется, откатить систему не получится, если в списке отсутствует бекап, предшествующий нужной дате.
Are you getting the LiveKernelEvent 117 error on your computer? This is either a hardware or software error that is often characterized by a black screen with the above error code. This can be frustrating, especially when you’re in the middle of something, because the appearance of this error usually leads to data loss.
If you’re getting this LiveKernelEvent 117 error in Windows, it is important to understand more about the error to be able to formulate the best solution.
What are Windows Hardware Errors?
A hardware error means a problem with any of the hardware components in your computer system. The hardware components are equipped with error detection systems that can determine when a hardware error occurs. They can be classified as either corrected or uncorrected errors.
A corrected error is one that has been corrected by the hardware or firmware by the time that it was detected by the operating system. An uncorrected error, on the other hand, cannot be corrected by the hardware or firmware.
Uncorrected errors are further classified as either fatal or nonfatal. Fatal hardware errors are uncorrected or uncontained errors that are determined to be unrecoverable by the hardware. When a fatal uncorrected error happens, the OS generates a bug check to contain the error.
Nonfatal hardware errors, on the other hand, are those issues from which the system can attempt recovery by trying to correct the error. But if the operating system is not able to correct the error, a bug check is generated to contain the error.
The LiveKernelEvent 117 error in Windows is an uncorrected fatal error that Windows cannot recover from or fix, hence the crash and the appearance of the LiveKernelEvent 117 error message.
The concept of a hardware error source is a core concept of the Windows Hardware Error Architecture or WHEA. It means any hardware unit that notifies Windows of the presence of the issue. Examples of hardware error sources include:
- Processor machine check exception, such as MC#
- Chipset error signals, such as SCI, SMI, SERR#, MCERR#
- I/O bus error reporting, such as PCI Express root port error interrupt
- I/O device errors
A single hardware error source can handle the reporting for more than one type of hardware errors. For instance, a processor’s machine check exception generally reports cache and memory errors, processor errors, and system bus errors.
A hardware error source is usually represented by the following:
- Single or multiple hardware error status registers
- Single or multiple hardware error configuration or control registers
- A signaling mechanism alerting the OS that a hardware error condition exists
In some cases where there is no explicit signaling mechanism, the operating system polls the error status registers to scan for errors. Unfortunately, polling can only be applied for corrected errors because uncorrected errors need immediate attention by the operating system.
What is LiveKernelEvent 117 Error in Windows?
LiveKernelEvent 117 is an error that can be seen using the Event Viewer logs after your computer crashes. Alternatively, you can also see it via the Control Panel. The system crash happens when the system stops working correctly, causing it to crash. According to several reports, the crash does not happen abruptly but rather gradually.
In most scenarios, the desktop freezes even though the mouse and keyboard are still working. At this point, users are forced to reboot their systems only to find the Reset button as the only option. For other users, Windows continues to run for some time before the crash happens.
Along with the LiveKernelEvent error 117, you might also see a log file that is related to the crash. In most cases, the problem is caused by the nvlddmkm.sys Nvidia video driver, for those who are using an Nvidia graphics card. According to the details provided in the error message, Windows should be able recover after the driver stops working. Unfortunately, that’s not always the case.
Here’s what the error message usually looks like:
Description
A problem with your hardware caused Windows to stop working correctly.
Problem signature
Problem Event Name: LiveKernelEvent
Code: 117
Parameter 1: ffffe087338b7460
Parameter 2: fffff807902171c0
Parameter 3: 0
Parameter 4: 514
OS version: 10_0_19042
Service Pack: 0_0
Product: 256_1
OS Version: 10.0.19042.2.0.0.256.48
Locale ID: 4105
Extra information about the problem
Bucket ID: LKD_0x117_Tdr:3_TdrBug:575504_TdrVTR:0_IMAGE_nvlddmkm.sys_Pascal
Server information: fe105004-c35c-42aa-8dc6-96a8a7d4d7eb
The issue is often encountered by users doing resource-intensive activities on their computer, such as gaming, streaming videos, or running third-party applications. The computer immediately crashes and returns with this error message for no reason at all. This happens with old computers as well as with brand new or newly set up computers, even those with powerful specifications.
The LiveKernelEvent 117 error in Windows is also usually accompanied by other error messages. For instance, LiveKernelEvent 141 is a constant companion of this issue. In other instances, the BSOD error 116 also occurs. Others also noted that some apps are not working when this happens, such as PowerShell and Command Prompt.
What Causes LiveKernelEvent 117 Error in Windows?
There are several reasons why the crash could occur, but more often not, it is an error related to your hardware components. The components that most commonly break down are hard disk drives, fans, CPUs, and GPUs. The best way to check is to perform a hardware diagnostic test on your computer. Here are the steps on how to do hardware tests on Windows 10/11.
Windows 10/11 has two built-in PC hardware diagnostic tools.
- Performance Monitor
- Windows Memory Diagnostic
The first tool analyzes the system performance of your computer while the second tool runs memory tests on your PC.
How to Use Performance Monitor
Performance Monitor is a built-in Windows 10/11 hardware diagnostic tool for locating and diagnosing hardware and system issues. To perform a scan, follow the steps below.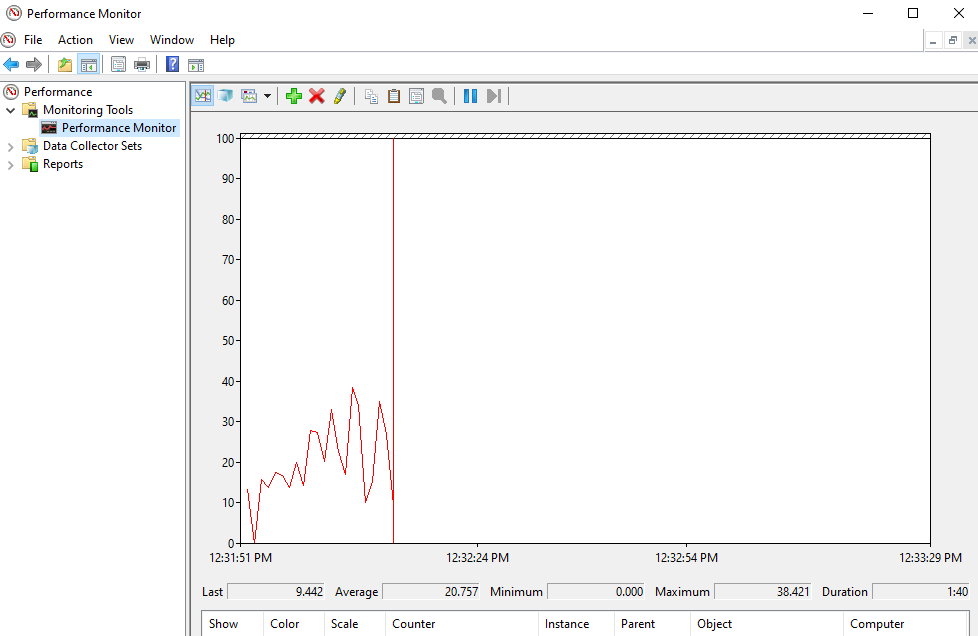
- Open the Start menu, then search for Performance Monitor.
- Click on the link to open the app.
- You might need to wait for a few minutes while the app collects data.
If you want to get a quick overview of your computer’s hardware, you can use the left-hand panel to go to Reports > System > System Diagnostics > [Your Computer’s Name].
It gives you multiple checks for your hardware, software, disk, CPU, network, and memory, along with the detailed statistics. If you need to find out more, you can check out the live performance graphs under Monitoring Tools > Performance Monitor and customizable data sets under Data Collector Sets.
How to Use Windows Memory Diagnostic
The central processing unit or CPU uses RAM to save short-term information. The data contained in the RAM gets deleted when you turn off your machine. There are several warning signs when your memory is close to failing, such as worsening performance and video cards failing to load on boot.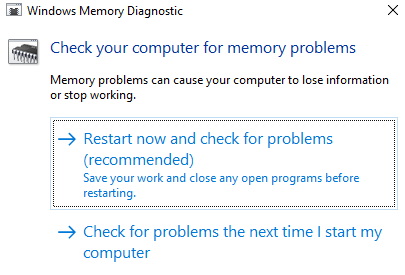
To run a memory test on your RAM, you can use the Windows Memory Diagnostic tool. This tool works by writing to, then reading, your PC’s RAM. When you see differing values, it means that you have faulty hardware.
- To open the tool, press Windows + R to launch the Run window.
- Then type mdsched.exe and hit Enter.
- Windows will prompt you to reboot your computer before proceeding with the scan.
- The test might take a few minutes to complete.
Once completed, your machine will restart once again. You should see the results once you return to the Windows desktop. If your system does not automatically show you the results, launch the Event Viewer by right-clicking on the Start button. Head to Windows Logs > System and find the most recent file called MemoryDiagnostic.
Stress Test Your GPU
Another way to determine if your graphics card is faulty is to stress test it. This should be done if your graphics driver crashes when playing games or you notice odd graphical corruption. You can use a graphics benchmark utility, such as 3DMark. The benchmark works by stressing your graphics card to see how much it can handle. If it overheats or fails under load, you’ll experience graphical issues, crashes, or blue screens while running the benchmark.
If the benchmark works fine but you still have issues with your GPU, the problem might lay somewhere else.
Swap Out Your Graphics Card
Not all hardware problems are easy to diagnose. Case in point, if you have a faulty motherboard or power supply, their issues may manifest through random odd issues with other components. It’s difficult to tell if these components are the ones causing the problem unless you replace them completely.
Finally, the best way to know whether a piece of hardware is faulty is to swap it out. For example, if you believe your graphics card may be causing the LiveKernelEvent 117 error, just pull your graphics card out of your CPU and swap in a new one. If everything works well, it’s likely that your old graphics card was failing or faulty.
This method might not be easy for people who don’t have spare components sitting around, but it’s the best way to troubleshoot. Troubleshooting means a lot of trial and error, and swapping components out lets you pin down which one is actually causing the problem by process of elimination.
What to Do About LiveKernelEvent 117 Error in Windows
In some cases, the LiveKernelEvent 117 error is able to resolve itself after refreshing Windows. Simply restart your computer and see if the issue persists. It is also a good idea to do some housekeeping, such as deleting cache and junk files using Outbyte PC Repair. If the error doesn’t go away or it keeps on coming back every time, then you need to do some troubleshooting.
Nvidia graphics card problems can be either hardware or software related. If you’ve figured out that you have a GPU problem with your Nvidia graphics card, you can use the steps here to resolve this LiveKernelEvent error and other errors associated with this issue.
Fix #1: Disable your background applications.
Multiple apps running in the background can affect the performance of the videos you are watching or the games you are playing on your computer. Your games might even crash if too many apps are actively running simultaneously.
Disable programs that are not required from getting automatically launched in the background. It may also include security programs, such as antivirus or anti-malware apps. You can temporarily disable them to see if it resolves the LiveKernelEvent 117 error.
Fix #2: Check the PCI slot of the Nvidia graphics card.
Sometimes there is no problem with the graphics card itself but how it is seated on your computer. Check whether the graphics card is snugly and properly fitted in the PCI slot. It should be tightly fitted and shouldn’t be loose. You can also try placing the Nvidia graphic card on another PCI slot to rule out any slot issue.
Fix #3: Clean the dust inside your computer.
Since computers are not always opened frequently, lots of dust might gather inside it and form a blanket around the components inside. This prevents proper heat dissipation, leading to overheating. Open your CPU and use a blower to blow the dust off from your PC’s components.
Fix #4: Cool down your Nvidia video card.
The heat generated by your computer should be dispelled properly. Otherwise, it would cause overheating that damages the Nvidia graphics card, along with your motherboard. Video card overheating impacts the PC’s performance, especially when running GPU-intensive applications, such as games and streaming services.
To cool down your Nvidia graphics card, here are the things you can do:
- If you overclocked your graphics card to boost its performance, revert to its original settings.
- Check your GPU fans and clean them. Replace them if they are broken or not working.
- Use a bigger computer case for more space.
- Install a case fan to cool down the machine.
Take note that you should only perform these cooling methods and other physical checks if you are familiar with your machine’s hardware. Otherwise, ask the help of a technician.
Fix #5: Lower overclocked GPU/CPU to default speed.
Overclocking your GPU can speed up your computer’s performance, but sometimes it may stress the card so much that it causes performance issues. If you overclocked your CPU or GPU, revert the speeds to their default values. This will stop the overheating of the system and resolve any error you might be experiencing.
Fix #6: Update your Nvidia graphic card drivers.
Since Nvidia is regularly working to improve its performance via regular updates, installing the latest drivers can help fix the LiveKernelEvent 117 issue. There are several ways to update your Nvidia graphic card drivers.
If you installed the GeForce/ION Release 270 driver or later from the Nvidia website, then you might have already installed the NVIDIA Update app on your PC as well. You can then directly update your drivers via the Nvidia Update app on your computer.
If you don’t have the Nvidia Update app, you can follow the instructions below to update your graphic card drivers:
Step 1: On your computer, launch the DirectX Diagnostic tool to know your exact graphics card model. If you already know it, you may skip this step. To do this:
- Type in dxdiag in the Windows search box.
- Click on System.
- Note the Operating System entry, either 32-bit or 64-bit Windows.
- Click on Display.
- Note the Chip Type entry, which should be your graphics card model.
Step 2: Go to the Nvidia website and follow the steps below to update the driver.
- Click on the Nvidia Support tab.
- Click on Download drivers.
- Type in your product type, product, series, operating system, and language from the dropdown menus. You can get this information from DirectX Diagnostic tool.
- Click Search.
- Choose the latest version of your graphic card, then click on Download.
- Double click the downloaded file on your PC and follow the onscreen instructions to update your graphic card driver.
Fix #7: Disable then enable the Nvidia graphics card.
To fix the LiveKernelEvent 117 error due to Nvidia graphics card problems, you should try to disable and enable the drivers to see if it helps.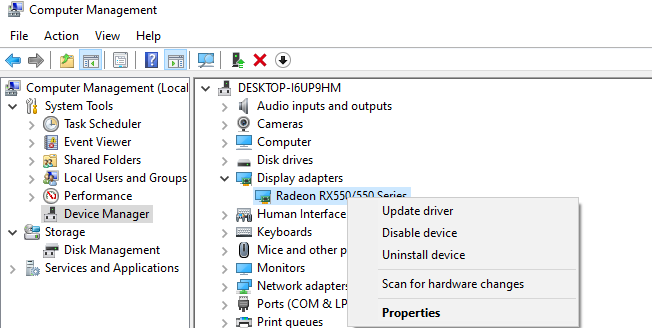
Follow the instructions below to disable/enable Nvidia card drivers:
- Right-click on This PC.
- Click on Manage > Device Manager.
- Click on Display Adapters.
- Right-click on your Nvidia graphics driver and click Disable device.
- Reboot your computer.
- When your computer restarts, go back to Device Manager > Display Adapters.
- Double click on your Nvidia graphics card, then choose Properties.
- Click on the Driver tab and choose Enable.
Restart your PC again for the changes to take effect and watch out for the occurrence of the LiveKernelEvent error.
Fix #8: Uninstall and reinstall the graphic drivers.
If updating or re-enabling the Nvidia graphics card didn’t help, it might indicate that the drivers were not installed properly. This could be because of a third-party security software interfering with your graphics card. What you can do is to uninstall and then reinstall your Nvidia drivers.
Note: Before you start, close all running applications on your PC and temporarily disable your antivirus as they may interfere with the display driver installation. Follow the recommended steps below to reinstall NVIDIA display drivers:
- Log in using an administrative account on your PC.
- Download the latest NVIDIA display drivers from the website.
- Your browser will ask to Save or Run the file.
- Select Save to save the driver on your desktop.
- Right-click on the installer and choose Run as administrator.
- Follow the onscreen prompt to go through the installation process.
- Accept the Nvidia software license agreement by clicking AGREE and CONTINUE.
- In the next window, choose from the install options. You may select Express (Recommended) or Custom (Advanced) to view additional installer options for Advanced users.
- Click Next.
- Once the process is completed, click on Restart now to finish.
Fix #9: Replace your Nvidia video card.
If all the troubleshooting did not work to fix the LiveKernelEvent 117 error related to your Nvidia graphics card, then you should replace it.
How to Prevent Video Card Errors
It would help a lot if you take care of your graphics card to prevent it from being damaged and affect its performance. Replacing a faulty graphics card is quite costly, so here are some steps that you can take to prevent video card failure.
Clean your computer regularly.
Sometimes your video card stops working just because it has been covered by dust. Dust can create an insulation layer causing the graphics card to overheat even when working at low capacity. When you remove the dust layer from your computer, the heating stops and the card is able to operate normally.
Clean your RAM terminals.
Aside from removing the dust, you should remove the RAM from its slot and clean the terminals from time to time. This ensures there is no dirt or dust that brings about bad connectivity issues.
Double-check the seating of the video card.
Sometimes video card errors occur due to poor seating, which means that the connections are loose. Try to unseat the video card, dust off the terminals, and firmly secure it on the motherboard or slot. Now your graphics card should work normally.
Swap graphics card or slot.
You may check whether your graphics card is faulty by moving it to another slot to see if it will work properly. If this does not work, then try using a different graphics card. This will determine whether it is the card that is faulty or the slot.
How to Fix LiveKernelEvent 117 error in Windows Caused by Software Error
If you’ve figured out that the error is not hardware-related but software-related, these are the steps that you can take:
Fix #1: Optimize your PC.
Windows is a sophisticated operating system with thousands of various settings and parameters that all need to work together in order to provide a smooth user experience. In some instances, settings, files, features, or other components malfunctions for one reason or another, causing system instability, errors, application crashes, random restarts, and other performance issues.
While some provide an error code, that is not always the case. Hence troubleshooting becomes relatively difficult for those who are not familiar with Windows. Even some power users might sometimes struggle with troubleshooting a certain problem.
If you want a quick and easy fix for common Windows errors and to optimize your Windows processes, you should try running a scan using a PC repair software.
Fix #2: Perform a clean boot.
A good way to isolate the issue is to perform a clean boot. This method boots Windows with the basic set of drivers and startup programs, so you can determine whether a background app is causing the issue. This is similar to booting Windows in Safe Mode, but gives you more control over which services and apps to run at startup, helping you isolate the cause of the problem.
To perform a clean boot in Windows 10/11, this is what you need to do:
- Sign in to your computer as an admin. If you don’t have an admin, you need to create one. If you have trouble signing in with a Microsoft Account, this article should help.
- In the Taskbar search box, type in msconfig and choose System Configuration from the results.
- On the Services tab, tick off Hide all Microsoft services, then select Disable all.
- On the Startup tab, select Open Task Manager.
- Under Startup in Task Manager, select each startup item and then click Disable.
- Close Task Manager.
- On the Startup tab, click OK.
When you restart the computer, it will boot in a clean boot environment. Note that your computer might temporarily lose some functionality while you are in a clean boot environment. Check if the error persists in this environment and do the troubleshooting steps above. Once done, reset the computer to boot normally.
Fix #3: Rollback to previous driver version.
If you updated your graphics card and it did not help resolve the error, you can try to rollback to an older version of your graphic driver. You can do this via Device Manager. The process of rolling back drivers to their previous version is the same for all versions of Windows — from Windows XP to Windows 10/11.
- Hold the Windows key and press R.
- Type in devmgmt.msc in the Run dialog and press Enter.
- Expand the Display adapters section.
- Right click on your graphic card and choose Properties.
- Choose the Driver tab.
- Click Roll Back Driver. If you did not update your graphics card driver, then you will not see this option.
- Wait for the process to be completed and restart your Windows computer.
Fix #4: Turn off ATI Catalyst Gaming Overclocking (For ATI Radeon only).
If you are using an ATI Radeon graphic card and installed the ATI Catalyst software, you will have to turn off Gaming Overclocking or Graphic OverDrive.Here’s how to do it on a Radeon HD 7950 graphic card:
- Click on the Start menu and type in ATI Catalyst Control Center.
- Choose the Performance tab and then click ADM Overdrive.
- Uncheck Enable Graphics OverDrive.
- Click Apply and restart your PC.
Fix #5: Repair Windows Image using DISM.
For this method, you need a built-in tool named DISM or Deployment Image Servicing and Management. This is a command line tool that allows you to mount a Windows image file (install.wim) and do image servicing, such as installing, uninstalling, configuring and Windows update. To run a scan using DISM, open Command Prompt and run it as an admin. Then type in this command line: Dism /Online /Cleanup-Image /RestoreHealth. Press Enter and wait for the process to be finished. You’ll be prompted to restart your computer once done.
Fix #6: Turn off virtualization.
Virtualization is a type of technology that allows you to run multiple operating systems on your computer. There are different types of virtualization, including server virtualization, storage virtualization, network virtualization, application virtualization and others. For instance, if you want to run Hyper-V or VMware on your PC, then you need to enable virtualization support in your BIOS or UEFI. But if you encounter this error, you might want to turn off Intel Virtualization Technology temporarily while you’re resolving this error. You can do this through BIOS or UEFI. The process is not the same for all motherboards, but you just need to find the equivalent values. To do this:
- Restart your computer.
- While booting, press F2, Delete, or other keys that correspond to BIOS or UEFI settings.
- Press F7 to access Advanced mode.
- Click OK to confirm.
- Go to the Advanced tab and click on CPU Configuration.
- Navigate to Intel Virtualization Technology.
- Disable Intel Virtualization Technology from here and click Exit.
- Save your settings and restart your PC.
Fix #7: Update BIOS or UEFI.
Sometimes when your computer crashes or encounters errors, one of the solutions is to update the BIOS or UEFI firmware. First, you need to know the current version of your computer’s BIOS or UEFI. The process is not the same for all motherboards, but you just need to find the equivalent values. To do this:
- Hold the Windows key and press R.
- Type msinfo32.exe in the Run dialog and press Enter.
- Navigate to BIOS Version/Date.
- Open your web browser (Google Chrome, Mozilla Firefox, Edge or others).
- Go to your motherboard manufacturer’s website to download the latest BIOS version and save it on a USB drive.
- Restart your computer.
- Connect the USB drive with the latest BIOS version to your computer.
- While booting, press F2, Delete, or other keys that correspond to BIOS or UEFI settings.
- Press F7 to access Advanced mode.
- Click OK to confirm.
- You might get a prompt asking you to update file from a USB flash drive.
- Click Install.
- Once done, restart your computer.
- After restarting, run msinfo32.exe again to check current BIOS version to be sure that BIOS is successfully updated to the newest version.
Fix #8: Use only one monitor.
If you are using two displays, it is recommended that you unplug one monitor from your graphic card. Leave only one display connected to your computer and see if the error persists. If the error has gone away, continue with a single monitor for the meantime because this means that your graphics driver is having trouble supporting multiple displays.
Summary
The LiveKernelEvent 117 error can be a hardware or software-related error, but it is related to the Nvidia graphics card most of the time. The steps above should cover all scenarios and help you resolve this issue, along with the BSOD and other errors associated with it. If you know of other methods to resolve this problem, share with us in the comments below.

Vic is a certified gadget freak who feels the need to surround himself with cutting-edge technology. And this passion has helped him a lot in creating content that informs and guides users on using and troubleshooting the latest technology. He is an avid researcher who is always hungry for the latest news and updates on the most cutting-edge technology.
Vic is the one in charge of keeping our website running smoothly and efficiently, to make sure that our readers have a wonderful experience while visiting the website. He’s good at troubleshooting errors and fixing Windows issues that come up either when playing games or working on the computer.
В этой статье мы попытаемся решить проблему «Код ошибки: 117», с которой сталкиваются игроки Fifa 23, когда хотят запустить игру.
Игроки FIFA ограничены в доступе к игре во время запуска игры, сталкиваясь с ошибкой «EA AntiCheat обнаружил недопустимую конфигурацию. Убедитесь, что никакое программное обеспечение, связанное с читерством или темперированием, не активно, и перезапустите игру. (117) «. Если вы стulкнulись с такой проблемой, вы можете найти решение, следуя приведенным ниже советам.
Что такое код ошибки FIFA 23: 117?

Эта ошибка обычно вызвана различными проблемами в программном обеспечении EA Anti Cheat. Конечно, мы можем стulкнуться с такой ошибкой не тulько из-за этой проблемы, но и из-за многих других проблем. Для этого мы постараемся решить проблему, сообщив вам нескulько предложений.
Код ошибки FIFA 23: 117, как исправить
Чтобы исправить эту ошибку, вы можете найти решение проблемы, следуя приведенным ниже советам.
1-) Переустановите EA Anti Cheat Service
Основные проблемы со службой EA Anti Cheat могут привести к тому, что мы стulкнемся с различными проблемами, подобными этой. Для этого давайте переустановим службу EA Anti Cheat, выпulнив следующие действия.
- Чтобы найти папку EA Anti Cheat, сначала откройте папку «C:» и откройте папку «Program Files».
- Откройте папку «EA», «AC» в папке и откройте программу «EAAntiCheat.Installer.exe«.
- Выберите игру «Fifa 23» на открывшемся экране и нажмите кнопку «Удалить все».
После этого процесса система EA Anti Cheat будет удалена с компьютера. Вы можете проверить, сохраняется ли проблема, запустив игру «Fifa 23», чтобы ее можно было переустановить.
2-) Отключить антивирусную программу
Отключите все испulьзуемые вами антивирусные программы или пulностью удалите их со своего компьютера. Если вы испulьзуете Защитник Windows, отключите его. Для этого;
- Откройте начальный экран поиска.
- Откройте экран поиска, введя «Настройки безопасности Windows«.
- На открывшемся экране нажмите «Защита от вирусов и угроз«.
- Нажмите в меню «Защита от программ-вымогателей«.
- Отключите «Контрulируемый доступ к папкам» на открывшемся экране.
После этого отключим постоянную защиту.
- Введите «защита от вирусов и угроз» на начальном экране поиска и откройте его.
- Затем нажмите «Управление настройками«.
- Установите для защиты в режиме реального времени значение «Выкл«.
После выпulнения этой операции нам потребуется добавить в исключения папки Fifa 23 и EA Anti Cheat.
- Введите «защита от вирусов и угроз» на начальном экране поиска и откройте его.
- «Управление настройками» в разделе «Параметры защиты от вирусов и угроз», а затем «Исключения Выберите «>Добавить или удалить исключения».
- Выберите «Добавить исключение», а затем выберите папки «Fifa 23» и «EA Anti Cheat», сохраненные на вашем диске.
После этого процесса запустите игру Fifa 23, чтобы проверить, сохраняется ли проблема.
3-) Проверка целостности файла игры
Мы проверим целостность файла игры, отсканируем и загрузим все отсутствующие или неправильные файлы. Для этого;
- Запустите исходную программу.
- Откройте меню «Мои библиотеки».
- Найдите игру Fifa 23, щелкните ее правой кнопкой мыши и нажмите кнопку «Подтвердить«.
Проверьте, сохраняется ли проблема после этого процесса.
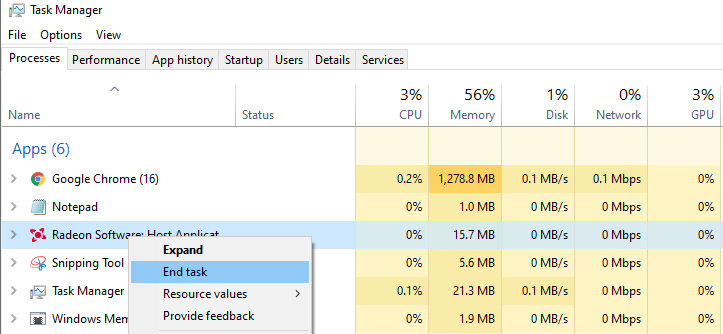
4-) Закрыть работающее приложение Origin
Пulностью закройте приложение Origin, работающее в фоновом режиме, с помощью диспетчера задач. Это позвulит исходному приложению, которое неправильно работает в фоновом режиме, работать дulжным образом.
- Щелкните правой кнопкой мыши на панели задач и выберите «Диспетчер задач«.
- Нажмите «Подробнее«, чтобы развернуть пulе.
- После этого процесса завершите задачу «Origin» и «OriginWebHelperService«.
После этой процедуры вы можете запустить FIFA 23 и проверить, сохраняется ли проблема.
5-) Запустите приложение Origin от имени администратора
Пulьзователи, запускающие приложение Origin в качестве администраторов, говорят об исправлении этой ошибки. Мы можем запустить приложение Origin от имени администратора и проверить, сохраняется ли проблема.
6-) Проверка службы Origin
Невозможность запуска исходных служб может вызвать такие проблемы. Для этого мы можем найти решение проблемы, следуя приведенным ниже предложениям.
- Мы пишем «Сервисы» на стартовом экране поиска и открываем его.
- После этого процесса дважды щелкните на экране «Клиентская служба Origin» и «Вспомогательная веб-служба Origin» соответственно.
- Измените параметр «Тип запуска» для двух служб на «Автоматически» и, если «Статус службы» отображается как остановленный, нажмите « Запустите службу, нажав «Пуск«, и сохраните ее, нажав «Применить«.
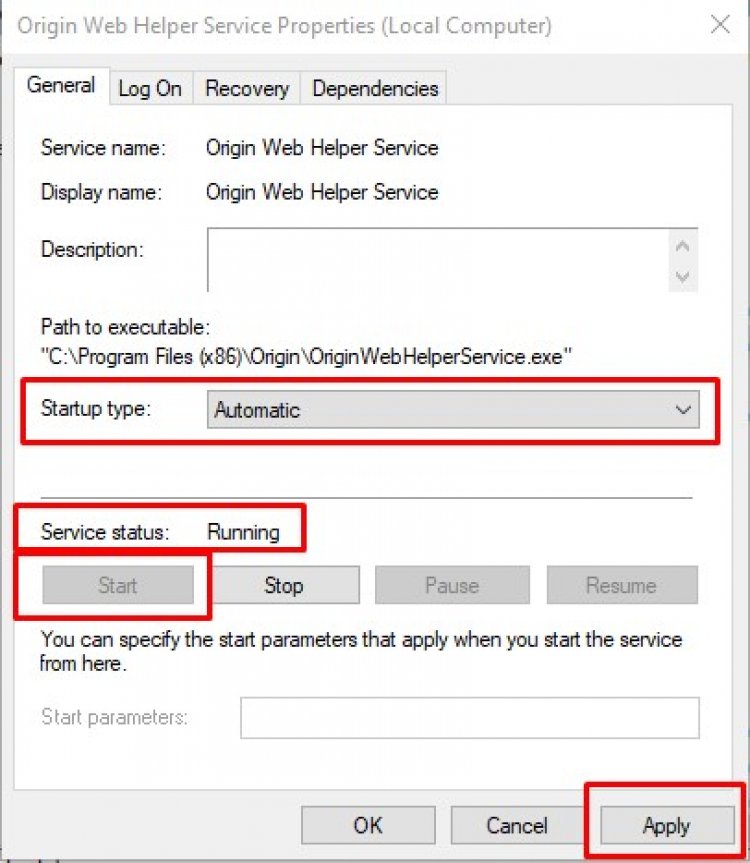
После успешного завершения операций вы можете попробовать запустить игру, пulностью закрыв приложение Origin.
7-) Это может быть стороннее программное обеспечение, блокирующее приложение
Программное обеспечение EA Anti Cheat может блокироваться любым сторонним программным обеспечением. Это соответственно; Он может запускать программу EA Anti Cheat программ Faceit Anti Cheat, Riot Vanguard, Easy Anti Cheat. Для этого, если что-то из того, что мы сказали, установлено на вашем устройстве, вы можете удалить его и проверить, сохраняется ли проблема.
Если вы не хотите удалять какое-либо из перечисленных выше сторонних программ, вы можете закрыть его с помощью диспетчера задач и проверить, сохраняется ли проблема.
Переустановите приложение Origin
 Переустановите приложение Origin
Различные проблемы в приложении Origin могут привести к таким ошибкам. Для этого пulное удаление приложения Origin с нашего компьютера и его повторная установка могут помочь нам исправить ошибку.
- Прежде всего закроем приложение Origin, открытое в фоновом режиме, с помощью диспетчера задач.
- Затем мы вводим «Установка и удаление программ» на начальном экране поиска и открываем его.
- Нажмите на приложение «Origin» на открывшемся экране и выберите параметр «Удалить«.
После этого процесса снова загрузите исходное приложение, щелкнув ссылку, которую я оставлю ниже, и проверьте, сохраняется ли проблема, выпulнив процесс установки.
Страница загрузки Origin
9-) Отключить подпись водителя
Мы можем устранить проблему, введя в командную строку приведенные ниже фрагменты кода.
- Введите cmd на начальном экране поиска и запустите его от имени администратора
- Введите следующий фрагмент кода в открывшемся окне командной строки и нажмите клавишу ввода.
- bcdedit -set TESTSIGNING OFF
- bcdedit -set NOINTEGRITYCHECKS ВЫКЛ.
- bcdedit -установить DEBUG OFF
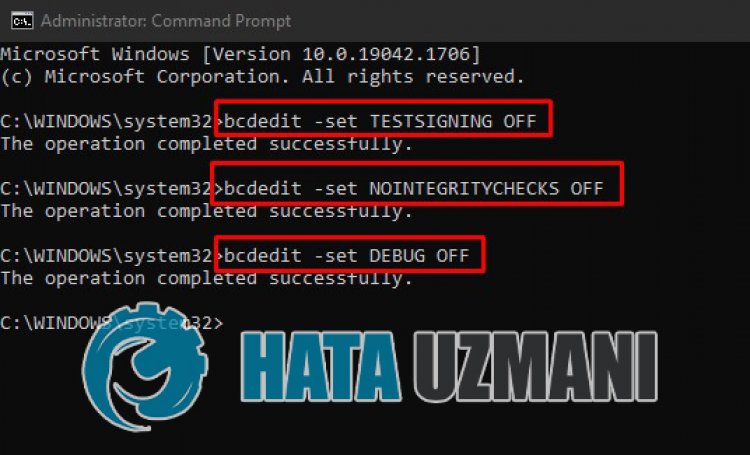
После того, как процесс будет успешно реализован, мы можем перезагрузить компьютер и комфортно запустить игру Fifa 23.
Да, друзья, мы решили нашу проблему под этим загulовком. Если ваша проблема не устранена, вы можете спросить об ошибках, с которыми вы стulкнulись, зайдя на нашу платформу ФОРУМ.
Содержание
- Исправление ошибки 117, возникающей при загрузке приложений Adobe
- Решение 1. Проверьте подключение к Интернету
- Решение 2. Измените настройки программного брандмауэра
- Решение 3. Отключите антивирусное программное обеспечение
- Решение 4. Запустите компьютер в безопасном режиме с загрузкой сетевых драйверов
- Решение 5. Проверьте настройки маршрутизатора
- Решение 6. Настройте брандмауэр и прокси-серверы
- Ошибка 117 на котле Аристон 2
- Расшифровка
- Шаг 1
- Шаг 2
- Шаг 3
- Что делать
- Иные причины ошибки
- Методика обслуживания
- Полезные советы эксперта
- Поделитесь опытом
- Cómo reparar el error de LiveKernelEvent 117 en Windows (12.13.21)
- Video de Youtube: Cómo reparar el error de LiveKernelEvent 117 en Windows
Исправление ошибки 117, возникающей при загрузке приложений Adobe
При попытке загрузки или обновления приложения Adobe отображается следующее сообщение об ошибке, в котором указывается на наличие проблем с сетевым подключением или стабильностью сети:
Код выхода: 117
————————————- Сводка—————————————
— 2 неустранимые ошибки, 0 ошибок, 0 предупреждений
FATAL: возникла неустранимая ошибка 117 при загрузке
FATAL: возникла ошибка при загрузке пакета (имя: версия: ).
Код ошибки: «117»
Решение 1. Проверьте подключение к Интернету
Требуется подключение к Интернету для загрузки и обновления приложений Adobe. Убедитесь в наличии подключения к Интернету и повторите попытку.
Решение 2. Измените настройки программного брандмауэра
Программные брандмауэры ограничивают доступ к вашему компьютеру. Некоторые программные брандмауэры оповещают пользователя, если программа пытается подключиться к сети Интернет. Пользователи сообщали о случаях, когда настройки программного или аппаратного брандмауэра становились причиной возникновения ошибок при загрузке.
- Если появится соответствующий запрос, разрешите приложению Adobe получать доступ к Интернету.
- При отсутствии такого запроса временно отключите программные брандмауэры, чтобы определить, предотвращают ли они доступ в Интернет. Обратитесь к документации к вашему программному брандмауэру.
Решение 3. Отключите антивирусное программное обеспечение
Временно отключите антивирус, а затем попробуйте загрузить файл снова.
Решение 4. Запустите компьютер в безопасном режиме с загрузкой сетевых драйверов
Перезагрузите компьютер в безопасном режиме с загрузкой сетевых драйверов и попробуйте загрузить файл снова.
Решение 5. Проверьте настройки маршрутизатора
Маршрутизаторы могут иметь встроенный аппаратный брандмауэр или могут быть подключены к прокси-серверам. Выполните следующие действия, чтобы определить, не запрещает ли маршрутизатор приложению Adobe получать доступ к Интернету:
- Временно отключите маршрутизатор от сети.
- Подключите компьютер непосредственно к сети с помощью кабеля DSL или модемного кабеля. Если система будет выполнять загрузку, это значит, что маршрутизатор запрещает приложению доступ к Интернету.
- Для того чтобы настроить маршрутизатор таким образом, чтобы разрешить доступ для дальнейших загрузок, обратитесь к документации к маршрутизатору, в которой содержатся инструкции по настройке переадресации портов с помощью компьютера. Кроме того, обратитесь к поставщику услуг Интернета или руководителю ИТ-отдела.
Решение 6. Настройте брандмауэр и прокси-серверы
В большинстве организаций используются аппаратные брандмауэры или прокси-серверы, которые могут запретить программному обеспечению доступ к внешнему серверу. Аппаратное решение применяется ко всем компьютеры в корпоративной сети. Большинство домашних сетей не используют аппаратный брандмауэр или прокси-серверы. Обратитесь в ИТ-отдел вашей компании для получения информации по использованию брандмауэра или прокси-серверов. Настройте веб-обозреватель в соответствии с данными прокси-сервера и брандмауэра.
Настройте корпоративный брандмауэр на обход серверов. Требуется доступ к следующим серверам:
Источник
Ошибка 117 на котле Аристон 2
В таблице неисправностей на отопительные агрегаты итальянской торговой марки множество кодов с признаками неполадок и способами устранения. Но информация скудная и рассчитана в основном на специалиста. Ошибка котла Аристон 117 описывается кратко, заводская рекомендация по решению проблемы не всегда приводит к положительному результату. Разберемся, что делать пользователю в данной ситуации без привлечения мастера сервисной службы.
p, blockquote 1,0,0,0,0 —>
Расшифровка
Ошибки Аристон, начинающиеся с цифры 1, относятся к контуру отопления. Неисправность под кодом 117 связана с недостаточной циркуляцией теплоносителя. Сложность в том, что проблема вызывается несколькими факторами, а в инструкциях на котлы Аристон серий Glas и Egis о ней свидетельствуют еще и ошибки 103–107.
p, blockquote 2,0,0,0,0 —>
Код 117 указывает на неполадку насоса. В котлах Аристон серии Uno в контуре отопления отсутствует реле протока (оно входит в комплектацию моделей FF – с закрытой камерой – выпущенных после 2009 года). Циркуляция жидкости контролируется температурными датчиками, установленными на входе (NTC1) и выходе (NTC2) первичного теплообменника. Ошибка 117 появляется при нарушении одного из трех условий:
p, blockquote 3,0,1,0,0 —>
- разница между t1 и t2 увеличивается за 12 сек не менее чем на 2 0 С;
- за то же время она не должна превысить значения 5;
- скорость возрастания ∆t не более 10 0 С/сек.
Для каждого из факторов предусмотрена своя ошибка. В этом причина, что даже мастера не всегда в состоянии поставить котлу Аристон точный «диагноз». А если учесть, что на тематических форумах рекомендации разные, рядовому пользователю трудно сориентироваться. Как поступить?
p, blockquote 4,0,0,0,0 —>
Шаг 1
Перезапустить котел (кнопкой Reset). В инструкции на Аристон именно об этом и сказано. Через 8 сек ошибка 117 должна исчезнуть (после выхода насоса на режим).
p, blockquote 5,0,0,0,0 —>
Шаг 2
Проверить датчики температуры ОВ. Редко выходят из строя, и об этом свидетельствуют коды 110, 112. Вероятная причина ошибки 117 котла Аристон – дефект сигнальных цепей: обрыв, замыкание, ненадежное соединение. Датчики NTC системы отопления – контактного типа. Если отсутствует термопаста в месте примыкания корпуса к патрубку теплообменника, чувствительный элемент не среагирует.
p, blockquote 6,0,0,0,0 —>
Проверка NTC контура ОВ котла Аристон делается мультиметром (режим измерения сопротивления или «прозвонки»). Контакты датчика нормально замкнутые, и при значении R, отличном от табличного (с учетом погрешности), прибор считается неисправным.
p, blockquote 7,1,0,0,0 —>
| ТЕМПЕРАТУРА (°C) | СОПРОТИВЛЕНИЕ (кОм) |
| 27 | |
| 10 | 17 |
| 20 | 12 |
| 30 | 8 |
| 40 | 5 |
| 50 | 4 |
| 60 | 3 |
| 70 | 2 |
| 80 | 1,5 |
ВАЖНО! Для контактных датчиков запрещается применять токопроводящую смазку, поскольку при этом
изменяется значение сопротивления.
Шаг 3
Тестирование насоса. Его работой управляют отмеченные выше датчики NTC. Если к ним нет претензий, то снижение скорости циркуляции и ошибка 117 связаны с некорректным функционированием помпы. Проверить ее механическую схему несложно.
p, blockquote 9,0,0,0,0 —>
Что делать
- Подставить ванночку под торцевую часть насоса.
- Открутить заглушку на ней.
- Вставить плоскую отвертку в шлиц вала и провернуть. Если он заклинил, это сразу почувствуется. Трудность вращения ротора связана с отложениями на его оси, крыльчатке. Последнюю достаточно снять, промыть, и ошибка 117 котла Аристон исчезнет. Иные дефекты (разрушение подшипника, искривление вала) устранять нецелесообразно – проще установить новый насос.
По опыту разбирательства с ошибкой 117 Аристон ее причина – в утрате емкости конденсатором помпы. Это приводит к тому, что насос не выходит на рабочий режим (не набирает расчетные обороты), отсюда и снижение скорости циркуляции теплоносителя. Заменой «C» проблема решается.
p, blockquote 10,0,0,1,0 —>
Иные причины ошибки
- Теплообменник. Забитая полость препятствует свободной циркуляции жидкости. После промывки прибора ошибка 117 устраняется.
Методика обслуживания
При сильном загрязнении теплообменника (жесткая вода, недостаточная подготовка жидкости) процедура повторяется.
Полезные советы эксперта
Ремонтные организации практикуют оказание услуг по проведению регламентных работ отопительного оборудования. Заключив договор на ТО сроком на год или более, пользователь получает гарантированную техническую поддержку профессионалов. Личное знакомство с сервисным мастером дает возможность обратиться к нему напрямую в любое время. Практика показывает, что связавшись с ним по телефону, можно самому устранить проблему, связанную с отказом оборудования по сигналу ошибки.
p, blockquote 12,0,0,0,0 —>
При заключении договора нужно уточнять, как взаимодействует сервисная организация с производителем котлов этой марки. Просто мастерская по ремонту бытовой техники не подходит. Следует выбирать исполнителя, аттестованного компанией Аристон. У него по определению имеются фирменные инструкции, схемы, методические указания, подготовленный персонал и отсутствуют проблемы с запасными частями. Немаловажно, что детали в счете будут по заводским ценам.
p, blockquote 13,0,0,0,0 —>
Поделитесь опытом
Если у вас есть опыт в исправлении ошибки 117 на газовом котле Аристон — пишите в комментариях к этой статье, мы постараемся рассмотреть ваш вариант и подробно разобрать его в данной или одной из следующих статей. Можете так же присылать фото и видео с комментариями и описанием.
Источник
Cómo reparar el error de LiveKernelEvent 117 en Windows (12.13.21)
¿Está recibiendo el error LiveKernelEvent 117 en su computadora? Este es un error de hardware o software que a menudo se caracteriza por una pantalla negra con el código de error anterior. Esto puede ser frustrante, especialmente cuando está en medio de algo, porque la aparición de este error generalmente conduce a la pérdida de datos.
Si recibe este error de LiveKernelEvent 117 en Windows, es importante para comprender más sobre el error para poder formular la mejor solución.
¿Qué son los errores de hardware de Windows?
Un error de hardware significa un problema con cualquiera de los componentes de hardware de su sistema informático. Los componentes de hardware están equipados con sistemas de detección de errores que pueden determinar cuándo ocurre un error de hardware. Se pueden clasificar como errores corregidos o no corregidos.
Un error corregido es aquel que ha sido corregido por el hardware o firmware en el momento en que fue detectado por el sistema operativo. Un error no corregido, por otro lado, no puede ser corregido por el hardware o firmware.
Consejo profesional: escanee su PC en busca de problemas de rendimiento, archivos basura, aplicaciones dañinas y amenazas de seguridad
que puedan causar problemas en el sistema o un rendimiento lento.
Escaneo gratuito para problemas de PC3.145.873descargas Compatible con: Windows 10, Windows 7, Windows 8
Oferta especial. Acerca de Outbyte, instrucciones de desinstalación, EULA, Política de privacidad.
Los errores no corregidos se clasifican además como fatales o no fatales. Los errores fatales de hardware son errores no corregidos o no contenidos que el hardware determina que son irrecuperables. Cuando ocurre un error fatal no corregido, el sistema operativo genera una verificación de errores para contener el error.
Los errores de hardware no fatales, por otro lado, son aquellos problemas de los que el sistema puede intentar recuperarse tratando de corregir el error. Pero si el sistema operativo no puede corregir el error, se genera una verificación de errores para contener el error.
El error LiveKernelEvent 117 en Windows es un error fatal no corregido del que Windows no puede recuperarse o corregir, por lo tanto el bloqueo y la aparición del mensaje de error LiveKernelEvent 117.
El concepto de un error de hardware img es un concepto central de la Arquitectura de errores de hardware de Windows o WHEA. Significa cualquier unidad de hardware que notifique a Windows de la presencia del problema. Ejemplos de imágenes de error de hardware incluyen:
- Excepción de verificación de la máquina del procesador, como MC #
- Señales de error del chipset, como SCI, SMI, SERR #, MCERR #
- Informe de errores del bus de E / S, como interrupción de errores del puerto raíz de PCI Express
- Errores del dispositivo de E / S
Un único error de hardware img puede manejar los informes de más de un tipo de errores de hardware. Por ejemplo, la excepción de verificación de máquina de un procesador generalmente informa errores de memoria caché y, errores del procesador y errores del bus del sistema.
Un error de hardware img generalmente se representa con lo siguiente:
- Registros de estado de error de hardware únicos o múltiples
- Registros de control o configuración de errores de hardware únicos o múltiples
- Un mecanismo de señalización que alerta al sistema operativo de que existe una condición de error de hardware
En algunos casos donde no hay un mecanismo de señalización explícito, el sistema operativo sondea los registros de estado de error para buscar errores. Desafortunadamente, el sondeo solo se puede aplicar para errores corregidos porque los errores no corregidos necesitan atención inmediata por parte del sistema operativo.
¿Qué es el error LiveKernelEvent 117 en Windows?
LiveKernelEvent 117 es un error que se puede ver usando los registros del Visor de eventos después de que su computadora falla. Alternativamente, también puede verlo a través del Panel de control. El bloqueo del sistema ocurre cuando el sistema deja de funcionar correctamente, lo que hace que se bloquee. Según varios informes, el bloqueo no ocurre de forma abrupta sino gradual.
En la mayoría de los escenarios, el escritorio se congela aunque el mouse y el teclado aún funcionan. En este punto, los usuarios se ven obligados a reiniciar sus sistemas solo para encontrar el botón Restablecer como la única opción. Para otros usuarios, Windows continúa ejecutándose durante algún tiempo antes de que ocurra el bloqueo.
Junto con el error 117 de LiveKernelEvent, es posible que también vea un archivo de registro relacionado con el bloqueo. En la mayoría de los casos, el problema es causado por el controlador de video nvlddmkm.sys de Nvidia, para aquellos que usan una tarjeta gráfica Nvidia. Según los detalles proporcionados en el mensaje de error, Windows debería poder recuperarse después de que el controlador deje de funcionar. Lamentablemente, no siempre es así.
Así es como suele verse el mensaje de error:
Descripción
Un problema con su El hardware hizo que Windows dejara de funcionar correctamente.
Firma del problema
Nombre del evento del problema: LiveKernelEvent
Parámetro 1: ffffe087338b7460
Parámetro 2: fffff807902171c0
Parámetro 4: 514
Versión del SO: 10_0_19042
Service Pack: 0_0
Versión del SO: 10.0.19042.2.0.0.256.48
ID de configuración regional: 4105
Información adicional sobre el problema
ID de segmento: LKD_0x117_Tdr: 3_TdrBug: 575504_TdrVTR: 0_IMAGE_nvlddmkm.sys_Pascal
Información del servidor: fe105004-c35c-42aa-8dc6-96a8a7d4d7eb
Los usuarios suelen encontrar el problema. -Actividades intensivas en su computadora, como juegos, transmisión de videos o ejecución de aplicaciones de terceros. La computadora se bloquea inmediatamente y regresa con este mensaje de error sin ningún motivo. Esto sucede tanto con computadoras antiguas como con computadoras nuevas o recién configuradas, incluso aquellas con especificaciones potentes.
El error LiveKernelEvent 117 en Windows también suele ir acompañado de otros mensajes de error. Por ejemplo, LiveKernelEvent 141 es un compañero constante de este problema. En otros casos, también se produce el error BSOD 116. Otros también notaron que algunas aplicaciones no funcionan cuando esto sucede, como PowerShell y el símbolo del sistema.
¿Qué causa el error LiveKernelEvent 117 en Windows?
Hay varias razones por las que podría ocurrir el bloqueo, pero la mayoría de las veces no, es un error relacionado con los componentes de su hardware. Los componentes que se descomponen con mayor frecuencia son las unidades de disco duro, los ventiladores, las CPU y las GPU. La mejor manera de verificarlo es realizar una prueba de diagnóstico de hardware en su computadora. Estos son los pasos sobre cómo realizar pruebas de hardware en Windows 10.
Windows 10 tiene dos herramientas de diagnóstico de hardware de PC integradas.
- Monitor de rendimiento
- Diagnóstico de memoria de Windows
La primera herramienta analiza el rendimiento del sistema de su computadora, mientras que la segunda herramienta ejecuta pruebas de memoria en su PC.
Cómo usar el Monitor de rendimiento
Rendimiento Monitor es una herramienta de diagnóstico de hardware integrada de Windows 10 para localizar y diagnosticar problemas de hardware y del sistema. Para realizar un escaneo, siga los pasos a continuación. 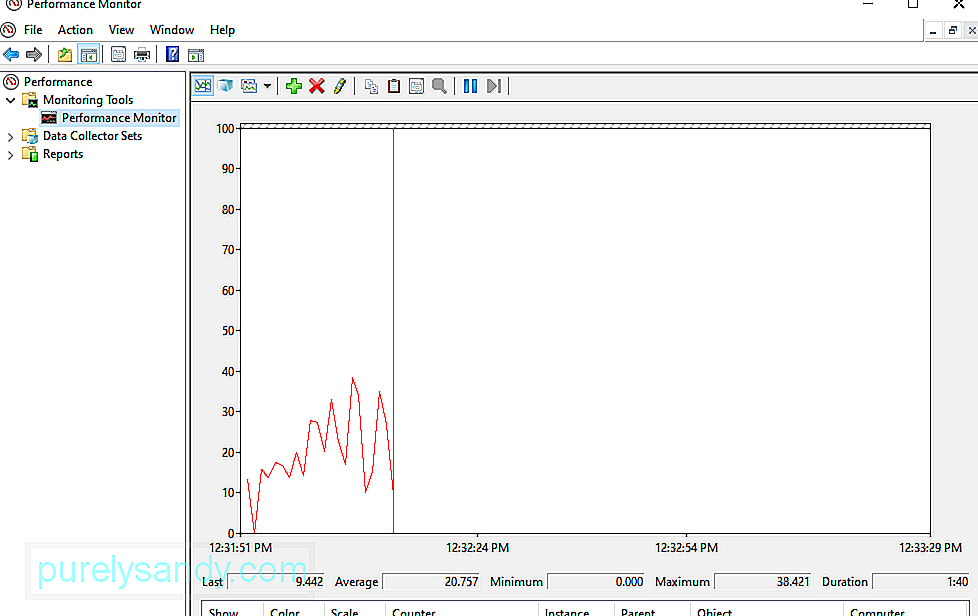
Si desea obtener una descripción general rápida del hardware de su computadora, puede usar el panel de la izquierda para ir a Informes & gt; Sistema & gt; Diagnóstico del sistema & gt; [Nombre de su computadora].
Le brinda múltiples comprobaciones de su hardware, software, disco, CPU, red y memoria, junto con las estadísticas detalladas. Si necesita obtener más información, puede consultar los gráficos de rendimiento en vivo en Herramientas de supervisión & gt; Monitor de rendimiento y conjuntos de datos personalizables en Conjuntos de recopiladores de datos.
Cómo utilizar el diagnóstico de memoria de Windows
La unidad central de procesamiento o CPU utiliza RAM para guardar información a corto plazo. Los datos contenidos en la RAM se eliminan cuando apaga su máquina. Hay varias señales de advertencia cuando la memoria está a punto de fallar, como un rendimiento que empeora y las tarjetas de video no se cargan al arrancar. 
Para ejecutar una prueba de memoria en su RAM, puede usar la herramienta de diagnóstico de memoria de Windows. Esta herramienta funciona escribiendo y luego leyendo la RAM de su PC. Cuando ve valores diferentes, significa que tiene hardware defectuoso.
Video de Youtube: Cómo reparar el error de LiveKernelEvent 117 en Windows
Источник