I am trying to add lighting to my current scene of a simple cube. After setting up my uniforms I get a 1282 error from glGetError() for this piece of code
GLuint ambientHandle = glGetUniformLocation(program->getHandle(), "ambientProduct");
glUniform4fv( ambientHandle, 1, ambientProduct );
GLuint diffuseHandle = glGetUniformLocation(program->getHandle(), "diffuseProduct");
glUniform4fv( diffuseHandle, 1, diffuseProduct );
GLuint specularHandle = glGetUniformLocation(program->getHandle(), "specularProduct");
glUniform4fv( specularHandle, 1, specularProduct );
GLuint lightPosHandle = glGetUniformLocation(program->getHandle(), "lightPosition");
glUniform4fv( lightPosHandle, 1, light.position );
GLuint shinyHandle = glGetUniformLocation(program->getHandle(), "shininess");
glUniform1f( shinyHandle, materialShininess );
Here are my shaders:
vertex.glsl
#version 120

attribute vec4 coord3d;
attribute vec3 normal3d;

// output values that will be interpretated per-fragment
varying  vec3 fN;
varying  vec3 fE;
varying  vec3 fL;

uniform vec4 lightPosition;
uniform mat4 mTransform;

void main()
{
    fN = normal3d;
    fE = coord3d.xyz;
    fL = lightPosition.xyz;

    if( lightPosition.w != 0.0 ) {
    fL = lightPosition.xyz - coord3d.xyz;
    }

    gl_Position = mTransform*coord3d;
}
fragment.glsl
// per-fragment interpolated values from the vertex shader
varying  vec3 fN;
varying  vec3 fL;
varying  vec3 fE;

uniform vec4 ambientProduct, diffuseProduct, specularProduct;
uniform mat4 mTransform;
uniform vec4 lightPosition;
uniform float shininess;

void main()
{
    // Normalize the input lighting vectors
    vec3 N = normalize(fN);
    vec3 E = normalize(fE);
    vec3 L = normalize(fL);

    vec3 H = normalize( L + E );

    vec4 ambient = ambientProduct;

    float Kd = max(dot(L, N), 0.0);
    vec4 diffuse = Kd*diffuseProduct;

    float Ks = pow(max(dot(N, H), 0.0), shininess);
    vec4 specular = Ks*specularProduct;

    // discard the specular highlight if the light's behind the vertex
    if( dot(L, N) < 0.0 ) {
    specular = vec4(0.0, 0.0, 0.0, 1.0);
    }

    gl_FragColor = ambient + diffuse + specular;
    gl_FragColor.a = 1.0;
}
The products and position are each a struct of three GLfloats and shininess is a float. I have checked all of the values of the handles and the values I am passing and they all seem valid. Ideas?
—EDIT:
I have narrowed it to the glUniform4fv calls. It happens after each one. Also I have double checked that the program->getHandle() is pointing to something that looks valid.
I have checked program->getHandle is a valid program
Here are the values of all handles:
Program handle 3
ambientHandle 0
diffuseHandle 1
specularHandle 5
lightPosHandle 2
shinyHandle 4
So they all look good. For testing I am commenting out the lines below the ones for ambientProduct. For clarity I am explicitly using this line instead
glUniform4f( ambientHandle, ambientProd.x, ambientProd.y, ambientProd.z, ambientProd.w );
These are the values for ambientProd at the time that line is executed.
x = 0.200000003, y = 0.0, z = 0.200000003, w = 1.0
A collaborator on this project moved the call for glUseProgram. Thanks for the help folks.
Ошибка OpenGL: 1282 (недопустимая операция) — распространенная ошибка Minecraft. Эта ошибка особенно распространена в версии Minecraft с установленными модами. Сообщение об ошибке рассылается спамом в ваш чат и иногда даже делает ваш экран черным. По словам игроков Minecraft, эта проблема расстраивает и требует быстрого решения. Именно поэтому в этом посте мы обсудим этот вопрос и посмотрим, что вам нужно делать, если вы видите Ошибка OpenGL: 1282 (недопустимая операция) в Майнкрафте.
 в Minecraft")
Исправить ошибку OpenGL: 1282 (недопустимая операция) в Minecraft
Если вы видите ошибку OpenGL: 1282 (недопустимая операция) в Minecraft, попробуйте следующие решения и предложения для решения проблемы.
- Отключить отображение ошибок GL
- Убедитесь, что ваши моды не повреждены
- Установите последнюю версию Java
- Отключить шейдеры
- Обновить Optfine
- Обновите графические драйверы
- Переустановите Майнкрафт
Поговорим о них подробно.
1]Отключить Показать ошибки GL
Некоторые пользователи просто видят ошибку GL без каких-либо последствий и вполне могут играть в игру. Если вы относитесь к этой категории, то ваша проблема будет решена путем простого отключения параметра «Показать ошибки GL» в настройках Minecraft. Вы не увидите спам-сообщения после внесения следующих настроек.
- Запустите Майнкрафт.
- Откройте свой мир и нажмите клавишу Esc (Escape).
- Перейти к Параметры > Настройки видео.
- Нажмите «Другие», а затем отключите «Показать ошибки GL».
- Наконец, выберите Готово.
Надеюсь, это поможет вам.
2]Убедитесь, что ваши моды не повреждены
Чаще всего с проблемой сталкивались пользователи, установившие моды Minecraft на свои компьютеры. Если это применимо в вашем случае, мы рекомендуем вам удалить все моды и посмотреть, решена ли проблема. Если удаление модов привело к удалению спама с ошибками GL, добавьте их один за другим, чтобы вы могли наткнуться на фактического виновника. Если причина, по которой вы видите эту ошибку, заключается в повреждении модов, это решение поможет.
3]Установите последнюю версию Java
Если вы используете Java-версию Minecraft, важно поддерживать Java на вашем компьютере в актуальном состоянии. Чтобы сделать то же самое, вы можете посетить OEM-производителя Java и загрузить его последнюю версию или выполнить предписанные шаги для обновления Java.
- Откройте панель управления.
- Изменить Просмотр по к Большие иконки.
- Перейти к Обновлять вкладка
- Нажми на Обновить сейчас кнопка.
- Вам будет предложено подтвердить свои действия, если доступно обновление, поэтому сделайте то же самое и закройте панель управления.
Запустите Minecraft и посмотрите, сохраняется ли проблема. Надеюсь, это поможет вам.
4]Отключить шейдеры
Если у вас есть шейдеры, работающие вместе с Optifine Minecraft, это может конфликтовать с некоторыми модами Minecraft. Эти шейдеры могут сделать ваш Minecraft эстетически привлекательным, но они также могут потреблять много памяти и мощности процессора. Итак, если вы видите ошибку OpenGL, отключите шейдеры. Затем запустите Minecraft и посмотрите, видите ли вы спам с ошибкой OpenGL. Если проблема вызвана шейдерами, их отключение поможет.
5]Обновить Optfine
Если вы используете устаревшую версию Optfine, вполне вероятно, что она вызывает рассматриваемую ошибку. Вот почему нам нужно установить последнюю версию с optfine.net. После загрузки установите инструмент и запустите Minecraft. Вам нужно выбрать последнюю версию Optfine внутри Minecraft. Итак, сделайте это и проверьте, решена ли проблема.
6]Обновите графические драйверы
OpenGL работает вместе с вашим графическим процессором для улучшения графики Minecraft. Когда вы обновляете свои графические драйверы, прошивка OpenGL автоматически обновляется. И если вы являетесь активным пользователем Windows, вы знаете, как легко обновляются драйверы в большинстве случаев. Так вот, «большую часть времени» не означает постоянно. Существует вероятность того, что ваш драйвер графического процессора устарел, в результате чего вы видите соответствующее сообщение об ошибке. Существует множество способов обновления графических драйверов, некоторые из которых мы упомянули ниже, поэтому выберите один и приступайте к делу.
Надеюсь, это поможет вам.
7]Переустановите Майнкрафт
Если ничего не помогло, в крайнем случае переустановите Minecraft и посмотрите, поможет ли это. Вы также можете создать резервную копию файлов игры перед ее установкой. Откройте «Выполнить», введите %appdata% и нажмите Enter. Откройте папку .minecraft и создайте резервную копию сейвы, скриншоты, ресурспаки, а также моды. Вы можете удалить приложение, переустановить его и вставить резервную копию в соответствующие места. Когда вы открываете Minecraft, спам с ошибкой OpenGL не появляется.
Надеюсь, вы сможете решить проблему, используя решения, упомянутые в этом посте.
Как избавиться от ошибки OpenGL 1282?
В большинстве случаев ошибка OpenGL 1282 — это не что иное, как спам-сообщения, которые мешают пользователю играть в игру. Это можно решить, отключив параметр «Показать ошибки GL» в настройках Minecraft. Однако пользователи сообщают о случаях, когда это сообщение об ошибке делало весь экран черным. Поскольку это более серьезный случай, существует несколько решений, которые могут устранить несколько причин этой ошибки. Вы должны проверить решения, упомянутые в этом посте, чтобы решить проблему.
Читайте: исправить ошибку удаления программы запуска Minecraft 0x80080204
Что означает ошибка OpenGL в Minecraft?
OpenGL или Open Graphics Library — это кроссплатформенный API, используемый для рендеринга 2D- и 3D-векторной графики. В Minecraft он используется для улучшения графики игры. Если вы видите ошибку OpenGL, это означает, что что-то не так с этим API или инструментами, которые работают вместе с ним.
Читайте также: Исправлена ошибка, из-за которой игра Minecraft вылетала с кодом выхода 0.
If you’re playing Minecraft with mods installed, you may encounter the infamous “OpenGL Error 1282” bug, which spams itself in your chat and even turns your entire screen black in some cases.

This may seem like a very serious bug, but don’t be alarmed, as it can be quite easy to fix once you figure out what you’re dealing with. There can be several reasons why you’re experiencing this error in Minecraft. You have to figure out the exact root cause of this problem and what you can do to solve it.
So below, we’ve compiled a list of all the possible causes of the OpenGL 1282 Error in Minecraft.
- Missing .dll File: DLL files are special files used by programs to execute their required operations. If you’re missing a DLL file, it can cause programs to malfunction. One of the possible causes of OpenGL Error 1282 is a missing DLL file named opengl32.dll.
- Shaders: Shaders are known to be troublemakers in Minecraft, especially if you have mods installed. They use a great number of your system’s resources and tend to conflict with the mods you’ve installed, causing errors.
- Incompatible Mods: Each Minecraft mod is designed to work with a specific game version. Trying to run the mod on a different version will cause many issues.
- Outdated Java: Java is required by Minecraft and its third-party mod installers to be able to run. Outdated versions of Java can hinder the game’s performance and cause bugs.
- Outdated Optifine: Outdated versions of Optifine are a major cause of OpenGL Errors in Minecraft.
- Outdated Graphics Drivers: If you haven’t updated your GPU drivers in a while, they can cause issues, especially if you’re trying to play with newer mods.
1. Disable the Show GL Errors Option
There are two types of OpenGL Error 1282 bug in Minecraft. In the first type, the bug just spams a message in your game chat that says “OpenGL Error: 1282 (Invalid operation)“.
In the second type, not only does the bug spam this message in your chat, but it also makes your screen completely black.
If you’re experiencing the first type of this bug, where it only shows up in your chat, and the rest of your game works fine, there’s a very simple solution to your problem.
All you need to do to fix this type of OpenGL error is to disable the “Show GL Errors” options from the in-game menu of Minecraft. To disable this option, follow the steps we’ve listed below:
- Open Minecraft and head into your world.
- Once you’ve loaded in, press Escape on your keyboard.
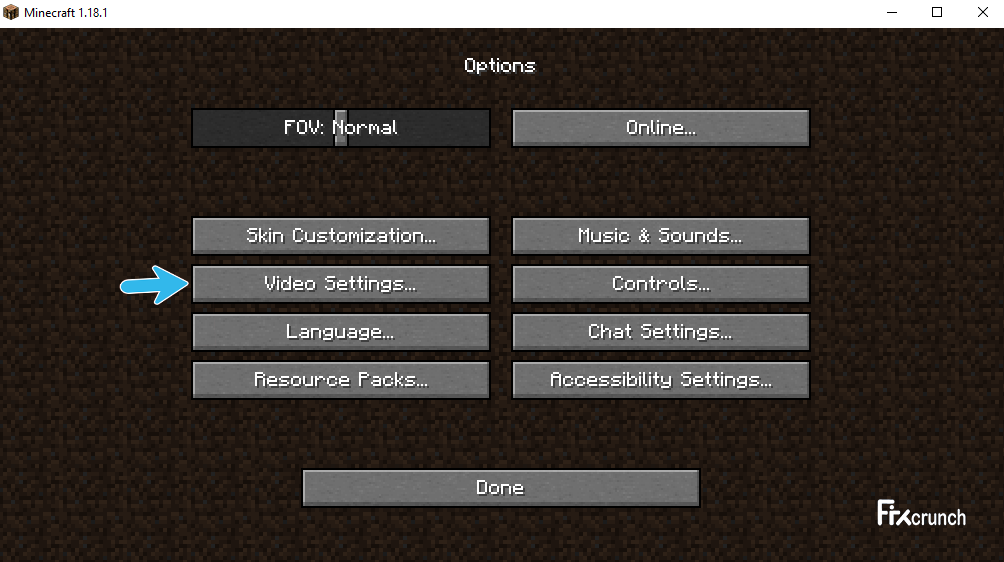
- Click on “Options…” in the menu.

Going into Minecraft options - Click on “Video Settings…”

Opening Minecraft Video Settings - Click on “Other…”

Click on Others - Click on the “Show GL Errors” option to disable it.

Disabling the OpenGL Error Notifications - Click on Done.


This method will turn off the chat notifications for the OpenGL Errors, instantly fixing your problem!
Now, if you’re experiencing the second type of the OpenGL Error 1282 bug, which turns your screen black, try the solutions we’ve listed below.
2. Download the Missing DLL File
Each program you download to your PC needs a set of DLL (Dynamic Library Link) files to function properly. These DLL files contain instructions, and programs like Minecraft use them to perform their required operations.
For a program to be able to work as intended, it needs all of its required DLL files.
So the first fix to the OpenGL Error 1282 bug will be to download a specific DLL file named opengl32.dll. You have to download this file and paste it into your Minecraft folder. This will likely fix your issue.
To download this missing DLL file, follow the steps listed below:
- Head to this website and download the opengl32.dll file by clicking on the orange download button.
- If you have a 32-bit processor, download the 32-bit file; if you have a 64-bit processor, download the 64-bit file.

Downloading the missing DLL file - Extract the ZIP file into an empty folder.
- Copy the opengl32.dll file.

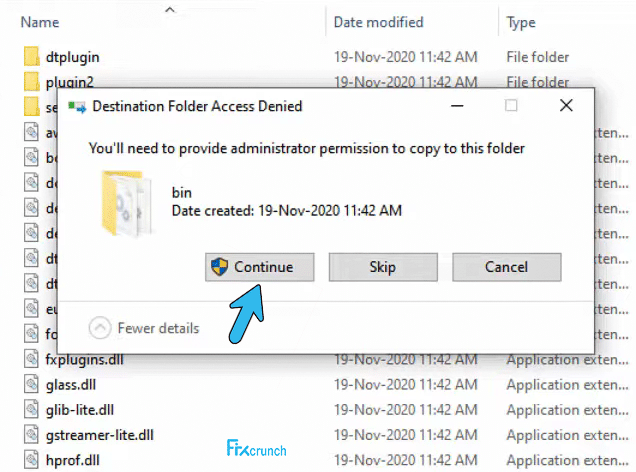
Copying the opengl32.dll file - Open File Explorer and paste the following address in the address bar:
C:Program FilesJava
- Press enter and then open the JRE folder.

Opening the Java folder - Open the bin folder and paste the opengl32.dll file in there.

Opening the bin folder - Launch Minecraft and see if the error is fixed.


If you don’t know what type of processor you have, there’s no need to worry. You can easily determine whether you have a 32 or 64-bit processor within a few clicks of your mouse.
Go to your desktop and right-click on the “This PC” icon. Select Properties and then look at the System Type to determine your processor’s architecture (type).

If it says 32-bit processor, return to the website linked above and download the “Architecture: 32” file. And if it’s a 64-bit processor, download the “Architecture: 64” file.

3. Disable Your Shaders
Shaders are used to change Minecraft’s entire look completely, but this comes at a cost. Shaders are known to cause all types of problems in Minecraft.
They consume a hefty amount of your system’s resources, causing game performance issues. But if Optifine and/or mods are installed, Shaders can conflict with them and create problems, such as OpenGL errors.
So if you have Shaders installed and are experiencing the OpenGL Error 1282 bug, make sure to disable the Shaders before you try other troubleshooting methods. These Shaders may just be the root cause of this error.
4. Check the Compatability of Your Mods
Whenever a developer makes a mod for Minecraft, they design it to run on a specific game version and the mod launcher (Forge). So if you try to run a mod on a game version and/or mod launcher it’s not designed for, it will cause many issues.
Therefore, whenever you download a mod, remember to check what game and mod launcher version it is compatible with. On the download page for the mod, there will be information regarding its compatibility.

And on top of that, not all mods work together flawlessly. If you download a bunch of mods made by different developers, there’s a chance that they will conflict with each other and create errors.
If this happens, you can solve the issue by uninstalling all your mods and then reinstalling them. Each time you install a new mod, run the game and see if there are any errors.
As soon as you encounter an error, it’ll mean that the last mod you installed conflicts with the rest. You can either uninstall that mod or find a different version of it. If it continues to cause problems, keep it uninstalled.
To avoid this hassle altogether, you should try using modpacks instead. Modpacks are filled with dozens of mods that have been carefully picked out by their creators. These modpacks are designed to work flawlessly.
5. Update Java
You must keep Java updated if you’re playing the Java Edition of Minecraft. We know how annoying the constant Java update reminders can get, but it’ll only take a few minutes of your time to update it.
To update Java, follow the steps we’ve listed below:
- Press Windows Key and type Java in the search bar.
- Click on “Check for Updates”

Checking for Java Updates - In the Java Window that opens up, click on Update Now.

Updating Java - Click on Update.

Update Java - Allow Java SE Runtime Environment to make changes to your PC.
- Click on Install.
Installing Java


After Java is done installing, relaunch Minecraft and see if your problem is resolved. If it isn’t, continue with the solutions listed below.
6. Update Optifine (If Applicable)
Updates for Optifine are released quite often, so many players forget to keep downloading all of its updates.
If you don’t keep your Optifine up to date, it’s a big mistake. An outdated version of Optifine can cause errors, especially if you’re using other mods.
So make sure to update your Optifine from time to time. If you don’t remember how to, first close Minecraft and then follow the steps listed below:
- Head to the official Optifine website and download the latest version of Optifine.

Downloading Optifine - After it finishes downloading, open up the file.
- Click on Install.

Installing Optifine - After it’s done installing, open up your Minecraft launcher and select the latest Optifine profile before pressing play.

Selecting the Optifine profile


7. Update Your Graphics Card Drivers
If none of the above solutions have worked for you, then the next step to fixing is to update your Graphics Card (GPU) drivers.
Unless you have a super old GPU, your GPU’s manufacturer is likely still releasing driver updates for it. You must regularly install these driver updates to ensure your GPU performs at its highest potential.
Now, to update your GPU drivers, you must first determine your GPU’s exact brand and model. To figure this out, follow the steps we’ve listed down below:
- Right-click on the Windows icon at the bottom-left corner of your screen.
- Select Device Manager.

Opening Device Manager - Click on the arrow next to Display Adapters to expand it.
- Note down the name of the GPU that appears.

Identifying GPU model using Device Manager


Unless your GPU drivers are corrupted or completely missing, this method should allow you to determine your GPU’s exact model.
But if it simply says, “Microsoft Basic Display Adapter,” instead of showing any unique model/brand name, then it means that GPU drivers are, in fact, corrupt/missing.
In this case, you’ll need to find your GPU’s model through another method. Follow the steps listed below:
- Right-click on the Windows icon at the bottom-left corner of your screen.
- Select Device Manager.
Opening Device Manager - Click on the arrow next to Display Adapters to expand it.
- Right-click on the Microsoft Basic Display Adapter.
- Click on Properties.

Selecting GPU Properties - In the Properties Window, navigate to the Details tab.
- Open up the drop-down list under Property.
- Select Hardware Ids.

Selecting Hardware Ids - Right-click on the first line of text written under Value.
- Click on Copy.

Copying Hardware Id - Open your browser, paste this text line into the search bar, and press enter.


When you press enter, the top results on Google will have your GPU’s exact brand and model written in their title, allowing you to easily figure out what GPU you’re working with.

Since we now know the name of your Graphics Card, we can start searching for its drivers online. But before we do that, we have to uninstall the GPU drivers that are currently installed in your system.
To do this, we’ll use a program called “Display Driver Uninstaller.” This program is far superior to the native Windows driver uninstaller.
This is because the Windows driver uninstaller does not delete the drivers well. It tends to miss out on some files, leaving residue behind. These residue files can cause problems when you update the drivers.
So to ensure that the current drivers are completely wiped from your system, we’ll be using DDU.
After you’ve downloaded and installed DDU, we have to ensure the safest driver removal process by booting the PC in Safe Mode.
- Press Windows Key and click on the Power button.
- Hold the shift key on your keyboard and click on the Restart option.
- Select Troubleshoot.
- Head to Advanced Options and then select Startup Settings.
- Enter Safe Mode by pressing the F5 key on your keyboard.

Going into Advanced Options 
Selecting Startup Settings 
Entering Safe Mode


Now that your PC is in Safe Mode, we can begin the driver removal process. Launch the Display Driver Uninstaller app, select “GPU” as your device type, and then select the brand of your GPU.
Click on the “Clean and restart” option to start wiping your GPU’s drivers.

After the drivers are completely wiped, the next step is to download the latest drivers of your GPU.
But before we do that, keep in mind that installing the latest version of GPU drivers can sometimes cause problems if your system is a laptop.
The drivers provided by your laptop’s Original Equipment Manufacturer (OEM) perform the best with your system. So it’s better to use the drivers provided by the OEM instead of just installing the latest drivers.
But if your system is a desktop, you don’t need to worry about this. Feel free to download the latest drivers for your GPU.
To do so, you’ll need to head to the official website of your GPU’s manufacturer.
For NVIDIA drivers, head to this website and then use the drop-down lists to find your GPU’s exact model.

For AMD drivers, head to this website and then use the drop-down lists to find your GPU’s exact model.

Once the driver file is downloaded, simply double-click on it to start installing the drivers. When asked for the installation type, select “Express” instead of “Custom”.
After the driver installation process finishes, restart your PC and launch Minecraft. The OpenGL 1282 Error should now be fixed.
Reinstall Minecraft
If all else fails, the final step is to reinstall Minecraft. This can fix your problem, as the root cause of the error might just be some corrupted game files. So when you reinstall Minecraft, there won’t be an issue of corrupted files.
So to reinstall Minecraft, first uninstall it from your system. But before we do that, note that when you uninstall Minecraft, your saved worlds, inventories, mods, and screenshots will be gone forever unless you create a backup for them.
To create a backup, follow the steps listed below:
- Open your documents folder and create a new folder within it titled “Minecraft Backup.”
- Press Windows Key + R to open the Run dialogue box.
- Type %appdata% and press enter.

Opening the AppData folder - Open the .minecraft folder.

Navigating to the .minecraft folder - Create a copy of the saves, screenshots, resource packs, and mods folder.

Copying important Minecraft save files - Paste them into the Minecraft Backup folder that you created earlier.

Creating the backup for the save files


When you reinstall Minecraft, you’ll be able to restore your progress by simply pasting these folders into the new .minecraft folder.
Once you’re ready, you can uninstall Minecraft from your PC by following these steps:
- Press the Windows Key, type Settings in the search bar, and enter.
Opening Settings - In the Settings menu, click on Apps.

Opening the Apps menu - In the search bar above the list of apps, type Minecraft.
- Click on Minecraft and press Uninstall.

Uninstalling Minecraft - Press Windows Key + R to open the Run Dialogue Box.
- Type %appdata% and press enter.
Opening the AppData folder - Right-click on the .minecraft folder.
- Press delete.

Deleting residue files of Minecraft - Open up Recycle Bin and permanently delete the .minecraft folder from there.


Minecraft is now fully wiped from your system. So the next step is to install it again by going to Minecraft’s official website. After installing Minecraft, launch the game and see if the OpenGL error went away.
The “OpenGL Error 1282 (Invalid operation)” is one of the common errors occurring in Minecraft. When this error occurs, you may experience lag issues or error message pop-ups. It’s annoying. But don’t worry. You can fix the error easily with the following methods.
There are seven methods available for you to try. You can try them one by one:
Method 1: Manually add the opengl32.dll file
Method 2: Update graphics card drivers
Method 3: Disable shaders
Method 4: Update OptiFine
Method 5: Update Java
Method 6: Try a different game version
Method 7: Turn off Show GL Errors
Method 1: Manually add the opengl32.dll file
The OpenGL error 1282 can be caused by missing the opengl32.dll file in the Minecraft folder. To fix the error , you can try manually adding the opengle32.dll file to the folder. Many Minecraft users have reported they fixed the same error with this fix. You can give it a try and see if it works for you too.
You can follow these steps to manually add the opengl32.dll file.
Firstly, download the opengl32.dll file.
1) Download the “OpenGL fix.7z” file to your computer (you can download the file from mediafire.com).
2) Extract the file.
3) In the extracted folder, you’ll see two subfolders: 32 bit and 64 bit. Select one of them according to your Windows version (How to check what Windows version you have?). In my case, I have Windows 10 64-bit version, then I need to open the 64 bit folder (see the screenshot below).
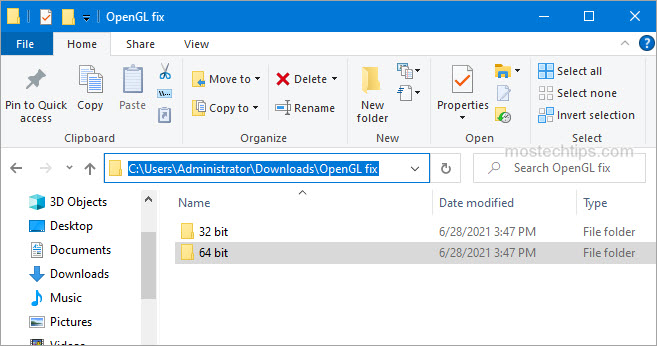
4) Copy the opengl32.dll file.
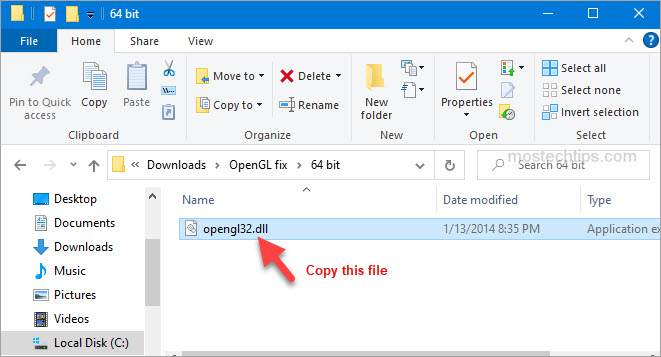
Secondly, paste the opengl32.dll file to the Minecraft folder.
1) Right-click on the shortcut of Minecraft and then select Open file location.
2) Navigate to the following location
MinecraftRuntime*JRE Version*bin
Note: The JRE Version is simply a placeholder. It depends on the game version you have, for example, Jre-x64, or something like that.
3) Paste the opengl32.dll file to the bin folder mentioned in Step 2).
4) Re-launch Minecraft and see if the error persists. If the error persists, continue to try Method 2.
Method 2: Update graphics card drivers
A faulty or missing graphics card driver can cause the Minecraft OpenGL 1282 error. You can try updating your graphics card driver and see if it helps.
You can update the graphics card driver via Device Manager:
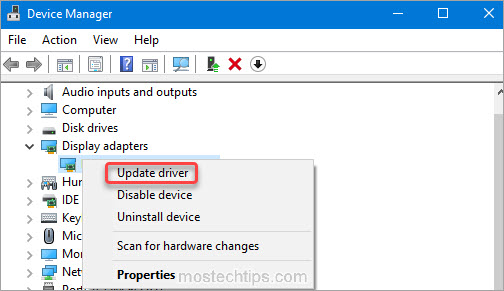
1) Right-click on the Start menu button and select Device Manager. Then the Device Manager window will open.

2) Expand category “Display adapters”. Right-click on your graphics card device and then select Update driver.
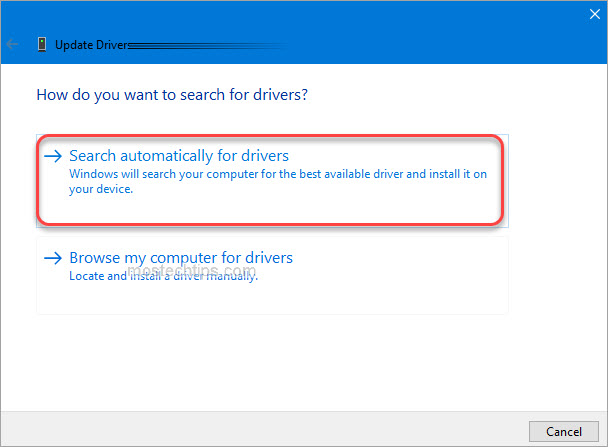
3) Select Search automatically for drivers. Then Windows will search for a new driver and install the driver automatically.
Alternatively, you can go to the PC manufacturer’s website to download the latest graphics card driver. Usually, drivers can be downloaded from the Drivers, Support or Download section.
Method 3: Disable shaders
Shaders in Minecraft allow you to set different terrains and settings so you can have a better game experience. But in the meantime, they can take up a lot of system resources, and may cause the OpenGL 1282 error. To fix the error, you can try disabling shaders in Minecraft. To do so:
1) Launch Minecraft.
2) On your keyboard, press the Esc key to pull up the Menu screen.
3) Go to Options -> Shaders.
4) Select OFF and click Done.
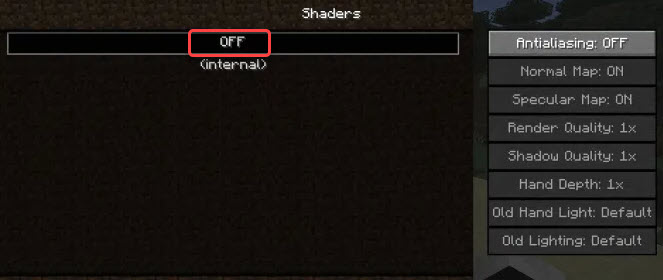
After you’re done with it, re-launch Minecraft and see if you’re still facing the OpenGL 1282 error.
Method 4: Update OptiFine
The OpenGL Error 1282 can be an OptiFine issue. If you’re using OptiFine for Minecraft , updating OptiFine to the latest version may help remove the error. If you’re using OptiFine, skip this method and continue to the next method.
Go to OptiFine’s official website and download the latest version of OptiFine, then install it on your computer. Once done, check to see if the error still occurs.

Method 5: Update Java
Minecraft relies on Java very much. If you have a low version Java or the Java files are corrupted, the OpenGL Error 1282 can occur. To fix the error, you can try updating Java to the latest version.
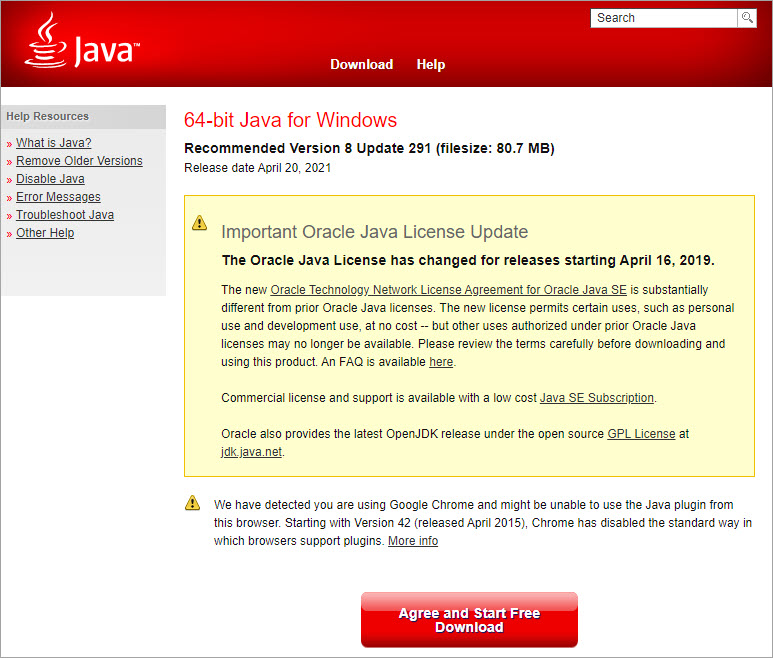
Go to Java’s website and download the latest version of Java to your computer, then follow the on-screen instructions to install it.
Once the installation completes, re-launch Minecraft and check to see if the OpenGL Error 1282 is fixed.
Method 6: Try a different game version
The error can occur in a specific version of Minecraft. So you could try switching to a different game version, for example a lower version, and see if the error continues.
Method 7: Turn off Show GL Errors
In some cases, the OpenGL Error 1282 is not a real error but just a bunch of pop-ups. If your game performance is not influenced due to this error, it’s nothing to worry about. To get rid of these annoying notifications, you can just turn off the Show GL Errors option in Minecraft. After that, you won’t receive any error notifications.
Here’s how to turn off the Show GL Errors option in Minecraft.
1) Launch Minecraft.
2) Go to Options > Video Settings > Others…
3) Click Show GL Errors and turn it off.

4) Save the changes and re-launch Minecraft, then you won’t see the annoying OpenGL Error 1282 message.
Hopefully you can fix OpenGL Error 1282 (Invalid operation) with the steps above. If you have any questions or suggestions, feel free to leave a comment below. I’ll get back to you ASAP.

как исправить ошибку opengl 1282 Майнкрафт
.games > Minecraft > как исправить ошибку opengl 1282 Minecraft
Обратите внимание, если хотите узнать, как исправить ошибку opengl 11282 Minecraf, ведь здесь у нас есть все вам нужно знать.
Что такое ошибка opengl 1282 Minecraft?
Это одна из многих ошибок OpenGL, которые вы можете найти в игре и это помешает вам играть в нее.
Как исправить ошибку opengl 1282 Minecraf? — Добавить файл OpenGL32.dll вручную
Первое, что вы можете сделать, это вручную добавить файл OpenGL32.dll. это потому, что иногда этот файл отсутствует, но существует 17 различных версий этого файла, поэтому вам придется выбрать правильную. проблема в том, что вы ничего не можете сделать, чтобы узнать, правильный ли вы выбрали.
К сожалению, сайты загрузки DLL не являются безопасным источником для файла. Вот почему мы рекомендуем вам проверять наличие обновлений Windows, использовать восстановление системы, если ошибка появилась после недавнего изменения, или попытаться восстановить Windows.
Как исправить ошибку opengl 1282 Minecraf? — Графика
Читайте также:
Еще одна вещь, которую вы можете сделать, это обновить графические драйверы, так как они могут быть устаревшими или неисправными. Поэтому зайдите на веб-сайт производителя вашей видеокарты, Nvidia, AMD или Intel, чтобы обновить их.
После их обновления мы рекомендуем вам проверить правильность настроек графики, потому что в противном случае они могут вызвать появление этой ошибки. Итак, войдите в игру и перейдите в «Параметры» > Настройки видео > отключить VBO, Render Region и Clear Water > измените знак включения на выключение > перезапустите игру и проверьте, устранена ли проблема.
Отключение шейдеров также может устранить эту ошибку, поэтому перейдите в раздел «Параметры» > Шейдеры > измените его с Вкл. на Выкл. > перезапустите игру и проверьте.
Как исправить ошибку opengl 1282 Minecraf? — Optifine
Обновление Optifine также может исправить эту ошибку, если она у вас есть. Поэтому зайдите на официальный сайт Optifine, чтобы загрузить последнюю версию.
Как исправить ошибку opengl 1282 Minecraf? — Показывать ошибки GL
Если вы столкнулись с этой ошибкой, но она не влияет на вашу игру, вы можете отключить уведомления. Для этого вам потребуется доступ к игре > Параметры > Настройки видео > Другое > нажмите «Показать ошибки GL» и отключите его, чтобы сохранить изменения и перезапустить игру.
Вы даже можете попробовать отключить OpenGL. Для этого вам потребуется доступ к игре > Параметры > Настройки видео > Расширенные настройки OpenGL > отключить OpenGL > Сохраните изменения и перезапустите игру, чтобы проверить, устранена ли проблема.
Как исправить ошибку opengl 1282 Minecraf? — Модификации
Вы должны знать, что если у вас много модификаций в игре, вы можете столкнуться с этой ошибкой. Поэтому мы рекомендуем вам отключить все модификации, а затем повторно активировать их одну за другой, чтобы определить, вызывает ли какая-либо из них проблемы. Если он есть, вам просто придется его удалить.
Как исправить ошибку opengl 1282 Minecraf? — Переустановка
Если пока ничего не помогло, рекомендуем удалить игру напрямую, а затем переустановить ее. То есть выполнить переустановку, которая должна исправить более одной ошибки.
Это все, что вам нужно знать о том, как исправить opengl ошибка 1282 Minecraf, и теперь, когда мы подошли к концу, вы более чем готовы избавиться от этой проблемы, поэтому принимайтесь за каждое решение одно за другим, пока не найдете подходящее для вас.
Платформы: ПК, macOS, Linux, PS4, Xbox One, Nintendo SwitchЖанры: Песочница, выживание Разработчики: Mojang, Xbox, Sony, Nintendo eShopИздатели: Mojang, Microsoft Studios, Sony Computer EntertainmentДата выпуска: 18 ноября 2011 г.Режим: Одиночная игра, многопользовательская Возрастной рейтинг (PEGI): 7+ Официальный сайт: https://www.minecraft. net/
Другие теги
видеоигры, геймплей, цена, 60fps, steam
We all enjoy playing Minecraft in our free time. But our gaming experience gets seriously hampered once we start getting the OpenGL error 1282 followed by a completely black screen. And this situation becomes even more annoying when it triggers while we are on a LAN party, isn’t it?
You should install the latest version of Java, your GPU driver, and Minecraft to resolve the error 1282 in OpenGL. Besides, you can also disable your antivirus and the OptiFine mod from the in-game settings. You can also disable shaders and render regions to eliminate this issue.
The OpenGL error code 1282 typically triggers if you are using an obsolete version of Java, GPU driver, or the game itself. Besides, it can also trigger if the OptiFine mod is outdated or the antivirus is constantly interfering. This issue can even arise if the OpenGL32.dll file is missing.
However, you don’t need to worry, as there are some generic fixes and some advanced fixes to resolve this issue in no time. But before we concentrate on the solutions, let’s understand what this error is all about!
Table of Contents
- 1 What Are The Primary Causes Of OpenGL Error Code 1282 In Minecraft?
-
2 4 Quick Fixes For The OpenGL 1282 Error
- 2.1 1. Update Minecraft
- 2.2 2. Update GPU Driver
- 2.3 3. Update Java
- 2.4 4. Disable Windows Defender
-
3 6 Advanced Fixes For The OpenGL 1282 Error
- 3.1 5. Manually Update OptiFine
- 3.2 6. Disable Shaders From Video Settings
- 3.3 7. Disable Render Regions From Video Settings
- 3.4 8. Decrease Render Distance
- 3.5 9. Manually Add OpenGL32.dll
- 3.6 10. Disable Showing OpenGL Popups
- 4 What Is OpenGL Error 1282 In Minecraft?
- 5 Conclusion
-
6 FAQs
- 6.1 Q. How do I get rid of OpenGL error 1282?
- 6.2 Q. How do I get rid of OpenGL errors?
- 6.3 Q. How do I fix OpenGL error 1282?
- 6.4 Q. What does OpenGL error 1282 mean?
What Are The Primary Causes Of OpenGL Error Code 1282 In Minecraft?
Getting an OpenGL error is not uncommon in Minecraft, although it can be easily solved. And you may encounter OpenGL error 1282 invalid operation in Minecraft for various reasons. But considering a broader spectrum, this issue can trigger for six main reasons.
- You are using an obsolete version of the GPU driver, or your GPU itself is below the minimum requirement.
- You are using an outdated version of OpenGL that is conflicting with your game.
- The OpenGL version you are using is interfering with the outdated version of Windows OS.
- You are using malicious mods that conflict with the root game files.
- You are using an outdated version of the OptiFine Mod.
- The java program installed on your Windows system is outdated and needs an update.
Developed by the Khronos Group, OpenGL is truly a great programming interface. However, it can create various issues if you are not updating it in timely intervals. So, you should also enable the automatic update to deliver a better hardware acceleration.
4 Quick Fixes For The OpenGL 1282 Error
There are four major generic fixes available that not just solve the OpenGL error 1282 but many other graphics-related issues as well. So, before you resort to any advanced methods that need technical tweaks, try these general fixes first.
1. Update Minecraft
Although it is hugely popular around the world, Minecraft is still not perfect in terms of security loopholes and other bugs. And the Mojang developers roll out frequent updates to deal with those errors. So, updating the game itself can solve not just this OpenGL error but a lot of other things.
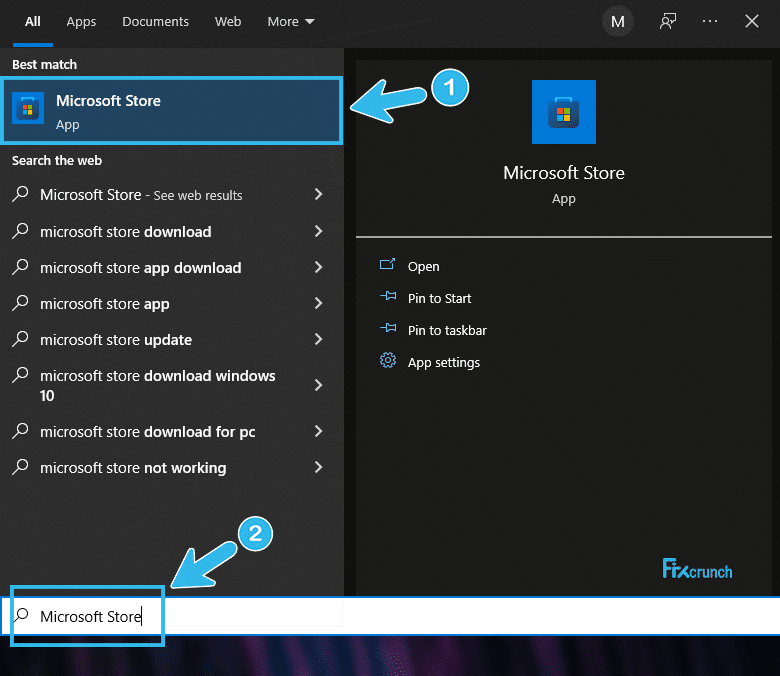
- Step 1: Click on the “Magnifying Glass” icon located at the bottom-left corner of your taskbar and type “Microsoft Store.” (You can also alternatively click on the “Shopping Bag” icon)
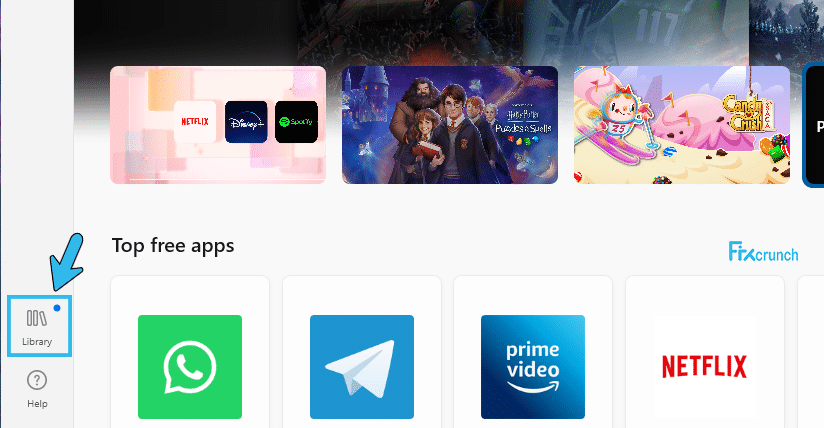
- Step 2: Locate the “Library” icon on the left side.
- Step 3: Once the new window pops up, scroll down, and click on the “Updates and Download” option.
- Step 4: Just click on the “Update” button.
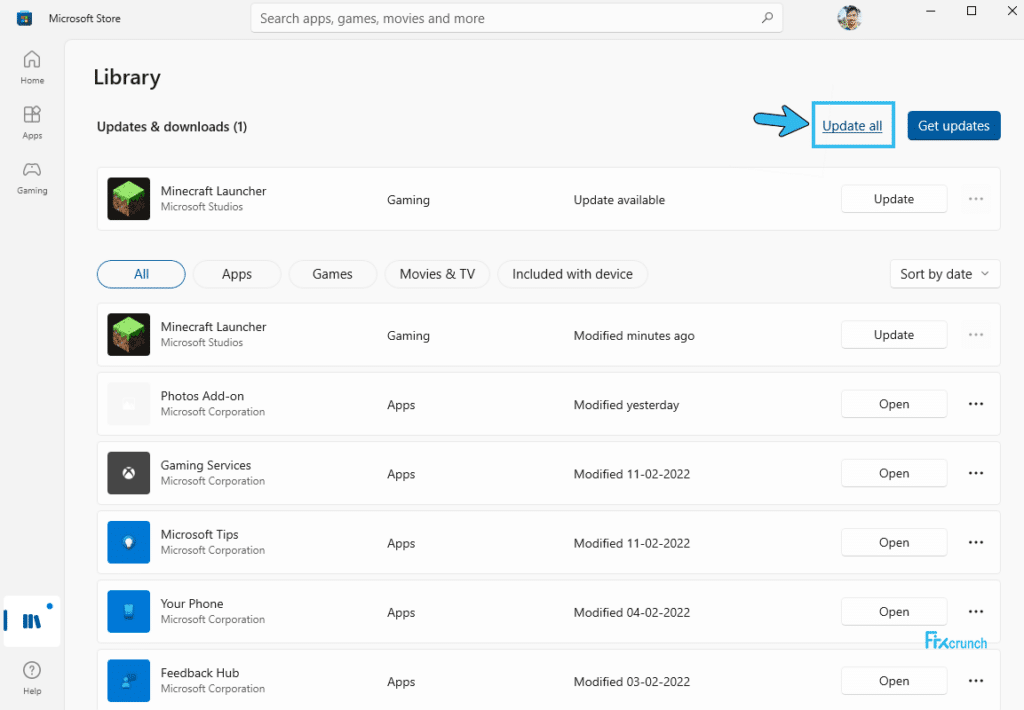
- Step 5: Let windows search automatically for every available update from the internet and install those.
- Step 6: After the “Your apps and games are up to date” message pops up, restart your system, and relaunch the game.
If you are not using Windows 10 or later versions, you can alternatively update the game from the in-game settings itself. Besides, you can also visit the official forum of Minecraft to download and install the latest update manually.
2. Update GPU Driver
Not just the error code 1282, most of the OpenGL errors are mainly triggered due to faulty or obsolete GPU drivers installed on your system. So, before you resort to anything else, update your GPU driver ASAP to solve this graphics-related issue.
- Step 1: Right-click on either the “Windows” icon or the “Start” button, depending on your OS version, to expand the additional menu.

- Step 2: Click on the “Device Manager” option to launch the new window and click on the “Display Adapter” option.
- Step 3: Once it expands, find your GPU from the list, and right-click again to select the “Update Driver” option.

- Step 4: Select the “Search automatically for drivers” option from the newly launched window and follow the on-screen instructions.
- Step 5: Update all the available drivers and restart your system.
3. Update Java
Java is not just the backbone of your system but also plays a crucial role in the smooth gameplay of Minecraft. And if you are using an outdated version of Java, the OpenGL error draw nodes: 1282 invalid operation can definitely trigger.
- Step 1: Right-click on the “This PC” icon on your desktop and click on the “Properties” option from the menu.
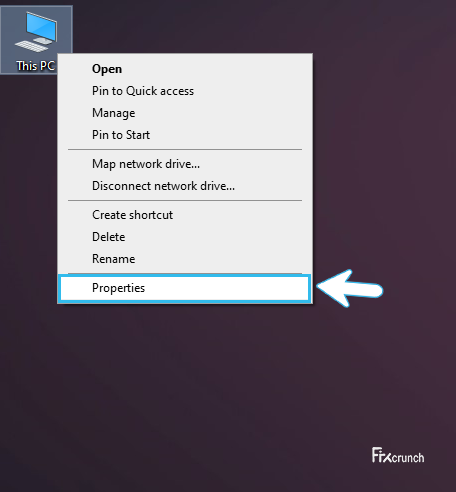
- Step 2: After the “About” window opens up, note down the architecture of your OS (either 32-bit or 64-bit) displayed beside the “System Type” option.
- Step 3: Now close that window and visit the official Java site to download the compatible update for your OS architecture.
- Step 4: Once the setup file is downloaded, double click to initiate the updating process and follow the on-screen instruction.
- Step 5: Once the update is installed, copy the entire folder from the root directory.
- Step 6: Come back to your desktop and press “Windows Key + E” together to launch the “Windows Explorer” menu.
- Step 7: Navigate to either “C:\Program Files\Java” (32-bit)” or “C:\Program Files (x86)\Java” (64-bit) on windows explorer.
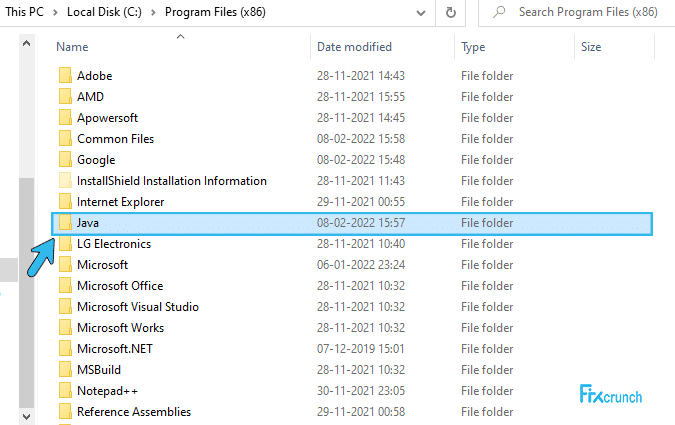
- Step 8: Paste the folder which you have copied already and click on the “Replace All” button once the popup appears.
- Step 9: Come back to your desktop again, launch “Minecraft,” and select the “Forge MOD Manager” option from the welcome screen.
- Step 10: Select the “Edit Profile” option from the new menu and assign the correct Java path on your system under the “Java settings (Advanced)” option.
- Step 11: Save the settings and relaunch your game.
4. Disable Windows Defender
Windows Defender is definitely a robust security software that comes pre-installed in the latest Windows OS. However, it may block certain applications from interfering with the core files to minimize security hazards. So, you can manually disable it temporarily to check if the problem still arises.
- Step 1: Launch the “Settings” application by pressing the “Windows Key + I” together.
- Step 2: Once the new window opens, click on the “Update & Security” button to expand it.
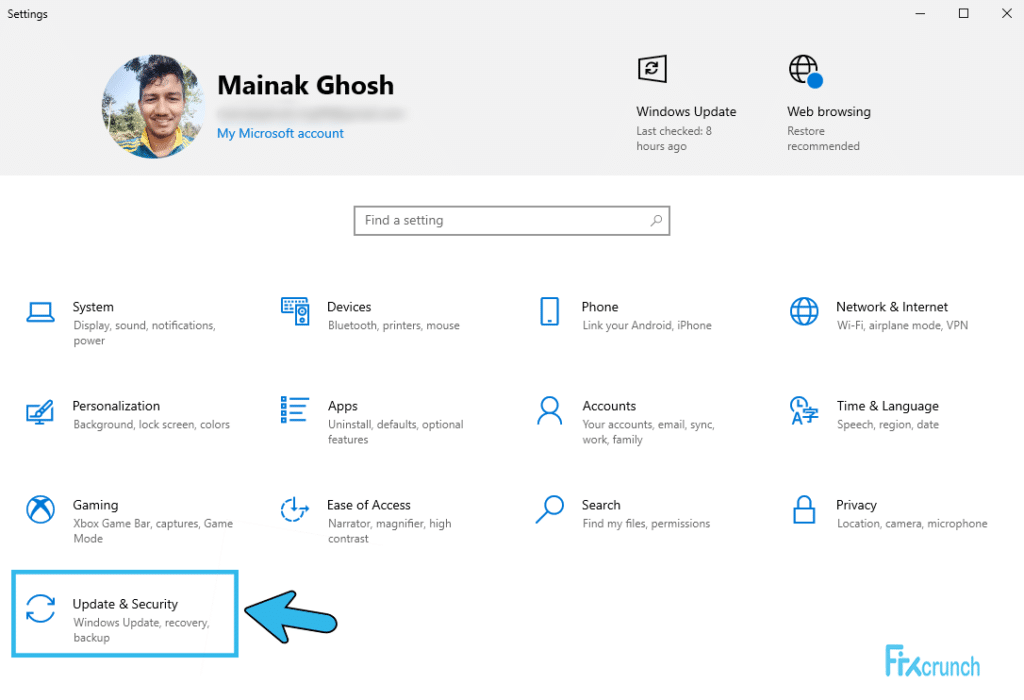
- Step 3: From the main panel, select the “Windows Security” option from the left-hand column.
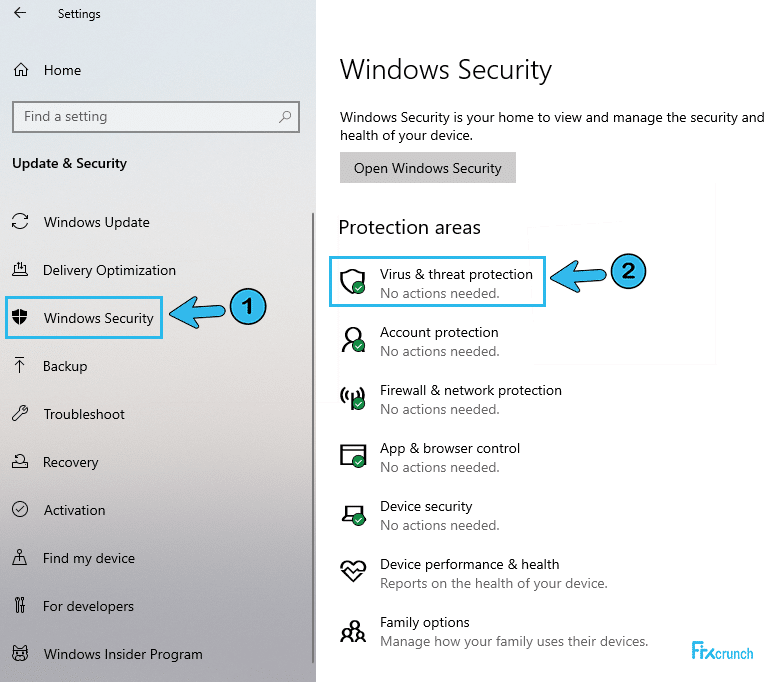
- Step 4: Once the new menu launches, click on the “Virus & threat protection” option.
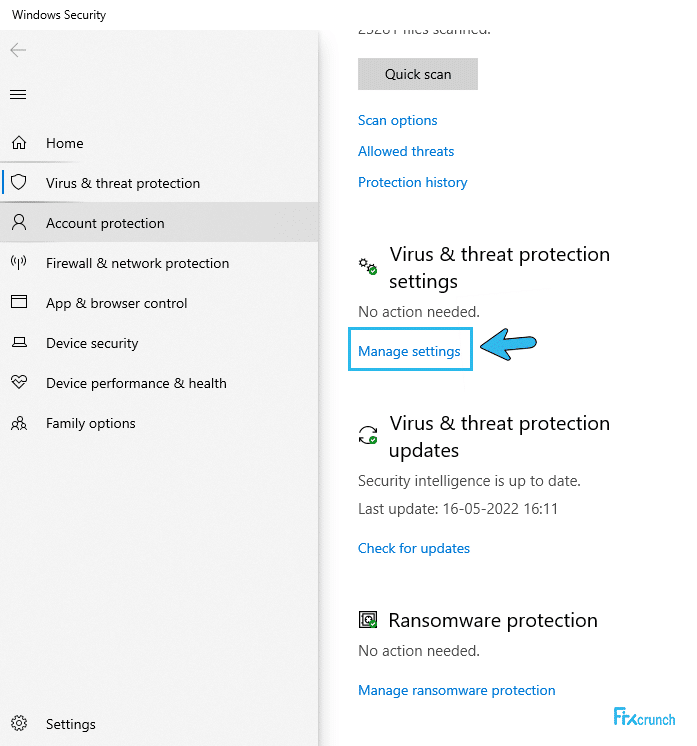
- Step 5: Select the “Virus & threat protection settings” option from the newly launched window.
- Step 6: Scroll down, find the “Real-time protection” option, and toggle the switch to disable it.
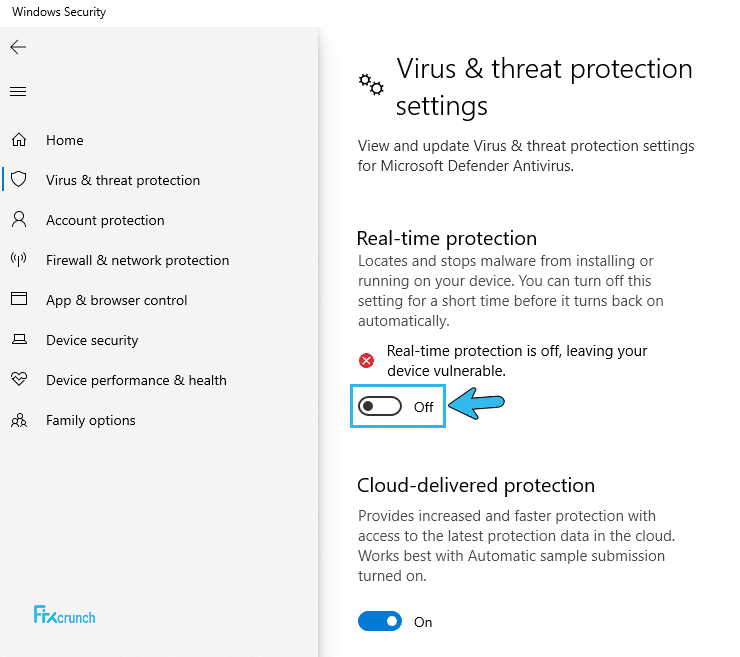
- Step 7: Save the settings and relaunch the game.
Your Windows Defender can still block certain applications if you are under a group moderator. In such cases, follow our complete guide to Fix OpenGL Error 1281 In Minecraft .
6 Advanced Fixes For The OpenGL 1282 Error
If none of the general fixes are working to resolve your OpenGL error 1282 in Minecraft, your problem may be way more deep-rooted than you actually assume. In such cases, implementing the pro methods is the sole option, although it requires some serious tweaks.
5. Manually Update OptiFine
OptiFine is not just the most popular mod in Minecraft trusted by millions of gamers, but it is also among the best-rated mod that ensures a superior rendering. However, an obsolete version of this mod can trigger OpenGL errors. So, you should update the mod at frequent intervals.
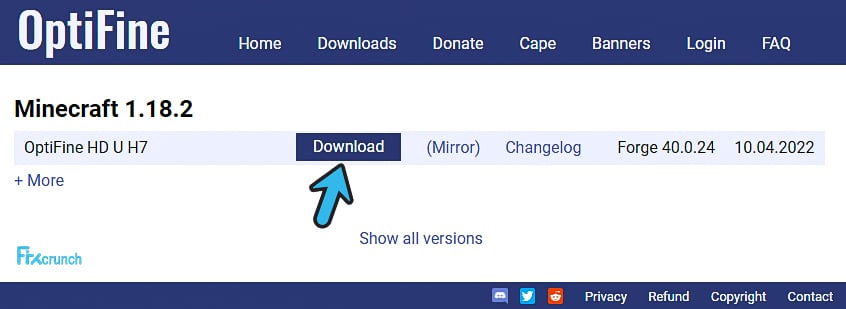
- Step 1: Open Google Chrome (or any other web browser), visit the official OptiFine Website, and click on the “Downloads” option located in the header section.
- Step 2: Navigate to the latest version of OptiFine listed on the menu and click on the adjacent “Download” button.
- Step 3: Let the “.jar” file download on your system and copy the entire file when it is done.
- Step 4: Launch the “Run” dialog by pressing the “Windows Key + R” together and type “%appdata%/.minecraft” to open the “Minecraft” folder under the “Roaming” directory.

- Step 5: Find the “Mods” folder and paste the “.jar” file inside the folder which you have already copied.

- Step 6: Launch the game by double-clicking the “Minecraft Launcher” icon and then click on the “Arrow” sign just beside the “Play” option.
- Step 7: Once all the available option appears on the screen, select the latest version of OptiFine from that.
- Step 8: Save the settings and click on the “Play” button to launch a new game.
Several gamers reported getting an unexpected bug in the taskbar where it completely freezes and fails to respond.
6. Disable Shaders From Video Settings
You may face OpenGL error 1282 in Minecraft shaders if you are using a low-end graphics card below the optimum requirement for the game. However, you can manually disable all the shaders in the game to ensure bug-free gameplay.
- Step 1: Launch the game by double-clicking the “Minecraft Launcher” icon on your desktop.
- Step 2: In the mode selection menu on the welcome screen, select the “OptiFine” option.
- Step 3: Choose either the “Single Player” or “Multiplayer” option and let all the maps load in your new game.
- Step 4: Once the game starts, press the “Esc” button to open the settings option and click on the “Options” button from that.
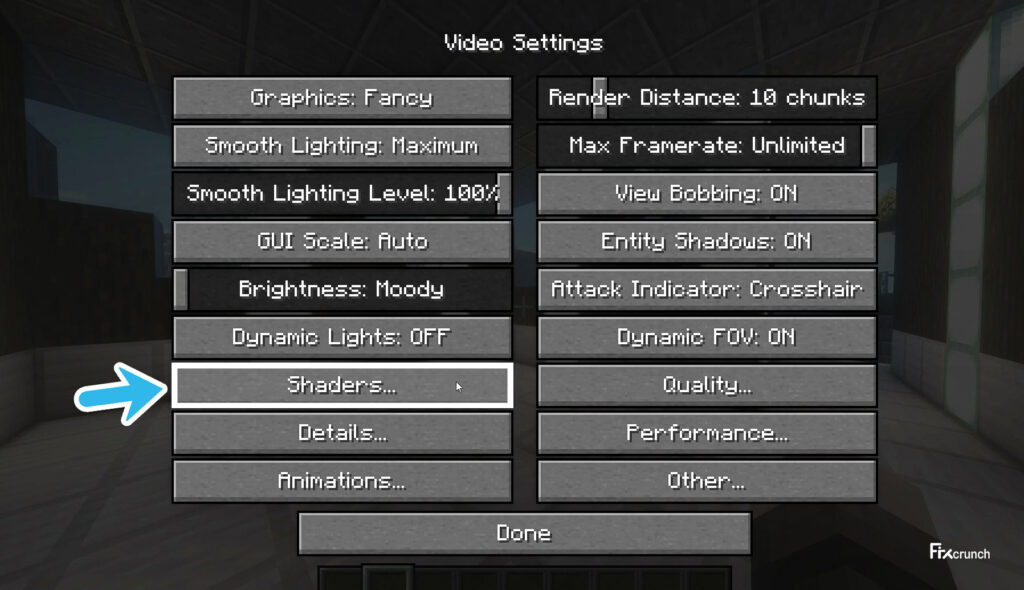
- Step 5: Further navigate to the “Shaders” option and click on the “Off” button to disable it.
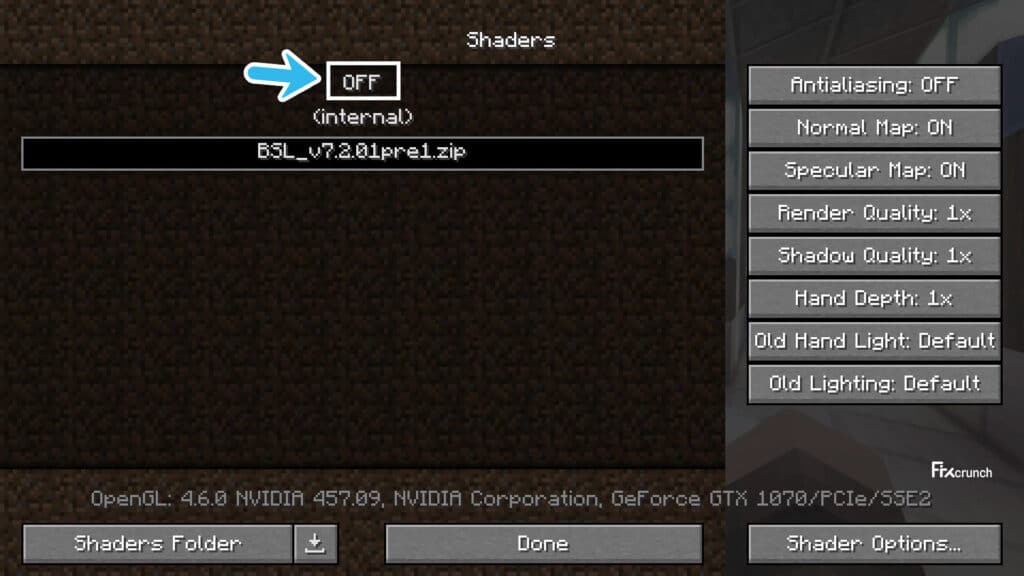
- Step 6: Click on the “Done” button to save it and relaunch Minecraft.
If you disable shaders, you may face several graphics-related issues, such as a broken bow or a wrongly rendered background. You can follow our step-by-step guide to repair bows in Minecraft on Windows systems in such cases.
7. Disable Render Regions From Video Settings
Besides shaders, render regions are also core vitals that can create trouble, especially in OpenGL. In such cases, you need to update your graphics card altogether to match the optimum requirement or can manually disable the render region from the in-game video settings.
- Step 1: Double-click on the “Minecraft Launcher” button to initiate the game and select the “Single Player” or “Multiplayer” option from the welcome screen.
- Step 2: Hit the “Esc” button once the game starts to open the in-game settings menu.
- Step 3: Select the “Options” button from the menu and select the “Video Options” from that.
- Step 4: After the video menu opens up, click on the “Performance” option.
- Step 5: Click on the toggle switch located beside the “Set Render Regions” option to off.
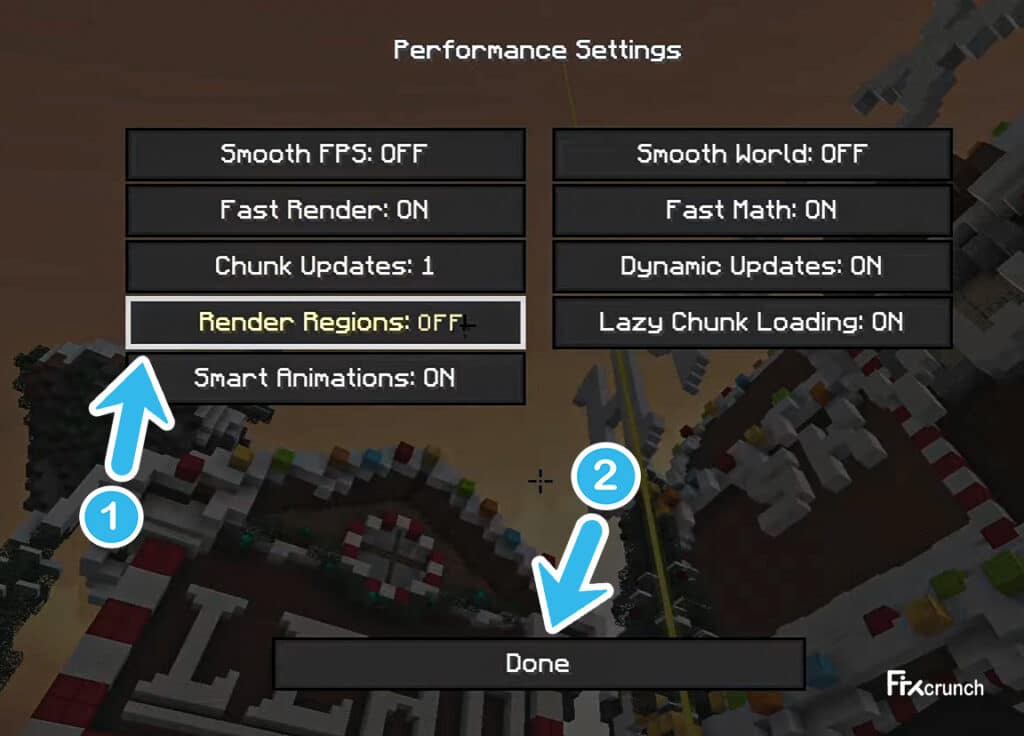
- Step 6: Click on the “Done” button to save the settings and relaunch your game.
You may feel a slight lag in gameplay or a jittery screen in a few patches if you disable the render regions permanently. So, it is better to update your GPU and enable it again to ensure the smoothest gameplay possible!
8. Decrease Render Distance
If completely disabling the render region isn’t your best bet, you can manually decrease the render distance to reduce the additional load from your GPU while playing Minecraft, especially if you are using a low-end one.
- Step 1: Double click on the “Minecraft Launcher” icon to initiate the game and click on either “Single Player” or “Multiplayer” to launch a map.
- Step 2: Hit the “Esc” button once the game starts and navigate to the “Options” section.
- Step 3: Click on the “Video Settings” option and navigate to the “Redner Distance” slider.
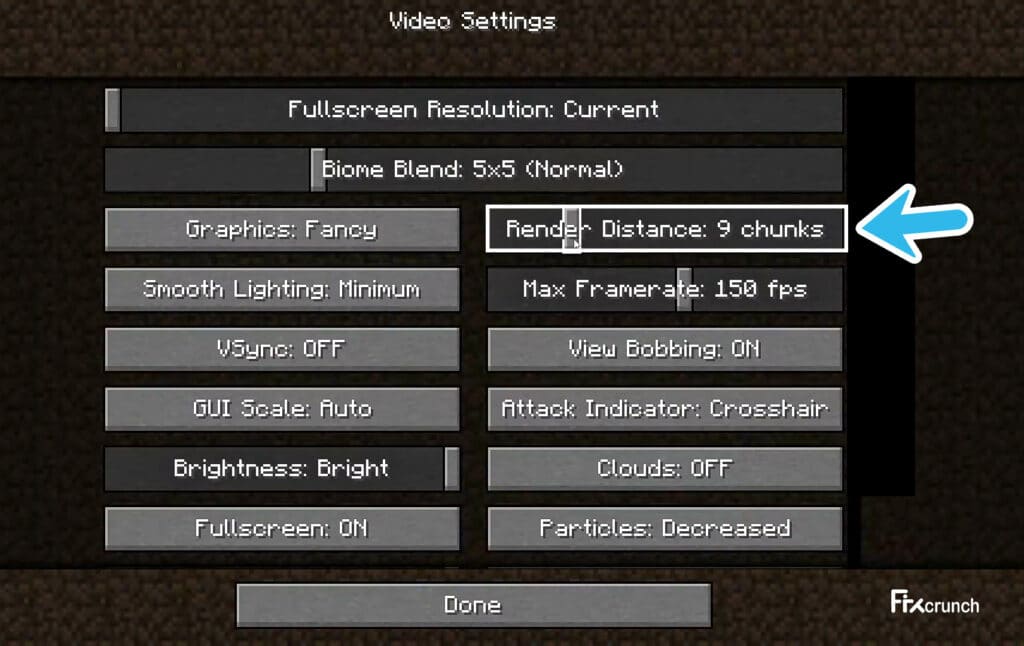
- Step 4: Hold the slider and drag it to your left-hand side to decrease the distance.
- Step 5: Click “Done” to save the settings and relaunch your game.
If you are using an old version of Minecraft, you may not get a slider but a numerical value instead beside the “Render Distance” option. In such cases, you need to set the value between 4 and 6 (the default numerical value is 10).
9. Manually Add OpenGL32.dll
The Minecraft OptiFine OpenGL error 1282 is bound to trigger if you have a wrongly configured DLL file in the root directory. Many gamers have also reported missing the Dll file completely from their system. In such cases, manually adding the OpenGL32.dll file is the only option.
- Step 1: Right-click on either the “This PC” or “My Computer” icon on your desktop (depending on your OS version) and select the “Properties” option from the menu.
- Step 2: Note down your OS architecture (either 32-bit or 64-bit) displayed beside the “System Type” option.
- Step 3: Open a web browser and go to the official website of DLL-Files or any other trusted third-party sites.
- Step 4: Download the compatible DLL file according to your OS architecture and copy the entire file.
- Step 5: Come back to your desktop, right-click on the “Minecraft Launcher” icon and click on the “Open File Location” option from the menu.
- Step 6: Once the root folder of “Minecraft” launches, find the “Runtime” folder and open the “JRE-x64” folder inside it.
- Step 7: Find and open the “bin” folder inside it and paste the DLL file which you have already copied.
- Step 8: Restart your Windows system and relaunch the game.
If you manually add third-party DLL files in any of your root directories, you may face graphics-related errors in some cases, such as a blacked-out PnP monitor or a flickering screen. You can follow our easy fix for the generic PnP monitor to resolve that error.
If none of the above methods (both generic and advanced) are working to resolve your OpenGL issue, you may need to disable showing the error popup completely from the in-game settings, as it is the only option remaining.
- Step 1: Double-click on the “Minecraft Launcher” icon and select either the “Single Player” or “Multiplayer” option from the welcome screen.
- Step 2: Hit the “Esc” button to bring the in-game settings menu once the map is loaded completely.
- Step 3: Navigate to the “Options” tab and click on the “Video Settings” option.
- Step 4: Click on the “Others” option and further select the “Show GL errors” option.

- Step 5: Click on the toggle switch to the “Off” position to disable it.
- Step 6: Click “Done” to save the settings and relaunch the game.
It is not recommended to disable the error message popup for a long time, as you may miss some critical errors that can create further problems in this game. So, once you identify the main cause and solve it, enable it again!
Before you try to identify the root cause and solve it in the right manner, you need to know what Minecraft OpenGL error 1282 actually is! Basically, there are two errors in OpenGL, 1281 and 1282, that can trigger on Minecraft, especially if you are using a low-end graphics card.
While the error code 1281 typically pops up randomly, the 1282 error code is mainly followed by a black or flickering screen. So, you may get a black screen and then the 1282 error message while playing Minecraft.
This error is mainly triggered when the dimensionality mod starts interfering with the shader mod. It can also trigger if the shader mod fails to load completely during the start-up of the game. However, any outdated mod can create this issue as well.
Conclusion
It is perfectly safe to follow the generic fixes. But, before you resort to any pro methods to fix the OpenGL error code 1282, you should create a restore point. It will protect your valuable saved games and other settings if anything goes wrong.
Have you found out any other solution we haven’t listed above? If yes, don’t forget to tell us about that in the comment box below! GG, folks!
FAQs
Q. How do I get rid of OpenGL error 1282?
You need to update your game, GPU driver, and Java application to get rid of error code 1282 in OpenGL. Besides, you can also manually download and include the OpenGL32.dll to fix this error.
Q. How do I get rid of OpenGL errors?
The best way to get rid of any OpenGL error is by updating your GPU driver, Windows version, and the game itself. Besides, you can also update Java on your system and disable the Windows Defender or any other third-party antivirus to fix it.
Q. How do I fix OpenGL error 1282?
First, try to update the OptiFine mod if you are using it. And secondly, you should disable the shader and render region to solve this issue. Several gamers also reported decreasing the render distance to fix this OpenGL issue.
Q. What does OpenGL error 1282 mean?
The OpenGL error code 1282 typically means that the dimensionality mod installed on your system is directly conflicting with the shader mod. It can also trigger if the shader mod fails to load completely during the start-up.
Comments
![]()
Hello everyone,
I’m getting a strange message pop up whenever I use Optifine. It’s been happening since 1.13.1 and continues into 1.13.2
The chat/command will display «OpenGL Error: 1282 (Invalid Operation)» every 10 seconds or so which can be really tedious in multiplayer when you’re trying to follow a chat.
I’ve tried everything I can think of. Full/clean reinstall of Minecraft, updating Java, updating Windows, updating graphics drivers, but the moment I run the game with Optifine it pops up again.
Has anyone else had this bug, and if so, how do you get rid of it? I am hoping to avoid having to play Minecraft without Optifine, but that’s the only way I can stop it happening at the moment.
![]()
Can you post the game output (error log)?
It should have more details about the error.
![]()
![]()
Actually getting a 2nd error in there now, «1281 (Invalid Value)»
![]()
Before the issue is fixed, there is a setting to turn off OpenGL errors. I believe it is Options... -> Video Settings -> Other -> Show OpenGL errors.
Hope this helps.
![]()
That is really useful, AndanteDevs, thank you!
![]()
I am also getting this error periodically on 1.12.2 using the extreme current version of sildurs vibrant shaders.
![]()
Mixed with the OpenGL errors are also some NullPointerExceptions which may be related:
Caused by: java.lang.NullPointerException
	at cfc.d(SourceFile:199)
	at crd.a(SourceFile:1809)
	at lo.a(SourceFile:122)
	at lo.a(SourceFile:16)
	at ix.lambda$checkThreadAndEnqueue$0(PacketThreadUtil.java:21)
	at ix$$Lambda$1032/114356890.run(Unknown Source)
	at java.util.concurrent.Executors$RunnableAdapter.call(Executors.java:511)
	at java.util.concurrent.FutureTask.run(FutureTask.java:266)
	at k.a(Util.java:157)
![]()
The OpenGL error is very strange: OpenGL API ERROR: 1281 (GL_INVALID_VALUE error generated. View frustum must not have a zero values of: (right-left), (top-bottom), or (zFar-zNear).)
As if the view frustum is incorrectly defined.
![]()
What OS, GPU, drivers?
F3 debug screenshot?
![]()
Windows 10 1909. GTX 1070, nvidia driver version 441.41. I’ll try to get the screenshot in a bit.
![]()

Here’s the debug screenshot.
![]()
@cybercatgurrl you are running Forge with 59 mods loaded, most probably a conflict with one of the installed mods.
The original problem is OptiFine standalone, no other mods.
![]()
so im having the same errors but my game is a black screen. i can open my inventory and see my hotbar. im running on 1.7.10. i’ll post the mod list below.

Thank you and pls get back to me asap. 
![]()
should probably update optifine, E3 is outdated
![]()
thanks man ill try it out and get back to you if it works or not
![]()
also do you think you can help me with some other issues im having. either through email, here or discord.
![]()
also updating the optifine version did not work still the same
here is a pic of how my game looks

![]()
@Hilife808 If u are running shaders. It can sometimes give u a black screen bc the shaders is trying to add visual effects but cant bc a mod is doing the same thing. And for ur error 1282. that is also a shader error message. which is to do with visals again. This error ecours mostly when u have a dimension mod installed since dimension mods can cause shaders issue’s.
How i fixed that error is just turn off the gui errors in your settings. but other then that with the black scrren i would contact the shader owner if still avalible for the issue to be resolved.
Most of all its a shader visual conflict
![]()
I have the same problem i select a shader and when its on the screen is black and i get the error Open GL Error 1282 (invalid operation).


![]()
You should be able to just reload the shader, and it should work. also why not use pre30
![]()
i have tried to reload the shader and the same thing happened
![]()
Hi, I am also having this error however I am not getting the black screen however my shader still isn’t loading, I also used a preview version of optifine because there was no 1.16 version, could that be the issue or do you think it was the shader? (the shader is SEUS renewed and is v1.0.1) I also don’t have any mods loaded on the game. How do I fix this error and load my shader?

![]()
Yes I have the same problem too with a different shader the other one gave me the black screen but trying a different one I got the error and can see my screen but the shader doesn’t work
![]()
Also I did get the newer preview optfine pre 30
![]()
![]()
This happens for me on mac but it does tell me that my device doesn’t support it and I get some bits of the screen staying still
![]()
My brother is running Aristois 1.16.5 with optifine and baritone on his survival hack game but it shows Open GL Error 1282 (Invalid Operation), He turns off mods and it still shows it every second please help someone?
![]()
Just regular shader errors. Always happens with optifine. To solve this issue of not getting the text. Go into options, video settings, Other settings and turn show GL errors: to off.
Edit: Some shaders are out of date and can cause more issues such as black screen and other issues. i would try finding the correct updated version of that shader.zip or find another shader to use. ^^
![]()
![]()
The thing is, im getting the same problem with Lunar Client (im using it because my normal minecraft crashes when i open it, it would be helpful if someone helps)

![]()
Hello I play forgeoptifine in 1.12.2 and when I put shaders my hand and the nether are either black or white I attach an image with my components and shader
This is what my hand looks like
that is not the color of my skin
Attached capture of the mods that I use
Plis if anyone knows how to solve it tell me and in the chat it also says OpenGl 1282


Man I actually have found out how to solve this problem. Your mod list screenshot helped me a lot. Delete «albedo». I don’t know why but this mod is ruining the visuals of your game.
![]()
Ran into the OpenGL 1282 error myself just now.
I was able to resolve the conflict by referring to the logs, where I found that at least in my case, it was Pneumaticraft having issues drawing the overlay for the pressure gauges.
Look at your latest log, scroll to the bottom and find the last occurrence of the error.
Read through the error and look for mention of a mod you have used or a default MC setting that is conflicting with Optifine.
Here is my error for reference and don’t get overwhelmed if you don’t understand everything.
You’re just looking to find what is causing the issue for OpenGL so just look for a reference to something for you to investigate further.
Then you can disable the mod or delete any error-causing items in game and the error should no longer be an issue.
Much better solution that just ignoring it and suffering the performance cost.
Hopefully this helps others figure out how to troubleshoot their specific conflict.
[20:28:13] [Client thread/ERROR]: OpenGL API ERROR: 1282 (GL_INVALID_OPERATION error generated. State(s) are invalid: primitive mode match.) java.lang.Exception: Stack trace at org.lwjgl.opengl.GLDebugMessageCallbackI.callback(GLDebugMessageCallbackI.java:39) [lwjgl-opengl-3.2.2.jar:build 10] at org.lwjgl.opengl.GL11C.glDrawArrays(Native Method) ~[lwjgl-opengl-3.2.2.jar:build 10] at org.lwjgl.opengl.GL11.glDrawArrays(GL11.java:1879) [lwjgl-opengl-3.2.2.jar:build 10] at com.mojang.blaze3d.platform.GlStateManager.drawArrays(GlStateManager.java:975) [?:?] at net.optifine.shaders.SVertexBuilder.drawArrays(SVertexBuilder.java:360) [?:?] at net.minecraft.client.renderer.WorldVertexBufferUploader.func_181679_a(WorldVertexBufferUploader.java:83) [?:?] at net.minecraft.client.renderer.Tessellator.func_78381_a(Tessellator.java:33) [?:?] at me.desht.pneumaticcraft.client.util.GuiUtils.drawPressureGauge(GuiUtils.java:95) [?:1.14.4-1.0.8-22] at me.desht.pneumaticcraft.client.model.module.ModelPressureGauge.renderDynamic(ModelPressureGauge.java:55) [?:1.14.4-1.0.8-22] at me.desht.pneumaticcraft.client.model.module.ModelPressureGauge.renderDynamic(ModelPressureGauge.java:13) [?:1.14.4-1.0.8-22] at me.desht.pneumaticcraft.client.model.module.ModelModuleBase.render(ModelModuleBase.java:25) [?:1.14.4-1.0.8-22] at me.desht.pneumaticcraft.client.render.tileentity.RenderPressureTubeModule.render(RenderPressureTubeModule.java:68) [?:1.14.4-1.0.8-22] at me.desht.pneumaticcraft.client.render.tileentity.RenderPressureTubeModule.func_199341_a(RenderPressureTubeModule.java:21) [?:1.14.4-1.0.8-22] at net.minecraft.client.renderer.tileentity.TileEntityRendererDispatcher.func_203602_a(TileEntityRendererDispatcher.java:201) [?:?] at net.minecraft.client.renderer.tileentity.TileEntityRendererDispatcher.func_180546_a(TileEntityRendererDispatcher.java:154) [?:?] at net.minecraft.client.renderer.WorldRenderer.func_215326_a(WorldRenderer.java:989) [?:?] at net.optifine.shaders.ShadersRender.renderShadowMap(ShadersRender.java:362) [?:?] at net.optifine.shaders.Shaders.beginRender(Shaders.java:4243) [?:?] at net.minecraft.client.renderer.GameRenderer.func_78471_a(GameRenderer.java:1029) [?:?] at net.minecraft.client.renderer.GameRenderer.func_195458_a(GameRenderer.java:795) [?:?] at net.minecraft.client.Minecraft.func_195542_b(Minecraft.java:890) [?:?] at net.minecraft.client.Minecraft.func_99999_d(Minecraft.java:384) [?:?] at net.minecraft.client.main.Main.main(SourceFile:155) [?:?] at sun.reflect.NativeMethodAccessorImpl.invoke0(Native Method) ~[?:1.8.0_51] at sun.reflect.NativeMethodAccessorImpl.invoke(NativeMethodAccessorImpl.java:62) ~[?:1.8.0_51] at sun.reflect.DelegatingMethodAccessorImpl.invoke(DelegatingMethodAccessorImpl.java:43) ~[?:1.8.0_51] at java.lang.reflect.Method.invoke(Method.java:497) ~[?:1.8.0_51] at net.minecraftforge.fml.loading.FMLClientLaunchProvider.lambda$launchService$0(FMLClientLaunchProvider.java:56) [forge-1.14.4-28.2.20.jar:28.2] at net.minecraftforge.fml.loading.FMLClientLaunchProvider$$Lambda$431/1353093587.call(Unknown Source) [forge-1.14.4-28.2.20.jar:28.2] at cpw.mods.modlauncher.LaunchServiceHandlerDecorator.launch(LaunchServiceHandlerDecorator.java:37) [modlauncher-4.1.0.jar:?] at cpw.mods.modlauncher.LaunchServiceHandler.launch(LaunchServiceHandler.java:54) [modlauncher-4.1.0.jar:?] at cpw.mods.modlauncher.LaunchServiceHandler.launch(LaunchServiceHandler.java:72) [modlauncher-4.1.0.jar:?] at cpw.mods.modlauncher.Launcher.run(Launcher.java:81) [modlauncher-4.1.0.jar:?] at cpw.mods.modlauncher.Launcher.main(Launcher.java:65) [modlauncher-4.1.0.jar:?]
![]()
hi, i have been having this problemwith my shaders in 1.17 and idk how to fix it, ive tried praticly evrything and nothing changes


![]()
I am also experiencing this issue, my game is vanilla except for Optifine, running through MultiMC.
The relevant line of my game log is [21:23:48] [Render thread/ERROR]: [OptiFine] OpenGL error: 1282 (Invalid operation), at: Expand VBO.
Minecraft 1.17.1, on macOS 11.5.2 on Intel.
![]()
The «OpenGL Error: 1282» is a general error which means «something is wrong».
OpenGL uses this error for many different problems at many different places.
The original issue from @bmcwal is for 1.13 about invalid frustum size with Forge and mods.
@cybercatgurrl reports it for 1.12 and running with shaders.
@Hilife808 reports it for 1.7.10 and Forge + mods.
@progamerdixie reports it for 1.15.2 with shaders.
@WilliamD47 reports it for a Mac.
@michealREEEEE reports it for https://github.com/cabaletta/baritone
@soopi-n reports it for Lunar client
@skyyxX reports it for 1.17 with shaders.
@ajs256 reports it for 1.17 on Mac running with MultiMC.
Those are different problems that need separate issues.
![]()
i having an error that says opengl error:1282 invalid operation
otherwise when i launch the game it just gets stuck at the loading screen with thedirt background pls help me some one
![]()
![]()
Error 1281 I solved it, enter the server, then press the ESC key, then, Graphics, Various Options, Reset all the configuration, Then yes, and reset all the unnecessary activity that you used.
![]()
In my case, the error stopped occurring when I turned off the «Render Regions» option of optifine.
![]()
how do i fix this error>> message: id=1282, source=API, type=ERROR, severity=HIGH, message=’Error has been generated. GL error GL_INVALID_OPERATION in (null): (ID: 173538523) Generic error’ im on vanilla by the way.
![]()
the thing is im on complete vanilla and im getting this error
![]()
С таким количеством движущихся частей в Minecraft: Java Edition ваша игра может легко перестать работать должным образом. Если ваш экран потемнел, а в игровом чате продолжает появляться сообщение «Ошибка OpenGL: 1282 (недопустимая операция)», вы определенно не хотите продолжать биться головой о стену, надеясь, что проблема исправится сама собой. Вот как исправить эту надоедливую ошибку и снова запустить игру.
Что делать, если вы получаете ошибку OpenGL 1282 в Minecraft: Java Edition
Если единственная проблема, которую вы видите, — это всплывающее окно чата с кодом ошибки, и все остальное в порядке, вы можете отключить это сообщение. Перейдите в «Параметры» в меню паузы и войдите в «Настройки видео». Прокрутите вниз, чтобы найти «Другое», и отключите параметр «Показывать ошибки GL».

Если вы получаете ошибку OpenGL 1282 в Minecraft, когда экран становится черным, вероятно, где-то в вашей игре есть какой-то поврежденный или устаревший файл, который все портит. Для начала выйдите из игры и убедитесь, что у вас установлена последняя версия Minecraft: Java Edition. Чтобы быть в полной безопасности, вы можете удалить и переустановить игру, просто убедитесь, что вы сделали копию своего мира, чтобы не потерять его.
После того, как игра будет полностью обновлена, вы также захотите проверьте и убедитесь, что Java также обновлена. Зайдите на официальный сайт и скачайте нужную версию для вашей операционной системы. Следуйте инструкциям по установке, пока она не будет завершена. Вы также можете попробовать обновить графический драйвер, если он в этом нуждается.
Если описанное выше не помогло вам решить проблему, возможно, у вас несовместимые или поврежденные моды. Если у вас куча модов от разных создателей, они могут конфликтовать друг с другом и вызывать ошибки. Проверьте страницу загрузки для каждого мода, чтобы узнать, для каких обновлений эти моды работают, и посмотрите, есть ли какие-либо сообщения о том, что они не работают с другими имеющимися у вас модами. Удалите все последние установленные вами моды, которые могут все испортить. Если у вас есть OptiFine, обязательно проверьте и обновите его.