Некоторые пользователи ПК Dell сталкиваются с ошибкой 2000-0415 при запуске средства диагностики EPSA (Enhanced Pre-Boot System Assessment) перед загрузкой системы. Большинство затронутых пользователей сообщают, что эта ошибка возникает после того, как они вернули свою систему после ремонта или после того, как они сами внесли некоторые изменения в оборудование.
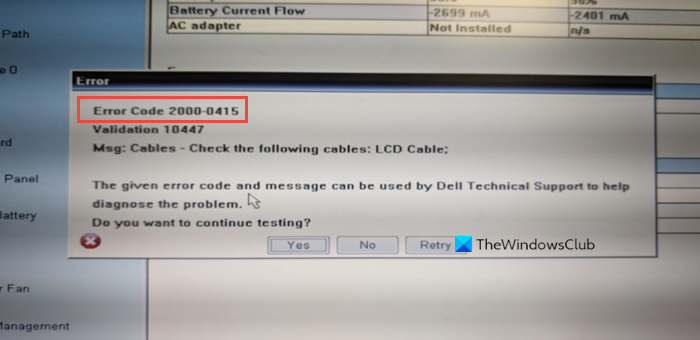
Код ошибки Dell 2000-0415
После того, как мы проанализировали все потенциальные сценарии, которые могут вызывать этот код ошибки, вот список сценариев, которые, как известно, вызывают 2000-0415 при запуске инструмента EPSA на компьютере Dell:
- Адаптер питания переменного тока не подключен — если вы столкнулись с этой проблемой с портативным устройством Dell (ноутбуком, ноутбуком, ультрабуком или планшетом Windows, скорее всего, сканирование ePSA вызывает эту ошибку, потому что напряжение и частота внутреннего Компоненты ниже ожидаемого. Этот конкретный сценарий является ложным срабатыванием, и его можно устранить, подключив адаптер питания переменного тока.
- Неподключенный кабель питания. Как оказалось, эта проблема также может возникать из-за того, что кабель SSD или жесткого диска не подключен к блоку питания через кабель питания. В этом случае вы можете решить проблему, разобрав боковую / заднюю части корпуса и убедившись, что все компоненты подключены к источникам питания.
- Старые данные конфигурации поддерживаются батареей CMOS. Если вы недавно внесли некоторые изменения в оборудование вашего ПК Dell, вы можете ожидать появления этой ошибки, потому что батарея CMOS поддерживает устаревшие данные конфигурации и, таким образом, затрудняет сканирование ePSA. В этом случае вы можете решить проблему, очистив батарею CMOS.
Теперь, когда вы знакомы со всеми сценариями, которые могут вызвать 2000-0415, перейдите к следующему разделу ниже, чтобы получить инструкции по решению этой конкретной проблемы.
1. Подключите адаптер питания переменного тока (если применимо).
Безусловно, наиболее распространенным случаем, вызывающим эту ошибку, является сценарий, в котором адаптер питания переменного тока не подключен к машине, которая выполняет сканирование ePSA.
Имейте в виду, что сканирование Enhanced Pre-Boot System Assessment будет выполнять полную проверку всех задействованных аппаратных компонентов, включая оценку напряжений и частот важнейших компонентов, таких как ЦП, графический процессор и память.
Примечание. Это применимо только к устройствам Dell со встроенным или съемным аккумулятором (ноутбуки, ультрабуки, планшеты с Windows и т. Д.).
Одна из причин, по которой значения напряжения или частоты отличаются от ожидаемых эквивалентов, заключается в том, что устройство Dell в настоящее время потребляет энергию от аккумулятора, а не напрямую от розетки.
Если этот сценарий применим, это, вероятно, будет означать, что частоты ваших аппаратных компонентов ниже ожидаемых, что может привести к тому, что инструмент ePSA выбрасывает 2000-0415 из-за проблем с аппаратным отказом.
К счастью, вы можете предотвратить возникновение ошибки, просто подключив устройство Del к адаптеру питания и повторив сканирование ePSA.
Подключение адаптера питания Dell
Если подключение адаптера питания Dell не устранило проблему или этот сценарий неприменим, перейдите к следующему потенциальному исправлению ниже.
2. Проверьте, нет ли неподключенного кабеля.
Если вы начали решать эту проблему только после того, как отдали компьютер специалисту по ПК или после внесения некоторых изменений (по компонентам), вам следует проверить, правильно ли подключены все кабели.
Имейте в виду, что ошибка 2000-0415 также может быть признаком компонента, к которому не подключен кабель питания — наиболее частыми виновниками в этом случае являются кабели SATA или ATA, отсоединенные от жесткого диска / SSD.
Чтобы убедиться, что этот сценарий неприменим, полностью выключите компьютер и отключите его от источника питания, прежде чем открывать заднюю крышку.
Примечание. Если у вас есть статический браслет, наденьте его, прежде чем продолжить, чтобы снизить риск повреждения внутренних органов из-за накопления статического электричества.
Оказавшись внутри, взгляните на свои компоненты и убедитесь, что все кабели правильно подключены.
Пример отключенного кабеля питания ATA
Примечание. Не забудьте протолкнуть каждый кабель, чтобы убедиться, что он не плохо подключен.
Если вам удастся найти отсоединенный или плохо подключенный кабель, устраните проблему и повторите сканирование ePSA после того, как вы снова наденете боковую / заднюю крышку и снова подключите кабель питания.
Если этот сценарий неприменим или все исследованные кабели были правильно подключены, перейдите к следующему потенциальному исправлению ниже.
3. Очистите батарею CMOS.
Вы также можете столкнуться с этой проблемой из-за остаточной информации, оставшейся после предыдущей конфигурации ПК, которая сбивает с толку сканирование ePSA — это очень часто в ситуациях, когда ЦП или графический процессор были заменены.
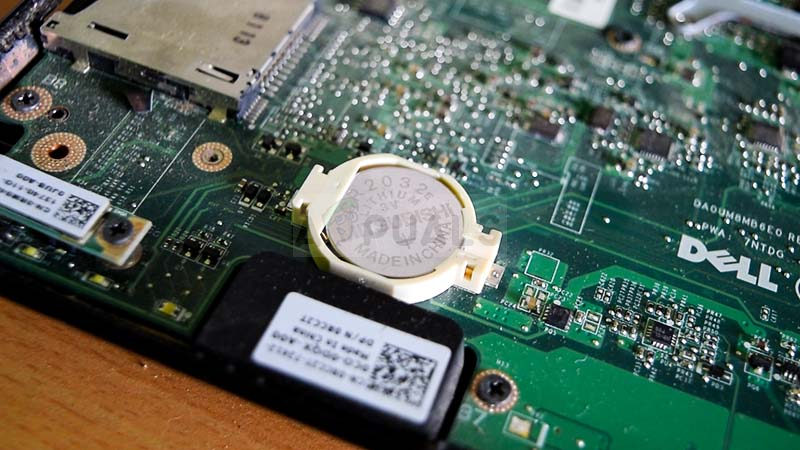
В этом случае вы можете заставить свой компьютер «забыть» о предыдущей конфигурации, вынув батарею CMOS из гнезда.
Батарея CMOS (Complementary Metal Oxide Semiconductor) (также известная как RTC или NVRAM) отвечает за хранение информации, начиная от времени и даты и заканчивая настройками оборудования системы.
Если вы подозреваете, что эта проблема связана с батареей CMOS, вы сможете решить проблему, очистив батарею CMOS, открыв корпус ПК и физически вынув ее на пару секунд.
Вот краткое руководство, как это сделать:
Примечание. Приведенные ниже шаги должны применяться независимо от вашей версии Windows или конфигурации вашего ПК.
- Полностью выключите компьютер и убедитесь, что он не подключен к розетке.
- Снимите боковую крышку и наденьте на основную руку статический браслет (если он у вас есть).
Примечание. Статический браслет будет заземлять вас на корпус компьютера и выравнивать электрическую энергию, что гарантирует, что вы не повредите компоненты вашего ПК. - Взгляните на свою материнскую плату и найдите батарею CMOS. Это не должно быть трудно заметить.
- Как только вы увидите его, используйте ноготь или непроводящую отвертку, чтобы вынуть его из гнезда.
Удаление батареи CMOS
Примечание. Если у вас есть запасная батарея CMOS, замените текущую, чтобы убедиться, что вы не имеете дело с неисправной батареей. Если вы этого не сделаете, тщательно очистите его, чтобы убедиться, что грязь не мешает подключению к материнской плате.
После того, как вы успешно очистили батарею CMOS, соберите все вместе и запустите другое сканирование ePSA, чтобы увидеть, устранена ли проблема.
Любое современное устройство подвержено ошибкам по разным причинам. Для портативных компьютеров Dell распространенной ошибкой, с которой сталкиваются пользователи, является код ошибки 2000-0415. Это происходит, когда вы пытаетесь запустить расширенную предзагрузочную оценку системы или средство диагностики ePSA на вашем компьютере. Dell Inspiron 15 или Dell Latitude E6420 ноутбук, Dell Optiplex 390 настольный ПК, а также множество других компьютеров Dell.
Если в вашем ноутбуке или настольном компьютере произошел системный сбой, вы можете диагностировать его с помощью инструмент диагностики ePSA. Он тщательно проверит ваши устройства и детали на предмет любых проблем, включая ЖК-дисплей, жесткий диск, клавиатуру, перемычку и многое другое. При запуске средства диагностики может появиться код ошибки 2000-0415.
Код ошибки Dell 2000-0415 возникает, когда на вашем ПК есть проблема с определенным кабелем. Кабель может быть незапломбирован или отсоединен. В некоторых случаях проблема связана с кабельным подключением вашего компьютера. Могут быть ошибки с системными файлами или батареей CMOS. Проблема также может быть вызвана вирусом или вредоносным ПО.
К счастью, есть способы справиться с проблемой с кодом ошибки Dell 2000-0415 на вашем ноутбуке или настольном компьютере с Windows 10. Ознакомьтесь с каждым из приведенных ниже решений и выполняйте шаги по очереди.
Решение № 1. Убедитесь, что адаптер питания подключен к ноутбуку Dell
При запуске диагностического инструмента ePSA вам необходимо подключить адаптер питания к ноутбуку Dell и подключить его к розетке. Обратите внимание, что средство диагностики ePSA выполняет диагностику всех частей вашего ноутбука, включая оборудование. Также необходимо определить напряжение питания и другие значения в вашем ноутбуке. Вам нужно будет подключить его напрямую к розетке, а не разряжать аккумулятор ноутбука.
После подключения адаптера питания к ноутбуку попробуйте снова запустить средство диагностики ePSA и посмотрите, устранит ли он ошибку.
Решение № 2 — Повторно подключите адаптер питания к компьютеру Dell.
Если адаптер питания уже подключен к ноутбуку, попробуйте снова подключить кабель. После этого выключите портативный компьютер Dell. Попробуйте снова подключить кабель перед включением ноутбука. Теперь снова запустите средство диагностики ePSA.
Решение №3 — Извлеките батарею CMOS.
 Предоставлено: Pok Rie / Pexels.
Вы можете попытаться выполнить следующие действия, если знаете, как открыть заднюю часть ноутбука Dell. В этом методе вам нужно будет открыть заднюю часть ноутбука и извлечь батарею CMOS, чтобы очистить настройки даты и времени, которые могут вызывать ошибку.
- Обязательно полностью выключите ноутбук Dell.
- Отключите его от розетки, если он подключен.
- Осторожно переверните ноутбук Dell.
- Снимите боковую крышку.
- Теперь найдите батарею CMOS.
- Осторожно извлеките батарею CMOS из гнезда.
- Очистите аккумулятор. Вы также можете заменить батарею CMOS на новую.
- Перед тем, как вставить батарею CMOS обратно, попробуйте проверить материнскую плату, есть ли плохо подключенные или отсоединенные кабели.
- Вставьте его обратно в слот и накройте ноутбук.
- Включите портативный компьютер Dell и снова запустите средство диагностики ePSA.
НУЖЕН НОВЫЙ НОУТБУК? Ознакомьтесь с этими потрясающими предложениями на новые компьютеры в официальном интернет-магазине Dell!
У вас есть другое решение, которое поможет решить проблему Dell 2000-0415? Вы можете поделиться им в разделе комментариев ниже, чтобы помочь другим пользователям ноутбуков Dell исправить свои ошибки!
Содержание
- Как исправить код ошибки 2000-0415 на ноутбуках Dell
- Как исправить код ошибки 2000-0415 на ноутбуках и настольных компьютерах Dell
- Решение № 1. Убедитесь, что адаптер питания подключен к ноутбуку Dell
- Решение № 2 — Повторно подключите адаптер питания к компьютеру Dell.
- Решение №3 — Извлеките батарею CMOS.
- Fix Error Code 2000-0415 on Windows computers
- What does Error Code 2000 mean?
- Fix Error Code 2000-0415
- 1] Check and connect the A/C Power Adapter
- 2] Check and connect any disconnected cables
- 3] Clear CMOS
- How do I fix error 2000-0146 on my hard drive?
- What does System fan failure mean?
- How do I fix the fan error on my Dell laptop?
- Related Posts
- Fix Event ID 55 (Kernel-Processor-Power) error on Windows PC
- Fix Unknown Software Exception Error Code 0xe06d7363
- Fix Error 0x8007000D, The data is invalid while renaming a folder on Windows 11/10
- [email protected]
- Fixing Error Code 2000-0415 on DELL Computers
- 1. Connect the A/C Power Adapter (if applicable)
- 2. Check for an Unconnected Cable
- 3. Clear the CMOS Battery
Как исправить код ошибки 2000-0415 на ноутбуках Dell
Любое современное устройство подвержено ошибкам по разным причинам. Для портативных компьютеров Dell распространенной ошибкой, с которой сталкиваются пользователи, является код ошибки 2000-0415. Это происходит, когда вы пытаетесь запустить расширенную предзагрузочную оценку системы или средство диагностики ePSA на вашем компьютере. Dell Inspiron 15 или Dell Latitude E6420 ноутбук, Dell Optiplex 390 настольный ПК, а также множество других компьютеров Dell.
Если в вашем ноутбуке или настольном компьютере произошел системный сбой, вы можете диагностировать его с помощью инструмент диагностики ePSA. Он тщательно проверит ваши устройства и детали на предмет любых проблем, включая ЖК-дисплей, жесткий диск, клавиатуру, перемычку и многое другое. При запуске средства диагностики может появиться код ошибки 2000-0415.
Код ошибки Dell 2000-0415 возникает, когда на вашем ПК есть проблема с определенным кабелем. Кабель может быть незапломбирован или отсоединен. В некоторых случаях проблема связана с кабельным подключением вашего компьютера. Могут быть ошибки с системными файлами или батареей CMOS. Проблема также может быть вызвана вирусом или вредоносным ПО.
Как исправить код ошибки 2000-0415 на ноутбуках и настольных компьютерах Dell
К счастью, есть способы справиться с проблемой с кодом ошибки Dell 2000-0415 на вашем ноутбуке или настольном компьютере с Windows 10. Ознакомьтесь с каждым из приведенных ниже решений и выполняйте шаги по очереди.
Программы для Windows, мобильные приложения, игры — ВСЁ БЕСПЛАТНО, в нашем закрытом телеграмм канале — Подписывайтесь:)
Решение № 1. Убедитесь, что адаптер питания подключен к ноутбуку Dell
При запуске диагностического инструмента ePSA вам необходимо подключить адаптер питания к ноутбуку Dell и подключить его к розетке. Обратите внимание, что средство диагностики ePSA выполняет диагностику всех частей вашего ноутбука, включая оборудование. Также необходимо определить напряжение питания и другие значения в вашем ноутбуке. Вам нужно будет подключить его напрямую к розетке, а не разряжать аккумулятор ноутбука.
После подключения адаптера питания к ноутбуку попробуйте снова запустить средство диагностики ePSA и посмотрите, устранит ли он ошибку.
Решение № 2 — Повторно подключите адаптер питания к компьютеру Dell.
Если адаптер питания уже подключен к ноутбуку, попробуйте снова подключить кабель. После этого выключите портативный компьютер Dell. Попробуйте снова подключить кабель перед включением ноутбука. Теперь снова запустите средство диагностики ePSA.
Решение №3 — Извлеките батарею CMOS.
 Предоставлено: Pok Rie / Pexels.
Вы можете попытаться выполнить следующие действия, если знаете, как открыть заднюю часть ноутбука Dell. В этом методе вам нужно будет открыть заднюю часть ноутбука и извлечь батарею CMOS, чтобы очистить настройки даты и времени, которые могут вызывать ошибку.
- Обязательно полностью выключите ноутбук Dell.
- Отключите его от розетки, если он подключен.
- Осторожно переверните ноутбук Dell.
- Снимите боковую крышку.
- Теперь найдите батарею CMOS.
- Осторожно извлеките батарею CMOS из гнезда.
- Очистите аккумулятор. Вы также можете заменить батарею CMOS на новую.
- Перед тем, как вставить батарею CMOS обратно, попробуйте проверить материнскую плату, есть ли плохо подключенные или отсоединенные кабели.
- Вставьте его обратно в слот и накройте ноутбук.
- Включите портативный компьютер Dell и снова запустите средство диагностики ePSA.
У вас есть другое решение, которое поможет решить проблему Dell 2000-0415? Вы можете поделиться им в разделе комментариев ниже, чтобы помочь другим пользователям ноутбуков Dell исправить свои ошибки!
Программы для Windows, мобильные приложения, игры — ВСЁ БЕСПЛАТНО, в нашем закрытом телеграмм канале — Подписывайтесь:)
Источник
Fix Error Code 2000-0415 on Windows computers
When running the ePSA (Enhanced Pre-Boot System Assessment) diagnostics on your Windows 11 or Windows 10-powered Dell computer, you may receive the Error Code 2000-0415. In this post, we provide the most suitable solutions affected PC users can try to resolve the issue.
What does Error Code 2000 mean?
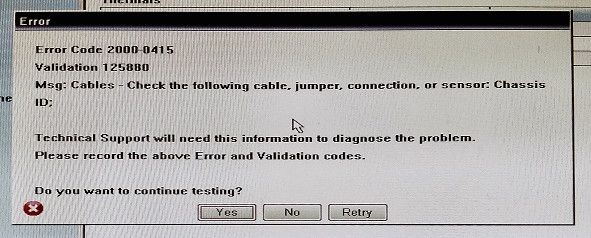
The Error Code 2000 that you might encounter on your Windows 11/10 PC simply means that the ePSA could not successfully read information from the hard drive. This error usually occurs due to faulty or misaligned cabling in your computer’s case, connecting your hard drive to the motherboard. This error typically signifies that a specific cable is not connected or is not seated correctly, and will normally name the specific cable in question as you can see on the lead-in image.
The most likely culprits to this error include;
- The A/C power adapter is not connected.
- Unconnected power cable.
- CMOS battery retains old configuration data.
Fix Error Code 2000-0415
If you’re faced with this Error Code 2000-0415 on your Windows 11/10 computer, you can try our recommended solutions below in no particular order and see if that helps to resolve the issue.
- Check and connect the A/C Power Adapter
- Check and connect any disconnected cables
- Clear CMOS
Let’s take a look at the description of the process involved concerning each of the listed solutions.
1] Check and connect the A/C Power Adapter
This solution to the Error Code 2000-0415 on your Dell Windows 11/10 computer requires you to make sure you have the A/C power adapter connected to the computer. The ePSA diagnostics are designed to test the charging functionality of the PC and the A/C power adapter needs to be connected for the ePSA diagnostics to run.
Try the next solution if this doesn’t apply to your case.
2] Check and connect any disconnected cables
As indicated on the error prompt that pops up on your system, this solution requires you to check and connect any disconnected cables. In addition to the cables identified on the error prompt, keep in mind that this error can also be a symptom of a component that doesn’t have a power cable connected to it – this could be SATA or ATA cables that are disconnected from the HDD/SSD. To rule out this scenario, shut down your computer completely and disconnect it from the mains and then open up the case and check for any loose or disconnected cables.
If there are disconnected or loose cables, make sure to push every cable through to ensure it’s not loosely connected. Once done, you can rerun the ePSA scan after you put the computer case back on and reconnect the power cable and power-on your Windows system.
If this didn’t work for you, you can try the next solution.
3] Clear CMOS
This solution requires you to simply reset or clear CMOS on your Dell Windows 11/10 PC.
Hope this helps!
How do I fix error 2000-0146 on my hard drive?
PC users that encounter the hard drive Error Code 2000-0146 on their Windows 11/10 computer, can fix the error by applying the following solutions:
- Scan your system.
- Run CHKDSK.
- Repair PC Registry.
- Run PSA (Pre-Boot System Assessment) Diagnostics.
- Reset BIOS settings.
- Restore PC in Safe Mode.
- Perform a Clean Boot.
What does System fan failure mean?
If the “Fan System Failure” message pops up on your Windows computer screen, it simply means that your power adapter was faulty before completely stopping to work and the CPU Fan wasn’t getting enough current and turning slowly.
How do I fix the fan error on my Dell laptop?
You may require the services of a PC hardware technician to perform this task successfully. To fix the fan error on your Windows 11/10 Dell laptop by cleaning the air vents on your computer. To clean the air vents on your computer do the following: Turn off the computer. Open up the computer case. Check the air vents on the computer for dust or debris. Use a can of compressed air to remove dust or debris from the air vents, dust filters (if any) and cooling fan fins.
Date: November 8, 2021 Tags: Dell, Errors
Fix Event ID 55 (Kernel-Processor-Power) error on Windows PC
Fix Unknown Software Exception Error Code 0xe06d7363
Fix Error 0x8007000D, The data is invalid while renaming a folder on Windows 11/10
[email protected]
Obinna Onwusobalu has studied Information & Communication Technology and is a keen follower of the Windows ecosystem. He has been a Windows Insider MVP (2020). He runs a computer software clinic.
Источник
Fixing Error Code 2000-0415 on DELL Computers
Some Dell PC users are encountering the 2000-0415 error when running the EPSA (Enhanced Pre-Boot System Assessment) diagnostics tool prior to booting up the system. Most affected users are reporting this error to occur after they received their system back from repairs or after they made some hardware modification themselves.
 Dell Error Code 2000-0415
After we analyzed every potential scenario that might be triggering this error code, here’s a list of scenarios that are known to cause the 2000-0415 when running the EPSA tool on a Dell computer:
- The A/C power adapter is not connected – If you’re encountering this issue with a portable Dell device (laptop, notebook, ultrabook, or Windows tablet, chances are the ePSA scan is triggering this error because the voltages and frequencies of the internal components are lower than expected. This particular scenario is only a false positive that can be resolved by connecting the A/C power adapter.
- Unconnected power cable – As it turns out, this issue can also occur due to an SSD or HDD cable that is not connected to the PSU via the power cable. In this case, you can resolve the issue by taking the side/back case apart and ensuring that every component is connected to the power sources.
- Old configuration data is maintained by CMOS battery – If you recently made some hardware changes to your Dell PC, you can expect to see this error occurring because the CMOS battery is maintaining outdated configuration data and thus confusing the ePSA scan. In this case, you can resolve the issue by clearing the CMOS battery.
Now that you are familiar with every scenario that might cause the 2000-0415, move down to the next section below for instructions on resolving this particular issue.
1. Connect the A/C Power Adapter (if applicable)
By far, the most common instance that will produce this error is a scenario in which the A/C power adaptor is not connected to the machine that is performing the ePSA scan.
Keep in mind that the Enhanced Pre-Boot System Assessment scan will execute a complete verification of every involved hardware component – This includes the assessment of voltages and frequencies of crucial components such as the CPU, GPU, and memory.
Note: This is only applicable for Dell devices that have a built-in or detachable battery (laptops, ultrabooks, Windows Tablets, etc.).
One of the reasons why the voltage or frequency values are different than the expected equivalents is if the Dell device currently draws power from the battery instead of drawing it directly from a power outlet.
If this scenario is applicable, this will likely mean that the frequencies of your hardware components are lower than expected, which might determine the ePSA tool to throw the 2000-0415 due to concerns of a hardware failure.
Fortunately, you can prevent the error from occurring simply by connecting the Del device to the power adaptor and repeating the ePSA scan.
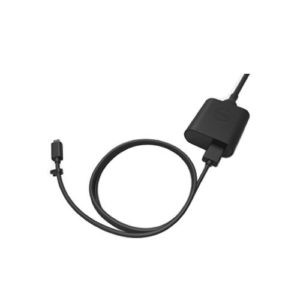
 Connecting the Dell power adaptor
In case connecting the Dell power adaptor didn’t resolve the issue or this scenario is not applicable, move down to the next potential fix below.
2. Check for an Unconnected Cable
If you only started dealing with this issue after taking your computer to a PC technician or after making some changes (component-wise), you should check either every cable is correctly connected.
Keep in mind that the 2000-0415 error can also be a symptom of a component that doesn’t have a power cable connected to it – The most common culprits, in this case, are SATA or ATA cables that are disconnected from the HDD / SSD.
To make sure this scenario is not applicable, shut down your computer completely and disconnect it from a power source before opening the back case.
Note: If you have a static wristband at your disposal, equip yourself with it before proceeding any further to mitigate the risk of damaging your internals due to static electricity accumulation.
Once you are inside, take a look at your components and see if every cable is correctly connected.
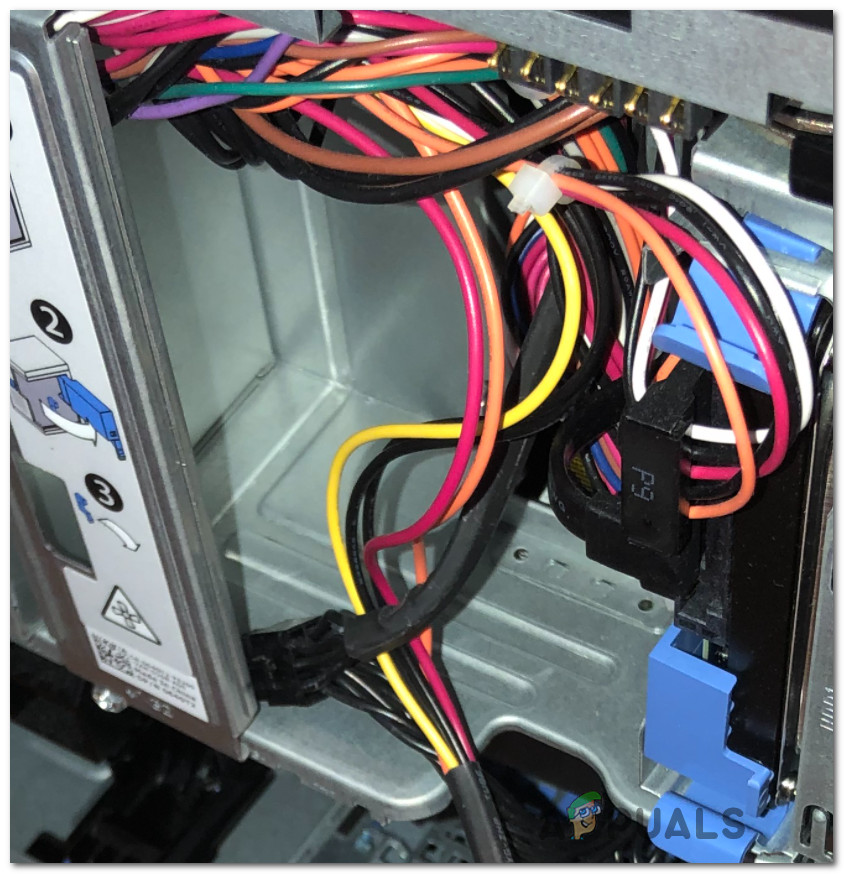 Example of a disconnected ATA power cable
Note: Make sure to push every cable through to ensure it’s not loosely connected.
In case you manage to find a disconnected or loosely connected cable, rectify the issue and repeat the ePSA scan after you put the side/back case back on and reconnect the power cable.
If this scenario was not applicable or every cable you investigated was correctly connected, move down to the next potential fix below.
3. Clear the CMOS Battery
You can also encounter this issue due to remnant information left behind from a previous PC configuration that is confusing the ePSA scan – This is very common in situations where the CPU or GPU was replaced.
In this case, you can make your PC ‘forget’ about the previous config by removing the CMOS battery from its socket.
The CMOS (Complementary Metal Oxide Semiconductor) battery (also known as RTC or NVRAM) is responsible for storing information ranging from time and date to system hardware settings.
If you suspect that this issue is being perpetuated by the CMOS battery, you should be able to fix the issue by clearing the CMOS battery by opening your PC case and physically taking it out for a couple of seconds.
Here’s a quick guide on doing this:
Note: The steps below should be applicable regardless of your Windows version or your PC configuration.
- Turn off your computer completely and ensure that it’s not currently plugged into a power outlet.
- Remove the side cover and equip your main hand with a static wristband (if you have one).
Note: A static wristband will ground you to the frame of the computer and evens out the electrical energy, which ensures that you don’t produce any damage to your PC’s components. - Take a look at your motherboard and identify the CMOS battery. It should not be hard to spot.
- Once you see it, use your fingernail or a non-conductive screwdriver to remove it from the slot.
 Removing the CMOS battery
 Removing the CMOS battery
Note: If you have a spare CMOS battery laying around, replace the current one to ensure that you’re not dealing with a faulty battery. If you don’t, clean it thoroughly to ensure that there’s no dirt inhibiting the connectivity with the motherboard.
After you have successfully cleared the CMOS battery, put everything back together and initiate another ePSA scan to see if the problem is now fixed.
Источник
Обновлено февраль 2023: перестаньте получать сообщения об ошибках и замедлите работу вашей системы с помощью нашего инструмента оптимизации. Получить сейчас в эту ссылку
- Скачайте и установите инструмент для ремонта здесь.
- Пусть он просканирует ваш компьютер.
- Затем инструмент почини свой компьютер.

На компьютерах Dell работает множество программ, необходимых для работы вашей системы. Однако иногда это программное обеспечение несовместимо со средой, в которой вы работаете. Например, на вашем компьютере Dell может быть установлена определенная версия Java, совместимая с вашей операционной системой, но версия JDK может быть несовместима с версией операционной системы вашего компьютера. В этом случае вы получите код ошибки, описанный выше.
Один из самых опасных кодов — это код ошибки 2000-0415, который обычно появляется на ноутбуках Dell и может быть вызван множеством проблем. Важно сначала проверить, действительно ли это код ошибки 2000-0415, поскольку это очень распространенный код ошибки, который часто появляется вместе с другими кодами ошибок в той же области. Код ошибки 2000-0415 может появиться в Windows Vista, Windows 7, Windows 8 или Windows 10.
- Шнур питания не подключен.
- Адаптер переменного тока не подключен.
- Батарея CMOS хранит старые данные конфигурации.
Как устранить код ошибки 2000-0415 на компьютерах DELL?
Обновление за февраль 2023 года:
Теперь вы можете предотвратить проблемы с ПК с помощью этого инструмента, например, защитить вас от потери файлов и вредоносных программ. Кроме того, это отличный способ оптимизировать ваш компьютер для достижения максимальной производительности. Программа с легкостью исправляет типичные ошибки, которые могут возникнуть в системах Windows — нет необходимости часами искать и устранять неполадки, если у вас под рукой есть идеальное решение:
- Шаг 1: Скачать PC Repair & Optimizer Tool (Windows 10, 8, 7, XP, Vista — Microsoft Gold Certified).
- Шаг 2: Нажмите «Начать сканирование”, Чтобы найти проблемы реестра Windows, которые могут вызывать проблемы с ПК.
- Шаг 3: Нажмите «Починить все», Чтобы исправить все проблемы.


Повторно подключите адаптер переменного тока к компьютеру Dell.
Если адаптер питания уже подключен к вашему ноутбуку, вы можете попробуйте снова подключить кабель. Затем выключите портативный компьютер Dell. Попробуйте снова подключить кабель перед включением ноутбука. Снова запустите средство диагностики ePSA.
Убедитесь, что адаптер питания подключен к вашему компьютеру Dell.
Пока запущено средство диагностики ePSA, необходимо подключить адаптер питания к ноутбуку Dell и подключить его к электрической розетке. Обратите внимание, что средство диагностики ePSA диагностирует все части портативного компьютера, включая оборудование. Также следует определить электрическое напряжение и другие показатели вашего ноутбука. Его следует подключать непосредственно к розетке, а не от аккумулятора ноутбука.
Совет экспертов: Этот инструмент восстановления сканирует репозитории и заменяет поврежденные или отсутствующие файлы, если ни один из этих методов не сработал. Это хорошо работает в большинстве случаев, когда проблема связана с повреждением системы. Этот инструмент также оптимизирует вашу систему, чтобы максимизировать производительность. Его можно скачать по Щелчок Здесь
Часто задаваемые вопросы
- Выйдите из ePSA, перезагрузив компьютер.
- Чтобы перейти к следующему тесту, нажмите Y.
- Чтобы перезапустить неудачный тест, нажмите R.
- Подключите жесткий диск к другому компьютеру.
- Используйте установочный носитель Windows для выполнения команды CHKDSK.
- Переустановите Windows.
Эта ошибка обычно означает, что конкретный кабель не подключен или неправильно расположен, и обычно дает название кабеля, о котором идет речь.
Сообщение Просмотров: 207
Download PC Repair Tool to quickly find & fix Windows errors automatically
When running the ePSA (Enhanced Pre-Boot System Assessment) diagnostics on your Windows 11 or Windows 10-powered Dell computer, you may receive the Error Code 2000-0415. In this post, we provide the most suitable solutions affected PC users can try to resolve the issue.

What does Error Code 2000 mean?
The Error Code 2000 that you might encounter on your Windows 11/10 PC simply means that the ePSA could not successfully read information from the hard drive. This error usually occurs due to faulty or misaligned cabling in your computer’s case, connecting your hard drive to the motherboard. This error typically signifies that a specific cable is not connected or is not seated correctly, and will normally name the specific cable in question as you can see on the lead-in image.
The most likely culprits to this error include;
- The A/C power adapter is not connected.
- Unconnected power cable.
- CMOS battery retains old configuration data.
If you’re faced with this Error Code 2000-0415 on your Windows 11/10 computer, you can try our recommended solutions below in no particular order and see if that helps to resolve the issue.
- Check and connect the A/C Power Adapter
- Check and connect any disconnected cables
- Clear CMOS
Let’s take a look at the description of the process involved concerning each of the listed solutions.
1] Check and connect the A/C Power Adapter
This solution to the Error Code 2000-0415 on your Dell Windows 11/10 computer requires you to make sure you have the A/C power adapter connected to the computer. The ePSA diagnostics are designed to test the charging functionality of the PC and the A/C power adapter needs to be connected for the ePSA diagnostics to run.
Try the next solution if this doesn’t apply to your case.
2] Check and connect any disconnected cables
As indicated on the error prompt that pops up on your system, this solution requires you to check and connect any disconnected cables. In addition to the cables identified on the error prompt, keep in mind that this error can also be a symptom of a component that doesn’t have a power cable connected to it – this could be SATA or ATA cables that are disconnected from the HDD/SSD. To rule out this scenario, shut down your computer completely and disconnect it from the mains and then open up the case and check for any loose or disconnected cables.
If there are disconnected or loose cables, make sure to push every cable through to ensure it’s not loosely connected. Once done, you can rerun the ePSA scan after you put the computer case back on and reconnect the power cable and power-on your Windows system.
If this didn’t work for you, you can try the next solution.
3] Clear CMOS
This solution requires you to simply reset or clear CMOS on your Dell Windows 11/10 PC.
Hope this helps!
How do I fix error 2000-0146 on my hard drive?
PC users that encounter the hard drive Error Code 2000-0146 on their Windows 11/10 computer, can fix the error by applying the following solutions:
- Scan your system.
- Run CHKDSK.
- Repair PC Registry.
- Run PSA (Pre-Boot System Assessment) Diagnostics.
- Reset BIOS settings.
- Restore PC in Safe Mode.
- Perform a Clean Boot.
What does System fan failure mean?
If the “Fan System Failure” message pops up on your Windows computer screen, it simply means that your power adapter was faulty before completely stopping to work and the CPU Fan wasn’t getting enough current and turning slowly.
How do I fix the fan error on my Dell laptop?
You may require the services of a PC hardware technician to perform this task successfully. To fix the fan error on your Windows 11/10 Dell laptop by cleaning the air vents on your computer. To clean the air vents on your computer do the following: Turn off the computer. Open up the computer case. Check the air vents on the computer for dust or debris. Use a can of compressed air to remove dust or debris from the air vents, dust filters (if any) and cooling fan fins.

Obinna Onwusobalu has studied Information & Communication Technology and is a keen follower of the Windows ecosystem. He has been a Windows Insider MVP (2020). He runs a computer software clinic.
Download PC Repair Tool to quickly find & fix Windows errors automatically
When running the ePSA (Enhanced Pre-Boot System Assessment) diagnostics on your Windows 11 or Windows 10-powered Dell computer, you may receive the Error Code 2000-0415. In this post, we provide the most suitable solutions affected PC users can try to resolve the issue.
What does Error Code 2000 mean?
The Error Code 2000 that you might encounter on your Windows 11/10 PC simply means that the ePSA could not successfully read information from the hard drive. This error usually occurs due to faulty or misaligned cabling in your computer’s case, connecting your hard drive to the motherboard. This error typically signifies that a specific cable is not connected or is not seated correctly, and will normally name the specific cable in question as you can see on the lead-in image.
The most likely culprits to this error include;
- The A/C power adapter is not connected.
- Unconnected power cable.
- CMOS battery retains old configuration data.
If you’re faced with this Error Code 2000-0415 on your Windows 11/10 computer, you can try our recommended solutions below in no particular order and see if that helps to resolve the issue.
- Check and connect the A/C Power Adapter
- Check and connect any disconnected cables
- Clear CMOS
Let’s take a look at the description of the process involved concerning each of the listed solutions.
1] Check and connect the A/C Power Adapter
This solution to the Error Code 2000-0415 on your Dell Windows 11/10 computer requires you to make sure you have the A/C power adapter connected to the computer. The ePSA diagnostics are designed to test the charging functionality of the PC and the A/C power adapter needs to be connected for the ePSA diagnostics to run.
Try the next solution if this doesn’t apply to your case.
2] Check and connect any disconnected cables
As indicated on the error prompt that pops up on your system, this solution requires you to check and connect any disconnected cables. In addition to the cables identified on the error prompt, keep in mind that this error can also be a symptom of a component that doesn’t have a power cable connected to it – this could be SATA or ATA cables that are disconnected from the HDD/SSD. To rule out this scenario, shut down your computer completely and disconnect it from the mains and then open up the case and check for any loose or disconnected cables.
If there are disconnected or loose cables, make sure to push every cable through to ensure it’s not loosely connected. Once done, you can rerun the ePSA scan after you put the computer case back on and reconnect the power cable and power-on your Windows system.
If this didn’t work for you, you can try the next solution.
3] Clear CMOS
This solution requires you to simply reset or clear CMOS on your Dell Windows 11/10 PC.
Hope this helps!
How do I fix error 2000-0146 on my hard drive?
PC users that encounter the hard drive Error Code 2000-0146 on their Windows 11/10 computer, can fix the error by applying the following solutions:
- Scan your system.
- Run CHKDSK.
- Repair PC Registry.
- Run PSA (Pre-Boot System Assessment) Diagnostics.
- Reset BIOS settings.
- Restore PC in Safe Mode.
- Perform a Clean Boot.
What does System fan failure mean?
If the “Fan System Failure” message pops up on your Windows computer screen, it simply means that your power adapter was faulty before completely stopping to work and the CPU Fan wasn’t getting enough current and turning slowly.
How do I fix the fan error on my Dell laptop?
You may require the services of a PC hardware technician to perform this task successfully. To fix the fan error on your Windows 11/10 Dell laptop by cleaning the air vents on your computer. To clean the air vents on your computer do the following: Turn off the computer. Open up the computer case. Check the air vents on the computer for dust or debris. Use a can of compressed air to remove dust or debris from the air vents, dust filters (if any) and cooling fan fins.
Obinna Onwusobalu has studied Information & Communication Technology and is a keen follower of the Windows ecosystem. He has been a Windows Insider MVP (2020). He runs a computer software clinic.
-
MiniTool
-
MiniTool News Center
- How to Fix Error Code 2000-0415 on Your Dell Device?
By Aurelie | Follow |
Last Updated January 03, 2023
![]()
Error code 2000-0415 is a small issue that is connected to some specific cables of your computer. It is pretty common in Dell devices. If you receive this error at the moment, the tips and tricks of this post on MiniTool Website will be helpful to you.
What Is Dell Error Code 2000-0415?
Error code 2000-0415 is a pretty common issue on Dell devices. When attempting to run the Enhanced Pre-Boot System Assessment tool before booting up a Dell computer, you may receive this error code because your device is unable to find a valid boot device.
The ePSA diagnostic tool is designed to check your devices and parts for any issues including your hard drive, LCD display, jumper, keyboard and more. Dell error code 2000-0415 is closely associated with this tool. When error code 2000-0415 appears, the responsible factors might be:
- The power cable might be disconnected or unsealed.
- The power adapter is not connected.
- There are some errors in the system files or COMS battery.
- The interference of antivirus software.
How to Fix Dell Error Code 2000-0415 on Windows 10/11?
Fix 1: Check the A/C Power Adapter
When your Dell device draws power from the battery rather than drawing it directly from a power outlet, the voltage or frequency values will be different than the expected equivalents. In this case, the Enhanced Pre-Boot System Assessment scan will throw the error code 2000-0415 because of concerns of a hardware failure.
You can prevent this error by connecting the Dell device to the power adapter and then repeating the ePSA scan.
This method is only applicable for Dell devices with an inbuilt or detachable battery like Dell laptops, Windows tablets, ultrabooks and so on.
Fix 2: Check Disconnected Cables
There is a chance that SATA or ATA cables are disconnected from the HDD/SDD hence causing error code 2000-0415 Dell. Here’s how to check for the disconnected cables: shut down your computer, disconnect it from the mains, and then push every cable to ensure it’s not disconnected damaged, or loosely connected. After that, put the computer case back on, reconnect the power cable, boot up your system and then rerun the ePSA scan.
Fix 3: Clear CMOS
If you made some hardware changes recently to your Dell device such as replacing the CPU or GPU and so on, the remnant information left from a previous computer configuration will confuse the ePSA scan. To get rid of error code 2000-0415 on Windows 10 or 11, you can clear the CMOS battery by opening the computer case and taking it out for a few moments.
If you have another CMOS battery in hand, replace it to ensure that the battery you deal with is not a faulty one. If not, clean the battery carefully to see if there’s no dirt on it.
After replacing or clearing the CMOS battery, put everything back and launch an ePSA scan again to see if error code 2000-0415 disappears.
Wrapping Things up
That’s all for Dell error code 2000-0415. By now, I believe that you have removed error code 2000-0415 completely and succeeded in booting up your system without any errors. If you continue to see this error after trying all the solutions above, you had better contact the support team of Dell to get technical help.
About The Author

Position: Columnist
Aurelie is a passionate soul who always enjoys researching & writing articles and solutions to help others. Her posts mainly cover topics related to games, data backup & recovery, file sync and so on. Apart from writing, her primary interests include reading novels and poems, travelling and listening to country music.
Some Dell PC users are encountering the 2000-0415 error when running the EPSA (Enhanced Pre-Boot System Assessment) diagnostics tool prior to booting up the system. Most affected users are reporting this error to occur after they received their system back from repairs or after they made some hardware modification themselves.
After we analyzed every potential scenario that might be triggering this error code, here’s a list of scenarios that are known to cause the 2000-0415 when running the EPSA tool on a Dell computer:
- The A/C power adapter is not connected – If you’re encountering this issue with a portable Dell device (laptop, notebook, ultrabook, or Windows tablet, chances are the ePSA scan is triggering this error because the voltages and frequencies of the internal components are lower than expected. This particular scenario is only a false positive that can be resolved by connecting the A/C power adapter.
- Unconnected power cable – As it turns out, this issue can also occur due to an SSD or HDD cable that is not connected to the PSU via the power cable. In this case, you can resolve the issue by taking the side/back case apart and ensuring that every component is connected to the power sources.
- Old configuration data is maintained by CMOS battery – If you recently made some hardware changes to your Dell PC, you can expect to see this error occurring because the CMOS battery is maintaining outdated configuration data and thus confusing the ePSA scan. In this case, you can resolve the issue by clearing the CMOS battery.
Now that you are familiar with every scenario that might cause the 2000-0415, move down to the next section below for instructions on resolving this particular issue.
1. Connect the A/C Power Adapter (if applicable)
By far, the most common instance that will produce this error is a scenario in which the A/C power adaptor is not connected to the machine that is performing the ePSA scan.
Keep in mind that the Enhanced Pre-Boot System Assessment scan will execute a complete verification of every involved hardware component – This includes the assessment of voltages and frequencies of crucial components such as the CPU, GPU, and memory.
Note: This is only applicable for Dell devices that have a built-in or detachable battery (laptops, ultrabooks, Windows Tablets, etc.).
One of the reasons why the voltage or frequency values are different than the expected equivalents is if the Dell device currently draws power from the battery instead of drawing it directly from a power outlet.
If this scenario is applicable, this will likely mean that the frequencies of your hardware components are lower than expected, which might determine the ePSA tool to throw the 2000-0415 due to concerns of a hardware failure.
Fortunately, you can prevent the error from occurring simply by connecting the Del device to the power adaptor and repeating the ePSA scan.
In case connecting the Dell power adaptor didn’t resolve the issue or this scenario is not applicable, move down to the next potential fix below.
2. Check for an Unconnected Cable
If you only started dealing with this issue after taking your computer to a PC technician or after making some changes (component-wise), you should check either every cable is correctly connected.
Keep in mind that the 2000-0415 error can also be a symptom of a component that doesn’t have a power cable connected to it – The most common culprits, in this case, are SATA or ATA cables that are disconnected from the HDD / SSD.
To make sure this scenario is not applicable, shut down your computer completely and disconnect it from a power source before opening the back case.
Note: If you have a static wristband at your disposal, equip yourself with it before proceeding any further to mitigate the risk of damaging your internals due to static electricity accumulation.
Once you are inside, take a look at your components and see if every cable is correctly connected.
Note: Make sure to push every cable through to ensure it’s not loosely connected.
In case you manage to find a disconnected or loosely connected cable, rectify the issue and repeat the ePSA scan after you put the side/back case back on and reconnect the power cable.
If this scenario was not applicable or every cable you investigated was correctly connected, move down to the next potential fix below.
3. Clear the CMOS Battery
You can also encounter this issue due to remnant information left behind from a previous PC configuration that is confusing the ePSA scan – This is very common in situations where the CPU or GPU was replaced.
In this case, you can make your PC ‘forget’ about the previous config by removing the CMOS battery from its socket.
The CMOS (Complementary Metal Oxide Semiconductor) battery (also known as RTC or NVRAM) is responsible for storing information ranging from time and date to system hardware settings.
If you suspect that this issue is being perpetuated by the CMOS battery, you should be able to fix the issue by clearing the CMOS battery by opening your PC case and physically taking it out for a couple of seconds.
Here’s a quick guide on doing this:
Note: The steps below should be applicable regardless of your Windows version or your PC configuration.
- Turn off your computer completely and ensure that it’s not currently plugged into a power outlet.
- Remove the side cover and equip your main hand with a static wristband (if you have one).
Note: A static wristband will ground you to the frame of the computer and evens out the electrical energy, which ensures that you don’t produce any damage to your PC’s components. - Take a look at your motherboard and identify the CMOS battery. It should not be hard to spot.
- Once you see it, use your fingernail or a non-conductive screwdriver to remove it from the slot.

Removing the CMOS battery
Note: If you have a spare CMOS battery laying around, replace the current one to ensure that you’re not dealing with a faulty battery. If you don’t, clean it thoroughly to ensure that there’s no dirt inhibiting the connectivity with the motherboard.
After you have successfully cleared the CMOS battery, put everything back together and initiate another ePSA scan to see if the problem is now fixed.

Kamil Anwar
Kamil is a certified MCITP, CCNA (W), CCNA (S) and a former British Computer Society Member with over 9 years of experience Configuring, Deploying and Managing Switches, Firewalls and Domain Controllers also an old-school still active on FreeNode.