Office 2019 Office 2016 Office 2013 Microsoft 365 для дома Office для бизнеса Office 365 для малого бизнеса Администратор Microsoft 365 служба Office 365, предоставляемая 21Vianet служба Office 365 для малого бизнеса, предоставляемая 21Vianet — для администраторов служба Office 365, предоставляемая 21Vianet — для администраторов нажми и работай Office 365 Germany корпоративный Office 365 Germany корпоративный для администраторов Office.com Еще…Меньше
При попытке установить Office может появляться сообщение об ошибке Не удалось запустить установку пакета Office. Идет установка другого приложения. Повторите попытку. Либо сообщение об ошибке может содержать один из этих кодов: 0–1018, 17003–2031 или 2035–0.
Эта ошибка обычно возникает, если вы пытаетесь запустить установку Office во время установки, обновления или удаления другого приложения.
Найдите значок Office в области уведомлений Windows и щелкните его, чтобы проверить ход выполнения установки. Если установка уже выполняется, дождитесь ее завершения перед установкой Office.
Если вам не удается найти значок Office в области уведомлений, выполните следующие инструкции, чтобы перезапустить Office, и попробуйте снова выполнить установку. Если это не помогло, запустите удаление, чтобы удалить все полные или частичные экземпляры пакета Office, а затем переустановите Office.
Перезагрузка компьютера и повторная установка Office
-
Перезагрузите компьютер.
-
Переустановите Microsoft 365.
Выберите версию Office, которую вы хотите переустановить, и выполните указанные ниже действия.
Microsoft 365
Office 2021
Office 2019
Office 2016
Office 2013
Удаление и повторная установка Office
Используйте вспомогательное средство для удаления Office, чтобы полностью удалить Microsoft 365 с компьютера и выполнить повторную установку Microsoft 365.
-
Выберите расположенную ниже кнопку для скачивания и установки средства поддержки удаления.
Скачать
-
Следуйте указанным ниже инструкциям, чтобы скачать средство поддержки удаления для соответствующего браузера.
Совет: Скачивание и установка средства может занять несколько минут. После завершения установки откроется окно удаления продуктов Office.
Edge или Chrome
-
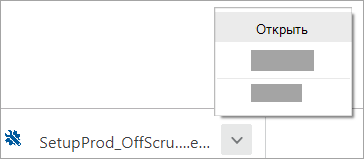
В левом нижнем углу щелкните правой кнопкой мыши SetupProd_OffScrub.exe и выберите пункт Открыть.

Microsoft Edge (старый) или Internet Explorer
-
В нижней части окна браузера нажмите кнопку Выполнить, чтобы запустить файл SetupProd_OffScrub.exe.
Firefox
-
Во всплывающем окне выберите Сохранить файл, а затем в правом верхнем окне браузера выберите стрелку загрузки> SetupProd_OffScrub.exe.
-
-
Выберите версию, которую нужно удалить, и нажмите кнопку «Далее».
-
Следуйте остальным указаниям и при появлении запроса перезагрузите компьютер.
После перезагрузки компьютера средство удаления автоматически откроется для завершения последнего этапа процесса удаления. Следуйте остальным указаниям.
-
Выберите действия для версии Office, которую нужно установить или переустановить. Закройте средство удаления.
Microsoft 365 | Office 2021 | Office 2019 | Office 2016 | Office 2013 | Office 2010 | Office 2007


См. также
Удаление Office с компьютера
Нужна дополнительная помощь?
Error Code 0-2035 (0) when installing Office It’s Stats that Another installation is in progress
Microsoft Office Error Code 0-2035 (0) Info:
It mainly occurs when you tried to install office or while installing office 365 and it gets failed. Error Code 0-2035 (0) may occur due to the following reasons:
- Due to the Microsoft Office system file get corrupt.
- Previous installation had not removed properly.
- Windows Firewall does not allow network access.
- You may download a partial setup.
To solve Office 365 Error 0-2035 (0) you may follow the below step to fix. If you follow the below steps or troubleshooting steps or processes then you may resolve this Error Code 0-2035 (0).
Steps to fix Microsoft Office 365 Error Code 0-2035 (0):
Whenever if you trying to install office 365 updated version and you keep getting error 0-2035 (0) it means you haven’t installed previous office 365 properly or your previous office file got corrupt. and you might be seen below the image as an error.
")
Some Common factor that causes Office Error 0-2035 (0):
- Pre-existing office installation files.
- Tamp and logs files.
- Microsoft Office file got corrupt.
- The Office didn’t update fully it updated partially.
- Windows Update not installed properly.
- Antivirus or Windows Firewall might be blocking the Office installation.
Steps to Fix/Resolve/troubleshoot the error code 0-2035 (0):
1. Repair your Microsoft Office Suite Application
Error Code 0-2035 (0) will
be fixed once your Microsoft Office repair tool replaces all the corrupted system files. Follow the steps below to run the repair tool to fix the error.
- Open Control Panel using Start.
- Click on Programs and select Programs and Features.
- Click on the Office product that you want to repair.
- Click Change.
- Select Quick Repair and click on Repair. If Quick Repair didn’t fix the Error Code 0-2035 (0), select Online Repair and click on Repair.
Note: If Office Repair did not fix this error code, then remove and reinstall the Office installation to fix this Error Code 0-2035 (0).
2. Steps to remove Microsoft Office
In case if the error persists even after running the Office repair tool, uninstall Office from your computer.
- Open Control Panel using Start
- Click on Programs and select Programs and Features.
- Select Office Suite and click on Remove.
Note: If Office installation failed or it didn’t fix the
error, manual installation is required to completely remove the Office
Suite.
3. Steps to remove Office manually to fix the Error Code 0-2035 (0)
If the error code 0-2035 (0) is re-occurring, proceed with the following steps to manually remove the Office program from your computer.
Step 1: Remove the Windows Installer packages
- Find the Office 16 installation folder, typically located in C:Program Files.
- Right-click the Microsoft Office 16 folder and select Delete.
Step 2: Remove the Microsoft Office scheduled tasks
- Open a Command Prompt window as an administrator.
- At the command prompt, type the following commands and press Enter after each one:
schtasks.exe /delete /tn “MicrosoftOfficeOffice Automatic Updates”
schtasks.exe /delete /tn “MicrosoftOfficeOffice Subscription Maintenance”
schtasks.exe /delete /tn “MicrosoftOfficeOffice Click To Run Service Monitor”
Step 3: Use Task Manager to end the Click-to-Run tasks
- Open Task Manager.
- Click the Process tab
- If the following processes are running, right-click each one, and then click End task after you select each process.
- .exe
- setup*.exe
Step 4: Delete the Office files
- Press Windows logo key + R to open the Run dialog box.
- In the Open box, type %ProgramFiles%, and then click OK.
- Delete the “Microsoft Office 16” folder.
- Delete the “Microsoft Office” folder.
- Open the Run dialog box, type %ProgramFiles(x86)%, and then click OK.
- Delete the “Microsoft Office” folder.
Step 5: Delete the Microsoft Office registry sub keys
- Open Registry Editor.
- Delete the following registry sub keys:
- HKEY_LOCAL_MACHINESOFTWAREMicrosoftOfficeClickToRun
- HKEY_LOCAL_MACHINESOFTWAREMicrosoftAppVISV
- HKEY_CURRENT_USERSoftwareMicrosoftOffice
- Then Delete the Office key.
Step 6: Delete the Start menu shortcuts
- Open a Command Prompt window as an administrator.
- Type %ALLUSERSPROFILE%MicrosoftWindowsStart MenuPrograms, and then press Enter.
- Delete the “Microsoft Office Tools” folder.
4. Download and install Microsoft Office
2. Choose Install.
3. Click Run or the equivalent depending on the browser you’re using.
4. When you see “You’re good to go”, click All done.
Still getting Microsoft Office Error Code 0-2035 (0) then you may contact with technical expertise that will solve your issues.
This article features error number Code 2035, commonly known as Cannot Load Project of wrong version described as Cannot Load Project of wrong [email protected]@@[email protected]@@1.
About Runtime Code 2035
Runtime Code 2035 happens when Microsoft Access fails or crashes whilst it’s running, hence its name. It doesn’t necessarily mean that the code was corrupt in some way, but just that it did not work during its run-time. This kind of error will appear as an annoying notification on your screen unless handled and corrected. Here are symptoms, causes and ways to troubleshoot the problem.
Definitions (Beta)
Here we list some definitions for the words contained in your error, in an attempt to help you understand your problem. This is a work in progress, so sometimes we might define the word incorrectly, so feel free to skip this section!
- Load — A measure of the amount of work a computer is performing
- Project — In software development, a project is a collection of files and resources used in the development of an application or service
- Version — Version defines an unique state of a computer software or a file.
Symptoms of Code 2035 — Cannot Load Project of wrong version
Runtime errors happen without warning. The error message can come up the screen anytime Microsoft Access is run. In fact, the error message or some other dialogue box can come up again and again if not addressed early on.
There may be instances of files deletion or new files appearing. Though this symptom is largely due to virus infection, it can be attributed as a symptom for runtime error, as virus infection is one of the causes for runtime error. User may also experience a sudden drop in internet connection speed, yet again, this is not always the case.
 Repair Tool")
(For illustrative purposes only)
Causes of Cannot Load Project of wrong version — Code 2035
During software design, programmers code anticipating the occurrence of errors. However, there are no perfect designs, as errors can be expected even with the best program design. Glitches can happen during runtime if a certain error is not experienced and addressed during design and testing.
Runtime errors are generally caused by incompatible programs running at the same time. It may also occur because of memory problem, a bad graphics driver or virus infection. Whatever the case may be, the problem must be resolved immediately to avoid further problems. Here are ways to remedy the error.
Repair Methods
Runtime errors may be annoying and persistent, but it is not totally hopeless, repairs are available. Here are ways to do it.
If a repair method works for you, please click the upvote button to the left of the answer, this will let other users know which repair method is currently working the best.
Please note: Neither ErrorVault.com nor it’s writers claim responsibility for the results of the actions taken from employing any of the repair methods listed on this page — you complete these steps at your own risk.
Method 1 — Close Conflicting Programs
When you get a runtime error, keep in mind that it is happening due to programs that are conflicting with each other. The first thing you can do to resolve the problem is to stop these conflicting programs.
- Open Task Manager by clicking Ctrl-Alt-Del at the same time. This will let you see the list of programs currently running.
- Go to the Processes tab and stop the programs one by one by highlighting each program and clicking the End Process buttom.
- You will need to observe if the error message will reoccur each time you stop a process.
- Once you get to identify which program is causing the error, you may go ahead with the next troubleshooting step, reinstalling the application.
Method 2 — Update / Reinstall Conflicting Programs
Using Control Panel
- For Windows 7, click the Start Button, then click Control panel, then Uninstall a program
- For Windows 8, click the Start Button, then scroll down and click More Settings, then click Control panel > Uninstall a program.
- For Windows 10, just type Control Panel on the search box and click the result, then click Uninstall a program
- Once inside Programs and Features, click the problem program and click Update or Uninstall.
- If you chose to update, then you will just need to follow the prompt to complete the process, however if you chose to Uninstall, you will follow the prompt to uninstall and then re-download or use the application’s installation disk to reinstall the program.
Using Other Methods
- For Windows 7, you may find the list of all installed programs when you click Start and scroll your mouse over the list that appear on the tab. You may see on that list utility for uninstalling the program. You may go ahead and uninstall using utilities available in this tab.
- For Windows 10, you may click Start, then Settings, then choose Apps.
- Scroll down to see the list of Apps and features installed in your computer.
- Click the Program which is causing the runtime error, then you may choose to uninstall or click Advanced options to reset the application.
Method 3 — Update your Virus protection program or download and install the latest Windows Update
Virus infection causing runtime error on your computer must immediately be prevented, quarantined or deleted. Make sure you update your virus program and run a thorough scan of the computer or, run Windows update so you can get the latest virus definition and fix.
Method 4 — Re-install Runtime Libraries
You might be getting the error because of an update, like the MS Visual C++ package which might not be installed properly or completely. What you can do then is to uninstall the current package and install a fresh copy.
- Uninstall the package by going to Programs and Features, find and highlight the Microsoft Visual C++ Redistributable Package.
- Click Uninstall on top of the list, and when it is done, reboot your computer.
- Download the latest redistributable package from Microsoft then install it.
Method 5 — Run Disk Cleanup
You might also be experiencing runtime error because of a very low free space on your computer.
- You should consider backing up your files and freeing up space on your hard drive
- You can also clear your cache and reboot your computer
- You can also run Disk Cleanup, open your explorer window and right click your main directory (this is usually C: )
- Click Properties and then click Disk Cleanup
Method 6 — Reinstall Your Graphics Driver
If the error is related to a bad graphics driver, then you may do the following:
- Open your Device Manager, locate the graphics driver
- Right click the video card driver then click uninstall, then restart your computer
Method 7 — IE related Runtime Error
If the error you are getting is related to the Internet Explorer, you may do the following:
- Reset your browser.
- For Windows 7, you may click Start, go to Control Panel, then click Internet Options on the left side. Then you can click Advanced tab then click the Reset button.
- For Windows 8 and 10, you may click search and type Internet Options, then go to Advanced tab and click Reset.
- Disable script debugging and error notifications.
- On the same Internet Options window, you may go to Advanced tab and look for Disable script debugging
- Put a check mark on the radio button
- At the same time, uncheck the «Display a Notification about every Script Error» item and then click Apply and OK, then reboot your computer.
If these quick fixes do not work, you can always backup files and run repair reinstall on your computer. However, you can do that later when the solutions listed here did not do the job.
Other languages:
Wie beheben Fehler 2035 (Projekt der falschen Version kann nicht geladen werden) — Projekt der falschen Version kann nicht geladen [email protected]@@[email protected]@@1.
Come fissare Errore 2035 (Impossibile caricare il progetto della versione errata) — Impossibile caricare il progetto della versione [email protected]@@[email protected]@@1.
Hoe maak je Fout 2035 (Kan project van verkeerde versie niet laden) — Kan project met verkeerde versie niet [email protected]@@[email protected]@@1.
Comment réparer Erreur 2035 (Impossible de charger le projet de mauvaise version) — Impossible de charger un projet de mauvaise [email protected]@@[email protected]@@1.
어떻게 고치는 지 오류 2035 (잘못된 버전의 프로젝트를 로드할 수 없습니다) — 잘못된 버전의 프로젝트를 로드할 수 없습니다[email protected]@@[email protected]@@1.
Como corrigir o Erro 2035 (Não é possível carregar o projeto da versão errada) — Não é possível carregar o projeto da versão errada. @@@ 1 @@@ 1.
Hur man åtgärdar Fel 2035 (Kan inte ladda projekt med fel version) — Kan inte ladda projekt av fel version. @@@ 1 @@@ 1.
Как исправить Ошибка 2035 (Невозможно загрузить проект неправильной версии) — Невозможно загрузить проект неправильной версии. @@@ 1 @@@ 1.
Jak naprawić Błąd 2035 (Nie można załadować projektu w złej wersji) — Nie można załadować projektu w złej [email protected]@@[email protected]@@1.
Cómo arreglar Error 2035 (No se puede cargar el proyecto de una versión incorrecta) — No se puede cargar el proyecto de la versión incorrecta. @@@ 1 @@@ 1.
![]() About The Author: Phil Hart has been a Microsoft Community Contributor since 2010. With a current point score over 100,000, they’ve contributed more than 3000 answers in the Microsoft Support forums and have created almost 200 new help articles in the Technet Wiki.
About The Author: Phil Hart has been a Microsoft Community Contributor since 2010. With a current point score over 100,000, they’ve contributed more than 3000 answers in the Microsoft Support forums and have created almost 200 new help articles in the Technet Wiki.
Follow Us: ![]()
![]()
![]()

This repair tool can fix common computer problems such as blue screens, crashes and freezes, missing DLL files, as well as repair malware/virus damage and more by replacing damaged and missing system files.
STEP 1:
Click Here to Download and install the Windows repair tool.
STEP 2:
Click on Start Scan and let it analyze your device.
STEP 3:
Click on Repair All to fix all of the issues it detected.
DOWNLOAD NOW
Compatibility
![]()
Requirements
1 Ghz CPU, 512 MB RAM, 40 GB HDD
This download offers unlimited scans of your Windows PC for free. Full system repairs start at $19.95.
Article ID: ACX03129EN
Applies To: Windows 10, Windows 8.1, Windows 7, Windows Vista, Windows XP, Windows 2000
Speed Up Tip #50
Convert Windows into a Virtual Machine:
Save yourself from malware, spyware, and other viruses by converting your Windows PC into a Virtual Machine. Browse the internet or install any program and games you want with confidence in your Virtual Machine by using free tools like Hyper-V. Your host operating system will be safe from troubles.
Click Here for another way to speed up your Windows PC
Problem
This article covers the most common reasons why an application running in WebSphere Application Server receives a 2035 MQRC_NOT_AUTHORIZED error connecting to MQ as a client over a network. Quick steps to work around the MQRC_NOT_AUTHORIZED errors during development are provided in the ‘Resolving the problem’ section, as well as considerations for implementing security in production environments. A summary is also provided of behavior for outbound scenarios with container-managed and component-managed security, as well as inbound behavior for listener ports and activation specifications
Symptom
JMSCMQ0001: WebSphere MQ call failed with compcode ‘2’ (‘MQCC_FAILED’) reason ‘2035’ (‘MQRC_NOT_AUTHORIZED’)
Cause
The two most likely reasons why the connection is refused by IBM MQ are as follows:
- The user identifier passed across the client connection from the application server to IBM MQ is not known on the server where the queue manager is running, is not authorized to connect to IBM MQ, or is longer than 12 characters.
- For queue managers running on Windows, the following error might be seen in the error logs for this scenario:
AMQ8075: Authorization failed because the SID for entity ‘wasuser‘ cannot be obtained.
No entry in the error logs would be seen by default for Unix.
See technote MQS_REPORT_NOAUTH environment variable can be used to better diagnose return code 2035 for details of enabling error log entries on all platforms. - The user identifier passed across the client connection from the application server to MQ is a member of the ‘mqm’ group on the server hosting the queue manager, and a Channel Authentication Record (CHLAUTH) exists that blocks administrative access to the queue manager. MQ configures a CHLAUTH record by default in WebSphere MQ Version 7.1 and later that blocks all MQ admins from connecting as a client to the queue manager.
The following error in the error logs would be seen for this scenario:
AMQ9777: Channel was blocked
See the
Error logs on Windows, UNIX and Linux systems
section of the Information Center for the location of the error logs.
Diagnosing The Problem
To understand the cause of the MQRC_NOT_AUTHORIZED reason code, you need to understand what username (and password) is being used by MQ to authorize the application server.
Please note that WebSphere MQ V7.5 and earlier does not provide any out-of-the box password authentication system for client connections.
Password authentication is provided out of the box in IBM MQ V8.0. More details on the new IBM MQ V8.0 security features are available in this presentation.
For WebSphere MQ V7.5 and earlier, this means that while the understanding provided in this technote over how usernames and passwords are passed from the application server to MQ is helpful for development environments, solving the security requirements of production environments usually also requires one of the following approaches:
- Mutual SSL/TLS authentication.
MQ provides out-of-the-box features to authenticate a remotely attaching client using the digital certificate they provide for SSL/TLS transport security. For example by configuring an SSLPEER rule on the SVRCONN channel to match the Distinguished Name in the certificate of the WebSphere Application Server, and establishing trust in the issuer of that certificate. - A custom, or 3rd party supplied, WebSphere MQ Security Exit
A security exit can be written for MQ that performs username and password authentication against a repository, such as the local operating system on the MQ server, or an LDAP repository.
When using a security exit for authentication it is important that SSL/TLS transport security is still configured, to ensure passwords are not sent in plain text.
MCA user ID (MCAUSER) configured on the Server Connection (SVRCONN) channel
If an MCAUSER is configured on the SVRCONN channel that the application server is using to connect, and no security exit or mapping Channel Authentication Record is installed, then this overrides the username provided by the application server.
It is common practice for many customers to set an MCAUSER on every SVRCONN channel, and use mutual SSL/TLS authentication exclusively for authentication.
Default behavior when no credentials are supplied in the application server
If no credentials are supplied by the application on the createConnection call, and neither of the component managed or container-managed security systems described below are configured, then WebSphere Application Server provides a blank username to MQ. This causes MQ to authorize the client based on the user id that the listener is running under. In the majority of cases this is ‘mqm’ on UNIX/Linux systems and ‘MUSR_MQADMIN’ on Windows.
As these are administrative users, they will be blocked by default in WebSphere MQ V7.1 and higher, with an AMQ9777 error logged in the error logs of the queue manager.
Container-managed security for outbound connections
The recommended way to configure the username and password passed to MQ by the application server for outbound connections, is to use container-managed security. Outbound connections are those created using a Connection Factory, rather than a Listener Port or Activation Specification.
Usernames of 12 characters or less are passed to MQ by the application server. Usernames longer than 12 characters in length will be truncated, either during authorization (on UNIX), or in the MQMD of messages that are sent.
Container-managed security means that the deployment descriptor, or EJB 3.0 annotations, of the application declare a resource reference with authentication type set to Container.
Then when the application looks up the Connection Factory in JNDI, it does so indirectly via the resource reference. For example an EJB 2.1 application would perform a JNDI lookup as follows, where «jms/MyResourceRef» has been declared as a resource reference in the deployment descriptor:
ConnectionFactory myCF = (ConnectionFactory)ctx.lookup(«java:comp/env/jms/MyResourceRef»)
An EJB 3.0 application might declare an annotated object property on the bean as follows:
authenticationType = AuthenticationType.CONTAINER)
private javax.jms.ConnectionFactory myCF;
When the application is deployed by an administrator, they bind this authentication alias to an actual Connection Factory that has been created in JNDI, and assign it a J2C authentication alias on deployment.
It is the username and password contained in this authentication alias that is then passed to MQ/JMS by the application server when the application connects. This approach puts the administrator in control of which username and password is used by each application, and prevents a different application from looking up the connection factory in JNDI directly to connect with the same username and password.
A default container-managed authentication alias can be supplied on the configuration panels in the administrative console for MQ connection factories. This default will only be used in the case that an application uses a resource reference configured for container-managed security, but the administrator has not bound it to an authentication alias during deployment. A screen shot is provided below:

Default component-managed authentication alias for outbound connections
For cases where it is impractical to change the application to use container-managed security, or to change it to supply a username and password directly on the createConnection call, it is possible to supply a default.
This default is called the «component-managed authentication alias» and cannot be configured via the administrative console (since WebSphere Application Server Version 7.0 when it was removed from the panels connection factories). The below scripting samples show how to configure it using wsadmin:
- JACL:
wsadmin>set cell [ $AdminConfig getid «/Cell:mycell» ]mycell(cells/mycell|cell.xml#Cell_1)wsadmin>
$AdminTask listWMQConnectionFactories $cellMyCF(cells/mycell|resources.xml#MQConnectionFactory_1247500675104)
wsadmin>
$AdminTask modifyWMQConnectionFactory MyCF(cells/mycell|resources.xml#MQConnectionFactory_1247500675104) { -componentAuthAlias myalias }MyCF(cells/mycell|resources.xml#MQConnectionFactory_1247500675104)
- Jython:
wsadmin>cell = AdminConfig.getid(«/Cell:mycell»)wsadmin>AdminTask.listWMQConnectionFactories(cell)‘MyCF(cells/mycell|resources.xml#MQConnectionFactory_1247500675104)’wsadmin>
AdminTask.modifyWMQConnectionFactory(‘MyCF(cells/mycell|resos urces.xml#MQConnectionFactory_1247500675104)’, «-componentAuthAlias myalias»)‘MyCF(cells/mycell|resources.xml#MQConnectionFactory_1247500675104)’
Authentication alias for inbound MDB connections using an activation specification
For inbound connections using an activation specification an authentication alias can be specified by the administrator when deploying the application, or a default authentication alias can be specified on the activation specification via the administrative console.
Authentication alias for inbound MDB connections using a listener port
For inbound connections using a listener port, the value specified in the «Container-managed authentication alias» setting of the connection factory (seen in the above screen shot) is used.
On zOS, first the «Container-managed authentication alias» is checked and used if set, then the «Component-managed authentication alias» is checked and used it set.
Resolving The Problem
The simplest steps to resolve the 2035 MQRC_NOT_AUTHORIZED errors in a development environment, where full transport security is not required, are as follows:
- Choose a user that you want WebSphere Application Server to be authenticated as. Typically the user chosen should have authority relevant to the context of the operations required by the application running in WebSphere Application Server and no more. For example, ‘mqm’ or other super user is not appropriate.
- If this user is an administrative user, then relax the Channel Authentication Record (CHLAUTH) security in MQ V7.1 or higher, so that administrative connections are not blocked on the SVRCONN channel you wish to use. An example MQSC command to do this for a SVRCONN channel called ‘WAS.CLIENTS’ is provided as follows:
SET CHLAUTH(‘WAS.CLIENTS’) TYPE(BLOCKUSER) USERLIST(ALLOWANY) - Configure the SVRCONN channel to set the MCA user ID (MCAUSER) to the user you have chosen. An example MQSC command to configure a SVRCONN channel to use ‘myuser’ as the MCA user ID is provided as follows:
ALTER CHL(‘WAS.CLIENTS’) CHLTYPE(SVRCONN) MCAUSER(‘myuser’)
The following additional considerations are important for production environments:
For all production environments where transport security is required, SSL/TLS security must be configured between the application server and MQ.
In order to configure SSL/TLS transport security, you must establish the appropriate trust between the queue manager and WebSphere Application Server. The application server, who initiates the SSL/TLS handshake, must always be configured to trust the certificate provided by the queue manager . If the application server is configured to send a certificate to the queue manager, then the queue manager must also be configured to trust it.
If trust is not correctly configured on both sides, you will encounter 2393 MQRC_SSL_INITIALIZATION_ERROR reason codes after enabling SSL/TLS on the connection.
If you do not have a security exit that performs username and password authentication, then you should configure mutual SSL/TLS authentication on your Server Connection channel to cause the queue manager to require a trusted certificate is provided by the application server. To do this you set «SSL Authentication» to «Required» in the MQ Explorer or SSLCAUTH(REQUIRED) via MQSC.
If you do have a security exit that performs username and password authentication installed in your MQ server, then configure your application to supply a username and password for validation by that security exit. The details of how to configure the username and password passed to MQ by the application server are described above in the «Diagnosing the problem» section.
All Server Connection channels that do not have SSL/TLS security applied should be disabled. Example MQSC commands to disable the SYSTEM.DEF.SVRCONN channel are provided as follows (these assume no user exists on the server called ‘NOAUTH’):
ALTER CHL(SYSTEM.DEF.SVRCONN) CHLTYPE(SVRCONN) MCAUSER(‘NOAUTH’)
STOP CHL(SYSTEM.DEF.SVRCONN)
Details of how to configure the private certificate and trust of a queue manager, and to enable SSL security on a Server Connection channel, see the following locations in the Information Center:
- To configure the certificates and trust of the queue manager see the following topic:
Configuring SSL on queue managers - To configure the Server Connection channel, used by applications running in the application server to connect to MQ, see the following topic:
Configuring SSL channels
Details of how you configure trust within WebSphere Application Server, and whether the application server sends a certificate to MQ for authentication, are in the following locations in the WebSphere Application Server information center:
- To create or modify an SSL Configuration containing the appropriate SSL/TLS configuration for connecting to MQ, see the following topic:
SSL configurations
Note that MQ requires you specify a matching Cipher Suite / Cipher Spec on both sides of the connection, as it checks the negotiated Cipher Suite matches the SSLCIPH setting on the channel after the handshake is complete. As a result the WebSphere Application Server SSL Configuration should be configured to contain only the Cipher Suite that matches the SSLCIPH setting on the Server Connection channel. See the following topic in the information center for details of matching pairs:
CipherSuite and CipherSpec name mappings for connections to a WebSphere® MQ queue manager - To enable SSL/TLS on a client connection, and choose which SSL Configuration to use, see the «Use SSL to secure communication with Websphere MQ», «Centrally managed» and «Specific configuration» sections of the following topics on Connection Factories and Activation Specifications
WebSphere MQ messaging provider connection factory settings
WebSphere MQ messaging provider activation specification settings
[{«Product»:{«code»:»SSEQTP»,»label»:»WebSphere Application Server»},»Business Unit»:{«code»:»BU059″,»label»:»IBM Software w/o TPS»},»Component»:»Java Message Service (JMS)»,»Platform»:[{«code»:»PF002″,»label»:»AIX»},{«code»:»PF010″,»label»:»HP-UX»},{«code»:»PF012″,»label»:»IBM i»},{«code»:»PF016″,»label»:»Linux»},{«code»:»PF027″,»label»:»Solaris»},{«code»:»PF033″,»label»:»Windows»},{«code»:»PF035″,»label»:»z/OS»}],»Version»:»8.5;8.0;7.0″,»Edition»:»Base;Network Deployment;Single Server»,»Line of Business»:{«code»:»LOB45″,»label»:»Automation»}},{«Product»:{«code»:»SS7K4U»,»label»:»WebSphere Application Server for z/OS»},»Business Unit»:{«code»:»BU059″,»label»:»IBM Software w/o TPS»},»Component»:»Java Messaging Service (JMS)»,»Platform»:[{«code»:»PF035″,»label»:»z/OS»},{«code»:»»,»label»:»OS/390″}],»Version»:»8.5;8.0;7.0″,»Edition»:»»,»Line of Business»:{«code»:»LOB45″,»label»:»Automation»}},{«Product»:{«code»:»SSSRR3″,»label»:»WebSphere Business Monitor»},»Business Unit»:{«code»:»BU059″,»label»:»IBM Software w/o TPS»},»Component»:» «,»Platform»:[{«code»:»PF002″,»label»:»AIX»},{«code»:»PF010″,»label»:»HP-UX»},{«code»:»PF016″,»label»:»Linux»},{«code»:»PF027″,»label»:»Solaris»},{«code»:»PF033″,»label»:»Windows»},{«code»:»PF035″,»label»:»z/OS»}],»Version»:»7.5.1;7.5;7.0″,»Edition»:»Advanced;Basic»,»Line of Business»:{«code»:»LOB45″,»label»:»Automation»}},{«Product»:{«code»:»SSKM8N»,»label»:»WebSphere Message Broker»},»Business Unit»:{«code»:»BU053″,»label»:»Cloud u0026 Data Platform»},»Component»:»Environment»,»Platform»:[{«code»:»PF002″,»label»:»AIX»},{«code»:»PF010″,»label»:»HP-UX»},{«code»:»PF016″,»label»:»Linux»},{«code»:»PF027″,»label»:»Solaris»},{«code»:»PF033″,»label»:»Windows»},{«code»:»PF035″,»label»:»z/OS»}],»Version»:»9.0;8.0;7.0″,»Edition»:»»,»Line of Business»:{«code»:»LOB36″,»label»:»IBM Automation»}},{«Product»:{«code»:»SSFKSJ»,»label»:»WebSphere MQ»},»Business Unit»:{«code»:»BU059″,»label»:»IBM Software w/o TPS»},»Component»:»Clients»,»Platform»:[{«code»:»PF002″,»label»:»AIX»},{«code»:»PF010″,»label»:»HP-UX»},{«code»:»PF012″,»label»:»IBM i»},{«code»:»PF016″,»label»:»Linux»},{«code»:»PF033″,»label»:»Windows»}],»Version»:»8.0;7.5;7.1;7.0″,»Edition»:»»,»Line of Business»:{«code»:»LOB45″,»label»:»Automation»}}]
Error MQRC 2035 basically means that your application has been able to connect to the queue manager, however due to certain absence of permissions/authorizations, it was unable to put/get/publish/subscribe messages.
To resolve this, at first, try these steps in order to disable the authorizations from queue manager and channel. Use this only if it isn’t a production queue manager.
-
Always check the queue manager logs. It tells you exactly where you need to look into, and resolve the issue.
-
In this case, generally, you can issue the following commands after doing a runmqsc on the queue manager :
ALTER QMGR CHLAUTH(DISABLED)
Then set the chckclnt object(under authinfo) to optional
-
DISPLAY QMGR CONNAUTH DISPLAY AUTHINFO(name-from-above) ALL //name from the first commands ALTER AUTHINFO(name-from-above) AUTHTYPE(IDPWOS) ADOPTCTX(YES) ALTER AUTHINFO(name-from-above) AUTHTYPE(IDPWOS) CHCKCLNT(OPTIONAL) REFRESH SECURITY TYPE(CONNAUTH) -
SET CHLAUTH('*') TYPE(BLOCKUSER) ACTION(REMOVEALL)This helps remove any blocks that the channel is creating against any user.
SET CHLAUTH(your channel name) TYPE(ADDRESSMAP) ADDRESS('*') USERSRC(CHANNEL)
This should resolve your issue, since we have disabled every authorization that an application has to pass in order to do anything on a queue manager.
Now, in case you are using a production queue manager, NEVER remove authorizations.
Go, and right click on any QM that you have configured in your MQ explorer. Go to the QM authority, and authority records. Click on create new user, and give the same name as the username your application is using. Select all the checkboxes, then copy from the space below all the commands that are given. Namely, setmqaut. Edit with your queue manager name, and issue them!
—-Never give up, the answer is where you have not looked yet———
| Номер ошибки: | Ошибка 2035 | |
| Название ошибки: | URL Not Found | |
| Описание ошибки: | URL Not Found. The SWF file is attempting to locate external assets but they cannot be found. | |
| Разработчик: | Adobe Systems Inc. | |
| Программное обеспечение: | Adobe Flash Player | |
| Относится к: | Windows XP, Vista, 7, 8, 10, 11 |
Анализ «URL Not Found»
«URL Not Found» обычно называется формой «ошибки времени выполнения». Разработчики тратят много времени и усилий на написание кода, чтобы убедиться, что Adobe Flash Player стабилен до продажи продукта. Как и во всем в жизни, иногда такие проблемы, как ошибка 2035, упускаются из виду.
Пользователи Adobe Flash Player могут столкнуться с сообщением об ошибке после выполнения программы, например «URL Not Found. The SWF file is attempting to locate external assets but they cannot be found.». Сообщение об этой ошибке 2035 позволит разработчикам обновить свое приложение и исправить любые ошибки, которые могут вызвать его. Затем Adobe Systems Inc. нужно будет исправить эти ошибки в главном исходном коде и предоставить модифицированную версию для загрузки. Таким образом при выполнении обновления программного обеспечения Adobe Flash Player, он будет содержать исправление для устранения проблем, таких как ошибка 2035.
Что вызывает ошибку 2035 во время выполнения?
Вполне вероятно, что при загрузке Adobe Flash Player вы столкнетесь с «URL Not Found». Следующие три наиболее значимые причины ошибок выполнения ошибки 2035 включают в себя:
Ошибка 2035 Crash — Ошибка 2035 может привести к полному замораживанию программы, что не позволяет вам что-либо делать. Это возникает, когда Adobe Flash Player не реагирует на ввод должным образом или не знает, какой вывод требуется взамен.
Утечка памяти «URL Not Found» — если есть утечка памяти в Adobe Flash Player, это может привести к тому, что ОС будет выглядеть вялой. Возможные причины включают сбой Adobe Systems Inc. для девыделения памяти в программе или когда плохой код выполняет «бесконечный цикл».
Ошибка 2035 Logic Error — «логическая ошибка», как говорят, генерируется, когда программное обеспечение получает правильный ввод, но генерирует неверный вывод. Когда точность исходного кода Adobe Systems Inc. низкая, он обычно становится источником ошибок.
Такие проблемы URL Not Found обычно вызваны повреждением файла, связанного с Adobe Flash Player, или, в некоторых случаях, его случайным или намеренным удалением. Обычно, установка новой версии файла Adobe Systems Inc. позволяет устранить проблему, из-за которой возникает ошибка. Запуск сканирования реестра после замены файла, из-за которого возникает проблема, позволит очистить все недействительные файлы URL Not Found, расширения файлов или другие ссылки на файлы, которые могли быть повреждены в результате заражения вредоносным ПО.
Классические проблемы URL Not Found
Обнаруженные проблемы URL Not Found с Adobe Flash Player включают:
- «Ошибка приложения URL Not Found.»
- «Недопустимый файл URL Not Found. «
- «Возникла ошибка в приложении URL Not Found. Приложение будет закрыто. Приносим извинения за неудобства.»
- «Не удается найти URL Not Found»
- «Отсутствует файл URL Not Found.»
- «Проблема при запуске приложения: URL Not Found. «
- «Файл URL Not Found не запущен.»
- «URL Not Found выйти. «
- «Ошибка пути программного обеспечения: URL Not Found. «
Проблемы URL Not Found с участием Adobe Flash Players возникают во время установки, при запуске или завершении работы программного обеспечения, связанного с URL Not Found, или во время процесса установки Windows. Запись ошибок URL Not Found внутри Adobe Flash Player имеет решающее значение для обнаружения неисправностей электронной Windows и ретрансляции обратно в Adobe Systems Inc. для параметров ремонта.
Причины ошибок в файле URL Not Found
Эти проблемы URL Not Found создаются отсутствующими или поврежденными файлами URL Not Found, недопустимыми записями реестра Adobe Flash Player или вредоносным программным обеспечением.
В основном, осложнения URL Not Found связаны с:
- Недопустимые разделы реестра URL Not Found/повреждены.
- Зазаражение вредоносными программами повредил файл URL Not Found.
- Другая программа злонамеренно или по ошибке удалила файлы, связанные с URL Not Found.
- Другое приложение, конфликтующее с URL Not Found или другими общими ссылками.
- Поврежденная установка или загрузка Adobe Flash Player (URL Not Found).
Продукт Solvusoft
Загрузка
WinThruster 2022 — Проверьте свой компьютер на наличие ошибок.
Совместима с Windows 2000, XP, Vista, 7, 8, 10 и 11
Установить необязательные продукты — WinThruster (Solvusoft) | Лицензия | Политика защиты личных сведений | Условия | Удаление
Story Highlights
- Close Office Processes
- Restart your computer
- Office Installation in Clean Boot
- Install Office using the Offline Installer
- Remove Other Office Versions
How to fix Error Code 0-1018(0) or 0-2035(0) when installing Office
Applies on Microsoft Office 365, Office 2021, Office 2019, Office 2016 and Office 2013
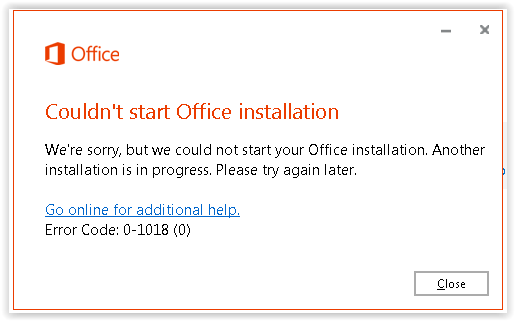
When you try to install Microsoft Office you may get an error message “Couldn’t start Office installation. Error Code 0-1018(0) or 0-2035(0)“
“Error Code 0-1018(0) or 0-2035(0) when installing Office” usually occurs if another installation, updation, or uninstallation was running before you attempted to install Office. You cannot run multiple instances of the same program to install or uninstall it. The installer will conflict with each other and prompt errors on the screen.
Error Message
Couldn’t start Office installation. We’re sorry, but we could not start your Office installation. Another installation is in progress, please try again later.
- Error Code 0-1018(0)
- Error Code 2035-0
Causes of Error Code 0-1018(0) or 0-2035(0) when installing Office
“Error Code 0-1018(0) or 0-2035(0)” occurs when another instance of the same program is conflicting with the office installation. We might see this error prompt with error code 0-1018(0), 17003-2031 or 2035-0 during office installation process.
- Multiple instances of the same program confliction
- Incomplete, partial, failed repair, installation, change, or removal of a previous Office suite can prevent from installing a newer version.
- Previous version of an Office suite is blocking the installation
Resolution of Error Code 0-1018(0) or 0-2035(0) when installing Office
We have made a list of resolutions that can fix the Error Code 0-1018(0) or 0-2035(0) when installing Office”. Performing the below-mentioned solutions and workarounds helps us to resolve the Error Code 0-1018(0) or 0-2035(0) when installing Office.
- Close other Office Processes
- Restart your computer and reinstall Office
- Office Installation in Clean Boot
- Install Office using the Offline Installer
- Remove Other Office Versions
Solution
1
Close other Office Processes
You might have another installation running in the background, and conflicting with the new installation you are initiating. This might prompt for the Error Code 0-1018(0) or 0-2035(0) when installing Office
To fix this error, you need to stop the other installation processes using Task Manager.
- Press Ctrl + Shift + Esc to start Task Manager.
- Locate the Office installation process running in the background
- Office installation processes are usually IntergratedOffice.exe and Microsoft Click-to-Run.
- Right-click on the process and click on End Task from the menu

Now try to initiate the office installation and it should work like charm.
Solution
2
Restart your computer and reinstall Office
The most common scenario is that the other office background processes are conflicting with the Office installation process and causing the Error Code 0-1018(0) or 0-2035(0). Try restarting your device and reinstalling Office once the device is up and running.
Solution
3
Office Suite Installation in Clean Boot
Office installation can also be interrupted if third-party services are conflicting with the office program which can result in Error Code 0-1018(0) or 0-2035(0).
Consider performing Clean Boot to disable all startup programs and services on the computer. Also, consider disabling unwanted software’s which can conflict with the office suite. Try installing the office after starting the computer with minimal set of services, drivers, and startup programs to avoid other programs interfering with office installation.
Perform Clean Boot in Windows10, 8.1 and 8
- Press Windows Key + R to open Run command, type msconfig.msc and click Ok. Or Open Control Panel –>Administrative Tools–>System Configuration

- On the Services tab of the System Configuration dialog box, tap or click to select the Hide all Microsoft services check box, and then tap or click Disable all.
- On the Startup tab of the System Configuration dialog box, tap or click Open Task Manager
- On the Startup tab in Task Manager, for each startup item, select the item and then click Disable
- Close Task Manager.
On the Startup tab of the System Configuration dialog box, tap or click OK, and then restart the computer.

Consider installing office after restarting the device.
Perform Clean Boot in Windows 7
- Press Windows Key + R to open Run command, type msconfig.msc and click Ok. Or Open Control Panel –>Administrative Tools–>System Configuration
- On the General tab, click the Selective startup option, and then click to clear the Load startup items check box
- On the Services tab, click to select the Hide all Microsoft services check box, and then click Disable all.
- Close Task Manager.
On the Startup tab of the System Configuration dialog box, tap or click OK, and then restart the computer.

Consider installing office after restarting the device.
Solution
4
Install Office using the Office Offline Installer
The Office offline installer may help in bypassing the potential firewall, proxy, antivirus, or Internet connection issues that might occur during an Office installation as we will be downloading the Offline installer ISO file to install office to avoid Error Code 0-1018(0) or 0-2035(0).
Steps to Download Office Offline Installer File
Please visit www.office.com/myaccount to download the office offline installer. We need to make sure that we are using the same account which is associated with our copy of office.
If we are not signed in with the Microsoft account associated with our copy of Office, we need to sign in now. If we are signed in with a different account, we need to sign out from that account and sign in again with the correct Microsoft account.
Once we logged in, we will find My Office Account Homepage with your subscription account information and the place we normally go to download the standard online Office installer.
- From the My Office Account Home page, click the Install button.

- From the Install page, click “Language, 32/64-bit, and other install options.”

- Language and Install Options: This is the section from where we can manually select to download Office in Language other than Operating System Configured language. We can also opt for the 64-bit version of office instead of normal 32 bit.
- Offline Installer: From the Office Installer section, select desired language and click on Download offline installer.

Solution
5
Remove Other Office Versions
Office installation can also be interrupted due to erroneous residual files during the installation or un-installation of previous versions of Microsoft office which can cause Error Code 0-1018(0) or 0-2035(0).
Consider removing Microsoft Office versions installed in the device and try to reinstall the Office program. You can reinstall the other office versions once the office installation is finished.
Uninstall Office from the Control Panel
- Press Windows Key + R to open Run command, type appwiz.cpl and click Ok. Or Open Control Panel –>Programs
- Right-click on the Microsoft Office product, and choose Uninstall.
- Follow the instructions on the screen.

Uninstall Office using Microsoft Easy Fix Tool
Try running Microsoft Easy Fix tool to completely remove Office from the device.
We’ve compiled all the resolutions and workarounds verified by the experts to fix the mentioned error. These resolutions and workarounds helped the users to fix the error on their system. Try implementing these resolutions on your computer and if the preceding suggestions fail to solve the error, please feel free to Ask an Expert.
Frequently Asked Questions
-
What is Office Error Code 0-1018(0)?
Office error code 1018(0) occurs when another instance of the same program is conflicting with the office installation.
-
What is Office Error Code 0-2035(0)?
Office error code 0-2035(0) occurs when another instance of the same program is conflicting with the office installation.
-
What is Error Couldn’t start Office installation?
«Couldn’t start Office installation» occurs when another instance of the same program is conflicting with the office installation.
- 28.06.2022
В данной статье рассмотрим ошибки с номерами: 0-1018, 17003-2031, 2035-0. Данный ошибки выходят в Microsoft Office при установке приложения. Рассмотрим по какой причине они могут выходить, и как это исправить?
1) Ошибка может возникать из-за того, что Вы запустили второй экземпляр установки Microsoft Office. Попробуйте посмотреть в трее, возможно там у Вас приложение Microsoft Office уже устанавливается.
Как решить проблему? — Дождитесь установки Microsoft Office, если у Вас в трее он действительно устанавливается.
2) Если в трее ничего не устанавливается — попробуйте перезагрузить ПК. И повторить установку Microsoft Office.
3) Если перезагрузка так же не помогла, воспользуйтесь приложением официальным приложением от Майкрософт — Microsoft Support and Recovery Assistant, скачать и инструкция по использованию в нашей прошлой статье.