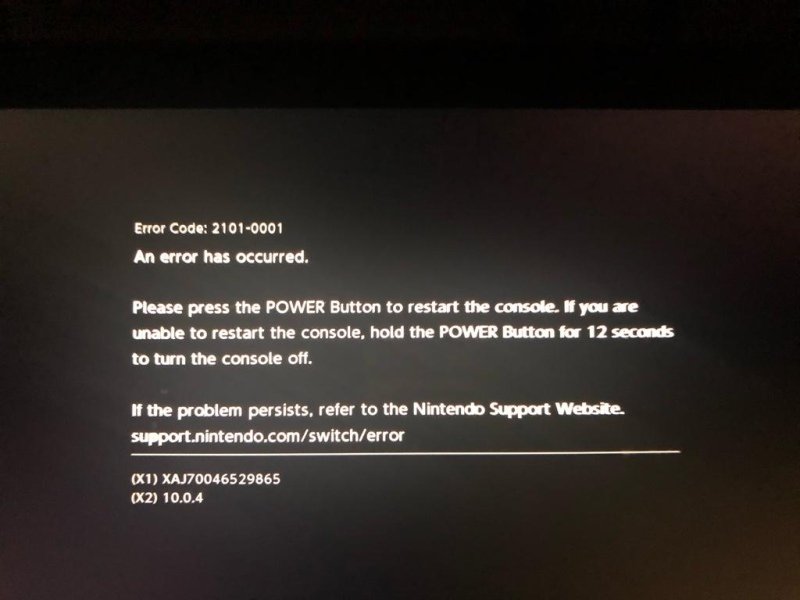
The 2101-0001 error code for the Nintendo Switch can be pretty annoying, but it’s usually pretty easy to diagnose and repair. This very specific error code is a critical error code related to a communication issue between the Nintendo Switch software and M92T36, the power management IC for the Switch. The very first thing to do, regardless of whether or not you see any kind of damage is to lift off the USB-C port. Replacing the port can cost about $1 on AliExpress, and since this issue is occurring, it’s best to change the port regardless.
Remember, the USB-C port on the Nintendo Switch has a hidden row of pins. BE CAREFUL! Trace repair on the Nintendo Switch port is no easy task, and damage is easy to do. To put it into context, watch this video: Nintendo Switch USB-C Trace Repair
There’s also a very detailed repair video you can watch if you do not want to follow this guide
Diagnosis Steps[edit | edit source]
Once the port is removed, proceed by testing the capacitors on M92T36 for shorts to ground using either diode or continuity mode on your multimeter. If there are no shorts, you may just have a port problem, so solder a new port and test. If you find shorts on M92T36, replace that IC. 2101-0001 is almost always both a port and IC problem. Even if you do have what appears to be a good M92T36, you may still have a problem with it. M92T36 doesn’t always show obvious signs that it has developed a fault.
While you still have the motherboard out of the chassis, check for shorts on P13USB on the other side of the motherboard (Side-A). If the top capacitor has a short, remove and replace P13USB too.
Once M92T36, P13USB or both have been replaced you can test the console before installing a new port should you prefer. That is usually my preferred option.
Causes[edit | edit source]
This error code is generally caused by M92T36. 2101-0001 is an error on the i2c bus. This is a faulty M92 in MOST cases. There are cases where it can be something such as a faulty charging cable, excessive force, or accidental damage when inserting and removing the charging cable. It is not usually an error that will just occur on its own for no reason. Because this is a hardware-related (critical) error code, replacing components is your only option.
This error code is generally caused by M92T36. 2101-0001 is an error on the i2c bus.
This error code can be caused by the user inserting the cable incorrectly (on a strange angle).
This error code can be caused by faulty accessories, such as a damaged charging cable or dock.
This error code can be caused by some poorly created 3rd party USB-C accessories which lack proper circuit protection.
Removing The USB-C Charging Port[edit | edit source]
The safest method I’ve personally found for removing the USB-C port is to remove any nozzle you have on your hot air wand. Use 480 degrees Celsius at around 40%(40l) air flow and hold the wand directly above the port from a straight angle. After around 60 seconds you will notice the lead-free solder will begin to melt. Do not lift the port yet! Start to lightly tap the port with a pair of tweezers while still applying heat until the port moves freely. Wait another 5-10 seconds after free movement starts and then slowly lift off the port. This might seem overkill, but spending an extra 30-60 seconds now will save you 60-90 minutes of work afterwards. Do not bend the board, do not yank on the port, do not try and force it off. Take extra care, and save yourself a whole world of pain… I’ve seen it happen!
Best Practices[edit | edit source]
Take extra care when removing the USB-C port.
Change the USB-C port anyway, regardless of how it looks.
Always clean the inside of the port using something soft, such as a small cotton swab or soft tooth brush after installation. It will always have flux inside.
Always clean all flux residue from the motherboard after component-level work. Leaving flux residue could potentially corrode the motherboard over time.
Ensure the console will charge using both an official Nintendo Switch charger (15v) and a 5v standard charger on both sides of the port (flip the cable around)
Ensure the console docks to the TV after replacing the port. If it doesn’t, it might not be installed correctly. Usually reflowing the port will correct this.
Ensure the console bumps up to fast charging after repair.
Do a full system test after repair including display, audio, charging, power, docking, joycon connectivity (wired and wireless), Wi-Fi connectivity, touch screen functionality, game reading and playing (using a game cartridge, not digital download)
If you are a repair shop, advise your customer to replace their charging cable too. Failing to replace the cable may result in the device coming back under warranty when the customer’s faulty accessories break it again
For a detailed video guide, refer to the video above.
Credit[edit source]
Original article credit: TheCod3r
Mena
In recent months, the number of error codes has increased quite a bit. Nintendo has provided many solutions for the issues. However, a few of them still remain unaddressed. The error code 2101-0001 is a complex error. The causes of this error are still not known. However, after collecting various complaint reports, it can be said that there are two main reasons for this error to be shown. They are –
- Failure in hardware components
- Fault in MicroSD card
Error Code 2101-0001 Fixes
The solution is that you can try is limited. In severe cases, it is advisable to seek professional care from Nintendo Support. The possible fixes to this error code are:
1. Perform a Full Power Cycle
A full power cycle will eliminate any minute abnormality in the software files. This is a safe method to try when the actual cause is not known. Press and hold down the power button for three seconds. Now, from the power options, select restart.
In case your Switch is unresponsive, keep pressing the power button for roughly twelve seconds. This signifies that you are shutting down the console by force. After some time, power it up.
2. Remove SD card
A faulty SD card creates errors while storing information. As the SD card is faulty, the Switch firmware cannot store the desired data. Hence, it throws this error. Power down your console. Now, remove the MicroSD card from the slot. The slot is present near the kickstand of your console.
Once you have removed the SD card, switch on your gaming console. If you see that the error no longer persists, then use the console on internal memory, In the meantime, get it repaired.
Hopefully, this will help you solve the error code 2101-0001. Now, you can enjoy your favorite games in peace.
You should upgrade or use an alternative browser.
-
Thread starterovermir
-
Start dateDec 30, 2019
-
Views
8,795 -
Replies
13 -
Likes
1
- Joined
- Dec 21, 2019
- Messages
- 2
- Trophies
- 0
- Age
- 43
- XP
-
60
- Country
-


-
#1
Pin 5 has 0v while switch is on and not charging, 3.84v while on and charging
Pin 6 has 3.33 volts while on and both charging and not charging
The PI3USB capacitor does not show a short.
Any ideas what could be the issue?
- Joined
- Jan 28, 2019
- Messages
- 364
- Trophies
- 0
- Age
- 51
- XP
-
771
- Country
-

-
#2
My switch I’m repairing is stuck on error screen 2101-0001. It initially would not charge and after replacing the M92T36 chip it now charges, but the error remains. The switch restarts if I try to get it into recovery mode.Pin 5 has 0v while switch is on and not charging, 3.84v while on and charging
Pin 6 has 3.33 volts while on and both charging and not chargingThe PI3USB capacitor does not show a short.
Any ideas what could be the issue?
Test for a short on the LDO caps connected to pins 38,39,40, and the VDDIO pin 18 of M92T36.
- Joined
- Dec 21, 2019
- Messages
- 2
- Trophies
- 0
- Age
- 43
- XP
-
60
- Country
-
-
#3
Test for a short on the LDO caps connected to pins 38,39,40, and the VDDIO pin 18 of M92T36.
I did not find any shorts on the caps. VDDIO pin 18 is showing 1.80v while the switch is on. Looking at the datasheet it should be around ~3.3v? What can cause the lower voltage? Thanks
- Joined
- Jan 28, 2019
- Messages
- 364
- Trophies
- 0
- Age
- 51
- XP
-
771
- Country
-
-
#4
I did not find any shorts on the caps. VDDIO pin 18 is showing 1.80v while the switch is on. Looking at the datasheet it should be around ~3.3v? What can cause the lower voltage? Thanks
1.8V is correct for the VDDIO pin.
Do you have no voltage on pin 5 of M92T36 when the switch is on and not charging if so you should have, as this is the M92T36’s internal power chosen from Vbus, VSVR or VEX, normally when not charging this will be around 3-5V
Check your soldering on the M92T36, try a reflow on it or try to run around the pins with a fine tip soldering iron preheat it first with hot air.
-
#5
1.8V is correct for the VDDIO pin.Do you have no voltage on pin 5 of M92T36 when the switch is on and not charging if so you should have, as this is the M92T36’s internal power chosen from Vbus, VSVR or VEX, normally when not charging this will be around 3-5V
Check your soldering on the M92T36, try a reflow on it or try to run around the pins with a fine tip soldering iron preheat it first with hot air.
Similar issue I had and M92T36 was not soldering well. Exactly what @Pintglass says, take a look at the M92T36.
-
#6
Similar issue I had and M92T36 was not soldering well. Exactly what @Pintglass says, take a look at the M92T36.
Just to add my thoughts on this one. If you remove the M92T and power up, you get this error.
@Pintglass and @FXDX are on the money here.
-
#7
- Joined
- Feb 14, 2009
- Messages
- 2
- Trophies
- 0
- XP
-
8
- Country
-

-
#8
- Joined
- Sep 17, 2021
- Messages
- 83
- Trophies
- 0
- Age
- 20
- XP
-
486
- Country
-
-
#9
I have just had this issue. I replaced the M92T36 on switch. Switch all working. using a stand USB C and faster charger only getting 0.9a on charge which isnt terrible. Ive plugged in a official nintendo switch charger and its gone off and I get this error. Checked around M92 and shorts again. If i replace the chip again will this keep happening, any help please?
Hey there, were you able to fix the switch?
- Joined
- Nov 20, 2018
- Messages
- 723
- Trophies
- 0
- Age
- 123
- XP
-
1,013
- Country
-

-
#10
I have just had this issue. I replaced the M92T36 on switch. Switch all working. using a stand USB C and faster charger only getting 0.9a on charge which isnt terrible. Ive plugged in a official nintendo switch charger and its gone off and I get this error. Checked around M92 and shorts again. If i replace the chip again will this keep happening, any help please?
It’s probably some components around the M92 that need to be replaced as well.
A USB charger only runs are 5V but the original Switch charger switches to 15V at a certain point to fast-charge the battery.
This switch to 15V likely damages the new M92 due to some unsolved problem with other components.
Start by checking is the caps related to the M92 (both on the front and back).
-
#11
My switch I’m repairing is stuck on error screen 2101-0001. It initially would not charge and after replacing the M92T36 chip it now charges, but the error remains. The switch restarts if I try to get it into recovery mode.Pin 5 has 0v while switch is on and not charging, 3.84v while on and charging
Pin 6 has 3.33 volts while on and both charging and not chargingThe PI3USB capacitor does not show a short.
Any ideas what could be the issue?
This is a generic error and can be M9, p13, usbc, bq or a res, cap that needs replacing.
- Joined
- Sep 17, 2021
- Messages
- 83
- Trophies
- 0
- Age
- 20
- XP
-
486
- Country
-
-
#12
This is a generic error and can be M9, p13, usbc, bq or a res, cap that needs replacing.
How would I determine the integrity of P13 and BQ? Just compare diode measurements? The switch, when it worked for a short while, did dock and charge just fine so I think this 2101-0001 error is caused by the usual suspects of this error code, M9 and the charging port.
-
#13
How would I determine the integrity of P13 and BQ? Just compare diode measurements? The switch, when it worked for a short while, did dock and charge just fine so I think this 2101-0001 error is caused by the usual suspects of this error code, M9 and the charging port.
Thats the problem. Shorted ics dont always show a short. Only way is to replace and test if no shorts present. I’ve also seen this error by a speaker wire being ripped off and touching something on motherboard. It is usually m9 or usb but just letting you know it can be other fault(s).
I have also fixed this with having to replace m9 3 times since they do come bad quite often
- Joined
- Sep 17, 2021
- Messages
- 83
- Trophies
- 0
- Age
- 20
- XP
-
486
- Country
-
-
#14
Thats the problem. Shorted ics dont always show a short. Only way is to replace and test if no shorts present. I’ve also seen this error by a speaker wire being ripped off and touching something on motherboard. It is usually m9 or usb but just letting you know it can be other fault(s).I have also fixed this with having to replace m9 3 times since they do come bad quite often
So I guess my current «action map» is to engage upon an in depth board inspection to make sure no shorts are being created, replace M9 again, and replace charging port. If the M9 chip shorts out again for a 3rd time then I’ll remove PI3 and replace BQ. If not of that fixes it I’m going to move on haha.
Similar threads
You may also like…
This article features error number Code 2101, commonly known as Microsoft Silverlight Error 2101 described as Failed to initialize the application’s root visual.
About Runtime Code 2101
Runtime Code 2101 happens when Microsoft Silverlight fails or crashes whilst it’s running, hence its name. It doesn’t necessarily mean that the code was corrupt in some way, but just that it did not work during its run-time. This kind of error will appear as an annoying notification on your screen unless handled and corrected. Here are symptoms, causes and ways to troubleshoot the problem.
Definitions (Beta)
Here we list some definitions for the words contained in your error, in an attempt to help you understand your problem. This is a work in progress, so sometimes we might define the word incorrectly, so feel free to skip this section!
- Root — On Unix-like systems, a special user account used for system administration.
- Silverlight — Silverlight is Microsoft’s cross-browser, cross platform plug-in for media experiences and rich interactive applications.
- Initialize — Initialization deals with the task of initializing the contents of your data structure
Symptoms of Code 2101 — Microsoft Silverlight Error 2101
Runtime errors happen without warning. The error message can come up the screen anytime Microsoft Silverlight is run. In fact, the error message or some other dialogue box can come up again and again if not addressed early on.
There may be instances of files deletion or new files appearing. Though this symptom is largely due to virus infection, it can be attributed as a symptom for runtime error, as virus infection is one of the causes for runtime error. User may also experience a sudden drop in internet connection speed, yet again, this is not always the case.
 Repair Tool")
(For illustrative purposes only)
Causes of Microsoft Silverlight Error 2101 — Code 2101
During software design, programmers code anticipating the occurrence of errors. However, there are no perfect designs, as errors can be expected even with the best program design. Glitches can happen during runtime if a certain error is not experienced and addressed during design and testing.
Runtime errors are generally caused by incompatible programs running at the same time. It may also occur because of memory problem, a bad graphics driver or virus infection. Whatever the case may be, the problem must be resolved immediately to avoid further problems. Here are ways to remedy the error.
Repair Methods
Runtime errors may be annoying and persistent, but it is not totally hopeless, repairs are available. Here are ways to do it.
If a repair method works for you, please click the upvote button to the left of the answer, this will let other users know which repair method is currently working the best.
Please note: Neither ErrorVault.com nor it’s writers claim responsibility for the results of the actions taken from employing any of the repair methods listed on this page — you complete these steps at your own risk.
Method 1 — Close Conflicting Programs
When you get a runtime error, keep in mind that it is happening due to programs that are conflicting with each other. The first thing you can do to resolve the problem is to stop these conflicting programs.
- Open Task Manager by clicking Ctrl-Alt-Del at the same time. This will let you see the list of programs currently running.
- Go to the Processes tab and stop the programs one by one by highlighting each program and clicking the End Process buttom.
- You will need to observe if the error message will reoccur each time you stop a process.
- Once you get to identify which program is causing the error, you may go ahead with the next troubleshooting step, reinstalling the application.
Method 2 — Update / Reinstall Conflicting Programs
Using Control Panel
- For Windows 7, click the Start Button, then click Control panel, then Uninstall a program
- For Windows 8, click the Start Button, then scroll down and click More Settings, then click Control panel > Uninstall a program.
- For Windows 10, just type Control Panel on the search box and click the result, then click Uninstall a program
- Once inside Programs and Features, click the problem program and click Update or Uninstall.
- If you chose to update, then you will just need to follow the prompt to complete the process, however if you chose to Uninstall, you will follow the prompt to uninstall and then re-download or use the application’s installation disk to reinstall the program.
Using Other Methods
- For Windows 7, you may find the list of all installed programs when you click Start and scroll your mouse over the list that appear on the tab. You may see on that list utility for uninstalling the program. You may go ahead and uninstall using utilities available in this tab.
- For Windows 10, you may click Start, then Settings, then choose Apps.
- Scroll down to see the list of Apps and features installed in your computer.
- Click the Program which is causing the runtime error, then you may choose to uninstall or click Advanced options to reset the application.
Method 3 — Update your Virus protection program or download and install the latest Windows Update
Virus infection causing runtime error on your computer must immediately be prevented, quarantined or deleted. Make sure you update your virus program and run a thorough scan of the computer or, run Windows update so you can get the latest virus definition and fix.
Method 4 — Re-install Runtime Libraries
You might be getting the error because of an update, like the MS Visual C++ package which might not be installed properly or completely. What you can do then is to uninstall the current package and install a fresh copy.
- Uninstall the package by going to Programs and Features, find and highlight the Microsoft Visual C++ Redistributable Package.
- Click Uninstall on top of the list, and when it is done, reboot your computer.
- Download the latest redistributable package from Microsoft then install it.
Method 5 — Run Disk Cleanup
You might also be experiencing runtime error because of a very low free space on your computer.
- You should consider backing up your files and freeing up space on your hard drive
- You can also clear your cache and reboot your computer
- You can also run Disk Cleanup, open your explorer window and right click your main directory (this is usually C: )
- Click Properties and then click Disk Cleanup
Method 6 — Reinstall Your Graphics Driver
If the error is related to a bad graphics driver, then you may do the following:
- Open your Device Manager, locate the graphics driver
- Right click the video card driver then click uninstall, then restart your computer
Method 7 — IE related Runtime Error
If the error you are getting is related to the Internet Explorer, you may do the following:
- Reset your browser.
- For Windows 7, you may click Start, go to Control Panel, then click Internet Options on the left side. Then you can click Advanced tab then click the Reset button.
- For Windows 8 and 10, you may click search and type Internet Options, then go to Advanced tab and click Reset.
- Disable script debugging and error notifications.
- On the same Internet Options window, you may go to Advanced tab and look for Disable script debugging
- Put a check mark on the radio button
- At the same time, uncheck the «Display a Notification about every Script Error» item and then click Apply and OK, then reboot your computer.
If these quick fixes do not work, you can always backup files and run repair reinstall on your computer. However, you can do that later when the solutions listed here did not do the job.
Other languages:
Wie beheben Fehler 2101 (Microsoft Silverlight-Fehler 2101) — Fehler beim Initialisieren des Stammvisuals der Anwendung.
Come fissare Errore 2101 (Errore 2101 di Microsoft Silverlight) — Impossibile inizializzare l’oggetto visivo radice dell’applicazione.
Hoe maak je Fout 2101 (Microsoft Silverlight-fout 2101) — Kan de rootvisual van de toepassing niet initialiseren.
Comment réparer Erreur 2101 (Erreur Microsoft Silverlight 2101) — Échec de l’initialisation du visuel racine de l’application.
어떻게 고치는 지 오류 2101 (Microsoft Silverlight 오류 2101) — 애플리케이션의 루트 시각적 개체를 초기화하지 못했습니다.
Como corrigir o Erro 2101 (Erro 2101 do Microsoft Silverlight) — Falha ao inicializar o visual raiz do aplicativo.
Hur man åtgärdar Fel 2101 (Microsoft Silverlight Error 2101) — Det gick inte att initialisera programmets rotvisuella.
Как исправить Ошибка 2101 (Ошибка Microsoft Silverlight 2101) — Не удалось инициализировать корневой визуальный элемент приложения.
Jak naprawić Błąd 2101 (Błąd Microsoft Silverlight 2101) — Nie udało się zainicjować głównej wizualizacji aplikacji.
Cómo arreglar Error 2101 (Error 2101 de Microsoft Silverlight) — No se pudo inicializar el objeto visual raíz de la aplicación.
![]() About The Author: Phil Hart has been a Microsoft Community Contributor since 2010. With a current point score over 100,000, they’ve contributed more than 3000 answers in the Microsoft Support forums and have created almost 200 new help articles in the Technet Wiki.
About The Author: Phil Hart has been a Microsoft Community Contributor since 2010. With a current point score over 100,000, they’ve contributed more than 3000 answers in the Microsoft Support forums and have created almost 200 new help articles in the Technet Wiki.
Follow Us: ![]()
![]()
![]()

This repair tool can fix common computer problems such as blue screens, crashes and freezes, missing DLL files, as well as repair malware/virus damage and more by replacing damaged and missing system files.
STEP 1:
Click Here to Download and install the Windows repair tool.
STEP 2:
Click on Start Scan and let it analyze your device.
STEP 3:
Click on Repair All to fix all of the issues it detected.
DOWNLOAD NOW
Compatibility
![]()
Requirements
1 Ghz CPU, 512 MB RAM, 40 GB HDD
This download offers unlimited scans of your Windows PC for free. Full system repairs start at $19.95.
Article ID: ACX08049EN
Applies To: Windows 10, Windows 8.1, Windows 7, Windows Vista, Windows XP, Windows 2000
Speed Up Tip #20
Cleaning out the Windows XP Prefetch Folder:
Prefetch is a useful and unique technique utilized in Windows XP. However, it can accumulate obsolete and rarely used links over time which can significantly slow down your computer. Just open C(system drive):/windows/prefetch, delete all files and reboot.
Click Here for another way to speed up your Windows PC
На чтение 6 мин Просмотров 12.9к.
Рассмотрим подробнее
- Техническое описание и расшифровка ошибки P2101
- Симптомы неисправности
- Причины возникновения ошибки
- Как устранить или сбросить код неисправности P2101
- Диагностика и решение проблем
- Тестирование проводки
- Проверка привода
- На каких автомобилях чаще встречается данная проблема
- Видео
Код ошибки P2101 звучит как «несоответствие диапазона рабочих характеристик цепи управляющего двигателя «А» привода дроссельной заслонки». Часто, в программах, работающих со сканером OBD-2, название может иметь английское написание «Throttle Actuator «A» Control Motor Circuit Range Performance».
Техническое описание и расшифровка ошибки P2101
Этот диагностический код неисправности (DTC) является общим кодом силового агрегата. Ошибка P2101 считается общим кодом, поскольку применяется ко всем маркам и моделям транспортных средств. Хотя конкретные этапы ремонта могут несколько отличаться в зависимости от модели.

Привод дроссельной заслонки «A» обычно установлен в передней части двигателя. На верхней части двигателя, внутри колесных арок или напротив переборки. TA-A управляется электрическим сигналом от модуля управления трансмиссией (PCM).
PCM получает входные данные, чтобы определить, когда и сколько времени ему нужно для работы привода. Эти входы представляют собой сигналы напряжения, полученные от датчиков температуры охлаждающей жидкости, температуры всасываемого воздуха. Также используются данные оборотов двигателя и давления в системе кондиционирования воздуха. Как только PCM получит эти входные данные, он может изменить сигнал на заслонку.
P2101 обычно устанавливается из-за проблем с электричеством в цепи, но может быть вызван механическими проблемами. Такими как механическое заедание дроссельной заслонки на приводе с электрическим приводом. На этапе устранения неполадок нельзя упускать из виду как электрические, так и механические проблемы. Особенно при решении периодически возникающих проблем.
Действия по устранению неполадок могут различаться в зависимости от производителя, типа привода дроссельной заслонки и цветов проводов.
Симптомы неисправности
Основным симптомом появления ошибки P2101 для водителя является подсветка MIL (индикатор неисправности). Также его называют Check engine или просто «горит чек».
Также они могут проявляться как:
- Загорится контрольная лампа «Check engine» на панели управления (код будет записан в память ECM как неисправность).
- Двигатель невозможно разогнать, реакция дроссельной заслонки неотзывчива.
- Плавающие обороты на холостом ходу (обороты могут быть ниже или выше нормы).
Ошибка P2101 относится к серьезным из-за воздействия на систему охлаждения. Поскольку это может быть электрическая или механическая неисправность. PCM не может полностью ее устранить. Частичная исправление блоком PCM обычно означает, что двигатель устанавливает фиксированные обороты холостого хода (обычно около 1000 — 1200 об / мин).
Причины возникновения ошибки
Код P2101 может означать, что произошла одна или несколько следующих проблем:
- Обрыв или короткое замыкание в цепи привода дроссельной заслонки – вероятно.
- Неисправный привод дроссельной заслонки (механически или электрически) – вероятно.
- Вышел из строя PCM – маловероятно.
Как устранить или сбросить код неисправности P2101
Некоторые предлагаемые шаги для устранения неполадок и исправления кода ошибки P2101:
- Проверить коды в ECM.
- Диагностировать код в соответствии с проверочным тестом производителя, чтобы проверить сигнал.
- С помощью педали акселератора, проконтролировать датчики положения дроссельной заслонки и работу привода.
- Проверить жгут и соединение, визуально на наличие проблем, в случае необходимости устранить неполадки.
- Испытать привод в соответствии с заданным точечным тестом производителя.
Диагностика и решение проблем
Первым делом необходимо проверить бюллетени технического обслуживания (TSB) для вашего конкретного автомобиля. Ваша проблема может быть известной с известным исправлением, выпущенным производителем. Это может сэкономить ваше время и деньги во время диагностики.
Затем найдите привод дроссельной заслонки «A» на вашем конкретном автомобиле. Этот привод обычно устанавливается в передней части двигателя. На верхней части двигателя, внутри колесных арок или напротив переборки.
Тестирование проводки
После обнаружения визуально осмотрите разъем и проводку. Ищите царапины, потертости, оголенные провода, пятна ожогов или расплавленный пластик. Разъедините разъем и внимательно осмотрите клеммы внутри разъема.
Посмотрите, выглядят ли они обгоревшими или имеют зеленый оттенок, указывающий на коррозию. При необходимости очистки клемм используйте очиститель электрических контактов и щетку с пластиковой щетиной. Дайте высохнуть и нанесите электрическую смазку в местах соприкосновения клемм.
При наличии диагностического сканера, удалите диагностические коды неисправностей из памяти и посмотрите, возвращается ли код P2101. Если это не так, скорее всего, проблема связана с подключением.
Проверка привода
В случае возвращения кода P2101, нам нужно будет протестировать привод и связанные с ним цепи. Обычно на каждом приводе дроссельной заслонки есть 2 провода. Сначала отсоедините жгут, идущий от привода дроссельной заслонки.
С помощью цифрового мультиметра подключите один вывод измерителя к одной клемме привода. Подсоедините оставшийся провод измерителя к другой клемме привода. Он не должен быть разомкнутым или закороченным.
Проверьте характеристики сопротивления для вашего конкретного автомобиля. Если привод закорочен, то сопротивление будет бесконечное или вовсе отсутствовать. В таком случае, замените привод дроссельной заслонки.
Если этот тест пройден, с помощью мультиметра убедитесь, что у вас подается 12 В в цепи питания привода дроссельной заслонки. Красный провод к цепи питания привода, черный провод к хорошему заземлению.
С помощью диагностического прибора, который может активировать привод дроссельной заслонки, включите привод. Если на приводе нет 12 вольт, отремонтируйте проводку от PCM или реле к приводу. Также в этом случае, возможно, неисправный PCM.
Если все в порядке, убедитесь, что у вас хорошее заземление на приводе дроссельной заслонки. Подключите контрольную лампу к плюсу аккумуляторной батареи 12 В (красный вывод). И коснитесь другим концом контрольной лампы цепи заземления. Идущей к заземлению цепи привода дроссельной заслонки.
Используя диагностический прибор для приведения в действие привода дроссельной заслонки. Проверьте, загорается ли контрольная лампа каждый раз, когда диагностический прибор приводит в действие привод.
Если контрольная лампа не загорается, это указывает на неисправную цепь. При загорании, пошевелите жгутом проводов, идущим к приводу. Чтобы увидеть, мигает ли контрольная лампа, указывая на прерывистое соединение.
Если все предыдущие тесты пройдены, и вы продолжаете получать ошибку P2101. Скорее всего, у вас неисправный привод дроссельной заслонки. Хотя отказавший PCM не может быть исключен до тех пор, пока привод дроссельной заслонки не будет заменен.
Если вы не уверены, обратитесь за помощью к квалифицированному автомобильному диагносту. Для правильной установки PCM, он должен быть запрограммирован или откалиброван для конкретного автомобиля.
На каких автомобилях чаще встречается данная проблема
Проблема с кодом P2101 может встречаться на различных машинах, но всегда есть статистика, на каких марках эта ошибка присутствует чаще. Вот список некоторых из них:
- Audi (Ауди а4)
- Chevrolet (Шевроле Авео, Импала, Каптива, Круз, Трейлблейзер)
- Chrysler
- Citroen (Ситроен С3, Берлинго)
- Dodge (Додж Авенджер)
- Ford (Форд Фокус)
- Geely (Джили Эмгранд)
- Honda (Хонда Аккорд)
- Hummer
- Hyundai (Хендай Солярис, i30)
- Infiniti
- Jeep (Джип Гранд Чероки)
- Kia (Киа Сид, Спортейдж)
- Lifan (Лифан х60)
- Mazda (Мазда 6)
- Mercedes
- Mitsubishi
- Nissan (Ниссан Альтима, Верса, Жук)
- Opel (Опель Астра, Виваро, Зафира, Корса)
- Peugeot (Пежо 206, 3008, Партнер)
- Renault (Рено Логан, Трафик)
- Skoda (Шкода Октавия, Фабия)
- Ssangyong
- Suzuki
- Volkswagen (Фольксваген Джетта, Поло Седан, Туарег, Тигуан)
- ВАЗ
- Лада Гранта, Калина, Нива
С кодом неисправности Р2101 иногда можно встретить и другие ошибки. Наиболее часто встречаются следующие: P0011, P0030, P0036, P0102, P0121, P0123, P0135, P0141, P0223, P0449, P0455, P0638, P0745, P1516, P1545, P1551, P1682, P2100, P2102, P2103, P2106, P2107, P2110, P2118, P2119, P2135, P2143, P2176, C0700.
Видео
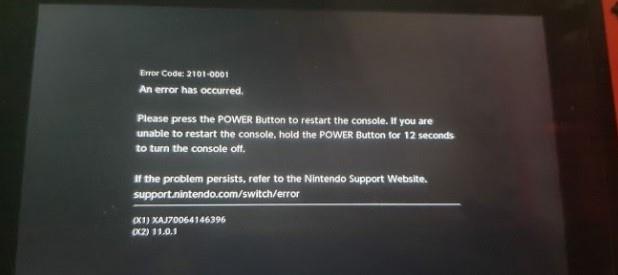
Вы получаете ошибку 2101-0001 на вашем Nintendo Switch? В этой статье мы расскажем об известных триггерах этой проблемы, а также о решениях, которые мы собрали на протяжении многих лет в отношении этого кода ошибки.
Что означает ошибка Nintendo Switch 2101-0001?
2101-0001 — это общая ошибка Nintendo Switch, которая может означать одно из двух: либо консоль обнаруживает случайный программный сбой, который она не может устранить самостоятельно, либо неисправно оборудование. В большинстве случаев аппаратным компонентом, который может вызвать этот код ошибки, является карта microSD.
Что происходит, когда ваш Nintendo Switch обнаруживает ошибку 2101-0001?
Хотя большинству людей, которые могут столкнуться с кодом ошибки 2101-0001 на своем Nintendo Switch, может просто потребоваться обновить систему, некоторым, возможно, придется вручную проверить наличие нового обновления программного обеспечения. Другие не могут загрузить свои игры, или некоторые игры могут не подключаться к сети. У небольшого числа пользователей это сообщение об ошибке может вылететь из игры.
Каковы причины появления кода ошибки Nintendo Switch 2101-0001?
Существует ряд возможных триггеров для кода ошибки 2101-0001.
Случайный программный глюк.
Этот код ошибки может появляться и исчезать в зависимости от состояния вашей консоли Nintendo Switch. Для некоторых триггер может быть связан с программным обеспечением и может появляться при попытке загрузить игру. Это также может помешать вам при попытке просмотреть Nintendo eShop.
Другие пользователи могут случайно столкнуться с этим кодом ошибки, когда они пытаются получить доступ к содержимому на своей карте microSD, например определенному загруженному содержимому и другим данным программного обеспечения.
Ошибка игры.
Также были сообщения от других пользователей об этой ошибке, появляющейся только при игре в определенные игры. Я еще не знаю лично, что это за конкретные игры, но если это верно, то это может быть связано с плохими сохраненными данными и не может быть полностью связано с плохим кодированием.
Устаревшее системное программное обеспечение.
Запуск Nintendo Switch на старом, устаревшем или даже поврежденном системном программном обеспечении также может вызвать ошибки, такие как 2101-0001.
Проблема с картой MicroSD.
Даже сама Nintendo признает, что в определенных ситуациях, когда возникает эта ошибка, основная причина может быть связана с расширением памяти консоли. Если вы используете карту microSD на своем коммутаторе, вы должны проверить, правильно ли она работает, прежде чем вставлять ее снова.
Как исправить ошибку Nintendo Switch 2101-0001?
Ниже приведены решения, которые вы можете попробовать, если обнаружите код ошибки 2101-0001 на вашем Nintendo Switch.
Исправление №1: перезагрузите Nintendo Switch.
Многие люди исправляли код ошибки 2101-0001, выполнив простой трюк: перезапустив коммутатор. Просто нажмите и удерживайте кнопку питания в верхней части консоли в течение трех секунд, затем выберите на экране вариант Перезагрузить .
Если ваш коммутатор перестал отвечать, нажатие и удерживание кнопки питания в течение 12 секунд вместо 3 должно заставить его перезагрузиться.
Исправление №2: Обновляйте программное обеспечение и игры.
Независимо от того, возникла ли у вас проблема или нет, всегда полезно обновлять программную среду вашего NIntendo Switch.
Чтобы вручную проверить наличие обновлений:
- Перейдите в Главное меню Nintendo .
- Выберите Системные настройки .
- Найдите и выберите Система .
- Выберите Обновление системы .
Также прочтите : Как обновить контроллер Nintendo Switch | Легкие шаги
Исправление №3: выньте карту microSD.
Если перезагрузка и обновление коммутатора не устранили проблему, следующим шагом будет проверить, не вызван ли код ошибки 2101-0001 вашей картой microSD. Для этого сначала убедитесь, что вы выключили Switch. Затем осторожно откройте лоток microSD, чтобы вынуть карту. После этого задвиньте лоток, прежде чем включать консоль.
Попробуйте использовать Nintendo Switch в течение нескольких минут, чтобы проверить, не возвращается ли ошибка, когда карта microSD не вставлена.
Исправление №4: обратитесь за помощью к Nintendo.
Если ошибка продолжает появляться без SD-карты, вы можете предположить, что для нее есть гораздо более глубокая причина. Поскольку у вас закончились варианты решения проблемы в этом варианте, вам необходимо обратиться в службу поддержки Nintendo.
ДАЛЬНЕЙШЕЕ ЧТЕНИЕ:
- Лучшие настройки GameLoop для ПК низкого уровня | НОВИНКА 2021 г.
- Как исправить ошибку Nintendo Switch 2137-0240 | НОВИНКА 2021 г.
- Как исправить сбой Call Of Duty Mobile в BlueStacks | НОВИНКА 2021 г.
- Как исправить сбой Call Of Duty Mobile в GameLoop | НОВИНКА 2021 г.
Посетите наш канал androidhow на Youtube, чтобы увидеть больше видео и руководств по устранению неполадок.