How to fix the Runtime Code 640 Acronis Backup Error 640
This article features error number Code 640, commonly known as Acronis Backup Error 640 described as Error 640: Acronis PC Backup & Recovery has encountered a problem and needs to close. We are sorry for the inconvenience.
About Runtime Code 640
Runtime Code 640 happens when Acronis PC Backup & Recovery fails or crashes whilst it’s running, hence its name. It doesn’t necessarily mean that the code was corrupt in some way, but just that it did not work during its run-time. This kind of error will appear as an annoying notification on your screen unless handled and corrected. Here are symptoms, causes and ways to troubleshoot the problem.
Definitions (Beta)
Here we list some definitions for the words contained in your error, in an attempt to help you understand your problem. This is a work in progress, so sometimes we might define the word incorrectly, so feel free to skip this section!
- Backup — The act of saving one’s files, data, applications, etc
- Pc — Anything about personal computers.
- Recovery — Use this tag on any questions related to data recovery in contrast to data restore.
Symptoms of Code 640 — Acronis Backup Error 640
Runtime errors happen without warning. The error message can come up the screen anytime Acronis PC Backup & Recovery is run. In fact, the error message or some other dialogue box can come up again and again if not addressed early on.
There may be instances of files deletion or new files appearing. Though this symptom is largely due to virus infection, it can be attributed as a symptom for runtime error, as virus infection is one of the causes for runtime error. User may also experience a sudden drop in internet connection speed, yet again, this is not always the case.
 Repair Tool")
(For illustrative purposes only)
Causes of Acronis Backup Error 640 — Code 640
During software design, programmers code anticipating the occurrence of errors. However, there are no perfect designs, as errors can be expected even with the best program design. Glitches can happen during runtime if a certain error is not experienced and addressed during design and testing.
Runtime errors are generally caused by incompatible programs running at the same time. It may also occur because of memory problem, a bad graphics driver or virus infection. Whatever the case may be, the problem must be resolved immediately to avoid further problems. Here are ways to remedy the error.
Repair Methods
Runtime errors may be annoying and persistent, but it is not totally hopeless, repairs are available. Here are ways to do it.
If a repair method works for you, please click the upvote button to the left of the answer, this will let other users know which repair method is currently working the best.
Please note: Neither ErrorVault.com nor it’s writers claim responsibility for the results of the actions taken from employing any of the repair methods listed on this page — you complete these steps at your own risk.
Method 1 — Close Conflicting Programs
When you get a runtime error, keep in mind that it is happening due to programs that are conflicting with each other. The first thing you can do to resolve the problem is to stop these conflicting programs.
- Open Task Manager by clicking Ctrl-Alt-Del at the same time. This will let you see the list of programs currently running.
- Go to the Processes tab and stop the programs one by one by highlighting each program and clicking the End Process buttom.
- You will need to observe if the error message will reoccur each time you stop a process.
- Once you get to identify which program is causing the error, you may go ahead with the next troubleshooting step, reinstalling the application.
Method 2 — Update / Reinstall Conflicting Programs
Using Control Panel
- For Windows 7, click the Start Button, then click Control panel, then Uninstall a program
- For Windows 8, click the Start Button, then scroll down and click More Settings, then click Control panel > Uninstall a program.
- For Windows 10, just type Control Panel on the search box and click the result, then click Uninstall a program
- Once inside Programs and Features, click the problem program and click Update or Uninstall.
- If you chose to update, then you will just need to follow the prompt to complete the process, however if you chose to Uninstall, you will follow the prompt to uninstall and then re-download or use the application’s installation disk to reinstall the program.
Using Other Methods
- For Windows 7, you may find the list of all installed programs when you click Start and scroll your mouse over the list that appear on the tab. You may see on that list utility for uninstalling the program. You may go ahead and uninstall using utilities available in this tab.
- For Windows 10, you may click Start, then Settings, then choose Apps.
- Scroll down to see the list of Apps and features installed in your computer.
- Click the Program which is causing the runtime error, then you may choose to uninstall or click Advanced options to reset the application.
Method 3 — Update your Virus protection program or download and install the latest Windows Update
Virus infection causing runtime error on your computer must immediately be prevented, quarantined or deleted. Make sure you update your virus program and run a thorough scan of the computer or, run Windows update so you can get the latest virus definition and fix.
Method 4 — Re-install Runtime Libraries
You might be getting the error because of an update, like the MS Visual C++ package which might not be installed properly or completely. What you can do then is to uninstall the current package and install a fresh copy.
- Uninstall the package by going to Programs and Features, find and highlight the Microsoft Visual C++ Redistributable Package.
- Click Uninstall on top of the list, and when it is done, reboot your computer.
- Download the latest redistributable package from Microsoft then install it.
Method 5 — Run Disk Cleanup
You might also be experiencing runtime error because of a very low free space on your computer.
- You should consider backing up your files and freeing up space on your hard drive
- You can also clear your cache and reboot your computer
- You can also run Disk Cleanup, open your explorer window and right click your main directory (this is usually C: )
- Click Properties and then click Disk Cleanup
Method 6 — Reinstall Your Graphics Driver
If the error is related to a bad graphics driver, then you may do the following:
- Open your Device Manager, locate the graphics driver
- Right click the video card driver then click uninstall, then restart your computer
Method 7 — IE related Runtime Error
If the error you are getting is related to the Internet Explorer, you may do the following:
- Reset your browser.
- For Windows 7, you may click Start, go to Control Panel, then click Internet Options on the left side. Then you can click Advanced tab then click the Reset button.
- For Windows 8 and 10, you may click search and type Internet Options, then go to Advanced tab and click Reset.
- Disable script debugging and error notifications.
- On the same Internet Options window, you may go to Advanced tab and look for Disable script debugging
- Put a check mark on the radio button
- At the same time, uncheck the «Display a Notification about every Script Error» item and then click Apply and OK, then reboot your computer.
If these quick fixes do not work, you can always backup files and run repair reinstall on your computer. However, you can do that later when the solutions listed here did not do the job.
Other languages:
Wie beheben Fehler 640 (Acronis Backup-Fehler 640) — Fehler 640: Acronis PC Backup & Recovery hat ein Problem festgestellt und muss geschlossen werden. Wir entschuldigen uns für die Unannehmlichkeiten.
Come fissare Errore 640 (Acronis Backup Errore 640) — Errore 640: Acronis PC Backup & Recovery ha riscontrato un problema e deve essere chiuso. Ci scusiamo per l’inconveniente.
Hoe maak je Fout 640 (Acronis-back-upfout 640) — Fout 640: Acronis PC Backup & Recovery heeft een probleem ondervonden en moet worden afgesloten. Excuses voor het ongemak.
Comment réparer Erreur 640 (Erreur de sauvegarde Acronis 640) — Erreur 640 : Acronis PC Backup & Recovery a rencontré un problème et doit se fermer. Nous sommes désolés du dérangement.
어떻게 고치는 지 오류 640 (Acronis 백업 오류 640) — 오류 640: Acronis PC Backup & Recovery에 문제가 발생해 닫아야 합니다. 불편을 드려 죄송합니다.
Como corrigir o Erro 640 (Acronis Backup Error 640) — Erro 640: O Acronis PC Backup & Recovery encontrou um problema e precisa fechar. Lamentamos o inconveniente.
Hur man åtgärdar Fel 640 (Acronis Backup Error 640) — Fel 640: Acronis PC Backup & Recovery har stött på ett problem och måste avslutas. Vi är ledsna för besväret.
Как исправить Ошибка 640 (Ошибка Acronis Backup 640) — Ошибка 640: Возникла ошибка в приложении Acronis PC Backup & Recovery. Приложение будет закрыто. Приносим свои извинения за неудобства.
Jak naprawić Błąd 640 (Błąd kopii zapasowej Acronis 640) — Błąd 640: Acronis PC Backup & Recovery napotkał problem i musi zostać zamknięty. Przepraszamy za niedogodności.
Cómo arreglar Error 640 (Error 640 de Acronis Backup) — Error 640: Acronis PC Backup & Recovery ha detectado un problema y debe cerrarse. Lamentamos las molestias.
![]() About The Author: Phil Hart has been a Microsoft Community Contributor since 2010. With a current point score over 100,000, they’ve contributed more than 3000 answers in the Microsoft Support forums and have created almost 200 new help articles in the Technet Wiki.
About The Author: Phil Hart has been a Microsoft Community Contributor since 2010. With a current point score over 100,000, they’ve contributed more than 3000 answers in the Microsoft Support forums and have created almost 200 new help articles in the Technet Wiki.
Follow Us: ![]()
![]()
![]()

This repair tool can fix common computer problems such as blue screens, crashes and freezes, missing DLL files, as well as repair malware/virus damage and more by replacing damaged and missing system files.
STEP 1:
Click Here to Download and install the Windows repair tool.
STEP 2:
Click on Start Scan and let it analyze your device.
STEP 3:
Click on Repair All to fix all of the issues it detected.
DOWNLOAD NOW
Compatibility
![]()
Requirements
1 Ghz CPU, 512 MB RAM, 40 GB HDD
This download offers unlimited scans of your Windows PC for free. Full system repairs start at $19.95.
Article ID: ACX01871EN
Applies To: Windows 10, Windows 8.1, Windows 7, Windows Vista, Windows XP, Windows 2000
Speed Up Tip #79
Disable OneDrive in Windows 10:
If you don’t want to use the built-in cloud storage service that came with Windows 10 you can always disable OneDrive. Indexing and syncing files take up a lot of resources and getting rid of OneDrive can give an extra boost to the performance of your PC.
Click Here for another way to speed up your Windows PC
Microsoft & Windows® logos are registered trademarks of Microsoft. Disclaimer: ErrorVault.com is not affiliated with Microsoft, nor does it claim such affiliation. This page may contain definitions from https://stackoverflow.com/tags under the CC-BY-SA license. The information on this page is provided for informational purposes only. © Copyright 2018
Looks like no one’s replied in a while. To start the conversation again, simply
ask a new question.
Time Machine couldn’t complete the back up… Error code:640
Time Machine stopped backing up 2 days ago — message appears — «Time Machine couldn’t complete the back up… Error code:640». Plenty of space available. Rebooted both MacBook air and TC. Cant find any reference to Error 640 online. Any help welcome. MacBook Air Mid 2013. Catalina 10.15.3.
Posted on Mar 22, 2020 12:44 PM
Thanks for the update. Welcome to the «Catalina Corrupted Backup Club».
Honestly at this point, backups to a Time Capsule…..especially using Catalina…..are not going to be all that reliable, so if your Mac’s data is really important to you, I would think about an additional backup plan. Something like using a USB drive connected directly to your Mac and a good application like Carbon Copy Cloner or SuperDuper.
Chances are, your Time Capsule is 5+ years old as well, so there is that as well.
Good luck!
Posted on Mar 22, 2020 2:46 PM
Time Machine couldn’t complete the back up… Error code:640
| Номер ошибки: | Ошибка 640 | |
| Название ошибки: | Filemaker Error 640 | |
| Описание ошибки: | Ошибка 640: Возникла ошибка в приложении FileMaker. Приложение будет закрыто. Приносим извинения за неудобства. | |
| Разработчик: | FileMaker, Inc. | |
| Программное обеспечение: | FileMaker | |
| Относится к: | Windows XP, Vista, 7, 8, 10, 11 |
Описание «Filemaker Error 640»
Обычно люди ссылаются на «Filemaker Error 640» как на ошибку времени выполнения (ошибку). Разработчики программного обеспечения пытаются обеспечить, чтобы программное обеспечение было свободным от этих сбоев, пока оно не будет публично выпущено. К сожалению, такие проблемы, как ошибка 640, могут быть пропущены, и программное обеспечение будет содержать эти проблемы при выпуске.
Пользователи FileMaker могут столкнуться с ошибкой 640, вызванной нормальным использованием приложения, которое также может читать как «Filemaker Error 640». После того, как об ошибке будет сообщено, FileMaker, Inc. отреагирует и быстро исследует ошибки 640 проблемы. Затем FileMaker, Inc. может исправить эти ошибки в исходном коде и подготовить обновление для загрузки. Таким образом, в этих случаях разработчик выпустит обновление программы FileMaker, чтобы исправить отображаемое сообщение об ошибке (и другие сообщенные проблемы).
Что на самом деле вызывает ошибку времени выполнения 640?
Сбой во время запуска FileMaker или во время выполнения, как правило, когда вы столкнетесь с «Filemaker Error 640». Следующие три наиболее значимые причины ошибок выполнения ошибки 640 включают в себя:
Ошибка 640 Crash — Ошибка 640 является хорошо известной, которая происходит, когда неправильная строка кода компилируется в исходный код программы. Это происходит много, когда продукт (FileMaker) или компьютер не может обрабатывать уникальные входные данные.
Утечка памяти «Filemaker Error 640» — ошибка 640 утечка памяти приводит к тому, что FileMaker постоянно использует все больше и больше памяти, увяская систему. Потенциальным фактором ошибки является код FileMaker, Inc., так как ошибка предотвращает завершение программы.
Ошибка 640 Logic Error — Логическая ошибка возникает, когда ПК производит неправильный вывод, даже когда пользователь вводит правильный вход. Это связано с ошибками в исходном коде FileMaker, Inc., обрабатывающих ввод неправильно.
Как правило, ошибки Filemaker Error 640 вызваны повреждением или отсутствием файла связанного FileMaker, а иногда — заражением вредоносным ПО. Большую часть проблем, связанных с данными файлами, можно решить посредством скачивания и установки последней версии файла FileMaker, Inc.. В качестве дополнительного шага по устранению неполадок мы настоятельно рекомендуем очистить все пути к неверным файлам и ссылки на расширения файлов FileMaker, Inc., которые могут способствовать возникновению такого рода ошибок, связанных с Filemaker Error 640.
Распространенные проблемы Filemaker Error 640
Эти проблемы FileMaker, связанные с Filemaker Error 640, включают в себя:
- «Ошибка приложения Filemaker Error 640.»
- «Недопустимый файл Filemaker Error 640. «
- «Filemaker Error 640 столкнулся с проблемой и закроется. «
- «Не удается найти Filemaker Error 640»
- «Отсутствует файл Filemaker Error 640.»
- «Проблема при запуске приложения: Filemaker Error 640. «
- «Filemaker Error 640 не работает. «
- «Отказ Filemaker Error 640.»
- «Неверный путь к программе: Filemaker Error 640. «
Проблемы Filemaker Error 640 с участием FileMakers возникают во время установки, при запуске или завершении работы программного обеспечения, связанного с Filemaker Error 640, или во время процесса установки Windows. Запись ошибок Filemaker Error 640 внутри FileMaker имеет решающее значение для обнаружения неисправностей электронной Windows и ретрансляции обратно в FileMaker, Inc. для параметров ремонта.
Причины ошибок в файле Filemaker Error 640
Проблемы Filemaker Error 640 могут быть отнесены к поврежденным или отсутствующим файлам, содержащим ошибки записям реестра, связанным с Filemaker Error 640, или к вирусам / вредоносному ПО.
Особенно ошибки Filemaker Error 640 проистекают из:
- Поврежденные ключи реестра Windows, связанные с Filemaker Error 640 / FileMaker.
- Зазаражение вредоносными программами повредил файл Filemaker Error 640.
- Filemaker Error 640 злонамеренно удален (или ошибочно) другим изгоем или действительной программой.
- Другое программное приложение, конфликтующее с Filemaker Error 640.
- Поврежденная установка или загрузка FileMaker (Filemaker Error 640).
Продукт Solvusoft
Загрузка
WinThruster 2022 — Проверьте свой компьютер на наличие ошибок.
Совместима с Windows 2000, XP, Vista, 7, 8, 10 и 11
Установить необязательные продукты — WinThruster (Solvusoft) | Лицензия | Политика защиты личных сведений | Условия | Удаление
Table of Contents
- Error code 21 and 19
- Error code 45
- Error code 92
- Error code 112
- Error code 404
- Error code 512
- Error code 640
Time Machine error codes are of no use unless you know what the code means. It will help if the error dialog window shares what went wrong with the backup app instead of codes. But the reality is, macOS doesn’t provide descriptive Time Machine errors that can help troubleshoot issues. Also, the numeric error codes are not publicly documented. So, it is challenging to take appropriate action whenever you encounter a Time Machine error.
The following sections describe a few most common Time Machine error codes with their solution.
Note: The methods shared below might not work in every case.
1. Error code 21 and 19
Error: Time Machine fails in the “preparing backup” phase while backing up Mac to NAS (Network-Attached Storage). The error code shown in the dialog window isn’t very helpful. But console presents the error from backupd as follows: “Failed to mount ‘/Volumes/{name of disk}/{name of}.sparsebundle’ because the image could not be attached, error: Error Domain = com.apple.backupd.ErrorDomain Code=21 “(null)” UserInfo = {MessageParameters = («/Volumes/{name of disk}/{name of}.sparsebundle», 19)}
Solution: Possibly, the NAS login password is not updated in Keychain. To update the Keychain, do the following:
- Go to Apple menu > System Preferences > Time Machine.
- Select “Stop using Time Machine for Backup.”
- Go to Applications > Utilities > Keychain Access.
- Search NAS hostname and delete all matching passwords.
- Open Time Machine > Add Backup Disk.
- Select Time Machine, then enter a password.
2. Error code 45
Error: Time Machine could not complete the backup. The backup disk image ‘/Volumes/{name of disk}/{name of}.sparsebundle’ could not be created (error 45).
Solution: For a connected Time Machine drive, disconnect the backup drive from your MacBook and quit the Time Machine application. Now, reconnect the backup drive to your Mac, then run Time Machine once again.

For network drive, make sure your storage is available on your network. If you’re using Time Capsule, go to Applications > Utilities > Airport Utility. Scan for available wireless devices. If you can’t find Time Capsule, turn it off, then turn it on again. Reselect your Time Machine backup.
3. Error code 92
Error: The error code 92 «Backup failed — time machine could not back up to drive.»
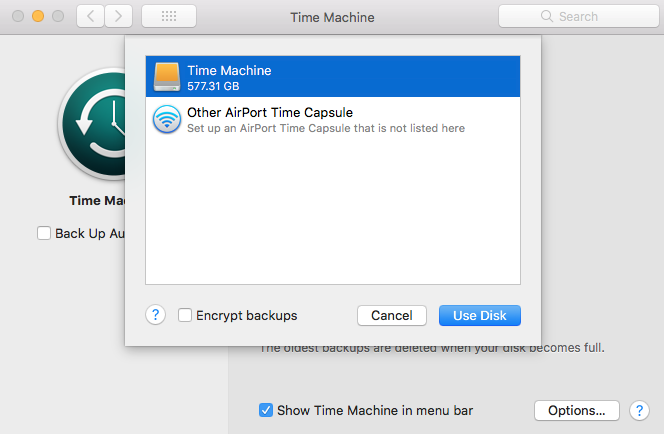
Solution: Navigate to Apple menu > System Preferences > Time Machine > click Add or Remove Backup Disk. Select the Backup Disk, then click Remove Disk. Select Stop Using This Disk.
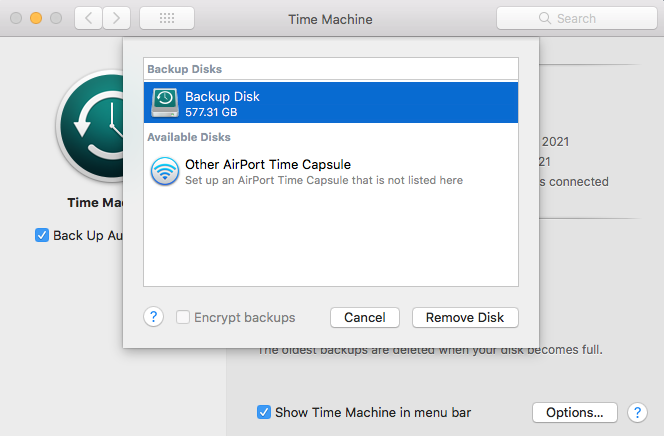
Go back, then click Add or Remove Disk, select the Time Machine Disk > click Use Disk to add the disk into the backup disk list.
4. Error code 112
Error: Time Machine backup to my Time Capsule fails. A dialog box says that disk image ‘/Volumes/{name of disk}/{name of}.sparsebundle’ could not be accessed (error 112).
Solution: Press and hold the Option key, click the Time Machine icon from the Menu bar, and select Verify Backup. Let the backup verification to complete.
5. Error code 404
Error: Time Machine couldn’t complete the backup to the drive. Error Code 404.
Solution: Type the following terminal command:
clear; printf ‘e[3J’ && log show —predicate ‘subsystem == «com.apple.TimeMachine»‘ —info —last 48h | grep -F ‘eMac’ | grep -Fv ‘etat’ | awk -F’]’ ‘{print substr($0,1,19), $NF}’
Once you know the log status of Time Machine, act accordingly to fix Time Machine 404 error.
6. Error code 512
Error: Time Machine could not complete the backup. Error Code: 512
Solution: Delete the .sparsebundle file. Then create it once again in your local disk but not the Time Machine disk using the following terminal command:
sudo hdiutil create -size 50g -type SPARSEBUNDLE -nospotlight -volname «Time Machine Backup» -fs «Case-sensitive Journaled HFS+» -verbose ./Computername_MACaddress
Here, replace the size as per your choice, keep your own volume name, and replace it with your computer name and MAC address.
Now, log in to your NAS. Next, create a user account and create a shared folder. In Finder, navigate to Go > Connect to Server. Type smb://TimeMachine@ip-address-of-nas/shared-folder-name for server address. Click Connect. When requested, enter the password and save it in your keychain.
Now, copy the created sparsebundle file into the Time Machine share folder. The sparsebundle file is in your Home folder /Users/your-user-name. On NAS, check the file is copied under your correct user account. Finally, open Time Machine, select the Time Machine folder as the desired destination. The backup will now start without any error.
7. Error code 640
Error: Time Machine couldn’t complete the backup. Error Code: 640
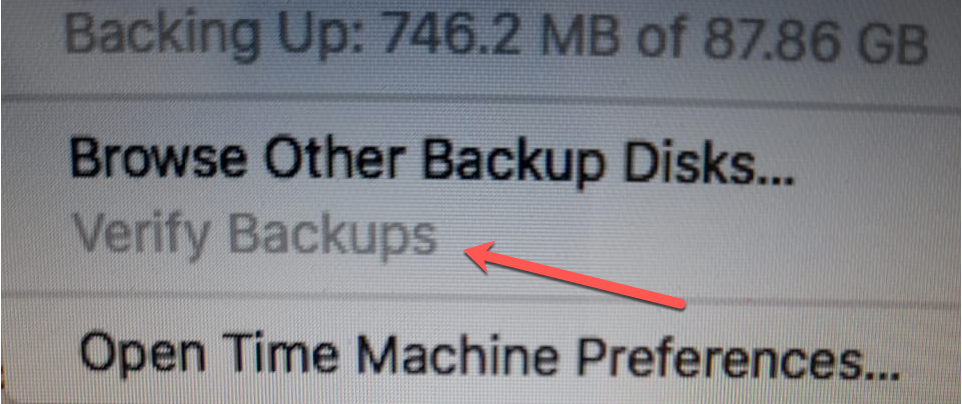
Solution: Hold the Option key on your Mac while you click on the Time Machine icon at the menu bar, then click on Verify Backups.
Time Machine Data Loss
Sometimes, a user may accidentally erase the Time Machine external hard drive using Disk Utility. Or, lose data through Command + Delete hotkey followed by emptying of Trash. What is supposed to be done if the backup drive itself is either deleted or corrupted?
Q) How should one retrieve the data contained inside the Time Machine storage medium?
A) Time Machine data can be restored using a professional Mac data recovery tool.
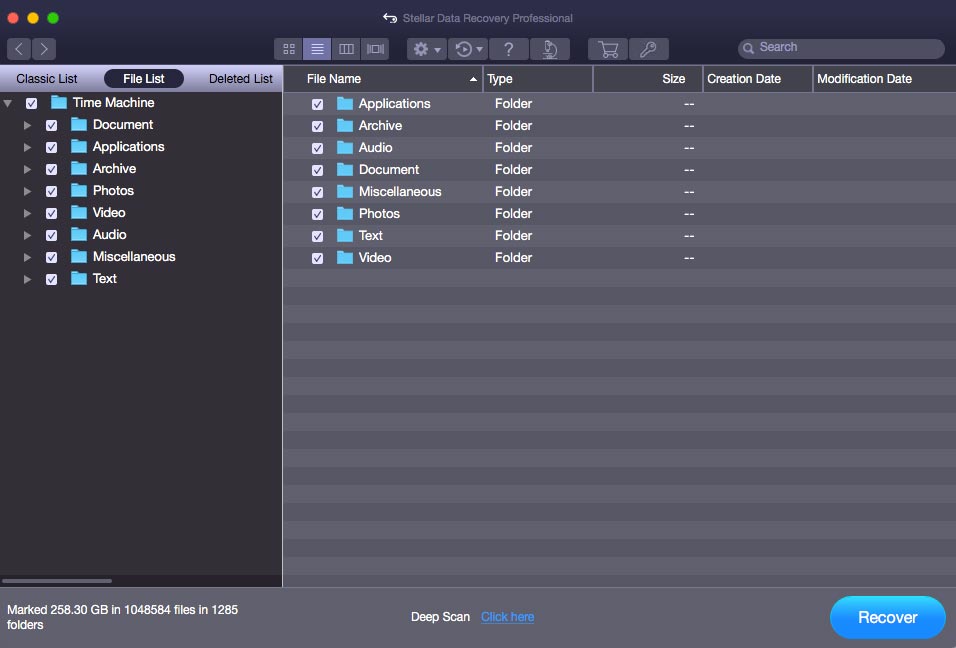
Step 1: Install Stellar Data Recovery Professional for Mac and mount the Time Machine device.
Step 2: Launch the software and choose the Time Machine device.

Step 3: Run Scan or Deep Scan on the Time Machine and preview all the recoverable files once the scan is complete.
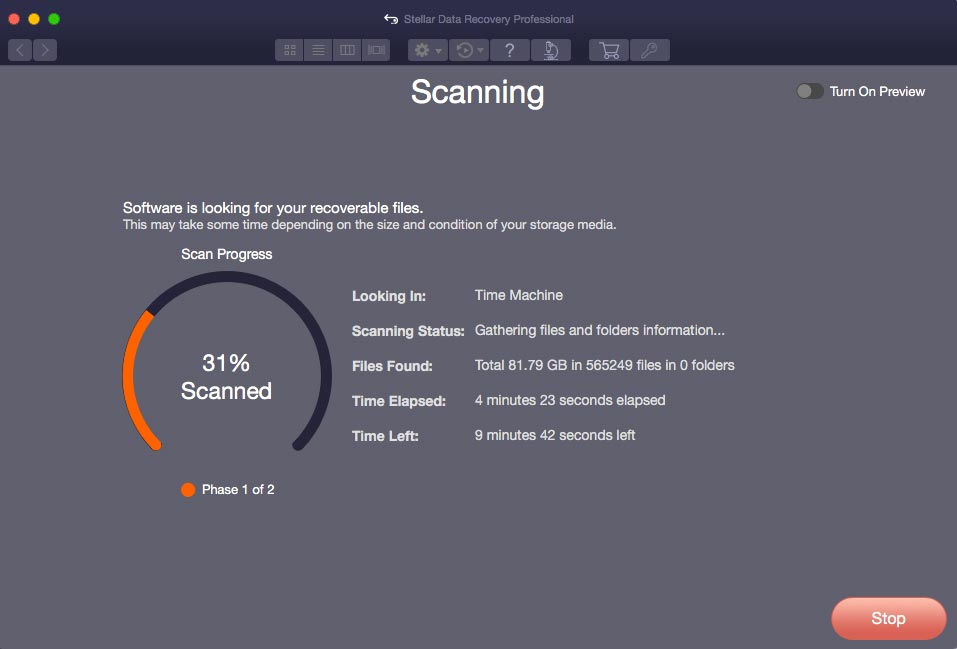
Step 4: Activate Stellar Data Recovery Professional for Mac software and press the Recover button to save the data.
Note: A free version of the Professional edition called – Stellar Data Recovery Free Edition for Mac is also available. You can install the free version on your Mac system and recover 1 GB of data for free. The free version doesn’t require any activation key for 1 GB data recovery.
Conclusion
We hope the blog helped you learn some of the standard Time Machine error codes and how to fix them if you encounter any. When you lose your Time Machine data, try using Stellar Data Recovery Professional for Mac to recover it from your MacBook, iMac, or Mac mini, wherever the data was once present. The software is compatible with macOS Ventura and even supports other earlier versions of macOS.
My code has retries till success when uploading a file to S3. At the moment the retries are triggered from a different place in app and do not have backoff. This means within a few seconds we have multiple upload attempts and all of them fail with the same error. The upload eventually succeeds.
Full error:
Error Domain=NSCocoaErrorDomain Code=640
"You can’t save the file “<UUID-1>.tmp” because the volume “Data” is out of space."
UserInfo={
NSFilePath=/var/mobile/Containers/Data/Application/UUID-2/Library/Caches/S3TransferUtility/<UUID1>.tmp,
NSUnderlyingError=0x2831d7b40 {Error Domain=NSPOSIXErrorDomain Code=28 "No space left on device"}
}
I read online that this error was introduced in iOS 14. I am assuming S3TransferUtility creates multiple NSURL calls that could be causing this issue, since the user is on iOS 15.
Error Domain=NSPOSIXErrorDomain Code=28 “No space left on device” UserInfo={_kCFStreamErrorCodeKey=28, _kCFStreamErrorDomainKey=1}
It appears to get called when there are too many NSURLSessions created, reaching a limit of (in our tests) 600-700 sessions, which are not maintained or closed properly. The error started to get thrown since iOS 14, so it is interesting to see if there was a limit introduced.
Is the only way to get around this issue to add some delay on getting this error before retrying an upload? Or is there a way to manually clear the cache for S3TransferUtility and immediately retry?