| Автор | Сообщение | |||
|---|---|---|---|---|
|
||||
|
Member Статус: Не в сети |
Здесь всё что поможет найти прошивки , прошить , заменять и редактировать биосы видеокарт на чипах Nvidia ! Смотрим подробный FAQ на первой странице ! NiBiTor — редактируем параметры напряжений для Fermi . Модденые биосы для GTX 460 (с разлоченной напругой) . Инструкция по модификации BIOS 970/980 с отключением BOOST Автор: freem-freem Настройки биоса Теперь делаем Save BIOS As и сохраняем с каким-то кастомным названием, теперь все в том же окне командной строки набираем Мой правленый bios MSI 970 1506/7800 http://forums.overclockers.co.uk/showth … t=18638693 http://www.overclock.net/t/1517316/extr … t_23034441 http://hardforum.com/showthread.php?t=1838369 http://cryptomining-blog.com/3757-how-t … d-gtx-980/ http://www.overclock.net/t/1522651/disa … maxwell-ii Пример как разгонять карты 970/980/980ti по таблице буст частот Информация от участника темы: Аффторитет Вкладка Power Table Вкладка Voltage Table (очень важный момент, если вы меняете напругу) третьей строках в левый ползунок ставим желаемую напругу, правый ползунок второй строки делаем на шаг больше, чтобы при мониторинге не показывало мол достигнут предел по напряжению. Для наглядности скрины, в левом оригинал, в правом изменения. Напругу изменили (ну а кто-то вовсе менять не будет), теперь сохраняем биос, прошиваем. Далее даем нагрузку на карту и смотрим подается ли указанная напруга и до какой частоты бустит карта. И так, имею я напругу 1.231в и частоту 1304МГц. У вас свои значения будут, запоминаем частоту и идем далее … Вкладка Boost table внимательны. Внизу двигаем ползунок так, чтобы на вашу буст-позицию установилась желаемая частота. На сринах 1506мгц на позицию №62. Вкладка Boost States Вкладка Common и Clock States скорость кулера по своему усмотрению. TDP, 3D Boost Entry-ы оставляем как было. Сохраняем биос. Теперь приступаем к колхозу. позиций. Какого черта он так наглеет я не знаю, по-этому будем возвращать оригинальный значения частот буст-позициям, предшествующим нашей максимальной. В моем случае с позиции №35 по №61. Качаем нех-редактор HxD http://mh-nexus.de/en/hxd/ или иной какой-нибудь. Устанавливаем. Запускаем. Открываем в редакторе оригинальный биос, в меню жмем search — find, в поле search for вбиваем 12 2a 03 00 02, в поле datatype выбираем hex-values и жмем ОК красными кругами). Что означают остальные 4 значения в каждом блоке нам неважно, да я и не знаю хаха (но догадки имеются
буст частот: 12 = 18 — 12 =06, 13 = 19 -12 = 07, 14 = 08, 15 = 09, 16 = 10 и тд. прибавить +12 и перевести результат в 16ричную систему — получаем 2F и находим этот блок (выделено синим). Ищу теперь блок №61, его позиция в редакторе будет 61+12 = 49 в 16ричной системе исчисления (выделено розовым). ними, вставляю заменой (ПКМ-paste write) порцию скопированных ранее оригинальных блоков буст-позиций. Далее сохраняю изменения. Теперь отколхозенный биос открываю в твикере и смотрю что получилось (на скрине оригинал, мод и нех-мод) Теперь пересохраняем его в твикере, а то контрольная сумма (checksum) у нас не совпадает. Твикер выровняет ее за нас при сохранении Далее прошиваемся и наслаждаемся кашерным разгоном через буст. Вот и всё Пошаговое редактирование BIOS(в том числе с помощью НЕХ-редактора) и рассмотрение ключевых параметров Информация от участника темы: olegdjus Начнем по вкладкам. 2) Вкладка Voltage Table Здесь можете углубленно прочитать про редактирование напряжений их шагов 3) Вкладка Power Table Это лимиты мощности. Нас интересуют первые 6 групп(одна группа состоит из Min|Def|Max значений) 4) Вкладка Boost Table Вариант с редактирование таблицы частот с помощью НЕХ-редактора: 5) Вкладка Boost States 6) Вкладка Clock States Редактирование BIOS Kepler с помощью HEX-редактора Добрый день! 1) Открываем BIOS с помощью KBT, заходим в Boost Table. б) (для GTX TITAN /GTX 780/GTX 780Ti/GTX TITAN BLACK (GK110. Kepler 28nm)) Программы для прошивки и редактирования BIOS Скачать Редактирование биос Kepler (680670GTX) Как шить: http://forum.reborn.ru/showthread.php?t=856903 Соблюдение правил конференции — обязательно ! *************************** ***************************
|
")
 .
.
 Открываем снова BIOS в KBT, видим такую картину:
| Реклама | |
|
Партнер |
|
Kr0t |
|
|
Junior Статус: Не в сети |
Доброе время суток! Парни, помогите решить проблему! Подогнали древнюю, но довольно прикольную видяху ASUS Extreme N6600GT Silencer: http://fcenter.ru/online/hardarticles/videos/15230 Но есть с ней трабла, вот точно такая, как у парня в этой теме: http://forum.asus.ru/viewtopic.php?f=2&t=14380 Цитата: Без установки каких либо драйверов виндовс загружается и стабильно работает. Стоит поставить любые драйвера (родные из комплекта или свежескаченные) во время загрузки при переходе в графику монитор отключается в спящий режим. Все виснет. При этом система грузится в режиме VGA или в безопасном. При попытке сменить разрешение результат черный экран. Единственное, в отличии от вышеописанного случая, разрешение экрана у меня меняется без проблем, 1280х1024 сейчас стоит — полёт нормальный… Радиаторы чуть тёплые, если что. Загнул её над процессорным кулером, ещё и корпусной снизу подложил, на всякий, чтоб исключить вариант перегрева… Вложение:
Изменить что либо не даёт, чуть что висяк и перезагрузка… Попробовал утилиту ASUS GPU Tweak заюзать — результат тот же. Вложение:
Bios, установленый в данный момент на карте, не идентифицируется, от сюда думаю и все проблемы. Видно чьи-то шаловливые ручки пытались перепрошить карту и зашили что то не то, в хлам карту не убили, но тяжко ранили. Правильный Bios зашить не получается, error на скрине выше… Как решить проблему, кто то в курсе? |

|
Analog |
|
||
|
Member Статус: Не в сети |
lautre1 Dart-s K2K Прошилось удачно — на скрине открытый бекап биоса, слитый с видеокарты GPUZ’ом после своей прошивки.
|
|
protoss |
|
|
Junior Статус: Не в сети |
я, кстати, попробовал поиграться другим редактором прошивки — MaxwellBiosTweaker. |

|
Dart-s |
|
|
Member Статус: Не в сети |
protoss писал(а): установил мин обороты в 0%. после прошивки в AB мин. стало 25% а сколько было? Добавлено спустя 4 минуты 17 секунд: Analog писал(а): Ниже заводских 30% установить скорость невозможно пробуй 29-28-27%… |
|
protoss |
|
|
Junior Статус: Не в сети |
Dart-s писал(а): а сколько было? изначально было не меньше 31% |
|
Dart-s |
|
|
Member Статус: Не в сети |
protoss писал(а): изначально было не меньше 31% прикольно. походу в биосе есть только какие то нестандартные значения — у меня 24% у кого то 26 или вообще 19%. бредописы короче! |
|
Kr0t |
|
|
Junior Статус: Не в сети |
Kr0t писал(а): Bios, установленый в данный момент на карте, не идентифицируется, от сюда думаю и все проблемы. Видно чьи-то шаловливые ручки пытались перепрошить карту и зашили что то не то, в хлам карту не убили, но тяжко ранили. Правильный Bios зашить не получается, error на скрине выше… Проблему решил заменой nvflash 5.136 на NVFlash 5.95.0.1. Всё прошилось на ура. Карта заработала, при загрузке винды сразу словила драйвер. Сейчас гоняю 3DMark 2003 — полёт нормальный! Единственное, новый Биос тоже NVFlash не определяет, но это уже собственно и не важно, главное — всё работает! |
|
protoss |
|
|
Junior Статус: Не в сети |
protoss писал(а): я, кстати, попробовал поиграться другим редактором прошивки — MaxwellBiosTweaker. поигрался еще маленько с настройками — получилось в AB сделать 0% минимальный порог, но проблема в том, что обороты ниже 920 все равно не падают, хоть в процентах и пишет 0% |
|
Ambal3000 |
|
|
Member Статус: Не в сети |
Как я понимаю у asus gtx780 минимальную скорость кулера не изменить через биос ? |
|
M19-LeXeR |
|
|
Member Статус: Не в сети |
NVIDIA Firmware Update Utility (Version 5.196) Checking for matches between display adapter(s) and image(s)… Adapter: GeForce GTX 970 (10DE,13C2,1462,3160) H:—:NRM B:01,PCI,D:00,F:00 Warning: Please make sure no Nvidia Display Driver is installed before continue Current — Version:84.04.2F.00.50 ID:10DE:13C2:1462:3160 Update display adapter firmware? Error Code:8 BCRT_ERROR_CODE_BODY_SIGNATURE_MISMATCH VBIOS Signature Check failed. Error Code:7 BCRT_ERROR_CODE_BODY_FNV_HASH_MISMATCH VBIOS image failed certification sanity check. BCRT Error: Certificate verification failed ERROR: ERROR:BIOS Cert Verification Error, Update aborted не могу прошить 970 |
|
Maximon |
|
||
|
Member Статус: Не в сети |
Привет всем. Недавно обнаружил проблему вентиляторов на моей MSI 970. Суть заключается в том, что один из винтиков не запускается в итоге в нагрузке вертит только 1(правый), но если подтолкнуть левый, то он заводится и в итоге все ок. Полазал в интернете и выяснилось, что я не один такой. Решил переправить биос, чтобы вентики крутились постоянно на 25%, но после загрузки в винду выдается ошибка адаптера (к сожалению не запомнил) и видюха не запускается (кажет на стандартном VGA). Прошиваюсь обратно на сток — все определяется и работает. Вопрос реально ли провернуть, что я задумал? Если да, то кто может мне помочь? Версия биоса 84.04.2F.00.F1.
|
|
|
|
|
Заблокирован Статус: Не в сети |
народ так почему видяха не определяется после перепрошивки, Добавлено спустя 21 минуту 20 секунд: |
|
Dart-s |
|
|
Member Статус: Не в сети |
mail ну откуда мы можем знать что и как ты там нахексил? |
|
|
|
|
Заблокирован Статус: Не в сети |
ну ты если не знаешь — не флуди (не отвечай) нормально нахексил : нашёл 2Д и 3Д частоты, поменял на свои. раньше так делал не раз — работало. |
|
indemeon |
|
||
|
Junior Статус: Не в сети |
Приветствую вас уважаемые форумчане! Хочу попросить помощи в разгоне 780Ti от фирмы MSI. Конкретно интересует, какие параметры необходимо выставить в Kepler BIOS Tweaker.
|
|
q1nex |
|
|
Junior Статус: Не в сети |
protoss писал(а): поигрался еще маленько с настройками — получилось в AB сделать 0% минимальный порог Можно поподробней, пожалуйста? Имеется GTX 760, обороты не опускаются ниже 34%, хотя в биосе из коробки прописано 20% =( |
|
protoss |
|
|
Junior Статус: Не в сети |
q1nex писал(а): Можно поподробней, пожалуйста? Имеется GTX 760, обороты не опускаются ниже 34%, хотя в биосе из коробки прописано 20% =( так все равно ведь фактически Цитата: обороты ниже 920 все равно не падают, хоть в процентах и пишет 0% вечерком постараюсь накидать скринов, какие именно параметры менял |
|
q1nex |
|
|
Junior Статус: Не в сети |
Maximon mail писал(а): хотя вручную хексом были найдены и поправлены частоты правильно ? 1. А чексумма? |
|
go.d-bq |
|
|
Member Статус: Не в сети |
Камрады, выручайте) |
|
Dart-s |
|
|
Member Статус: Не в сети |
mail писал(а): не флуди (не отвечай) нормально нахексил прописывал частоты 5041350504 Рива показывает 400810400. да не больно то и хотелось. |
 хекси дальше и главное хами побольше — сразу народ потянется на помощь!..
—
| Вы не можете начинать темы Вы не можете отвечать на сообщения Вы не можете редактировать свои сообщения Вы не можете удалять свои сообщения Вы не можете добавлять вложения |
Лаборатория
Новости

Nvidia is advertising their new GeForce GTX 750 Ti GPUs based on the new more power efficient Maxwell architecture as being with 60W TDP, but in truth they seem to be much more power efficient than that. A lot of people are already interested in using these new GPUs from NVidia for mining, because the performance that the Maxwell delivers seems to be very good in terms of hashrate per Watt ratio. When you use CUDAminer to mine with the GTX 750 Ti you will notice the card will quickly reach the 100% power target limit and normally you are not allowed to increase the power limiter of the card above the 100% value, you are allowed to only lower it further. The interesting thing here however is that the default TDP limit for GTX 750 Ti is actually set to 38.5W inside the BIOS and the minimum of 78% you can go down to is equal to just 30W TDP and as we’ve mentioned Nvidia is talking about 60W TDP for these cards. The fact that the cards are actually limited to 38.5W by their power limiter is something that can prevent you from squeezing the maximum performance that you can get by overclocking the GPU and/or the video memory of the card, so increasing the TDP limit by modifying the BIOS and reflashing the video card with the modified BIOS can help you with that.
Since many of the GeForce GTX 750 Ti video cards do not have external PCI-E power connector you will be limited to the maximum power that these cards will be able to use due to the 75W maximum of power that PCI-E x16 slot can provide by specifications (66W for the 12V line that you will be actually using, the other ~10W are for the 3.3V line). But even this will provide more than enough headroom since the default TDP limit is not 60W as we though, but really just 38.5W, so lots of headroom for overclocking. In order to be able to modify the BIOS of your video card you will need to first save the original one from the card, you can use GPU-Z for that and make sure you keep the original BIOS as a backup and save the modified one as a separate file (you can also backup the BIOS with the nvflash under DOS if you are having trouble with GPU-Z). Then you need to fire up Kepler Bios Tweaker and open up your BIOS file and edit is as shown in the screenshot above (left is original, right is the modified) in order to get 65.5W as the maximum TDP of the card. After that you need to flash the BIOS back to your card using the provided nvflash, you can download the flasher and the Kepler Bios Tweaker along with a standard BIOS from a reference 750 Ti and a modified version of that BIOS to allow 65.5W TDP from the link below. We suggest that you save the BIOS from your own video card and modify it, also do have in mind that modifying and flashing modified video BIOS to your video card can be dangerous, so you should be extra careful what you are doing and not modifying things that you should not or does not know what they are for!

The procedure described above will work for increasing the power target limit on other video cards as well not only on GTX 750 Ti, however before increasing the limit make sure that your video card cooling can keep the card cool enough. Using the video card fro mining will bring the power target to 100% in most cases even without overclocking the card additionally, so just by increasing it you might e able to squeeze some extra performance even without overclocking it further. The version of nvflash provided in the archive below is the latest one that will work with the GTX 750 Ti as well as with older video cards, it is the DOS version of the flasher as the Windows version of nvlfash does not seem to work properly – it does not want to flash the modified BIOS to the card saying that the BIOS digital signature is wrong. No problems flashing the modified video BIOS though trough the DOS version of nvflash 5.163, so we have only included the DOS version that will work with the method described above. There are two BAT files configured to flash the modified video BIOS and to restore the original version of the included reference design board BIOSes, you just need to run “nvflash your_bios.rom” and confirm with “y” when asked by nvflash (make sure you’ve made a backup of your original video BIOS first!). Again, be aware that video BIOS flashing and modification can be dangerous and can temporary render your video card useless, at least until you reflash it with the original BIOS, so do keep a backup of the original! Also note that increasing the TDP limit beyond the recommended value above could also be dangerous, so be well aware that this modification can be dangerous! Feel free to share your results for overclocking and mining hashrate after increasing the TDP limit of your GTX 750 Ti or another board in the comments below.
– Download the Kepler Bios Tweaker tool and nvflash for modifying your video BIOS…
- Publihsed in: Mining Hardware|Tests and Reviews
- Related tags: GeForce GTX 750 Ti, GeForce GTX 750 Ti mining, GeForce GTX 750 Ti TDP, GPU-Z, GTX 750 Ti, GTX 750 Ti cudaminer, GTX 750 Ti mining, GTX 750 Ti nvflash, GTX 750 Ti power target, GTX 750 Ti TDP, increase power limit, increase power target, Kepler Bios Tweaker, Maxwell, maxwell mining, Maxwell power target, Maxwell TDP, nvflash, nvflash 5.163, nvflash download, Nvidia power limit, Nvidia power target, power limit increase, power target increase, Power Target Limit, TDP limit, TDP limit change, TDP limit increase, TDP limit override, video BIOS, video BIOS modification
Check Some More Similar Crypto Related Publications:
- Power Usage and Noise of the iBeLink DM384M X11 ASIC Miner
- AsRock H110 Pro BTC+ Mining Motherboard with 13 PCI-E Slots
- Looking For The Efficiency Sweet Spot of GTX 1080 Ti
- Updated Guide on How to Mine Both BTC and LTC on Gridseed 5-chip GC3355 ASIC
- Bitmain Antminer E3 Firmware Update to Extend the Miner’s Life
- Bitmain with Two New 7nm ASic Miners – Antminer S15 and T15
- Nvidia P102-100 Crypto Mining Cards Are Coming to the Market
- GAWMiners With an Upcoming 500 MHS Scrypt ASIC – The Vaultbreaker
- Bitmain BM1385, a 4th Generation Bitcoin Mining ASIC Chip
- 24 THS Innosilicon T2 Turbo (T2T) Bitcoin ASIC Miner
- Running AntMiner U1 USB ASIC with the Latest Cgminer 3.12.3
- Innosilicon A4 Dominator Scrypt ASICs Might Be Coming Soon
- Bitmain Has Announced The Antminer V9, a “NEW” 4 THS ASIC
- iBeLink DM384 Specification and Users Manual Now Available
- Qarnot QC-1 Claiming to be the First Crypto Heater
- Mining Performance of Gigabyte Windoforce OC AMD Radeon RX 460 2GB
- The Upcoming Ethereum ASIC Miners To Offer 2000+ MHS
- New Halong Mining DragonMint T2 Miner 17 THS ASIC
- AntRouter R3-LTC, a WiFi Router and Clock That Mines Too
- Mining Ethereum with RTX 3070 Laptop GPU on a Gaming Notebook
- Innosilicon With New D9 DecredMaster and S11 SiaMaster ASIC Miners
- Checking the Power Usage of the New ZeusMiner Scrypt ASIC Miners
- BitMain AntMiner U3 Available Again, Comes With New Design
- The First X11 Mining ASIC iBeLink DM384M ASIC DASH Miner
- First Impressions from the TechnoBit DICE ASIC Miner
Joined Apr 7, 2016
·
41 Posts
Quote:
Originally Posted by e4et
Guys.
Do I need to use the «-6» if I am flashing a backup bios back to my 1070, or can I just use the nvflash and then filename?edit.
nvm. I successfully flashed without using the -6

can you send me some instruction on doing this and with what version of nvflash you did this with i have the gigabyte 1070 extreme gaming edition. thanks

Joined Nov 25, 2012
·
29 Posts
Was able to flash custom bios and now on water the card overclocks better and even runs faster as GPU Boost will give more headroom if temps are lower. Card runs great with OC bios. If voltage slider turned up all the way in XOC it reads 1.091V at full load. whereas before I was only showing 1.05V. I’m not 100% that I didn’t have the voltage slider up, it’s hard to see and doesn’t make much sense in the tooltip so don’t quote me that you cannot get 1.09V on stock bios…

Joined May 3, 2015
·
52 Posts
Hi guys, I have a gtx 970 MSI gaming 4g I flashed long time ago a custom bios…I saved the original one and now I want to flash the original one again…the problem is that in the NVFlash thread, its said » If you try to flash a stock, none modified BIOS, it will not work.» , so Im a bit scared and have no idea how can I just reflash the original bios. Cant find much info about this also…
Any help would be really apreciated!…thanks guys!!

Joined Aug 24, 2009
·
2,147 Posts
I’m having issues flashing my 980 to stock, I have the original bios, i’ve tried updated and the nvflash list in this thread, I get 2.0 protection error when using modded flasher and «no longer supports wow64 flasher» when I use the updated. What do? thanks!
Joined Dec 12, 2015
·
28 Posts
delete the nvflash.exe and the other one go with it. Only keep the nvflash64.exe and the other 64 that comes with it. use nvflash64 -6 «rom_name».rom to flash

Joined Apr 4, 2010
·
551 Posts
Joined Jul 30, 2018
·
4 Posts
Joined Jul 30, 2018
·
4 Posts
No idea or any suggestions?

Joined Dec 28, 2007
·
11,692 Posts
No idea or any suggestions?
Yes. Please don’t spam the forums crossposting the same question in multiple threads. And if no one answers, no one knows. This forum doesn’t specialize in laptops, which are far more locked down than even desktop Pascal cards.

Joined Apr 30, 2017
·
14,851 Posts
Hi,
With a mod would edit and add a note that this is for 32 bit system or something lol
nvflash64 not nvflash :doh:
Joined Sep 13, 2018
·
1 Posts
Evga Gtx1080 Sc
Saved my Ass, you Da MAN
Joined Jun 7, 2015
·
147 Posts
Joined Apr 30, 2017
·
14,851 Posts
Joined Jun 7, 2015
·
147 Posts
Hi,
You didn’t link to any instructions I could tellIf you made a folder on
C:/
that is named nvflash and put all the the goodies in it
First entry iscd C:nvflash
Whether this requires you to unlock/ protectoff or not I don’t know same vbios no need for this probably
nvflash64 —protectoff
https://www.overclock.net/forum/69-nvidia/1627212-how-flash-different-bios-your-1080-ti.html
If notnvflash64 -6 ROM_NAME.rom
The details of the Vbios flash is in the first post in that link. Sorry, I can’t give much more information than that.
Ok, so I made a little progress. Turns out I needed that «64» in «nvflash64 -6 ROM_NAME.rom».
But now I’m getting this error
‘bcrt error code body signature mismatch
Error Code 8:VBIOS Signature Check Failed
Error code 7: VBIOS image Failed certification sanity check’
I’m currently using this «NVFlash_Certs_Bypassed_v5.265_x64
Joined Apr 30, 2017
·
14,851 Posts
Hi,
vbios doesn’t match original vbios safety features
protectoff before ……..rom file string if you’re really sure you want that vbios
Joined Feb 4, 2020
·
1 Posts
I just heard about ths flashing video cards to better firmware. What if any improvments did you get out of this?
Joined May 29, 2015
·
3 Posts
Hello guys. Got a really wierd problem, havn’t seen someone feedback’d it yet.
Tried all bios versions for my evga gtx970 sc acx2.0 from this thread http://forums.evga.com/Solution-For…oblem-For-GTX-970-SC-ACX20-2974-m2332911.aspx , the card version (or whatever number -2974 means) is correct. Made everything exactly following instructions, even tried different versions of nvflash software. Primary VGA is PCIE in bios setup.
BUT:
After last step, when i have to activate gpu and restart system, after reboot i have black screen, no beeps from m/b, 15-20 second later my devices (keyboard, mouse) get power (led activates on all devices), and 5-10 seconds after i see the «signal not found» alert on the display.So after that i rolled back to original bios, and i’m literally forced to use it atm.
Any suggestions? Maybe anyone had this problem?
I know this is a really old post but I just ran into this same exact issue as well! On the same card and BIOS.
It’s weird because I flashed my card with one of those years back when that post was still fairly new, since I was having issues with those black screens too.
Now wanted to flash to a different version and got this same issue, had to spend several hours gutting an old office PC for a spare GPU to get output and revert the flash.
This time only the original BIOS actually works, can’t get any of those to flash correctly. (They say successful, reboot, no output) Even though I’ve been running the 1506 1.2v version for the past 4-5 years…
I suspect it’s either something new with Windows or Nvidia drivers, but makes me wonder why my 1506 bios worked fine all this time and now I can’t even go back to it. Would be really nice to find a solution for this.
0, first give the NVFLASH official website download address:
https://www.techpowerup.com/download/nvidia-nvflash/
Brush command
Multi-graphics cardBrush the following command to see the graphics ID that you want to brush
Then execute
nvflash --index=1 xxx.rom
Note the value after the index command is the graphics card ID you want to brush.
1. If the BIOS of the NVFlash brush the GPU, it encounters the following issues:
1)
Unable to open NVFLASH driver (0x00000005)
Restart your computer can be resolved
2)
Error Code:8 BCRT_ERROR_CODE_BODY_SIGNATURE_MISMATCH

       VBIOS Signature Check failed.

Error Code:7 BCRT_ERROR_CODE_BODY_FNV_HASH_MISMATCH

       VBIOS image failed certification sanity check.

BCRT Error: Certificate verification failed

ERROR: ERROR:BIOS Cert Verification Error, Update aborted
- in the case ofASUS’s GPUPlease perform the command to cancel your write
Solution:
1) Please try to use the version of the certificate check:
https://www.techpowerup.com/download/nvidia-nvflash-with-certificate-checks-bypassed/
2) If it is still an error, please use the unofficial modified version:
http://www.mediafire.com/download/lpcon4fizbst12r/nvflash.rar
Domestic mirror:nvflash
Brush BIOS is risky, the consequences are at your own risk, please be sure to back up the original ROM
reference:
https://forums.evga.com/Problem-when-flashing-GTX-750-Ti-SC-m2542868.aspx
http://bbs.duowan.com/thread-45097157-1-1.html
Hello. i ended up with bad flash. I have MSI GT0 0NC with GTX670MX card.
This is what i have
NVIDIA Firmware Update Utility (Version 5.199)
Modified Version by JoeDirt
Checking for matches between display adapter(s) and image(s)…
Adapter: GeForce GTX 760 (10DE,1191,1462,0000) H:—:NRM S:00,B:01,PCI,D:00,F:00
NOTE: EEPROM does not contain board ID, skipping board ID check.
WARNING: None of the firmware image compatible PCI Device ID’s
match the PCI Device ID of the adapter.
Adapter PCI Device ID: 1191
Firmware image PCI Device ID: 11A1
WARNING: Firmware image PCI Subsystem ID (1462.10D9)
does not match adapter PCI Subsystem ID (1462.0000).
PCI Device ID override detected.
(This is usually only needed for very special circumstances.)
Are you sure you want to continue?
Type «YES» to confirm (all caps):
YES
Overriding GPU mismatch
Please press ‘y’ to confirm override of PCI Subsystem ID’s:
Overriding PCI subsystem ID mismatch
Current — Version:Unavailable (Invalid) ID:0000:0000:0000:0000
Replace with — Version:80.04.58.00.0D ID:10DE:11A1:1462:10D9
GK104 Board — 2051b003 (Normal Board)
Update display adapter firmware?
Press ‘y’ to confirm (any other key to abort):
Error Code:8 BCRT_ERROR_CODE_BODY_SIGNATURE_MISMATCH
VBIOS Signature Check failed.
Error Code:7 BCRT_ERROR_CODE_BODY_FNV_HASH_MISMATCH
VBIOS image failed certification sanity check.
BCRT Error: Certificate verification failed
ERROR: ERROR:BIOS Cert Verification Error, Update aborted
If anyone can help with vbios. I lost hope as its 2cnd day im trying to sort it. I cant upload here files but i trying to flash my backup with no success.. Sort of vbios`es found on internet dont flash as well.
|
Mot : Pseudo : Filtrer Aller à la page : |
|
|---|---|
|
Page : 1 2 3 4 5 .. 18 19 20 21 22 23 24 Page Suivante Page Précédente Bas de page |
|
| Auteur | Sujet :
Tuto Flash Mod BIOS GTX Maxwell Voltage bridé débridé locked unlocked |
|
lyonelthebest |
Reprise du message précédent : Du coup j’aimerais juste tester de mettre 1,25 max pour avoir un peu de marge et voir si ma carte se stabilise ou si Ya rien a faire. J’ai lu la première page mais j’ai pas compris quel valeurs je devais modifier pour ca sinon je ne demanderais pas. Je modifie juste la premier ligne de l’onglet tension pour pouvoir faire cela ? ————— |

|
Publicité |
|
Kyjja Paye la dîme. |
Plop
Petite 750 Ti à flasher pour baisser la vitesse minimale des ventilos.
J’obtiens soit un message comme quoi nvflash n’est pas assez récent sous DOS (alors que je viens de prendre la dernière sous Techpowerup), soit ceci en tentant par Windows (toujours avec la dernière version pour Windows de chez Techpowerup) :
C:nvflash>nvflash64 -i0 -6 GM107.rom
NVIDIA Firmware Update Utility (Version 5.278.0)
Checking for matches between display adapter(s) and image(s)
Adapter: GeForce GTX 750 Ti (10DE,1380,1458,362D) H:—:NRM
Current — Version:82.07.25.00.6B ID:10DE:1380:1458:362D
Update display adapter firmware?
Identifying EEPROM…
Error Code:8 BCRT_ERROR_CODE_BODY_SIGNATURE_MISMATCH
VBIOS Signature Check failed.
Error Code:7 BCRT_ERROR_CODE_BODY_FNV_HASH_MISMATCH
VBIOS image failed certification sanity check.
BCRT Error: Certificate verification failed
ERROR: ERROR:BIOS Cert Verification Error, Update aborted Message édité par Kyjja le 20-05-2016 à 15:19:21 ————— |
|
Xixou2 |
les derniers gpu ne sont flashage que sous windows |

|
qwrty BFG! |
je voudrais flasher le BIOS de ma GTX 970 afin d’eviter d’avoir EXPERTool qui tourne, puis parceque c’est plus propre Je voudrais simplement mettre mes fréquences de base/boost stable pour ma carte au voltage d’origine. Est ce que j’ai juste a toucher à l’onglet «common» ? Je voulais également mettre le temp target @85 degres, histoire que la carte ne throttle pas dés 79 degres. Message édité par qwrty le 20-05-2016 à 19:29:26 ————— |


 )
)

|
Kyjja Paye la dîme. |
Bon double pour la bonne cause, c’est vraiment une histoire de signature, j’ai flashé la carte avec un BIOS legit (82.07.55.00.05) et nvflash n’a pas fait d’histoire. Du coup y a des gens qui ont pu flasher avec des BIOS modifiés par leur soins ? ————— |
|
dwane78 |
Bonjour, Mais je ne sais pas du tout comment faire avec NVFlash, flasher sous windows ou sous DOS ? Merci d’avance. |
|
Xixou2 |
ca ne fonctionne que sous windows |
|
lyonelthebest |
dwane78 a écrit :
Bonjour,
Mais je ne sais pas du tout comment faire avec NVFlash, flasher sous windows ou sous DOS ?
Merci d’avance. moi j’aimerais bien que tu me dise quels valeurs tu as modifier pour la tension max, parce qu’on ne m’as pas répondu plus haut ^^ willyman21 a écrit :
Voici ton bios que j’ai modifié : https://mega.nz/#!NUdzkTIA!7CrjWZhW […] oJ4sVNb-qo
Les manipulations pour le flash :
Télécharge ça si tu as un systeme 64 bits :
ou ça si 32bits :
Ensuite, crée un dossier nommé «nvflash» à la racine de ton disque dur principale, en général le c:
Puis met le bios que je t’ai modifié dans ce dossier.
Ta maintenant fait le plus gros. Pour résumer tu dois avoir maintenant a la racine de ton disque dur c:, un dossier nommé «nvflash», qui contient 3 fichiers qui sont : nvflash.exe ; nvflsh64.sys ; GM200.rom
Si tu as bien tout ça tu peu alors continuer, place au flash maintenant
Tu vas dans panneau de configuration>materiel et audio>gestionnaire de périphérique>tu déroule l’onglet «cartes graphiques»>clique droit sur nvidia gtx 980ti>désinstaller>ok (ATTENTION : ne coche PAS «supprimer le pilote»)
Maintenant ouvre une boite de commande en mode administrateur et écrit ça :
cd c
ensuite écrit ça :
nvflash —list
et pour finir, la commande final :
nvflash gm200.rom -6
(tu fais entrée, il va te demander de confirmer, tu fais «y», laisse le faire le flashage ça dure 20 sec)
Ensuite il te dira un truc du genre «redémarrer pour prendre effet» écrit en anglais
Puis tu redémarre a nouveau
Et après tu as terminé
à savoir que si tu es en 64 bit et prends la version 64 bit de nvflash dans la commande pour l’exe ce n’est plus nvflash tout court mais nvflash64 gm200.rom -6 Message édité par lyonelthebest le 05-06-2016 à 09:41:18 ————— |
 nvflash
|
dwane78 |
Merci pour la procédure je vais tenter ça. Pour la tension j’ai mis 1.3 max. Et 130% en power limit. Le reste pas touché du tout je ne me sent pas de bidouiller le reste. |
|
Publicité |
|
dwane78 |
|
|
Xixou2 |
1.3v pa possible, le max sera de 1.28V. Message édité par Xixou2 le 05-06-2016 à 16:29:12 |
|
dwane78 |
Je n’applique pas 1.3v en OC mais c’est juste que j’ai monter la limite max à 1.3v. Je me doute bien que 1.3v ne va pas lui faire du bien c’est pas le but. |
|
dwane78 |
J’ai un problème quand je veux lancer le flash dans l’invite de commande ca me marque : ERROR no nvidia display adapters found. Je suis pourtant la procédure plus haut. Une idée ? Une solution ? |
|
dwane78 |
Merci quentincc j’ai fait avec ta manip. Mais j’ai malheureusement le même problème : |
|
Fris@u |
La commande est : nvflash -f biosname.rom |
|
Xixou2 |
même plus simple: nvflash.exe rom.rom |
|
55speed |
ça change quoi de désinstaller la carte à chaque fois ? j’avoue que quant je flash ma carte je ne le fait pas, et du coup quant je redémarre j’ai pas besoin d’attendre 1 minute ça marche direct et les modifications sont bien prise en compte pourtant |
|
lyonelthebest |
ah merci c’est celui que j’ai suivi et que je voulais lui link au début mais je ne le retrouvais pas parcontre c’est sur celui la que j’ai ajouter le 64 pour la version 64 bit sinon il ne trouvais pas le programme ————— |
|
Fris@u |
55speed a écrit :
ça change quoi de désinstaller la carte à chaque fois ? j’avoue que quant je flash ma carte je ne le fait pas, et du coup quant je redémarre j’ai pas besoin d’attendre 1 minute ça marche direct et les modifications sont bien prise en compte pourtant C’est juste » déactiver» pour les drivers |
|
dwane78 |
Maintenant ça me marque lors du flash : |
|
quentincc It’s all ogre now |
J’ai une GTX750 à flash, j’ai custom son bios d’origine pour que le ventilo tourne à 35% mini au lieu de 22% car il est plus silencieux mais quand je flash y’a la «sécurité qui est toujours activé» : Citation :
c:>nvflash GM107fanOC.rom
NVIDIA Firmware Update Utility (Version 5.196)
Checking for matches between display adapter(s) and image(s)…
Adapter: GeForce GTX 750 (10DE,1381,1043,84B5) H:—:NRM B:02,PCI,D:00,F:00
Warning: Please make sure no Nvidia Display Driver is installed before continue
Current — Version:82.07.32.00.31 ID:10DE:1381:1043:84B5
Update display adapter firmware?
Identifying EEPROM…
ERROR: Software write protection enabled, unable to erase EEPROM. Message édité par quentincc le 30-06-2016 à 02:09:24 ————— |
|
Kyjja Paye la dîme. |
|
quentincc It’s all ogre now |
justement le protectoff me lance «l’aide» de nvflash Citation :
c:>nvflash —list
NVIDIA Firmware Update Utility (Version 5.196)
NVIDIA display adapters present in system:
edit: l’overvolt est possible sur ces cartes bas de gamme? Message édité par quentincc le 30-06-2016 à 11:09:11 ————— |

|
Kyjja Paye la dîme. |
Bah ça change rien, a priori t’as pas de GPU sur le premier PCI-E (d’après ce que je comprends ta 750 est le GPU numéro 0).
C’est bizarre que ça te lance l’aide le protectoff, mais apparemment ça ne marche que sur certaines EEPROM.
Et avec Code :
?
Edith : By the way tu ne sembles pas avoir la dernière version de nvflash. J’ai la 5.278.0 sur mon PC, et y en a peut-être eu d’autres depuis? A moins que tu n’ai voulu spécifiquement utilisé la version modifiée par JoeDirt.
Les versions vanilla => https://www.techpowerup.com/downloa […] ng/NVIDIA/
Edith² : Pas de soucis avec le protectoff de la version modifiée chez moi pour une 750 Ti
Code :
Message édité par Kyjja le 30-06-2016 à 12:27:29 ————— |
|
quentincc It’s all ogre now |
J’ai essayer le dernier de ton lien, le dernier de Joedirt et le protectoff fonctionne mais pas le flash T_T Code :
————— |
|
davids |
toujours pas mod bios pour les GTX pascal ? |
|
Dreth |
Hello, je cherche a flasher ma gtx 970, j’ai suivi le tuto et j’en suis là : la commande nvflash -i0 -6 nom_du_bios.rom ne fait rien, ca reste sur «Checking for matches between display adapter(s) and image(s)» depuis bientôt 1h. J’ai testé un reboot, re-tuto avec un nvflash —protectoff mais ça me donne le même message… Je précise que j’ai désinstallé la carte dans le gestionnaire de périphériques, lancé le cmd en admin, etc … Au cas ou, voilà la config on sait jamais:MSI Z97 SLI Krait, 4690k@4,5Ghz, Inno3D GTX 970, 4x4Go Kingston. Quelqu’un a une idée? |
|
MeteK |
Citation :
Je précise que j’ai désinstallé la carte dans le gestionnaire de périphériques Il ne faut pas la désinstaller, juste la désactiver … |
|
Dreth |
My bad, j’ai lu les 2 selon les tutos…merci Metek Ca avance mais c’est toujours pas ok, j’ai ça maintenant : Code :
j’ai aussi testé «nvflash gm204mod.rom» et «»nvflash gm204mod.rom -f»…même résultat |
|
Dreth |
La 5.292 c’est bien la dernière? une version qui accepte les bios non conformes? a priori non, mais j’ai extrait le bios avec gpu-z, modifié 3 valeurs de ventilation avec MBT (je cherche a rendre la carte silencieuse en idle, fan@40% ca le fait pas), pis «Save bios as» je dirai que c’est un bios conforme nan? |

| Sujets relatifs | |
|---|---|
| Comment OC ma GTX 750Ti | [MOD] Air BryBry One: montage en cours |
| Need help pour flash ma 980TI msi golden please ! | Projet de flash BIOS 780ti WF3 avec BIOS de WF3 OC, même PCB ? |
| [MOD] Carbid 540 / Orange | [MOD] white and black blues par nagash modding |
| [MOD] aegis par nagash modding | BIOS Mod — AMD Fury Full Unlock |
| Plus de sujets relatifs à : Tuto Flash Mod BIOS GTX Maxwell Voltage bridé débridé locked unlocked |
Auch wenn der Kepler BIOS Tweaker relativ benutzerfreundlich geraten ist, möchte ich es natürlich nicht nur beim Uploaden des Tools belassen und Euch dieses ausführliche Tutorial mitliefern,
das an für sich alle Fragen beantworten dürfte.
BIOS öffnen
Geöffnet wird das BIOS einfach über Open BIOS — wichtig ist nur, dass die Dateiendung .rom ist. Ansonsten könnte man es später unter NVFlash auch nicht flashen.
Anmerkung: Ich empfehle bei allen anderen Karten außer der GTX 680 und GTX 670 mit 2GB VRAM die Benutzung von NVFlash 5.127 (DOS), damit werden neben den Karten mit 4GB auch die kleinen GPUs bis hinunter zum GK107 unterstützt — unter anderem auch die GTX 690. ")
CommonBasic Clock Settings
Hier kann man alle wichtigen Taktraten bequem verstellen — mit dem GPU Clock Offset +13 MHz erhöht man sowohl den Baseclock, als auch den Boost um diese 13 MHz — es werden valid clockrates genommen, also solche, die entweder in der Taktraten-Tabelle (siehe Boost Table — P0 ist gelb markiert) stehen oder stehen würden, wenn man den in P0 für einen höheren Max Boost (Max Table Clock)verschiebt. Man kann den Baseclock und Boost mit den Pfeilen auch einzeln erhöhen oder senken. Natürlich kann man die Taktraten auch manuell eintippen.
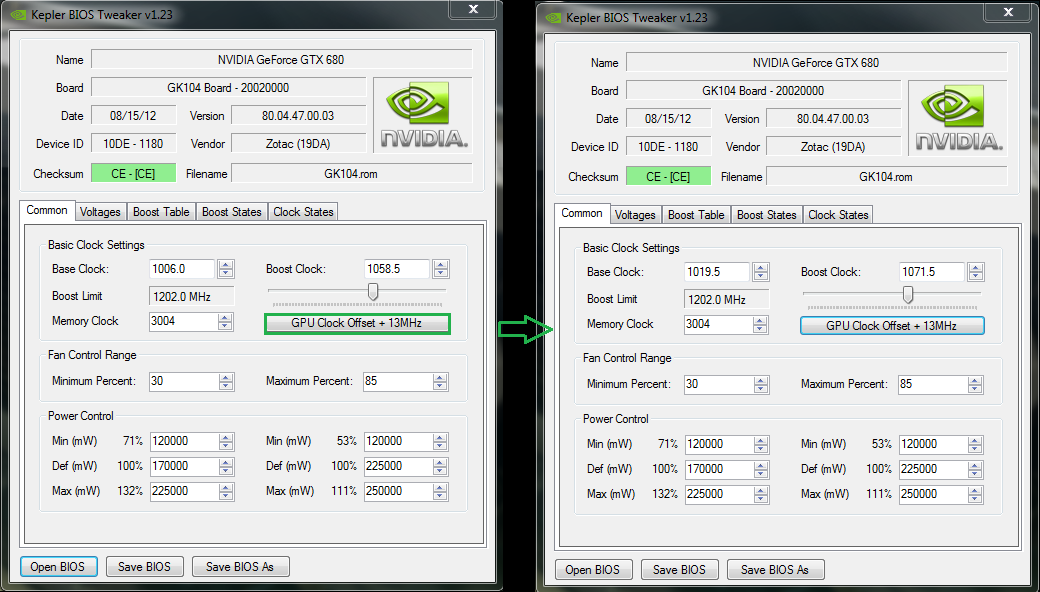
Ein netter Nebeneffekt des Erhöhens des Boost Limits ist auch, dass die Karte dann, sofern das Power-Target und die VCore nicht limitiert, um den entsprechenden Wert höher boostet.
Waren es zum Beispiel vor dem Editieren bei einer Referenz GTX 680 (1202 MHz Max Table Clock) noch 1097 MHz Estimated Max (siehe NVIDIA Inspector), so sind es bei gesetzten 1215 MHz Max Boost Clock 13 MHz mehr -> 1110 MHz! ")
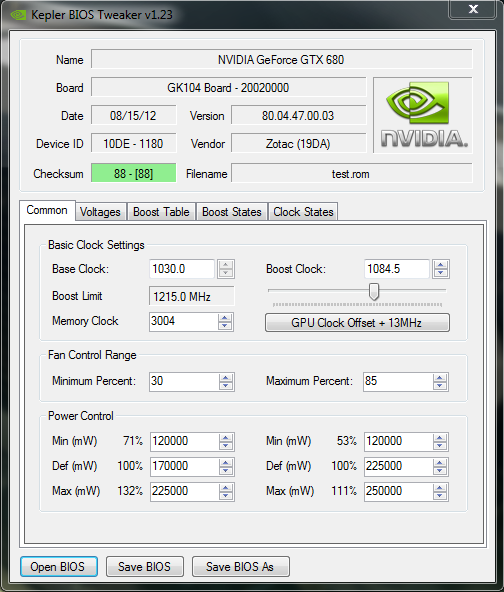
Es ist auch möglich Taktraten zu verwenden, die nicht in der Taktraten-Tabelle stehen, allerdings kann dann weder der GPU Clock Offset + 13 MHz, noch ein getrenntes Erhöhen über die Pfeil-Buttons erfolgen. Gleiches gilt auch für den Max Boost, wenn man bei Boost States einen anderen Wert eintragen würde, als normal möglich. Wir sprechen dann von invalid clockrates. Diese einzelnen Taktraten können dann erst wieder über die Buttons bzw. den Slider (Boost Limit) editiert werden, wenn sie valid, also gültig, sind. Man kann dazu aber wie erwähnt in der Boost Table nachschauen oder diese gegebenenfalls erhöhen, und einen Wert eintragen, der nach der Taktraten-Tabelle gültig ist. Beim Max Table Clock (oder Max Boost) muss man sowieso immer einen gültigen Wert verwenden!
Hier ein Beispiel, wo nur der Baseclock individuell gesetzt wurde — hier funkioniert das Editieren beim Basecklock über die Buttons, sowie GPU Clock Offset + 13 MHz nicht mehr, bis man wieder nach der Taktraten-Tabelle gültige Werte verwendet:
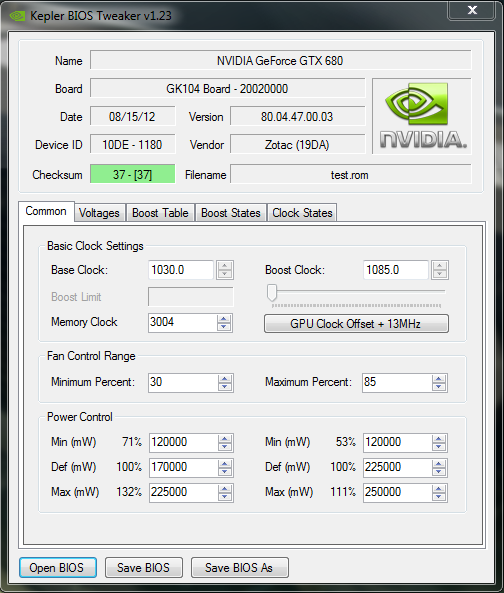
Hier noch ein Beispiel, wenn man alle Werte davon abweichend editieren würde — man kann danach weder die Pfeil-Buttons, noch den GPU Clock Offset + 13 MHz oder den Slider für Boost Limit verwenden,
erst wieder, nachdem man alles auf valid clockrates zurücksetzt. Aus dem Grund würde ich zumindest davon abraten, andere Werte beim Max Table Clock zu setzen als normal möglich:
Den VRAM kann man bei Memory Clock verstellen. Hier wird der GDDR3 Wert angezeigt — der GDDR5-Wert (siehe GPU-Z) ist die Hälfte davon. Nutzt man die Buttons, so kann man die Taktraten in 4 MHz GDDR3-Schritten, also 2 MHz GDDR5, verstellen. Das manuelle Eintippen funktioniert natürlich auch. Nach dem Editieren sind die neuen Taktraten auch im Reiter Clock States unter DDR zu finden — diese werden sowohl im P0-State (Vollllast), als auch in P2-State (Teil-Last mit niedrigerem GPU-, aber vollem GDDR-Takt und idR auch 0,987V) synchron gesetzt.
Als Beispiel: 1702 MHz GDDR5 entspricht 3404 MHz GDDR3. Letzteres muss dann eingetragen werden.
Fan Control Range
Eigentlich selbsterklärend — der Fanspeed-Range des Lüfters bzw. der Lüfter. Bei manchen Karten wie einigen Gigabyte-Modellen sollte man allerdings nicht zu tief mit dem Minimum-Wert (unter 25%) gehen, da der Lüfter nach dem Flashen stehen bleibt! Die GTX 660 Ti Referenz (EVGA) hatten wir (mongoo) aber z.B. auch mit 15% betrieben, was in etwas mehr als 40 °C im Idle resultiert. Mit den Buttons kann man die Werte in 5% Schritten erhöhen oder senken. Alternativ lassen sich auch eigene Werte eintragen.
Die Lüfterkennlinie kann man leider nicht bearbeiten, dafür braucht man EVGA Precision X oder MSI Afterburner (Settings -> Fan).

Power Control
Hier kann man das Power-Target der Karte verändern. Die Werte sind im BIOS in mW angegeben. Über die Buttons kann man analog zu einer manuellen Eingabe die Werte in 1W-Schritten, also 1000 mW, ändern. Auf der linken Seite befinden sich die eigentlichen Power-Target-Werte, die man in den Tools dann verstellen kann, auf der rechten Seite sind die Werte für die Schutz-Funktion eingetragen. Darum fallen Default und Maximum höher aus. Setzt man das PT höher, so kann es nichts schaden, bei Default rechts den Wert des Maximums links anzugeben und für das Maximum einen etwas höheren Wert. Man muss allerdings Vorsicht walten lassen — die Karte bzw. das PCB sollten auch die Power-Target Werte bewältigen können — setzt man zu hohe Werte, dann kann dies die Karte schrotten!
Beim Referenz-Design der GTX 680 und GTX 670 wird empfohlen, das Maximum PT nicht über 225W zu setzen, sondern dann eher den Wert für 100% etwas anzuheben!
Vor allem bei den kleineren Modellen wie der GTX 650 oder GTX 660 sollte man es auch nicht mit den Power-Target Werten übertreiben. Die default-Werte haben so schon einen Sinn, eben weil das PCB nicht für viel mehr ausgelegt ist — um 10 bis 15W anheben sollte eigentlich noch problemlos laufen, aber mehr würde ich hier nicht empfehlen.
Beispiel: 200W => 200000mW
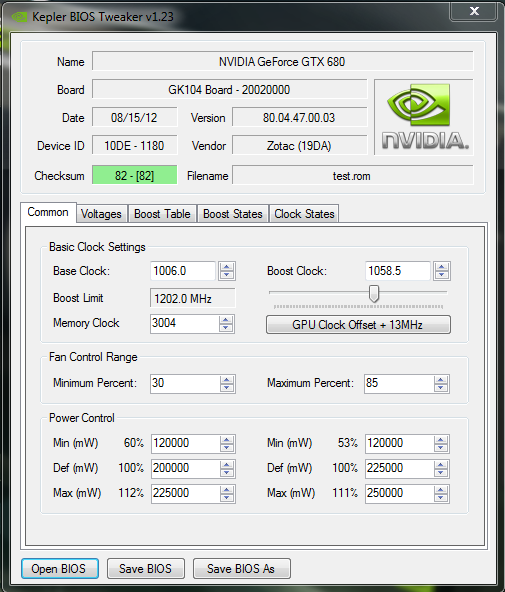
Hier gesetzt sind 200W als neuer default Wert für 100% Power-Target; die ehemals als 132% gesetzten 225W Maximum PT sind dementsprechend nun nur noch 112%.
Sehr gut gelöst ist auch, dass auch die %-Werte immer gleich mit ausgerechnet werden!
P.S.: Werte ab 600W (600000mW) sind zu hoch als Max Power-Target, darum kann das LN2 BIOS der MSI GTX 680 Lightning (900W Max PT) nicht ausgelesen werden!
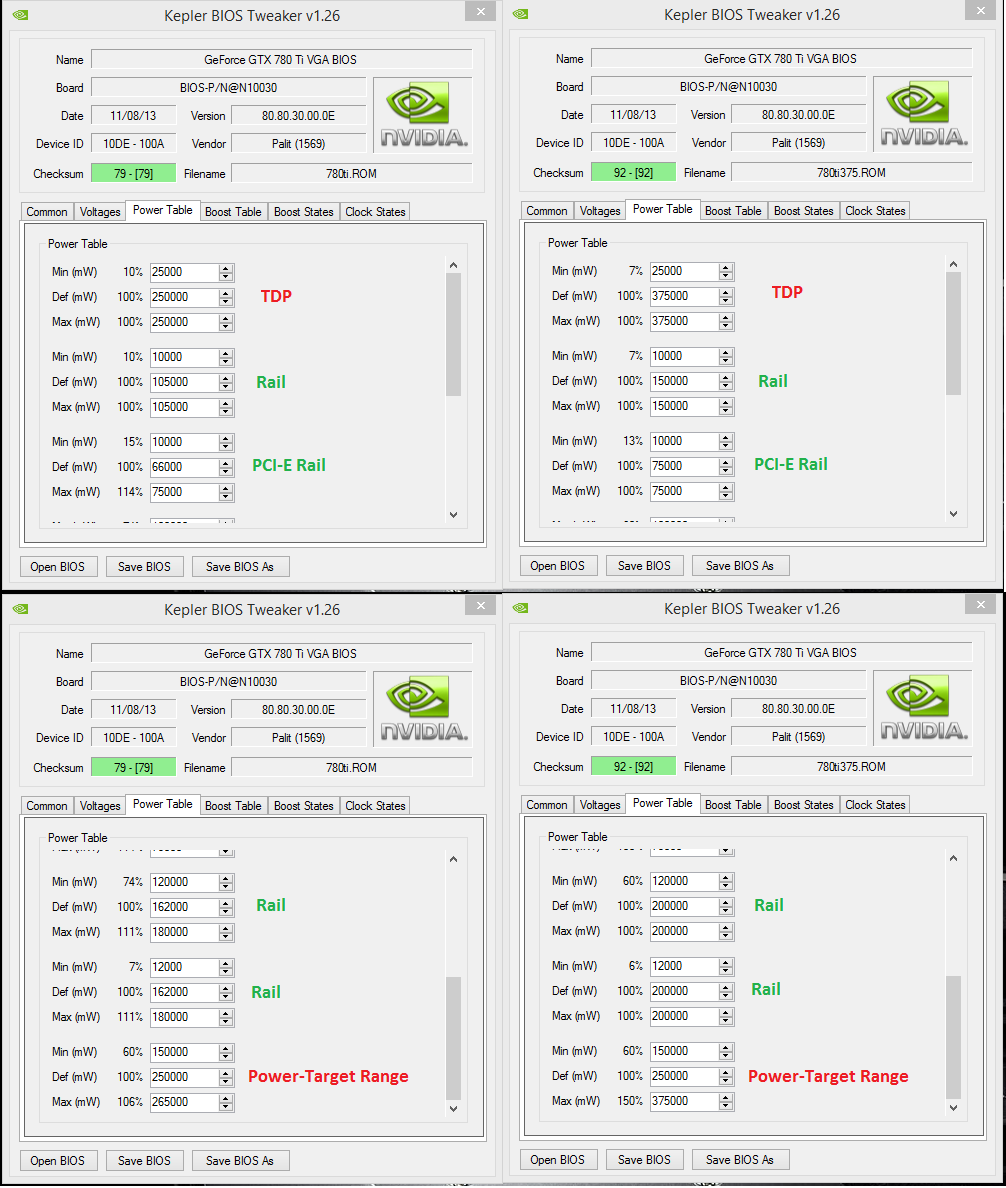
Power Table
Wie bekannt ist, kann man bei allen GK110 basierten Karten nur maximal 106% Power-Target wählen. Wird ein höherer Wert im BIOS eingetragen, so ist dies ohne Bedeutung. Mit der neuen Version 1.26 aber hat man nun aber den direkten Zugriff auf die Werte der 12V-Rails für die Karten. Somit sind hier höhere Werte möglich, wie sie etwa auch bei der MSI GTX 680 Lightning per LN2 BIOS gesetzt waren — allerdings sind die dort gesetzten 900W gesamt doch schon sehr krass und richten sich eher wie der Name schon sagt an Extrem-Overclocker.
Am Beispiel einer Palit GTX 780 Ti JetStream (Max Power-Target — Referenz 265W vs. 375W )[/U]
VoltagesVoltage Table
— Added enhanced Voltage Table mit Möglichkeit zum Freischalten von maximal 1,2125V @ Over Voltage sowie Listung aller Voltage Entries (CLK) im BIOS
Per default sind es 12,5mV Steps und maximal 1,2125V. 1,225V ist quasi als Platzhalter zu betrachten.
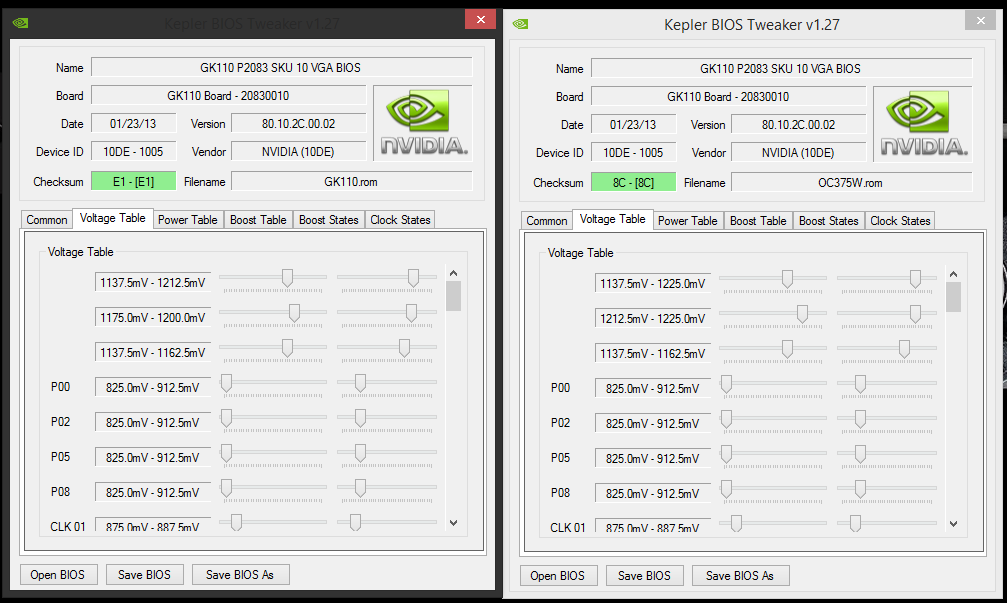
Mit diesen Settings schaltet man — hier am Beispiel der GTX TITAN — maximal 1,2125V für Over Voltage frei, auch wenn in dem Fall 1,225V angezeigt werden.
Höhere VCores lassen sich zwar einstellen, bleiben aber ohne Wirkung.
Hier stellt man die Spannungen ein. Bei Voltage Table stellt man den Basis-Wert für P0 ein — es gibt jeweils zwei dreier Gruppen im BIOS, darum sind zwei Regler eingebaut.
Bei GK104 sind hier jeweils 1,150V — außer bei der GTX 690 — einmal feste 1,175V (man kann effektiv den Wert auch nicht erhöhen, selbst wenn mehr im BIOS drin steht).
Bei 1,1625V bis 1,187V fällt die VCore im Boost in der Regel um zwei 12,5mV Inkremente höher aus. Sprich, bei 1,1625V hat man maximal 1,187V unter Boost und bei 1,187V maximal 1,200V.
Bei 1,200V geht es hoch auf 1,2125V. Stellt man das Maximum (1,2125V) ein, so liegen diese standardmäßig an.
Bedenken muss man allerdings auch, dass es ab einer gewissen GPU-Temperaturschwelle zum Voltage Droop um 12,5 mV kommt. Bei gesetzten 1,2125V geht es dann runter auf 1,200V um ein Beispiel zu nennen.
GK106-GPUs haben in einem Block gleich das Maximum eingetragen, darum lässt sich nur der untere Wert ändern.
Voltage Pattern
Richtig interessant ist hier meiner Meinung nach nur P8 (Idle), da die Kepler-GPUs 90%+ entweder in diesem State oder in P0 (Volllast) laufen und die anderen States nur sehr kurz anliegen.
Bei HD-Videos geht es beim Start auch mal kurz hoch, allerdings takten sich die GPUs dann relativ flott wieder komplett herunter. Im P8 kann man bei den aktuellen Karten ohne Probleme auch den Mindestwert von 0,825V fahren — es kann natürlich auch nie schaden, wenn man einen kleinen Sicherheitspuffer einbaut und etwa 0,850V setzt.
Bei GK106 ist es so, dass für P2 bis P8 (GK106-220 -> GTX 650 Ti hat nur P5 bis P8) ein Voltage-Range existiert (darum wird hier im Editor kein fester Wert angezeigt) — im P8 liegen, soweit ich weiß, 0,875V an. Theoretisch sollte es möglich sein, hier auch fixe Werte wie bei GK104 zu setzen. Ausprobiert hat das aber noch Niemand! Allerdings muss auch gesagt werden, dass schon GK104 relativ sparsam mit ~ 13 — 15W im Idle zu Werke geht, bei den kleinen Karten geht es default bis ~ 8,5W (bei GTX 650) herunter. Bei der 680er sollten sich hier aber zwischen 1 — 3W im Vergleich zu 0,987V einsparen lassen.
E: Hier kommen Verbrauchsmessungen von SSD Freak (Gigabyte GTX 670 OC 2GB) für das gesamte System:
gtx 670 / 1 TFT ; P8-State = 0,9875v = 75w ; Idle nur I-net Explorer auf
gtx 670 / 2 TFT ; P8-State = 0,9875v = 77w ; Idle nur I-net Explorer auf
gtx 670 / 1 TFT ; P8-State = 0,85v = 73w ; Idle nur I-net Explorer auf
gtx 670 / 2 TFT ; P8-State = 0,85v = 75w ; Idle nur I-net Explorer auf
Es bringt dort eine Einsparung von 2W unter beiden Konstellationen von 0,987V zu 0,850V.
Der P0 Wert bezieht sich übrigens auf das Minimum Voltage Offset, was man einstellen kann — nun ja, braucht man meiner Meinung nach eigentlich nicht verändern.
P2 bis P5 sind genau wie P8 aber die anliegende VCore. Kann man diese auch senken, wenn man will, muss man aber nicht unbedingt, da P8 eh mit Abstand am häufigsten davon genutzt wird.
Beispiel: 1,2125V in P0 sowie 0,825V in P8:

Boost Table
Hier sieht man die komplette Taktraten-Tabelle, die im BIOS eingetragen ist. In grün markiert sind die jeweils maximalen Taktraten für die unterschiedlichen P-States.
Gelb markiert sind die Einträge für den P0-State. Der Eintrag # 46 ist dabei immer der aktuell gesetzte Max Table Clock (Max Boost). Erhöht man diesen Wert, so wird die komplette Tabelle ab Eintrag # 24 um ~ 13 MHz pro Schritt erhöht. Wie schon zu Common geschrieben, bewirkt das Erhöhen auch einen höheren Boost-Takt der GPU, sofern keine Limitierung (Power-Target und/oder VCore) vorliegt. Man kann mit dem Slider theoretisch bis zu 1816 MHz einstellen…auch wenn es wohl noch mindestens eine bis zwei GPU-Generationen dauern dürfte, bis solche Taktraten zumindest unter Wasser lauffähig sein sollten.
Karten mit Werks-OC haben entsprechend schon erhöhte P0-Taktraten in der Tabelle von Haus aus drin, auch um einen höheren Max Boost zu ermöglichen.
Der aktuelle Spitzenreiter ist hier Galaxy/KFA² bei der GTX 680 OC LTD wo satte 1398 MHz als Max Boost gesetzt sind (der Standard Boost liegt schon bei 1306 MHz inkl. 1,175V Referenz @ Boost!)
Man kann dabei auch immer die Verschiebung des Max Table Clocks live mitverfolgen, wenn man den Slider verschiebt — das ist auch exzellent gelungen! 
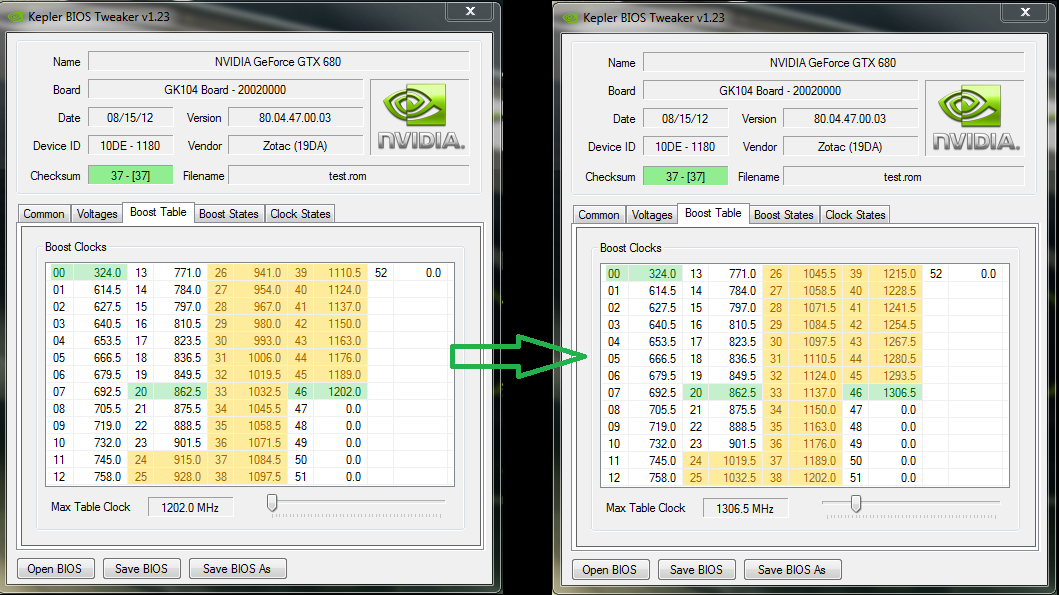
Hier im Beispiel wurde der Max Table Clock von 1202 MHz auf 1306,5 MHz erhöht.
Man kann natürlich auch einen höheren Max Table Clock mit einem etwas niedrigeren Boost Limit ( siehe Common) kombinieren.
Also etwa 1280,5 MHz als Boost Limit unter Common setzen und 1306,5 MHz als Max Table Clock haben.
Boost States
Hier ist sozusagen der Boost-Bereich eines jeden P-States eingetragen. Die maximalen Werte unter P0 und P2 für GPC, L2C, XBAR und SYS entsprechen standardmäßig sowohl dem maximalen Boost Limit, als auch dem Max Table Clock. Diese acht Werte werden verändert, wenn man das Boost Limit (siehe Common) verändert oder man ein neues Boost Limit und einen identischen Max Table Clock (siehe Boost Table) setzt. Das kann man natürlich auch manuell machen, sofern sich der neue Wert in der Tabelle bzw. der erhöhten Taktraten-Tabelle für P0 befindet aber bequemer geht es natürlich über Common und/oder Boost Table.
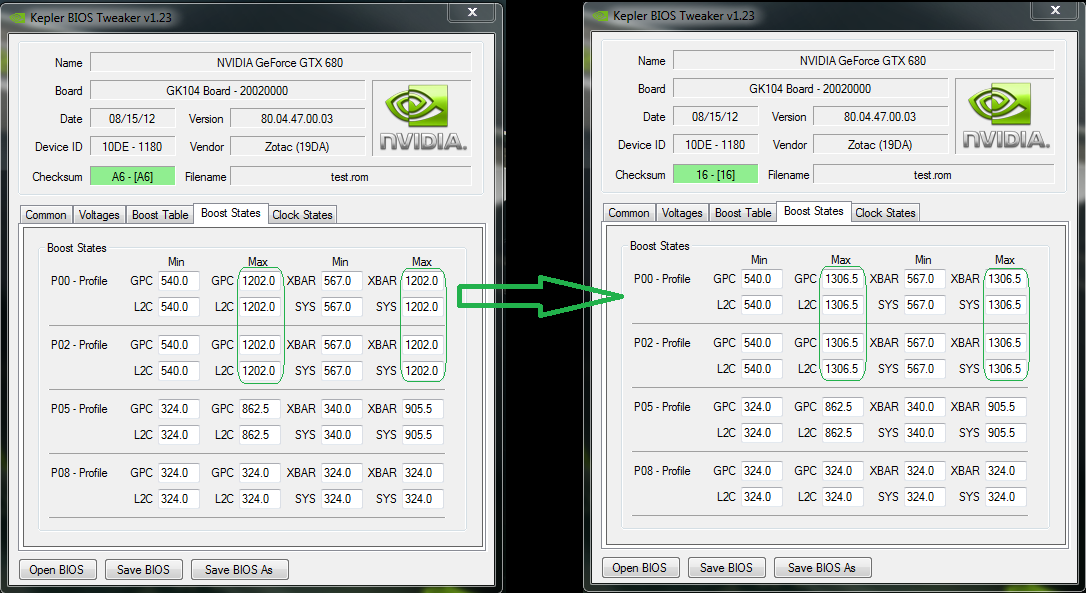
Hier greifen wir mit den Taktraten wieder auf die Werte aus dem letzten Beispiel zurück. Einmal mit 1202 MHz default und einmal erhöht auf 1306,5 MHz.
Clock States
Hier befinden sich die Werte für die GDDR-Taktraten, samt einiger niedrigerer Werte, die für uns, wenn es um das Modden des VRAM-Taktes unter P0 und P2 (ist immer gleich) geht, nicht von Bedeutung sind. Wichtig sind nur die GDDR3-Taktraten unter DDR. Mann diese dort einzeln eingeben oder lässt es unter Common bequem synchronisieren.

Als Beispiel einmal mit 3004 MHz GDDR3 (1502 MHz GDDR5) und einmal mit 3404 MHz GDDR3 (1702 MHz GDDR5) im Vergleich.
BIOS speichern
Speichern kann man das neue BIOS entweder über Save, womit das Ursprungs-BIOS überschrieben wird oder über Save As unter anderem Dateinamen.
Ich hoffe, dass euch das Tutorial alle wichtigen Fragen beantwortet und ihr euch fleißig ans Tweaken eurer Karten machen könnt!
MfG
Edge
-
#1
Hallo,
Es geht um eine Gtx 750 ti, Maxwell Bios Tweaker und Nvflash.
Bios aus gelesen und als Orginal.rom gespeichert. Datei in den Tweaker geladen und unter Neu.rom gespeichert ohne etwas zu ändern. Nvflash gibt dann diese Fehlermeldung aus:
Error Code:8 BCRT_ERROR_CODE_BODY_SIGNATURE_MISMATCH
VBIOS Signature Check failed.
Error Code:7 BCRT_ERROR_CODE_BODY_FNV_HASH_MISMATCH
VBIOS image failed certification sanity check.
BCRT Error: Certificate verification failed
ERROR: ERROR:BIOS Cert Verification Error, Update aborted
Auch Versuche mit anderen Versionen des Tweakers oder Nvflash brachten keinen Erfolg. Das flashen der Orginal.rom funktioniert problemlos.
Hoffe jemand hat Erfahrung damit und kann mir weiterhelfen.
Gruß
Karlos
-
#3
AW: Grafikkarten Bios speichern, bearbeiten und dann neu flashen
Schade……Vielleicht findet sich ein User der den Fehler kennt und weiß wie er beseitigt werden kann.
Die Verantwortung für meine Handlungen übernehme ich auch. Alles andere wäre Schuldzuweisung die nur der Gewissensberuhigung dient.
Gruß
Karlos
Fand eine Lösung für mein Problem.
Gruß
Karlos
Zuletzt bearbeitet: 24. November 2015