Содержание
- Тема: Communigate
- Communigate
- How to solve Fastly error: unknown domain
- 1 Answer 1
- Domains
- Displaying the Domain List
- Creating a New Domain
- Specifying Domain Settings
- Specifying Default Domain Settings
- Multihoming and Dedicated IP Addresses
- Client IP Addresses
- Enabling Services
- Domain Limits
- Domain Aliases
- Directory Integration
- Domain Security Settings
- Provisioning
- Processing Unknown Names
- Sending Mail To All Accounts in the Domain
- Sending Mail To All Accounts in All Domains
- WebUser Interface Settings
- SMTP Options
- Domain Rules
- Administrator Domain
- Renaming Domains
- Removing Domains
- Suspending Domains
- Domain File Directories
- Domain Subdirectories
- Account Subdirectories in Large Domains
- Storage Mount Points
Тема: Communigate
Опции темы
Поиск по теме
Communigate
вот прописал в конфиге как и написано в хелпе
MTA compro
CommunigateProUser compro
CommunigateProPassword paPitev
path CommunigateProPath /var/CommuniGate
пытаюсь создать сайт.. а мне в ответ
Внутренняя ошибка Can execute command
без комунигейта все нормально создается


Видимо не может в communigate создаться соответствующий домен. Вы уверены, что ваш пользователь compro является администратором communigate? Обычно это пользователь postmaster. Кстати, именно это имя используется поумолчанию, если CommunigateProUser не указан.
Если причина не в этом, то можно включить максимальный уровень лога LogLevel 9 в файле /usr/local/ispmgr/etc/config. Тогда можно будет в логе ISP manager /usr/local/ispmgr/var/ispmgr.log посмотреть, какую ошибку вернул communigate.
Jan 11 09:46:23 .[1;32mINFO Request [127.0.0.1][root] ‘func=domain.edit&plid=’.[0m
Jan 11 09:46:26 .[1;32mINFO Request [127.0.0.1][root] ‘func=site’.[0m
Jan 11 09:46:26 ../../ispmgr/utils.cpp:479 .[1;33mDEBUG cache_quota /usr/sbin/repquota -g -n /.[0m
Jan 11 09:46:30 .[1;32mINFO Request [127.0.0.1][root] ‘func=site.edit&elid=delux.dp.ua’.[0m
Jan 11 09:46:44 .[1;32mINFO Request [127.0.0.1][root] ‘func=site.edit&plid=’.[0m
Jan 11 09:46:57 .[1;32mINFO Request [127.0.0.1][root] ‘name=qw.qw&ip=***.***.***.***&alias=www.qw.qw&ali as_list=&admin=qwq&p
asswd=*&confirm=*&sitepreset=custom&disklimit=0&sh elluser=0&alluser=1&domain=1&base=0&traf=0&phptype =phpnone&sslport=443&func
=site.edit&elid=&sok=ok&suok=++++Ok++++’.[0m
Jan 11 09:46:57 ../../ispmgr/action.cpp:520 .[1mTRACE FormAction:CheckValues.[0m
Jan 11 09:46:57 ../../ispmgr/tdata.cpp:1142 .[1mTRACE RecordSet::Post(insert) rsname=’group’ key=’qwq’.[0m
Jan 11 09:46:57 ../../ispmgr/configs.cpp:252 .[1mTRACE Passwd::PasswdPost().[0m
Jan 11 09:46:57 ../../ispmgr/tdata.cpp:1142 .[1mTRACE RecordSet::Post(insert) rsname=’shadow’ key=’qwq’.[0m
Jan 11 09:46:57 ../../ispmgr/tdata.cpp:1142 .[1mTRACE RecordSet::Post(insert) rsname=’user’ key=’qwq’.[0m
Jan 11 09:46:57 .[1;36mEXTINFO Execl (/bin/cp -Rp /usr/local/ispmgr/etc/site.skel /home/qw.qw) ret=0.[0m
Jan 11 09:46:57 ../../ispmgr/compro.cpp:318 .[1;33mDEBUG Do command ‘USER postmaster’.[0m
Jan 11 09:46:57 ../../ispmgr/compro.cpp:339 .[1;33mDEBUG err = ‘please send the PASS’.[0m
Jan 11 09:46:57 ../../ispmgr/compro.cpp:318 .[1;33mDEBUG Do command ‘PASS ****’.[0m
Jan 11 09:46:57 ../../ispmgr/compro.cpp:339 .[1;33mDEBUG err = ‘login OK, proceed’.[0m
Jan 11 09:46:57 ../../ispmgr/compro.cpp:306 .[1;33mDEBUG CommunigatePro socket connected.[0m
Jan 11 09:46:57 ../../ispmgr/compro.cpp:318 .[1;33mDEBUG Do command ‘SetDomainSettings qw.qw < AccountsLimit = 0; >‘.[0m
Jan 11 09:46:57 ../../ispmgr/compro.cpp:339 .[1;33mDEBUG err = ‘unknown secondary domain name’.[0m
Jan 11 09:46:57 ../../ispmgr/compro.cpp:318 .[1;33mDEBUG Do command ‘Quit’.[0m
Jan 11 09:46:57 ../../ispmgr/compro.cpp:339 .[1;33mDEBUG err = ‘CommuniGate Pro PWD Server connection closed’.[0m
Jan 11 09:46:57 ../../ispmgr/tdata.cpp:1142 .[1mTRACE RecordSet::Post(insert) rsname=’siteprop’ key=’qw.qw’.[0m
Jan 11 09:46:57 ../../ispmgr/domain.cpp:1159 .[1;33mDEBUG CreateDomain qw.qw owner 508 ‘qw.qw’.[0m
Jan 11 09:46:57 ../../ispmgr/domain.cpp:1163 .[1;33mDEBUG Checking domain limit .[0m
Jan 11 09:46:57 ../../ispmgr/tdata.cpp:1142 .[1mTRACE RecordSet::Post(insert) rsname=’domain’ key=’qw.qw’.[0m
Jan 11 09:46:57 ../../ispmgr/domain.cpp:1186 .[1;33mDEBUG Looking for reseller default domain params owner=508.[0m
Jan 11 09:46:57 ../../ispmgr/domain.cpp:1194 .[1;33mDEBUG After reseller detection ns=».[0m
Jan 11 09:46:57 .[1;36mEXTINFO Create config ‘/var/named/qw.qw’.[0m
Jan 11 09:46:57 ../../ispmgr/domain.cpp:443 .[1;33mDEBUG Insert new NS with value ‘ns.domen.com.’.[0m
Jan 11 09:46:57 ../../ispmgr/tdata.cpp:1142 .[1mTRACE RecordSet::Post(insert) rsname=’domain record’ key=’qw.qw. NS ns.domen.com.’.[0m
Jan 11 09:46:57 ../../ispmgr/domain.cpp:466 .[1;33mDEBUG Detected zonename=’qw.qw.’.[0m
Jan 11 09:46:57 ../../ispmgr/domain.cpp:481 .[1;33mDEBUG Check NS1 = ‘ns.domen.com.’ domain = ‘qw.qw.’.[0m
Jan 11 09:46:57 ../../ispmgr/tdata.cpp:1142 .[1mTRACE RecordSet::Post(insert) rsname=’domain record’ key=’qw.qw. MX 10 ***.***.***.***’.[0m
Jan 11 09:46:57 ../../ispmgr/domain.cpp:569 .[1;33mDEBUG Start process local-host-names.[0m
Jan 11 09:46:57 ../../ispmgr/domain.cpp:579 .[1;33mDEBUG set local-host-names mxip=».[0m
Jan 11 09:46:57 ../../ispmgr/compro.cpp:318 .[1;33mDEBUG Do command ‘USER postmaster’.[0m
Jan 11 09:46:57 ../../ispmgr/compro.cpp:339 .[1;33mDEBUG err = ‘please send the PASS’.[0m
Jan 11 09:46:57 ../../ispmgr/compro.cpp:318 .[1;33mDEBUG Do command ‘PASS ****’.[0m
Jan 11 09:46:57 ../../ispmgr/compro.cpp:339 .[1;33mDEBUG err = ‘login OK, proceed’.[0m
Jan 11 09:46:57 ../../ispmgr/compro.cpp:306 .[1;33mDEBUG CommunigatePro socket connected.[0m
Jan 11 09:46:57 ../../ispmgr/compro.cpp:318 .[1;33mDEBUG Do command ‘DeleteDomain qw.qw’.[0m
Jan 11 09:46:57 ../../ispmgr/compro.cpp:339 .[1;33mDEBUG err = ‘unknown secondary domain name’.[0m
Jan 11 09:46:57 ../../ispmgr/compro.cpp:318 .[1;33mDEBUG Do command ‘Quit’.[0m
Jan 11 09:46:57 ../../ispmgr/compro.cpp:339 .[1;33mDEBUG err = ‘CommuniGate Pro PWD Server connection closed’.[0m
Jan 11 09:46:57 .[1;36mEXTINFO Execl (/usr/sbin/rndc reload qw.qw) ret=256.[0m
Jan 11 09:46:57 ../../ispmgr/compro.cpp:850 .[1mTRACE void CreateMailBox(‘qwq@qw.qw’, ‘qwq’, »).[0m
Jan 11 09:46:57 ../../ispmgr/compro.cpp:318 .[1;33mDEBUG Do command ‘USER postmaster’.[0m
Jan 11 09:46:57 ../../ispmgr/compro.cpp:339 .[1;33mDEBUG err = ‘please send the PASS’.[0m
Jan 11 09:46:57 ../../ispmgr/compro.cpp:318 .[1;33mDEBUG Do command ‘PASS ****’.[0m
Jan 11 09:46:57 ../../ispmgr/compro.cpp:339 .[1;33mDEBUG err = ‘login OK, proceed’.[0m
Jan 11 09:46:57 ../../ispmgr/compro.cpp:306 .[1;33mDEBUG CommunigatePro socket connected.[0m
Jan 11 09:46:57 ../../ispmgr/compro.cpp:318 .[1;33mDEBUG Do command ‘CreateAccount qwq@qw.qw’.[0m
Jan 11 09:46:57 ../../ispmgr/compro.cpp:339 .[1;33mDEBUG err = ‘unknown secondary domain name’.[0m
Jan 11 09:46:57 .[1;35mERROR generate exception ‘1’.[0m
Jan 11 09:46:57 .[1;35mERROR Can execute command.[0m
Jan 11 09:46:57 ../../ispmgr/compro.cpp:318 .[1;33mDEBUG Do command ‘Quit’.[0m
Jan 11 09:46:57 ../../ispmgr/compro.cpp:339 .[1;33mDEBUG err = ‘CommuniGate Pro PWD Server connection closed’.[0m
Jan 11 09:46:57 .[1;36mEXTINFO Execl (/bin/rm -rf /home/qw.qw) ret=0.[0m
/var/named/qw.qw есть . а в named.conf ничего не пишется .
куда копать ?
В вашем случае похоже, что у вас MX запси для домена не создаются.
Источник
How to solve Fastly error: unknown domain
I’m trying to accomplish this task, I have an IP and with the IP I want to make an HTTP request.
Let’s say that I have the stackoverflow.com IP (151.101.193.69) and I want to make an HTTP request at the website with python using the requests module. I wrtie this code
that returns the html code of the page. Doing so I get a page that says
But if I do this with the Google IP it works and the request returns the Google home page
1 Answer 1
Yes, that’s normal.
HTTP requests always include a «Host:» header indicating what name was actually used in the URL. For example, accessing http://superuser.com will send a header Host: superuser.com ; and if you’re using http://151.101.193.69 , the header will of course show Host: 151.101.193.69 (or even be completely absent).
The important bit is that many HTTP servers share the same IP address for many different domains (aka virtual hosting), and they rely on this header to know which domain you’re trying to access.
For example, all Stack Exchange domains – superuser.com , stackoverflow.com , serverfault.com , diy.stackexchange.com , … – share the exact same set of IP addresses. The only way for the webserver to distinguish between all these websites is by looking at the «Host» HTTP header.
(Additionally, these addresses actually belong to Fastly CDN, not to the real webservers. Large CDNs such as Fastly or CloudFlare might use the same IP address for hundreds of domains from various different customers.)
Finally, it is up to the server to decide what it’ll do with «Host» headers that it doesn’t recognize. Some servers return an error page stating so, other servers return the «first» domain that they have.
So in order to make a successful request, you’d need to do this:
But that’s a silly way of saying requests.get(«http://stackoverflow.com») . The only time you might need this method is when you have an IP address that doesn’t match the DNS information (e.g. if you’re trying to bypass DNS).
(And it will cause you more problems as soon as you try to access a HTTPS website, because the domain from the URL is used for checking TLS certificates, too.)
Источник
Domains
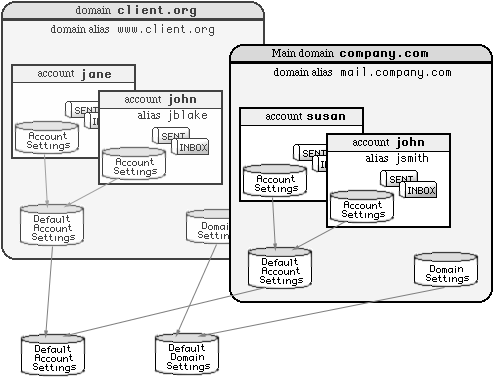
CommuniGate Pro Server can serve Accounts, Goups, Mailing Lists, Forwarders and other objects in its Main Domain, and, optionally, in multiple Secondary Domains, each with its own set of Accounts (and other objects such as Mailing Lists, Groups, and Forwarders).
Every Domain can have zero, one, or several Domain Aliases (alternative names). All Domain names and Domain Aliases should be unique, and they should be registered with the Domain Name System (DNS).
In many cases, a Domain should not have a separate set of user Accounts, but should rather be a domain name alias for an already existing CommuniGate Pro Domain. You may also want to serve some domain names using account mapping and/or Unified Domain-Wide Accounts.
In all these cases, you do not have to create a new CommuniGate Pro Domain to serve a domain name.
When a client application connects to your CommuniGate Pro Server, and specifies an account name, the Server has to decide in which Domain to look for that Account. See the Access section for the details.
Displaying the Domain List
Use the WebAdmin Interface to view the list of Domains served with your Server. Open the Domains page in the Users realm.
To open the Users realm, you should be connected as the postmaster or any other Server Administrator with the All Domains access right.
To select Domains by name, type a string into the Filter field, and click the Display button: only the Domains with names containing the specified string will be displayed.
Each entry in the Domain list contains the Domain name, the assigned network address (if any), and the number of Accounts in the Domain. If the Domain is a shared Domain served by a Dynamic Cluster, the Domain name has the [+] prefix. If the Domain is a Directory-based Domain, its name is displayed with the [D] prefix.
A list entry also displays the number of currently opened Domain Accounts, the total number of times the Domain Accounts have been opened (since the Server last restart), and the last time any Domain Account was opened.
Select the Show Aliases option to include Domain Aliases into the list. Each Domain Alias element contains the link to its «real» Domain object list and settings pages.
Click a Domain name to view the Objects in that Domain.
Click the word Settings in the last column to view and update the Domain Settings.
Click the Telephone Numbers (Telnum) link to view all Telnums.
Creating a New Domain
Type a new Domain name into the field on the right side of the Create Domain button.
Click the Create Domain button. When a new Domain is created, its name appears in the Domain List.
If this Server is a member of a Dynamic Cluster, the additional Create Dynamic Cluster Domain button appears. Click that button to create a Domain that will be served with all Cluster members. The Domain created using the Create Domain button are created as «local» Domains and are served with this Server only.
Specifying Domain Settings
The Main Domain and all Secondary Domains have Domain-level settings.
To open the Domain Settings page in your browser, either click the Domain Settings link in the Domains List, or click the Domain Settings link on the Domain Object list page.
The Comment field allows you to enter arbitrary information about the domain.
The Account Log option allows you to specify how the account-level operations (account open/close, password verifications, Mailbox creating/removing, size updates, etc.) are recorded. Log records for account-related events have the ACCOUNT tag.
The Mailbox Log option allows you to specify how the mailbox-level operations (message storing/removing, message status updating, etc.) are recorded. Log records created for Mailbox-related events have the MAILBOX tag.
Most of Domain Settings can be set to the default value. In this case the actual setting value is taken from the global, Server-wide Default Domain Settings.
When the Domain Settings are modified, click the Update button. The page should appear again, displaying the Updated marker.
You can click the Objects link to switch to the Domain Object List.
Specifying Default Domain Settings
A Domain setting can have the default value. In this case the actual setting value is taken from the server-wide Default Domain Settings. You can modify these Default values by clicking the Domain Defaults link on the Domains (Domain List) page.
The Default Domain Settings page resembles a regular Domain Settings page.
A Dynamic Cluster installation maintains separate server-wide Default Domain settings for all non-Shared (Local) Domains, and cluster-wide Default Domain settings for all Shared Domains. In the Cluster environment, the Default Domain Settings page displays links that allow you to switch between the Server-wide and Cluster-wide Default Settings.
Multihoming and Dedicated IP Addresses
You should read this chapter only if you plan to support multihoming, if your system is behind a firewall, or if you have a non-standard Domain Name System setup.
When the Server starts, it detects its own network address(es). Your Server system is «multihomed» if it has more than one network (IP) address.
If the Server system has several IP addresses, some of them can be assigned (dedicated) to secondary Domains. Accounts in such Domains can be accessed using any POP, IMAP, or other client application without explicitly specifying the full Account name.
The Assigned IP Addresses option allows you to assign network addresses to the main and secondary Domains.
All Available This option can be selected for one Domain only, and it is the default setting for the Main Domain.
All Server’s network addresses not assigned to other Domains are assigned to this Domain. Manually Defined This option is selected by default for all secondary Domains.
If you want to assign (dedicate) an IP address to this Domain, type the address into the text field on the right of the pop-up menu. You can specify several IP addresses, separating them with the comma (,) symbol.
Only the Server computer’s own addresses are accepted, and all specified addresses should not be already assigned to any other CommuniGate Pro Domain.
If you select this option and leave the text field blank, the Domain will not have any IP addressed assigned to it. In this case, to access the Domain Accounts, users should specify the full Account name (account@domain) in their client application settings. See the Access section for the details. by DNS A-Record When this option is selected, the Server sends a request to the Domain Name System and tries to resolve the Domain name. If an A-Record for this CommuniGate Pro Domain is found in the Domain Name System, the addresses from that record are assigned to the Domain. The system checks that all addresses retrieved from the A-record belong to the Server computer and that these addresses have not been already assigned to any other Domain.
This setting is useful if you have several secondary Domains with dedicated IP addresses and you want to redistribute the Server addresses from time to time. Instead of reconfiguring both DNS and Server settings, you may reconfigure the DNS records only, and the Server will take the updated data from the DNS. by DNS MX-Record When this option is selected, the Server retrieves the highest-priority MX record (relay name) for this CommuniGate Pro Domain, and then processes addresses in the A-record for that relay name. Use for Outgoing Connections If this option is enabled, then the non-LAN IP addresses assigned to this Domain (if any) can be used as source network address when establishing outgoing connections (such as SMTP, RPOP, XMPP, etc.)
For each Domain in the Domain List, the assigned network (IP) addresses are displayed. This can be used to check the DNS and Server setup for systems with multihoming.
Because of setup errors or due to a non-standard network and DNS setup, the Server’s own IP address(es) may be left unassigned to any of the Server domains. Open the General Settings page to see the list of the Server own IP addresses. The unassigned addresses are marked in red.
When a client application connects to the Server via an unassigned address and the full account name is not specified, the Server does not allow the user to log in.
Client IP Addresses
Each Domain can have its own list of Client IP Addresses, which extends the Server-wide or Cluster-wide Client IP Addresses list for this Domain Account users:
Enabling Services
Each Domain has a set of settings that specify which CommuniGate Pro services can be used with the Domain Accounts. See the Accounts section for the details.
Services can also be disabled for individual Domain Accounts.
A service is available for an Account only if that service is enabled for the Account itself AND for the Account Domain. Disabling a service in the Domain Settings disables that service for all Domain Accounts.
Note: This is different from disabling a service in the Domain Default Account Settings: disabling a service in the Default Account Settings disables that service only for those Domain Accounts that have the Enabled Services option set to default.
Domain Limits
The System Administrator can specify some limits on the resources available to the Domain users.
A Domain Administrator can see, but cannot modify these limits.
Domain Aliases
Each CommuniGate Pro Domain can have aliases (alternative names). If the client.dom Domain has the mail.client.dom and www.client.dom Domain Aliases, E-mail and Signals directed to user@mail.client.dom and to user@www.client.dom will be routed to the user@client.dom Account. Also, to access the user@client.dom Account via POP, IMAP, XMPP, and other client applications the Account names user@mail.client.dom and user@www.client.dom can be specified in the client settings.
This is especially useful for WebUser clients. Users specify the domain name in their browser URLs, and users of the client.dom Domain tend to use www.client.dom in the browser URLs. You may want to register the www.client.dom domain name with the DNS, assigning it the same IP address as the address assigned to the client.dom Domain, and then you should create the www.client.dom Domain Alias for the client.dom Domain.
You can modify existing Domain Aliases, add an Alias by typing a new name in the empty field, and remove an Alias by deleting it from its field. Use the Update button to update the Domain Aliases list.
The Domain Aliases are stored in the DomainAliases database located in the Settings directory inside the CommuniGate Pro base directory.
Directory Integration
The System Administrator can specify if the Domain Accounts should be included into the Central Directory.
This panel is not displayed for Directory-Based Domains, since those domains are always completely integrated with the Directory.
See the Directory Integration section for the details.
Domain Security Settings
A Domain can have its own set of enabled Authentication methods. See the Security section for more details.
A Domain can have PKI settings (Private Keys and Certificates) enabling secure communications (TLS, Certificate Authentication, S/MIME) with that Domain.
Use the Security link on the Domain Settings page to open the Domain Security settings.
See the PKI section for more details.
A Domain can be configured to add DKIM-Signature headers to outgoing messages.
Use the Security link on the Domain Settings page to open the DKIM settings.
See the PKI section for more details.
A Domain can have Kerberos keys enabling «secure single sign-on» for that Domain.
Use the Security link on the Domain Settings page to open the Domain Security settings.
See the Security section for more details.
Provisioning
The Domain objects (Accounts, Groups, Forwarders, etc.) should have unique names within that Domain.
Each name should contain from 1 to 250 Latin letters, decimal digits, the dot (.), underscore (_), minus (-) symbols.
A name should not start or end with the dot (.) symbol.
A name should not be the same as one of the Special Address names.
Names of Account Aliases and Forwarders may contain non-Latin characters and ideograms (such as Cyrillic, Greek, Chinese) and the Latin alphabet-based characters with diacritics or ligatures (such as French). Since one such character may be encoded by multiple bytes the maximal length of the name may be less than 250 letters.
All upper case letters (Latin, Cyrillic, Greek, Coptic, Armenian) are automatically transferred to lower case.
You can control how the Server creates, renames, and removes Domain Accounts.
Auto-Signup If this option is enabled, users can create Domain Accounts themselves, via the WebUser Interface, or by using XMPP, or XIMSS clients.
If this option is enabled, the Sign-up link appears on the WebUser Interface Domain Login page, and the XIMSS and XMPP modules report their self-registration capabilities.
The Server checks that no Account with the specified name exists and creates a new Account.
The Server uses the Account Template settings for the newly created Account, overriding its Password and Real Name settings with the data specified by the new user. Consult External on Provision If this option is enabled, the CommuniGate Pro Server sends a pair of commands to the External Authentication Helper application every time a Domain Account is created, renamed, or removed, when the Account License Class is changes. One command is sent before the Server performs the operation, and the other command is sent after the Server successfully completes the operation. Auto-Create Chatrooms If this option is enabled, users can create chatroom Named Tasks by trying to connect to a non-existent chatroom in this Domain. See the Named Tasks section for the details.
Processing Unknown Names
Addresses used in E-mail messages, in client «login names», and in Signals can contain unknown names. If the Server cannot find an Object (an Account, a Mailing List, an Alias, a Group, or a Forwarder) with the specified name, the Domain Unknown Names settings are used.
Consult External for Unknown When an unknown name is supplied and this option is enabled, the CommuniGate Pro Server sends a command to the External Authentication Helper application. That application can check an external database (or any other data source) and optionally create a new object (an Account, an Alias, etc.) with the specified name. If the program returns a positive response, the Server makes one more attempt to find a Domain object. Mail to Unknown This setting specifies what the Server should do when unknown account/object names are encountered in E-mail message addresses. Rejected The address is rejected; if the message is being received via SMTP, the address is not accepted, and if it was the only message recipient address, the message is not received at all. Discarded The address is routed to NULL. The message is considered «delivered» immediately (it is discarded). Rerouted to: the address is changed to the E-mail address specified in the text field, and the Router restarts trying to route this new address.
Note: you specify an E-mail address, not an account name there. So, if you specify Rerouted To: Postmaster for the client1.com Domain, messages sent to unknown names will be routed to the Postmaster account in the Main Domain, not to the postmaster Account in that client1.com Secondary Domain. Specify postmaster@client1.com to direct those messages to the postmaster Account in the client1.com Domain.
Note: you can use the asterisk (*) symbol in the E-mail address field. This symbol will be replaced with the original (unknown) name. Sample: The Domain client1.com Mail to Unknown Name option is set to
Rerouted to: Bad-*@support.company.com
A message comes addressed to jjones@client1.com, and the Account jjones does not exist in the client1.com Domain.
The message is rerouted to bad-jjones@support.company.com Accepted and Bounced The Router accepts E-mail addresses with unknown names, routing them to the Local Delivery module. When the message is enqueued into the Local Delivery module queue, the module fails to find the addressed account/object, the message is rejected, and an error report is sent back to the sender. Calls to Unknown This setting specifies what the Server should do when unknown account/object names are encountered in Signal addresses. This setting is set in the same way as the Mail to Unknown setting. Access to Unknown This setting specifies what the Server should do when unknown account/object names are encountered in Access operations. This setting is set in the same way as the Mail to Unknown setting.
Sending Mail To All Accounts in the Domain
The administrator can enable the special virtual list (address) «all» that can be used to send messages to all Accounts created in this Domain.
Sending Mail To All Accounts in All Domains
If the administrator has enabled mail distribution to all Accounts in the Main Domain, a message can be sent to all Accounts in all Domains.
To send a message to all Accounts in all server Domains, it should be sent to the alldomains@main_domain_name address.
For each Domain, the message source is checked and the message is distributed to the Domain Accounts only if it passes that Domain «Mail to All» distribution checks.
WebUser Interface Settings
SMTP Options
The SMTP panel controls how E-mail messages are sent from and received for Accounts in this Domain.
Force AUTH for If this option is enabled and the SMTP module receives a Return-Path address that belongs to this Domain, the address and the message itself are rejected unless the client application user has been authenticated.
See the SMTP Module section for the details. Force STARTTLS for If this option is enabled and the SMTP module receives a Return-Path address that belongs to this Domain, the address and the message itself are rejected unless the SMTP connection secured using SSL/TLS encryption.
See the SMTP Module section for the details. Check Recipient Account This option specifies if the SMTP Module should perform additional checks when processing the RCPT TO command targeting a local Account.
If this option is enabled, the module accepts the command only if:
- the Account Mail Service is enabled, and
- the Account Message Storage quota is not exceeded, and
- the Account Incoming Flow control limits are not exceeded.
HELO Prefix When an outgoing SMTP connection is made on behalf of this Domain, the domain name in the HELO/EHLO command contains this Domain name. Note: this requires that a non-LAN IP is assigned to the Domain.
This setting specifies if the Domain name must be prefixed with some subdomain: if the example.dom Domain has this setting value set to mail , the HELO/EHLO command will contain the mail.example.dom parameter.
Domain Rules
Administrator Domain
If this field is not empty, the Domain Administrator Accounts created in this Domain and the Domain Administrator Accounts created in the specified Domain can be used to administer this Domain.
See the System Administrator section for more details.
Renaming Domains
If you want to rename a Secondary Domain, open its Domain Settings page, fill the New Domain Name field, and click the Rename Domain button.
If there is no other Domain with the same name as the specified new domain name, the Domain is renamed and its Domain Settings page should reappear on the screen under the new name.
You cannot rename a Domain when any of its Accounts is in use.
Removing Domains
If you want to remove a Secondary Domain, open its Domain Settings page, and click the Remove Domain button. The confirmation page appears. If the Empty Domains Only option is selected, a Secondary Domain is removed only if there are no Accounts in it. Otherwise, all Domain Accounts are permanently removed, too.
If you confirm the action, the selected Domain, its settings, all its Accounts and other Objects will be permanently removed.
You cannot remove a Domain when any of its Accounts is in use.
Suspending Domains
You may want to suspend a secondary Domain to close all its currently open Accounts, sessions, and connections. Attempts to open an Account in a suspended Domain are rejected with a temporary error (and incoming mail is delayed).
Suspend a Domain if you want to perform OS-level maintenance tasks on the Domain storage and you need to ensure that the CommuniGate Pro Server or Cluster is not accessing that storage.
To suspend a Domain, open its Domain Settings page, and click the Suspend Domain button. The Button changes to become the Resume button.
To resume a Domain, open its Domain Settings page, and click the Resume button.
Suspended Domains have the Suspended marker on the WebAdmin Domains list page, and their Domain Settings pages have the same marker on the page top.
Domain File Directories
The Main Domain data is stored in the Accounts file directory inside the CommuniGate Pro base directory.
The secondary Domains data is stored in the Domains file directory inside the base directory. For each secondary Domain, a directory with the Domain name is created in the Domains directory. All shared Domains in a Dynamic Cluster and stored as subdirectories of the SharedDomains directory.
Each Domain directory contains data for all Domain Accounts.
When a Domain contains many Accounts, Account Subdirectories inside the Domain directory can be used.
Domain Subdirectories
Domain subdirectories are directories inside the Domains or SharedDomains directory. A subdirectory name has the .sub file path extension (suffix).
Subdirectories can be nested.
Note: When the CommuniGate Pro Server starts, it scans the Domains directory and all its .sub subdirectories, and it collects the names and file paths of all Domains it finds there.
This feature allows the administrator to change the foldering method (see below) without stopping the Server and without relocating already created Domains. It also allows the system administrator to move Domains between subdirectories at any time when the CommuniGate Pro Server is stopped.
When a new Domain is being created (or when an existing Domain is being renamed), the Server composes a name for the subdirectory in which the Domain files should be created. The Domain Storage panel contains the settings that control how a subdirectory name is composed. Open the Domains page of the WebAdmin Interface, and follow the Domain Defaults link to open the page that contains the Domain Storage panel:
Foldering Method This option allows you to specify the subdirectory name construction method. The following methods are supported: flat This is the default method. All new Domains are placed into the Domains directory itself (or SharedDomains directory if a shared Domain is being created or renamed in a Dynamic Cluster). 2 Letters 1 Level The first two letters of the Domain name are used to form the name of the subdirectory, the Domain client1.com will be placed into the Domains/cl.sub/ subdirectory. If the Domain name has just one letter, that letter is used as the subdirectory name. 2 Letters 2 Levels The first two letters of the Domain name are used to form the name of a nested subdirectory, the Domain client1.com will be placed into the Domains/c.sub/l.sub/ subdirectory. If the Domain name has just one letter, that letter is used as the subdirectory name. Hashed 1 Level A numeric hash function is applied to the Domain name, the result is used to form a subdirectory name: the Domain client1.com will be placed into the Domains/nu.sub/ subdirectory. Hashed 2 Levels A numeric hash function is applied to the Domain name, the result is used to form a nested subdirectory name: the Domain client1.com will be placed into the Domains/pj.sub/v.sub/ subdirectory. Rename in Place If this option is not enabled, and you rename a Domain, the CommuniGate Pro Server uses the currently set Foldering method to compose a new file path for the renamed Domain and moves the Domain data there. If you have replaced the xx.sub directories with symbolic links to directories on different disk volumes, such a rename operation may require moving data from one volume to a different one, and it will fail. If you enable this option, the CommuniGate Pro Server will move (rename) the renamed Domain data within the same directory, so the «cross-volume link» problem will be avoided.
Account Subdirectories in Large Domains
Account subdirectories are directories inside the Domain directory. A subdirectory name has the .sub file path extension (suffix).
Subdirectories can be nested.
Note: When the CommuniGate Pro Server starts, it scans all Domain file directories and all their subdirectories, and it collects the names of all Domain Accounts. This feature allows the system administrator to move Accounts between subdirectories at any time when the server is stopped. It also allows you to change the foldering method (see below) without stopping the Server and without relocating already created Accounts.
For each Account, the CommuniGate Pro Server remembers the name of the subdirectory that contains the Account files.
When a new Account is being created (or when an existing Account is being renamed), the Server composes a name for the subdirectory in which the Account files should be created.
Foldering Method This option allows you to specify the subdirectory name construction method. The following methods are supported: flat This is the default method. All new Accounts are placed into the domain directory itself. 2 Letters 1 Level The first two letters of the Account name are used to form the name of the subdirectory, the Account jsmith will be placed into the domain/js.sub/ subdirectory. If the Account name has just one letter, that letter is used as the subdirectory name. 2 Letters 2 Levels The first two letters of the Account name are used to form the name of a nested subdirectory, the Account jsmith will be placed into the domain/j.sub/s.sub/ subdirectory. If the Account name has just one letter, that letter is used as the subdirectory name. Hashed 1 Level A numeric hash function is applied to the Account name, the result is used to form a subdirectory name: the Account jsmith will be placed into the domain/pf.sub/ subdirectory. Hashed 2 Levels A numeric hash function is applied to the Account name, the result is used to form a nested subdirectory name: the Account jsmith will be placed into the domain/lu.sub/y.sub/ subdirectory. Rename in Place If this option is not enabled, and you rename an Account, the CommuniGate Pro Server uses the currently set Foldering method to compose a new file path for the renamed Account and moves the account data there. If you have replaced the xx.sub directories with symbolic links to directories on different disk volumes, such a rename operation may require moving data from one volume to a different one, and it will fail. If you enable this option, the CommuniGate Pro Server will move (rename) the renamed Account data within the same directory, so the «cross-volume link» problem will be avoided. Generate Index If this option is enabled, the CommuniGate Pro Server creates the Index.data file in the Domain file directory. This file contains the names of all Domain Accounts, the Account types, and the location of the Account files. When the Server starts and finds the Index.data file in the Domain directory, it reads that file instead of scanning the Domain file directory tree. On some file systems scanning a directory tree with 100,000 files can take up to 10 minutes.
Note: if you have stopped the Server and manually moved/removed some Domain Account directories, delete the Index.data file from the Domain directory before you start the Server again.
Note: if you want to keep only symbolic links in the Domain file directory, you can create the Index subdirectory inside the Domain directory (or an Index symbolic link to some other directory). If this subdirectory exists, the Server stores the Index.data file inside that subdirectory rather than in the Domain file directory itself.
Fast Storage Type Use this option if you want to store Account «fast» («settings», «prefs» and «info») files separately from other Account data. For example, you may want to use smaller, but faster disk storage for these frequently used files.
This option has an effect on multi-mailbox Accounts only.
When this option is set to the zero value, the Account «fast» files are stored within the Account file directory:
Domains/subdirectory/domainName/subdirectory/accountName.extension/account.fastFileExtension
When this option is set to a non-zero value N, the Account «fast» files are stored outside the Account file directory, by inserting the path member fast after the Nth path component:
Domains/subdirectory/domainName/subdirectory/fast/subdirectory/accountName.fastFileExtension
For example, if the jsmith@client1.dom Account path is
Domains/cl.sub/client1.dom/js.sub/jsmith.macnt
and this option value is 2, the «settings» file path is
Domains/cl.sub/fast/client1.dom/js.sub/jsmith.settings
The Domains/cl.sub/fast directory can be a link to a separate fast storage volume.
Storage Mount Points
When a CommuniGate Pro system serves many Domains, especially large Domains, you may want to distribute Domain files and directories between several physical storage volumes.
To create a «Storage mount point», use the CREATEDOMAINSTORAGE CLI command. It creates the storage name.mnt directory inside the Domains directory.
Replace that directory with a symbolic link to the selected physical storage volume, or «mount» an additional physical storage volume over this directory.
When at least one «storage mount point» exists, the Create Domain button is accompanied by a pull-down menu listing all available storage mount points. Select a storage mount point to store new Domain files in.
When a Domain is renamed, its files stay within the storage used to create that Domain.
When a CommuniGate Pro Domain has many Accounts, you may want to distribute Account files and directories between several physical storage volumes.
To create a «Storage mount point», use the CREATEACCOUNTSTORAGE CLI command. It creates the storage name.mnt directory inside the Domain directory.
Replace that directory with a symbolic link to the selected physical storage volume, or «mount» an additional physical storage volume over this directory.
When at least one «storage mount point» exists, the Create Account button is accompanied by a pull-down menu listing all available storage mount points. Select a storage mount point to store the new Account files in.
When an Account is renamed, its files stay within the storage used to create that Account.
Источник
Здравствуйте.
В принципе, решил свою проблему обходным (?) путем, но глюк-то никуда не делся., решил написать.
Ось FreeBSD 6.3 набор Soft2006 у FirstVDS.ru
CGP 5.2.6Проблема и скриншот — тут:
http://forum.firstvds.ru/viewtopic.php?p=17576#17576
Вкратце: ISP Manager выдает ошибку при попытке указать адрес для перенаправления почты рута при использовании CGP. В логах CGP ничего не появляется, до него дело и не доходит.
В логах ISP Manager следующее:
Sep 15 23:14:37 [1;32mINFO Request [MY.IP.ADD.RES][root] ‘srvname=mydomain.ru&timezone=Europe%2FMoscow&root fwd=dmitriy%40mydomain.ru&func=srvparam&elid=&sok= ok&suok=++++Ok++++'[0m
Sep 15 23:14:37 [1;36mEXTINFO Execute (/bin/cp -Rp /usr/share/zoneinfo/Europe/Moscow /etc/localtime) ret=0[0m
Sep 15 23:14:37 [1;31mERROR Exception 1: Can’t execute CGP command[0m
Sep 15 23:14:37 [1;36mEXTINFO Execute (/bin/rm -rf /etc/localtime) ret=0[0mВ-общем догадываюсь, что ISP Manager делать то же, что я сделал руками — прописал алиас в /etc/mail/aliases. Причем тут CGP непонятно, в-общем странно.
In many cases, a Domain should not have a separate set of user Accounts,
but should rather be a domain name alias for an already existing CommuniGate Pro Domain.
You may also want to serve some domain names using account mapping and/or Unified Domain-Wide Accounts.
In all these cases, you do not have to create a new CommuniGate Pro Domain to serve a domain name.
When a client application connects to your CommuniGate Pro Server, and specifies an account name,
the Server has to decide in which Domain to look for that Account.
See the Access section for the details.
Displaying the Domain List
Use the WebAdmin Interface to view the list of Domains served with your Server. Open the Domains page in the Users realm.
To open the Users realm, you should be connected as the postmaster or any other Server Administrator with the All Domains access right.
To select Domains by name, type a string into the Filter field, and
click the Display button: only the Domains with names containing the specified
string will be displayed.
Each entry in the Domain list contains the Domain name, the assigned network address (if any),
and the number of Accounts in the Domain. If the Domain is a shared Domain served by a Dynamic Cluster,
the Domain name has the [+] prefix. If the Domain is a Directory-based Domain, its name is displayed with
the [D] prefix.
A list entry also displays the number of currently opened Domain Accounts, the total number of
times the Domain Accounts have been opened (since the Server last restart), and the
last time any Domain Account was opened.
Select the Show Aliases option to include Domain Aliases into the list. Each
Domain Alias element contains the link to its «real» Domain object list and
settings pages.
Click a Domain name to view the Objects in that Domain.
Click the word Settings in the last column to view and update the Domain Settings.
Click the Telephone Numbers (Telnum) link to view all Telnums.
Creating a New Domain
Type a new Domain name into the field on the right side of the Create Domain button.
Click the Create Domain button. When a new Domain is created, its name
appears in the Domain List.
If this Server is a member of a Dynamic Cluster,
the additional Create Dynamic Cluster Domain button appears.
Click that button to create a Domain that will be served with all Cluster members.
The Domain created using the Create Domain button are created as «local» Domains and are served with this Server only.
Specifying Domain Settings
The Main Domain and all Secondary Domains have Domain-level settings.
To open the Domain Settings page in your browser, either click the Domain Settings
link in the Domains List, or click the Domain Settings link on
the Domain Object list page.
The Comment field allows you to enter arbitrary information about the domain.
| Account Log Level: | Mailbox Log Level: |
The Account Log option allows you to specify how the account-level operations
(account open/close, password verifications, Mailbox creating/removing,
size updates, etc.) are recorded. Log records
for account-related events have the ACCOUNT tag.
The Mailbox Log option allows you to specify how the mailbox-level operations
(message storing/removing, message status updating, etc.) are recorded.
Log records created for Mailbox-related events have the MAILBOX tag.
Most of Domain Settings can be set to the default value.
In this case the actual setting value is taken from the global, Server-wide
Default Domain Settings.
When the Domain Settings are modified, click the Update button. The page
should appear again, displaying the Updated marker.
You can click the Objects link to switch to the Domain Object List.
Specifying Default Domain Settings
A Domain setting can have the default value. In this case the actual setting value
is taken from the server-wide Default Domain Settings. You can modify these Default
values by clicking the Domain Defaults link on the Domains (Domain List) page.
The Default Domain Settings page resembles a regular Domain Settings page.
A Dynamic Cluster installation maintains separate
server-wide Default Domain settings for all non-Shared (Local) Domains, and cluster-wide
Default Domain settings for all Shared Domains. In the Cluster environment, the
Default Domain Settings page displays links that allow you to switch between the Server-wide
and Cluster-wide Default Settings.

Multihoming and Dedicated IP Addresses
You should read this chapter only if you plan to support multihoming, if your
system is behind a firewall, or if you have a non-standard Domain Name System setup.
When the Server starts, it detects its own network address(es).
Your Server system is «multihomed» if it has more than one network (IP) address.
If the Server system has several IP addresses, some of them can be assigned
(dedicated) to secondary Domains. Accounts in such Domains can be accessed
using any POP, IMAP, or other client application without explicitly specifying the full Account name.
The Assigned IP Addresses option allows you to assign network addresses to the main and secondary Domains.
-
- All Available
- This option can be selected for one Domain only, and it is the
default setting for the Main Domain.
All Server’s network addresses not assigned to other Domains are assigned to this Domain. - Manually Defined
- This option is selected by default for all secondary Domains.
If you want to assign (dedicate) an IP address to this Domain, type the
address into the text field on the right of the pop-up menu. You can specify several IP addresses, separating them with the comma (,) symbol.
Only the Server computer’s own addresses are accepted, and all specified
addresses should not be already assigned to any other CommuniGate Pro Domain.
If you select this option and leave the text field blank, the Domain will
not have any IP addressed assigned to it. In this case, to access the Domain
Accounts, users should specify the full Account name (account@domain)
in their client application settings. See the Access section for
the details. - by DNS A-Record
- When this option is selected, the Server sends a request to the Domain Name
System and tries to resolve the Domain name. If an A-Record for this CommuniGate Pro Domain is
found in the Domain Name System, the addresses from that record are assigned
to the Domain. The system checks that all addresses retrieved from the A-record
belong to the Server computer and that these addresses have not been already assigned
to any other Domain.
This setting is useful if you have several secondary Domains with dedicated IP
addresses and you want to redistribute the Server addresses from time to time.
Instead of reconfiguring both DNS and Server settings, you may reconfigure the DNS
records only, and the Server will take the updated data from the DNS. - by DNS MX-Record
- When this option is selected, the Server retrieves the highest-priority
MX record (relay name) for this CommuniGate Pro Domain, and then processes
addresses in the A-record for that relay name.
- Use for Outgoing Connections
- If this option is enabled, then the non-LAN IP addresses assigned to this Domain (if any) can be used
as source network address when establishing outgoing connections (such as SMTP, RPOP, XMPP, etc.)
For each Domain in the Domain List, the assigned network (IP) addresses are displayed.
This can be used to check the DNS and Server setup for systems with multihoming.
Because of setup errors or due to a non-standard network and DNS setup, the Server’s
own IP address(es) may be left unassigned to any of the Server domains. Open the
General Settings page to see the list of the Server
own IP addresses. The unassigned addresses are marked in red.
When a client application connects to the Server via an unassigned address and the
full account name is not specified, the Server does not allow the user to log in.
Client IP Addresses
Each Domain can have its own list of Client IP Addresses, which extends the Server-wide or Cluster-wide
Client IP Addresses list for this Domain Account users:
Enabling Services
Each Domain has a set of settings that specify which CommuniGate Pro services can be used with the Domain Accounts.
See the Accounts section for the details.
Services can also be disabled for individual Domain Accounts.
A service is available for an Account only if that service is enabled for the Account itself AND
for the Account Domain. Disabling a service in the Domain Settings disables that service for all Domain Accounts.
Note: This is different from disabling a service in the Domain Default Account Settings:
disabling a service in the Default Account Settings disables that service only
for those Domain Accounts that have the Enabled Services option set to default.
Domain Limits
The System Administrator can specify some limits on the resources available to the Domain users.
A Domain Administrator can see, but cannot modify these limits.
| Resources | Limits | Usage |
|---|---|---|
| Accounts: | 390 | |
| Mailing Lists: | 5 |
Domain Aliases
Each CommuniGate Pro Domain can have aliases (alternative names). If the
client.dom Domain has the mail.client.dom and www.client.dom Domain Aliases,
E-mail and Signals directed to user@mail.client.dom and to user@www.client.dom will be routed to the user@client.dom Account.
Also, to access the user@client.dom Account via POP, IMAP, XMPP, and other
client applications the Account names user@mail.client.dom and user@www.client.dom can be specified in
the client settings.
This is especially useful for WebUser clients. Users specify the
domain name in their browser URLs, and users of the client.dom Domain tend to use
www.client.dom in the browser URLs. You may want to register the www.client.dom domain name with the DNS, assigning it
the same IP address as the address assigned to the client.dom Domain, and then you should create the
www.client.dom Domain Alias for the client.dom Domain.
You can modify existing Domain Aliases, add an Alias by typing a new name in the empty field, and remove an Alias by deleting it
from its field. Use the Update button to update the Domain Aliases list.
The Domain Aliases are stored in the DomainAliases database located in the Settings directory inside the CommuniGate Pro base directory.
Directory Integration
The System Administrator can specify if the Domain Accounts should be included into the Central Directory.
This panel is not displayed for Directory-Based Domains, since those domains are
always completely integrated with the Directory.
See the Directory Integration section for the details.
Domain Security Settings
A Domain can have its own set of enabled Authentication methods. See
the Security section for more details.
A Domain can have PKI settings (Private Keys and Certificates) enabling
secure communications (TLS, Certificate Authentication, S/MIME) with that Domain.
Use the Security link on the Domain Settings page to open the Domain Security settings.
See the PKI section for more details.
A Domain can be configured to add DKIM-Signature headers to outgoing messages.
Use the Security link on the Domain Settings page to open the DKIM settings.
See the PKI section for more details.
A Domain can have Kerberos keys enabling «secure single sign-on» for that Domain.
Use the Security link on the Domain Settings page to open the Domain Security settings.
See the Security section for more details.
Provisioning
The Domain objects (Accounts, Groups, Forwarders, etc.) should have unique names within that Domain.
Each name should contain from 1 to 250 Latin letters, decimal digits, the dot (.), underscore (_), minus (-) symbols.
A name should not start or end with the dot (.) symbol.
A name should not be the same as one of the Special Address names.
Names of Account Aliases and Forwarders may contain non-Latin characters and ideograms (such as Cyrillic, Greek, Chinese) and the Latin alphabet-based characters with diacritics or ligatures (such as French). Since one such character may be encoded by multiple bytes the maximal length of the name may be less than 250 letters.
All upper case letters (Latin, Cyrillic, Greek, Coptic, Armenian) are automatically transferred to lower case.
You can control how the Server creates, renames, and removes Domain Accounts.
| Account Provisioning | |
| Auto-Signup: | |
| Consult External on Provision: | |
| Auto-Create Chatrooms: |
- Auto-Signup
- If this option is enabled, users can create Domain Accounts themselves,
via the WebUser Interface, or by using XMPP, or XIMSS clients.If this option is enabled, the Sign-up link appears on the WebUser Interface Domain Login page,
and the XIMSS and XMPP modules report their self-registration capabilities.The Server checks that no Account with the specified name exists and creates a new Account.
The Server uses the Account Template settings for the newly created Account,
overriding its Password and Real Name settings with the data specified by the new user. - Consult External on Provision
- If this option is enabled, the CommuniGate Pro Server sends a pair of commands to the External Authentication Helper application
every time a Domain Account is created, renamed, or removed, when the Account License Class is changes.
One command is sent before the Server performs the operation, and the other command is sent after the
Server successfully completes the operation. - Auto-Create Chatrooms
- If this option is enabled, users can create chatroom Named Tasks by trying to connect to a non-existent chatroom in this Domain.
See the Named Tasks section for the details.
Processing Unknown Names
Addresses used in E-mail messages, in client «login names», and in Signals can contain
unknown names. If the Server cannot find an Object (an Account, a Mailing List, an Alias, a Group,
or a Forwarder) with the specified name, the Domain Unknown Names settings are used.
- Consult External for Unknown
- When an unknown name is supplied and this option is enabled, the CommuniGate Pro Server
sends a command to the External Authentication Helper application.
That application can check an external database (or any other data source) and optionally create a new object (an Account, an Alias, etc.)
with the specified name. If the program returns a positive response, the Server makes one more attempt to find a Domain object. - Mail to Unknown
- This setting specifies what the Server should do when unknown account/object names are encountered in E-mail message addresses.
- Rejected
- The address is rejected; if the message is being received via SMTP, the
address is not accepted, and if it was the only message recipient address, the message is not received at all. - Discarded
- The address is routed to NULL. The message is considered «delivered»
immediately (it is discarded). - Rerouted to:
- the address is changed to the E-mail address specified in the text field, and
the Router restarts trying to route this new address.
Note: you specify an E-mail address, not an account
name there. So, if you specify Rerouted To: Postmaster for the client1.com
Domain, messages sent to unknown names will be routed to the Postmaster account
in the Main Domain, not to the postmaster Account in that client1.com Secondary Domain.
Specify postmaster@client1.com to direct those messages to the postmaster
Account in the client1.com Domain.
Note: you can use the asterisk (*) symbol in the E-mail address
field. This symbol will be replaced with the original (unknown) name.- Sample:
- The Domain client1.com Mail to Unknown Name option is set to
Rerouted to: Bad-*@support.company.com
A message comes addressed to jjones@client1.com, and the Account
jjones does not exist in the client1.com Domain.
The message is rerouted to bad-jjones@support.company.com
- Accepted and Bounced
- The Router accepts E-mail addresses with unknown names, routing them to the Local
Delivery module. When the message is enqueued
into the Local Delivery module queue, the module fails to find the addressed
account/object, the message is rejected, and an error report is sent back to the sender.
- Calls to Unknown
- This setting specifies what the Server should do when unknown account/object names are encountered in Signal addresses.
This setting is set in the same way as the Mail to Unknown setting. - Access to Unknown
- This setting specifies what the Server should do when unknown account/object names are encountered in Access operations.
This setting is set in the same way as the Mail to Unknown setting.
Sending Mail To All Accounts in the Domain
The administrator can enable the special virtual list (address) «all»
that can be used to send messages to all Accounts created in this Domain.
| <all@company.com> | |
| Mail to All is distributed for: | |
| Mail to All is sent to Forwarders: |
Messages sent to the <all@domainname> address are stored directly in the Account INBOX Mailboxes,
bypassing any Account Rules.
Messages sent to the <all@domainname> address are not stored in the Accounts that have the
Accept Mail to All setting disabled.
Mail access to the <all@domainname> address can be restricted.
- anybody
- Any message sent to the <all@domainname> is distributed to all Accounts in this Domain.
- Clients
- A message sent to the <all@domainname> address is distributed only if it
has been received via SMTP from an Internet address included into the Client IP Addresses list,
or if the message was received using one of the authenticated methods (WebUser Interface, XIMSS,
via RPOP, via POP using the XTND XMIT method, etc.) - Authenticated Users
- A message sent to the <all@domainname> address is distributed only if it has been
received from a Server user (Account) using one of the trusted methods. - Authenticated Domain Users
- A message sent to the <all@domainname> address is distributed only if it has
been received (using one of the trusted methods) from an Account in this Domain or
from any other Server Account that has the Domain Administration right for this domain. - Authenticated Administrator
- A message sent to the <all@domainname> address is distributed only if it has been received
(using one of the trusted methods) from a Server Account that has the
Domain Administration rights for this domain. - nobody
- The <all@domainname> address is disabled. In this case it
is possible to create the real Account, Forwarder, Group, or Mailing List with the All name.
Messages to <all@domainname> can be sent to all Forwarder addresses, too:
- Send to Forwarders:
- When this option is enabled, a new message is composed. Its envelope contains the addresses from all
Forwarder objects in this Domain. The message body is a copy of the message sent to
the <all@domainname>.
Sending Mail To All Accounts in All Domains
If the administrator has enabled mail distribution to all Accounts in the Main Domain, a message can be sent to all Accounts in all Domains.
To send a message to all Accounts in all server Domains, it should be sent
to the alldomains@main_domain_name address.
For each Domain, the message source is checked and the message is distributed
to the Domain Accounts only if it passes that Domain «Mail to All» distribution
checks.
WebUser Interface Settings
Each Domain has several WebUser Interface settings:
- Mail Trailer Text
- The text in this field is appended (optionally) to all messages the Domain users compose
via the WebUser and MAPI Interfaces. - Site Prefix
- This option allows you to change the URL prefix needed to access Account File Storage via HTTP.
It can be set to an empty string, so URLs for a File Storage will look like http://domainName:port/accountName/.
See the HTTP module description for more details. - Web Banner Text
- When the HTTP protocol is used to retrieve an HTML file from an Account File Storage in this Domain,
this text is inserted into the beginning of the file HTML «body». - Recommended XIMSS Mode
- This option controls what the features XIMSS Pre-Login response. The following values are supported:
- TCP
- use a TCP connection for XIMSS sessions, connecting to the same port the current request was sent to.
- XIMSS TCP
- use a TCP connection for XIMSS sessions, connecting to the first port specified for the XIMSS Module Listener.
- HTTP
- use HTTP Binding for XIMSS sessions.
- Preferred URL for HTTP
- The text in this field is used to build URLs that need to point back to the server in all HTTP responses.
SMTP Options
The SMTP panel controls how E-mail messages are sent from and received for Accounts in this Domain.
- Force AUTH for
- If this option is enabled and the SMTP module receives a Return-Path address
that belongs to this Domain, the address and the message itself are rejected unless the
client application user has been authenticated.
See the SMTP Module section for the details. - Force STARTTLS for
- If this option is enabled and the SMTP module receives a Return-Path address
that belongs to this Domain, the address and the message itself are rejected unless the SMTP connection secured using SSL/TLS encryption.
See the SMTP Module section for the details. - Check Recipient Account
- This option specifies if the SMTP Module should perform
additional checks when processing the RCPT TO command targeting a local Account.
If this option is enabled, the module accepts the command only if:- the Account Mail Service is enabled, and
- the Account Message Storage quota is not exceeded, and
- the Account Incoming Flow control limits are not exceeded.
- HELO Prefix
- When an outgoing SMTP connection is made on behalf of this Domain, the domain name in the HELO/EHLO command
contains this Domain name. Note: this requires that a non-LAN IP is assigned to the Domain.
This setting specifies if the Domain name must be prefixed with some subdomain:
if the example.dom Domain has this setting value set to mail,
the HELO/EHLO command will contain the mail.example.dom parameter.
Domain Rules
Domains can have Automated Rules that are applied to all E-Mail Messages and all Signals being delivered
to Accounts in those Domains. See the Rules section for more details.
Administrator Domain
Domains can be controlled by the Server Administrators and by
the Domain Administrators — Accounts in the same Domain that are granted some Domain Administrator Access Rights.
You may choose to grant administration rights for this Domain to Domain Administrators created in a different Domain.
In this case the name of that other Domain should be entered into the Administrator Domain Name field:
If this field is not empty, the Domain Administrator Accounts created in this Domain and
the Domain Administrator Accounts created in the specified Domain can be used to administer this Domain.
See the System Administrator section for more details.
Renaming Domains
If you want to rename a Secondary Domain, open its Domain Settings page,
fill the New Domain Name field, and click the Rename Domain button.
If there is no other Domain with the same name as the specified new
domain name, the Domain is renamed and its Domain Settings page should reappear on the screen under the new name.
You cannot rename a Domain when any of its Accounts is in use.
Removing Domains
If you want to remove a Secondary Domain, open its Domain Settings page, and click the Remove Domain button.
The confirmation page appears.
If the Empty Domains Only option is selected, a Secondary Domain is removed only if there are no Accounts in it.
Otherwise, all Domain Accounts are permanently removed, too.
If you confirm the action, the selected Domain, its settings, all
its Accounts and other Objects will be permanently removed.
You cannot remove a Domain when any of its Accounts is in use.
Suspending Domains
You may want to suspend a secondary Domain to close all its currently open Accounts,
sessions, and connections. Attempts to open an Account in a suspended Domain are rejected
with a temporary error (and incoming mail is delayed).
Suspend a Domain if you want to perform OS-level maintenance tasks on the Domain storage
and you need to ensure that the CommuniGate Pro Server or Cluster is not accessing that storage.
To suspend a Domain, open its Domain Settings page, and click the Suspend Domain button.
The Button changes to become the Resume button.
To resume a Domain, open its Domain Settings page, and click the Resume button.
Suspended Domains have the Suspended marker on the WebAdmin Domains list page,
and their Domain Settings pages have the same marker on the page top.
Domain File Directories
The Main Domain data is stored in the Accounts file directory
inside the CommuniGate Pro base directory.
The secondary Domains data is stored in the Domains file directory inside the base directory.
For each secondary Domain, a directory with the Domain name is created in the Domains directory.
All shared Domains in a Dynamic Cluster and stored as subdirectories of the SharedDomains directory.
Each Domain directory contains data for all Domain Accounts.
When a Domain contains many Accounts, Account Subdirectories inside the Domain directory can be used.
Domain Subdirectories
When a CommuniGate Pro system serves many Domains (more than 3,000), you may want to place Domain
files directories into several subdirectories:
- many operating and file systems have limits on the number of files in one directory;
- subdirectories can speed up the Domain and Account files access operations;
- subdirectories can be moved to additional storage devices.
Domain subdirectories are directories inside the Domains or SharedDomains directory.
A subdirectory name has the .sub file path extension (suffix).
Subdirectories can be nested.
Note: When the CommuniGate Pro Server starts, it scans the Domains directory and
all its .sub subdirectories, and it collects the names and file paths of all Domains
it finds there.
This feature allows the administrator to change the foldering method
(see below) without stopping the Server and without relocating already created Domains.
It also allows the system administrator to move Domains between subdirectories
at any time when the CommuniGate Pro Server is stopped.
When a new Domain is being created (or when an existing Domain is being renamed), the Server
composes a name for the subdirectory in which the Domain files should be created.
The Domain Storage panel contains the settings that control how a subdirectory name is composed.
Open the Domains page of the WebAdmin Interface, and follow the Domain Defaults link to open the
page that contains the Domain Storage panel:
| Domain Storage | |
| Foldering Method: | |
| Rename In Place: |
- Foldering Method
- This option allows you to specify the subdirectory name construction method. The
following methods are supported:- flat
- This is the default method. All new Domains are placed into the Domains directory
itself (or SharedDomains directory if a shared Domain is being created or renamed in a Dynamic Cluster). - 2 Letters 1 Level
- The first two letters of the Domain name are used to form the name of the subdirectory,
the Domain client1.com will be placed into the Domains/cl.sub/ subdirectory.
If the Domain name has just one letter, that letter is used as the subdirectory name. - 2 Letters 2 Levels
- The first two letters of the Domain name are used to form the name of a nested subdirectory,
the Domain client1.com will be placed into the Domains/c.sub/l.sub/ subdirectory.
If the Domain name has just one letter, that letter is used as the subdirectory name. - Hashed 1 Level
- A numeric hash function is applied to the Domain name, the result is used to form a
subdirectory name: the Domain client1.com will be placed into the Domains/nu.sub/ subdirectory. - Hashed 2 Levels
- A numeric hash function is applied to the Domain name, the result is used to form a
nested subdirectory name: the Domain client1.com will be placed into the Domains/pj.sub/v.sub/ subdirectory.
- Rename in Place
- If this option is not enabled, and you rename a Domain, the CommuniGate Pro Server
uses the currently set Foldering method to compose a new file path for the renamed Domain and
moves the Domain data there. If you have replaced the xx.sub directories with
symbolic links to directories on different disk volumes, such a rename operation may require
moving data from one volume to a different one, and it will fail. If you enable this option,
the CommuniGate Pro Server will move (rename) the renamed Domain data within the same directory,
so the «cross-volume link» problem will be avoided.
Account Subdirectories in Large Domains
When a CommuniGate Pro Domain contains many Accounts (more than 10,000), you may want to place account files in several subdirectories:
- many operating and file systems have limits on the number of files in one directory;
- subdirectories can speed up the account files access operations;
- subdirectories can be moved to additional storage devices.
Account subdirectories are directories inside the Domain directory.
A subdirectory name has the .sub file path extension (suffix).
Subdirectories can be nested.
Note: When the CommuniGate Pro Server starts, it scans all Domain file directories and
all their subdirectories, and it collects the names of all Domain Accounts.
This feature allows the system administrator to move Accounts between subdirectories
at any time when the server is stopped. It also allows you to change the foldering method
(see below) without stopping the Server and without relocating already created Accounts.
For each Account, the CommuniGate Pro Server remembers the name of the subdirectory
that contains the Account files.
When a new Account is being created (or when an existing Account is being renamed), the Server
composes a name for the subdirectory in which the Account files should be created.
| Account Storage | |
| Foldering Method: | |
| Rename In Place: | |
| Generate Index: | |
| Fast Storage Type: |
- Foldering Method
- This option allows you to specify the subdirectory name construction method. The following methods are supported:
- flat
- This is the default method. All new Accounts are placed into the domain directory itself.
- 2 Letters 1 Level
- The first two letters of the Account name are used to form the name of the subdirectory,
the Account jsmith will be placed into the domain/js.sub/ subdirectory. If the Account
name has just one letter, that letter is used as the subdirectory name. - 2 Letters 2 Levels
- The first two letters of the Account name are used to form the name of a nested subdirectory,
the Account jsmith will be placed into the domain/j.sub/s.sub/ subdirectory. If the Account
name has just one letter, that letter is used as the subdirectory name. - Hashed 1 Level
- A numeric hash function is applied to the Account name, the result is used to form a
subdirectory name: the Account jsmith will be placed into the domain/pf.sub/ subdirectory. - Hashed 2 Levels
- A numeric hash function is applied to the Account name, the result is used to form a
nested subdirectory name: the Account jsmith will be placed into the domain/lu.sub/y.sub/ subdirectory.
- Rename in Place
- If this option is not enabled, and you rename an Account, the CommuniGate Pro Server
uses the currently set Foldering method to compose a new file path for the renamed Account and
moves the account data there. If you have replaced the xx.sub directories with
symbolic links to directories on different disk volumes, such a rename operation may require
moving data from one volume to a different one, and it will fail. If you enable this option,
the CommuniGate Pro Server will move (rename) the renamed Account data within the same directory,
so the «cross-volume link» problem will be avoided. - Generate Index
- If this option is enabled, the CommuniGate Pro Server creates the Index.data file in the
Domain file directory. This file contains the names of all Domain Accounts,
the Account types, and the location of the Account files. When the Server starts and finds
the Index.data file in the Domain directory, it reads that file instead of scanning the
Domain file directory tree. On some file systems scanning a directory tree with 100,000 files
can take up to 10 minutes.Note: if you have stopped the Server and manually moved/removed some Domain Account directories,
delete the Index.data file from the Domain directory before you start the Server again.Note: if you want to keep only symbolic links in the Domain file directory, you can create
the Index subdirectory inside the Domain directory (or an Index symbolic link to some other directory).
If this subdirectory exists, the Server stores the Index.data file inside that subdirectory rather than in the Domain file
directory itself. - Fast Storage Type
- Use this option if you want to store Account «fast» («settings», «prefs» and «info») files separately from other
Account data. For example, you may want to use smaller, but faster disk storage for these frequently used files.
This option has an effect on multi-mailbox Accounts only.
When this option is set to the zero value, the Account «fast» files are stored within the Account file directory:
Domains/subdirectory/domainName/subdirectory/accountName.extension/account.fastFileExtension
When this option is set to a non-zero value N, the Account «fast» files are stored outside the Account file directory,
by inserting the path member fast after the Nth path component:
Domains/subdirectory/domainName/subdirectory/fast/subdirectory/accountName.fastFileExtension
For example, if the jsmith@client1.dom Account path is
Domains/cl.sub/client1.dom/js.sub/jsmith.macnt
and this option value is 2, the «settings» file path is
Domains/cl.sub/fast/client1.dom/js.sub/jsmith.settings
The Domains/cl.sub/fast directory can be a link to a separate fast storage volume.
Storage Mount Points
When a CommuniGate Pro system serves many Domains, especially large Domains, you may want to distribute Domain
files and directories between several physical storage volumes.
To create a «Storage mount point», use the CREATEDOMAINSTORAGE CLI command.
It creates the storage name.mnt directory inside the Domains directory.
Replace that directory with a symbolic link to the selected physical storage volume, or «mount» an additional physical storage volume over this directory.
When at least one «storage mount point» exists, the Create Domain button is accompanied by a pull-down menu listing all available storage mount points.
Select a storage mount point to store new Domain files in.
When a Domain is renamed, its files stay within the storage used to create that Domain.
When a CommuniGate Pro Domain has many Accounts, you may want to distribute Account
files and directories between several physical storage volumes.
To create a «Storage mount point», use the CREATEACCOUNTSTORAGE CLI command.
It creates the storage name.mnt directory inside the Domain directory.
Replace that directory with a symbolic link to the selected physical storage volume, or «mount» an additional physical storage volume over this directory.
When at least one «storage mount point» exists, the Create Account button is accompanied by a pull-down menu listing all available storage mount points.
Select a storage mount point to store the new Account files in.
When an Account is renamed, its files stay within the storage used to create that Account.
Содержание
- Что такое DNS и как работает?
- Что такое ошибка NXDOMAIN
- Возможные причины ошибки NXDOMAIN
- Как исправить ошибку NXDOMAIN
- Изменить DNS
- Избегайте использования VPN
- Проверьте, не мешает ли какой-либо антивирус или брандмауэр
- Обеспечьте бесперебойную работу браузера
- Перезагрузить систему
Что такое DNS и как работает?
Чтобы понять, что Ошибка NXDOMAIN есть, мы должны сначала вспомнить, что DNS есть и как это работает. Можно сказать, что DNS-серверы действуют как переводчики, позволяя нам просматривать Интернет без запоминания большого количества цифр.

При входе на веб-страницу мы обычно переходим в адресную строку браузера и пишем там имя и адрес. Например, мы пишем redeszone.net. Мы можем это сделать благодаря DNS-серверы которые переводят это сообщение, которое мы пишем, на соответствующий IP-адрес. Таким образом, нам не нужно запоминать, что это за IP-адрес, а просто имя, которое мы пишем.
Таким образом, DNS-серверы действуют как посредники, чтобы иметь возможность отвечать на запросы что мы делаем. Есть много DNS-серверов, которые мы можем использовать. Бывают платные и бесплатные. Некоторые даже могут помочь нам повысить безопасность, поскольку они настроены на фильтрацию возможных вредоносных страниц, а не на отправку содержимого. Иногда смена серверов нашего интернет-оператора может помочь улучшить скорость.
Теперь, иногда в этом типе услуг могут быть проблемы и сбой при поиске в Интернете. Вот тут и возникает ошибка NXDOMAIN, о которой мы и поговорим.

Когда мы пытаемся войти на веб-страницу и получаем сообщение об ошибке с указанием NXDOMAIN, это означает, что имя домена не может быть разрешено. Это логически означает, что мы не можем перемещаться по сайту, к которому пытаемся получить доступ.
Отображаемое сообщение может незначительно отличаться. Например, в Google Chrome в браузере появившееся сообщение будет DNS_PROBE_FINISHED_NXDOMAIN . Это означает, что страница, на которую мы пытаемся войти, загружается некорректно.
Возможные причины ошибки NXDOMAIN
Эта ошибка может возникать по разным причинам. Иногда это может быть в наших силах исправить, а в других случаях это зависит от сервера сайта. Посмотрим, что за Основные причины составляют:
- DNS-сервер не работает
- Проблема с DNS-клиентом
- VPN мешает
- Установленные средства безопасности
- Неправильные настройки DNS
- Проблемы с браузером
Как исправить ошибку NXDOMAIN
К счастью, мы можем принять во внимание определенные шаги, чтобы решить Ошибка NXDOMAIN . Это, как мы уже упоминали, может произойти в любом браузере, который мы используем, поэтому совет, который мы собираемся дать, является общим, и мы можем применить его в любом случае.
Некоторые проблемы, вызывающие эту ошибку, мы не сможем решить с нашей стороны, например, когда они присутствуют на стороне сервера.
Изменить DNS
Проблемы такого типа могут быть связаны с ошибками DNS-серверы что мы используем. Мы уже упоминали, что можем использовать много разных, как бесплатных, так и платных.
В случае появления такого типа сообщения мы можем попробовать выбрать другой общедоступный DNS, чем те, которые мы используем. Мы можем легко изменить их в Windows, через настройки сети. Для этого заходим в Конфигурацию, Cеть и Интернет, мы вводим Параметры смены адаптера и там выбираем интересующую нас сеть, нажимаем Свойства и откроется окно для изменения IP-адреса и DNS.
Избегайте использования VPN
Мы также видели, что причиной ошибки NXDOMAIN является то, что мы используем VPN и это создает конфликт. Мы можем временно приостановить работу этого инструмента и проверить, действительно ли это связано с этой проблемой.
Если мы обнаружим, что это действительно VPN, мы можем либо не использовать его, либо переключиться на другую службу.
Проверьте, не мешает ли какой-либо антивирус или брандмауэр
Также могло случиться, что антивирус или брандмауэр которые мы используем, создавали проблемы. Мы уже знаем, что инструменты безопасности необходимы для предотвращения сетевых проблем, но они также могут вызвать определенные сбои при неправильной конфигурации.
Обеспечьте бесперебойную работу браузера
Конечно браузер должен работать правильно . Вы должны быть осторожны, например, если используете плохо настроенные расширения. Мы должны убедиться, что все, что окружает браузер, работает правильно, и, таким образом, исправить возможные ошибки, вызывающие эту проблему, чтобы правильно разрешить доменные имена.
Перезагрузить систему
Это базовое решение, но во многих случаях оно может решить проблемы такого типа. Мы должны перезапуск и наш компьютер, и сам роутер. Таким образом, мы можем исправить подобные и подобные ошибки.
В конечном счете, это некоторые варианты, которые мы должны решить, когда появляется ошибка NXDOMAIN.
Тема: Communigate
Опции темы
Поиск по теме
Communigate
вот прописал в конфиге как и написано в хелпе
MTA compro
CommunigateProUser compro
CommunigateProPassword paPitev
path CommunigateProPath /var/CommuniGate
пытаюсь создать сайт.. а мне в ответ
Внутренняя ошибка Can execute command
без комунигейта все нормально создается
Видимо не может в communigate создаться соответствующий домен. Вы уверены, что ваш пользователь compro является администратором communigate? Обычно это пользователь postmaster. Кстати, именно это имя используется поумолчанию, если CommunigateProUser не указан.
Если причина не в этом, то можно включить максимальный уровень лога LogLevel 9 в файле /usr/local/ispmgr/etc/config. Тогда можно будет в логе ISP manager /usr/local/ispmgr/var/ispmgr.log посмотреть, какую ошибку вернул communigate.
Jan 11 09:46:23 .[1;32mINFO Request [127.0.0.1][root] ‘func=domain.edit&plid=’.[0m
Jan 11 09:46:26 .[1;32mINFO Request [127.0.0.1][root] ‘func=site’.[0m
Jan 11 09:46:26 ../../ispmgr/utils.cpp:479 .[1;33mDEBUG cache_quota /usr/sbin/repquota -g -n /.[0m
Jan 11 09:46:30 .[1;32mINFO Request [127.0.0.1][root] ‘func=site.edit&elid=delux.dp.ua’.[0m
Jan 11 09:46:44 .[1;32mINFO Request [127.0.0.1][root] ‘func=site.edit&plid=’.[0m
Jan 11 09:46:57 .[1;32mINFO Request [127.0.0.1][root] ‘name=qw.qw&ip=***.***.***.***&alias=www.qw.qw&ali as_list=&admin=qwq&p
asswd=*&confirm=*&sitepreset=custom&disklimit=0&sh elluser=0&alluser=1&domain=1&base=0&traf=0&phptype =phpnone&sslport=443&func
=site.edit&elid=&sok=ok&suok=++++Ok++++’.[0m
Jan 11 09:46:57 ../../ispmgr/action.cpp:520 .[1mTRACE FormAction:CheckValues.[0m
Jan 11 09:46:57 ../../ispmgr/tdata.cpp:1142 .[1mTRACE RecordSet::Post(insert) rsname=’group’ key=’qwq’.[0m
Jan 11 09:46:57 ../../ispmgr/configs.cpp:252 .[1mTRACE Passwd::PasswdPost().[0m
Jan 11 09:46:57 ../../ispmgr/tdata.cpp:1142 .[1mTRACE RecordSet::Post(insert) rsname=’shadow’ key=’qwq’.[0m
Jan 11 09:46:57 ../../ispmgr/tdata.cpp:1142 .[1mTRACE RecordSet::Post(insert) rsname=’user’ key=’qwq’.[0m
Jan 11 09:46:57 .[1;36mEXTINFO Execl (/bin/cp -Rp /usr/local/ispmgr/etc/site.skel /home/qw.qw) ret=0.[0m
Jan 11 09:46:57 ../../ispmgr/compro.cpp:318 .[1;33mDEBUG Do command ‘USER postmaster’.[0m
Jan 11 09:46:57 ../../ispmgr/compro.cpp:339 .[1;33mDEBUG err = ‘please send the PASS’.[0m
Jan 11 09:46:57 ../../ispmgr/compro.cpp:318 .[1;33mDEBUG Do command ‘PASS ****’.[0m
Jan 11 09:46:57 ../../ispmgr/compro.cpp:339 .[1;33mDEBUG err = ‘login OK, proceed’.[0m
Jan 11 09:46:57 ../../ispmgr/compro.cpp:306 .[1;33mDEBUG CommunigatePro socket connected.[0m
Jan 11 09:46:57 ../../ispmgr/compro.cpp:318 .[1;33mDEBUG Do command ‘SetDomainSettings qw.qw < AccountsLimit = 0; >‘.[0m
Jan 11 09:46:57 ../../ispmgr/compro.cpp:339 .[1;33mDEBUG err = ‘unknown secondary domain name’.[0m
Jan 11 09:46:57 ../../ispmgr/compro.cpp:318 .[1;33mDEBUG Do command ‘Quit’.[0m
Jan 11 09:46:57 ../../ispmgr/compro.cpp:339 .[1;33mDEBUG err = ‘CommuniGate Pro PWD Server connection closed’.[0m
Jan 11 09:46:57 ../../ispmgr/tdata.cpp:1142 .[1mTRACE RecordSet::Post(insert) rsname=’siteprop’ key=’qw.qw’.[0m
Jan 11 09:46:57 ../../ispmgr/domain.cpp:1159 .[1;33mDEBUG CreateDomain qw.qw owner 508 ‘qw.qw’.[0m
Jan 11 09:46:57 ../../ispmgr/domain.cpp:1163 .[1;33mDEBUG Checking domain limit .[0m
Jan 11 09:46:57 ../../ispmgr/tdata.cpp:1142 .[1mTRACE RecordSet::Post(insert) rsname=’domain’ key=’qw.qw’.[0m
Jan 11 09:46:57 ../../ispmgr/domain.cpp:1186 .[1;33mDEBUG Looking for reseller default domain params owner=508.[0m
Jan 11 09:46:57 ../../ispmgr/domain.cpp:1194 .[1;33mDEBUG After reseller detection ns=».[0m
Jan 11 09:46:57 .[1;36mEXTINFO Create config ‘/var/named/qw.qw’.[0m
Jan 11 09:46:57 ../../ispmgr/domain.cpp:443 .[1;33mDEBUG Insert new NS with value ‘ns.domen.com.’.[0m
Jan 11 09:46:57 ../../ispmgr/tdata.cpp:1142 .[1mTRACE RecordSet::Post(insert) rsname=’domain record’ key=’qw.qw. NS ns.domen.com.’.[0m
Jan 11 09:46:57 ../../ispmgr/domain.cpp:466 .[1;33mDEBUG Detected zonename=’qw.qw.’.[0m
Jan 11 09:46:57 ../../ispmgr/domain.cpp:481 .[1;33mDEBUG Check NS1 = ‘ns.domen.com.’ domain = ‘qw.qw.’.[0m
Jan 11 09:46:57 ../../ispmgr/tdata.cpp:1142 .[1mTRACE RecordSet::Post(insert) rsname=’domain record’ key=’qw.qw. MX 10 ***.***.***.***’.[0m
Jan 11 09:46:57 ../../ispmgr/domain.cpp:569 .[1;33mDEBUG Start process local-host-names.[0m
Jan 11 09:46:57 ../../ispmgr/domain.cpp:579 .[1;33mDEBUG set local-host-names mxip=».[0m
Jan 11 09:46:57 ../../ispmgr/compro.cpp:318 .[1;33mDEBUG Do command ‘USER postmaster’.[0m
Jan 11 09:46:57 ../../ispmgr/compro.cpp:339 .[1;33mDEBUG err = ‘please send the PASS’.[0m
Jan 11 09:46:57 ../../ispmgr/compro.cpp:318 .[1;33mDEBUG Do command ‘PASS ****’.[0m
Jan 11 09:46:57 ../../ispmgr/compro.cpp:339 .[1;33mDEBUG err = ‘login OK, proceed’.[0m
Jan 11 09:46:57 ../../ispmgr/compro.cpp:306 .[1;33mDEBUG CommunigatePro socket connected.[0m
Jan 11 09:46:57 ../../ispmgr/compro.cpp:318 .[1;33mDEBUG Do command ‘DeleteDomain qw.qw’.[0m
Jan 11 09:46:57 ../../ispmgr/compro.cpp:339 .[1;33mDEBUG err = ‘unknown secondary domain name’.[0m
Jan 11 09:46:57 ../../ispmgr/compro.cpp:318 .[1;33mDEBUG Do command ‘Quit’.[0m
Jan 11 09:46:57 ../../ispmgr/compro.cpp:339 .[1;33mDEBUG err = ‘CommuniGate Pro PWD Server connection closed’.[0m
Jan 11 09:46:57 .[1;36mEXTINFO Execl (/usr/sbin/rndc reload qw.qw) ret=256.[0m
Jan 11 09:46:57 ../../ispmgr/compro.cpp:850 .[1mTRACE void CreateMailBox(‘qwq@qw.qw’, ‘qwq’, »).[0m
Jan 11 09:46:57 ../../ispmgr/compro.cpp:318 .[1;33mDEBUG Do command ‘USER postmaster’.[0m
Jan 11 09:46:57 ../../ispmgr/compro.cpp:339 .[1;33mDEBUG err = ‘please send the PASS’.[0m
Jan 11 09:46:57 ../../ispmgr/compro.cpp:318 .[1;33mDEBUG Do command ‘PASS ****’.[0m
Jan 11 09:46:57 ../../ispmgr/compro.cpp:339 .[1;33mDEBUG err = ‘login OK, proceed’.[0m
Jan 11 09:46:57 ../../ispmgr/compro.cpp:306 .[1;33mDEBUG CommunigatePro socket connected.[0m
Jan 11 09:46:57 ../../ispmgr/compro.cpp:318 .[1;33mDEBUG Do command ‘CreateAccount qwq@qw.qw’.[0m
Jan 11 09:46:57 ../../ispmgr/compro.cpp:339 .[1;33mDEBUG err = ‘unknown secondary domain name’.[0m
Jan 11 09:46:57 .[1;35mERROR generate exception ‘1’.[0m
Jan 11 09:46:57 .[1;35mERROR Can execute command.[0m
Jan 11 09:46:57 ../../ispmgr/compro.cpp:318 .[1;33mDEBUG Do command ‘Quit’.[0m
Jan 11 09:46:57 ../../ispmgr/compro.cpp:339 .[1;33mDEBUG err = ‘CommuniGate Pro PWD Server connection closed’.[0m
Jan 11 09:46:57 .[1;36mEXTINFO Execl (/bin/rm -rf /home/qw.qw) ret=0.[0m
/var/named/qw.qw есть . а в named.conf ничего не пишется .
куда копать ?
В вашем случае похоже, что у вас MX запси для домена не создаются.
Источник
Что такое ошибка NXDOMAIN и как ее избежать
При просмотре страниц в Интернете и использовании наших устройств для подключения мы можем столкнуться с проблемами, которые мешают правильной работе подключения. Иногда это может быть аппаратный сбой, а иногда просто плохая конфигурация. Иногда ошибка может быть нашей (сетевая карта, оборудование, маршрутизатор, кабели, система…), но иногда эта ошибка является внешней, от самого оператора Интернета. В этой статье мы поговорим о что за ошибка NXDOMAIN и что делать, если он появится.
Что такое DNS и как работает?
Чтобы понять, что Ошибка NXDOMAIN есть, мы должны сначала вспомнить, что DNS есть и как это работает. Можно сказать, что DNS-серверы действуют как переводчики, позволяя нам просматривать Интернет без запоминания большого количества цифр.
При входе на веб-страницу мы обычно переходим в адресную строку браузера и пишем там имя и адрес. Например, мы пишем redeszone.net. Мы можем это сделать благодаря DNS-серверы которые переводят это сообщение, которое мы пишем, на соответствующий IP-адрес. Таким образом, нам не нужно запоминать, что это за IP-адрес, а просто имя, которое мы пишем.
Таким образом, DNS-серверы действуют как посредники, чтобы иметь возможность отвечать на запросы что мы делаем. Есть много DNS-серверов, которые мы можем использовать. Бывают платные и бесплатные. Некоторые даже могут помочь нам повысить безопасность, поскольку они настроены на фильтрацию возможных вредоносных страниц, а не на отправку содержимого. Иногда смена серверов нашего интернет-оператора может помочь улучшить скорость.
Теперь, иногда в этом типе услуг могут быть проблемы и сбой при поиске в Интернете. Вот тут и возникает ошибка NXDOMAIN, о которой мы и поговорим.
Что такое ошибка NXDOMAIN
Когда мы пытаемся войти на веб-страницу и получаем сообщение об ошибке с указанием NXDOMAIN, это означает, что имя домена не может быть разрешено. Это логически означает, что мы не можем перемещаться по сайту, к которому пытаемся получить доступ.
Отображаемое сообщение может незначительно отличаться. Например, в Google Chrome в браузере появившееся сообщение будет DNS_PROBE_FINISHED_NXDOMAIN . Это означает, что страница, на которую мы пытаемся войти, загружается некорректно.
Возможные причины ошибки NXDOMAIN
Эта ошибка может возникать по разным причинам. Иногда это может быть в наших силах исправить, а в других случаях это зависит от сервера сайта. Посмотрим, что за Основные причины составляют:
- DNS-сервер не работает
- Проблема с DNS-клиентом
- VPN мешает
- Установленные средства безопасности
- Неправильные настройки DNS
- Проблемы с браузером
Как исправить ошибку NXDOMAIN
К счастью, мы можем принять во внимание определенные шаги, чтобы решить Ошибка NXDOMAIN . Это, как мы уже упоминали, может произойти в любом браузере, который мы используем, поэтому совет, который мы собираемся дать, является общим, и мы можем применить его в любом случае.
Некоторые проблемы, вызывающие эту ошибку, мы не сможем решить с нашей стороны, например, когда они присутствуют на стороне сервера.
Изменить DNS
Проблемы такого типа могут быть связаны с ошибками DNS-серверы что мы используем. Мы уже упоминали, что можем использовать много разных, как бесплатных, так и платных.
В случае появления такого типа сообщения мы можем попробовать выбрать другой общедоступный DNS, чем те, которые мы используем. Мы можем легко изменить их в Windows, через настройки сети. Для этого заходим в Конфигурацию, Cеть и Интернет, мы вводим Параметры смены адаптера и там выбираем интересующую нас сеть, нажимаем Свойства и откроется окно для изменения IP-адреса и DNS.
Избегайте использования VPN
Мы также видели, что причиной ошибки NXDOMAIN является то, что мы используем VPN и это создает конфликт. Мы можем временно приостановить работу этого инструмента и проверить, действительно ли это связано с этой проблемой.
Если мы обнаружим, что это действительно VPN, мы можем либо не использовать его, либо переключиться на другую службу.
Проверьте, не мешает ли какой-либо антивирус или брандмауэр
Также могло случиться, что антивирус или брандмауэр которые мы используем, создавали проблемы. Мы уже знаем, что инструменты безопасности необходимы для предотвращения сетевых проблем, но они также могут вызвать определенные сбои при неправильной конфигурации.
Обеспечьте бесперебойную работу браузера
Конечно браузер должен работать правильно . Вы должны быть осторожны, например, если используете плохо настроенные расширения. Мы должны убедиться, что все, что окружает браузер, работает правильно, и, таким образом, исправить возможные ошибки, вызывающие эту проблему, чтобы правильно разрешить доменные имена.
Перезагрузить систему
Это базовое решение, но во многих случаях оно может решить проблемы такого типа. Мы должны перезапуск и наш компьютер, и сам роутер. Таким образом, мы можем исправить подобные и подобные ошибки.
В конечном счете, это некоторые варианты, которые мы должны решить, когда появляется ошибка NXDOMAIN.
Источник
Yes, that’s normal.
HTTP requests always include a «Host:» header indicating what name was actually used in the URL. For example, accessing http://superuser.com will send a header Host: superuser.com; and if you’re using http://151.101.193.69, the header will of course show Host: 151.101.193.69 (or even be completely absent).
The important bit is that many HTTP servers share the same IP address for many different domains (aka virtual hosting), and they rely on this header to know which domain you’re trying to access.
For example, all Stack Exchange domains – superuser.com, stackoverflow.com, serverfault.com, diy.stackexchange.com, … – share the exact same set of IP addresses. The only way for the webserver to distinguish between all these websites is by looking at the «Host» HTTP header.
(Additionally, these addresses actually belong to Fastly CDN, not to the real webservers. Large CDNs such as Fastly or CloudFlare might use the same IP address for hundreds of domains from various different customers.)
Finally, it is up to the server to decide what it’ll do with «Host» headers that it doesn’t recognize. Some servers return an error page stating so, other servers return the «first» domain that they have.
So in order to make a successful request, you’d need to do this:
requests.get("http://151.101.193.69", headers={"Host": "stackoverflow.com"})
But that’s a silly way of saying requests.get("http://stackoverflow.com"). The only time you might need this method is when you have an IP address that doesn’t match the DNS information (e.g. if you’re trying to bypass DNS).
(And it will cause you more problems as soon as you try to access a HTTPS website, because the domain from the URL is used for checking TLS certificates, too.)
CommuniGate Pro applies routing rules not only to addresses in incoming messages, but to all addresses it
processes. If you have rerouted the postmaster account to some other account abc, then all attempts
to log in as the postmaster will cause the Server to try to open the abc account. If you provide
the correct password (i.e. the abc account password), you will be able to log in, but you will have the access
rights granted to the abc account, not to the postmaster account.
You still can log into the postmaster account even if the postmaster name is redirected
to a completely different address. Use the following name instead of the postmaster name:
abcd@postmaster.local
This address is always routed to the account postmaster.
Use the regular postmaster account password with this string.
When you connect to CommuniGate Pro via a browser, the Server checks the domain name you have
specified in the browser URL. If that name matches the name of one of your Secondary Domains, the WebAdmin
Interface of that Domain is opened, rather than the Server WebAdmin Interface.
To open the Server WebAdmin Interface, use the Main Domain Name in your browser URL. If that name does not have a DNS
A-record or its record points to a different server, use the Server IP Address in the browser URL.
If all Server IP Addresses were assigned to secondary Domains, you can try to use ANY domain name
that points to the CommuniGate Pro Server, and does not match any of the Secondary Domain names.
If all Server IP Addresses were assigned to secondary Domains and all DNS domain names pointing
to your server are names of your secondary Domains or secondary Domain Aliases, then use the following URL:
http://sub.domain.com:8010/MainAdmin
https://sub.domain.com:9010/MainAdmin
where sub.domain.com is any name pointing to your server computer or any of its IP addresses.
Open the Network pages in the WebAdmin Settings realm, and open the Client IPs page.
The Logins from Non-Client IP Addresses option is set to prohibit, so users can connect
to the Server only from the addresses listed in the Client IP Addresses field (on the same page).
If the Client IP Addresses field
was left empty, you still can connect to the Server if you launch your browser on the Server computer itself,
and connect locally, using the http://127.0.0.1:8010 URL.
If you have not entered anything into the Client IP Addresses field, or if you cannot connect from the IP Addresses
listed in that field, and you cannot connect to the server locally, using the http://127.0.0.1:8010 URL, then:
- stop the CommuniGate Pro Server;
- open the {base}/Settings/IPAddresses.settings file and change the ClientOnly option from
YES to NO, and save the updated file. - start the CommuniGate Pro Server again.