Within the default Ubuntu’s installation (apt install phpmyadmin) PhpMyAdmin is included (and enabled) into the Apache’s configuration through this additional configuration file:
/etc/apache2/conf-enabled/phpmyadmin.conf
This file is a symbolic link to the file /etc/apache2/conf-available/phpmyadmin.conf and when we type a2enconf or a2disconf we ‘enable’ or ‘disable’ this symbolic link.
On its side, the file /etc/apache2/conf-enabled/phpmyadmin.conf is a symbolic link to the file /etc/phpmyadmin/apache.conf.
According to the discussion below the question, during the installation process something goes wrong and the last symbolic link isn’t created.
The solution, that @abalter provided, is manual creation of this symbolic link:
sudo ln -s /etc/phpmyadmin/apache.conf /etc/apache2/conf-available/phpmyadmin.conf
Then enable this configuration file and restart Apache or just reload its configuration:
sudo a2enconf phpmyadmin.conf
sudo systemctl reload apache2.service    # within Ubuntu 16.04
sudo service apache2 reload              # within Ubuntu 14.04
Когда я перехожу к localhost/phpmyadmin, я получаю ошибку apache «Not Found» (404). Однако я могу загружать html-страницы и запускать php-страницы (например, <?php phpinfo(); ?>). И phpmyadmin установлен.
balter@homedevbox:~$ aptitude search phpmyadmin

i   phpmyadmin                                               - MySQL web administration tool
Я также установил стандартный стек LAMP для LAMP и установил пароли для mysql и все это.
В чем может быть проблема?
EDIT: Здесь мои файлы phpmyadmin.
balter@homedevbox:/var$ cd /

balter@homedevbox:/$ sudo find . -type d -name phpmyadmin

./var/lib/mysql/phpmyadmin

./var/lib/phpmyadmin

./etc/phpmyadmin

./usr/share/phpmyadmin

./usr/share/dbconfig-common/scripts/phpmyadmin

./usr/share/dbconfig-common/data/phpmyadmin

./usr/share/doc/phpmyadmin
задан
8 August 2017 в 10:25
поделиться
2 ответа
В рамках установки Ubuntu по умолчанию (apt install phpmyadmin) PhpMyAdmin включен (и включен) в конфигурацию Apache через этот дополнительный файл конфигурации:
/etc/apache2/conf-enabled/phpmyadmin.conf
Этот файл является символической ссылкой на файл /etc/apache2/conf-available/phpmyadmin.conf, и когда мы вводим a2enconf или a2disconf, мы включаем или отключаем эту символическую ссылку.
На своей стороне файл /etc/apache2/conf-enabled/phpmyadmin.conf является символической ссылкой на файл /etc/phpmyadmin/apache.conf ].
Согласно обсуждаемому ниже вопросу, во время процесса установки что-то пойдет не так, и последняя символическая ссылка не создана.
Решение, предоставленное @abalter, является ручным созданием этой символической ссылки:
sudo ln -s /etc/phpmyadmin/apache.conf /etc/apache2/conf-available/phpmyadmin.conf
Затем включите этот файл конфигурации и перезапустите Apache или просто перезагрузите его конфигурацию:
sudo a2enconf phpmyadmin.conf

sudo systemctl reload apache2.service    # within Ubuntu 16.04

sudo service apache2 reload              # within Ubuntu 14.04
ответ дан pa4080
18 July 2018 в 08:08
поделиться
В рамках установки Ubuntu по умолчанию (apt install phpmyadmin) PhpMyAdmin включен (и включен) в конфигурацию Apache через этот дополнительный файл конфигурации:
/etc/apache2/conf-enabled/phpmyadmin.conf
Этот файл является символической ссылкой на файл /etc/apache2/conf-available/phpmyadmin.conf, и когда мы вводим a2enconf или a2disconf, мы включаем или отключаем эту символическую ссылку.
На своей стороне файл /etc/apache2/conf-enabled/phpmyadmin.conf является символической ссылкой на файл /etc/phpmyadmin/apache.conf ].
Согласно обсуждаемому ниже вопросу, во время процесса установки что-то пойдет не так, и последняя символическая ссылка не создана.
Решение, предоставленное @abalter, является ручным созданием этой символической ссылки:
sudo ln -s /etc/phpmyadmin/apache.conf /etc/apache2/conf-available/phpmyadmin.conf
Затем включите этот файл конфигурации и перезапустите Apache или просто перезагрузите его конфигурацию:
sudo a2enconf phpmyadmin.conf

sudo systemctl reload apache2.service    # within Ubuntu 16.04

sudo service apache2 reload              # within Ubuntu 14.04
ответ дан pa4080
24 July 2018 в 19:00
поделиться
When trying to start apache with
sudo /etc/init.d/apache2 restart
I get the error
apache2: Syntax error on line 260 of /etc/apache2/apache2.conf: Could not open
configuration file /etc/apache2/conf.d/phpmyadmin.conf: No such file or directory
Action 'configtest' failed.
The Apache error log may have more information.
...fail!
What should I do? When reading on the internet I should also have a file called apache.conf in /etc/phpmyadmin but I don’t.
asked May 19, 2013 at 12:04
![]()
5
Just ran into this issue on Debian 7, installer and dpkg-reconfigure phpmyadmin create a broken link «/etc/apache2/conf.d/phpmyadmin.conf» which points to the missing file «../../phpmyadmin/apache.conf». Had to pull a copy off an older installation, posting below. Piotr, your comments were not useful, don’t pollute.
phpMyAdmin default Apache configuration
Alias /phpmyadmin /usr/share/phpmyadmin

<Directory /usr/share/phpmyadmin>
    Options Indexes FollowSymLinks
    DirectoryIndex index.php

    <IfModule mod_php5.c>
        AddType application/x-httpd-php .php

        php_flag magic_quotes_gpc Off
        php_flag track_vars On
        php_flag register_globals Off
        php_value include_path .
    </IfModule>

</Directory>

# Authorize for setup
<Directory /usr/share/phpmyadmin/setup>
    <IfModule mod_authn_file.c>
    AuthType Basic
    AuthName "phpMyAdmin Setup"
    AuthUserFile /etc/phpmyadmin/htpasswd.setup
    </IfModule>
    Require valid-user
</Directory>

# Disallow web access to directories that don't need it
<Directory /usr/share/phpmyadmin/libraries>
    Order Deny,Allow
    Deny from All
</Directory>
<Directory /usr/share/phpmyadmin/setup/lib>
    Order Deny,Allow
    Deny from All
</Directory>
answered Nov 6, 2013 at 16:28
![]()
Marc SMarc S
1211 silver badge3 bronze badges
3
Check if the folder /etc/apache2/conf.d exists, if not create it.
mkdir -p /etc/apache2/conf.d/
Apache2.conf file includes all files from this folder into the config, if this folder does not exist it shows an error.
user@host:~$ cat /etc/apache2/apache2.conf | grep conf.d
Include conf.d/
From: https://askubuntu.com/questions/365454/apache2-error-could-not-open-configuration-file-etc-apache2-conf-d-no-such-fi
Then replace this line:
LockFile ${APACHE_LOCK_DIR}/accept.lock
with this one:
Mutex file:${APACHE_LOCK_DIR} default
in the apache2.conf file.
Sorted it out for me.
![]()
answered Dec 18, 2013 at 21:31
![]()
GrantGrant
2,3752 gold badges31 silver badges40 bronze badges
Forum rules
Before you post please read how to get help. Topics in this forum are automatically closed 6 months after creation.
-
dumbbunny
phpmyadmin on Mint 18 is no-go
Hi,
Installed Mint 18 then lamp-server and phpmyadmin on a new machine. The server works but phpmyadmin does not — just a blank page or perhaps error 500. Then tried a clean install of Mint 17 erasing Mint 18 and installed lamp-server and phpmyadmin — all works fine. How do I make phpmyadmin work on Mint 18?
Thanks for any help,
Paul
-
weyland
Re: phpmyadmin on Mint 18 is no-go
Post
by weyland » Sun Jul 17, 2016 11:56 am
I have a similar problem with Mint 18 Mate.
The whole LAMP installation seemed to work fine. The server works, MySQL works, and this php script in /var/www/html/ works . . .
<?php
phpinfo();
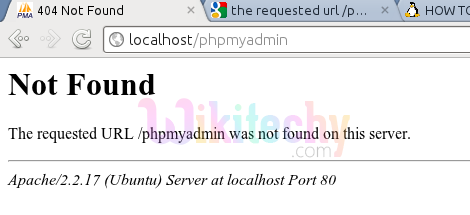
But when I try to start http://xxx.xxx.x.xx/phpmyadmin I get a 404, The requested URL /phpmyadmin was not found on this server.
Any ideas?
-
bbobbo
Re: phpmyadmin on Mint 18 is no-go
Post
by bbobbo » Sun Jul 17, 2016 1:07 pm
is the following symlink in /etc/apache2/conf-available: phpmyadmin.conf -> ../../phpmyadmin/apache2.conf
if not, create it:
Code: Select all
cd /etc/apache2/conf-available
sudo ln -s ../../phpmyadmin/apache2.conf phpmyadmin.conf
is the following symlink in /etc/apache2/conf-enabled: phpmyadmin.conf -> ../conf-available/phpmyadmin.conf
if not, create it and restart apache:
Code: Select all
sudo a2enconf phpmyadmin
sudo /etc/init.d/apache2 restart-
weyland
Re: phpmyadmin on Mint 18 is no-go
Post
by weyland » Mon Jul 18, 2016 5:27 am
Thanks, bbobbo. Those links weren’t there, but when I added them I got this . . .
Code: Select all
[Mon 2016-07-18 09:28:40]/etc/apache2/conf-enabled>> sudo ln -s ../conf-available/phpmyadmin.conf phpmyadmin.conf
[Mon 2016-07-18 09:40:04]/etc/apache2/conf-enabled>> ls -al
total 8
drwxr-xr-x 2 root root 4096 Jul 18 09:40 .
drwxr-xr-x 8 root root 4096 Jul 17 16:29 ..
lrwxrwxrwx 1 root root   30 Jul 16 11:54 charset.conf -> ../conf-available/charset.conf
lrwxrwxrwx 1 root root   44 Jul 16 11:54 localized-error-pages.conf -> ../conf-available/localized-error-pages.conf
lrwxrwxrwx 1 root root   46 Jul 16 11:54 other-vhosts-access-log.conf -> ../conf-available/other-vhosts-access-log.conf
lrwxrwxrwx 1 root root   33 Jul 18 09:40 phpmyadmin.conf -> ../conf-available/phpmyadmin.conf
lrwxrwxrwx 1 root root   31 Jul 16 11:54 security.conf -> ../conf-available/security.conf
lrwxrwxrwx 1 root root   36 Jul 16 11:54 serve-cgi-bin.conf -> ../conf-available/serve-cgi-bin.conf
[Mon 2016-07-18 09:40:07]/etc/apache2/conf-enabled>> sudo a2enconf phpmyadmin
ERROR: /etc/apache2/conf-enabled/phpmyadmin.conf is a dangling symlink!
ERROR: Conf phpmyadmin does not exist!
[Mon 2016-07-18 09:42:11]/etc/apache2>> cd ../conf-available
[Mon 2016-07-18 09:48:24]/etc/apache2/conf-available>> ls *php*
phpmyadmin.conf
[Mon 2016-07-18 09:48:32]/etc/apache2/conf-available>> ls -la
total 28
drwxr-xr-x 2 root root 4096 Jul 18 09:26 .
drwxr-xr-x 8 root root 4096 Jul 17 16:29 ..
-rw-r--r-- 1 root root  315 Mar 19 09:48 charset.conf
-rw-r--r-- 1 root root 3224 Mar 19 09:48 localized-error-pages.conf
-rw-r--r-- 1 root root  189 Mar 19 09:48 other-vhosts-access-log.conf
lrwxrwxrwx 1 root root   29 Jul 18 09:26 phpmyadmin.conf -> ../../phpmyadmin/apache2.conf
-rw-r--r-- 1 root root 2174 Mar 19 09:48 security.conf
-rw-r--r-- 1 root root  455 Mar 19 09:48 serve-cgi-bin.conf
[Mon 2016-07-18 09:49:00]/etc/apache2/conf-available>> ls ../../phpmyadmin/apache2.conf
ls: cannot access '../../phpmyadmin/apache2.conf': No such file or directory
[Mon 2016-07-18 09:56:42]/etc/apache2/conf-available>>
There’s a dangling symlink after a2enconf.
It seems that the LAMP installation is far from clean, and I don’t know where to go from here.
-
weyland
Re: phpmyadmin on Mint 18 is no-go
Post
by weyland » Mon Jul 18, 2016 6:59 am
I just get
Code: Select all
sudo a2enconf phpmyadmin.conf
ERROR: /etc/apache2/conf-enabled/phpmyadmin.conf is a dangling symlink!
ERROR: Conf phpmyadmin does not exist!-
weyland
Re: phpmyadmin on Mint 18 is no-go
Post
by weyland » Mon Jul 18, 2016 7:02 am
does /etc/phpmyadmin exist? if so, what are the contents?
No. Doesn’t exist.
I have the results of phpinfo() open, if that might help.
-
bbobbo
Re: phpmyadmin on Mint 18 is no-go
Post
by bbobbo » Mon Jul 18, 2016 7:06 am
did you install phpmyadmin from repository? if so, it seems like the post-installation procedures didn’t complete.
i’m going to have a bite to eat now. i’ll check back in 30-60 minutes.
-
weyland
Re: phpmyadmin on Mint 18 is no-go
Post
by weyland » Mon Jul 18, 2016 8:31 am
Doh. I’ve clearly been wasting your time. My only excuse is that I had no problems with LAMP on 17.3 and assumed it was almost the same set of instructions. Dropped the ball.
My apologies, and thank you.
-
dumbbunny
Re: phpmyadmin on Mint 18 is no-go
Post
by dumbbunny » Wed Jul 20, 2016 7:00 am
Hi,
Could not get it working even though all the links etc existed as «weyland» has said. There was some update for PHP included in the system update dialog, I blindly clicked update (as I always do) and was prompted to remove phpmyadmim (didn’t work anyway) which I did. After the update had finished I followed the directions:-
https://www.digitalocean.com/community/ … untu-16-04
After re-boot it all worked.
Thanks,
Paul
-
West_Training_8668
- Level 2

- Posts: 69
- Joined: Tue Mar 29, 2016 8:41 am

Re: phpmyadmin on Mint 18 is no-go
Post
by West_Training_8668 » Thu Jul 21, 2016 8:35 am
I installed LAMP with this script:
Code: Select all
service apache2 restart && service mysql restart > /dev/null
  if [ $? -ne 0 ]; then
      clear
      echo "Installing apache2, php7, mysql-server"
      sudo apt install -y apache2 mariadb-server mariadb-client
      sudo mysql_secure_installation
      sudo apt install -y php7.0 php7.0-mysql libapache2-mod-php7.0
          php7.0-mbstring php7.0-common php7.0-gd php7.0-mcrypt php-gettext
          php7.0-curl php7.0-cli
      sudo apt-get install -y phpmyadmin php-mbstring php-gettext
      sudo phpenmod mcrypt
      sudo phpenmod mbstring

      # Restart all the installed services to verify that everything is installed properly
      clear
      service apache2 restart && service mysql restart > /dev/null
      if [ $? -ne 0 ]; then
        echo "Please Check the Install Services, There is some $(tput bold)$(tput setaf 1)Problem$(tput sgr0)"
        else
        echo "Installed Services run $(tput bold)$(tput setaf 2)Sucessfully$(tput sgr0)"
        read
      fi
      echo "========================================================================"
  fi
The problem is it didn’t ask me to write anything while installing phpmyadmin as it says here http://www.2daygeek.com/install-lamp-st … linuxmint/#
bbobbo wrote:is the following symlink in
/etc/apache2/conf-available:phpmyadmin.conf -> ../../phpmyadmin/apache2.confif not, create it:
Code: Select all
cd /etc/apache2/conf-available
sudo ln -s ../../phpmyadmin/apache2.conf phpmyadmin.conf
is the following symlink in
/etc/apache2/conf-enabled:phpmyadmin.conf -> ../conf-available/phpmyadmin.confif not, create it and restart apache:
Code: Select all
sudo a2enconf phpmyadmin
sudo /etc/init.d/apache2 restart
Code: Select all
user@linux /etc/apache2/conf-available $ ls
charset.conf  localized-error-pages.conf  other-vhosts-access-log.conf  security.conf  serve-cgi-bin.conf
user@linux /etc/apache2/conf-available $ sudo ln -s ../../phpmyadmin/apache2.conf phpmyadmin.conf
user@linux /etc/apache2/conf-available $ cd ../conf-enabled/
user@linux /etc/apache2/conf-enabled $ ls
charset.conf  localized-error-pages.conf  other-vhosts-access-log.conf  security.conf  serve-cgi-bin.conf
user@linux /etc/apache2/conf-enabled $ sudo ln -s ../conf-available/phpmyadmin.conf phpmyadmin.conf
user@linux /etc/apache2/conf-available $ sudo a2enconf phpmyadmin
ERROR: /etc/apache2/conf-enabled/phpmyadmin.conf is a dangling symlink!
ERROR: Conf phpmyadmin does not exist!
user@linux /etc/apache2/conf-available $ sudo /etc/init.d/apache2 restart
[....] Restarting apache2 (via systemctl): apache2.serviceJob for apache2.service failed because the control process exited with error code. See "systemctl status apache2.service" and "journalctl -xe" for details.
 failed!
bbobbo wrote:what does
ls -al /etc/phpmyadmingive you?
Code: Select all
 user@linux /etc/apache2/conf-available $ ls -al /etc/phpmyadmin
total 60
drwxr-xr-x   3 root root      4096 Jul 19 13:10 .
drwxr-xr-x 152 root root     12288 Jul 21 00:38 ..
-rw-r--r--   1 root root      1448 Mar 31 04:16 apache.conf
drwxr-xr-x   2 root root      4096 Jun 17 10:44 conf.d
-rw-r-----   1 root www-data   519 Jul 19 13:04 config-db.php
-rw-r--r--   1 root root       168 Oct 29  2015 config.footer.inc.php
-rw-r--r--   1 root root       168 Oct 29  2015 config.header.inc.php
-rw-r--r--   1 root root      6319 Jan 30 15:05 config.inc.php
-rw-r-----   1 root www-data     8 Jul 19 13:04 htpasswd.setup
-rw-r--r--   1 root root       570 Oct 29  2015 lighttpd.conf
-rw-r--r--   1 root root       198 Oct 29  2015 phpmyadmin.desktop
-rw-r--r--   1 root root       295 Oct 29  2015 phpmyadmin.service
bbobbo wrote:what does
dpkg -l phpmyadminshow you?
Code: Select all
user@linux /etc/apache2/conf-available $ dpkg -l phpmyadmin
Desired=Unknown/Install/Remove/Purge/Hold
| Status=Not/Inst/Conf-files/Unpacked/halF-conf/Half-inst/trig-aWait/Trig-pend
|/ Err?=(none)/Reinst-required (Status,Err: uppercase=bad)
||/ Name                     Version           Architecture      Description
+++-========================-=================-=================-======================================================
ii  phpmyadmin               4:4.5.4.1-2ubuntu all               MySQL web administration tool
dumbbunny wrote:Hi,
Could not get it working even though all the links etc existed as «weyland» has said. There was some update for PHP included in the system update dialog, I blindly clicked update (as I always do) and was prompted to remove phpmyadmim (didn’t work anyway) which I did. After the update had finished I followed the directions:-
https://www.digitalocean.com/community/ … untu-16-04
After re-boot it all worked.Thanks,
Paul
I’m going to try that now.
-
bbobbo
Re: phpmyadmin on Mint 18 is no-go
Post
by bbobbo » Thu Jul 21, 2016 9:33 am
your apache configuration file in /etc/phpmyadmin is named apache.conf instead of apache2.conf. so this command:
sudo ln -s ../../phpmyadmin/apache2.conf phpmyadmin.conf
won’t work for you. do:
Code: Select all
cd /etc/apache2/conf-available
sudo unlink phpmyadmin.conf
sudo ln -s ../../phpmyadmin/apache.conf phpmyadmin.conf
sudo a2enconf phpmyadmin
sudo /etc/init.d/apache2 restart
also, rather than just doing ls, do ls -al as that will give you more details in the directory listing. if you had done that while in /etc/apache2/conf-available, you would have seen a visual indication that the symlink for phpmyadmin.conf was invalid.
За последние 24 часа нас посетили 11576 программистов и 1152 робота. Сейчас ищут 222 программиста …
-

Команда форума
Модератор- С нами с:
- 18 мар 2010
- Сообщения:
- 32.415
- Симпатии:
- 1.768
-
- С нами с:
- 20 май 2018
- Сообщения:
- 4
- Симпатии:
- 0
только под windows? у меня убунта стоит
-
Команда форума
Модератор- С нами с:
- 18 мар 2010
- Сообщения:
- 32.415
- Симпатии:
- 1.768
а, ну тогда просто учи конфиги и читай их и делай правильными =)
-
@migor, вероятно ты не включил конфиг phpmyadmin смотри папку sites-enabled есть ли там ссылка на конфиг phpmyadmin
-
Команда форума
Модератор- С нами с:
- 18 мар 2010
- Сообщения:
- 32.415
- Симпатии:
- 1.768
-
@migor, я чуть ошибся с папками. Этот конф лежит у тебя в conf-available а в conf-enabled должна лежать символьная ссылка на conf-available/phpmyadmin.conf
Это можно сделать двумя способами
Есть готовая функция
a2enconf
Или при помощи lnв общем, набери в консоли a2enconf phpmyadmin потом перезапусти сервер, если все ок, с конфигами то даьше по ссылке должен быть доступен твой PMA
-
Команда форума
Модератор- С нами с:
- 18 мар 2010
- Сообщения:
- 32.415
- Симпатии:
- 1.768
можно и просто переместить сам файл туда
— Добавлено —если PHP запущен и если nginx передаёт ему запросы
-
Ну да, можно. Но лучше когда у тебя один конфиг а в sites-enabled лежат ссылки на эти конфиги, в случае чего просто грохнул ссылку и все.
Так работает апач, так же и делают вроде и в Nginx/ правда там придется ссылку создавать при помощи ln готовой функции как у apache нету, но это мелочи.В статье вроде ngnix не упоминается, поэтому я про него ничего не сказал).
А php подумал что уже работает, раз он начал phpmyadmin устанавливать.)) -
- С нами с:
- 20 май 2018
- Сообщения:
- 4
- Симпатии:
- 0
консоль выдаёт
$ a2enconf phpmyadmin
ERROR: Conf phpmyadmin does not exist! -
@migor, теперь наверно ясно, что у тебя phpmyadmin похоже не установился. пробуй устанавливать. Если установлен — удали. Скорее всего что-то в какой-то момент пошло не так.
— Добавлено —
До установки phpmyadmin У тебя уже должен быть установлены и настроены php, mysql/
- Печать
Страницы: [1] 2 3 Все Вниз

Тема: phpmyadmin не работает (Прочитано 7416 раз)
0 Пользователей и 1 Гость просматривают эту тему.
Planes

Использую ubuntu server 16.04
Раньше устанавливал ISP manager, там PhPmyAdmin работал нормально. Удалил. Спустя некоторое время решил установить VestaCP. Установилась хорошо, но при попытке зайти в PhPmyAdmin показывает только лишь PHP код файла index.php. Пытался переустанавливать PhPmyAdmin. Не помогло. 
Heider
Пытался переустанавливать PhPmyAdmin.
Может, лучше php переустановить?
sudo apt-get install --reinstall libapache2-mod-php
victor00000
Planes
victor00000
sudo a2ensite phpmyadmin?
Planes
sudo a2ensite phpmyadmin
ERROR: Site phpmyadmin does not exist!
victor00000
ls /etc/apache2/sites-available/phpmyadmin.conf?
ls /etc/phpmyadmin/apache.conf
Planes
ls /etc/apache2/sites-available/phpmyadmin.conf
невозможно получить доступ к ‘/etc/apache2/sites-available/phpmyadmin.conf’: Нет такого файла или каталога
ls /etc/phpmyadmin/apache.conf
/etc/phpmyadmin/apache.conf
victor00000
Planes
sudo a2ensite phpmyadmin
Site phpmyadmin already enabled
Но на сайте все же ошибка та же.
victor00000
Но на сайте все же ошибка та же.
угадаю, 404?
Planes
victor00000
sudo apt-get install pastebinit?
cat /var/log/apache2/a*g | tail -20 | pastebinit
cat /var/log/apache2/e*g | tail -20 | pastebinit
Planes
sudo apt-get install pastebinit?
cat /var/log/apache2/a*g | tail -20 | pastebinit
cat /var/log/apache2/e*g | tail -20 | pastebinit
Не помогло. Странно что PHP не работает только в PHPmyAdmin. Vesta отображается нормально.
Есть команда для полного удаления phpmyadmin, при попытке удалить не удаляется база данных phpmyadmin с ошибкой 1045 (2800)
victor00000
вижу твой сылку 502 nginx.
nginx и apache2?
- Печать
Страницы: [1] 2 3 Все Вверх
PROBLEM:
ubuntu-11.04
- When we try http://localhost/phpmyadmin/
- We get this error on my browser
PhpMyadmin not working
SOLUTION 1:
- You will need to configure your apache2.conf
[pastacode lang=”php” manual=”gksu%20gedit%20%2Fetc%2Fapache2%2Fapache2.conf%20%0A” message=”php code” highlight=”” provider=”manual”/]
- You can add the following line to the end of the file.
[pastacode lang=”php” manual=”Include%20%2Fetc%2Fphpmyadmin%2Fapache.conf%20%0A” message=”php code” highlight=”” provider=”manual”/]
- Then restart apache
[pastacode lang=”php” manual=”%2Fetc%2Finit.d%2Fapache2%20restart%20%0A” message=”php code” highlight=”” provider=”manual”/]
SOLUTION 2:
Sample code:
[pastacode lang=”php” manual=”sudo%20ln%20-s%20%2Fetc%2Fphpmyadmin%2Fapache.conf%20%2Fetc%2Fapache2%2Fconf-available%2Fphpmyadmin.conf%20%0Asudo%20a2enconf%20phpmyadmin%20%0Asudo%20service%20apache2%20reload%20%0A” message=”php code” highlight=”” provider=”manual”/]
SOLUTION 3:
Ubuntu 16.04
- After installing and setting up user and password in mysql and phpmyadmin execute following command
[pastacode lang=”php” manual=”sudo%20apt%20install%20php-gettext%0A” message=”php code” highlight=”” provider=”manual”/]
SOLUTION 4:
- Open terminal and the user using the command:
[pastacode lang=”php” manual=”sudo%20su%0A” message=”php code” highlight=”” provider=”manual”/]
- After installing phpmyadmin using instructions, open /etc/apache2/conf-available
- You will find a file named phpmyadmin.conf. Copy it to /etc/apache2/conf-enabled
simply use the command
[pastacode lang=”php” manual=”sudo%20cp%20%2Fetc%2Fapache2%2Fconf-available%20%2Fetc%2Fapache2%2Fconf-enabled%20%0A” message=”php code” highlight=”” provider=”manual”/]
- Restart apache2 (sudo service apache2 restart) and then open the link localhost/phpmyadmin in a browser.
SOLUTION 5:
[pastacode lang=”javascript” manual=”sudo%20sed%20-i%20’%24%20a%5CInclude%20%2Fetc%2Fphpmyadmin%2Fapache.conf’%20%2Fetc%2Fapache2%2Fapache2.conf%20%26%26%20sudo%20service%20apache2%20restart%20%26%26%20sudo%20apt-get%20install%20php-gettext%60%20%0A” message=”javascript code” highlight=”” provider=”manual”/]
SOLUTION 6:
- Firstly check if the directory /usr/share/phpmyadmin/ exists. If it does, just move it to /var/www/phpmyadmin by executing this command:
[pastacode lang=”php” manual=”mv%20%2Fusr%2Fshare%2Fphpmyadmin%20%2Fvar%2Fwww%2Fphpmyadmin%0A” message=”php code” highlight=”” provider=”manual”/]
- Open your browser and open http://localhost/phpmyadmin.
SOLUTION 7:
Ubuntu 16.04
Two options
Enter these commands for the specific error if your prior configuration:
- sudo apt-get update
- sudo apt-get install php-gettext php-mbstring
- sudo service apache2 restart
Or remove and start a fresh install:
- sudo service mysql stop
- sudo apt-get –purge remove mysql*
- sudo apt-get –purge remove phpmyadmin
- sudo apt-get autoremove
- sudo apt-get autoclean
- sudo apt-get update
- sudo apt-get install mysql-server phpmyadmin php-gettext php-mbstring
- sudo service apache2 restart
SOLUTION 8:
Run the following code with root permission in terminal:
[pastacode lang=”php” manual=”sudo%20ln%20-s%20%2Fusr%2Fshare%2Fphpmyadmin%20%2Fvar%2Fwww%0A” message=”php code” highlight=”” provider=”manual”/]

Wikitechy Founder, Author, International Speaker, and Job Consultant. My role as the CEO of Wikitechy, I help businesses build their next generation digital platforms and help with their product innovation and growth strategy. I’m a frequent speaker at tech conferences and events.
Related Tags
- but sendmail through command prompt works?,
- error: conf phpmyadmin does not exist!,
- How I can Fix Problem htaccess,
- http //127.0.0.1/phpmyadmin/ not found,
- Incomming cURL being denied.,
- Installing cURL on Ubuntu 12.04,
- Is it possible to access my VPS from internet without having a domain,
- localhost phpmyadmin not found wamp,
- localhost/phpmyadmin not found windows,
- PHP mail() not working,
- phpmyadmin not found nginx,
- phpmyadmin not found wamp,
- phpmyadmin not found windows,
- phpmyadmin not working in wamp,
- phpmyadmin not working windows,
- the requested url /phpmyadmin was not found on this server. Ubuntu
Recommended Posts

Club AC-News
Posted July 13, 2020
-
- Share
Posted July 13, 2020
Hi all,
I’ve installed ISPConfig by the «armbian-config» menu
I created several sites on my web server installed in debian Buster and ISPConfig 3.1.15p3.
I would like to use phpmyadmin to create an independent database at ISPConfig.
When I try to start phpMyadmin (http: // myipadresse / phpmyadmin), I get a 404 error message.
I found this post: https://www.howtoforge.com/community/threads/phpmyadmin-404-not-found-debian-9-3-ispconfig-3.78145/
I applied the first line without difficulty (ln -s /etc/phpmyadmin/apache.conf /etc/apache2/conf-available/phpmyadmin.conf). The second line (a2enconf phpmyadmin) gives me an error again: «ERROR: Conf phpmyadmin does not exist!»
How to access phpmyadmin by setting it correctly ?
Thanks
0
- Quote
Link to comment
Share on other sites
Armbian Linux community supported weekly builds download

Werner
Posted July 14, 2020
-
- Share
Posted July 14, 2020
Odd. You could utilize steamroller tactics and place the symlink into conf-enabled directly and see what happens when you restart apache. Maybe there is something wrong with the config file itselt and therefore it is not detected properly.
0
- Quote
Link to comment
Share on other sites
This thread is quite old. Please consider starting a new thread rather than reviving this one.
Join the conversation
You can post now and register later.
If you have an account, sign in now to post with your account.
Note: Your post will require moderator approval before it will be visible.

Reply to this topic…
×
Pasted as rich text. Restore formatting
Only 75 emoji are allowed.
×
Your link has been automatically embedded. Display as a link instead
×
Your previous content has been restored. Clear editor
×
You cannot paste images directly. Upload or insert images from URL.
Loading…
×
- Desktop
- Tablet
- Phone
Share
Followers
1
LAMP stack is the combination of the most frequently used software packages to build dynamic websites. LAMP is an abbreviation that uses the first letter of each of the packages included in it: Linux, Apache, MariaDB, and PHP.
You can use LAMP to build awesome websites with platforms such as WordPress or Joomla for example.
Additionally, by default, MySQL/MariaDB databases are managed from the command-line interface, via the MySQL shell. If you prefer to manage your databases and perform other useful database server operations from a graphical interface, you need to install PhpMyAdmin, a popular PHP-based web application.
If you looking for a LAMP setup for your Ubuntu 20.04, then you should read our LEMP setup guide on Ubuntu 20.04.
In this article, you will learn how to install and configure LAMP with PhpMyAdmin in Ubuntu 20.04 server. The guide assumes that you have already installed Ubuntu 20.04. If you have not installed already, you can refer to our guides here:
Prerequisites:
- Ubuntu 20.04 Server Installation Guide
Step 1: Installing Apache on Ubuntu 20.04
1. Apache2 is an open-source popular, powerful, reliable, and high extensible web/HTTP server software used by numerous websites on the internet.
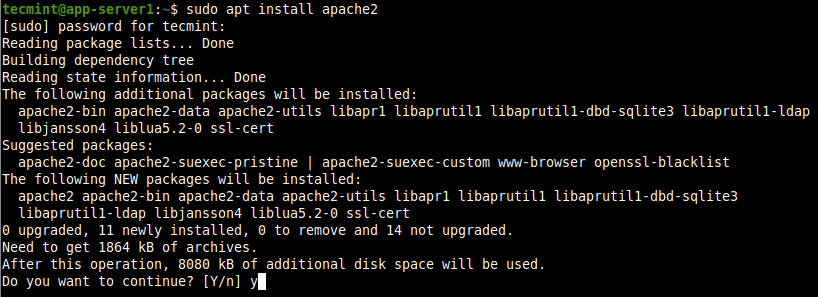
To install the Apache2 package, use the default package manager as follows:
$ sudo apt install apache2
The configuration files for Apache2 are located in /etc/apache2 directory and the main configuration file is /etc//etc/apache2/apache2.conf. And the default document root for storing your web files is /var/www/html/.
2. On Ubuntu unlike on other major Linux distributions, systemd services are automatically started and enabled to start at system boot, when a package (intended to run as a service) installation is complete.
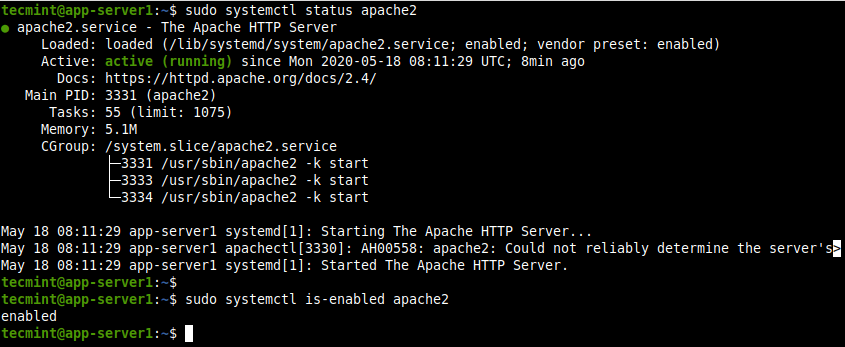
You can confirm that the Apache2 service is up and enabled on boot using the following systemctl commands.
$ sudo systemctl status apache2
$ sudo systemctl is-enabled apache2
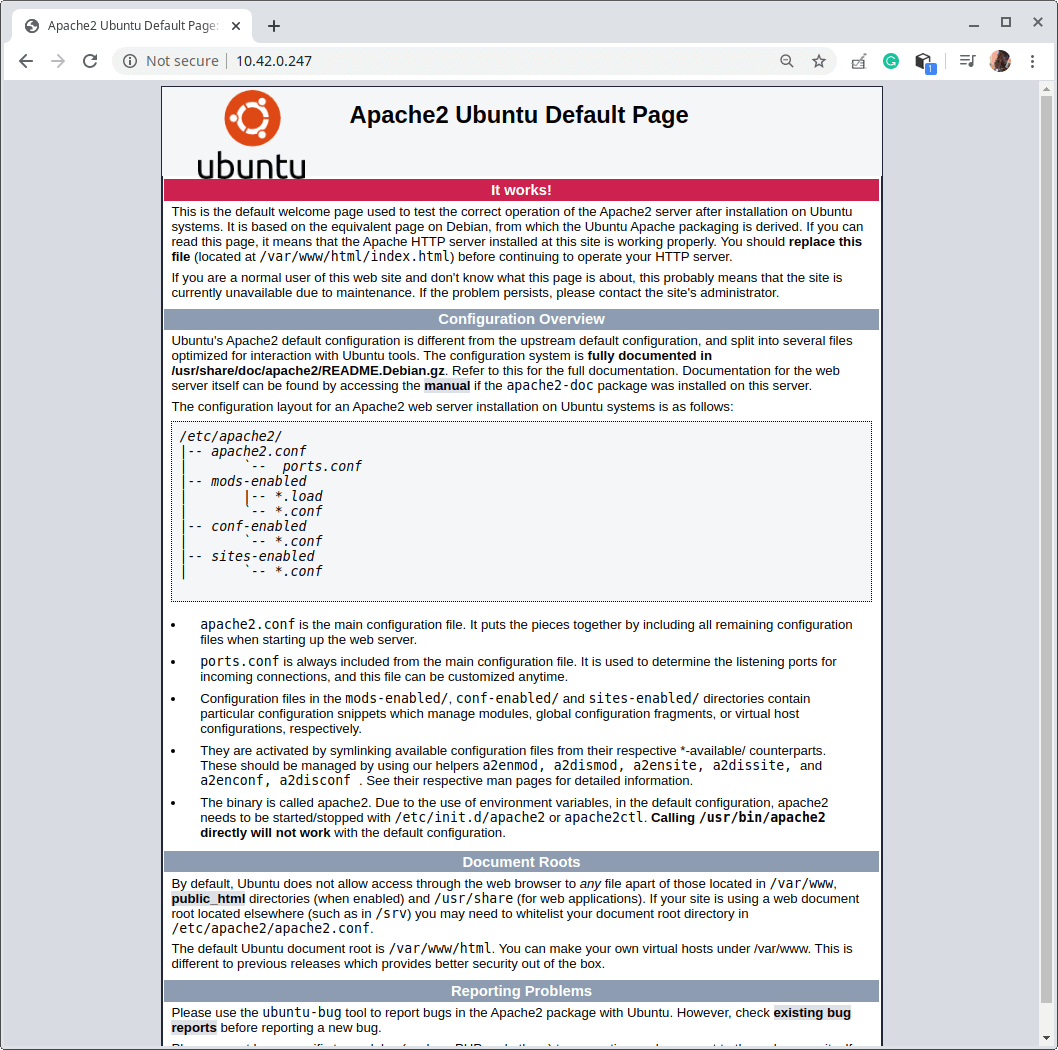
4. Next, you need to test the correct operation of the Apache2 server installation. Open a web browser and use the following address to navigate.
http://YOUR_SERVER_IP
You should see the Apache Ubuntu default page shown in the screenshot.
Step 2: Installing MariaDB Database on Ubuntu 20.04
5. MariaDB is a fork of the popular MySQL database. It is now popular too and is the default in most Linux distributions including Ubuntu and is also part of most cloud offerings.
To install the MariaDB database server and client, run the following command.
$ sudo apt install mariadb-server mariadb-client
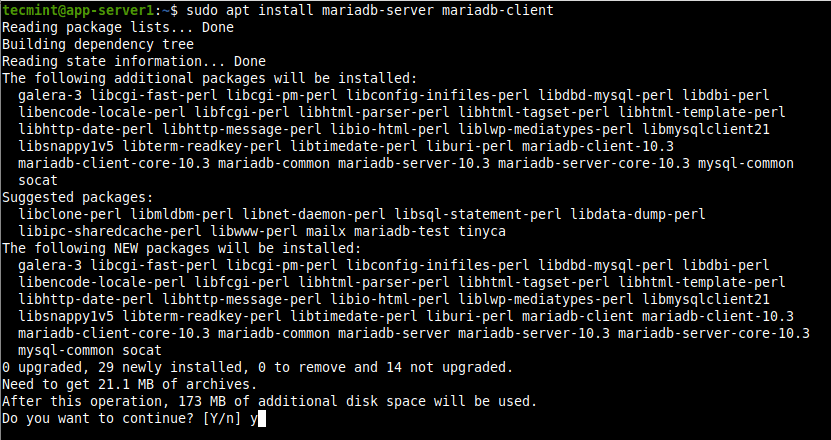
The MariaDB configuration files are stored under the /etc/mysql/ directory. There are so many configuration files in there, you can read the MariaDB documentation for more information.
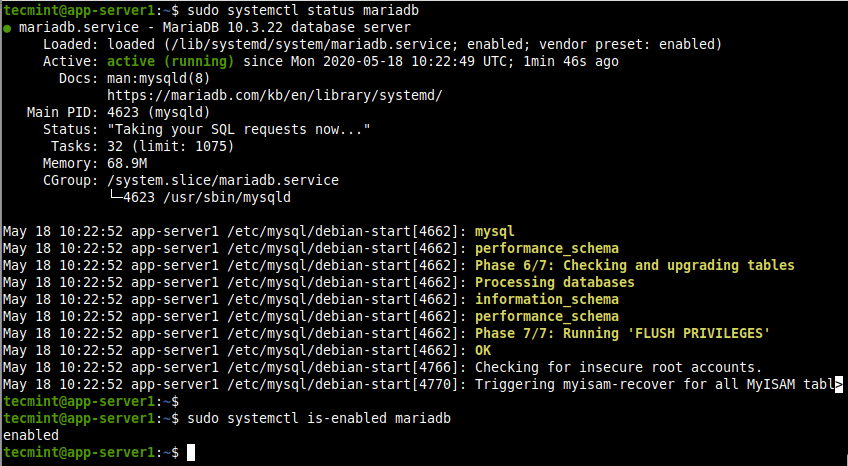
6. Next, confirm that the MariaDB database service is running and is enabled to automatically start when your system is restarted.
$ sudo systemctl status mariadb
$ sudo systemctl is-enabled mariadb
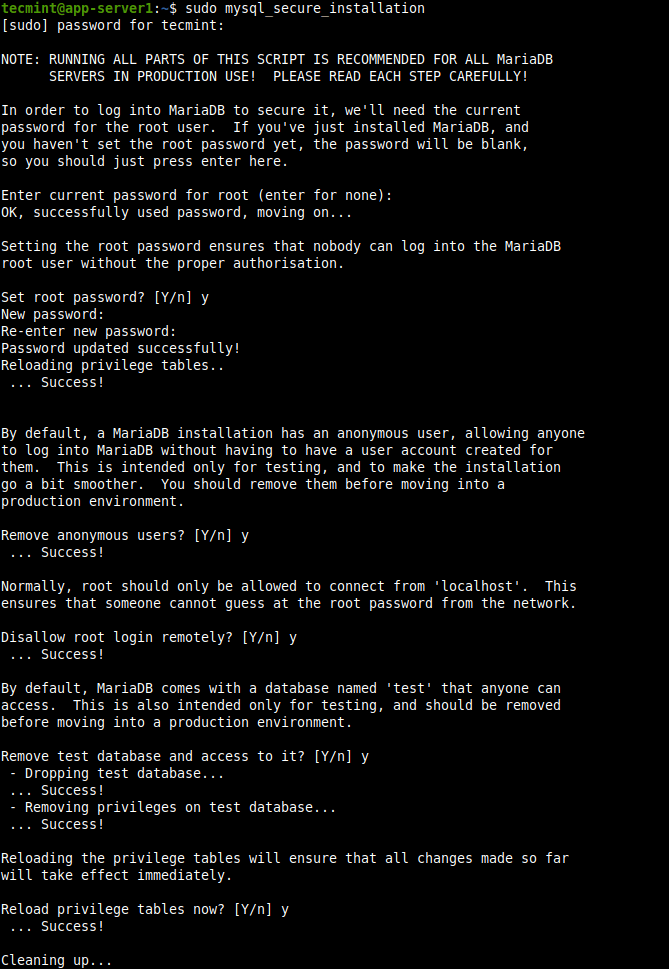
7. On production servers, you need to enable some basic security measures for the MariaDB database installation, by running the mysql_secure_installation script which ships with the MariaDB package.
$ sudo mysql_secure_installation
After running the script, it will take you through a series of questions where you can answer yes(y) or no(n) to enable some security options. Because the database system has just been installed, there is no database root (or administrator) user password.
So you need to create one as shown in the following screenshot.
- Enter current password for root (enter for none): Enter
- Set a root password? [Y/n]
y - Remove anonymous users? [Y/n]
y - Disallow root login remotely? [Y/n]
y - Remove test database and access to it? [Y/n]
y - Reload privilege tables now? [Y/n]
y
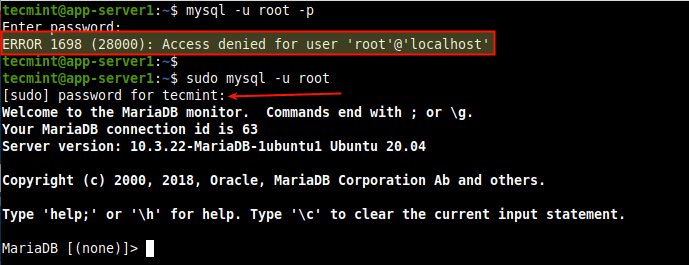
8. To access the MariaDB shell, run the mysql command with the -u option with sudo. If you do not use the sudo command, you are bound to encounter the error indicated in the following screenshot.
$ mysql -u root -p
$ sudo mysql -u root
Step 3: Installing PHP in Ubuntu 20.04
9. A general-purpose open-source scripting language, PHP is one of the most popular programming languages for web development. It powers some of the most popular websites and web applications in the world.
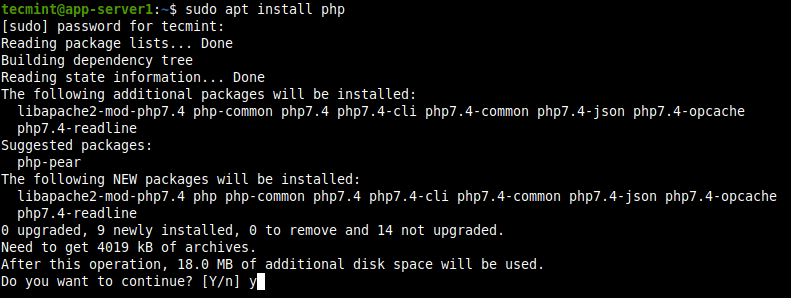
To install PHP, run the following command.
$ sudo apt install php libapache2-mod-php php-mysql
The PHP configuration file will be located in /etc/php/7.2/.
Also, depending on your project, you may want to install some PHP extensions required by your application. You can search a PHP extension as shown.
$ sudo apt-cache search php | grep php- #show all php packages
10. After finding the extension, you can install it. For example, I am installing PHP modules for Redis in-memory cache and Zip compression tool.
$ sudo apt install php-redis php-zip
11. After installing PHP extension, you need to restart apache to apply recent changes.
$ sudo systemctl restart apache2
12. Next, test if Apache is working in conjunction with PHP. Create an info.php page under the web document root /var/www/html/ directory as shown.
$ sudo vi /var/www/html/info.php
Copy and paste the following code in the file, then save the file and exit it.
<?php
        phpinfo();
?>
13. Next, open a web browser and navigate using the following address.
http://YOUR_SERVER_IP/info.php
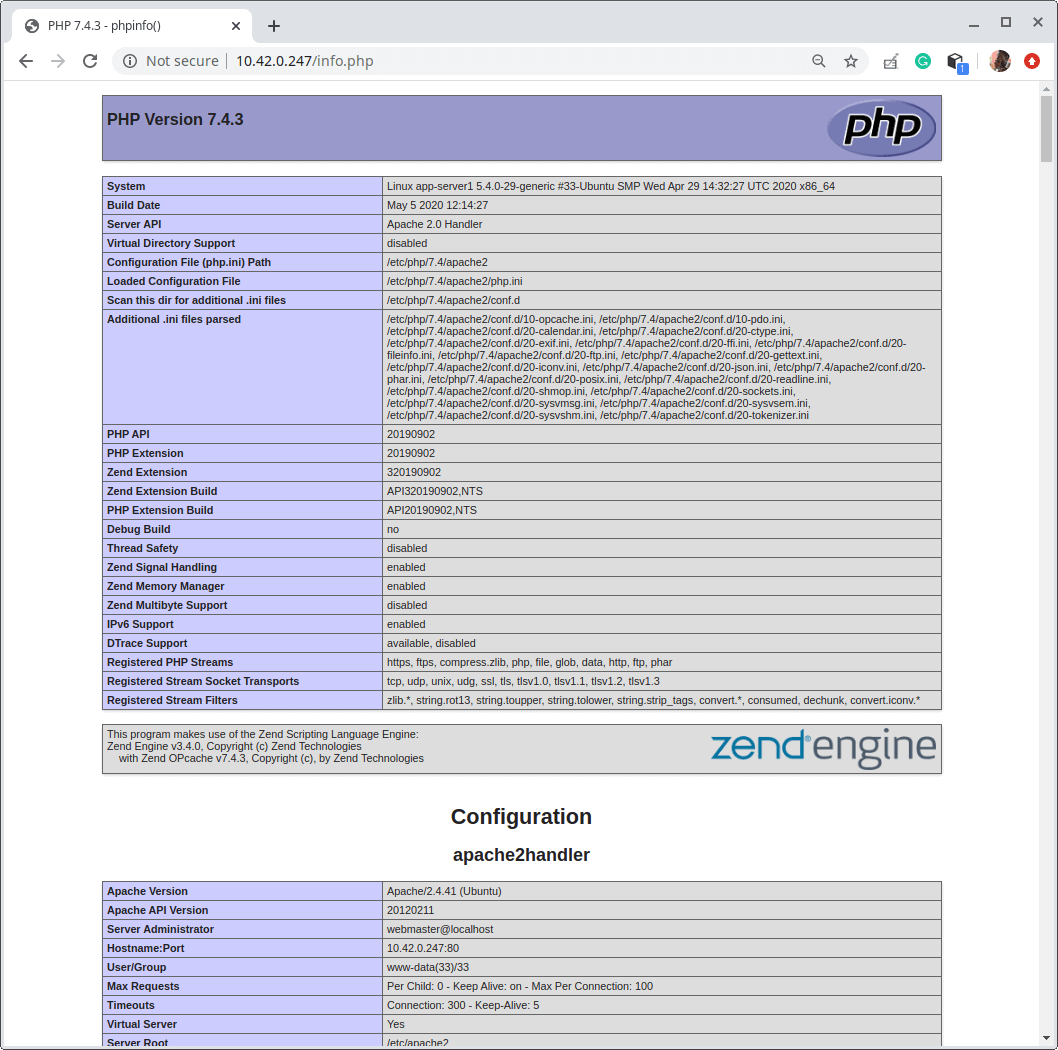
If Apache and PHP are working well together, you should see the PHP information (configuration settings and available predefined variables, installed modules, and more on your system) shown in the following screenshot.
Step 4: Installing PhpMyAdmin in Ubuntu 20.04
14. Intended to handle the administration of MySQL/MariaDB databases, PhpMyAdmin is a free widely-used web-based graphical tool with an intuitive web interface, that supports a wide range of operations on MySQL and MariaDB.
To install PhpMyAdmin, run the following command.
$ sudo apt install phpmyadmin

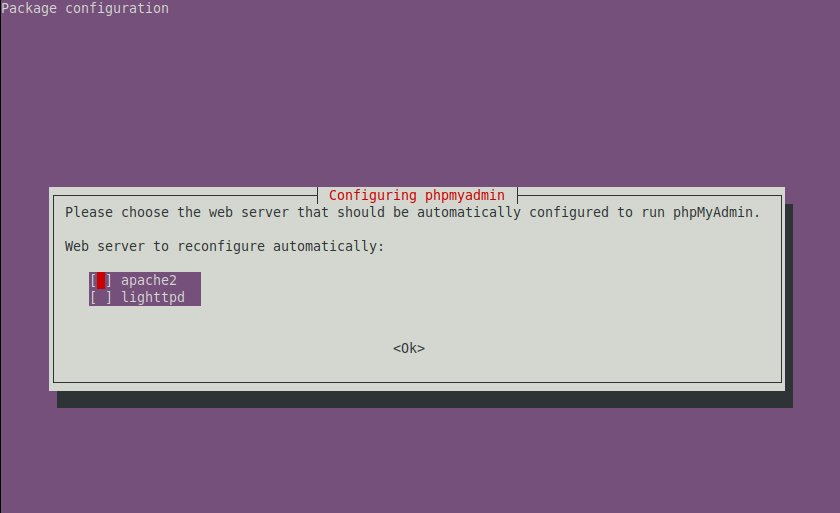
15. During the package installation, you will be prompted to choose the web server that should be automatically configured to run PhpMyAdmin. Click enter to use Apache, the default option.
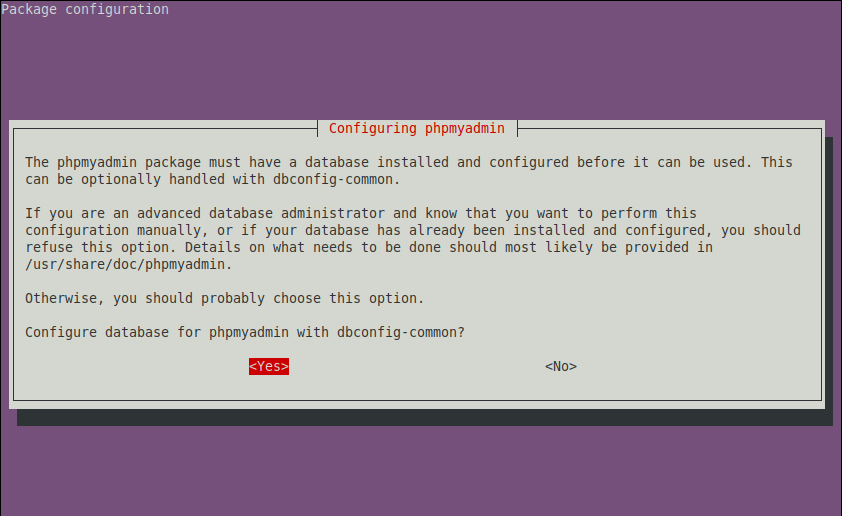
16. Also, PhpMyAdmin must have a database installed and configured before you can start using it. To configure a database for PhpMyAdmin with the dbconfig-common package, select yes in the next prompt.
17. Next, create a password for PhpMyAdmin to register with the MariaDB database server.
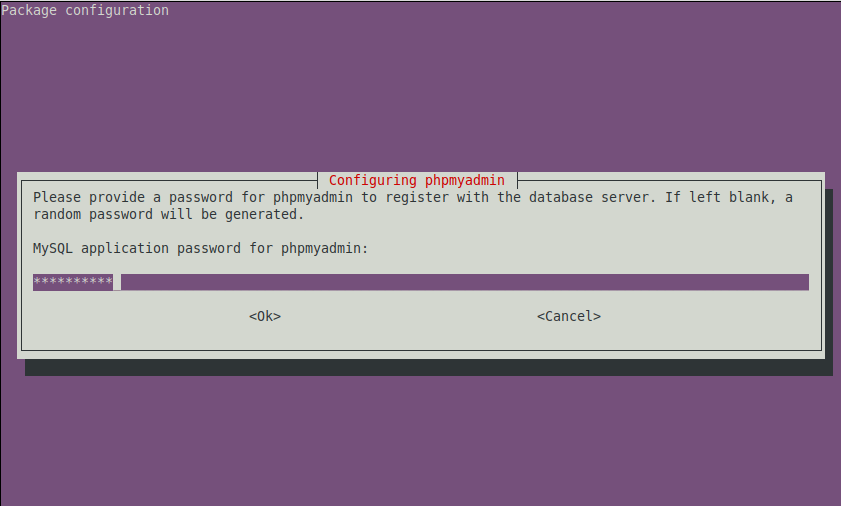
Once the installation process is complete, the configuration files for phpMyAdmin are located in /etc/phpmyadmin and its main configuration file is /etc/phpmyadmin/config.inc.php. Another important configuration file is /etc/phpmyadmin/apache.conf, used to configure Apache2 to work with PhpMyAdmin.
18. Next, you need to configure Apache2 to serve the phpMyAdmin site. Run the following command to symlink the file /etc/phpmyadmin/apache.conf to /etc/apache2/conf-available/phpmyadmin.conf. Then enable the phpmyadmin.conf configuration files for Apache2 and restart the Apache2 service to apply the recent changes.
$ sudo ln -s /etc/phpmyadmin/apache.conf /etc/apache2/conf-available/phpmyadmin.conf
$ sudo a2enconf phpmyadmin.conf
$ sudo systemctl reload apache2.service

19. In a browser go to http://SERVER_IP/phpmyadmin, replacing SERVER_IP with the server’s actual IP address.
http://SERVER_IP/phpmyadmin
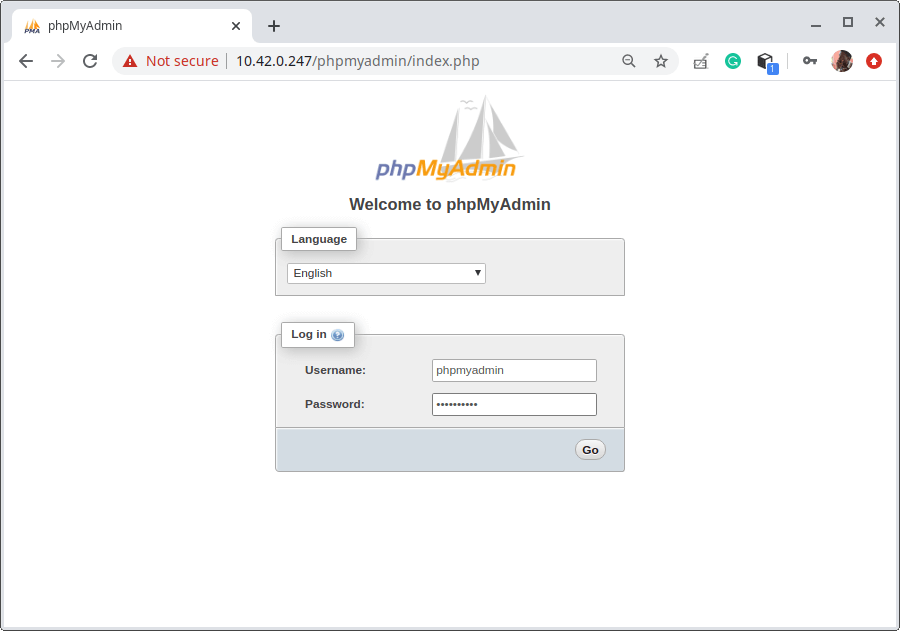
Once the PhpMyAdmin login page loads, enter root for the username and its password, or another MariaDB user, if you have any setup, and enter the user’s password. If you disabled remote root user login, you can use the phpmyadmin user and password to log in.
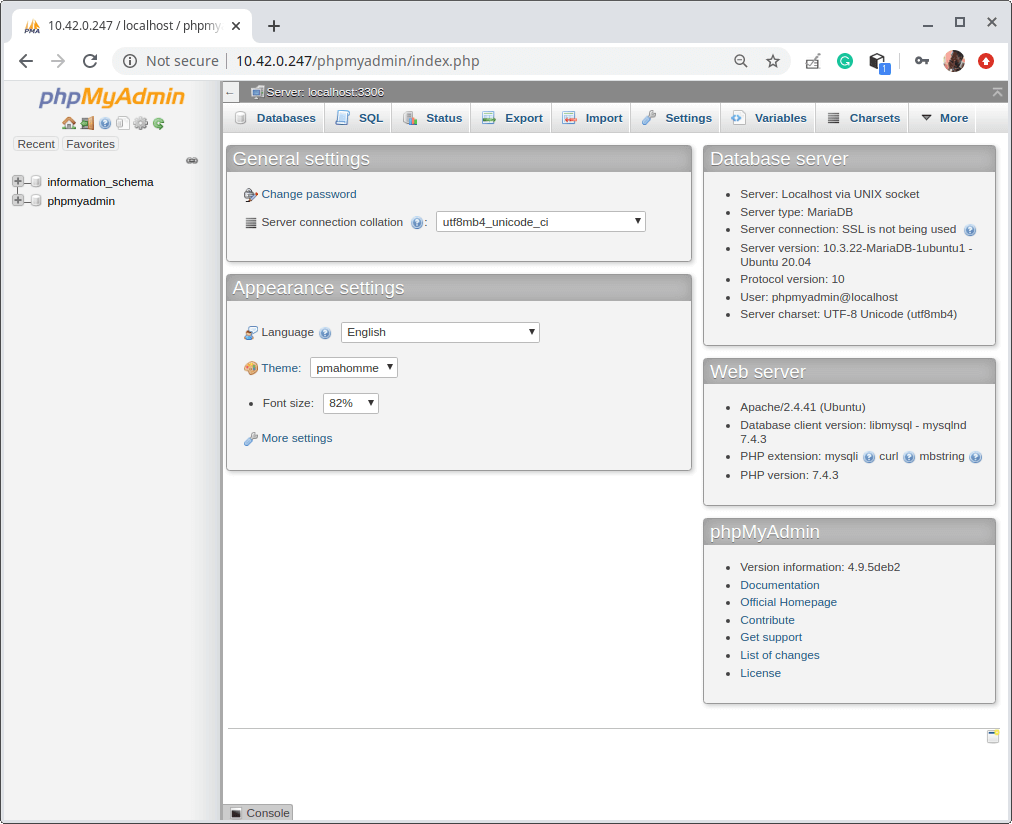
20. After login, you will see the PhpMyAdmin dashboard. Use it for managing databases, tables, columns, relations, indexes, users, permissions, etc.
This brings us to the end of this guide. Use the feedback form to ask any questions about this guide or any other LAMP stack related issues concerning Ubuntu 20.04.
phpMyadmin is the best web based client for accessing MySQL servers. It is freely available to download and install on your server. You can host this on any server running with Apache and PHP.
The phpMyAdmin is written on PHP. The current phpMyAdmin version is compatible with PHP 7.1 and newer and MySQL 5.5 or MariaDB 5.5 or newer.
This tutorial will help you to install and configure phpMyAdmin on Ubuntu 20.04 Linux system.
Step 1 – Install Apache and PHP
We are assuming you already have installed the MySQL server on Ubuntu system. So just install the other required packages to run and access phpMyAdmin.
sudo apt install apache2 wget unzipsudo apt install php php-zip php-json php-mbstring php-mysql
Once the installation finished, enable and start Apache web server.
sudo systemctl enable apache2sudo systemctl start apache2
phpMyAdmin is also available under the default packages repository but mostly they have older version. In this tutorial, we will download latest phpMyAdmin and configure on our system.
Your system is ready for the phpMyAdmin installation. Download the latest phpMyAdmin archive from the official download page, or use the below commands to download phpMyAdmin 5.1.1 on your system.
After downloading extract archive and move to the proper location.
wget https://files.phpmyadmin.net/phpMyAdmin/5.1.1/phpMyAdmin-5.1.1-all-languages.zipunzip phpMyAdmin-5.1.1-all-languages.zipmv phpMyAdmin-5.1.1-all-languages /usr/share/phpmyadmin
Next, create tmp directory and set the proper permissions.
mkdir /usr/share/phpmyadmin/tmpchown -R www-data:www-data /usr/share/phpmyadminchmod 777 /usr/share/phpmyadmin/tmp
Step 3 – Configure phpMyAdmin
Now, you need to configure web server to serve phpMyAdmin on network. Create Apache configuration file for phpMyAdmin and edit in text editor:
sudo vi /etc/apache/conf-available/phpmyadmin.conf
add the below content to file.
|
1 2 3 4 5 6 7 8 9 10 11 12 13 14 15 16 17 18 19 |
Alias /phpmyadmin /usr/share/phpmyadmin Alias /phpMyAdmin /usr/share/phpmyadmin <Directory /usr/share/phpmyadmin/> AddDefaultCharset UTF-8 <IfModule mod_authz_core.c> <RequireAny> Require all granted </RequireAny> </IfModule> </Directory> <Directory /usr/share/phpmyadmin/setup/> <IfModule mod_authz_core.c> <RequireAny> Require all granted </RequireAny> </IfModule> </Directory> |
Save your file. Press ESC key to switch to command more. Then type : (colon) and type w after the colon and hit Enter.
After making all the changes, make sure to start the Apache service to reload all settings.
sudo a2enconf phpmyadminsudo systemctl restart apache2
Step 4 – Adjusting FirewallD
The systems with enabled firewalls need to allow HTTP service from the firewall. Run the below commands to open a port for the webserver in the firewall.
sudo firewall-cmd --permanent --add-service=httpsudo firewall-cmd --reload
Step 5 – Access phpMyAdmin
All done. You have finished the setup with the phpMyAdmin on Ubuntu Linux system. Now access phpMyAdmin with the server IP address or domain name.
http://your-server-ip-domain/phpmyadmin
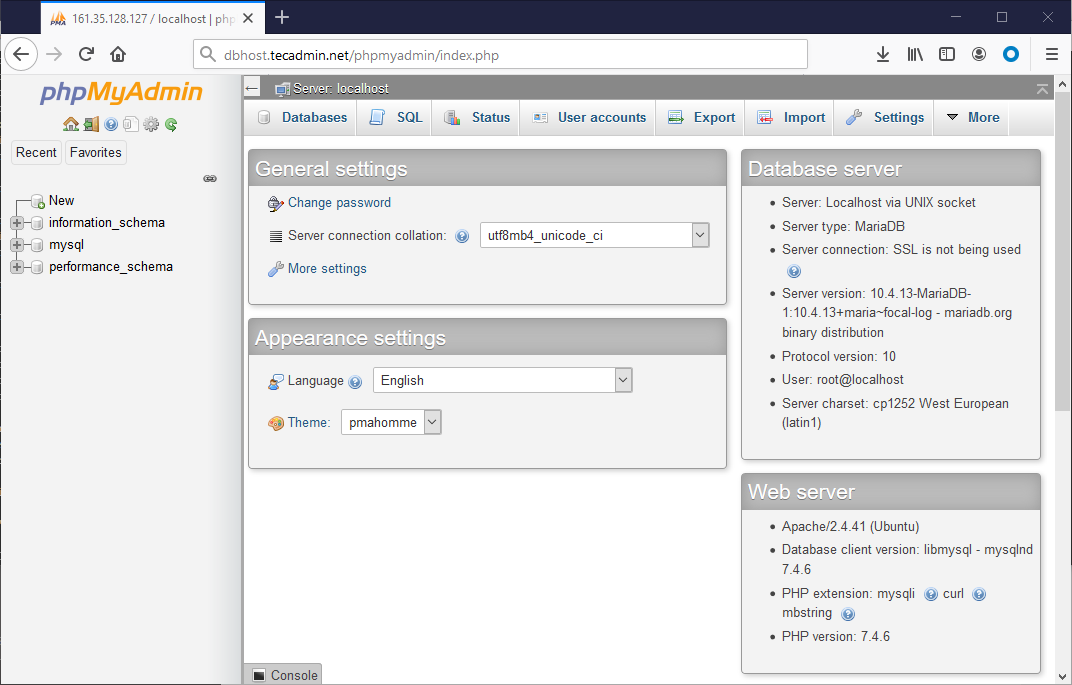
Replace your-server-ip-domain with the localhost (for the local machines), or system IP address for remote machines. I have updated our DNS and pointed dbhost.tecadmin.net to the server’s IP address.
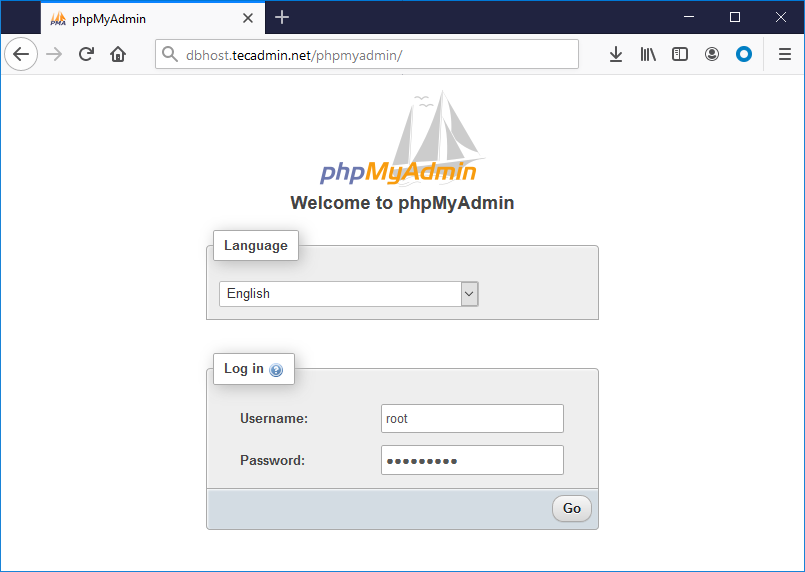
Log in with the username and password used to access MySQL on the command line.
Conclusion
You have successfully configured phpMyAdmin on Ubuntu system. Let’s disable root user login for the phpMyAdmin for security purposes.