My macbook pro is stuck on the Apple logo on booting and after going through most of the alternatives attempts at fixing it, I’ve finally come to giving the command fsck -fy a try. I’ve booted into safe mode (holding down CMS+S whilst booting) and I’ve run this command only to get the following error:
error: container /dev/rdisk1 is mounted with write access
My unix-fu is nowhere near up to the task and I’ve searched around for similar problems with no success. One thing worth noting is that when the command prompt comes up it says the following:
To mount the root device as read-write:
$ /sbin/mount -X /
I tried this command thinking that maybe it was something I needed to do before running fsck but it told me that the X option was illegal. Any help greatly appreciated. If this doesn’t work at least I can fallback to a reinstall off time machine.
asked Feb 26, 2020 at 10:59
![]()
Ben FranklinBen Franklin
1311 gold badge1 silver badge3 bronze badges
To run fsck_apfs as of Big Sur 11.2.3, assuming the container is at /dev/disk2 and the volume you want to check is at /dev/disk2s2:
- Boot from the recovery partition or external disk (not the disk you want to check).
diskutil unmountDisk /dev/disk2- If the volume is encrypted,
diskutil apfs unlockVolume /dev/disk2s2 -nomount fsck_apfs -y /dev/disk2s2
answered Mar 13, 2021 at 1:17
![]()
parpar
1431 silver badge8 bronze badges
The problem is that fsck -fy can not repair a filesystem which is currently in use. The filesystem needs to be unmounted or, at the very least, in a «read-only» mode. It may be possible to switch the filesystem to read-only with /sbin/mount -o remount,ro /. Then fsck -fy might work. As always: make sure you have a backup.
answered Feb 26, 2020 at 14:21
![]()
SundaySunday
4064 silver badges8 bronze badges
2
Correction
Apple’s official word is that the traditional single-user mode which one enters by booting whilst holding ⌘S is deprecated on macOS Mojave (10.14) and later. This is due to the presence of the Apple T2 security chip in Macs which initially went to market with Mojave or later.
From Mac startup key combinations:
- Command-S: Start up in single-user mode. Disabled in macOS Mojave or later, or when using a firmware password.
And from the small print on the linked «single-user mode» page, Start up your Mac in single-user mode or verbose mode:
These steps replace the Command-S method, which doesn’t work with the recommended settings on current Mac computers.
The linked page «current Mac computers» refers to those which have a T2 chip.
Despite the claim that the traditional single-user mode is outright disabled on Mojave and later, you can still boot into it using ⌘S on devices which don’t have a T2 chip, even if you attempt to do so on a system running Mojave or later. However, this single-user mode will require access to the data and VM volumes of the APFS container that contains the OS, and you will find that you are unable to unmount these volumes in order to run fsck_apfs -y on that container. This is because umount will refuse to unmount the volumes due to them being actively used, and you cannot forcibly unmount them using diskutil since the DiskManagement framework required by diskutil is not loaded/present in this mode — and even if this were possible in some other way, it is unadvisable to forcibly unmount elements of a filesystem that you are trying to repair!
Having said that, macOS still technically has a single-user mode in Mojave and later: the Terminal in macOS Recovery. After actually trying to use fsck_apfs -y in this environment, it turns out that it is possible, but you will first need to unmount any mounted APFS volumes belonging to the APFS container that contains the OS; macOS Recovery will automatically mount the data and VM volumes by default. Because macOS Recovery isn’t as stripped down as the traditional single-user mode, you can do this simply with e.g. diskutil unmountDisk disk2. You can use mount and diskutil apfs list to determine the device nodes.
Original answer
This isn’t a Catalina thing, but an APFS thing. You cannot perform reparatory actions on an APFS container (or any of its volumes, since this requires acting on the container) when that container is mounted. If any volume in that container is mounted, then the container itself is necessarily also mounted.
As such, you cannot use You can still run fsck_apfs -y on the APFS partition that you have booted from, whether that’s in a regular environment, in single-user mode, in recovery mode, or however else.fsck_apfs -nl when booted normally to inspect the APFS partition for errors, but this will not repair any such errors.
To run fsck_apfs -y on your Catalina APFS partition, you must access could also try accessing the disk another way, such as:
- booting into Catalina Internet Recovery (which also requires you to unmount the automatically mounted volumes).
- booting from a Catalina USB installer.
- booting your Mac in Target Disk Mode and connecting it to a secondary Mac running Catalina, then running
fsck_apfsfrom the secondary Mac on the affected disk. - physically removing the disk from your Mac and connecting it to a secondary Mac running Catalina, then running
fsck_apfsfrom the secondary Mac on the affected disk.
Since new, significant APFS features were introduced in Catalina («volume groups» in particular), avoid using any fsck_apfs belonging to an older macOS version, particularly if you are trying to repair incorrectly allocated disk space. fsck_apfs(8) states for the -o option:
-o— Repair overallocations; please do not run an olderfsck_apfson newer systems with this option.
MacBook Pro Retina Late 2013, running Big Sur 11.0.1.
I’m trying to install Windows using Boot Camp Assistant, encountering: «An error occurred while partitioning the disk. Please run First Aid from within Disk Utility to check and fix the error.»
I’ve seemingly been unable to repair any errors using Disk Utility; the only time anything was flagged was when running First Aid on Container disk1. The following lines may be of note:
error: Cross Check : FSroot tree references extent (0x686378d + 64) which is not present in the ExtentRef tree (x3 similar)
error: Cross Check : Mismatch between extentref entry reference count (0) and calculated fsroot entry reference count (1) for extent (0x686378d + 64) (x3 similar)
warning: apfs_fs_alloc_count is not valid (expected 64182711, actual 64182903)
warning: overallocation detected on Main device: (0x686378d+192) bitmap address (0x7d1f)
However, First Aid then says the volume appears to be OK, and that the operation was successful— even though it will return the same error messages if the operation is performed again. To be honest, I don’t know if this is even relevant.
I have never used Time Machine, but there appears to be one System Snapshot on the computer (I think created during Big Sur installation). I’ve read that the presence of these can be a cause of the problem, but I am hesitant to force-delete the one I have found (com.apple.os.update-779BDF1556C6F68), because—after running First Aid on any volume—Disk Utility is indicating that the snapshot is mounted instead of Macintosh HD.(?) This reverts to normal after trying Boot Camp again, and then back again after First Aid. (I don’t understand, sorry).
I did have a Windows partition a couple of years ago (pre-APFS, I think) which I quite possibly resized and ultimately deleted using Disk Utility, not Boot Camp, so perhaps this is a source of the problem.
I’ve spent hours looking for a solution and have tried a couple of things, so I will let you know if I have already tried something that is suggested. I’d be really grateful if someone could point out to me what would be the next sensible step.
Thanks.
-
#1
Hello,
Does anyone know how to resolve the latest or Main error Message described below? Or have any suggestion to efficiently complete my Todo list below?
**Latest Error:**
container /dev/rdisk1 is mounted. repairs in a mounted container is not supported yet.
**Latest Context:**
I was running the code as prescribed in this article. https://osxdaily.com/…/how-to-repair-a-mac-disk-with…/ to resolve the Main Error Msg.
**Main Error Msg— MacbookAir won’t start:**
Your computer restarted because of a problem. press a key or wait a few seconds to continue starting up
**Possible Trigger/cause:**
electricity suddenly went off in the house & this issue occurs shortly afterward
**Error Msg diaplyed after restarting in recovery mode:**
First aid process has failed. If possible back up data on this volume
**Todo**
Does timemachine recovery restore chrome extensions & bookmarks? Custom shortcuts ?
If not, how to backup those when the computer won’t start?
Should I unmount the container then?
Advertisements

-
#2
Hello and welcome.
-Which exact model MacBook Air?
-Which version of macOS?
-Do you have a current Time Machine backup?
-If not, do you need to save any of the data?
-Have you tried starting up in macOS Recovery mode and running Disk Utility from there?
It sounds like the drive is corrupt and cannot be repaired by Disk Utility First Aid. You may need to totally erase it and reinstall macOS. If you cannot startup properly, there isn’t any easy way to backup data. You would need an external drive with macOS installed to startup from, then attempt to mount/read the internal drive and save data.
If you were signed into Chrome with a Google account, it automatically saves your bookmarks and Chrome Extensions. You would be able to sign into Chrome on another computer and they will automatically sync back.
C
-
#3
Hello and welcome.
-Which exact model MacBook Air?
-Which version of macOS?
-Do you have a current Time Machine backup?
-If not, do you need to save any of the data?
-Have you tried starting up in macOS Recovery mode and running Disk Utility from there?It sounds like the drive is corrupt and cannot be repaired by Disk Utility First Aid. You may need to totally erase it and reinstall macOS. If you cannot startup properly, there isn’t any easy way to backup data. You would need an external drive with macOS installed to startup from, then attempt to mount/read the internal drive and save data.
If you were signed into Chrome with a Google account, it automatically saves your bookmarks and Chrome Extensions. You would be able to sign into Chrome on another computer and they will automatically sync back.
C
-Which exact model MacBook Air? > A1465
-Which version of macOS? Big Sur
-Do you have a current Time Machine backup? Not current, it’s 3 months old, but I am ok to lose the rest of data if retrieving is cumbersome
-If not, do you need to save any of the data? Not necessarely
-Have you tried starting up in macOS Recovery mode and running Disk Utility from there? yes, that’s where the error message comes from— since the initial issue is that I can’t restart the mac; so there is no other way that error could have been generated.
Thanks for the other comments
Advertisements
-
#4
OK, thanks.
The A1465 can be a few different models:
-MacBook Air (11-inch, Mid 2012)
-MacBook Air (11-inch, Mid 2013)
-MacBook Air (11-inch, Early 2014)
-MacBook Air (11-inch, Early 2015)
Since you started up from macOS Recovery and ran Disk Utility there and it fails, then the next step would be to try and completely erase the drive and then run First Aid to see if the error persists. If not, you can reinstall macOS or attempt to restore from your Time Machine backup.
The other option would be to try and install macOS on an external USB drive, startup from it, and then see if you can retrieve any of the data off the internal.
C
Want to reply to this thread or ask your own question?
You’ll need to choose a username for the site, which only take a couple of moments. After that, you can post your question and our members will help you out.
Ask a Question
| SOLVED Dell P2421DC, MacBook Air, no USB Type-C signal from device | 6 | Jan 26, 2021 |
| Part of Container disk locked, how can I access ? | 2 | Jan 13, 2021 |
| USB audio input device keeps disappearing | 6 | Dec 31, 2020 |
| No device connected ??? | 8 | Dec 23, 2020 |
| SOLVED (iOS 14.2) I used to swipe right and get a widget that would tell me the remaining battery life on my Bluetooth devices. What happened to that? | 2 | Nov 20, 2020 |
| SOLVED /library/developer/… can i delete it? | 2 | Jul 19, 2020 |
| Seeing my iDevices from Catalina’s finder | 3 | Jun 27, 2020 |
| How to remove Container disk and restore disk to original setting | 1 | Apr 7, 2020 |
Chapter in this post:
- 1 Update: Repairing access rights with new macOS systems
- 2 Preview: Single user mode uses the English key layout
- 3 Check Mac hard drive for errors in Disk Utility
- 4 fsck: Repair Mac File System in Single User Mode
- 5 Repair specific Mac hard drive using the fsck command
- 6 The single user mode appears tiny on the Retina MacBook
If the hard drive in your Mac begins to weaken and appears to be damaged, then Disk Utility is likely to get you stuck. Here it is necessary to pull out the command fsck, which stands for «File System Consistency Check». However, this is only possible to a limited extent via the terminal and can only be carried out in single user mode for an internal hard drive from which the macOS operating system is executed. Does that all sound very extensive and like many new terms? Don’t worry, you can use the following guide to repair the startup disk file system on Mac!
Update: Repair access rights with new macOS systems
The instructions here seem to only work up to macOS Mojave. Since macOS Catalina, Apple has created a separate volume for the system and made it write-protected. As a result, the commands, the commands mentioned below, no longer work.
How it works under the operating system versions macOS Catalina, Big Sur and Monterey is explained here in the article » Repair access rights on macOS Big Sur and Monterey» explained. All people with a system before macOS Catalina can now just read on…

Preview: Single user mode uses the English key layout
Before I get to the detailed explanations about single user mode, fsck and Co., here is a short but important note: In the mode shown, the Mac uses English not only for output, but also for input. This means, among other things, that the English keyboard layout is used. Accordingly, when entering Z and Y are swapped; and the hyphen “-” is not in its usual place between the period and the right shift key, but where the ß is on the German keyboard. But don’t panic, you don’t have to remember that, I’ll show the commands in both layouts below;)
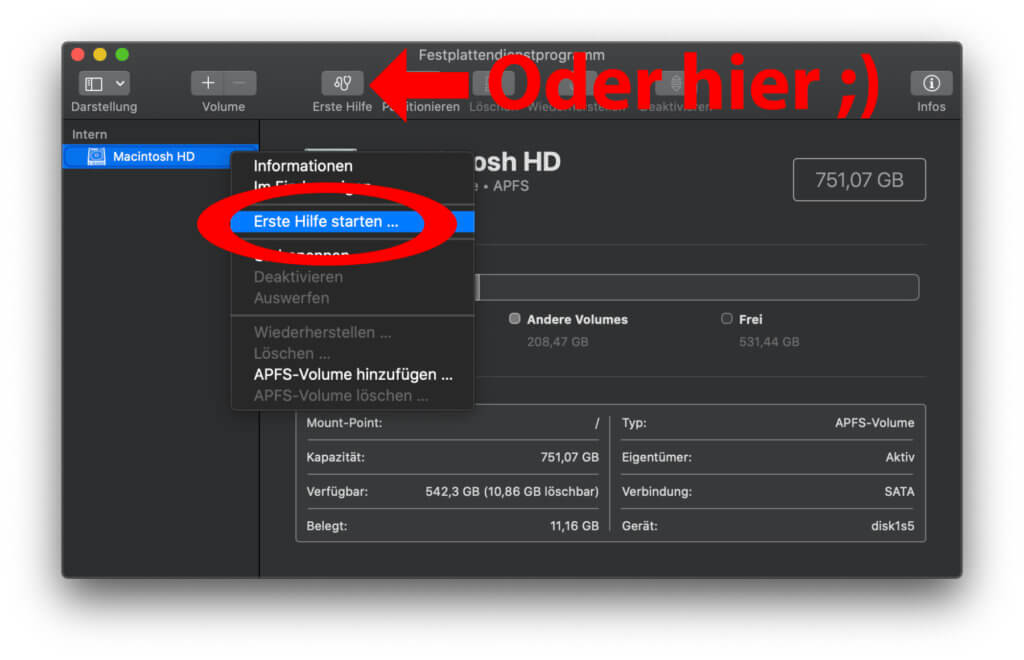
Check Mac hard drive for errors in Disk Utility
You can find Disk Utility in the Applications -> Utilities folder, via the Launchpad or via Spotlight search (cmd + spacebar). From there, if you want to check a hard drive for errors, select it and right-click (tap with two fingers on the trackpad). Then you choose Start first aid … out. Now you confirm the whole thing and after a few minutes you may be shown one or the other errors.
fsck: Repair Mac File System in Single User Mode
Perhaps at the end of the “First Aid” for the Mac hard drive you will be suggested to put the Mac into recovery mode with cmd + R when restarting. But you can ignore that. Instead, you should restart your Mac (or turn it off and on again), but then cmd + p Hold down (⌘ + S). When white letters appear on the black display, you can let go of the buttons.
You may now see a lot of white text scrolling through. If it stops and the cursor (small, white rectangle) appears after root #, you can start. If that doesn’t happen, press Enter once; then the display should be correct. And then you do the following:
- The command for the first File System Consistency Check is (English layout):
/ sbin / fsck -yf
on a German keyboard you press these keys:
-sbin-fsck ßzf
- Confirm the entry with Enter and wait for the end of the check or its evaluation
- If there are still errors or if the check shows that there are errors, enter this command again and confirm with Enter:
fsck -yf
on the keyboard with German design:
fsck ßzf
- Repeat step 3 until the message “The Volume Macintosh HD was repaired successfully” appears at the end
- Quit the Single User Mode with this entry, which you confirm with Enter (then the Mac restarts normally with macOS):
exit
Repair specific Mac hard drive using the fsck command
In the special case that you have installed several hard drives in your Mac, iMac or MacBook, there is of course also the option of addressing and repairing individual storage drives. So if you do not (only) want to repair the file system on the Mac’s startup disk, but also on other hard drives, then proceed as follows:
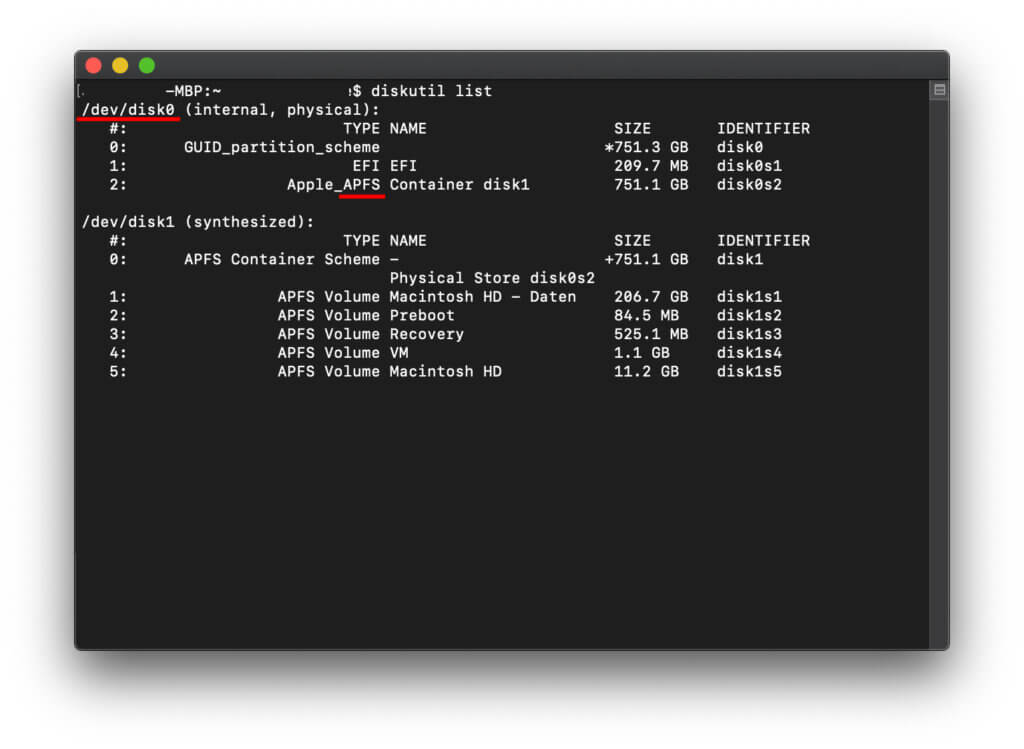
- Starts the on macOS Port (Programs -> Utilities or similar)
- Call up the list of your hard drives and memories with this command:
disktil list - Now the hard disks are listed, by default with names like / dev / disk0, / dev / disk1 and so on
- Make a note of the name of the hard drive in question, as well as the file system that you can find in the TYPE column (or alternatively in the Disk Utility) finds
- Closes the terminal
So you now have the identification and the file system (APFS, HFS + or exFAT) of the hard drive that you want to repair. You then restart the Mac and press cmd + S to get into single user mode. As described above, when the white font appears on a black background, release the keys and wait until root # and the cursor rectangle appear. Then it goes on like this:
- Enter the following command for a drive with HFS + and ID «0» and confirm it with Enter:
/ sbin / fsck_hfs -fy / dev / disk0
or in the German layout:
-sbin-fsck? hfs ßfz -dev-disk0
- Alternatively, enter the following for this hard drive with APFS:
/ sbin / fsck_apfs -fy / dev / disk0
or in the German layout:
-sbin-fsck? apfs ßfz -dev-disk0
- For a hard drive with exFAT the command is of course:
/ sbin / fsck_exfat -fy / dev / disk0
or in the German layout:
-sbin-fsck? exfat ßfz -dev-disk0
- If there are still errors, you can enter the command several times and confirm it
- End the session either with the exit command shown above or with:
reboot
Note: The question mark «?» Is not a placeholder, but the German character for the underscore «_» written in the English layout — so press Shift + ß for this.
The single user mode appears tiny on the Retina MacBook
The font may appear very small in single-user mode on an Apple MacBook, Apple MacBook Pro or Apple MacBook Air with Retina display. This is probably due to the fact that this mode is not designed for retina resolution, but for coarser or older displays. Unfortunately, this also means that — if you do not recognize the entry correctly — you have to pay particular attention to the fact that your entries are correct. I wish you success! And if you found a bug in the instructions above, please leave a comment.

Jens has been running the blog since 2012. He appears as Sir Apfelot for his readers and helps them with problems of a technical nature. In his free time he drives electric unicycles, takes photos (preferably with his iPhone, of course), climbs around in the Hessian mountains or hikes with the family. His articles deal with Apple products, news from the world of drones or solutions for current bugs.
—
Did you like the article and did the instructions on the blog help you? Then I would be happy if you the blog via a Steady Membership or at Patreon would support.
I am trying to make a python script that runs the command line for turning a file into a .zip using python3 on my Mac.
However, whenever I run: os.system('zip -er file.zip /Users/mymac/Desktop/file.py') in python3, I get the error:
zip I/O error: Read-only file system
zip error: Could not create output file (file.zip)
I have tried disabling SIP on my Mac, as well as trying to use subprocess but I get the same message every time. I am really unsure why this happens… Is anyone able to help out?
asked Dec 31, 2020 at 18:20
![]()
3
i will suggest 3 steps !
first run :
fsck -n -f
then reboot !
make sure to run the python file as root
import os
try:

    os.system('zip mag.zip mag.ppk')
    print ('success')
 except:
    print ('problem')
screnshoot for my test
answered Dec 31, 2020 at 20:19
![]()
2
Habe neu installiert.
Zuvor die SSD mit einem externen Gerät Secure Erast und den NVRAM gelöscht.
Nach der neuen Installation in den Single User Modus gebootet und fsck -y ausgeführt.
Kam wieder die Meldung : error: container /dev/rdisk1 is mounted with write access
Terminal :
-MacBook-Pro ~ % fsck -y
error: container /dev/rdisk1 is mounted with write access.
———————————————————————————————-
Was ist nun dev/rdisk1 ???
Gab es zuvor nicht.
———————————————————————————————-
Terminal :
-MacBook-Pro ~ % diskutil list /dev/rdisk1
/dev/disk1 (synthesized):
#: TYPE NAME SIZE IDENTIFIER
0: APFS Container Scheme — +249.8 GB disk1
Physical Store disk0s2
1: APFS Volume SSD — Daten 3.7 GB disk1s1
2: APFS Volume Preboot 26.7 MB disk1s2
3: APFS Volume Recovery 525.8 MB disk1s3
4: APFS Volume VM 1.1 GB disk1s4
5: APFS Volume SSD 11.1 GB disk1s5
————————————————————————————————————————————
Terminal :
-MacBook-Pro ~ % umount /dev/rdisk1
umount: /dev/rdisk1: not a directory or special device
umount: /dev/rdisk1: not currently mounted
————————————————————————————————————————————-
Terminal :
-MacBook-Pro ~ % rm /dev/rdisk1
override rw-r—— root/operator for /dev/rdisk1?
—————————————————————————————————————————————
override rw-r—— root/operator for /dev/rdisk1?
yes ???
—————————————————————————————————————————————
Im Recovery Modus hat das fsck -y dann aber funktioniert :
bash-3.2# fsck -y
** /dev/rdisk1s1
** Root file system
Executing fsck_hfs (version hfs-522.100.5).
** Checking non-journaled HFS Plus Volume.
The volume name is macOS Base System
** Checking extents overflow file.
** Checking catalog file.
** Checking multi-linked files.
** Checking catalog hierarchy.
** Checking extended attributes file.
** Checking volume bitmap.
** Checking volume information.
** The volume macOS Base System appears to be OK.
-bash-3.2#
Paßt das nun soweit oder hat die SSD vielleicht einen Schuss?
Vielen Dank
When I try to save something or rename a file/folder it say this error » Read-only file system» or run something as root in the terminal it say this error
sudo: unable to open /var/lib/sudo/"My User Name"/0: Read-only file system
W: Not using locking for read only lock file /var/lib/dpkg/lock
E: Unable to write to /var/cache/apt/
E: The package lists or status file could not be parsed or opened.
When I make a Folder the error dialog in the details with Nautilus is this:
Error creating directory: Read-only file system
I would show you I picture of it but it isn’t even letting my save onto my flash drive. Please help me.
![]()
Seth
56.2k43 gold badges144 silver badges196 bronze badges
asked Apr 28, 2013 at 2:35
![]()
1
This worked for me:
First, run this command with sudo permission:
sudo fsck -n -f
Then reboot the machine.
The options -f and -n are documented directly under man fsck, but under the filesystem-specific fsck subcommand. The fs-specific-options part alludes to this:
SYNOPSIS
fsck [-lsAVRTMNP]
     [-r [fd]]
     [-C [fd]]
     [-t fstype]
     [filesystem...]
     [--]
     [fs-specific-options]
From man fsck.ext4 (a.k.a. e2fsck):
-f— Force checking even if the file system seems clean.
-n— Open the file system read-only, and assume an answer ofnoto all questions. Allowse2fsckto be used non-interactively. This option may not be specified at the same time as the-por-yoptions.
Further comments to option -n from this Unix & Linux stackexchange answer:
If you meant
fsck -n, then the filesystem-specific programs are called and passed the-noption, which for most of them means “look but don’t touch”. If the filesystem is mounted,fsckwill usually find spurious errors, because a mounted filesystem tends to be in an inconsistent state as write operations are happening. It won’t lock up your system, but it won’t report anything useful either.
![]()
answered Jan 6, 2017 at 17:24
![]()
7
When the system enters a read-only state, it does so to prevent damage to the system. Make sure your HDD is working properly and/or backup your data before doing anything.
I suggest to boot a live USB/DVD, open GParted, and use the check/repair feature.
This is the command to enable writing:
sudo mount -o rw,remount /
![]()
answered Apr 28, 2013 at 2:41
![]()
9
If you are dual booting Windows with Ubuntu and you do not have any error in dmesg, then the problem could very well be caused by Windows.
In Windows go to Control Panel → Power Options and disable Fast Startup. Now boot into Ubuntu.
![]()
answered Jul 16, 2018 at 16:09
![]()
Prejith PPrejith P
911 silver badge2 bronze badges
7
When accessing an HDD from different OS (Windows & Linux) the disk could contain an unclean file system. So the metadata cached in the OS, deny mounting the disk
To try to correct the mistakes, identify the path of your partition disk in the Disk app (i.e: /dev/sdb1) and use ntfsfix.
sudo ntfsfix /dev/sdb1
If the disk is not mounted automatically, so:
$ sudo mkdir /media/[mount point]
$ sudo mount -o rw /dev/sdb1 /media/[mount point]
If you get the error Read-only file system then you should delete the following directories from Windows:
- .Tash-1000
- $RECYCLE.BIN/
In Git Bash as Admin:
Identify your disk. In my case is /f
$ cd /f
$ rm -R $RECYCLE.BIN/ && rm -R .Tash-1000
GL
answered Jul 18, 2020 at 4:22
![]()
If someone using dual OS(Ubuntu, Windows) like me, NTFS filesystem is the main reason of this problem. Inspect the path of disk like «/dev/sda3», unmount the disk and run:
sudo ntfsfix /dev/sda3
answered May 24, 2022 at 5:45
![]()
sundowatchsundowatch
2631 gold badge4 silver badges12 bronze badges
2
In my case, I have a common drive between Windows and Ubuntu.
On Ubuntu, I had installed trash-cli and had trashed some files.
When I booted in Windows, I did some defragmentation on that drive.
But when I went back to Ubuntu, then it started giving me Read-only file system error on any write operation.
After reading @Braian Coronel’s answer, I went back to Windows and permanently deleted .Trash-1000 folder which solved my issue.
answered Dec 22, 2021 at 17:35
![]()