Мне нужно создать скрипт PHP, который создает событие sigle в Календаре Google. У меня не возникало проблем с настройкой идентификатора клиента, секретности клиента, ключа разработчика и создания нового события.
Моя единственная проблема заключается в OAuth2, в частности, мне нужно сделать постоянное соединение, и я не хочу выполнять аутентификацию каждый раз, когда запускаю скрипт.
- Как отменить доступ к Microsoft APP для пользователя в php
- Правильный способ установки маркера Bearer с CURL
- Автоматическая аутентификация Soundcloud PHP Api без взаимодействия с пользователем
- Интеграция Dwolla с PHP с их API
- yii2, google outh2 и область действия
Собственно, с помощью этого скрипта я могу получить токен и токен обновления, но каждый час истекает мой токен, и я не знаю, как его обновить. Как я могу отредактировать этот код для этого? Могу ли я сохранить токен и токен обновления где-нибудь и всегда использовать одни и те же данные?
Я получаю неперехваченное исключение «Google_AuthException» с сообщением «Ошибка обновления токена OAuth2, сообщение:« {«error»: «invalid_grant»
Я уже прочитал некоторые другие сообщения об этой теме здесь, в stackoverflow, но я до сих пор не нашел решение …:
<?php require_once 'src/Google_Client.php'; require_once 'src/contrib/Google_CalendarService.php'; session_start(); $client = new Google_Client(); $client->setApplicationName("Calendar App"); $client->setClientId('xxxx'); $client->setClientSecret('yyy'); $client->setRedirectUri('http://www.zzzzzz'); $client->setDeveloperKey('kkk'); $client->setAccessType('offline'); $cal = new Google_CalendarService($client); if (isset($_GET['logout'])) { unset($_SESSION['token']); } if (isset($_GET['code'])) { $client->authenticate($_GET['code']); $_SESSION['token'] = $client->getAccessToken(); header('Location: http://' . $_SERVER['HTTP_HOST'] . $_SERVER['PHP_SELF']); } if (isset($_SESSION['token'])) { //echo $_SESSION['token']; //$client->setAccessToken($_SESSION['token']); $authObj = json_decode($_SESSION['token']); $accessToken = $authObj->access_token; $refreshToken = $authObj->refresh_token; $tokenType = $authObj->token_type; $expiresIn = $authObj->expires_in; echo 'access_token = ' . $accessToken; echo '<br />'; echo 'refresh_token = ' . $refreshToken; echo '<br />'; echo 'token_type = ' . $tokenType; echo '<br />'; echo 'expires_in = ' . $expiresIn; } if(!empty($cookie)){ $client->refreshToken($this->Cookie->read('token')); } if ($client->getAccessToken()) { $calList = $cal->calendarList->listCalendarList(); $_SESSION['token'] = $client->getAccessToken(); } else { $authUrl = $client->createAuthUrl(); print "<a class='login' href='$authUrl'>Connect Me!</a>"; } // Creation of a single event $event = new Google_Event(); $event->setSummary($event_name); $event->setLocation(''); .... ?> Большое спасибо за вашу поддержку!
- Как использовать паспорт Laravel с пользовательским столбцом имени пользователя
- Ошибка получения маркера доступа OAuth2: ошибка 500
- Аутентификация API Google API для сервера
- Передача безопасных файлов cookie на PHP через AJAX
- Токены доступа к Facebook — аутентификация на стороне сервера
На этой странице https://developers.google.com/accounts/docs/OAuth2WebServer#offline объясняется, как работает токен обновления, и как использовать его для получения нового токена доступа с использованием raw http.
Из этого вопроса Как обновить токен с клиентом API Google? здесь есть php-эквивалент
here is the snippet to set token, before that make sure the access type should be set to offline if (isset($_GET['code'])) { $client->authenticate(); $_SESSION['access_token'] = $client->getAccessToken(); } To refresh token $google_token= json_decode($_SESSION['access_token']); $client->refreshToken($google_token->refresh_token); this will refresh your token, you have to update it in session for that you can do $_SESSION['access_token']= $client->getAccessToken()
ОТКЛЮЧЕНИЕ Следуйте этим трем шагам, чтобы отладить любое приложение oauth
-
Убедитесь, что вы прочитали https://developers.google.com/accounts/docs/OAuth2, а также соответствующую подстраницу (webapp, javascript и т. Д.) В зависимости от того, какой вкус вы используете. Вы не будете очень далеко отлаживать свое приложение, если не понимаете, что он делает.
-
Используйте Oauth Playground на странице https://developers.google.com/oauthplayground/, чтобы пройти через шаги Oauth и в конечном итоге сделать вызов API Google. Это подтвердит ваше понимание и покажет вам, как выглядят вызовы и ответы http
-
Используйте трассировку / протоколирование / прокси и т. Д., Чтобы отслеживать фактический трафик HTTP из вашего приложения. Сравните это с тем, что вы наблюдали на шаге 2. Это должно показать вам, где проблема.
Я получил эту ошибку раньше, потому что я пытался проверить подлинность дважды.
Поскольку у вас есть эта строка:
if (isset($_GET['code']))
Он попытается выполнить аутентификацию, когда код находится в строке запроса, независимо от того, вы уже прошли аутентификацию. Попробуйте проверить, присутствует ли токен SESSION перед попыткой (повторной) аутентификации.
Попробуйте удалить setDeveloperKey (), это вызвало некоторые проблемы для меня, и это кажется ненужным.
Я хочу получить токен доступа от Google. Google API сообщает, что для получения токена доступа отправьте код и другие параметры на страницу создания токена, и ответом будет объект JSON, подобный следующему:
{
"access_token" : "ya29.AHES6ZTtm7SuokEB-RGtbBty9IIlNiP9-eNMMQKtXdMP3sfjL1Fc",
"token_type" : "Bearer",
"expires_in" : 3600,
"refresh_token" : "1/HKSmLFXzqP0leUihZp2xUt3-5wkU7Gmu2Os_eBnzw74"
}
Однако я не получаю токен обновления. Ответ в моем случае:
{
 "access_token" : "ya29.sddsdsdsdsds_h9v_nF0IR7XcwDK8XFB2EbvtxmgvB-4oZ8oU",
"token_type" : "Bearer",
"expires_in" : 3600
}
Ответы:
Предоставляется refresh_tokenтолько при первой авторизации от пользователя. Последующие авторизации, такие как те, которые вы делаете при тестировании интеграции OAuth2, больше не вернутся refresh_token. 
- Перейдите на страницу, на которой показаны приложения с доступом к вашей учетной записи:
https://myaccount.google.com/u/0/permissions . - В меню Сторонние приложения выберите свое приложение.
- Нажмите «Удалить доступ», затем нажмите «ОК» для подтверждения.
- Следующий запрос OAuth2 вернет
refresh_token(при условии, что он также включает параметр запроса «access_type = offline»).
Кроме того, вы можете добавить параметры запроса prompt=consent&access_type=offlineв перенаправление OAuth (см. Страницу Google OAuth 2.0 для приложений веб-сервера ).
Это побудит пользователя снова авторизовать приложение и всегда вернет refresh_token.
Чтобы получить токен обновления, вы должны добавить оба, approval_prompt=forceи access_type="offline"
если вы используете java-клиент, предоставленный Google, он будет выглядеть следующим образом:
GoogleAuthorizationCodeFlow flow = new GoogleAuthorizationCodeFlow.Builder(
            HTTP_TRANSPORT, JSON_FACTORY, getClientSecrets(), scopes)
            .build();

AuthorizationCodeRequestUrl authorizationUrl =
            flow.newAuthorizationUrl().setRedirectUri(callBackUrl)
                    .setApprovalPrompt("force")
                    .setAccessType("offline");
Я искал долгую ночь, и это делает свое дело:
Модифицированный user-example.php из admin-sdk
$client->setAccessType('offline');
$client->setApprovalPrompt('force');
$authUrl = $client->createAuthUrl();
echo "<a class='login' href='" . $authUrl . "'>Connect Me!</a>";
затем вы получите код по URL-адресу перенаправления и аутентификацию с кодом и получите токен обновления
$client()->authenticate($_GET['code']);
echo $client()->getRefreshToken();
Вы должны хранить его сейчас;)
Когда ваш accesskey истекает, просто сделайте
$client->refreshToken($theRefreshTokenYouHadStored);
Это вызвало у меня некоторую путаницу, поэтому я решил поделиться тем, чему научился на своем нелегком пути:
При запросе доступа с использованием access_type=offlineи approval_prompt=forceпараметров , которые вы должны получить одновременно доступ маркеров и обновление маркеров. Доступа лексема истекает вскоре после вы получите его , и вам нужно будет обновить его.
Вы правильно сделали запрос на получение нового токена доступа и получили ответ с новым токеном доступа . Меня также смутил тот факт, что я не получил новый токен обновления . Однако так и должно быть, поскольку вы можете использовать один и тот же токен обновления снова и снова.
Я думаю, что некоторые из других ответов предполагают, что вы по какой-то причине захотели получить себе новый токен обновления, и предположили, что вы повторно авторизуете пользователя, но на самом деле вам это не нужно, так как имеющийся у вас токен обновления будет работать до отозвано пользователем.
Для того, чтобы получить, refresh_tokenвам нужно включить access_type=offlineв URL-адрес запроса OAuth. Когда пользователь впервые авторизуется, вы получите не ноль, refresh_tokenа access_tokenсрок действия, срок действия которого истекает.
Если вы столкнулись с ситуацией, когда пользователь может повторно аутентифицировать учетную запись, для которой у вас уже есть токен аутентификации (как упомянуто выше в @SsjCosty), вам необходимо получить информацию от Google, для которой этот токен предназначен. Для этого добавьте profileв свои рамки. При использовании OAuth2 Ruby gem ваш окончательный запрос может выглядеть примерно так:
client = OAuth2::Client.new(
  ENV["GOOGLE_CLIENT_ID"],
  ENV["GOOGLE_CLIENT_SECRET"],
  authorize_url: "https://accounts.google.com/o/oauth2/auth",
  token_url: "https://accounts.google.com/o/oauth2/token"
)

# Configure authorization url
client.authorize_url(
  scope: "https://www.googleapis.com/auth/analytics.readonly profile",
  redirect_uri: callback_url,
  access_type: "offline",
  prompt: "select_account"
)
Обратите внимание, что в области есть две записи, разделенные пробелами, одна для доступа только для чтения к Google Analytics, а другая просто profile, что является стандартом OpenID Connect.
Это приведет к тому, что Google предоставит дополнительный атрибут, называемый id_tokenв get_tokenответе. Чтобы получить информацию из id_token, просмотрите эту страницу в Документах Google. Существует несколько библиотек, предоставленных Google, которые будут проверять и «декодировать» это для вас (я использовал гем Ruby google-id-token ). После того, как вы его проанализируете, этот subпараметр фактически станет уникальным идентификатором учетной записи Google.
Стоит отметить, что если вы измените область действия, вы снова получите токен обновления для пользователей, которые уже прошли проверку подлинности в исходной области действия. Это полезно, если, скажем, у вас уже есть группа пользователей, и вы не хотите, чтобы они все отключили приложение в Google.
Да, и последнее замечание: вам не нужно prompt=select_account , но это полезно, если у вас есть ситуация, когда ваши пользователи могут захотеть пройти аутентификацию с использованием нескольких учетных записей Google (т. Е. Вы не используете это для входа / аутентификации) ,
1. Как получить «refresh_token»?
Решение: опция access_type = ‘offline’ должна использоваться при создании authURL. Источник: Использование OAuth 2.0 для приложений веб-сервера
2. Но даже с «access_type = offline» я не получаю «refresh_token»?
Решение: обратите внимание, что вы получите его только при первом запросе, поэтому, если вы храните его где-то и есть возможность перезаписать это в своем коде при получении нового access_token после истечения предыдущего срока действия, убедитесь, что это значение не перезаписано.
Из Google Auth Doc: (это значение = access_type)
Это значение указывает серверу авторизации Google возвращать токен обновления и токен доступа при первом обмене кода авторизации вашим приложением для токенов.
Если вам снова понадобится «refresh_token», то вам нужно удалить доступ к своему приложению, выполнив шаги, описанные в ответе Рича Саттона .
Установка этого параметра приведет к тому, что токен обновления будет отправляться каждый раз:
$client->setApprovalPrompt('force');
пример приведен ниже (php):
$client = new Google_Client();
$client->setClientId($client_id);
$client->setClientSecret($client_secret);
$client->setRedirectUri($redirect_uri);
$client->addScope("email");
$client->addScope("profile");
$client->setAccessType('offline');
$client->setApprovalPrompt('force');
Для меня я пробовал CalendarSampleServletпредоставленные Google. Через 1 час access_key истекает, и происходит перенаправление на страницу 401. Я перепробовал все вышеперечисленные варианты, но они не сработали. Наконец, после проверки исходного кода для «AbstractAuthorizationCodeServlet» , я увидел, что перенаправление будет отключено при наличии учетных данных, но в идеале его следует проверить refresh token!=null. Я добавил ниже код, CalendarSampleServletи он работал после этого. Большое облегчение после стольких часов разочарования. Слава Богу.
if (credential.getRefreshToken() == null) {
    AuthorizationCodeRequestUrl authorizationUrl = authFlow.newAuthorizationUrl();
    authorizationUrl.setRedirectUri(getRedirectUri(req));
    onAuthorization(req, resp, authorizationUrl);
    credential = null;
}
Теперь Google отклонил эти параметры в моем запросе (access_type, prompt) … :(, и вообще нет кнопки «Отменить доступ». Я расстраиваюсь из-за того, что вернул свой refresh_token lol
ОБНОВЛЕНИЕ: я нашел ответ здесь: D вы можете получить токен обновления по запросу
https://developers.google.com/identity/protocols/OAuth2WebServer
curl -H «Тип содержимого: application / x-www-form-urlencoded»
https://accounts.google.com/o/oauth2/revoke?token= {token}Токен может быть токеном доступа или токеном обновления. Если токен является токеном доступа и имеет соответствующий токен обновления, токен обновления также будет отозван.
Если отзыв успешно обработан, то код состояния ответа равен 200. Для условий ошибки возвращается код состояния 400 вместе с кодом ошибки.
    #!/usr/bin/env perl

    use strict;
    use warnings;
    use 5.010_000;
    use utf8;
    binmode STDOUT, ":encoding(utf8)";

    use Text::CSV_XS;
    use FindBin;
    use lib $FindBin::Bin . '/../lib';
    use Net::Google::Spreadsheets::V4;

    use Net::Google::DataAPI::Auth::OAuth2;

    use lib 'lib';
    use Term::Prompt;
    use Net::Google::DataAPI::Auth::OAuth2;
    use Net::Google::Spreadsheets;
    use Data::Printer ;


    my $oauth2 = Net::Google::DataAPI::Auth::OAuth2->new(
         client_id => $ENV{CLIENT_ID},
         client_secret => $ENV{CLIENT_SECRET},
         scope => ['https://www.googleapis.com/auth/spreadsheets'],
    );
    my $url = $oauth2->authorize_url();
    # system("open '$url'");
    print "go to the following url with your browser n" ;
    print "$urln" ;
    my $code = prompt('x', 'paste code: ', '', '');
    my $objToken = $oauth2->get_access_token($code);

    my $refresh_token = $objToken->refresh_token() ;

    print "my refresh token is : n" ;
    # debug p($refresh_token ) ;
    p ( $objToken ) ;


    my $gs = Net::Google::Spreadsheets::V4->new(
            client_id      => $ENV{CLIENT_ID}
         , client_secret  => $ENV{CLIENT_SECRET}
         , refresh_token  => $refresh_token
         , spreadsheet_id => '1hGNULaWpYwtnMDDPPkZT73zLGDUgv5blwJtK7hAiVIU'
    );

    my($content, $res);

    my $title = 'My foobar sheet';

    my $sheet = $gs->get_sheet(title => $title);

    # create a sheet if does not exit
    unless ($sheet) {
         ($content, $res) = $gs->request(
              POST => ':batchUpdate',
              {
                    requests => [
                         {
                              addSheet => {
                                    properties => {
                                         title => $title,
                                         index => 0,
                                    },
                              },
                         },
                    ],
              },
         );

         $sheet = $content->{replies}[0]{addSheet};
    }

    my $sheet_prop = $sheet->{properties};

    # clear all cells
    $gs->clear_sheet(sheet_id => $sheet_prop->{sheetId});

    # import data
    my @requests = ();
    my $idx = 0;

    my @rows = (
         [qw(name age favorite)], # header
         [qw(tarou 31 curry)],
         [qw(jirou 18 gyoza)],
         [qw(saburou 27 ramen)],
    );

    for my $row (@rows) {
         push @requests, {
              pasteData => {
                    coordinate => {
                         sheetId     => $sheet_prop->{sheetId},
                         rowIndex    => $idx++,
                         columnIndex => 0,
                    },
                    data => $gs->to_csv(@$row),
                    type => 'PASTE_NORMAL',
                    delimiter => ',',
              },
         };
    }

    # format a header row
    push @requests, {
         repeatCell => {
              range => {
                    sheetId       => $sheet_prop->{sheetId},
                    startRowIndex => 0,
                    endRowIndex   => 1,
              },
              cell => {
                    userEnteredFormat => {
                         backgroundColor => {
                              red   => 0.0,
                              green => 0.0,
                              blue  => 0.0,
                         },
                         horizontalAlignment => 'CENTER',
                         textFormat => {
                              foregroundColor => {
                                    red   => 1.0,
                                    green => 1.0,
                                    blue  => 1.0
                              },
                              bold => 1,
                         },
                    },
              },
              fields => 'userEnteredFormat(backgroundColor,textFormat,horizontalAlignment)',
         },
    };

    ($content, $res) = $gs->request(
         POST => ':batchUpdate',
         {
              requests => @requests,
         },
    );

    exit;

    #Google Sheets API, v4

    # Scopes
    # https://www.googleapis.com/auth/drive   View and manage the files in your Google D# # i# rive
    # https://www.googleapis.com/auth/drive.file View and manage Google Drive files and folders that you have opened or created with this app
    # https://www.googleapis.com/auth/drive.readonly   View the files in your Google Drive
    # https://www.googleapis.com/auth/spreadsheets  View and manage your spreadsheets in Google Drive
    # https://www.googleapis.com/auth/spreadsheets.readonly  View your Google Spreadsheets
Использование автономного доступа и подсказки: согласие хорошо для меня:
   auth2 = gapi.auth2.init({
                    client_id: '{cliend_id}'
   });

   auth2.grantOfflineAccess({prompt:'consent'}).then(signInCallback);
Мое решение было немного странным. Я перепробовал каждое решение, которое нашел в интернете, и ничего Удивительно, но это сработало: удалите credentials.json, обновите, снова установите приложение в своей учетной записи. Новый файл credentials.json будет иметь токен обновления. Сделайте резервную копию этого файла где-нибудь. Затем продолжайте использовать приложение, пока ошибка обновления токена не появится снова. Удалите файл crendetials.json, который теперь только с сообщением об ошибке (в моем случае это произошло), затем вставьте старый файл учетных данных в папку, готово! Прошла 1 неделя с тех пор, как я это сделал, и проблем больше не было.
Чтобы каждый раз при аутентификации получать новый refresh_token, тип учетных данных OAuth 2.0, созданных на панели мониторинга, должен быть «Другой». Также, как упомянуто выше, опция access_type = ‘offline’ должна использоваться при генерации authURL.
При использовании учетных данных с типом «веб-приложение» никакая комбинация переменных prompt / authentication_prompt работать не будет — вы все равно получите refresh_token только при первом запросе.
Мне нужно сделать PHP-скрипт, который создает одно событие в Календаре Google. У меня не было проблем с настройкой идентификатора клиента, секрета клиента, ключа разработчика и созданием нового события.
Моя единственная проблема связана с OAuth2, в частности, мне нужно установить постоянное соединение, и я не хочу выполнять аутентификацию каждый раз, когда запускаю скрипт.
На самом деле, с помощью этого скрипта я могу получить токен и токен обновления, но срок действия моего токена истекает каждый час, и я не знаю, как его обновить. Как я могу отредактировать этот код, чтобы сделать это? Могу ли я где-нибудь сохранить токен и токен обновления и всегда использовать одни и те же данные?
Я получаю неперехваченное исключение «Google_AuthException» с сообщением «Ошибка обновления токена OAuth2, сообщение:» { «ошибка»: «invalid_grant»
Я уже читал некоторые другие сообщения на эту тему здесь, в stackoverflow, но до сих пор не нашел решения… :
<?php

 require_once 'src/Google_Client.php';
 require_once 'src/contrib/Google_CalendarService.php';
 session_start();

 $client = new Google_Client();
 $client->setApplicationName("Calendar App");
 $client->setClientId('xxxx');
 $client->setClientSecret('yyy');
 $client->setRedirectUri('http://www.zzzzzz');
 $client->setDeveloperKey('kkk');
 $client->setAccessType('offline');
 $cal = new Google_CalendarService($client);

if (isset($_GET['logout'])) {
  unset($_SESSION['token']);
}

if (isset($_GET['code'])) {
  $client->authenticate($_GET['code']);
  $_SESSION['token'] = $client->getAccessToken();
  header('Location: http://' . $_SERVER['HTTP_HOST'] . $_SERVER['PHP_SELF']);
}

if (isset($_SESSION['token'])) {
    //echo $_SESSION['token'];
  //$client->setAccessToken($_SESSION['token']);
    $authObj = json_decode($_SESSION['token']);
    $accessToken = $authObj->access_token;
    $refreshToken = $authObj->refresh_token;
    $tokenType = $authObj->token_type;
    $expiresIn = $authObj->expires_in;
    echo 'access_token = ' . $accessToken;
    echo '<br />';
    echo 'refresh_token = ' . $refreshToken;
    echo '<br />';
    echo 'token_type = ' . $tokenType;
    echo '<br />';
    echo 'expires_in = ' . $expiresIn;
}

if(!empty($cookie)){
    $client->refreshToken($this->Cookie->read('token'));
}

if ($client->getAccessToken()) {
    $calList = $cal->calendarList->listCalendarList();
    $_SESSION['token'] = $client->getAccessToken();
} else {
  $authUrl = $client->createAuthUrl();
  print "<a class='login' href='$authUrl'>Connect Me!</a>";
}


// Creation of a single event
$event = new Google_Event();
$event->setSummary($event_name);
$event->setLocation('');
....

?>
Большое спасибо за вашу поддержку!
Upgrade your OAuth integration to the latest version of Indeed’s OAuth.
By using this API, this API documentation, and/or building the integration, you agree to the Additional API Terms and Guidelines.
This page only explains how to upgrade your application authorization code from the v1 to the v2 version of the Indeed OAuth endpoint.
For a complete set of authorization instructions, see Authorization.
To upgrade your integration from v1 to the v2 version of the Indeed OAuth endpoint, see the upgrade instructions for each step:
| # | Step | Step Frequency |
|---|---|---|
| 1. | Update Your Application Registration | One time only |
| 2. | Get an Access Token | For each user |
| 3. | Pass Your Token to the API | With each API call |
| 4. | Refresh Your Token | An hour after the last refresh or the next time you make an API call |
Update Your Application Registration
- Go to the Indeed Application Registration page, and review your application’s information.
- Make sure you add at least one redirect URL. A redirect URL is a page on your website where Indeed redirects a user after attempting to authorize the user. If authorization is successful, then we pass an authorization code to your redirect URL. If you would like to test your OAuth application on your local machine, you can set one of your redirect URLs to
http://localhost.
Get an access token
Indeed’s access tokens use the OAuth 2.0 protocol. Specifically, they follow the IETF OAuth 2.0 Authorization Framework.
Follow these steps to get an access token on behalf of an Indeed user. Repeat these steps for each user:
a. Request an Authorization Code
b. Receive the Authorization Code
c. Request Your User’s Access Token
d. Receive the Access Token
The owner of an Indeed account must authorize your application to call the API on its behalf.
The URL path for the authorization link, which you send to the user, has changed from https://secure.indeed.com/account/oauth to:
https://secure.indeed.com/oauth/v2/authorize
Parameters
The parameters have not changed, but the redirect_uri parameter is now required.
The redirect_uri is the page on your site that captures the authorization code. It must match one of the redirect URLs registered with your application. You can use http://localhost as one of your redirect URLs.
Example Request
https://secure.indeed.com/oauth/v2/authorize?client_id=6nwwcdklwgktryjw2j5fxh5t2fyneule7zg7mvw3pf9jbx3wmewzlxkdz1jxvs6b&redirect_uri=http%3A%2F%2Fwww.acerecruitersllc.com%2Foauth%2Findeed&response_type=code&scope=email+offline_access&state=employer1234
If you prefer to use a button instead of a link, then you can create a Log In with Indeed button.
Receive the Authorization Code
This step has not changed.
- The user clicks on the authorization link and logs in to Indeed’s site.
- The OAuth consent page asks the user to give your application access.
- We redirect the user to your
redirect_uriwith the following parameters appended:
| Name | Description | Example |
|---|---|---|
code |
The authorization code. It is valid for 10 minutes. | rXZSMNyYQHQ |
state |
An optional value that is returned only if you pass it in the request. | employer1234 |
Request Your User’s Access Token
Next, send the authorization code back to Indeed to get an access token.
The URL path has changed from https://secure.indeed.com/oauth/tokens to:
POST https://apis.indeed.com/oauth/v2/tokens
Headers
The required headers have not changed.
Fields
The fields have not changed, but the redirect_uri must match the one you used to request an authorization code.
Example Request
curl -X POST -H 'Content-Type: application/x-www-form-urlencoded' -H 'Accept: application/json'
 -d 'code=rXZSMNyYQHQ'
 -d 'client_id=6nwwcdklwgktryjw2j5fxh5t2fyneule7zg7mvw3pf9jbx3wmewzlxkdz1jxvs6b'
 -d 'client_secret=02KKpg6yLXw2v3FKf5lqyFGtMQCvPBNbJIw89SoSd9fts1LAdlvwUQQ6dwhAhEXv'
 -d 'redirect_uri=http://www.acerecruitersllc.com/oauth/indeed'
 -d 'grant_type=authorization_code'
 https://apis.indeed.com/oauth/v2/tokens
Receive the Access Token
The JSON response contains the access_token, id_token, expires_in, token_type, and refresh_token.
The id_token field is new. This field is a JSON Web Token that contains the same information that you can retrieve from the User Info endpoint: sub, email, email_verified. The id token includes the email and email_verified fields only if
your application requests (and is granted) the email scope.
The format of the scope field has changed. In v1, this field returns the array ["all"]. In v2, this field returns a string of scopes separated by spaces. See scopes.
Finally, in v2, we return a refresh token only when your application requests (and is granted) the
offline_access scope. In this case, we also include the field «consented_scope», which represents all scopes that a user has granted the application.
Example Response
{
  "access_token":"eyJhbGciOiJIUzI1NiIsInR5cCI6IkpXVCJ[...]",
  "id_token":"eyJraWQiOiJlMzEzZTc4My1lM2YwLTQ3ZWMtY[...]",
  "refresh_token":"rXZSMNyYQHQ",
  "expires_in":3600,
  "token_type":"Bearer",
  "scope": "email offline_access",
  "consented_scope":"email offline_access"
}
Error Example
{
  error: "invalid_request",
  error_description: "Invalid authentication request."
}
Pass Your Token to the API
This step has not changed.
Refresh Your Token
Access tokens are valid for one hour (3600 seconds). To refresh an expired access token, use the refresh token returned with your user’s access token. The refresh token is valid for 60 days from when it was issued. With each refresh, the refresh token’s expiration date is extended to 60 days from the most recent refresh.
We return a refresh token with the access token only when your application requests (and is granted) the offline_access scope.
The URL path path has changed from https://secure.indeed.com/oauth/tokens to:
POST https://apis.indeed.com/oauth/v2/tokens
Headers
The required headers have not changed.
Fields
The scope response field has changed. In v1, this field returns the array ["all"]. In v2, this field returns a string representing all of the scopes that have been granted by the user. For example, if your application requests the email and offline_access scopes and the user grants these scopes during the
authorization step, then the scope response field has the value email offline_access as a string.
Example Request
curl -X POST -H 'Content-Type: application/x-www-form-urlencoded' -H 'Accept: application/json'
  -d 'refresh_token=8qE_nKXUng4'
  -d 'client_id=6nwwcdklwgktryjw2j5fxh5t2fyneule7zg7mvw3pf9jbx3wmewzlxkdz1jxvs6b'
  -d 'client_secret=02KKpg6yLXw2v3FKf5lqyFGtMQCvPBNbJIw89SoSd9fts1LAdlvwUQQ6dwhAhEXv'
  -d 'grant_type=refresh_token'
  https://apis.indeed.com/oauth/v2/tokens
Example Response
{
  "access_token":"eyJhbGciOiJIUzI1NiIsInR5cCI6IkpXVCJ9.eyJzdWIiOiIxMjM0NTY3ODkwIiwibmFtZSI6IkpvaG4gRG9lIiwiaWF0IjoxNTE2MjM5MDIyfQ.SflKxwRJSMeKKF2QT4fwpMeJf36POk6yJV_adQssw5c",
  "refresh_token":"rXZSMNyYQHQ",
  "convid":"1c1a1s8540kkt89p",
  "scope":"email offline_access",
  "token_type":"Bearer",
  "expires_in":3600
}
Note: The new access token is also valid for one hour only. You must refresh this token after that.
User Info
The user information endpoint that is used to request account information has changed. This endpoint returns the user id, email address, and email verification status associated with the access token. The response only includes the email and email_verified fields if you request the email scope, and the user grants it to you.
The host name remains the same, secure.indeed.com. However, the endpoint path has changed. It is no longer /v1/api/account and has changed to /v2/api/userinfo.
Also, you can no longer pass the access token as a URL parameter. You must pass the access token in an authorization header.
URL Path
GET/POST https://secure.indeed.com/v2/api/userinfo
Headers
Send the access token in an Authorization header.
| Header | Value |
|---|---|
Authorization |
Bearer <access_token> |
Fields
This endpoint does not have any request fields. In the request, pass only the access token in an Authorization header, with Bearer pre-pended before the access token string.
A successful request returns the HTTP status code 200 and the following response fields.
| Name | Type | Description | Example |
|---|---|---|---|
sub |
string | A unique identifier of the user’s account. | 248289761001 |
email |
string | The user’s email address. | mina.ray@myemail.world |
email_verified |
boolean | Whether the user has verified their email address. | true |
Example Request
GET /v2/api/userinfo HTTP/1.1
Authorization: Bearer eyJhbGciOiJIUzI1NiIsInR5cCI6IkpXVCJ9.eyJzdWIiOiIxMjM0NTY3ODkwIiwibmFtZSI6IkpvaG4gRG9lIiwiaWF0IjoxNTE2MjM5MDIyfQ.SflKxwRJSMeKKF2QT4fwpMeJf36POk6yJV_adQssw5c
Host: secure.indeed.com
Example Response
  HTTP/1.1 200 OK
  Content-Type: application/json

  {
   "sub": "248289761001",
   "email": "mina.ray@myemail.world",
   "email_verified": true
  }
Scopes
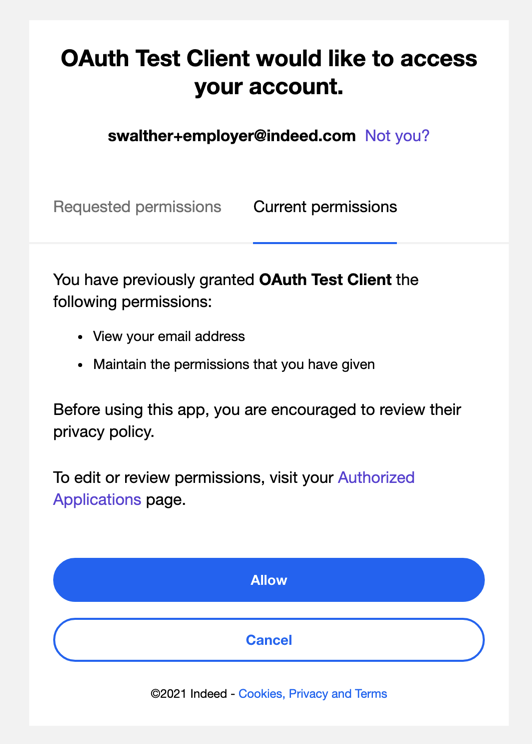
When requesting an access token, you can request one or more scopes. The scopes determine the permissions granted to your app.
Currently, Indeed supports the following authorization scopes:
Note: Some Indeed APIs have additional scopes. You may need to pass these scopes when you request the access token. For API-specific scopes, see the API documentation for each API.
| Name | Consent String | Description |
|---|---|---|
email |
View your email address. | When calling the UserInfo endpoint, this scope returns the email and email_verified fields in the ID token. With this scope, an app can read a user’s email and email_verified status from an ID Token or the UserInfo endpoint. |
employer_access |
List the employers associated with a user account and get an access token for a particular employer. | This scope returns all of the employers associated with your account. With this scope, an app can retrieve the list of employer accounts associated with the user. This scope is also required to get an access token for a particular employer. To retrieve a list of employers and get an access token for a particular employer, see Represent an Employer. |
offline_access |
Maintain the permissions that you have given. | This scope is required to generate a refresh token. Indeed OAuth access tokens expire after one hour. If you want to retrieve a new access token, and you don’t want to pester the user by displaying an OAuth consent screen again, then you can mint a new access token using a refresh token. |
When using the Authorization Code Flow (3-Legged OAuth), the authorizing user can choose which checkboxes to select on the consent screen. The user can decide on the particular scopes that they want to grant your app. They could decide to grant all of the scopes, none of the scopes, or only particular scopes.
Your app can detect the actual scopes that a user granted by reading the scope field of a token response.
Example:
  {
    "access_token":"eyJraWQiOiI1OTdjYTgxNC03YTA2LTRkZTMtO",
    "refresh_token":"ZenoK4KeQsg",
    "id_token":"eyJraWQiOiI1OTdjYTgxNC03YTA2LTE69SSJkjQQ",
    "scope":"offline_access employer_access email",
    "consented_scope":"offline_access employer_access email",
    "convid":"1er835qvtu54n800",
    "token_type":"Bearer",
    "expires_in":3600
  }
Using Incremental Authorization
We encourage apps to only request the scopes that they actually need at the time that they actually need them. Therefore, we recommend that apps request scopes incrementally.
Indeed OAuth supports incremental authorization. If a user has already granted your app a scope in the past, then the user does not need to grant the same scope again. Requesting offline_access scope is required for incremental authorization to work. For example, if your app requests the email scope to view the user’s email addresses, also request the offline_access scope.
Suppose the user attempts to access additional functionality that your app provides, and this additional functionality requires the employer_access scope. When the OAuth consent screen displays a second time, the app does not need to request the email and offline_access scopes again. The OAuth consent screen prompts the user to grant only the new scope: employer_access.
On the consent screen, the user can view scopes they previously granted under the Current permissions tab. If the user clicks that tab, then the user can see that they have already granted the email and offline_access scopes.
Revoking OAuth Scopes
When using the Authorization Code Flow (3-Legged OAuth), a user can revoke the scopes granted to a particular app via the authorized applications page.
Note: You currently cannot revoke scopes individually. You can revoke all scopes and, when using the app, grant scopes again.
Represent an Employer
A single Indeed user account can be associated with one or more employer accounts. An Indeed API might require you to represent a particular employer
when calling the API. There are two ways that you can associate an employer with an access token: you can use the Indeed Employer Selection Screen or
you can create a Custom Employer Selection Screen.
Note: An access token can only represent a single employer at a time. If you need to switch employers, then you
need to generate a new access token (for example, by using a refresh token).
Display the Indeed Employer Selection Screen
You can use the prompt=select_employer parameter when creating an authorization link to trigger the display of the Indeed Employer Selection Screen. When using
the prompt=select_employer parameter, your OAuth app must also request the employer_access scope or the Indeed Employer Selection Screen will
not be displayed. For example, the
following link includes both the prompt=select_employer parameter and a request for the employer_access scope:
https://secure.indeed.com/oauth/v2/authorize?client_id=bf7622efee705862320df0f5c7690b22f60ba24f236aaf4adf5b7a36fa0adcf1&redirect_uri=https%3A%2F%2Fexample.com%2Foauth&response_type=code&state=random&scope=email+offline_access+employer_access&prompt=select_employer
This authorization link will trigger the following three screens to be displayed:
- Authentication Screen — the standard Indeed Authentication Screen is displayed when the user is not already logged into Indeed.
- OAuth Consent Screen — the OAuth Consent Screen enables a user to grant consent for any scopes requested by the OAuth app (such as the
employer_accessscope). - Indeed Employer Selection Screen — the Indeed Employer Selection Screen enables a user to select a particular employer from a list of all of the employers associated with the user.
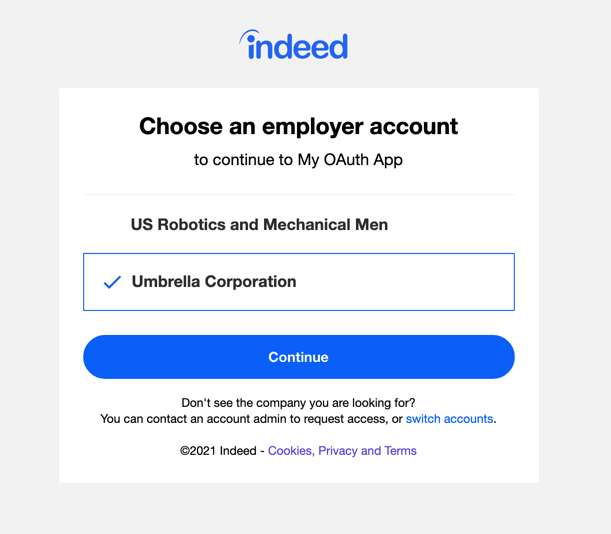
The Indeed Employer Selection Screen in the above figure displays a list of two employers associated with the user account: US Robotics and Mechanical Men
and Umbrella Corporation. If the user selects one of the employers, and submits the page, then the employer id is transmitted to your OAuth app as a parameter
of the Redirect URI:
https://example.com/oauth/callback?state=random&employer=6d2f02224e30d401810b1726eb246d8d&code=e_IEr5UlBys
Notice that the URL above includes an employer parameter that represents an employer id. You can use the employer id when requesting an
access token to associate the access token with a particular employer like this:
curl -X POST -H 'Content-Type: application/x-www-form-urlencoded' -H 'Accept: application/json'
 -d 'code=e_IEr5UlBys'
 -d 'client_id=bf7622efee705862320df0f5c7690b22f60ba24f236aaf4adf5b7a36fa0adcf1'
 -d 'client_secret=02KKpg6yLXw2v3FKf5lqyFGtMQCvPBNbJIw89SoSd9fts1LAdlvwUQQ6dwhAhEXv'
 -d 'redirect_uri=https://example.com/oauth'
 -d 'grant_type=authorization_code'
 -d 'employer=6d2f02224e30d401810b1726eb246d8d'
 https://apis.indeed.com/oauth/v2/tokens
You can also use the employer parameter when using a refresh token to request a new
access token.
If there are no employers associated with a user account, or the user does not select an employer, then an
employer parameter is not
passed with the redirect URI back to your OAuth app.
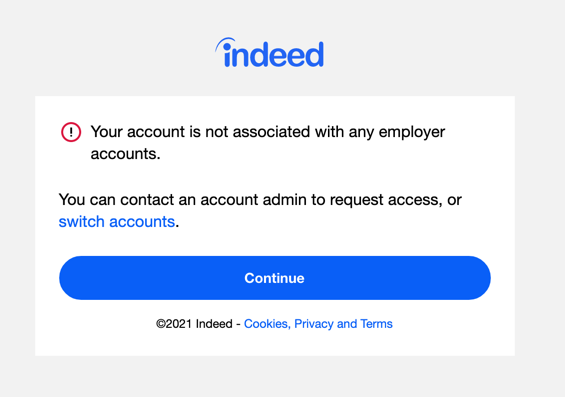
Warning: Don’t assume that the Redirect URI will include an employer parameter
even when using the prompt=select_employer parameter.
Display a Custom Employer Selection Screen
Indeed recommends that you use the standard Indeed Employer Selection Screen to enable users to select a particular employer. If you
want to customize the appearance of the Employer Selection Screen then you also have the option of retrieving the list of employers and
building an employer selection screen yourself. Follow these steps:
Step 1: Retrieve an Access Token, ID Token, and Refresh Token
Follow the get an access token steps to trigger the OAuth consent screen and get an access token with the employer_access and offline_access scopes.
The query returns an access token, ID token, and refresh token. You can get a list of employers associated with the current user by decoding
the ID Token (see Get User Info).
Step 2: Create a Custom Employer Selection Screen
Now that you have a list of employers, you can build a user interface that enables the user to select a particular employer.
Step 3: Retrieve an Access Token that Represents a Particular Employer
Use the selected employer’s ID to retrieve a new access token that represents that employer. To do this, pass the employer ID in the employer parameter of the /tokens endpoint.
curl -X POST -H 'Content-Type: application/x-www-form-urlencoded' -H 'Accept: application/json'
  -d 'refresh_token=4U0xku8M9u0'
  -d 'client_id=b0c3b1092225d3e99f85d7aa3fe1e6001f9a0bb798717cbc2008e58fbda3ef16'
  -d 'client_secret=2YFoyZOWmr83njlsIuyCL9QQq5jZkRCR4UtmHGp22MRzjIhe5RbynnAGmuYLFbYx'
  -d 'grant_type=refresh_token'
  -d 'employer=13ef9940a7c1f0500a7e411e74178c4e'
  https://apis.indeed.com/oauth/v2/tokens
Note that the grant_type parameter has the value refresh_token. The refresh_token parameter has the refresh token retrieved in step one. Because you retrieved the new access token using a refresh token, an OAuth consent screen is not needed. The request also includes an employer parameter with the Dharma Initiative employer ID as its value.
Use this access token for API calls on behalf of the consenting user and only for that particular employer.
Мне нужно создать PHP скрипт, который создает событие sigle в Календаре Google.
У меня не возникало проблем с настройкой идентификатора клиента, секретности клиента, ключа разработчика и создания нового события.
Моя единственная проблема с OAuth2, в частности, мне нужно сделать постоянное соединение, и я не хочу выполнять аутентификацию каждый раз, когда я запускаю script.
Собственно, с этим script я могу получить токен и токен обновления, но каждый час мой токен истекает, и я не знаю, как его обновить. Как я могу отредактировать этот код для этого?
Могу ли я сохранить токен и токен обновления где-нибудь и всегда использовать одни и те же данные?
Я получаю неперехваченное исключение «Google_AuthException» с сообщением «Ошибка обновления токена OAuth2, сообщение:» { «error»: «invalid_grant»
Я уже прочитал некоторые другие сообщения об этой теме здесь, в stackoverflow, но я до сих пор не нашел решение…:
<?phprequire_once 'src/Google_Client.php';
require_once 'src/contrib/Google_CalendarService.php';
session_start();$client = new Google_Client();
$client->setApplicationName("Calendar App");
$client->setClientId('xxxx');
$client->setClientSecret('yyy');
$client->setRedirectUri('http://www.zzzzzz');
$client->setDeveloperKey('kkk');
$client->setAccessType('offline');
$cal = new Google_CalendarService($client);if (isset($_GET['logout'])) {
unset($_SESSION['token']);
}if (isset($_GET['code'])) {
$client->authenticate($_GET['code']);
$_SESSION['token'] = $client->getAccessToken();
header('Location: http://' . $_SERVER['HTTP_HOST'] . $_SERVER['PHP_SELF']);
}if (isset($_SESSION['token'])) {
//echo $_SESSION['token'];
//$client->setAccessToken($_SESSION['token']);
$authObj = json_decode($_SESSION['token']);
$accessToken = $authObj->access_token;
$refreshToken = $authObj->refresh_token;
$tokenType = $authObj->token_type;
$expiresIn = $authObj->expires_in;
echo 'access_token = ' . $accessToken;
echo '<br />';
echo 'refresh_token = ' . $refreshToken;
echo '<br />';
echo 'token_type = ' . $tokenType;
echo '<br />';
echo 'expires_in = ' . $expiresIn;
}if(!empty($cookie)){
$client->refreshToken($this->Cookie->read('token'));
}if ($client->getAccessToken()) {
$calList = $cal->calendarList->listCalendarList();
$_SESSION['token'] = $client->getAccessToken();
} else {
$authUrl = $client->createAuthUrl();
print "<a class='login' href='$authUrl'>Connect Me!</a>";
}// Creation of a single event
$event = new Google_Event();
$event->setSummary($event_name);
$event->setLocation('');
....
?>
Большое спасибо за вашу поддержку!
I have the following code running on my localhost to try and authenticate with Google Oauth2. After authenticating, it appears to work for a while. Then after a certain amount of time I’m getting this classic error:
Error refreshing the OAuth2 token, message: '{
"error" : "invalid_grant"
}'
I’ve looked at the previous times this issue was posted to StackOverflow, but the suggested solutions didn’t seem to work for me.
I believe the access token is updated correctly (see code below). I also believe the server clock is synchronized correctly. What am I doing wrong?
    //$token retrieved from database
    $token = {"access_token":"xxx.xxx_xxxx-xxx","token_type":"Bearer","expires_in":3600,"refresh_token":"1/xXxXxxxxxXXXxx","created":145490000}

    $google = new Google_Client();
    $google->setAccessType('offline');
    $google->setClientId($client_id);
    $google->setClientSecret($client_secret);
    $google->setRedirectUri($client_redirect_uri);
    $google->setAccessToken($token);
    if($google->isAccessTokenExpired()) {
      $google->refreshToken($token);
    }
    $token = $google->getAccessToken();
    $google->setAccessToken($token);

    //Some Database code to save the new $token
    ...

    $result = new Google_Service_YouTube($google);