Стилизация полей форм
Последнее обновление: 20.08.2022
Поля формы применяют некоторые стили по умолчанию. Если же мы хотим применить к ним какие-то собственные стили и классы, то нам надо использовать ряд механизмов.
Прежде всего мы можем вручную выводить каждое поле и определять правила стилизации для этого поля или окружающих его блоков. Возьмем простейшую форму:
from django import forms

class UserForm(forms.Form):
    name = forms.CharField(min_length=3)
    age = forms.IntegerField(min_value=1, max_value=100)
В шаблоне пропишем ее использование:
<!DOCTYPE html>
<html>
<head>
    <meta charset="utf-8" />
    <title>METANIT.COM</title>
    <style>
    .alert{color:red}
    .form-group{margin: 10px 0;}
    .form-group input{width:250px;height: 25px;border-radius:3px;}
    </style>
</head>
<body class="container">
    <form method="POST" novalidate>
        {% csrf_token %}
        <div>
        {% for field in form %}
        <div class="form-group">
            {{field.label_tag}}
            <div>{{field}}</div>
            {% if field.errors%}
            {% for error in field.errors %}
            <div class="alert alert-danger">
                {{error}}
            </div>
            {% endfor %}
            {% endif %}
        </div>
        {% endfor %}
        </div>
        <input type="submit" value="Send" >
    </form>
</body>
</html>
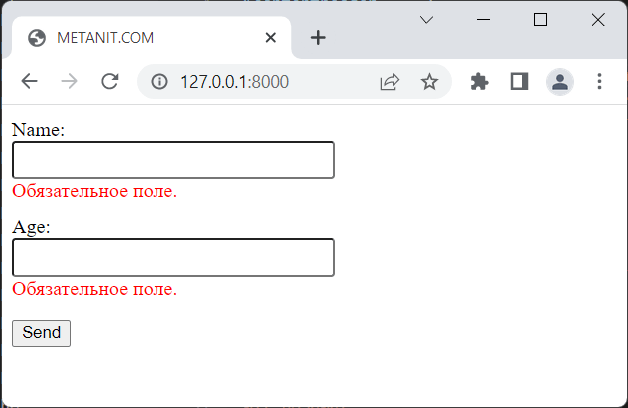
Результа при отправке формы с ошибками:
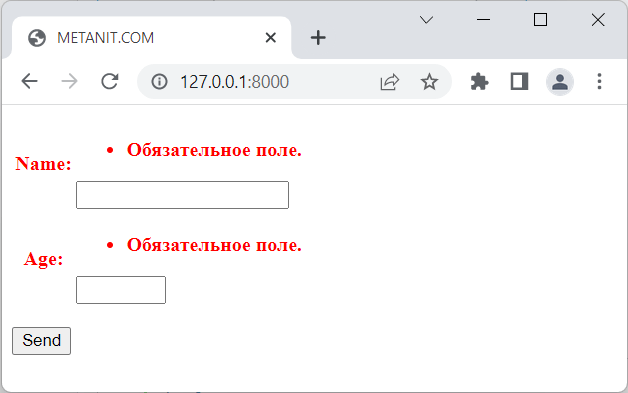
Второй механизм представляют свойства формы required_css_class и error_css_class,
который соответственно применяют класс css к метке, создаваемой для поля формы, и к блоку ассоциированных с ним ошибок.
Например, определим следующую форму:
from django import forms

class UserForm(forms.Form):
    name = forms.CharField(min_length=3)
    age = forms.IntegerField(min_value=1, max_value=100)
    required_css_class = "field"
    error_css_class = "error"
В этом случае в шаблоне у нас должны быть определены или подключены классы «field» и «error»:
<!DOCTYPE html>
<html>
<head>
    <meta charset="utf-8" />
    <title>METANIT.COM</title>
    <style>
    .field{font-weight:bold;}
    .error{color:red;}
    </style>
</head>
<body class="container">
    <form method="POST" novalidate>
        {% csrf_token %}
        <table>
        {{form}}
        </table>
        <input type="submit" value="Send" >
    </form>
</body>
</html>
Но также можно было бы комбинировать оба способа:
<!DOCTYPE html>
<html>
<head>
    <meta charset="utf-8" />
    <title>METANIT.COM</title>
    <style>
        .field{font-weight:bold;}
        .error{color:red;}
    </style>
</head>
<body>
    <form method="POST" novalidate>
        {% csrf_token %}
        <div>
        {% for field in form %}
        <div class="row">
            {{field.label_tag}}
            <div>{{field}}</div>
            {% if field.errors%}
            <div class="error">{{field.errors}}</div>
            {% endif %}
        </div>
        {% endfor %}
        </div>
        <input type="submit" value="Send" >
    </form>
</body>
</html>
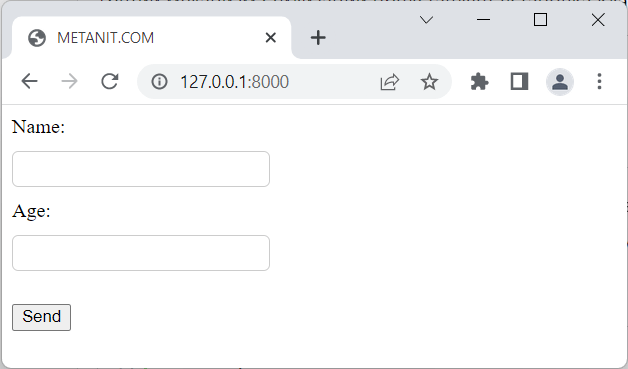
Третий механизм стилизации представляет установка классов и стилей через виджеты:
from django import forms

class UserForm(forms.Form):
    name = forms.CharField(widget=forms.TextInput(attrs={"class":"myfield"}))
    age = forms.IntegerField(widget=forms.NumberInput(attrs={"class":"myfield"}))
В данном случае через параметр виджетов attrs устанавливаются атрибуты того элемента html, который будет генерироваться.
В частности, здесь для обоих полей устанавливается атрибут class, который представляет класс myfield.
И, допустим, в шаблоне будет определен класс myfield:
<!DOCTYPE html>
<html>
<head>
    <meta charset="utf-8" />
    <title>METANIT.COM</title>
    <style>
        .myfield{
			border:1px solid #ccc;
			border-radius:5px;
			height:25px;
			width:200px;
			margin: 10px 10px 10px 0;
		}
    </style>
</head>
<body>
    <form method="POST">
        {% csrf_token %}
        <div>
        {% for field in form %}
        <div>
            {{field.label_tag}}
            <div>{{field}}</div>
        </div>
        {% endfor %}
        </div>
        <input type="submit" value="Send" >
    </form>
</body>
</html>
The Forms API
Bound and unbound forms
A Form instance is either bound to a set of data, or unbound.
- If it’s bound to a set of data, it’s capable of validating that data
and rendering the form as HTML with the data displayed in the HTML. - If it’s unbound, it cannot do validation (because there’s no data to
validate!), but it can still render the blank form as HTML.
-
class
Form
To create an unbound Form instance, instantiate the class:
To bind data to a form, pass the data as a dictionary as the first parameter to
your Form class constructor:
>>> data = {'subject': 'hello',
...         'message': 'Hi there',
...         'sender': 'foo@example.com',
...         'cc_myself': True}
>>> f = ContactForm(data)
In this dictionary, the keys are the field names, which correspond to the
attributes in your Form class. The values are the data you’re trying to
validate. These will usually be strings, but there’s no requirement that they be
strings; the type of data you pass depends on the Field, as we’ll see
in a moment.
-
Form.is_bound
If you need to distinguish between bound and unbound form instances at runtime,
check the value of the form’s is_bound attribute:
>>> f = ContactForm()
>>> f.is_bound
False
>>> f = ContactForm({'subject': 'hello'})
>>> f.is_bound
True
Note that passing an empty dictionary creates a bound form with empty data:
>>> f = ContactForm({})
>>> f.is_bound
True
If you have a bound Form instance and want to change the data somehow,
or if you want to bind an unbound Form instance to some data, create
another Form instance. There is no way to change data in a
Form instance. Once a Form instance has been created, you
should consider its data immutable, whether it has data or not.
Using forms to validate data
-
Form.clean()
Implement a clean() method on your Form when you must add custom
validation for fields that are interdependent. See
Cleaning and validating fields that depend on each other for example usage.
-
Form.is_valid()
The primary task of a Form object is to validate data. With a bound
Form instance, call the is_valid() method to run validation
and return a boolean designating whether the data was valid:
>>> data = {'subject': 'hello',
...         'message': 'Hi there',
...         'sender': 'foo@example.com',
...         'cc_myself': True}
>>> f = ContactForm(data)
>>> f.is_valid()
True
Let’s try with some invalid data. In this case, subject is blank (an error,
because all fields are required by default) and sender is not a valid
email address:
>>> data = {'subject': '',
...         'message': 'Hi there',
...         'sender': 'invalid email address',
...         'cc_myself': True}
>>> f = ContactForm(data)
>>> f.is_valid()
False
-
Form.errors
Access the errors attribute to get a dictionary of error
messages:
>>> f.errors
{'sender': ['Enter a valid email address.'], 'subject': ['This field is required.']}
In this dictionary, the keys are the field names, and the values are lists of
strings representing the error messages. The error messages are stored
in lists because a field can have multiple error messages.
You can access errors without having to call
is_valid() first. The form’s data will be validated the first time
either you call is_valid() or access errors.
The validation routines will only get called once, regardless of how many times
you access errors or call is_valid(). This means that
if validation has side effects, those side effects will only be triggered once.
-
Form.errors.as_data()
Returns a dict that maps fields to their original ValidationError
instances.
>>> f.errors.as_data()
{'sender': [ValidationError(['Enter a valid email address.'])],
'subject': [ValidationError(['This field is required.'])]}
Use this method anytime you need to identify an error by its code. This
enables things like rewriting the error’s message or writing custom logic in a
view when a given error is present. It can also be used to serialize the errors
in a custom format (e.g. XML); for instance, as_json()
relies on as_data().
The need for the as_data() method is due to backwards compatibility.
Previously ValidationError instances were lost as soon as their
rendered error messages were added to the Form.errors dictionary.
Ideally Form.errors would have stored ValidationError instances
and methods with an as_ prefix could render them, but it had to be done
the other way around in order not to break code that expects rendered error
messages in Form.errors.
-
Form.errors.as_json(escape_html=False)
Returns the errors serialized as JSON.
>>> f.errors.as_json()
{"sender": [{"message": "Enter a valid email address.", "code": "invalid"}],
"subject": [{"message": "This field is required.", "code": "required"}]}
By default, as_json() does not escape its output. If you are using it for
something like AJAX requests to a form view where the client interprets the
response and inserts errors into the page, you’ll want to be sure to escape the
results on the client-side to avoid the possibility of a cross-site scripting
attack. You can do this in JavaScript with element.textContent = errorText
or with jQuery’s $(el).text(errorText) (rather than its .html()
function).
If for some reason you don’t want to use client-side escaping, you can also
set escape_html=True and error messages will be escaped so you can use them
directly in HTML.
-
Form.errors.get_json_data(escape_html=False)
Returns the errors as a dictionary suitable for serializing to JSON.
Form.errors.as_json() returns serialized JSON, while this returns the
error data before it’s serialized.
The escape_html parameter behaves as described in
Form.errors.as_json().
-
Form.add_error(field, error)
This method allows adding errors to specific fields from within the
Form.clean() method, or from outside the form altogether; for instance
from a view.
The field argument is the name of the field to which the errors
should be added. If its value is None the error will be treated as
a non-field error as returned by Form.non_field_errors().
The error argument can be a string, or preferably an instance of
ValidationError. See Raising ValidationError for best practices
when defining form errors.
Note that Form.add_error() automatically removes the relevant field from
cleaned_data.
-
Form.has_error(field, code=None)
This method returns a boolean designating whether a field has an error with
a specific error code. If code is None, it will return True
if the field contains any errors at all.
To check for non-field errors use
NON_FIELD_ERRORS as the field parameter.
-
Form.non_field_errors()
This method returns the list of errors from Form.errors that aren’t associated with a particular field.
This includes ValidationErrors that are raised in Form.clean() and errors added using Form.add_error(None,.
"...")
Behavior of unbound forms
It’s meaningless to validate a form with no data, but, for the record, here’s
what happens with unbound forms:
>>> f = ContactForm()
>>> f.is_valid()
False
>>> f.errors
{}
Initial form values
-
Form.initial
Use initial to declare the initial value of form fields at
runtime. For example, you might want to fill in a username field with the
username of the current session.
To accomplish this, use the initial argument to a Form.
This argument, if given, should be a dictionary mapping field names to initial
values. Only include the fields for which you’re specifying an initial value;
it’s not necessary to include every field in your form. For example:
>>> f = ContactForm(initial={'subject': 'Hi there!'})
These values are only displayed for unbound forms, and they’re not used as
fallback values if a particular value isn’t provided.
If a Field defines initial and you
include initial when instantiating the Form, then the latter
initial will have precedence. In this example, initial is provided both
at the field level and at the form instance level, and the latter gets
precedence:
>>> from django import forms
>>> class CommentForm(forms.Form):
...     name = forms.CharField(initial='class')
...     url = forms.URLField()
...     comment = forms.CharField()
>>> f = CommentForm(initial={'name': 'instance'}, auto_id=False)
>>> print(f)
<tr><th>Name:</th><td><input type="text" name="name" value="instance" required></td></tr>
<tr><th>Url:</th><td><input type="url" name="url" required></td></tr>
<tr><th>Comment:</th><td><input type="text" name="comment" required></td></tr>
-
Form.get_initial_for_field(field, field_name)
Returns the initial data for a form field. It retrieves the data from
Form.initial if present, otherwise trying Field.initial.
Callable values are evaluated.
It is recommended to use BoundField.initial over
get_initial_for_field() because BoundField.initial has a
simpler interface. Also, unlike get_initial_for_field(),
BoundField.initial caches its values. This is useful especially when
dealing with callables whose return values can change (e.g. datetime.now or
uuid.uuid4):
>>> import uuid
>>> class UUIDCommentForm(CommentForm):
...     identifier = forms.UUIDField(initial=uuid.uuid4)
>>> f = UUIDCommentForm()
>>> f.get_initial_for_field(f.fields['identifier'], 'identifier')
UUID('972ca9e4-7bfe-4f5b-af7d-07b3aa306334')
>>> f.get_initial_for_field(f.fields['identifier'], 'identifier')
UUID('1b411fab-844e-4dec-bd4f-e9b0495f04d0')
>>> # Using BoundField.initial, for comparison
>>> f['identifier'].initial
UUID('28a09c59-5f00-4ed9-9179-a3b074fa9c30')
>>> f['identifier'].initial
UUID('28a09c59-5f00-4ed9-9179-a3b074fa9c30')
Checking which form data has changed
-
Form.has_changed()
Use the has_changed() method on your Form when you need to check if the
form data has been changed from the initial data.
>>> data = {'subject': 'hello',
...         'message': 'Hi there',
...         'sender': 'foo@example.com',
...         'cc_myself': True}
>>> f = ContactForm(data, initial=data)
>>> f.has_changed()
False
When the form is submitted, we reconstruct it and provide the original data
so that the comparison can be done:
>>> f = ContactForm(request.POST, initial=data)
>>> f.has_changed()
has_changed() will be True if the data from request.POST differs
from what was provided in initial or False otherwise. The
result is computed by calling Field.has_changed() for each field in the
form.
-
Form.changed_data
The changed_data attribute returns a list of the names of the fields whose
values in the form’s bound data (usually request.POST) differ from what was
provided in initial. It returns an empty list if no data differs.
>>> f = ContactForm(request.POST, initial=data)
>>> if f.has_changed():
...     print("The following fields changed: %s" % ", ".join(f.changed_data))
>>> f.changed_data
['subject', 'message']
Accessing the fields from the form
-
Form.fields
You can access the fields of Form instance from its fields
attribute:
>>> for row in f.fields.values(): print(row)
...
<django.forms.fields.CharField object at 0x7ffaac632510>
<django.forms.fields.URLField object at 0x7ffaac632f90>
<django.forms.fields.CharField object at 0x7ffaac3aa050>
>>> f.fields['name']
<django.forms.fields.CharField object at 0x7ffaac6324d0>
You can alter the field and BoundField of Form instance to
change the way it is presented in the form:
>>> f.as_div().split("</div>")[0]
'<div><label for="id_subject">Subject:</label><input type="text" name="subject" maxlength="100" required id="id_subject">'
>>> f["subject"].label = "Topic"
>>> f.as_div().split("</div>")[0]
'<div><label for="id_subject">Topic:</label><input type="text" name="subject" maxlength="100" required id="id_subject">'
Beware not to alter the base_fields attribute because this modification
will influence all subsequent ContactForm instances within the same Python
process:
>>> f.base_fields["subject"].label_suffix = "?"
>>> another_f = CommentForm(auto_id=False)
>>> f.as_div().split("</div>")[0]
'<div><label for="id_subject">Subject?</label><input type="text" name="subject" maxlength="100" required id="id_subject">'
Accessing “clean” data
-
Form.cleaned_data
Each field in a Form class is responsible not only for validating
data, but also for “cleaning” it – normalizing it to a consistent format. This
is a nice feature, because it allows data for a particular field to be input in
a variety of ways, always resulting in consistent output.
For example, DateField normalizes input into a
Python datetime.date object. Regardless of whether you pass it a string in
the format '1994-07-15', a datetime.date object, or a number of other
formats, DateField will always normalize it to a datetime.date object
as long as it’s valid.
Once you’ve created a Form instance with a set of data and validated
it, you can access the clean data via its cleaned_data attribute:
>>> data = {'subject': 'hello',
...         'message': 'Hi there',
...         'sender': 'foo@example.com',
...         'cc_myself': True}
>>> f = ContactForm(data)
>>> f.is_valid()
True
>>> f.cleaned_data
{'cc_myself': True, 'message': 'Hi there', 'sender': 'foo@example.com', 'subject': 'hello'}
Note that any text-based field – such as CharField or EmailField –
always cleans the input into a string. We’ll cover the encoding implications
later in this document.
If your data does not validate, the cleaned_data dictionary contains
only the valid fields:
>>> data = {'subject': '',
...         'message': 'Hi there',
...         'sender': 'invalid email address',
...         'cc_myself': True}
>>> f = ContactForm(data)
>>> f.is_valid()
False
>>> f.cleaned_data
{'cc_myself': True, 'message': 'Hi there'}
cleaned_data will always only contain a key for fields defined in the
Form, even if you pass extra data when you define the Form. In this
example, we pass a bunch of extra fields to the ContactForm constructor,
but cleaned_data contains only the form’s fields:
>>> data = {'subject': 'hello',
...         'message': 'Hi there',
...         'sender': 'foo@example.com',
...         'cc_myself': True,
...         'extra_field_1': 'foo',
...         'extra_field_2': 'bar',
...         'extra_field_3': 'baz'}
>>> f = ContactForm(data)
>>> f.is_valid()
True
>>> f.cleaned_data # Doesn't contain extra_field_1, etc.
{'cc_myself': True, 'message': 'Hi there', 'sender': 'foo@example.com', 'subject': 'hello'}
When the Form is valid, cleaned_data will include a key and value for
all its fields, even if the data didn’t include a value for some optional
fields. In this example, the data dictionary doesn’t include a value for the
nick_name field, but cleaned_data includes it, with an empty value:
>>> from django import forms
>>> class OptionalPersonForm(forms.Form):
...     first_name = forms.CharField()
...     last_name = forms.CharField()
...     nick_name = forms.CharField(required=False)
>>> data = {'first_name': 'John', 'last_name': 'Lennon'}
>>> f = OptionalPersonForm(data)
>>> f.is_valid()
True
>>> f.cleaned_data
{'nick_name': '', 'first_name': 'John', 'last_name': 'Lennon'}
In this above example, the cleaned_data value for nick_name is set to an
empty string, because nick_name is CharField, and CharFields treat
empty values as an empty string. Each field type knows what its “blank” value
is – e.g., for DateField, it’s None instead of the empty string. For
full details on each field’s behavior in this case, see the “Empty value” note
for each field in the “Built-in Field classes” section below.
You can write code to perform validation for particular form fields (based on
their name) or for the form as a whole (considering combinations of various
fields). More information about this is in Form and field validation.
Outputting forms as HTML
The second task of a Form object is to render itself as HTML. To do so,
print it:
>>> f = ContactForm()
>>> print(f)
<tr><th><label for="id_subject">Subject:</label></th><td><input id="id_subject" type="text" name="subject" maxlength="100" required></td></tr>
<tr><th><label for="id_message">Message:</label></th><td><input type="text" name="message" id="id_message" required></td></tr>
<tr><th><label for="id_sender">Sender:</label></th><td><input type="email" name="sender" id="id_sender" required></td></tr>
<tr><th><label for="id_cc_myself">Cc myself:</label></th><td><input type="checkbox" name="cc_myself" id="id_cc_myself"></td></tr>
If the form is bound to data, the HTML output will include that data
appropriately. For example, if a field is represented by an
<input type="text">, the data will be in the value attribute. If a
field is represented by an <input type="checkbox">, then that HTML will
include checked if appropriate:
>>> data = {'subject': 'hello',
...         'message': 'Hi there',
...         'sender': 'foo@example.com',
...         'cc_myself': True}
>>> f = ContactForm(data)
>>> print(f)
<tr><th><label for="id_subject">Subject:</label></th><td><input id="id_subject" type="text" name="subject" maxlength="100" value="hello" required></td></tr>
<tr><th><label for="id_message">Message:</label></th><td><input type="text" name="message" id="id_message" value="Hi there" required></td></tr>
<tr><th><label for="id_sender">Sender:</label></th><td><input type="email" name="sender" id="id_sender" value="foo@example.com" required></td></tr>
<tr><th><label for="id_cc_myself">Cc myself:</label></th><td><input type="checkbox" name="cc_myself" id="id_cc_myself" checked></td></tr>
This default output is a two-column HTML table, with a <tr> for each field.
Notice the following:
- For flexibility, the output does not include the
<table>and
</table>tags, nor does it include the<form>and</form>
tags or an<input type="submit">tag. It’s your job to do that. - Each field type has a default HTML representation.
CharFieldis
represented by an<input type="text">andEmailFieldby an
<input type="email">.BooleanField(null=False)is represented by an
<input type="checkbox">. Note these are merely sensible defaults; you can
specify which HTML to use for a given field by using widgets, which we’ll
explain shortly. - The HTML
namefor each tag is taken directly from its attribute name
in theContactFormclass. - The text label for each field – e.g.
'Subject:','Message:'and
'Cc myself:'is generated from the field name by converting all
underscores to spaces and upper-casing the first letter. Again, note
these are merely sensible defaults; you can also specify labels manually. - Each text label is surrounded in an HTML
<label>tag, which points
to the appropriate form field via itsid. Itsid, in turn, is
generated by prepending'id_'to the field name. Theid
attributes and<label>tags are included in the output by default, to
follow best practices, but you can change that behavior. - The output uses HTML5 syntax, targeting
<!DOCTYPE html>. For example,
it uses boolean attributes such ascheckedrather than the XHTML style
ofchecked='checked'.
Although <table> output is the default output style when you print a
form, other output styles are available. Each style is available as a method on
a form object, and each rendering method returns a string.
Default rendering
The default rendering when you print a form uses the following methods and
attributes.
template_name
New in Django 4.0.
-
Form.template_name
The name of the template rendered if the form is cast into a string, e.g. via
print(form) or in a template via {{ form }}.
By default, a property returning the value of the renderer’s
form_template_name. You may set it
as a string template name in order to override that for a particular form
class.
Changed in Django 4.1:
In older versions template_name defaulted to the string value
'django/forms/default.html'.
render()
New in Django 4.0.
-
Form.render(template_name=None, context=None, renderer=None)
The render method is called by __str__ as well as the
Form.as_table(), Form.as_p(), and Form.as_ul() methods.
All arguments are optional and default to:
template_name:Form.template_namecontext: Value returned byForm.get_context()renderer: Value returned byForm.default_renderer
By passing template_name you can customize the template used for just a
single call.
get_context()
New in Django 4.0.
-
Form.get_context()
Return the template context for rendering the form.
The available context is:
form: The bound form.fields: All bound fields, except the hidden fields.hidden_fields: All hidden bound fields.errors: All non field related or hidden field related form errors.
template_name_label
New in Django 4.0.
-
Form.template_name_label
The template used to render a field’s <label>, used when calling
BoundField.label_tag()/legend_tag(). Can be changed per
form by overriding this attribute or more generally by overriding the default
template, see also Overriding built-in form templates.
Output styles
As well as rendering the form directly, such as in a template with
{{ form }}, the following helper functions serve as a proxy to
Form.render() passing a particular template_name value.
These helpers are most useful in a template, where you need to override the
form renderer or form provided value but cannot pass the additional parameter
to render(). For example, you can render a form as an unordered
list using {{ form.as_ul }}.
Each helper pairs a form method with an attribute giving the appropriate
template name.
as_div()
-
Form.template_name_div
New in Django 4.1.
The template used by as_div(). Default: 'django/forms/div.html'.
-
Form.as_div()
New in Django 4.1.
as_div() renders the form as a series of <div> elements, with each
<div> containing one field, such as:
>>> f = ContactForm()
>>> f.as_div()
… gives HTML like:
<div>
<label for="id_subject">Subject:</label>
<input type="text" name="subject" maxlength="100" required id="id_subject">
</div>
<div>
<label for="id_message">Message:</label>
<input type="text" name="message" required id="id_message">
</div>
<div>
<label for="id_sender">Sender:</label>
<input type="email" name="sender" required id="id_sender">
</div>
<div>
<label for="id_cc_myself">Cc myself:</label>
<input type="checkbox" name="cc_myself" id="id_cc_myself">
</div>
Note
Of the framework provided templates and output styles, as_div() is
recommended over the as_p(), as_table(), and as_ul() versions
as the template implements <fieldset> and <legend> to group related
inputs and is easier for screen reader users to navigate.
as_p()
-
Form.template_name_p
The template used by as_p(). Default: 'django/forms/p.html'.
-
Form.as_p()
as_p() renders the form as a series of <p> tags, with each <p>
containing one field:
>>> f = ContactForm()
>>> f.as_p()
'<p><label for="id_subject">Subject:</label> <input id="id_subject" type="text" name="subject" maxlength="100" required></p>n<p><label for="id_message">Message:</label> <input type="text" name="message" id="id_message" required></p>n<p><label for="id_sender">Sender:</label> <input type="text" name="sender" id="id_sender" required></p>n<p><label for="id_cc_myself">Cc myself:</label> <input type="checkbox" name="cc_myself" id="id_cc_myself"></p>'
>>> print(f.as_p())
<p><label for="id_subject">Subject:</label> <input id="id_subject" type="text" name="subject" maxlength="100" required></p>
<p><label for="id_message">Message:</label> <input type="text" name="message" id="id_message" required></p>
<p><label for="id_sender">Sender:</label> <input type="email" name="sender" id="id_sender" required></p>
<p><label for="id_cc_myself">Cc myself:</label> <input type="checkbox" name="cc_myself" id="id_cc_myself"></p>
as_ul()
-
Form.template_name_ul
The template used by as_ul(). Default: 'django/forms/ul.html'.
-
Form.as_ul()
as_ul() renders the form as a series of <li> tags, with each <li>
containing one field. It does not include the <ul> or </ul>, so that
you can specify any HTML attributes on the <ul> for flexibility:
>>> f = ContactForm()
>>> f.as_ul()
'<li><label for="id_subject">Subject:</label> <input id="id_subject" type="text" name="subject" maxlength="100" required></li>n<li><label for="id_message">Message:</label> <input type="text" name="message" id="id_message" required></li>n<li><label for="id_sender">Sender:</label> <input type="email" name="sender" id="id_sender" required></li>n<li><label for="id_cc_myself">Cc myself:</label> <input type="checkbox" name="cc_myself" id="id_cc_myself"></li>'
>>> print(f.as_ul())
<li><label for="id_subject">Subject:</label> <input id="id_subject" type="text" name="subject" maxlength="100" required></li>
<li><label for="id_message">Message:</label> <input type="text" name="message" id="id_message" required></li>
<li><label for="id_sender">Sender:</label> <input type="email" name="sender" id="id_sender" required></li>
<li><label for="id_cc_myself">Cc myself:</label> <input type="checkbox" name="cc_myself" id="id_cc_myself"></li>
as_table()
-
Form.template_name_table
The template used by as_table(). Default: 'django/forms/table.html'.
-
Form.as_table()
as_table() renders the form as an HTML <table>:
>>> f = ContactForm()
>>> f.as_table()
'<tr><th><label for="id_subject">Subject:</label></th><td><input id="id_subject" type="text" name="subject" maxlength="100" required></td></tr>n<tr><th><label for="id_message">Message:</label></th><td><input type="text" name="message" id="id_message" required></td></tr>n<tr><th><label for="id_sender">Sender:</label></th><td><input type="email" name="sender" id="id_sender" required></td></tr>n<tr><th><label for="id_cc_myself">Cc myself:</label></th><td><input type="checkbox" name="cc_myself" id="id_cc_myself"></td></tr>'
>>> print(f)
<tr><th><label for="id_subject">Subject:</label></th><td><input id="id_subject" type="text" name="subject" maxlength="100" required></td></tr>
<tr><th><label for="id_message">Message:</label></th><td><input type="text" name="message" id="id_message" required></td></tr>
<tr><th><label for="id_sender">Sender:</label></th><td><input type="email" name="sender" id="id_sender" required></td></tr>
<tr><th><label for="id_cc_myself">Cc myself:</label></th><td><input type="checkbox" name="cc_myself" id="id_cc_myself"></td></tr>
Styling required or erroneous form rows
-
Form.error_css_class
-
Form.required_css_class
It’s pretty common to style form rows and fields that are required or have
errors. For example, you might want to present required form rows in bold and
highlight errors in red.
The Form class has a couple of hooks you can use to add class
attributes to required rows or to rows with errors: set the
Form.error_css_class and/or Form.required_css_class
attributes:
from django import forms

class ContactForm(forms.Form):
    error_css_class = 'error'
    required_css_class = 'required'

    # ... and the rest of your fields here
Once you’ve done that, rows will be given "error" and/or "required"
classes, as needed. The HTML will look something like:
>>> f = ContactForm(data)
>>> print(f.as_table())
<tr class="required"><th><label class="required" for="id_subject">Subject:</label>    ...
<tr class="required"><th><label class="required" for="id_message">Message:</label>    ...
<tr class="required error"><th><label class="required" for="id_sender">Sender:</label>      ...
<tr><th><label for="id_cc_myself">Cc myself:<label> ...
>>> f['subject'].label_tag()
<label class="required" for="id_subject">Subject:</label>
>>> f['subject'].legend_tag()
<legend class="required" for="id_subject">Subject:</legend>
>>> f['subject'].label_tag(attrs={'class': 'foo'})
<label for="id_subject" class="foo required">Subject:</label>
>>> f['subject'].legend_tag(attrs={'class': 'foo'})
<legend for="id_subject" class="foo required">Subject:</legend>
Notes on field ordering
In the as_p(), as_ul() and as_table() shortcuts, the fields are
displayed in the order in which you define them in your form class. For
example, in the ContactForm example, the fields are defined in the order
subject, message, sender, cc_myself. To reorder the HTML
output, change the order in which those fields are listed in the class.
There are several other ways to customize the order:
-
Form.field_order
By default Form.field_order=None, which retains the order in which you
define the fields in your form class. If field_order is a list of field
names, the fields are ordered as specified by the list and remaining fields are
appended according to the default order. Unknown field names in the list are
ignored. This makes it possible to disable a field in a subclass by setting it
to None without having to redefine ordering.
You can also use the Form.field_order argument to a Form to
override the field order. If a Form defines
field_order and you include field_order when instantiating
the Form, then the latter field_order will have precedence.
-
Form.order_fields(field_order)
You may rearrange the fields any time using order_fields() with a list of
field names as in field_order.
How errors are displayed
If you render a bound Form object, the act of rendering will automatically
run the form’s validation if it hasn’t already happened, and the HTML output
will include the validation errors as a <ul class="errorlist"> near the
field. The particular positioning of the error messages depends on the output
method you’re using:
>>> data = {'subject': '',
...         'message': 'Hi there',
...         'sender': 'invalid email address',
...         'cc_myself': True}
>>> f = ContactForm(data, auto_id=False)
>>> print(f.as_div())
<div>Subject:<ul class="errorlist"><li>This field is required.</li></ul><input type="text" name="subject" maxlength="100" required></div>
<div>Message:<textarea name="message" cols="40" rows="10" required>Hi there</textarea></div>
<div>Sender:<ul class="errorlist"><li>Enter a valid email address.</li></ul><input type="email" name="sender" value="invalid email address" required></div>
<div>Cc myself:<input type="checkbox" name="cc_myself" checked></div>
>>> print(f.as_table())
<tr><th>Subject:</th><td><ul class="errorlist"><li>This field is required.</li></ul><input type="text" name="subject" maxlength="100" required></td></tr>
<tr><th>Message:</th><td><textarea name="message" cols="40" rows="10" required></textarea></td></tr>
<tr><th>Sender:</th><td><ul class="errorlist"><li>Enter a valid email address.</li></ul><input type="email" name="sender" value="invalid email address" required></td></tr>
<tr><th>Cc myself:</th><td><input checked type="checkbox" name="cc_myself"></td></tr>
>>> print(f.as_ul())
<li><ul class="errorlist"><li>This field is required.</li></ul>Subject: <input type="text" name="subject" maxlength="100" required></li>
<li>Message: <textarea name="message" cols="40" rows="10" required></textarea></li>
<li><ul class="errorlist"><li>Enter a valid email address.</li></ul>Sender: <input type="email" name="sender" value="invalid email address" required></li>
<li>Cc myself: <input checked type="checkbox" name="cc_myself"></li>
>>> print(f.as_p())
<p><ul class="errorlist"><li>This field is required.</li></ul></p>
<p>Subject: <input type="text" name="subject" maxlength="100" required></p>
<p>Message: <textarea name="message" cols="40" rows="10" required></textarea></p>
<p><ul class="errorlist"><li>Enter a valid email address.</li></ul></p>
<p>Sender: <input type="email" name="sender" value="invalid email address" required></p>
<p>Cc myself: <input checked type="checkbox" name="cc_myself"></p>
Customizing the error list format
-
class
ErrorList(initlist=None, error_class=None, renderer=None)¶ -
By default, forms use
django.forms.utils.ErrorListto format validation
errors.ErrorListis a list like object whereinitlistis the
list of errors. In addition this class has the following attributes and
methods.-
error_class¶ -
The CSS classes to be used when rendering the error list. Any provided
classes are added to the defaulterrorlistclass.
-
renderer¶ -
New in Django 4.0.
Specifies the renderer to use for
ErrorList.
Defaults toNonewhich means to use the default renderer
specified by theFORM_RENDERERsetting.
-
template_name¶ -
New in Django 4.0.
The name of the template used when calling
__str__or
render(). By default this is
'django/forms/errors/list/default.html'which is a proxy for the
'ul.html'template.
-
template_name_text¶ -
New in Django 4.0.
The name of the template used when calling
as_text(). By default
this is'django/forms/errors/list/text.html'. This template renders
the errors as a list of bullet points.
-
template_name_ul¶ -
New in Django 4.0.
The name of the template used when calling
as_ul(). By default
this is'django/forms/errors/list/ul.html'. This template renders
the errors in<li>tags with a wrapping<ul>with the CSS
classes as defined byerror_class.
-
get_context()¶ -
New in Django 4.0.
Return context for rendering of errors in a template.
The available context is:
errors: A list of the errors.error_class: A string of CSS classes.
-
render(template_name=None, context=None, renderer=None)¶ -
New in Django 4.0.
The render method is called by
__str__as well as by the
as_ul()method.All arguments are optional and will default to:
template_name: Value returned bytemplate_namecontext: Value returned byget_context()renderer: Value returned byrenderer
-
as_text()¶ -
Renders the error list using the template defined by
template_name_text.
-
as_ul()¶ -
Renders the error list using the template defined by
template_name_ul.
If you’d like to customize the rendering of errors this can be achieved by
overriding thetemplate_nameattribute or more generally by
overriding the default template, see also
Overriding built-in form templates. -
Changed in Django 4.0:
Rendering of ErrorList was moved to the template engine.
Deprecated since version 4.0: The ability to return a str when calling the __str__ method is
deprecated. Use the template engine instead which returns a SafeString.
More granular output
The as_p(), as_ul(), and as_table() methods are shortcuts –
they’re not the only way a form object can be displayed.
-
class
BoundField¶ -
Used to display HTML or access attributes for a single field of a
Forminstance.The
__str__()method of this object displays the HTML for this field.
To retrieve a single BoundField, use dictionary lookup syntax on your form
using the field’s name as the key:
>>> form = ContactForm()
>>> print(form['subject'])
<input id="id_subject" type="text" name="subject" maxlength="100" required>
To retrieve all BoundField objects, iterate the form:
>>> form = ContactForm()
>>> for boundfield in form: print(boundfield)
<input id="id_subject" type="text" name="subject" maxlength="100" required>
<input type="text" name="message" id="id_message" required>
<input type="email" name="sender" id="id_sender" required>
<input type="checkbox" name="cc_myself" id="id_cc_myself">
The field-specific output honors the form object’s auto_id setting:
>>> f = ContactForm(auto_id=False)
>>> print(f['message'])
<input type="text" name="message" required>
>>> f = ContactForm(auto_id='id_%s')
>>> print(f['message'])
<input type="text" name="message" id="id_message" required>
Attributes of BoundField
-
BoundField.auto_id¶ -
The HTML ID attribute for this
BoundField. Returns an empty string
ifForm.auto_idisFalse.
-
BoundField.data¶ -
This property returns the data for this
BoundField
extracted by the widget’svalue_from_datadict()
method, orNoneif it wasn’t given:>>> unbound_form = ContactForm() >>> print(unbound_form['subject'].data) None >>> bound_form = ContactForm(data={'subject': 'My Subject'}) >>> print(bound_form['subject'].data) My Subject
-
BoundField.errors¶ -
A list-like object that is displayed
as an HTML<ul class="errorlist">when printed:>>> data = {'subject': 'hi', 'message': '', 'sender': '', 'cc_myself': ''} >>> f = ContactForm(data, auto_id=False) >>> print(f['message']) <input type="text" name="message" required> >>> f['message'].errors ['This field is required.'] >>> print(f['message'].errors) <ul class="errorlist"><li>This field is required.</li></ul> >>> f['subject'].errors [] >>> print(f['subject'].errors) >>> str(f['subject'].errors) ''
-
BoundField.field¶ -
The form
Fieldinstance from the form class that
thisBoundFieldwraps.
-
BoundField.form¶ -
The
Forminstance thisBoundField
is bound to.
-
BoundField.help_text¶ -
The
help_textof the field.
-
BoundField.html_name¶ -
The name that will be used in the widget’s HTML
nameattribute. It takes
the formprefixinto account.
-
BoundField.id_for_label¶ -
Use this property to render the ID of this field. For example, if you are
manually constructing a<label>in your template (despite the fact that
label_tag()/legend_tag()will do this
for you):<label for="{{ form.my_field.id_for_label }}">...</label>{{ my_field }}
By default, this will be the field’s name prefixed by
id_
(”id_my_field” for the example above). You may modify the ID by setting
attrson the field’s widget. For example,
declaring a field like this:my_field = forms.CharField(widget=forms.TextInput(attrs={'id': 'myFIELD'}))
and using the template above, would render something like:
<label for="myFIELD">...</label><input id="myFIELD" type="text" name="my_field" required>
-
BoundField.initial¶ -
Use
BoundField.initialto retrieve initial data for a form field.
It retrieves the data fromForm.initialif present, otherwise
tryingField.initial. Callable values are evaluated. See
Initial form values for more examples.BoundField.initialcaches its return value, which is useful
especially when dealing with callables whose return values can change (e.g.
datetime.noworuuid.uuid4):>>> from datetime import datetime >>> class DatedCommentForm(CommentForm): ... created = forms.DateTimeField(initial=datetime.now) >>> f = DatedCommentForm() >>> f['created'].initial datetime.datetime(2021, 7, 27, 9, 5, 54) >>> f['created'].initial datetime.datetime(2021, 7, 27, 9, 5, 54)
Using
BoundField.initialis recommended over
get_initial_for_field().
-
BoundField.is_hidden¶ -
Returns
Trueif thisBoundField’s widget is
hidden.
-
BoundField.label¶ -
The
labelof the field. This is used in
label_tag()/legend_tag().
-
BoundField.name¶ -
The name of this field in the form:
>>> f = ContactForm()
>>> print(f['subject'].name)
subject
>>> print(f['message'].name)
message
-
BoundField.use_fieldset¶ -
New in Django 4.1.
Returns the value of this BoundField widget’s
use_fieldsetattribute.
-
BoundField.widget_type¶ -
Returns the lowercased class name of the wrapped field’s widget, with any
trailinginputorwidgetremoved. This may be used when building
forms where the layout is dependent upon the widget type. For example:{% for field in form %} {% if field.widget_type == 'checkbox' %} # render one way {% else %} # render another way {% endif %} {% endfor %}
Methods of BoundField
-
BoundField.as_hidden(attrs=None, **kwargs)¶ -
Returns a string of HTML for representing this as an
<input type="hidden">.**kwargsare passed toas_widget().This method is primarily used internally. You should use a widget instead.
-
BoundField.as_widget(widget=None, attrs=None, only_initial=False)¶ -
Renders the field by rendering the passed widget, adding any HTML
attributes passed asattrs. If no widget is specified, then the
field’s default widget will be used.only_initialis used by Django internals and should not be set
explicitly.
-
BoundField.css_classes(extra_classes=None)¶ -
When you use Django’s rendering shortcuts, CSS classes are used to
indicate required form fields or fields that contain errors. If you’re
manually rendering a form, you can access these CSS classes using the
css_classesmethod:>>> f = ContactForm(data={'message': ''}) >>> f['message'].css_classes() 'required'
If you want to provide some additional classes in addition to the
error and required classes that may be required, you can provide
those classes as an argument:>>> f = ContactForm(data={'message': ''}) >>> f['message'].css_classes('foo bar') 'foo bar required'
-
BoundField.label_tag(contents=None, attrs=None, label_suffix=None, tag=None)¶ -
Renders a label tag for the form field using the template specified by
Form.template_name_label.The available context is:
field: This instance of theBoundField.contents: By default a concatenated string of
BoundField.labelandForm.label_suffix(or
Field.label_suffix, if set). This can be overridden by the
contentsandlabel_suffixarguments.attrs: Adictcontainingfor,
Form.required_css_class, andid.idis generated by the
field’s widgetattrsorBoundField.auto_id. Additional
attributes can be provided by theattrsargument.use_tag: A boolean which isTrueif the label has anid.
IfFalsethe default template omits thetag.tag: An optional string to customize the tag, defaults tolabel.
Tip
In your template
fieldis the instance of theBoundField.
Thereforefield.fieldaccessesBoundField.fieldbeing
the field you declare, e.g.forms.CharField.To separately render the label tag of a form field, you can call its
label_tag()method:>>> f = ContactForm(data={'message': ''}) >>> print(f['message'].label_tag()) <label for="id_message">Message:</label>
If you’d like to customize the rendering this can be achieved by overriding
theForm.template_name_labelattribute or more generally by
overriding the default template, see also
Overriding built-in form templates.Changed in Django 4.0:
The label is now rendered using the template engine.
Changed in Django 4.1:
The
tagargument was added.
-
BoundField.legend_tag(contents=None, attrs=None, label_suffix=None)¶ -
New in Django 4.1.
Calls
label_tag()withtag='legend'to render the label with
<legend>tags. This is useful when rendering radio and multiple
checkbox widgets where<legend>may be more appropriate than a
<label>.
-
BoundField.value()¶ -
Use this method to render the raw value of this field as it would be rendered
by aWidget:>>> initial = {'subject': 'welcome'} >>> unbound_form = ContactForm(initial=initial) >>> bound_form = ContactForm(data={'subject': 'hi'}, initial=initial) >>> print(unbound_form['subject'].value()) welcome >>> print(bound_form['subject'].value()) hi
Customizing BoundField
If you need to access some additional information about a form field in a
template and using a subclass of Field isn’t
sufficient, consider also customizing BoundField.
A custom form field can override get_bound_field():
-
Field.get_bound_field(form, field_name)¶ -
Takes an instance of
Formand the name of the field.
The return value will be used when accessing the field in a template. Most
likely it will be an instance of a subclass of
BoundField.
If you have a GPSCoordinatesField, for example, and want to be able to
access additional information about the coordinates in a template, this could
be implemented as follows:
class GPSCoordinatesBoundField(BoundField): @property def country(self): """ Return the country the coordinates lie in or None if it can't be determined. """ value = self.value() if value: return get_country_from_coordinates(value) else: return None class GPSCoordinatesField(Field): def get_bound_field(self, form, field_name): return GPSCoordinatesBoundField(form, self, field_name)
Now you can access the country in a template with
{{ form.coordinates.country }}.
Binding uploaded files to a form
Dealing with forms that have FileField and ImageField fields
is a little more complicated than a normal form.
Firstly, in order to upload files, you’ll need to make sure that your
<form> element correctly defines the enctype as
"multipart/form-data":
<form enctype="multipart/form-data" method="post" action="/foo/">
Secondly, when you use the form, you need to bind the file data. File
data is handled separately to normal form data, so when your form
contains a FileField and ImageField, you will need to specify
a second argument when you bind your form. So if we extend our
ContactForm to include an ImageField called mugshot, we
need to bind the file data containing the mugshot image:
# Bound form with an image field >>> from django.core.files.uploadedfile import SimpleUploadedFile >>> data = {'subject': 'hello', ... 'message': 'Hi there', ... 'sender': 'foo@example.com', ... 'cc_myself': True} >>> file_data = {'mugshot': SimpleUploadedFile('face.jpg', <file data>)} >>> f = ContactFormWithMugshot(data, file_data)
In practice, you will usually specify request.FILES as the source
of file data (just like you use request.POST as the source of
form data):
# Bound form with an image field, data from the request >>> f = ContactFormWithMugshot(request.POST, request.FILES)
Constructing an unbound form is the same as always – omit both form data and
file data:
# Unbound form with an image field >>> f = ContactFormWithMugshot()
Testing for multipart forms
-
Form.is_multipart()
If you’re writing reusable views or templates, you may not know ahead of time
whether your form is a multipart form or not. The is_multipart() method
tells you whether the form requires multipart encoding for submission:
>>> f = ContactFormWithMugshot() >>> f.is_multipart() True
Here’s an example of how you might use this in a template:
{% if form.is_multipart %} <form enctype="multipart/form-data" method="post" action="/foo/"> {% else %} <form method="post" action="/foo/"> {% endif %} {{ form }} </form>
Subclassing forms
If you have multiple Form classes that share fields, you can use
subclassing to remove redundancy.
When you subclass a custom Form class, the resulting subclass will
include all fields of the parent class(es), followed by the fields you define
in the subclass.
In this example, ContactFormWithPriority contains all the fields from
ContactForm, plus an additional field, priority. The ContactForm
fields are ordered first:
>>> class ContactFormWithPriority(ContactForm): ... priority = forms.CharField() >>> f = ContactFormWithPriority(auto_id=False) >>> print(f.as_div()) <div>Subject:<input type="text" name="subject" maxlength="100" required></div> <div>Message:<textarea name="message" cols="40" rows="10" required></textarea></div> <div>Sender:<input type="email" name="sender" required></div> <div>Cc myself:<input type="checkbox" name="cc_myself"></div> <div>Priority:<input type="text" name="priority" required></div>
It’s possible to subclass multiple forms, treating forms as mixins. In this
example, BeatleForm subclasses both PersonForm and InstrumentForm
(in that order), and its field list includes the fields from the parent
classes:
>>> from django import forms >>> class PersonForm(forms.Form): ... first_name = forms.CharField() ... last_name = forms.CharField() >>> class InstrumentForm(forms.Form): ... instrument = forms.CharField() >>> class BeatleForm(InstrumentForm, PersonForm): ... haircut_type = forms.CharField() >>> b = BeatleForm(auto_id=False) >>> print(b.as_div()) <div>First name:<input type="text" name="first_name" required></div> <div>Last name:<input type="text" name="last_name" required></div> <div>Instrument:<input type="text" name="instrument" required></div> <div>Haircut type:<input type="text" name="haircut_type" required></div>
It’s possible to declaratively remove a Field inherited from a parent class
by setting the name of the field to None on the subclass. For example:
>>> from django import forms >>> class ParentForm(forms.Form): ... name = forms.CharField() ... age = forms.IntegerField() >>> class ChildForm(ParentForm): ... name = None >>> list(ChildForm().fields) ['age']
Prefixes for forms
-
Form.prefix
You can put several Django forms inside one <form> tag. To give each
Form its own namespace, use the prefix keyword argument:
>>> mother = PersonForm(prefix="mother") >>> father = PersonForm(prefix="father") >>> print(mother.as_div()) <div><label for="id_mother-first_name">First name:</label><input type="text" name="mother-first_name" required id="id_mother-first_name"></div> <div><label for="id_mother-last_name">Last name:</label><input type="text" name="mother-last_name" required id="id_mother-last_name"></div> >>> print(father.as_div()) <div><label for="id_father-first_name">First name:</label><input type="text" name="father-first_name" required id="id_father-first_name"></div> <div><label for="id_father-last_name">Last name:</label><input type="text" name="father-last_name" required id="id_father-last_name"></div>
The prefix can also be specified on the form class:
>>> class PersonForm(forms.Form): ... ... ... prefix = 'person'
Стилизация требуемых или ошибочных строк формы
-
Form.error_css_class
-
Form.required_css_class
Довольно часто требуется стилизовать строки формы и поля,которые являются обязательными или содержат ошибки.Например,вы можете выделить обязательные строки формы жирным шрифтом,а ошибки-красным.
У класса Form есть пара хуков, которые вы можете использовать для добавления атрибутов class к обязательным строкам или к строкам с ошибками: установите Form.error_css_class и/или Form.required_css_class :
from django import forms class ContactForm(forms.Form): error_css_class = 'error' required_css_class = 'required'
Как только вы это сделаете, строкам будут присвоены классы "error" и/или "required" классы по мере необходимости. HTML будет выглядеть примерно так:
>>> f = ContactForm(data) >>> print(f.as_table()) <tr class="required"><th><label class="required" for="id_subject">Subject:</label> ... <tr class="required"><th><label class="required" for="id_message">Message:</label> ... <tr class="required error"><th><label class="required" for="id_sender">Sender:</label> ... <tr><th><label for="id_cc_myself">Cc myself:<label> ... >>> f['subject'].label_tag() <label class="required" for="id_subject">Subject:</label> >>> f['subject'].legend_tag() <legend class="required" for="id_subject">Subject:</legend> >>> f['subject'].label_tag(attrs={'class': 'foo'}) <label for="id_subject" class="foo required">Subject:</label> >>> f['subject'].legend_tag(attrs={'class': 'foo'}) <legend for="id_subject" class="foo required">Subject:</legend>
Настройка атрибутов HTML id элементов формы и тегов <label>
-
Form.auto_id
По умолчанию,методы рендеринга форм включают в себя:
- Атрибуты HTML
idв элементах формы. - Соответствующие теги
<label>вокруг меток. Тег HTML<label>указывает, какой текст метки связан с каким элементом формы. Это небольшое усовершенствование делает формы более удобными и доступными для вспомогательных устройств. Всегда полезно использовать теги<label>.
Значения атрибута id генерируются путем добавления id_ к именам полей формы. Это поведение настраивается, однако, если вы хотите изменить соглашение об id или полностью удалить атрибуты id HTML и теги <label> .
Используйте аргумент auto_id конструктора Form для управления поведением id и метки. Этот аргумент должен быть True , False или строкой.
Если auto_id имеет значение False , то выходные данные формы не будут содержать тегов <label> и атрибутов id :
>>> f = ContactForm(auto_id=False) >>> print(f.as_table()) <tr><th>Subject:</th><td><input type="text" name="subject" maxlength="100" required></td></tr> <tr><th>Message:</th><td><input type="text" name="message" required></td></tr> <tr><th>Sender:</th><td><input type="email" name="sender" required></td></tr> <tr><th>Cc myself:</th><td><input type="checkbox" name="cc_myself"></td></tr> >>> print(f.as_ul()) <li>Subject: <input type="text" name="subject" maxlength="100" required></li> <li>Message: <input type="text" name="message" required></li> <li>Sender: <input type="email" name="sender" required></li> <li>Cc myself: <input type="checkbox" name="cc_myself"></li> >>> print(f.as_p()) <p>Subject: <input type="text" name="subject" maxlength="100" required></p> <p>Message: <input type="text" name="message" required></p> <p>Sender: <input type="email" name="sender" required></p> <p>Cc myself: <input type="checkbox" name="cc_myself"></p>
Если для auto_id установлено значение True , выходные данные формы будут содержать теги <label> и будут использовать имя поля в качестве id для каждого поля формы:
>>> f = ContactForm(auto_id=True) >>> print(f.as_table()) <tr><th><label for="subject">Subject:</label></th><td><input id="subject" type="text" name="subject" maxlength="100" required></td></tr> <tr><th><label for="message">Message:</label></th><td><input type="text" name="message" id="message" required></td></tr> <tr><th><label for="sender">Sender:</label></th><td><input type="email" name="sender" id="sender" required></td></tr> <tr><th><label for="cc_myself">Cc myself:</label></th><td><input type="checkbox" name="cc_myself" id="cc_myself"></td></tr> >>> print(f.as_ul()) <li><label for="subject">Subject:</label> <input id="subject" type="text" name="subject" maxlength="100" required></li> <li><label for="message">Message:</label> <input type="text" name="message" id="message" required></li> <li><label for="sender">Sender:</label> <input type="email" name="sender" id="sender" required></li> <li><label for="cc_myself">Cc myself:</label> <input type="checkbox" name="cc_myself" id="cc_myself"></li> >>> print(f.as_p()) <p><label for="subject">Subject:</label> <input id="subject" type="text" name="subject" maxlength="100" required></p> <p><label for="message">Message:</label> <input type="text" name="message" id="message" required></p> <p><label for="sender">Sender:</label> <input type="email" name="sender" id="sender" required></p> <p><label for="cc_myself">Cc myself:</label> <input type="checkbox" name="cc_myself" id="cc_myself"></p>
Если для auto_id задана строка, содержащая символ формата '%s' , то выходные данные формы будут содержать теги <label> и будут генерировать атрибуты id на основе строки формата. Например, для строки формата 'field_%s' поле с именем subject получит значение id 'field_subject' . Продолжая наш пример:
>>> f = ContactForm(auto_id='id_for_%s') >>> print(f.as_table()) <tr><th><label for="id_for_subject">Subject:</label></th><td><input id="id_for_subject" type="text" name="subject" maxlength="100" required></td></tr> <tr><th><label for="id_for_message">Message:</label></th><td><input type="text" name="message" id="id_for_message" required></td></tr> <tr><th><label for="id_for_sender">Sender:</label></th><td><input type="email" name="sender" id="id_for_sender" required></td></tr> <tr><th><label for="id_for_cc_myself">Cc myself:</label></th><td><input type="checkbox" name="cc_myself" id="id_for_cc_myself"></td></tr> >>> print(f.as_ul()) <li><label for="id_for_subject">Subject:</label> <input id="id_for_subject" type="text" name="subject" maxlength="100" required></li> <li><label for="id_for_message">Message:</label> <input type="text" name="message" id="id_for_message" required></li> <li><label for="id_for_sender">Sender:</label> <input type="email" name="sender" id="id_for_sender" required></li> <li><label for="id_for_cc_myself">Cc myself:</label> <input type="checkbox" name="cc_myself" id="id_for_cc_myself"></li> >>> print(f.as_p()) <p><label for="id_for_subject">Subject:</label> <input id="id_for_subject" type="text" name="subject" maxlength="100" required></p> <p><label for="id_for_message">Message:</label> <input type="text" name="message" id="id_for_message" required></p> <p><label for="id_for_sender">Sender:</label> <input type="email" name="sender" id="id_for_sender" required></p> <p><label for="id_for_cc_myself">Cc myself:</label> <input type="checkbox" name="cc_myself" id="id_for_cc_myself"></p>
Если auto_id задано любое другое истинное значение — например, строка, не содержащая %s , — тогда библиотека будет действовать так, как будто auto_id имеет значение True .
По умолчанию для auto_id задана строка 'id_%s' .
-
Form.label_suffix
Переводимые строки ( по умолчанию двоеточия ( : ) на английском языке) , которые будут добавлены после любого имени метки , когда форма визуализации.
Можно настроить этот символ или полностью исключить его, используя параметр label_suffix :
>>> f = ContactForm(auto_id='id_for_%s', label_suffix='') >>> print(f.as_ul()) <li><label for="id_for_subject">Subject</label> <input id="id_for_subject" type="text" name="subject" maxlength="100" required></li> <li><label for="id_for_message">Message</label> <input type="text" name="message" id="id_for_message" required></li> <li><label for="id_for_sender">Sender</label> <input type="email" name="sender" id="id_for_sender" required></li> <li><label for="id_for_cc_myself">Cc myself</label> <input type="checkbox" name="cc_myself" id="id_for_cc_myself"></li> >>> f = ContactForm(auto_id='id_for_%s', label_suffix=' ->') >>> print(f.as_ul()) <li><label for="id_for_subject">Subject -></label> <input id="id_for_subject" type="text" name="subject" maxlength="100" required></li> <li><label for="id_for_message">Message -></label> <input type="text" name="message" id="id_for_message" required></li> <li><label for="id_for_sender">Sender -></label> <input type="email" name="sender" id="id_for_sender" required></li> <li><label for="id_for_cc_myself">Cc myself -></label> <input type="checkbox" name="cc_myself" id="id_for_cc_myself"></li>
Обратите внимание, что суффикс метки добавляется только в том случае, если последний символ метки не является знаком препинания (в английском языке это . , ! , ? или : ).
Поля также могут определять свой собственный label_suffix . Это будет иметь приоритет над Form.label_suffix . Суффикс также можно переопределить во время выполнения, используя параметр label_suffix для label_tag() / legend_tag() .
-
Form.use_required_attribute
Если установлено значение True (по умолчанию), обязательные поля формы будут иметь required атрибут HTML.
Formsets создают формы с помощью use_required_attribute=False , чтобы избежать некорректной проверки браузера при добавлении и удалении форм из набора форм.
Настройка отображения виджетов формы
-
Form.default_renderer
Указывает средство визуализации , используемое для формы. По умолчанию установлено значение None , что означает использование средства визуализации по умолчанию, указанного параметром FORM_RENDERER .
Вы можете установить это как атрибут класса при объявлении вашей формы или использовать аргумент renderer для Form.__init__() . Например:
from django import forms class MyForm(forms.Form): default_renderer = MyRenderer()
or:
form = MyForm(renderer=MyRenderer())
Примечания к заказу на месте
В as_p() , as_ul() и as_table() поля отображаются в том порядке, в котором вы их определяете в классе формы. Например, в примере ContactForm поля определены в subject заказа , message , sender , cc_myself . Чтобы изменить порядок вывода HTML, измените порядок, в котором эти поля перечислены в классе.
Существует несколько других способов настройки заказа:
-
Form.field_order
По умолчанию Form.field_order=None , который сохраняет порядок, в котором вы определяете поля в своем классе формы. Если field_order представляет собой список имен полей, поля упорядочиваются в соответствии со списком, а остальные поля добавляются в соответствии с порядком по умолчанию. Неизвестные имена полей в списке игнорируются. Это позволяет отключить поле в подклассе, установив для него значение None без необходимости переопределять порядок.
Вы также можете использовать аргумент Form.field_order для Form , чтобы переопределить порядок полей. Если Form определяет field_order и вы включаете field_order при создании экземпляра Form , то последний field_order будет иметь приоритет.
-
Form.order_fields(field_order)
Вы можете изменить порядок полей в любое время, используя order_fields() со списком имен полей, как в field_order .
© Django Software Foundation and individual contributors
Licensed under the BSD License.
https://docs.djangoproject.com/en/4.1/ref/forms/api/
Django
4.1
-
Формы API
Об этом документе Этот документ рассказывает о деталях API форм Django.
-
Доступ к полям из формы
Вы можете получить доступ к полям экземпляра формы из его атрибута: вы можете изменить поле экземпляра формы, чтобы изменить способ его представления.
-
Как отображаются ошибки
Если вы визуализируете связанный объект формы, акт рендеринга автоматически запускает проверку формы, которая еще не произошла, а вывод HTML включает ошибки
-
Form fields
Когда вы создаете класс Form,наиболее важной частью является определение полей Хотя основной способ,которым вы будете использовать классы Field,-это классы Form,они также могут инстанцировать
Answer by Bailee Greer
1)first thing is error_css_class must be outside of meta not the inside of meta class,2)and the second thing is in django error always come as a unordered list so do one thing put error_css_class = «error» in proper place on the for and add css like this so it might work for you,
I made the end tag for the div, and i tried adding the error_css_class but still nothing
– Dániel Mozsár
Sep 1 ’20 at 9:54
,Find centralized, trusted content and collaborate around the technologies you use most.
2)and the second thing is in django error always come as a unordered list so do one thing put error_css_class = «error» in proper place on the for and add css like this so it might work for you
.error li {
font-size: 1rem;
margin-left: 20px;
}
Answer by Preston Savage
Hey Wayne check out http://code.djangoproject.com/ticket/3515 your idea is great but I needed these options on the actual fields, and to be included regardless of how I output the form. Also added css=’myfield’ support to all field types.
,
If I misunderstood you, sorry about that, but between that comment and some in the original thread on the mailling list, I figured I’d clear things up once and for all.
,
I’m still trying to make sense of all the differences between this #3515 at the moment, but I wanted to note the problem while I remember it.
,
Therefore, using as_tr(), a field that is both required and contains an error would begin like so:
Therefore, using as_tr(), a field that is both required and contains an error would begin like so:
<tr class="error required">...
Answer by Hendrix Rasmussen
In this dictionary, the keys are the field names, and the values are lists of
strings representing the error messages. The error messages are stored
in lists because a field can have multiple error messages.,Implement a clean() method on your Form when you must add custom
validation for fields that are interdependent. See
Cleaning and validating fields that depend on each other for example usage.,If you have multiple Form classes that share fields, you can use
subclassing to remove redundancy.,Access the errors attribute to get a dictionary of error
messages:
>>> f = ContactForm()
Answer by Colby Carter
Django forms provide input validation and HTML form field generation. They also integrate nicely with models. However, Django itself does not allow one-off customizations of form-generated HTML.,Here’s a Django form definition:,With the render_field tag you can add attributes to form fields with a much more HTML-like syntax:,The django-widget-tweaks library provides two solutions to this problem:
1
2
3
4
5
Answer by Itzayana Meza
As you can see in listing 6-25,
the error_css_class and
required_css_class fields are added just like regular
form fields. When a field associated with a form instance of this
kind is rendered on a template, Django adds the error
CSS class to all fields marked with an error and adds the
bold CSS class to all fields marked as required.,Outputs the Django widget
associated with a field; technically produces the same output as
calling the standalone field with the syntax
{{form.<field_name>}} — shown at the top of this table.,By default, when you output form
fields and labels there are no CSS classes or styles associated
with them. Django offers several mechanisms to associate CSS
classes with form fields. The first two approaches are the
error_css_class and required_css_class
fields which are declared directly in a Django form, as illustrated
in listing 6-25.,You can see in listing 6-27 that
inside the loop for each field, another loop is made on the
field.errors reference to granularly output and assign
custom markup to each field error.
Listing 6-19. Django form class definition
from django import forms
class ContactForm(forms.Form):
name = forms.CharField(required=False)
email = forms.EmailField(label='Your email')
comment = forms.CharField(widget=forms.Textarea)
Listing 6-20. Django form output with form.as_table
<tr>
<th><label for="id_name">Name:</label></th>
<td><input id="id_name" name="name" type="text" /></td>
</tr>n
<tr>
<th><label for="id_email">Your email:</label></th>
<td><input id="id_email" name="email" type="email" required/></td>
</tr>n
<tr>
<th><label for="id_comment">Comment:</label></th>
<td><textarea cols="40" id="id_comment" name="comment" rows="10" required>rn</textarea></td>
</tr>
Listing 6-21. Django form output with form.as_p
<p>
<label for="id_name">Name:</label>
<input id="id_name" name="name" type="text" />
</p>n
<p>
<label for="id_email">Your email:</label>
<input id="id_email" name="email" type="email" required/>
</p>n
<p>
<label for="id_comment">Comment:</label>
<textarea cols="40" id="id_comment" name="comment" rows="10" required>rn</textarea>
</p>'
Listing 6-22 Django form output with form.as_ul
<li>
<label for="id_name">Name:</label>
<input id="id_name" name="name" type="text" />
</li>n
<li>
<label for="id_email">Your email:</label>
<input id="id_email" name="email" type="email" required/>
</li>n
<li><label for="id_comment">Comment:</label>
<textarea cols="40" id="id_comment" name="comment" rows="10" required>rn</textarea>
</li>
Listing 6-23 Django form {% for %} loop over all fields
{% for field in form %}
<div class="row">
<div class="col-md-2">
{{ field.label_tag }}
{% if field.help_text %}
<sup>{{ field.help_text }}</sup>
{% endif %}
{{ field.errors }}
</div><div class="col-md-10 pull-left">
{{ field }}
</div>
</div>
{% endfor %}
Listing 6-24 Django form field_order option to enforce field
order
from django import forms
class ContactForm(forms.Form):
name = forms.CharField(required=False)
email = forms.EmailField(label='Your email')
comment = forms.CharField(widget=forms.Textarea)
field_order = ['email','comment','name']
Listing 6-25. Django form error_css_class and
required_css_class fields to apply CSS formatting
from django import forms
class ContactForm(forms.Form):
name = forms.CharField(required=False)
email = forms.EmailField(label='Your email')
comment = forms.CharField(widget=forms.Textarea)
error_css_class = 'error'
required_css_class = 'bold'
Listing 6-26. Django form with inline widget definition to add
custom CSS class
from django import forms
class ContactForm(forms.Form):
name = forms.CharField(required=False)
email = forms.EmailField(label='Your email', widget=forms.TextInput(attrs={'class' : 'myemailclass'}))
comment = forms.CharField(widget=forms.Textarea)
Just as form fields can be output
in different ways, form field errors can also be output in
different ways. Toward the end of the first section in listing
6-23, you can see how we use the {{field.errors}}
syntax to output errors associated with a particular field.
However, an important thing to keep in mind when outputting a
field’s errors value in this manner is the output is
generated as an HTML formatted list:
<ul class="errorlist">
<li>Name is required.</li>
</ul>
Listing 6-27. Django loop over
form.<field_name>.errors
{% for field in form %}
<div class="row">
<div class="col-md-2">
{{ field.label_tag }}
{% if field.help_text %}
<sup>{{ field.help_text }}</sup>
{% endif %}
{% for error in field.errors %}
<div class="row">
<div class="alert alert-danger">{{error}}</div>
</div>
{% endfor %}
</div><div class="col-md-10 pull-left">
{{ field }}
</div>
</div>
{% endfor %}
Listing 6-28. Django form.errors and form.non_field_errors with
custom HTML output
<!-- Field errors -->
{% if form.errors %}
<div class="row">
{% for field_with_error,error_messages in form.errors.items %}
<div class="alert alert-danger">{{field_with_error}} {{error_messages}}</div>
{% endfor %}
</div>
{% endif %}
<!-- Non-field errors --> {% if form.non_field_errors %}
<div class="row">
{% for error in form.non_field_errors %}
<div class="alert alert-danger">{{error}}</div>
{% endfor %}
</div>
{% endif %}
Answer by Azrael Juarez
To complicate matters further, website users expect feedback when they haven’t filled out a form correctly. So, you must also have some way of displaying errors on the form for the user to correct before allowing them to submit the form.,Figure 8-5: Adding some CSS changes our rather plain contact form into something to be proud of.,Figure 8-2: Django’s Form class renders the error messages to the form automatically.,Line 2. We create our SimpleForm class, which inherits from Django’s forms.Form class.
The code for a basic HTML form is simple, for example:
<form>
<p>First Name: <input type="text" name="firstname"></p>
<p>Last Name: <input type="text" name="lastname"></p>
<p><input type="submit" value="Submit"></p>
</form>Let’s explore the Form class further with the Django interactive shell. From within your virtual environment, run the command:
(env_myclub) ...myclub_root> python manage.py shellOnce the shell is running, create your SimpleForm class:
1 >>> from django import forms
2 >>> class SimpleForm(forms.Form):
3 ... firstname = forms.CharField(max_length=100)
4 ... lastname = forms.CharField(max_length=100)
5 ...
6 >>>This is the first big plus for Django’s Form class—you don’t have to remember a new syntax for declaring form fields. But it gets better. Let’s go back to the shell:
1 >>> f = SimpleForm()
2 >>> print(f.as_p())
<p><label for="id_firstname">Firstname:</label> <input type="text" name="firstname" maxlength="100" required id="id_firstname"></p>
<p><label for="id_lastname">Lastname:</label> <input type="text" name="lastname" maxlength="100" required id="id_lastname"></p>
>>>Django doesn’t just output HTML paragraphs—you can also get Django to output HTML for displaying your form as a list or a table. Try these out for yourself:
>>> print(f.as_ul())
>>> print(f.as_table())Answer by Shay Ibarra
django-crispy-forms implements a class called FormHelper that defines the form rendering behavior. Helpers give you a way to control form attributes and its layout, doing this in a programmatic way using Python. This way you write as little HTML as possible, and all your logic stays in the forms and views files.,Django fields generate default classes, crispy-forms handles these and adds other classes for compatibility with CSS frameworks.,Let’s see how to render the form in a template. Supposing we have the form in the template context as example_form, we would render it doing:,You can read a list of Helper attributes you can set and what they are for.
class ExampleForm(forms.Form):
like_website = forms.TypedChoiceField(
label = "Do you like this website?",
choices = ((1, "Yes"), (0, "No")),
coerce = lambda x: bool(int(x)),
widget = forms.RadioSelect,
initial = '1',
required = True,
)
favorite_food = forms.CharField(
label = "What is your favorite food?",
max_length = 80,
required = True,
)
favorite_color = forms.CharField(
label = "What is your favorite color?",
max_length = 80,
required = True,
)
favorite_number = forms.IntegerField(
label = "Favorite number",
required = False,
)
notes = forms.CharField(
label = "Additional notes or feedback",
required = False,
)
Answer by Alejandra McClure
valueMissing: Returns true if the element has a required attribute, but no value, or false otherwise. If true, the element matches the :invalid CSS pseudo-class.,The simplest HTML5 validation feature is the required attribute. To make an input mandatory, add this attribute to the element. When this attribute is set, the element matches the :required UI pseudo-class and the form won’t submit, displaying an error message on submission when the input is empty. While empty, the input will also be considered invalid, matching the :invalid UI pseudo-class.,If the user tries to send the data, the browser will block the form and display an error message.,The presence of the required attribute on any element that supports this attribute means the element matches the :required pseudoclass whether it has a value or not. If the <input> has no value, the input will match the :invalid pseudoclass.
<form>
<label for="choose">Would you prefer a banana or cherry?</label>
<input id="choose" name="i_like">
<button>Submit</button>
</form>Answer by Mila Santos
You can be creative with these variables: e.g. a context processor could set a default CSS error class on all fields rendered by {% render_field %}.,Adds CSS class to field element. Split classes by whitespace in order to add several classes at once.,The same as ‘add_error_class’ adds css class only for required field.,If any blockers with the release I would be happy to help.
You can get Django Widget Tweaks by using pip:
$ pip install django-widget-tweaks
To enable widget_tweaks in your project you need to add it to INSTALLED_APPS in your projects settings.py file:
INSTALLED_APPS = [
...
'widget_tweaks',
...
]
Example:
{% load widget_tweaks %}
<!-- change input type (e.g. to HTML5) -->
{% render_field form.search_query type="search" %}
<!-- add/change several attributes -->
{% render_field form.text rows="20" cols="20" title="Hello, world!" %}
<!-- append to an attribute -->
{% render_field form.title class+="css_class_1 css_class_2" %}
<!-- template variables can be used as attribute values -->
{% render_field form.text placeholder=form.text.label %}
<!-- double colon -->
{% render_field form.search_query v-bind::class="{active:isActive}" %}
For fields rendered with {% render_field %} tag it is possible to set error class and required fields class by using WIDGET_ERROR_CLASS and WIDGET_REQUIRED_CLASS template variables:
{% with WIDGET_ERROR_CLASS='my_error' WIDGET_REQUIRED_CLASS='my_required' %}
{% render_field form.field1 %}
{% render_field form.field2 %}
{% render_field form.field3 %}
{% endwith %}
Examples:
{% load widget_tweaks %}
<!-- change input type (e.g. to HTML5) -->
{{ form.search_query|attr:"type:search" }}
<!-- add/change several attributes -->
{{ form.text|attr:"rows:20"|attr:"cols:20"|attr:"title:Hello, world!" }}
<!-- attributes without parameters -->
{{ form.search_query|attr:"autofocus" }}
<!-- attributes with double colon Vuejs output: v-bind:class="{active:ValueEnabled}" -->
{{ form.search_query|attr:"v-bind::class:{active:ValueEnabled}" }}
Example:
{% load widget_tweaks %}
<!-- add 2 extra css classes to field element -->
{{ form.title|add_class:"css_class_1 css_class_2" }}
Example:
{% load widget_tweaks %}
<!-- data-filters:"OverText" will be added to input field -->
{{ form.title|set_data:"filters:OverText" }}
Example:
{% load widget_tweaks %}
<!-- add 2 extra css classes to field element -->
{{ form.title|append_attr:"class:css_class_1 css_class_2" }}
Example:
{% load widget_tweaks %}
<!-- removes autofocus attribute from field element -->
{{ form.title|remove_attr:"autofocus" }}
Example:
{% load widget_tweaks %}
<!-- add 2 extra css classes to field label element -->
{{ form.title|add_label_class:"label_class_1 label_class_2" }}
Example:
{% load widget_tweaks %}
<!-- add 'error-border' css class on field error -->
{{ form.title|add_error_class:"error-border" }}
The same as ‘attr’ but sets an attribute only if validation failed for the field (field.errors is not empty). This can be useful when dealing with accessibility:
{% load widget_tweaks %}
<!-- add aria-invalid="true" attribute on field error -->
{{ form.title|add_error_attr:"aria-invalid:true" }}
Example:
{% load widget_tweaks %}
<!-- add 'is-required' css class on field required -->
{{ form.title|add_required_class:"is-required" }}
Example:
{% load widget_tweaks %}
<div class="field {{ field|field_type }} {{ field|widget_type }} {{ field.html_name }}">
{{ field }}
</div>
Output:
<div class="field charfield textinput name">
<input id="id_name" type="text" name="name" maxlength="100" />
</div>
Example:
{% render_field form.category|append_attr:"readonly:readonly" type="text" placeholder="Category" %}
returns:
<input name="category" placeholder="Profession" readonly="readonly" type="text">
The order django-widget-tweaks filters apply may seem counter-intuitive (leftmost filter wins):
{{ form.simple|attr:"foo:bar"|attr:"foo:baz" }}
returns:
<input foo="bar" type="text" name="simple" id="id_simple" />
Reusable field template example:
{# inc/field.html #}
{% load widget_tweaks %}
<div>{{ field|attr:"foo:default_foo" }}</div>
Example usage:
{# my_template.html #}
{% load widget_tweaks %}
<form method='POST' action=''> {% csrf_token %}
{% include "inc/field.html" with field=form.title %}
{% include "inc/field.html" with field=form.description|attr:"foo:non_default_foo" %}
</form>
Make sure you have tox installed, then type
tox
Содержание
- :invalid
- Try it
- Syntax
- Examples
- Coloring elements to show validation
- Result
- Showing sections in stages
- Result
- Accessibility concerns
- Notes
- Radio buttons
- Gecko defaults
- :invalid , :valid
- Кратко
- Пример
- Как понять
- Как пишется
- Подсказки
- На практике
- Денис Ежков советует
- Валидация форм на стороне клиента
- Что такое валидация формы?
- Типы валидации на стороне клиента
- Использование встроенной валидации форм
- Примеры встроенной валидации форм
- Простой начальный файл
- Атрибут required
- Валидация с помощью регулярного выражения
- Ограничение длины вводимых значений
- Ограничение допустимых значений
- Полный пример
- Валидация форм с помощью JavaScript
- Constraint Validation API
- Реализация кастомного сообщения об ошибке
- Более подробный пример
- Проверка форм без встроенного API
- Пример без использования Constraint Validation API
- Проверьте свои навыки!
- Заключение
:invalid
The :invalid CSS pseudo-class represents any , , or other element whose contents fail to validate.
Try it
This pseudo-class is useful for highlighting field errors for the user.
Syntax
Examples
Coloring elements to show validation
Result
Showing sections in stages
In this example we use :invalid along with
, the general sibling combinator, to make a form appear in stages, so the form initially shows the first item to complete, and when the user completes each item the form displays the next one. When the whole form is complete the user can submit it.
Result
Accessibility concerns
The color red is commonly used to indicate invalid input. People who have certain types of color blindness will be unable to determine the input’s state unless it is accompanied by an additional indicator that does not rely on color to convey meaning. Typically, descriptive text and/or an icon are used.
Notes
Radio buttons
If any one of the radio buttons in a group is required , the :invalid pseudo-class is applied to all of them if none of the buttons in the group is selected. (Grouped radio buttons share the same value for their name attribute.)
Gecko defaults
By default, Gecko does not apply a style to the :invalid pseudo-class. However, it does apply a style (a red «glow» using the box-shadow property) to the :user-invalid pseudo-class, which applies in a subset of cases for :invalid .
Источник
:invalid , :valid
Время чтения: меньше 5 мин
Обновлено 17 мая 2022
Кратко
Псевдоклассы используются для стилизации полей формы, филдсетов, либо самой формы:
- :invalid для заполнений с ошибкой;
- :valid для верных заполнений.
Пример
Как понять
Часто на сайтах мы встречаем формы. Это могут быть формы регистрации или формы оплаты покупки в интернет-магазине. Некоторые поля ввода и другие элементы управления в этих формах могут иметь особые требования к заполнению. Например, какие-то поля ввода должны быть обязательно заполнены, какие-то — иметь определённый формат данных (к примеру, текст в поле с типом email должен содержать знак @ ).
Чтобы показать что поле ввода заполнено корректно к нему можно применить особые стили используя псевдокласс :valid . Аналогично, для некорректно заполненного поля мы можем применить особые стили используя псевдокласс :invalid .
В примере выше можно увидеть пару моментов:
- Поле ввода имени и чекбокс обязательны к заполнению, но не заполнены, поэтому псевдокласс :invalid применяется к ним сразу же.
- Поле ввода электронной почты необязательно к заполнению, поэтому к нему сразу же применён псевдокласс :valid .
Но если ввести в поле хотя бы один символ, браузер запускает проверку на корректность ввода email (из-за того, что мы указали type = «email» ) и применяет псевдокласс :invalid до тех пор, пока не будет введён корректный адрес электронной почты.
Также указанные псевдоклассы применяются и к самой форме, в которой находится инпут.
В примере выше можно увидеть, что при наличии филдсета к нему также будет применён соответствующий псевдокласс.
Как пишется
К любому селектору добавляем двоеточие и ключевое слово invalid или valid . Селектор должен указывать на интерактивный элемент ввода, у которого предусмотрены правила проверки, на форму или на филдсет. Например, абзац браузер не умеет проверять на правильность, а значит, селектор p : invalid будет бесполезен.
Например, так выглядит селектор по классу:
Подсказки
💡 Если в форме есть группа связанных радиокнопок ( = «radio»> ), то если хотя бы у одной есть атрибут required , псевдокласс :invalid будет применён ко всем радиокнопкам сразу.
💡 Псевдоклассы :invalid или :valid применяются и к самой форме, и к тегу , в зависимости от того, есть ли внутри ошибки, или все инпуты заполнены верно.
💡 В отличие от комплексной валидации формы, которая происходит при попытке её отправить, эти псевдоклассы работают в реальном времени и сохраняют свою актуальность даже во время ввода.
На практике
Денис Ежков советует
🛠 В настоящий момент стили для псевдокласса :invalid применяются к невалидному полю сразу же, что не всегда удобно. Было бы круто, если бы валидация включалась, только если пользователь начал что-то вводить, но, к сожалению, пока нет такой возможности «из коробки».
В будущих версиях спецификации CSS должен появиться псевдокласс :user — invalid , который задуман как раз для целей, описанных выше. То есть он будет применяться, например, к полю ввода только после того, как пользователь начал там что-то писать.
Но это пока перспективы, а что же можно сделать сейчас? В настоящий момент добиться похожего поведения можно только для полей ввода. При этом нужно выполнить два условия:
- добавить атрибут placeholder ;
- использовать псевдокласс :placeholder — shown .
Открыть демо в новой вкладке + Развернуть
Источник
Валидация форм на стороне клиента
Перед отправкой данных на сервер важно убедиться, что все обязательные поля формы заполнены данными в корректном формате. Это называется валидацией на стороне клиента и помогает убедиться, что данные, введённые в каждый элемент формы, соответствуют требованиям. Данная статья проведёт вас через основные концепци и примеры валидации на стороне клиента.
| Начальные требования: | Владение компьютером, достаточное понимание HTML, CSS, и JavaScript. |
|---|---|
| Цель: | Понять, что такое валидация на стороне клиента, почему это важно и как применять различные техники для её реализации. |
Валидация на стороне клиента — это первичная проверка введённых данных, которая существенно улучшает удобство взаимодействия с интерфейсом; обнаружение некорректных данных на стороне клиента позволяет пользователю немедленно их исправить. Если же проверка происходит только на сервере, процесс заполнения может быть более трудоёмким, так как требует повторения одних и тех же действий отправки данных на сервер для получения обратного ответа с сообщением о том, что нужно исправить.
Однако, не следует рассматривать валидацию на стороне клиента как достаточную меру безопасности! Любые данные, отправляемые через форму, необходимо дополнительно проверять на безопасность и на стороне сервера, поскольку валидацию на стороне клиента достаточно просто обойти и она может не остановить злоумышленников. Чтобы лучше понимать потенциальные угрозы, рекомендуем ознакомиться с разделом Безопасность вебсайтов; валидация на стороне сервера выходит за рамки этого модуля, но о ней следует помнить.
Что такое валидация формы?
Зайдите на любой популярный сайт, имеющий форму регистрации. Вы заметите, что при вводе данных в неправильном формате, пользователя сразу уведомляют о наличии проблемы. Вы получите примерно такое сообщение:
- «Обязательное поле» (Вы не можете оставить поле пустым).
- «Пожалуйста, введите номер телефона в формате xxx-xxxx» (Чтобы данные считались корректными, их необходимо указать в определённом формате).
- «Пожалуйста, введите корректный email-адрес» (вы ввели данные в неправильном формате).
- «Длина пароля должна быть от 8 до 30 символов и включать одну заглавную букву, один символ, и одну цифру.» (Требования к формату данных достаточно конкретные).
Это называется валидацией формы. По мере ввода, браузер и/или сервер проверяют данные, чтобы определить, соответствуют ли они требуемому формату. Валидация, выполняемая в браузере, называется валидацией на стороне клиента, а выполняемая на сервере — валидацией на стороне сервера. В этом разделе мы сосредоточимся на валидации, выполняемой на стороне клиента.
Если формат корректен, приложение позволяет отправить данные на сервер и (обычно) сохранить в базу данных; в противном случае выводится сообщение с описанием того, что нужно исправить, позволяя ввести данные снова.
Мы хотим максимально упростить заполнение веб-форм. Тогда почему мы настаиваем валидации данных? На это есть три основные причины:
- Мы хотим получать правильные данные в правильном формате. Наши приложения не будут работать должным образом, если данные от пользователей хранятся в неправильном формате, некорректны сами по себе или вовсе пропущены.
- Мы хотим защитить данные пользователей. Принуждение пользователей вводить надёжные пароли облегчает защиту их аккаунтов.
- Мы хотим защитить себя. Существует множество способов, позволяющих злоумышленникам с помощью незащищённых форм навредить приложению (смотрите Безопасность вебсайтов).
Предупреждение: Никогда не доверяйте данным, передаваемым на сервер клиентской программой. Даже если ваша форма правильно валидируется и не допустит введение потенциально вредоносных данных на стороне клиента, злоумышленники по-прежнему могут изменить сетевой запрос.
Типы валидации на стороне клиента
Существует два типа валидации на стороне клиента, с которыми вы столкнётесь в Интернете:
- Встроенная валидация форм использует функционал валидации HTML5, который мы неоднократно обсуждали в этом модуле. HTML5-валидация обычно не требует большого количества JavaScript-кода и демонстрирует лучшую производительность, но не настолько настраиваема, как валидация с помощью JavaScript.
- JavaScript-валидация кодируется с помощью JavaScript. Она полностью настраиваема, но требует программирования всей логики (или использования библиотеки).
Использование встроенной валидации форм
Одной из самых важных функций элементов форм HTML5 (en-US) является способность валидировать бóльшую часть пользовательских данных без использования JavaScript. Это выполняется с помощью атрибутов валидации у элементов формы. Многие из них мы уже рассмотрели в этом курсе:
- required : Определяет, что для отправки формы данное поле предварительно должно быть заполнено.
- minlength и maxlength : Задаёт минимальную и максимальную длину текстовых данных (строк)
- min и max : Задаёт минимальное и максимальное значение для поля, расчитанного на числовой тип данных
- type : Определяет тип данных, на который рассчитано поле: число, email-адрес или какой-то другой предустановленный тип
- pattern : С помощью регулярного выражения, определяет шаблон, которому должны соответствовать вводимые данные.
Если данные, введённые в поле формы, соответствуют правилам перечисленных выше атрибутов, они считаются валидными, если нет — не валидными
Когда элемент валиден, справедливы следующие утверждения:
- Элемент соответствует CSS-псевдоклассу :valid , позволяющему стилизовать только валидные элементы.
- Если пользователь пытается отправить данные, браузер отправит форму при условии, что ничто другое (например, JavaScript) не помешает ему это сделать
Когда элемент не валиден, справедливы следующие утверждения:
- Элемент соответствует CSS-псевдоклассу :invalid или, в зависимости от ошибки, другим псевдоклассам (например, :out-of-range ), которые позволяют применять определённые стили к элементам, не являющимся валидными.
- Если пользователь пытается отправить данные, браузер заблокирует форму и выведет сообщение об ошибке.
Примеры встроенной валидации форм
В этом разделе мы протестируем некоторые из атрибутов, которые обсуждали выше.
Простой начальный файл
Давайте начнём с простого примера: поле, позволяющее указать своё предпочтение — банан или вишня. Этот пример включает обычное текстовое поле , связанный с ним элемент и кнопку отправки формы . Исходный код можно найти на GitHub по адресу fruit-start.html, а ниже приведён рабочий пример.
Для начала скопируйте файл fruit-start.html в новую папку на вашем жёстком диске.
Атрибут required
Самым простым в HTML5-валидации является атрибут required . Добавьте его к элементу, чтобы сделать заполнение обязательным. Элемент с данным атрибутом соответствует CSS-псевдоклассу :required , а если поле ввода пустое, вместо отправки формы отобразится сообщение об ошибке. Пока поле пустое, оно также будет соответствовать CSS-псевдоклассу :invalid .
Добавьте к полю атрибут required , как показано ниже.
Обратите внимание на CSS, который включён в файл примера:
Данный CSS задаёт полю красную пунктирную рамку, когда оно не валидно, а когда валидно — сплошную чёрную. Мы также добавили фоновый градиент для обязательных не валидных полей. Проверьте новое поведение в примере ниже:
Примечание: Рабочий пример можно найти на GitHub по адресу fruit-validation.html (отдельно можно найти исходный код.)
Попробуйте отправить форму без введения значения. Обратите внимание, что не валидное поле получает фокус, появляется сообщение об ошибке («Заполните это поле») и блокируется отправка формы.
Наличие атрибута required у любого элемента, который его поддерживает, означает, что элемент соответствует CSS-псевдоклассу :required , независимо от того, имеет он значение или нет. Если элемент не содержит значение, он будет соответствовать псевдоклассу :invalid .
Примечание: Для повышения удобства взаимодействия указывайте пользователям, какие поля являются обязательными. К тому же, этого требует руководство по обеспечению доступности WCAG. Требуйте обязательного ввода только тех данных, которые вам действительно нужны: например, так ли важно знать пол или должность пользователя?
Валидация с помощью регулярного выражения
Ещё одной полезной функцией валидации является атрибут pattern , который в виде значения принимает Регулярное выражение. Регулярное выражение (regex) — это шаблон, который может быть использован для сопоставления набора символов в текстовой строке, поэтому они идеально подходят для валидации формы и используются для множества других целей в JavaScript.
Регулярные выражения достаточно сложны, и мы не будем подробно рассматривать эту тему в данной статье. Ниже приведены несколько примеров, чтобы дать вам представление о том, как они работают.
- a — Соответствует одному символу a (не b , не aa , и так далее).
- abc — Соответствует символу a , за которой следует b , за которой следует c .
- ab?c — Соответствует символу a , за которым опционально может следовать b , за которым следует c . ( ac или abc )
- ab*c — Соответствует символу a , за которым опционально может следовать любое количество символов b , за которыми следует c . ( ac , abc , abbbbbc , и так далее).
- a|b — Соответствует символу a или b .
- abc|xyz — Соответствует в точности abc или в точности xyz (но не abcxyz или a или y , и так далее).
Есть еще много возможностей, которые мы не упомянули. Полный список со множеством примеров можно найти в документации по Регулярным выражениям
Давайте рассмотрим пример. Добавьте в атрибут pattern следующий шаблон:
Это даёт нам следующее обновление — опробуйте его:
Примечание: Рабочий пример можно найти на GitHub по адресу fruit-pattern.html (исходный код.)
В этом примере элемент принимает одно из четырёх возможных значений: строку «banana», «Banana», «cherry», или «Cherry». Регулярные выражения чувствительны к регистру, но с помощью шаблона «Aa», вложенного в квадратные скобки, мы сделали поддержку написания слова как с большой, так и с маленькой буквы.
Подставьте в атрибут pattern приведённые выше примеры регулярных выражений, и посмотрите, как это повлияет на валидацию введённого в поле значения. Попробуйте написать свои шаблоны проверки и посмотрите, что получится. По возможности, делайте их связанными с фруктами, чтобы примеры имели смысл.
Если не пустое значение элемента не соответствует шаблону регулярного выражения, input будет соответствовать псевдоклассу :invalid .
Примечание: Некоторым типам элементов для валидации с помощью регулярного выражения не требуется атрибут pattern . Например, поле с типом email валидирует значение по шаблону одного email-адреса или, если присутствует атрибут multiple (en-US) , шаблону списка email-адресов, разделённых запятыми.
Примечание: Элемент
Ограничение длины вводимых значений
Можно ограничить максимально допустимое количество символов для текстовых полей или
(en-US) используя атрибуты minlength (en-US) и maxlength . Поле будет не валидным, если количество символов его содержимого будет меньше minlength (en-US) или больше maxlength .
Зачастую браузеры не позволяют пользователям вводить в текстовое поле значение, длина которого превышает максимально допустимую. Можно существенно повысить удобство использования, если помимо ограничения в атрибуте maxlength добавить доступный индикатор, отображающий текущее и максимально допустимое количество символов, что даст пользователю возможность уместить содержимое в заданные рамки. Хорошим примером является окно написания твита в Twitter. Для реализации такого функционала можно использовать JavaScript, включая решения, использующие maxlength .
Ограничение допустимых значений
В полях, предназначенных для ввода чисел (например, ), диапазон допустимых значений можно определить с помощью атрибутов min и max . Если поле содержит значение за пределами данного диапазона, оно будет не валидным.
Давайте рассмотрим другой пример. Создайте новую копию файла fruit-start.html.
Содержимое элемента замените на:
- Здесь мы в поле с типом text атрибутам minlength и maxlength , задали одинаковое значение 6, что соответствует количеству символов в словах banana и cherry.
- В поле с типом number атрибуту min мы задали значение 1, а атрибуту max значение 10. При вводе чисел за пределами данного диапазона, поле будет становиться не валидным; с помощью стрелок увеличения/уменьшения пользователи не смогут выйти за границы диапазона. Текущее поле не является обязательным для заполнения, поэтому даже после очистки будет оставаться валидным.
Примечание: Рабочий пример можно найти на GitHub по адресу fruit-length.html (исходный код.)
Примечание: (и другие типы, такие как range и date ) могут также принимать атрибут step (en-US) , который задаёт шаг увеличения или уменьшения значения при использовании кнопок вверх и вниз. В примере выше мы явно не указывали атрибут step , поэтому он получает значение по умолчанию, равное 1 . Это значит, что дробные числа, такие как 3.2, будут не валидными.
Полный пример
Ниже представлен полный пример, демонстрирующий использование встроенного функционала валидации. Сначала немного HTML:
И немного CSS для стилизации HTML:
В статье Атрибуты валидации (en-US) можно найти полный список атрибутов, которые можно использовать для ограничения допустимых значений ввода и типов полей input , которые их поддерживают.
Примечание: Рабочий пример можно найти на GitHub по адресу full-example.html (исходный код.)
Валидация форм с помощью JavaScript
Если нужно управлять внешним видом встроенных сообщений об ошибке или работать с устаревшими браузерами, которые не поддерживают встроенную валидацию форм HTML, вам следует использовать JavaScript. В данном разделе мы рассмотрим различные способы делать это.
Constraint Validation API
Большинство браузеров поддерживают Constraint Validation API, который состоит из набора свойств и методов, доступных на DOM-интерфейсах следующих элементов форм:
Для перечисленных выше элементов Constraint Validation API делает доступными следующие свойства.
- validationMessage : Возвращает локализованное сообщение, описывающее ограничения валидации (если таковые имеются), которым не удовлетворяет определённый элемент. Если элемент не участвует в валидации ( willValidate установлено в false ) или значение элемента удовлетворяет установленным ограничениям (является валидным), будет возвращена пустая строка.
- validity : Возвращает объект ValidityState , который содержит несколько свойств, описывающих состояние валидности элемента. Подробное описание всех свойств доступности можно найти на странице справочника ValidityState ; ниже приведён список наиболее используемых:
- patternMismatch : Возвращает true , если значение не соответствует шаблону, указанному в атрибуте pattern , и false если соответствует. Если true, элемент соответствует CSS-псевдоклассу :invalid .
- tooLong : Возвращает true , если значение длиннее максимальной длины, указанной в атрибуте maxlength , и false если оно короче или равно ей. Если true, элемент соответствует CSS-псевдоклассу :invalid .
- tooShort : Возвращает true , если значение короче минимальной длины, указанной в атрибуте minlength , и false если оно длинее или равно ей. Если true, элемент соответствует CSS-псевдоклассу :invalid .
- rangeOverflow : Возвращает true , если значение больше указанного в атрибуте max максимума, и false если меньше или равно ему. Если true, элемент соответствует CSS-псевдоклассам :invalid и :out-of-range
- rangeUnderflow : Возвращает true , если значение меньше указанного в атрибуте min , и false если больше или равно ему. Если true, элемент соответствует CSS-псевдоклассу :invalid и :out-of-range .
- typeMismatch : Возвращает true , если значение не соответствует требуемому синтаксису (когда для type задано значение email или url ), и false если синтаксис корректный. Если true , элемент соответствует CSS-псевдоклассу :invalid .
- valid : Возвращает true , если элемент соответствует всем ограничениям валидации — следовательно, считается валидным, и false если не соответствует какому-то ограничению. Если true, элемент соответствует CSS-псевдоклассу :valid ; иначе :invalid .
- valueMissing : Возвращает true , если у элемента есть атрибут required , но не введено значенение, иначе возвращает false . Если true, элемент соответствует CSS-псевдоклассу :invalid .
- willValidate : Возвращает true , если элемент будет участвовать в валидации при отправке формы; иначе возвращает false .
Также для перечисленных выше элементов Constraint Validation API делает доступными следующие методы.
- checkValidity() : Возвращает true , если значение элемента проходит валидацию, иначе возвращает false . Если элемент не валиден, данный метод также запускает на нём событие invalid .
- setCustomValidity(message) : Позволяет добавить в элемент кастомное сообщение об ошибке; при этом элемент будет считаться не валидным и отобразится указанная ошибка. Это позволяет использовать JavaScript-код, чтобы представить ошибку валидации иначе, чем это предусмотрено стандартными средствами валидации HTML5. При сообщении об ошибке данное кастомное сообщение показывается пользователю.
Реализация кастомного сообщения об ошибке
Как вы видели в примерах HTML5-валидации выше, каждый раз, когда пользователь пытается отправить не валидную форму, браузер отображает сообщение об ошибке. Способ отображения сообщения зависит от браузера.
У этих автоматических сообщений есть два недостатка:
- Не существует стандартного способа их стилизации с помощью CSS.
- Они зависят от локали браузера, из-за чего страница может быть на одном языке, а сообщение об ошибке — на другом, как показано на следующем скриншоте браузера Firefox.
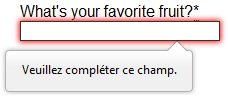
Настройка таких сообщений об ошибках является одной из наиболее распространённых причин использования Constraint Validation API. Давайте рассмотрим простой пример, как это делается.
Начнём с простого HTML (Не стесняйтесь поместить это в пустой HTML-файл. Вы можете взять за основу свежую копию fruit-start.html, если хотите):
Добавьте на страницу следующий JavaScript:
Здесь мы сохраняем ссылку на поле email, а затем добавляем к нему обработчик события, который запускает код обработчика каждый раз, когда в поле меняется значение.
В коде обработчика мы проверяем, возвращает ли свойство поля email validity.typeMismatch значение true , что значит, что содержащееся значение не соответствует шаблону корректного email-адреса. Если возвращается true , мы вызываем метод setCustomValidity() (en-US) с кастомным сообщением. Это делает поле не валидным, поэтому попытка отправить форму приводит к ошибке и отображается кастомное сообщение об ошибке.
Если свойство validity.typeMismatch возвращает false , мы вызываем метод setCustomValidity() с пустой строкой. Это делает поле валидным, поэтому форма может быть успешно отправлена.
Попробовать пример можно ниже:
Примечание:: Данный пример можно найти на GitHub по адресу custom-error-message.html (отдельно можно найти исходный код.)
Более подробный пример
Теперь, когда мы разобрали простой пример, давайте посмотрим, как можно использовать данный API для создания более сложной валидацию.
Во-первых, HTML. Опять же, не стесняйтесь писать его вместе с нами:
Эта простая форма использует атрибут novalidate , который отключает автоматическую валидацию браузером; это позволяет нашему скрипту взять управление валидацией на себя. Однако, это не отменяет поддержку Constraint Validation API или псевдоклассов, таких как :valid или ему подобных. Это значит, что хотя браузер автоматически и не проверяет валидность формы перед отправкой данных, вы можете сделать это самостоятельно и соответствующим образом стилизовать форму.
Объектом валидации является обязательный для заполнения , длина которого не должна быть меньше 8 символов. Давайте напишем код, проверяющий эти критерии, и покажем кастомное сообщение об ошибке в случае несоблюдения какого-то из них.
Мы хотим показывать сообщение об ошибке внутри элемента . Данному элементу задан атрибут aria-live , чтобы гарантировать, что наше кастомное сообщение об ошибке будет доступно всем, включая пользователей скринридеров.
Примечание: Ключевым моментом здесь является то, что добавление к форме атрибута novalidate отключает отображение встроенных сообщений об ошибке и позволяет вместо этого добавлять в DOM кастомные сообщения.
Перейдём к базовому CSS, чтобы немного улучшить внешний вид формы и обеспечить визуальную обратную связь при введении не валидных данных:
Теперь давайте рассмотрим JavaScript, который реализует кастомную валидацию.
Комментарии объясняют логику хорошо, но кратко:
- При каждом изменении значения поля, мы производим его валидацию. Если данные валидны, удаляем ранее отображаемые сообщения об ошибках. Если данные не валдны, запускаем showError() , чтобы показать соответствующую ошибку.
- При каждой попытке отправить форму, мы снова производим валидацию. Если данные валидны, позволяем отправку формы. Если данные не валидны, запускам showError() , чтобы показать соответствующее сообщение об ошибке, а также предотвращаем отправку формы с помощью preventDefault() .
- Функция showError() использует различные свойства объекта validity поля ввода, чтобы определить тип ошибки и отобразить соответсвущее сообщение.
Примечание: Рабочий пример можно найти на GitHub по адресу detailed-custom-validation.html (отдельно можно найти исходный код.)
Constraint Validation API явяется мощным инструментом валидации форм, позволяющим получить контроль над пользовательским интерфейсом, существенно превосходящий возможности HTML и CSS.
Примечание: Для получения дополнительной информации смотрите руководства Constraint validation guide (en-US) и Constraint Validation API.
Проверка форм без встроенного API
В некоторых случаях, например, при необходимости поддержки устаревших браузеров или кастомных элементов формы, вы не сможете или не захотите использовать Constraint Validation API. Вы по-прежнему сможете использовать JavaScript для валидации форм, но для этого всё нужно будет писать самостоятельно.
Для создания своего валидатора формы, задайте себе несколько вопросов:
Какую тип валидации я должен выполнить?
Вам нужно определить, как данные будут валидироваться: с помощью строковых операций, преобразования типов, регулярных выражений и так далее. Решать вам.
Что мне нужно делать, если форма не проходит валидацию?
Это явно вопрос пользовательского интерфейса. Вы должны решить, как в этом случае будет себя вести форма. Будет ли она в любом случае отправлять данные? Нужно ли выделять поля, содержащие ошибки? Нужно ли отображать сообщения об ошибках?
Как я могу помочь пользователю исправить не валидные данные?
Чтобы снизить степень разочарования пользователя, очень важно предоставить как можно больше полезной информации, чтобы помочь исправить данные, которые он ввёл неправильно. Нужно предложить правильные варианты, чтобы дать понять, какие данные вы ожидаете от него получить, а также сообщение, чётко описывающее ошибку. Если вы хотите подробнее ознакомиться с требованиями к пользовательскому интрефейсу при валидации форм, предлагаем прочитать следующие статьи:
Пример без использования Constraint Validation API
Чтобы проиллюстрировать это дальше приводится упрощённая версия предыдущего примера, которая работает с устаревшими браузерами.
HTML почти тот такой же; мы только удалили функционал валидации HTML5.
CSS также не требует особых изменений; мы только заменили CSS-псевдокласс :invalid на реальный класс и не использовали селектор по атрибутам, так как он не работает в Internet Explorer 6.
Существенно изменился только JavaScript-код, который теперь должен выполнять гораздо больше работы.
Результат выглядит следующим образом:
Как вы можете видеть, сделать собственную валидацию не так уж и сложно. Сложность состоит лишь в том, чтобы сделать его кроссплатформенным и работающим с любой формой, которую можно создать. Для проверки формы доступно множество библиотек, например Validate.js.
Проверьте свои навыки!
Вы дошли до конца этой статьи, но можете ли вы вспомнить самую важную информацию? Вы можете найти дополнительные тесты, чтобы убедиться, что вы сохранили эту информацию, прежде чем двигаться дальше — Test your skills: Form validation (en-US) .
Заключение
Для проверки формы на стороне клиента иногда требуется JavaScript, если вы хотите настроить стилизацию и сообщения об ошибках, но это всегда требует от вас внимательного отношения к пользователю. Всегда помните о необходимости помогать пользователям исправлять данные, которые они вводят. Для этого обязательно нужно:
- Отображать явные сообщения об ошибках.
- Снисходительно относиться к формату ввода.
- Указывать, где именно возникла ошибка. Особенно в больших формах.
После того, как вы убедились, что форма заполнена правильно, ее можно отправлять. Дальше мы рассмотрим отправку данных формы.
Источник
Bound and unbound forms
A Form instance is either bound to a set of data, or unbound.
- If it’s bound to a set of data, it’s capable of validating that data and rendering the form as HTML with the data displayed in the HTML.
- If it’s unbound, it cannot do validation (because there’s no data to validate!), but it can still render the blank form as HTML.
-
class Form
To create an unbound Form instance, instantiate the class:
>>> f = ContactForm()
To bind data to a form, pass the data as a dictionary as the first parameter to your Form class constructor:
>>> data = {'subject': 'hello',
... 'message': 'Hi there',
... 'sender': '[email protected]',
... 'cc_myself': True}
>>> f = ContactForm(data)
In this dictionary, the keys are the field names, which correspond to the attributes in your Form class. The values are the data you’re trying to validate. These will usually be strings, but there’s no requirement that they be strings; the type of data you pass depends on the Field, as we’ll see in a moment.
-
Form.is_bound
If you need to distinguish between bound and unbound form instances at runtime, check the value of the form’s is_bound attribute:
>>> f = ContactForm()
>>> f.is_bound
False
>>> f = ContactForm({'subject': 'hello'})
>>> f.is_bound
True
Note that passing an empty dictionary creates a bound form with empty data:
>>> f = ContactForm({})
>>> f.is_bound
True
If you have a bound Form instance and want to change the data somehow, or if you want to bind an unbound Form instance to some data, create another Form instance. There is no way to change data in a Form instance. Once a Form instance has been created, you should consider its data immutable, whether it has data or not.
Using forms to validate data
-
Form.clean()
Implement a clean() method on your Form when you must add custom validation for fields that are interdependent. See Cleaning and validating fields that depend on each other for example usage.
-
Form.is_valid()
The primary task of a Form object is to validate data. With a bound Form instance, call the is_valid() method to run validation and return a boolean designating whether the data was valid:
>>> data = {'subject': 'hello',
... 'message': 'Hi there',
... 'sender': '[email protected]',
... 'cc_myself': True}
>>> f = ContactForm(data)
>>> f.is_valid()
True
Let’s try with some invalid data. In this case, subject is blank (an error, because all fields are required by default) and sender is not a valid email address:
>>> data = {'subject': '',
... 'message': 'Hi there',
... 'sender': 'invalid email address',
... 'cc_myself': True}
>>> f = ContactForm(data)
>>> f.is_valid()
False
-
Form.errors
Access the errors attribute to get a dictionary of error messages:
>>> f.errors
{'sender': ['Enter a valid email address.'], 'subject': ['This field is required.']}
In this dictionary, the keys are the field names, and the values are lists of strings representing the error messages. The error messages are stored in lists because a field can have multiple error messages.
You can access errors without having to call is_valid() first. The form’s data will be validated the first time either you call is_valid() or access errors.
The validation routines will only get called once, regardless of how many times you access errors or call is_valid(). This means that if validation has side effects, those side effects will only be triggered once.
-
Form.errors.as_data()
Returns a dict that maps fields to their original ValidationError instances.
>>> f.errors.as_data()
{'sender': [ValidationError(['Enter a valid email address.'])],
'subject': [ValidationError(['This field is required.'])]}
Use this method anytime you need to identify an error by its code. This enables things like rewriting the error’s message or writing custom logic in a view when a given error is present. It can also be used to serialize the errors in a custom format (e.g. XML); for instance, as_json() relies on as_data().
The need for the as_data() method is due to backwards compatibility. Previously ValidationError instances were lost as soon as their rendered error messages were added to the Form.errors dictionary. Ideally Form.errors would have stored ValidationError instances and methods with an as_ prefix could render them, but it had to be done the other way around in order not to break code that expects rendered error messages in Form.errors.
-
Form.errors.as_json(escape_html=False)
Returns the errors serialized as JSON.
>>> f.errors.as_json()
{"sender": [{"message": "Enter a valid email address.", "code": "invalid"}],
"subject": [{"message": "This field is required.", "code": "required"}]}
By default, as_json() does not escape its output. If you are using it for something like AJAX requests to a form view where the client interprets the response and inserts errors into the page, you’ll want to be sure to escape the results on the client-side to avoid the possibility of a cross-site scripting attack. You can do this in JavaScript with element.textContent = errorText or with jQuery’s $(el).text(errorText) (rather than its .html() function).
If for some reason you don’t want to use client-side escaping, you can also set escape_html=True and error messages will be escaped so you can use them directly in HTML.
-
Form.errors.get_json_data(escape_html=False)
Returns the errors as a dictionary suitable for serializing to JSON. Form.errors.as_json() returns serialized JSON, while this returns the error data before it’s serialized.
The escape_html parameter behaves as described in Form.errors.as_json().
-
Form.add_error(field, error)
This method allows adding errors to specific fields from within the Form.clean() method, or from outside the form altogether; for instance from a view.
The field argument is the name of the field to which the errors should be added. If its value is None the error will be treated as a non-field error as returned by Form.non_field_errors().
The error argument can be a string, or preferably an instance of ValidationError. See Raising ValidationError for best practices when defining form errors.
Note that Form.add_error() automatically removes the relevant field from cleaned_data.
-
Form.has_error(field, code=None)
This method returns a boolean designating whether a field has an error with a specific error code. If code is None, it will return True if the field contains any errors at all.
To check for non-field errors use NON_FIELD_ERRORS as the field parameter.
-
Form.non_field_errors()
This method returns the list of errors from Form.errors that aren’t associated with a particular field. This includes ValidationErrors that are raised in Form.clean() and errors added using Form.add_error(None,.
"...")
Behavior of unbound forms
It’s meaningless to validate a form with no data, but, for the record, here’s what happens with unbound forms:
>>> f = ContactForm()
>>> f.is_valid()
False
>>> f.errors
{}
Dynamic initial values
-
Form.initial
Use initial to declare the initial value of form fields at runtime. For example, you might want to fill in a username field with the username of the current session.
To accomplish this, use the initial argument to a Form. This argument, if given, should be a dictionary mapping field names to initial values. Only include the fields for which you’re specifying an initial value; it’s not necessary to include every field in your form. For example:
>>> f = ContactForm(initial={'subject': 'Hi there!'})
These values are only displayed for unbound forms, and they’re not used as fallback values if a particular value isn’t provided.
If a Field defines initial and you include initial when instantiating the Form, then the latter initial will have precedence. In this example, initial is provided both at the field level and at the form instance level, and the latter gets precedence:
>>> from django import forms
>>> class CommentForm(forms.Form):
... name = forms.CharField(initial='class')
... url = forms.URLField()
... comment = forms.CharField()
>>> f = CommentForm(initial={'name': 'instance'}, auto_id=False)
>>> print(f)
<tr><th>Name:</th><td><input type="text" name="name" value="instance" required></td></tr>
<tr><th>Url:</th><td><input type="url" name="url" required></td></tr>
<tr><th>Comment:</th><td><input type="text" name="comment" required></td></tr>
-
Form.get_initial_for_field(field, field_name)
Use get_initial_for_field() to retrieve initial data for a form field. It retrieves data from Form.initial and Field.initial, in that order, and evaluates any callable initial values.
Checking which form data has changed
-
Form.has_changed()
Use the has_changed() method on your Form when you need to check if the form data has been changed from the initial data.
>>> data = {'subject': 'hello',
... 'message': 'Hi there',
... 'sender': '[email protected]',
... 'cc_myself': True}
>>> f = ContactForm(data, initial=data)
>>> f.has_changed()
False
When the form is submitted, we reconstruct it and provide the original data so that the comparison can be done:
>>> f = ContactForm(request.POST, initial=data) >>> f.has_changed()
has_changed() will be True if the data from request.POST differs from what was provided in initial or False otherwise. The result is computed by calling Field.has_changed() for each field in the form.
-
Form.changed_data
The changed_data attribute returns a list of the names of the fields whose values in the form’s bound data (usually request.POST) differ from what was provided in initial. It returns an empty list if no data differs.
>>> f = ContactForm(request.POST, initial=data)
>>> if f.has_changed():
... print("The following fields changed: %s" % ", ".join(f.changed_data))
>>> f.changed_data
['subject', 'message']
Accessing the fields from the form
-
Form.fields
You can access the fields of Form instance from its fields attribute:
>>> for row in f.fields.values(): print(row) ... <django.forms.fields.CharField object at 0x7ffaac632510> <django.forms.fields.URLField object at 0x7ffaac632f90> <django.forms.fields.CharField object at 0x7ffaac3aa050> >>> f.fields['name'] <django.forms.fields.CharField object at 0x7ffaac6324d0>
You can alter the field of Form instance to change the way it is presented in the form:
>>> f.as_table().split('n')[0]
'<tr><th>Name:</th><td><input name="name" type="text" value="instance" required></td></tr>'
>>> f.fields['name'].label = "Username"
>>> f.as_table().split('n')[0]
'<tr><th>Username:</th><td><input name="name" type="text" value="instance" required></td></tr>'
Beware not to alter the base_fields attribute because this modification will influence all subsequent ContactForm instances within the same Python process:
>>> f.base_fields['name'].label = "Username"
>>> another_f = CommentForm(auto_id=False)
>>> another_f.as_table().split('n')[0]
'<tr><th>Username:</th><td><input name="name" type="text" value="class" required></td></tr>'
Accessing “clean” data
-
Form.cleaned_data
Each field in a Form class is responsible not only for validating data, but also for “cleaning” it – normalizing it to a consistent format. This is a nice feature, because it allows data for a particular field to be input in a variety of ways, always resulting in consistent output.
For example, DateField normalizes input into a Python datetime.date object. Regardless of whether you pass it a string in the format '1994-07-15', a datetime.date object, or a number of other formats, DateField will always normalize it to a datetime.date object as long as it’s valid.
Once you’ve created a Form instance with a set of data and validated it, you can access the clean data via its cleaned_data attribute:
>>> data = {'subject': 'hello',
... 'message': 'Hi there',
... 'sender': '[email protected]',
... 'cc_myself': True}
>>> f = ContactForm(data)
>>> f.is_valid()
True
>>> f.cleaned_data
{'cc_myself': True, 'message': 'Hi there', 'sender': '[email protected]', 'subject': 'hello'}
Note that any text-based field – such as CharField or EmailField – always cleans the input into a string. We’ll cover the encoding implications later in this document.
If your data does not validate, the cleaned_data dictionary contains only the valid fields:
>>> data = {'subject': '',
... 'message': 'Hi there',
... 'sender': 'invalid email address',
... 'cc_myself': True}
>>> f = ContactForm(data)
>>> f.is_valid()
False
>>> f.cleaned_data
{'cc_myself': True, 'message': 'Hi there'}
cleaned_data will always only contain a key for fields defined in the Form, even if you pass extra data when you define the Form. In this example, we pass a bunch of extra fields to the ContactForm constructor, but cleaned_data contains only the form’s fields:
>>> data = {'subject': 'hello',
... 'message': 'Hi there',
... 'sender': '[email protected]',
... 'cc_myself': True,
... 'extra_field_1': 'foo',
... 'extra_field_2': 'bar',
... 'extra_field_3': 'baz'}
>>> f = ContactForm(data)
>>> f.is_valid()
True
>>> f.cleaned_data # Doesn't contain extra_field_1, etc.
{'cc_myself': True, 'message': 'Hi there', 'sender': '[email protected]', 'subject': 'hello'}
When the Form is valid, cleaned_data will include a key and value for all its fields, even if the data didn’t include a value for some optional fields. In this example, the data dictionary doesn’t include a value for the nick_name field, but cleaned_data includes it, with an empty value:
>>> from django import forms
>>> class OptionalPersonForm(forms.Form):
... first_name = forms.CharField()
... last_name = forms.CharField()
... nick_name = forms.CharField(required=False)
>>> data = {'first_name': 'John', 'last_name': 'Lennon'}
>>> f = OptionalPersonForm(data)
>>> f.is_valid()
True
>>> f.cleaned_data
{'nick_name': '', 'first_name': 'John', 'last_name': 'Lennon'}
In this above example, the cleaned_data value for nick_name is set to an empty string, because nick_name is CharField, and CharFields treat empty values as an empty string. Each field type knows what its “blank” value is – e.g., for DateField, it’s None instead of the empty string. For full details on each field’s behavior in this case, see the “Empty value” note for each field in the “Built-in Field classes” section below.
You can write code to perform validation for particular form fields (based on their name) or for the form as a whole (considering combinations of various fields). More information about this is in Form and field validation.
Outputting forms as HTML
The second task of a Form object is to render itself as HTML. To do so, print it:
>>> f = ContactForm() >>> print(f) <tr><th><label for="id_subject">Subject:</label></th><td><input id="id_subject" type="text" name="subject" maxlength="100" required></td></tr> <tr><th><label for="id_message">Message:</label></th><td><input type="text" name="message" id="id_message" required></td></tr> <tr><th><label for="id_sender">Sender:</label></th><td><input type="email" name="sender" id="id_sender" required></td></tr> <tr><th><label for="id_cc_myself">Cc myself:</label></th><td><input type="checkbox" name="cc_myself" id="id_cc_myself"></td></tr>
If the form is bound to data, the HTML output will include that data appropriately. For example, if a field is represented by an <input type="text">, the data will be in the value attribute. If a field is represented by an <input type="checkbox">, then that HTML will include checked if appropriate:
>>> data = {'subject': 'hello',
... 'message': 'Hi there',
... 'sender': '[email protected]',
... 'cc_myself': True}
>>> f = ContactForm(data)
>>> print(f)
<tr><th><label for="id_subject">Subject:</label></th><td><input id="id_subject" type="text" name="subject" maxlength="100" value="hello" required></td></tr>
<tr><th><label for="id_message">Message:</label></th><td><input type="text" name="message" id="id_message" value="Hi there" required></td></tr>
<tr><th><label for="id_sender">Sender:</label></th><td><input type="email" name="sender" id="id_sender" value="[email protected]" required></td></tr>
<tr><th><label for="id_cc_myself">Cc myself:</label></th><td><input type="checkbox" name="cc_myself" id="id_cc_myself" checked></td></tr>
This default output is a two-column HTML table, with a <tr> for each field. Notice the following:
- For flexibility, the output does not include the
<table>and</table>tags, nor does it include the<form>and</form>tags or an<input type="submit">tag. It’s your job to do that. - Each field type has a default HTML representation.
CharFieldis represented by an<input type="text">andEmailFieldby an<input type="email">.BooleanField(null=False)is represented by an<input type="checkbox">. Note these are merely sensible defaults; you can specify which HTML to use for a given field by using widgets, which we’ll explain shortly. - The HTML
namefor each tag is taken directly from its attribute name in theContactFormclass. - The text label for each field – e.g.
'Subject:','Message:'and'Cc myself:'is generated from the field name by converting all underscores to spaces and upper-casing the first letter. Again, note these are merely sensible defaults; you can also specify labels manually. - Each text label is surrounded in an HTML
<label>tag, which points to the appropriate form field via itsid. Itsid, in turn, is generated by prepending'id_'to the field name. Theidattributes and<label>tags are included in the output by default, to follow best practices, but you can change that behavior. - The output uses HTML5 syntax, targeting
<!DOCTYPE html>. For example, it uses boolean attributes such ascheckedrather than the XHTML style ofchecked='checked'.
Although <table> output is the default output style when you print a form, other output styles are available. Each style is available as a method on a form object, and each rendering method returns a string.
as_p()
-
Form.as_p()
as_p() renders the form as a series of <p> tags, with each <p> containing one field:
>>> f = ContactForm() >>> f.as_p() '<p><label for="id_subject">Subject:</label> <input id="id_subject" type="text" name="subject" maxlength="100" required></p>n<p><label for="id_message">Message:</label> <input type="text" name="message" id="id_message" required></p>n<p><label for="id_sender">Sender:</label> <input type="text" name="sender" id="id_sender" required></p>n<p><label for="id_cc_myself">Cc myself:</label> <input type="checkbox" name="cc_myself" id="id_cc_myself"></p>' >>> print(f.as_p()) <p><label for="id_subject">Subject:</label> <input id="id_subject" type="text" name="subject" maxlength="100" required></p> <p><label for="id_message">Message:</label> <input type="text" name="message" id="id_message" required></p> <p><label for="id_sender">Sender:</label> <input type="email" name="sender" id="id_sender" required></p> <p><label for="id_cc_myself">Cc myself:</label> <input type="checkbox" name="cc_myself" id="id_cc_myself"></p>
as_ul()
-
Form.as_ul()
as_ul() renders the form as a series of <li> tags, with each <li> containing one field. It does not include the <ul> or </ul>, so that you can specify any HTML attributes on the <ul> for flexibility:
>>> f = ContactForm() >>> f.as_ul() '<li><label for="id_subject">Subject:</label> <input id="id_subject" type="text" name="subject" maxlength="100" required></li>n<li><label for="id_message">Message:</label> <input type="text" name="message" id="id_message" required></li>n<li><label for="id_sender">Sender:</label> <input type="email" name="sender" id="id_sender" required></li>n<li><label for="id_cc_myself">Cc myself:</label> <input type="checkbox" name="cc_myself" id="id_cc_myself"></li>' >>> print(f.as_ul()) <li><label for="id_subject">Subject:</label> <input id="id_subject" type="text" name="subject" maxlength="100" required></li> <li><label for="id_message">Message:</label> <input type="text" name="message" id="id_message" required></li> <li><label for="id_sender">Sender:</label> <input type="email" name="sender" id="id_sender" required></li> <li><label for="id_cc_myself">Cc myself:</label> <input type="checkbox" name="cc_myself" id="id_cc_myself"></li>
as_table()
-
Form.as_table()
Finally, as_table() outputs the form as an HTML <table>. This is exactly the same as print. In fact, when you print a form object, it calls its as_table() method behind the scenes:
>>> f = ContactForm() >>> f.as_table() '<tr><th><label for="id_subject">Subject:</label></th><td><input id="id_subject" type="text" name="subject" maxlength="100" required></td></tr>n<tr><th><label for="id_message">Message:</label></th><td><input type="text" name="message" id="id_message" required></td></tr>n<tr><th><label for="id_sender">Sender:</label></th><td><input type="email" name="sender" id="id_sender" required></td></tr>n<tr><th><label for="id_cc_myself">Cc myself:</label></th><td><input type="checkbox" name="cc_myself" id="id_cc_myself"></td></tr>' >>> print(f) <tr><th><label for="id_subject">Subject:</label></th><td><input id="id_subject" type="text" name="subject" maxlength="100" required></td></tr> <tr><th><label for="id_message">Message:</label></th><td><input type="text" name="message" id="id_message" required></td></tr> <tr><th><label for="id_sender">Sender:</label></th><td><input type="email" name="sender" id="id_sender" required></td></tr> <tr><th><label for="id_cc_myself">Cc myself:</label></th><td><input type="checkbox" name="cc_myself" id="id_cc_myself"></td></tr>
Styling required or erroneous form rows
-
Form.error_css_class
-
Form.required_css_class
It’s pretty common to style form rows and fields that are required or have errors. For example, you might want to present required form rows in bold and highlight errors in red.
The Form class has a couple of hooks you can use to add class attributes to required rows or to rows with errors: set the Form.error_css_class and/or Form.required_css_class attributes:
from django import forms
class ContactForm(forms.Form):
error_css_class = 'error'
required_css_class = 'required'
# ... and the rest of your fields here
Once you’ve done that, rows will be given "error" and/or "required" classes, as needed. The HTML will look something like:
>>> f = ContactForm(data)
>>> print(f.as_table())
<tr class="required"><th><label class="required" for="id_subject">Subject:</label> ...
<tr class="required"><th><label class="required" for="id_message">Message:</label> ...
<tr class="required error"><th><label class="required" for="id_sender">Sender:</label> ...
<tr><th><label for="id_cc_myself">Cc myself:<label> ...
>>> f['subject'].label_tag()
<label class="required" for="id_subject">Subject:</label>
>>> f['subject'].label_tag(attrs={'class': 'foo'})
<label for="id_subject" class="foo required">Subject:</label>
Configuring form elements’ HTML id attributes and <label> tags
-
Form.auto_id
By default, the form rendering methods include:
- HTML
idattributes on the form elements. - The corresponding
<label>tags around the labels. An HTML<label>tag designates which label text is associated with which form element. This small enhancement makes forms more usable and more accessible to assistive devices. It’s always a good idea to use<label>tags.
The id attribute values are generated by prepending id_ to the form field names. This behavior is configurable, though, if you want to change the id convention or remove HTML id attributes and <label> tags entirely.
Use the auto_id argument to the Form constructor to control the id and label behavior. This argument must be True, False or a string.
If auto_id is False, then the form output will not include <label> tags nor id attributes:
>>> f = ContactForm(auto_id=False) >>> print(f.as_table()) <tr><th>Subject:</th><td><input type="text" name="subject" maxlength="100" required></td></tr> <tr><th>Message:</th><td><input type="text" name="message" required></td></tr> <tr><th>Sender:</th><td><input type="email" name="sender" required></td></tr> <tr><th>Cc myself:</th><td><input type="checkbox" name="cc_myself"></td></tr> >>> print(f.as_ul()) <li>Subject: <input type="text" name="subject" maxlength="100" required></li> <li>Message: <input type="text" name="message" required></li> <li>Sender: <input type="email" name="sender" required></li> <li>Cc myself: <input type="checkbox" name="cc_myself"></li> >>> print(f.as_p()) <p>Subject: <input type="text" name="subject" maxlength="100" required></p> <p>Message: <input type="text" name="message" required></p> <p>Sender: <input type="email" name="sender" required></p> <p>Cc myself: <input type="checkbox" name="cc_myself"></p>
If auto_id is set to True, then the form output will include <label> tags and will use the field name as its id for each form field:
>>> f = ContactForm(auto_id=True) >>> print(f.as_table()) <tr><th><label for="subject">Subject:</label></th><td><input id="subject" type="text" name="subject" maxlength="100" required></td></tr> <tr><th><label for="message">Message:</label></th><td><input type="text" name="message" id="message" required></td></tr> <tr><th><label for="sender">Sender:</label></th><td><input type="email" name="sender" id="sender" required></td></tr> <tr><th><label for="cc_myself">Cc myself:</label></th><td><input type="checkbox" name="cc_myself" id="cc_myself"></td></tr> >>> print(f.as_ul()) <li><label for="subject">Subject:</label> <input id="subject" type="text" name="subject" maxlength="100" required></li> <li><label for="message">Message:</label> <input type="text" name="message" id="message" required></li> <li><label for="sender">Sender:</label> <input type="email" name="sender" id="sender" required></li> <li><label for="cc_myself">Cc myself:</label> <input type="checkbox" name="cc_myself" id="cc_myself"></li> >>> print(f.as_p()) <p><label for="subject">Subject:</label> <input id="subject" type="text" name="subject" maxlength="100" required></p> <p><label for="message">Message:</label> <input type="text" name="message" id="message" required></p> <p><label for="sender">Sender:</label> <input type="email" name="sender" id="sender" required></p> <p><label for="cc_myself">Cc myself:</label> <input type="checkbox" name="cc_myself" id="cc_myself"></p>
If auto_id is set to a string containing the format character '%s', then the form output will include <label> tags, and will generate id attributes based on the format string. For example, for a format string 'field_%s', a field named subject will get the id value 'field_subject'. Continuing our example:
>>> f = ContactForm(auto_id='id_for_%s') >>> print(f.as_table()) <tr><th><label for="id_for_subject">Subject:</label></th><td><input id="id_for_subject" type="text" name="subject" maxlength="100" required></td></tr> <tr><th><label for="id_for_message">Message:</label></th><td><input type="text" name="message" id="id_for_message" required></td></tr> <tr><th><label for="id_for_sender">Sender:</label></th><td><input type="email" name="sender" id="id_for_sender" required></td></tr> <tr><th><label for="id_for_cc_myself">Cc myself:</label></th><td><input type="checkbox" name="cc_myself" id="id_for_cc_myself"></td></tr> >>> print(f.as_ul()) <li><label for="id_for_subject">Subject:</label> <input id="id_for_subject" type="text" name="subject" maxlength="100" required></li> <li><label for="id_for_message">Message:</label> <input type="text" name="message" id="id_for_message" required></li> <li><label for="id_for_sender">Sender:</label> <input type="email" name="sender" id="id_for_sender" required></li> <li><label for="id_for_cc_myself">Cc myself:</label> <input type="checkbox" name="cc_myself" id="id_for_cc_myself"></li> >>> print(f.as_p()) <p><label for="id_for_subject">Subject:</label> <input id="id_for_subject" type="text" name="subject" maxlength="100" required></p> <p><label for="id_for_message">Message:</label> <input type="text" name="message" id="id_for_message" required></p> <p><label for="id_for_sender">Sender:</label> <input type="email" name="sender" id="id_for_sender" required></p> <p><label for="id_for_cc_myself">Cc myself:</label> <input type="checkbox" name="cc_myself" id="id_for_cc_myself"></p>
If auto_id is set to any other true value – such as a string that doesn’t include %s – then the library will act as if auto_id is True.
By default, auto_id is set to the string 'id_%s'.
-
Form.label_suffix
A translatable string (defaults to a colon (:) in English) that will be appended after any label name when a form is rendered.
It’s possible to customize that character, or omit it entirely, using the label_suffix parameter:
>>> f = ContactForm(auto_id='id_for_%s', label_suffix='') >>> print(f.as_ul()) <li><label for="id_for_subject">Subject</label> <input id="id_for_subject" type="text" name="subject" maxlength="100" required></li> <li><label for="id_for_message">Message</label> <input type="text" name="message" id="id_for_message" required></li> <li><label for="id_for_sender">Sender</label> <input type="email" name="sender" id="id_for_sender" required></li> <li><label for="id_for_cc_myself">Cc myself</label> <input type="checkbox" name="cc_myself" id="id_for_cc_myself"></li> >>> f = ContactForm(auto_id='id_for_%s', label_suffix=' ->') >>> print(f.as_ul()) <li><label for="id_for_subject">Subject -></label> <input id="id_for_subject" type="text" name="subject" maxlength="100" required></li> <li><label for="id_for_message">Message -></label> <input type="text" name="message" id="id_for_message" required></li> <li><label for="id_for_sender">Sender -></label> <input type="email" name="sender" id="id_for_sender" required></li> <li><label for="id_for_cc_myself">Cc myself -></label> <input type="checkbox" name="cc_myself" id="id_for_cc_myself"></li>
Note that the label suffix is added only if the last character of the label isn’t a punctuation character (in English, those are ., !, ? or :).
Fields can also define their own label_suffix. This will take precedence over Form.label_suffix. The suffix can also be overridden at runtime using the label_suffix parameter to label_tag().
-
Form.use_required_attribute
When set to True (the default), required form fields will have the required HTML attribute.
Formsets instantiate forms with use_required_attribute=False to avoid incorrect browser validation when adding and deleting forms from a formset.
Configuring the rendering of a form’s widgets
-
Form.default_renderer
Specifies the renderer to use for the form. Defaults to None which means to use the default renderer specified by the FORM_RENDERER setting.
You can set this as a class attribute when declaring your form or use the renderer argument to Form.__init__(). For example:
from django import forms
class MyForm(forms.Form):
default_renderer = MyRenderer()
or:
form = MyForm(renderer=MyRenderer())
Notes on field ordering
In the as_p(), as_ul() and as_table() shortcuts, the fields are displayed in the order in which you define them in your form class. For example, in the ContactForm example, the fields are defined in the order subject, message, sender, cc_myself. To reorder the HTML output, change the order in which those fields are listed in the class.
There are several other ways to customize the order:
-
Form.field_order
By default Form.field_order=None, which retains the order in which you define the fields in your form class. If field_order is a list of field names, the fields are ordered as specified by the list and remaining fields are appended according to the default order. Unknown field names in the list are ignored. This makes it possible to disable a field in a subclass by setting it to None without having to redefine ordering.
You can also use the Form.field_order argument to a Form to override the field order. If a Form defines field_order and you include field_order when instantiating the Form, then the latter field_order will have precedence.
-
Form.order_fields(field_order)
You may rearrange the fields any time using order_fields() with a list of field names as in field_order.
How errors are displayed
If you render a bound Form object, the act of rendering will automatically run the form’s validation if it hasn’t already happened, and the HTML output will include the validation errors as a <ul class="errorlist"> near the field. The particular positioning of the error messages depends on the output method you’re using:
>>> data = {'subject': '',
... 'message': 'Hi there',
... 'sender': 'invalid email address',
... 'cc_myself': True}
>>> f = ContactForm(data, auto_id=False)
>>> print(f.as_table())
<tr><th>Subject:</th><td><ul class="errorlist"><li>This field is required.</li></ul><input type="text" name="subject" maxlength="100" required></td></tr>
<tr><th>Message:</th><td><input type="text" name="message" value="Hi there" required></td></tr>
<tr><th>Sender:</th><td><ul class="errorlist"><li>Enter a valid email address.</li></ul><input type="email" name="sender" value="invalid email address" required></td></tr>
<tr><th>Cc myself:</th><td><input checked type="checkbox" name="cc_myself"></td></tr>
>>> print(f.as_ul())
<li><ul class="errorlist"><li>This field is required.</li></ul>Subject: <input type="text" name="subject" maxlength="100" required></li>
<li>Message: <input type="text" name="message" value="Hi there" required></li>
<li><ul class="errorlist"><li>Enter a valid email address.</li></ul>Sender: <input type="email" name="sender" value="invalid email address" required></li>
<li>Cc myself: <input checked type="checkbox" name="cc_myself"></li>
>>> print(f.as_p())
<p><ul class="errorlist"><li>This field is required.</li></ul></p>
<p>Subject: <input type="text" name="subject" maxlength="100" required></p>
<p>Message: <input type="text" name="message" value="Hi there" required></p>
<p><ul class="errorlist"><li>Enter a valid email address.</li></ul></p>
<p>Sender: <input type="email" name="sender" value="invalid email address" required></p>
<p>Cc myself: <input checked type="checkbox" name="cc_myself"></p>
Customizing the error list format
By default, forms use django.forms.utils.ErrorList to format validation errors. If you’d like to use an alternate class for displaying errors, you can pass that in at construction time:
>>> from django.forms.utils import ErrorList >>> class DivErrorList(ErrorList): ... def __str__(self): ... return self.as_divs() ... def as_divs(self): ... if not self: return '' ... return '<div class="errorlist">%s</div>' % ''.join(['<div class="error">%s</div>' % e for e in self]) >>> f = ContactForm(data, auto_id=False, error_class=DivErrorList) >>> f.as_p() <div class="errorlist"><div class="error">This field is required.</div></div> <p>Subject: <input type="text" name="subject" maxlength="100" required></p> <p>Message: <input type="text" name="message" value="Hi there" required></p> <div class="errorlist"><div class="error">Enter a valid email address.</div></div> <p>Sender: <input type="email" name="sender" value="invalid email address" required></p> <p>Cc myself: <input checked type="checkbox" name="cc_myself"></p>
More granular output
The as_p(), as_ul(), and as_table() methods are shortcuts – they’re not the only way a form object can be displayed.
-
class BoundField -
Used to display HTML or access attributes for a single field of a
Forminstance.The
__str__()method of this object displays the HTML for this field.
To retrieve a single BoundField, use dictionary lookup syntax on your form using the field’s name as the key:
>>> form = ContactForm() >>> print(form['subject']) <input id="id_subject" type="text" name="subject" maxlength="100" required>
To retrieve all BoundField objects, iterate the form:
>>> form = ContactForm() >>> for boundfield in form: print(boundfield) <input id="id_subject" type="text" name="subject" maxlength="100" required> <input type="text" name="message" id="id_message" required> <input type="email" name="sender" id="id_sender" required> <input type="checkbox" name="cc_myself" id="id_cc_myself">
The field-specific output honors the form object’s auto_id setting:
>>> f = ContactForm(auto_id=False) >>> print(f['message']) <input type="text" name="message" required> >>> f = ContactForm(auto_id='id_%s') >>> print(f['message']) <input type="text" name="message" id="id_message" required>
Attributes of BoundField
-
BoundField.auto_id -
The HTML ID attribute for this
BoundField. Returns an empty string ifForm.auto_idisFalse.
-
BoundField.data -
This property returns the data for this
BoundFieldextracted by the widget’svalue_from_datadict()method, orNoneif it wasn’t given:>>> unbound_form = ContactForm() >>> print(unbound_form['subject'].data) None >>> bound_form = ContactForm(data={'subject': 'My Subject'}) >>> print(bound_form['subject'].data) My Subject
-
BoundField.errors -
A list-like object that is displayed as an HTML
<ul class="errorlist">when printed:>>> data = {'subject': 'hi', 'message': '', 'sender': '', 'cc_myself': ''} >>> f = ContactForm(data, auto_id=False) >>> print(f['message']) <input type="text" name="message" required> >>> f['message'].errors ['This field is required.'] >>> print(f['message'].errors) <ul class="errorlist"><li>This field is required.</li></ul> >>> f['subject'].errors [] >>> print(f['subject'].errors) >>> str(f['subject'].errors) ''
-
BoundField.field -
The form
Fieldinstance from the form class that thisBoundFieldwraps.
-
BoundField.form -
The
Forminstance thisBoundFieldis bound to.
-
BoundField.help_text -
The
help_textof the field.
-
BoundField.html_name -
The name that will be used in the widget’s HTML
nameattribute. It takes the formprefixinto account.
-
BoundField.id_for_label -
Use this property to render the ID of this field. For example, if you are manually constructing a
<label>in your template (despite the fact thatlabel_tag()will do this for you):<label for="{{ form.my_field.id_for_label }}">...</label>{{ my_field }}By default, this will be the field’s name prefixed by
id_(“id_my_field” for the example above). You may modify the ID by settingattrson the field’s widget. For example, declaring a field like this:my_field = forms.CharField(widget=forms.TextInput(attrs={'id': 'myFIELD'}))and using the template above, would render something like:
<label for="myFIELD">...</label><input id="myFIELD" type="text" name="my_field" required>
-
BoundField.is_hidden -
Returns
Trueif thisBoundField’s widget is hidden.
-
BoundField.label -
The
labelof the field. This is used inlabel_tag().
-
BoundField.name -
The name of this field in the form:
>>> f = ContactForm() >>> print(f['subject'].name) subject >>> print(f['message'].name) message
-
BoundField.widget_type -
New in Django 3.1.
Returns the lowercased class name of the wrapped field’s widget, with any trailing
inputorwidgetremoved. This may be used when building forms where the layout is dependent upon the widget type. For example:{% for field in form %} {% if field.widget_type == 'checkbox' %} # render one way {% else %} # render another way {% endif %} {% endfor %}
Methods of BoundField
-
BoundField.as_hidden(attrs=None, **kwargs) -
Returns a string of HTML for representing this as an
<input type="hidden">.**kwargsare passed toas_widget().This method is primarily used internally. You should use a widget instead.
-
BoundField.as_widget(widget=None, attrs=None, only_initial=False) -
Renders the field by rendering the passed widget, adding any HTML attributes passed as
attrs. If no widget is specified, then the field’s default widget will be used.only_initialis used by Django internals and should not be set explicitly.
-
BoundField.css_classes(extra_classes=None) -
When you use Django’s rendering shortcuts, CSS classes are used to indicate required form fields or fields that contain errors. If you’re manually rendering a form, you can access these CSS classes using the
css_classesmethod:>>> f = ContactForm(data={'message': ''}) >>> f['message'].css_classes() 'required'If you want to provide some additional classes in addition to the error and required classes that may be required, you can provide those classes as an argument:
>>> f = ContactForm(data={'message': ''})
>>> f['message'].css_classes('foo bar')
'foo bar required'
-
BoundField.label_tag(contents=None, attrs=None, label_suffix=None) -
To separately render the label tag of a form field, you can call its
label_tag()method:>>> f = ContactForm(data={'message': ''}) >>> print(f['message'].label_tag()) <label for="id_message">Message:</label>You can provide the
contentsparameter which will replace the auto-generated label tag. Anattrsdictionary may contain additional attributes for the<label>tag.The HTML that’s generated includes the form’s
label_suffix(a colon, by default) or, if set, the current field’slabel_suffix. The optionallabel_suffixparameter allows you to override any previously set suffix. For example, you can use an empty string to hide the label on selected fields. If you need to do this in a template, you could write a custom filter to allow passing parameters tolabel_tag.
-
BoundField.value() -
Use this method to render the raw value of this field as it would be rendered by a
Widget:>>> initial = {'subject': 'welcome'} >>> unbound_form = ContactForm(initial=initial) >>> bound_form = ContactForm(data={'subject': 'hi'}, initial=initial) >>> print(unbound_form['subject'].value()) welcome >>> print(bound_form['subject'].value()) hi
Customizing BoundField
If you need to access some additional information about a form field in a template and using a subclass of Field isn’t sufficient, consider also customizing BoundField.
A custom form field can override get_bound_field():
-
Field.get_bound_field(form, field_name) -
Takes an instance of
Formand the name of the field. The return value will be used when accessing the field in a template. Most likely it will be an instance of a subclass ofBoundField.
If you have a GPSCoordinatesField, for example, and want to be able to access additional information about the coordinates in a template, this could be implemented as follows:
class GPSCoordinatesBoundField(BoundField):
    @property
    def country(self):
        """
        Return the country the coordinates lie in or None if it can't be
        determined.
        """
        value = self.value()
        if value:
            return get_country_from_coordinates(value)
        else:
            return None

class GPSCoordinatesField(Field):
    def get_bound_field(self, form, field_name):
        return GPSCoordinatesBoundField(form, self, field_name)
Now you can access the country in a template with {{ form.coordinates.country }}.
Binding uploaded files to a form
Dealing with forms that have FileField and ImageField fields is a little more complicated than a normal form.
Firstly, in order to upload files, you’ll need to make sure that your <form> element correctly defines the enctype as "multipart/form-data":
<form enctype="multipart/form-data" method="post" action="/foo/">
Secondly, when you use the form, you need to bind the file data. File data is handled separately to normal form data, so when your form contains a FileField and ImageField, you will need to specify a second argument when you bind your form. So if we extend our ContactForm to include an ImageField called mugshot, we need to bind the file data containing the mugshot image:
# Bound form with an image field
>>> from django.core.files.uploadedfile import SimpleUploadedFile
>>> data = {'subject': 'hello',
... 'message': 'Hi there',
... 'sender': '[email protected]',
... 'cc_myself': True}
>>> file_data = {'mugshot': SimpleUploadedFile('face.jpg', <file data>)}
>>> f = ContactFormWithMugshot(data, file_data)
In practice, you will usually specify request.FILES as the source of file data (just like you use request.POST as the source of form data):
# Bound form with an image field, data from the request
>>> f = ContactFormWithMugshot(request.POST, request.FILES)
Constructing an unbound form is the same as always – omit both form data and file data:
# Unbound form with an image field
>>> f = ContactFormWithMugshot()
Testing for multipart forms
-
Form.is_multipart()
If you’re writing reusable views or templates, you may not know ahead of time whether your form is a multipart form or not. The is_multipart() method tells you whether the form requires multipart encoding for submission:
>>> f = ContactFormWithMugshot()
>>> f.is_multipart()
True
Here’s an example of how you might use this in a template:
{% if form.is_multipart %}
    <form enctype="multipart/form-data" method="post" action="/foo/">
{% else %}
    <form method="post" action="/foo/">
{% endif %}
{{ form }}
</form>
Subclassing forms
If you have multiple Form classes that share fields, you can use subclassing to remove redundancy.
When you subclass a custom Form class, the resulting subclass will include all fields of the parent class(es), followed by the fields you define in the subclass.
In this example, ContactFormWithPriority contains all the fields from ContactForm, plus an additional field, priority. The ContactForm fields are ordered first:
>>> class ContactFormWithPriority(ContactForm): ... priority = forms.CharField() >>> f = ContactFormWithPriority(auto_id=False) >>> print(f.as_ul()) <li>Subject: <input type="text" name="subject" maxlength="100" required></li> <li>Message: <input type="text" name="message" required></li> <li>Sender: <input type="email" name="sender" required></li> <li>Cc myself: <input type="checkbox" name="cc_myself"></li> <li>Priority: <input type="text" name="priority" required></li>
It’s possible to subclass multiple forms, treating forms as mixins. In this example, BeatleForm subclasses both PersonForm and InstrumentForm (in that order), and its field list includes the fields from the parent classes:
>>> from django import forms >>> class PersonForm(forms.Form): ... first_name = forms.CharField() ... last_name = forms.CharField() >>> class InstrumentForm(forms.Form): ... instrument = forms.CharField() >>> class BeatleForm(InstrumentForm, PersonForm): ... haircut_type = forms.CharField() >>> b = BeatleForm(auto_id=False) >>> print(b.as_ul()) <li>First name: <input type="text" name="first_name" required></li> <li>Last name: <input type="text" name="last_name" required></li> <li>Instrument: <input type="text" name="instrument" required></li> <li>Haircut type: <input type="text" name="haircut_type" required></li>
It’s possible to declaratively remove a Field inherited from a parent class by setting the name of the field to None on the subclass. For example:
>>> from django import forms

>>> class ParentForm(forms.Form):
...     name = forms.CharField()
...     age = forms.IntegerField()

>>> class ChildForm(ParentForm):
...     name = None

>>> list(ChildForm().fields)
['age']
Prefixes for forms
-
Form.prefix
You can put several Django forms inside one <form> tag. To give each Form its own namespace, use the prefix keyword argument:
>>> mother = PersonForm(prefix="mother") >>> father = PersonForm(prefix="father") >>> print(mother.as_ul()) <li><label for="id_mother-first_name">First name:</label> <input type="text" name="mother-first_name" id="id_mother-first_name" required></li> <li><label for="id_mother-last_name">Last name:</label> <input type="text" name="mother-last_name" id="id_mother-last_name" required></li> >>> print(father.as_ul()) <li><label for="id_father-first_name">First name:</label> <input type="text" name="father-first_name" id="id_father-first_name" required></li> <li><label for="id_father-last_name">Last name:</label> <input type="text" name="father-last_name" id="id_father-last_name" required></li>
The prefix can also be specified on the form class:
>>> class PersonForm(forms.Form):
...     ...
...     prefix = 'person'