pip install colorama
The Python colorama library is among the top 100 Python libraries, with more than 87,783,866 downloads. This article will show you everything you need to get this installed in your Python environment.
- Library Link
Alternatively, you may use any of the following commands to install colorama, depending on your concrete environment. One is likely to work!
💡 If you have only one version of Python installed:pip install colorama💡 If you have Python 3 (and, possibly, other versions) installed:pip3 install💡 If you don't have PIP or it doesn't workcoloramapython -m pip install💡 If you have Linux and you need to fix permissions (any one):coloramapython3 -m pip installcoloramasudo pip3 install💡 If you have Linux with aptcoloramapip3 installcolorama--usersudo apt install💡 If you have Windows and you have set up thecoloramapyaliaspy -m pip install💡 If you have Anacondacoloramaconda install -c anaconda💡 If you have Jupyter Notebookcolorama!pip installcolorama!pip3 installcolorama
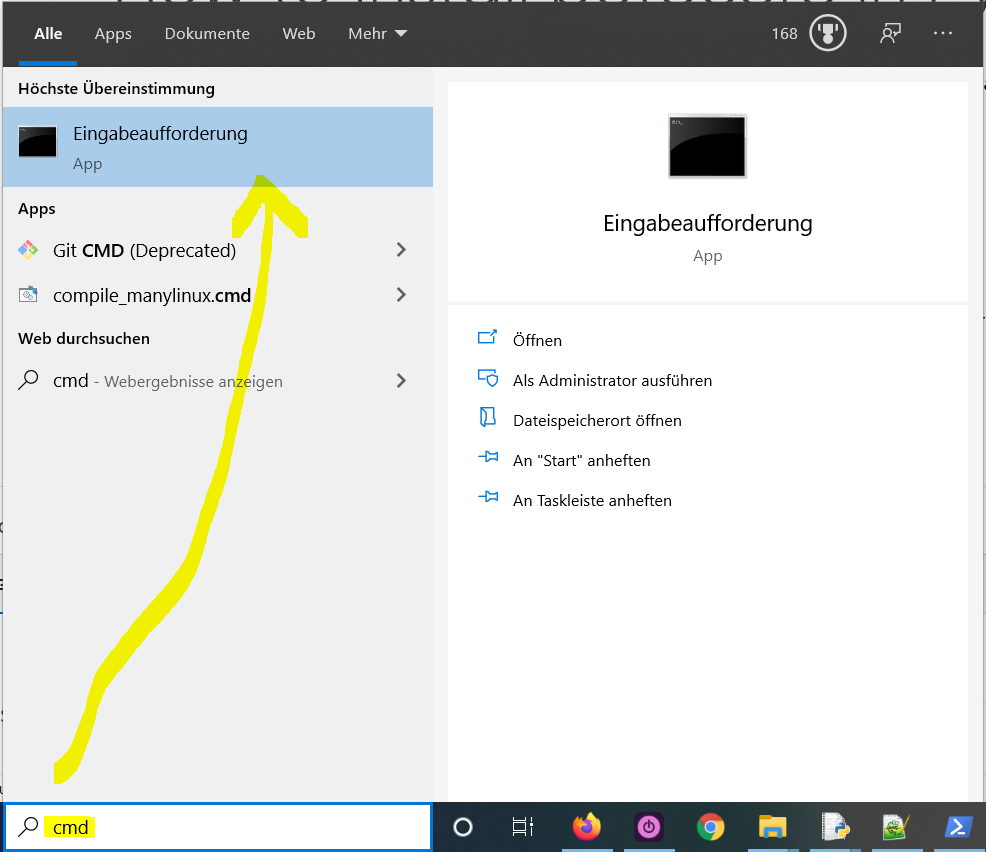
How to Install colorama on Windows?
- Type
"cmd"in the search bar and hitEnterto open the command line. - Type “
pip install colorama” (without quotes) in the command line and hitEnteragain. This installs colorama for your default Python installation. - The previous command may not work if you have both Python versions 2 and 3 on your computer. In this case, try
"pip3 install colorama"or “python -m pip install colorama“. - Wait for the installation to terminate successfully. It is now installed on your Windows machine.
Here’s how to open the command line on a (German) Windows machine:
First, try the following command to install colorama on your system:
pip install colorama
Second, if this leads to an error message, try this command to install colorama on your system:
pip3 install colorama
Third, if both do not work, use the following long-form command:
python -m pip install colorama
The difference between pip and pip3 is that pip3 is an updated version of pip for Python version 3. Depending on what’s first in the PATH variable, pip will refer to your Python 2 or Python 3 installation—and you cannot know which without checking the environment variables. To resolve this uncertainty, you can use pip3, which will always refer to your default Python 3 installation.
How to Install colorama on Linux?
You can install colorama on Linux in four steps:
- Open your Linux terminal or shell
- Type “
pip install colorama” (without quotes), hit Enter. - If it doesn’t work, try
"pip3 install colorama"or “python -m pip install colorama“. - Wait for the installation to terminate successfully.
The package is now installed on your Linux operating system.
How to Install colorama on macOS?
Similarly, you can install colorama on macOS in four steps:
- Open your macOS terminal.
- Type “
pip install colorama” without quotes and hitEnter. - If it doesn’t work, try
"pip3 install colorama"or “python -m pip install colorama“. - Wait for the installation to terminate successfully.
The package is now installed on your macOS.
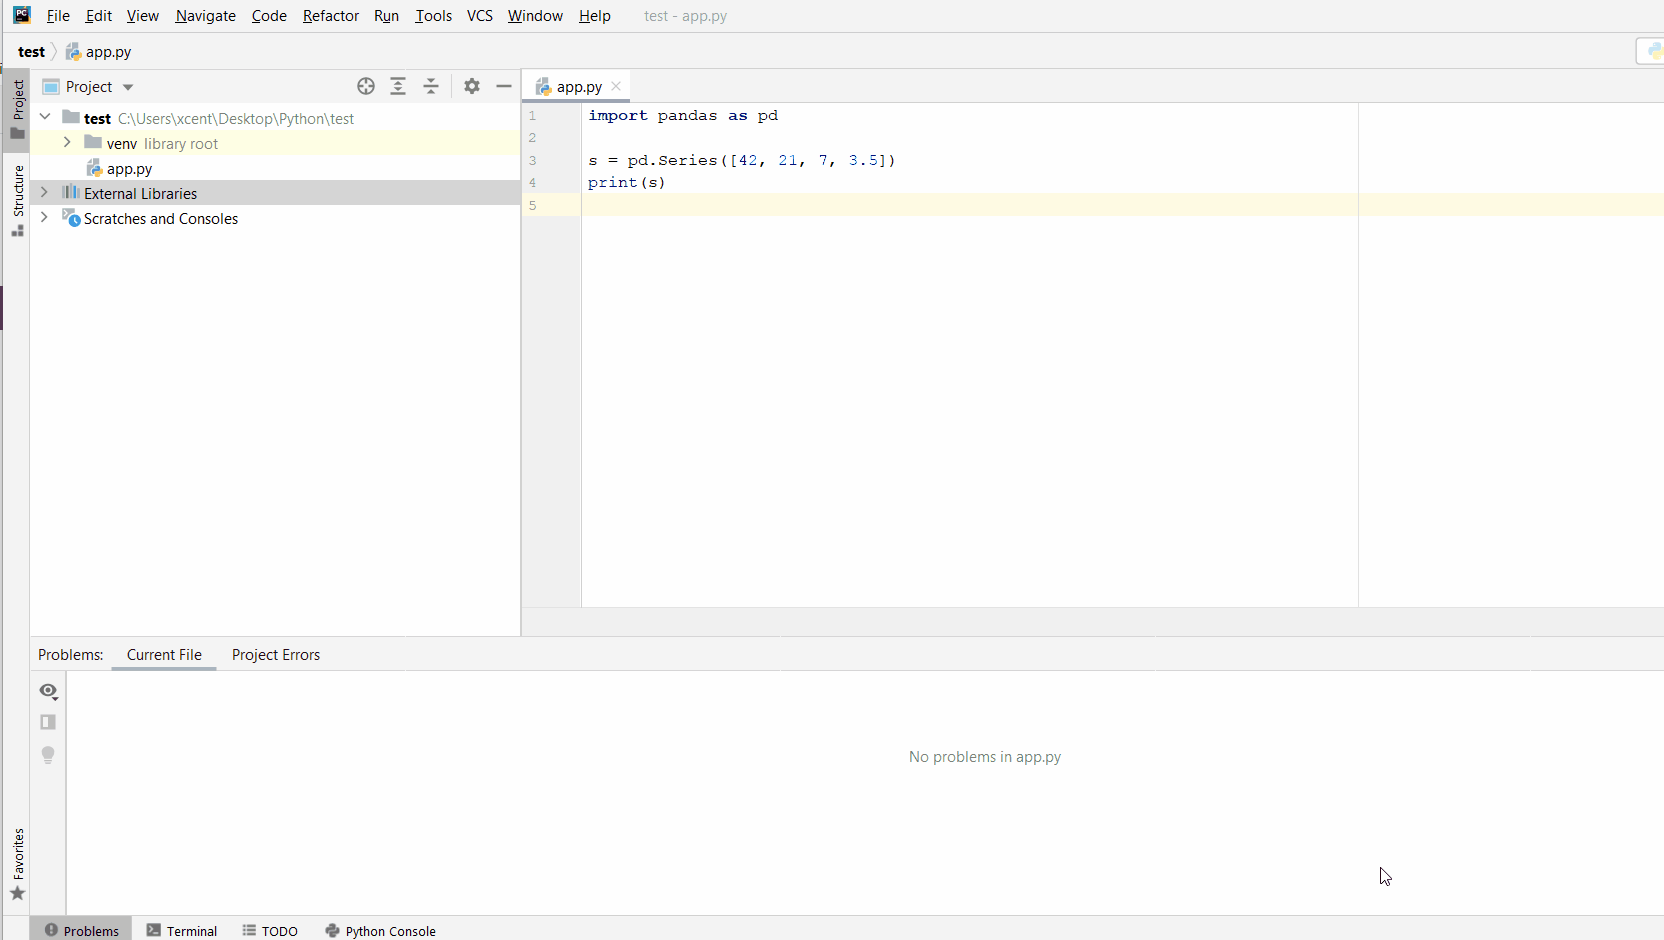
Given a PyCharm project. How to install the colorama library in your project within a virtual environment or globally? Here’s a solution that always works:
- Open
File > Settings > Projectfrom the PyCharm menu. - Select your current project.
- Click the
Python Interpretertab within your project tab. - Click the small
+symbol to add a new library to the project. - Now type in the library to be installed, in your example
"colorama"without quotes, and clickInstall Package. - Wait for the installation to terminate and close all pop-ups.
Here’s the general package installation process as a short animated video—it works analogously for colorama if you type in “colorama” in the search field instead:
Make sure to select only “colorama” because there may be other packages that are not required but also contain the same term (false positives):
How to Install colorama in a Jupyter Notebook?
To install any package in a Jupyter notebook, you can prefix the !pip install my_package statement with the exclamation mark "!". This works for the colorama library too:
!pip install my_package
This automatically installs the colorama library when the cell is first executed.
How to Resolve ModuleNotFoundError: No module named ‘colorama’?
Say you try to import the colorama package into your Python script without installing it first:
import colorama
# ... ModuleNotFoundError: No module named 'colorama'
Because you haven’t installed the package, Python raises a ModuleNotFoundError: No module named 'colorama'.
To fix the error, install the colorama library using “pip install colorama” or “pip3 install colorama” in your operating system’s shell or terminal first.
See above for the different ways to install colorama in your environment.
Improve Your Python Skills
If you want to keep improving your Python skills and learn about new and exciting technologies such as Blockchain development, machine learning, and data science, check out the Finxter free email academy with cheat sheets, regular tutorials, and programming puzzles.
Join us, it’s fun! 🙂
Programming Humor


While working as a researcher in distributed systems, Dr. Christian Mayer found his love for teaching computer science students.
To help students reach higher levels of Python success, he founded the programming education website Finxter.com. He’s author of the popular programming book Python One-Liners (NoStarch 2020), coauthor of the Coffee Break Python series of self-published books, computer science enthusiast, freelancer, and owner of one of the top 10 largest Python blogs worldwide.
His passions are writing, reading, and coding. But his greatest passion is to serve aspiring coders through Finxter and help them to boost their skills. You can join his free email academy here.
A common error you may encounter when using Python is modulenotfounderror: no module named ‘colorama’.
This error occurs if you do not install colorama before importing it or install it in the wrong environment.
You can install colorama in Python 3 with python3 -m pip install colorama.
This tutorial goes through the exact steps to troubleshoot this error for the Windows, Mac and Linux operating systems.
Table of contents
- What is ModuleNotFoundError?
- What is colorama?
- Always Use a Virtual Environment to Install Packages
- How to Install colorama on Windows Operating System
- How to Install colorama on Mac Operating System using pip
- How to Install colorama on Linux Operating Systems
- Installing pip for Ubuntu, Debian, and Linux Mint
- Installing pip for CentOS 8 (and newer), Fedora, and Red Hat
- Installing pip for CentOS 6 and 7, and older versions of Red Hat
- Installing pip for Arch Linux and Manjaro
- Installing pip for OpenSUSE
- colorama installation on Linux with Pip
- Installing colorama Using Anaconda
- Check colorama Version
- Using colorama Example
- Summary
What is ModuleNotFoundError?
The ModuleNotFoundError occurs when the module you want to use is not present in your Python environment. There are several causes of the modulenotfounderror:
The module’s name is incorrect, in which case you have to check the name of the module you tried to import. Let’s try to import the re module with a double e to see what happens:
import ree
---------------------------------------------------------------------------
ModuleNotFoundError                       Traceback (most recent call last)
1 import ree

ModuleNotFoundError: No module named 'ree'
To solve this error, ensure the module name is correct. Let’s look at the revised code:
import re

print(re.__version__)
2.2.1
You may want to import a local module file, but the module is not in the same directory. Let’s look at an example package with a script and a local module to import. Let’s look at the following steps to perform from your terminal:
mkdir example_package

cd example_package

mkdir folder_1

cd folder_1

vi module.py
Note that we use Vim to create the module.py file in this example. You can use your preferred file editor, such as Emacs or Atom. In module.py, we will import the re module and define a simple function that prints the re version:
import re

def print_re_version():

    print(re.__version__)
Close the module.py, then complete the following commands from your terminal:
cd ../

vi script.py
Inside script.py, we will try to import the module we created.
import module

if __name__ == '__main__':

    mod.print_re_version()
Let’s run python script.py from the terminal to see what happens:
Traceback (most recent call last):
  File "script.py", line 1, in ≺module≻
    import module
ModuleNotFoundError: No module named 'module'
To solve this error, we need to point to the correct path to module.py, which is inside folder_1. Let’s look at the revised code:
import folder_1.module as mod

if __name__ == '__main__':

    mod.print_re_version()
When we run python script.py, we will get the following result:
2.2.1
You can also get the error by overriding the official module you want to import by giving your module the same name.
Lastly, you can encounter the modulenotfounderror when you import a module that is not installed in your Python environment.
What is colorama?
colorama is a Python library for producing coloured terminal text and cursor positioning.
The simplest way to install colorama is to use the package manager for Python called pip. The following installation instructions are for the major Python version 3.
Always Use a Virtual Environment to Install Packages
It is always best to install new libraries within a virtual environment. You should not install anything into your global Python interpreter when you develop locally. You may introduce incompatibilities between packages, or you may break your system if you install an incompatible version of a library that your operating system needs. Using a virtual environment helps compartmentalize your projects and their dependencies. Each project will have its environment with everything the code needs to run. Most ImportErrors and ModuleNotFoundErrors occur due to installing a library for one interpreter and trying to use the library with another interpreter. Using a virtual environment avoids this. In Python, you can use virtual environments and conda environments. We will go through how to install colorama with both.
How to Install colorama on Windows Operating System
First, you need to download and install Python on your PC. Ensure you select the install launcher for all users and Add Python to PATH checkboxes. The latter ensures the interpreter is in the execution path. Pip is automatically on Windows for Python versions 2.7.9+ and 3.4+.
You can check your Python version with the following command:
python3 --version
You can install pip on Windows by downloading the installation package, opening the command line and launching the installer. You can install pip via the CMD prompt by running the following command.
python get-pip.py
You may need to run the command prompt as administrator. Check whether the installation has been successful by typing.
pip --version
virtualenv env
You can activate the environment by typing the command:
envScriptsactivate
You will see “env” in parenthesis next to the command line prompt. You can install colorama within the environment by running the following command from the command prompt.
python3 -m pip install colorama
We use python -m pip to execute pip using the Python interpreter we specify as Python. Doing this helps avoid ImportError when we try to use a package installed with one version of Python interpreter with a different version. You can use the command which python to determine which Python interpreter you are using.
How to Install colorama on Mac Operating System using pip
Open a terminal by pressing command (⌘) + Space Bar to open the Spotlight search. Type in terminal and press enter. To get pip, first ensure you have installed Python3:
python3 --version
Python 3.8.8
Download pip by running the following curl command:
curl https://bootstrap.pypa.io/get-pip.py -o get-pip.py
The curl command allows you to specify a direct download link. Using the -o option sets the name of the downloaded file.
Install pip by running:
python3 get-pip.py
To install colorama, first create the virtual environment:
python3 -m venv env
Then activate the environment using:
source env/bin/activate
You will see “env” in parenthesis next to the command line prompt. You can install colorama within the environment by running the following command from the command prompt.
python3 -m pip install colorama
How to Install colorama on Linux Operating Systems
All major Linux distributions have Python installed by default. However, you will need to install pip. You can install pip from the terminal, but the installation instructions depend on the Linux distribution you are using. You will need root privileges to install pip. Open a terminal and use the commands relevant to your Linux distribution to install pip.
Installing pip for Ubuntu, Debian, and Linux Mint
sudo apt install python-pip3
Installing pip for CentOS 8 (and newer), Fedora, and Red Hat
sudo dnf install python-pip3
Installing pip for CentOS 6 and 7, and older versions of Red Hat
sudo yum install epel-release

sudo yum install python-pip3
Installing pip for Arch Linux and Manjaro
sudo pacman -S python-pip
Installing pip for OpenSUSE
sudo zypper python3-pip
colorama installation on Linux with Pip
To install colorama, first create the virtual environment:
python3 -m venv env
Then activate the environment using:
source env/bin/activate
You will see “env” in parenthesis next to the command line prompt. You can install colorama within the environment by running the following command from the command prompt.
Once you have activated your virtual environment, you can install colorama using:
python3 -m pip install colorama
Installing colorama Using Anaconda
Anaconda is a distribution of Python and R for scientific computing and data science. You can install Anaconda by going to the installation instructions. Once you have installed Anaconda, you can create a virtual environment and install colorama.
To create a conda environment you can use the following command:
conda create -n project python=3.8
You can specify a different Python 3 version if you like. Ideally, choose the latest version of Python. Next, you will activate the project container. You will see “project” in parentheses next to the command line prompt.
source activate project
Now you’re ready to install colorama using conda.
Once you have installed Anaconda and created your conda environment, you can install colorama using the following command:
conda install -c anaconda colorama
Check colorama Version
Once you have successfully installed colorama, you can check its version. If you used pip to install colorama, you can use pip show from your terminal.
python3 -m pip show colorama
Name: colorama
Version: 0.4.4
Summary: Cross-platform colored terminal text.
Home-page: https://github.com/tartley/colorama
Second, within your python program, you can import colorama and then reference the __version__ attribute:
import colorama
print(colorama.__version__)
0.4.4
If you used conda to install colorama, you could check the version using the following command:
conda list -f colorama
# Name                    Version                   Build  Channel
colorama                  0.4.4              pyhd3eb1b0_0    anaconda
Using colorama Example
from colorama import Fore, Back, Style
print(Fore.RED + 'some red text')
print(Back.GREEN + 'and with a green background')
print(Style.DIM + 'and in dim text')
print(Style.RESET_ALL)
print('back to normal now')

Summary
Congratulations on reading to the end of this tutorial.
Go to the online courses page on Python to learn more about Python for data science and machine learning.
For further reading on missing modules in Python, go to the article:
- How to Solve ModuleNotFoundError: no module named ‘plotly’.
- How to Solve Python ModuleNotFoundError: no module named ‘psycopg2’.
- How to Solve Python ModuleNotFoundError: no module named ‘seaborn’.
Have fun and happy researching!
Error dependency colorama is missing install via pip3 install colorama
Reading time В· 4 min
ModuleNotFoundError: No module named ‘colorama’ in Python #
The Python «ModuleNotFoundError: No module named ‘colorama’» occurs when we forget to install the colorama module before importing it or install it in an incorrect environment. To solve the error, install the module by running the pip install colorama command.
Open your terminal in your project’s root directory and install the colorama module.
After you install the colorama package, try importing it as follows.
The Python error «ModuleNotFoundError: No module named ‘colorama’» occurs for multiple reasons:
- Not having the colorama package installed by running pip install colorama .
- Installing the package in a different Python version than the one you’re using.
- Installing the package globally and not in your virtual environment.
- Your IDE running an incorrect version of Python.
- Naming your module colorama.py which would shadow the official module.
- Declaring a variable named colorama which would shadow the imported variable.
If the error persists, get your Python version and make sure you are installing the package using the correct Python version.
For example, my Python version is 3.10.4 , so I would install the colorama package with pip3.10 install colorama .
Notice that the version number corresponds to the version of pip I’m using.
If the PATH for pip is not set up on your machine, replace pip with python3 -m pip :
If the «No module named ‘colorama’» error persists, try restarting your IDE and development server/script.
You can check if you have the colorama package installed by running the pip show colorama command.
The pip show colorama command will either state that the package is not installed or show a bunch of information about the package, including the location where the package is installed.
If the package is not installed, make sure your IDE is using the correct version of Python.
For example, In VSCode, you can press CTRL + Shift + P or ( вЊ + Shift + P on Mac) to open the command palette.
Then type «Python select interpreter» in the field.
Then select the correct python version from the dropdown menu.
If you are using a virtual environment, make sure you are installing colorama in your virtual environment and not globally.
You can try creating a virtual environment if you don’t already have one.
If the python3 -m venv venv command doesn’t work, try the following 2 commands:
- python -m venv venv
- py -m venv venv
Your virtual environment will use the version of Python that was used to create it.
You also shouldn’t be declaring a variable named colorama as that would also shadow the original module.
If the error is not resolved, try to uninstall the colorama package and then install it.
Try restarting your IDE and development server/script.
You can also try to upgrade the version of the colorama package.
This one is for using virtual environments (VENV) on Windows :
This one is for using virtual environments (VENV) on MacOS and Linux :
Conclusion #
The Python «ModuleNotFoundError: No module named ‘colorama’» occurs when we forget to install the colorama module before importing it or install it in an incorrect environment. To solve the error, install the module by running the pip install colorama command.
Источник
How to Install colorama in Python?
The Python colorama library is among the top 100 Python libraries, with more than 87,783,866 downloads. This article will show you everything you need to get this installed in your Python environment.
Alternatively, you may use any of the following commands to install colorama , depending on your concrete environment. One is likely to work!
How to Install colorama on Windows?
- Type «cmd» in the search bar and hit Enter to open the command line.
- Type “ pip install colorama ” (without quotes) in the command line and hit Enter again. This installs colorama for your default Python installation.
- The previous command may not work if you have both Python versions 2 and 3 on your computer. In this case, try «pip3 install colorama» or “ python -m pip install colorama “.
- Wait for the installation to terminate successfully. It is now installed on your Windows machine.
Here’s how to open the command line on a (German) Windows machine:
First, try the following command to install colorama on your system:
Second, if this leads to an error message, try this command to install colorama on your system:
Third, if both do not work, use the following long-form command:
The difference between pip and pip3 is that pip3 is an updated version of pip for Python version 3. Depending on what’s first in the PATH variable, pip will refer to your Python 2 or Python 3 installation—and you cannot know which without checking the environment variables. To resolve this uncertainty, you can use pip3 , which will always refer to your default Python 3 installation.
How to Install colorama on Linux?
You can install colorama on Linux in four steps:
- Open your Linux terminal or shell
- Type “ pip install colorama ” (without quotes), hit Enter.
- If it doesn’t work, try «pip3 install colorama» or “ python -m pip install colorama “.
- Wait for the installation to terminate successfully.
The package is now installed on your Linux operating system.
How to Install colorama on macOS?
Similarly, you can install colorama on macOS in four steps:
- Open your macOS terminal.
- Type “ pip install colorama ” without quotes and hit Enter .
- If it doesn’t work, try «pip3 install colorama» or “ python -m pip install colorama “.
- Wait for the installation to terminate successfully.
The package is now installed on your macOS.
How to Install colorama in PyCharm?
Given a PyCharm project. How to install the colorama library in your project within a virtual environment or globally? Here’s a solution that always works:
- Open File > Settings > Project from the PyCharm menu.
- Select your current project.
- Click the Python Interpreter tab within your project tab.
- Click the small + symbol to add a new library to the project.
- Now type in the library to be installed, in your example «colorama» without quotes, and click Install Package .
- Wait for the installation to terminate and close all pop-ups.
Here’s the general package installation process as a short animated video—it works analogously for colorama if you type in “colorama” in the search field instead:
Make sure to select only “colorama” because there may be other packages that are not required but also contain the same term (false positives):
How to Install colorama in a Jupyter Notebook?
To install any package in a Jupyter notebook, you can prefix the !pip install my_package statement with the exclamation mark «!» . This works for the colorama library too:
This automatically installs the colorama library when the cell is first executed.
How to Resolve ModuleNotFoundError: No module named ‘colorama’?
Say you try to import the colorama package into your Python script without installing it first:
Because you haven’t installed the package, Python raises a ModuleNotFoundError: No module named ‘colorama’ .
To fix the error, install the colorama library using “ pip install colorama ” or “ pip3 install colorama ” in your operating system’s shell or terminal first.
See above for the different ways to install colorama in your environment.
Improve Your Python Skills
If you want to keep improving your Python skills and learn about new and exciting technologies such as Blockchain development, machine learning, and data science, check out the Finxter free email academy with cheat sheets, regular tutorials, and programming puzzles.
Join us, it’s fun! 🙂
Programming Humor
While working as a researcher in distributed systems, Dr. Christian Mayer found his love for teaching computer science students.
To help students reach higher levels of Python success, he founded the programming education website Finxter.com. He’s author of the popular programming book Python One-Liners (NoStarch 2020), coauthor of the Coffee Break Python series of self-published books, computer science enthusiast, freelancer, and owner of one of the top 10 largest Python blogs worldwide.
His passions are writing, reading, and coding. But his greatest passion is to serve aspiring coders through Finxter and help them to boost their skills. You can join his free email academy here.
Related Tutorials
Why Finxter?
Learning Resources
Источник
How to Solve Python ModuleNotFoundError: no module named ‘colorama’
A common error you may encounter when using Python is modulenotfounderror: no module named ‘colorama’.
This error occurs if you do not install colorama before importing it or install it in the wrong environment.
You can install colorama in Python 3 with python3 -m pip install colorama .
This tutorial goes through the exact steps to troubleshoot this error for the Windows, Mac and Linux operating systems.
Table of contents
What is ModuleNotFoundError?
The ModuleNotFoundError occurs when the module you want to use is not present in your Python environment. There are several causes of the modulenotfounderror:
The module’s name is incorrect, in which case you have to check the name of the module you tried to import. Let’s try to import the re module with a double e to see what happens:
To solve this error, ensure the module name is correct. Let’s look at the revised code:
You may want to import a local module file, but the module is not in the same directory. Let’s look at an example package with a script and a local module to import. Let’s look at the following steps to perform from your terminal:
Note that we use Vim to create the module.py file in this example. You can use your preferred file editor, such as Emacs or Atom. In module.py , we will import the re module and define a simple function that prints the re version:
Close the module.py , then complete the following commands from your terminal:
Inside script.py , we will try to import the module we created.
Let’s run python script.py from the terminal to see what happens:
To solve this error, we need to point to the correct path to module.py , which is inside folder_1 . Let’s look at the revised code:
When we run python script.py , we will get the following result:
You can also get the error by overriding the official module you want to import by giving your module the same name.
Lastly, you can encounter the modulenotfounderror when you import a module that is not installed in your Python environment.
What is colorama?
colorama is a Python library for producing coloured terminal text and cursor positioning.
The simplest way to install colorama is to use the package manager for Python called pip . The following installation instructions are for the major Python version 3.
Always Use a Virtual Environment to Install Packages
It is always best to install new libraries within a virtual environment. You should not install anything into your global Python interpreter when you develop locally. You may introduce incompatibilities between packages, or you may break your system if you install an incompatible version of a library that your operating system needs. Using a virtual environment helps compartmentalize your projects and their dependencies. Each project will have its environment with everything the code needs to run. Most ImportErrors and ModuleNotFoundErrors occur due to installing a library for one interpreter and trying to use the library with another interpreter. Using a virtual environment avoids this. In Python, you can use virtual environments and conda environments. We will go through how to install colorama with both.
How to Install colorama on Windows Operating System
First, you need to download and install Python on your PC. Ensure you select the install launcher for all users and Add Python to PATH checkboxes. The latter ensures the interpreter is in the execution path. Pip is automatically on Windows for Python versions 2.7.9+ and 3.4+.
You can check your Python version with the following command:
You can install pip on Windows by downloading the installation package, opening the command line and launching the installer. You can install pip via the CMD prompt by running the following command.
You may need to run the command prompt as administrator. Check whether the installation has been successful by typing.
You can activate the environment by typing the command:
You will see “ env ” in parenthesis next to the command line prompt. You can install colorama within the environment by running the following command from the command prompt.
We use python -m pip to execute pip using the Python interpreter we specify as Python. Doing this helps avoid ImportError when we try to use a package installed with one version of Python interpreter with a different version. You can use the command which python to determine which Python interpreter you are using.
How to Install colorama on Mac Operating System using pip
Open a terminal by pressing command (⌘) + Space Bar to open the Spotlight search. Type in terminal and press enter. To get pip, first ensure you have installed Python3:
Download pip by running the following curl command:
The curl command allows you to specify a direct download link. Using the -o option sets the name of the downloaded file.
Install pip by running:
To install colorama , first create the virtual environment:
Then activate the environment using:
You will see “ env ” in parenthesis next to the command line prompt. You can install colorama within the environment by running the following command from the command prompt.
How to Install colorama on Linux Operating Systems
All major Linux distributions have Python installed by default. However, you will need to install pip. You can install pip from the terminal, but the installation instructions depend on the Linux distribution you are using. You will need root privileges to install pip. Open a terminal and use the commands relevant to your Linux distribution to install pip.
Installing pip for Ubuntu, Debian, and Linux Mint
Installing pip for CentOS 8 (and newer), Fedora, and Red Hat
Installing pip for CentOS 6 and 7, and older versions of Red Hat
Installing pip for Arch Linux and Manjaro
Installing pip for OpenSUSE
colorama installation on Linux with Pip
To install colorama , first create the virtual environment:
Then activate the environment using:
You will see “env” in parenthesis next to the command line prompt. You can install colorama within the environment by running the following command from the command prompt.
Once you have activated your virtual environment, you can install colorama using:
Installing colorama Using Anaconda
Anaconda is a distribution of Python and R for scientific computing and data science. You can install Anaconda by going to the installation instructions. Once you have installed Anaconda, you can create a virtual environment and install colorama .
To create a conda environment you can use the following command:
You can specify a different Python 3 version if you like. Ideally, choose the latest version of Python. Next, you will activate the project container. You will see “ project ” in parentheses next to the command line prompt.
Now you’re ready to install colorama using conda.
Once you have installed Anaconda and created your conda environment, you can install colorama using the following command:
Check colorama Version
Once you have successfully installed colorama , you can check its version. If you used pip to install colorama , you can use pip show from your terminal.
Second, within your python program, you can import colorama and then reference the __version__ attribute:
If you used conda to install colorama , you could check the version using the following command:
Using colorama Example
Summary
Congratulations on reading to the end of this tutorial.
Go to the online courses page on Python to learn more about Python for data science and machine learning.
For further reading on missing modules in Python, go to the article:
Источник
Я скачал модуль colorama для python и дважды щелкнул файл setup.py. Экран мигает, но когда я пытаюсь импортировать модуль, он всегда говорит «Нет модуля с именем colorama»
Я скопировал и вставил папку в C: Python26 Lib site-packages и попытался запустить установку оттуда. Та же сделка Я делаю что-то неправильно?
Спасибо Майк
8 ответов
Лучший ответ
Пакеты Python устанавливаются с помощью setup.py, введя следующую команду из командной строки:
python setup.py install
8
TJD
23 Мар 2012 в 21:30
Для Windows вы можете использовать это в командной строке:
python get-pip.py

pip install colorama
pip uninstall colorama
Вам также следует проверить официальный сайт: Установка модулей Python
0
CrazyVideoGamez
3 Дек 2019 в 03:19
У меня просто странная проблема с awscli и colorama. В поисках ответа я пришел сюда. Решение было:
$ sudo -H pip uninstall colorama
$ sudo -H pip install colorama
2
Martin Thoma
29 Ноя 2017 в 14:48
Установка с pip — почти всегда путь. Он будет обрабатывать загрузку пакета для вас, а также любые зависимости. Если у вас нет пункта, см. http://www.pip-installer.org/en/latest. /installing.html
Затем
pip install colorama
Или
sudo pip install colorama
Ба — бах! Выполнено.
18
Travis Bear
29 Янв 2014 в 00:26
Я также испытал эту проблему. Следуя инструкциям по установке sudo pip install colorama, я получаю сообщение:
Требование уже выполнено: колорама в /usr/lib/python2.7/dist-packages.
Проблема для меня в том, что я использую python3 в своем коде заголовка #!usr/bin/env python3. Изменение этого параметра на #!usr/bin/env python работает — извините, я не знаю, как заставить его работать с Python 3!
0
Ali Yousefi Sabzevar
13 Фев 2019 в 12:25
Переустановка colorama может не сработать сразу. Если в site-packages есть файл colorama .egg, сначала нужно удалить этот файл, а затем pip install colorama.
0
Raul Santelices
23 Авг 2018 в 16:43
Если вы получили приведенную ниже ошибку в Ubuntu 18.04 ModuleNotFoundError: No module named 'rsa', попробуйте:
pip3 install colorama
0
Bhargav Rao
19 Фев 2019 в 10:52
Если у вас есть easy_install (в большинстве случаев это будет работать)
sudo easy_install -U colorama
Если вы установили пип
sudo pip install -U colorama
0
SaPPi
23 Авг 2018 в 15:26

hello,
MCE.exe doesn’t find any update and mce.py is too much older about of their dependancies asked for work :
- kind of MCE.exe below :
MCE -search 806E9 :


- kind of mce.py below :
PS C:MCExtractor-masterMCExtractor-master> ./mce.py [-ubu] -skip -exit
MC Extractor v1.77.0

Error: Dependency "colorama" is missing!
       Install via "pip3 install colorama"

PS C:MCExtractor-masterMCExtractor-master> pip3 install colorama
Requirement already satisfied: colorama in c:python37libsite-packages (0.4.1)
PS C:MCExtractor-masterMCExtractor-master> ./mce.py [-ubu] -skip -exit
MC Extractor v1.77.0

Error: Dependency "colorama" is missing!
       Install via "pip3 install colorama"

PS C:MCExtractor-masterMCExtractor-master> pip3 install --upgrade colorama
Requirement already satisfied: colorama in c:python37libsite-packages (0.4.1)
Collecting colorama
  Downloading colorama-0.4.5-py2.py3-none-any.whl (16 kB)
Installing collected packages: colorama
  Attempting uninstall: colorama
    Found existing installation: colorama 0.4.1
    Uninstalling colorama-0.4.1:
      Successfully uninstalled colorama-0.4.1
ERROR: pip's dependency resolver does not currently take into account all the packages that are installed. This behaviour is the source of the following dependency conflicts.
cmd2 0.9.10 requires pyreadline, which is not installed.
awscli 1.16.115 requires colorama<=0.3.9,>=0.2.5, but you have colorama 0.4.5 which is incompatible.
awscli 1.16.115 requires rsa<=3.5.0,>=3.1.2, but you have rsa 4.0 which is incompatible.
Successfully installed colorama-0.4.5
PS C:MCExtractor-masterMCExtractor-master> pip3 install pyreadline
Collecting pyreadline
  Downloading pyreadline-2.1.zip (109 kB)
     ---------------------------------------- 109.2/109.2 kB 487.4 kB/s eta 0:00:00
  Preparing metadata (setup.py) ... done
Building wheels for collected packages: pyreadline
  Building wheel for pyreadline (setup.py) ... done
  Created wheel for pyreadline: filename=pyreadline-2.1-py3-none-any.whl size=93835 sha256=393c4f2c34c0a3d4576beaa560aa621a87f0ceac6a203669f5aff0a247cf3ac0
  Stored in directory: c:usersdoriaappdatalocalpipcachewheels2cbaa79cfdda2594b992540020a641a4abc70764064f532acbe56b4
Successfully built pyreadline
Installing collected packages: pyreadline
Successfully installed pyreadline-2.1
PS C:MCExtractor-masterMCExtractor-master> pip3 install rsa
Requirement already satisfied: rsa in c:python37libsite-packages (4.0)
Requirement already satisfied: pyasn1>=0.1.3 in c:python37libsite-packages (from rsa) (0.4.5)
PS C:MCExtractor-masterMCExtractor-master> pip3 install --upgrade rsa
Requirement already satisfied: rsa in c:python37libsite-packages (4.0)
Collecting rsa
  Downloading rsa-4.9-py3-none-any.whl (34 kB)
Requirement already satisfied: pyasn1>=0.1.3 in c:python37libsite-packages (from rsa) (0.4.5)
Installing collected packages: rsa
  Attempting uninstall: rsa
    Found existing installation: rsa 4.0
    Uninstalling rsa-4.0:
      Successfully uninstalled rsa-4.0
ERROR: pip's dependency resolver does not currently take into account all the packages that are installed. This behaviour is the source of the following dependency conflicts.
awscli 1.16.115 requires colorama<=0.3.9,>=0.2.5, but you have colorama 0.4.5 which is incompatible.
awscli 1.16.115 requires rsa<=3.5.0,>=3.1.2, but you have rsa 4.9 which is incompatible.
Successfully installed rsa-4.9
PS C:MCExtractor-masterMCExtractor-master> pip3 install pyasn1
Requirement already satisfied: pyasn1 in c:python37libsite-packages (0.4.5)
PS C:MCExtractor-masterMCExtractor-master> pip3 install --upgrade pyasn1
Requirement already satisfied: pyasn1 in c:python37libsite-packages (0.4.5)
Collecting pyasn1
  Downloading pyasn1-0.4.8-py2.py3-none-any.whl (77 kB)
     ---------------------------------------- 77.1/77.1 kB 194.5 kB/s eta 0:00:00
Installing collected packages: pyasn1
  Attempting uninstall: pyasn1
    Found existing installation: pyasn1 0.4.5
    Uninstalling pyasn1-0.4.5:
      Successfully uninstalled pyasn1-0.4.5
ERROR: pip's dependency resolver does not currently take into account all the packages that are installed. This behaviour is the source of the following dependency conflicts.
awscli 1.16.115 requires colorama<=0.3.9,>=0.2.5, but you have colorama 0.4.5 which is incompatible.
awscli 1.16.115 requires rsa<=3.5.0,>=3.1.2, but you have rsa 4.9 which is incompatible.
Successfully installed pyasn1-0.4.8
PS C:MCExtractor-masterMCExtractor-master> ./mce.py [-ubu] -skip -exit
MC Extractor v1.77.0

Error: Dependency "colorama" is missing!
       Install via "pip3 install colorama"
-
kind of MCE.exe : does the database is ready because it doesn’t find any update ? fornulately two are installed ever since the olds patchs i was found and install from your fork there are some months or years and inspectre the say about both threat disabled,
-
kind of mce.py : does this is a threat if i move down the level of their dependencies ? thus if there aren’t any threat how to move down the level of their dependancies ?
thanks you in advance for your help,
regards.
Azaretdodo.

Hi,
I have downloaded MC Extractor and python310.dll but it will not start.
python310.dll is in the same folder and also C:WindowsSysWOW64 and C:WindowsSystem32
I include screen grabs.


At the Command Prompt typing MCE.exe the following window opens:

After clicking on «OK» the following appears in the Command Prompt window:
Error loading Python DLL ‘C:UsersGerdAppDataLocalTemp_MEI142842python39.dll’.
LoadLibrary: The specified module could not be found.
Where do I get this python39.dll file?
hello,
I fall on error following :
C:MCExtractor-master>pyinstaller --noupx --onefile MCE.py
The 'enum34' package is an obsolete backport of a standard library package and is incompatible with PyInstaller. Please `pip uninstall enum34` then try again.

C:MCExtractor-master>pip uninstall enum34
WARNING: Skipping enum34 as it is not installed.
as you see i can’t install pyinstaller,
thank you in advance to bring your help,
(i have success to import pyinstaller by pip3 this time but i hope for mean about security use it),
Regards.
Azaretdodo.
hello,
I can’t compile MCE :
python3 --noupx --onefile MCE.py
unknown option --noupx
usage: python3 [option] ... [-c cmd | -m mod | file | -] [arg] ...
Try `python -h' for more information.
thanks you in advance to help myself pass this error,
Regards.
Azaretdodo.

please add cpu microcode for x7 z8750 . I need microcode for custom cpu

I’m getting this error while opening MCE.exe
Error loading Python DLL ‘C:UsersMyUserNameAppDataLocalTemp_MEI60322python39.dll’.
MyExe Version: v1.72.0
DB Version: DB r217
I’m guessing it’s because python dropped support for Windows 7, but what can i do? I may need to build from source 

Hello Plato,
I hope this is an actual mistake or am I doing something wrong: Missing from MCExtractor r205-r210 —
Intel cpu906E9_plat2A_ver000000EC_2021-04-29_PRD_8C68349C
eg from UBU BIOS Updater:
╔═════════════════════════════════════════╗
║ MC Extractor v1.70.0 r210 ║
╚═════════════════════════════════════════╝
╔══════════════════════════════════════════════════════════════════╗
║ Intel ║
╟─┬─────┬────────────┬────────┬──────────┬────┬───────┬───────┬────╢
║#│CPUID│ Platform │Revision│ Date │Type│ Size │ Offset│Last║
╟─┼─────┼────────────┼────────┼──────────┼────┼───────┼───────┼────╢
║1│906E9│ 2A (1,3,5) │ EA │2021-01-05│PRD │0x19800│ 0x18 │ No ║
╟─┼─────┼────────────┼────────┼──────────┼────┼───────┼───────┼────╢
║2│506E3│36 (1,2,4,5)│ EA │2021-01-25│PRD │0x19C00│0x19818│Yes ║
╚═╧═════╧════════════╧════════╧══════════╧════╧═══════╧═══════╧════╝
These microcodes will be entered into your BIOS file
R — Start replacement
A — Start replacement Alternative with MMTool
0 — Cancel
Choice:
Cheers,
Andrew


Hello,
Thank you in advance to help myself running fully your program,
I think the microcode is the following :

the inscpectre program say it is the followinf uid :

if you are agree thank you in advance to help myself launch the microcode,
Regards.
Azaretdodo.

At the moment AFAICT they are shown in whatever order they are placed inside a file.
But at least for the mcupdates windows ships with, there’s absolutely no regularity in the position of any single «entry» across different «whole file» releases.
This makes diffing slightly more annoying than I’d like.
Now, I don’t really know how much important offset ordering is (so maybe changing this could not be a good default), but I’d like to see some way to have CPUID ordering.

I would like to know the origin of newer Intel microcodes, especially those:
cpu1067A_plat44_ver00000A0E_2015-07-29_PRD_A3107D75.bin
cpu1067A_platB1_ver00000A0E_2015-07-29_PRD_59BF808E.bin
cpu10676_plat04_ver00000612_2015-08-02_PRD_AEAA6CC1.bin
cpu10676_plat40_ver00000612_2015-08-02_PRD_B6F50E9C.bin
cpu10676_plat91_ver00000612_2015-08-02_PRD_1750A2A6.bin
because they are newer than Intel’s official microcodes. Corresponding entries from that repository:
║  79 │ 1067A │      11 (0,4)      │   A0B    │ 2010-09-28 │ PRD  │  0x2000 │ 0x36000  │  No  ║
║  80 │ 1067A │      44 (2,6)      │   A0B    │ 2010-09-28 │ PRD  │  0x2000 │ 0x38000  │  No  ║
║  81 │ 1067A │      A0 (5,7)      │   A0B    │ 2010-09-28 │ PRD  │  0x2000 │ 0x3A000  │  No  ║
║  73 │ 10676 │       01 (0)       │   60F    │ 2010-09-29 │ PRD  │  0x1000 │ 0x30000  │  No  ║
║  74 │ 10676 │       04 (2)       │   60F    │ 2010-09-29 │ PRD  │  0x1000 │ 0x31000  │  No  ║
║  75 │ 10676 │       10 (4)       │   60F    │ 2010-09-29 │ PRD  │  0x1000 │ 0x32000  │  No  ║
║  76 │ 10676 │       40 (6)       │   60F    │ 2010-09-29 │ PRD  │  0x1000 │ 0x33000  │  No  ║
║  77 │ 10676 │       80 (7)       │   60F    │ 2010-09-29 │ PRD  │  0x1000 │ 0x34000  │  No  ║
Is there any other official microcode repository, or could it be that Intel’s is outdated?

Thanks a lot for your useful tool! I was looking for the newest Intel Xeon 5600 Series microcode (206C2) today and I used your tool to extract the microcode of an Intel S55xx BIOS file (R0068) as well as one HP server board (SP75718) which both include a more recent version 1D (2015/08/04) than what I could find on the web otherwise. Your tool tells me that this is not the most up-to-date version though and I wanted to suggest to provide the version number and the date of the newest one as well in your tool which would be very useful. By the way, the official files from Intel for Linux don’t provide this particular microcode.
As I tried to integrate the extracted *.bin-file in the BIOS of my motherboard (Asus P6X58D-E) with MMTool (3.26 and 3.19 Mod 21-Fix), the tool rejects it with an error message: «This is not a valid CPU microcode patch file». I get this error with some of the official Intel Linux files as well, but some do work. Hence I can’t say for sure if it is an issue of your tool or MMTool. Is there another easy to use method to integrate the *.bin-files into this particular AMI BIOS?

Tested on: Fedora 34; Components: | PyInstaller: 4.3; Python: 3.9.4; Platform: Linux-5.11.13-300.fc34.x86_64-x86_64-with-glibc2.33
$ sudo dmidecode -t processor | grep -E ID | sed 's/.*: //' | head -n 1
E9 06 08 00 FF FB EB BF
$ ./MCE -search 'E9 06 08 00 FF FB EB BF'
╔═══════════════════════════════════════════╗
║         MC Extractor v1.53.0 r186         ║
╚═══════════════════════════════════════════╝
Error: Invalid CPUID (Intel, AMD, VIA) or Model (FSL)!
Tested on: Fedora 34; Components: | PyInstaller: 4.3; Python: 3.9.4; Platform: Linux-5.11.13-300.fc34.x86_64-x86_64-with-glibc2.33
$ ls -l MCE.db
-rw-rw-r--. 1 yk yk 217088 19. 4. 14:37 MCE.db
$ dist/MCE
╔══════════════════════════════════════╗
║         MC Extractor v1.53.0         ║
╚══════════════════════════════════════╝
Error: MCE.db file is missing!
Press enter to exit
Hello Plato.


Hello Plato.
Information about the platform: HP 250 G1, InsydeH20, SPI on 2 flashes (4096kB+1024kB).
Full dump from FPT
The first thing that confused me was MCExtractor with warnings about microcode #8. Details below:
Warning: Microcode #8 has non-empty Reserved fields, please report it!

Warning: Microcode #8 has Header CPUID discrepancy, please report it!

Warning: Microcode #8 is crossing over to the next microcode(s), please report it!

Warning: Microcode #8 is corrupted, please report it!
My further analysis leads to the fact that the MC 306A9 of interest to me is located in the firmware in a truncated form. The MC block starting at 3F00C has a length of 2440 instead of the original 2C00 corresponding to this version of the MC.
Thread on Win-Raid
Thanks for your time helping me.

My Windows10 detects:
Trojan:Win32/Ymacco.AA65
and blocks the exe.
I dont know, if you can do something to circumvent this, but just for info…

Hi, I am currently digging BIOS files of my new potential motherboard, specifically AMD B550 chipset that is rumored to have zen/zen+ support depending on OEM. Using the downloaded BIOS of Phantom Gaming B550 ITX, I performed a search with CPUID 0800F11 which is the ID of my soon-to-be-transferred CPU (Ryzen 3 1200).
the search succeed, displaying entries of 0800F11 as shown below

while I could understand the date and size, I’m unsure what version means. Exact cpu model? cpu model string?
why I’m choosing this board for my zen cpu is future proofing, of course and Asrock seems to have it in initial/factory bios