Pages Previous 1 2 3 4 5 … 24 Next
You must login or register to post a reply
51 06-02-2014 01:09:01
- MAG79
- SVP developer
- Offline
- Thanks: 1084
Re: Настройка отрисовщика madVR
Noweol
Да, удалось. Держит удвоение разрешения для 1280x720p при 24 к/сек. Для этого нужен драйвер 327.23 или более ранний. Последние драйвера не работали с NNED3 OpenCL. madshi начал переносить работу аппаратно-ускоренных алгоритмов с OpenCL на DirectCompute (поддерживаются D3D11 совместимые вимдеокарты, т.е. Nvidia 2xx и AMD 4xxx уже не подходят). На данный момент он перенес только дебандинг Error Diffusion. Это сократило объем требуемой видеопамяти вдвое и увеличило скорость работы на 10-25%.
Скачать madVR 0.78.4 бета3 с Error Diffusion на DirectCompute: http://madshi.net/madVRdirectCompute3.rar
Сейчас madshi работает над переносом NNEDI3 с OpenCL на DirectCompute. Так что я пока отложил замеры.
52 Reply by MAG79 06-02-2014 01:48:10
- MAG79
- SVP developer
- Offline
- Thanks: 1084
Re: Настройка отрисовщика madVR
По поводу качества удвоителя NNEDI3. Вот нарезка из сравнения качества увеличения размера в 4 раза алгоритмов Nearest Neibour, Jinc3 и NNEDI3.

Как видно, NNEDI3 лучше сглаживает наклонные линии и практически полностью убирает пикселизацию. Резкость при этом не падает так сильно, как при использовании Jinc3.
Post’s attachments
Mario_NNEDI3.gif 95.82 kb, 1023 downloads since 2014-02-05
53 Reply by NightFox 07-02-2014 01:45:03
- NightFox
- Beta Tester
- Offline
- Thanks: 42
Re: Настройка отрисовщика madVR
Его бы в эмуляторы прикрутить.
54 Reply by nemoW 07-02-2014 15:19:42
- nemoW
- Beta Tester
- Offline
- Thanks: 47
- Thanks for the post: 1
Re: Настройка отрисовщика madVR
http://madshi.net/madVRdirectCompute5.rar
В общем, на R7850 либо SVP, либо NNEDI. Вместе сплошные Dropped frames идут.
55 Reply by Noweol 07-02-2014 15:58:21
- Noweol
- Beta Tester
- Offline
- Thanks: 133
Re: Настройка отрисовщика madVR
И это печально… Видяйка-то из топовых…
56 Reply by MAG79 08-02-2014 16:14:50
- MAG79
- SVP developer
- Offline
- Thanks: 1084
- Thanks for the post: 1
Re: Настройка отрисовщика madVR
madVRdirectCompute5.rar все еще с OpenCL реализацией NNEDI3. madshi пишет, что пока ему не удается решить проблему 10-ти кратного падения производительности алгоритма NNEDI3, портированного на DirectCompute. Он взял тайм-аут. Учитывая не скорое появление обещанного быстрого аппаратно-ускоренного NNEDI3, я померял имеющийся OpenCL-алгоритм NNEDI3.
софт: SVP 3.1.5, MPC-HC 1.7.3, madVR 0.87.4 directCompute5, настройки по-умолчанию, включено NNEDI3 удвоение разрешения
железо: core i5-3570K, GTX 660 Ti (GeForce driver 327.23)
Максимальное разрешение, которое смогла удвоить эта конфигурация через NNEDI3 без дропов:
видео 1280×720 60 к/сек, увеличение до 1920×1080. загрузка GPU 77%, загрузка Memory Controller 30%, загрузка CPU 33%
(поток 55,3 МПикс/сек)
видео 1024×432 120 к/сек, увеличение до 1920×1080. загрузка GPU 80%, загрузка Memory Controller 35%, загрузка CPU 33%
(поток 53,1 МПикс/сек)
видео 1152×448 120 к/сек, увеличение до 1920×1080. загрузка GPU 89%, загрузка Memory Controller 36%, загрузка CPU 38%
(поток 61,9 МПикс/сек)
Максимальные цифры отмечены красным.
57 Reply by Noweol 08-02-2014 16:45:20
- Noweol
- Beta Tester
- Offline
- Thanks: 133
Re: Настройка отрисовщика madVR
Хорошие цифры. Это значит, что при наличии middle-end видяйки, nnedi3 реально можно пользоваться
58 Reply by Chainik 08-02-2014 21:13:39
- Chainik
- SVP developer
- Offline
- Thanks: 1457
Re: Настройка отрисовщика madVR
MAG79
Картинки бы сравнить, чуть более реальные чем пиксельно-мультяшная синтетика ![]() причем с двумя ресайзами (ну типа что «1280×720 увеличение до 1920×1080»)
причем с двумя ресайзами (ну типа что «1280×720 увеличение до 1920×1080»)
А еще, для чистоты эксперимента, сравнить скорость с программным NNEDI3 в ависните.
59 Reply by fakel 14-02-2014 17:40:34 (edited by fakel 14-02-2014 18:49:10)
- fakel
- Member
- Offline
- Thanks: 73
Re: Настройка отрисовщика madVR
Добрый день, подскажите пожалуйста так влияет ли на качество изображения «галка» в «enable automatic exclusive fullscreen mode»? У меня связка SVP 3.1.5+MadVR 0.87.4+POT (сборка 7sh3 1.5.44465×86) при включении этой галки, при автоматическом переходе в списке воспроизведения на следующий файл намертво виснет плеер. И еще, с момента выхода этой инструкции: svp-team.com/wiki/Настройка_MadVR ничего не поменялось? Может кто поделится настройками, как его правильно настроить(максимальное качество)? i5 2500K | 4Gb | MSI GTX560 Ti | Win 8.1 64.
60 Reply by MAG79 15-02-2014 04:33:57
- MAG79
- SVP developer
- Offline
- Thanks: 1084
- Thanks for the post: 1
Re: Настройка отрисовщика madVR
fakel
с момента выхода этой инструкции: svp-team.com/wiki/Настройка_MadVR ничего не поменялось?
Менялось. Инструкция устарела.
Может кто поделится настройками, как его правильно настроить(максимальное качество)? i5 2500K | 4Gb | MSI GTX560 Ti | Win 8.1 64
Самая лучшая инструкция — это сбросить настройки madVR к значениям по-умолчанию. Менять только то, что понимаешь. Все остальное уже настроено разработчиком и его армией поклонников на doom9.org.
так влияет ли на качество изображения «галка» в «enable automatic exclusive fullscreen mode»?
Она имеет своей целью исключить появление выпавших кадров. См. статистику по ctrl-j. Если она не помогает, то вместо нее можно включить галку «enable windowed overlay» либо «disable desktop composition». У них та же самая цель, только иная реализация этой цели.
61 Reply by fakel 15-02-2014 09:49:26
- fakel
- Member
- Offline
- Thanks: 73
Re: Настройка отрисовщика madVR
MAG79
Спасибо большое, извините если глупые вопросы, пытаюсь понимать… ![]()
62 Reply by psnsergey 01-03-2014 01:52:40 (edited by psnsergey 01-03-2014 01:54:06)
- psnsergey
- Member
- Offline
Re: Настройка отрисовщика madVR
MAG79 wrote:
По поводу качества удвоителя NNEDI3.
Есть ещё вот такая ссылка: http://www.infognition.com/articles/vid … otout.html
Там вычисляют PSNR для восстановленной разными отрисовщиками вчетверо уменьшенной исходной картинки. NNEDI3 там плетётся почти в хвостике. А Lanczos с шарпером — среди фаворитов.
Лучше — больше
Post’s attachments
Ресайзеры.png 14.93 kb, 985 downloads since 2014-02-28
63 Reply by Noweol 01-03-2014 05:58:12 (edited by Noweol 01-03-2014 06:02:33)
- Noweol
- Beta Tester
- Offline
- Thanks: 133
Re: Настройка отрисовщика madVR
Вот поэтому и говорят, что PNSR — плохое мерило всего. Во-первых, у lanczos рингинг будет, во вторых шарпинг его только увеличит. В третьих lanczos ещё и алиазинга добавит. Всего этого не будет у NNEDI3.
А вот VideoEnhancer заинтриговал. Если смотреть скрины bjorn.avi, то VideoEnhancer умудряется рамы в окнах восстанавливать, а у NNEDI3 это не получается. Всё остальные алгоритмы отдыхают. В общем и целом результат VideoEnhancer мне нравится — в среднем деталей больше выдаёт, но, бывают и промахи — Шрек и Panasonic.
P.S. Ха! У них бикубик и lanczos ничем друг от друга не отличаются. Насмешили, однако.
64 Reply by psnsergey 01-03-2014 09:54:08
- psnsergey
- Member
- Offline
Re: Настройка отрисовщика madVR
Noweol wrote:
А вот VideoEnhancer заинтриговал. Если смотреть скрины bjorn.avi, то VideoEnhancer умудряется рамы в окнах восстанавливать, а у NNEDI3 это не получается. Всё остальные алгоритмы отдыхают.
Прикольно, что главная вычислительная сложность алгоритма заключается в том же самом определении движения объектов в кадре, которым и так занимается процессор в SVP…
65 Reply by Chainik 01-03-2014 20:02:22
- Chainik
- SVP developer
- Offline
- Thanks: 1457
Re: Настройка отрисовщика madVR
Noweol
А вот VideoEnhancer заинтриговал.
вроде как давно эту штуку на doom9 развенчали
по сути то что она делает — это денойс (по трем кадрам) + шарп, и как бы все
каждый может повторить это сам ![]()
66 Reply by psnsergey 02-03-2014 02:18:29 (edited by psnsergey 02-03-2014 02:34:06)
- psnsergey
- Member
- Offline
Re: Настройка отрисовщика madVR
Chainik wrote:
по сути то что она делает — это денойс (по трем кадрам) + шарп, и как бы все
каждый может повторить это сам
Вы, похоже, правы (оттуда же, http://forum.doom9.org/archive/index.php/t-142704.html ):
Tempter57
26th November 2012, 11:07
@Jenyok
The problem is to discriminate between what is noise and what isn’t. But the sharpening stage will sharpen also noise, which will be blend later inside the other frames. So you can’t escape the temporal denoising, more efficient than spatial denoising, combined with motion compensation.
А есть способы сделать это или что-то похожее при проигрывании видео? Про плагины к MVTools знаю, но скорость их (если использовать не кластер из 10 машин) вызывает печаль… Шейдерами. Ведь векторы перемещения объектов в SVP и так определяются, и задача Super Resolution сильно облегчилась бы, если бы это можно было использовать не только как «построить промежуточные кадры с исходным разрешением» в видеокарте (как это делается в SVP сейчас), но и как
» 1. построить исходные кадры с увеличенным до размера экрана разрешением силами видеокарты посредством Super Resolution (того самого темпорал денойсинга и потом шарпа), используя определённые вектора перемещений;
2. построить промежуточные кадры с увеличенным до размера экрана разрешением силами видеокарты из увеличенных в п. 1 исходных кадров, используя те же вектора перемещений. «
Так можно зарулить MadVR по качеству картинки так, что никакие NNEDI ему не помогут…
Подозреваю, что сие можно сделать скриптом AVISync для нынешнего SVP, но относительно .avs «давненько не брал я в руки шашек»… Никто не делал подобного?
67 Reply by gaunt 02-03-2014 06:14:52
- gaunt
- Beta Tester
- Offline
- Thanks: 153
Re: Настройка отрисовщика madVR
psnsergey
» 1. построить исходные кадры с увеличенным до размера экрана разрешением силами видеокарты посредством Super Resolution (того самого темпорал денойсинга и потом шарпа), используя определённые вектора перемещений; 2. построить промежуточные кадры с увеличенным до размера экрана разрешением силами видеокарты из увеличенных в п. 1 исходных кадров, используя те же вектора перемещений. «
Используёте увеличение картинки до свп . Хоть там и используется обычный сплайн …
На секундочку — во всех промежуточных кадрах вы увидите реальные посчитанные пикселы , вместо отресайзенного изображения .
Честно сказать , уже давно практикую увеличение кадров до двухразмерного от мониторного , затем наложение шейдеров на полученный кадр , затем уменьшение рендером до размера монитора .
Картинка получается исключительная . Пикселы не бьют + более ,чем четвертьпиксельное построение .
При наличии ай5 и видяйки уровня 5750 — вполне реально «раскочегарить» свп до уровня 1500р .
68 Reply by psnsergey 02-03-2014 07:06:16 (edited by psnsergey 02-03-2014 11:12:02)
- psnsergey
- Member
- Offline
Re: Настройка отрисовщика madVR
gaunt wrote:
Используёте увеличение картинки до свп . Хоть там и используется обычный сплайн …
1. В том-то и дело, можно недорого (при наличии среднего уровня видеокарты) получить уменьшение шума на многие дБ благодаря темпоральному денойсингу. Вектора уже есть!..
Хотя если исходник плохой, то шумы там — артефакты сжатия, а они будут примерно те же самые в соседних кадрах, ибо сжатие основано на той же самой компенсации движения.
2. Вообще ресайзить до СВП — немножко не правильно, ИМХО. СВП же прежде всего надо вычислить вектора перемещений, а делать это лучше всего по исходной картинке до искажения ресайзом (а ресайз всегда искажение, он искажает спектр картинки). А вот потом, после того, как исходные кадры попадут в видеокарту, тут-то и надо их ресайзить — и потом уже и выводить отресайзенные кадры на телевизор, и строить из них же промежуточные кадры.
gaunt wrote:
На секундочку — во всех промежуточных кадрах вы увидите реальные посчитанные пикселы , вместо отресайзенного изображения .
Это как так? Ресайз в СВП работает только для алгоритма поиска векторов СВП, но не для построения промежуточных кадров? То есть цепочка построения выглядит как:
для исходных кадров — ресайз (с последующим построением маски векторов перемещений), вывод.
для промежуточных — построение из картинки исходного размера по маске векторов перемещений, ресайз, вывод?
Я думал, что раз до SVP изображение увеличено до HD — всё, SVP имеет дело с интерполированной картинкой и к исходной SD доступа не имеет.
69 Reply by gaunt 02-03-2014 11:33:06
- gaunt
- Beta Tester
- Offline
- Thanks: 153
Re: Настройка отрисовщика madVR
psnsergey
2. Вообще ресайзить до СВП — немножко не правильно, ИМХО. СВП же прежде всего надо вычислить вектора перемещений, а делать это лучше всего по исходной картинке до искажения ресайзом (а ресайз всегда искажение, он искажает спектр картинки). А вот потом, после того, как исходные кадры попадут в видеокарту, тут-то и надо их ресайзить — и потом уже и выводить отресайзенные кадры на телевизор, и строить из них же промежуточные кадры.
Это одно из заблуждений , не только ваше .
Не забываем — вектора ищатся не по соседним пикселам , а целыми блоками .
Т.е. блок 8*8 учитывает 64 пиксела . Ему абсолютно фиолетов тип ресайза на увеличение .
Блок 16*16 содержит уже 256 пиксел …
С другой стороны — поиск векторов на грубых уровнях пирамиды , Тут надо понимать , что весь поиск может иметь лишь целые координаты .
Т.е. блок 8*8 и радиус 2 пиксела (четверть размера блока)
16*16 и радиус 4 пиксела (та же четверть)
32*32 и радиус 8 пиксел (опять четверть)
Всё это по сути одно и тоже . НО — сколько координат может дать радиус 2 пиксела …0,1 и 2 .
4 пиксела — 0 ,1,2,3,4
8 пиксела от 0 до 9 .
Т.е. поиск блоком 32*32 будет в 4 раза точнее поиска блоком 8*8 . И это линейные размеры , по площади — в 16 раз .
Другое дело , что даже блок 8*8 является достаточно точным .
Т.е. увеличивая кадр , появляется возможность найти и вывести пиксела в натуральном виде . Ведь поиск целочисленный .
Как и монитор — реальный пиксел монитора тоже целочисленный .
Без движения ресайзить действительно неважно где , до или после .
Но с движением — появляется шанс вывести реальный мониторный пиксел , именно там , где он должен быть .
Т.е. в промежуточных — расчитанных кадрах элементарно растет точность , что выражается в улучшенном отображении деталей .
Чем не продвинутый ресайз ?
Ну и построение избыточной точности по определению будет уменьшать шум . Ибо поиск происходит блоками , где один-два пиксела погоды не сделает . При построении же — имеем смешивание , шумы уменьшатся , контуры подчеркнуты=усилены .
Если наложить шейдеры на реальный кадр , который сильно больше реального изображения монитора — вы получаете шейдер полупиксельной точности . Т.е. имеем относительно безопасное увеличение резкости .
Конечно , многое будет зависеть от качества обратного ресайза . Например , евр польз. с бикубиком 0.6,075 позволяет наложить лишь один шарпенкомплекс2 . С Мадвр и ланзосом — вполне можно накатить два раза подряд . Повторюсь — при размере видео после свп больше реальных пиксел монитора .
70 Reply by Vovanchik 05-03-2014 19:20:06
- Vovanchik
- SVP developer
- Offline
- Thanks: 92
- Thanks for the post: 1
Re: Настройка отрисовщика madVR
madVR v0.87.5
* error diffusion now uses DirectCompute (DX11 GPU needed) instead of OpenCL
* added fast and reasonably high quality «ordered dithering» algorithm
* added «renderingdithering» settings page with many new options
* new default dithering is now ordered dithering instead of random dithering
* madTPG now always uses monochromatic ordered dithering
* fixed: #107: XySubFilter: reducing CPU queue size during playback -> crash
* fixed: #112: 120fps clip resulted in 23Hz being selected instead of 60Hz
* fixed: #119: installation resulted in «might not have installed correctly»
* fixed: #123: XySubFilter: Nearest Neighbor/Bilinear distorted subtitles
* fixed: #125: forced film mode with unsupported FOURCCs: graphical corruption
* fixed: #133: XySubFilter: opaque black box when smooth motion was enabled
* fixed: #136: when playback is stopped, madVR now always turns the video off
* fixed: #137: Nearest Neighbor/Bilinear has problems with post-resize shaders
* fixed: #138: smooth motion FRC flickered when using Nearest Neighbor
* fixed: #145: DCI-P3 was using an incorrect white point
* fixed: #155: screeshots sometimes had an added black border
* fixed: #159: speciying DCI-P3 as the calibrated gamut -> green screen
* fixed: #160: corruption with uncompressed 4096×2304 v210 in AVI
* fixed: #161: YUV 4:4:4 videos with weird resolutions crashed madVR
* fixed: #165: overlay mode restricted madVR to single player window
* fixed: #167: dithering produced dithering noise on pure black areas
* fixed: #169: dithering produced dithering noise on pure white areas
* fixed: #170: Overlay mode sometimes unnecessarily cleared GPU gamma ramps
* fixed: Overlay mode applied 3dlut and gamma ramps in wrong order
* fixed: crash reporting didn’t catch exceptions in private threads, anymore
* fixed: crash when using XySubFilter with small GPU queue size
* fixed: DVD navigator was not released properly by madVR
* fixed: Run/Seek hooks also affected secondary DirectShow graphs
* fixed: profile key shortcuts only worked for «scaling» profiles
* fixed: full range YCbCr input produced slightly incorrect colors
* reduced Overlay mode graphical corruption when resizing media player
* exclusive -> windowed switch now shows a black frame instead of an old one
* removed XySubFilter auto-loading functionality, it’s now XySubFilter’s job
* disabled resolution based DCI-P3 auto detection
* changed default luma doubling value to 32 neurons
* display bitdepth can be be set to as low as 3bit (just for testing)
71 Reply by nemoW 07-03-2014 20:21:22
- nemoW
- Beta Tester
- Offline
- Thanks: 47
Re: Настройка отрисовщика madVR
madVR v0.87.6
* fixed: #090: FSE mode switched to 23Hz instead of 24Hz in Windows 8
* fixed: #127: crash when jumping to next video file on secondary monitor
* fixed: #173: overlay: exiting multiple windows in same order -> black screen
* madTPG now forces ordered dither, but you can en/disable colored & dynamic
* added support for new subtitle API ISubRenderConsumer2::Clear()
72 Reply by fakel 15-03-2014 14:08:11
- fakel
- Member
- Offline
- Thanks: 73
- Thanks for the post: 1
Re: Настройка отрисовщика madVR
madVR v0.87.7
* added linear light processing for ordered dithering and error diffusion
* added «trade quality for performance» option for linear light dithering
* fixed: #175: Banding appears if bitdepth is set to ‘7 bit’
* fixed: crash in MC19 when switching videos with native DXVA decoding
* fixed: rare overlay stability problems introduced in v0.87.5
* random dithering doesn’t round down to less than 8bit, anymore
* «present several frames in advance = off» now auto-disables error diffusion
* display bitdepth can be be set to as low as 1bit (just for testing)
* added silent exception handling for Intel OpenCL initialization crashes
* madTPG now optionally supports APL windows (gamma and linear light)
* madTPG now has a minimum image area of 4% instead of 10%
* madTPG now draws a 20 pixel black border around the measurement area
* madTPG now properly supports dynamic dithering (didn’t before)
* madTPG dithering was optimized to not dither for integer test patterns
* madTPG headers and demo projects updated
* madVR in a media player no longer supports test pattern, only madTPG does
73 Reply by fakel 31-03-2014 12:02:59
- fakel
- Member
- Offline
- Thanks: 73
- Thanks for the post: 1
Re: Настройка отрисовщика madVR
madVR v0.87.8
* added workaround for NVidia OpenCL <-> D3D9 interop driver bug
* fixed: #158: NNEDI3 chroma upscaling + DXVA deint + NVidia -> green image
* fixed: DirectCompute rendering resources weren’t properly released
* fixed: some multi monitor problems introduced in v0.87.7
* fixed: smooth motion frc sometimes incorrectly dropped frames
* fixed: toggling subtitle «trade quality» option required restart
* some DirectCompute stability improvements
* added vendor based OpenCL device filtering
* non-DX11-GPUs: error diffusion now falls back to ordered dithering
* improved Windows 8.1 FSE mode refresh rate hack
74 Reply by fakel 03-04-2014 11:19:04
- fakel
- Member
- Offline
- Thanks: 73
- Thanks for the post: 1
Re: Настройка отрисовщика madVR
madVR v0.87.9
* fixed: NNEDI3 didn’t work properly on AMD/Intel (introduced in v0.87.8)
* fixed: native DXVA decoding + NNEDI3 chroma up + NVidia -> green color cast
* fixed: #032: Smooth Motion FRC sometimes failed to activate
* fixed: #096: Smooth Motion FRC resulted in last/only frame being hidden
* fixed: #097: Smooth Motion FRC didn’t respect «treat 25p movies as 24p»
* fixed: #098: «Treat 25p movies as 24p» now only activates up to 25.5fps
* fixed: #104: «Delay playback until …» failed when toggling subtitles
* fixed: #113: film mode key shortcut didn’t enable Smooth Motion FRC
* fixed: #124: videoLUTs were not properly restored in multi monitor setup
* fixed: #132: Image corruption when leaving FSE with 3dlut loaded
* fixed: #171: film mode activation with display mode change could crash
* fixed: #178: RGB/YUV 4:4:4 with mod2 height showed black screen
* fixed: #182: NNEDI3 chroma up neuron count wasn’t properly memorized
* fixed: #187: switching subtitles triggered a short black screen
* fixed: #189: Smooth Motion FRC sometimes activated when not needed
* NNEDI3 no longer offsets by 0.5 pixel if Luma needs to be resampled, anyway
* added «HKCUSoftwaremadshimadVROpenCLforceVendor» override option
* modified madLevelsTweaker GUI to make intended multi monitor usage clearer
75 Reply by fakel 22-04-2014 22:18:19
- fakel
- Member
- Offline
- Thanks: 73
- Thanks for the post: 1
Re: Настройка отрисовщика madVR
madVR v0.87.10
* added some optimizations to reduce AMD OpenCL interop cost
* added new windowed presentation path («present several frames in advance»)
* added support for decimating 50p/60p movies to 25p/24p
* added profile strings «filePath/Name/Ext», with wild char («?», «*») support
* fixed: #181: profile auto switching sometimes invalidated file name tags
* fixed: #192: black flashing with Smooth Motion + NNEDI3 chroma doubling
* fixed: #193: image corruption when up&down scale is needed at the same time
* fixed: crash on Vista when trying to activate error diffusion
* fixed: Intel OpenCL CPU driver sometimes crashed
* OpenCL should now automatically prefer NVidia GPUs on Optimus laptops
* refresh rate hack is now only installed on Windows 8 (and newer)
* «Pause» OSD message no longer blocked
* file «madshi.net/madVR/version.txt» lists the current version number
* file «madshi.net/madVR/sha1.txt» lists SHA1 hash of the current «madVR.zip»
Pages Previous 1 2 3 4 5 … 24 Next
You must login or register to post a reply
Содержание
- madVR: как выжать максимум качества из видео
- Секреты качественного воспроизведения видео на компьютере. Часть 3: Настройка плавного воспроизведения в рендере madVR
- Настройка рендера madVR
madVR: как выжать максимум качества из видео
 В первый раз я познакомился с madVR, когда обнаружил новый чекбокс в настройках MPC Home Cinema. Как оказалось, качество видео получаемое на выходе madVR видео рендерер просто не сравнимо ни с чем, что я использовал раньше (EVR, Overlay, VMR 7, 9 и Haali). madVR создавался с целью выводить видео максимально возможного качества. В чем особенности madVR и каким образом у него получается видео такого высокого качества?
К основным фишкам madVR можно отнести:
- плавное отображение движения в кадре (smooth motion rendering)
- высокое качество дискретизация цвета (chroma upsampling)
- высокое качество преобразования YCbCr -> RGB,
- высококачественные алгоритмы маштабирования видео (bicubic, mitchell, lanczos, spline etc)
- коррекция спектра и контрастности для разных видов мониторов (gamut & gamma correction)
- обработка видео GPU в 16 битном режиме без потерь
Как я уже упоминал, MPC HC поддерживает madVR довольно давно, также как и KmPlayer и Zoom Player.
Все, что нужно, чтобы попробовать в деле этот видео рендерер — распаковать скачанный zip файл (ссылка на закачку последней версии) в отдельную папку и установить, кликнув на install.bat.
После этого в настройках (Настройки-Воспроизведение-Вывод) выбрать madVR.
Настройки самого madVR доступны после запуска видео и правого клика Фильтры-madVRRenderer. У меня все отлично работает с настройками по умолчанию, но при желании, там достаточно много опций, чтобы подстроить под свой вкус и мощность видеокарты.
Обсуждение madVR, пожелания к разработчику и баг репорты можно оставить в специальной ветке на форуме Doom9. Там же на первой странице можно посмотреть сравнение по качеству с конкурентами.
Источник
Секреты качественного воспроизведения видео на компьютере. Часть 3: Настройка плавного воспроизведения в рендере madVR
Здравствуйте уважаемые читатели блога www.ithabits.ru. В предыдущих статьях мы выяснили, что если нет проблем с быстродействием компьютера, то основное влияние на плавность воспроизведения видео оказывают временные (ударение на последнем слоге) характеристики. В первую очередь это несоответствие частоты обновления экрана монитора частоте кадров воспроизводимого видеоконтента.
В прошлый раз мы рассмотрели способ улучшения качества демонстрации фильмов путем соответствующего изменения частоты обновления дисплея.
К сожалению, этот очень простой и эффективный способ в полной мере доступен только тогда, когда видеомонитор: дисплей компьютера, телевизор, проектор — имеет необходимый набор кадровых частот.
Как быть, если в списке доступных отсутствует режим 24р или дисплей и вовсе поддерживает одну единственную частоту обновления равную 60 Гц?
Ожидать от мировой киноиндустрии отказа от стандарта съемки 24 кадра в секунду в самое ближайшее время не приходится.
Однако, как мы уже говорили, решение есть. Как гласит древняя восточная мудрость: “Если гора не идет к Магомету, то Магомет идет к горе”.
В нашем случае это означает, что если нельзя изменить частоту обновления экрана монитора, то нужно поменять частоту кадров проигрываемого видео.
Возможно ли это? Не только возможно, но уже широко используется, например, во многих современных телевизорах.
Эту технологию обобщенно можно назвать “Smooth motion” (плавное движение). У разных производителей видеоаппаратуры она имеет различные названия. Например, в телевизорах Sony — Motionflow, у Samsung — Clear Motion Rate, у других производителей как-то еще, но суть от этого не меняется. Заключается она в добавлении недостающих промежуточных кадров методом интерполяции соседних кадров исходного видео непосредственно в процессе его вывода на экран.
Учитывая тот факт, что сегодня далеко не у всех есть телевизор с поддержкой такой технологии, посмотрим как можно реализовать ее с помощью компьютера.
Сразу же необходимо отметить, что отнюдь не все зрители воспринимают изменение частоты кадров фильмов с 24 до 60, 100 и более в секунду как однозначное благо. Некоторые отмечают, что при этом совершенно меняется характер восприятия и теряется привычное ощущение кино. Иногда это даже называют эффектом мыльной оперы (soap opera effect).
И действительно, такое мнение не лишено оснований. Не знаю как вы, а мне с детства достаточно было одного взгляда на экран телевизора, чтобы мгновенно определить, что показывают – художественный фильм или телевизионную постановку. А всего-то разница была в два раза – 25р против 50i (о демонстрации фильмов 24р в телевизионных системах PAL/SECAM смотрим в предыдущей части).
В любом случае имеет смысл попробовать и лишь после этого принимать решение о том, как лучше смотреть фильмы. Ну а если устройство видео вывода не поддерживает режим 24р, то думать особо и не о чем.
Далее мы рассмотрим три возможных варианта реализации Smooth motion:
- Smooth motion в рендере madVR;
- SmoothVideo Project(SVP);
- МедиаплеерSplash PRO EX.
Из-за большого объема материала в данной статье будет представлено описание лишь первого из них, а именно настройки рендера madVR. Два других – в следующей части.
Настройка рендера madVR
В прошлый раз мы уже начали знакомиться с программным обеспечением madVR.
Напомню, что MadVR — это проект, нацеленный на улучшение качества обработки и визуализации видео путем использования в процессе вывода точного преобразования цветового пространства и качественного масштабирования изображения с использованием возможностей видеоадаптера.
Рассмотрим основные настройки рендера madVR. (Загрузка и установка данного ПО была разобрана здесь).
Данный модуль имеет большое количество настроек. При этом необходимо иметь в виду, что чем выше желаемое качество обработки изображения, тем больше будет нагрузка на графический процессор. В конечном счете изменение тех или иных настроек процесса может привести к тому, что GPU перестанет справляться с обработкой видеопотока, что является недопустимым. При этом реальное улучшение картинки может оказаться крайне незначительным.
В целом можно рекомендовать такой подход к настройкам данного фильтра.
Запасаемся несколькими видеофайлами с различным разрешением по горизонтали: 720, 1280, 1440, 1920 px и частотой кадров: 23,976, 24, 29,97, 50, 59,94 fps.
Не обязательно должен присутствовать весь перечисленный набор, но одного “предельного” 1080р60 будет недостаточно. Так, в моем случае самыми “тяжелыми”, кто бы мог подумать, оказались файлы MPEG 1440х1080i50 с видеокамеры. Почему, вскоре станет понятно.
Для более-менее объективной настройки вывода потребуется контролировать загрузку графического процессора.

Владельцы видеокарт AMD, правда не все, могут использовать для этой цели вкладку AMD OverDrive в Catalyst Control Center.

Всем остальным можно порекомендовать утилиту TechPowerUp GPU-Z. Ее можно скачать непосредственно с сайта разработчика.
На вкладке “Sensor” представлена информация о состоянии видеоадаптера в интересующий момент времени. В первую очередь нас будет интересовать загрузка процессора (GPU Load). Информация об использовании видеопамяти (Memory Used) поможет определиться с количеством видео буферов.
Ниже представлены оптимальные с точки зрения качество/производительность настройки madVR применительно к компьютеру с процессором i7-950 (3,06 GHz) и видеокартой NVIDIA GeForce GTS 450.
Они ни в коем случае не являются догмой или чем-то обязательным к исполнению. В зависимости от производительности вашего видеоадаптера их следует менять в ту или иную сторону руководствуясь при этом информацией о загрузке GPU в процессе воспроизведения видео различных форматов.

Напомню, что войти в настройки madVR можно только непосредственно во время воспроизведения видео медиаплеером, поддерживающим данный тип DirectShow вывода, с помощью соответствующего значка в трее или через меню “Воспроизведение –> Фильтры –> MadVR” (для MPC-HC). Настройки madVR можно открыть и из меню по правому клику мышью в любом месте экрана плеера.
В контексте сегодняшней темы нас интересует одна единственная настройка, но пропустить все остальные было бы как-то неправильно. Поэтому начнем по порядку сверху вниз.
- Devices (устройства вывода)

Для каждого подключенного к видеокарте компьютера монитора указываем его тип.
Calibration (калибровка)

На вкладке “Calibration” имеет смысл выбрать “this display is already calibrated” (дисплей уже откалиброван). MadVR позволяет задавать расширенные калибровочные характеристики, однако в подавляющем большинстве случаев лучше указать все так, как показано. Задание этих параметров нужно рендеру для правильного преобразования цветовых пространств.
Display modes (Режимы дисплея)

Данную вкладку мы уже разобрали в прошлый раз. В поле “list all display modes…” нужно вписать режимы, поддерживаемые дисплеем и выбрать в какой момент — при старте воспроизведения или при переходе на полный экран, переключать частоту его обновления.
Возможность обработки видео 25р как 24р пропускаем (для реализации данной опции необходима установка дополнительного ПО).
- Processing (обработка)
Decoding (декодирование видео)
Считаем, что все вопросы с декодированием видео к этому моменту уже решены и поэтому вкладку “decoding”, на которой для MPEG2, VC1 и h264 можно отдельно включить декодирование с помощью ffmpeg/libav, пропускаем.
Большое количество свободных медиаплееров, в том числе MPC, перешли на использование декодера LAV. Сегодня это представляется оправданным и целесообразным.
Если есть проблемы с производительностью центрального процессора компьютера, то для его разгрузки, если позволяют возможности видеоадаптера, в настройках декодера LAV можно включить аппаратное декодирование видео с помощью GPU.
Deinterlacing (деинтерлейсинг)

В самой первой публикации темы интерлейсному видео уже было уделено достаточно много внимания.
Определения для вариантов переключателя “automatically activate deinterlacing when needed (автоматически активировать деинтерлейсинг если нужно)” могут показаться несколько неожиданными: “if in doubt, activate deinterlacing (если есть сомнения, то активировать деинтерлейсинг)” и “if in doubt, deactivate deinterlacing (если есть сомнения, то выключить деинтерлейсинг)”. О каком сомнении или неопределенности может идти речь?
Дело в том, что декодеры далеко не всегда правильно распознают тип видео. И LAV в данном случае не является исключением. Например, вот с такими настройками неожиданно возникла проблема с деинтерлейсингом обычного PAL DV видео.
С чем это связано сказать трудно, как и невозможно дать единую рекомендацию для всех типов видео с полями. В целом можно рекомендовать такой подход – включить деинтерлейсинг в настройках кодека, программный или аппаратный, а в рендере madVR сделать “подстраховку”, как это показано на рисунке.
Узнать активен ли деинтерлейсинг в рендере madVR можно из информации, выводимой по комбинации клавиш “Ctrl+J”, а переключать режимы обработки чересстрочного видео на ходу с помощью “Ctrl+Alt+Shift+T”.
Artifact removal (удаление артифактов)

Речь идет о таком неприятном явлении при просмотре видео, как дебандинг. Проявляется он в виде ступенчатого градиента на однородных поверхностях. Если позволяет быстродействие видеокарты, то безусловно данную возможность уменьшения артефактов такого типа имеет смысл включить.
- Scaling algorithms (алгоритмы масштабирования)
Очень высокое качество масштабирования изображения в рендере madVR является одной из главных причин, по которой его стоит использовать.
Chroma upscaling (масштабирование цвета)
Большинство цифровых видеофильмов кодируются в формате субдискретизации цветности 4:2:0. Это означает, что черно-белое изображение (luma — яркость) сохраняется в видео с полным разрешением, а цветовая картинка (chroma — цветность) имеет разрешение в два раза меньшее как по горизонтали, так и по вертикали. В данном представлении четыре соседних пикселя (квадрат 2х2) имеют одинаковый цвет.
По сравнению с представлением без субдискретизации (4:4:4), 4:2:0 позволяет уменьшить скорость потока (битрейт) и, соответственно, конечный размер видеофайла примерно в два раза.
В некоторых форматах видео используется субдискретизация цветности 4:1:1, которая также позволяет уменьшить скорость потока в два раза, но при этом одинаковый цвет приобретают четыре пикселя в строке по горизонтали.
Такое возможно благодаря тому, что детали черно-белого изображения в значительной степени маскируют низкое разрешение цветного. Тем не менее границы объектов получают неравномерную ступенчатую окраску.
В этой связи вспомнился некогда легендарный домашний компьютер ZX Spectrum. Возможно старшее поколение читателей его помнит. Графическое разрешение создаваемой им картинки составляло 256х192 точек, а вот цветовые атрибуты задавались по знакоместам размером 8х8 пикселей. Благодаря такому решению получилось занять под видеопамять всего около 7 Кб. Хотя, конечно, возникли определенные сложности с рисованием цветных изображений и сами они выглядели порой весьма забавно.

По причине, отмеченной выше, цветная картинка всегда масштабируется в madVR в сторону увеличения (Chroma upscaling) до разрешения видео. Это позволяет заметно улучшить качество ее визуального восприятия.
Интерфейс секции “Scaling algorithms” выполнен в дружественном пользователю стиле. Слева представлены доступные алгоритмы масштабирования. Общий порядок такой – качество увеличивается сверху вниз по списку. Разумеется, одновременно с этим повышаются и требования к производительности компьютера.
Так, самый примитивный, но одновременно и самый быстрый и легкий алгоритм “Nearest Neighbor (Ближайший сосед)” расположен в самом верху.
Зато внизу можно увидеть появившийся не так давно в madVR OpenCL алгоритм масштабирования цветности NNEDI3, являющийся на сегодняшний момент времени одним из лучших. Однако позволить себе его смогут только владельцы достаточно продвинутых видеокарт.
В моей конфигурации компьютера со старенькой NVIDIA GeForce GTS 450, равно как и с ее одноклассницей AMD Radeon HD 5770, выбор алгоритма масштабирования NNEDI3 мгновенно загружает GPU до уровня, близкого к 100%, со всеми вытекающими из этого последствиями в виде заикающегося видео.
Это как раз тот случай, когда лучшее может стать врагом хорошего. Если видео компьютером не воспроизводится плавно, то разговоры о качестве масштабирования картинки становятся бессмысленными. Плавность воспроизведения однозначно имеет абсолютный приоритет.
В конце концов я остановился на методе Jinc, но при этом для уменьшения нагрузки на GPU пришлось отключить в настройках LAV аппаратное декодирование (примерно –10% для 1080р50/60, соответственно, +10…15% увеличение загрузки CPU).
Идеальных алгоритмов масштабирования не существует. Каждый из них имеет свои сильные и слабые стороны.
Для того, чтобы облегчить пользователю выбор, в правой верхней части окна показаны их основные характеристики в форме цветных полос. Чем больше будет площадь зеленых столбиков, тем лучше, чем больше красных, тем хуже.
В категории положительных (зеленых) характеристик присутствуют:
Sharpness – резкость. Очевидно, в комментариях не нуждается.
Hide source artifacts – способность алгоритма скрывать дефекты (артифакты) исходной картинки.
В категории отрицательных (красных) свойств представлены:
Aliasing – широкий класс нежелательных визуальных эффектов (артефактов), проявляющихся в компьютерной графике в простейшем случае как зубчатость, неровность, ступенчатость линий, расположенных не параллельно краям экрана.
В более широком смысле aliasing означает неправильное или искаженное представление реального объекта его цифровой моделью, обусловленное недостаточной частотой выборок. В нашем случае частота выборок определяется разрешением изображения и частотой кадров видео.
Классическими примерами такого проявления алиасинга являются причудливые фигуры, получаемые вместо горизонтальных жалюзей на окнах домов или видеосъемка быстро вращающихся лопастей воздушного винта самолета.
Rinding — «звон» — переходный процесс в виде затухающих колебаний. Получил свое название по аналогии со звучанием колокола после удара по нему. При цифровой обработке изображений rinding приводит к появлению артефактов, представляющих собой ложные сигналы вблизи резких переходов. Визуально они проявляются в виде полос или «призраков» у краев объектов.
Other artifacts – другие искажения.
Image upscaling (увеличение изображения)

Для того, чтобы правильно выбрать подходящий для вашей конфигурации оборудования алгоритм масштабирования, как раз и потребуются видеофайлы разного формата и утилита TechPowerUp GPU-Z, о которых мы упомянули выше.
Подбор будем проводить по критерию качество/производительность.
Для видеокарт средней категории имеет смысл сразу начать с метода “Bicubic”. По многочисленным оценкам он дает вполне приемлемое для большинства случаев качество при увеличении разрешения — Image upscaling.
Проверяем загрузку GPU при воспроизведении выбранных видеофайлов. Если она невелика, то можно попробовать другие варианты, расположенные ниже по списку, или включить дополнительные опции. Например, активировать anti-ringing фильтр, как показано на иллюстрации.
Необходимо иметь в виду, что при воспроизведении видео с разрешением 1920х1080 на дисплее с таким же разрешением Image upscaling задействован не будет. Поэтому, как я уже говорил выше, одного “предельного” файла 1080р60 для настройки madVR недостаточно.
Image downscaling (уменьшение изображения)

Поступаем аналогично двум предыдущим настройкам, но начать лучше сразу с метода “Lanczos”, который лучше справляется с задачей Image downscaling — масштабирование изображения в сторону уменьшения размерности.
Для активизации фильтра разрешение окна или экрана монитора должно быть меньше, чем разрешение видео. Если дисплей имеет разрешение 1920х1080, то запустить Image downscaling получится только в оконном режиме видеоплеера. Об этом нужно помнить в процессе настройки.
В целом настройка madVR на максимально возможное качество обработки изображения при сохранении необходимой для плавного воспроизведения производительности является задачей весьма увлекательной.
- Rendering (построение изображения, воспроизведение)
Некоторые настройки madVR из раздела Rendering способны оказывать заметное влияние на производительность.
General settings – основные настройки

Если не вдаваться в детали, то можно сказать, что включение режимов “windowed overlay (оконное наложение)” и “automatic fullscreen exclusive mode (автоматическое включение эксклюзивного режима при полноэкранном воспроизведении)” потенциально должно улучшать производительность. Попробуйте. Лично я не нашел в этих режимах для себя ничего полезного. Кроме того, fullscreen exclusive mode запрещает вывод на экран любых окон других приложений, не будет работать и “Print Screen”.
В разделе General settings есть настройка длинны очередей на обработку в СPU (decoder queue) и GPU (upload/render queue). Если есть проблема с плавностью воспроизведения, то теоретически увеличение очередей должно помочь ее решению. Однако при этом нужно помнить, что чем больше длинна, тем больше памяти нужно madVR.
Проконтролировать доступный объем видеопамяти можно с помощью утилиты TechPowerUp GPU-Z.
Windowed mode settings – настройки оконного режима

Как следует из названия, эти параметры применяются когда madVR работает в оконном режиме. При отключенном fullscreen exclusive mode эти настройки будут использоваться как при работе в окне, так и в при переходе к полноэкранному представлению.
Данная настройка определяет количество буферизированных кадров и потенциально может повлиять на плавность воспроизведения. По умолчанию в память предварительно загружаются 3 кадра. При обычном воспроизведении этого вполне достаточно. Однако, если планируется включить опцию Smootch motion, то имеет смысл увеличить размер буфера, например, до 8-ми кадров.
Нужно помнить, что при этом будет использовано больше памяти.
Exclusive mode settings – настройки режима эксклюзивного полноэкранного воспроизведения
Аналогично Windowed mode settings.
Smooth motion – плавное воспроизведение

Наконец мы подошли к главной цели сегодняшней публикации – к опции Smooth motion.
Smooth motion в madVR – это не совсем то, о чем мы говорили в начале статьи. Она не является системой безусловной интерполяции кадров, которая используется в телевизорах, или в системе SVP, о которой пойдет речь в следующей части.
В рендере madVR Smooth motion предназначена для организации плавного воспроизведения в тех случаях, когда частота кадров исходного видео не соответствует ни одной из частот обновления экрана монитора.
Так как для согласования частот используется смешивание кадров (frame blending), то иногда можно увидеть ореол вокруг движущихся объектов. Однако такое случается достаточно редко и точно не может перечеркнуть ценность улучшения плавности воспроизведения.
Если сделать настройки так, как показано на иллюстрации, — “Enable smootch motion frame rate conversion only if there would be motion judder without it” (включить преобразование частоты кадров только тогда, когда без него будет дрожание изображения), то функция будет активироваться только в тех случаях, когда это действительно нужно. Например, при воспроизведении видео с частотой кадров 23/24/25/50 на мониторе с частотой 60 Гц. А вот для NTSC частот 30/60 кадров в секунду в этом случае smootch motion останется неактивной.
Если экран вашего устройства вывода имеет возможность обновляться с частотой 50 Гц, эту возможность нужно обязательно использовать. В этом случае smootch motion будет включаться в работу только для фильмов 23/24 fps.
В общем случае такую настройку можно считать оптимальной.
Могу сказать, что фильмы с наиболее распространенной частотой кадров 29,976 fps с включенной в madVR функцией smootch motion смотрятся на мониторе 60 Гц очень даже неплохо.
Еще одним положительным аспектом реализации технологии smootch motion в madVR является ее низкая ресурсоемкость. Общее правило такое – если вам удалось настроить и запустить madVR в принципе, то smootch motion также будет работать.
Dithering (сглаживание)

Выбор метода сглаживания в данной секции настроек может оказать решающее влияние на производительность. В последних версиях madVR появилась реализация очень высококачественного алгоритма сглаживания, известного как Error Diffusion. К сожалению, это как раз то, что, как и NNEDI3, может мгновенно поставить на колени вашу видеокарту. Кстати, для работы Error Diffusion нужна поддержка DX11 со стороны GPU видеоадаптера.
Как следует из комментариев к представленным алгоритмам, быстрой альтернативой Error Diffusion является Ordered Dithering.
Включение дополнительных опций use colored noise (использовать цветной шум) и change dither for every frame (менять сглаживание для каждого кадра) не оказывают заметного влияния на нагрузку GPU. Но при этом их влияние неоднозначно. Выбирайте в данном случае то, что вам больше понравилось, или оставьте их первоначальные установки.
Trade quality for perfomance (улучшить производительность за счет качества)

Если все еще остались проблемы с производительностью, то можно попробовать решить их за счет незначительного ухудшения качества обработки изображения.
Отмечать перечисленные опции нужно последовательно сверху вниз до тех пор, пока не будет достигнута необходимая плавность воспроизведения видео.
- User interface (интерфейс пользователя)
Keyboard shortcuts (клавиатурные комбинации)
Здесь можно посмотреть используемые в madVR для быстрого доступа к некоторым настройкам клавиатурные комбинации.
Желаю всем приятного просмотра фильмов, например в плеере MPC-HC, с использованием рендера madVR.
В следующий раз мы займемся изменением частоты кадров исходного видео с помощью программного обеспечения SmoothVideo Project (SVP). Не пропустите самое интересное.
Источник
![]()
Posts: 3,823
Joined: Feb 2014
Reputation:
220
![]()
2016-02-08, 05:37
(This post was last modified: 2019-08-04, 21:15 by Warner306.)
madVR Set up Guide (for Kodi DSPlayer and Media Player Classic)
madVR v0.92.17
LAV Filters 0.74
Last Updated: Aug 04, 2019
Please inform me of any dead links as there are countless external links spread throughout this guide. It is also helpful to point out any typos you find or technical information that appears to be misstated or incorrect. It is always an option to use a description from a better and more reliable source.
Follow current madVR development at AVS Forum: Thread: Improving HDR -> SDR Tone Mapping for Projectors
New to Kodi? Try this Quick Start Guide.
What Is madVR?
How to Configure LAV Filters
This guide is an additional resource for those using Kodi DSPlayer or MPC. Set up for madVR is a lengthy topic and its configuration will remain fairly consistent regardless of the chosen media player.
Table of Contents:
- Devices;
- Processing;
- Scaling Algorithms;
- Rendering;
- Measuring Performance & Troubleshooting;
- Sample Settings Profiles & Profile Rules;
- Other Resources.
…………..
Devices
Identification, Properties, Calibration, Display Modes, Color & Gamma, HDR and Screen Config.
Processing
Deinterlacing, Artifact Removal, Image Enhancements and Zoom Control.
Scaling Algorithms
Chroma Upscaling, Image Downscaling, Image Upscaling and Upscaling Refinement.
Rendering
General Settings, Windowed Mode Settings, Exclusive Mode Settings, Stereo 3D, Smooth Motion, Dithering and Trade Quality for Performance.
…………..
Credit goes to Asmodian’s madVR Options Explained, JRiver Media Center MADVR Expert Guide and madshi for most technical descriptions.
To access the control panel, open madHcCtrl in the installation folder:

Double-click the tray icon or select Edit madVR Settings…

During Video Playback:
Ctrl + S opens the control panel. I suggest mapping this shortcut to your media remote.
…………..
Resource Use of Each Setting
madVR can be very demanding on most graphics cards. Accordingly, each setting is ranked based on the amount of processing resources consumed: Minimum, Low, Medium, High and Maximum. Users of integrated graphics cards should not combine too many features labelled Medium and will be unable to use features labelled High or Maximum without performance problems.
This performance scale only relates to processing features requiring use of the GPU.
…………..
GPU Overclocking
Overclocking the GPU with a utility such as MSI Afterburner can improve the performance of madVR. Increasing the memory clock speed alone is a simple adjustment that is often beneficial in lowering rendering times. Most overclocking utilities also offer the ability to create custom fan curves to reduce fan noise.
…………..
Video Drivers
Most issues with madVR can be traced to changes to video drivers (e.g., broken HDR passthrough, playback stutter, 10-bit output support, color tints, etc.). Those only using a HTPC for video playback do not require frequent driver upgrades or updates. The majority of basic features such as HDR passthrough will work for many years with older drivers and frequent driver releases are solely intended to improve video game performance, not video playback performance. As such, users of HTPCs and madVR are advised to find a stable video driver that serves your needs and stick with it. It is easy to disable automatic driver updates that coincide with Windows updates and any of Intel, AMD or Nvidia provide download links to installers for legacy drivers that can be kept in case the video drivers need to be reinstalled.
…………..
Image gallery of madVR image processing settings
…………..
Summary of the rendering process:

Source
![]()
Posts: 3,823
Joined: Feb 2014
Reputation:
220
![]()
2016-02-08, 05:50
(This post was last modified: 2019-11-30, 14:36 by Warner306.)
1. DEVICES
- Identification
- Properties
- Calibration
- Display Modes
- Color & Gamma
- HDR
- Screen Config

Devices contains settings necessary to describe the capabilities of your display, including: color space, bit depth, 3D support, calibration, display modes, HDR support and screen type.
device name
Customizable device name. The default name is taken from the device’s EDID (Extended Display Information Data).
device type
The device type is only important when using a Digital Projector or a Receiver, Processor or Switch. If Digital Projector is selected, a new screen config section becomes available under devices.
Identification
The identification tab displays a summary of the EDID (Extended Display Information Data) that identifies any connected display devices and outlines its playback capabilities.
Before continuing on, it can be helpful to have a refresher on basic video terminology. These two sections are optional references:
Common Video Source Specifications & Definitions
Reading & Understanding Display Calibration Charts
Properties – RGB Output Levels

Step one is to configure video output levels, so black and white are shown correctly.
What Are Video Levels?
PC and consumer video use different video levels. At 8-bits, video levels will be either full range RGB 0-255 (PC) or limited range RGB 16-235 (Video). Reference black starts at 0 (PC) or 16 (Video), but 16-235 video content is visually identical when displayed. The ideal output path maintains the same video levels from the media player to the display without any unwanted video levels or color space conversions. What the display does with this input is another matter…as long as black and white are the same as when they left the media player, you can’t ask for much more.
Note: The RGB Output levels checkboxes in LAV Video will not impact these conversions.
Option 1:
If you just connect an HDMI cable from PC to TV, chances are you’ll end up with a signal path like this:
(madVR) PC levels (0-255) -> (GPU) Limited Range RGB 16-235 -> (Display) Output as RGB 16-235
madVR expands the 16-235 source to full range RGB and it is converted back to 16-235 by the graphics card. Expanding the source prevents the GPU from clipping the levels when outputting 16-235. Both videos and the desktop will look accurate. However, it is possible to introduce banding if the GPU fails to use dithering when compressing 0-255 to 16-235. The range is converted twice: by madVR and the GPU.
This option isn’t recommended because of the range compression by the GPU and should only be used if no other suitable option is possible.
If your graphics card doesn’t allow for a full range setting (like many Intel iGPUs or older Nvidia cards), then this may be your only choice. If so, it may be worth running madLevelsTweaker.exe in the madVR installation folder to see if you can force full range output from the GPU.
Option 2:
If your PC is a dedicated HTPC, you might consider this approach:
(madVR) TV levels (16-235) -> (media front-end) Use limited color range (16-235) -> (GPU) Full Range RGB 0-255 -> (Display) Output as RGB 16-235
In this configuration, the signal remains 16-235 all the way to the display. A GPU set to 0-255 will passthrough all output from the media player without clipping the levels. If a media front-end is used, it should also be configured to use 16-235 to match the media player.
When set to 16-235, madVR does not clip Blacker-than-Black (0-15) and Whiter-than-White (236-255) if the source video includes these values. Black and white clipping patterns should be used to adjust brightness and contrast until 16-235 are the only visible bars.
This can be the best option for GPUs that output full range to a display that only accepts limited range RGB. Banding should not occur as madVR handles the only conversion (YCbCr -> RGB) and the GPU is bypassed. However, the desktop and other applications will output incorrect levels. PC applications render black at 0,0,0, while the display expects 16,16,16. The result is crushed blacks. This sacrifice improves the quality of the video player at the expense of all other computing.
Option 3:
A final option involves setting all sources to full range — identical to a traditional PC and computer monitor:
(madVR) PC levels (0-255) -> (GPU) Full Range RGB 0-255 -> (Display) Output as RGB 0-255
madVR expands 16-235 to 0-255 and it is presented in full range by the display. The display’s HDMI black level must be toggled to display full range RGB (Set to High or Normal (0-255) vs. Low (16-235)).
When expanding 16-235 to 0-255, madVR clips both 0-15 and 236-255, as reference black, 16, is mapped to 0, and reference white, 235, is mapped to 255. Clipping both BtB and WtW is acceptable as long as a correct grayscale is maintained. The use of black and white clipping patterns can confirm video levels (16-235) are displayed accurately.
This is usually the optimal setting for those with displays and GPUs supporting full range output (the majority of users). Both videos and the desktop will look correct and banding is unlikely as madVR handles the only required conversion. A PC must already convert from a video color space (YCbCr) to a PC color space (RGB), so the conversion of 16-235 to 0-255 is simply done with a YCbCr -> RGB conversion matrix that converts directly from limited range YCbCr to full range RGB. No additional scaling step is necessary.
Recommended Use (RGB output levels):
Banding is prevented when the GPU is set to passthrough all sources that occurs when set to RGB 0-255. Both Option 2 and Option 3 configure the GPU to 0-255. Option 3 should be considered the default option because it maintains correct output levels for all PC applications, while Option 2 only benefits video playback.
To confirm accurate video levels, it is a good idea to use some test patterns. This may require some adjustment to the display’s brightness and contrast controls to eliminate any black crush or white clipping. For testing, start with these AVS Forum Black and White Clipping Patterns (under Basic Settings) to confirm the display of 16-25 and 230-235, and move on to these videos that can be used to fine-tune «black 16» and «white 235.»
Discussion from madshi on RGB vs. YCbCr
How to Configure a Display and GPU for a HTPC
Properties – Native Display Bit Depth

The native display bit depth is the value output from madVR to the GPU. Internal math in madVR is calculated at 32-bits and the final result is dithered to the output bit depth selected here.
What Is a Bit Depth?
Every display panel is manufactured to a specific bit depth. Most displays are either 8-bit or 10-bit. Nearly all 1080p displays are 8-bit and nearly all UHD displays are 10-bit. This doesn’t necessarily mean the display panel is native 8-bit or 10-bit, but that it is capable of displaying detail in gradients up to that bit depth. For example, many current UHD displays are advertised as 10-bit panels, but are actually 8-bit panels that can quickly flash two adjacent colors together to create the illusion of a 10-bit color value (known as Frame Rate Control or FRC temporal dithering — typical of many VA 120 Hz LED TVs). The odd high-end, 1080p computer monitor, TV or projector can also display 10-bit color values, either natively or via FRC. So the display either represents color detail at 8-bits or 10-bits and converts all sources to match this native bit depth.
If you want to determine if your display can natively represent a 10-bit gradient, try using this test protocol along with this gradient test image and these videos. Omit the instructions to use fullscreen exclusive mode for the test if using Windows 10.
10-bit output requires the following is checked in general settings:
- use Direct3D 11 for presentation (Windows 7 and newer)
Other required options:
- Windows 7/8: enable automatic fullscreen exclusive mode;
- Windows 10: 10-bit output is possible in both windowed mode and fullscreen exclusive mode.
If there are no settings conflicts, the output bit depth should be set to match the display’s native bit depth (either 8-bit or 10-bit). Feeding a 10-bit or 12-bit input to an 8-bit display without FRC temporal dithering will lead two outcomes: low-quality dithering noise or color banding. If unsure, testing both 8-bits and 10-bits with the above linked gradient tests with and without dithering enabled can assist in determining if both look the same or one is superior.
Some factors that may force you to choose 8-bit output:
- You are unable to find any official specs for the display’s native bit depth;
- The best option for 4K UHD 60 Hz output is 8-bit RGB due to the bandwidth limitations of HDMI 2.0;
- You have created a custom resolution in madVR that has forced 8-bit output;
- Display mode switching to 12-bits at 23-24 Hz is not working correctly with certain Nvidia video drivers;
- The display has poor processing and creates banding with a 10/12-bit input even though it is a native 10-bit panel.
So is it a good idea to output a 10-bit source at 8-bits?
The answer to this depends on an understanding of madVR’s processing.
A bit depth represents a fixed scale of visible luminance steps. High bit depths are used in image processing to create sources free of banding without having to manipulate the source steps. This ensures content survives the capture, mastering and compression processes without introducing any color banding into the SOURCE VIDEO.
madVR takes the 10-bit YCbCr source values and converts them to 32-bit floating point RGB data. These additional bits are not invented but available to assist in rounding from one color space to another. This high bit depth is maintained until the final processing result, which is dithered in the highest-quality possible. So the end result is a 10-bit source upconverted to 32-bits and then downconverted for display.
madVR is designed to preserve the information from its processing and the initial data provided by the YCbCr to RGB conversion to lower bit depths, so it should never introduce banding at any stage because the data is kept all the way to the final output. This all depends on the quality of the source and whether it had banding to begin with.
Color gamuts are fixed at the top and bottom. Manipulating the source bit depth will not add any new colors. You simply get more shades or steps for each color when the bit depth is increased; everything in between becomes smoother, not more colorful.
madVR can represent any output bit depth with smooth gradients by adding invisible noise to the image before output called dithering. Dithering can make most output bit depths appear nearly indistinguishable from each other by using the information from the higher source bit depth to add missing color steps to lower bit depths. Dithering replicates any missing color steps by combining available colors to approximate the missing color values. This creates a random or repetitive offset pattern at places where banding would otherwise occur to create smooth transitions between every color shade. The higher the output bit depth, the more invisible any noise created by dithering and the dithering pattern itself becomes. By the time the bit depth is increased to 8-bits, the dithering pattern becomes so small that 8-bit color detail and 10-bit (or higher) color detail will appear virtually identical to the human eye. This is why many 8-bit FRC display panels still exist in the display market that employ high-quality dithering to display 10-bit videos.
There is an argument that when capturing something with a digital camera there is no value in using 10-bits if the noise captured by the camera is not below a certain threshold (the signal-to-noise ratio). If it is above this threshold, then the dithering added at 8-bits will be indiscernible from the noise captured at 10-bits. That is really what you are measuring when it comes to bit depths as high as 8-bits: detectable dithering noise. If dithering noise is not detectable, then an 8-bit panel is an acceptable way to show 10-bit content. Dithering noise can be particularly hard to detect at 4K UHD resolutions, especially using madVR’s low-noise dithering algorithms.
Take a look at these images that show the impact of dithering to a bit depth as low as 2-bits:
Dithering — 8-bits (16.8 million color shades) to 2-bits (64 color shades):
2 bit Ordered Dithering
2 bit No Dithering
*Best viewed at 100% browser zoom for the dithering to look most accurate.
Seems remarkable? As the bit depth is increased, the shading created by dithering becomes more and more seamless to the point where the output bit depth becomes somewhat unimportant as gradients will always remain smooth without introducing any color banding not found in the source values.
Dithering is designed to spread out and erase any quantization (digital rounding) errors, so it is not designed to remove banding from the source video. Rather, if the source is free of banding, that information can always be maintained faithfully at lower display bit depths with dithering.
Recommended Use (native display bitdepth):
Those with native 8-bit displays should stick with 8-bit output, as the additional detail of higher bit depths cannot be represented by the display panel and will only result in added image noise. On the other hand, those with 10-bit displays have a choice between either 8-bit or 10-bit output, with each providing nearly identical image quality due to the use of madVR’s excellent dithering algorithms. The high bit depths used for image processing will prevent any loss of color detail from the source video to bit depths of 8-10 bits when the final 16-bit processing result is dithered to the output bit depth (with any remaining differences masked by the blending of colors created by these higher bit depths).
While 10-bit output could be considered the default option for a native 10-bit display panel, simply setting madVR and the GPU to 8-bit RGB can greatly simplify HTPC configuration for HDMI 2.0 devices. There are some common issues that can be encountered when the GPU is set to output 10 or 12-bits. For one, display mode switching from 8-bit RGB @ 60 Hz to 12-bit RGB @ 23-24 Hz is finicky with Nvidia video drivers and sometimes the video driver won’t switch correctly from 8-bits to 12-bits. HDMI 2.0 limits 60 Hz 4K UHD output to 8-bit RGB, and RGB output is always preferred over YCbCr on a PC. Two, Nvidia’s API for custom resolutions is locked to 8-bits, so Nvidia users needing a custom resolution must use 8-bits. Three, certain GPU drivers are known to create color banding when set to output 10 or 12-bits and 8-bit output can avoid any banding. In each of these cases, 8-bit output would be preferred. Those using madVR for the first time may not be accustomed to a video renderer that uses dithering, but it should be stated again: both 8-bit and 10-bit output offer virtually indistinguishable visual quality as a result of high-quality dithering added to all bit depths.
When the bit depth is set below the display’s native bit depth, the only visual change occurs in the noise floor of the image, and this subtlety can be invisible. Setting madVR to 8-bits might even be beneficial for some 10-bit displays (like some LG OLEDs). Providing the display with a good 8-bits as opposed to 10 or 12-bits can sometimes make for less work for the display and a reduced chance of introducing quantization errors. The odd UHD display may struggle with high bit depths due to the use of low bit depths for its internal video processing, not applying dithering correctly when converting 12-bits to 10-bits or some other unknown display deficiency. This is not meant to discourage anyone from choosing 10-bit output; the highest bit depth should produce the highest perceived quality, but your eyes are often the best judge of what bit depth works best for the display.
Regardless of output bit depth, it is advised to check if the GPU or display processing is adding any color banding to the image by using a good high-bit depth gradient test image (such as those linked above). Other good tests for color banding include scenes with open blue skies and animated films with large patches of blended color shades.
Determining Display-Panel Bit Depth
Properties – 3D Format

3D support in madVR is limited to MPEG4-MVC 3D Blu-ray. MVC 3D mkvs can be created from frame packed 3D Blu-rays with software such as MakeMKV.
The input 3D format must be frame packed MPEG4-MVC. The output format depends on the operating system, HDMI spec and display type. 3D formats with the left and right images on the same frame will be sent out as 2D images.
3D playback requires four ingredients:
- enable stereo 3d playback is checked in the madVR control panel (rendering -> stereo 3d);
- A 3D video decoder is used (e.g., LAV Filters 0.68+ with 3D software decoder installation checked);
- A 3D-capable display is used (with its 3D mode enabled);
- Windows 8.1 or Windows 10 is used as the operating system.
In addition, it may be necessary to check enable automatic fullscreen exclusive mode in general settings if MPEG4-MVC videos play in 2D rather than 3D.
Stereoscopic 3D is designed to capture separate images of the same object from slightly different angles to create an image for the left eye and right eye. The brain is able to combine the two images into one, which leads to a sense of enhanced depth.
What Is the Difference Between an Active 3D TV and Passive 3D TV?
auto
The default output format is frame packed 3D Blu-ray. The output is an extra-tall (1920 x 2205 — with padding) frame containing the left eye and right eye images stacked on top of each other at full resolution.
auto – (Windows 8+, GPU — HDMI 1.4+, Display — HDMI 1.4+): Receives the full resolution, frame packed output. On an active 3D display, each frame is split and shown sequentially. A passive 3D display interweaves the two images as a single image.
auto – (Windows+, GPU — HDMI 1.3, Display — HDMI 1.3): Receives a downconverted, half side-by-side format. On an active 3D display, each frame is split, upscaled and shown sequentially. A passive 3D display upscales the two images and then combines them as a single frame.
The above default behavior can be overridden by converting the frame packed source to any format that places the left eye and right eye images on the same frame. These 2D formats function without active GPU stereoscopic 3D and are compatible with all Windows versions and HDMI specifications.
Force 3D format below:
side-by-side
Side-by-side (SbS) stacks the left eye and right eye images horizontally. madVR outputs half SbS, where each eye is stored at half its horizontal resolution (960 x 1080) to fit on one 2D frame. The display splits each frame and scales each image back to its original resolution.
An active 3D display shows half SbS sequentially. Passive 3D displays will split the screen into odd and even horizontal lines. The left eye and right eye odd sections are combined. Then the left eye and right eye even sections are combined. This weaving creates the perception of two seperate images.
top-and-bottom
Top-and-bottom (TaB) stacks the left eye and right eye images vertically. madVR outputs half TaB, where each eye is stored at half its vertical resolution (1920 x 540) to fit on one 2D frame. The display splits each frame and scales each image back to its original resolution.
An active 3D display shows half TaB sequentially. Passive 3D displays will split the screen into odd and even horizontal lines. The left eye and right eye odd sections are combined. Then the left eye and right eye even sections are combined. This weaving creates the perception of two seperate images.
line alternative
Line alternative is an interlaced 3D format designed for passive 3D displays. Each frame contains a left odd field and right odd field. The next frame contains a left even field and right even field. 3D glasses make the appropriate lines visible for the left eye or right eye. For line alternative to function, the display must be set to its native resolution without any visible over or underscan.
column alternative
Column alternative is another interlaced 3D format similar to line alternative, except the frames are matched vertically as opposed to horizontally. This is another passive 3D format. One frame contains a left odd field and right odd field. The next frame contains a left even field and right even field. 3D glasses make the appropriate lines visible for the left or right eye. The display must be set to its native resolution without any visible over or underscan.
Further Detail on the Various 3D Formats
swap left / right eye
Swaps the order in which frames are displayed. This can correct the behavior of some displays that show the left eye and right eye images in the incorrect order. Incorrect eye order can be fixed for all formats, including line and column alternative. Many displays can also swap the eye order in its picture menus.
3D glasses must be synchronized with the display before playback. If the image appears blurry (particularly, the background elements), your 3D glasses are likely not enabled.
Recommended Use (3D format):
AMD and Intel users can safely set 3D format to auto. When functioning correctly, stereoscopic 3D should trigger in the GPU control panel at playback start and the display’s 3D mode should takeover from there. Nvidia, on the other hand, no longer offers support for MVC 3D in its official drivers. Nvidia’s official support for 3D playback ended with driver v425.31 (April 11, 2019) and only the 18 series drivers are to receive legacy updates and patches to keep MVC 3D operable with current Windows builds (recommended: v385.28 or v418.91). Nvidia 3D Vision that enables stereoscopic 3D is incompatible with the newest drivers and manual installation of 3D Vision will not provide any added functionality.
Manual Workaround to Install 3D Vision with Recent Nvidia Drivers
Users of Nvidia drivers after v425.31 must convert MVC 3D to a two-dimensional 3D format (where both 3D images are reduced in resolution and combined into a single frame) using any of the supported 3D formats listed under 3D format. Then 3D content can be passed through to the display without any need for active GPU stereoscopic 3D. The display’s user manual should be consulted for a list of supported 3D formats.
Calibration

When doing any kind of gamut mapping or transfer function conversion, madVR uses the values in calibration as the target. This requires you know your display’s calibrated color gamut and gamma curve and attach any available yCMS or 3D LUT calibration files.
What Is a Color Gamut?
Most 4K UHD displays have separate display modes for HDR and SDR. Calibration settings in madVR only apply to the display’s default SDR mode. BT.2020 HDR content is passed through unless a special setting in hdr is enabled such as converting HDR to SDR.
disable calibration controls for this display
Turns off calibration controls for gamut and transfer function conversions.
If you purchased your display and went through only basic calibration without any knowledge of its calibrated gamma or color gamut, this is the safest choice.
Turning off calibration controls defaults to:
- primaries / gamut: BT.709
- transfer function / gamma: pure power curve 2.20
this display is already calibrated
This enables calibration options used to map content with a different gamut than the calibrated display color profile. For example, a BT.2020 source, such as an UHD Blu-ray, may need to be mapped to the BT.709 color space of an SDR display, or a BT.709 source could be mapped to an UHD display calibrated to BT.2020. Displays with an Automatic color space setting can select the appropriate color profile to match the source, but all other displays require the input gamut matches the calibrated gamut to track the color coordinates correctly and prevent any over or undersatuation. madVR should convert any source gamut that doesn’t match the calibrated gamut.
If you want to use this feature but are unsure of how your display is calibrated, try the following values that are most common.
1080p Display:
- primaries / gamut: BT.709
- transfer function / gamma: pure power curve 2.20
4K UHD Display:
- primaries / gamut: BT.709 (Auto/Normal) / BT.2020 (Wide/Extended/Native)
- transfer function / gamma: pure power curve 2.20
Note: transfer function / gamma is only used if enable gamma processing is checked under color & gamma. Gamma processing is unnecessary as madVR will always use the same gamma as the encoded source mastering monitor. The transfer function is only applied by default for the conversion of HDR to SDR because madVR must convert a PQ HDR source to match the known calibrated SDR gamma of the display.
HDR to SDR Instructions: Mapping Wide Color Gamuts | Choosing a Gamma Curve
calibrate this display by using yCMS
Medium Processing
yCMS and 3DLUT files are forms of color management that use the GPU for gamut and transfer function correction. yCMS is the simpler of the two, only requiring a few measurements with a colorimeter and appropriate software. This a lengthy topic beyond the scope of this guide.
yCMS files can be created with use of HCFR. If you are going this route, it may be better to use the more accurate 3D LUT.
calibrate this display by using external 3DLUT files
Medium — High Processing
Display calibration software such as ArgyllCMS/DisplayCal, CalMAN or LightSpace CMS is used along with madVR to create up to a 256 x 256 x 256 3D LUT.
A 3D LUT (3D lookup table) is a fast and automated form of display calibration that uses the GPU to produce corrected color values for sophisticated grayscale, transfer function and primary color calibration.
What Is a 3D LUT?
Display calibration software, a colorimeter and a set of test patterns are used to create 3D LUTs. madTPG.exe (madVR Test Pattern Generator) found in the madVR installation folder provides all the necessary patterns. Using hundreds or thousands of color patches, the calibration software assesses the accuracy of the display before calibration, calculates necessary corrections and assesses the performance of the display with those corrections enabled. An accurate calibration can be achieved in as little as 10 minutes.
Manni’s JVC RS2000 Before Calibration | Manni’s JVC RS2000 After a 10 Minute 3D LUT Calibration
Source
Display calibration software will generate .3dlut files that can be attached from madVR as the calibration profile for the monitor. Active 3D LUTs are indicated in the madVR OSD. A special split screen mode (Ctrl + Alt + Shift + 3) is available to show the unprofiled monitor on one side of the screen and the corrections provided by the 3D LUT on the other.
Multiple 3D LUTs can be used to correct the individual color space of each source, or a single 3D LUT that matches the display’s native color gamut can be used to color correct all sources. HDR 3D LUTs are added from the hdr section.
Common Display Color Gamuts: BT.709, DCI-P3 and BT.2020.
Instructions on how to generate and use 3D LUT files with madVR are found below:
ArgyllCMS | CalMAN | LightSpace CMS
disable GPU gamma ramps
Disables the default GPU gamma LUT. This will return to its default when madVR is closed. Using a windowed overlay means this setting only impacts madVR. 3D LUTs typically include calibration curves that ignore the GPU hardware gamma ramps, so this setting is unnecessary and will have no effect.
Enable if you have installed an ICC color profile in Windows Color Management. madVR cannot make use of ICC profiles.
report BT.2020 to display (Nvidia only)
Allows the gamut to be flagged as BT.2020 when outputting in DCI-P3. Can be useful in situations where a display or video processor requires or expects a BT.2020 container, but DCI-P3 output is preferred.
Recommended Use (calibration):
Even if you are uncertain of the display’s color gamut and gamma setting, it is worth choosing this display is already calibrated and guessing the display’s SDR calibration. You then have quick access to madVR’s calibration options in the future if you need to adjust something. This is especially true if you are playing any HDR content with tone map HDR using pixel shaders selected under hdr. Some adjustment of the gamma curve and/or color gamut from madVR are usually required to get the best results for both SDR and HDR.
Color calibrating a display with a 3D LUT file is one of madVR’s most impactful features. There is no need to invest in costly PC software to create a 3D LUT. Free display calibration software such as DisplayCAL and ArgyllCMS are available that are supplemented with online help documentation and active support forums. Creating a 3D LUT is a much easier process than manual grayscale calibration with often superior results. A display calibrated with an accurate grayscale and gamma tracking benefits from more natural images with improved picture depth. 3D LUTs make this kind of pinpoint accurate display calibration accessible to anyone without any specialized training or knowledge of calibration beyond access to an accurate colorimeter.
Display Modes

display modes matches the display refresh rate to the source frame rate. This ensures smooth playback by playing sources such as 23.976 frame per second video at a matching refresh rate or multiple of the source frame rate (e.g., 23.976 Hz from the GPU and 120 Hz — 23.976 x 5 — at the display). Conversely, playing 23.976 fps content at 60 Hz presents a mismatch — the frame frequencies do not align — artificial frames are added by 3:2 pulldown that creates motion judder. The goal of display modes is to eliminate motion judder caused by mismatched frame rates.
What Is 24p Judder?
Enter all display modes (refresh rates) supported by your display into the blank textbox. At the start of playback, madVR will switch the GPU and by extension the display to output modes that best match the source frame rate.
Available display refresh rates for the connected monitor can be found in Windows Settings:
- Right-click on the desktop and select Display settings;
- Click on Advanced display settings;
- Click on Display adapter properties;
- Select the Monitor tab;
- Screen refresh rate will display all compatible refresh rates for the monitor under the drop-down.
Ideally, a GPU and display should be capable of the most common video source refresh rates:
- 23.976 Hz
(23 Hz in Windows) - 24 Hz
(24 Hz in Windows) - 25 Hz
(25 Hz / 50 Hz in Windows) - 29.97 Hz
(29 Hz / 59 Hz in Windows) - 30 Hz
(30 Hz / 60 Hz in Windows) - 50 Hz
(50 Hz in Windows) - 59.94 Hz
(59 Hz in Windows) - 60 Hz
(60 Hz in Windows)
madVR recognizes display modes by output resolution and refresh rate. You only need to output to one resolution for all content, which includes 1080p 3D videos, to ensure all sources are upscaled by madVR to the same native resolution of the display.
To cover all of the refresh rates above, eight entries are needed:
1080p Display: 1080p23, 1080p24, 1080p25, 1080p29, 1080p30, 1080p50, 1080p59, 1080p60
4K UHD Display: 2160p23, 2160p24, 2160p25, 2160p29, 2160p30, 2160p50, 2160p59, 2160p60
In most cases, the display will refresh the input signal at a multiple of the source frame rate (29.97 fps x 2 = 59.94 Hz). Frame interpolation of any kind is avoided so long as the two refresh rates are exact multiples.
treat 25p movies as 24p (requires ReClock or VideoClock)
Check this box to remove PAL Speedup common to PAL region (European) content. madVR will slow down 25 fps film by 4.2% to its original 24 fps. Requires the use of an audio renderer such as ReClock or VideoClock (JRiver Media Center) to slow the down the audio by the same amount.
hack Direct3D to make 24.000Hz and 60.000Hz work
madVR Explained: A hack to Direct3D that enables true 24 and 60 Hz display modes in Windows 8.1 or 10 that are usually locked to 23.976 Hz and 59.940 Hz. May cause presentation queues to not fill.
Note on 24p Smoothness:
When playing videos with a native frame rate of 24 fps (such as most film-based content), it may be possible to see some visible stutter in panning shots when the source is played at its native refresh rate (24p). This stutter is due to the low frame count of the video. The human eye can easily discern frame rates higher than 60 Hz (perhaps even as high as 500 Hz), so low frame rates will be visible to the human eye in motion and are no different than watching the same source at a commercial theatre. If you want to simulate the low motion of 24 fps sources, try switching the GPU to 23 Hz and moving the mouse cursor around.
Motion interpolation can improve the fluidity of 24 fps content, but will introduce a noticeable and unwanted soap-opera effect. True 24 fps playback at a matching refresh rate (usually with 5:5 pulldown), even with small amounts of stutter or blur, remains the best way to accurately view film-based content.
What Is Motion Interpolation?
Recommended Use (display modes):
Refresh rate matching should be considered a default setting for a smooth playback experience. Use of any type of frame interpolation goes against the creator’s intent and most often leads to temporal artifacts that are avoided with native playback at a matching refresh rate. The primary concern of display mode switching is avoiding 3/2 pulldown judder for 24 fps content ([email protected] Hz, and not [email protected] Hz). If your display does not support refresh rate switching, consider enabling smooth motion in madVR (under rendering) to remove any judder.
When entering display modes, you may selectively choose which ones are used. For example, 8-bit RGB output may not need smaller refresh rates like 2160p25 when 2160p50 is entered (as 25p x 2 = 50p). Remember that refresh rates of 30 Hz and below are required for 4K 10-bit, RGB output.
Custom Modes

This is actually a second tab under display modes. This is for users who do not want to use ReClock or other similar audio renders to correct clock jitter that can result in dropped or repeated frames every few minutes with many graphics cards. Generally, this is anyone who is bitstreaming rather than decoding to PCM. The goal is to reduce or eliminate the dropped/repeated frames counted by madVR.
What Is Clock Jitter?
madVR Explained:
Only custom timings can be optimized but simply editing a mode and applying the «EDID / CTA» timing parameters creates a custom mode and is the recommended way to start optimizing a refresh rate. New timing parameters must be tested before they can be applied. Delete replaces the add button when selecting a custom mode. It uses each of GPU vendor’s private APIs to add these modes and does not work with EDID override methods like CRU; supports AMD, Intel and Nvidia GPUs. With Nvidia, these custom modes can only be set to 8-bit, but 10 or 12-bit output is still possible if the GPU is already using a high bit depth before switching to the custom resolution.
SimpleTutorial: How to Create Custom Modes
Detailed Tutorial: How to Create Custom Modes
Recommended Use (custom modes):
AMD tends to minimize any clock jitter with factory frame repeats or drops at intervals of an hour or more. So custom resolutions are typically only of concern to Nvidia users. Because they are so brief and infrequent, most will never notice these occasional frame drops or repeats. Many have been living with them for years without ever perceiving any playback oddities. However, the automated creation of custom resolutions offered by madVR can make custom modes worth trying, provided you are willing to accept forced 8-bit output from the GPU and the need to repeat this process any time the video drivers are upgraded or reinstalled. Be warned that Nvidia’s custom resolution API is buggy and can cause stability issues with refresh rate switching and tends to break regularly with driver updates. Trial-and-error can be involved with different drivers to get a display to accept a custom resolution.
CRU (Custom Resolution Utility) is a more reliable but less user-friendly method to create a custom resolution. CRU supports 12-bit custom resolutions with functioning display mode switching that survives a reboot of the operating system. The recommended method of using CRU is to first calculate an automated custom resolution with madVR, take a Print Screen of madVR’s calculated values and enter those values into CRU. Unlike the buggy Nvidia API, CRU doesn’t use the GPU vendor APIs and instead creates custom resolutions at the operating system-level.
Color & Gamma

Color and transfer function adjustments do not need to be used unless you are unable to correct an issue using the calibration controls of your display.
enable gamma processing
This option works in conjunction with the gamma set in calibration. The value in calibration is used as the base that madVR uses to map to a chosen gamma below. A gamma must be set in calibration for this feature to work.
Most viewing environments work best with a gamma between 2.20 and 2.40. Although, many other values are possible.
What Is Display Gamma?
madVR Explained:
pure power curve
Uses the standard pure power gamma function.
BT.709/601 curve
Uses the inverse of a meant for camera gamma function. This can be helpful if your display has crushed shadows.
2.20
Brightens mid-range values, which can be nice in a brightly lit room.
2.40
Darkens mid-range values, which might look better in a darker room.
Recommended Use (color & gamma):
It is best to leave these options alone. Without knowing what you’re doing, it is more likely you will degrade the image rather than improve it. brightness and contrast adjustments are only useful on the PC side if 16-235 video levels are not displaying correctly after manual adjustment of the display’s controls. A better solution to this problem is to create a 3D LUT or use a colorimeter to manually adjust the display’s detailed grayscale controls to correct deviations from the calibrated gamma curve.
![]()
Posts: 3,823
Joined: Feb 2014
Reputation:
220
![]()
2016-02-08, 06:06
(This post was last modified: 2020-12-02, 04:06 by Warner306.)
1. DEVICES (Continued…)
HDR

The hdr section specifies how HDR sources are handled. HDR refers to High Dynamic Range content. This is a new standard for consumer video that includes sources ranging from UHD Blu-ray to streaming services such as Netflix, Amazon, Hulu, iTunes and Vudu, as well as HDR TV broadcasts.
What Is HDR Video?
Current HDR support in madVR focuses on PQ HDR10 content. Other formats such as Hybrid Log Gamma (HLG), HDR10+ and Dolby Vision are not supported because current video filters and video drivers cannot passthrough these formats.

HDR sources are converted internally in the display through a combination of tone mapping, gamut mapping and transfer function conversion. madVR is capable of all of these tasks, so HDR video can be displayed accurately on any display type, and not just bright HDR TVs.
The three primary HDR options below provide various methods of compressing HDR sources to a lower peak brightness (known as tone mapping). Unlike SDR video, HDR10 videos are not mastered universally to match the specifications of all consumer displays and it is up to each display manufacturer to determine how to map the brightness levels of HDR video to its displays.
Each HDR setting adds incremental amounts of tone mapping and gamut mapping to the source video with varied levels of resource use. 3D LUT correction adds a small amount to GPU rendering times, but tone map HDR using pixel shaders with all HDR enhancements enabled can add considerably to rendering times, which may not make it a good option for mid to low-level GPUs when outputting at 3840 x 2160p (4K UHD).
What Is HDR Tone Mapping?
madVR offers four options for processing HDR10 sources:
let madVR decide
madVR detects the display’s capabilities. Displays that are HDR-compatible receive HDR sources with metadata via passthrough (untouched). Not HDR-compatible? HDR is converted to SDR via pixel shader math at reasonable quality, but not the highest quality.
passthrough HDR to display
The display receives HDR RGB source values untouched for conversion by the display (a setting of let madVR decide will also accomplish this). HDR passthrough should only be selected for displays which natively support HDR playback. send HDR metadata to the display: Use Nvidia’s or AMD’s private APIs to passthrough HDR metadata: Requires a Nvidia or AMD GPU with recent drivers and a minimum of Windows 7. Use Windows 10 HDR API (D3D 11 only): For Intel users; requires Windows 10 and use Direct3D 11 for presentation (Windows 7 and newer). To use the Windows API, HDR and WCG must be enabled in Windows Display settings. This is important as the Windows API will not dynamically switch in and out of HDR mode. By comparison, the Nvidia & AMD APIs do dynamically switch between SDR and HDR when HDR videos are played, allowing for perfect HDR and SDR playback. The Windows 10 API is all or nothing — all HDR all the time. The Nvidia & AMD APIs for HDR metadata passthrough require Windows 10 HDR and WCG is deactivated. AMD also needs two additional settings: Direct3D 11 for presentation (Windows 7 and newer) in general settings and 10-bit output from madVR (GPU output may be 8-bit). You do not need to select 10-bit output for Nvidia GPUs; dithered 8-bit output is acceptable and sometimes preferable in some cases.
tone map HDR using pixel shaders
HDR is converted to SDR through combined tone mapping, gamut mapping and transfer function conversion. The display receives SDR content. output video in HDR format: The display receives HDR content, but the HDR source is tone mapped/downconverted to the target specs.
tone map HDR using external 3DLUT
The display receives HDR or SDR content with the 3D LUT downconverting the HDR source to some extent. The 3D LUT input is R’G’B’ HDR (PQ). The output is either R’G’B’ SDR (gamma) or R’G’B’ HDR (PQ). The 3D LUT applies some tone and/or gamut mapping.
Recommended Use (hdr):
The first decision you need to make when choosing an hdr setting is whether you want to output HDR video as HDR or SDR. If it is a true HDR display such as an LED TV or OLED TV with at least 500 nits or more of peak luminance, you most likely want HDR output. These displays usually follow the PQ EOTF curve 1:1 linearly up to 100 nits because they have more than adequate brightness to do so and tend to only focus on tone mapping the specular highlights above 100 nits. Given 90% or more of the video levels in current HDR videos are mastered within the first 0-100 nits (known as PQ reference white or SDR white), the majority of HDR displays don’t have a lot of tone mapping to do. For these displays, selecting passthrough HDR to display or applying a small amount of tone mapping to the brightest source levels with tone map HDR using pixel shaders and output video in HDR format checked can be all that is required to get a great HDR image.
If the display has limited light output, such as a projector or entry-level HDR LED TV, you will likely get a better image by converting HDR to SDR by selecting tone map using pixel shaders and using the default output configuration. Why? It comes down to having a limited range of brightness to work with and a need to compress more of the HDR source range.
HDR converted to SDR does not involve any loss of the original HDR signal. HDR can be easily mapped to an SDR gamma curve with 1:1 PQ EOTF luminance tracking for any HDR sources that fit within the available peak nits of the display. However, for scenes that have nits levels mastered above the display peak nits, some tone mapping of the brightness levels to the display is required and the SDR gamma curve can often do a more convincing job of compressing the high dynamic range of PQ HDR videos to dimmer HDR displays than fixed linear PQ EOTF tracking with a roll-off curve.
HDR to SDR tone mapping tends to be most effective when the target display has no option but to tone map the shadows and midtones of HDR10 videos to accommodate the very bright HDR specular highlights of HDR videos within a limited range of contrast. The relative SDR gamma curve can be utilized to automatically resize HDR signals by rescaling the entire source levels to be brighter or darker to have more consistent contrast from scene-to-scene. This wholesale rescaling of the gamma curve is used by madVR to create precise control over the brightness and positioning of the shadows, midtones and highlights to produce higher Average Picture Levels (APLs) for the display with a good balance of contrast enhancement and brightness without overly clipping the HDR specular highlights. This eskews the traditional tone mapping for HDR flat panel TVs that most often leave the shadows and midtones largely untouched with a focus on tone mapping the specular highlights in isolation. Instead, HDR converted to SDR gamma acknowledges any deficiencies in available nits output by rebalancing the full source signal with the best compromise of brightness preservation versus local contrast enhancement.
This style of tone mapping that uses the full display curve may not be necessary for true HDR flat panel TVs that have the headroom to represent the specular highlights in HDR videos without having to compress the lower source levels. However, accurate tone mapping of the entire display curve becomes far more important when a display lacks the ability to display HDR specular highlights with proper brightness, such as HDR front projectors, and necessitates lowering the nits levels of the the shadows and midtones in order to fit in the HDR highlights.
When using an SDR picture mode, HDR levels of peak brightness are not always achievable, but most displays that would benefit from HDR to SDR tone mapping have similar brightness when playing HDR or SDR sources, so there isn’t any downside to using a shared display mode to accommodate both content types. Converting HDR sources to SDR gamma also offers a way for SDR display owners to enjoy HDR10 videos on older SDR displays that lack the ability to accurately tone map HDR content.
HDR 3D LUTs are created for HDR-compatible displays with a colorimeter and free display calibration software such as DisplayCal. 3D LUTs are static curves designed to apply static tone mapping roll-offs for specific source mastering peaks. A 3D LUT is not intended to be used to apply any form of dynamic HDR tone mapping or dynamic LUT correction.
If your display does a poor job with HDR sources or you want to experiment, try each of the HDR output options to find one that provides an HDR image that isn’t too dim or plagued by excessive specular highlight clipping.
Recommended hdr Setting by Display Type:
OLED (HDR) / High Brightness LED (HDR) (600+ nits):
passthrough HDR to display OR tone map using pixel shaders (HDR output).
Mid Brightness LED (HDR) (400-600 nits):
passthrough HDR to display OR tone map using pixel shaders (HDR output).
Low Brightness LED (HDR) (300-400 nits):
tone map using pixel shaders (SDR output) OR passthrough HDR to display.
Projector (HDR) (50-250 nits):
tone map using pixel shaders (SDR output) OR passthrough HDR to display.
Television (SDR) / Projector (SDR):
tone map using pixel shaders (SDR output).
Signs Your Display Has Correctly Switched into HDR Mode:
- An HDR icon typically appears in a corner of the screen;
- Backlight in the Picture menu will go up to its highest level;
- Display information should show a BT.2020 PQ SMPTE 2084 input signal;
- The first line of the madVR OSD will indicate NV HDR or AMD HDR.
*A faulty video driver can prevent the display from correctly entering HDR mode. If this is the case, it is recommended to roll back to an older, working driver.
List of Video Drivers that Support HDR Passthrough
tone map HDR using pixel shaders
Pixel shader tone mapping is madVR’s video-shader based tone mapping algorithm. This applies both tone mapping and gamut mapping to HDR sources to compress them to the target peak nits entered in madVR. The output from pixel shaders is either HDR converted to SDR gamma or HDR PQ sent with altered metadata that reports the source peak brightness and primaries after tone mapping.
Pixels shaders does not rely on static HDR10 metadata. All tone mapping is done dynamically per detected movie scene by using real-time, frame-by-frame measurements of the peak brightness and frame average light level of each frame in the video.
What Is HDR to SDR Tone Mapping?
What Is Gamut Mapping?
What Is the Difference Between Static & Dynamic Tone Mapping?
Pixel Shaders HDR Output Formats:
Default: SDR Gamma
The default pixel shaders output converts HDR PQ to SDR gamma (2.20, 2.40, etc.). madVR redistributes PQ values along the SDR gamma curve with necessary dithering to mimic the response of a PQ EOTF. This is HDR converted at the source side rather than the display side to replace a display’s HDR picture mode.
Best Usage Cases:
HDR Projectors, SDR Projectors, Low Brightness LED HDR TVs, SDR TVs.
HDR to SDR: Advantages and Disadvantages
output video in HDR format: PQ EOTF
Checking output video in HDR format outputs in the original PQ EOTF. madVR’s tone mapping is applied and the HDR metadata is altered to reflect the lowered RGB values after mapping. So the display receives the mapped RGB values along with the correct metadata to trigger its HDR mode. madVR does some pre-tone mapping for the display:
PQ (source) -> PQ EETF (Electrical-Electrical Transfer Function: PQ values rescaled by madVR) -> PQ EOTF (display)
Best Usage Cases:
OLED HDR TVs, Mid-High Brightness LED HDR TVs.
Doing some tone mapping for the display is useful for an HDR standard that relies on a single value for peak luminance. Most displays will gamble that frame peaks near the source peak will be infrequent and choose to maximize the display’s available brightness by using a roll-off that prioritizes brightness over specular highlight detail. This usually results in some clipping of very bright highlight detail in some scenes. Other displays will assume much of the image is well above the display’s peak brightness and use a harsh tone curve that makes many scenes unnecessarily dark.
Pixel shaders with HDR output compresses any specular highlights that are above the target peak nits entered in madVR. These highlights are tone mapped back into the display range to present all sources with the same compressed source peak. This benefits the display by keeping all specular highlight detail within the display range without clipping and prevents the display from choosing a harsh tone curve for titles with high MaxCLLs, such as 4,000 nits or 10,000 nits, by reporting a lower source peak to the display. Compression is applied dynamically, so only highlights that have levels above the specified display peak nits are compressed back into range and the rest of the image remains the same as HDR passthrough. The ability to compress HDR highlights too bright for the display is very similar to the HDR Optimiser found on the Panasonic UB820/UB9000 Blu-ray players.
Rescaling of the source values and HDR metadata does not always work well with all displays. Most HDR displays will apply some additional compression to the input values with its internal display curve, which can sometimes lead to some clipping of the highlights or distorted colors due to the effect of the double tone map. Pixel shaders also cannot correct displays that do not follow the PQ curve, like those that artificially boost the brightness of HDR content or those with poor EOTF tracking that crush shadow detail.
Pixel shaders with HDR output checked is only recommended if it works in conjunction with your display’s own internal tone mapping, largely based on how it handles the altered static metadata provided by madVR (lowered MaxCLL and mastering display peak luminance). Displays with a dynamic tone mapping setting don’t usually use the static metadata and should ignore the metadata in favor of simply reading the RGB values sent by madVR. Some experimentation with the target peak nits and movie scenes with many bright specular highlights can be necessary to determine the usefulness of this setting. The brightest titles mastered above 1,000 nits tend to be the best usage case for this tone mapping. A good way to test the impact of the source rescaling is to create two hdr profiles mapped to keyboard shortcuts in madVR that can be toggled during playback: one set to passthrough HDR to display and the other pixel shaders with HDR output.
HDR to HDR: Advantages and Disadvantages
*Incorrect metadata can be sent by some Nvidia drivers when madVR is set to passthrough HDR content. If a display uses this metadata to select a tone curve, incorrect metadata may result in some displays selecting the wrong tone curve for the source. There are many driver versions known to both passthrough HDR content correctly and provide an accurate MaxCLL, MaxFALL and mastering display maximum luminance to the display.
List of Nvidia Video Drivers that Support Correct HDR Metadata Passthrough
tone map HDR using external 3DLUT
The best method to reliably defeat the display’s tone mapping is to use the option tone map HDR using external 3DLUT and create a 3D LUT with display calibration software, which will trigger the display’s HDR mode and apply a tone curve and adjust its color balance by using corrections provided by the 3D LUT table.
HDR 3D LUTs are static tables and may be created in several configurations to replace the selection of static HDR curves used by the display: such as 500 nits, 1,000 nits, 1,500 nits, 4,000 nits and 10,000 nits. HDR 3D LUT curve selection is automated with HDR profile rules referencing hdrVideoPeak.
Example of image tone mapped by madVR
2,788 nits BT.2020 -> 150 nits BT.709 (480 target nits):

Settings: tone map HDR using pixel shaders
![]()
Preview of Functionality of the Next Official madVR Build and Current AVS Forum Test Builds:
HDR -> SDR: Resources Toolkit
What Is Dynamic Clipping?
What Is a Dynamic Target Nits?
Instructions: Using madMeasureHDR to create dynamic HDR10 metadata
target peak nits [200]
target peak nits is the target display brightness for tone mapping in PQ nits. Enter the estimated actual peak nits of the display. If you own a colorimeter, the easiest way to measure peak luminance is to open a 100% white pattern with HCFR and read the value for Y. If you are outputting in an HDR format, the standard method to measure HDR peak luminance is to measure Y with a 10% white window in HDR mode. A TV’s peak luminance can be estimated by multiplying the known peak brightness of the display times the chosen backlight setting (e.g., 300 peak nits x 11/20 backlight setting = 165 real display nits).
Recommendation for Estimating Peak Nits for a Projector (via a Light Meter)
target peak nits doesn’t need to correlate to the actual peak peak brightness of the display when set to SDR output. SDR brightness works similar to a dynamic range slider: Increasing the display target nits above the actual peak nits of the display increases HDR contrast (makes the image darker) and lowering it decreases HDR contrast (makes the image brighter).

HDR output uses fixed luminance (the target brightness is not rescaled by the display) and decreasing the target peak nits below the actual display peak nits should make the image increasingly darker as the source peak is compressed to a brightness that is lower than the display peak.
With output video in HDR format checked, only scenes above the entered target peak nits have tone mapping applied. If set to 700 nits, for example, the majority of current HDR content would be output 1:1 and only the brightest scenes would need tone mapping (you can reference the peak brightness of any scene in the madVR OSD). Most HDR displays attempt to retain specular highlight detail up to 1,000 nits, but can often benefit from some assistance in preserving brighter highlights in titles with higher MaxCLLs of 4,000 nits — 10,000 nits.

High Processing
tone mapping curve [BT.2390]
BT.2390 is the default curve. The entire source range is compressed to match the set target peak nits.
A tone mapping curve is necessary because clipping the brightest information would cause the image to flatten and lose detail wherever pixels exceed the display capabilities. Tone mapping applies an S-shaped curve to create different amounts of compression to pixels of different luminances. The strongest compression is applied to the highlights while adjusting other pixels relative to each other to retain similar contrast between bright and dark detail relative to the original image.
clipping is automatically substituted if the content peak brightness is below the target peak nits.
Report BT.2390 comes from the International Telecommunications Union (ITU).
clipping
No tone mapping curve is applied. All pixels higher than the set target nits are clipped and those lower are preserved 1:1. Pixels that clip will turn white. Obviously, this is not recommended if you want to preserve specular highlight detail.
arve custom curve
With the aid of Arve’s Custom Gamma Tool, it is possible to create custom PQ curves that are converted to 2.20, 2.40, BT.1886 or PQ EOTFs. The Arve Tool is designed to work with a JVC projector via a network connection, but it may be possible to manually adjust the curve without direct access to the display by changing the curve parameters in Python and saving the output for madVR. Be prepared to do some reading as this tool is complicated.
Instructions:
- Install Python 3.6 or later;
- Download Arve Custom Tool for madVR;
- Open menu.py with Python;
- Follow the instructions here;
- Skip to ga (Adjust gamma curve) if you don’t own a JVC projector;
- Documentation;
- Speed guide;
- Explanation of gamma curve parameters.
Recommended Use (tone mapping curve):
The tone mapping curve can be left at its default value of BT.2390. Most tone mapping in madVR is optimized for this curve and arve custom curve’s don’t support frame measurements. clipping is only available for comparison or test purposes.
color tweaks for fire & explosions [balanced]
Fire is mostly comprised of a mixture of red, orange and yellow hues. After tone mapping and gamut mapping are applied, yellow shifts towards white due to the effects of tone mapping, which can cause fire and explosions to appear overly red. To correct this, madVR shifts bright red/orange pixels towards yellow to put a little yellow back into the flames and make fire appear more impactful. All bright red/orange pixels are impacted by this hue shift, so it is possible this is not desirable in every scene, but the color shift is slight and not always noticeable.
high strength
Bright red/orange out-of-gamut pixels are shifted towards yellow by 55.55% when gamut mapping is applied to compensate for the loss of yellow hues in fire and flames caused by tone mapping. This is meant to improve the impact of fire and explosions directly, but will have an effect on all bright red/orange pixels.
balanced [Default]
Bright red/orange out-of-gamut pixels are shifted towards yellow by 33.33% (and only the brightest pixels) when gamut mapping is applied to compensate for the loss of yellow hues in fire and flames caused by tone mapping. This is meant to improve the impact of fire and explosions directly, but will have an effect on all bright red/orange pixels.
disabled
All out-of-gamut pixels retain the same hue as the tone mapped result when moved in-gamut.
Mad Max Fury Road:
color tweaks for fire & explosions: disabled
color tweaks for fire & explosions: balanced
color tweaks for fire & explosions: high
Mad Max Fury Road (unwanted hue shift):
color tweaks for fire & explosions: disabled
color tweaks for fire & explosions: balanced
color tweaks for fire & explosions: high
Recommended Use (color tweaks for fire & explosions):
Most would be better off by disabling color tweaks for fire & explosions. The reason being that bright reds and oranges in movies are more commonly seen in scenes that don’t include any fire or explosions. So, on average, you will have more accurate hues by not shifting bright reds and oranges towards yellow to improve a few specific scenes at the expense of all other scenes in the video. These color tweaks are best reserved for those who place a high premium on having “pretty fire.”
High — Maximum Processing
highlight recovery strength [none]
Detail in compressed image areas can become slightly smeared due to a loss of visible luminance steps. When adjacent pixels with large luminance steps become the same luminance or the difference between those steps is drastically reduced (e.g. a difference of 5 steps becomes a difference of 2 steps), a loss of texture detail is created. This is corrected by simply adding back some detail lost in the luminance channel. The effect is similar to applying image sharpening to certain frequencies with the potential to give the image an unwanted sharpened appearance at higher strengths.
Available detail recovery strengths range from low to are you nuts!?. Higher strengths could be more desirable at lower target peak nits where compressed portions of the image can appear increasingly flat. Expect a significant performance hit; only the fastest GPUs should be enabling it with 4K 60 fps content.
none [Default]
highlight recovery strength is disabled.
low — are you nuts!?
Recovered frequency width varies from 3.25 to 22.0. GPU resource use remains the same with all strengths.
Batman v Superman:
highlight recovery strength: none
highlight recovery strength: medium
Recommended Use (highlight recovery strength):
The lone reason not to enable highlight recover strength would be for performance reasons. It is very resource-intensive. Otherwise, this setting adds a lot of detail and sharpness to compressed highlights, particularly on displays with a low peak brightness. I would recommend starting with a base value of medium, which does not oversharpen the highlights and leaves room for those who want even higher strengths with even more detail recovery. highlight recovery strength performs considerably faster when paired with D3D11 Native hardware decoding in LAV Video compared to DXVA2 (copy-back). This is due to D3D11 Native’s better optimization for DX11 DirectCompute used by this shader.
Low Processing
measure each frame’s peak luminance [Checked]
Overcomes the limitation of HDR10 metadata, which provides a single value for peak luminance but no per scene or per frame dynamic metadata. madVR can measure the brightness of each pixel in each frame and provide a rolling average, as reported in the OSD. The brightness range of an HDR video will vary during each scene. By measuring the peak luminance of each pixel, madVR will adjust the tone mapping curve subtlety throughout the video to provide optimized highlight detail. This is like having HDR10+ metadata available to provide more dynamic tone mapping for future releases.
Recommended Use (measure each frame’s peak luminance):
The performance cost of frame measurements is very low, so it is worth enabling them to add some specular highlight detail and provide a small boost in brightness for some scenes.
Note: The checkbox compromise on tone & gamut mapping accuracy under trade quality for performance is checked by default. Gamut mapping is applied without hue and saturation correction when this is enabled. Unless you have limited processing resources available, you’ll want to uncheck this to get the full benefit of tone mapping.
HDR -> SDR: The following should also be selected in devices -> calibration -> this display is already calibrated:
- primaries / gamut (BT.709, DCI-P3 or BT.2020)
- transfer function / gamma (pure power curve 2.xx)
If no calibration profile is selected (by ticking disable calibration controls for this display), madVR maps all HDR content to BT.709 and pure power curve 2.20.
tone map HDR using pixel shaders set to SDR output will use any matching 3D LUTs attached in calibration. HDR is converted to SDR and the 3D LUT is left to process the SDR output as it would any other video.
Other video filters required for HDR playback:
- LAV Filters 0.68+: To passthrough the HDR metadata to madVR.
ShowHdrMode: To add additional HDR info to the madVR OSD including the active HDR mode selected and detailed HDR10 metadata read from the source video, create a blank folder named «ShowHdrMode» and place it in the madVR installation folder.
HDR10 Metadata Explained
HDR Demos from YouTube with MPC-BE
Image Comparison: SDR Blu-ray vs. HDR Blu-ray at 100 nits on a JVC DLA-X30 by Vladimir Yashayev
Official HDR Tone Mapping Development Thread at AVS Forum
Screen Config

The screen config section options can be used to apply screen masking to the player window or an anamorphic stretch to crop portions of the screen area to dimensions that match CinemaScope (scope) projector screens. This screen configuration is used alongside zoom control (under processing) to enforce a reduced target window size for rendering all video. The device type must be set to Digital Projector for this option to appear.
Those who output to a standard 16:9 display without screen masking shouldn’t need to adjust these settings. screen config is designed more for users of Constant Image Height (CIH), Constant Image Width (CIW) or Constant Image Area (CIA) projection that use screen masking to hide or crop portions of the image.
A media player will always send a 16:9 image that will fill a 16:9 screen if the source video happens to be 16:9. However, many video formats are mastered in wider aspect ratios known as CinemaScope with common ratios of 2.35:1, 2.39:1 and 2.40:1 that are too wide for the default 16:9 window size. Normally, black bars are added to the top and bottom of CinemaScope videos to rescale them to a fit the 16:9 window. To get rid these black bars, some projector owners use a zoom lens to make CinemaScope videos larger and wider and project them onto wider 2.35:1 — 2.40:1 ratio CinemaScope screens.
If a 16:9 image is projected onto a CinemaScope projector screen with a zoom setting designed for CinemaScope, the image overshoots the top and bottom of the screen like this:

This screen overshoot is managed by using a projector lens memory that disables the zoom lens when 16:9 videos are played. Then 16:9 videos are zoomed to a smaller size to fit the height of the screen with some vacant space left on both sides. Zoom settings for 21:9 and 16:9 content are stored as separate lens memories in the projector. However, in some cases, it is possible for video content to overshoot the 21:9 projector zoom setting if the source switches at any point from a 21:9 to 16:9 aspect ratio during playback, such as the 1.78:1 IMAX sequences in The Dark Knight Trilogy. Two-way screen masking is often used to frame the top and bottom of the screen to ensure no visible content spills outside the screen area during these sequences.
madVR’s solution for framing CinemaScope screens is to define a screen rectangle for the media player that maintains the correct aspect ratio at all times. If any content is to spill outside the defined screen space, it is automatically cropped or resized to fit the player window. This ensures the full screen area is used regardless of the source aspect ratio without having to worry about any video content either being projected outside the screen area or any black bars being left along the inside edges.
screen config and its companion zoom control (which is discussed later) are compatible with all forms of Constant Image Height (CIH), Constant Image Width (CIW) and Constant Image Area (CIA) projection.
What Is Constant Image Height (CIH), Constant Image Width (CIW) and Constant Image Area (CIA) Projection?
define visible screen area by cropping masked borders
The defined screen area is intended to simulate screen masking used to frame widescreen projector screens by placing black pixels on the borders of the media player window and rescaling the image to a lower resolution.
madVR will maintain this screen framing when cropping black bars and resizing the image using zoom control. Only active when fullscreen.
Screen masking is used to create a solid, black rectangle around edges of the screen space that frames the screen for greater immersion and keeps all video contained within the screen area.
This masking is applied to create aspect ratios that match most standard video content:

Current consumer video sources are distributed exclusively in a 16:9 aspect ratio intended for 16:9 screens. The width of consumer video is always the same (1920 or 3840) and only the height is rescaled to fit aspect ratios wider than 16:9. The fixed width of consumer video means screen masking should only be needed at the top and bottom of the player window to remove the black bars. When the top and bottom cropping match the target screen aspect ratio, the cropped screen area should provide the precise pixel height to fill the projector panel so that zoomed CinemaScope videos fit both the exact height AND width of the scope screen.
The pixel dimensions of any CinemaScope screen are determined by the amount of cropping created by the projector zoom. When zoomed, the visible portions of standard 16:9 sources fill the full screen space with the source’s black bars overshooting the top and bottom of the screen. This creates a cropped 21:9 image.
Original Source Size: The pixel dimensions of the source rectangle output from madVR to the display. Sources are always output as 1920 x 1080p or 3840 x 2160p, often with black bars included in the video.
Projected Image Size: The pixel dimensions of the image when projected onto the projector screen. The size of the projected image is controlled by the lens controls of the projector, which sets the zoom, focus and, in some cases, lens shift of the projected image. An anamorphic lens and anamorphic stretch are sometimes used in place of a projector zoom lens to rescale the image to a larger size.
Native projector resolutions are:
- 1920 x 1080p (HD);
- 3840 x 2160p (4K UHD);
- 4096 x 2160p (DCI 4K).
Projector screens are available in several aspect ratios, including:
- 2.35:1;
- 2.37:1;
- 2.39:1;
- 2.40:1; and,
- Other non-standard aspect ratios.
When projecting images onto these screens, the projected resolution matches the size of the cropped screen area: 2.35:1 = 1920 x 817 to 4096 x 1743 and 2.40:1 = 1920 x 800 to 4096 x 1707.
Cropped Size of Standard Movie Content:
- 1.33:1: 1920 x 1440 -> 3840 x 2880
- 1.78:1: 1920 x 1080 -> 3840 x 2160
- 1.85:1: 1920 x 1038 -> 3840 x 2076
- 2.35:1: 1920 x 817 -> 3840 x 1634
- 2.39:1: 1920 x 803 -> 3840 x 1607
- 2.40:1: 1920 x 800 -> 3840 x 1600
Aspect Ratio Cheat Sheet
As the media player will always output a 1.78:1 image by default (1920 x 1080p or 3840 x 2160p), new screen dimensions are only necessary for the other aspect ratios: 1.85:1, 1.33:1, 2.35:1, 2.39:1 and 2.40:1.
CIH, CIW or CIA projection typically separates all aspect ratios into two screen configurations with two saved lens memories:
One Standard 16:9 (1.78:1, 1.85:1, 1.33:1) screen configuration that uses the default 16:9 window size and,
A CinemaScope 21:9 (2.35:1, 2.39:1, 2.40:1) screen configuration that matches the zoomed or masked screen area suitable for wider CinemaScope videos.
Any rescaling or cropping that happens within these player windows is controlled by the settings in zoom control.
Screen Profile #1 — CinemaScope (2.35:1 — 2.40:1) (21:9)
Screen Sizes: 1.78:1, 2.05:1, 2.35:1, 2.37:1, 2.39:1, 2.40:1
The height of the screen area is cropped based on a combination of the GPU output resolution and the aspect ratio of the projector screen.
Fixed CIH projection without a zoom lens would use the same 2.35:1, 2.37:1, 2.39:1 or 2.40:1 screen dimensions for 21:9 and 16:9 sources. When a 16:9 source is played, image downscaling is activated to shrink 16:9 videos to match the height of 21:9 videos.
Zoom-based CIH, CIW and CIA projection needs a second screen configuration that switches to the default 16:9 rectangle for 16:9 content (disables the zoomed or masked screen dimensions). It is also possible to have madVR activate a lens memory on the projector to match the 16:9 or 21:9 screen profile.
To frame a CinemaScope screen, crop the top and bottom of the player window until the window size matches the exact height of the projector screen up to its borders. For example, a 2.35:1 screen would need a crop of approximately 131 — 417 pixels from the top and bottom of the player window.
2.35:1 Screens (CinemaScope Masked):
1920 x 1080 (GPU) -> 1920 x 817 (cropped)
3840 x 2160 (GPU) -> 3840 x 1634 (cropped)
4096 x 2160 (GPU) -> 4096 x 1743 (cropped)
2.37:1 Screens (CinemaScope Masked):
1920 x 1080 (GPU) -> 1920 x 810 (cropped)
3840 x 2160 (GPU) -> 3840 x 1620 (cropped)
4096 x 2160 (GPU) -> 4096 x 1728 (cropped)
2.39:1 Screens (CinemaScope Masked):
1920 x 1080 (GPU) -> 1920 x 803 (cropped)
3840 x 2160 (GPU) -> 3840 x 1607 (cropped)
4096 x 2160 (GPU) -> 4096 x 1714 (cropped)
2.40:1 Screens (CinemaScope Masked):
1920 x 1080 (GPU) -> 1920 x 800 (cropped)
3840 x 2160 (GPU) -> 3840 x 1600 (cropped)
4096 x 2160 (GPU) -> 4096 x 1707 (cropped)
2.05:1+ (CIA) Screens (CinemaScope Masked):
The amount of height cropped depends on the width of the CIA projector screen.
Screen Profile #2 — Default (1.85:1, 1.78:1, 1.33:1) (16:9)
Screen Sizes: 1.78:1, 2.05:1, 2.35:1, 2.37:1, 2.39:1, 2.40:1
The target rectangle for 16:9 content requires no adjustment. The default media player window is already suitable for these narrower aspect ratios.
1.78:1, 2.05:1, 2.35:1, 2.37:1, 2.39:1 & 2.40:1 Screens (16:9 Default):
1920 x 1080 (GPU) -> 1920 x 1080 (no crop)
3840 x 2160 (GPU) -> 3840 x 2160 (no crop)
4096 x 2160 (GPU) -> 4096 x 2160 (no crop)
move OSD into active video area
Check this to move the madVR OSD into the defined screen area. madVR can also move some video player OSDs depending on the API it uses.
activate lens memory number
Sends a command to a network-connected JVC or Sony projector to activate an on-projector lens memory number with the necessary zoom, focus and lens shift to match the screen defined in screen config. Multiple lens memories are managed through the creation of profile rules based on custom filename tags or the source aspect ratio.
What Is a Projector Lens Memory?
ip control
In order to activate lens memories, madVR must establish a network connection with the projector. The projector can be connected to madVR from devices -> properties -> ip control. The device type must set to Digital Projector for this option to appear.
Enable IP control at the projector and then click find projector to start a search for the projector and connect it to madVR. Options are also provided to automatically pause and resume playback as lens memories are adjusted.
anamorphic lens
All videos are output with non-square pixels suitable for a fixed or moveable anamorphic lens. Check this if you use an anamorphic lens in order to apply a vertical or horizontal stretch to the image.
A vertical stretch stretches the image vertically to fill the top and bottom of the screen area. When a standard horizontal anamorphic lens is added, the image is pulled horizontally to fill the full width of a CinemaScope (2.35:1 — 2.40:1) screen. A standard projector lens, by comparison, leaves a post-cropped image needing a resize in both height AND width to achieve the same effect. The advantage of anamorphic projection is a brighter image with less visible pixel structure. The smaller pixel structure is a result of the pixels being flattened before they are enlarged.
If you are using a movable anamorphic lens, a second screen profile must be created under screen config that disables the anamorphic stretch for 16:9 content. A fixed anamorphic lens will work with the anamorphic stretch enabled at all times, as long as separate 21:9 and 16:9 zoom profiles are created in zoom control.
When using an anamorphic lens, it is not necessary to define the visible screen area. A projector zoom isn’t needed with an anamorphic lens and the top and bottom cropping wouldn’t properly align the heights of 21:9 and 16:9 aspect ratios when the anamorphic stretch is added.
stretch factor
This is the ratio of the vertical or horizontal stretch applied by madVR. The stretch defaults to the most common 4:3 vertical stretch, with possible manual entry for other stretch ratios. Vertical stretching should only be enabled for madVR or the projector, not both. madVR takes the vertical stretch into account when image scaling, so no extra image scaling operation is performed. The vertical scaling performed by madVR should be of higher quality than most projectors or external video processors.

Recommended Use (screen config):
screen config is recommended for all users of Constant Image Height (CIH), Constant Image Width (CIW) or Constant Image Area (CIA) projection to keep all video content within the visible screen area.
CIW zoomed, CIW or CIA setups need two screen configurations: one for 16:9 content (uncropped) and one with the top and bottom of the image cropped to create a rectangle suitable for 21:9 CinemaScope content. zoom control (under processing) will apply any necessary cropping or rescaling of the video for the defined player window size.
Creation of two screen configurations is possible with profile rules such as this:
if (fileName = «*customname*») or (ar > 1.9) «21:9»
else «16:9»
Fixed CIH without lens memories only needs one screen configuration with masking placed on the top and bottom to match a CinemaScope screen and two profiles in zoom control for 21:9 and 16:9 content. If you are using a custom resolution to resize the Windows desktop to match a scope aspect ratio, madVR can output to this custom resolution, as long as display modes is configured for this custom resolution and zoom control is set to rescale 16:9 videos to fit the 21:9 desktop aspect ratio.
If the desired output resolution is 4096 x 2160p, or any other non-standard output resolution, you must manually enter compatible display modes into display modes to have madVR output to this resolution. For example: 4096x2160p23, 4096x2160p24, 4096x2160p25, 4096x2160p29, 4096x2160p30, 4096x2160p50, 4096x2160p59, 4096x2160p60, etc.
![]()
Posts: 3,823
Joined: Feb 2014
Reputation:
220
![]()
2016-02-08, 06:30
(This post was last modified: 2020-12-02, 04:17 by Warner306.)
2. PROCESSING
- Deinterlacing
- Artifact Removal
- Image Enhancements
- Zoom Control
Deinterlacing

Deinterlacing is required for any interlaced sources to be shown on progressive scan displays. Deinterlacing should be an automatic process if your sources are flagged correctly. It is becoming increasingly uncommon to encounter interlaced sources, so deinterlacing shouldn’t be a significant concern for most. We are mostly talking about DVDs and broadcast 480i or 1080i HDTV. Native interlaced sources can put a large strain on madVR because the frame rate is doubled after deinterlacing.
What Is Deinterlacing?
Low Processing
automatically activate deinterlacing when needed
Deinterlaces video based on the content flag.
If doubt, activate deinterlacing
Always deinterlaces if content is not flagged as progressive.
If doubt, deactivate deinterlacing
Only deinterlaces if content is flagged as interlaced.
Low Processing
disable automatic source type detection
Overrides automatic deinterlacing with setting below.
force film mode
Forces inverse telecine (IVTC), reconstructing the original progressive frames from film (native 23.976 fps content) that was telecined to interlaced video, decimating duplicate frames if necessary. A source with a field rate of 59.94i would be converted to 23.976p under this method. Software (CPU) deinterlacing is used in this case.
force video mode
Forces DXVA deinterlacing that uses the GPU’s video deinterlacing as set in its drivers. The frame rate is doubled after deinterlacing. This is considered the best method to deinterlace native interlaced content.
only look at pixels in the frame center
This is generally thought as the best way to detect the video cadence to determine if deinterlacing is necessary and the type that should be applied.
Recommended Use (deinterlacing):
Set to automatically activate deinterlacing when needed unless you know the content flag is being read incorrectly by madVR and wish to override it. Note that using inverse telecine (IVTC) on a native interlaced source will lead to artifacts. The quality of video deinterlacing is determined by that provided by the GPU drivers.
Note: Deinterlacing in madVR is not currently possible when D3D11 Automatic (Native) hardware decoding is used. If you have any interlaced sources, DXVA2 (copy-back) must be selected as the video decoder.
Artifact Removal

The artifact removal section includes four settings designed to reduce or remove the most common video artifacts.
The list of potential visual artifacts can be lengthy:
- compression artifacts;
- digital artifacts;
- signal noise;
- signal distortion;
- interlacing artifacts;
- screen tearing;
- color banding;
- screen-door (projection) effect;
- silk screen (rear projection) effect;
- rainbow (DLP) effect;
- camera effects (noise, chromatic aberration and purple fringing);
- etc.
The artifact removal settings are for artifacts found in video sources. Artifact removal algorithms are designed to detect and remove unwanted artifacts in a precise manner while not disturbing the rest of the image. Unfortunately, some detail loss is possible, whether this is actually noticeable or not. You may choose to skip these settings if you desire the sharpest image possible, but sometimes a cleaner image without artifacts is preferable to a sharper image with artifacts.
Some filters may work well as a general use setting, and some may only be appropriate for specific usage cases. To use some of the most demanding filters, you may need to create special profile groups or lower other settings in madVR. It can be a great idea to program these settings to a keyboard shortcut in madVR and enable them when needed.
reduce banding artifacts
When a display is unable to represent a gradient with multiple shades of the same color with smooth transitions between each color, color banding is the result. Banding is considered a loss of color detail, as the display is unable to resolve small differences in color that can often be most visible in scenes with blue skies, dark shadows or in animated films.
What Is Color Banding?
Debanding in madVR is designed to correct color banding created during the content creation process and as a result of lossy compression. Display processing can also create issues with color banding, specifically HDR tone mapping, screen uniformity issues and processing the image at too low of a bit depth, but this can’t be addressed by the debanding filter.
High-quality sources such as 4K UHD and 1080p Blu-rays are even capable of displaying subtle color banding in large gradients or very dark scenes. Better compression codecs and higher bit depths make 4K UHD sources less prone to these artifacts. In general, the less compression applied to the source, the less likelihood of source banding.
Low — Medium Processing
reduce banding artifacts
Smooths the edges of color bands by recalculating new pixel values for gradients at much higher bit depths.
default debanding strength
Sets the amount of correction from low to high. Higher settings will slightly soften image detail.
strength during fade in/out
Five frames are rendered with correction when a fade is detected. This only applies if this setting is higher than the default debanding strength.
Demonstration of Debanding
1080p Blu-ray Credits:
Original
Debanding low
Debanding medium
Debanding high
If banding is obviously present in the source, a setting of high/high may be necessary to provide adequate correction. However, this is not a set-it-and-forget-it scenario, as a clean source would be unnecessarily smoothed. A setting of high is considerably stronger than medium or low. As such, it may be safer to set debanding to low/medium or medium/medium if the majority of your sources are high-quality. A setting of low puts the highest priority on avoiding detail loss while still doing a decent amount of debanding. While medium does effective debanding for most sources while accepting only the smallest of detail loss. And high removes all debanding, even from rather bad sources, with acceptable detail loss, but no more than necessary.
Recommended Use (reduce banding artifacts):
Choosing to leave debanding enabled at a low value for 8-bit sources is usually an improvement in most cases with only the finest details being impacted. Meaningful improvement with sources subject to harsh compression requires higher debanding strengths (likely, high). The choice to use a debanding filter mostly comes down to picking between smoothing all gradients to reduce the appearance of color banding or maintaining the sharpest image possible at all times while leaving any color banding intact. The least likely sources to benefit are HEVC sources encoded with 10-bits at high bitrates.
reduce ringing artifacts
Ringing artifacts refer to artifacts in the source video — and not ringing caused by video rendering. Source ringing results from resizing a source master with upscaling or downscaling or is a consequence of attempted edge enhancement. This may sound sloppy, but there are many examples of high-quality sources that ship with ringing artifacts. For example, attempting to improve the 3D look of a Blu-ray with edge enhancement most often leads to these artifacts.
What Are Ringing Artifacts?
Deringing corrects ringing created during the mastering process that differ from the halos created by video compression. Not all sources are prone to visible ringing artifacts. The deringing filter attempts to be non-destructive to these sources, but it is possible to remove some valid detail.
Medium — High Processing
reduce ringing artifacts
Removes source ringing artifacts with a deringing filter.
reduce dark halos around bright edges, too
Ringing artifacts are of two types: bright halos or dark halos. Removing dark halos increases the likelihood of removing valid detail. This can be particularly true with animated content, which makes this a risk/reward setting. It may be a safer choice to focus on bright halos and leave dark halos alone.
Lighthouse Top:
No Deringing
madVR Deringing
DVD Animated:
No Deringing
madVR Deringing
Recommended Use (reduce ringing artifacts):
Activating deringing comes down to preference. It is difficult to estimate the number of sources that are distributed with visible ringing artifacts. Older content such as DVD and 1080p Blu-ray subject to lower-quality scaling algorithms are more likely to display some noticeable halos compared to the expensive offline processing available today. Overuse of edge enhancement is also less common today, but it hasn’t been completely abandoned. Not everyone is sensitive to ringing artifacts. If you find you are always noticing halos around objects (particularly, around actor’s heads), deringing can be worth enabling. Compared to debanding, the filter is less prone to removing valid detail from a clean source.
reduce compression artifacts
Compression artifacts are created when a video is compressed by a compression codec such as HEVC or H.264 that removes pixels from groups of similar frames that it considers redundant in order to reduce the amount of digital information in the source. Codecs are impressive math algorithms that hold up surprisingly well at even reasonable bitrates. At a certain bitrate, however, the source will start to deteriorate rapidly, as too much pixel data is lost and can’t be recovered. Outside of Blu-ray, few consumer sources (particularly, streaming and broadcast sources) maintain high enough bitrates at all times to completely avoid compression artifacts.
What Are Compression Artifacts?
High — Maximum Processing
reduce compression artifacts
A shader designed to remove blocking, ringing and noise caused by video encoding by compression. This type of correction is beneficial for sources encoded with low bitrates. The bitrate where compression artifacts occur depends on a combination of factors such as the source bit depth, frame rate, input and output resolution and compression codec used.
Bitrates: Constant Rate Factor Encoding Explained (0 lossless -> 51 terrible quality)
strength
The amount of correction applied. Lower strength values are best at preserving fine details. The highest strength values are often the only way to provide visible improvement to sources obscured by compression artifacts at the expense of blurring more detail.
quality
There are four quality settings: low, medium, high and very high. Each level alters the effectiveness of the algorithm and how much stress is put on the GPU.
process chroma channels, too
By default, reduce compression artifacts only works on the luma (black and white) channel. Enabling this includes the chroma (color) layer in the algorithm’s pass. Keep in mind, this setting almost doubles the resources used by the algorithm and removing chroma artifacts may be overkill. The soft chroma layer makes compression artifacts harder to notice.
activate only if it comes for free (as part of NGU sharp)
Only applies RCA when NGU Sharp medium, high or very high is used to upscale the image. NGU Sharp and RCA are fused together with no additional resource use added to NGU Sharp.
NGU Sharp medium fuses RCA medium quality, NGU Sharp high fuses RCA high quality and NGU Sharp very high fuses RCA very high quality. The strength value of RCA is left to the user. This only applies when image upscaling.
Note: GPU resource use must always be considered when enabling RCA. It is very hard on the GPU if not used for free as part of image upscaling (especially at high and very high). So be warned of the performance deficit before enabling this shader!
Animated:
NGU Sharp very high
NGU Sharp very high + RCA very high / strength:8
Music Video:
Original
RCA very high / strength:12
Recommended Use (reduce compression artifacts):
Because compression artifacts are so common, RCA can be worth trying. Combining RCA with NGU Sharp slightly softens the result, but this combination often produces a cleaner upscaled image with less apparent noise and artifacts. Because of this, RCA can also be used as a general denoiser for higher-quality sources. The best candidates for improvement are sources subject to light compression. Animated sources, in particular, often benefit the most. The worst sources plagued by a lot of dancing temporal artifacts tend to only show mild improvement with RCA enabled. This is one you may want to map to your keyboard to try with your compressed or noisy sources.
reduce random noise
Image noise artifacts are unwanted fluctuations in color or luminance that obscure valid detail in video. These refer to specs on the image that produce a dirty screen appearance that can sometimes make a video appear as though it was shot on a low-quality camera or subject to heavy compression. In most cases, this noise is considered a normal byproduct of digital and film cameras and may even reflect a conscious decision by the director to capture a certain tonal appearance (e.g., most content shot on film).
What Is Image Noise?
Denoising removes noise from the image in exchange for some acceptable losses of fine detail. Most denoising/degrain filters can often be indiscriminate in blurring foreground detail to remove background noise, and madVR’s denoising filter is no different. As the strength value is increased, fine texture detail is lost in increasing amounts.
High — Maximum Processing
reduce random noise
Removes all video noise and grain while attempting to leave the rest of the image undisturbed.
strength
Consider this a slider between preserving image detail and removing as much image noise as possible.
process chroma channels, too
reduce random noise focuses only on the luma (black and white) channel by default. To include the chroma (color) layer, check this setting. Remember, you are almost doubling the resources used by the algorithm and chroma noise is much harder to see than luma noise.
Saving Private Ryan:
Original
Denoising strength: 2
Denoising strength: 3
Denoising strength: 4
Denoising strength: 5
Lord of War:
Original
Denoising strength: 1
Denoising strength: 2
Denoising strength: 3
Denoising strength: 4
Recommended Use (reduce random noise):
Removing some noise is possible with reduce compression artifacts, but RRN is far more effective at this. Those who find heavy film grain and images with excessive noise especially bothersome may feel this filter is necessary. It is difficult to recommended due to the amount of detail it removes in order to remove any noise. To offset any detail loss, you might want to add some sharpening shaders from image enhancements or upscaling refinement. The usefulness of this filter tends to drop off quickly as the strength value is increased. A strength between 1-2 may be a good general use setting to moderately lower the noise floor of the image without risking unwanted removal of texture detail.
Image Enhancements

image enhancements are not used to remove artifacts, but are instead available to sharpen the image pre-resize. These shaders are applied before upscaling or to sources shown at its native resolution (e.g., 1080p at 1080p, or 4K UHD at 4K UHD). Edge and detail enhancement are means to accentuate detail in the source that can make the image more pleasing or more artificial depending on your tastes. Soft video footage can often be enhanced in post-production, but some sources will still end up appearing soft.
When applying sharpening to the image, the desire is to find the right balance of enhancement without oversharpening. Too much sharpening will lead to noticeable enhancement of noise or grain and visible halos or ringing around edges.
Some Things to Watch for When Applying Sharpening to an Image
image enhancements are not recommended for content that needs to be upscaled. Pre-resize sharpening will show a stronger effect than sharpening applied after resize like that under upscaling refinement. In many cases, this will lead to an image that is oversharpened and less natural in appearance.
You might consider combining the shaders together to hit the image from different angles.
Saving Private Ryan:
Native Original
sharpen edges (4.0) + AR
crispen edges (3.0) + AR
LumaSharpen (1.50) + AR
AdaptiveSharpen (1.5) + LL + AR
Medium Processing
activate anti-bloating filter
Reduces the line fattening that occurs when sharpening shaders are applied to an image. Uses more processing power than anti-ringing, but has the benefit of blurring oversharpened pixels to produce a more natural result that better blends into the background elements.
Applies to LumaSharpen, sharpen edges and AdaptiveSharpen. Both crispen edges and thin edges are «skinny» by design and are omitted.
Low Processing
activate anti-ringing filter
Applies an anti-ringing filter to reduce ringing artifacts caused by aggressive edge enhancement. Uses a small amount of GPU resources and reduces the overall sharpening effect. All sharpening shaders can create ringing artifacts, so anti-ringing should be checked.
Applies to LumaSharpen, crispen edges, sharpen edges and AdaptiveSharpen.
Low Processing
enhance detail
Doom9 Forum: Focuses on making faint image detail in flat areas more visible. It does not discriminate, so noise and grain may be sharpened as well. It does not enhance the edges of objects but can work well with line sharpening algorithms to provide complete image sharpening.
LumaSharpen
SweetFX WordPress: LumaSharpen works its magic by blurring the original pixel with the surrounding pixels and then subtracting the blur. The end result is similar to what would be seen after an image has been enhanced using the Unsharp Mask filter in GIMP or Photoshop. While a little sharpening might make the image appear better, more sharpening can make the image appear worse than the original by oversharpening it. Experiment and apply in moderation.
Medium Processing
crispen edges
Doom9 Forum: Focuses on making high-frequency edges crisper by adding light edge enhancement. This should lead to an image that appears more high-definition.
thin edges
Doom9 Forum: Attempts to make edges, lines and even full image features thinner/smaller. This can be useful after large upscales, as these features tend to become fattened after upscaling. May be most useful with animated content and/or used in conjunction with sharpen edges at low values.
sharpen edges
Doom9 Forum: A line/edge sharpener similar to LumaSharpen and AdaptiveSharpen. Unlike these sharpeners, sharpen edges introduces less bloat and fat edges.
AdaptiveSharpen
Doom9 Forum: Adaptively sharpen the image by sharpening more intensely near image edges and less intensely far from edges. The outer weights of the laplace matrix are variable to mitigate ringing on relative sharp edges and to provide more sharpening on wider and blurrier edges. The final stage is a soft limiter that confines overshoots based on local values.
General Usage of image enhancements:
Each shader works a little differently. It may be desirable to match an edge sharpener with a detail enhancer such as enhance detail. The two algorithms will sharpen the image from different perspectives, filling in the flat areas of an image as well as its angles. A good combination might be:
sharpen edges (AB & AR) + enhance detail
sharpen edges provides subtle line sharpening for an improved 3D look, while enhance detail brings out texture detail in the remaining image.
Recommended Use (image enhancements):
A mastering monitor does not apply any post-process edge enhancement after the source master has been completed for distribution. So adding any enhancements is actually moving away from the creator’s intent rather than towards it. However, some consumer displays are noticeably softer than others. There are also those who like the additional texture and depth provided by shapending shaders and prefer to have them enabled with all sources. If you find the image is too soft despite the use of sharp chroma upscaling, the use of sharpening shaders is certainly preferable to increasing the sharpness control at the display. If added, image enhancements tend to look most natural in appearance when applied judiciously.
Zoom Control

The zoom control settings are mostly relevant to projector owners using any forms of Constant Image Height (CIH), Constant Image Width (CIW) or Constant Image Area (CIA) projection.
What zoom control does is remove black bars from the borders of videos, such as those included with 2.35:1 to 2.40:1 CinemaScope movies, and zooms the cropped image to fill the borders of the media player window. The media player window size is defined in screen config. Depending on the aspect ratio of the masked screen, this zoom may lead to some cropping to keep all video within the defined screen area.
What Is Zoom Control?
For example, someone wishing to keep all visible video within the rectangle of a 2.35:1 CinemaScope screen, might set screen config to crop the top and bottom of the window to 1920 x 817, 3840 x 1634 or 4096 x 1679 to match the exact 2.35:1 pixel dimensions of the native projected on-screen image.
With this screen masking enabled in screen config, the image is rescaled to a smaller size with big black bars on all sides:

zoom control takes this masked image, crops the black bars from all sides and zooms the remaining video to fit the top, bottom, left and right edges of the defined 2.35:1 player window:

A fixed 2.35:1 rectangle such as the one above, or even a 2.40:1 rectangle, is sized appropriately to accommodate any CinemaScope videos presented in either 2.35:1, 2.39:1 or 2.40:1 aspect ratios.
If a 2.40:1 movie is shown on a 2.35:1 scope screen, small bars of about 8 pixels each are left on the top and bottom of the video that madVR zooms away with some miniscule cropping to the left and right edges:

If a 2.35:1 movie is shown on a 2.40:1 scope screen, tiny pillarbox bars are added on the left and right sides that are also zoomed away by madVR with some miniscule cropping to the top and bottom of the image:

This is all well and good until you encounter a video with multiple aspects ratios, such as the 1.78:1 or 1.85:1 IMAX scenes that pop-up in The Dark Knight or Mission Impossible Trilogies, which would normally overshoot a CinemaScope screen set to match its full screen width:

zoom control can deal with this overshoot by dynamically cropping the top and bottom of these scenes back into the 2.35:1 or 2.40:1 rectangle:

Or the 16:9 sections could could be scaled down by image downscaling to maintain the original 16:9 aspect ratio with black bars placed on the sides:

The second approach offers an additional advantage of being able to present all 16:9 and 21:9 CinemaScope content with the same zoom setting on the projector without losing the source aspect ratio or cropping any desired video. This is commonly referred to as the «shrink» method of Constant Image Height projection, providing CIH without having to mess with a projector zoom lens or switches between lens memories.
zoom control can be used for any video with constantly changing aspect ratios, such as The Grand Budapest Hotel, which switches between numerous aspect ratios during its runtime. zoom control keeps the image in the center of the screen at all times with the correct aspect ratio without any overshoot or undershoot of the available screen area in a seamless fashion to the viewer despite the varying aspect ratio of the source.
To use zoom control, first define the target rectangle in screen config under devices. Those with zoom-based CIH, CIW or CIA setups will need two screen configurations: one screen without any screen masking for 16:9 content and another with screen masking on the top and bottom to crop CinemaScope content to a zoomed 2.35:1, 2.37:1, 2.39:1 or 2.40:1 size. If you need an additional screen configuration, then add it to the ones above.
madVR will only zoom the image to fit the media player window on the instruction of the media player. A media player set to 100% / no zoom will not resize a cropped image even when madVR is set to zoom. But a setting of touch window from inside / zoom should follow the settings in zoom control. Only MPC-HC provides on-demand zoom status. All other media players should be set to notify media player about cropped black bars to have madVR communicate with the media player and adjust the settings in zoom control to match the zoom level of the player window.
More Detail on Media Player Zoom Notification
Basic zoom control Configuration for Various Projection Types:
Constant Image Height (CIH) Zoomed, Constant Image Width (CIW) and Constant Image Area (CIA):
21:9 & 16:9 Profile:
- automatically detect hard coded black bars;
- if there are big black bars (…reduce bar size by 5% to …zoom the bars away completely).
Two profiles should be created in screen config to switch between 16:9 (default) or 21:9 (2.05:1, 2.35:1, 2.37:1, 2.39:1 or 2.40:1+) window sizes based on the aspect ratio of the content. The same zoom control settings can be used in both cases.
Movable Anamorphic Lens:
21:9 & 16:9 Profile:
- automatically detect hard coded black bars;
- if there are big black bars (…reduce bar size by 5% to …zoom the bars away completely).
No screen masking is needed if madVR’s vertical stretch is enabled because the top and bottom masking would limit the necessary vertical stretch. The same zoom control settings can be used in both cases.
Fixed Constant Image Height (CIH):
21:9 Profile:
- automatically detect hard coded black bars;
- if there are big black bars (…reduce bar size by 5% to …zoom the bars away completely).
16:9 Profile:
- automatically detect hard coded black bars.
The screen size defined in screen config should be configured for a fixed 21:9 (2.05:1, 2.35:1, 2.37:1, 2.39:1 or 2.40:1) window size where all aspect ratios will be rendered with cropping and resizing as needed to fit the fixed player window. The second 16:9 zoom control profile is necessary to disable the zoom function for 16:9 videos so they are resized with image downscaling to maintain the original 16:9 aspect ratio without any edge cropping.
Fixed Anamorphic Lens:
21:9 Profile:
- automatically detect hard coded black bars;
- if there are big black bars (…reduce bar size by 5% to …zoom the bars away completely).
16:9 Profile:
- automatically detect hard coded black bars.
No screen masking is needed if madVR’s vertical stretch is enabled because the top and bottom masking would limit the necessary vertical stretch.
The output resolution from madVR will match the native resolution of the projector: 1920 x 1080p, 3840 x 2160p or 4096 x 2160p. DCI 4K projector resolutions of 4096 x 2160p require additional image upscaling to match the wider native resolution of the projector.
The basic configurations above do not include consideration for mixed aspect ratio videos. These videos require additional settings based on whether there is a single aspect ratio change or a series of aspect ratio changes in succession. Frequent aspect ratio changes involve some discretion in the choice of options below to determine whether to crop, rescale or ignore some aspect ratio changes over others.
Note: Detection of black bars is not currently possible when D3D11 Automatic (Native) hardware decoding is used. DXVA2 (copy-back) should be selected instead until full support is added.
madVR Explained:
disable scaling if image size changes by only
Prevents an often unnecessary upscaling step if the resolution requires scaling by the number of pixels set or less. Image upscaling is disabled and black pixels are instead added to the right and/or bottom of the image.
move subtitles
This is important when zooming to remove black bars. Otherwise, it is possible to display subtitles outside the visible screen area.
automatically detect hard coded black bars
Enabling this setting unlocks a number of other settings designed to identify, hide and crop any black bars.
Black bar detection detects black bars added to fit video content to a display aspect ratio different than the source aspect ratio, or the small black bars left from imprecise analog captures. An example of imprecise analog captures includes 16:9 video with black bars on the top and bottom encoded as 4:3 video, or the few blank pixels on the left and right of a VHS capture. madVR can detect black bars on all sides.
if black bars change pick one zoom factor
Sets a single zoom factor to avoid changing the zoom or crop factor too often for black bars that appear intermittently during playback. When set to which doesn’t lose any image content, madVR will not zoom or crop a 16:9 portion of a 4:3 film. Conversely, when set to which doesn’t show any black bars, madVR will zoom or crop all of the 4:3 footage the amount needed to remove the black bars from 16:9 sections.
if black bars quickly change back and forth
This can be used in place of the option above. A limit is placed on how often madVR can change the zoom or crop during playback to remove black bars as they are detected. Without either of these options, madVR will always crop or zoom to remove all black bars.
notify media player about cropped black bars
Defines how often the media player is notified of changes to the black bars. Some media players use this information to resize the window.
always shift the image
Moves the entire image to the top or bottom of the screen. This can sometimes be necessary due to the placement of the projector or screen. When removing any black bars, this also determines whether the top or bottom of the video is cropped.
keep bars visible if they contain subtitles
Disables zooming or cropping of black bars when subtitles are detected as part of the black bar. Black bars can remain visible permanently or for a set period of time.
cleanup image borders by cropping
Crops additional non-black pixels beyond the black bars or on all edges. This can be used to correct any overshoot of the image. When set to crop all edges, pixels are cropped even when no black bars are detected.
if there are big black bars
Defines a specific cropping for large black bars. Examples of big black bars include those found in almost all CinemaScope movies produced in 2.35:1, 2.39:1 or 2.40:1 aspect ratios, or 4:3 television or movies with big black bars on the sides. The large black bars that surround the image after screen masking is applied and the image is rescaled to a lower resolution are also considered big black bars. So removing all big black bars entails filling the full width and height of the media player window with no blank space remaining and some edge cropping if the aspect ratio of the video doesn’t fit the precise pixel dimensions of the defined window size. Options for removing large black bars include reducing them by 5% — 75% or removing them completely.
zoom small black bars away
Eliminates small black bars by zooming slightly such as those on the top and bottom of 1.85:1 movies or those occasionally placed on the left and right of the image. Zooming the video slightly usually results in cropping a small amount of video information from one edge to maintain the original aspect ratio before resizing back to the original display resolution. For example, the bottom of the image is cropped after removing small black bars on the left and right and the video is scaled back to its original resolution. If the display is set to display a 16:9 image, some video content will be lost with this setting. This setting is also required to crop smaller black bars added by screen masking that cause the image to be rescaled to a smaller size. This includes any black bars not zoomed away by any of the options under if there are big black bars.
crop black bars
Crops black bars to change the display aspect ratio and resolution. The cropping of black bars is a separate function from the image zoom. Cropping black bars increases performance by the reducing the number of pixels that need to be processed. Profile rules referencing resolution will use the post-crop resolution.
Recommended Use (zoom control):
The recommendations for basic zoom control configuration as provided above will work with most common forms of Constant Image Height (CIH), Constant Image Width (CIW) or Constant Image Area (CIA) projector set ups.
Mixed ratio content with a single aspect ratio change can be managed by selecting if black bars change pick one zoom factor with either which doesn’t show any black bars or which doesn’t lose any image content selected. Mixed aspect ratio content with many aspect ratio changes necessitates a second zoom control profile with any of the options under if black bars quickly change back and forth selected to give madVR upfront notice of the frequent aspect ratio changes in the source.
Fixed Constant Image Height (CIH) set ups without separate lens memories require two zoom control profiles to switch between zooming 21:9 content and shrinking 16:9 content to a lower resolution to maintain its 16:9 aspect ratio without cropping:
if (fileName = «*customname*») or (ar > 1.9) «21:9»
else «16:9»
If you use madVR’s anamorphic stretch or output at 4096 x 2160p to a DCI 4K projector, additional pixels must be added to the source resolution to create the anamorphic stretch and/or match the wider native resolution of the projector. The additional upscaling steps will put additional stress on the GPU, particularly for 4K UHD sources rendered at UHD resolutions. Rendering times for 4K UHD content can be kept reasonable by creating a profile group under scaling algorithms for 3840 x 2160 videos that uses a low-resource setting for image upscaling such as Lanczos3 + AR or Jinc + AR to reduce strain on the GPU by avoiding image doubling for the small required upscale.
The primary limitation of zoom control with current builds is the requirement to combine it with DXVA2 (copy-back) video decoding in LAV Video. Compared to D3D11 Native, DXVA2 (copy-back) costs additional performance when combined with madVR’s HDR tone mapping (specifically, highlight recovery strength). The zoom feature also fails from time-to-time with some troublesome videos, but it is mostly reliable for one or two aspect ratio movies.
![]()
Posts: 3,823
Joined: Feb 2014
Reputation:
220
![]()
2016-02-08, 06:35
(This post was last modified: 2019-10-23, 15:19 by Warner306.)
3. SCALING ALGORITHMS
- Chroma Upscaling
- Image Downscaling
- Image Upscaling
- Upscaling Refinement

The real fun begins with madVR’s image scaling algorithms. This is perhaps the most demanding and confusing aspect of madVR due to the sheer number of combinations available. It can be easy to simply turn all settings to its maximum. However, most graphics cards, even powerful ones, will be forced to compromise somewhere. To understand where to start, here is an introduction to scaling algorithms from the JRiver MADVR Expert Guide.
“Scaling Algorithms
Image scaling is one of the main reasons to use madVR. It offers very high quality scaling options that rival or best anything I have seen.
Most video is stored using chroma subsampling in a 4:2:0 video format. In simple terms, what this means is that the video is basically stored as a black-and-white “detail” image (luma) with a lower resolution “color” image (chroma) layered on top. This works because the detail image helps to mask the low resolution of the color image that is being layered on top.
So the scaling options in madVR are broken down into three different categories: Chroma upscaling, which is the color layer. Image upscaling, which is the detail layer. Image downscaling, which only applies when the image is being displayed at a lower resolution than the source — 1080p content on a 720p display, or in a window on a 1080p display, for example.
Chroma upscaling is performed on all videos — it takes the half-resolution chroma image, and upscales it to the native luma resolution of the video. If there is any further scaling to be performed; whether that is upscaling or downscaling, then the image upscaling/downscaling algorithm is applied to both chroma and luma.”
Not all displays can receive upscaled chroma 4:4:4 or RGB inputs and will always convert the input signal to YCbCr 4:2:2 or 4:2:0. To complete its internal video processing, many displays must downconvert to 4:2:2. This is even the case with current 4K UHD displays that advertise 4:4:4 support, but this is often only in PC mode that comes with its own shortcomings for video playback. Chroma subsampling means some of the chroma pixels are missing and shared with neighboring luma pixels. When converted directly to RGB, this has the effect of lowering chroma resolution by blurring some of the chroma planes.
What Is Chroma Subsampling?
Spears & Munsil HD Benchmark Chroma Upsampling and YCbCr to RGB Conversion Evaluation
HTPC Chroma Subsampling:
(Source) YCbCr 4:2:0 -> (madVR) YCbCr 4:2:0 to YCbCr 4:4:4 to RGB -> (GPU) RGB or RGB to YCbCr -> (Display) RGB or YCbCr to YCbCr 4:4:4/4:2:2/4:2:0 or RGB -> (Display Output) RGB
Chroma and Image Scaling Options in madVR
The following section lists the chroma upscaling, image downscaling and image upscaling algorithms available in madVR. The algorithms are ranked by the amount of GPU processing required to use each setting. Keep in mind, Jinc and higher scaling requires large GPU usage (especially if scaling content to 4K UHD). Users with low-powered GPUs should stick with settings labeled Medium or lower.
The goal of image scaling is to replicate what a low resolution image would look like if it was a high resolution image. It is not about adding artificial detail or enhancement, but attempting to recreate what the source should look like at a higher or lower resolution.
Most algorithms offer a tradeoff between three factors:
- sharpness: crisp, coarse detail.
- aliasing: jagged, square edges on lines/curves.
- ringing: haloing around objects.
The visible benefits of upscaling are influenced by the size of the display pixel grid (screen size) and the distance of those pixels to the viewer. For example, a low-resolution video played on a cell phone screen will look much sharper than when played on a tablet screen, even if the two screens are placed directly in front of your eyes. The influence of viewing distance and screen size on perceived image detail is estimated through charts such as this:
Visible Resolution: Viewing Distance vs. Screen Size
Visible differences between scaling algorithms will be most apparent with larger upscales that add a large number of new pixels.
The list of scaling algorithms below does not have be considered an absolute quality scale from worst to best. You may have your own preference as to what looks best (e.g., sharp vs. soft) and this should be considered along with the power of your graphics card.
Sample of Scaling Algorithms:
Bilinear
Bicubic
Lanczos4
Jinc
[Default Values]
Chroma Upscaling [Bicubic 60]
Doubles the resolution of the chroma layer in both directions: vertical and horizontal to match the native luma layer. Chroma upsampling is a requirement for all videos before converting to RGB:
Y’ (luma — 4) CbCr (chroma — 2:0) -> Y’CbCr 4:2:2 -> Y’CbCr 4:4:4 -> RGB
Note: If downscaling by a large amount, you may want to check scale chroma separately… in trade quality for performance to avoid chroma upscaling before downscaling.
activate SuperRes filter, strength: Applies a sharpening filter to the chroma layer after upscaling. Use of chroma sharpening is up to preference, although oversharpening chroma information is generally not recommended as ringing artifacts may be introduced. A Medium Processing feature.
Minimum Processing
- Nearest Neighbor
- Bilinear
Low Processing
- Cubic
sharpness: 50 — 150 (anti-ringing filter)
Medium Processing
- Lanczos
3 — 4 taps (anti-ringing filter) - Spline
3 — 4 taps (anti-ringing filter) - Bilateral
old — sharp
High Processing
- Jinc
3 taps (anti-ringing filter) - super-xbr
sharpness: 25 — 150
High — Maximum Processing
- NGU
low — very high - Reconstruction
soft — placebo AR
Comparison of Chroma Upscaling Algorithms
Image Downscaling [Bicubic 150]
Downscales the luma and chroma as RGB when the source is larger than the the output resolution:
RGB -> downscale -> RGB downscaled.
scale in linear light (recommended when image downscaling)
Low Processing
- DXVA2 (overrides madVR processing and chroma upscaling)
- Nearest Neighbor
- Bilinear
Medium Processing
- Cubic
sharpness: 50 — 150 (scale in linear light) (anti-ringing filter)
High Processing
- SSIM 1D
strength: 25% — 100% (scale in linear light) (anti-ringing filter) - Lanczos
3 — 4 taps (scale in linear light) (anti-ringing filter) - Spline
3 — 4 taps (scale in linear light) (anti-ringing filter)
Maximum Processing
- Jinc
3 taps (scale in linear light) (anti-ringing filter) - SSIM 2D
strength: 25% — 100% (scale in linear light) (anti-ringing filter)
Image Upscaling [Lanczos 3]
Upscales the luma and chroma as RGB when the source is smaller than the output resolution:
RGB -> upscale -> RGB upscaled.
scale in sigmoidal light (not recommended when image upscaling)
Minimum Processing
- DXVA2 (overrides madVR processing and chroma upscaling)
- Bilinear
Low Processing
- Cubic
sharpness: 50 — 150 (anti-ringing filter)
Medium Processing
- Lanczos
3 — 4 taps (anti-ringing filter) - Spline
3 — 4 taps (anti-ringing filter)
High Processing
- Jinc
3 taps (anti-ringing filter)
Image Doubling [Off]
Doubles the resolution (2x) of the luma and chroma independently or as RGB when the source is smaller than the output resolution. This may require additional upscaling or downscaling to correct any undershoot or overshoot of the output resolution:
Y / CbCr / RGB -> Image doubling -> upscale or downscale -> RGB upscaled.
High Processing
- super-xbr
sharpness: 25 — 150
(always to 4x scaling factor)
High — Maximum Processing
- NGU Anti-Alias
low — very high
(always to 4x scaling factor) - NGU Soft
low — very high
(always to 4x scaling factor) - NGU Standard
low — very high
(always to 4x scaling factor) - NGU Sharp
low — very high
(always to 4x scaling factor)

Ranking the Image Downscaling Algorithms (Best to Worst):
- SSIM 2D
- SSIM 1D
- Bicubic150
- Lanczos
- Spline
- Jinc
- DXVA2
- Bilinear
- Nearest Neighbor
What Is Image Doubling?
Image doubling is simply another form of image upscaling that results in a doubling of resolution — in either X or Y direction — such as 540p to 1080p, or 1080p to 2160p. Once doubled, the image may be subject to further upscaling or downscaling to match the output resolution. Image doubling produces exact 2x resizes and can run multiple times (x4 to x8). Image doubling algorithms are very good at detecting and preserving the edges of objects to eliminate the staircase effect (aliasing) caused by simpler resizers. Some of the better image doubling algorithms like NGU can also be very sharp without introducing any visible ringing. Image doubling algorithms continue to improve through refinement provided by the emerging technologies of deep learning or convolutional neural networks.
Chroma upscaling is considered a form of image doubling. You are, however, less likely to notice the benefits of image doubling when upscaling the soft chroma layer. The chroma layer was originally subsampled because the color channel contributes a proportionally smaller amount to overall image detail than the luma layer. So increasing chroma resolution plays a far less prominent role in improving perceived image sharpness compared to the benefits of improving the sharp, black and white luma.
Available Image Doubling Algorithms:
super-xbr
- Resolution doubler;
- Relies on RGB inputs — luma and chroma are doubled together;
- High sharpness, low aliasing, medium ringing.
NGU Family:
- Neural network resolution doubler;
- Next Generation Upscaler proprietary to madVR;
- Uses YCbCr color space — capable of doubling luma and chroma independently.
- Medium — high sharpness, low aliasing, no ringing.
What Is Image Scaling by Neural Networks?
madshi on how NGU’s neural networks work:
Quote:This is actually very near to how madVR’s «NGU Sharp» algorithm was designed: It tries to undo/revert a 4K -> 2K downscale in the best possible way. There’s zero artificial sharpening going on. The algo is just looking at the 2K downscale and then tries to take a best guess at how the original 4K image might have looked like, by throwing lots and lots of GLOPS on the task. The core part of the whole algo is a neural network (AI) which was carefully trained to «guess» the original 4K image, given only the 2K image. The training of such a neural network works by feeding it with both the downscaled 2K and the original 4K image, and then the training automatically analyzes what the neural network does and how much its output differs from the original 4K image, and then applies small corrections to the neural network to get nearer to the ideal results. This training is done hundreds of thousands of times, over and over again.
Sadly, if a video wasn’t actually downscaled from 4K -> 2K, but is actually a native 2K source, the algorithm doesn’t produce as good results as otherwise, but it’s usually still noticeably better than conventional upscaling algorithms.
Source
Recommended Use (image upscaling — doubling):
NGU Anti-Alias
- NNEDI3 replacement — most natural lines, but blurrier than NGU Sharp and less detailed;
- Best choice for low to mid-quality sources with some aliasing or for those who don’t like NGU Sharp.
NGU Soft
- Softest and most blurry variant of NGU;
- Best choice for poor sources with a lot of artifacts or for those who hate sharp upscaling.
NGU Standard
- Similar sharpness to NGU Sharp, but a bit blurrier and less detailed;
- Best choice for large upscales applied to lower-quality sources to reduce the plastic look caused by NGU Sharp.
NGU Sharp
- Sharpest upscaler and most detailed, but can create a plastic look with lower-quality sources and very large upscales;
- Best choice for high-quality sources with clean lines.
Note on comparisons below: The «Original 1080p» images in the image comparisons below can make for a difficult reference because Photoshop tends to alter image detail significantly when downscaling. The color is also a little different. These images are still available as a reference as to how sharp the upscaled image should appear.
Video Game Poster:
Original 1080p
Photoshop Downscaled 480p
Lanczos3 — no AR
Jinc + AR
super-xbr100 + AR
NGU Anti-Alias very high
NGU Standard very high
NGU Sharp very high
American Dad:
Original
Jinc + AR
super-xbr100 + AR
NNEDI3 256 neurons + SuperRes (4)
NGU Sharp very high
Wall of Books:
Original 480p
Lanczos3 — no AR
Jinc + AR
super-xbr-100 + AR
NGU Anti-Alias very high
NGU Standard very high
NGU Sharp very high
Comic Book:
Original 1080p
Photoshop Downscaled 540p
Lanczos3 — no AR
Jinc + AR
super-xbr-100 + AR
NGU Anti-Alias very high
NGU Standard very high
NGU Sharp very high
Corporate Photo:
Original 1080p
Photoshop Downscaled 540p
Lanczos3 — no AR
Jinc + AR
super-xbr100 + AR
NGU Anti-Alias very high
NGU Standard very high
NGU Sharp very high
Bilinear (Nvidia Shield upscaling algorithm)
Image Doubling Settings

algorithm quality <— luma doubling:
luma doubling/quality always refers to image doubling of the luma layer (Y) of a Y’CbCr source. This will provide the majority of the improvement in image quality as the black and white luma is the detail layer of the image. Priority should be made to maximize this value first before adjusting other settings.
super-xbr: sharpness: 25 — 150
NGU Anti-Alias: low — very high
NGU Soft: low — very high
NGU Standard: low — very high
NGU Sharp: low — very high
algorithm quality <— luma quadrupling:
luma quadrupling is doubling applied twice or scaling directly 4x to the target resolution.
let madVR decide: direct quadruple — same as luma doubling; double again (super-xbr & NGU Anti-Alias)
double again —> low — very high
direct quadruple —> low — very high
algorithm quality <— chroma
chroma quality determines how the chroma layer (CbCr) will be doubled to match the luma layer (Y). This is different from chroma upsampling that is performed on all videos.
The chroma layer is inherently soft and lacks fine detail making chroma doubling overkill or unnecessary in most cases. Bicubic60 + AR provides the best bang for the buck here. It saves resources for luma doubling while still providing acceptable chroma quality. Adjust chroma quality last.
let madVR decide: Bicubic60 + AR unless using NGU very high. In that case, NGU medium is used.
normal: Bicubic60 + AR
high: NGU low
very high: NGU medium
activate doubling/quadrupling… <— doubling
Determines the scaling factor when image doubling is activated.
let madVR decide: 1.2x
…only if any upscaling is needed: Image doubling is activated if any upscaling is needed.
…always — supersampling: Image doubling is always applied. This includes sources already matching the native resolution of the display.
activate doubling/quadrupling… <— quadrupling
Determines the scaling factor when image quadrupling is activated.
let madVR decide: 2.4x
…only if any upscaling is needed: Image quadrupling is activated for any scaling factor greater than 2.0x.
if any (more) scaling needs to be done <— upscaling algo
Image upscaling is applied after doubling if the scaling factor is greater than 2x but less than 4x, or greater than 4x but less than 8x.
For example, further upscaling is required if scaling 480p -> 1080p, or 480p -> 2160p. The luma and/or chroma is upscaled after doubling to fill in any remaining pixels (960p -> 1080p, or 1920p -> 2160p). Upscaling after image doubling is not overly important.
let madVR decide: Bicubic60 + AR unless using NGU very high. In that case, Jinc + AR is used.
if any (more) scaling needs to be done <— downscaling algo
Image downscaling will reduce the value of the luma and/or chroma if the scaling result is larger than the target resolution. Image downscaling is necessary for scaling factors less than 2x or when quadrupling resolutions less than 4x.
For example, image downscaling is required when upscaling 720p -> 1080p, or 720p -> 2160p. Much like upscaling after doubling and chroma quality, downscaling after image doubling is only somewhat important.
let madVR decide: Bicubic150 + LL + AR unless using NGU very high. In that case, SSIM 1D 100% + LL + AR is used.
use «image downscaling» settings: The setting from image downscaling is used.
Example of Image Doubling Using the madVR OSD
Upscaling Refinement

upscaling refinement is also available to further improve the quality of upscaling.
upscaling refinement applies sharpening to the image post-resize. Post-resize luma sharpening is a means to combat the softness introduced by upscaling. In most cases, even sharp image upscaling is incapable of replicating the image as it should appear at a higher resolution.
To illustrate the impact of image upscaling, view the image below:
Original Castle Image (before 50% downscale)
The image is downscaled 50%. Then, upscaling is applied to bring the image back to the original resolution using super-xbr100. Despite the sharp upscaling of super-xbr, the image appears noticeably softer:
Downscaled Castle Image resized using super-xbr100
Now, image sharpening is layered on top of super-xbr. Note the progressive nature of each sharpener in increasing perceived detail. This can be good or bad depending on the sharpener. In this case, SuperRes occupies the middle ground in detail but is most faithful to the original after resize without adding additional detail not found in the original image.
super-xbr100 + FineSharp (4.0)
super-xbr100 + SuperRes (4)
super-xbr100 + AdaptiveSharpen (0.8)
Compare the above images to the original. The benefit of image sharpening should become apparent as the image moves closer to its intended target. In practice, using slightly less aggressive values of each sharpener is best to limit artifacts such as excess ringing and aliasing. But clearly some added sharpening can be beneficial to the upscaling process.
upscaling refinement shaders share four common settings:
refine the image after every ~2x upscaling step
Sharpening is applied after every 2x resize. This is mostly helpful for large upscales of 4x or larger where the image can become very soft. Uses extra processing for a small improvement in image sharpness.
refine the image only once after upscaling is complete
Sharpening is applied once after the resize is complete.
Medium Processing
activate anti-bloating filter
Reduces the line fattening that occurs when sharpening shaders are applied to an image. Uses more processing power than anti-ringing, but has the benefit of blurring oversharpened pixels to produce a more natural result that better blends into the background elements.
Applies to LumaSharpen, sharpen edges and AdaptiveSharpen. Both crispen edges and thin edges are «skinny» by design and are omitted.
Low Processing
activate anti-ringing filter
Applies an anti-ringing filter to reduce ringing artifacts caused by aggressive edge enhancement. Uses a small amount of GPU resources and reduces the overall sharpening effect. All sharpening shaders can create ringing artifacts, so anti-ringing should be checked.
Applies to LumaSharpen, crispen edges, sharpen edges and AdaptiveSharpen. SuperRes includes its own built-in anti-ringing filter.
Low Processing
soften edges / add grain
Doom9 Forum: These options are meant to work with NGU Sharp. When trying to upscale a low-res image, it’s possible to get the edges very sharp and very near to the «ground truth» (the original high-res image the low-res image was created from). However, texture detail which is lost during downscaling cannot properly be restored. This can lead to «cartoon» type images when upscaling by large factors with full sharpness, because the edges will be very sharp, but there’s no texture detail. In order to soften this problem, I’ve added options to «soften edges» and «add grain.» Here’s a little comparison to show the effect of these options:
NGU Sharp | NGU Sharp + soften edges + add grain | Jinc + AR
enhance detail
Doom9 Forum: Focuses on making faint image detail in flat areas more visible. It does not discriminate, so noise and grain may be sharpened as well. It does not enhance the edges of objects but can work well with line sharpening algorithms to provide complete image sharpening.
Medium Processing
LumaSharpen
SweetFX WordPress: LumaSharpen works its magic by blurring the original pixel with the surrounding pixels and then subtracting the blur. The end result is similar to what would be seen after an image has been enhanced using the Unsharp Mask filter in GIMP or Photoshop. While a little sharpening might make the image appear better, more sharpening can make the image appear worse than the original by oversharpening it. Experiment and apply in moderation.
crispen edges
Doom9 Forum: Focuses on making high-frequency edges crisper by adding light edge enhancement. This should lead to an image that appears more high-definition.
Medium — High Processing
thin edges
Doom9 Forum: Attempts to make edges, lines and even full image features thinner/smaller. This can be useful after large upscales, as these features tend to become fattened after upscaling. May be most useful with animated content and/or used in conjunction with sharpen edges at low values.
sharpen edges
Doom9 Forum: A line/edge sharpener similar to LumaSharpen and AdaptiveSharpen. Unlike these sharpeners, sharpen edges introduces less bloat and fat edges.
AdaptiveSharpen
Doom9 Forum: Adaptively sharpen the image by sharpening more intensely near image edges and less intensely far from edges. The outer weights of the laplace matrix are variable to mitigate ringing on relative sharp edges and to provide more sharpening on wider and blurrier edges. The final stage is a soft limiter that confines overshoots based on local values.
SuperRes
Doom9 Forum: The general idea behind the super resolution method is explained in the white paper Alexey Lukin et al. The idea is to treat upscaling as inverse downscaling. So the aim is to find a high resolution image, which, after downscaling is equal to the low resolution image.
This concept is a bit complex, but can be summarized as follows:
Estimated upscaled image is calculated -> Image is downscaled -> Differences from the original image are calculated
Forces (corrections) are calculated based on the calculated differences -> Combined forces are applied to upscale the image
This process is repeated 2-4 times until the image is upscaled with corrections provided by SuperRes.
All of the above shaders focus on the luma channel.
Recommended Use (upscaling refinement):
upscaling refinement is useful for any upscale, especially for those who prefer a very sharp image. NGU Sharp is an exception, as it does not usually require any added enhancement and can actually benefit from soften edges and add grain with larger upscales to soften upscaled edges to better match the rest of the image. Those using any of the NGU image scalers (Anti-Alias, Soft, Standard or Sharp) may find edge enhancement is unnecessary.
There is no right or wrong combination with these shaders. What looks best mostly comes down to your tastes. As a general rule, the amount of sharpening suitable for a given source increases with the amount of upscaling applied, as sources will become softer with larger amounts of upscaling.
![]()
Posts: 3,823
Joined: Feb 2014
Reputation:
220
![]()
2016-02-08, 07:05
(This post was last modified: 2019-11-30, 12:59 by Warner306.)
4. RENDERING
- General Settings
- Windowed Mode Settings
- Exclusive Mode Settings
- Stereo 3D
- Smooth Motion
- Dithering
- Trade Quality for Performance
General Settings

General settings ensure hardware and operating system compatibility for smooth playback. Minor performance improvements may be experienced, but they aren’t likely to be noticeable. The goal is to achieve correct open and close behavior of the media player with smooth and stable playback without any dropped frames or presentation glitches.
Expert Guide:
delay playback start until render queue is full
Pauses the video playback until a number of frames have been rendered in advance of playback. This potentially avoids some stuttering right at the start of video playback, or after seeking through a video — but it will add a slight delay to both. It is disabled by default, but I prefer to have it enabled. If you are having problems where a video fails to start playing, this is the first option I would disable when troubleshooting.
enable windowed overlay (Windows 7 and newer)
Windows 7/8/10
Changes the way that windowed mode is rendered, and will generally give you better performance. The downside to windowed overlay is that you cannot take screenshots of it with the Print Screen key on your keyboard. Other than that, it’s mostly a “free” performance increase.
It does not work with AMD graphics cards or fullscreen exclusive mode. D3D9 Only.
enable automatic fullscreen exclusive mode
Windows 7/8/10*
Allows madVR to use fullscreen exclusive mode for video rendering. This allows for several frames to be sent to the video card in advance, which can help eliminate random stuttering during playback. It will also prevent things like notifications from other applications being displayed on the screen at the same time, and similar to the Windowed Overlay mode, it stops Print Screen from working. The main downside to fullscreen exclusive mode is that when switching in/out of FSE mode, the screen will flash black for a second (similar to changing refresh rates). A mouse-based interface is rendered in such a way that it would not be visible in FSE mode, so madVR gets kicked out of FSE mode any time you use it, and you get that black flash on the screen. I personally find this distracting, and as such, have disabled FSE mode. The «10ft interface» is unaffected and renders correctly inside FSE mode.
Required for 10-bit output with Windows 7 or 8. fullscreen exclusive mode is not recommended with Windows 10 due to the way Windows 10 handles this mode. In reality, fullscreen exclusive mode is no longer exclusive in Windows 10 and in fact fake, not to mention unreliable with many drivers and media players. Consider it unsupported. It is only useful in Windows 10 if you are unable to get smooth playback with the default windowed mode.
disable desktop composition (Vista and newer)
Windows Vista/7
This option will disable Aero during video playback. Back in the early days of madVR this may have been necessary on some systems, but I don’t recommend enabling this option now. Typically, the main thing that happens is that it breaks VSync and you get screen tearing (horizontal lines over the video). Not available for Windows 8 and Windows 10.
use Direct3D 11 for presentation (Windows 7 and newer)
Windows 7/8/10
Uses a Direct3D 11 presentation path in place of Direct3D 9. This may allow for faster entering and exiting of fullscreen exclusive mode. Overrides windowed overlay.
Required for 10-bit output (all video drivers) and HDR passthrough (AMD).
present a frame for every VSync
Windows 7/8/10
Disabling this setting may improve performance but can cause presentation glitches. However, enabling it will cause presentation glitches on other systems. When disabled, madVR presents new frames when needed, relying on Direct3D 11 to repeat frames as necessary to maintain VSync. Unless you are experiencing dropped frames, it is best to leave it enabled.
use a separate device for presentation (Vista and newer)
Windows Vista/7/8/10
By default, this option is now disabled. It could provide a small performance improvement or performance hit depending on the system. You will have to experiment with this one.
use a separate device for DXVA processing (Vista and newer)
Windows Vista/7/8/10
Also disabled by default. Similar to the option above, this may improve or impair performance slightly.
CPU/GPU queue size
This sets the size of the decoder/subtitle queues (CPU) (video & subtitle) and upload/render queues (GPU) (madVR). Unless you are experiencing problems, I would leave it at the default settings of 16/8. The higher these queue sizes are, the more memory madVR requires. With larger queues, you could potentially have smoother playback on some systems, but increased queue sizes also mean increased delays when seeking if the delay playback… options are enabled.
The default queue sizes should be more than enough for most systems. Some weaker PCs may benefit from lowering the CPU queue and possibility the GPU queue.
Windowed Mode Settings

present several frames in advance
Provides a buffer to protect against dropped frames and presentation glitches by sending a predetermined number of frames in advance of playback to the GPU driver. This presentation buffer comes at the expense of some delay during seeking. Dropped frames will occur when the present queue shown in the madVR OSD reaches zero.
It is best to leave this setting enabled. Smaller present queues are recommended (typically, 4-8 frames) for the most responsive playback. If the number of frames presented in advance is increased, the size of the CPU and GPU queues may also need to be larger to fill the present queue.
If the present queue is stuck at zero, your GPU has likely run out of resources and madVR processing settings will have to be reduced until it fills.
Leave the flush settings alone unless you know what you are doing.
Exclusive Mode Settings

show seek bar
This should be unchecked if using fullscreen exclusive mode and a desktop media player such as MPC. Otherwise, a seek bar will appear at the bottom of every video that cannot be removed during playback.
delay switch to exclusive mode by 3 seconds
Switching to FSE can sometimes be slow. Checking this options gives madVR time to fill its buffers and complete the switch to FSE, limiting the chance of dropped frames or presentation glitches.
present several frames in advance
Like the identical setting in windowed mode, present several frames in advance is protection against dropped frames and presentation glitches and is best left enabled. Smaller present queues are recommended (typically, 4-8 frames) for the most responsive playback. If the number of frames presented in advance is increased, the size of the CPU and GPU queues may also need to be larger to fill the present queue.
If the present queue is stuck at zero, your GPU has likely run out of resources and madVR processing settings will have to be reduced until it fills.
Again, flush settings should be left alone unless you know what you are doing.
Stereo 3D

enable stereo 3d playback
Enables stereoscopic 3D playback for supported media, which is currently limited to frame packed MPEG4-MVC 3D Blu-ray.
What Is Stereo 3D?
Nvidia’s official support for MVC 3D playback ended with driver 425.31 (April 11, 2019). Newer drivers will not install the 3D Vision driver or offer the ability to enable Stereoscopic 3D in the GPU control panel. Options for 3D playback with Nvidia include converting MVC 3D to any format that places frame packed frames on the same 2D frame: devices -> properties -> 3D format, or using the last stable driver with frame packed 3D support (recommended: 385.28 or 418.91).
Manual Workaround to Install 3D Vision with Recent Nvidia Drivers
when playing 2d content
Nvidia GPUs are known to crash on occasion when 3D mode is active in the operating system and 2D content is played. This most often occurs when use Direct3D 11 for presentation (Windows 7 and newer) is used by madVR. Disable OS stereo 3d support for all displays should be checked if using this combination.
when playing 3d content
Not all GPUs need to have 3D enabled in the operating system. If 3D mode is enabled in the operating system, some GPUs will change the display calibration to optimize playback for frame-packed 3D. This can interfere with the performance of madVR’s 3D playback. Possible side effects include altered gamma curves (designed for frame-packed 3D) and screen flickering caused by the use of an active shutter. Disable OS stereo 3d support for all displays is a failsafe to prevent GPU 3D settings from altering the image in unwanted ways.
restore OS stereo 3D settings when media player is closed
Returns the GPU back to the same state as before playback. So this is an override for any of the GPU control panel adjustments made by the two settings above. Overrides made by madVR will be enabled again when the media player is started.
Recommended Use (stereo 3D):
It is recommended to leave all secondary 3D settings at the default values and only change them if 3D playback is causing problems or 2D videos are not playing correctly.
madVR’s approach to 3D is not failsafe and can be at the mercy of GPU drivers. If 3D mode is not engaged at playback start, try checking enable automatic fullscreen exclusive mode. If this does not work, a batch file may be needed to toggle 3D mode in the GPU control panel.
The use of batch files with madVR is beyond the scope of this guide, but a batch file that can enable stereoscopic 3D in the Nvidia control panel can be found here. Batch files can be called from madVR by associating them with folders created under profile groups.
Smooth Motion

Expert Guide: smooth motion is a frame blending system for madVR. What smooth motion is not, is a frame interpolation system — it will not introduce the “soap opera effect” like you see on 120 Hz+ TVs, or reduce 24p judder.
smooth motion is designed to display content where the source frame rate does not match up to any of the refresh rates that your display supports. For example, that would be 25/50fps content on a 60 Hz-only display, or 24p content on a 60 Hz-only display.
It does not replace ReClock or JRiver VideoClock, and if your display supports 1080p24, 1080p50, and 1080p60 then you should not need to use smooth motion at all.
Because smooth motion works by using frame blending you may see slight ghost images at the edge of moving objects — but this seems to be rare and dependent on the display you are using, and is definitely preferable to the usual judder from mismatched frame rates/refresh rates.
What Is Motion Interpolation?
Medium Processing
enable smooth motion frame rate conversion
Eliminates motion judder caused by mismatched frame rates by converting any source frame rate to the output refresh rate by using frame blending.
only if there would be motion judder without it…
Enables smooth motion when 3/2 pulldown is needed or any other irregular frame pattern is detected.
…or if the display refresh rate is an exact multiple of the movie frame rate
Enables smooth motion when the output refresh rate of the GPU is an exact duplicate of the content refresh rate.
always
Enables smooth motion for all playback.
Recommended Use (smooth motion):
If your display lacks the ability to match refresh rates, like most native 60 Hz panels, smooth motion may be a prefered alternative to 3/2 pulldown. Use of smooth motion largely comes down your taste for this form of frame smoothing. Those with projectors with equipment that takes ages to change refresh rates could be tempted to lock the desktop to 60 Hz and use smooth motion to eliminate any motion judder. smooth motion can introduce some blur artifacts, so its judder-free performance upgrade is not free and comes with its own trade-offs.
Dithering

madVR Explained:
Dithering is performed as the last step in madVR to convert its internal 16-bit data to the bit depth set for the display. Any time madVR does anything to the video (e.g., upsample or convert to another color space), high bit-depth information is created. Dithering allows much of this information to be preserved when displayed at lower bit depths. For example, the conversion of Y’CbCr to RGB generates >10-bits of RGB data.
What Is Dithering?
Dithering to 2-bits:
2 bit Ordered Dithering
2 bit No Dithering
Low Processing
Random Dithering
Very fast dithering. High-noise, no dither pattern.
Ordered Dithering
Very fast dithering. Low-noise, high dither pattern. This offers high-quality dithering basically for free.
use colored noise
Uses an inverted dither pattern for green («opposite color»), which reduces luma noise but adds chroma noise.
change dither for every frame
Uses a new dither seed for every frame. Or, for Ordered Dithering, add random offsets and rotate the dither texture 90° between every frame. Hides dither patterns but adds some subjective noise.
Medium Processing
Error Diffusion — option 1
DirectCompute is used to perform very high-quality error diffusion dithering. Mid-noise, no dither pattern. Requires a DX 11-compatible graphics card.
Error Diffusion — option 2
DirectCompute is used to perform very high-quality error diffusion dithering. Low-noise, mid dither pattern. Requires a DX 11-compatible graphics card.
Recommended Use (dithering):
There really is no good reason to disable dithering. Even when the input and output bit depths match, slight color banding will be introduced into the image just through digital quantization (or rounding) errors. When the source bit depth is higher than the output bit depth set in madVR, severe banding can be introduced if dithering is not used.
Error Diffusion offers a gradual improvement over Ordered Dithering with marginally higher resource use and is by no means necessary. Two variants of Error Diffusion are offered in madVR because no clear preference exists amongst users for one over the other. Either choice will provide similar quality with slightly different trade-offs.
Trade Quality for Performance

The last set of settings reduce GPU usage at the expense of image quality. Most, if not all, options will provide very small degradations to image quality.
Recommended Use (trade quality for performance):
I would start by disabling all options in this section to retain the highest-quality output and only check them if you truly need the extra performance. Those trying to squeeze the last bit of power from their GPU will want to start at the top and work their way to the bottom. It usually takes more than one checkbox to put rendering times under the frame interval or cause the present queue to fill.
![]()
Posts: 3,823
Joined: Feb 2014
Reputation:
220
![]()
2016-02-08, 07:12
(This post was last modified: 2019-11-02, 20:16 by Warner306.)
5. MEASURING PERFORMANCE & TROUBLESHOOTING
How Do I Measure the Performance of My Chosen Settings?
Once all of the settings have been configured to your liking, it is important those settings match the capabilities of your hardware. The madVR OSD (Ctrl + J) can be accessed anytime during playback to view real-time feedback on the CPU and GPU rendering performance. Combining several settings labelled Medium or higher will create a large load on the GPU.
Rendering performance is determined based on the frequency frames are drawn. Rendering times are reported as a combination of the average rendering and present time of each frame in relation to the frame interval.
In the OSD example below, a new frame must be rendered every 41.71ms to present each frame at a 23.976 fps interval. However, at a reported average rendering time of 49.29ms plus a present time of 0.61ms (49.29 + 0.61 = 49.90ms), the GPU is not rendering frames fast enough to keep up with this frame rate. When rendering times are above the frame interval, madVR will display dropped frames.
Settings in madVR must be lowered until reported rendering times are comfortably under the frame interval where dropped frames stop occurring. For a 23.976 fps source, this often means rendering times are between 35-37 ms to provide some headroom for any rendering spikes experienced during playback.
Factors Influencing Rendering Times:
- Source Frame rate;
- Number of Pixels in the Source (Source Resolution);
- Number of Pixels Output from madVR (Display Resolution);
- Source Bit Depth.
The source frame rate is the biggest stress on rendering performance. madVR must render each frame to keep pace with the source frame frequency. A video with a native frame rate of 29.97 fps requires madVR works 25% faster than a video with a frame rate of 23.976 fps because the frame interval becomes shorter and each frame must be presented at a faster rate. Live TV broadcast at 1920 x 1080/60i can be particularly demanding because the source frame rate is doubled after deinterlacing.
Common Source Frame Intervals:
- 23.976 fps -> 41.71ms
- 25 fps -> 40.00ms
- 29.97 fps -> 33.37ms
- 50 fps -> 20.00ms
- 59.94 fps -> 16.68ms
Display Rendering Stats:
Ctrl + J during fullscreen playback
Rendering must be comfortably under the frame interval:

Rather than attempt to optimize one set of settings for all sources, it is almost always preferable to create separate profiles for different content types: SD, 720p, 1080p, 2160p, etc. Each content type can often work best with specific settings optimizations. The creation of profile rules tailored for different types of content is covered in the last section.
Understanding madVR’s List of Queues

The madVR OSD includes a list of queues that describe various memory buffers used for rendering. These five queues each represent a measure of performance for a specific component of your system: decoding, access memory, rendering and presentation. Filling all queues in order is a prerequisite for rendering a video.
Summary of the Queues:
decoder queue: CPU memory buffer
subtitle queue: CPU memory buffer
upload queue: GPU memory buffer
render queue: GPU memory buffer
present queue: GPU memory buffer
Increasing specific queue sizes under rendering -> general settings and windowed mode or exclusive mode will increase the amount of CPU RAM or GPU VRAM devoted to a queue.
When a queue fails to fill, there is no immediate indication of the source, but the problem can often be inferred. The queues should fill in order. When all queues are empty, the cause can usually be traced to the first queue that fails to fill.
How to Monitor CPU Performance:
Windows Task Manager is useful to assess CPU load and system RAM usage during video playback.
How to Monitor GPU Performance:
GPU-Z (with the Sensors tab) is useful to assess GPU load and VRAM usage during video playback.
Summary of Causes of Empty Queues:
decoder queue: Insufficient system RAM; slow RAM speed for iGPUs/APUs; failed software decoding; bottleneck in shared hardware decoding; lack of PCIe bandwidth; network latency.
Network requirements for UHD Blu-ray: Gigabit Ethernet adapters, switches and routers; Cat5e plus cabling.
Test network transfer speeds: LAN Speed Test (Write access to the media folders is required to complete the test)
List of maximum and average Ethernet transfer speeds (Note: Blu-ray bitrates are expressed in Mbps)
subtitle queue: Insufficient system RAM with subtitles enabled; slow RAM speed for APUs; weak CPU.
upload queue: Insufficient VRAM; failed hardware decoding.
render queue: Insufficient VRAM; lack of GPU rendering resources.
present queue: Insufficient VRAM; lack of GPU rendering resources; video driver problems.
Note: Systems with limited system RAM and/or VRAM should stick with the smallest CPU and GPU queues possible that allow for smooth playback.
Translation of the madVR Debug OSD

display 23.97859Hz (NV HDR, 8-bit, RGB, full)
The reported refresh rate of the video clock. The second entry (NV HDR, 8-bit, RGB, full) indicates the active GPU output mode (Nvidia only). NV HDR or AMD HDR indicate that HDR10 metadata is being passed through using the private APIs of Nvidia or AMD.
composition rate 23.977Hz
The measured refresh rate of the virtual Windows Aero desktop composition. This should be very close to the video clock, but it is not uncommon for the composition rate to be different, sometimes wildly different. The discrepancy between the display refresh rate and composition rate is only an issue if the OSD is reporting dropped frames or presentation glitches, or if playback is jerky. The composition rate should not appear in fullscreen exclusive mode.
clock deviation 0.00580%
The amount the audio clock deviates from the system clock.
smooth motion off (settings)
Whether madVR’s smooth motion is enabled or disabled.
D3D11 fullscreen windowed (8-bit)
Indicates whether a D3D9 or D3D11 presentation path is used, the active windowed mode (windowed, fullscreen windowed or exclusive) and the output bit depth from madVR.
P010, 10-bit, 4:2:0 (DXVA11)
The decoded format provided by the video decoder. The last entry (DXVA11) is available if native hardware decoding is used (either DXVA11 or DXVA2). madVR is unable to detect copy-back decoding.
movie 23.976 fps (says source filter)
The frame rate of the video as reported by the source filter. Videos subject to deinterlacing will report the frame rate before deinterlacing.
1 frame repeat every 14.12 minutes
Uses the difference between the reported video clock and audio clock deviation to estimate how often a frame correction will have to be made to restore VSync. This value is only an estimate and the actual dropped frames or repeated frames counters may contradict this number.
movie 3840×2160, 16:9
The pixel dimensions (resolution) and aspect ratio of the video.
scale 0,0,3840,2160 -> 0,0,1920,1080
Describes the position of the video before and after resizing: left,top,right,bottom. The example starts at 0 on the left and top of the screen and draws 1920 pixels horizontally and 1080 pixels vertically. Videos encoded without black bars and image cropping can lead to some shifting of the image after resize.
touch window from inside
Indicates the active media player zoom mode. This is relevant when using madVR’s zoom control because the two settings can interact.
chroma > Bicubic60 AR
The algorithm used to upscale the chroma resolution to 4:4:4, with AR indicating the use of an anti-ringing filter.
image < SSim2D75 LL AR
The image upscaling or downscaling algorithm used to resize the image, with AR indicating the use of an anti-ringing filter and LL indicating scaling in linear light.
vsync 41.71ms, frame 41.71ms
The vertical sync interval and frame interval of the video. In order to present each frame on time, rendering times must be comfortably under the frame interval.
matrix BT.2020 (says upstream)
The matrix coefficients used in deriving the original luma and chroma (YUV) from the RGB primaries and the coefficients used to convert back to RGB.
primaries BT.2020 (says upstream)
The chromaticity coordinates of the source primaries of the viewing/mastering display.
HDR 1102 nits, BT.2020 -> DCI-P3
Displayed when an HDR video is played. The first entry (1040 nits) indicates the source brightness as reported by a valid MaxCLL or the mastering display maximum luminance. If a .measurements file is available, the source peak is substituted for the peak value measured by madVR. The second entry (BT.2020 -> DCI-P3) indicates that DCI-P3 primaries were used within a BT.2020 container.
frame/avg/scene/movie 0/390/1/1222 nits, tone map 0 nits
Displayed when an HDR video is played using tone map HDR using pixel shaders. This reporting changes to a detailed description when a .measurements file is available: peak of the measured frame / AvgFMLL of the movie / peak of the scene / peak of the movie. Tone mapping targets the measured scene peak brightness.
limited range (says upstream)
The video levels used by the source (either limited or full).
deinterlacing off (dxva11)
Whether deinterlacing was used to deinterlace the video. The second entry indicates the source of the deinterlacing: (dxva11) D3D11 Native; (dxva2) DXVA2 Native; (says upstream) copy-back; (settings) madVR IVTC film mode.
How to Get Help
- Take a Print Screen of the madVR OSD (Ctrl + J) during playback when the issue is present;
- Post this screenshot along with a description of your issue at the Official Doom9 Support Forum;
- If that isn’t convenient, post your issue in this thread.
Important Information:
- Detailed description of the issue;
- List of settings checked under general settings;
- GPU model (e.g., GTX 1060 6GB);
- Video driver version: Nvidia/AMD/Intel (e.g., 417.22);
- Operating system or Windows 10 Version Number (e.g., Windows 10 1809);
- Details of the video source (e.g., resolution; frame rate; video codec; file extension/format; interlacing).
How to Capture a Crash Report for madVR
Crashes likely caused by madVR should be logged via a madVR crash report. Crash reports are produced by pressing CTRL+ALT+SHIFT+BREAK when madVR becomes unresponsive. This report will appear on the desktop. Copy and paste this log to Pastebin and provide a link.
Troubleshooting Dropped Frames/Presentation Glitches
Weak CPU
Problem: The decoder and subtitle queues fail to fill.
Solution: Ease the load on the CPU by enabling hardware acceleration in LAV Video. If your GPU does not support the format played (e.g., HEVC or VP9), consider upgrading to a card with support for these formats. GPU hardware decoding is particularly critical for smooth playback of high-bitrate HEVC.
Empty Present Queue
Problem: Reported rendering stats are under the movie frame interval, but the present queue remains at zero and will not fill.
Solution: It is not abnormal to have the present queue contradict the rendering stats — in most cases, the GPU is simply overstrained and unable to render fast enough. Ease the load on the GPU by reducing processing settings until the present queue fills. If the performance deficit is very low, this situation can be cured by checking a few of the trade quality for performance checkboxes.
Lack of Headroom for GUI Overlays
Problem: Whenever a GUI element is overlaid, madVR enters low latency mode. This will temporarily reduce the present queue to 1-2/8 to maintain responsiveness of the media player. If the present queue reaches zero or fails to refill when the GUI element is removed, your madVR settings are too aggressive. This can also lead to a flickering OSD.
Solution: Ease the load on the GPU by reducing processing settings. If the performance deficit is very low, this situation can be cured by checking a few of the trade quality for performance checkboxes. Enabling GUI overlays during playback is the ultimate stress test for madVR settings — the present queue should recover effortlessly.
Inaccurate Rendering Stats
Problem: The average and max rendering stats indicate rendering is below the movie frame interval, but madVR still produces glitches and dropped frames.
Solution: A video with a frame interval of 41.71 ms should have average rendering stats of 35-37 ms to give madVR adequate headroom to render the image smoothly. Anything higher risks dropped frames or presentation glitches during performance peaks.
Scheduled Frame Drops/Repeats
Problem: This generally refers to clock jitter. Clock jitter is caused by a lack of synchronization between three clocks: the system clock, video clock and audio clock. The system clock always runs at 1.0x. The audio and video clocks tick away independent of each other. Having three independent clocks invites of the possibility of losing synchronization. These clocks are subject to variability caused by differences in A/V hardware, drivers and software. Any difference from the system clock is captured by the display and clock deviation in madVR’s rendering stats. If the audio and video clocks are synchronized by luck or randomness, then frames are presented «perfectly.» However, any reported difference between the two would lead to a slow drift between audio and video during playback. Because the video clock yields to the audio clock — a frame is dropped or repeated every few minutes to maintain synchronization.
Solution: Correcting clock jitter requires an audio renderer designed for this purpose. It also requires all audio is output as multichannel PCM. ReClock and VideoClock (JRiver) are two examples audio renderers that use decoded PCM audio to correct audio/video clock synchronization through real-time resampling. For those wishing to bitstream, creating a custom resolution in madVR can reduce the frequency of dropped or repeated frames to an acceptable amount, to as few as one interruption per hour or several hours. Frame drops or repeats caused by clock jitter are considered a normal occurrence with almost all HTPCs.
Interrupted Playback
Problem: Windows or other software interrupts playback with a notification or background process causing frame drops.
Solution: The most stable playback mode in madVR is enable automatic fullscreen exclusive mode (found in general settings). Exclusive mode will ensure madVR has complete focus during all aspects of playback and the most stable VSync. Some systems do not work well with fullscreen exclusive mode and will drop frames.
![]()
Posts: 3,823
Joined: Feb 2014
Reputation:
220
![]()
2016-02-08, 07:22
(This post was last modified: 2019-10-20, 15:53 by Warner306.)
6. SAMPLE SETTINGS PROFILES & PROFILE RULES
Note: Feel free to customize the settings within the limits of your graphics card. If color is your issue, consider buying a colorimeter and calibrating your display with a 3D LUT.
The settings posted represent my personal preferences. You may disagree, so don’t assume these are the «best madVR settings» available. Some may want to use more shaders to create a sharper image, and others may use more artifact removal. Everyone has their own preference as to what looks good. When it comes to processing the image, the suggested settings are meant to err on the conservative side.
Summary of the rendering process:
Source
Note: The settings recommendations are separated by output resolution: 1080p or 4K UHD. The 1080p settings are presented first and 4K UHD afterwards.
So, with all of the settings laid out, let’s move on to some settings profiles…
It is important to know your graphics card when using madVR, as the program relies heavily on this hardware. Due to the large performance variability in graphics cards and the breadth of possible madVR configurations, it can be difficult to recommend settings for specific GPUs. However, I’ll attempt to provide a starting pointing for settings by using some examples with my personal hardware. The example below demonstrates the difference in madVR performance between an integrated graphics card and a dedicated gaming GPU.
I own a laptop with an Intel HD 3000 graphics processor and Sandy Bridge i7. madVR runs with settings similar to its defaults:
Integrated GPU 1080p:
- Chroma: Bicubic60 + AR
- Downscaling: Bicubic150 + LL + AR
- Image upscaling: Lanczos3 + AR
- Image doubling: Off
- Upscaling refinement: Off
- Artifact removal — Debanding: Off
- Artifact removal — Deringing: Off
- Artifact removal — Deblocking: Off
- Artifact removal — Denoising: Off
- Image enhancements: Off
- Dithering: Ordered Dithering
I am upscaling primarily high-quality, 24 fps content to 1080p24. These settings are very similar to those provided by Intel DXVA rendering in Kodi with the quality benefits provided by madVR and offer a small subjective improvement.
I also owned a HTPC that combined a Nvidia GTX 750 Ti and Core 2 Duo CPU.
Adding a dedicated GPU allows the flexibility to use more of everything: more demanding scaling algorithms, artifact removal, sharpening and high-quality dithering.
Settings assume all trade quality for performance checkboxes are unchecked save the one related to subtitles.
Given the flexibility of a gaming GPU, four different scenarios are outlined based on common sources:
Display: 1920 x 1080p
Scaling factor: Increase in vertical resolution or pixels per inch.
Resizes:
- 1080p -> 1080p
- 720p -> 1080p
- SD -> 1080p
- 4K UHD -> 1080p
Profile: «1080p»
1080p -> 1080p
1920 x 1080 -> 1920 x 1080
Increase in pixels: 0
Scaling factor: 0
Native 1080p sources require basic processing. The settings to be concerned with are Chroma upscaling that is necessary for all videos, and Dithering. The only upscaling taking place is the resizing of the subsampled chroma layer.
Chroma Upscaling: Doubles the 2:0 of a 4:2:0 source to match the native resolution of the luma layer (upscale to 4:4:4 and convert to RGB). Chroma upscaling is where the majority of your resources should go with native sources. My preference is for NGU Anti-Alias over NGU Sharp because it seems better-suited for upscaling the soft chroma layer. The sharp, black and white luma and soft chroma can often benefit from different treatment. It can be difficult to directly compare chroma upscaling algorithms without a good chroma upsampling test pattern. Reconstruction, NGU Sharp, NGU Standard and super-xbr100 are also good choices.
Comparison of Chroma Upscaling Algorithms
Read the following post before choosing a chroma upscaling algorithm
Image Downscaling: N/A.
Image Upscaling: Set this to Jinc + AR in case some pixels are missing. This setting should be ignored, however, as there is no upscaling involved at 1080p.
Image Doubling: N/A.
Upscaling Refinement: N/A.
Artifact Removal: Artifact removal includes Debanding, Deringing, Deblocking and Denoising. I typically choose to leave Debanding enabled at a low value because it is hard to find 8-bit sources that don’t display some form of color banding, even when the source is an original Blu-ray rip. Banding is a common artifact and madVR’s debanding algorithm is fairly effective. To avoid removing image detail, a setting of low/medium or medium/medium is advisable. You might choose to disable this if you desire the sharpest image possible.
Deringing, Deblocking and Denoising are not typically general use settings. These types of artifacts are less common, or the artifact removal algorithm can be guilty of smoothing an otherwise clean source. If you want to use these algorithms with your worst cases, try using madVR’s keyboard shortcuts. This will allow you to quickly turn the algorithm on and off with your keyboard when needed and all profiles will simply reset when the video is finished.
Used in small amounts, artifact removal can improve image quality without having a significant impact on image detail. Some choose to offset any loss of image sharpness by adding a small amount of sharpening shaders. Deblocking is useful for cleaning up compressed video. Even sources that have undergone light compression can benefit from it without harming image detail when low values are used. Deringing is very effective for any sources with noticeable edge enhancement. And Denoising will harm image detail, but can often be the only way to remove bothersome video noise or film grain. Some may believe Deblocking, Deringing or Denoising are general use settings, while others may not.
Image Enhancements: It should be unnecessary to apply sharpening shaders to the image as the source is already assumed to be of high-quality. If your display is calibrated, the image you get should approximate the same image seen on the original mastering monitor. Adding some image enhancements may still be attractive for those who feel chroma upscaling alone is not doing enough to create a sharp picture and want more depth and texture detail.
Dithering: The last step before presentation. The difference between Ordered Dithering and Error Diffusion is quite small, especially if the bit depth is 8-bits or greater. But if you have the resources, you might as well use them, and Error Diffusion will produce a small quality improvement. The slight performance difference between Ordered Dithering and Error Diffusion is a way to save a few resources when you need them. You aren’t supposed to see dithering, anyways.
1080p:
- Chroma: NGU Anti-Alias (high)
- Downscaling: SSIM 1D 100% + LL + AR
- Image upscaling: Jinc + AR
- Image doubling: Off
- Upscaling refinement: Off
- Artifact removal — Debanding: low/medium
- Artifact removal — Deringing: Off
- Artifact removal — Deblocking: Off
- Artifact removal — Denoising: Off
- Image enhancements: Off
- Dithering: Error Diffusion 2
Some enhancement can be applied to native sources with supersampling.
Supersampling involves doubling a source to twice its original size and then returning it to its original resolution. The chain would look like this: Image doubling -> Upscaling refinement (optional) -> Image downscaling. Doubling a source and reducing it to a smaller image can lead to a sharper image than what you started with without actually applying any sharpening to the image.
Chroma Upscaling: NGU Anti-Alias is selected. You may choose to use a higher quality level chroma upscaling setting than provided if your GPU is more powerful.
Image Downscaling: SSIM 1D + LL + AR + AB 100% is selected. It is best to use a sharp downscaler when supersampling to retain as much detail as possible from the larger doubled image. Either SSIM 1D or SSIM 2D are recommended as downscalers. These algorithms are both very sharp and produce minimal ringing artifacts.
SSIM 2D uses considerably more resources than SSIM 1D, but provides the benefit of mostly eliminating any ringing artifacts caused by image downscaling by using the softer Jinc downscaling as a guide. So SSIM 2D essentially downscales the image twice: through Jinc-based interpolation followed by resizing the image to a lower resolution with SSIM 2D.
Image Upscaling: N/A.
Image Doubling: Supersampling involves image doubling followed directly by image downscaling. NGU Sharp is selected to make the image as sharp as possible before downscaling. Supersampling must be manually chosen: image upscaling -> doubling <— activate doubling: …always — supersampling.
Upscaling Refinement: NGU Sharp is quite sharp. But you may want to add some extra sharpening to the doubled image; crispen edges is a good choice.
Artifact Removal: Debanding is set to low/medium.
Image Enhancements: soften edges is used at a low strength to make the edges of the image look more natural and less flat after image downscaling is applied.
Dithering: Error Diffusion 2 is selected.
1080p -> 2160p Supersampling (for newer GPUs):
- Chroma: NGU Anti-Alias (low)
- Downscaling: SSIM 1D 100% + LL + AR + AB 100%
- Image upscaling: Off
- Image doubling: NGU Sharp
- <— Luma doubling: high
- <— Luma quadrupling: let madVR decide (direct quadruple — NGU Sharp (low))
- <— Chroma: let madVR decide (Bicubic60 + AR)
- <— Doubling: …always — supersampling
- <— Quadrupling: let madVR decide (scaling factor 2.4x (or bigger))
- <— Upscaling algo: let madVR decide (Bicubic60 + AR)
- <— Downscaling algo: use «image downscaling» settings
- Upscaling refinement: soften edges (1)
- Artifact removal — Debanding: low/medium
- Artifact removal — Deringing: Off
- Artifact removal — Deblocking: Off
- Artifact removal — Denoising: Off
- Image enhancements: Off
- Dithering: Error Diffusion 2
If you want to avoid any kind of sharpening or enhancement of native sources, avoid supersampling and use the first profile. If you want the sharpening effect to be more noticeable, applying image enhancements to the native source will produce a greater sharpening effect than supersampling can provide.
Profile: «720p»
720p -> 1080p
1280 x 720 -> 1920 x 1080
Increase in pixels: 2.25x
Scaling factor: 1.5x
Image upscaling is introduced at 720p to 1080p.
Upscaling the sharp luma channel is most important in resolving image detail, so settings for Image upscaling followed with Upscaling refinement are most critical for upscaled sources.
Chroma Upscaling: NGU Anti-Alias is selected.
Image Downscaling: N/A.
Image Upscaling: Jinc + AR is the chosen image upscaler. We are upscaling by RGB directly from 720p -> 1080p.
Image Doubling: N/A.
Upscaling Refinement: SuperRes (1) is layered on top of Jinc to provide additional sharpness. This is important as upscaling alone will create a noticeably soft image. Note that sharpening is added from Upscaling refinement, so it is applied to the post-resized image.
Artifact Removal: Debanding is set to low/medium.
Image Enhancements: N/A.
Dithering: Error Diffusion 2 is selected.
720p Regular upscaling:
- Chroma: NGU Anti-Alias (medium)
- Downscaling: SSIM 1D 100% + LL + AR
- Image upscaling: Jinc + AR
- Image doubling: Off
- Upscaling refinement: SuperRes (1)
- Artifact removal — Debanding: low/medium
- Artifact removal — Deringing: Off
- Artifact removal — Deblocking: Off
- Artifact removal — Denoising: Off
- Image enhancements: Off
- Dithering: Error Diffusion 2
Image doubling is another and often superior approach to upscaling a 720p source.
This will double the image (720p -> 1440p) and use Image downscaling to correct the slight overscale (1440p -> 1080p).
Chroma Upscaling: NGU Anti-Alias is selected. Lowering the value of chroma upscaling is an option when attempting to increase the quality of image doubling. Always try to maximize Luma doubling first, if possible. This is especially true if your display converts all 4:4:4 inputs to 4:2:2. Chroma upscaling could be wasted by the display’s processing. The larger quality improvements will come from improving the luma layer, not the chroma, and it will always retain the full resolution when it reaches the display.
Image Downscaling: N/A.
Image Upscaling: N/A.
Image Doubling: NGU Sharp is used to double the image. NGU Sharp is a staple choice for upscaling in madVR, as it produces the highest perceived resolution without oversharpening the image or usually requiring any enhancement from sharpening shaders.
Image doubling performs a 2x resize combined with image downscaling.
To calibrate image doubling, select image upscaling -> doubling -> NGU Sharp and use the drop-down menus. Set Luma doubling to its maximum value (very high) and everything else to let madVR decide.
If the maximum luma quality value is too aggressive, reduce Luma doubling until rendering times are under the movie frame interval (35-37ms for a 24 fps source). Leave the other settings to madVR. Luma quality always comes first and is most important.
Think of let madVR decide as madshi’s expert recommendations for each upscaling scenario. This will help you avoid wasting resources on settings which do very little to improve image quality. So, let madVR decide. When you become more advanced, you may consider manually adjusting these settings, but only expect small improvements. In this case, I’ve added SSIM 1D for downscaling.
Luma & Chroma are upscaled separately:
Luma: RGB
-> Y’CbCr 4:4:4 -> Y -> 720p ->1440p -> 1080p
Chroma: RGB
-> Y’CbCr 4:4:4 -> CbCr -> 720p -> 1080p
Keep in mind, NGU very high is three times slower than NGU high while only producing a small improvement in image quality. Attempting to a use a setting of very high at all costs without considering GPU stress or high rendering times is not always a good idea. NGU very high is the best way to upscale, but only if you can accommodate the considerable performance hit. Higher values of NGU will cause fine detail to be slightly more defined, but the overall appearance produced by each type (Anti-Alias, Soft, Standard, Sharp) will remain identical through each quality level.
Upscaling Refinement: NGU Sharp shouldn’t require any added sharpening. If you want the image to be sharper, you can check some options here such as crispen edges or sharpen edges.
Artifact Removal: Debanding is set to low/medium.
Image Enhancements: N/A.
Dithering: Error Diffusion 2 is selected.
720p Image doubling:
- Chroma: NGU Anti-Alias (medium)
- Downscaling: SSIM 1D 100% + LL + AR
- Image upscaling: Off
- Image doubling: NGU Sharp
- <— Luma doubling: high
- <— Luma quadrupling: let madVR decide (direct quadruple — NGU Sharp (high))
- <— Chroma: let madVR decide (Bicubic60 + AR)
- <— Doubling: let madVR decide (scaling factor 1.2x (or bigger))
- <— Quadrupling: let madVR decide (scaling factor 2.4x (or bigger))
- <— Upscaling algo: let madVR decide (Bicubic60 + AR)
- <— Downscaling algo: SSIM 1D 100 AR Linear Light
- Upscaling refinement: Off
- Artifact removal — Debanding: low/medium
- Artifact removal — Deringing: Off
- Artifact removal — Deblocking: Off
- Artifact removal — Denoising: Off
- Image enhancements: Off
- Dithering: Error Diffusion 2
Profile: «SD»
SD -> 1080p
640 x 480 -> 1920 x 1080
Increase in pixels: 6.75x
Scaling factor: 2.25x
By the time SD content is reached, the scaling factor starts to become quite large (2.25x). Here, the image becomes soft due to the errors introduced by upscaling. Countering this soft appearance is possible by introducing more sophisticated image upscaling provided by madVR’s image doubling. Image doubling does just that — it takes the full resolution luma and chroma information and scales it by factors of two to reach the desired resolution (2x for a double and 4x for a quadruple). If larger than needed, the result is interpolated down to the target.
Doubling a 720p source to 1080p involves overscaling by 0.5x and downscaling back to the target resolution. Improvements in image quality may go unnoticed in this case. However, image doubling applied to larger resizes of 540p to 1080p or 1080p to 2160p will, in most cases, result in the highest-quality image.
Chroma Upscaling: NGU Anti-Alias is selected.
Image Downscaling: N/A.
Image Upscaling: N/A.
Image Doubling: NGU Sharp is the selected image doubler.
Luma & Chroma are upscaled separately:
Luma: RGB
-> Y’CbCr 4:4:4 -> Y -> 480p ->960p -> 1080p
Chroma: RGB
-> Y’CbCr 4:4:4 -> CbCr -> 480p -> 1080p
Upscaling Refinement: NGU Sharp shouldn’t require any added sharpening. If you want the image to be sharper, you can check some options here such as crispen edges or sharpen edges. If you find the image looks unnatural with NGU Sharp, try adding some grain with add grain or using another scaler such as NGU Anti-Alias or super-xbr100.
Artifact Removal: Debanding is set to low/medium.
Image Enhancements: N/A.
Dithering: Error Diffusion 2 is selected.
SD Image doubling:
- Chroma: NGU Anti-Alias (medium)
- Downscaling: SSIM 1D 100% + LL + AR
- Image upscaling: Off
- Image doubling: NGU Sharp
- <— Luma doubling: high
- <— Luma quadrupling: let madVR decide (direct quadruple — NGU Sharp (high))
- <— Chroma: let madVR decide (Bicubic60 + AR)
- <— Doubling: let madVR decide (scaling factor 1.2x (or bigger))
- <— Quadrupling: let madVR decide (scaling factor 2.4x (or bigger))
- <— Upscaling algo: Jinc AR
- <— Downscaling algo: let madVR decide (Bicubic150 + LL + AR)
- Upscaling refinement: Off
- Artifact removal — Debanding: low/medium
- Artifact removal — Deringing: Off
- Artifact removal — Deblocking: Off
- Artifact removal — Denoising: Off
- Image enhancements: Off
- Dithering: Error Diffusion 2
Profile: «4K UHD to 1080p»
2160p -> 1080p
3840 x 2160 -> 1920 x 1080
Decrease in pixels: 4x
Scaling factor: -2x
The last 1080p profile is for the growing number of people who want to watch 4K UHD content on a 1080p display. madVR offers a high-quality HDR to SDR conversion that can make watching HDR content palatable and attractive on an SDR display. This will apply to many that have put off upgrading to a 4K UHD display for various reasons. HDR to SDR is intended to replace the HDR picture mode of an HDR display. The conversion from HDR BT.2020/DCI-P3 to SDR BT.709 is excellent and perfectly matches the 1080p Blu-ray in many cases if they were mastered from the same source.
The example graphics card is a GTX 1050 Ti outputting to an SDR display calibrated to 150 nits.
madVR is set to the following:
primaries / gamut: BT.709
transfer function / gamma: pure power curve 2.40
Note: The transfer function / gamma setting only applies in madVR when HDR is converted to SDR and may need some adjustment.
Chroma Upscaling: Bicubic60 + AR is selected. Chroma upscaling to 3840 x 2160p before image downscaling is generally a waste of resources. If you check scale chroma separately, if it saves performance under trade quality for performance, chroma upscaling is disabled because the native resolution of the chroma layer is already 1080p. This is exactly what you should do. The performance savings will allow you to use higher values for image downscaling.
Image Downscaling: SSIM 2D + LL + AR + AB 100% is selected. Image downscaling can also be a drag on performance but is obviously necessary when reducing from 4K UHD to 1080p. SSIM 2D is the sharpest image downscaler in madVR and the best choice to preserve detail from the larger 4K UHD source.
SSIM 1D and Bicubic150 are also good, sharp downscalers. DXVA2 is the fastest (and lowest quality) option.
Image Upscaling: N/A.
Image Doubling: N/A.
Upscaling Refinement: N/A.
Artifact Removal: Artifact removal is disabled. The source is assumed to be an original high-quality, 4K UHD rip.
Some posterization can be caused by tone mapping compression. However, this cannot be detected or addressed by madVR’s artifact removal. I recommend disabling debanding for 4K UHD content as 10-bit HEVC should take care of most source banding issues.
Image Enhancements: N/A
Dithering: Error Diffusion 2 is selected. Reducing a 10-bit source to 8-bits necessitates high-quality dithering and the Error Diffusion algorithms are the best dithering algorithms available.
HDR: tone map HDR using pixel shaders
target peak nits:
275 nits. The target nits value can be thought of as a dynamic range slider. You increase it to preserve the high dynamic range and contrast of the source at the expense of making the image darker. And decrease it to create brighter images at the expense of compressing or clipping the source contrast. If this value is set too low, the gamma will become raised and the image will end up washed out. A good static value should provide a middle ground for sources with both a high or low dynamic range.
HDR to SDR Tone Mapping Explained
tone mapping curve: BT.2390.
color tweaks for fire & explosions: disabled. When enabled, bright reds and oranges are shifted towards yellow to compensate for changes in the appearance of fire and explosions caused by tone mapping. This hue correction is meant to improve the appearance of fire and explosions alone, but applies to any scenes with bright red/orange pixels. I find there are more bright reds and oranges in a movie that aren’t related to fire or explosions and prefer to have them appear as red as they were encoded. So I prefer to disable this shift towards yellow.
highlight recovery strength: medium. You run the risk slightly overcooking the image by enabling this setting, but tone mapping can often leave the image appearing overly flat in spots due to compression caused by the roll-off. So any help with texture detail is welcome. Another huge hog on performance. I prefer medium as it seems most natural without giving the image a sharpened appearance. Higher values will make compressed portions of the image appear sharper, but they also invite the possibility of introducing ringing artifacts from aggressive enhancement or simply making the image appear unnatural.
highlight recovery strength should be set to none for 4K 60 fps sources. This shader is simply too expensive for 60 fps content.
measure each frame’s peak luminance: checked.
Note: trade quality for performance checkbox compromise on tone & gamut mapping accuracy should be unchecked. The quality of tone mapping goes down considerably when this is enabled, so avoid using it if possible. It should only be considered a last resort.
4K UHD to 1080p Downscaling:
- Chroma: Bicubic60 + AR
- Downscaling: SSIM 2D 100% + LL + AR + AB 100%
- Image upscaling: Jinc + AR
- Image doubling: Off
- Upscaling refinement: Off
- Artifact removal — Debanding: Off
- Artifact removal — Deringing: Off
- Artifact removal — Deblocking: Off
- Artifact removal — Denoising: Off
- Image enhancements: Off
- Dithering: Error Diffusion 2
Creating madVR Profiles
Now we will translate each profile into a resolution profile with profile rules.
Add this code to each profile group:
if (srcHeight > 1080) «2160p»
else if (srcWidth > 1920) «2160p»
else if (srcHeight > 720) and (srcHeight <= 1080) «1080p»
else if (srcWidth > 1280) and (srcWidth <= 1920) «1080p»
else if (srcHeight > 576) and (srcHeight <= 720) «720p»
else if (srcWidth > 960) and (srcWidth <= 1280) «720p»
else if (srcHeight <= 576) and (srcWidth <= 960) «SD»
deintFps (the source frame rate after deinterlacing) is another factor on top of the source resolution that greatly impacts the load placed on madVR. Doubling the frame rate, for example, doubles the demands placed on madVR. Profile rules such as (deintFps <= 25) and (deintFps > 25) may be combined with srcWidth and srcHeight to create additional profiles.
A more «fleshed-out» set of profiles incorporating the source frame rate might look like this:
- «2160p25»
- «2160p60»
- «1080p25»
- «1080p60»
- «720p25»
- «720p60»
- «SD25»
- «SD60»
Click on scaling algorithms. Create a new folder by selecting create profile group.

Each profile group offers a choice of settings to include.
Select all items, and name the new folder «Scaling.»

Select the Scaling folder. Using add profile, create eight profiles.
Name each profile: 2160p25, 2160p60, 1080p25, 1080p60, 720p25, 720p60, 576p25, 576p60.
Copy and paste the code below into Scaling:
if (deintFps <= 25) and (srcHeight > 1080) «2160p25»
else if (deintFps <= 25) and (srcWidth > 1920) «2160p25»
else if (deintFps > 25) and (srcHeight > 1080) «2160p60»
else if (deintFps > 25) and (srcWidth > 1920) «2160p60»
else if (deintFps <= 25) and ((srcHeight > 720) and (srcHeight <= 1080)) «1080p25»
else if (deintFps <= 25) and ((srcWidth > 1280) and (srcWidth <= 1920)) «1080p25»
else if (deintFps > 25) and ((srcHeight > 720) and (srcHeight <= 1080)) «1080p60»
else if (deintFps > 25) and ((srcWidth > 1280) and (srcWidth <= 1920)) «1080p60»
else if (deintFps <= 25) and ((srcHeight > 576) and (srcHeight <= 720)) «720p25»
else if (deintFps <= 25) and ((srcWidth > 960) and (srcWidth <= 1280)) «720p25»
else if (deintFps > 25) and ((srcHeight > 576) and (srcHeight <= 720)) «720p60»
else if (deintFps > 25) and ((srcWidth > 960) and (srcWidth <= 1280)) «720p60»
else if (deintFps <= 25) and ((srcWidth <= 960) and (srcHeight <= 576)) «576p25»
else if (deintFps > 25) and ((srcWidth <= 960) and (srcHeight <= 576)) «576p60»
A green check mark should appear above the box to indicate the profiles are correctly named and no code conflicts exist.

Additional profile groups must be created for processing and rendering.
Note: The use of eight profiles may be unnecessary for other profile groups. For instance, if I wanted image enhancements (under processing) to only apply to 1080p content, two folders would be required:
if (srcHeight > 720) and (srcHeight <= 1080) «1080p»
else if (srcWidth > 1280) and (srcWidth <= 1920) «1080p»
else «Other»
How to Configure madVR Profile Rules
Disabling Image upscaling for Cropped Videos:
You may encounter some 1080p or 2160p videos cropped just short of their original size (e.g., width = 1916). Those few missing pixels will put an abnormal strain on madVR as it tries to resize to the original display resolution. zoom control in the madVR control panel contains a setting to disable image upscaling if the video falls within a certain range (e.g., 10 lines or less). Disabling scaling adds a few black pixels to the video and prevents the image upscaling algorithm from resizing the image. This may prevent cropped videos from pushing rendering times over the frame interval.
Display: 3840 x 2160p
Let’s repeat this process, this time assuming the display resolution is 3840 x 2160p (4K UHD). Two graphics cards will be used for reference. A Medium-level card such as the GTX 1050 Ti, and a High-level card similar to a GTX 1080 Ti. Again, the source is assumed to be of high quality with a frame rate of 24 fps.
Scaling factor: Increase in vertical resolution or pixels per inch.
Resizes:
- 2160p -> 2160p
- 1080p -> 2160p
- 720p -> 2160p
- SD -> 2160p
Profile: «2160p»
2160p -> 2160p
3840 x 2160 -> 3840 x 2160
Increase in pixels: 0
Scaling factor: 0
This profile is identical in appearance to that for a 1080p display. Without image upscaling, the focus is on settings for Chroma upscaling that is necessary for all videos, and Dithering. The only upscaling taking place is the resizing of the subsampled chroma layer.
Chroma Upscaling: Doubles the 2:0 of a 4:2:0 source to match the native resolution of the luma layer (upscale to 4:4:4 and convert to RGB). Chroma upscaling is where the majority of your resources should go with native sources. My preference is for NGU Anti-Alias over NGU Sharp because it seems better-suited for upscaling the soft chroma layer. The sharp, black and white luma and soft chroma can often benefit from different treatment. It can be difficult to directly compare chroma upscaling algorithms without a good chroma upsampling test pattern. Reconstruction, NGU Sharp, NGU Standard and super-xbr100 are also good choices.
Comparison of Chroma Upscaling Algorithms
Read the following post before choosing a chroma upscaling algorithm
Image Downscaling: N/A.
Image Upscaling: Set this to Jinc + AR in case some pixels are missing. This setting should be ignored, however, as there is no upscaling involved at 2160p.
Image Doubling: N/A.
Upscaling Refinement: N/A.
Artifact Removal: Artifact removal includes Debanding, Deringing, Deblocking and Denoising. I typically choose to leave Debanding enabled at a low value, but this should be less of an issue with 10-bit 4K UHD sources compressed by HEVC. So we will save debanding for other profiles.
Deringing, Deblocking and Denoising are not typically general use settings. These types of artifacts are less common, or the artifact removal algorithm can be guilty of smoothing an otherwise clean source. If you want to use these algorithms with your worst cases, try using madVR’s keyboard shortcuts. This will allow you to quickly turn the algorithm on and off with your keyboard when needed and all profiles will simply reset when the video is finished.
Used in small amounts, artifact removal can improve image quality without having a significant impact on image detail. Some choose to offset any loss of image sharpness by adding a small amount of sharpening shaders. Deblocking is useful for cleaning up compressed video. Even sources that have undergone light compression can benefit from it without harming image detail when low values are used. Deringing is very effective for any sources with noticeable edge enhancement. And Denoising will harm image detail, but can often be the only way to remove bothersome video noise or film grain. Some may believe Deblocking, Deringing or Denoising are general use settings, while others may not.
Image Enhancements: It should be unnecessary to apply sharpening shaders to the image as the source is already assumed to be of high-quality. If your display is calibrated, the image you get should approximate the same image seen on the original mastering monitor. Adding some image enhancements may still be attractive for those who feel chroma upscaling alone is not doing enough to create a sharp picture and want more depth and texture detail.
Dithering: The last step before presentation. The difference between Ordered Dithering and Error Diffusion is quite small, especially if the bit depth is 8-bits or greater. But if you have the resources, you might as well use them, and Error Diffusion will produce a small quality improvement. The slight performance difference between Ordered Dithering and Error Diffusion is a way to save a few resources when you need them. You aren’t supposed to see dithering, anyways.
With madVR set to 8-bit output, I would recommended Error Diffusion. Reducing a source from 10-bits to 8-bits with dithering invites the use of higher-quality dithering.
Both Medium and High profiles use Error Diffusion 2.
HDR: For HDR10 content, read the instructions in Devices -> HDR. Simple passthrough involves a few checkboxes. AMD users must output from madVR at 10-bits (but 8-bit output from the GPU is still possible).
Medium:
- Chroma: NGU Anti-Alias (medium)
- Downscaling: SSIM 1D 100% + LL + AR
- Image upscaling: Jinc + AR
- Image doubling: Off
- Upscaling refinement: Off
- Artifact removal — Debanding: Off
- Artifact removal — Deringing: Off
- Artifact removal — Deblocking: Off
- Artifact removal — Denoising: Off
- Image enhancements: Off
- Dithering: Error Diffusion 2
High:
- Chroma: NGU Anti-Alias (high)
- Downscaling: SSIM 1D 100% + LL + AR
- Image upscaling: Jinc + AR
- Image doubling: Off
- Upscaling refinement: Off
- Artifact removal — Debanding: Off
- Artifact removal — Deringing: Off
- Artifact removal — Deblocking: Off
- Artifact removal — Denoising: Off
- Image enhancements: Off
- Dithering: Error Diffusion 2
Profile: «Tone Mapping HDR»
This profile makes one small adjustment to the one above for anyone using tone map HDR using pixel shaders. madVR’s tone mapping can be very resource-heavy with all of the HDR enhancements enabled. To make room, I would recommend simply reducing the value of chroma upscaling to Bicubic60 + AR. Bicubic is more than acceptable as a basic chroma upscaler and is not in any way as impactful as madVR’s tone mapping in improving image quality.
HDR to SDR Tone Mapping Explained
Recommended checkboxes:
color tweaks for fire & explosions: disabled or balanced
highlight recovery strength: medium-high
measure each frame’s peak luminance: checked
tone map HDR using pixel shaders:
- Chroma: Bicubic60 + AR
- Downscaling: SSIM 1D 100% + LL + AR
- Image upscaling: Jinc + AR
- Image doubling: Off
- Upscaling refinement: Off
- Artifact removal — Debanding: Off
- Artifact removal — Deringing: Off
- Artifact removal — Deblocking: Off
- Artifact removal — Denoising: Off
- Image enhancements: Off
- Dithering: Error Diffusion 2
Profile: «1080p»
1080p -> 2160p
1920 x 1080 -> 3840 x 2160
Increase in pixels: 4x
Scaling factor: 2x
A 1080p source requires image upscaling.
For upscaling FHD content to UHD, image doubling is a perfect match for the 2x resize.
Chroma Upscaling: NGU Anti-Alias is selected. Lowering the value of chroma upscaling is an option when attempting to increase the quality of image doubling. Always try to maximize Luma doubling first, if possible. This is especially true if your display converts all 4:4:4 inputs to 4:2:2. Chroma upscaling could be wasted by the display’s processing. The larger quality improvements will come from improving the luma layer, not the chroma, and it will always retain the full resolution when it reaches the display.
Image Downscaling: N/A.
Image Upscaling: N/A.
Image Doubling: NGU Sharp is used to double the image. NGU Sharp is a staple choice for upscaling in madVR, as it produces the highest perceived resolution without oversharpening the image or usually requiring any enhancement from sharpening shaders.
Image doubling performs a 2x resize.
To calibrate image doubling, select image upscaling -> doubling -> NGU Sharp and use the drop-down menus. Set Luma doubling to its maximum value (very high) and everything else to let madVR decide.
If the maximum luma quality value is too aggressive, reduce Luma doubling until rendering times are under the movie frame interval (35-37ms for a 24 fps source). Leave the other settings to madVR. Luma quality always comes first and is most important.
Think of let madVR decide as madshi’s expert recommendations for each upscaling scenario. This will help you avoid wasting resources on settings which do very little to improve image quality. So, let madVR decide. When you become more advanced, you may consider manually adjusting these settings, but only expect small improvements.
Luma & Chroma are upscaled separately:
Luma: RGB -> Y’CbCr 4:4:4 -> Y -> 1080p -> 2160p
Chroma: RGB -> Y’CbCr 4:4:4 -> CbCr -> 1080p -> 2160p
Keep in mind, NGU very high is three times slower than NGU high while only producing a small improvement in image quality. Attempting to a use a setting of very high at all costs without considering GPU stress or high rendering times is not always a good idea. NGU very high is the best way to upscale, but only if you can accommodate the considerable performance hit. Higher values of NGU will cause fine detail to be slightly more defined, but the overall appearance produced by each type (Anti-Alias, Soft, Standard, Sharp) will remain identical through each quality level.
Upscaling Refinement: NGU Sharp shouldn’t require any added sharpening. If you want the image to be sharper, you can check some options here such as crispen edges or sharpen edges.
Artifact Removal: Debanding is set to low/medium. Most 8-bit sources, even uncompressed Blu-rays, can display small amounts of banding in large gradients because they don’t compress as well as 10-bit sources. So I find it helpful to use a small amount of debanding to help with these artifacts as they are so common with 8-bit video. To avoid removing image detail, a setting of low/medium or medium/medium is advisable. You might choose to disable this if you desire the sharpest image possible.
Image Enhancements: N/A.
Dithering: Both Medium and High profiles use Error Diffusion 2.
Medium:
- Chroma: NGU Anti-Alias (low)
- Downscaling: SSIM 1D 100% + LL + AR
- Image upscaling: Off
- Image doubling: NGU Sharp
- <— Luma doubling: high
- <— Luma quadrupling: let madVR decide (direct quadruple — NGU Sharp (high))
- <— Chroma: let madVR decide (Bicubic60 + AR)
- <— Doubling: let madVR decide (scaling factor 1.2x (or bigger))
- <— Quadrupling: let madVR decide (scaling factor 2.4x (or bigger))
- <— Upscaling algo: let madVR decide (Bicubic60 + AR)
- <— Downscaling algo: let madVR decide (Bicubic150 + LL + AR)
- Upscaling refinement: Off
- Artifact removal — Debanding: low/medium
- Artifact removal — Deringing: Off
- Artifact removal — Deblocking: Off
- Artifact removal — Denoising: Off
- Image enhancements: Off
- Dithering: Error Diffusion 2
High:
- Chroma: NGU Anti-Alias (medium)
- Downscaling: SSIM 1D 100% + LL + AR
- Image upscaling: Off
- Image doubling: NGU Sharp
- <— Luma doubling: very high
- <— Luma quadrupling: let madVR decide (direct quadruple — NGU Sharp (very high))
- <— Chroma: let madVR decide (NGU medium)
- <— Doubling: let madVR decide (scaling factor 1.2x (or bigger))
- <— Quadrupling: let madVR decide (scaling factor 2.4x (or bigger))
- <— Upscaling algo: let madVR decide (Jinc + AR)
- <— Downscaling algo: let madVR decide (SSIM 1D 100% + LL + AR)
- Upscaling refinement: Off
- Artifact removal — Debanding: low/medium
- Artifact removal — Deringing: Off
- Artifact removal — Deblocking: Off
- Artifact removal — Denoising: Off
- Image enhancements: Off
- Dithering: Error Diffusion 2
Profile: «720p»
720p -> 2160p
1280 x 720 -> 3840 x 2160
Increase in pixels: 9x
Scaling factor: 3x
At a 3x scaling factor, it is possible to quadruple the image.
The image is upscaled 4x and downscaled by 1x (reduced 25%) to match the output resolution. This is the lone change from Profile 1080p. If quadrupling is used, it is best combined with sharp Image downscaling such as SSIM 1D or Bicubic150.
Chroma Upscaling: NGU Anti-Alias is selected.
Image Downscaling: N/A.
Image Upscaling: N/A.
Image Doubling: NGU Sharp is the selected image doubler.
Image doubling performs a 4x resize combined with image downscaling.
Luma & Chroma are upscaled separately:
Luma: RGB -> Y’CbCr 4:4:4 -> Y -> 720p ->2880p -> 2160p
Chroma: RGB
-> Y’CbCr 4:4:4 -> CbCr -> 720p -> 2160p
Upscaling Refinement: NGU Sharp shouldn’t require any added sharpening. If you want the image to be sharper, you can check some options here such as crispen edges or sharpen edges.
soften edges is used to correct any oversharp edges created by using NGU Sharp with such a large scaling factor. soften edges will apply a very small correction to all edges without having much impact on image detail. Some may also want to experiment with add grain with large upscales for similar reasons.
NGU Sharp | NGU Sharp + soften edges + add grain | Jinc + AR
Artifact Removal: Debanding is set to low/medium.
Image Enhancements: N/A.
Dithering: Both Medium and High profiles use Error Diffusion 2.
Medium:
- Chroma: NGU Anti-Alias (low)
- Downscaling: SSIM 1D 100% + LL + AR
- Image upscaling: Off
- Image doubling: NGU Sharp
- <— Luma doubling: high
- <— Luma quadrupling: let madVR decide (direct quadruple — NGU Sharp (high))
- <— Chroma: let madVR decide (Bicubic60 + AR)
- <— Doubling: let madVR decide (scaling factor 1.2x (or bigger))
- <— Quadrupling: let madVR decide (scaling factor 2.4x (or bigger))
- <— Upscaling algo: let madVR decide (Bicubic60 + AR)
- <— Downscaling algo: let madVR decide (Bicubic150 + LL + AR)
- Upscaling refinement: soften edges (2)
- Artifact removal — Debanding: low/medium
- Artifact removal — Deringing: Off
- Artifact removal — Deblocking: Off
- Artifact removal — Denoising: Off
- Image enhancements: Off
- Dithering: Error Diffusion 2
High:
- Chroma: NGU Anti-Alias (medium)
- Downscaling: SSIM 1D 100% + LL + AR
- Image upscaling: Off
- Image doubling: NGU Sharp
- <— Luma doubling: very high
- <— Luma quadrupling: let madVR decide (direct quadruple — NGU Sharp (very high))
- <— Chroma: let madVR decide (NGU medium)
- <— Doubling: let madVR decide (scaling factor 1.2x (or bigger))
- <— Quadrupling: let madVR decide (scaling factor 2.4x (or bigger))
- <— Upscaling algo: let madVR decide (Jinc + AR)
- <— Downscaling algo: let madVR decide (SSIM 1D 100% + LL + AR)
- Upscaling refinement: soften edges (2)
- Artifact removal — Debanding: low/medium
- Artifact removal — Deringing: Off
- Artifact removal — Deblocking: Off
- Artifact removal — Denoising: Off
- Image enhancements: Off
- Dithering: Error Diffusion 2
Profile: «SD»
SD -> 2160p
640 x 480 -> 3840 x 2160
Increase in pixels: 27x
Scaling factor: 4.5x
The final resize, SD to 2160p, is a monster (4.5x!). This is perhaps the only scenario where image quadrupling is not only useful but necessary to maintain the integrity of the original image.
The image is upscaled 4x by image doubling and the remaining 0.5x by the Upscaling algo.
Chroma Upscaling: NGU Anti-Alias is selected.
Image Downscaling: N/A.
Image Upscaling: N/A.
Image Doubling: Because we are upscaling SD sources, NGU Standard will be substituted for NGU Sharp. You may find that NGU Sharp can start to look a little unnatural or «plastic» when a lower-quality source is upscaled to a much higher resolution. It can be beneficial to substitute NGU Sharp for a slightly softer variant of NGU such as NGU Standard to reduce this plastic appearance without losing too much of the desired sharpness and detail. The even softer NGU Anti-Alias is also option.
Image doubling performs a 4x resize combined with image upscaling.
Luma & Chroma are upscaled separately:
Luma: RGB -> Y’CbCr 4:4:4 -> Y -> 480p ->1920p -> 2160p
Chroma: RGB
-> Y’CbCr 4:4:4 -> CbCr -> 480p -> 2160p
Upscaling Refinement: If you want the image to be sharper, try adding a small level of crispen edges or sharpen edges.
Both soften edges and add grain are used to mask some of the lost texture detail caused by upsampling a lower-quality SD source to a much higher resolution. When performing such a large upscale, the upscaler can sometimes keep the edges of the image quite sharp, but still fail to recreate all of the necessary texture detail. The grain used by madVR will add some missing texture detail to the image without looking noisy or unnatural due to its very fine structure.
Artifact Removal: Debanding is set to low/medium.
Image Enhancements: N/A.
Dithering: Both Medium and High profiles use Error Diffusion 2.
Medium:
- Chroma: NGU Anti-Alias (low)
- Downscaling: SSIM 1D 100% + LL + AR
- Image upscaling: Off
- Image doubling: NGU Standard
- <— Luma doubling: high
- <— Luma quadrupling: let madVR decide (direct quadruple — NGU Standard (high))
- <— Chroma: let madVR decide (Bicubic60 + AR)
- <— Doubling: let madVR decide (scaling factor 1.2x (or bigger))
- <— Quadrupling: let madVR decide (scaling factor 2.4x (or bigger))
- <— Upscaling algo: let madVR decide (Bicubic60 + AR)
- <— Downscaling algo: let madVR decide (Bicubic150 + LL + AR)
- Upscaling refinement: soften edges (1); add grain (3)
- Artifact removal — Debanding: low/medium
- Artifact removal — Deringing: Off
- Artifact removal — Deblocking: Off
- Artifact removal — Denoising: Off
- Image enhancements: Off
- Dithering: Error Diffusion 2
High:
- Chroma: NGU Anti-Alias (medium)
- Downscaling: SSIM 1D 100% + LL + AR
- Image upscaling: Off
- Image doubling: NGU Standard
- <— Luma doubling: very high
- <— Luma quadrupling: let madVR decide (direct quadruple — NGU Standard (very high))
- <— Chroma: let madVR decide (NGU medium)
- <— Doubling: let madVR decide (scaling factor 1.2x (or bigger))
- <— Quadrupling: let madVR decide (scaling factor 2.4x (or bigger))
- <— Upscaling algo: let madVR decide (Jinc + AR)
- <— Downscaling algo: let madVR decide (SSIM 1D 100% + LL + AR)
- Upscaling refinement: soften edges (1); add grain (3)
- Artifact removal — Debanding: low/medium
- Artifact removal — Deringing: Off
- Artifact removal — Deblocking: Off
- Artifact removal — Denoising: Off
- Image enhancements: Off
- Dithering: Error Diffusion 2
Creating madVR Profiles
These profiles can be translated into madVR profile rules.
Add this code to each profile group:
if (srcHeight > 1080) «2160p»
else if (srcWidth > 1920) «2160p»
else if (srcHeight > 720) and (srcHeight <= 1080) «1080p»
else if (srcWidth > 1280) and (srcWidth <= 1920) «1080p»
else if (srcHeight > 576) and (srcHeight <= 720) «720p»
else if (srcWidth > 960) and (srcWidth <= 1280) «720p»
else if (srcHeight <= 576) and (srcWidth <= 960) «SD»
OR
if (deintFps <= 25) and (srcHeight > 1080) «2160p25»
else if (deintFps <= 25) and (srcWidth > 1920) «2160p25»
else if (deintFps > 25) and (srcHeight > 1080) «2160p60»
else if (deintFps > 25) and (srcWidth > 1920) «2160p60»
else if (deintFps <= 25) and ((srcHeight > 720) and (srcHeight <= 1080)) «1080p25»
else if (deintFps <= 25) and ((srcWidth > 1280) and (srcWidth <= 1920)) «1080p25»
else if (deintFps > 25) and ((srcHeight > 720) and (srcHeight <= 1080)) «1080p60»
else if (deintFps > 25) and ((srcWidth > 1280) and (srcWidth <= 1920)) «1080p60»
else if (deintFps <= 25) and ((srcHeight > 576) and (srcHeight <= 720)) «720p25»
else if (deintFps <= 25) and ((srcWidth > 960) and (srcWidth <= 1280)) «720p25»
else if (deintFps > 25) and ((srcHeight > 576) and (srcHeight <= 720)) «720p60»
else if (deintFps > 25) and ((srcWidth > 960) and (srcWidth <= 1280)) «720p60»
else if (deintFps <= 25) and ((srcWidth <= 960) and (srcHeight <= 576)) «576p25»
else if (deintFps > 25) and ((srcWidth <= 960) and (srcHeight <= 576)) «576p60»
How to Configure madVR Profile Rules
Sony Reality Creation Processing Emulation
markmon1 at AVS Forum devised a set of settings that are meant to emulate the video processing used by Sony projectors and TVs. Sony’s Reality Creation processing combines advanced upscaling, sharpening/enhancement and noise reduction to reduce image noise while still rendering a very sharp image.
To match the result of Reality Creation in madVR, markmon lined-up a Sony VPL-VW675ES and JVC DLA-RS640 side-by-side with various settings checked in madVR until the projected image from the JVC resembled the projected image from the Sony. The settings profiles created for 1080p («4k Upscale») and 4K UHD content utilize sharp upscaling in madVR combined with a little bit of sharpening shaders, noise reduction and artifact removal, all intended to slightly lower the noise floor of the image without compromising too much detail or sharpness.
Click here for a gallery of settings for Sony Realty Creation emulation in madVR

![]()
Posts: 3,823
Joined: Feb 2014
Reputation:
220
![]()
2016-02-08, 07:41
(This post was last modified: 2019-02-13, 20:50 by Warner306.)
7. OTHER RESOURCES
Advanced Topics
List of Compatible Media Players & Calibration Software
madVR Player Support Thread
Building a High-performance HTPC for madVR
Building a 4K madVR HTPC
Kodi Beginner’s Guide
Kodi Quick Start Guide
Configuring a Remote Control
HOW TO — Configure a Logitech Harmony Remote for Kodi
HTPC Updater
This program is designed to download and install updated copies of MPC-HC, LAV Filters and madVR.
For this tool to work, a 32-bit version of MPC-HC must installed on your system along with LAV Filters and madVR. Running the program will update copies of each program. The benefit for DSPlayer users is this avoids the process of manually extracting and re-registering madVR with each update.
Note: On the first run, madVR components are dropped one level above the existing installation folder. If your installation was C:Program FilesmadVR, madVR installation files would be placed in the C:Program Files directory. This is the default behavior of the program. Subsequent runs will overwrite the existing installation. If one component fails, try updating it manually before running the program again.
HTPC Updater
MakeMKV
MakeMKV is pain-free software for ripping Blu-rays and DVDs into an MKV container, which can be read by Kodi. By selecting the main title and an audio stream, it is possible to create bit-for-bit copies of Blu-rays with the accompanying lossless audio track in one hour or less. No encoding is required — the video is placed in a new container and packaged with the audio and subtitle track(s). From here, the file can be added directly to your Kodi library or compressed for storage using software such as Handbrake. This is the fastest way to import your Blu-ray collection into Kodi.
Tip: Set the minimum title length to 3600 seconds (60 minutes) and a default language preference in Preferences to ease the task of identifying the correct video, audio and subtitle tracks.
MakeMKV Homepage (Beta Registration Key)
Launcher4Kodi
Launcher4Kodi is a HTPC helper utility that can assist in creating appliance-like behavior of a Windows-based HTPC running Kodi. This utility auto-starts Kodi on power on/resume from sleep and auto-closes Kodi on power off. It can also be used to ensure Kodi remains focused when loaded fullscreen and set either Windows or Kodi to run as a shell.
![]()
Posts: 3,823
Joined: Feb 2014
Reputation:
220
![]()
2016-02-08, 07:45
(This post was last modified: 2018-12-26, 00:21 by Warner306.)
Reserved…
![]()
Posts: 3,823
Joined: Feb 2014
Reputation:
220
![]()
2016-02-08, 07:50
(This post was last modified: 2018-12-26, 00:22 by Warner306.)
Reserved….
![]()
Posts: 1,772
Joined: Aug 2009
Reputation:
24
![]()
Derek
Posting Freak
Posts: 1,772
awesome information buddy
![]()
Posts: 3,823
Joined: Feb 2014
Reputation:
220
![]()
(2016-02-10, 05:39)Derek Wrote: awesome information buddy
Thanks. Hopefully it will be of some use to others.
![]()
Posts: 590
Joined: Jun 2014
Reputation:
6
![]()
Hi.
Excellent review, future-proof.
I wanted to ask just one thing, for Demo HDR played on a display 1920×1080 24Hz and Video Rendering madVR, rules + profile you entered for display: 3840 x 2160p can be inserted to a display 1920×1080 24Hz?
Thanks.
![]()
Posts: 3,823
Joined: Feb 2014
Reputation:
220
![]()
(2016-02-12, 16:57)gotham_x Wrote: Hi.
Excellent review, future-proof.
I wanted to ask just one thing, for Demo HDR played on a display 1920×1080 24Hz and Video Rendering madVR, rules + profile you entered for display: 3840 x 2160p can be inserted to a display 1920×1080 24Hz?
Thanks.
If you’re asking if you can use the profile rules for a 4K display for a 1080p display, then yes.
|
|
#29001 | Link |
|
AV heretic Join Date: Nov 2009 Posts: 422 |
Quote:
Originally Posted by cyberbeing Personally I like: HD: ED2 |

|
|


|
|
#29002 | Link |
|
Broadband Junkie Join Date: Oct 2005 Posts: 1,859 |
My reasons are essentially opposite of yours. I use ED1 mono static explicitly since it’s not completely transparent and adds a bit of texture (similar to static grain) to the image, which I find benefits clean HD sources the most visually, especially animation. ED1 also has the lowest tendency of producing undesired dithering patterns and artifacts, at the expense of a slightly higher noise floor. This noise floor in turn makes Dynamic mono a poor fit for ED1, since it adds too much energy to motionless and flat content which can be distracting. ED2 on the other hand has a lower noise floor, yet has a tendency to produce minor patterns and artifacts. Dynamic is needed to counteract this. With SD and below, I’d rather have a transparent dither without any visible texture. While quality of SD is usually low enough, that I wouldn’t notice ED2 mono dynamic even if I were looking for it. |
|
|
|
|
|
#29003 | Link |
|
Registered User Join Date: Aug 2011 Posts: 38 |
I’m using Error Diffusion Option 1 in madvr, but acessing the LAV Video Decoder Menu there’s also an option for dithering mode (in this case I’m using ordered dithering). Is there a way to disable the LAV dithering and use only the madvr dithering? |
|
|
|
|
|
#29004 | Link |
|
Registered User Join Date: May 2013 Posts: 115 |
Quote:
Originally Posted by Arm3nian Can’t those users just turn off motion interpolation on their tv? Seems to me there are more people who dislike things like SVP than favor it. In my experience internet comments tend to be «trollish». That means if someone doesn’t have a PC that can handle SVP, will likely post negative comments about it anyway. A good 1080p source will not be able to be played properly on a common 5 year old PC (let alone on an average HTPC that various users in this forum have), especially if madvr and svp quality settings must be set to the better algorithms. e.g. I noticed that on overclock.net, where most people have insanely good GPUs and CPUs, they are often in favor of SVP+madvr. Also sometimes it’s only purism. I know there are rare artifacts, but the slideshow of 24 fps is multiple times more awful.
Last edited by tobindac; 16th April 2015 at 15:55.
|
|
|
|
|
|
#29005 | Link |
|
Registered User Join Date: Dec 2002 Posts: 5,565 |
Quote:
Originally Posted by luk008 I’m using Error Diffusion Option 1 in madvr, but acessing the LAV Video Decoder Menu there’s also an option for dithering mode (in this case I’m using ordered dithering). Is there a way to disable the LAV dithering and use only the madvr dithering? LAV only uses dithering when it does a colorspace conversion itself. It lets madVR do it unless you turn off the respective output format in the LAV Video settings. |
|
|
|
|
|
#29006 | Link |
|
Registered User Join Date: Aug 2011 Posts: 38 |
Quote:
Originally Posted by sneaker_ger LAV only uses dithering when it does a colorspace conversion itself. It lets madVR do it unless you turn off the respective output format in the LAV Video settings. In the YUV -> RGB conversion I leaved it as «untouched» in the LAV options. MadVR is set to use PC levels. Is this the best choice? |
|
|
|
|
|
#29007 | Link |
|
Registered User Join Date: Dec 2002 Posts: 5,565 |
Just leave everything at the default value. Do not uncheck any of the output formats. |
|
|
|
|
|
#29008 | Link |
|
Registered User Join Date: Oct 2012 Location: Akron, OH Posts: 490 |
Now that madshi has given us 64-bits in madVR, I wonder how close he’s getting to a 1.0 release where we can finally give him some money for all his years of hard work. |
|
|
|
|
|
#29009 | Link |
|
Registered User Join Date: Jul 2014 Location: Las Vegas Posts: 177 |
Quote:
Originally Posted by MokrySedeS Goddammit, Arm3nian… give up already. You just don’t get it. Apologies to everyone, I just couldn’t stand him anymore… I’ll shut up now. Why are you so angry? And why is this off topic? Huhn thinks that there are pitch issues when watching pal content with SM. I’m telling him that there aren’t, and there isn’t a need for reclock when using SM. Why is this concept so hard for you to grasp? Quote:
Originally Posted by tobindac In my experience internet comments tend to be «trollish». That means if someone doesn’t have a PC that can handle SVP, will likely post negative comments about it anyway. A good 1080p source will not be able to be played properly on a common 5 year old PC (let alone on an average HTPC that various users in this forum have), especially if madvr and svp quality settings must be set to the better algorithms. e.g. I noticed that on overclock.net, where most people have insanely good GPUs and CPUs, they are often in favor of SVP+madvr. Also sometimes it’s only purism. I know there are rare artifacts, but the slideshow of 24 fps is multiple times more awful. I’m not talking about SVP, I’m talking about things like SVP, motion interpolation, used in televisions. Sometimes they aren’t well implemented, and people don’t like it. SVP works fine with SM. It was mentioned that there is ghosting with SM on some TVs, first with no proof, and second with disregarding the fact that plasmas flicker at 24hz, so reclock isn’t that much of a benefit compared to running at 60hz with SM. 24fps looks fine for most content. If you want higher fps content, blame the content creators. Motion interpolation is like upscaling, it helps sometimes, but its tied to the quality of the source, you can’t create information that isn’t there. |
|
|
|
|
|
#29010 | Link |
|
Registered User Join Date: Mar 2002 Location: Sofia, Bulgaria Posts: 661 |
Arm3nian, I hope you’ll finally understand it and stop this discussion in this thread.
__________________ |
|
|
|
|
|
#29011 | Link |
|
Registered User Join Date: Jul 2014 Location: Las Vegas Posts: 177 |
So why can I watch 25fps content on a 60hz screen with SM and get no pitch issues? |
|
|
|
|
|
#29012 | Link |
|
AV heretic Join Date: Nov 2009 Posts: 422 |
Quote:
Originally Posted by Arm3nian there isn’t a need for reclock when using SM. Why is this concept so hard for you to grasp? Because you’re wrong? Quote:
Originally Posted by madshi madVR v0.86.0 released Code: * added smooth motion frame rate conversion algorithm ... …Consequently the motion smoothness depends on proper timestamps. If the timestamps (or audio clock) contain jitter, the playback will contain jitter, too. So even if Reclock might not be needed to avoid frame drops/repeats, anymore, when using madVR’s new FRC algorithm, you might still want to use Reclock, because it provides a stable and reliable audio clock with very low jitter… |
|
|
|
|
|
#29013 | Link |
|
Registered User Join Date: Jul 2014 Location: Las Vegas Posts: 177 |
LOL. Because reclock magically generates a clock in software right? Reclock gets the clcok the from the crystal on your board, like other renderers. That was a problem in windows XP. |
|
|
|
|
|
#29014 | Link |
|
AV heretic Join Date: Nov 2009 Posts: 422 |
I can’t speak for madshi. You better tell him he was wrong. |
|
|
|
|
|
#29015 | Link |
|
Registered User Join Date: Feb 2002 Location: San Jose, California Posts: 4,372 |
Quote:
Originally Posted by Arm3nian So why can I watch 25fps content on a 60hz screen with SM and get no pitch issues? With PAL speedup you get the wrong pitch watching 25 fps on a 50 Hz screen or even only listening to the audio. The studio did the speed up and Reclock offers a speed down option, which madVR also supports, to play 25 fps video at 24 fps. The display’s refresh rate does not come into it. |
|
|
|
|
|
#29016 | Link |
|
Registered User Join Date: Dec 2012 Posts: 57 |
I noticed that using 64-bit madVR with the appropriate MPC-HC and internal LAV Filters, NNEDI3 upscaling is not working at all. No matter which sub-settings I pick. Milisecond count however (rarely) spikes up in the renderer as if it were active. Graphics card is a R9 270X. Also: Thanks for making a 64-bit version finally! That should be huge for scaler performance.
Last edited by Schwartz; 16th April 2015 at 23:30.
|
|
|
|
|
|
#29017 | Link |
|
/人 ◕ ‿‿ ◕ 人 Join Date: May 2011 Location: Russia Posts: 643 |
Quote:
Originally Posted by Schwartz Also: Thanks for making a 64-bit version finally! That should be huge for scaler performance. All processing is done on GPU, there’s no benefit for madVR (but there’s for playback chain — currently x64 HEVC decoder is much faster). |
|
|
|
|
|
#29018 | Link |
|
Registered User Join Date: Sep 2006 Posts: 2,193 |
cant people just whine at slysoft forums for them to put out a x64 version of reclock? I guess thats all that is needed, right?
__________________ |
|
|
|
|
|
#29019 | Link |
|
Registered User Join Date: Jul 2014 Location: Las Vegas Posts: 177 |
Quote:
Originally Posted by Qaq I can’t speak for madshi. You better tell him he was wrong. Ugh madshi was correct in his statement, just like everything he says. That post is just old, and doesn’t apply anymore. There is a clock for your cpu, gpu, and audio. Other renderers can access the same clock that reclock can. Madshi has stated often that reclock is not needed for SM. If you don’t believe me, try SM with reclock and without, there is no difference in IQ… Quote:
Originally Posted by Asmodian With PAL speedup you get the wrong pitch watching 25 fps on a 50 Hz screen or even only listening to the audio. The studio did the speed up and Reclock offers a speed down option, which madVR also supports, to play 25 fps video at 24 fps. The display’s refresh rate does not come into it. What content actually suffers from this? 24fps or 25fps works fine on 50hz or 60hz. Those with Pal televisions can get the NTSC content and watch it with SM. Same with those with NTSC monitors who want to watch pal content. Not all content is sped up or slowed down. What is actually released today that is only available in a pitch alretered version? |
|
|
|
|
|
#29020 | Link |
|
Registered User Join Date: May 2011 Posts: 164 |
There are plenty of DVDs sped up to 25fps (from 24) that require Reclock or JRiver’s equivalent to watch them properly. Otherwise you’re just watching a sped up film. Maybe recent releases don’t suffer from this, I have no clue, I moved to blu-ray long ago and rarely watch DVDs (just for those few titles that aren’t released on blu-ray) but I’ve had to deal with more than a few sped up ones. |
|
|
|
MadVR — это высокостандартный видеорендерер с поддержкой графических процессоров, обеспечивающего высокоуровневое повышение цветности и масштабирования: бикубическое, митчелловское, ланцошо, сплайн. Функции настройки madVR способны выполнять преобразование YCbCr -> RGB, гамма-коррекцию калибровки дисплея, обход алгоритмов повреждений видеокарты. Вся работа выполняется с помощью шейдеров GPU, без ярлыков, высочайший стандарт качества имеет приоритет над всем остальным. Имеется 32-битная, и 64-битная версия программы.
Высококачественный видеорендерер
Это программное обеспечение, которое обрабатывает видео файл и отправляет последовательно к дисплею, плате контроллера для отображения на экране компьютера. Настройка madVR позволяет достичь наилучшего качества воспроизведения.
Особенности видеорендерера:
- Обработка с высокой разрядностью.
- Высококачественные алгоритмы для масштабирования, повышения резкости, расслоения, сглаживания.
- Плавное воспроизведение движения без дрожания 3:2 даже при настройке madVR 60 Гц.
- Воспроизведение кадров в формате 3D через HDMI 1.4+ (Windows 8.1 или новее).
- Принудительный режим превращение формата 60i в идеальное 24p.
- Надежное воспроизведение с использованием автоматического полноэкранного эксклюзивного стандарта.
Требования к устройствам — GPU с полной аппаратной поддержкой D3D9/PS3. Необходимое оборудование:
- Установщик mpc x86, считается одним из лучших проигрывателей директ-шоу для Windows.
- MadVR.zip — считается лучшим рендерером видео с большинством улучшений качества.
Установка для декодирования видео
Перед запуском установщика MPC x86, обращают внимание, что он дает возможность выполнить сброс настроек madVR, если перепутаны действия с другими руководствами или пакетами кодеков, можно начать процесс заново.
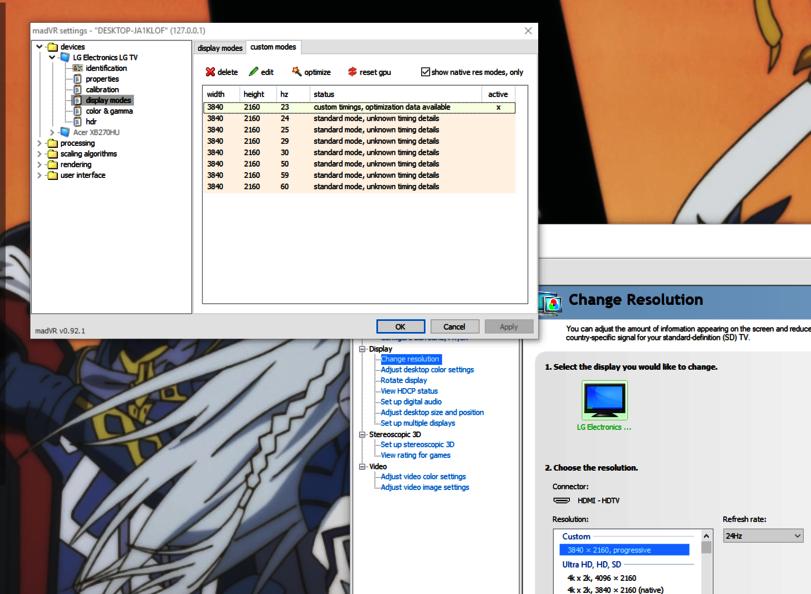
Алгоритм действия:
- Распаковывают zip-файл и запускают для него install.bat.
- Чтобы указать mpc, открывают его, нажимают «o» для выбора параметров, переходят к выходу и выбирают в разделе настройку 4k madVR «Прямое видео».
- Чтобы получить доступ к параметрам декодирования, открывают mpc, нажимают для параметров, переходят к внутренним фильтрам и нажимают внизу Video Decoder.
- Отмечают опции аппаратного ускорения в верхней правой части. В общем, dxva copyback используется для декодирования через графический процессор.
- Используют опцию «none» mpc hc, если нужно включить ПК.
Аппаратное ускорение снижает использование процессора в поддерживаемых форматах, таких как 8-битный HEVC, 8-битный H264, VC-1 и mpeg, в зависимости от графической карты и того, что отмечено в параметрах декодера.
Сочетание клавиш madVR
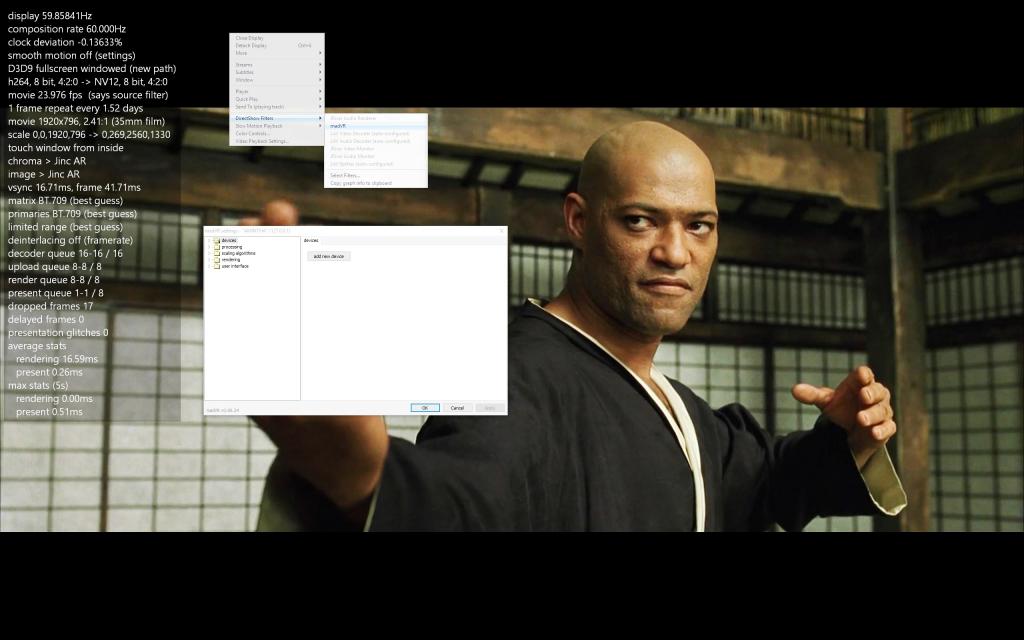
MadVR Debug OSD (Statistics) особенно полезен при диагностике проблем с отображением видео. Для этого потребуется включить отображение статистики отладки OSD.
Последовательность действий:
- Отключают опцию «Удаленный, клавиатура, геймпад или другой HID»;
- Перезапускают MC, и нажимают Ctrl+J для корректной работы настройки madVR под проектор.
- Используют Ctrl+J с открытым диалогом настроек.
- Получают доступ к конфигурации, начинают воспроизведение, нажав правой кнопкой мыши в любом месте экрана и перейдя к DirectShow Filters> madVR.
- Снимают флажок «использовать только, если медиаплеер имеет фокус клавиатуры» в диалоговом окне «Пользовательский интерфейс madVR».
- Выделяют любой заголовок меню в левой части настроек.
- Нажимают Ctrl+J. Отобразится экранная статистика madVR Debug. Комбинация Ctrl + R также будет работать для сброса статистики, пока открыт диалог настроек.
Многооконный режим
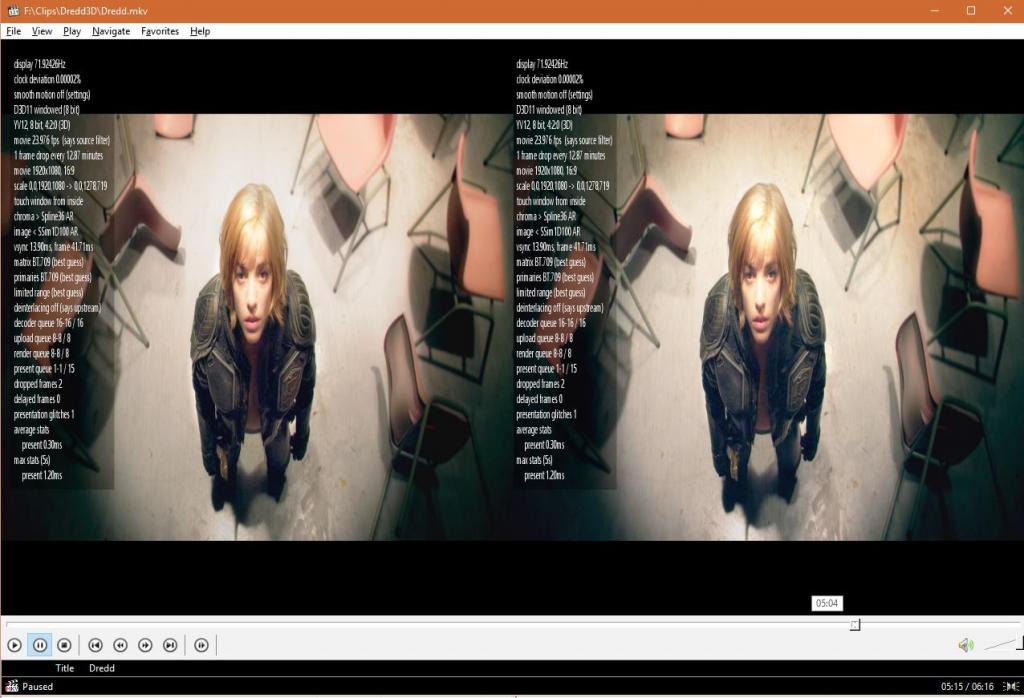
Чтобы понять, что это за программа madVR и, как она функционирует, используют вкладку «Настройки оконного режима» в Windows или когда отключен полноэкранный эксклюзивный вариант. Увеличение количества буферов может потенциально привести к плавному воспроизведению за счет увеличения памяти. Рекомендуется оставить их по умолчанию. При использовании Smooth Motion, рекомендуют установить их на максимум до 8.
Подключение эксклюзивных параметров:
- Открыть вкладку «Настройки эксклюзивного режима».
- Перед тем как настроить madVR используют Media Center — она рисует панель поиска, которую можно использовать в варианте FSE, не возвращая юзера обратно.
- Устанавливают задержку переключения в эксклюзивный режим на 3 секунды. Если медиаплеер переключается в полноэкранный просмотр, а FSE включен, он всегда будет переключаться мгновенно. Этот параметр предназначен для случаев, когда что-то, например управляемый мышью интерфейс Media Center, прерывает FSE и переводит его в оконный режим. Если опция включена, она будет ждать 3 секунды, возвращаясь в FSE, а не переключаясь мгновенно. Это может быть полезно, если пользователь собирается внести пару изменений, в такие настройки, как переключение дорожки субтитров и регулировка размера и положения, без необходимости входить/выходить из FSE каждый раз при вызове меню.
- Присутствие нескольких кадров должно быть включено. Отключение этой опции переводит madVR в устаревший режим, который на данный момент не поддерживается.
- Устанавливают видеорендерер с предварительным представлением 4 кадров по умолчанию.
- Увеличивают объем CPU / GPU соответственно, чтобы заполнить буфер.
Алгоритмы масштабирования
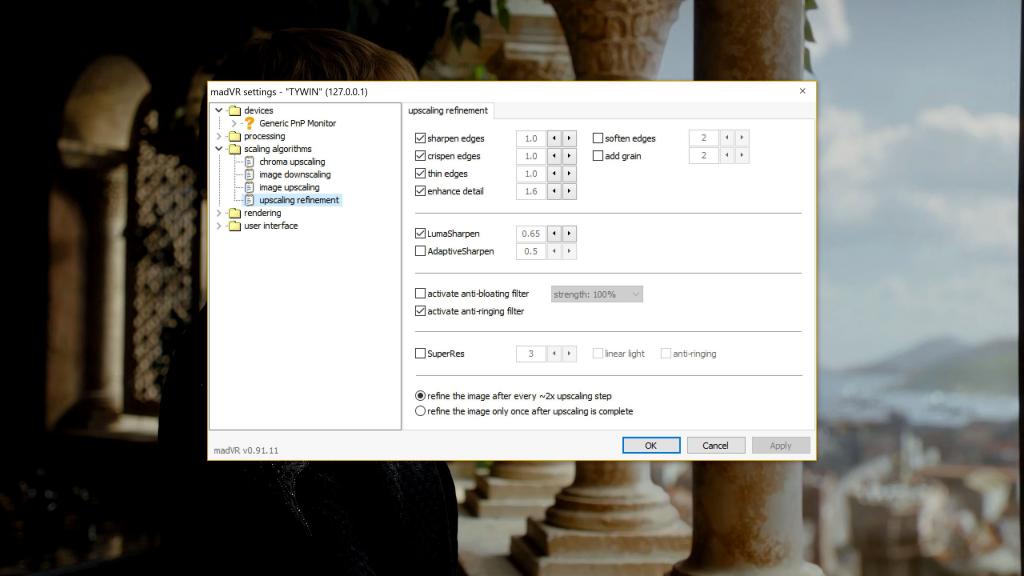
Для того, чтобы правильно отредактировать параметры madVR, сначала воспроизводят любое видео в mpc hc настройки madVR. Затем правой кнопкой мыши нажимают на файл, переходят к фильтрам и нажимают на madVR, выбирая раздел «Изменить настройки». Убеждаются, что все нужные фильтры правильно отображаются в списке фильтров.
Для уменьшения масштаба изображения рекомендуется использовать Catmull rom. Для цветности и масштабирования выбирают Jinc с фильтром защиты от искажений, он считается лучшим по качеству, но для него требуется быстрый графический процессор.
Если компьютер слабенький, рекомендуют алгоритм Lanczos 3, тоже высокого стандарта и не требующей мощной видеокарты. В частности, для современных Intel параметры масштабирования dxva обеспечивают хорошие параметры просмотра при очень небольшом снижении производительности.
Масштабирование является одной из основных причин использования madVR, предлагающего очень высокие опции масштабирования. Большая часть видео хранится с использованием выборки цветности в формате 4: 2: 0, как черно-белое «детальное» изображение (яркость) с «цветным» (цветностью) более низкого разрешения, наслоенным сверху. Такая технологическая конструкция помогает маскировать низкое разрешение цветного изображения.
Уменьшение, применяется только в том случае, если оно отображается с более низким разрешением, чем исходное — например, содержимое 1080p на дисплее с 720p. Масштабирование цветности выполняется для всех видео — оно берет изображение цветности с четвертью разрешения и масштабирует его до исходной яркости видео. Если нужно масштабировать дальше, будь то увеличение или уменьшение масштаба, тогда алгоритм применяется, как к цветности, так и к яркости.
Чтобы madVR автоматически переключался на правильную частоту обновления, переходят в раздел устройств в настройках и выбирают дисплей с просмотром, а затем — режимы отображения. Устанавливают флажок, чтобы перейти в соответствующие параметры, а затем перечисляют частоты обновления, которые поддерживает устройство: 23.976, 24, 50, 59.94, 60 или их кратные. Имена нецелых частот обновления сокращены, поэтому 23,976 = 23.
Предварительно убеждаются, что они вводятся для собственного разрешения дисплея, например, не вводят значения 720p для дисплея 1080p. Можно увидеть их данные во время просмотра, нажав «CTRL+J».
Калибровки в настройках
У madVR есть несколько расширенных опций калибровки, процесс довольно сложный — для калибровки может быть написано целое руководство. Если юзер не хочет использовать более продвинутые функции калибровки madVR, обычно лучше оставить настройки, по умолчанию. С HD-контентом эти настройки означают, что цвет должен выглядеть так же, как и у других рендереров, но с SD-видео он позволяет выполнять преобразования цветового пространства, необходимые для контента SMPTE-C и EBU/PAL.
Эти преобразования цветового пространства требуют небольшого количества энергии графического процессора, поэтому если компьютер слабенький, чтобы воспроизвести файл в madVR без проблем, его придется отключить. Опции y CMS и 3DLUT намного сложнее в использовании, поскольку они более требовательны к GPU.
MadVR включает переключатель режимов отображения для автоматического разрешения и изменения частоты обновления. Большинство пользователей применяют его для обработки масштабирования видео и изменения частоты обновления, а вводят их через запятую. Предварительно убеждаются, что дисплей действительно поддерживает выбранные разрешения. Рекомендуют сначала переключиться на них через панель управления видеокарты.
Режим 25p для фильмов, как 24p (требуется Reclock) полезен для тех, кто использует контент на основе фильмов PAL (обычно DVD), поскольку он позволяет либо ReClock, либо VideoClock JRiver для воспроизведения контента PAL с исходным форматом 24p. Все, что делает эта опция, это переключается на лучший режим отображения для 24p, который зависит от проигрывателя. Лучше, если используется ReClock или VideoClock.
Переключатель отображений madVR сейчас немного более продвинутый, чем в Media Center. С содержимым IVTC он переключает отображение на 24p, тогда как переключатель JRiver — нет.
Удвоение разрешения Chroma или Luma
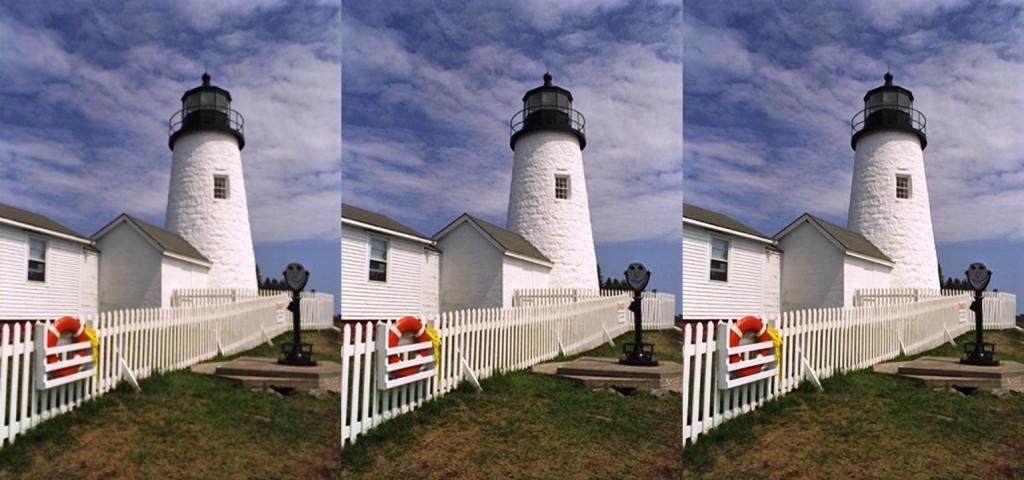
Его выполняют с применением NNEDI3. Прежде чем приступать к настройке параметров предварительно требуется учесть следующие факторы:
- 720p потребляет значительно больше ресурсов, чем 1080p, если включено удвоение разрешения.
- В большинстве случаев 1080p не удваивается, поэтому снижения производительности не происходит.
- Чем ниже разрешение, тем больше обработки должно быть сделано во время настройки madVR для лучшего качества изображения.
- Нажимают CTRL+J для просмотра статистики во время воспроизведения видео, если замечено, что пропущенные кадры требуется уменьшить количество нейронов NNEDI3 до 32 или 64 для удвоения. После 64 нейронов наблюдается значительный скачок производительности, поэтому если нет GTX 970 или выше, скорее всего, придется остаться в режиме с 64 нейронами.
- Не использовать NNEDI3 для удвоения разрешения Chroma, если у ПК нет достаточно мощного графического процессора.
- Используют NNEDI3, чтобы удвоить параметры Luma и измеряют, как компьютер обрабатывает файлы, если время рендеринга меньше 30 мс. Можно использовать NNEDI3 для четырехкратного разрешения при более низких уровнях нейронов, таких как 32 или 64.
Повышение качества изображения
В зависимости от видеокарты, опция DXVA2 может быть либо высокопроизводительной, либо средней. Есть также фильтр защиты от прозвона и опция линейного освещения, которые увеличивают требования к графическим процессорам, когда они включены. Изначально целью должно быть плавное воспроизведение, а не лучшее качество изображения, поэтому рекомендуют при установке и настройке madVR для 4к выполнить все алгоритмы масштабирования на Bilinear.
DirectX Video Acceleration (DXVA) — это спецификация Microsoft API для платформ Windows, которая позволяет ускорять декодирование видео. Система допускает определенные CPU — intensive. Например, IDCT, стабилизацию движения и деинтерлейса, которые должны быть выгружены на GPU. DXVA 2.0 помогает аппаратно ускорять операции с захватом и обработкой фильмов. DXVA функционирует в сочетании с моделью рендеринга, используемой видеокартой. Версия 1.0 существует, как стандартизированный API для Win 2000.
В настоящее время доступна в Win 98 или более поздней версии и может использовать либо режим с наложением, либо VMR 7/9. Версия 2.0 применима только в ОС Vista, Windows 7 / 8 и более поздних выпусках, интегрируясь с Media Foundation (MF) и применяя Enhanced Video Renderer (EVR), присутствующий в MF.
Система смешивания кадров
Smooth Motion — недавно представленная система смешивания кадров для madVR — это система интерполяции кадров, она не будет вводить «эффект дрожания», как наблюдается на телевизорах с частотой 120 Гц.
Smooth Motion применяется для отображения контента, в котором частота кадров источника не отвечает ни одной из поддерживаемых дисплеем. Например, это будет контент 25/50 кадров/секунду на дисплее только 60 Гц, или контент 24p на дисплее только 60 Гц. Он не заменяет ReClock или VideoClock, и если дисплей поддерживает 1080p24, 1080p50 и 1080p60 — в этих случаях не нужно применять Smooth Motion вообще.
Поскольку алгоритм работает с использованием смешивания кадров, можно увидеть небольшие побочные изображения на краю движущихся объектов, но это проявляется редко и зависит от используемого дисплея, и определенно предпочтительнее обычного дрожания из-за несоответствия частоты кадров обновления.
Есть некоторые случаи, когда дисплей делает поддержку 1080p24 / 50/60 и требуется использовать плавное движение. Если плазма отображает 24p при 48 Гц и нужно отобразить ее при 60 Гц, используя вместо этого Smooth Motion, чтобы уменьшить мерцание, то режим оставляют включенным.
Начиная с madVR 0.86.3 при показе видео со скоростью 23/24/25 кадров/секунду и с частотой 24 Гц, не будет активировать Smooth Motion, а только 23/24/25 кадров/секунду при 60 Гц. Поэтому видео, отображаемые в полноэкранном режиме, не используют Smooth Motion, но когда воспроизводится фильм в окне на рабочем столе с частотой 60 Гц, Smooth Motion активируется.
Опции повышения производительности
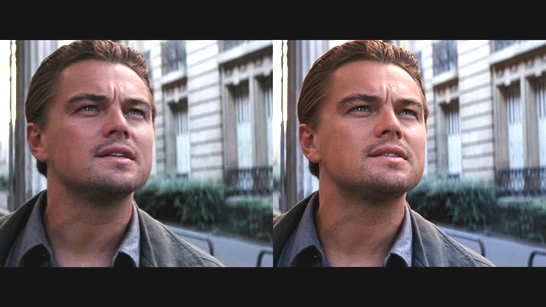
Эти опции существуют для снижения качества изображения и повышения производительности. Многие из этих параметров будут иметь очень небольшое влияние на работоспособность машины. Как правило, если существуют проблемы с производительностью, лучше всего подойти к списку, включив их по одному, пока воспроизведение не станет плавным.
Удвоение изображения и NNEDI3 — это очень мощные улучшения общих параметров видео, однако, они приводят к тому, что средний компьютер будет греться, если пользователь попытается проверить настройки.
Идея состоит в том, чтобы поэкспериментировать с различными параметрами, пока не будет достигнуто время рендеринга менее 40 мс, а предпочтительнее 30 мс для большинства типов видео с разрешением 720p и 1080p. Используя различные параметры Chroma Upscaling, стараются понять, какие параметры подходят лучше всего.
Рендеринг для высокопроизводительных процессоров
Если у пользователя высокопроизводительный графический процессор серии GTX 700 или выше, эти настройки должны дать около 12 мс времени рендеринга на кадр для 720p, благодаря CUDA. Время для 1080p, как правило, будет лучше, чем 720p, так как происходит меньшее масштабирование или удвоение видео, если оно смотрится в формате 1080p и 720p. Эти настройки должны работать для обоих форматов. В режиме 1080p можно использовать 128 нейронов для увеличения цветности и удвоения параметров.
Редактируют настройки, нажав правой кнопкой мыши на значке madvr во время воспроизведения видео с помощью mpc hc или PotPlayer. Если нет подробного списка, нужно нажать правой кнопкой мыши на панели задач Windows > Свойства, а затем настроить область уведомлений и нажать «всегда показывать все значки и уведомления». Это должно работать для Windows 7 и Windows 8. Если используется графический процессор Nvidia, убеждаются, что включено шумоподавление и усиление краев на панели управления Nvidia.
Конфигурация Nvidia GTX 770 SLI
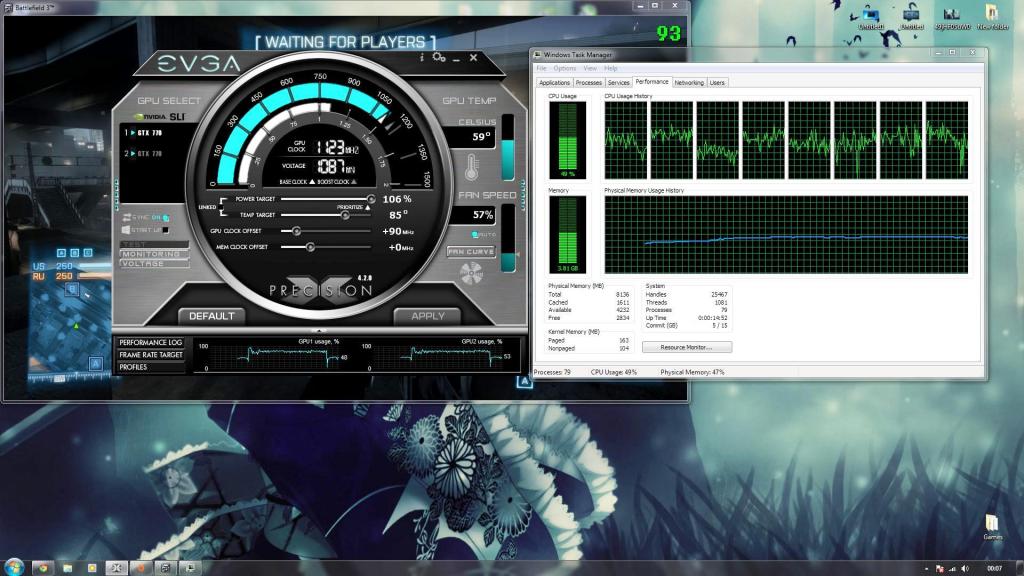
Удвоить разрешение Luma можно с использованием NNEDI3 и 32 нейронов. Для конфигурации GTX 970 используют DXVA2 для масштабирования изображения, поскольку при любых других настройках madVR время рендеринга составляет 50 мс + с MPC-HC, что приводит к большому количеству пропущенных видеокадров. Эти настройки также хорошо работают для фильмов с 720p и ниже. Можно утверждать, что использование NNEDI3 для Chroma Upscaling не стоит дополнительных затрат на GPU, и что Bicubic или Lanczos являются лучшими режимными вариантами.
Использование рендерера madvr с декодером lav cuvid позволяет ему получить доступ к API-интерфейсу NVIDIA CUDA для обработки видео, что не было достигнуто раньше. Он использует ту же технологию, которая была доступна только для игр. Никто не смог создать программное обеспечение, которое позволит делать это с картами ATI, поскольку выходит далеко за пределы возможностей dxva. Это наилучшее качество изображения, которое можете достичь с помощью ПК. Также необходимо использовать видеокарту с большим количеством потоковых процессоров. Таким образом, понадобится не менее gts 450, предпочтительно GTX 460.
|
JPulowski 2015-01-22 18:37 reporter |
mpc-hc_madvr_ed1_bug.png (978,807 bytes) |
|
skaurus 2015-01-24 11:07
reporter ~0000686 |
GTX 670 here, same thing. Started only after updating drivers to 347.25 version. |
|
madshi 2015-01-24 11:19
administrator ~0000687 |
This is very likely a bug in the new drivers, because it didn’t occur with older drivers, and it also doesn’t occur with AMD and Intel GPUs. Could you guys please report this to NVidia? If it’s a bug in their drivers (which I think has a probability of 99%), there’s nothing I can do to fix this. |
|
omarank 2015-01-24 18:26
reporter ~0000688 |
Certainly this should be a bug in the latest NVIDIA driver, but I was wondering how the NVIDIA driver is even able to differentiate between Error Diffusion Option 1 and Error Diffusion Option 2 as the problem does not manifest when the latter is selected. |
|
JPulowski 2015-01-24 18:31
reporter ~0000689 |
Reported it to NVIDIA. Looks like there are many issues with the latest drivers, lately. With the latest 347.xx drivers NNEDI3 and Error Diffusion 1 produces artifacts during playback. Well, I am not that hopeful but will wait for a reply from NVIDIA. |
|
cyberbeing 2015-01-25 01:14
reporter ~0000690 |
Yesterday, I also reported this bug to NVIDIA via the CUDA Registered Developer program:
Bug ID: 1602226, «[DirectCompute][347.12][Regression] 16px spaced vertical columns of dotted lines with madVR error diffusion dither» madshi, just a heads-up that I also listed your contact information in case they require more technical details about the DirectCompute code which triggers the bug, so there is a slim possibility they may end up emailing you. Unlikely though, since this bug is easy to reproduce. |
|
cyberbeing 2015-01-26 08:23
reporter ~0000691 Last edited: 2015-01-26 08:25 |
I just received a response from NVIDIA.
They were able to reproduce the issue, and have assigned the bug to their development team for investigation. |
|
madshi 2015-01-26 09:37
administrator ~0000693 |
Great, thanks! |
|
cyberbeing 2015-02-10 15:35
reporter ~0000703 Last edited: 2015-02-10 15:37 |
Issue was not fixed in 347.52 WHQL, I’ll try to check-up on the status. |
|
huhn 2015-03-23 17:48
reporter ~0000847 |
i can’t reproduce this anymore with 349.90 windows 10 driver. i guess there is a high chance the next stable driver will have this fix too. |
|
madshi 2015-03-23 17:49
administrator ~0000848 |
Sounds promising. How’s NNEDI3 and error diffusion performance of 349.90 compared to older pre-bug drivers? |
|
huhn 2015-03-23 18:27
reporter ~0000849 |
i’m going to kill that system now. i got a well know very hard bug. after that i try 341.44, 345.20 or 347.09? the numbers are such a mess. http://www.nvidia.com/Download/Find.aspx?lang=en-us and than update to 349.90 and compare. |
|
huhn 2015-03-26 16:28
reporter ~0000867 Last edited: 2015-03-26 16:30 |
edit: tried to fix the number «translation» from the bugtracker so i removed all ~
i can’t get windows 10 10041 with nvidia 349.90 running on my nvidia system. so this is 9926 with 349.65: in short just hope this version will never be released… nnedi3 chroma upscaling, with version 349.65, results in: same error as this: http://bugs.madshi.net/view.php?id=234 nnedi3 set to always: error diffusion mode 1 performance: |
|
madshi 2015-03-26 16:32
administrator ~0000868 |
Hmmmm… Seems Mantis has screwed with your numbers somehow. So what is your verdict about the driver situation? |
|
huhn 2015-03-26 16:36
reporter ~0000869 |
working error diffusion mode 1 for breaking nnedi3 chroma completely and artefact’s with slower image doubling.
just hope it will never be released like this. |
|
madshi 2015-03-26 17:19
administrator ~0000870 |
I see, thanks for the tests. |
|
JonnyRedHed 2015-03-31 12:33
reporter ~0000905 Last edited: 2015-03-31 12:36 |
I’ve dropped back to 347.09 and am still getting the issue and other odd flickering. re-tried just now with a clean NV wipe, safe mode > drivercleaner then reboot and fresh install of 347.09. Will see how this fairs today.
Kind of major issue for me, seems I can’t really use option2 or ordered dithering either. opt1 gives the vertical lines, and the other two options just give tiny stutters, like motion blur. And odd random flicking. I was on 337.94 before that. All Ok with them. |
|
huhn 2015-04-02 11:31
reporter ~0000913 |
some news about 349.xx
http://forum.doom9.org/showpost.php?p=1715810&postcount=348 http://www.phoronix.com/forums/showthread.php?116257-NVIDIA-Linux-349-12-Beta-Has-Improved-G-SYNC-amp-VDPAU-Features&p=480748#post480748 looks like they added openCL 1.2 |
|
JonnyRedHed 2015-04-02 12:05
reporter ~0000914 |
I’ve had a clean install of 347.09 for a day now and only get very occasion lines now. anything after 347.09 and its full on opt1 lines and odd flicking with opt2 etc. |
|
cyberbeing 2015-04-04 02:42
reporter ~0000921 Last edited: 2015-04-04 02:44 |
NVIDIA appears to have fixed this issue in the 350.05 Hotfix driver: http://nvidia.custhelp.com/app/answers/detail/a_id/3647 Similar to the Win10 driver, this Hotfix also adds support for OpenCL 1.2 on prior OS. |
|
cyberbeing 2015-04-04 03:06
reporter ~0000922 Last edited: 2015-04-04 03:13 |
Unfortunately, similar to what huhn posted about 349.65, the 350.05 driver now has corruption when using NNEDI3 ( http://i.imgbox.com/AxRKYBuL.png )… Not surprising, since this is also a r349 branch driver. |
|
madshi 2015-04-04 08:59
administrator ~0000924 |
And the OpenCL 1.2 support does not seem to support D3D9 interop, so the part I might be using is missing. It’s not that dramatic, though, because there’s a custom NVidia D3D9 interop extension which I’m currently using. But then, I don’t really have use for 1.2 without the D3D9 interop, so there’s no real progress for me. Anyway, any step forward is a step I appreciate. Maybe they will improve performance, too, at some point.
But of course these artifacts are very annoying! According to cyberbeing NVidia has been analyzing the problem for more than 2 months now. How long do they need to fix such an obvious problem as this?? |
|
huhn 2015-04-04 10:38
reporter ~0000927 |
with new feature like directx 12 or WDDM 2.0 i guess they have a lot to do right now.
direct compute issue (this issue 250)is fixed they simply added a new openCL issue. |
|
cyberbeing 2015-04-05 06:35
reporter ~0000929 Last edited: 2015-04-05 22:37 |
madshi, it actually looks like this new OpenCL NNEDI3 corruption is a bug in the r349 NVVM Compiler v4.2 rather than the kernel interpreter in the driver.
If you override the madVR OpenCL kernel in the registry with one from an earlier CUDA 7.0 driver (NVVM v4.1), NNEDI3 seems to function as expected without any corruption. For those wondering, you can do this by just importing an older version of the key at: HKEY_CURRENT_USERSoftwaremadshimadVROpenCL and then overriding the DriverVersion to 350.05 This will likely only work if you import an OpenCL kernel from another Cuda 7.0 (r346+) driver though. All of the r346 drivers generate identical NNEDI3 kernels, so it shouldn’t matter which version you backup from before updating. |
|
cyberbeing 2015-04-05 07:35
reporter ~0000930 |
I went ahead and submitted another bug via the CUDA Registered Developer program about this OpenCL NVVM Compiler problem:
Bug ID: 1632554, «NVVM Compiler (version 4.2) is producing corrupted output from OpenCL 1.0 kernels» |
|
madshi 2015-04-05 13:36
administrator ~0000931 |
Interesting. Good method to figure out whether it’s the compiler or something else which causes the problem. I guess most of the time the compiler will be responsible. |
|
cyberbeing 2015-04-09 12:16
reporter ~0000934 |
NVIDIA has now reproduced the NNEDI3 OpenCL issue, and passed it along to the NVVM developers.
It’s worth mentioning that they were unable to reproduce the issue on a GTX 750Ti Maxwell (sm_50), so it seems possible this bug may only occur with Kepler GPUs (sm_30). |
|
huhn 2015-04-14 00:54
reporter ~0000935 |
about nnedi3 issue.
i just tried 350.12 and it’s fixed for me. if they really fixed this in such a short time for a hotfix GTA 5 driver… respect! |
|
cyberbeing 2015-04-14 01:01
reporter ~0000936 |
Not fixed on my GTX 770. Still massive artifacts when using NNEDI3. |
|
huhn 2015-04-14 01:07
reporter ~0000937 |
that’s strange isn’t it? so i’m just lucky i guess… |
|
cyberbeing 2015-04-14 01:08 reporter |
NNEDI3_bug1632554_test2.mkv (14,414 bytes) Your browser does not support video tag. NNEDI3_bug1632554_test2.mkv (14,414 bytes) |
|
cyberbeing 2015-04-14 01:10
reporter ~0000938 |
huhn, could you please confirm that it’s actually fixed on your GTX 760 by testing the NNEDI3_bug1632554_test2.mkv video I just attached with NNEDI3 256 Neurons? |
|
huhn 2015-04-14 01:26
reporter ~0000939 |
i rebooted and tested your clip but not even angel beats can trigger the issue for me. i tried it with all types of neurons. |
|
cyberbeing 2015-04-14 01:27
reporter ~0000940 Last edited: 2015-04-14 01:28 |
Also if could you export the HKEY_CURRENT_USERSoftwaremadshimadVROpenCL registry key from both 350.05 (artifacts with my sample?) and 350.12 (no artifacts?) driver installs, that would be useful when I update my bug report. Which OS are you testing on?
If this really was an NVVM compiler bug for your GTX 760 as well, the Binary key should have changed between those two driver releases. If it didn’t change, then this bug which remains on my GTX 770 may reside somewhere else in the driver. |
|
huhn 2015-04-14 01:58 reporter |
350.12 350.05.zip (48,389 bytes) |
|
huhn 2015-04-14 02:00
reporter ~0000941 |
i’m using windows 10 10041 i can’t reproduce the issue with 350.05 and i never used that version. i saw that issue with 349.65. i added the 2 regs which have the same binary key. |
|
cyberbeing 2015-04-14 02:19
reporter ~0000942 |
Thanks for your help.
> i can’t reproduce the issue with 350.05…windows 10 10041 This is interesting, since when I reported the bug to NVIDIA they reproduced it with a GTX 760 + 350.05 on Windows 7. So it sounds like the NNEDI3 corruption you previously saw with 349.65 may have been resolved by 350.05(?), yet in Windows 10 only? |
|
huhn 2015-04-14 02:27
reporter ~0000943 |
i try older madVR version next. because i just installed 349.65 and no issue… i haven’t restarted yet.
i’m running first some antivir stuff i didn’t got the driver from nvidia i got i from a file share site so not today anymore. |
|
cyberbeing 2015-04-14 02:43
reporter ~0000944 |
Okay, I think I see what’s going on.
It wasn’t the 350.12 driver which resolved this issue for you, but rather the recent madVR x64 release. The difference being the NVVM generates a kernel with .address_size 32 with madVR x86, yet .address_size 64 with madVR x64. The NNEDI3 corruption does not occur on my GTX 770 with the .address_size 64 kernel, with 350.05 or 350.12. I didn’t notice at first since madVR has an issue related to this, which causes it to not regenerate the OpenCL key when switching between madVR x86 & madVR x64. So whichever madVR version you run first, that OpenCL kernel will be used for both. I think what should be done here, is madVR should always generate a OpenCL kernel with x64 when using a 64bit OS. |
|
madshi 2015-04-14 02:48
administrator ~0000945 |
The 32bit version of madVR does not have the capability to talk to the 64bit NVidia OpenCL driver. Only the 64bit madVR version has that. On the other hand the 64bit madVR version can’t talk to the 32bit NVidia OpenCL driver. So there isn’t really much I can do here.
It’s weird that the OpenCL driver creates different kernels, anyway. For all intends and purposes, they should produce identical kernels, because the GPU doesn’t really care at all whether the media player runs in 32bit or 64bit CPU mode. |
|
cyberbeing 2015-04-14 03:10
reporter ~0000947 Last edited: 2015-04-14 03:13 |
It doesn’t though, with .address_size 64 NVVM generates a kernel with uses 64bit integers in various portions of the math (with a modified kernel to match), while the .address_size 32 uses a 32bit integers instead.
I’ve opened a new bug about the OpenCL registry key failing to regenerate. |
|
madshi 2015-04-14 03:17
administrator ~0000949 |
Neither in my C++ code nor in my OpenCL kernel code «address_size» can be found, so I don’t know how to control that. FWIW, pretty much all the integers in the OpenCL kernel are used for loops, only, or for things like the frame width/height. So they’re not something 64bit would be needed for. All the real math is done in float. |
|
cyberbeing 2015-04-14 05:52
reporter ~0000955 Last edited: 2015-04-14 05:55 |
> Neither in my C++ code nor in my OpenCL kernel code «address_size» > can be found, so I don’t know how to control that. .address_size would likely need to be passed to NVVM in the same way which .target is specified for GPU architecture. Though it seems likely the built-in driver NVVM sets these automatically if not specified, I’d suspect there must be some kind of api to override the default parameters. Who knows what that api would be though. > FWIW, pretty much all the integers in the OpenCL kernel are used for loops, Looking at the difference between .address_size 32 and .address_size 64, it seems only a couple parameters are changed from 32bit to 64bit integers. One being nnedi3$input, and the other being nnedi3_param_2 (whatever those refer to). Since .address_size 32 functioned just fine prior to r349, it doesn’t seem like that could be directly related to any corruption. I’ll upload the PTX which NVVM generates for reference. You’ll probably need to read the PTX specification to understand what all that pseudo assembly means though… http://docs.nvidia.com/cuda/pdf/ptx_isa_4.2.pdf |
|
cyberbeing 2015-04-14 05:54 reporter |
NVVM_NNEDI3_Output.zip (38,088 bytes) |
|
madshi 2015-04-14 10:06
administrator ~0000957 |
There’s no API for setting «.address_size», and the OpenCL spec doesn’t even know this parameter. There’s a device information parameter you can ask which tells you which bitdepth the compiler will compile «size_t» types to. This can be either 32bit or 64bit. But I’m not using «size_t» anywhere. I’m always using types which have a strictly defined bitdepth. So «.address_size» should not even make a difference.
We’re talking about a simple and straight NVidia driver bug here. What NVVM seems to be doing here is violating the OpenCL spec. NVVM is not allowed to reinterpret my data types. I’ve explicitly told OpenCL which bitdepths I want to be used for every single one of my variables/parameters. |
|
cyberbeing 2015-04-14 12:36
reporter ~0000959 |
I’m getting the feeling .address_size 64 may have the same function as the more intuitively named AMD compiler option GPU_FORCE_64BIT_PTR, and is probably doing exactly as intended by such an option. So if there is an issue, it sounds more like one of driver default settings than anything else? If you believe otherwise after looking at my NVVM_NNEDI3_Output.zip, I’d suggest you file a bug with NVIDIA yourself, since it’s still unclear to me how this would violates the OpenCL spec.
When I look at the OpenCL spec, it mentions that device hardware (i.e. GPU) address bits can be either 32bit or 64bit. Those compiler switches likely just force the GPU driver generate assembly in such a way so it will behave as a 64bit OpenCL hardware device, rather than a 32bit OpenCL hardware device. I would think of it in terms of a 32bit vs 64bit software, where you’d sometimes need to make minor code changes to take into account the 64bit address space in order everything to compile and function as expected. But you know more about OpenCL about I do, so maybe this comparison is incorrect? |
|
madshi 2015-04-14 14:15
administrator ~0000960 |
I’m not sure if we need to dig so deep ourselves here. It’s a clear bug in the NVidia driver, so they should fix it, no? I don’t really feel the need to investigate this myself. Sure, we could spend many hours trying to dig into the depths of what the driver does, analyze the PTX commands and compare them between different NVVM versions and bitdepths. But in the end the fix must come from NVidia. So why should we bother? Us spending those hours on implementing new features instead seems much more fruitful to me. Don’t you agree? |
|
cyberbeing 2015-04-14 15:00
reporter ~0000962 |
> It’s a clear bug in the NVidia driver, so they should fix it, no?
The NNEDI3 corruption issue is a clear bug in the NVIDIA driver. No need to investigate that, since NVIDIA is doing so themselves. > I don’t really feel the need to investigate this myself. If you think there is a bug in the driver other than corruption issue I already have a bug open for, you may need to do a bit of investigation yourself. With statements such as… «What NVVM seems to be doing here is violating the OpenCL spec.» «I’m always using types which have a strictly defined bitdepth. So «.address_size» should not even make a difference» …if you were suggesting that (corruption bug non-withstanding) that NVVM in general handles the .address_size parameter incorrectly in relation to OpenCL, you’d need prove that theory with a reproducible test case if another bug were to be opened. That is all I was saying. |
|
madshi 2015-04-14 15:10
administrator ~0000963 |
Originally you said that the actual variables/parameters used in the kernel would change their bitdepth, depending on «.address_size», and that «.address_size» would depend on the NVVM bitdepth. *That* would have been a violation of the OpenCL spec. Now you’re saying the variables/parameters don’t change their bitdepth, after all, so also my comment about NVVM violating the OpenCL spec is no longer valid.
I still don’t really see a need for NVVM 32bit to create a different PTX kernel compared to NVVM 64bit, but as far as OpenCL memory addressing is concerned, I’m not really an expert. |
|
cyberbeing 2015-04-14 15:42
reporter ~0000964 Last edited: 2015-04-14 15:42 |
>Now you’re saying the variables/parameters don’t change their bitdepth
All I’m saying is don’t take my word for it. Anything I’ve said regarding this has in no way been verified. At best they are guesses based on what it sounds like such an option should be doing. Trying to understand exactly how the OpenCL code is being translated to PTX is a bit beyond me. The only thing clear is that the use of 64bit integers increases when .address_size 64 is specified. At that point only you could say for sure if any of those were actual clearly defined variables/parameters which shouldn’t have been changed. Though as long as output is correct, maybe this doesn’t even matter. |
|
madshi 2015-04-14 15:54
administrator ~0000965 |
I can either take your word for it, or investigate myself, which would cost me dozens of hours of my development time, or I could simply let NVidia do their job and be done with it. I prefer the latter. |
|
cyberbeing 2015-04-15 01:45
reporter ~0000966 |
That’s perfectly fine with me. No use wasting valuable time on trying to find a problem which likely doesn’t even exist. Considering NVIDIA uses the PTX intermediary format for CUDA as well, if there were a serious problem with how a basic target parameter such as .address_size was being handled, I think it’s safe to assume it would not go unnoticed for long. |
|
huhn 2015-09-26 06:52
reporter ~0001181 |
installed an old madVR version and used restore default and update back to the current version. i tried to reproduce this issue with a 32 bit player and i guess this is fixed now. but i can’t 100% check if the openCL kernel is 32 bit. |
|
|
#38321 | Link |
|
Registered User Join Date: Aug 2015 Posts: 7 |
Quote:
Originally Posted by huhn did you changed the HDR peak luminance to something low like 180? In v0.90.20 display’s peak luminance is set to 120 nits and it works like a charm. In v0.90.21 The problem appear when the value is at 120 nits or 180 nits. At 256 nits the images look good. Another thing: if I set any value to display’s peak luminance and then I disable the HDR processing, the display’s value will not reset.
Last edited by Vegekou; 13th June 2016 at 20:03.
|

|
|


|
|
#38322 | Link |
|
Registered User Join Date: Dec 2012 Posts: 163 |
Quote:
Originally Posted by robl45 So I updated my driver and it switches to stereoscopic resolution when I play mvc mkv file. But I’m not getting 3d. Its like it’s switching to 3d and playing the 2d file and then when I exit, it stays in 3d resolution and I need to manually go to display panel and turn off 3d to get back to normal 1080p resolution. I played with the settings in Madvr, it appears to now be switching resolutions properly back and forth but the file playing still does not appear to be in 3d. Does anyone have a small test file I could try in case this one isn’t working correctly? |
|
|
|
|
|
#38323 | Link |
|
Registered User Join Date: Nov 2011 Posts: 187 |
Quote:
Originally Posted by madshi madVR v0.90.21 released Thanks for the new build. I will play with the new HDR related options by the weekend. I have questions regarding the gamma used for HDR tone mapping. If I understand it correctly, SMPTE 2084 transfer function doesn�t specify any gamma. After madVR decodes the SMPTE 2084 content and compresses the highlights, it ends up with linear light content which it gamma corrects depending upon what gamma the user is targeting:
Quote:
Originally Posted by madshi Code: * HDR: added option to choose between clipping and tone mapping I didn�t see this option in the HDR settings page. Where can I find this? Quote:
Originally Posted by madshi When doing tone mapping, you’re compressing highlight image areas into a smaller data range. Doing that is necessary, but results in lost details. So the «Restore details» option tries to restore the detail that was lost due to tone mapping. It does so by selectively sharpen the image (only where it’s needed). This option is rather subtle, but in some scenes there’s a visible difference. (Upscaling is not involved.) If it doesn’t take much of your time, could you please show some illustration or sample images to show what details are lost and how well madVR is able to restore them at the default settings: anti-ringing and anti-bloating enabled with strength 100%? |
|
|
|
|
|
#38324 | Link |
|
Registered User
Join Date: Jan 2014 Posts: 63 |
If my monitor’s brightness is 250 cd/m2…. then its max nits is 250, correct? Also, there’s an option that states it won’t work with DXVA scaling… so i need to turn off DXVA copy-back? |
|
|
|

|
|
#38325 | Link |
|
Registered Developer Join Date: Mar 2010 Location: Hamburg/Germany Posts: 10,266 |
Quote:
Originally Posted by wolfman2791 If my monitor’s brightness is 250 cd/m2…. then its max nits is 250, correct? Unfortunately thats not quite how it works. Just get some HDR material and test which looks best to you.
__________________ |
|
|
|
|
|
#38326 | Link |
|
Registered User
Join Date: Mar 2002 Posts: 2,321 |
Quote:
Originally Posted by omarank I didn�t see this option in the HDR settings page. Where can I find this? Good finding, me neither. Quote:
Originally Posted by omarank If it doesn’t take much of your time, could you please show some illustration or sample images to show what details are lost and how well madVR is able to restore them at the default settings: anti-ringing and anti-bloating enabled with strength 100%? He doesn’t have to, you can easily try it out (I’ve played with it yesterday). Just pick up different scenes and enable/disable those features (don’t forget to hit apply) and you’ll see what he means.
__________________ |
|
|
|


|
|
#38327 | Link |
|
Registered User Join Date: Jun 2013 Posts: 23 |
madVR help with 3d Hi I’m having trouble getting framepacking 3d working with MadVR, I have tried both a 3d mounted iso and a 3d mkv mkc test file. I can confirm 3d is working fine with Cyberlink PDVD when I play a mounted bluray iso. My System: Test File: MadVR Settings: When I playback the movie it just seems to work in 2d mode only. The display doesn’t swich to 3d mode and it doesn’t receive a framepacked signal. Even if I enable side by side format under settings in madvr still displays a normal picture. I’d appreciate any help. What is the next step in diagnosing my problem? Thanks
Last edited by kiwijunglist; 14th June 2016 at 11:40.
|
|
|
|
|
|
#38328 | Link |
|
Registered User Join Date: Oct 2012 Posts: 7,570 |
make sure the internal filter from mpc-hc aren’t used. then check that the 3d decoder is used running a 3D -> play -> filter -lav video decoder(this should be the internal one) and then check under hardware acceleration active decoder. |
|
|
|
|
|
#38329 | Link |
|
Registered User Join Date: Jun 2013 Posts: 23 |
Thanks hunn Not sure what you mean by make sure internal filter from mpc-hc aren’t used, however… I played a 3d mkv file, I right clicked on the video during playback, Filters -> LAV Video -> Settings ->
Last edited by kiwijunglist; 14th June 2016 at 12:16.
|
|
|
|
|
|
#38330 | Link |
|
Registered User Join Date: Jun 2013 Posts: 23 |
Attached Images
Last edited by kiwijunglist; 14th June 2016 at 12:16.
|
|
|
|
|
|
#38331 | Link |
|
Registered User Join Date: Jun 2013 Posts: 23 |
EDIT: I got it working, I disabled all internal filters in MPC-HC. Thank you.
Last edited by kiwijunglist; 14th June 2016 at 12:29.
|
|
|
|
|
|
#38332 | Link |
|
Registered User Join Date: Dec 2012 Posts: 163 |
Quote:
Originally Posted by kiwijunglist EDIT: I got it working, I disabled all internal filters in MPC-HC. Thank you. What did you do to get it working.I have everything working and playing but no 3d actually coming out. |
|
|
|
|
|
#38333 | Link |
|
Registered User Join Date: Sep 2014 Posts: 280 |
is there a way to use madvr with a logitech harmony remote? I try to find a way to toggle profiles, switch on/off 3D Lut or open madvrsettings via remote…
__________________ |
|
|
|
|
|
#38334 | Link |
|
***** Join Date: Feb 2005 Posts: 5,538 |
For 3D playback you need to install the Intel Media SDK DLLs. This installer puts the required DLLs in the Windows system folder. That way it should also work with the internal LAV Filters of MPC-HC. |
|
|
|
|
|
#38335 | Link |
|
Registered User Join Date: Dec 2014 Posts: 1,127 |
Quote:
Originally Posted by Sunset1982 is there a way to use madvr with a logitech harmony remote? I try to find a way to toggle profiles, switch on/off 3D Lut or open madvrsettings via remote… Use MCE keyboard as the device. This gives you access to any keyboard command. |
|
|
|
|
|
#38336 | Link |
|
Registered User Join Date: Dec 2012 Posts: 40 |
Quote:
Originally Posted by madshi madVR v0.90.19 released Code: * fixed: image doubling was sometimes activated although it shouldn't This issue still exists. Seems to me that madVR calculates scaling factor = (window height) / (source height), which can activate image doubling even when the image is actually downscaled quite a lot as this example shows. With doubling set to activate when the scaling factor is 1.2 or bigger, it actually activates when the window height is increased from 839 pixels (first picture) to 840=1.2*700 (second picture) pixels regardless of the window width which in this case actually defines the scaling factor. |
|
|
|
|
|
#38337 | Link |
|
Registered User Join Date: Dec 2004 Posts: 35 |
Hi guys. Is it normal to not be able to uncheck Chroma doubling if Luma doubling is enabled? There are separate checkboxes, but if I enabled Luma Doubling, I am unable to disable Chroma Doubling. I’m juuuuuust barely able to use super sampling and would love to not double Chroma if it will save system resources. Thanks |
|
|
|
|
|
#38338 | Link |
|
Registered User Join Date: Oct 2012 Posts: 7,570 |
you can only disable chroma doubling with nnedi3 |
|
|
|
|
|
#38340 | Link |
|
Registered User Join Date: Jun 2013 Posts: 23 |
Quote:
Originally Posted by robl45 What did you do to get it working.I have everything working and playing but no 3d actually coming out. Play a 3d video, then right click -> filters -> lav video. and screenshot what the active decoder is. It should be «msdk mvc». The active decoder is written underneath the box that lets you choose your hardware accleration method in LAV while a video is actually playing. Before i properly disabled internal filters in mpc-hc it was listed as «dxvan2» |
|
|
|
#301
![]()
Posted 30 January 2014 — 02:50 PM
Might work for some, not me. I renamed the nvopencl.dll file per the instructions, unchecked the «use random dithering instead of openCL error diffusion» in the trade quality for performance settings and still get a black screen. Note: Image Doubling options checed or unchecked.
I posted this result to the mVR doom9 thread.
- Back to top
#302
![]()
ehathgepiurhe
Posted 31 January 2014 — 01:37 AM
If you check the last few pages of the doom9 madvr thread, apparently that renaming trick does not actually work — the files are already named correctly.
Edit: http://forum.doom9.o…967#post1664967 (and the following posts, including the next page where the person who posted to AVS admits it does not actually work)
- Back to top
#303
![]()
Prinz
Posted 03 February 2014 — 09:41 PM
DirectCompute instead of OpenCL for Error Diffusion test-build:
http://forum.doom9.o…postcount=22398
- Back to top
#304
![]()
ehathgepiurhe
Posted 04 February 2014 — 01:29 AM
As a nvidia user, will be interested to see how well this works.
- Back to top
#305
![]()
bkm
Posted 04 February 2014 — 09:43 AM
As a nvidia user, will be interested to see how well this works.
Didn’t work for me and my 650M, posted my result to the mVR thread. FSE mode made my 650M explode haha (ran out of video memory)
Did you have better luck?
- Back to top
#306
![]()
bkm
Posted 04 February 2014 — 09:44 AM
If you check the last few pages of the doom9 madvr thread, apparently that renaming trick does not actually work — the files are already named correctly.
Yep, I was the first to report that it doesn’t work 
- Back to top
#307
![]()
ehathgepiurhe
Posted 04 February 2014 — 10:52 AM
Didn’t work for me and my 650M, posted my result to the mVR thread. FSE mode made my 650M explode haha (ran out of video memory)
Did you have better luck?
Honestly — I don’t know. I’m not sure it is actually enabled or not. madshi said it was only enabled for error diffusion. I couldn’t actually see anything by that name in madVR, so I simply ticked the ‘use nnedi3 to double luma resolution’ option. I then fullscreened Zoom. With the previous OpenCL builds, that was the end of that — the video would stop playing, as it did for any NVIDIA user. This time, Zoom continued to play…but the video image was negative! That is, as in it looked like a photo negative. Also, the dropped and delayed frames values in the madVR OSD started to rise dramatically. This is with a GTX 660Ti. So — I don’t know if DirectCompute is being used or not. If yes, then it doesn’t work well. If no, then I can’t really comment on the performance until I actually get it working! 
ehat
- Back to top
#308
![]()
Prinz
Posted 04 February 2014 — 11:01 AM
The relevant option is in trade quality for performance:
use random dithering instead of OpenCL errror diffusion
It’s of couse still called OpenCL since in the rar is not a new madHcCtrl.exe
- Back to top
#309
![]()
ehathgepiurhe
Posted 04 February 2014 — 11:11 AM
Thanks Prinz. Disabled that option (it was enabled), and then disabled the nnedi3 option (to return it to the default disabled). Playback is fine now — doesn’t seem to be any performance hit, though there looks to be absolutely no difference in the video image either. From what I understand though, unless you have just the right sort of video file playing, to see a difference in the video image with most of the options in madVR you need to pause the video and take a screenshot (and compare that screenshot to one from the exact same place with the options at the defaults).
ehat
- Back to top
#310
![]()
Prinz
Posted 04 February 2014 — 12:12 PM
test build 3: (build 2 didn’t work at all)
http://forum.doom9.o…postcount=22459
- Back to top
#311
![]()
ehathgepiurhe
Posted 05 February 2014 — 01:35 AM
Disregard my results above — I don’t think the DirectCompute stuff was active after all. There is a post in the madvr thread that error diffusion only applies when in 8 bit mode. My lcd’s are only 6 bit, so that is what I have madvr set to. So it probably wasn’t being used.
- Back to top
#312
![]()
bkm
Posted 05 February 2014 — 02:41 AM
(Edited below) Hopefully since the DirectCompute is working for us Nvidia users this will allow madshi to introduce new madVR features that he couldn’t before. But most likely I will be leaving that Random Dithering Trade Quality option checked. The more stuff madshi adds the more CPU/GPU intensive it is getting as can be seen below
Edit, After more testing:
With SD material (typical mp4 SD downloaded TV show in H264 format, cuvid) : In FSE mode I definitely see a better video quality but unfortunately my GPU load jumps up to a whopping 75% from 34% without the new DirectCompute dithering. Zoom Player slightly higher cpu consumption. Gosh that is just too much even with my overclocked 650M to almost 660M standards. But yes, the image for the SD material is definitely noticeably sharper and clearer and this is even after using avisynth script sharpener LSFMod.
With HD material (typical mkv HD downloaded movie in H264 format,cuvid 720p): Again in FSE mode I definitely see better video quality but again my GPU load jumps up to 67% from 27% without the new DirectCompute dithering. Zoom Player about the same as SD slightly higher cpu consumption.
I am also having occasional ZP crashing errors when switching out of FSE to window mode with the new DirectCompute dithering. Hopefully next time it happens I can catch the error number and report it to the doom9 thread
- Back to top
#313
![]()
ehathgepiurhe
Posted 05 February 2014 — 08:12 AM
I just changed the panel setting in madVR to 8-bit, just to check. I think I was correct before — at 6-bit, error diffusion was not enabled. With 8-bit, there is a large performance hit on my 660Ti. Rendering time for a 1280×720 video fullscreened to 1920×1200 went from 3ms to 10ms. Much more, and it would start dropping frames (I have FSE mode disabled). No noticeable change in the image quality however (as expected).
ehat
Edit: Hm. A 960×536 AVI file at fullscreen 1920×1200 goes from 3ms at 6-bit to a number that does not actually seem to stop increasing at 8-bit (I stopped the video playing when it reached 16ms — it was increasing about 1ms every few seconds). Seems my 660Ti doesn’t like DirectCompute either.
- Back to top
#314
![]()
Prinz
Posted 06 February 2014 — 12:23 PM
- Back to top
#315
![]()
Prinz
Posted 07 February 2014 — 10:20 AM
- Back to top
#316
![]()
ehathgepiurhe
Posted 08 February 2014 — 08:15 AM
Heh — so much for 0.87.5 
ehat
- Back to top
#317
![]()
Prinz
Posted 08 February 2014 — 02:26 PM
- Back to top
#318
![]()
Prinz
Posted 05 March 2014 — 06:16 PM
madVR v0.87.5 released
* error diffusion now uses DirectCompute (DX11 GPU needed) instead of OpenCL
* added fast and reasonably high quality «ordered dithering» algorithm
* added «renderingdithering» settings page with many new options
* new default dithering is now ordered dithering instead of random dithering
* madTPG now always uses monochromatic ordered dithering
* fixed: #107: XySubFilter: reducing CPU queue size during playback -> crash
* fixed: #112: 120fps clip resulted in 23Hz being selected instead of 60Hz
* fixed: #119: installation resulted in «might not have installed correctly»
* fixed: #123: XySubFilter: Nearest Neighbor/Bilinear distorted subtitles
* fixed: #125: forced film mode with unsupported FOURCCs: graphical corruption
* fixed: #133: XySubFilter: opaque black box when smooth motion was enabled
* fixed: #136: when playback is stopped, madVR now always turns the video off
* fixed: #137: Nearest Neighbor/Bilinear has problems with post-resize shaders
* fixed: #138: smooth motion FRC flickered when using Nearest Neighbor
* fixed: #145: DCI-P3 was using an incorrect white point
* fixed: #155: screeshots sometimes had an added black border
* fixed: #159: speciying DCI-P3 as the calibrated gamut -> green screen
* fixed: #160: corruption with uncompressed 4096×2304 v210 in AVI
* fixed: #161: YUV 4:4:4 videos with weird resolutions crashed madVR
* fixed: #165: overlay mode restricted madVR to single player window
* fixed: #167: dithering produced dithering noise on pure black areas
* fixed: #169: dithering produced dithering noise on pure white areas
* fixed: #170: Overlay mode sometimes unnecessarily cleared GPU gamma ramps
* fixed: Overlay mode applied 3dlut and gamma ramps in wrong order
* fixed: crash reporting didn’t catch exceptions in private threads, anymore
* fixed: crash when using XySubFilter with small GPU queue size
* fixed: DVD navigator was not released properly by madVR
* fixed: Run/Seek hooks also affected secondary DirectShow graphs
* fixed: profile key shortcuts only worked for «scaling» profiles
* fixed: full range YCbCr input produced slightly incorrect colors
* reduced Overlay mode graphical corruption when resizing media player
* exclusive -> windowed switch now shows a black frame instead of an old one
* removed XySubFilter auto-loading functionality, it’s now XySubFilter’s job
* disabled resolution based DCI-P3 auto detection
* changed default luma doubling value to 32 neurons
* display bitdepth can be be set to as low as 3bit (just for testing)As you can see, this build contains a LOT of bugfixes. There are still some bugfixes left to do (see bug tracker), but I wanted to release a new official build with the new dithering algorithms now. There’ll probably be a v0.87.6 in the near future with some more bugfixes.
Please note that there’s also a new XySubFilter build which I recommend to use. See here:
http://forum.doom9.o…ad.php?t=168282
http://forum.doom9.o…postcount=24308
- Back to top
#319
![]()
Jacques
Posted 06 March 2014 — 04:17 PM
I wonder if this is the time to revisit the «Enable MadVR’s smooth motion» option in ZP (under Playback:Video). This has always been confusing since the ZP option did override the option in MadVR’s settings without it being clear that it did so. (There is NO mention of this option in the ZP Help.) There WAS some justification for it, however, since the MadVR settings were only available when a video was playing.
Starting with MadVR 87.0, however, the MadVR settings are available at all times. This makes things even more confusing. Right now, I’m not even sure which has precedence at a particular time.
I think that the ZP option should be removed since the MadVR option can now be changed at any time. If not, then at least make it VERY clear how the ZP option works in conjunction with the MadVR option.
- Back to top
#320
![]()
mitko
Posted 06 March 2014 — 04:46 PM
I agree with Jacques’ proposal.
If I remember correctly the idea of this option was to have the ability to have two separate instances of ZP with different madVR configurations … but I think that having only this single option is far from enough and it’s creating more confusion than helping the users.
Also having in mind that madVR now has the ability to create profiles which can be loaded based on the player name I think it’s better to remove this option … or at least it should be a three state check box with default the third state which should mean — «don’t override madVR’s configuration».
- Back to top