Добрый день! Помогите, пожалуйста, восстановить камеру Vstarcam C7833WIP-X4, работала пару-тройку лет, висела на фасаде дома, подключена к роутеру лан-кабелем. Внезапно пропал к ней доступ. Ни из приложения ни по сети она не видится. Программатором был слит дамп. Была подобрана похожая флеш и был программатором залит на новую флеш тот дамп. Эффекта ноль. Сейчас подключился к ней через uart и слил вот такой лог.
System startup
U-Boot 2010.06 (Mar 25 2017 — 11:29:49)
Check Flash Memory Controller v100 … Found
SPI Nor(cs 0) ID: 0xef 0x40 0x18
spi_general_qe_enable(294): Error: Disable Quad failed! reg: 0x2
Block:64KB Chip:16MB Name:»W25Q128(B/F)V»
SPI Nor total size: 16MB
MMC:
EMMC/MMC/SD controller initialization.
Card did not respond to voltage select!
No EMMC/MMC/SD device found !
In: serial
Out: serial
Err: serial
Hit any key to stop autoboot: 0
16384 KiB hi_fmc at 0:0 is now current device
## Booting kernel from Legacy Image at 82000000 …
Image Name: Linux-3.4.35
Image Type: ARM Linux Kernel Image (uncompressed)
Data Size: 2740520 Bytes = 2.6 MiB
Load Address: 80008000
Entry Point: 80008000
Loading Kernel Image … OK
OK
Starting kernel …
Uncompressing Linux… done, booting the kernel.
Booting Linux on physical CPU 0
Linux version 3.4.35 (xufengqi@ubuntu) (gcc version 4.8.3 20131202 (prerelease) (Hisilicon_v300) ) #31 Sat Mar 25 11:32:16 CST 2017
CPU: ARM926EJ-S [41069265] revision 5 (ARMv5TEJ), cr=00053177
CPU: VIVT data cache, VIVT instruction cache
Machine: hi3518ev200
Memory policy: ECC disabled, Data cache writeback
Built 1 zonelists in Zone order, mobility grouping on. Total pages: 10668
Kernel command line: mem=42M console=ttyAMA0,115200 root=/dev/mtdblock2 rootfstype=squashfs rw init=/sbin/init mtdparts=hi_sfc:1024k(boot),3072k(kernel),7168k(rootfs),5120k(system)
PID hash table entries: 256 (order: -2, 1024 bytes)
Dentry cache hash table entries: 8192 (order: 3, 32768 bytes)
Inode-cache hash table entries: 4096 (order: 2, 16384 bytes)
Memory: 42MB = 42MB total
Memory: 37044k/37044k available, 5964k reserved, 0K highmem
Virtual kernel memory layout:
vector : 0xffff0000 — 0xffff1000 ( 4 kB)
fixmap : 0xfff00000 — 0xfffe0000 ( 896 kB)
vmalloc : 0xc3000000 — 0xff000000 ( 960 MB)
lowmem : 0xc0000000 — 0xc2a00000 ( 42 MB)
modules : 0xbf000000 — 0xc0000000 ( 16 MB)
.text : 0xc0008000 — 0xc04d0000 (4896 kB)
.init : 0xc04d0000 — 0xc04f2d3c ( 140 kB)
.data : 0xc04f4000 — 0xc0523000 ( 188 kB)
.bss : 0xc0523024 — 0xc0562858 ( 255 kB)
SLUB: Genslabs=13, HWalign=32, Order=0-3, MinObjects=0, CPUs=1, Nodes=1
NR_IRQS:32
VIC @fe0d0000: id 0x00641190, vendor 0x41
sched_clock: 32 bits at 49MHz, resolution 20ns, wraps every 86767ms
Console: colour dummy device 80×30
Calibrating delay loop… 269.10 BogoMIPS (lpj=1345536)
pid_max: default: 32768 minimum: 301
Mount-cache hash table entries: 512
Initializing cgroup subsys freezer
CPU: Testing write buffer coherency: ok
Setting up static identity map for 0x803b5f28 — 0x803b5f80
dummy:
NET: Registered protocol family 16
Serial: AMBA PL011 UART driver
uart:0: ttyAMA0 at MMIO 0x20080000 (irq = 5) is a PL011 rev2
console [ttyAMA0] enabled
uart:1: ttyAMA1 at MMIO 0x20090000 (irq = 30) is a PL011 rev2
uart:2: ttyAMA2 at MMIO 0x200a0000 (irq = 25) is a PL011 rev2
bio: create slab <bio-0> at 0
SCSI subsystem initialized
hi-spi-master hi-spi-master.0: with 1 chip select slaves attached
hi-spi-master hi-spi-master.1: with 2 chip select slaves attached
usbcore: registered new interface driver usbfs
usbcore: registered new interface driver hub
usbcore: registered new device driver usb
Switching to clocksource timer0
NET: Registered protocol family 2
IP route cache hash table entries: 1024 (order: 0, 4096 bytes)
TCP established hash table entries: 2048 (order: 2, 16384 bytes)
TCP bind hash table entries: 2048 (order: 1, 8192 bytes)
TCP: Hash tables configured (established 2048 bind 2048)
TCP: reno registered
UDP hash table entries: 256 (order: 0, 4096 bytes)
UDP-Lite hash table entries: 256 (order: 0, 4096 bytes)
NET: Registered protocol family 1
RPC: Registered named UNIX socket transport module.
RPC: Registered udp transport module.
RPC: Registered tcp transport module.
RPC: Registered tcp NFSv4.1 backchannel transport module.
VFS: Disk quotas dquot_6.5.2
Dquot-cache hash table entries: 1024 (order 0, 4096 bytes)
squashfs: version 4.0 (2009/01/31) Phillip Lougher
NFS: Registering the id_resolver key type
jffs2: version 2.2. (NAND) © 2001-2006 Red Hat, Inc.
fuse init (API version 7.18)
msgmni has been set to 72
Block layer SCSI generic (bsg) driver version 0.4 loaded (major 254)
io scheduler noop registered
io scheduler deadline registered (default)
io scheduler cfq registered
brd: module loaded
Check Flash Memory Controller v100 … Found.
SPI Nor(cs 0) ID: 0xef 0x40 0x18
spi_general_qe_enable(294): Error: Disable Quad failed! reg: 0x2
Block:64KB Chip:16MB Name:»W25Q128(B/F)V»
SPI Nor total size: 16MB
4 cmdlinepart partitions found on MTD device hi_sfc
4 cmdlinepart partitions found on MTD device hi_sfc
Creating 4 MTD partitions on «hi_sfc»:
0x000000000000-0x000000100000 : «boot»
0x000000100000-0x000000400000 : «kernel»
0x000000400000-0x000000b00000 : «rootfs»
0x000000b00000-0x000001000000 : «system»
SPI Nand ID Table Version 1.9
hifmc100_dev_ready(650): Error: SPI Nand wait ready timeout, status: 0xff
hifmc100_dev_ready(650): Error: SPI Nand wait ready timeout, status: 0xff
hifmc100_dev_ready(650): Error: SPI Nand wait ready timeout, status: 0xff
hifmc100_dev_ready(650): Error: SPI Nand wait ready timeout, status: 0xff
hifmc100_dev_ready(650): Error: SPI Nand wait ready timeout, status: 0xff
No NAND device found
himii: probed
pegasus: v0.6.14 (2006/09/27), Pegasus/Pegasus II USB Ethernet driver
usbcore: registered new interface driver pegasus
usbcore: registered new interface driver asix
usbcore: registered new interface driver cdc_ether
usbcore: registered new interface driver net1080
usbcore: registered new interface driver cdc_subset
usbcore: registered new interface driver zaurus
usbcore: registered new interface driver cdc_ncm
ehci_hcd: USB 2.0 ‘Enhanced’ Host Controller (EHCI) Driver
hiusb-ehci hiusb-ehci.0: HIUSB EHCI
hiusb-ehci hiusb-ehci.0: new USB bus registered, assigned bus number 1
hiusb-ehci hiusb-ehci.0: irq 15, io mem 0x100b0000
hiusb-ehci hiusb-ehci.0: USB 0.0 started, EHCI 1.00
hub 1-0:1.0: USB hub found
hub 1-0:1.0: 1 port detected
ohci_hcd: USB 1.1 ‘Open’ Host Controller (OHCI) Driver
hiusb-ohci hiusb-ohci.0: HIUSB OHCI
hiusb-ohci hiusb-ohci.0: new USB bus registered, assigned bus number 2
hiusb-ohci hiusb-ohci.0: irq 16, io mem 0x100a0000
hub 2-0:1.0: USB hub found
hub 2-0:1.0: 1 port detected
Initializing USB Mass Storage driver…
usbcore: registered new interface driver usb-storage
USB Mass Storage support registered.
mousedev: PS/2 mouse device common for all mice
i2c /dev entries driver
hisi_i2c hisi_i2c.0: Hisilicon [i2c-0] probed!
hisi_i2c hisi_i2c.1: Hisilicon [i2c-1] probed!
hisi_i2c hisi_i2c.2: Hisilicon [i2c-2] probed!
usbcore: registered new interface driver usbhid
usbhid: USB HID core driver
TCP: cubic registered
Initializing XFRM netlink socket
NET: Registered protocol family 10
NET: Registered protocol family 17
NET: Registered protocol family 15
lib80211: common routines for IEEE802.11 drivers
Registering the dns_resolver key type
VFS: Mounted root (squashfs filesystem) readonly on device 31:2.
Freeing init memory: 136K
usb 1-1: new high-speed USB device number 2 using hiusb-ehci
_ _ _ _ _ _ _ _ _ _ _ _
_ _ _ _ _ ___
/ /__/ |_/
/ __ / — _ ___
/ / / / / /
_ _ _ _/ / / _/ _ ______
________________________________
[RCS]: /etc/init.d/S00devs
[RCS]: /etc/init.d/S01udev
udevd (531): /proc/531/oom_adj is deprecated, please use /proc/531/oom_score_adj instead.
host f_min:60000, f_max:148500000, hz:50000000real use hz:50000000
mmc1: new high speed SD card at address 0001
mmcblk0: mmc1:0001 ASTC 1.86 GiB
mmcblk0: p1
[RCS]: /etc/init.d/S80network
* checkModule iRet = 0x00
*************************init down!
gpio: version magic ‘3.0.8 mod_unload ARMv5 ‘ should be ‘3.4.35 mod_unload ARMv5 p2v8 ‘
insmod: can’t insert ‘/system/system/bin/gpio_aplink.ko’: invalid module format
Open gpio error!(-1)
devInit error!
/system/init/ipcam.sh: line 7: /system/system/bin/upgrade: not found
Hisilicon Watchdog Timer: 0.01 initialized. default_margin=60 sec (nowayout= 0, nodeamon= 0)
read 0x00B8 = 1
(none) login: write read 0x00B8 = 0
read 0x0400 = 0
write read 0x0400 = 2
read 0x03fc = 40
write read 0x03fc = 40
write read 0x03fc = 42
[M][1970/01/01/08:00:20][wifiupdate.c<main>:39]run /system/system/bin/encoder
logfile : /tmp/wifiupdate.log
[M][1970/01/01/08:00:20][wifiupdate.c<main>:49]NetWorkHardWareInit
[M][1970/01/01/08:00:20][hardware.c<NetWorkHardWareInit>:20]NetWorkDriverAppInit
[M][1970/01/01/08:00:20][networkparamapp.c<NetWorkDriverAppInit>:25]NetWorkWifiDriverInit
NetWorkWifiDriverInit insmod wifi KO
[M][1970/01/01/08:00:20][wifi.c<NetWorkWifiDriverInit>:1023]insmod /lib/modules/wifi/mtutil7601Usta.ko
[M][1970/01/01/08:00:20][wifi.c<NetWorkWifiDriverInit>:1028]insmod /lib/modules/wifi/mt7601Usta.ko
/system/system/bin/encoder: can’t load library ‘libmem.so’
mt7601Usta: module license ‘unspecified’ taints kernel.
Disabling lock debugging due to kernel taint
[M][1970/01/01/08:00:21][wifi.c<NetWorkWifiDriverInit>:1033]insmod /lib/modules/wifi/mtnet7601Usta.ko
rtusb init rtusbSTA —>
=== pAd = c31d4000, size = 860440 ===
<— RTMPAllocTxRxRingMemory, Status=0
<— RTMPAllocAdapterBlock, Status=0
RTMP_COM_IoctlHandle():pAd->BulkOutEpAddr=0x8
RTMP_COM_IoctlHandle():pAd->BulkOutEpAddr=0x4
RTMP_COM_IoctlHandle():pAd->BulkOutEpAddr=0x5
RTMP_COM_IoctlHandle():pAd->BulkOutEpAddr=0x6
RTMP_COM_IoctlHandle():pAd->BulkOutEpAddr=0x7
RTMP_COM_IoctlHandle():pAd->BulkOutEpAddr=0x9
NVM is EFUSE
Endpoint(8) is for In-band Command
Endpoint(4) is for WMM0 AC0
Endpoint(5) is for WMM0 AC1
Endpoint(6) is for WMM0 AC2
Endpoint(7) is for WMM0 AC3
Endpoint(9) is for WMM1 AC0
Endpoint(84) is for Data-In
Endpoint(85) is for Command Rsp
usbcore: registered new interface driver rtusbSTA
[M][1970/01/01/08:00:21][hardware.c<NetWorkHardWareInit>:23]damonNetWorkInit
[M][1970/01/01/08:00:21][networkinterface.c<damonNetWorkInit>:91]ifconfig lo 127.0.0.1
[M][1970/01/01/08:00:21][networkinterface.c<damonNetWorkInit>:94]NetWorkParamInit
[M][1970/01/01/08:00:21][networkparam.c<NetWorkParamInit>:481]NetWorkParamRead
[M][1970/01/01/08:00:21][networkparam.c<NetWorkParamRead>:166]dhcp = 1
[M][1970/01/01/08:00:21][networkparam.c<NetWorkParamInit>:484]SysConfigInit
[M][1970/01/01/08:00:21][sysparam.c<SysConfigRead>:484]===SysConfigRead===
[M][1970/01/01/08:00:21][sysparam.c<SysConfigRead>:526]open /system/param/factory.ini success
[M][1970/01/01/08:00:21][sysparam.c<SysConfigRead>:545]===Get wifi ap mac:00:00:00:00:00:00===
[M][1970/01/01/08:00:21][sysparam.c<SysConfigRead>:565]===SysConfigRead Get wifi mac:00:00:00:00:00:00===
[D][1970/01/01/08:00:21][network.c<NetWorkSetMac>:220]NetWorkSetMac01->networkethmac:00:00:00:00:00:00
[M][1970/01/01/08:00:21][sysparam.c<SysConfigRead>:593]SysConfigRead->ethmac:00:00:00:00:00:00
[M][1970/01/01/08:00:21][sysparam.c<SysConfigRead>:594]SysConfigRead->wifimac:00:00:00:00:00:00
[D][1970/01/01/08:00:21][networkparam.c<HttpWebServerPortInit>:533]curtime = 1538650093
[M][2018/10/04/18:48:43][networkparam.c<HttpWebServerPortInit>:537]time(NULL) [1538650123]
[M][2018/10/04/18:48:43][networkparam.c<HttpWebServerPortInit>:546]networkparam.NetWorkParam.Port [23982]
[M][2018/10/04/18:48:43][networkparam.c<NetWorkParamSave>:212]WifiParam.SSID = , ip = 192.168.8.159
[M][2018/10/04/18:48:43][sysparam.c<SysConfigRead>:484]===SysConfigRead===
[M][2018/10/04/18:48:43][sysparam.c<SysConfigRead>:526]open /system/param/factory.ini success
[M][2018/10/04/18:48:43][sysparam.c<SysConfigRead>:545]===Get wifi ap mac1. LDO_CTR0(6c) = a64799, PMU_OCLEVEL c
:00:00:00:00:00:00===
[M]2. LDO_CTR0(6c) = a6478d, PMU_OCLEVEL 6
[2018/10/04/18:48:43][sysparam.c<SysConfigRead>:565]===SysConfigRead Get wifi mac:00:00:00:00:00:00===
FW Version:0.1.00 [D][2018/10/04/18:48:43][nBuild:7640
etwork.c<NetWorkSetMac>:220]NetWorkSetMaBuild Time:c01->networkethmac:00:00:00:00:00:00
[M][2018/10/04/18:48:43][sys0param.c<SysConfigRead>:593]SysConfigRead1->ethmac:00:00:00:00:00:00
[M][2018/10/04/18:48:43][sysparam.c<Sy0sConfigRead>:594]SysConfigRead->wifimac:800:00:00:00:00:00
[D][20128/10/04/18:48:43][wifi.c<NetWorkWifiPara2mInit>:73]wifissid:[],wifimode:[0],wifia2uth:[0],wifikey:[], wifiipaddr:[192.168.18.159],wifimask:[255.255.255.0],wifigate5way:[192.168.8.1],wifidns1:[8.8.8.8],wif3idns2:[192.168.8.1], wifidhcp[1]
ss_id: mode 0 wifiauth 0 wifikey:
___
ILM Length = 47000(bytes)
DLM Length = 0(bytes)
Loading FW….
#
RTMP_TimerListAdd: add timer obj c325492c!
RTMP_TimerListAdd: add timer obj c3254944!
RTMP_TimerListAdd: add timer obj c325495c!
RTMP_TimerListAdd: add timer obj c3254914!
RTMP_TimerListAdd: add timer obj c32548cc!
RTMP_TimerListAdd: add timer obj c32548e4!
RTMP_TimerListAdd: add timer obj c31e9764!
RTMP_TimerListAdd: add timer obj c31d61e0!
RTMP_TimerListAdd: add timer obj c31d61fc!
RTMP_TimerListAdd: add timer obj c31e97bc!
RTMP_TimerListAdd: add timer obj c31d8cf0!
RTMP_TimerListAdd: add timer obj c31d83a0!
RTMP_TimerListAdd: add timer obj c31d8cd4!
RTMP_TimerListAdd: add timer obj c31d8f14!
RTMP_TimerListAdd: add timer obj c31d8d0c!
RTMP_TimerListAdd: add timer obj c31d8d28!
RTMP_TimerListAdd: add timer obj c31d8d44!
RTMP_TimerListAdd: add timer obj c31e9734!
RTMP_TimerListAdd: add timer obj c31e97a4!
RTMP_TimerListAdd: add timer obj c31d8f44!
RTMP_TimerListAdd: add timer obj c31d8f5c!
RTMP_TimerListAdd: add timer obj c31d8f74!
RTMP_TimerListAdd: add timer obj c31d8f8c!
cfg_mode=9
wmode_band_equal(): Band Equal!
Key2Str is Invalid key length(0) or Type(0)
Key3Str is Invalid key length(0) or Type(0)
Key4Str is Invalid key length(0) or Type(0)
1. Phy Mode = 14
2. Phy Mode = 14
NVM is Efuse and its size =1d[1e0-1fc]
3. Phy Mode = 14
AntCfgInit: primary/secondary ant 0/1
—> InitFrequencyCalibration
InitFrequencyCalibrationMode:Unknow mode = 3
InitFrequencyCalibration: frequency offset in the EEPROM = 105(0x69)
<— InitFrequencyCalibration
RTMPSetPhyMode: channel is out of range, use first channel=1
MCS Set = ff 00 00 00 01
<==== rt28xx_init, Status=0
0x1300 = 00064300
RTMPDrvOpen(1):Check if PDMA is idle!
RTMPDrvOpen(2):Check if PDMA is idle!
[M][2018/10/04/18:48:43][networkinterface.c<damonNetWorkInit>:99]damonNetWorkEthInit
NetWorkEthInitMac…………….:len 17,00:00:00:00:00:00
ifconfig: SIOCSIFHWADDR: Cannot assign requested address
ADDRCONF(NETDEV_UP): eth0: link is not ready
[D][2018/10/04/18:48:43][network.c<NetWorkEthInitMac>:308]========mac=00:00:00:00:00:00===========
route: SIOCDELRT: No such process
[M][2018/10/04/18:48:45][networkinterface.c<damonNetWorkInit>:101]NetWorkEthDnsEnable
dns1:8.8.8.8 dns2:192.168.8.1
[M][2018/10/04/18:48:45][hardware.c<NetWorkHardWareInit>:26]NetWorkDamonThread
SIOCGMIIREG…………….243,c54
AsicSendCmdToAndes: !fRTMP_ADAPTER_MCU_SEND_IN_BAND_CMD && fRTMP_ADAPTER_IDLE_RADIO_OFF
unlink cmd rsp urb
1. LDO_CTR0(6c) = a6478d, PMU_OCLEVEL 6
2. LDO_CTR0(6c) = a6478d, PMU_OCLEVEL 6
RTMP_TimerListAdd: add timer obj c325492c!
RTMP_TimerListAdd: add timer obj c3254944!
RTMP_TimerListAdd: add timer obj c325495c!
RTMP_TimerListAdd: add timer obj c3254914!
RTMP_TimerListAdd: add timer obj c32548cc!
RTMP_TimerListAdd: add timer obj c32548e4!
RTMP_TimerListAdd: add timer obj c31e9764!
RTMP_TimerListAdd: add timer obj c31d61e0!
RTMP_TimerListAdd: add timer obj c31d61fc!
RTMP_TimerListAdd: add timer obj c31e97bc!
RTMP_TimerListAdd: add timer obj c31d8cf0!
RTMP_TimerListAdd: add timer obj c31d83a0!
RTMP_TimerListAdd: add timer obj c31d8cd4!
RTMP_TimerListAdd: add timer obj c31d8f14!
RTMP_TimerListAdd: add timer obj c31d8d0c!
RTMP_TimerListAdd: add timer obj c31d8d28!
RTMP_TimerListAdd: add timer obj c31d8d44!
RTMP_TimerListAdd: add timer obj c31e9734!
RTMP_TimerListAdd: add timer obj c31e97a4!
RTMP_TimerListAdd: add timer obj c31d8f44!
RTMP_TimerListAdd: add timer obj c31d8f5c!
RTMP_TimerListAdd: add timer obj c31d8f74!
RTMP_TimerListAdd: add timer obj c31d8f8c!
cfg_mode=9
wmode_band_equal(): Band Equal!
Key2Str is Invalid key length(0) or Type(0)
Key3Str is Invalid key length(0) or Type(0)
Key4Str is Invalid key length(0) or Type(0)
1. Phy Mode = 14
2. Phy Mode = 14
NVM is Efuse and its size =1d[1e0-1fc]
3. Phy Mode = 14
AntCfgInit: primary/secondary ant 0/1
—> InitFrequencyCalibration
InitFrequencyCalibrationMode:Unknow mode = 3
InitFrequencyCalibration: frequency offset in the EEPROM = 105(0x69)
<— InitFrequencyCalibration
RTMPSetPhyMode: channel is out of range, use first channel=1
MCS Set = ff 00 00 00 01
<==== rt28xx_init, Status=0
0x1300 = 00064300
RTMPDrvOpen(1):Check if PDMA is idle!
RTMPDrvOpen(2):Check if PDMA is idle!
[M][2018/10/04/18:48:46][network.c<NetWorkStatusDamonThread>:1939]create NetWorkDamonThreadProc
[M][2018/10/04/18:48:46][network.c<NetWorkStatusDamonThread>:1950]create WifiConnStatusPro
[M][2018/10/04/18:48:46][network.c<NetWorkStatusDamonThread>:1960]create CheckIpAddrProc
[M][2018/10/04/18:48:46][hardware.c<NetWorkHardWareInit>:29]SysParamAppInit
[M][2018/10/04/18:48:46][sysparam.c<SystemParamInit>:1688]SysConfigInit
[M][2018/10/04/18:48:46][sysparam.c<SysConfigRead>:484]===SysConfigRead===
[M][2018/10/04/18:48:46][sysparam.c<SysConfigRead>:526]open /system/param/factory.ini success
func = CheckIpAddrProc, thread tid 642
NetWorkThreadProc check …………….
func = NetWorkDamonThreadProc, thread tid 640
[M][2018/10/04/18:48:46][sysparam.c<SysConfigRead>:545]===Get wifi ap mac:48:02:2C:61:54:DD===
[M][2018/10/04/18:48:46][sysparam.c<SysConfigRead>:565]===SysConfigRead Get wifi mac:48:02:2C:61:54:DD===
[D][2018/10/04/18:48:46][network.c<NetWorkSetMac>:220]NetWorkSetMac01->networkethmac:48:02:2C:61:54:DD
[M][2018/10/04/18:48:46][sysparam.c<SysConfigRead>:593]SysConfigRead->ethmac:48:02:2C:61:54:DD
[M][2018/10/04/18:48:46][sysparam.c<SysConfigRead>:594]SysConfigRead->wifimac:48:02:2C:61:54:DD
[M][2018/10/04/18:48:46][sysparam.c<SystemParamInit>:1691]SysParamInit
[D][2018/10/04/18:48:46][sysparam.c<SysParamRead>:304]open /system/www/system.ini
[D][2018/10/04/18:48:46][sysparam.c<SysParamRead>:345]read /system/www/system.ini success
[M][2018/10/04/18:48:46][sysparam.c<SystemParamInit>:1694]SysParamUserBackup
[D][2018/10/04/18:48:46][sysparam.c<SysParamUserBackup>:844]user0:
read_rs232…7,7 total 7
[:55 06 00 35 17 32 84 ] total 7 len=:7
*error! alarm_svr =
time out 0
read_rs232…7,7 total 7
[:55 06 00 35 17 32 84 ] total 7 len=:7
*error! alarm_svr =
time pwd:6 00 35 17 32 84 ] total 7 len=:7
*error! alarm_svr =
time out 0
read_rs232…7,7 total 7
[:55 06 00 35 17 32 84 ] total 7 len=:7
*error! alarm_svr =
time
[D][2018/10/04/18:48:46][sysparam.c<SysParamUserBackup>:845]user1:7
*error! alarm_svr =
time out 0
read_rs232…7,7 total 7
[:55 06 00 35 17 32 84 ] total 7 len=:7
*error! alarm_svr =
time pwd:t 0
read_rs232…7,7 total 7
[:55 06 00 35 17 32 84 ] total 7 len=:7
*error! alarm_svr =
time
[D][2018/10/04/18:48:46][sysparam.c<SysParamUserBackup>:846]user2:5 06 00 35 17 32 84 ] total 7 len=:7
*error! alarm_svr =
time pwd:n=:7
*error! alarm_svr =
time
От неё есть логин и пароль. При вводе логина и пароля вылезает вот такое приглашение
Welcome to HiLinux.
Всё. Куда дальше копать и что делать не знаю. Подскажите пожалуйста по шагам что и куда. Спасибо!!!
Содержание
- Форум по системам видеонаблюдения и безопасности.
- HVR5008-E постоянная перезагрузка.
- HVR5008-E постоянная перезагрузка.
- Форум по системам видеонаблюдения и безопасности.
- Помощь в восстановлении Vstarcam C7833WIP-X4
- Помощь в восстановлении Vstarcam C7833WIP-X4
Форум по системам видеонаблюдения и безопасности.
Форум по системам видеонаблюдения, безопасности, пожарным и охранным сигнализациям, контролю доступа.
HVR5008-E постоянная перезагрузка.
HVR5008-E постоянная перезагрузка.
Сообщение yuri1958 » 15 сен 2019, 09:19
Регистратор постоянно ребутится. Загрузка ни какими комбинациями клавиш не останавливается.Пробовал залить дамп с рабочего рега результат тот же. Пробовал менять флешку на новую эффекта тоже нет.
U-Boot 2010.06-svn (Mar 16 2017 — 15:11:29)
Check Flash Memory Controller v100 . Found
SPI Nor(cs 0) ID: 0xef 0x40 0x18
spi_general_qe_enable(294): Error: Disable Quad failed! reg: 0x2
Block:64KB Chip:16MB Name:»W25Q128(B/F)V»
SPI Nor total size: 16MB
*** Warning — bad CRC, using default environment
Erasing SPI flash, offset 0x00070000 size 64K . done
Writing to SPI flash, offset 0x00070000 size 64K . done
In: serial
Out: serial
Err: serial
16384 KiB hi_fmc at 0:0 is now current device
jpeg decoding .
jpeg_addr=0, Invalid jpeg_address! set jpeg_address to value: 0x84000000
jpeg_size=0, Invalid jpeg_size! set jpeg_size to value: 0x10000
s= , Invalid vobuf address! set vobuf to address: 0x84010000
mmu_enable
decode success.
decode jpeg!
pSrc=84010000, pDest=89210000
dev 0 set background color!
OpenDev vo:0 intf_type:36 out_sync:16
dev 0 opened!
graphic layer 0 opened!
dev 1 set background color!
OpenDev vo:1 intf_type:1 out_sync:0
dev 1 opened!
graphic layer 1 opened!
16384 KiB hi_fmc at 0:0 is now current device
16384 KiB hi_fmc at 0:0 is now current device
0x17 0x04 0x00 0xea 0x14 0xf0 0x9f 0xe5 0x14 0xf0 0x9f 0xe5 0x14 0xf0 0x9f 0xe5
0x14 0xf0 0x9f 0xe5 0x14 0xf0 0x9f 0xe5 0x14 0xf0 0x9f 0xe5 0x14 0xf0 0x9f 0xe5
0x60 0x12 0x80 0x80 0xc0 0x12 0x80 0x80 0x20 0x13 0x80 0x80 0x80 0x13 0x80 0x80
0xe0 0x13 0x80 0x80 0x40 0x14 0x80 0x80 0xa0 0x14 0x80 0x80 0x78 0x56 0x34 0x12
0x34 0x00 0x04 0x12 0x00 0x00 0x00 0x00 0x00 0x00 0x00 0x00 0x6d 0x00 0x00 0x00
0x00 0x00 0x04 0x12 0x00 0x00 0x00 0x00 0xc8 0x00 0x00 0x00 0x00 0x00 0x00 0x00
0x00 0x00 0x04 0x12 0x00 0x00 0x00 0x11 0x00 0x00 0x00 0x00 0xfd 0x00 0x00 0x00
0x04 0x00 0x04 0x12 0xc8 0x60 0x00 0x03 0x00 0x00 0x00 0x00 0xfd 0x00 0x00 0x00
0x20 0x00 0x04 0x12 0x00 0x00 0x00 0x13 0x00 0x00 0x00 0x00 0xfd 0x00 0x00 0x00
0x24 0x00 0x04 0x12 0x90 0x81 0x00 0x03 0x00 0x00 0x00 0x00 0xfd 0x00 0x00 0x00
test_auth fail !
### ERROR ### Please RESET the board ###
resetting .
и так беконечно. В логах не силен поэтому прошу помощи у коллег. Выручайте плис!!
Источник
Форум по системам видеонаблюдения и безопасности.
Форум по системам видеонаблюдения, безопасности, пожарным и охранным сигнализациям, контролю доступа.
Помощь в восстановлении Vstarcam C7833WIP-X4
Помощь в восстановлении Vstarcam C7833WIP-X4
Сообщение r52alex » 27 авг 2019, 14:46
Добрый день! Помогите, пожалуйста, восстановить камеру Vstarcam C7833WIP-X4, работала пару-тройку лет, висела на фасаде дома, подключена к роутеру лан-кабелем. Внезапно пропал к ней доступ. Ни из приложения ни по сети она не видится. Программатором был слит дамп. Была подобрана похожая флеш и был программатором залит на новую флеш тот дамп. Эффекта ноль. Сейчас подключился к ней через uart и слил вот такой лог.
U-Boot 2010.06 (Mar 25 2017 — 11:29:49)
Check Flash Memory Controller v100 . Found
SPI Nor(cs 0) ID: 0xef 0x40 0x18
spi_general_qe_enable(294): Error: Disable Quad failed! reg: 0x2
Block:64KB Chip:16MB Name:»W25Q128(B/F)V»
SPI Nor total size: 16MB
MMC:
EMMC/MMC/SD controller initialization.
Card did not respond to voltage select!
No EMMC/MMC/SD device found !
In: serial
Out: serial
Err: serial
Hit any key to stop autoboot: 0
16384 KiB hi_fmc at 0:0 is now current device
## Booting kernel from Legacy Image at 82000000 .
Image Name: Linux-3.4.35
Image Type: ARM Linux Kernel Image (uncompressed)
Data Size: 2740520 Bytes = 2.6 MiB
Load Address: 80008000
Entry Point: 80008000
Loading Kernel Image . OK
OK
Uncompressing Linux. done, booting the kernel.
Booting Linux on physical CPU 0
Linux version 3.4.35 (xufengqi@ubuntu) (gcc version 4.8.3 20131202 (prerelease) (Hisilicon_v300) ) #31 Sat Mar 25 11:32:16 CST 2017
CPU: ARM926EJ-S [41069265] revision 5 (ARMv5TEJ), cr=00053177
CPU: VIVT data cache, VIVT instruction cache
Machine: hi3518ev200
Memory policy: ECC disabled, Data cache writeback
Built 1 zonelists in Zone order, mobility grouping on. Total pages: 10668
Kernel command line: mem=42M console=ttyAMA0,115200 root=/dev/mtdblock2 rootfstype=squashfs rw init=/sbin/init mtdparts=hi_sfc:1024k(boot),3072k(kernel),7168k(rootfs),5120k(system)
PID hash table entries: 256 (order: -2, 1024 bytes)
Dentry cache hash table entries: 8192 (order: 3, 32768 bytes)
Inode-cache hash table entries: 4096 (order: 2, 16384 bytes)
Memory: 42MB = 42MB total
Memory: 37044k/37044k available, 5964k reserved, 0K highmem
Virtual kernel memory layout:
vector : 0xffff0000 — 0xffff1000 ( 4 kB)
fixmap : 0xfff00000 — 0xfffe0000 ( 896 kB)
vmalloc : 0xc3000000 — 0xff000000 ( 960 MB)
lowmem : 0xc0000000 — 0xc2a00000 ( 42 MB)
modules : 0xbf000000 — 0xc0000000 ( 16 MB)
.text : 0xc0008000 — 0xc04d0000 (4896 kB)
.init : 0xc04d0000 — 0xc04f2d3c ( 140 kB)
.data : 0xc04f4000 — 0xc0523000 ( 188 kB)
.bss : 0xc0523024 — 0xc0562858 ( 255 kB)
SLUB: Genslabs=13, HWalign=32, Order=0-3, MinObjects=0, CPUs=1, Nodes=1
NR_IRQS:32
VIC @fe0d0000: id 0x00641190, vendor 0x41
sched_clock: 32 bits at 49MHz, resolution 20ns, wraps every 86767ms
Console: colour dummy device 80×30
Calibrating delay loop. 269.10 BogoMIPS (lpj=1345536)
pid_max: default: 32768 minimum: 301
Mount-cache hash table entries: 512
Initializing cgroup subsys freezer
CPU: Testing write buffer coherency: ok
Setting up static identity map for 0x803b5f28 — 0x803b5f80
dummy:
NET: Registered protocol family 16
Serial: AMBA PL011 UART driver
uart:0: ttyAMA0 at MMIO 0x20080000 (irq = 5) is a PL011 rev2
console [ttyAMA0] enabled
uart:1: ttyAMA1 at MMIO 0x20090000 (irq = 30) is a PL011 rev2
uart:2: ttyAMA2 at MMIO 0x200a0000 (irq = 25) is a PL011 rev2
bio: create slab at 0
SCSI subsystem initialized
hi-spi-master hi-spi-master.0: with 1 chip select slaves attached
hi-spi-master hi-spi-master.1: with 2 chip select slaves attached
usbcore: registered new interface driver usbfs
usbcore: registered new interface driver hub
usbcore: registered new device driver usb
Switching to clocksource timer0
NET: Registered protocol family 2
IP route cache hash table entries: 1024 (order: 0, 4096 bytes)
TCP established hash table entries: 2048 (order: 2, 16384 bytes)
TCP bind hash table entries: 2048 (order: 1, 8192 bytes)
TCP: Hash tables configured (established 2048 bind 2048)
TCP: reno registered
UDP hash table entries: 256 (order: 0, 4096 bytes)
UDP-Lite hash table entries: 256 (order: 0, 4096 bytes)
NET: Registered protocol family 1
RPC: Registered named UNIX socket transport module.
RPC: Registered udp transport module.
RPC: Registered tcp transport module.
RPC: Registered tcp NFSv4.1 backchannel transport module.
VFS: Disk quotas dquot_6.5.2
Dquot-cache hash table entries: 1024 (order 0, 4096 bytes)
squashfs: version 4.0 (2009/01/31) Phillip Lougher
NFS: Registering the id_resolver key type
jffs2: version 2.2. (NAND) © 2001-2006 Red Hat, Inc.
fuse init (API version 7.18)
msgmni has been set to 72
Block layer SCSI generic (bsg) driver version 0.4 loaded (major 254)
io scheduler noop registered
io scheduler deadline registered (default)
io scheduler cfq registered
brd: module loaded
Check Flash Memory Controller v100 . Found.
SPI Nor(cs 0) ID: 0xef 0x40 0x18
spi_general_qe_enable(294): Error: Disable Quad failed! reg: 0x2
Block:64KB Chip:16MB Name:»W25Q128(B/F)V»
SPI Nor total size: 16MB
4 cmdlinepart partitions found on MTD device hi_sfc
4 cmdlinepart partitions found on MTD device hi_sfc
Creating 4 MTD partitions on «hi_sfc»:
0x000000000000-0x000000100000 : «boot»
0x000000100000-0x000000400000 : «kernel»
0x000000400000-0x000000b00000 : «rootfs»
0x000000b00000-0x000001000000 : «system»
SPI Nand ID Table Version 1.9
hifmc100_dev_ready(650): Error: SPI Nand wait ready timeout, status: 0xff
hifmc100_dev_ready(650): Error: SPI Nand wait ready timeout, status: 0xff
hifmc100_dev_ready(650): Error: SPI Nand wait ready timeout, status: 0xff
hifmc100_dev_ready(650): Error: SPI Nand wait ready timeout, status: 0xff
hifmc100_dev_ready(650): Error: SPI Nand wait ready timeout, status: 0xff
No NAND device found
himii: probed
pegasus: v0.6.14 (2006/09/27), Pegasus/Pegasus II USB Ethernet driver
usbcore: registered new interface driver pegasus
usbcore: registered new interface driver asix
usbcore: registered new interface driver cdc_ether
usbcore: registered new interface driver net1080
usbcore: registered new interface driver cdc_subset
usbcore: registered new interface driver zaurus
usbcore: registered new interface driver cdc_ncm
ehci_hcd: USB 2.0 ‘Enhanced’ Host Controller (EHCI) Driver
hiusb-ehci hiusb-ehci.0: HIUSB EHCI
hiusb-ehci hiusb-ehci.0: new USB bus registered, assigned bus number 1
hiusb-ehci hiusb-ehci.0: irq 15, io mem 0x100b0000
hiusb-ehci hiusb-ehci.0: USB 0.0 started, EHCI 1.00
hub 1-0:1.0: USB hub found
hub 1-0:1.0: 1 port detected
ohci_hcd: USB 1.1 ‘Open’ Host Controller (OHCI) Driver
hiusb-ohci hiusb-ohci.0: HIUSB OHCI
hiusb-ohci hiusb-ohci.0: new USB bus registered, assigned bus number 2
hiusb-ohci hiusb-ohci.0: irq 16, io mem 0x100a0000
hub 2-0:1.0: USB hub found
hub 2-0:1.0: 1 port detected
Initializing USB Mass Storage driver.
usbcore: registered new interface driver usb-storage
USB Mass Storage support registered.
mousedev: PS/2 mouse device common for all mice
i2c /dev entries driver
hisi_i2c hisi_i2c.0: Hisilicon [i2c-0] probed!
hisi_i2c hisi_i2c.1: Hisilicon [i2c-1] probed!
hisi_i2c hisi_i2c.2: Hisilicon [i2c-2] probed!
usbcore: registered new interface driver usbhid
usbhid: USB HID core driver
TCP: cubic registered
Initializing XFRM netlink socket
NET: Registered protocol family 10
NET: Registered protocol family 17
NET: Registered protocol family 15
lib80211: common routines for IEEE802.11 drivers
Registering the dns_resolver key type
VFS: Mounted root (squashfs filesystem) readonly on device 31:2.
Freeing init memory: 136K
usb 1-1: new high-speed USB device number 2 using hiusb-ehci
_ _ _ _ _ _ _ _ _ _ _ _
_ _ _ _ _ ___
/ /__/ |_/
/ __ / — _ ___
/ / / / / /
_ _ _ _/ / / _/ _ ______
________________________________
[RCS]: /etc/init.d/S00devs
[RCS]: /etc/init.d/S01udev
udevd (531): /proc/531/oom_adj is deprecated, please use /proc/531/oom_score_adj instead.
host f_min:60000, f_max:148500000, hz:50000000real use hz:50000000
mmc1: new high speed SD card at address 0001
mmcblk0: mmc1:0001 ASTC 1.86 GiB
mmcblk0: p1
[RCS]: /etc/init.d/S80network
* checkModule iRet = 0x00
*************************init down!
gpio: version magic ‘3.0.8 mod_unload ARMv5 ‘ should be ‘3.4.35 mod_unload ARMv5 p2v8 ‘
insmod: can’t insert ‘/system/system/bin/gpio_aplink.ko’: invalid module format
Open gpio error!(-1)
devInit error!
/system/init/ipcam.sh: line 7: /system/system/bin/upgrade: not found
Hisilicon Watchdog Timer: 0.01 initialized. default_margin=60 sec (nowayout= 0, nodeamon= 0)
read 0x00B8 = 1
(none) login: write read 0x00B8 = 0
read 0x0400 = 0
write read 0x0400 = 2
read 0x03fc = 40
write read 0x03fc = 40
write read 0x03fc = 42
[M][1970/01/01/08:00:20][wifiupdate.c :39]run /system/system/bin/encoder
logfile : /tmp/wifiupdate.log
[M][1970/01/01/08:00:20][wifiupdate.c :49]NetWorkHardWareInit
[M][1970/01/01/08:00:20][hardware.c :20]NetWorkDriverAppInit
[M][1970/01/01/08:00:20][networkparamapp.c :25]NetWorkWifiDriverInit
NetWorkWifiDriverInit insmod wifi KO
[M][1970/01/01/08:00:20][wifi.c :1023]insmod /lib/modules/wifi/mtutil7601Usta.ko
[M][1970/01/01/08:00:20][wifi.c :1028]insmod /lib/modules/wifi/mt7601Usta.ko
/system/system/bin/encoder: can’t load library ‘libmem.so’
mt7601Usta: module license ‘unspecified’ taints kernel.
Disabling lock debugging due to kernel taint
[M][1970/01/01/08:00:21][wifi.c :1033]insmod /lib/modules/wifi/mtnet7601Usta.ko
rtusb init rtusbSTA —>
=== pAd = c31d4000, size = 860440 ===
BulkOutEpAddr=0x8
RTMP_COM_IoctlHandle():pAd->BulkOutEpAddr=0x4
RTMP_COM_IoctlHandle():pAd->BulkOutEpAddr=0x5
RTMP_COM_IoctlHandle():pAd->BulkOutEpAddr=0x6
RTMP_COM_IoctlHandle():pAd->BulkOutEpAddr=0x7
RTMP_COM_IoctlHandle():pAd->BulkOutEpAddr=0x9
NVM is EFUSE
Endpoint(8) is for In-band Command
Endpoint(4) is for WMM0 AC0
Endpoint(5) is for WMM0 AC1
Endpoint(6) is for WMM0 AC2
Endpoint(7) is for WMM0 AC3
Endpoint(9) is for WMM1 AC0
Endpoint(84) is for Data-In
Endpoint(85) is for Command Rsp
usbcore: registered new interface driver rtusbSTA
[M][1970/01/01/08:00:21][hardware.c :23]damonNetWorkInit
[M][1970/01/01/08:00:21][networkinterface.c :91]ifconfig lo 127.0.0.1
[M][1970/01/01/08:00:21][networkinterface.c :94]NetWorkParamInit
[M][1970/01/01/08:00:21][networkparam.c :481]NetWorkParamRead
[M][1970/01/01/08:00:21][networkparam.c :166]dhcp = 1
[M][1970/01/01/08:00:21][networkparam.c :484]SysConfigInit
[M][1970/01/01/08:00:21][sysparam.c :484]===SysConfigRead===
[M][1970/01/01/08:00:21][sysparam.c :526]open /system/param/factory.ini success
[M][1970/01/01/08:00:21][sysparam.c :545]===Get wifi ap mac:00:00:00:00:00:00===
[M][1970/01/01/08:00:21][sysparam.c :565]===SysConfigRead Get wifi mac:00:00:00:00:00:00===
[D][1970/01/01/08:00:21][network.c :220]NetWorkSetMac01->networkethmac:00:00:00:00:00:00
[M][1970/01/01/08:00:21][sysparam.c :593]SysConfigRead->ethmac:00:00:00:00:00:00
[M][1970/01/01/08:00:21][sysparam.c :594]SysConfigRead->wifimac:00:00:00:00:00:00
[D][1970/01/01/08:00:21][networkparam.c :533]curtime = 1538650093
[M][2018/10/04/18:48:43][networkparam.c :537]time(NULL) [1538650123]
[M][2018/10/04/18:48:43][networkparam.c :546]networkparam.NetWorkParam.Port [23982]
[M][2018/10/04/18:48:43][networkparam.c :212]WifiParam.SSID = , ip = 192.168.8.159
[M][2018/10/04/18:48:43][sysparam.c :484]===SysConfigRead===
[M][2018/10/04/18:48:43][sysparam.c :526]open /system/param/factory.ini success
[M][2018/10/04/18:48:43][sysparam.c :545]===Get wifi ap mac1. LDO_CTR0(6c) = a64799, PMU_OCLEVEL c
:00:00:00:00:00:00===
[M]2. LDO_CTR0(6c) = a6478d, PMU_OCLEVEL 6
[2018/10/04/18:48:43][sysparam.c :565]===SysConfigRead Get wifi mac:00:00:00:00:00:00===
FW Version:0.1.00 [D][2018/10/04/18:48:43][nBuild:7640
etwork.c :220]NetWorkSetMaBuild Time:c01->networkethmac:00:00:00:00:00:00
[M][2018/10/04/18:48:43][sys0param.c :593]SysConfigRead1->ethmac:00:00:00:00:00:00
[M][2018/10/04/18:48:43][sysparam.c :594]SysConfigRead->wifimac:800:00:00:00:00:00
[D][20128/10/04/18:48:43][wifi.c :73]wifissid:[],wifimode:[0],wifia2uth:[0],wifikey:[], wifiipaddr:[192.168.18.159],wifimask:[255.255.255.0],wifigate5way:[192.168.8.1],wifidns1:[8.8.8.8],wif3idns2:[192.168.8.1], wifidhcp[1]
ss_id: mode 0 wifiauth 0 wifikey:
___
ILM Length = 47000(bytes)
DLM Length = 0(bytes)
Loading FW.
#
RTMP_TimerListAdd: add timer obj c325492c!
RTMP_TimerListAdd: add timer obj c3254944!
RTMP_TimerListAdd: add timer obj c325495c!
RTMP_TimerListAdd: add timer obj c3254914!
RTMP_TimerListAdd: add timer obj c32548cc!
RTMP_TimerListAdd: add timer obj c32548e4!
RTMP_TimerListAdd: add timer obj c31e9764!
RTMP_TimerListAdd: add timer obj c31d61e0!
RTMP_TimerListAdd: add timer obj c31d61fc!
RTMP_TimerListAdd: add timer obj c31e97bc!
RTMP_TimerListAdd: add timer obj c31d8cf0!
RTMP_TimerListAdd: add timer obj c31d83a0!
RTMP_TimerListAdd: add timer obj c31d8cd4!
RTMP_TimerListAdd: add timer obj c31d8f14!
RTMP_TimerListAdd: add timer obj c31d8d0c!
RTMP_TimerListAdd: add timer obj c31d8d28!
RTMP_TimerListAdd: add timer obj c31d8d44!
RTMP_TimerListAdd: add timer obj c31e9734!
RTMP_TimerListAdd: add timer obj c31e97a4!
RTMP_TimerListAdd: add timer obj c31d8f44!
RTMP_TimerListAdd: add timer obj c31d8f5c!
RTMP_TimerListAdd: add timer obj c31d8f74!
RTMP_TimerListAdd: add timer obj c31d8f8c!
cfg_mode=9
wmode_band_equal(): Band Equal!
Key2Str is Invalid key length(0) or Type(0)
Key3Str is Invalid key length(0) or Type(0)
Key4Str is Invalid key length(0) or Type(0)
1. Phy Mode = 14
2. Phy Mode = 14
NVM is Efuse and its size =1d[1e0-1fc]
3. Phy Mode = 14
AntCfgInit: primary/secondary ant 0/1
—> InitFrequencyCalibration
InitFrequencyCalibrationMode:Unknow mode = 3
InitFrequencyCalibration: frequency offset in the EEPROM = 105(0x69)
:99]damonNetWorkEthInit
NetWorkEthInitMac. len 17,00:00:00:00:00:00
ifconfig: SIOCSIFHWADDR: Cannot assign requested address
ADDRCONF(NETDEV_UP): eth0: link is not ready
[D][2018/10/04/18:48:43][network.c :308]========mac=00:00:00:00:00:00===========
route: SIOCDELRT: No such process
[M][2018/10/04/18:48:45][networkinterface.c :101]NetWorkEthDnsEnable
dns1:8.8.8.8 dns2:192.168.8.1
[M][2018/10/04/18:48:45][hardware.c :26]NetWorkDamonThread
SIOCGMIIREG. 243,c54
AsicSendCmdToAndes: !fRTMP_ADAPTER_MCU_SEND_IN_BAND_CMD && fRTMP_ADAPTER_IDLE_RADIO_OFF
unlink cmd rsp urb
1. LDO_CTR0(6c) = a6478d, PMU_OCLEVEL 6
2. LDO_CTR0(6c) = a6478d, PMU_OCLEVEL 6
RTMP_TimerListAdd: add timer obj c325492c!
RTMP_TimerListAdd: add timer obj c3254944!
RTMP_TimerListAdd: add timer obj c325495c!
RTMP_TimerListAdd: add timer obj c3254914!
RTMP_TimerListAdd: add timer obj c32548cc!
RTMP_TimerListAdd: add timer obj c32548e4!
RTMP_TimerListAdd: add timer obj c31e9764!
RTMP_TimerListAdd: add timer obj c31d61e0!
RTMP_TimerListAdd: add timer obj c31d61fc!
RTMP_TimerListAdd: add timer obj c31e97bc!
RTMP_TimerListAdd: add timer obj c31d8cf0!
RTMP_TimerListAdd: add timer obj c31d83a0!
RTMP_TimerListAdd: add timer obj c31d8cd4!
RTMP_TimerListAdd: add timer obj c31d8f14!
RTMP_TimerListAdd: add timer obj c31d8d0c!
RTMP_TimerListAdd: add timer obj c31d8d28!
RTMP_TimerListAdd: add timer obj c31d8d44!
RTMP_TimerListAdd: add timer obj c31e9734!
RTMP_TimerListAdd: add timer obj c31e97a4!
RTMP_TimerListAdd: add timer obj c31d8f44!
RTMP_TimerListAdd: add timer obj c31d8f5c!
RTMP_TimerListAdd: add timer obj c31d8f74!
RTMP_TimerListAdd: add timer obj c31d8f8c!
cfg_mode=9
wmode_band_equal(): Band Equal!
Key2Str is Invalid key length(0) or Type(0)
Key3Str is Invalid key length(0) or Type(0)
Key4Str is Invalid key length(0) or Type(0)
1. Phy Mode = 14
2. Phy Mode = 14
NVM is Efuse and its size =1d[1e0-1fc]
3. Phy Mode = 14
AntCfgInit: primary/secondary ant 0/1
—> InitFrequencyCalibration
InitFrequencyCalibrationMode:Unknow mode = 3
InitFrequencyCalibration: frequency offset in the EEPROM = 105(0x69)
:1939]create NetWorkDamonThreadProc
[M][2018/10/04/18:48:46][network.c :1950]create WifiConnStatusPro
[M][2018/10/04/18:48:46][network.c :1960]create CheckIpAddrProc
[M][2018/10/04/18:48:46][hardware.c :29]SysParamAppInit
[M][2018/10/04/18:48:46][sysparam.c :1688]SysConfigInit
[M][2018/10/04/18:48:46][sysparam.c :484]===SysConfigRead===
[M][2018/10/04/18:48:46][sysparam.c :526]open /system/param/factory.ini success
func = CheckIpAddrProc, thread tid 642
NetWorkThreadProc check .
func = NetWorkDamonThreadProc, thread tid 640
[M][2018/10/04/18:48:46][sysparam.c :545]===Get wifi ap mac:48:02:2C:61:54:DD===
[M][2018/10/04/18:48:46][sysparam.c :565]===SysConfigRead Get wifi mac:48:02:2C:61:54:DD===
[D][2018/10/04/18:48:46][network.c :220]NetWorkSetMac01->networkethmac:48:02:2C:61:54:DD
[M][2018/10/04/18:48:46][sysparam.c :593]SysConfigRead->ethmac:48:02:2C:61:54:DD
[M][2018/10/04/18:48:46][sysparam.c :594]SysConfigRead->wifimac:48:02:2C:61:54:DD
[M][2018/10/04/18:48:46][sysparam.c :1691]SysParamInit
[D][2018/10/04/18:48:46][sysparam.c :304]open /system/www/system.ini
[D][2018/10/04/18:48:46][sysparam.c :345]read /system/www/system.ini success
[M][2018/10/04/18:48:46][sysparam.c :1694]SysParamUserBackup
[D][2018/10/04/18:48:46][sysparam.c :844]user0:
read_rs232. 7,7 total 7
[:55 06 00 35 17 32 84 ] total 7 len=:7
*error! alarm_svr =
time out 0
read_rs232. 7,7 total 7
[:55 06 00 35 17 32 84 ] total 7 len=:7
*error! alarm_svr =
time pwd:6 00 35 17 32 84 ] total 7 len=:7
*error! alarm_svr =
time out 0
read_rs232. 7,7 total 7
[:55 06 00 35 17 32 84 ] total 7 len=:7
*error! alarm_svr =
time
[D][2018/10/04/18:48:46][sysparam.c :845]user1:7
*error! alarm_svr =
time out 0
read_rs232. 7,7 total 7
[:55 06 00 35 17 32 84 ] total 7 len=:7
*error! alarm_svr =
time pwd:t 0
read_rs232. 7,7 total 7
[:55 06 00 35 17 32 84 ] total 7 len=:7
*error! alarm_svr =
time
[D][2018/10/04/18:48:46][sysparam.c :846]user2:5 06 00 35 17 32 84 ] total 7 len=:7
*error! alarm_svr =
time pwd:n=:7
*error! alarm_svr =
time
От неё есть логин и пароль. При вводе логина и пароля вылезает вот такое приглашение
Welcome to HiLinux.
Всё. Куда дальше копать и что делать не знаю. Подскажите пожалуйста по шагам что и куда. Спасибо.
Источник
U-Boot 2010.06-svn5074 (Jul 06 2021 — 16:03:35)
Check Flash Memory Controller v100 … Found
SPI Nor(cs 0) ID: 0xef 0x40 0x18
spi_general_qe_enable(294): Error: Disable Quad failed! reg: 0x2
Block:64KB Chip:16MB Name:»W25Q128(B/F)V»
SPI Nor total size: 16MB
In: serial
Out: serial
Err: serial
chip type hi3520dv300
===============================================
DPLL:400Mhz DDR:1600Mhz
APLL:800Mhz VPLL0:162Mhz
===============================================
phy id:0x1cc816
nice find PHY RTL8201 on higmac
hwid_gpio_val=0x5A
hwid_gpio_val=0x5A
hwid_gpio_val=0x5A
hwid_gpio_val=0x5A
hwid_gpio_val=0x5A
find_inode failed for name=hwidconfig
hwid_gpio_val=0x5A
find_inode failed for name=hwidconfig
hardware ver: 2.00
Hit any key to stop autoboot: 0
usb_stor_get_info->1489,blksz:512
Interface: USB
Device 0: Vendor: Kingston Rev: 1.00 Prod: DataTraveler 2.0
Type: Removable Hard Disk
Capacity: 1909.9 MB = 1.8 GB (3911616 x 512)
Partition 0: Filesystem: FAT32 «NO NAME «
reading u-boot.bin.img
upgrade file: u-boot.bin.img found
close frondboard!
update_version_check success!!!. Header CRC Checking … OK
Data CRC Checking … OK
Image Name: hi3520Dboot
Image Type: ARM Linux Standalone Program (gzip compressed)
Data Size: 315148 Bytes = 307.8 KiB
Load Address: a0000000
Entry Point: a0050000
img_addr 0x82000000 write to: 0xa0000000
write : 100%
done
reading update.img
upgrade file: update.img found
close frondboard!
update_version_check success!!!. Header CRC Checking … OK
Data CRC Checking … OK
Image Name: linux
Image Type: ARM Linux Standalone Program (gzip compressed)
Data Size: 4096 Bytes = 4 KiB
Load Address: a0f40000
Entry Point: a0f60000
img_addr 0x82000040 write to: 0xa0f40000
write : 100%
done
update_version_check success!!!. Header CRC Checking … OK
Data CRC Checking … OK
Image Name: hi3520Dromfs
Image Type: ARM Linux Kernel Image (gzip compressed)
Data Size: 13074432 Bytes = 12.5 MiB
Load Address: a0060000
Entry Point: a0da0000
img_addr 0x82001080 write to: 0xa0060000
write : 100%
done
update_version_check success!!!. Header CRC Checking … OK
Data CRC Checking … OK
Image Name: linux
Image Type: ARM Linux Standalone Program (gzip compressed)
Data Size: 12288 Bytes = 12 KiB
Load Address: a0f60000
Entry Point: a0f80000
img_addr 0x82c790c0 write to: 0xa0f60000
write : 100%
done
update_version_check success!!!. Header CRC Checking … OK
Data CRC Checking … OK
Image Name: linux
Image Type: ARM Linux Standalone Program (gzip compressed)
Data Size: 1675264 Bytes = 1.6 MiB
Load Address: a0da0000
Entry Point: a0f40000
img_addr 0x82c7c100 write to: 0xa0da0000
write : 100%
done
Have auto upgraded by USB or TFTP !
Loading Kernel Image … OK
OK
Starting kernel …
Uncompressing Linux… done, booting the kernel.
Booting Linux on physical CPU 0x0
Linux version 3.10.0-SVN:9014 (jenkins@centos235) (gcc version 4.8.3 20131202 (prerelease) (Hisilicon_v300) ) #1 Wed Jul 7 14:16:28 CST 2021
CPU: ARMv7 Processor [410fc075] revision 5 (ARMv7), cr=10c53c7d
CPU: PIPT / VIPT nonaliasing data cache, n: 0
¤hsync_len: 0
¤vsync_len: 0
¤sync: 0
¤vmode: 0
Fixed screen info:
¤id: hifb
¤smem_start: 0x8d7f5000
¤smem_len: 4149248
¤type: 0
¤type_aux: 0
¤visual: 2
¤xpanstep: 1
¤ypanstep: 1
¤ywrapstep: 0
¤line_length: 2560
¤mmio_start: 0x0
¤mmio_len: 0
¤accel: 0
¤[0;32;32m[libvos] INFO (func = SetVideoCSC line =>4286): dev:0 luma:45 contra:45 hue:50 u32Satuature:50
¤[m¤[0;32;32m[libvos] INFO (func = SetGraphicCSC line =>4312): dev:0 luma:80 contra:38 hue:50 u32Satuature:50
¤[m¤[0;32;32m[libvos] INFO (func = SetVgaCSC line =>4382): dev:0 luma:50 contra:50 hue:50 Satu:50, Gain:8
¤[m¤[0;32;32m[libvos] INFO (func = SetHdmiCSC line =>4349): dev:0 luma:50 contra:50 hue:50 Satu:50
¤[m¤[0;32;32m[libvos] INFO (func = OpenBlit line =>59): ret:0 u8ThresholdValue:0xff
¤[m¤[0;32;32m[libvos] INFO (func = OpenBlit line =>63): ret:0 bEnAlphaThreshold:0
¤[m¤[0;32;32m[libvos] INFO (func = OpenBlit line =>67): ret:0 DeflickerLevel:0
¤[m
**
HI35xx: libvos.a Svn: 0 Compile at Jul 6 2021 15:59:06
**
* Maxchannel:8, Vstd:0
*
**
HI35xx: libvos.a Svn: 0 Compile at Jul 6 2021 15:59:06
**
* Maxchannel:8, Vstd:0
*
¤[1;33m[libhicap.a] WARN (CapAvcfg_CheckHwidConfig|834): Failed to read file: /mnt/mtd/Config/hwidconfig
¤[m¤[0;32;32mlibhicap.a INFO (func = CaptureCheckMemCfg line =>7889): iVideoChnNum: 8, iCurrentMemSize: -1, iLegalMemSize: 214
¤[m¤[0;32;32mlibhicap.a INFO (func = CaptureCheckMemCfg line =>7901): Memcfg check succeed!
¤[m¤[37;40m02:08:14|[] [ver:] trace tid:1253 CLocales::loadFont()>>>>>>>>>
¤[0mstat 4mыvl/. error
¤[37;40m02:08:14|[] [ver:] trace tid:1253 CFontManager::config ret = 1
¤[0mstat ../DeviceSecurity error
stat DeviceSecurity/Font.bin error
¤[37;40m02:08:14|[] [ver:] trace tid:1253 libguikit: Font::load file /usr/data/Data/Font.bin Successed!
¤[0mstat Font.bin/FontSmallEn.bin error
¤[37;40m02:08:14|[] [ver:] trace tid:1253 libguikit: Font::load file /usr/data/Data/FontSmallEn.bin Successed!
¤[0mstat FontSmallEn.bin/Intell error
stat Intell/NavigationBar error
stat NavigationBar/RealPlay error
stat RealPlay/Stat error
stat Stat/StringAll.7z error
stat StringAll.7z/afterSaleService error
stat afterSaleService/cloudUpgrade error
stat cloudUpgrade/colorSettingPage error
stat colorSettingPage/configurationPage error
stat configurationPage/cursors error
stat cursors/desktopPage error
stat desktopPage/exitPage error
stat exitPage/faceplayer error
stat faceplayer/gbkpy.mb error
stat gbkpy.mb/guiCtrls error
stat guiCtrls/infoOnlineUserPage error
stat infoOnlineUserPage/infoPage error
stat infoPage/mainMenu error
stat ma_
Прощу помощи в восстановлении IP камеры на чипе hi3516c v300.
При подключении следующая информация:
hi3516cv300 System startup
Uncompress…….Ok
hi3516cv300 System startup
U-Boot 2010.06-svn (Apr 20 2017 — 19:16:36)
Check Flash Memory Controller v100 … Found
SPI Nor(cs 0) ID: 0xef 0x40 0x17
spi_general_qe_enable(294): Error: Disable Quad failed! reg: 0x42
Block:64KB Chip:8MB Name:»W25Q64FV»
Spi is locked. lock address[0 => 0x800000]
SPI Nor total size: 8MB
MMC:
EMMC/MMC/SD controller initialization.
Card did not respond to voltage select!
No EMMC/MMC/SD device found !
In: serial
Out: serial
Err: serial
Hit any key to stop autoboot: 0
8192 KiB hi_fmc at 0:0 is now current device
srcAddr 0x83000000, dstAddr 0x82000000
created_inode 0x883e0200
find_squashfs_file: name bin, start_block 0, offset 2425, type 1
find_squashfs_file: name boot, start_block 0, offset 2521, type 1
read inode: name boot, sb 0, of 2521, type 1
find_squashfs_file: name uImage, start_block 0, offset 2457, type 2
read inode: name uImage, sb 0, of 2457, type 2
write_file: regular file, blocks 8
len 2024731
### FS load complete: 2024731 bytes loaded to 0x82000000
## Booting kernel from Legacy Image at 82000000 …
Image Name: Linux-3.18.20
Image Type: ARM Linux Kernel Image (uncompressed)
Data Size: 2024667 Bytes = 1.9 MiB
Load Address: 80008000
Entry Point: 80008000
Loading Kernel Image … OK
OK
Starting kernel …
Восстанавливаю вот по этой инструкции:
http://cs5-2.4pda.to/9880035/%C8%ED…%ED%E8%FE.pdf073b4c81fb6f74374e2c3e37f6b44886
tftpd пишет, что файлы успешно загружены, но ошибка какая то появляется:
U-Boot 2010.06-svn (Apr 20 2017 — 19:16:36)
Check Flash Memory Controller v100 … Found
SPI Nor(cs 0) ID: 0xef 0x40 0x17
spi_general_qe_enable(294): Error: Disable Quad failed! reg: 0x42
Block:64KB Chip:8MB Name:»W25Q64FV»
Spi is locked. lock address[0 => 0x800000]
SPI Nor total size: 8MB
MMC:
EMMC/MMC/SD controller initialization.
Card did not respond to voltage select!
No EMMC/MMC/SD device found !
In: serial
Out: serial
Err: serial
Hit any key to stop autoboot: 0
hisilicon # cccc
hisilicon # run du
Hisilicon ETH net controler
MAC: 00-12-17-2B-EE-CA
eth0 : phy status change : LINK=UP : DUPLEX=FULL : SPEED=100M
TFTP from server 192.168.1.107; our IP address is 192.168.1.10
Download Filename ‘user-x.cramfs.img’.
Download to address: 0x82000000
Downloading: #################################################
done
Bytes transferred = 3125312 (2fb040 hex)
8192 KiB hi_fmc at 0:0 is now current device
## Checking Image at 0x82000000 …
hdr->ih_magic=0x56190527
Header CRC Checking … OK
Image Name: linux
Image Type: ARM Linux Kernel Image (gzip compressed)
Data Size: 3125248 Bytes = 3 MiB
Load Address: 00310000
Entry Point: 00610000
Data CRC Checking … OK
Programing start at: 0x00310000
Programing end at: 0x00610000
ERROR: The erase area was locked.
SPI flash erase failed
Timeout writing to Flash
hisilicon #
Что не так делаю?
OpenIPC Wiki
Table of Content
Available Installation Methods
Unfortunately IP camera manufacturers aren’t yet shipping hardware with
OpenIPC preinstalled, so to install OpenIPC onto a camera which is still using
factory firmware images, one of the following methods must be used:
-
The Coupler project makes available
firmware images which can be installed using the firmware upgrade mechanisms
which are built into the factory firmware of many cameras. -
Flashing the OpenIPC firmware using the U Boot
bootloader which is included in
the vendor firmware. This method interrupts the normal boot process of the
vendor firmware, and instead instructs U-Boot to load the OpenIPC firmware
over the network, and write it to the flash storage (replacing the main
portion of the vendor firmware). This method requires the camera’s case to
be opened to connect a UART adapter to the camera’s internal
«console» serial/debug port.
OpenIPC firmware installation using Coupler.
Instructions for using Coupler can be
found in the project’s documenation.
OpenIPC firmware installation via TFTP and UART, step by step.
Step 1. Determine the System on Chip.
The SoC includes the CPU core of the camera, as well as all the necessary
periperhals such as the camera and network interfaces. For various reasons
(including the limited onboard storage space on most IP Cameras), the OpenIPC
project currently builds separate firmware binaries for each SoC model. You
must identify the SoC which your camera uses, so that you can use the correct
firmware binaries. This can be done by reading the markings on the SoC IC
package on the camera’s main PCB (see example photo below), or by using
software such as ipctool to identify the
SoC model from the vendor firmware.


Hisilicon Hi3518EV100, Ingenic T20, T31 and T40 SoCs marking.
Relevant symbols highlighted with yellow.
Step 2. Install and set up a TFTP server.
TFTP stands for Trivial File Transfer Protocol. As the name implies, it is a
very simple protocol intended for transferring files over a local computer
network. TFTP does not support authentication. Its code is so tiny and simple
that TFTP-clients are widely used in thin-clients and embedded systems for
retrieving bootable images from a designated boot server on the local network.
If you have Linux…
…then it’s easy. Pre-compiled and ready-to-use binary package for your distro
most likely already exists in distro’s repo, and you only need to install it and
set it up.
sudo apt install tftpd-hpa
sudo sed -i '/^TFTP_OPTIONS/s/"$/ --create"/' /etc/default/tftpd-hpa
sudo systemctl restart tftpd-hpa.service
Note: some users reported issues (connection timeouts) when using
tftpd-hpawith recent versions of Ubuntu. In that case, you can try with an
alternative TFTP server.
Step 3. Connect to UART port of your camera.
In order to make a connection to UART port you will need a
serial port adapter for your PC.

Before you connect that adapter to you camera, make sure that it’s working
voltage is set to 3.3 volt!
Sometimes, you only need to flip a jumper to achieve that. But in some cases you
might need to solder a wire, a zero Ohm resistor, or make a connection between
two contacts with a blob of solder. Some adapters support only 5 volt. In that
case, you will need an additional logic level converter connected
between the adapter and UART port on your camera.
One of the contact pads you will need to connect you adapter to is GND (ground).
It is easy to discover using a multimeter in continuity mode. Put one of the
leads onto a well-known exposed ground pads. Usually, these are large open
copper contact areas around mounting screw holes, USB port housing, SD card slot
metallic walls. Use another lead to slightly touch control pads until you see or
hear a notification from your multimeter that the circuit is closed. That means,
you found the ground. Now, you need to find two more: RX and TX, both used
for receiving and transmitting data, respectively. Start with TX. It transmits
series of characters and quite easy to spot.
Be aware that you are looking for a contact with 3.3v potential between it and
the ground. Test possible connection points with a multimeter and mark those
showing 3.3 volt. This way you won’t have to test everything, and you save
yourself from hitting say a 12 volt connector intended for infrared LED array
or whatnot.
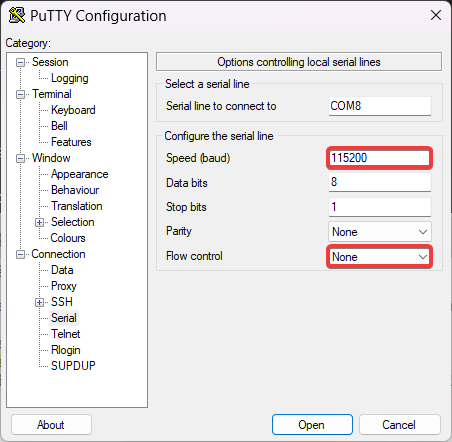
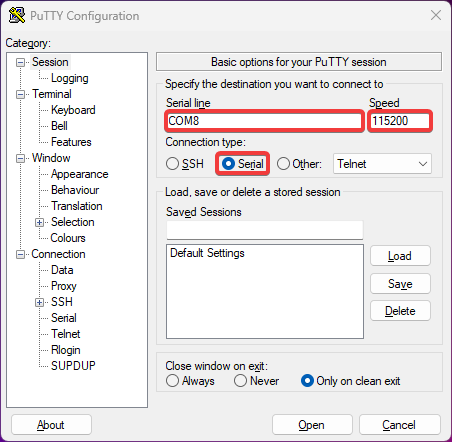
Connect GND pin on your camera to GND pad of the adapter, connect USB
connector of the adapter to a USB port on your PC, start a terminal emulator
application and connect to your adapter. Set your terminal settings to
115200 bps baudrate, 8 bits, no parity, 1 stopbit, no flow control. If you use
PuTTY, this is how it should look like:
Then, connect RX pin on the adapter to a possible TX contact of UART port
on your camera. Power the camera with its standard power adapter. If you had a
lucky guess then you’ll start seeing booting log in your terminal window. In
some cases, if you see garbled text on you screen instead of booting kernel,
you might need to change the connection speed to 57600 bps and try again.
If your screen remains blank, try another UART contact, and then another, until
you hit the proper one.
After you found the TX pad, connect it to RX pin on your adapter. Yes, it is
a cross-connection. Whatever transmits goes into a receiver and vice-versa. Now,
put a heavy object — a railroad nut, an antique tin solder, a shot of vodka
(full) — on any letter key of your computer keyboard and start connect
remaining TX pin of your adapter to different pads on the camera until you see
it backfeeding to the terminal. As it happens, you have successfully completed
a UART connection to you camera. Now you may drink the vodka.
NB! Usually, there is a fourth contact on a UART connector marked VCC. It is
used for powering camera during initial programming by manufacturer. We strongly
advise not to power your camera though that pin, but use the OEM power connector
for this purpose.
Step 4. Get access to the bootloader.
Reboot the camera and try to interrupt its boot sequence in order to access
bootloader console by pressing a key combination on your computer keyboard,
between the time the bootloader starts and before Linux kernel kicks in.
Key combinations differ from vendor to vendor but, in most cases, it is
Ctrl-C, less commonly — Enter, Esc or just any key. Carefully read text
appearing on screen while booting, you might see a hint there. Some cameras
require more exotic combinations not revealed in booting logs. You may try to
look them up on the internet, or ask on our Telegram channel.
Chances are, we have already dealt with such a camera and know the combo.
If you succeeded and got a command prompt then congrats, you’ve got access to
your camera’s bootloader.
From this point on, we strongly advise you to keep a record of everything you do.
Enable session logging in your terminal. Even better, create a text file on your
computer and write down all commands you run and how system responses to them.
Step 5. Determine the flash memory size.
Most IP cameras nowadays are equipped with 8 or 16 MB NOR or NAND flash memory.
You can check the type and size of the chip installed on of your camera in the
bootloader log output. You’ll see something like this:
U-Boot 2010.06-svn (Oct 21 2016 - 11:21:29)

Check Flash Memory Controller v100 ... Found
SPI Nor(cs 0) ID: 0xс2 0x20 0x18
spi_general_qe_enable(294): Error: Disable Quad failed! reg: 0x2
Block:64KB Chip:16MB Name:"MX25L128XX"
SPI Nor total size: 16MB
Another example:
U-Boot 2013.07 (Feb 27 2019 - 02:05:08)

DRAM:  64 MiB
MMC:   msc: 0
SF: Detected EN25QH64
Which shows the flash memory model (EN25QH64) that you can look up online to
find a data sheet. Also, 64 in the model number hints for a 64 Megabits memory,
which is equivalent to 8MB. Similarly, 128 would be equivalent to 16MB.
You should also be able to identify the model of the flash memory by looking up
at the board, but this is usually a difficult task because the chips are very
small and may not come with clear markings.
Step 6. Save the original firmware.
After you get access to the bootloader console, run help to get a list of
available commands. Check if you have tftp among them. If you do, then saving
the original firmware should be a breeze. You only need to set up access to your
TFTP server from step 2.
NB! If your bootloader does not have tftp, you can still make a copy of the
original firmware. Read here for more.
Check the system environment using printenv command. Look for ipaddr,
netmask, gatewayip and serverip parameters. The first three set IP address,
netmask of your camera, and the IP address of the network gateway for accessing
local network. The fourth parameter is an IP address of your TFTP server. Assign
the values by setenv command (use IP addresses and netmask corresponding to
your local network), then save the new values into environment with saveenv
command.
setenv ipaddr 192.168.1.253
setenv netmask 255.255.255.0
setenv gatewayip 192.168.1.1
setenv serverip 192.168.1.254
saveenv
To dump the original firmware, you need to save the contents of camera’s flash
memory to a file. For that, you must first load the contents into RAM. Here’s
how you do that. Initialize the Flash memory. Clean a region of RAM large enough to
fit whole content of flash memory chip. Read contents of the flash from into that
region, then export it to a file on the TFTP server.
Please note, that flash type, size and starting address differ for different cameras!
For exact commands please use automatically generated instructions
for your hardware, consult data sheets, or seek help on our Telegram channel.
Step 7. Install OpenIPC firmware.
Prelude.
No two camera models are alike. Different camera models consist of different
sets of components. The most important of them, the central processor and the
image sensor, directly affect the image quality and the range of functions
inherent in a particular camera. Unlike desktop computer CPU, camera’s processor
handles so many functions that it got a specific name — System-on-Chip or SoC,
for short.
But even seemingly less significant components can set limitations on the camera
and its firmware capabilities. For example, different cameras may have different
flash memory chips installed. Some cameras may have 8MB of flash memory, while
others may have 16MB or more. More flash memory can fit more software code and
allow the camera to run additional services that are not available on cameras
with less flash memory. So we decided to build two versions of our firmware:
the basic version (Lite) for cameras with 8 MB of flash memory and the
advanced version (Ultimate) with additional features for cameras with 16 MB
flash memory.
As said before, firmware installation routine differs for different cameras.
There are different memory addresses and different environment parameters,
so before proceeding, determine what kind of SoC is in your camera, what sensor,
what flash memory chip and what amount of memory is has.
Below we describe the procedure for installing the OpenIPC Lite firmware on a
camera with 8 MB of flash memory, as an example. Even if your camera has larger
flash memory, do not skip this text. Read it carefully to understand the
principle and the sequence of operations. We will provide specific commands
for different cameras in the second part of this section.
Preparing the firmware and the TFTP server.
Go to https://openipc.org/supported-hardware, find your SoC in the table of
supported hardware. Make sure there is a downloadable binary file for that SoC.
Hopefully there is a pre-compiled firmware file for your processor —
download it onto your PC.
If you followed step 2, you’ve got your own TFTP server serving files from
/srv/tftp directory. Extract files from the bundle you just downloaded into
that directory.
sudo tar -C /srv/tftp/ -xvf openipc.*.tgz
Preparing the camera for flashing.
So, we have a guinea pig, a camera with hi3518ev100 SoC, equipped with a OV9712
sensor, 64 MB of RAM and a 8MB NOR flash memory.
Connect to the camera via the UART port and access the bootloader console.
Set the component parameters to the appropriate environment variables. Set
environment variables for loading the Linux kernel and the root file system
of the new firmware. Set environment variables for the camera to access local network,
where ethaddr is the original camera MAC address, ipaddr is camera’s IP address
on the network, gatewayip is the IP address of a router to access the network,
netmask is the subnet mask, and serverip is am IP address of the TFTP server
from step 3. Save updated values to flash memory.
For exact commands please use automatically generated instructions
for your hardware, consult data sheets, or seek help on our Telegram channel.
Installation.
For exact commands please use automatically generated instructions
for your hardware, consult data sheets, or seek help on our Telegram channel.
NB! Pay attention to the messages on the terminal screen! If any of the commands
throws an error, find out what went wrong. Maybe you made a typo? In any case,
do not continue the procedure until all previous commands succeed. Otherwise,
you might end up with a bricked camera!
Step 8. First boot.
If all previous steps are done correctly, your camera should start with the new
firmware. Welcome to OpenIPC!
After the first boot with the new firmware you need to clean the overlay
partition. Run this in your terminal window:
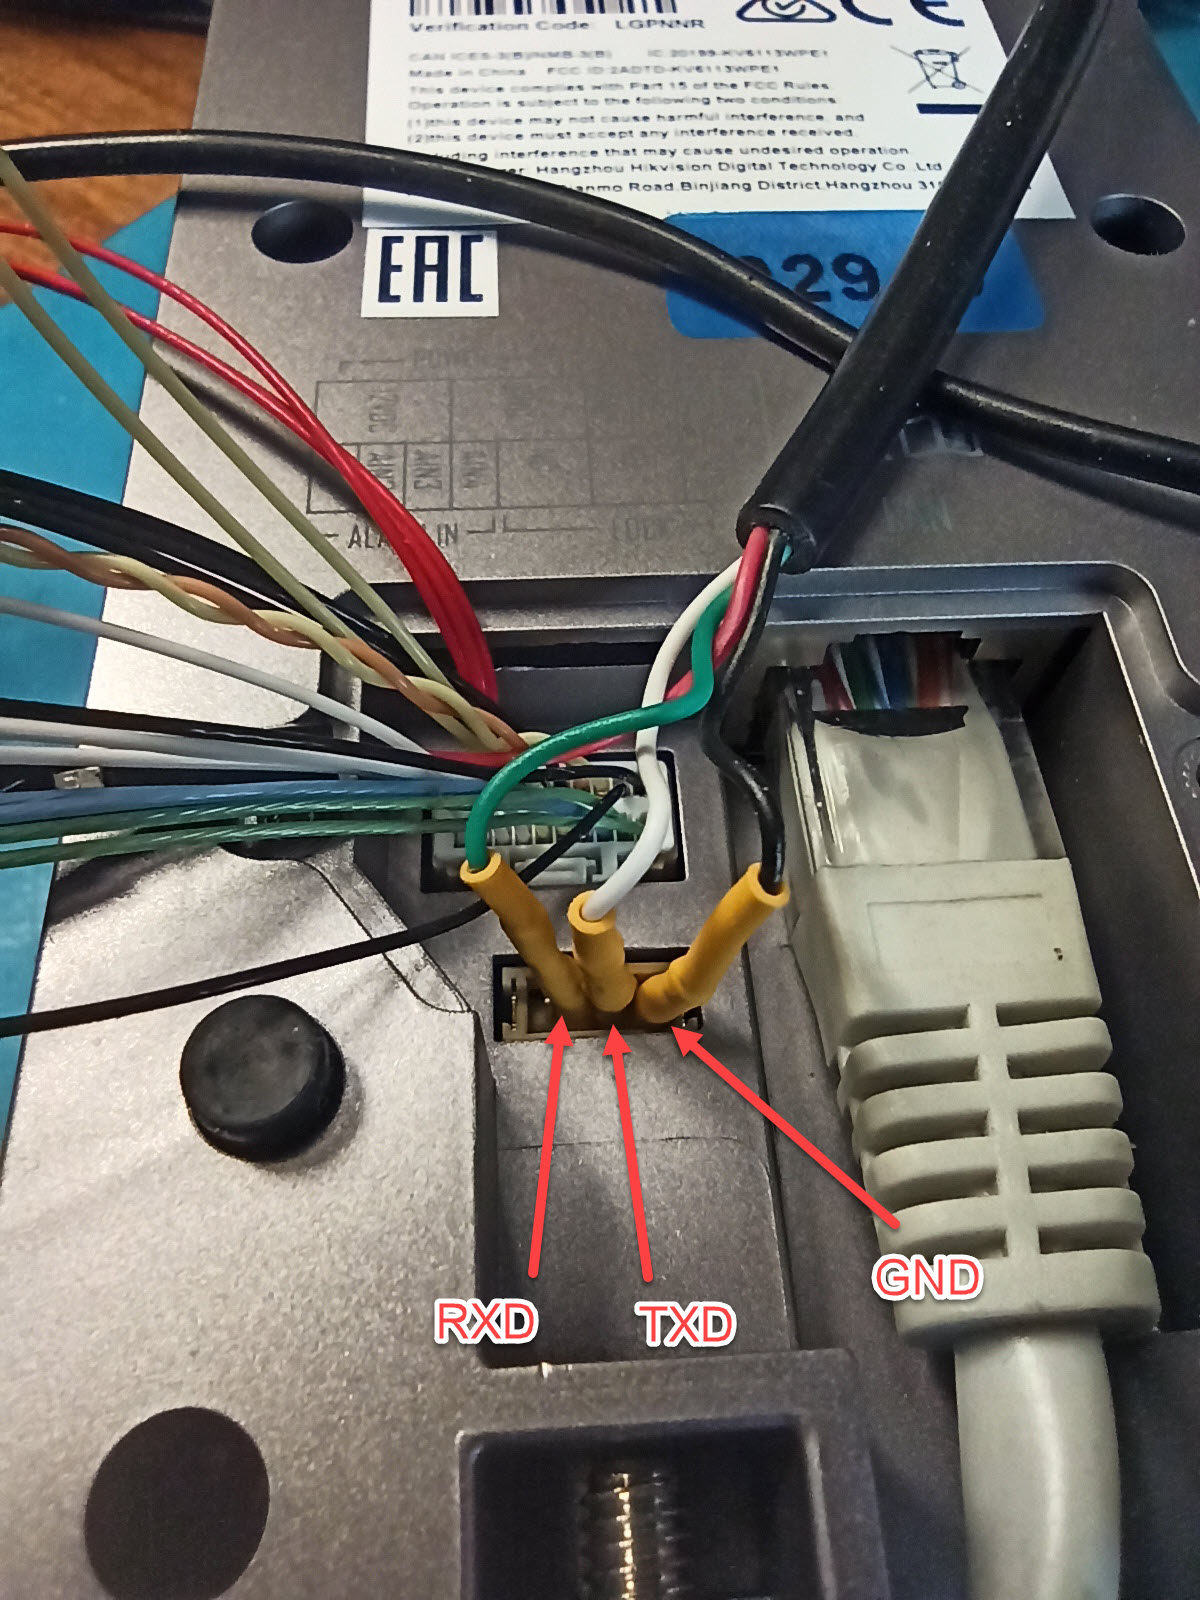
Вызывная панель DS-KV6113-WPE1 на прошивке версий 2.2.х не работает самостоятельно по SIP протоколу. Откатить простым способом на 2.1.35 не получилось. Подоткнул USB-TTL Serial порт в технологический разъём консоли (разбирать панель не требуется). Параметры 115200,N,1. Распиновка на картинке, изначально смотрел осцилографом. TFTP у меня всегда поднят, просто положил в его папку распакованную прошивку «digicap.dav». При включении надо понажимать, например, пробел, чтобы попасть в командную строку загрузчика. На компе прописан адрес 192.168.1.2, он указывается в качестве сервера. Остальное и так понятно.
Код: Выделить всё
U-Boot 2010.06-svn167559 (Sep 03 2019 - 14:54:44)
spi_w25q256fv_solve_flash_lock_qe_enable(268): Error: Disable Quad failed! reg:0x2
spi_w25q256fv_entry_4addr enable is 1
*** Warning - bad CRC, using default environment
set default env for Linux
Hit any key to stop autoboot: 1
This program will upgrade software.
*******************************************************
* ATTENTION!! PLEASE READ THIS NOTICE CAREFULLY! *
* Don't reset machine,or anything that interrupt it. *
* The upgrade process must finish in 10 minutes! *
* If this program fails,machine might be unusable, *
* and you will need to reflash again. *
* If you find this too risky,power off machine now. *
*******************************************************
Now press [u/U] key to upgrade software: u
File system error,please upgrade by TFTP
Please input ip address of device: 192.168.1.1
Please input ip address of upgrade server: 192.168.1.2
Confirm?(y/n): y
Do you want to erase devcfg partition after update? (y/n/q): y
Hisilicon ETH net controler
MAC: C0-51-7E-07-AF-DC
eth0 : phy status change : LINK=UP : DUPLEX=FULL : SPEED=100M
TFTP from server 192.168.1.2; our IP address is 192.168.1.1
Download Filename 'digicap.dav'.
Download to address: 0x80008000
Downloading: #################################################
done
Bytes transferred = 21184666 (143409a hex)
cramfs.img checkSum ok !
Erasing SPI flash...done
Writing SPI flash...done
Upgrade check ......done
Erasing devcfg...done
digicap update success
Press ENTER key to reboot
resetting ...
- Спойлер

2 x gmini C6HD, 3 x gmini M6HD, 1 x gmini M61HD, 1 x gmini M5, 1 x QUMO Libro II HD, 1 x Digma E600
OpenIPC Wiki
Оглавление
Установка OpenIPC. Шаг за шагом.
Шаг 1. Определите тип процессора.


Пример маркировки процессоров Hisilicon Hi3518EV100, Ingenic T20, T31 и T40.
Значимые символы обведены жёлтым.
Шаг 2. Скачайте прошивку.
Найдите свой тип процессора на странице https://github.com/OpenIPC/firmware
и убедитесь, что для него есть готовая прошивка. Если вам повезло, и такая
прошивка существует – скачайте её на свой компьютер.
Шаг 3. Установите и настройте сервер TFTP.
TFTP расшифровывается как Trivial File Transfer Protocol. Как следует уже из
названия, это очень простой протокол, предназначенный для передачи файлов по
компьютерной сети. TFTP не поддерживает аутентификацию. Его код настолько прост
и компактен, что TFTP клиенты используются в сетевых и встроенных системах для
получения загрузочных образов с сетевых серверов.
Если на вашем компьютере Linux.
Если на вашем компьютере установлен Linux, то здесь всё просто. Скомпилированный
и готовый к использованию пакет сервера TFTP уже лежит в репозитории, и вам
только надо установить его и настроить:
sudo apt install tftpd-hpa
sudo sed -i '/^TFTP_OPTIONS/s/"$/ --create"/' /etc/default/tftpd-hpa
sudo systemctl restart tftpd-hpa.service
Теперь у вас есть свой TFTP сервер, который работает с файлами в директории
/srv/tftp. Разверните архив с прошивкой, скачанный в п.2 в эту директорию.
sudo tar -C /srv/tftp/ -xvf openipc.*.tgz
Шаг 4. Подключитесь к порту UART камеры.
Для подключения к камере через порт UART вам понадобится адаптер для
создания подключения с серийного порта вашего компьютера.

Прежде чем подключать адаптер к камере, убедитесь, что переключатель уровня
рабочего напряжения на адаптере установлен в 3.3 вольта! Иногда для этого
достаточно выставить соответствующее положение джампера, иногда надо перепаять
ключ на контактной площадке. Некоторые адаптеры работают только с напряжением 5
вольт. В этом случае вам понадобится дополнительный конвертер уровня
сигналов TTL, включенный между адаптером и портом UART камеры.
Один из нужных вам контактов порта UART – GND. Его легко определить, проверив
мультиметром неразрывность цепи на любой другой известный контакт GND. Нашли?
Тогда остаётся найти ещё два контакта – RX и TX, они используются для
получения и передачи данных, соответственно. Соедините GND камеры с контактом
GND адаптера, подключите USB разъём адаптера к порту USB вашего компьютера,
запустите на компьютере программу подключения к серийному порту и установите
соединение с адаптером. Используйте скорость подключения 115200 bps. После этого
соедините контакт RX адаптера с предполагаемым контактом TX порта UART.
Подайте питание на камеру. Если вы угадали правильно, на экране появится лог
загрузки. Если же экран остался чистым – повторите процедуру с другим свободным
контактом UART. После того как вы определили порт RX, подключите порт TX
адаптера к оставшемуся свободному контакту порта UART. Попробуйте прервать
загрузку камеры нажатием комбинации клавиш на клавиатуре компьютера. Если всё
получилось – поздравляем, вы получили доступ к камере.
Четвертым контактом порта UART может быть VCC. Он используется для подачи
напряжения во время прошивки камеры на заводе. Мы настоятельно советуем не
подключать питание камеры через VCC порт UART, а использовать для этого
штатный разъем питания.
Шаг 5. Получите доступ к консоли загрузчика.
Перегрузите камеру и постарайтесь получить доступ к консоли загрузчика нажав
требуемую комбинацию клавиш между моментом начала загрузки и до старта ядра
Линукс. В большинстве случаев это комбинация Ctrl-C. Реже – Enter, Esc`
или просто любая клавиша. Но некоторые камеры требуют более экзотические
комбинации. Читайте надписи на экране во время загрузки. Если внимательное
чтение лога не помогло – попросите помощи на нашем канале Телеграм. Скорее
всего, мы уже имели дело с подобной камерой.
Начиная с этого момента мы настоятельно советуем вам вести записи всего, что
вы делаете. Включите сохранение логов сессии в вашем консольном клиенте. Но для
еще большей надежности создайте текстовый файл на вашем компьютере и заносите в
него все выполняемые команды и ответы системы.
Шаг 6. Сохраните заводскую прошивку.
После того как вы получили доступ в консоль загрузчика, наберите help, чтобы
вывести список доступных вам команд. Убедитесь, что в списке команд присутствует
tftp. Если такая команда есть, то сохранение оригинальной прошивки не должно
доставить проблем. Надо только настроить сетевой доступ камеры к вашему серверу
TFTP.
NB! Если в вашем загрузчике нет tftp, вы всё ещё можете сделать копию
оригинальной прошивки. Подробности здесь.
Проверьте настройки системного окружения командой printenv. Вас интересуют
настройки сетевого подключения: ipaddr, netmask, gatewayip и serverip.
Первые три параметра задают IP адрес и сетевую маску вашей камеры, IP адрес
сетевого шлюза для подключения в локальную сеть. Четвёртый параметр – IP адрес
сервера TFTP, с которого и на который будут передаваться файлы командой tftp.
Установите нужные значения командой setenv (используйте IP адреса и сетевую
маску соответствующие вашей сети). Сохраните установленные значения командой
saveenv.
setenv ipaddr 192.168.1.253
setenv netmask 255.255.255.0
setenv gatewayip 192.168.1.1
setenv serverip 192.168.1.254
saveenv
Большинство IP камер сегодня комплектуются чипами Nor или Nand флэш-памяти
объемом 8 или 16 мегабайтов. Вы можете увидеть тип и размер установленной на
вашей камере микросхемы в выводе лога загрузчика. Там будет что-то вроде этого:
U-Boot 2010.06-svn (Oct 21 2016 - 11:21:29)

Check Flash Memory Controller v100 ... Found
SPI Nor(cs 0) ID: 0xс2 0x20 0x18
spi_general_qe_enable(294): Error: Disable Quad failed! reg: 0x2
Block:64KB Chip:16MB Name:"MX25L128XX"
SPI Nor total size: 16MB
Чтобы сохранить содержимое флэш-памяти в файл, необходимо сначала загрузить это
содержимое в оперативную память. Очистите содержимое региона оперативной памяти
достаточно большое чтобы вместить содержимое флэш-памяти, затем считайте содержимое
флэш-памяти в подготовленный участок оперативной памяти, и выгрузите считанные
данные из оперативной памяти в виде файла на сервер TFTP.
Разные процессоры, разные размеры микросхем памяти, разные адреса загрузки не позволяют
привести здесь универсальный набор команд. Для получения списка команд, подходящих для
вашей конкретной конфиругации, воспользуйтесь автоматическим генератором инструкций
на нашем сайте.
Шаг 7. Установите прошивку OpenIPC.
Разные модели камер имеют разные наборы компонентов. Самые значимые из них –
процессор и сенсор, – напрямую влияют на качество изображения и набор функций,
присущих той или иной камере. Но и казалось бы менее значимые детали могут
устанавливать ограничения на возможности камеры и её прошивки. Например, у
разных камер могут отличаться установленные микросхемы флэш-памяти. Одни камеры
могут иметь флэш-память объемом 8 МБ, в то время как другие — 16 МБ, а то и
больше. В больший объем флэш-памяти можно поместить большее количество
программного кода, позволить камере запускать дополнительные сервисы, которые
недоступны на камерах с меньшим объёмом флэш-памяти. Поэтому мы решили
собирать два варианта нашей прошивки: базовую версию (Lite) для камер с
объемом флэш-памяти 8 МБ и расширенную версию (Ultimate) с дополнительными
возможностями для камер с увеличенным объемом флэш-памяти.
Процедура установка прошивки на разные модели камер отличается используемыми
адресами памяти и разными параметрами, устанавливаемыми в переменные окружения,
поэтому прежде чем продолжить, определите, какой именно тип процессора, какая
модель сенсора, какой объем памяти установлены на вашей камере.
Для получения списка команд, подходящих для вашей конкретной конфиругации,
воспользуйтесь автоматическим генератором инструкций
на нашем сайте.
Шаг 8. Первая загрузка.
Если все предыдущие шаги выполнены правильно, ваша камера должна стартовать уже
с новой прошивкой. Добро пожаловать в OpenIPC!
После первой загрузки с новой прошивкой вам нужно очистить перекрывающий раздел,
запустив для этого программу
Recommend Projects
-

React
A declarative, efficient, and flexible JavaScript library for building user interfaces.
-
Vue.js
🖖 Vue.js is a progressive, incrementally-adoptable JavaScript framework for building UI on the web.
-
Typescript
TypeScript is a superset of JavaScript that compiles to clean JavaScript output.
-
TensorFlow
An Open Source Machine Learning Framework for Everyone
-
Django
The Web framework for perfectionists with deadlines.
-
Laravel
A PHP framework for web artisans
-
D3
Bring data to life with SVG, Canvas and HTML. 📊📈🎉
Recommend Topics
-
javascript
JavaScript (JS) is a lightweight interpreted programming language with first-class functions.
-
web
Some thing interesting about web. New door for the world.
-
server
A server is a program made to process requests and deliver data to clients.
-
Machine learning
Machine learning is a way of modeling and interpreting data that allows a piece of software to respond intelligently.
-
Visualization
Some thing interesting about visualization, use data art
-
Game
Some thing interesting about game, make everyone happy.
Recommend Org
-
Facebook
We are working to build community through open source technology. NB: members must have two-factor auth.
-
Microsoft
Open source projects and samples from Microsoft.
-
Google
Google ❤️ Open Source for everyone.
-
Alibaba
Alibaba Open Source for everyone
-
D3
Data-Driven Documents codes.
-
Tencent
China tencent open source team.
-
#21
can you share me backup rom hex. i unbrick my nvr i lose uboot
-
#22
Hey, nice guy.
Thank you very much for Haching.It became very helpful.
Before discovering this article, connect a serial console,I just looked at «Starting kernel …» and gave it up.
Unlike Firmware, I examined the defeat of the control panel, so keep the circuit diagram.
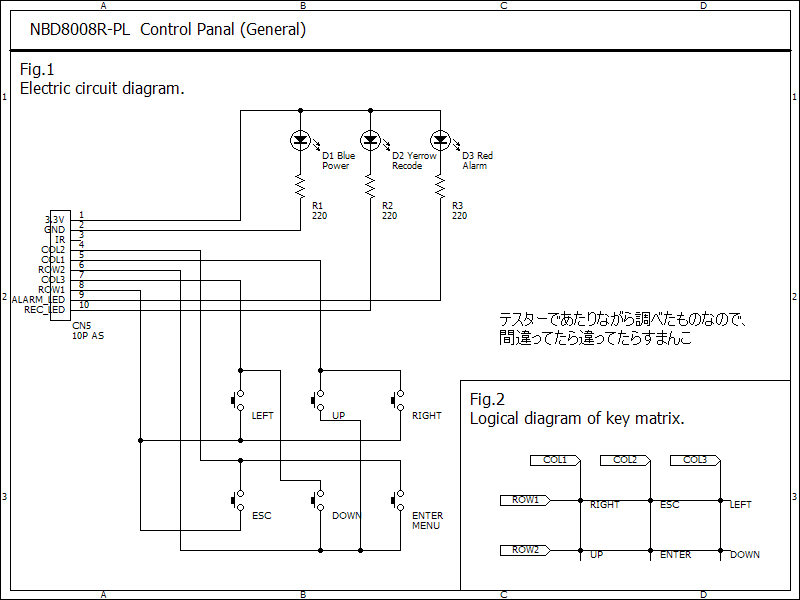
For all NBD8008R users
-
#23
@kirikomori Thanks for the diagram, I can use that to control the menu with my raspberrypi.
@Nhat Huy What do you exactly want? You can just download the firmware and unpack it to get the hex data.
-
#24
i have a nvr board use Hi3536D chip all schematic same NBD8008 xiongmai hardware. I try flash uboot and then flash fw via UART, nvr boot up and run but only 1 frame and serial and mac is default. Maybe i lost rom chip 24c08 ( mac + serial ) or it include master rom ( address 3FC00 to 40000) can you backup your rom via UART but I worry i do it you and me same cloud id.
-
#25
@Nyat Huy, that is what I mean. You can get the right files from the firmware file.
General_General_NBD8008R-PL_V4.02.R11.7601.Nat.OnvifC.20180901.bin
Just unzip the .bin to get the below files and then flash them in uboot. Reflashing romfs, web and custom should get you going again.
web-x.cramfs.img
custom-x.cramfs.img
user-x.cramfs.img
romfs-x.cramfs.img
logo-x.cramfs.img
u-boot.bin.img
InstallDesc
BTW sorry for the late reaction. a bit too busy at work lately.
-
#26
If someone wants to build a box with a 3D printer for the NBD8008R — 3536DV100 V1.01 print I have designed a simple one Search Thingiverse — Thingiverse Tinkercad links are also there so you can customize it. There are 3 parts bottom, top and back. HDD can be screwed to the top.
-
#27
i have the same board. and i have unfortunately bricked it. (working U-boot)
but corroupted kernel
i have not been able to find the kernel in any update files yet.
any chance you have a complete dump file, individual files to help me recover via TFTP?
u-boot.bin.img
user-x.cramfs.img
romfs-x.cramfs.img
web-x.cramfs.img
logo-x.cramfs.img
custom-x.cramfs.img
update.img
zImage.img
mtd-x.jffs2.img
or could pull them off your working board for me ?
would be greatly appreciated
Last edited: Oct 11, 2018
-
#28
bit of pinout i found / fixed
-
61.2 KB
Views: 101
-
#29
@runekyndal It loads the kernel (zImage) from the romfs image. See the output of the serial console. So if you already reflashed the romfs image, and it still doesn’t want to boot the kernel, you are using the wrong firmware.
Code:
find_squashfs_file: name bin, start_block 0, offset 2676, type 1

find_squashfs_file: name boot, start_block 0, offset 2916, type 1

read inode: name boot, sb 0, of 2916, type 1

find_squashfs_file: name zImage.img, start_block 0, offset 2708, type 2

read inode: name zImage.img, sb 0, of 2708, type 2

### FS load complete: 2821835 bytes loaded to 0x81000000

## Booting kernel from Legacy Image at 81000000 ...

   Image Name:   Linux-4.9.37

   Image Type:   ARM Linux Kernel Image (uncompressed)

   Data Size:    2821771 Bytes = 2.7 MiB

   Load Address: 80008000

   Entry Point:  80008000

   Loading Kernel Image ... OK

OK


Starting kernel ...
-
#30
hm.. well if that’s the case, then im in a bit of a pinch. i have tried several firmwares. unpack into my TFTP folder and flashed with «run da» , du,dr,dw,dl,dc
my most current boot up
Code:
U-Boot 2010.06-svn1009 (Apr 23 2018 - 15:33:45)

Check Flash Memory Controller v100 ... Found
SPI Nor(cs 0) ID: 0xef 0x40 0x18
spi_w25q256fv_qe_enable(193): Error: Disable Quad failed! reg:0x2
Block:64KB Chip:16MB Name:"W25Q128(B/F)V"
CONFIG_CLOSE_SPI_8PIN_4IO = y.
at hifmc100_setTB() mid:0xef,chipsize:0x1000000 <no>.
unlock all.
SPI Nor total size: 16MB
In:    serial
Out:   serial
Err:   serial
USB:   scanning bus for devices... 2 USB Device(s) found
usb_stor_get_info->1431,blksz:512
1 Storage Device(s) found
device name usb!
Interface:  USB
  Device 0: Vendor: SCSI     Rev: 1.00 Prod: DISK1.8.4.9.656
            Type: Removable Hard Disk
            Capacity: 7695.0 MB = 7.5 GB (15759456 x 512)

No valid FAT fs found
file_fat_detectfs failed, name:usb
PHY 0x02: OUI = 0x1374, Model = 0x07, Rev = 0x02
Net PHY: AR8035
at higmac_demux() phy_intf:2 [0:mii,1:rmii,2:rgmii];MAC_TXCKOUT_MUX_REG value:0x1 [1,rgmii;2,mii;3,rmii;]
PHY 0x02: OUI = 0x1374, Model = 0x07, Rev = 0x02
change register for AR8035
CONFIG RGMII <<222>>
at higmac_net_adjust_link() port_mode:45,speed_mode:0
ETH1: PHY(phyaddr=3, rgmii) link UP: DUPLEX=HALF : SPEED=10M
MAC:   00-0B-3F-00-00-01
Press CTRL-C to abort autoboot in 2 seconds16384 KiB hi_fmc at 0:0 is now current device
CFG_BOOT_ADDR:0x0 argc 2 argv[0] logoload
### /UbootLogo/ UbootLogoload complete:bytes  oadaddr0x82000000 loaded to 0x9f000000
cramfs: wrong magic
cramfs: wrong magic
### /UbootLogo/ LOAD ERROR<ffffffff> !
jpeg decoding ...
<<addr=0x9f000000, size=0xb85f9, vobuf=0x9f600000>>
addr:0x80870b24,size:755193,logoaddr:0x9f000000,:ff,dd
load jpeg err.
stMaxRect.u32Width:1024, stMaxRect.u32Height:768.
HDMI_INFO:DispFmt2HdmiTiming[383] ,Non CEA video timing:17
HDMI_INFO:Hdmi_PixelFreqSearch[127] ,u32Fmt17.
srcAddr 0x82000000, dstAddr 0x81000000
unknow
read_super_m faile
### FS LOAD ERROR<0> for boot/zImage.img!
Wrong Image Format for bootm command
ERROR: can't get kernel image!
hisilicon #
and now this morning… u-boot not so much either… Sigh.
I’m pretty sure i have a bad flash chip. and / or pretty propper bricked haha..
i have the new part and it looks like i will need to program that and replace
any chance of making / finding a complete working .hex file for programming direct like that ?
R
-
#31
i think something along these lines should dump the whole 128kbit flash chip to RAM, and then push to TFTP ?
# sf probe 0;sf read 0x82000000 0x0 0x1600000
# tftp 0x82000000 flash.bin 0x1600000
but i’m not entirely sure? also not sure if that’s usable to program direct onto the 25q128 with external programmer?
do you mind doing that? id give it a try anyway
R
Last edited: Oct 11, 2018
-
#32
For some reason I cannot read the flash in u-boot when starting at ie 0xb10000 where the web squashfs files starts. It gives me an «ERROR: read/write area is out of range!» I only can read part of the flash, which is weird. It seems locked.
So sadly I can’t help you with that, however you can just use the image files and strip of the uboot header.
Code:
binwalk user-x.cramfs.img

DECIMAL       HEXADECIMAL     DESCRIPTION
--------------------------------------------------------------------------------
0             0x0             uImage header, header size: 64 bytes, header CRC: 0x6EF60315, created: 2018-07-19 13:47:28, image size: 4718592 bytes, Data Address: 0x430000, Entry Point: 0xB10000, data CRC: 0x2A278CF8, OS: Linux, CPU: ARM, image type: OS Kernel Image, compression type: gzip, image name: "linux"
64            0x40            Squashfs filesystem, little endian, version 4.0, compression:xz, size: 4717676 bytes, 153 inodes, blocksize: 65536 bytes, created: 2018-07-19 13:47:28
Then:
NOTE: skip is the decimal value of the binwalk output of Squashfs filesystem and count are the size in bytes of the squashfs filesystem. You also will see Data Address: 0x430000, Entry Point: 0xB10000 in the uboot header which is important for where it should be on the flash.
Code:
dd if=user-x.cramfs.img bs=1 skip=64 count=4717676 of=user-x.cramfs.img.stripped
4717676+0 records in
4717676+0 records out
4717676 bytes (4,7 MB, 4,5 MiB) copied, 10,593 s, 445 kB/s
When I look at your latest output on serial, it seems that you need signed firmware. This could be because you flashed a wrong uboot. I never touched the uboot on my device, too dangerous IMO. When you have a good uboot it is easy to reflash the rest if something goes wrong.
Code:
cramfs: wrong magic
cramfs: wrong magic
When I do a printenv in my uboot shell I have a variable set «verify=n» this could be the one that sets a check if you need a signed cramfs.
-
#33
okay. thanks for trying..
im 100% now that i need to replace the flash chip. so i need to program the whole thing, uboot and all.
so stripping the uImage header off one of my user-x.cramfs.img files as per above should produce a flashable file ?
R
-
#34
so stripping the uImage header off one of my user-x.cramfs.img files as per above should produce a flashable file ?
Yeah, you should do that for all the files to get the complete flash. You also could try uboot first and see if that works. Then flash the rest from the uboot shell.
To clarify: The user-x.cramfs.img was just an example file.
-
#35
ok, i got a stripped u-boot file now, just cobbling together a programmer (just ordered a dedicated one online) but i got a few options here.
i think my buspirate is the go-to for this
u-boot should be programmed, star starting 0x1000000 i believe?
R
-
#36
u-boot should be programmed, star starting 0x1000000 i believe?
R
No, at least not on my firmware and others also not that would be not logical. It would normally always start at 0x0
Code:
maurice@maurice-N73SM:~/Downloads/extract$ binwalk u-boot.bin.img

DECIMAL       HEXADECIMAL     DESCRIPTION
--------------------------------------------------------------------------------
0             0x0             uImage header, header size: 64 bytes, header CRC: 0x865B27D3, created: 2018-07-19 13:47:22, image size: 140597 bytes, Data Address: 0x0, Entry Point: 0x40000, data CRC: 0x37220CE3, OS: Linux, CPU: ARM, image type: Firmware Image, compression type: gzip, image name: "linux"
21664         0x54A0          LZMA compressed data, properties: 0x5D, dictionary size: 8388608 bytes, uncompressed size: 330144 bytes
Data Address: 0x0, —> starting at address 0x0
Entry Point: 0x40000 —> End address
So from 0x0 to 0x40000 is reserved for u-boot.
-
#37
i’m trying to find where i got the 0x1000000 from… in my various screen logs.. oh well.
i will give 0x0 a go first.. i have converted my board to DIP8 now.. 
R
Last edited: Oct 11, 2018
-
#38
hm. so it took a couple of hours for flashrom to read in, write and verify u-boot.bin.img.stripped (u-boot.bin)? through my buspirate.
(successfully)
but no luck on boot up.
my uboot is only 139.373 byte ?
root@odroidxu4:~# binwalk u-boot.bin.img (before stripping uimage header)
DECIMAL HEXADECIMAL DESCRIPTION
———————————————————————————
0 0x0 uImage header, header size: 64 bytes, header CRC: 0x94549E76, created: 2018-03-26 07:01:23, image size: 139373 bytes, Data Address: 0x0, Entry Point: 0x40000, data CRC: 0x43AD27C1, OS: Linux, CPU: ARM, image type: Firmware Image, compression type: gzip, image name: «linux»
19008 0x4A40 LZMA compressed data, properties: 0x5D, dictionary size: 8388608 bytes, uncompressed size: 335552 bytes
am i supposed to uncompress the bin file out of the .bin out of the img file first ? (335552 bytes)
which wont fit in the first 0-0x40000 reserved for uboot
R
Last edited: Oct 11, 2018
-
#39
starting the cooking over.. haha
General_General_NBD8008R-PL_V4.02.R11.7601.Nat.OnvifC.20180928.bin
Code:
root@odroidxu4:~# dd if=u-boot.bin.img bs=1 skip=64 count=4717676 of=u-boot.bin      (strip uimage header 64 byte)

root@odroidxu4:~# dd if=u-boot.bin of=flash-u-boot.bin bs=1 count=1 seek=16777215   (Expand image size to fit Flash size to avoid flashrom error)

root@odroidxu4:~# flashrom -VV -p buspirate_spi:dev=/dev/ttyUSB0 -c W25Q128.V -w flash-u-boot.bin  (flash 25q128 with flashrom and buspirate)
this is the workflow.. different bin file. but that’s what didn’t work for me
something obvious wrong ?
R
-
#40
dd if=u-boot.bin of=flash-u-boot.bin bs=1 count=1 seek=16777215
This for me will create a file with all zeros. except the last byte —> bs=1 count=1
Try the following this will add zeros to the end of u-boot.bin until it reaches the size 16777215
Code:
truncate -s 16777215 u-boot.binLast edited: Oct 12, 2018