- Login
- Register
- FAQ
- Search
- It is currently Thu Feb 09, 2023 1:26 pm
- Print view
Cannot Create Optimized Media
- Message
CazadorTyphoon
- Posts: 2
- Joined: Mon Jul 05, 2021 3:54 pm
- Real Name: Tayfun Uzum
![]() Mon Jul 05, 2021 5:24 pm
Mon Jul 05, 2021 5:24 pm
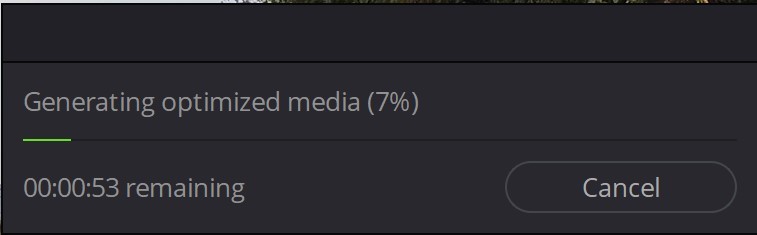
Hi! I am new to the forum and I recently realized I had an issue with creating optimized media in DaVinci Resolve 17. I can’t generate optimized media, an error pops up (I can only see from the box size that «error encountered during optimized media generation. Ca») and disappears immediately so, I don’t know the exact problem but it happens randomly, sometimes it doesn’t even proceed and immediately I get an error and sometimes around %10-20 I get an error. I tried this with multiple projects and clips, although note that they are all .mkv files with two separate audio tracks in them (I recorded them that way through OBS). My settings for «Optimized Media and Render Generation» are as follows:
— Proxy media resolution: Choose automatically
— Proxy media format: DNxHR SQ
— Optimized media resolution: Choose automatically
— Optimized media format: DNxHR SQ
— Render cache format: DNxHR SQ
Also note that I changed «Working Folders» from default C: users/videos to an internal hdd and didn’t create another folder for each (since Resolve does that automatically, though I tried creating another folder and putting all of them in that folder, which didn’t work). Also I changed «Media Storage» to said internal HDD and didn’t select any other folders in that. I also changed Video monitoring to 720p 60fps, Video depth to 8 and Monitor scaling to basic. As far as I can remember these are all the changes I made regarding optimized media. I experimented with all these settings but nothing seemed to work. Please help me with this issue since I have a fairly old system which without optimized media increases my work time even on simple edits by a lot. To help you helping me, I saw from a post from 2012 in which someone asked for logfiles, I created this log files from «CaptureLogs.bat» right after the error and I am sharing via WeTransfer and I am also uploading them to this post. Link to WeTransfer file:https://we.tl/t-zOxA3yPxL8
- Attachments
-
 DaVinci-Resolve-logs-05.07.2021_185726,41.zip
- My logs
- (567.11 KiB) Downloaded 26 times
![]() Wed Jul 07, 2021 5:29 am
Wed Jul 07, 2021 5:29 am
Please confirm, in preferences, system, edit storage, you have the C drive listed?
In the working folders, you have that same C drive listed?
if you power down and restart the computer, then resolve, these listings are still the same?
DaVinci Resolve Product Manager
CazadorTyphoon
- Posts: 2
- Joined: Mon Jul 05, 2021 3:54 pm
- Real Name: Tayfun Uzum
![]() Wed Jul 07, 2021 1:21 pm
Wed Jul 07, 2021 1:21 pm
In system>storage I didn’t have C because I changed it when I first realized the issue, I removed C and added D, but after reading your post I reverted it and added C and removed my hdd from the list. Then I changed the working folders to the same C drive. None of these worked, although it seems like it is working for %30 or so in random times each time, it just stops working. After power down and restart, settings are still the same. Note that there is 17gbs worth of data in Cacheclip, in C drive, (for a couple of minutes of HD footage), so it does create something but it never finishes. I started using proxy after creating this post, it works just fine but I just would like to know whether the issue is on my side, therefore would it have any effect on my future projects, or is it some sort of a bug that I shouldn’t concern myself with.
An extra clarification I need is, as far as I read, there is no difference between proxy and optimized media (other than proxy having the advantage for multiple people working on the same project), is that correct?
Jim Simon
- Posts: 23952
- Joined: Fri Dec 23, 2016 1:47 am
![]() Thu Jul 08, 2021 5:22 pm
Thu Jul 08, 2021 5:22 pm
Proxy doesn’t (yet?) offer the option of Cineform, which is my preferred working codec.
And Proxies are a single file on the hard drive, whereas Optimized Media (all codec options) are actually stored as Image Sequences.
Those differences may not matter to you.
Return to DaVinci Resolve
Who is online
Users browsing this forum: Bing [Bot], hiixdcaaw766, nnjrewzas112 and 103 guests
Содержание
- Error encountered during optimized media generation davinci resolve
- Re: Cannot Create Optimized Media
- Re: Cannot Create Optimized Media
- Error encountered during optimized media generation davinci resolve
- Re: Cannot Create Optimized Media
- Re: Cannot Create Optimized Media
- Error encountered during optimized media generation davinci resolve
- Re: Cannot Create Optimized Media
- Re: Cannot Create Optimized Media
- Error encountered during optimized media generation davinci resolve
- Error occured during optimized media generation. Cancelling
- Re: Error occured during optimized media generation. Cancell
- Re: Error occured during optimized media generation. Cancell
- Error encountered during optimized media generation davinci resolve
- Error occured during optimized media generation. Cancelling
- Re: Error occured during optimized media generation. Cancell
- Re: Error occured during optimized media generation. Cancell
- Posts: 2
- Joined: Mon Jul 05, 2021 3:54 pm
- Real Name: Tayfun Uzum
Re: Cannot Create Optimized Media
Wed Jul 07, 2021 1:21 pm
In system>storage I didn’t have C because I changed it when I first realized the issue, I removed C and added D, but after reading your post I reverted it and added C and removed my hdd from the list. Then I changed the working folders to the same C drive. None of these worked, although it seems like it is working for %30 or so in random times each time, it just stops working. After power down and restart, settings are still the same. Note that there is 17gbs worth of data in Cacheclip, in C drive, (for a couple of minutes of HD footage), so it does create something but it never finishes. I started using proxy after creating this post, it works just fine but I just would like to know whether the issue is on my side, therefore would it have any effect on my future projects, or is it some sort of a bug that I shouldn’t concern myself with.
An extra clarification I need is, as far as I read, there is no difference between proxy and optimized media (other than proxy having the advantage for multiple people working on the same project), is that correct?
- Posts: 23498
- Joined: Fri Dec 23, 2016 1:47 am
Re: Cannot Create Optimized Media
Thu Jul 08, 2021 5:22 pm
Proxy doesn’t (yet?) offer the option of Cineform, which is my preferred working codec.
And Proxies are a single file on the hard drive, whereas Optimized Media (all codec options) are actually stored as Image Sequences.
Источник
- Website
- Posts: 77
- Joined: Sat Sep 01, 2018 6:40 pm
- Location: Dallas, Texas
- Real Name: Randy Spencer
Error occured during optimized media generation. Cancelling
Mon Nov 12, 2018 6:18 pm
I am trying to work on a 4K multicam project that will require optimized media for my system to work at a decent level however, I get this error message when I try to create optimized media.
Error occured during optimized media generation. Cancelling
I am using Resolve 15.1.1.005, Windows 10 etc. I have used this optimized media feature many times in the past so I know it works on my current system. What could be causing this error? Have I changed a setting that effects this? Software issue? Any idea for fixes?
Any and all suggestions would be appreciated. I can’t get any work done until I get this fixed.
P4K, Rokinon Cine DS lenses
Asus Deluxe x299
Intel 7940X 14 core cpu
32GB ram
EVGA 3050 8GB
Samsung 970 EVO M.2 — Windows
Samsung 970 EVO M.2 — programs
Samsung 960 EVO ssd — storage
1-WD Black — storage
4-WD Blue — storage
DR Studio
- Posts: 2574
- Joined: Tue Nov 11, 2014 6:48 pm
- Location: Vancouver, Canada
Re: Error occured during optimized media generation. Cancell
Mon Nov 12, 2018 10:28 pm
perhaps it’s disk space?
btw, love the guitars on your website. I’m a fan of luither built high quality guitars, lucky to own a few already, hats off to anyone who has the skills to do what you do!
Color gradeing is dead easy in comparison
- Website
- Posts: 77
- Joined: Sat Sep 01, 2018 6:40 pm
- Location: Dallas, Texas
- Real Name: Randy Spencer
Re: Error occured during optimized media generation. Cancell
Tue Nov 13, 2018 3:09 am
I doubt it is disk space, just added another 4TB last week. However, I did remove a lot of stuff from the drive I use for all my video editing. I didn’t move anything from my editing folder so that shouldn’t have caused the problem but who knows.
My full time job the last 5 1/2 years has been teaching people how to build acoustic guitars. It really is not that hard, it’s just cutting, sanding and gluing parts together until it looks like a guitar. Making them sound good is a different story. I tell all my new students, it’s your job to make it look good but it’s my job to make sure it will sound good.
Most of my students have little or no woodworking experience and they make some gorgeous guitars. Sure I’m showing them step-by-step what to do but they have to do the work. Anyone can do this with the right instructions. By the way, I have a P4K on order so I can make an online guitar building course. Sooooo, coming soon. Fall of 2020, maybe.
P4K, Rokinon Cine DS lenses
Asus Deluxe x299
Intel 7940X 14 core cpu
32GB ram
EVGA 3050 8GB
Samsung 970 EVO M.2 — Windows
Samsung 970 EVO M.2 — programs
Samsung 960 EVO ssd — storage
1-WD Black — storage
4-WD Blue — storage
DR Studio
Источник
Are you experiencing choppy playback while editing your videos? Then optimizing media (also known as proxy files) in DaVinci Resolve will most likely be your best bet. As long as your PC isn’t from the 90s or something. Let’s get to it.
1. Optimize Media in DaVinci Resolve (Updated for 2021)
Creating optimized media is definitely the most powerful way to get rid of lag. However, I would actually try some of the other methods first before trying this one! Scroll down for them, and come back and try this one if none of those works!
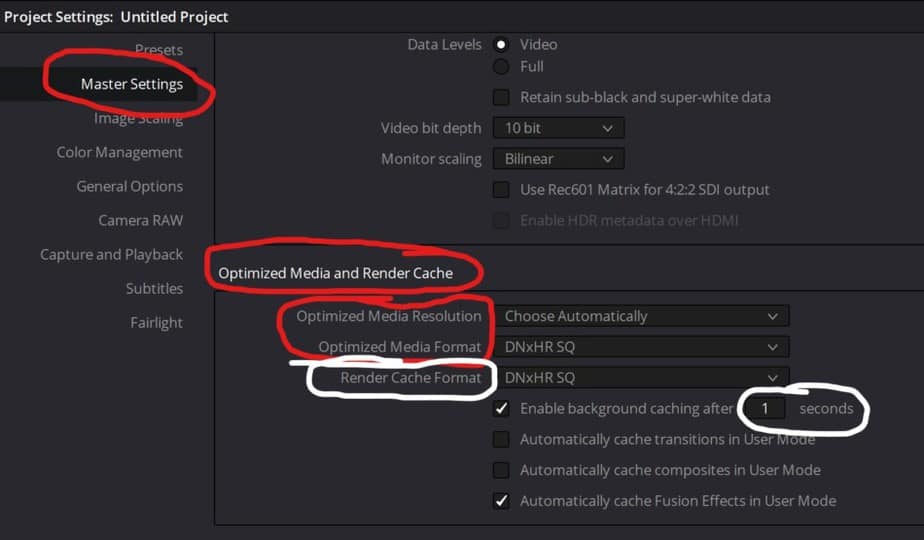
- Project Settings>Master Settings>Optimized Media and Render Cache.
- Set “Optimized Media Format” to DNxHR SQ. (For Mac: ProRes 422).
- Go to Playback and Enable “Use Optimized Media if Available”.
- Right-click clip and select “Generate Optimized Media”.
Let’s dive a bit deeper into what I briefly explained above. I may change between using the word proxy and optimized media, but these mean the same thing. If you’re coming from Premiere Pro you may be more used to the proxy files.
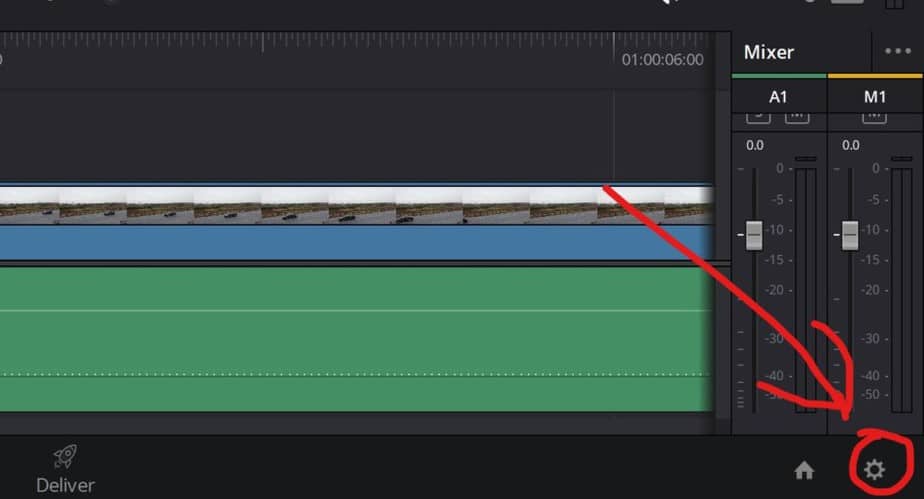
The first thing you have to do is to open Project Settings, which you can do by clicking on that gear icon. Or you can open it by doing like the picture below.
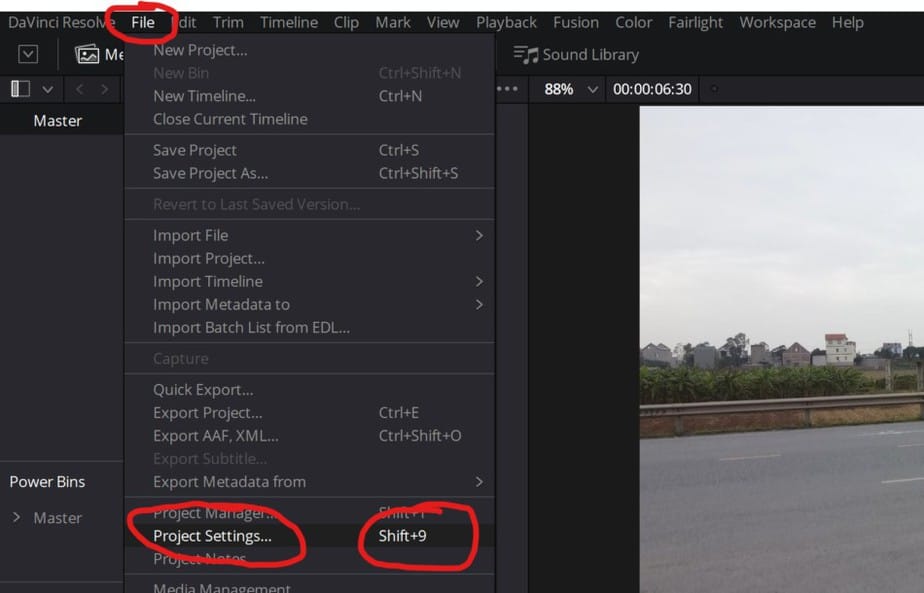
This is another way of doing it, if you want to be superfast just press “Shift+9”.

Now go to “Master Settings” and scroll down to “Optimized Media and Render Cache”.
Here you have a few options to choose from.:
Optimized Media Resolution: This is what resolution you want your proxy files to be in. This is your decision as it varies from computer to computer how much it can handle. But remember the higher you set it the bigger the files will and the more memory it will require. Also if you’re going to add a lot of effects and color grading to it, it may prevent you from choppy playback. Test the different out and see which of them suits you the best.
Optimized Media Format: This is what format you want to transcode your video to. DNxHR SQ I’ve found to work very well, but this depends on your needs of course. Everyone of them have their advantage.
If you’re on a MacBook, I don’t believe you have this option. Instead you have something the Windows users don’t have! You have the ProRes formats. After doing some research you can safely choose the “ProRes 422”, which a lot of Mac people seem to prefer.
Additional options: I also recommend changing the “Render Cache Format” to the same as the one above. Like I’ve done in the picture. Also set the “Enable Background Caching after” to 1 second. These settings are not for proxies but something we can use later on, if you get choppy playback when you are using your proxy files.

Now go ahead and press “Save”.
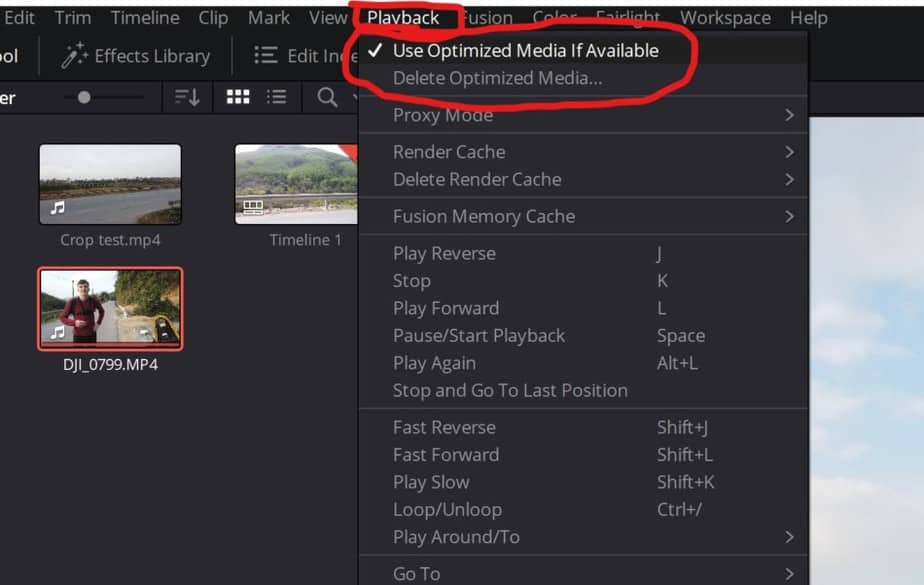
Open the Playback tab in the menubar. Here you must enable “Use Optimized Media If Available”. Also notice the “Delete Optimized Media” which is nice if your PC memory is getting full.
If you want to see your original footage once in a while, all you have to do is to disable the “Use Optimized Media if Available.
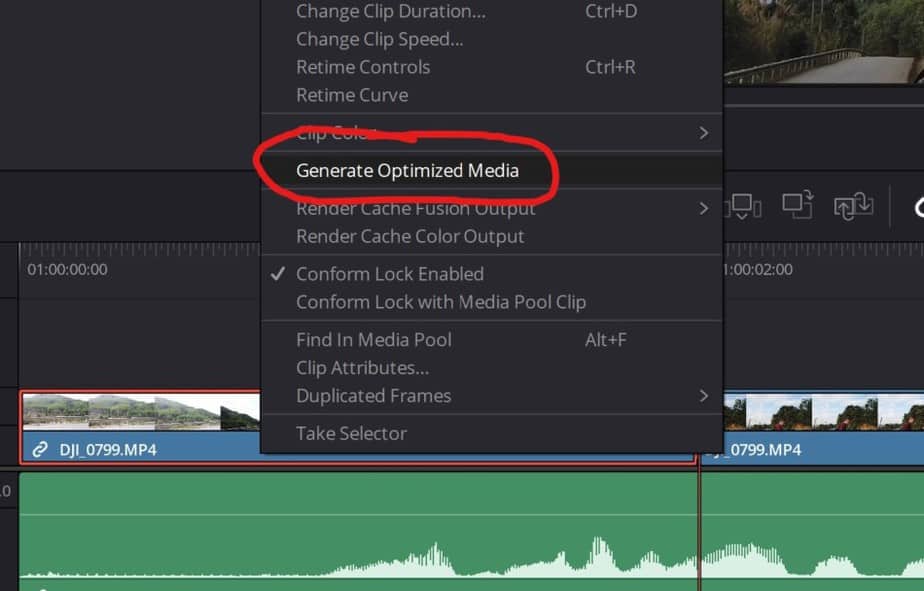
Now right-click the clip you want to create proxy file for and click on “Generate Optimized Media”.
It’s also possible to create multiple proxy files at once too. You can do this by either selecting which one you want in the timeline, then right-click on one of them. Or you can select your clips in the Media Pool and “Generate Optimized Media” from here!
To create them may take some time, but this varies, depending on your hardware and the size of your files. You can expect it to take many hours if you have hours of footage, but once they’re done you are able to edit them without wanting to punch your monitor all the time.
Delete Optimized Media and Cache in DaVinci Resolve
After a couple of projects with optimized media and cache your drive gets full pretty quickly if you don’t delete the files after you’re done with them!
Doing this after every project or at least regularly is therefore not stupid. To delete them when you have your project open is really easy!
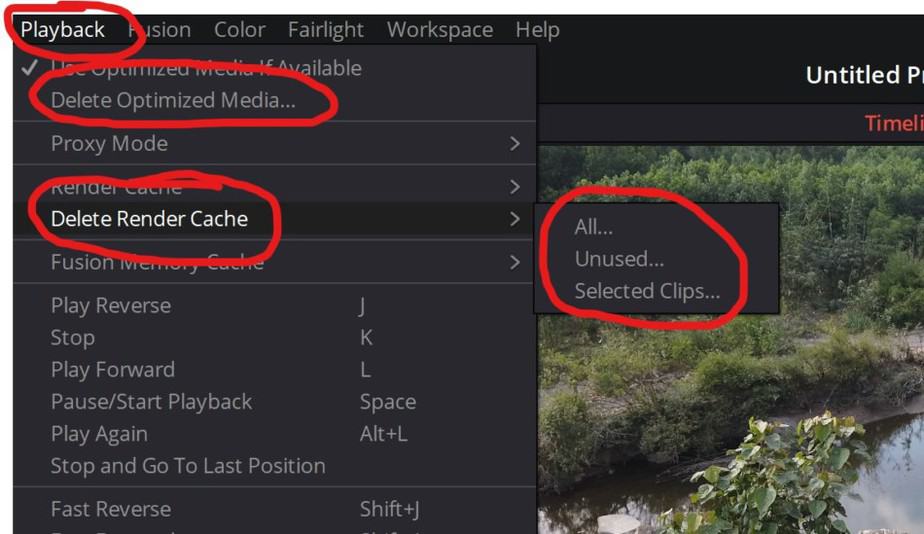
Go to playback in the menu bar. (which the people who have read the whole article is pretty familiar with by now). Then click on “Delete Optimized Media” then you have to accept.
To delete cache go to “Delete Render Cache” and then select “All” if you want to get rid of all caches from the project.
If you don’t have deleted them for awhile it’s easier to delete the files from the folder they are saved. Both optimized media and rendered cache files.
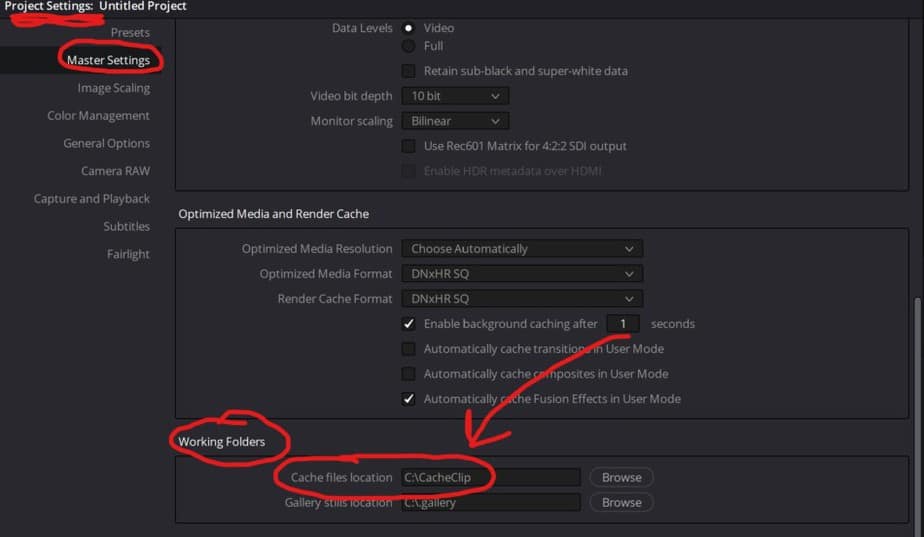
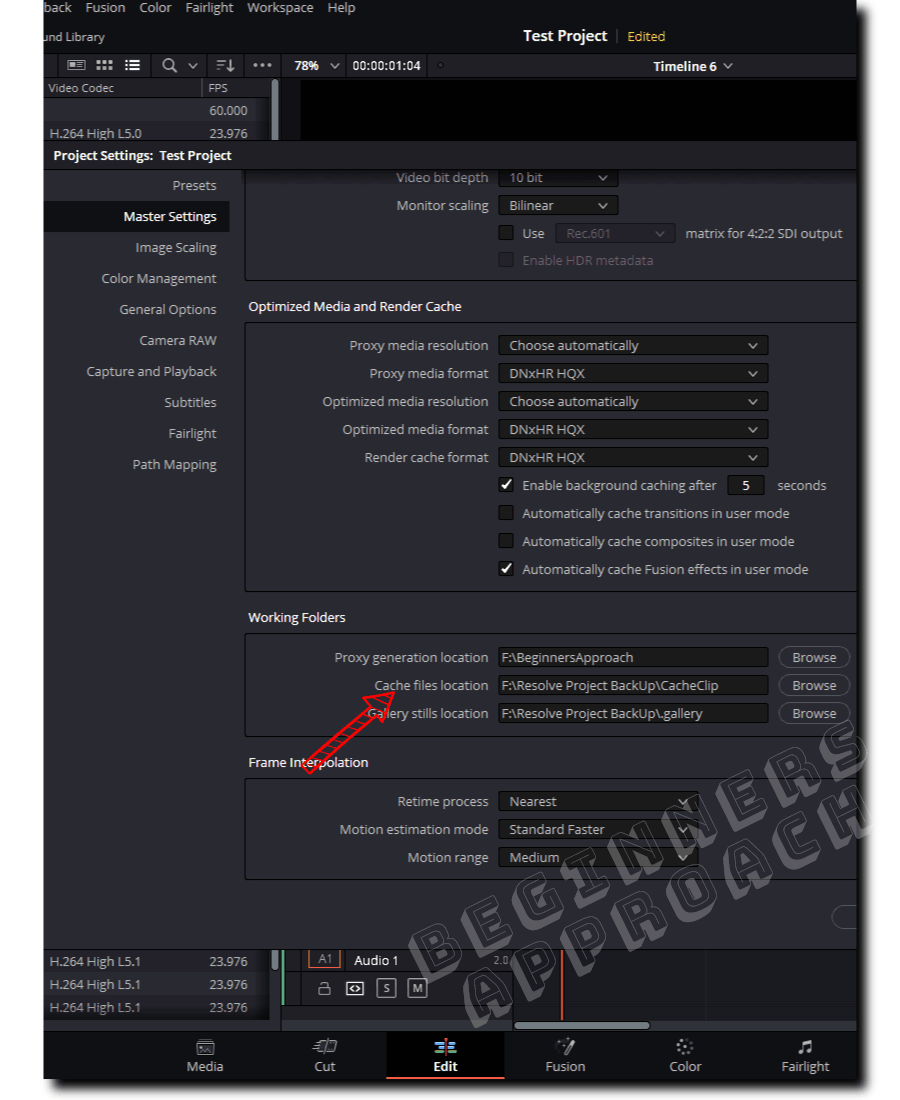
Go to “Project Settings > Master Settings” and locate “Working Folders”. On the right side of “Cache files Location” you can see where its located on your computer. Remember this, and find it on your computer. Or you can simply copy it.

And paste it in here, to go directly to the folder. But if you have it located like me you should be able to find it fairly easy without doing that.
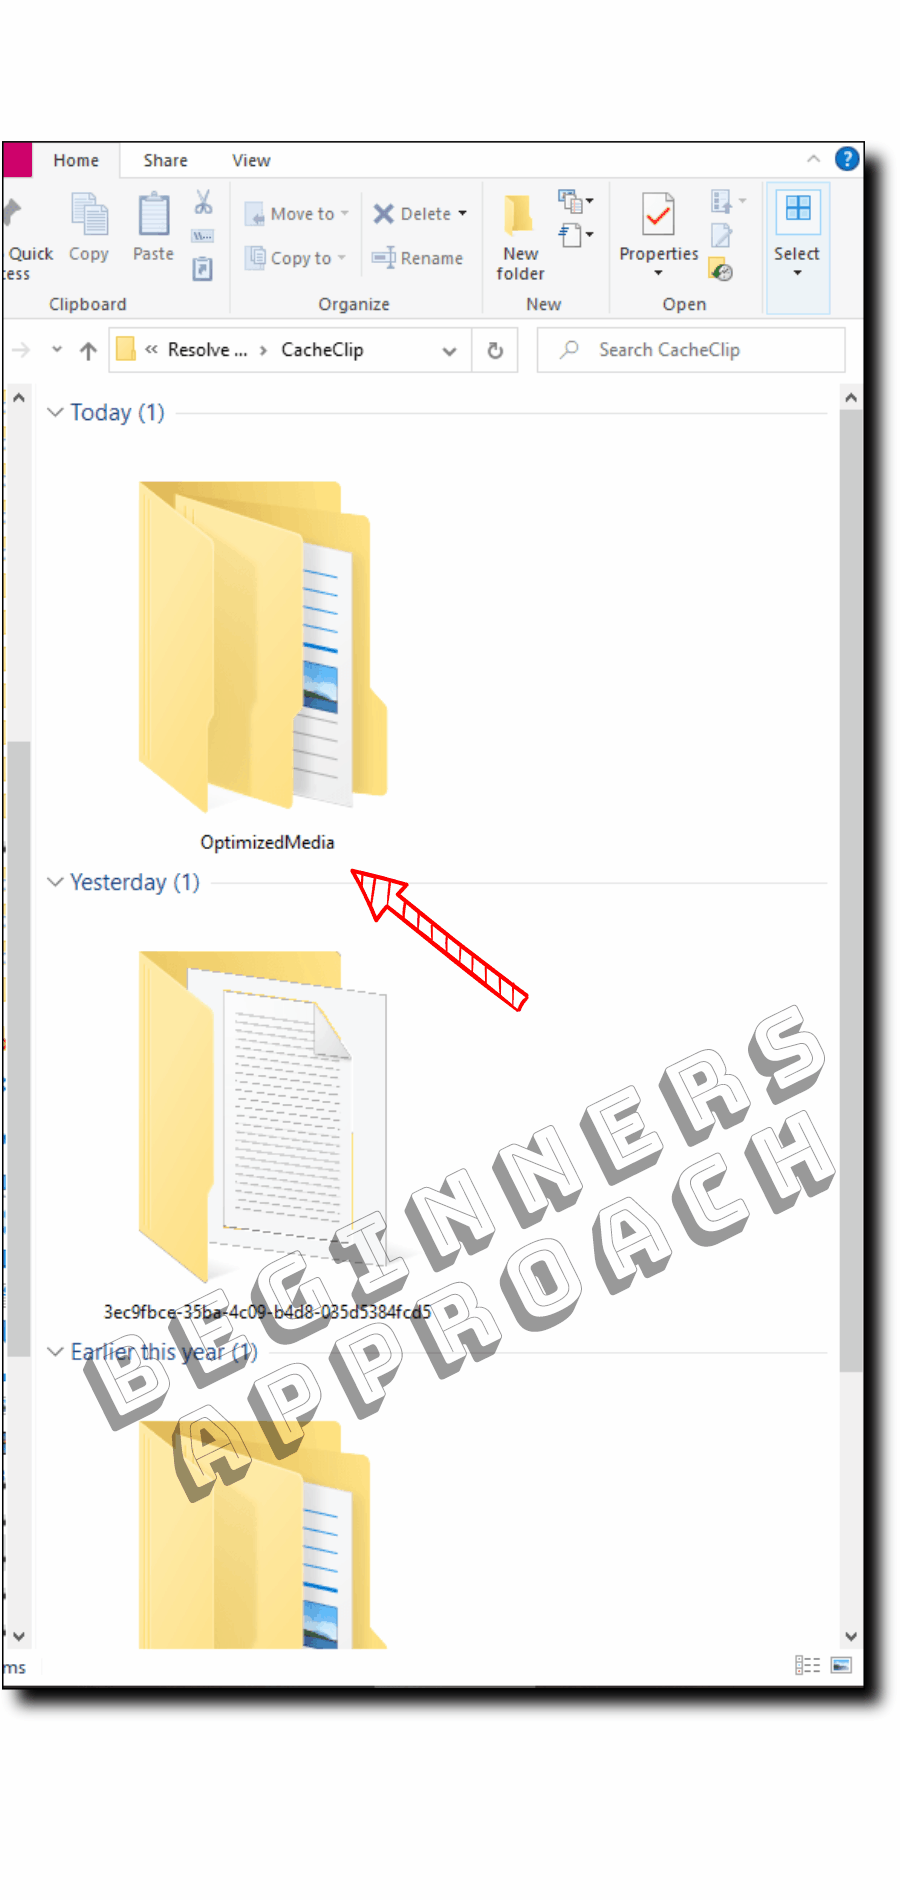
Anyways each of the folders you are looking at now is representing a project you’ve been working on. Inside these the render caches and optimized media will be saved. If you are done with all the projects you can just delete everything that’s in the “CacheClip” folder.
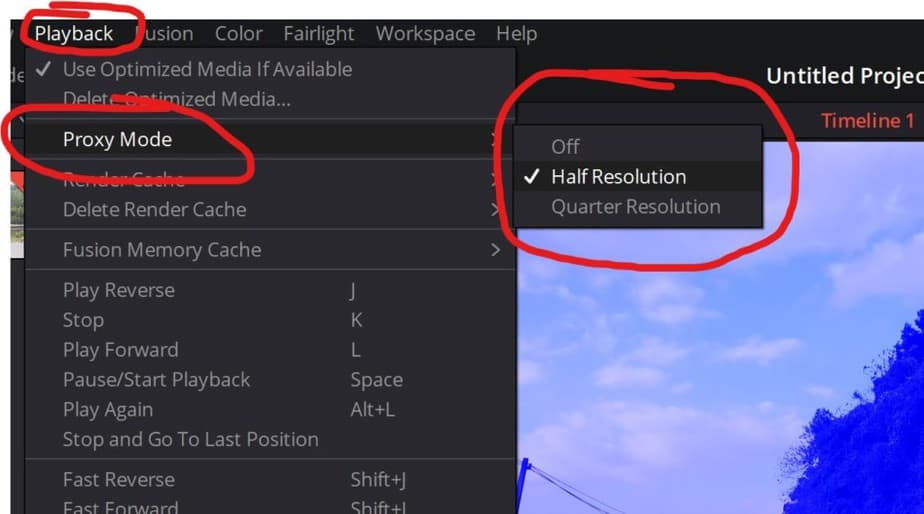
2. View Playback in Proxy Mode (Easiest method)
This is a neat little trick to prevent lag, that doesn’t require you to do anything except turn it on… This makes the resolution of the playback (video you see while editing) lower resolution. However, it will not affect the final product!
To enable proxy mode go to “Playback > Proxy Mode > Choose one of the alternatives”.
3. Render Cache
Sometimes you may experience choppy playback in DaVinci even with optimized media. Often when adding a lot of additional effects and color grading to your video it will start lagging again. This is when rendering cache comes in handy! However, you can test this before using optimized media aswell!
Just a few more click and you got silky-smooth playback once again! This is perfect in combination with optimized media! But it’s best to first make try proxies and if that’s not enough use this in addition to them. Since proxies are something you do once then it’s all good. Here you have to render after every change made to the clip.
But it’s totally worth it when you are experiencing choppy playback.
Let’s get to it!
This is why I earlier in the article wanted you to change the additional settings too (in the white circles). If you haven’t already changed it, go ahead and do that now.
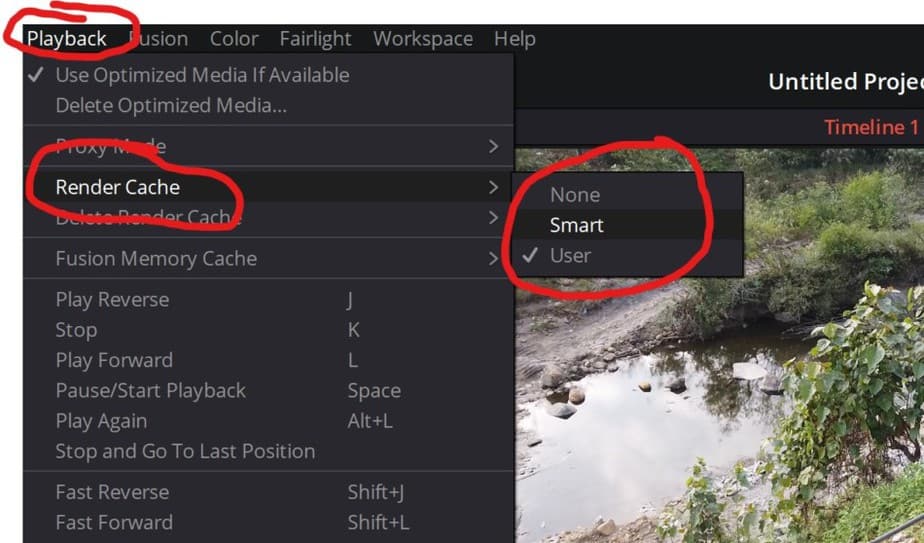
Next go to Playback in the menu bar, then Render Cache. Here you are met with three alternatives
None: If you’re not experiencing any problems, turning it off or set it to user is a good idea.
Smart: This is a clever solution. Here Resolve is analyzing your project and rendering what’s necessary for smooth playback. This can save you alittle bit of time.
User: Here you are manually choosing which clips to render. But you only have to do it once to the clips you want to render. Then everytime you make an adjustment to one of those clips it will start to render it.
It will start to render immediately after an adjustment has been made since we set the timer to 1 second earlier. If you want to delay it simply increase the timer.
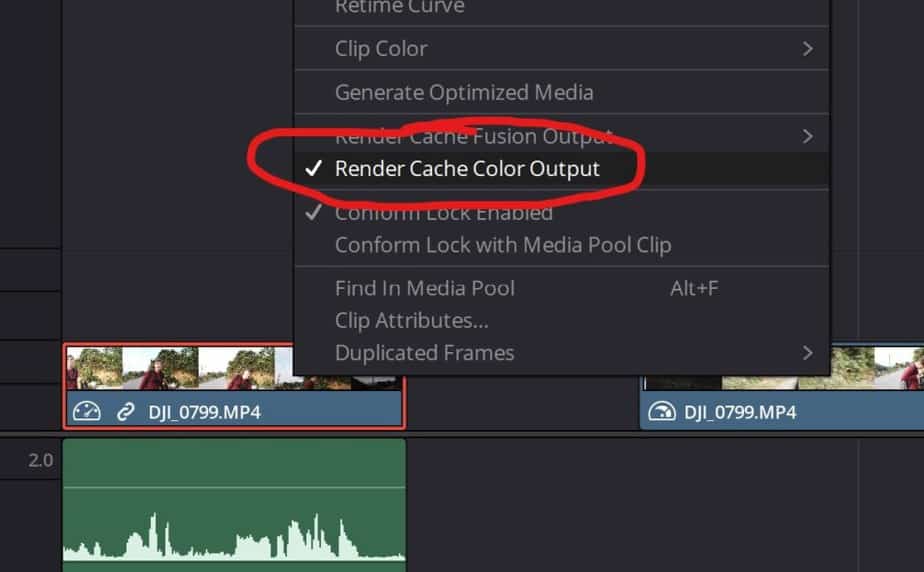
To choose which clip to render with the “User” option, right-click on a clip and Enable “Render Cache Color Output”.
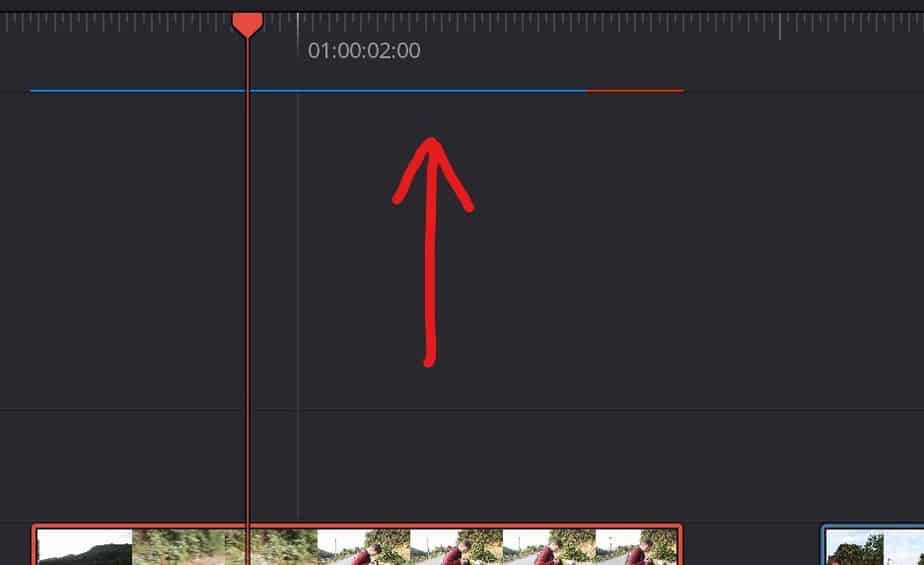
When a clip is rendered you can see this blue line over it in the timeline (edit page). When it’s not rendered the line is red, so you will see when it’s rendering as well as the red line is disappearing.
I hope you found this article helpful!
Cheers,
Jens
Как ускорить работу в DaVinci Resolve. Proxy, Optimized Media и прочее.
Здравствуйте! DaVinci Resolve, сама по себе программа очень требовательная до ресурсов вашего компьютера и вообще у них на сайте есть системные требования под эту программу. Сегодня попробуем разобраться как оптимизировать работу в DaVinci Resolve на средних машинах и совсем на слабых машинах, потому что я знаю что многие хотят работать в мобильной версии. Разберемся сегодня вот с прокси и оптимизированным медиа и вот это вот все. И:так поехали у меня открыт DaVinci Resolve я достаю два клипа, вот эти исходники снятые в прорез 4k вернее это 4096 на 2160 это cinema 4k. Сейчас разберемся: самым основным популярным способом создания optimized медиа, так называемые оптимизированные данные.
Идем вот сюда: в правый нижний угол где project settings у нас появится вот такая табличка, опускаемся чуть ниже вот у нас optimized медиа и рендер кэш сендер. Вот здесь мы настраиваем формат в котором наш исходник будет пересчитываться в более легкий формат, с которым будет комфортно работать нашему компьютеру. Я оставляю здесь выбор автоматически, то есть я оставляю выбор за компьютером. Он сам решит какое разрешение ему поставить. Теперь я иду во вкладку edit, монтажную нашу историю и что я делаю. Я выделяю два клипа, но у вас может быть их большее количество, нажимаю правой клавишей и выбираю генерит optimized медиа. Вот такая табличка появляется, он сейчас прочитает мои клипы в тот формат, который мы ему указали в настройках проекта. Это конечно займет у меня некоторое время, только два клипа это около минуты, а если у вас много клипов разных, разве не большой длительности, то это займет время.
Создаю timeline: теперь у меня вот это видео оно пересчитано в тот самый формат, который мы с вами выбрали. После того как вы закончите монтаж, вы переходите к покраске вашего видео. Красить естественно лучше сам исходник, поэтому вот тот самый optimized медиа вам нужно удалить, да и работать уже с исходником. Мы заходим вот сюда в меню playback и нажимаем делить optimized view media. Теперь у меня на таймлайне исходные файлы, с которыми я могу работать во вкладке товар. Я перехожу сюда и здесь продолжаю работу уже с цветокоррекцией. Как поступать в том случае, когда у вас слабый компьютер и вы сделали цветокоррекцию? Всю нашу работу можно превратить в кэш, чтобы он был просчитан, чтобы можно было спокойно смотреть. Идем в наше меню playback и вот здесь у нас есть рендер кэш по умолчанию.
Когда дело доходит до монтажа или цветкора внутри DaVinci Resolve, требуется довольно мощный компьютер.
Опытный колорист Алекс Джордан из Learn Color Grading предлагает несколько полезных советов для тех кто хочет выжить максимум из своего не самого мощного компьютера, при этом комфортно работать в DaVinci Resolve.
Первым шагом в улучшении производительности воспроизведения Resolve является изменение оптимизированных параметров мультимедиа и кэша рендеринга. Для этого перейдите на панель Settings. На вкладке « Master Settings Tab » найдите раздел, « Optimized Media» и «Render Cache».
Если вы пользователь Windows, измените оба на DNxHR SQ. Если вы используете старый Mac, вам нужно использовать ProRes 422 LT.

После этого просмотрите раскрывающееся меню Render Cache и убедитесь, что установлен флажок «Enable background caching after ___ second» (Включить фоновое кэширование через _ секунды)». Также измените временной интервал на 1 секунду. После того, как вы внесли все изменения, нажмите ОК.
Затем в меню « Playback» убедитесь, что «Use optimized media if available«, включено. В том же меню измените настройку Render Cache с «None» на «User».

Как объяснено, эти три шага подготовят Resolve для оптимизации ваших кадров. Однако это не говорит программному обеспечению о том, что нужно начинать оптимизировать ваши клипы. Вы должны сделать это вручную, щелкнув правой кнопкой мыши по файлу и выбрав « Render Cache Color Output».
Как только вы это сделаете, вам придется подождать, пока программа отобразит оптимизированный носитель. После того, как процесс будет завершен, вы увидите, что процесс очистки и воспроизведения будет намного более плавным, практически без пропущенных кадров.
Несмотря на то, что у вас могут быть оптимизированные медиафайлы, вы заметите, что когда вы начнете добавлять видеоэффекты и цветовые узлы, ваша временная шкала снова замедлится. Это происходит на всех машинах — старых или новых. Чтобы это исправить, щелкните правой кнопкой мыши на своем клипе и выберите «Render Cache Color Output».

Если вы выберете эту опцию, в верхней части вашего видео появится красная полоса, которая постепенно изменит цвет на синий. Как только вся полоса станет синей, вы сможете добавлять столько эффектов и настроек изображения, сколько пожелаете, не влияя на производительность воспроизведения.
Важно отметить, что этот пятиэтапный процесс чрезвычайно эффективен — даже до такой степени, что процесс редактирования на старом ноутбуке становится простым. Фактически, для всего урока Алекс использует ноутбук Sony VAIO 2013 года, оснащенный 2,9 ГГц процессором Intel Core i7-3520M, графическим процессором GeForce GTX640M LE 1 ГБ и 12 ГБ оперативной памяти.
Какой бы старой машины ни была машина, всегда есть шаги, которые вы можете предпринять в качестве редактора, чтобы убедиться, что ваше программное обеспечение для редактирования оптимизировано для вашей системы.
Касаем проблемы «Your gpu memory is full», как оказалось об этом на русском особо ничего нет. Какие нашёл решения.
«Таким образом, если у вас заканчивается память GPU, вам нужно уменьшить обработку, запрашиваемую GPU, или уменьшить разрешение, или и то, и другое. В качестве альтернативы получите один графический процессор с большим объемом памяти. Сейчас есть несколько номеров с 16 ГБ или больше.»
И вот
«вы также можете зайти в панель предпочтений (advanced configuration) в NeatVideo и уменьшить использование GPU или попросить «только CPU» или … вы должны протестировать различные параметры, чтобы дать Davinci Resolve больше GPU VRAM.»
Обычно когда такая ситуация возникал например в after effects (была проблема при рендере) не хватало оперативной памяти, то приходилось дробить проект на 2 и более частей. Плюс отключать все что «сжирает» видеопамять.
Насколько понял проблема старая и возникает далеко не у всех, первые упоминания датируются 2017 годом.
вот еще решение
Также уроки по DaVinci Resolve можно найти в разделе тут
Подписывайтесь в социальных сетях:telegram вконтакте instagram facebook
По вопросам размещения рекламы писать сюда, стать автором сюда, сделать донат сюда
Купить настоящие подставки apple box для дома и работы можно тут
Также по теме:
КАК СТАТЬ ЛУЧШИМ КОЛОРИСТОМ? ИНТЕРВЬЮ ИЗВЕСТНОГО КОЛОРИСТА И РЕЖИССЕРА-МОНТАЖА АЛЕКСАНДРА ВЕРХОЛЯКА
ЭКСКЛЮЗИВНОЕ ИНТЕРВЬЮ ДИРЕКТОРА BLACKMAGIC DESIGN В ЕВРОПЕ
КАК ОСВЕТИТЬ БЛЕСТЯЩИЕ ПРЕДМЕТЫ. ДЕЛИМСЯ СЕКРЕТАМИ
Если вы нашли ошибку, пожалуйста, выделите фрагмент текста и нажмите Ctrl+Enter.
The following two tabs change content below.
- Bio
- Latest Posts

Фильммейкер, главный редактор, технический писатель
По вопросам статей и материалов писать сюда http://news.fidller.com/about-contact/
Наш магазин оборудования — http://fidller.com/
Optimized Media files could be HUGE(in GBs), occupying a lot of storage space.
Now that you have completed your project, you no longer need those massive files and save valuable disk storage space.
Today we’ll see how to delete those files permanently from your hard disk QUICKLY – a foolproof way.
Without wasting time.
Let’s dive right in!
- Click on the bottom right corner cog wheel – the “Project Settings” (short cut is “Shift + 9”).
- Click on the “Master Settings” and scroll until you see the “Working Folders” section.
- Take a note of the folder against the “Cache Files Location” (your optimized media location).
- Navigate to the folder and find the “OptimizedMedia” folder. Double click and get inside it.
- You can select all the random alpha numerals folders and delete them to save space.
(A word of caution – always be extra careful and mindful of deleting anything. Have a backup in case something goes wrong. But in this case, even if you delete the optimized media, you can re-generate them.)
Manually Delete Optimized Media Files with “.DVCC” extension in Resolve
.DVCC files are proprietary DaVinci Resolve image formats that are created during optimized media generation and render caching.
You can navigate to the “CacheClip” folder (the one displayed under the “Working Folders” section in the “Project Settings” window – refer to the above section for more details).
Then double click the “OptimizedMedia” folder.
Search for “.dvcc” in the search bar. It will return all the files with the “.dvcc” extension.
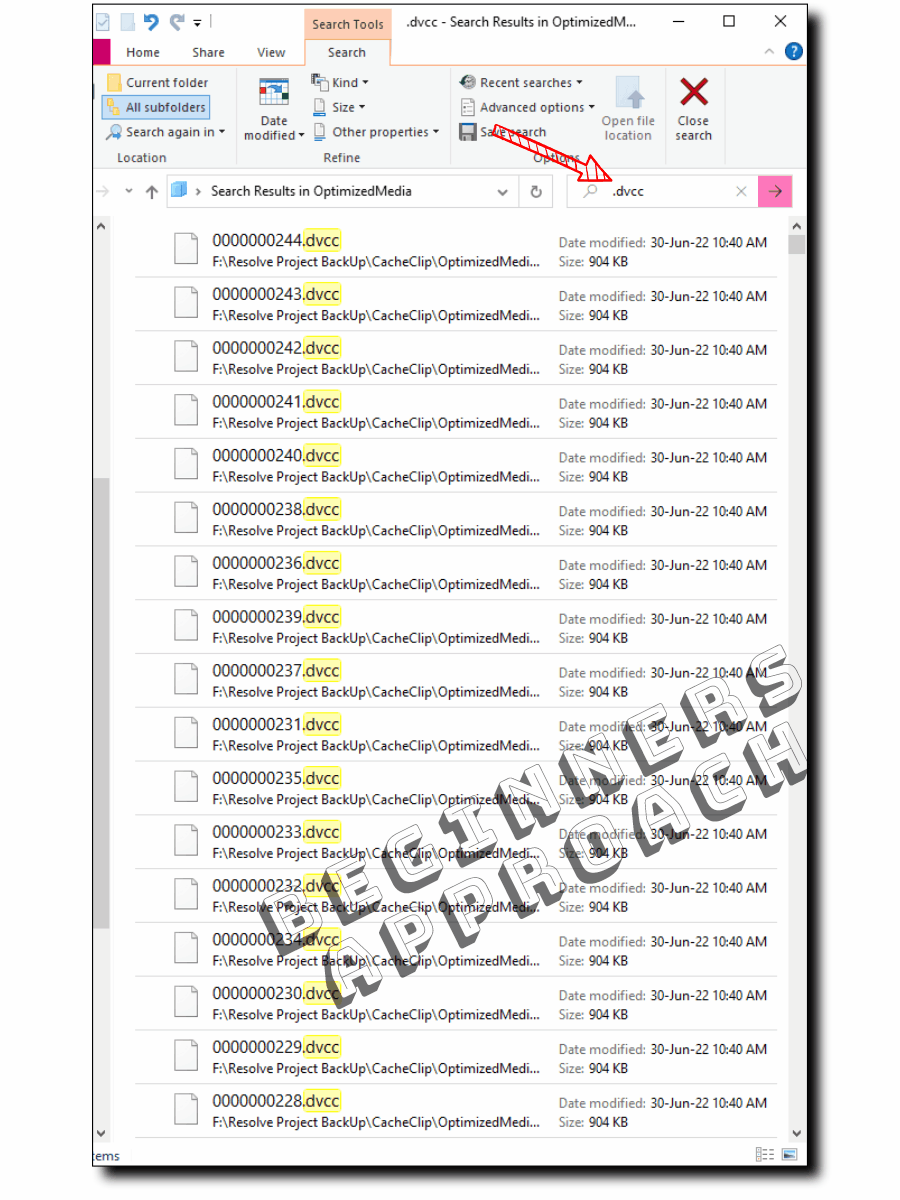
Before selecting all and deleting them, please keep in mind that the search result will also display render-cache files that end with the file extension “.dvcc“.
(The render cache files with .dvcc extension are placed outside the “OptimizedMedia” folder.)
So make sure you are either inside the “OptimizedMedia” folder or are prepared to delete all the .dvcc files irrespective of optimized media or cache files.
If you are absolutely sure and need to delete the “.dvcc” files, you can select all of them and permanently hit delete to save massive storage space.
Automatically Clear Optimized Media Files in DaVinci Resolve?
There is no automatic deleting of optimized media files in DaVinci Resolve. It is a manual process. Navigate to the “OptimizedMedia” folder on your computer (as discussed above) and delete them.
DaVinci Resolve от Blackmagic Design — популярный бесплатный видеоредактор, доступный на нескольких платформах. Однако некоторые пользователи сообщают, что DaVinci Resolve продолжает падать при редактировании видео.
В отличие от Adobe Premier Pro, популярный видеоредактор DaVinci Resolve лучше работает с системой с выделенным графическим процессором. Отсутствие которых может привести к случайным сбоям.
В этой статье мы рассмотрим несколько шагов по устранению неполадок, которые помогут вам навсегда решить проблемы сбоев DaVinci Resolve.
Как исправить сбой DaVinci Resolve при запуске?
1. Изменить приоритет процесса

- Убедитесь, что DaVinci Resolve запущен.
- Щелкните правой кнопкой мыши на панели задач и выберите «Диспетчер задач».
- Откройте детали
- Прокрутите вниз и щелкните правой кнопкой мыши Разрешить. исполняемый файл
- Перейдите в «Установить приоритет» и выберите «Высокий».
Вот и все. Попробуйте поработать над любым из ваших проектов и проверьте, решена ли проблема. Обратите внимание, что при каждом перезапуске DaVinci Resolve вам, возможно, придется устанавливать высокий приоритет.
2. Установите драйвер Nvidia Studio

- Запустите опыт Nvidia GeForce.
- Нажмите на значок меню (три точки в правом верхнем углу).
- Выберите Студийный драйвер.
- GeForce Experience загрузит и установит драйвер Nvidia Studio.
Если у вас уже установлены драйверы Studio, попробуйте выполнить чистую установку.

- Загрузите и установите программу удаления драйвера дисплея.
- Запустите инструмент и выберите графическую карту,
- Нажмите «Очистить» и перезапустите.
- После удаления загрузите последнюю версию драйвера NVIDA Studio.
- Запустите установщик и установите необходимые пакеты через выборочную установку.
- Перезагрузите компьютер и перезапустите DaVinci Resolve.
Драйвер Nvidia Studio также может вызывать сбои DaVinci Resolve. Попробуйте выполнить чистую установку драйверов, чтобы устранить проблемы.
Если вам нужно правильно установить этот драйвер Nvidia, не вызывая серьезных проблем, лучше попробуйте специальный инструмент обновления драйверов и эффективно установите или обновите любые драйверы на вашем ПК.
3. Какая версия DaVinci Resolve лучше всего подходит для предотвращения сбоев?
Начнем с наиболее распространенной причины сбоев DaVinci Resolve. DaVinci Resolve 15 был пронизан несколькими сбоями и ошибками, которые приводили к частым сбоям.
Эти сбои также происходили в системе, в которой было достаточно оборудования для запуска видеоредактора. Тем не менее, установка последней версии DaVinci Resolve 16, похоже, устранила многие проблемы с программным обеспечением.
Обновить DaVinci Resolve

- Запустите приложение Разрешение.
- Щелкните DaVinci Resolve.
- Выберите Проверить наличие обновлений.
- Загрузите и установите все ожидающие обновления.
После установки перезапустите приложение и проверьте, решена ли проблема сбоя. Если нет, возможно, вам придется удалить, а затем переустановить последнюю версию, чтобы устранить проблему. Вот как это сделать.

- Нажмите клавишу Windows + R.
- Введите appwiz. cpl и нажмите OK.
- В Панели управления выберите DaVinci Resolve.
- Нажмите «Удалить», а затем подтвердите действие.
- После удаления загрузите последнюю версию DaVinci Resolve отсюда.
- Запустите установщик и проверьте наличие улучшений.
4. Включите мультимониторинг IGPU

- Выключите компьютер.
- Нажмите кнопку питания, чтобы перезагрузить компьютер. При перезапуске начните нажимать клавишу настройки (F2) на клавиатуре, чтобы войти в BIOS.
Примечание. Клавиша настройки обычно отображается на начальном экране. Обратитесь к руководству пользователя для вашего ноутбука или материнской платы (в случае настольного компьютера), чтобы найти ключ настройки. - В меню BIOS откройте вкладку Advanced.
- Найдите IGPU Multi-Monitoring и убедитесь, что он включен.
- Сохраните изменения и выйдите.
5. Проверьте совместимость графического процессора
Отключить встроенный графический процессор

- Нажмите клавишу Windows + R.
- Введите devmgmt.msc и нажмите OK.
- В диспетчере устройств разверните раздел «Адаптер дисплея».
- Щелкните правой кнопкой мыши встроенный графический процессор Intel.
- Выберите Отключить устройство.
- Откройте DaVinci Resolve и проверьте, не возникают ли сбои по-прежнему.
Обновление графического процессора
Как обсуждалось ранее, DaVinci Resolve — это приложение, интенсивно использующее GPU. Для стабильной работы рекомендуется установить достойную дискретную видеокарту. Если у вас есть только интегрированный графический процессор Intel, самое время подумать о переходе на выделенный графический процессор.
Решение DaVinci продолжает давать сбой. Обычно это происходит из-за несовместимости драйвера графического процессора или ошибки в самом программном обеспечении. Выполните шаги один за другим, чтобы диагностировать и устранить проблемы, вызывающие сбои.