Error executing updater binary in zip twrp что делать 4pda
FAQ по созданию патча update.zip для прошивки через рекавери
Редактирование Updater-script. Информация, решения, команды, подпись патчей.
Инструкция по установке системных и пользовательских приложений с помощью recovery
Редактирование установленной прошивки и удаление системных приложений
(ключевые слова)
Напоминаю, тут не стол заказов.. Посты с просьбой собрать zip для «хххх» Recovery оффтоп
Сообщения, не относящиеся к теме обсуждения (оффтоп), удаляются без предупреждения
- Добавление нескольких пользовательских/системных приложений «за один клик» (одним патчем).
- Добавление/удаление системных приложений без root прав и вспомогательных программ.
- Изменение прошивки (замена файлов, украшательства и т.д.).
- Обновление программы или прошивки.
- Переразметка памяти (обсуждения в другой теме)
- Получение root прав SuperUser, SuperSU, Magisk
- Установленный на телефоне кастомный рекавери (CWM/TWRP)
- NotePad++ (редактор с сохранением Unix формата)
- Zip_signer (подписчик архивов)
- Архиватор ZIP
- Файл-заготовка sample.zip (либо update-binary для ручной сборки)
 Zip_signer.rar ( 13.28 КБ )sample-patch.rar ( 4.77 МБ )update-binary.rar ( 113.25 КБ )
 - Дополнительные версии бинарника. binary_all.rar ( 649.36 КБ )
- Бинарники (архив/исходники)
Исходники бинарника, основная ссылка:
https://android.google…ootable/recovery/+refs
выбираем к примеру «android-9.0.0_r18» , потом ищем папку «updater», в папке «updater» исходники бинарника
К примеру https://android.google…droid-9.0.0_r18/updater — можно глянуть все команды которые может выполнить бинари в андроид 9.0.0 (в файле install.cpp, в самом низу)
 signapk.zip ( 9.24 КБ )
 + Android update-script (Пост Няшная #63580419)
Внимание! Патчи создаются только для мод.рекавери и результативно работают только в них. В стоковых рекавери (на аппаратах «из коробки») патчи не работают.
Для того, чтобы установить новые системные приложения apk в Ваш аппарат, необходимо выполнить три шага:
- Собрать свой update.zip (из заготовки sample.zip)
- Подписать update.zip утилитой Zip_signer(Не обязательно!)
- Закинуть на флэшку и установить в аппарат через ClockWorkMod Recovery
Эти шаги являются универсальными, т.е. подойдут для выполнения других подобных операций.
ШАГ №1
Собрать новый update.zip, используя «болванку» sample.zip
Порядок использования sample.zip:
- Разархивировать архив sample.zip
- Удалить файлы подписи META-INF/CERT.RSA, CERT.SF, MANIFEST.MF (т.к. 2м шагом мы их будем создавать для своей сборки)
- Поместить в папку /data/app свое пользовательское приложение (xxxxx.apk)
- При необходимости отредактировать файл updater-script (подробнее позже)
- Заархивировать всё (META-INF и data) ZIP’ом без сжатия
ШАГ №2
Подписать update.zip с помощью утилиты Zip_signer
Порядок использования утилиты Zip_signer:
- Переименовать Ваш отредактированный (т.е. уже с приложением внутри) sample.zip в update.zip
- Поместить его в папку с программой Zip_signer
- Запустить файл zip_signer.bat
- Дождаться, пока процесс будет завершен
- В папке появится файл update-finished.zip — это и есть подписанный файл
- Переименовать update-finished.zip по своему усмотрению (согласно логике патча)
ШАГ №3
Установка нового приложения
- Перекинуть (переименованный) update-finished.zip на флэшку и установить его в аппарат через TWRP или CWM (install zip from sdcard -> chooze zip from internal sdcard -> Yes, install sample.zip)
- Перезагрузить аппарат
/ )
Внимание! Патчи создаются только для мод.рекавери и результативно работают только в них. В стоковых рекавери (на аппаратах «из коробки») патчи не работают.
Корень патча:
- папка META-INF
- папка источник установки приложений (system, data, sdcard, cache, sd-ext)
Обязательные файлы: - META-INF/com/google/android/update-binary — системное средство запуска данного патча, также создает временную рабочую папку tmp
- META-INF/com/google/android/updater-script — выполняемый скрипт по которому и происходят операции копирования и т.д.
Разберем sample.zip
Патч добавляет пользовательское приложение MyPiano в Data.
— Выводит сообщение о завершении процесса.
- busybox — приложение для выполнения командной строки, устанавливается с кастомным рекавери, находится в ramdisk/sbin. в кастомных прошивках зачастую добавляют его в system/xbin
Возможные исправления для своих целей
- Изменение прав
• package_extract_dir
Синтаксис: package_extract_dir(» «, » «);
Копирует содержимое в . Файлы в имеющиеся в перезаписываются.
Пример: package_extract_dir(«system», «/system»); Скопирует файлы из папки update.zip/system в /system
• package_extract_file
Синтаксис: package_extract_file(» «, » «);
Копирует файл в . Если файл существует, то он перезаписывается.
Пример: package_extract_file(«test.sh», «/tmp/test.sh»); Скопирует файл test.sh из update.zip в /tmp/test.sh
• format
Синтаксис: format(«MTD», » «);
Форматирует раздел (см. приложение).
Пример: format(«MTD», «system»); Полностью отформатирует /system . Примечание: форматирование удаляет данные необратимо.
Пример 2: format(«ext4», «EMMC», «/dev/block/mtdblock5», «0», «/system»);
Определение номера блока под спойлером «инфо и материалы».
• delete
Синтаксис: delete(» «[, «file2», . «fileN»]);
Удаляет файл(ы)
Пример: delete(«/system/app/Calculator.apk»); Удалит Calculator.apk из папки system/app.
• delete_recursive
Синтаксис: delete_recursive(» «[, «dir2», . «dirN»]);
Рекурсивно удаляет папку(и) со всем содержимым
Пример: delete_recursive(«/data/dalvik-cache»); Удалит папку /data/dalvik-cache со всем содержимым.
• run_program
Синтаксис: run_program(» «[, » «, » «, » «]);
Запускает программу(скрипт) .
Пример: run_program(«/tmp/install_busybox.sh»); Запустит скрипт /tmp/install_busybox.sh.
«[, . «pathtofileN»]);
Устанавливает владельца, группу и разрешения для файла или папки, как ‘chmod’, ‘chown’, и ‘chgrp’ всё в одном
Пример: set_perm(0, 2000, 0550, «/system/etc/init.goldfish.sh»); Установит владельца, группу и разрешения для файла /system/etc/init.goldfish.sh
• set_perm_recursive
Синтаксис: set_perm_recursive( , , , , «
«])
Рекурсивно устанавливает владельца, группу и разрешения для содержимого папки. — для папок, — для файлов.
Пример: set_perm_recursive(0, 0, 0755, 0644, «/system/app»); Установит права для содержимого /system/app, для папок — 0755, для файлов — 0644.
• show_progress
Синтаксис: show_progress( , );
Продвижение прогрессбара на долю за секунд. может быть нулевым для продвижения его по командe set_progress, а не по времени.
Пример: show_progress(0.100000, 1); Увеличит прогресс на 0.1 часть за 1 секунду
• set_progress
Синтаксис: set_progress( );
Устанавливает положение прогрессбара на долю , для самого последнего вызова команды show_progress.
Пример: set_progress(0.500000);
• symlink
Синтаксис: symlink(«
Создает символическую ссылку (как ‘ln-s’).
Пример: symlink(«/data/app_s», «/system/app»); Создаст символическую ссылку на папку /data/app_s для папки /system/app
«);
Монтирует в путь
. должно быть название раздела, если это «MTD», или блок памяти если это «vfat»
Пример: mount(«MTD», «userdata», «/data»);
• ui_print
Синтаксис: ui_print(» «);
Выводит на экран сообщение
Пример: ui_print(«Formatting SYSTEM. «);
• sleep
Синтаксис: sleep( );
Пауза процесса на секунд
Пример: sleep(5); — пауза 5 секунд, после чего код скрипта выполняется дальше.
• set_metadata / set_metadata_recursive
Синтаксис: set_metadata (. );
Устанавливает владельца, группу и разрешения (новая команда взамен set_perm для andriod 4.4.*)
Примеры: Android update-script (Пост #32151495)
Создание патча update.zip для прошивки через рекавери (Пост kory-vadim #81945464)
• set_metadata / set_metadata_recursive
Синтаксис:
set_metadata(«имя файла», «ключ1», «значение1», «ключ2», «значение2», . )
set_metadata_recursive(«имя директории», «ключ1», «значение1», «ключ2», «значение2», . )
Ключи:
* uid
* gid
* mode (set_perm_extd only)
* fmode (set_perm_extd_recursive only)
* dmode (set_perm_extd_recursive only)
* selabel
* capabilities
первые три (uid, gid, mode) это тоже самое что и в chmod, заполняется «uid», 0, «gid», 1000, «mode», 06754.
для установки прошивки хватает трех ключей «uid», 0, «gid», 1000, «mode», 06754.
Пример: set_metadata(«/system/xbin/shelld», «uid», 0, «gid», 1000, «mode», 06754, «capabilities», 0x0, «selabel», «u:object_r:system_file:s0»);
set_metadata_recursive(«/system/xbin», «uid», 0, «gid», 2000, «dmode», 0755, «fmode», 0755, «capabilities», «0x0», «selabel», «u:object_r:system_file:s0»);
• команды для Nexus’ов
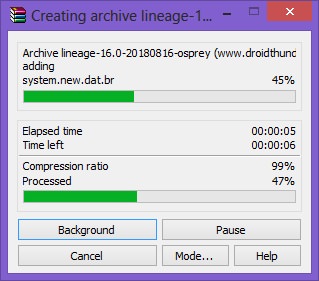
block_image_update(«/dev/block/platform/msm_sdcc.1/by-name/system», package_extract_file(«system.transfer.list»), «system.new.dat», «system.patch.dat»);
Синтаксис: block_image_update(«Путь к блоку раздела», package_extract_file(«список информации для патча (?) «), «образ», «патч образа»);
я так понимаю, что так прошивается сильно сжатая прошивка (образ системы).
Еще ifelse
Пример: ifelse(is_mounted(«/system»), unmount(«/system»)); — если раздел сустем смонтирован дается команда на его размонтирование, если размонтиовать то нечего не происходит.
• Информация по атрибутам set_metadata и подобным командам на Android 4.4+
Android update-script (Пост blackeangel #50803606)
Описание откуда берутся «u:object_r:uncrypt_exec:s0» и подобные атрибуты. . .
• Пример скрипта который может удалятьперемещатьбекапить файлы и вести лог действий
Android Script Creator (Пост Octanium #51085030)
Используется при отсутствии busybox, либо чтоб не привязываться к его расположению в системе.
Код «перезагрузки» и «перезагрузки в рекавери» соответственно:
Когда скрипт выполняется очень быстро (1-4 секунд) я использовал следующий код:
Т.е. за 3 секунды прогресс бар доходит до 100% (постепенно).
Число «3» выбрано как [время установки скрипта]+1 сек, чтоб прогресс бар при установке гарантированно двигался и не успел дойти до 100% раньше, чем скрипт установится.
«[, . «pathtofileN»]);
Устанавливает владельца, группу и разрешения для файла или папки, как ‘chmod’, ‘chown’, и ‘chgrp’ всё в одном
Пример: set_perm(0, 2000, 0550, «/system/etc/init.goldfish.sh») Установит владельца, группу и разрешения для файла /system/etc/init.goldfish.sh
«])
Рекурсивно устанавливает владельца, группу и разрешения для содержимого папки. — для папок, — для файлов.
Пример: set_perm_recursive(0, 0, 0755, 0644, «/system/app») Установит права для содержимого /system/app, для папок — 0755, для файлов — 0644.
«);
Монтирует в путь
. должно быть название раздела, если это «MTD», или блок памяти если это «vfat»
Пример: mount(«MTD», «userdata», «/data»);
Пример монтирования на андроид 9-10
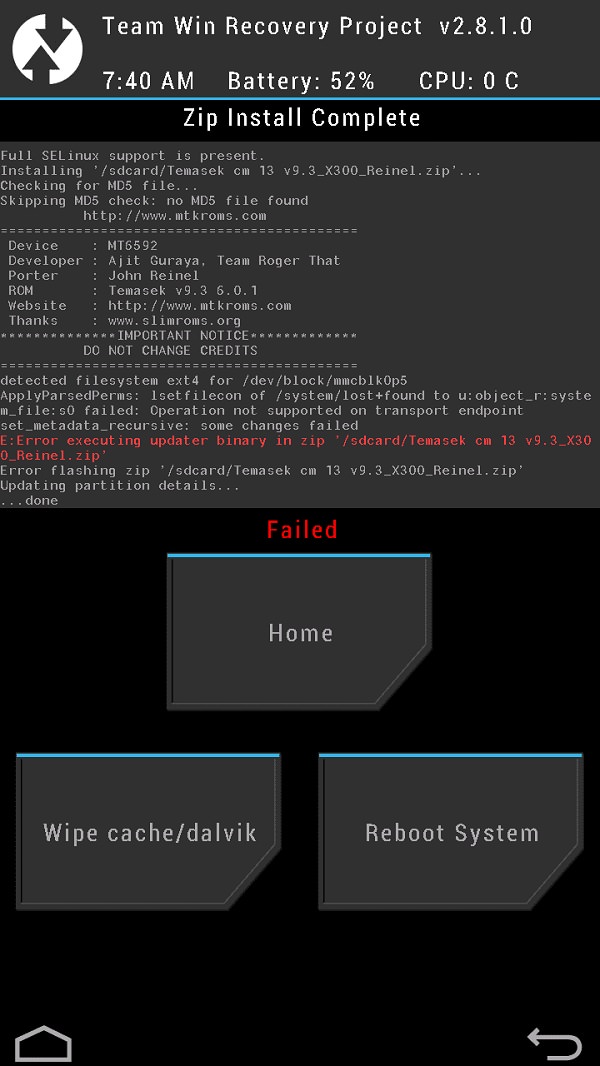
Если Вам знакомо что такое Recovery, CWM,TWRP, знаете что такое кастомные прошивки и с чем их едят, то наверняка вы сталкивались с тем что прошивка или обновление не устанавливается выводя при этом ошибку «Status #».
Источник
Error executing updater binary in zip twrp что делать 4pda
FAQ по созданию патча update.zip для прошивки через рекавери
Редактирование Updater-script. Информация, решения, команды, подпись патчей.
Инструкция по установке системных и пользовательских приложений с помощью recovery
Редактирование установленной прошивки и удаление системных приложений
(ключевые слова)
Напоминаю, тут не стол заказов.. Посты с просьбой собрать zip для «хххх» Recovery оффтоп
Сообщения, не относящиеся к теме обсуждения (оффтоп), удаляются без предупреждения
- Добавление нескольких пользовательских/системных приложений «за один клик» (одним патчем).
- Добавление/удаление системных приложений без root прав и вспомогательных программ.
- Изменение прошивки (замена файлов, украшательства и т.д.).
- Обновление программы или прошивки.
- Переразметка памяти (обсуждения в другой теме)
- Получение root прав SuperUser, SuperSU, Magisk
- Установленный на телефоне кастомный рекавери (CWM/TWRP)
- NotePad++ (редактор с сохранением Unix формата)
- Zip_signer (подписчик архивов)
- Архиватор ZIP
- Файл-заготовка sample.zip (либо update-binary для ручной сборки)Zip_signer.rar ( 13.28 КБ )sample-patch.rar ( 4.77 МБ )update-binary.rar ( 113.25 КБ )
- Дополнительные версии бинарника. binary_all.rar ( 649.36 КБ )
- Бинарники (архив/исходники)
Исходники бинарника, основная ссылка:
https://android.google…ootable/recovery/+refs
выбираем к примеру «android-9.0.0_r18» , потом ищем папку «updater», в папке «updater» исходники бинарника
К примеру https://android.google…droid-9.0.0_r18/updater — можно глянуть все команды которые может выполнить бинари в андроид 9.0.0 (в файле install.cpp, в самом низу)
signapk.zip ( 9.24 КБ ) + Android update-script (Пост Няшная #63580419)
Внимание! Патчи создаются только для мод.рекавери и результативно работают только в них. В стоковых рекавери (на аппаратах «из коробки») патчи не работают.
Для того, чтобы установить новые системные приложения apk в Ваш аппарат, необходимо выполнить три шага:
- Собрать свой update.zip (из заготовки sample.zip)
- Подписать update.zip утилитой Zip_signer(Не обязательно!)
- Закинуть на флэшку и установить в аппарат через ClockWorkMod Recovery
Эти шаги являются универсальными, т.е. подойдут для выполнения других подобных операций.
ШАГ №1
Собрать новый update.zip, используя «болванку» sample.zip
Порядок использования sample.zip:
- Разархивировать архив sample.zip
- Удалить файлы подписи META-INF/CERT.RSA, CERT.SF, MANIFEST.MF (т.к. 2м шагом мы их будем создавать для своей сборки)
- Поместить в папку /data/app свое пользовательское приложение (xxxxx.apk)
- При необходимости отредактировать файл updater-script (подробнее позже)
- Заархивировать всё (META-INF и data) ZIP’ом без сжатия
ШАГ №2
Подписать update.zip с помощью утилиты Zip_signer
Порядок использования утилиты Zip_signer:
- Переименовать Ваш отредактированный (т.е. уже с приложением внутри) sample.zip в update.zip
- Поместить его в папку с программой Zip_signer
- Запустить файл zip_signer.bat
- Дождаться, пока процесс будет завершен
- В папке появится файл update-finished.zip — это и есть подписанный файл
- Переименовать update-finished.zip по своему усмотрению (согласно логике патча)
ШАГ №3
Установка нового приложения
- Перекинуть (переименованный) update-finished.zip на флэшку и установить его в аппарат через TWRP или CWM (install zip from sdcard -> chooze zip from internal sdcard -> Yes, install sample.zip)
- Перезагрузить аппарат
/ )
Внимание! Патчи создаются только для мод.рекавери и результативно работают только в них. В стоковых рекавери (на аппаратах «из коробки») патчи не работают.
Корень патча:
- папка META-INF
- папка источник установки приложений (system, data, sdcard, cache, sd-ext)
Обязательные файлы: - META-INF/com/google/android/update-binary — системное средство запуска данного патча, также создает временную рабочую папку tmp
- META-INF/com/google/android/updater-script — выполняемый скрипт по которому и происходят операции копирования и т.д.
Разберем sample.zip
Патч добавляет пользовательское приложение MyPiano в Data.
— Выводит сообщение о завершении процесса.
- busybox — приложение для выполнения командной строки, устанавливается с кастомным рекавери, находится в ramdisk/sbin. в кастомных прошивках зачастую добавляют его в system/xbin
Возможные исправления для своих целей
- Изменение прав
• package_extract_dir
Синтаксис: package_extract_dir(» «, » «);
Копирует содержимое в . Файлы в имеющиеся в перезаписываются.
Пример: package_extract_dir(«system», «/system»); Скопирует файлы из папки update.zip/system в /system
• package_extract_file
Синтаксис: package_extract_file(» «, » «);
Копирует файл в . Если файл существует, то он перезаписывается.
Пример: package_extract_file(«test.sh», «/tmp/test.sh»); Скопирует файл test.sh из update.zip в /tmp/test.sh
• format
Синтаксис: format(«MTD», » «);
Форматирует раздел (см. приложение).
Пример: format(«MTD», «system»); Полностью отформатирует /system . Примечание: форматирование удаляет данные необратимо.
Пример 2: format(«ext4», «EMMC», «/dev/block/mtdblock5», «0», «/system»);
Определение номера блока под спойлером «инфо и материалы».
• delete
Синтаксис: delete(» «[, «file2», . «fileN»]);
Удаляет файл(ы)
Пример: delete(«/system/app/Calculator.apk»); Удалит Calculator.apk из папки system/app.
• delete_recursive
Синтаксис: delete_recursive(» «[, «dir2», . «dirN»]);
Рекурсивно удаляет папку(и) со всем содержимым
Пример: delete_recursive(«/data/dalvik-cache»); Удалит папку /data/dalvik-cache со всем содержимым.
• run_program
Синтаксис: run_program(» «[, » «, » «, » «]);
Запускает программу(скрипт) .
Пример: run_program(«/tmp/install_busybox.sh»); Запустит скрипт /tmp/install_busybox.sh.
«[, . «pathtofileN»]);
Устанавливает владельца, группу и разрешения для файла или папки, как ‘chmod’, ‘chown’, и ‘chgrp’ всё в одном
Пример: set_perm(0, 2000, 0550, «/system/etc/init.goldfish.sh»); Установит владельца, группу и разрешения для файла /system/etc/init.goldfish.sh
• set_perm_recursive
Синтаксис: set_perm_recursive( , , , , «
«])
Рекурсивно устанавливает владельца, группу и разрешения для содержимого папки. — для папок, — для файлов.
Пример: set_perm_recursive(0, 0, 0755, 0644, «/system/app»); Установит права для содержимого /system/app, для папок — 0755, для файлов — 0644.
• show_progress
Синтаксис: show_progress( , );
Продвижение прогрессбара на долю за секунд. может быть нулевым для продвижения его по командe set_progress, а не по времени.
Пример: show_progress(0.100000, 1); Увеличит прогресс на 0.1 часть за 1 секунду
• set_progress
Синтаксис: set_progress( );
Устанавливает положение прогрессбара на долю , для самого последнего вызова команды show_progress.
Пример: set_progress(0.500000);
• symlink
Синтаксис: symlink(«
Создает символическую ссылку (как ‘ln-s’).
Пример: symlink(«/data/app_s», «/system/app»); Создаст символическую ссылку на папку /data/app_s для папки /system/app
«);
Монтирует в путь
. должно быть название раздела, если это «MTD», или блок памяти если это «vfat»
Пример: mount(«MTD», «userdata», «/data»);
• ui_print
Синтаксис: ui_print(» «);
Выводит на экран сообщение
Пример: ui_print(«Formatting SYSTEM. «);
• sleep
Синтаксис: sleep( );
Пауза процесса на секунд
Пример: sleep(5); — пауза 5 секунд, после чего код скрипта выполняется дальше.
• set_metadata / set_metadata_recursive
Синтаксис: set_metadata (. );
Устанавливает владельца, группу и разрешения (новая команда взамен set_perm для andriod 4.4.*)
Примеры: Android update-script (Пост #32151495)
Создание патча update.zip для прошивки через рекавери (Пост kory-vadim #81945464)
• set_metadata / set_metadata_recursive
Синтаксис:
set_metadata(«имя файла», «ключ1», «значение1», «ключ2», «значение2», . )
set_metadata_recursive(«имя директории», «ключ1», «значение1», «ключ2», «значение2», . )
Ключи:
* uid
* gid
* mode (set_perm_extd only)
* fmode (set_perm_extd_recursive only)
* dmode (set_perm_extd_recursive only)
* selabel
* capabilities
первые три (uid, gid, mode) это тоже самое что и в chmod, заполняется «uid», 0, «gid», 1000, «mode», 06754.
для установки прошивки хватает трех ключей «uid», 0, «gid», 1000, «mode», 06754.
Пример: set_metadata(«/system/xbin/shelld», «uid», 0, «gid», 1000, «mode», 06754, «capabilities», 0x0, «selabel», «u:object_r:system_file:s0»);
set_metadata_recursive(«/system/xbin», «uid», 0, «gid», 2000, «dmode», 0755, «fmode», 0755, «capabilities», «0x0», «selabel», «u:object_r:system_file:s0»);
• команды для Nexus’ов
block_image_update(«/dev/block/platform/msm_sdcc.1/by-name/system», package_extract_file(«system.transfer.list»), «system.new.dat», «system.patch.dat»);
Синтаксис: block_image_update(«Путь к блоку раздела», package_extract_file(«список информации для патча (?) «), «образ», «патч образа»);
я так понимаю, что так прошивается сильно сжатая прошивка (образ системы).
Еще ifelse
Пример: ifelse(is_mounted(«/system»), unmount(«/system»)); — если раздел сустем смонтирован дается команда на его размонтирование, если размонтиовать то нечего не происходит.
• Информация по атрибутам set_metadata и подобным командам на Android 4.4+
Android update-script (Пост blackeangel #50803606)
Описание откуда берутся «u:object_r:uncrypt_exec:s0» и подобные атрибуты. . .
• Пример скрипта который может удалятьперемещатьбекапить файлы и вести лог действий
Android Script Creator (Пост Octanium #51085030)
Используется при отсутствии busybox, либо чтоб не привязываться к его расположению в системе.
Код «перезагрузки» и «перезагрузки в рекавери» соответственно:
Когда скрипт выполняется очень быстро (1-4 секунд) я использовал следующий код:
Т.е. за 3 секунды прогресс бар доходит до 100% (постепенно).
Число «3» выбрано как [время установки скрипта]+1 сек, чтоб прогресс бар при установке гарантированно двигался и не успел дойти до 100% раньше, чем скрипт установится.
«[, . «pathtofileN»]);
Устанавливает владельца, группу и разрешения для файла или папки, как ‘chmod’, ‘chown’, и ‘chgrp’ всё в одном
Пример: set_perm(0, 2000, 0550, «/system/etc/init.goldfish.sh») Установит владельца, группу и разрешения для файла /system/etc/init.goldfish.sh
«])
Рекурсивно устанавливает владельца, группу и разрешения для содержимого папки. — для папок, — для файлов.
Пример: set_perm_recursive(0, 0, 0755, 0644, «/system/app») Установит права для содержимого /system/app, для папок — 0755, для файлов — 0644.
«);
Монтирует в путь
. должно быть название раздела, если это «MTD», или блок памяти если это «vfat»
Пример: mount(«MTD», «userdata», «/data»);
Пример монтирования на андроид 9-10
Если Вам знакомо что такое Recovery, CWM,TWRP, знаете что такое кастомные прошивки и с чем их едят, то наверняка вы сталкивались с тем что прошивка или обновление не устанавливается выводя при этом ошибку «Status #».
Источник

Solve Error Executing Updater Binary In Zip using three simple methods. Fix updater process ended with Status 7 Error through TWRP recovery. Since Android is open-source, it is possible to edit the code, recompile, and re-release it for different types of devices. You can easily tweak the kernel, theme, recovery, or user interface from the Operating system.
Many third-party developers compile various custom ROMs and kernels to experience a change in the appearance and performance of a device. A brand-new Android device comes with preinstalled stock firmware. This stock ROM has limited functionality; however, you can improve it by flashing a custom ROM.

This way you can not only gain some extra features but also improve your device performance. But flashing any custom firmware is a risky process. A small mistake during installation can brick your Android device, thus making it completely useless. For flashing any custom ROM or kernel, you must have a custom recovery installed on your device.
ClockworkMod (CWM) and Team Win Recovery Project (TWRP) are the most popular custom recoveries. Both of these recoveries come loaded with features and are useful for installing third-party ROM or even stock Android images. However, replacing the stock recovery with a custom voids your device warranty.
Related: How to Solve Status 7 Error in TWRP Recovery
Sometimes while installing a zip file through recovery, an unexpected or unwanted error might occur, thus failing the flashing process. At such times, it becomes really difficult as you cannot restart your device because of wiped partitions. The only way to get out of this situation is to restore your previously backed-up ROM or to flash any working ROM.
But what if you don’t have any custom ROM or backup ROM? Don’t worry, as we will guide you through our tutorial on how to fix error executing updater binary in zip. Without wasting any more time, let’s get started.
How to Fix Error Executing Updater Binary In Zip
When installing certain custom ROMs, you can encounter errors like Status 7 Error, Error: 7 or zip signature verification failed, Error Executing Updater Binary in Zip, and many more. Generally, these errors are caused due to the updater-script file, which is present in your custom ROM. This file confirms your Android device model to check the compatibility with the ROM.
This is a safety mechanism to prevent the flashing of incompatible ROM on your device. But sometimes, you may encounter these errors even if you have the correct ROM for your device. The reason for this is a code error in the updater script created by the developer while compiling the ROM zip file. The solution to this problem is quite simple, but still, many users get stuck when they encounter such errors.
Related: How to Fix TWRP Error 70 while installing GApps
You can fix these common errors by using our easy step-by-step tutorial given below. To fix this issue, all you need is a computer and software. That’s it! You can even use your Android device if you don’t have a PC. Here in this guide to fix error executing updater binary in zip errors, we have listed three methods. Refer to any one of the three methods to solve the error executing updater binary in zip error.
Disclaimer
Proceed at your own risk. Implement every step correctly without doing anything on your own. If your device gets bricked by following this guide, then we at Droid Thunder will not be held responsible for that.
Method 1: By Editing Updater-Script file
In this method, we’ll edit and update the Updater-Script file present in the zip package file. Let’s get straight into it.
Downloads
WinRar
Notepad++
Steps to Fix Error Executing Updater Binary In Zip
- Download and install WinRar and Notepad++ on your computer.
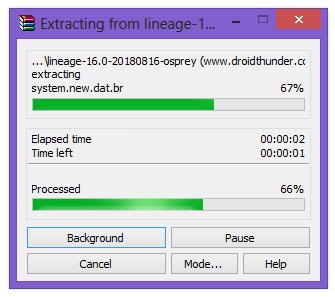
- Copy the ROM zip file on your computer and extract it using WinRar.
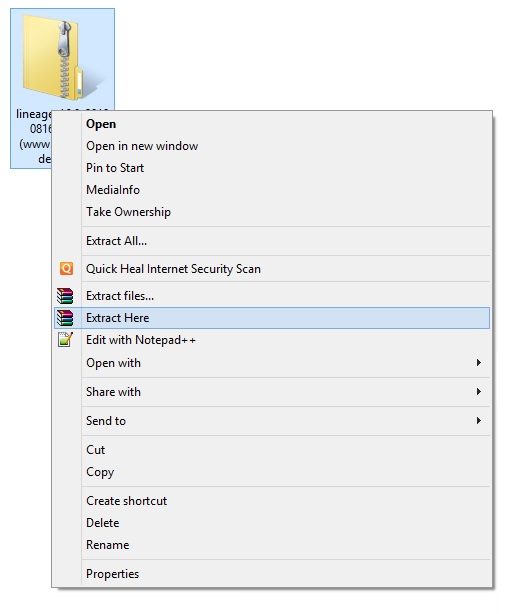
- After extracting, you’ll find Install, META-INF, and System folders along with other files.
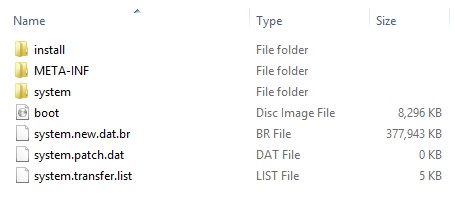
- Note: Files may differ from those shown in the image.
- Open the META-IN folder.
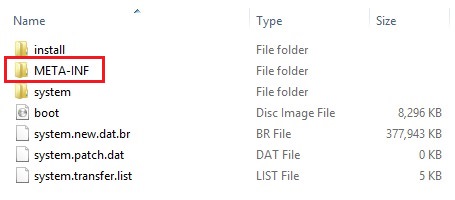
- Then open the com folder.

- Next, open the google folder.

- Finally, open the android folder.

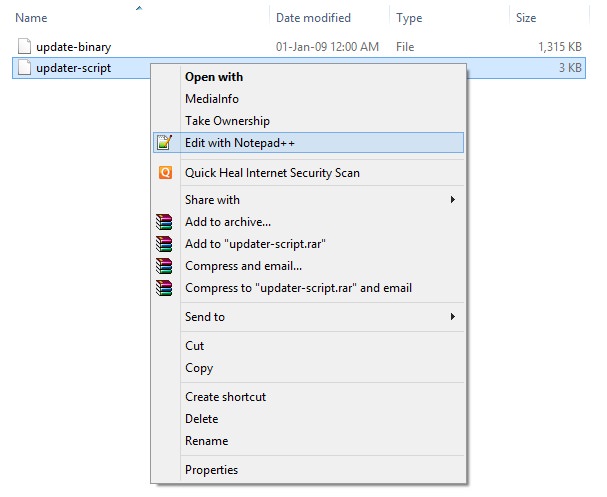
- Here, you’ll find these two files: update-binary and updater-script.

- Right-mouse click on the updater-script file and select Edit with Notepad++ option.
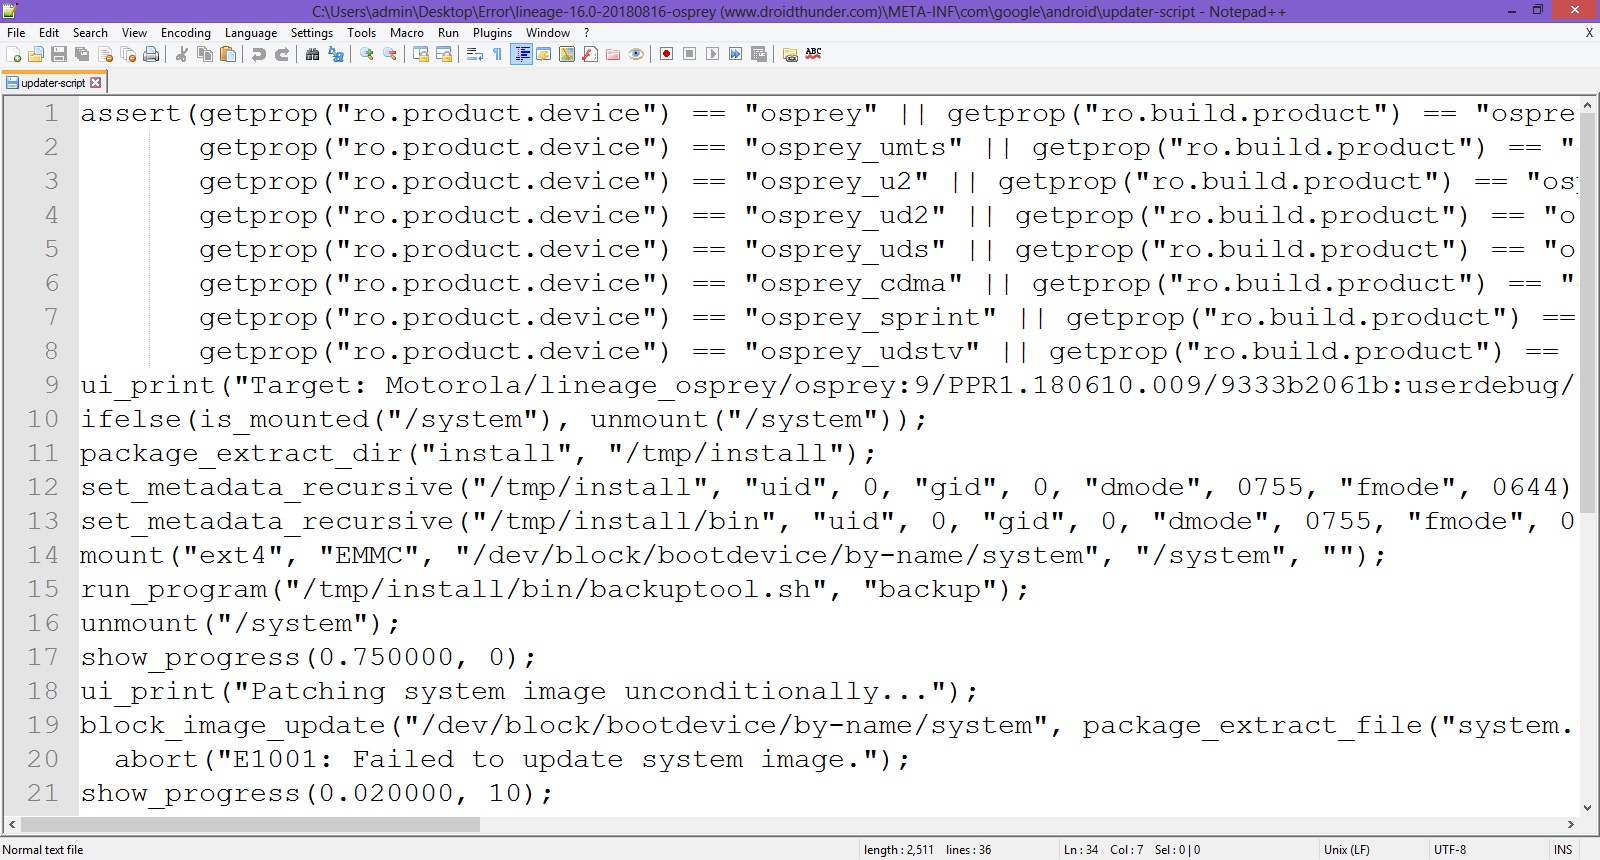
- Select the line starting with ‘assert’ to the next semi-colon and delete it.
- Normally this is the first line or one of the first lines at the top of the text file.
- Remove everything until the command ‘mount’ is visible.
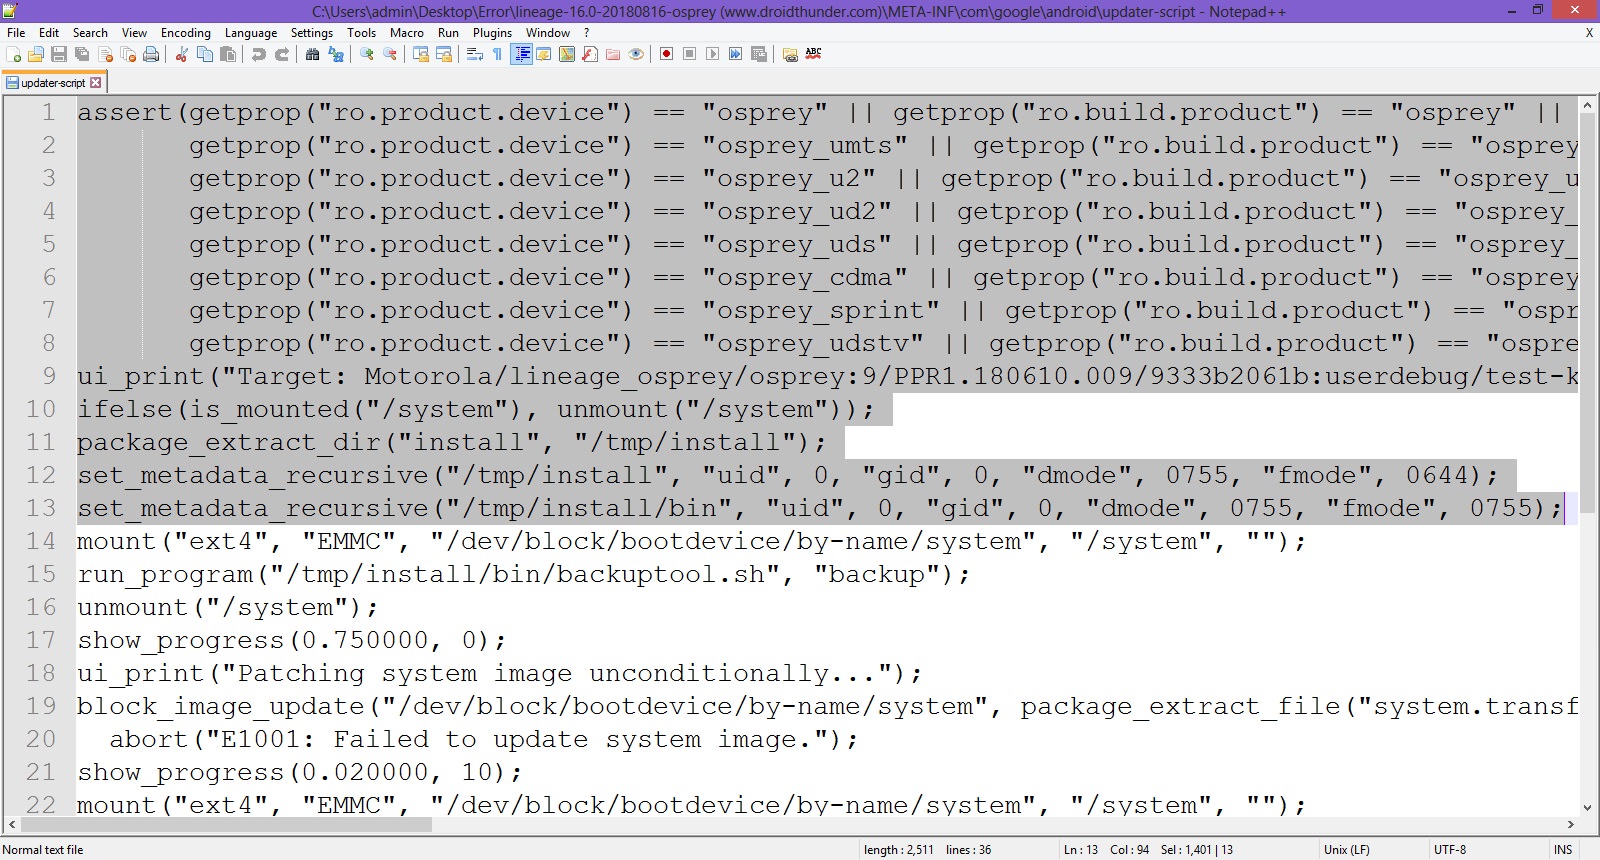
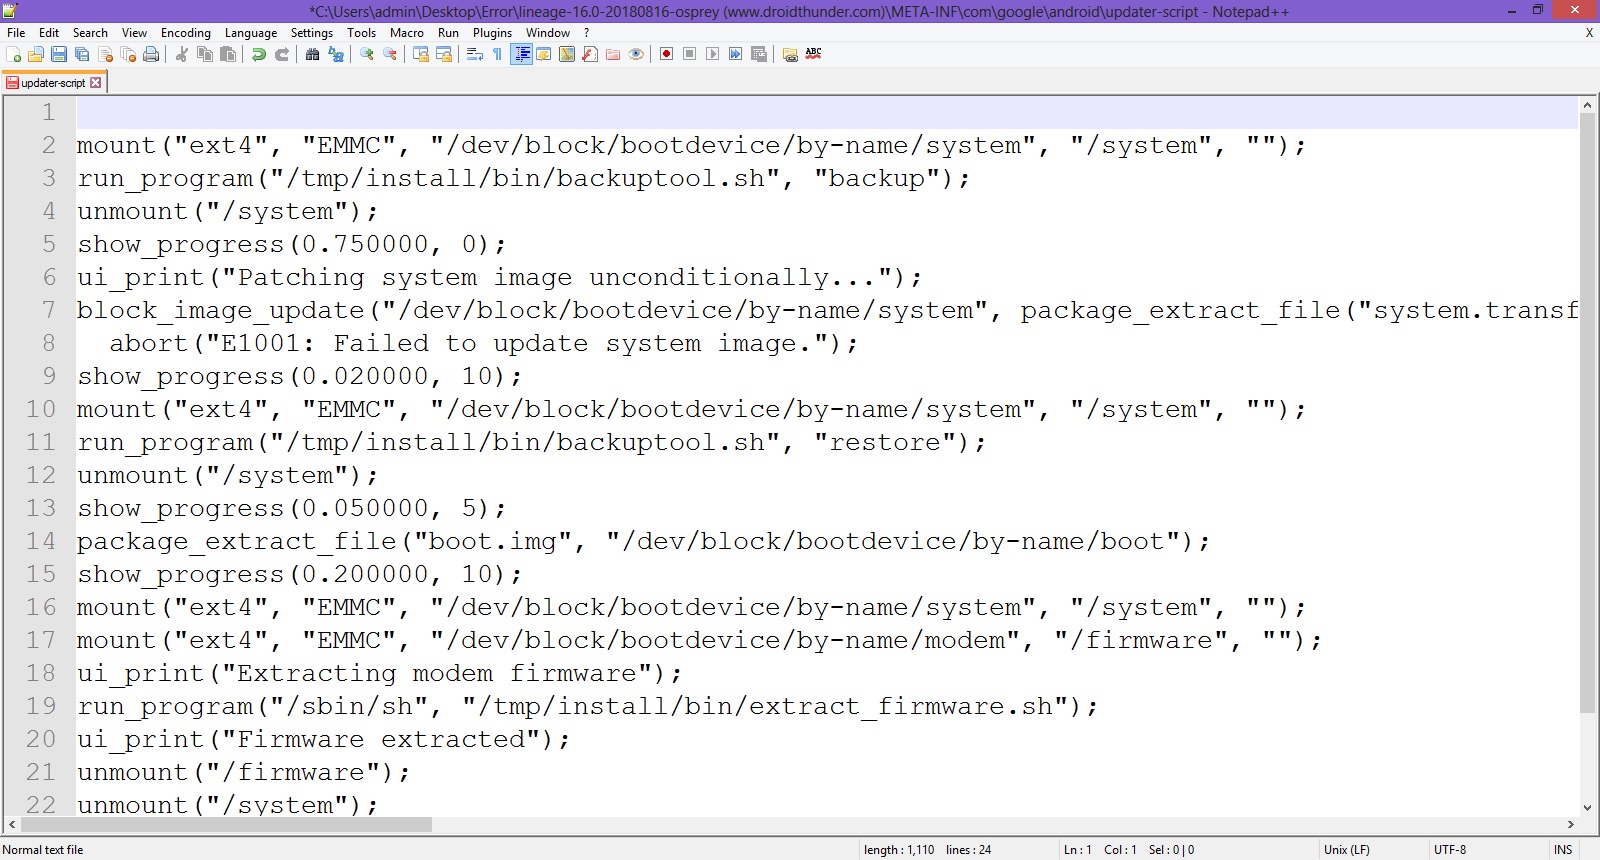
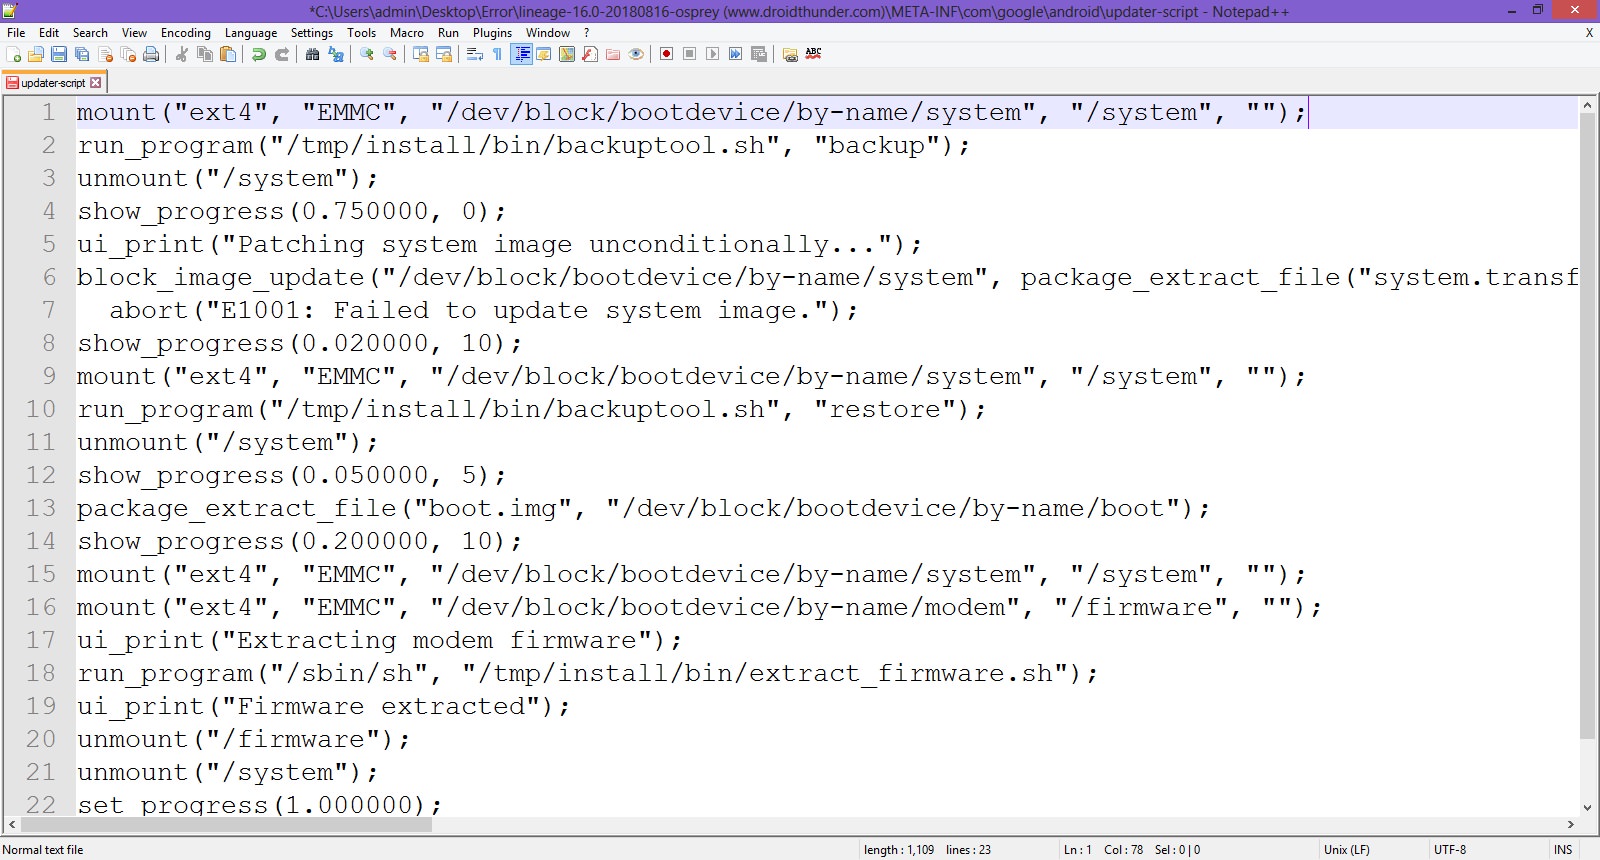
- Now your first line will start from mount. Save the file.
- Rezip/Re-compress all the files you’ve unzipped.
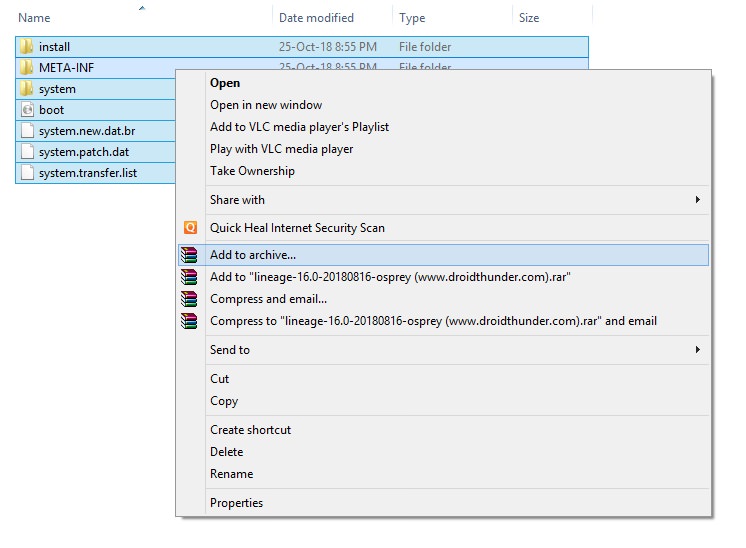
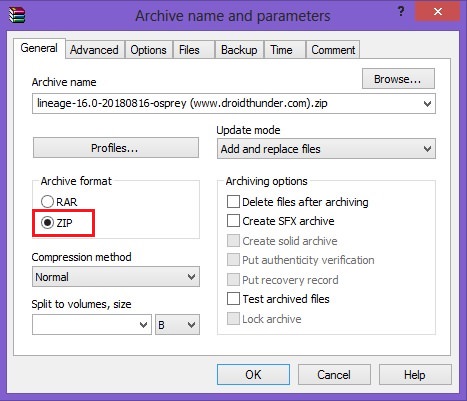
- Note: Save it as a .zip file and NOT .rar.
- Now copy this ROM.zip file on your device. And flash it through TWRP recovery. Now the ROM will be installed successfully without giving Error Executing Updater Binary In Zip error.
Method 2: By using Flashify app
We’ll use the Flashify app and install the latest TWRP custom recovery in this second method.
Downloads
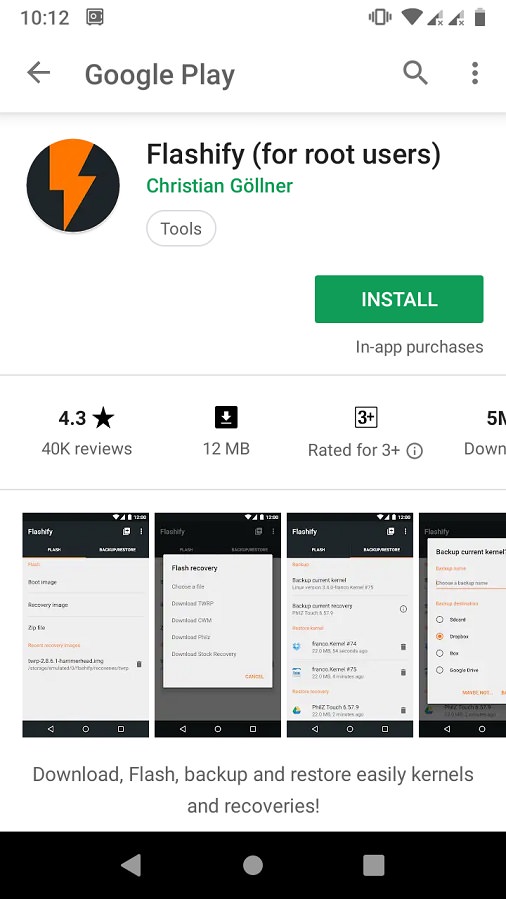
Flashify app
Steps to Fix Error Executing Updater Binary In Zip
- Install the Flashify app from Google Play Store.
- Launch the app and give root permissions to the app.
- From the Flash tab, select the Recovery image option.
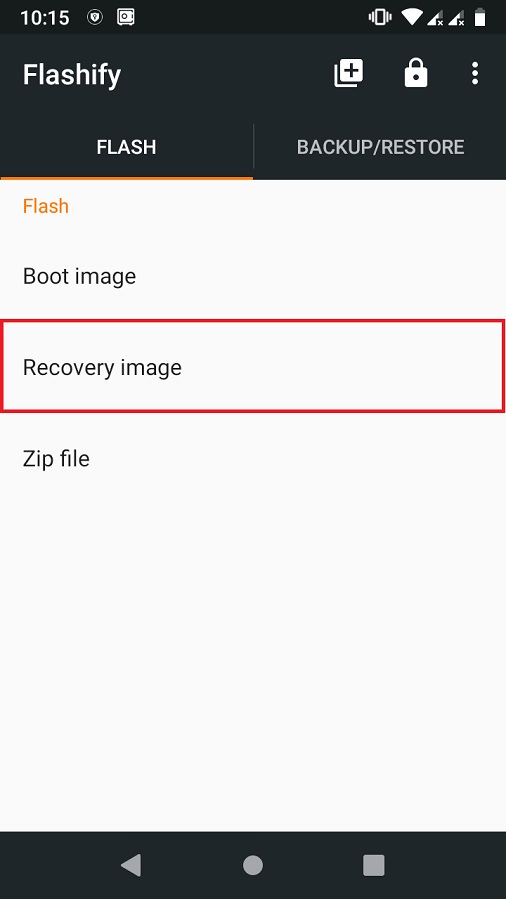
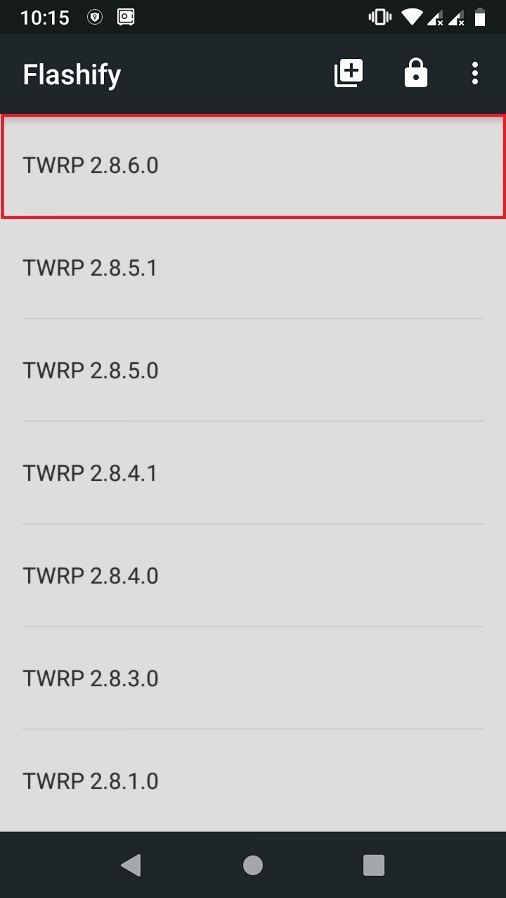
- Then click on the Download TWRP option.
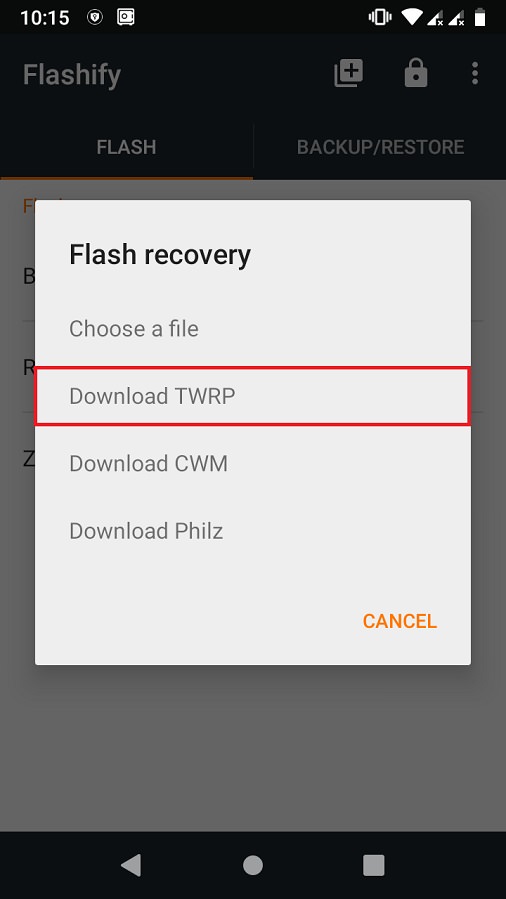
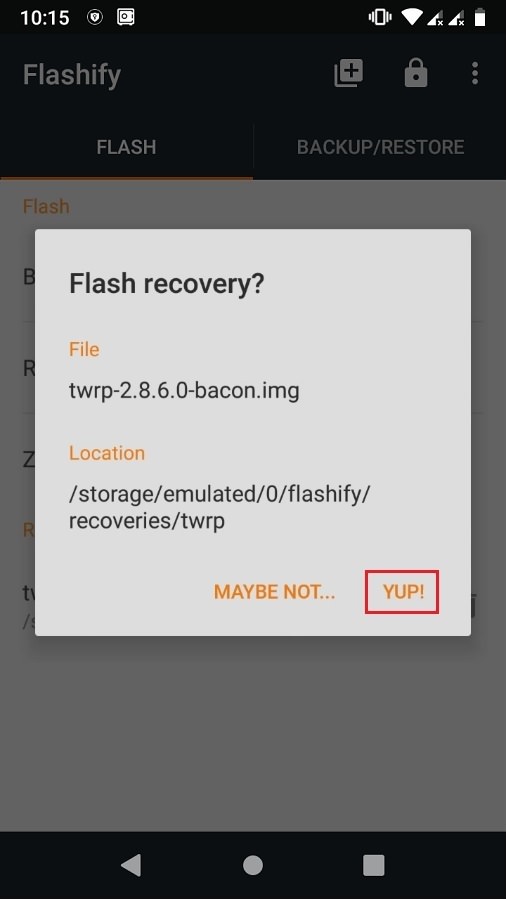
- A list of TWRP recoveries will be shown. Just choose the latest one.
- Click on Yup to initiate the flashing of the latest TWRP recovery on your Android device.
- After the installation completes, boot into TWRP and flash the ROM.zip file. This time the zip file will be installed successfully without giving Error Executing Updater Binary In Zip error.
Method 3: Factory Reset
In this method, we’ll use TWRP recovery and perform a factory reset and wipe the Dalvik cache. Let’s get straight into it.
Steps to Fix Error Executing Updater Binary In Zip
- Boot your Android device into TWRP recovery.
- Click on the Wipe option.
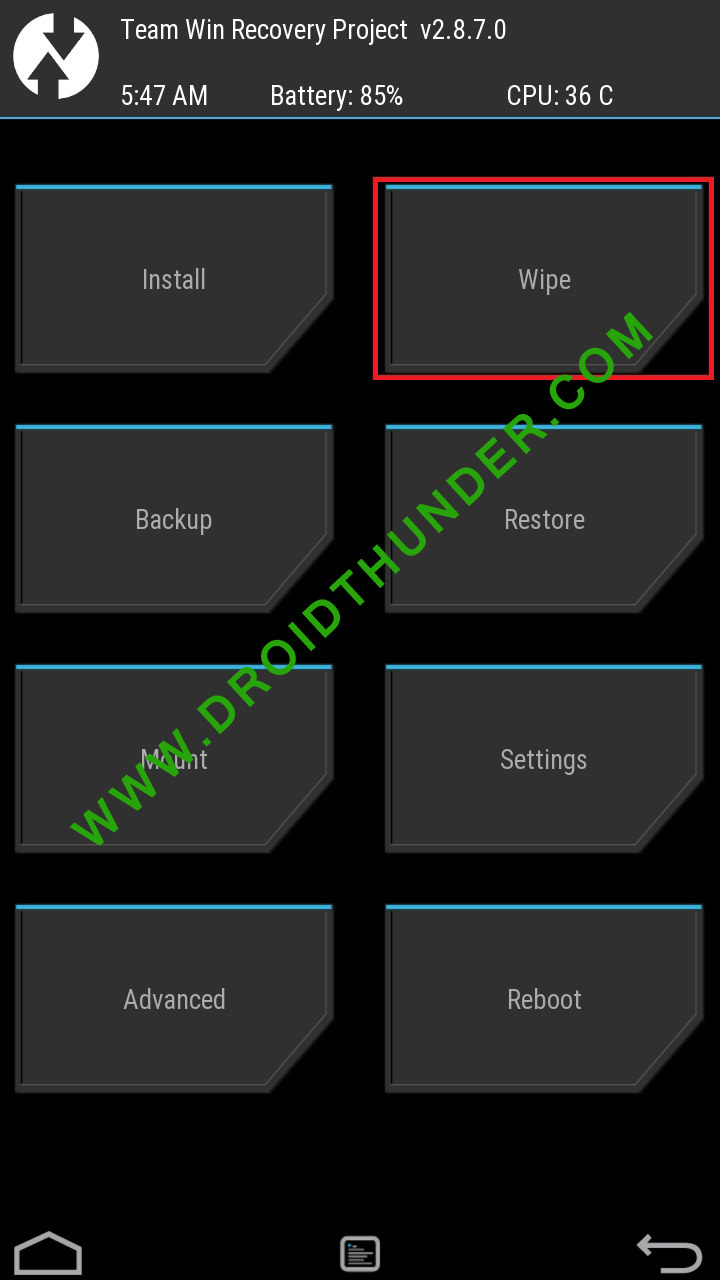
- Then swipe right to start the factory reset process.

- After factory resetting your device, again select the Wipe option. And then, click on the Advanced Wipe option.
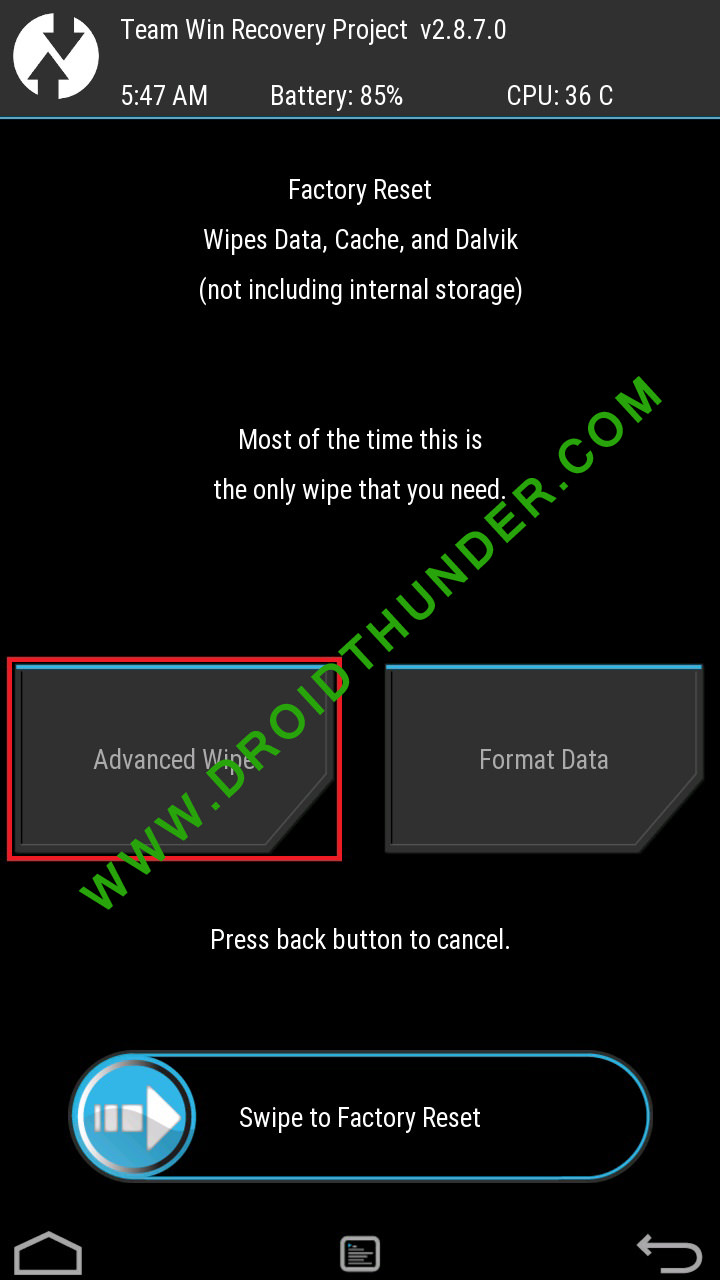
- On the next screen, select only the Dalvik cache partition.
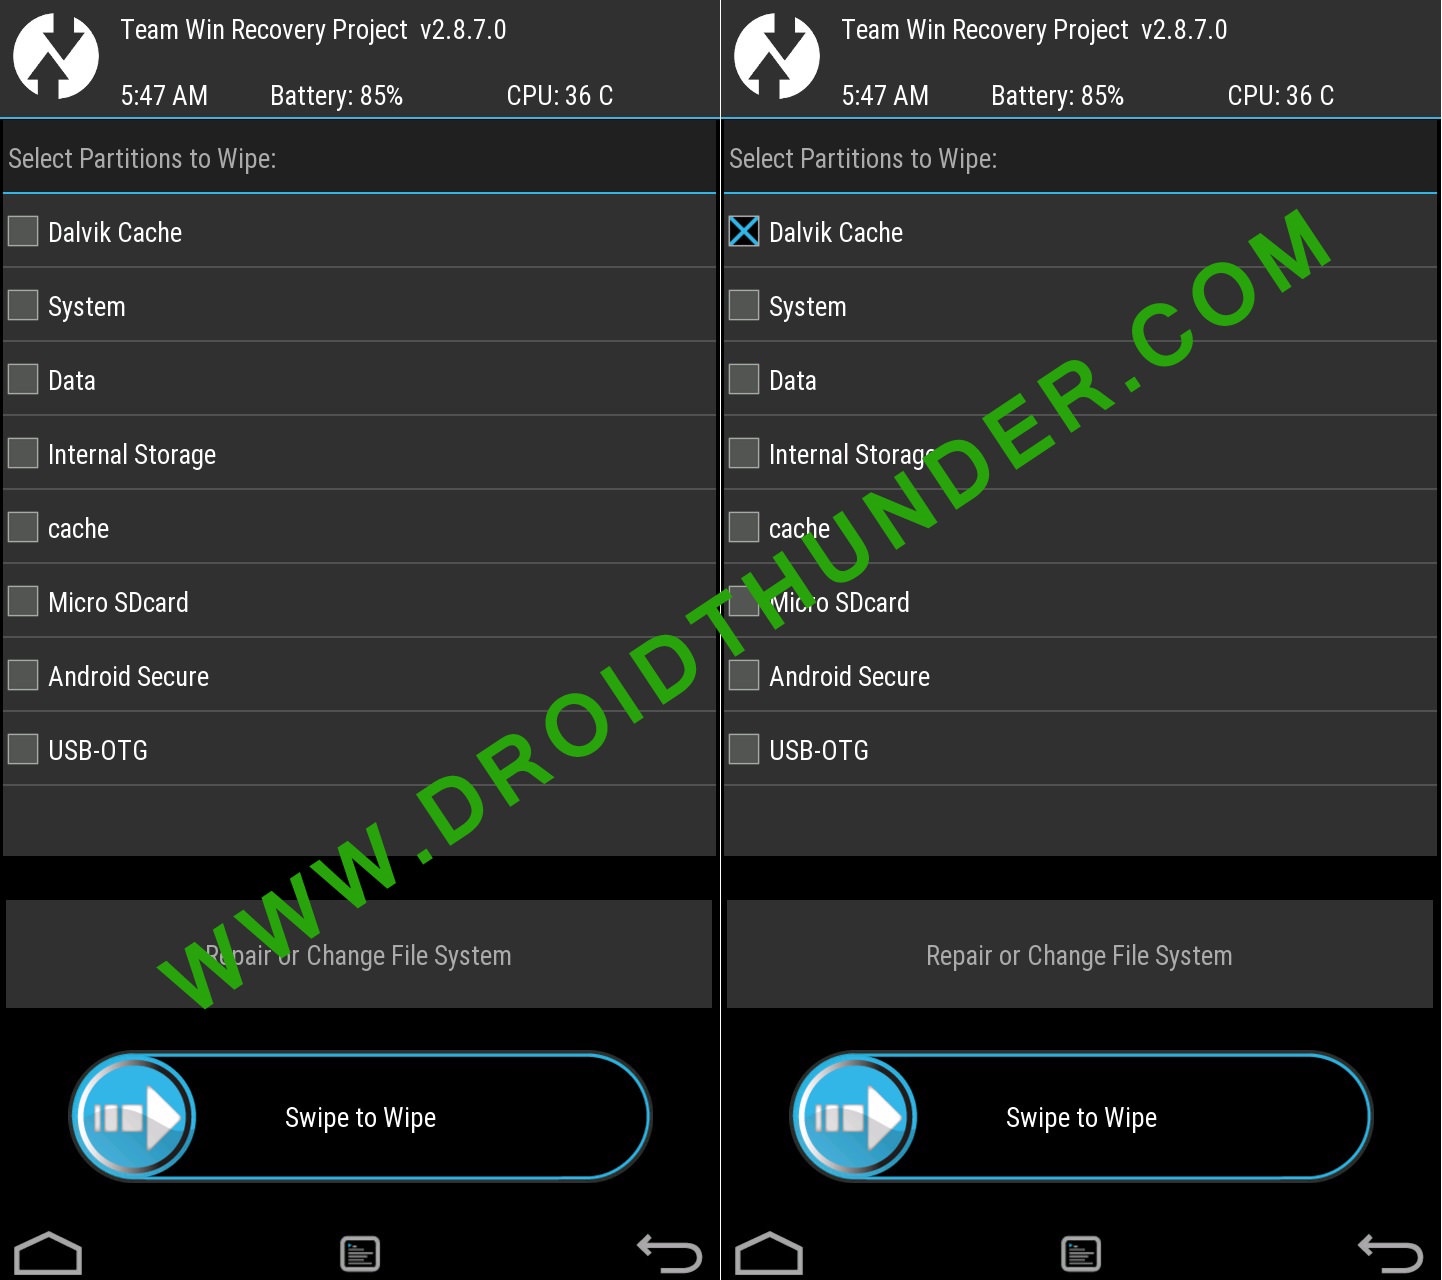
- Note: Do NOT select system and data partitions.
- Then swipe right to initiate the wiping process.
- After the wiping completes, flash the ROM.zip file, and it’ll be installed without giving Error Executing Updater Binary In Zip error.
Conclusion
Finally! This is how you can solve Error Executing Updater Binary In Zip in TWRP while flashing custom ROM. If the above methods don’t work, kindly comment below.
Leave a Comment
47 thoughts on “How to Solve Error Executing Updater Binary In Zip”
-
1ST METHOD IS WORKING FINE..
THANK YOU BRO…
Reply
-
-
its work. Thank you sir.
Reply
-
-
Thanks,it seems to work like a charm. Accidentally formatted the entire phone and nothing seemed to help. Keeping this article incase I’ll need it for future use. Currently waiting for the initial (long) start of LineageOS 16, but there’s the logo so that’s already a good sign
Reply
-
Glad to hear that! 🙂
Reply
-
-
Abhijeet…. You are a LEGEND!!!!!!! Thank you sooooooo much! Keep up the good work!!!
Reply
-
Thanks for the kind words Jaydee! 🙂
Reply
-
-
Thanks mate! What a annoying issue
Reply
-
Many thanks!
Several days I tried installing LineageOS 16 (unofficial) to a Samsung A5 (SM-A500FU) but it failed hopelessly… Until I discovered your post!
The 1st did the trick (didn’t try the others though).
Now I have a phone running on Android 9 – the stock version stopped at 6.0.1.
Again: thanks!Reply
-
-
Thank u so much bro. it worked as a charm
now i have pixel launcher with android pieReply
-
-
After a long suffering period, installing lineage OS finally worked on my Samsung Galaxy S5. With method 2 and 3, i was not successful, but with method 1. Thank you very much for this helpful instruction.
Reply
-
-
it says E:zip signature verification failed:1
Reply
-
Which method did you use?
Reply
-
Method 1 as well as method 3
Reply
-
May I know what are you trying to flash?
Reply
-
-
I’m trying to flash lenovo K3 note.
Reply
-
Try with this TWRP recovery.
Reply
-
-
Hey sorry to disturb but I noticed in super su app that currently I haven’t checkmarked the “enable su during boot” option. Is that why I’m getting error?
Reply
-
No problem dude. Generally, this error occurs due to the updater-script file which is present in your file. Maybe the downloaded file is not compatible with your device. Just update the TWRP recovery and try again. Let me know if the problem persists.
Reply
-
-
Hey I installed twrp from your link by installing it and selecting recovery option and I again rebooted into recovery. I allowed modifications too and then I followed method 3 but it taking a long time to perform factory reset. It’s still going. I’m worried what do I do?
Reply
-
Don’t worry Aravindh. Are you sure you are flashing the correct package file?
Reply
-
-
Hey it finally completed the format and I tried again method 3 but same error. Zip signature verification failed.
Reply
-
Tell me the file name and its source
Reply
-
-
Okay. So are you now using the TWRP v3.1.1-0 that I’ve mentioned earlier? If yes, then I request you to download the LineageOS again, and follow only Method 1 from the above guide. Sometimes, the error might occur due to incomplete downloads as well.
Reply
-
Okay I’ll try that and get back to soon. Thank you for your help!
Reply
-
-
-
-
I’m using twrp 2.8.7
Reply
-
Hey I’m really sorry to bother you but I tried other ROM Aospextended for K3 note(k50a40_S327_160517_ROW) with aio_otfp board.
but I’m getting that same error zip file verification failed. I don’t know what I’m doing wrong. If you could help me figure this out I’ll be really grateful. Thanks!Reply
-
No issues Aravindh. I’ll check the package file and get back to you.
Reply
-
It seems there is no issue with the ROM package file. The only solution is update TWRP to the latest one.
Reply
-
-
-
Hey one more thing. I’m trying to install twrp 3.4.0 (latest) and I selected lenovo but my exact model isn’t available. Closest thing is A7000 aio_row but cpuz tells me that my board is aio_otfp. Is that ok or?
Reply
-
Nope, don’t flash that. Have you tried with CWM? I think K3 Note does have a CWM recovery.
Reply
-
-
So now to do cwm, how do I remove twrp? Could you please point to any article that helps? Thank you very much
Reply
-
-
None of the methods worked for me……..its still showing the same error…. when i try the first method the binary error was not there instead it showed error flashing zip…..can you please help me….. maybe i ve downloaded the wrong rom…..can u provide me a link to download the correct rom and TWRP???
My device is
Samsung galaxy tab 3, 7.0 inch
SM-T211Thank you
Reply
-
-
In method 1:
My updater script didnt start with assert..
What should i do??Reply
-
No problem, just delete everything until the command ‘mount’ is visible.
Reply
-
3rd method worked for me. Thanks
Reply
-
-
-
Finally, a well written article that works. Thanks Mr. Abhijeet
Reply
-
-
Completely fixed everything. Thanks guys, I’m so thrilled to finally have my first phone that has a custom ROM on it. So again, thanks.
Reply
-
You are welcome, Heather!
Reply
-
Several users over XDA forums and on our Facebook page have reported that an “error executing updater binary in zipping” error is creating problem while flashing custom ROM through recovery. Here’s how you can fix the Error Executing Updater Binary In zipping.
Well, it’s no doubt that we all love to use Android smartphone. In fact, Android is right now the most popular mobile operating system which is loved by millions of users all over the world. One of the most probable reasons behind the success of Android is its open-source nature. Since it’s based on Linux, we can actually enjoy lots of custom ROM on the operating system.
We have also shared one article in which we have discussed different types of custom ROMs that you can enjoy on your Android device. However, in order to install Custom ROM, you need to have a rooted Android smartphone.
Not only just rooted devices, you also need to have a custom recovery installed on your device. The well-known and popular recoveries like TWRP and CMW can help Android users in multiple ways. However, several Android users have reported to us about the “error executing updater binary in zipping” error while flashing custom ROM.
What Is Error Executing Updater Binary In zipping?
Several users over XDA forums and on our Facebook page have reported that an “error executing updater binary in zipping” error is creating problem while flashing custom ROM through recovery. The worst thing is, the error leaves no room rolling back because we usually wipe out everything before flashing custom ROM.
Some Android users also believe that the error occurred because they have been trying to flash a corrupted or wrong one. However, tHere’s nothing like that, in fact, the error mostly seen while flashing through TWRP recovery mode. So, if the same thing is creating problems for you, then let’s know how to fix the Error executing updater binary in zip Android error.
Important: All the information shared in the article are collected from the internet. Techviral doesn’t hold any responsibility if any damage happens. Therefore, follow it with your own risk.
Steps To Follow Before Flashing Custom Rom
Well, there are a few things that you should remember before you flash a new ROM. These things are pretty common and we are going to share the easiest method to fix the error. However, before you flash Custom ROM, make sure to create a complete android backup.
- Create a complete nandroid backup of your current ROM (That was running on your device)
- For creating the backup of your current ROM, head to the recovery and then select ‘Backup’ option.
- The backup option in recovery will create a backup of your whole Android system and will store it on your SD card.
Well, to be honest, the error executing updater binary in zip error is mostly caused because Android users fail to utilize the Advanced Wipe option correctly. Normally, users just use the ‘factory reset & the Dalvik cache’ option which triggers the error. So, if you are also facing the same error, then just follow the simple steps listed below.

- Go To Recovery
- On the Recovery, go to Wipe > Advanced Wipe (Important)
- Now under the Advanced Wipe, select Data, System, Cache & Dalvik Cache and then swipe to wipe all.
- Now select the ZIP file of your ROM and flash it as usual.
- You will now get the error executing updater binary in zip, but don’t panic!
- Now move to the reboot menu and then select reboot to recovery
- Once your device reboots in recovery, flash the ZIP file again Without wiping (Don’t wipe anything)
This will probably fix the error executing updater binary in zip error. Now you won’t get the error again. However, its worth noting that you might also get the error after following the tutorial because of several reasons. Maybe there’s something wrong with the ROM and you might need to download a fresh copy of the ZIP file.
If you have read the article, then most probably you are already getting the ‘error executing updater binary in zip error’ while flashing custom ROM. However, if the above tutorial failed to fix the error, then you might raise a question on the XDA-Developer forum.
So, what’s your opinion on this? If the tutorial helped you to fix the problem, then make sure to drop a comment below.
Архив 3 раза перекачал..
А помимо данного текста «E: Unable to open zip file.» никакой код ошибки не пишет, к примеру code 7 или 6? Если пишет то надо:
1. Иметь на ПК программу notepad ++ для редактирования текста в уникоде
2. Открыть архив с прошивкой не распаковывая его
3. Найти по пути META-INFcomgoogleandroid файл update-skript и открыть его используя notepad++
4. Удалить все первые строчки которые имеют что то наподобие данного текста проверки версии , у вас может конечно же отличаться
ui_print("lenovo debug WriteFullOTAPackage omit kitonw ...");getprop("ro.product.device") == "kiton" ||getprop("ro.product.device") == "kitonw" ||abort("Package expects build fingerprint of kiton or kitonw; this device has " + getprop("ro.product.device") + ".");getprop("ro.product.device") != "kitone" || abort("This package is for "omit kitonw and kiton" devices; this is a "" + getprop("ro.product.device") + "".");
5. Удалить их и сохранить
6. После того как закрыли редактор согласиться на изменение в архиве.
7. Закинуть получившийся архив с прошивкой в память телефона и попробовать установить заново, так же можно в рекавери отключить проверку подписи.
Отредактировал 13 ноября, 2014 master_lie
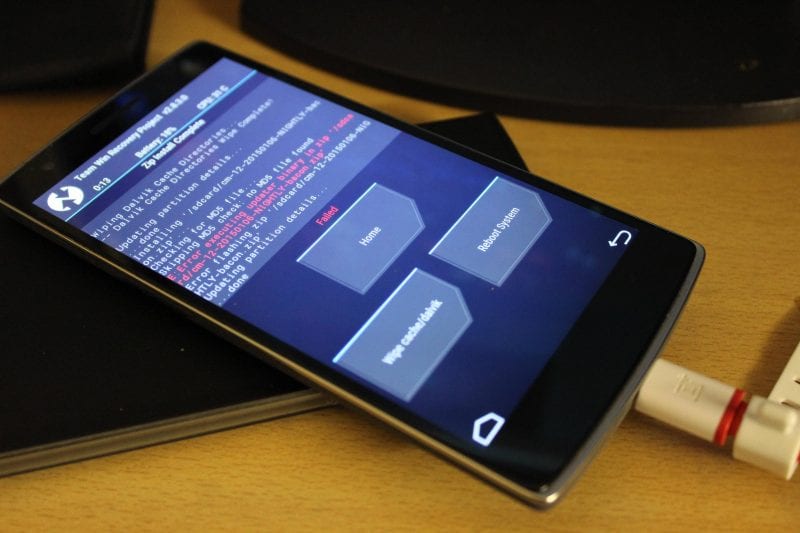
Many of us have their hobbies to flash different Rom(s) available one by one depending on the mood, same as I do. But recently while flashing Miui v6 on Xiaomi Redmi 1s, it gave me this “Error executing upda ter binary in zip” error in the recovery while flashing as shown in the given image. Now after this error you can’t boot back obviously as you wiped everything before the flashing.
Lots of people misinterprets thinking that it is encountered because of the Rom they had downloaded & flashed on their devices might be the wrong one, but its not like that. I’ve seen this error mostly with the Team Win Recoveries(TWRPs) , so let me help you with this thing step by step that how you can avoid this error and get your device flashed properly.
So lets begin,
What all we need before flashing any Rom?
1. A complete nandroid backup of the Rom that was running on the device.
2. You can backup your Rom in the recovery under the ‘backup’ option. It will create a backup of your whole system on your external SD card.
3. If you failed to create the backup of the Rom or you don’t have the backup and the error occurred, then at least you should have the zip file of any working custom Rom of your device in the storage (external/internal).
Now lets suppose ‘Rom1‘ as the stock Rom(or any working custom Rom of your device) and ‘Rom2‘ will be the Rom that you flashed and got the error.
Our common steps for flashing any custom Rom(s) are,
Step 1:- Go to recovery.
Step 2:- Go to Wipe>>Advanced wipe.
Step 3:- Check data, system, cache & dalvik cache and then swipe to wipe all.
Step 4:- Then go to install zip from SD card and browse the Rom and install it.
Step 5:- Reboot the device.
Same as the above steps I flashed the Rom on the device and encountered the error in the recovery. So what I did to flash the Rom2 correctly after the error was,
Step 1:- I flashed the Rom1 again by the same methods followed above.
Step 2:- Then without following Step 2 & Step 3 (that is not wiping the data & system from the Advanced wipe).
Step 3:- I just only did the factory reset & the dalvik cache wipe instead, from the Wipe menu.
Step 4:- After that flashed the Rom2 which gave me the updater binary error before and it got flashed completely without the error.
Step 5:- Then I rebooted the device and it booted on the system successfully.
Update: You can just only hit the “Factory Reset” before flashing the ROM to pass the error instead.
Also make sure that you are using the latest version of TWRP recovery available for your respective devices.
That’s it, if still the error stays then maybe the issue will be of the ROM only what you are flashing, but this method worked for me. As complete system wipe sometimes leads to the flashing error. Still you are getting the error again and again then stay relaxed and comment below I will work for you and find the solution for your device asap when I’ll get time.
Good luck. Stay connected to tecHulk.

A Tech Geek who loves to write about WordPress blogging, How-To’s, and fixing errors. He founded techulk with the sole purpose of providing visitors the exact information they need with simple and step-by-step working explanations.
Posting to help others who had my problem.
While flashing newer ROMs from recovery, sometimes an error will occur:
This package supports bootloader(s): 0x4118, 0x4119, 0x411A; this device has bootloader …
Error executing updater binary in zip …
This means the ROM you have is not compatible with your bootloader and you have to download a new one.
You can skip that by opening the ROM’s zip using 7-zip and notepad, to the updater-script and metadata files:
In 7-zip, right click the files and select edit. The files should open in notepad.
In my case, my bootloader was 0x4113. I replaced every instance of «0x4118» in both files to «0x4113» (0x4118 was picked because it was the first in both files).
Before:
After:
Finally, save your edits and then either adb push the edited ROM zip to your device or copy them normally, and install. If you edited properly, it should install successfully!
Note: you cannot unzip the ROM, edit and then re-zip it. You must edit the files when inside the archive.
EDIT: forgot to add, this allowed me to install the latest CM12.1 nightly on my XT1032.
![]()
-

Thread Starter
Good morning everyone. I am trying to install any custom ROM to my sons sgh-t599n. The probl I am running into is every ROM I attempt to flash ends up with error executing updater binary in zip. I am using twrp 2.7.0.0, and have tried using different recoveries with no luck. I used philz and it said something like the basebands don’t match. So I went back to twrp. Then I found something that said wipe everything except internal storage and SD card and flash. After you get the error reboot into recovery and flash without wiping. Still didn’t flash and received the same error. Does anyone know why it is doing this and how to fix it? Would like to put carbon on his phone for him. Thank you in advance!
-

Download the Forums for Android™ app!
Download
-
Can you take a picture of the error and post it on this thread so i have a better idea of what youre talking about ?
And if any .. id suggest vanir 4.4.4 or cm11 4.4.4 -
Try charging your battery some, then re-flash. Sometimes a low battery can cause this.
Edit: Sometimes a bad download can be possible, try re-downloading the rom and delete the existing one from the sd card, then move the newly downloaded one onto the sd card and try to flash. Report back on results -
Try cm11, it is a kitkat based rom as well but more stable.
-
I’m having this same issue, with all but two or three of the roms I’ve tried. With TWRP it just says error executing… etc. With Philz or CWM it gives an error about incorrect baseband. OP, did you ever solve this problem?
*edit
I found the problem. Apparently the MetroPCS variants are using a newer baseband (T599NUVAOH1) that is not compatible with the flashable zips for any of the roms currently available. I dug up this information:
I can confirm this works. I just flashed Carbon to my T599N with T599NUVAOH1 baseband. It would NOT work before, and gave me the «error executing update binary…» Just wanted to put this out there, because I did a lot of searching across here and XDA and found little to no information on the issue. Data, WIFI, GPS, calls, everything seems to work as it should.
-
It is t the binary its the updater-script thats causing the issue
-
Thread Starter
Thank you. I will give this a shot. My son has been bothering me about it for the last few days. I will try it tonight.
-
Or you can try GamerROM 5 out
-
Thread Starter
Thank you all for the help. I have successfully installed gamerrom5 on my sons device.
-
Your welcome GR6 is coming will be faster then GR5 with new features laumches 1/1/2016
-
Thread Starter
Is that based on android6
-
-
this is awesome i just joined today and the first thread i see is the problem i am having with my t599n
i am going to try GamerROM5 hopefully gr6 -
Es la banda base, seguramente tiene el T599NUVAOH1 que no es compatible con muchas roms solo con el carbonROM, intente cambiar la banda base o el firware, y el problema es la actualización de binario
-
It is the baseband, surely you have the T599NUVAOH1 that is not compatible with many roms only with the carbonROM, try changing the baseband or the firware, and the problem is the updat-binary
- samsung galaxy exhibit
![]()