Hi,
I would like to build the codes in Ubuntu. When I built it, there are some errors:
make -j4
Scanning dependencies of target caffe
[  2%] Building CXX object CMakeFiles/caffe.dir/src/c_api.cpp.o
[  2%] Building CXX object CMakeFiles/caffe.dir/src/net.cpp.o
[  5%] Building CXX object CMakeFiles/caffe.dir/src/common.cpp.o
[  5%] Building CXX object CMakeFiles/caffe.dir/src/blob.cpp.o
[  7%] Building CXX object CMakeFiles/caffe.dir/src/profiler.cpp.o
[  8%] Building CXX object CMakeFiles/caffe.dir/src/syncedmem.cpp.o
[ 10%] Building CXX object CMakeFiles/caffe.dir/src/layers/absval_layer.cpp.o
[ 11%] Building CXX object CMakeFiles/caffe.dir/src/layers/argmax_layer.cpp.o
[ 13%] Building CXX object CMakeFiles/caffe.dir/src/layers/base_conv_layer.cpp.o
[ 14%] Building CXX object CMakeFiles/caffe.dir/src/layers/batch_norm_layer.cpp.o
[ 16%] Building CXX object CMakeFiles/caffe.dir/src/layers/bias_layer.cpp.o
[ 17%] Building CXX object CMakeFiles/caffe.dir/src/layers/bn_layer.cpp.o
[ 19%] Building CXX object CMakeFiles/caffe.dir/src/layers/bnll_layer.cpp.o
[ 20%] Building CXX object CMakeFiles/caffe.dir/src/layers/concat_layer.cpp.o
/home/kang/Documents/py/mini-caffe/src/layers/bnll_layer.cpp: In member function ‘virtual void caffe::BNLLLayer::Forward_cpu(const std::vector<caffe::Blob*>&, const std::vector<caffe::Blob*>&)’:
/home/kang/Documents/py/mini-caffe/src/layers/bnll_layer.cpp:15:35: error: ‘exp’ was not declared in this scope
         bottom_data[i] + log(1. + exp(-bottom_data[i])) :
                                   ^~~
/home/kang/Documents/py/mini-caffe/src/layers/bnll_layer.cpp:15:35: note: suggested alternative: ‘exit’
         bottom_data[i] + log(1. + exp(-bottom_data[i])) :
                                   ^~~
                                   exit
/home/kang/Documents/py/mini-caffe/src/layers/bnll_layer.cpp:15:26: error: ‘log’ was not declared in this scope
         bottom_data[i] + log(1. + exp(-bottom_data[i])) :
                          ^~~
/home/kang/Documents/py/mini-caffe/src/layers/bnll_layer.cpp:15:26: note: suggested alternative: ‘long’
         bottom_data[i] + log(1. + exp(-bottom_data[i])) :
                          ^~~
                          long
CMakeFiles/caffe.dir/build.make:350: recipe for target 'CMakeFiles/caffe.dir/src/layers/bnll_layer.cpp.o' failed
make[2]: *** [CMakeFiles/caffe.dir/src/layers/bnll_layer.cpp.o] Error 1
make[2]: *** Waiting for unfinished jobs....
CMakeFiles/Makefile2:141: recipe for target 'CMakeFiles/caffe.dir/all' failed
make[1]: *** [CMakeFiles/caffe.dir/all] Error 2
Makefile:83: recipe for target 'all' failed
make: *** [all] Error 2
So I was writing this simple program to calculate the day of any date using the Gaussian algorithm found here.
#include <iostream>
using namespace std;

//Using the Gaussian algorithm
int dayofweek(int date, int month, int year ){
    int d=date;
    if (month==1||month==2)
        {int y=((year-1)%100);int c=(year-1)/100;}
    else
        {int y=year%100;int c=year/100;}
    int m=(month+9)%12+1;
    int product=(d+(2.6*m-0.2)+y+y/4+c/4-2*c);
    return product%7;
}

int main(){
    cout<<dayofweek(19,1,2054);
    return 0;
}
It’s a very simple program and what’s even more puzzling is the output.
:In function  dayofweek(int, int, int)’:
:19: warning:  unused variable ‘y’
:19: warning: unused variable ‘c’
:21: warning: unused variable ‘y’
:21: warning: unused variable ‘c’
:23: error: ‘y’ was not declared in this scope
:25: error: ‘c’ was not declared in this scope
It says that my variable is unused but then says that it isn’t declared? Could anyone please tell me whats wrong.
![]()
Bill Lynch
78.8k16 gold badges128 silver badges172 bronze badges
asked Apr 7, 2012 at 16:15
![]()
1
The scope of a variable is always the block it is inside. For example if you do something like
if(...)
{
     int y = 5; //y is created
} //y leaves scope, since the block ends.
else
{
     int y = 8; //y is created
} //y leaves scope, since the block ends.

cout << y << endl; //Gives error since y is not defined.
The solution is to define y outside of the if blocks
int y; //y is created

if(...)
{
     y = 5;
}
else
{
     y = 8;
}

cout << y << endl; //Ok
In your program you have to move the definition of y and c out of the if blocks into the higher scope. Your Function then would look like this:
//Using the Gaussian algorithm
int dayofweek(int date, int month, int year )
{
    int y, c;
    int d=date;

    if (month==1||month==2)
    {
         y=((year-1)%100);
         c=(year-1)/100;
    }
    else
    {
         y=year%100;
         c=year/100;
    }
int m=(month+9)%12+1;
int product=(d+(2.6*m-0.2)+y+y/4+c/4-2*c);
return product%7;
}
answered Apr 7, 2012 at 16:21
![]()
HaatschiiHaatschii
8,91110 gold badges58 silver badges95 bronze badges
0
Here’s a simplified example based on of your problem:
if (test)
{//begin scope 1
    int y = 1;
}//end scope 1
else
{//begin scope 2
    int y = 2;//error, y is not in scope
}//end scope 2
int x = y;//error, y is not in scope
In the above version you have a variable called y that is confined to scope 1, and another different variable called y that is confined to scope 2. You then try to refer to a variable named y after the end of the if, and not such variable y can be seen because no such variable exists in that scope.
You solve the problem by placing y in the outermost scope which contains all references to it:
int y;
if (test)
{
    y = 1;
}
else
{
    y = 2;
}
int x = y;
I’ve written the example with simplified made up code to make it clearer for you to understand the issue. You should now be able to apply the principle to your code.
answered Apr 7, 2012 at 16:23
![]()
David HeffernanDavid Heffernan
596k42 gold badges1055 silver badges1471 bronze badges
0
You need to declare y and c outside the scope of the if/else statement. A variable is only valid inside the scope it is declared (and a scope is marked with { })
#include <iostream>
using namespace std;
//Using the Gaussian algorithm
int dayofweek(int date, int month, int year ){
int d=date;
int y, c;
if (month==1||month==2)
        {y=((year-1)%100);c=(year-1)/100;}
else
        {y=year%100;c=year/100;}
int m=(month+9)%12+1;
int product=(d+(2.6*m-0.2)+y+y/4+c/4-2*c);
return product%7;
}

int main(){
cout<<dayofweek(19,1,2054);
return 0;
}
answered Apr 7, 2012 at 16:18
![]()
huysentruitwhuysentruitw
26.9k9 gold badges88 silver badges130 bronze badges
1
Here
{int y=((year-1)%100);int c=(year-1)/100;}
you declare and initialize the variables y, c, but you don’t used them at all before they run out of scope. That’s why you get the unused message.
Later in the function, y, c are undeclared, because the declarations you made only hold inside the block they were made in (the block between the braces {...}).
answered Apr 7, 2012 at 16:20
![]()
ImpImp
8,3291 gold badge24 silver badges36 bronze badges
I just wanted to add that for me the error was due to a careless mistake in one of the file header guards. Instead of:
#ifndef MY_AWESOME_HEADER_H
#define MY_AWESOME_HEADER_H
...
#endif // MY_AWESOME_HEADER_H
I had
#ifdef MY_AWESOME_HEADER_H
#define MY_AWESOME_HEADER_H
...
#endif // MY_AWESOME_HEADER_H
answered Nov 23, 2021 at 17:49
![]()
SandeepSandeep
1,1951 gold badge11 silver badges26 bronze badges
#include <iostream>
using namespace std;
class matrix
{
    int a[10][10],b[10][10],c[10][10],x,y,i,j;
    public :
        void degerler();
        void ters();
};
void matrix::degerler()
{
    cout << "Satırları giriniz: "; cin >> x;
    cout << "Sütunları giriniz: "; cin >> y;
    cout << "İlk matris elamanlarını giriniz:nn";
    for (i=1; i<=x; i++)
    {
        for (j=1; j<=y; j++)
        {
            cin >> a[i][j];
        }
    }
    cout << "İkinci matris elamanlarını giriniz:nn";
    for (i=1; i<=x; i++)
    {
        for (j=1; j<=y; j++)
        {
            cin >> b[i][j];
        }
    }
}

void matrix::ters()
{
    cout << "matrisin tersin";
    for (i=1; i<=x; i++)
    {
        for (j=1; j<=y; j++)
        {
    if(i==j)
    {
    b[i][j]=1;
    }
    else
    b[i][j]=0;
    }
}
float d,k;
    for (i=1; i<=x; i++)
    {
    d=a[i][j];
        for (j=1; j<=y; j++)
        {
    a[i][j]=a[i][j]/d;
            b[i][j]=b[i][j]/d;
    }
        for (int h=0; h<x; h++)
        {
            if(h!=i)
    {
       k=a[h][j];
               for (j=1; j<=y; j++)
               {
                    a[h][j]=a[h][j]-(a[i][j]*k);
                    b[h][j]=b[h][j]-(b[i][j]*k);
               }
    }
    count << a[i][j] << "";
    }
    count << endl;
}
}
int main()
{
    int secim;
    char ch;
    matrix m;
    m.degerler();
    do
     {
    cout << "seçiminizi girinizn";
    cout << " 1. matrisin tersin";
    cin >> secim;
    switch (secim)
    {
        case 1:
            m.ters();
            break;
    }
    cout << "nBaşka bir şey yap/n?";
    cin >> ch;
    }
    while (ch!= 'n');
    cout << "n";
    return 0;
}
![]()
SOFe
7,7754 gold badges32 silver badges60 bronze badges
answered Jan 8, 2017 at 14:08
![]()
0 / 0 / 0
Регистрация: 14.02.2016
Сообщений: 34
1
27.11.2016, 23:25. Показов 27734. Ответов 3

вот мой класс, пишет вот такие ошибки:
error: ‘pow’ was not declared in this scope, так же само с fabs, atan, M_PI. в чём моя ошибка?
| C++ | ||
|
| C++ | ||
|
| C++ | ||
|
__________________
Помощь в написании контрольных, курсовых и дипломных работ, диссертаций здесь
0
Example
This error happens if a unknown object is used.
Variables
Not compiling:
#include <iostream>

int main(int argc, char *argv[])
{
    {
        int i = 2;
    }

    std::cout << i << std::endl; // i is not in the scope of the main function

    return 0;
}
Fix:
#include <iostream>

int main(int argc, char *argv[])
{
    {
        int i = 2;
        std::cout << i << std::endl;
    }

    return 0;
}
Functions
Most of the time this error occurs if the needed header is not
included (e.g. usingstd::coutwithout#include <iostream>)
Not compiling:
#include <iostream>

int main(int argc, char *argv[])
{
    doCompile();

    return 0;
}

void doCompile()
{
    std::cout << "No!" << std::endl;
}
Fix:
#include <iostream>

void doCompile(); // forward declare the function

int main(int argc, char *argv[])
{
    doCompile();

    return 0;
}

void doCompile()
{
    std::cout << "No!" << std::endl;
}
Or:
#include <iostream>

void doCompile() // define the function before using it
{
    std::cout << "No!" << std::endl;
}

int main(int argc, char *argv[])
{
    doCompile();

    return 0;
}
Note: The compiler interprets the code from top to bottom (simplification). Everything must be at least declared (or defined) before usage.
Tips: If you need C++ homework help from experts, you can always rely upon assignment helpers.
- Forum
- Beginners
- «___ was not declared in this scope» err
«___ was not declared in this scope» errors
![]()
I am receiving compiler errors as follows and do not know how to fix this. I know it’s the same type of error, I just don’t exactly know how to fix this error. Thanks in advanced!
main.cpp: In function ‘int main()’:
main.cpp:26:18: error: ‘count’ was not declared in this scope
for (count = 1; count <= 12; count ++);
^
main.cpp:28:13: error: ‘count’ was not declared in this scope
count = count + 1;
^
main.cpp:29:13: error: ‘output’ was not declared in this scope
output count;
^
|
|
Last edited on
![]()
You’re getting that error because you hadn’t initialized the ‘count’ variable. Write
int count; after int payment;
Also replace output count with cout<<count;
cout is used for console output. There’s nothing called output in STL of C++
Also:
can you explain what you’re trying to do with this block:
|
|
Last edited on
![]()
Hello bkatic,
In addition to what Nwb has said you should give this a read http://www.cplusplus.com/doc/tutorial/control/#for
After yo will notice that for loops are generally written as:
|
|
The «int» allows you to define the variable count for use as a local variable in the for loop.
To what you think is in the for loop. Actually nothing because of the semicolon at the end of line 27 that should not be there. What it does is limit the for loop to just that line.
This is what your code looks line in a different way:
|
|
I think this is what you intended:
|
|
What is the point of line 5 in the above code? Between this and the for loop you are adding 2 to count on each iteration of the loop. Adding to count is what the third part of the for condition is for.
Hope that helps,
Andy
![]()
Wow, thank you for the responses! I finally got it to work. As to what I’m trying to do with the
|
|
is from the pseudocode my homework assignment gave me. The pseudocode is as follows:
for count 1 to 12
output «Payment Number», count, «: $» , payment.
endfor
For context the assignment is designing an application that accept’s a client’s loan amount and monthly payment amount and outputs the loan balance each month until the loan is paid off.
But after further inspection and your feedback I understand why it doesn’t make sense and I have to switch things around. Thank you again!
![]()
So you’re supposed to display
"Payment Number" count ": $" payment
for 12 purchases
( In your for loop you need to add braces like Andy said, but also you don’t need count = count + 1 because count++ in the for parameter does that job for you. You must have been confused with while )
But where will you get the ‘payment’ from? Something is missing because the program accepts only 1 purchase but is asked to display 12 purchases??
Also I didn’t get why «payment = purchasePrice / 12;» is being done.
And I suspect that purchasePrice is supposed to be an array. Also lastName was never assigned, you can’t call it when it’s not assigned.
Topic archived. No new replies allowed.
Arduino programming is an open-source and simple stage that arranges the Arduino board into working with a particular goal in mind. An Arduino code is written in C++ yet with extra capacities and strategies. An Arduino is an equipment and programming stage broadly utilised in hardware.
In this article, we go through three quick fixes for the error ‘was not declared in this scope’.
Also read: How to solve the Tower of Hanoi problem using Python?
What does the error mean?
Every programming language has a concept of Scope. Scope tells us where a specific variable, constant or function is accessible and usable. It refers to the area of code a statement, block, or name. The scope of an entity determines where that entity is usable in other parts of the program. The scope of a block determines where that block can be used in other blocks, and the scope of a name determines where that name can be used in other names.
There are two types of scope in programming languages: local and global. Local scope refers to the identifiers and symbols visible inside a block of code. Global scope, on the other hand, refers to the identifiers and symbols visible outside a block of code.
The error ‘was not declared in this scope’ generally occurs when a variable or function is not accessible to its call. A global variable in Arduino is the variable that is declared outside any function, including the setup() and loop() functions. Any variable declared inside a function or loop has restrictive access and is a local variable.
If any other function calls a local variable, it gives an error. To call any variable or function in any other function, including the setup() and loop() function, it should be declared as a global variable.
Also read: How to stop an Arduino program?
There are the quick fixes for the Arduino error: was not declared in the scope.
Declare the variable
Before assigning a value to the variable, make sure to define it. There are 16 data types commonly used in Arduino coding. Each data type expresses the nature of the value assigned to it. If the data type and value doesn’t match, an error arises. Also, if a variable is assigned any value without its declaration or data type, the error occurs.
Always ensure to declare the variable before the assignment. There are two ways to do this.
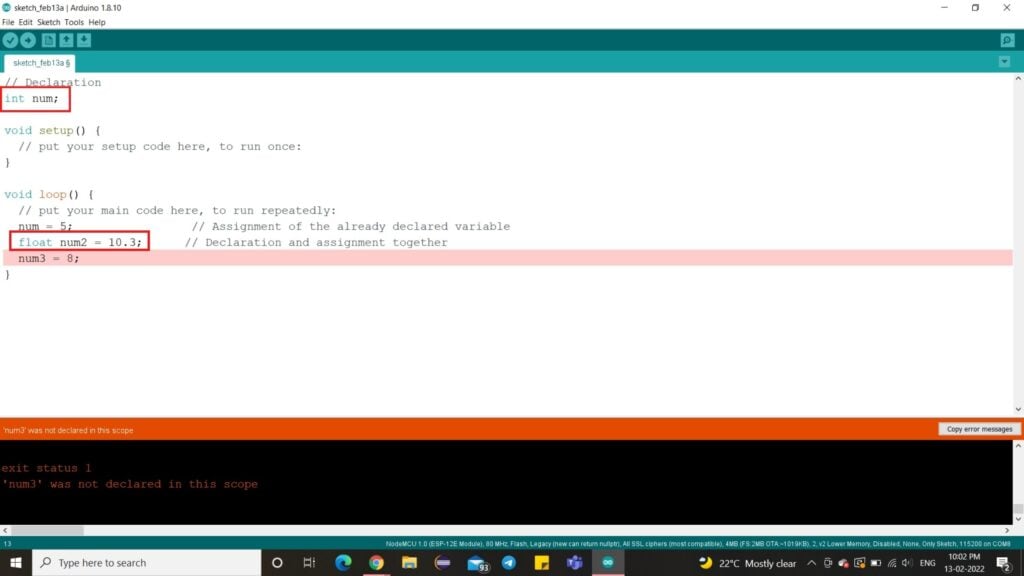
There are three variables in the above example – num1, num2 and num3. The variable num1 has been declared separately and assigned to a data type corresponding value in the loop. The variable num2 has been declared and assigned in the same line of code. The variable num3, on the other hand, has directly been assigned a value without its declaration. This causes the error, as shown above.
Other details
There may be errors arising even after proper declaration and assignment of the variable. This may be due to incorrect or absence of the closing brackets, semicolons or improper declaration of functions. Ensure proper use of syntax when defining loops and functions. Every opening in curly brace must be accounted for and closed. Extra closing braces also cause errors. Alongside, semicolons hold their importance. A semicolon missed can cause the entire program to go haywire.
Library folder
Many times, variables call or use functions that require importing a few specific libraries.

In the example above, the variable num calls the square root function – sqrt() from the maths library of Arduino. If we call a function without including its library first, an error occurs. There are multiple inbuilt and standard libraries in Arduino, while a few special libraries must be included separately.
Also read: What is ‘does not name a type’ in Arduino: 2 Fixes.
СОДЕРЖАНИЕ ►
- Произошла ошибка при загрузке скетча в Ардуино
- programmer is not responding
- a function-definition is not allowed arduino ошибка
- expected initializer before ‘}’ token arduino ошибка
- ‘что-то’ was not declared in this scope arduino ошибка
- No such file or directory arduino ошибка
- Compilation error: Missing FQBN (Fully Qualified Board Name)
Ошибки компиляции Arduino IDE возникают при проверке или загрузке скетча в плату, если код программы содержит ошибки, компилятор не может найти библиотеки или переменные. На самом деле, сообщение об ошибке при загрузке скетча связано с невнимательностью самого программиста. Рассмотрим в этой статье все возможные ошибки компиляции для платы Ардуино UNO R3, NANO, MEGA и пути их решения.
Произошла ошибка при загрузке скетча Ардуино
Самые простые ошибки возникают у новичков, кто только начинает разбираться с языком программирования Ардуино и делает первые попытки загрузить скетч. Если вы не нашли решение своей проблемы в статье, то напишите свой вопрос в комментариях к этой записи и мы поможем решить вашу проблему с загрузкой (бесплатно!).
avrdude: stk500_recv(): programmer is not responding
Что делать в этом случае? Первым делом обратите внимание какую плату вы используете и к какому порту она подключена (смотри на скриншоте в правом нижнем углу). Необходимо сообщить Arduino IDE, какая плата используется и к какому порту она подключена. Если вы загружаете скетч в Ардуино Nano V3, но при этом в настройках указана плата Uno или Mega 2560, то вы увидите ошибку, как на скриншоте ниже.

Такая же ошибка будет возникать, если вы не укажите порт к которому подключена плата (это может быть любой COM-порт, кроме COM1). В обоих случаях вы получите сообщение — плата не отвечает (programmer is not responding). Для исправления ошибки надо на панели инструментов Arduino IDE в меню «Сервис» выбрать нужную плату и там же, через «Сервис» → «Последовательный порт» выбрать порт «COM7».
a function-definition is not allowed here before ‘{‘ token
Это значит, что в скетче вы забыли где-то закрыть фигурную скобку. Синтаксические ошибки IDE тоже распространены и связаны они просто с невнимательностью. Такие проблемы легко решаются, так как Arduino IDE даст вам подсказку, стараясь отметить номер строки, где обнаружена ошибка. На скриншоте видно, что строка с ошибкой подсвечена, а в нижнем левом углу приложения указан номер строки.

expected initializer before ‘}’ token / expected ‘;’ before ‘}’ token
Сообщение expected initializer before ‘}’ token говорит о том, что вы, наоборот где-то забыли открыть фигурную скобку. Arduino IDE даст вам подсказку, но если скетч довольно большой, то вам придется набраться терпения, чтобы найти неточность в коде. Ошибка при компиляции программы: expected ‘;’ before ‘}’ token говорит о том, что вы забыли поставить точку с запятой в конце командной строки.
‘что-то’ was not declared in this scope
Что за ошибка? Arduino IDE обнаружила в скетче слова, не являющиеся служебными или не были объявлены, как переменные. Например, вы забыли продекларировать переменную или задали переменную ‘DATA’, а затем по невнимательности используете ‘DAT’, которая не была продекларирована. Ошибка was not declared in this scope возникает при появлении в скетче случайных или лишних символов.

Например, на скриншоте выделено, что программист забыл продекларировать переменную ‘x’, а также неправильно написал функцию ‘analogRead’. Такая ошибка может возникнуть, если вы забудете поставить комментарий, написали функцию с ошибкой и т.д. Все ошибки также будут подсвечены, а при нескольких ошибках в скетче, сначала будет предложено исправить первую ошибку, расположенную выше.
exit status 1 ошибка компиляции для платы Arduino
Данная ошибка возникает, если вы подключаете в скетче библиотеку, которую не установили в папку libraries. Например, не установлена библиотека ИК приемника Ардуино: fatal error: IRremote.h: No such file or directory. Как исправить ошибку? Скачайте нужную библиотеку и распакуйте архив в папку C:Program FilesArduinolibraries. Если библиотека установлена, то попробуйте скачать и заменить библиотеку на новую.

Довольно часто у новичков выходит exit status 1 ошибка компиляции для платы arduino uno /genuino uno. Причин данного сообщения при загрузке скетча в плату Arduino Mega или Uno может быть огромное множество. Но все их легко исправить, достаточно внимательно перепроверить код программы. Если в этом обзоре вы не нашли решение своей проблемы, то напишите свой вопрос в комментариях к этой статье.
missing fqbn (fully qualified board name)
Ошибка возникает, если не была выбрана плата. Обратите внимание, что тип платы необходимо выбрать, даже если вы не загружаете, а, например, делаете компиляцию скетча. В Arduino IDE 2 вы можете использовать меню выбора:
— список плат, которые подключены и были идентифицированы Arduino IDE.
— или выбрать плату и порт вручную, без подключения микроконтроллера.
Синтаксические ошибки
Первые ошибки, которые определяются отладчиком – это синтаксические ошибки. Их же легче всего исправить. Неправильный синтаксис в Arduino IDE выделяется строкой, в которой допущена неточность. Нужно разобраться – это ошибка в написании служебного слова, случайно удалена важная функция, не хватает закрывающейся скобки или неправильно отделены комментарии.
Для определения ошибки внимательно просмотрите строку-подсказку и внесите необходимые изменения. Ниже мы приведем примеры наиболее часто встречающихся синтаксических ошибок компиляции кода:
- Ошибка “expected initializer before ‘}’ token” говорит о том, что случайно удалена или не открыта фигурная скобка.
- Ошибка “a function-definition is not allowed here before ‘{‘ token” – аналогичная предыдущей и указывает на отсутствие открывающейся скобки, например, открывающих скобок в скетче только 11, а закрывающих 12.
- Уведомление об ошибке “undefined reference to “setup” получите в случае переименования или удаления функции “setup”.
- Ошибка “undefined reference to “loop” – возникает в случае удаления функции loop. Без команд этой функции компилятор запустить программу не сможет. Для устранения надо вернуть каждую из команд на нужное место в скетче.
- Ошибка “… was not declared in this scope” обозначает, что в программном коде обнаружены слова, которые написаны с ошибкой (например, которые обозначают какую-то функцию) или найдены необъявленные переменные, методы. Подобная ошибка возникает также в случае случайного удаления значка комментариев и текст, который не должен восприниматься как программа, читается IDE.

Ошибки библиотек
Большое количество ошибок возникает на уровне подключения библиотек или неправильного их функционирования. Наиболее известные:
- “fatal error: … No such file or directory”. Такое сообщение вы получите, если необходимую в скетче библиотеку вы не записали в папку libraries. Сообщение об ошибке в одном из подключенных файлов может означать, что вы используете библиотеку с ошибками или библиотеки не совместимы. Решение – обратиться к разработчику библиотеки или еще раз проверить правильность написанной вами структуры.
- “redefinition of void setup” – сообщение возникает, если автор библиотеки объявил функции, которые используются и в вашем коде. Чтобы исправить – переименуйте свои методы или в библиотеке.
Ошибки компилятора
Нестабильность в работе самого компилятора тоже могут возникать при отладке программы. Вариантов выхода из данной ситуации может быть несколько, например, установить последнюю версию компилятора. Иногда решением может быть наоборот, возвращение до более старой версии. Тогда используемая библиотека может работать корректно.
Ошибки компиляции при работе с разными платами — Uno, Mega и Nano
В Arduino можно писать программы под разные варианты микроконтроллеров. По умолчанию в меню выбрана плата Arduino/Genuino Uno. Если забудете о том что нужно указать нужную плату – в вашем коде будут ссылки на методы или переменные, не описанные в конфигурации “по умолчанию”.
Вы получите ошибку при компиляции “programmer is not responding”. Чтобы исправить ее – проверьте правильность написания кода в части выбора портов и вида платы. Для этого в Ардуино IDE в меню «Сервис» выберите плату. Аналогично укажите порт в меню “Сервис” – пункт «Последовательный порт».
Ошибка exit status 1
В среде разработки такое сообщение можно увидеть во многих случаях. И хотя в документации данная ошибка указывается как причина невозможности запуска IDE Аrduino в нужной конфигурации, на самом деле причины могут быть и другие. Для того, чтобы найти место, где скрывается эта ошибка можно “перелопатить” действительно много. Но все же стоит сначала проверить разрядность системы и доступные библиотеки.

Обновления и исправления касательно версий инструкции и ПО
лови:
/*
Лабораторный блок питания под управлением arduino
Версия 2 (26.02.2015)
Для дополнительной информации посетите http://start.net.ua/blog/lab_power_arduino/
*/
#include <LiquidCrystal.h>;
#include <EEPROM.h>
LiquidCrystal lcd(11, 6, 5, 4, 3, 2); //rs, e, d4, d5, d6, d7
// задаем константы
float umax = 17.00; //максимальное напряжение
float umin = 0.00; //минимальное напряжение
float ah = 0.0000; //Cчетчик Ампер*часов
const int down = 10; //выход валкодера 1/2
const int up = 8; //выход валкодера 2/2
const int pwm = 9; //выход ШИМ
const int power = 7; //управление релюхой
long previousMillis = 0; //храним время последнего обновления дисплея
long maxpwm = 0; //циклы поддержки максимального ШИМ
long interval = 500; // интервал обновления информации на дисплее, мс
int mig = 0; //Для енкодера (0 стоим 1 плюс 2 минус)
float level = 0; //»уровень» ШИМ сигнала
float com = 100;
long com2 = 0;
int mode = 0;//режим (0 обычный, спабилизация тока, защита по току)
int mode1 = 0;
float Ioutmax = 1.0; //заданный ток
int set = 0; //пункты меню, отображение защиты…
int knopka_a = 0; //состояние кнопок
int knopka_b = 0;
int knopka_ab = 0;
boolean off = false;
boolean red = false;
boolean blue = false;
float counter = 5; // переменная хранит заданное напряжение
int disp = 0; //режим отображения 0 ничего, 1 мощьность, 2 режим, 3 установленный ток, 4 шим уровень
float Uout ; //напряжение на выходе
const int Pin=A2; // номер выхода, подключенного к реле
int PinState = LOW; // этой переменной устанавливаем состояние реле
long previousMillis1 = 0; // храним время последнего переключения реле
long interval1 = 1000; // интервал между включение/выключением реле (1 секунда)
long interval2 = 500;
int incomingByte;
void EEPROM_float_write(int addr, float val) // запись в ЕЕПРОМ
{
byte *x = (byte *)&val;
for(byte i = 0; i < 4; i++) EEPROM.write(i+addr, x[i]);
}
float EEPROM_float_read(int addr) // чтение из ЕЕПРОМ
{
byte x[4];
for(byte i = 0; i < 4; i++) x[i] = EEPROM.read(i+addr);
float *y = (float *)&x;
return y[0];
}
void setup() {
cli();
DDRB |= 1<<1 | 1<<2;
PORTB &= ~(1<<1 | 1<<2);
TCCR1A = 0b00000010;
//TCCR1A = 0b10100010;
TCCR1B = 0b00011001;
ICR1H = 255;
ICR1L = 255;
sei();
int pwm_rez = 13;
pwm_rez = pow(2, pwm_rez);
ICR1H = highByte(pwm_rez);
ICR1L = lowByte(pwm_rez);
// задаем режим выхода для порта, подключенного к реле
pinMode(Pin, OUTPUT);
Serial.begin(9600);
pinMode(pwm, OUTPUT);
pinMode(down, INPUT);
pinMode(up, INPUT);
pinMode(12, INPUT);
pinMode(13, INPUT);
pinMode(power, OUTPUT);
pinMode(A4, OUTPUT);
pinMode(A5, OUTPUT);
// поддерживаем еденицу на входах от валкодера
digitalWrite(up, 1);
digitalWrite(down, 1);
//поддерживаем еденицу на контактах кнопок
digitalWrite(12, 1);
digitalWrite(13, 1);
//запуск дисплея
lcd.begin(16, 2);
lcd.print(» WELCOME! «);
//загружаем настройки из памяти МК
counter = EEPROM_float_read(0);
Ioutmax = EEPROM_float_read(4);
mode = EEPROM_float_read(12);
disp = EEPROM_float_read(10);
//Если в памяти еще нет настроек — задаем что нибудь кроме нулей
if(counter==0) counter = 5; //5 вольт
if(Ioutmax==0) Ioutmax = 2; //2 ампера
//включаем реле
digitalWrite(power, 1);
}
//функции при вращении енкодера
void uup(){ //енкодер +
if(set==0){//обычный режим — добавляем напряжения
if(counter<umax) {
counter = counter+0.1;//добавляем
}
}
if(set==1){ //переключаем режим работы вперед
mode = mode+1;
if(mode>2) mode=2;
}
if(set==2){ //переключаем режим работы вперед (ON)
mode1 = mode1+1;
if(mode1>1) mode1=1;
}
if(set==3){ //настройка тока, добавляем ток
iplus();
}
if(set==4){//сброс счетчика А*ч
ah = 0;
set = 0;
disp = 5;
}
if(set==5){//сохранение текущих настроек в память
save();
}
}
void udn(){ //валкодер —
if(set==0){
if(counter>umin+0.1)counter = counter-0.1; //убавляем напнряжение
}
if(set==1){
mode = mode-1; //переключаем режим работы назад
if(mode<0) mode=0;
}
if(set==2){ //переключаем режим работы назад (OFF)
mode1 = mode1-1;
if(mode1<0) mode1=0;
}
if(set==3){//убавляем ток
iminus();
}
}
void iplus(){
Ioutmax = Ioutmax+0.01;
if(Ioutmax>0.2) Ioutmax=Ioutmax+0.04;
if(Ioutmax>1) Ioutmax=Ioutmax+0.05;
if(Ioutmax>8.00) Ioutmax=8.00;
}
void iminus(){
Ioutmax = Ioutmax-0.01;
if(Ioutmax>0.2) Ioutmax=Ioutmax-0.04;
if(Ioutmax>1) Ioutmax=Ioutmax-0.05;
if(Ioutmax<0.03) Ioutmax=0.03;
}
void save(){
lcd.clear();
lcd.setCursor (0, 0);
lcd.print(» S A V E — OK «);
EEPROM_float_write(0, counter);
EEPROM_float_write(4, Ioutmax);
EEPROM_float_write(12, mode);
EEPROM_float_write(10, disp);
//мигаем светодиодами
digitalWrite(A4, 1);
digitalWrite(A5, 1);
delay(500);
digitalWrite(A4, 0);
digitalWrite(A5, 0);
set = 0; //выходим из меню
}
void loop() //основной цикл работы МК
{
// здесь будет код, который будет работать постоянно
// и который не должен останавливаться на время между переключениями свето
unsigned long currentMillis1 = millis();
//проверяем не прошел ли нужный интервал, если прошел то
if((currentMillis1 — previousMillis1 > interval1)&(mode1==1)) {
// сохраняем время последнего переключения
previousMillis1 = currentMillis1;
// если светодиод не горит, то зажигаем, и наоборот
if (PinState == LOW)
PinState = HIGH;
else
PinState = LOW;
// устанавливаем состояния выхода, чтобы включить или выключить светодиод
digitalWrite(Pin, PinState);
}
unsigned long currentMillis = millis();
/* Вншнее управление */
if (Serial.available() > 0) { //если есть доступные данные
// считываем байт
incomingByte = Serial.read();
}else{
incomingByte = 0;
}
if(incomingByte==97){ //a
if(counter>umin+0.1)counter = counter-0.1; //убавляем напнряжение
}
if(incomingByte==98){ //b
if(counter<umax) counter = counter+0.1;//добавляем
}
if(incomingByte==99){ //c
iminus();
}
if(incomingByte==100){ //d
iplus();
}
if(incomingByte==101) mode = 0;
if(incomingByte==102) mode = 1;
if(incomingByte==103) mode = 2;
if(incomingByte==104) mode1 = 1;
if(incomingByte==105) save();
if(incomingByte==106){
digitalWrite(power, 1); //врубаем реле если оно было выключено
delay(100);
digitalWrite(A4, 0); //гасим красный светодиод
Serial.print(‘t’);
Serial.print(0);
Serial.print(‘;’);
off = false;
set = 0;//выходим из меню
}
if(incomingByte==107) off = true;
if(incomingByte==108) ah = 0;
/* конец внешнего управления */
//получаем значение напряжения и тока в нагрузке
//float Ucorr = 0.00; //коррекция напряжения, при желании можно подстроить
//float Uout = analogRead(A1) * ((5.0 + Ucorr) / 1023.0) * 5.0; //узнаем напряжение на выходе
float Uout = analogRead(A1) * (5.0 / 1023.0) * 5.0; //узнаем напряжение на выходе
float Iout = analogRead(A0) / 100.00; // узнаем ток в нагрузке
//if(Iout==0.01) Iout = 0.03; else
//if(Iout==0.02) Iout = 0.04; else
//if(Iout==0.03) Iout = 0.05; else
//if(Iout==0.04) Iout = 0.06; else
//if(Iout>=0.05) Iout = Iout + 0.02;
//if(Iout>=0.25)Iout = Iout + 0.01;
//if(Iout>=1)Iout = Iout * 1.02;
/* ЗАЩИТА и выключение */
if (((Iout>(counter+0.3)*2.0) | Iout>10.0 | off) & set<4 & millis()>100 ) // условия защиты
{
digitalWrite(power, 0); //вырубаем реле
level = 0; //убираем ШИМ сигнал
digitalWrite(A4, 1);
Serial.print(‘I0;U0;r1;W0;’);
Serial.println(‘ ‘);
set = 6;
}
//Зашита от длительного максимального шим
if (level==8190 & off==false)
{
if(set<4)//если уже не сработала защита
{
maxpwm++; //добавляем +1 к счетчику
digitalWrite(A4, 1); //светим красным для предупреждения о максимальном ШИМ
}
}
else //шим у нас не максимальный, поэтому поубавим счетчик
{
maxpwm—;
if(maxpwm<0)//если счетчик дошел до нуля
{
maxpwm = 0; //таким его и держим
if(set<4) digitalWrite(A4, 0); // гасим красный светодиод. Перегрузки нет.
}
}
/* ЗАЩИТА КОНЕЦ */
// считываем значения с входа валкодера
boolean regup = digitalRead(up);
boolean regdown = digitalRead(down);
if(regup<regdown) mig = 1; // крутится в сторону увеличения
if(regup>regdown) mig = 2; // крутится в сторону уменшения
if(!regup & !regdown) //момент для переключения
{
if(mig==1) uup();//+
if(mig==2) udn(); //-
mig = 0; //сбрасываем указатель направления
}
if(mode==0 | mode==1) //если управляем только напряжением (не режим стабилизации тока)
{
//Сравниваем напряжение на выходе с установленным, и принимаем меры..
if(Uout>counter)
{
float raz = Uout — counter; //на сколько напряжение на выходе больше установленного…
if(raz>0.05)
{
level = level — raz * 20; //разница большая управляем грубо и быстро!
}else{
if(raz>0.015) level = level — raz * 3 ; //разница небольшая управляем точно
}
}
if(Uout<counter)
{
float raz = counter — Uout; //на сколько напряжение меньше чем мы хотим
if(raz>0.05)
{
level = level + raz * 20; //грубо
}else{
if(raz>0.015) level = level + raz * 3 ; //точно
}
}
if(mode==1&&Iout>Ioutmax) //режим защиты по току, и он больше чем мы установили
{
digitalWrite(power, 0); //вырубаем реле
Serial.print(‘t’);
Serial.print(2);
Serial.print(‘;’);
//зажигаем красный светодиод
digitalWrite(A4, 1);
level = 0; //убираем ШИМ сигнал
set=5; //режим ухода в защиту…
}
}else{ //режим стабилизации тока
if(Iout>=Ioutmax)
{
//узнаем запас разницу между током в нагрузке и установленным током
float raz = (Iout — Ioutmax);
if(raz>0.3) //очень сильно превышено (ток больше заданного более чем на 0,3А)
{
level = level — raz * 20; //резко понижаем ШИМ
}else{
if(raz>0.05) //сильно превышено (ток больше заданного более чем на 0,1А)
{
level = level — raz * 5; //понижаем ШИМ
}else{
if(raz>0.00) level = level — raz * 2; //немного превышен (0.1 — 0.01А) понижаем плавно
}
}
//зажигаем синий светодиод
digitalWrite(A5, 1);
}else{ //режим стабилизации тока, но ток у нас в пределах нормы, а значит занимаемся регулировкой напряжения
digitalWrite(A5, 0);//синий светодиод не светится
//Сравниваем напряжение на выходе с установленным, и принимаем меры..
if(Uout>counter)
{
float raz = Uout — counter; //на сколько напряжение на выходе больше установленного…
if(raz>0.1)
{
level = level — raz * 20; //разница большая управляем грубо и быстро!
}else{
if(raz>0.015) level = level — raz * 5; //разница небольшая управляем точно
}
}
if(Uout<counter)
{
float raz = counter — Uout; //на сколько напряжение меньше чем мы хотим
float iraz = (Ioutmax — Iout); //
if(raz>0.1 & iraz>0.1)
{
level = level + raz * 20; //грубо
}else{
if(raz>0.015) level = level + raz ; //точно
}
}
}
}//конец режима стабилизации тока
if(off) level = 0;
if(level<0) level = 0; //не опускаем ШИМ ниже нуля
if(level>8190) level = 8190; //не поднимаем ШИМ выше 13 бит
//Все проверили, прощитали и собственно отдаем команду для силового транзистора.
if(ceil(level)!=255) analogWrite(pwm, ceil(level)); //подаем нужный сигнал на ШИМ выход (кроме 255, так как там какая-то лажа)
/* УПРАВЛЕНИЕ */
if (digitalRead(13)==0 && digitalRead(12)==0 && knopka_ab==0 ) { // нажата ли кнопка a и б вместе
knopka_ab = 1;
//ah = 0.000;
knopka_ab = 0;
}
if (digitalRead(13)==0 && knopka_a==0) { // нажата ли кнопка А (disp)
knopka_a = 1;
disp = disp + 1; //поочередно переключаем режим отображения информации
if(disp==6) disp = 0; //дошли до конца, начинаем снова
}
if (digitalRead(12)==0 && knopka_b==0) { // нажата ли кнопка Б (menu)
knopka_b = 1;
set = set+1; //
if(set>5 | off) {//Задействован один из режимов защиты, а этой кнопкой мы его вырубаем. (или мы просто дошли до конца меню) //количество меню
off = false;
digitalWrite(power, 1); //врубаем реле если оно было выключено
delay(100);
digitalWrite(A4, 0); //гасим красный светодиод
Serial.print(‘t’);
Serial.print(0);
Serial.print(‘;’);
Serial.print(‘r’);
Serial.print(0);
Serial.print(‘;’);
Serial.println(‘ ‘);
set = 0;//выходим из меню
}
lcd.clear();//чистим дисплей
}
//сбрасываем значения кнопок или чего-то вроде того.
if(digitalRead(12)==1&&knopka_b==1) knopka_b = 0;
if(digitalRead(13)==1&&knopka_a==1) knopka_a = 0;
/* COM PORT */
if(currentMillis — com2 > com) {
// сохраняем время последнего обновления
com2 = currentMillis;
//Считаем Ампер*часы
ah = ah + (Iout / 36000);
Serial.print(‘U’);
Serial.print(Uout);
Serial.print(‘;’);
Serial.print(‘I’);
Serial.print(Iout);
Serial.print(‘;’);
Serial.print(‘i’);
Serial.print(Ioutmax);
Serial.print(‘;’);
Serial.print(‘u’);
Serial.print(counter);
Serial.print(‘;’);
Serial.print(‘W’);
Serial.print(level);
Serial.print(‘;’);
Serial.print(‘c’);
Serial.print(ah);
Serial.print(‘;’);
Serial.print(‘m’);
Serial.print(mode);
Serial.print(‘;’);
Serial.print(‘r’);
Serial.print(digitalRead(A4));
Serial.print(‘;’);
Serial.print(‘b’);
Serial.print(digitalRead(A5));
Serial.print(‘;’);
Serial.println(‘ ‘);
}
/* ИНДИКАЦИЯ LCD */
if(set==0){
//стандартный екран
//выводим уснановленное напряжение на дисплей
lcd.setCursor (0, 1);
lcd.print(«U>»);
if(counter<10) lcd.print(» «); //добавляем пробел, если нужно, чтобы не портить картинку
lcd.print (counter,1); //выводим установленное значение напряжения
lcd.print («V «); //пишем что это вольты
//обновление информации
/*проверяем не прошел ли нужный интервал, если прошел то
выводим реальные значения на дисплей*/
if(currentMillis — previousMillis > interval) {
// сохраняем время последнего обновления
previousMillis = currentMillis;
//выводим актуальные значения напряжения и тока на дисплей
lcd.setCursor (0, 0);
lcd.print(«U=»);
if(Uout<9.99) lcd.print(» «);
lcd.print(Uout,2);
lcd.print(«V I=»);
lcd.print(Iout, 2);
lcd.print(«A «);
//дополнительная информация
lcd.setCursor (8, 1);
if(disp==0){ //ничего
lcd.print(» «);
}
if(disp==1){ //мощьность
lcd.print(» «);
lcd.print (Uout * Iout,2);
lcd.print(«W «);
}
if(disp==2){ //режим БП
if(mode==0)lcd.print («standart»);
if(mode==1)lcd.print («shutdown»);
if(mode==2)lcd.print (» drop»);
}
if(disp==3){ //режим БП
if(mode1==0) lcd.print(«Off»);
if(mode1==1) lcd.print(«On «);
}
if(disp==4){ //максимальный ток
lcd.print (» I>»);
lcd.print (Ioutmax, 2);
lcd.print («A «);
}
if(disp==5){ // значение ШИМ
lcd.print («pwm:»);
lcd.print (ceil(level), 0);
lcd.print (» «);
}
if(disp==6){ // значение ШИМ
if(ah<1){
//if(ah<0.001) lcd.print (» «);
if(ah<=0.01) lcd.print (» «);
if(ah<=0.1) lcd.print (» «);
lcd.print (ah*1000, 1);
lcd.print («mAh «);
}else{
if(ah<=10) lcd.print (» «);
lcd.print (ah, 3);
lcd.print («Ah «);
}
}
}
}
/* ИНДИКАЦИЯ МЕНЮ */
if(set==1)//выбор режима
{
lcd.setCursor (0, 0);
lcd.print(«> MENU 1/5 «);
lcd.setCursor (0, 1);
lcd.print(«mode: «);
//режим (0 обычный, спабилизация тока, защита по току)
if(mode==0) lcd.print(«normal «);
if(mode==1) lcd.print(«shutdown «);
if(mode==2) lcd.print(«drop «);
}
if(set==2){//настройка сульфатации
lcd.setCursor (0, 0);
lcd.print(«> MENU 2/5 «);
lcd.setCursor (0, 1);
lcd.print(«DeSulfat: «);
if(mode1==0) lcd.print(«Off»);
if(mode1==1) lcd.print(«On «);
}
if(set==3){//настройка тока
lcd.setCursor (0, 0);
lcd.print(«> MENU 3/5 «);
lcd.setCursor (0, 1);
lcd.print(«I out max: «);
lcd.print(Ioutmax);
lcd.print(«A»);
}
if(set==4){//спрашиваем хочет ли юзер сохранить настройки
lcd.setCursor (0, 0);
lcd.print(«> MENU 4/5 «);
lcd.setCursor (0, 1);
lcd.print(«Reset A*h? ->»);
}
if(set==5){//спрашиваем хочет ли юзер сохранить настройки
lcd.setCursor (0, 0);
lcd.print(«> MENU 5/5 «);
lcd.setCursor (0, 1);
lcd.print(«Save options? ->»);
}
/* ИНДИКАЦИЯ ЗАЩИТЫ */
if(set==6){//защита. вывод инфы
lcd.setCursor (0, 0);
lcd.print(«ShutDown! «);
lcd.setCursor (0, 1);
lcd.print(«Iout»);
lcd.print(«>Imax(«);
lcd.print(Ioutmax);
lcd.print(«A)»);
level=0;
Serial.print(‘I0;U0;r1;W0;’);
Serial.println(‘ ‘);
}
if(set==7){//защита. вывод инфы критическое падение напряжения
Serial.print(‘I0;U0;r1;W0;’);
digitalWrite(A4, true);
Serial.println(‘ ‘);
level=0;
lcd.setCursor (0, 0);
if (off==false){ lcd.print(«[ OVERLOAD ]»);
lcd.setCursor (0, 1);
//и обьясняем юзеру что случилось
if((Iout>(counter+0.3)*2.0) | Iout>10.0){
Serial.print(‘t’);
Serial.print(1);
Serial.print(‘;’);
lcd.print(» Iout >= Imax «);
}
}else{
lcd.print(«[ OFF ]»);
lcd.setCursor (0, 1);
Serial.print(‘t’);
Serial.print(4);
Serial.print(‘;’);
}
}
}