for whatever reason I get «expected initializer before ‘PROGMEM'» when attemting to use progmem in a project. the line looks like this:
const unsigned char myArray[] PROGMEM = { bunch of numbers };
it’s in a seperate header file that I have included with #include «testImages.h»
funny thing is that the file is a direct copy from an other project I did a while back and the way I use it in the code is pretty much the same, yet I don’t get the error when compiling the old project where I use the same file with PROGMEM used in the same way. i’ve googled and tried my best to figure out why it’s not working I’ve tried including avr/pgmspace.h even tho it shouldn;t be needed after arduino version 1.0 or something, i’ve made some other arrays defined in the exact same way. but with different sizes and have the same issue, but without progmem there it compiles without issue(other than needing 180% of available SRAM) I also get the same error when putting the array in the main file instead of the header file.
I don’t know what to do and I have no clue why it’s not working, please help.
I want to use a lot of .h/.cpp files to be used by my ino sketch.
In one of these .cpp files (and later more) I want to use constant arrays (like lookup tables). To save SRAM I want to use PROGMEM.
What worked before in the Ino sketch is:
const uint8_t _red[] PROGMEM = { 0, 9, 10, 220, 230, 240, 255 };
But when I put the line above in a .h or .cpp file I get the error:
Par.h:13:25: error: expected initializer before 'PROGMEM'
Should I include something or can’t I use PROGMEM in a .h/.cpp file?
asked May 9, 2019 at 22:54
![]()
Michel KeijzersMichel Keijzers
12.8k7 gold badges36 silver badges56 bronze badges
I already found the answer.
Include:
#include <avr/pgmspace.h>
Update
See also remark of AnT, which is a more generic (and in most cases better solution):
#include "Arduino.h"
(just to help others with the same problem).
answered May 9, 2019 at 22:57
![]()
Michel KeijzersMichel Keijzers
12.8k7 gold badges36 silver badges56 bronze badges
2
New issue
Have a question about this project? Sign up for a free GitHub account to open an issue and contact its maintainers and the community.
By clicking “Sign up for GitHub”, you agree to our terms of service and
privacy statement. We’ll occasionally send you account related emails.
Already on GitHub?
Sign in
to your account
Closed
linjinc opened this issue
Jan 16, 2015
· 19 comments
Closed
Error compiling.
#1372
linjinc opened this issue
Jan 16, 2015
· 19 comments
Comments
![]()
ConfigurationStore.cpp: In function 'void Config_ResetDefault()':
ConfigurationStore.cpp:426:31: error: expected initializer before 'MARLIN_PROGMEM'
     const static float tmp1[] MARLIN_PROGMEM =DEFAULT_AXIS_STEPS_PER_UNIT;
                               ^
ConfigurationStore.cpp:427:31: error: expected initializer before 'MARLIN_PROGMEM'
     const static float tmp2[] MARLIN_PROGMEM =DEFAULT_MAX_FEEDRATE;
                               ^
ConfigurationStore.cpp:428:30: error: expected initializer before 'MARLIN_PROGMEM'
     const static long tmp3[] MARLIN_PROGMEM =DEFAULT_MAX_ACCELERATION;
                              ^
In file included from Marlin.h:16:0,
                 from ConfigurationStore.cpp:1:
ConfigurationStore.cpp:431:48: error: 'tmp1' was not declared in this scope
         axis_steps_per_unit[i]=pgm_read_float(&tmp1[i]);
                                                ^
ConfigurationStore.cpp:432:41: error: 'tmp2' was not declared in this scope
         max_feedrate[i]=pgm_read_float(&tmp2[i]);
                                         ^
ConfigurationStore.cpp:433:65: error: 'tmp3' was not declared in this scope
         max_acceleration_units_per_sq_second[i]=pgm_read_float(&tmp3[i]);
                                                                 ^
Error compiling.
![]()
arduino-1.5.8
Marlin Update printrboard pin assignments 12 hours ago
![]()
Broken by this commit: 5388596
Seems like MARLIN_PROGMEM is only defined if GCC_VERSION2 < 40602. All other cases will not compile.
![]()
use ide 1.0.6…. 1.5.8 is only in beta
![]()
Or revert the commit that is obviously not correct. Presumably there should be a #else that defines it as something else, not leave it undefined which will always cause an error.
![]()
Reverted it, left a message at the original commit why the whole pull request is a bad idea anyhow.
![]()
so this one could be closed?
![]()
![]()
C:arduinoHEXsketchConfigurationStore.cpp: In function 'void Config_ResetDefault()':
C:arduinoHEXsketchConfigurationStore.cpp:215:9: error: 'axis_steps_per_unit' was not declared in this scope
         axis_steps_per_unit[i]=tmp1[i];
         ^
C:arduinoHEXsketchConfigurationStore.cpp:216:9: error: 'max_feedrate' was not declared in this scope
         max_feedrate[i]=tmp2[i];
         ^
C:arduinoHEXsketchConfigurationStore.cpp:217:9: error: 'max_acceleration_units_per_sq_second' was not declared in this scope
         max_acceleration_units_per_sq_second[i]=tmp3[i];
         ^
C:arduinoHEXsketchConfigurationStore.cpp:219:5: error: 'acceleration' was not declared in this scope
     acceleration=DEFAULT_ACCELERATION;
     ^
C:arduinoHEXsketchConfigurationStore.cpp:220:5: error: 'retract_acceleration' was not declared in this scope
     retract_acceleration=DEFAULT_RETRACT_ACCELERATION;
     ^
C:arduinoHEXsketchConfigurationStore.cpp:221:5: error: 'minimumfeedrate' was not declared in this scope
     minimumfeedrate=DEFAULT_MINIMUMFEEDRATE;
     ^
C:arduinoHEXsketchConfigurationStore.cpp:222:5: error: 'minsegmenttime' was not declared in this scope
     minsegmenttime=DEFAULT_MINSEGMENTTIME;
     ^
C:arduinoHEXsketchConfigurationStore.cpp:223:5: error: 'mintravelfeedrate' was not declared in this scope
     mintravelfeedrate=DEFAULT_MINTRAVELFEEDRATE;
     ^
C:arduinoHEXsketchConfigurationStore.cpp:224:5: error: 'max_xy_jerk' was not declared in this scope
     max_xy_jerk=DEFAULT_XYJERK;
     ^
C:arduinoHEXsketchConfigurationStore.cpp:225:5: error: 'max_z_jerk' was not declared in this scope
     max_z_jerk=DEFAULT_ZJERK;
     ^
C:arduinoHEXsketchConfigurationStore.cpp:226:5: error: 'max_e_jerk' was not declared in this scope
     max_e_jerk=DEFAULT_EJERK;
     ^
C:arduinoHEXsketchConfigurationStore.cpp:227:5: error: 'add_homeing' was not declared in this scope
     add_homeing[0] = add_homeing[1] = add_homeing[2] = 0;
     ^
C:arduinoHEXsketchConfigurationStore.cpp:237:5: error: 'Kp' was not declared in this scope
     Kp = DEFAULT_Kp;
     ^
C:arduinoHEXsketchConfigurationStore.cpp:238:5: error: 'Ki' was not declared in this scope
     Ki = (DEFAULT_Ki*PID_dT);
     ^
C:arduinoHEXsketchConfigurationStore.cpp:239:5: error: 'Kd' was not declared in this scope
     Kd = (DEFAULT_Kd/PID_dT);
     ^
exit status 1
Error compiling for board Arduino/Genuino Mega or Mega 2560.
![]()
Arduino 1.6.10 — Marlin latest version June 30th 2016 ?? any help out there?
![]()
@Mike-Menci The latest tagged version is 1.1.0-RC7 (July 31). Are you seeing this with that version or in the current RCBugFix branch?
![]()
Yes July 31st sorry! — latest version
![]()
Hello — Seems working now — was my computer library problem !! Sorry!! My mistake!
I managed to compile Marlin to Arduino!
Thanks
Mike
![]()
Which version of GRBL to use _ ? grbl_v0_9i_atmega328p_16mhz_115200
![]()
I don’t know. GRBL and Marlin are totally separate things.
![]()
OK I ask Mrs. Google > Thanks
![]()
Hi Mike-Menci,
I have the exact same problem. Can you please tell me which was the library giving you problems?
Thanks
![]()
@FelisucoVFR — please open a new issue for your problem.
Please include the following in the new issue:
- What controller you’re using.
- What version of Marlin that you’re using.
- What compiler you’re using (Arduino 1.8.5, PlatformIO, …)
- What you’ve tried.
- A copy of the section of the compiler log showing the error.
- A ZIP file containing the Configuration.h, Configuration_adv.h and pins_YOUR_BOARD.h files.
![]()
@Bob-the-Kuhn
Thanks Bob. It has been self solved.
It seems an Arduino INO 1.8.5 issue as I just selected another board on it to force an error and going back to the Mega with Ramps 1.4
I am with the last bugfix 1.1.x just dowloaded yesterday.
Many thanks for your work and support!
![]()
This issue has been automatically locked since there has not been any recent activity after it was closed. Please open a new issue for related bugs.
- Coccon
- Posts:1
- Joined:Sat Apr 14, 2012 11:13 am
[phpBB Debug] PHP Warning: in file [ROOT]/vendor/twig/twig/lib/Twig/Extension/Core.php on line 1275: count(): Parameter must be an array or an object that implements Countable
Hi!
I’m new to this and I’m wondering how to add new libraries to the IDE. In arduino i just had to put a new directory and create my header and source file to it, next time restarting the library was ready to use. I tried this in mpide without success. What am i doing wrong?
Many thanks in advance!
- KurtE
- Posts:64
- Joined:Wed Nov 16, 2011 11:24 pm
[phpBB Debug] PHP Warning: in file [ROOT]/vendor/twig/twig/lib/Twig/Extension/Core.php on line 1275: count(): Parameter must be an array or an object that implements Countable
Re: Adding new libraries?
Post
by KurtE » Sat Apr 14, 2012 2:19 pm
There are others who can answer better than I can, but it depends on where you put the library.
For Chipkit like boards, you need to put the new library directory in. For example when I am working with the current test build I put them in:
C:mpide-0023-windows-20120304-testhardwarepic32libraries
You need to change the first part to wherever you installed the MPIDE…
Kurt
- Ryan K
- Posts:79
- Joined:Fri Feb 10, 2012 12:36 am
[phpBB Debug] PHP Warning: in file [ROOT]/vendor/twig/twig/lib/Twig/Extension/Core.php on line 1275: count(): Parameter must be an array or an object that implements Countable
Re: Adding new libraries?
Post
by Ryan K » Wed Apr 25, 2012 12:29 pm
Hello,
You should open MPIDE and go to File -> Preferences and remember the Sketchbook location. In that location you should create a subdirectory called «libraries» and place any new libraries in that location. This will allow you to add new libraries to be tested across MPIDE builds. This is where the contributed libraries should be placed.
Best Regards,
Ryan K
Digilent
- cebalo
- Posts:14
- Joined:Tue May 01, 2012 9:56 am
[phpBB Debug] PHP Warning: in file [ROOT]/vendor/twig/twig/lib/Twig/Extension/Core.php on line 1275: count(): Parameter must be an array or an object that implements Countable
Re: Adding new libraries?
Post
by cebalo » Tue May 01, 2012 10:42 am
thank you very much, it’s working
best regard
- cebalo
- Posts:14
- Joined:Tue May 01, 2012 9:56 am
[phpBB Debug] PHP Warning: in file [ROOT]/vendor/twig/twig/lib/Twig/Extension/Core.php on line 1275: count(): Parameter must be an array or an object that implements Countable
Re: Adding new libraries?
Post
by cebalo » Tue May 01, 2012 10:46 am
hi,
i want to add to Libray Datetime to use in the Mpide but the Mpide don´t supported the
library?
- Ryan K
- Posts:79
- Joined:Fri Feb 10, 2012 12:36 am
[phpBB Debug] PHP Warning: in file [ROOT]/vendor/twig/twig/lib/Twig/Extension/Core.php on line 1275: count(): Parameter must be an array or an object that implements Countable
Re: Adding new libraries?
Post
by Ryan K » Tue May 01, 2012 11:19 pm
Hello,
I can include the DateTime library and have it compile fine in MPIDE. Are you asking for help getting it to compile and seen by MPIDE? or are you asking for a port into chipKIT. I haven’t taken too close of a look at the library so I can’t say whether or not it is chipKIT compatible at this point in time. Let me know either way.
Best Regards,
Ryan K
Digilent
- cebalo
- Posts:14
- Joined:Tue May 01, 2012 9:56 am
[phpBB Debug] PHP Warning: in file [ROOT]/vendor/twig/twig/lib/Twig/Extension/Core.php on line 1275: count(): Parameter must be an array or an object that implements Countable
Re: Adding new libraries?
Post
by cebalo » Wed May 30, 2012 11:06 pm
Hi Ryan,
please sorry that i answer you so late. I use The Uno 32 and the BASIC I/O Shield and i want to added the Date time Libray but i have some error
Code: Select all
In file included from C:UsersLionelDocumentsmpidelibrariesDateTimeStringsDateTimeStrings.cpp:20:0:
c:userslioneldownloadsmpide-0023-windows-20111221hardwarepic32compilerpic32-toolsbin../lib/gcc/pic32mx/4.5.1/../../../../pic32mx/include/avr/pgmspace.h:4:2: error: #error ******** This sketch or library uses AVR-specific code that may not work with the chipKIT platform. See this forum for more information on porting code to chipKIT [www.chipkit.org/forum/viewforum.php?f=7] ********
C:UsersLionelDocumentsmpidelibrariesDateTimeStringsDateTimeStrings.cpp:32:18: error: expected initializer before 'PROGMEM'
C:UsersLionelDocumentsmpidelibrariesDateTimeStringsDateTimeStrings.cpp:33:18: error: expected initializer before 'PROGMEM'
C:UsersLionelDocumentsmpidelibrariesDateTimeStringsDateTimeStrings.cpp:34:18: error: expected initializer before 'PROGMEM'
C:UsersLionelDocumentsmpidelibrariesDateTimeStringsDateTimeStrings.cpp:35:18: error: expected initializer before 'PROGMEM'
C:UsersLionelDocumentsmpidelibrariesDateTimeStringsDateTimeStrings.cpp:36:18: error: expected initializer before 'PROGMEM'
C:UsersLionelDocumentsmpidelibrariesDateTimeStringsDateTimeStrings.cpp:37:18: error: expected initializer before 'PROGMEM'
C:UsersLionelDocumentsmpidelibrariesDateTimeStringsDateTimeStrings.cpp:38:18: error: expected initializer before 'PROGMEM'
C:UsersLionelDocumentsmpidelibrariesDateTimeStringsDateTimeStrings.cpp:39:18: error: expected initializer before 'PROGMEM'
C:UsersLionelDocumentsmpidelibrariesDateTimeStringsDateTimeStrings.cpp:40:18: error: expected initializer before 'PROGMEM'
C:UsersLionelDocumentsmpidelibrariesDateTimeStringsDateTimeStrings.cpp:41:18: error: expected initializer before 'PROGMEM'
C:UsersLionelDocumentsmpidelibrariesDateTimeStringsDateTimeStrings.cpp:42:19: error: expected initializer before 'PROGMEM'
C:UsersLionelDocumentsmpidelibrariesDateTimeStringsDateTimeStrings.cpp:43:19: error: expected initializer before 'PROGMEM'
C:UsersLionelDocumentsmpidelibrariesDateTimeStringsDateTimeStrings.cpp:45:1: error: 'PGM_P' does not name a type
C:UsersLionelDocumentsmpidelibrariesDateTimeStringsDateTimeStrings.cpp:56:16: error: expected initializer before 'PROGMEM'
C:UsersLionelDocumentsmpidelibrariesDateTimeStringsDateTimeStrings.cpp:57:16: error: expected initializer before 'PROGMEM'
C:UsersLionelDocumentsmpidelibrariesDateTimeStringsDateTimeStrings.cpp:58:16: error: expected initializer before 'PROGMEM'
C:UsersLionelDocumentsmpidelibrariesDateTimeStringsDateTimeStrings.cpp:59:16: error: expected initializer before 'PROGMEM'
C:UsersLionelDocumentsmpidelibrariesDateTimeStringsDateTimeStrings.cpp:60:16: error: expected initializer before 'PROGMEM'
C:UsersLionelDocumentsmpidelibrariesDateTimeStringsDateTimeStrings.cpp:61:16: error: expected initializer before 'PROGMEM'
C:UsersLionelDocumentsmpidelibrariesDateTimeStringsDateTimeStrings.cpp:62:16: error: expected initializer before 'PROGMEM'
C:UsersLionelDocumentsmpidelibrariesDateTimeStringsDateTimeStrings.cpp:64:1: error: 'PGM_P' does not name a type
C:UsersLionelDocumentsmpidelibrariesDateTimeStringsDateTimeStrings.cpp: In member function 'char* DateTimeStringsClass::monthStr(byte)':
C:UsersLionelDocumentsmpidelibrariesDateTimeStringsDateTimeStrings.cpp:91:23: error: 'PGM_P' was not declared in this scope
C:UsersLionelDocumentsmpidelibrariesDateTimeStringsDateTimeStrings.cpp:91:66: error: 'strcpy_P' was not declared in this scope
C:UsersLionelDocumentsmpidelibrariesDateTimeStringsDateTimeStrings.cpp: In member function 'char* DateTimeStringsClass::dayStr(byte)':
C:UsersLionelDocumentsmpidelibrariesDateTimeStringsDateTimeStrings.cpp:106:23: error: 'PGM_P' was not declared in this scope
C:UsersLionelDocumentsmpidelibrariesDateTimeStringsDateTimeStrings.cpp:106:62: error: 'strcpy_P' was not declared in this scope
Best Regard I hope that you help me
- ajitnayak
- Posts:59
- Joined:Mon Nov 19, 2012 9:21 am
- Location:Bangalore
- Contact:
Re: Adding new libraries?
Post
by ajitnayak » Wed Nov 21, 2012 11:54 am
to add library you need to go MPIDE folder -> select hadware->pic32 -> library
paste the library you want it . and start using it
- ajitnayak
- Posts:59
- Joined:Mon Nov 19, 2012 9:21 am
- Location:Bangalore
- Contact:
Re: Adding new libraries?
Post
by ajitnayak » Wed Nov 21, 2012 12:12 pm
Hello Ryan,,
Could you explain your step by step procedure to adding library and accessing it.
I am using uno32 . I found most of arduino library not working on Uno 32 . like SoftwareSerial/tinyGPS/ds1307/wire . How to add these library in detail.
I tried with replacing library of uno 32 in PIC32 (hardware folder) with lib of arduino. They are not working as expected .Please let me how can avoid those conflicts
i wanna use same arduino library instead of PIC lib . How can make it run
-

majenko
- Site Admin
- Posts:2254
- Joined:Wed Nov 09, 2011 7:51 pm
- Location:UK
-
Contact:
Re: Adding new libraries?
Post
by majenko » Wed Nov 21, 2012 12:16 pm
Most libraries written specifically for the Arduino will not work on the ChipKit boards.
The ChipKit boards use a completely different chip to the Arduino boards, and libraries which directly interface with that chip (which is most, because Arduino programmers are stupid), need to be re-written to be able to work on the ChipKit.
You need both intimate knowledge of the library, AND intimate knowledge of Atmel and Microchip chips in order to do it.
It can be a good learning experience for those willing to undertake it, but it’s not a job for a novice programmer.
Why not visit my shop? http://majenko.co.uk/catalog
Universal IDE: http://uecide.org
«I was trying to find out if it was possible to only eat one Jaffa Cake. I had to abandon the experiment because I ran out of Jaffa Cakes».
Post Reply
[phpBB Debug] PHP Warning: in file [ROOT]/vendor/twig/twig/lib/Twig/Extension/Core.php on line 1275: count(): Parameter must be an array or an object that implements Countable
|
BalexD 0 / 0 / 0 Регистрация: 26.05.2013 Сообщений: 16 |
||||
|
1 |
||||
|
28.12.2013, 21:41. Показов 30160. Ответов 11 Метки нет (Все метки)
В общем, компилятор почему-то ругается на 3 строку, говоря «expected initializer before void» Что ему тут не нравится — ума не приложу. Все функции есть в хидере, ругаться стал недавно — ранее работал на ура. Перестраивала, перезапускала блокс(на всяк пожарный), а толку нет. Вот сам код:
__________________
0 |

|
Модератор
12641 / 10135 / 6102 Регистрация: 18.12.2011 Сообщений: 27,170 |
|
|
28.12.2013, 21:48 |
2 |
|
Что-то не так в HW_C.h
0 |
|
1672 / 1044 / 174 Регистрация: 27.09.2009 Сообщений: 1,945 |
|
|
28.12.2013, 21:48 |
3 |
|
Логично предположить, что ошибка в файле HW_C.h. Например, отсутствие точки с запятой после определения структуры.
0 |
|
17 / 17 / 2 Регистрация: 03.05.2013 Сообщений: 114 |
|
|
28.12.2013, 21:50 |
4 |
|
Что-то в заголовочном файле не так. Покажите нам его, пожалуйста.
0 |
|
BalexD 0 / 0 / 0 Регистрация: 26.05.2013 Сообщений: 16 |
||||
|
28.12.2013, 22:07 [ТС] |
5 |
|||
|
Вот та самая часть хидера:
0 |
|
Модератор
12641 / 10135 / 6102 Регистрация: 18.12.2011 Сообщений: 27,170 |
|
|
29.12.2013, 11:03 |
6 |
|
У меня это все компилируется.
0 |
|
0 / 0 / 0 Регистрация: 26.05.2013 Сообщений: 16 |
|
|
03.01.2014, 02:07 [ТС] |
7 |
|
Проблема в том, что HW_C.h — один-единственный. И других просто нету. Уж не знаю, на что грешить(
0 |
|
5493 / 4888 / 831 Регистрация: 04.06.2011 Сообщений: 13,587 |
|
|
03.01.2014, 02:14 |
8 |
|
Весь проект выкладывайте.
0 |
|
0 / 0 / 0 Регистрация: 26.05.2013 Сообщений: 16 |
|
|
08.01.2014, 20:02 [ТС] |
9 |
|
Ну, кидаю в виде ссылки. Чтоб никто не терялся: сама функция используется в HW_Dop1.cpp, а в хидере прописана в самом конце.
0 |
|
5493 / 4888 / 831 Регистрация: 04.06.2011 Сообщений: 13,587 |
|
|
09.01.2014, 04:58 |
10 |
|
Вот результат компиляции этого проекта в Code::Blocks 12.11: objDebugHW_Dop1.o||In function `Z13insert_4_numbv’:| И при чём здесь тогда:
компилятор почему-то ругается на 3 строку, говоря «expected initializer before void» ??? Добавлено через 1 минуту
сама функция используется в HW_Dop1.cpp, а в хидере прописана в самом конце.
1 |

|
0 / 0 / 0 Регистрация: 26.05.2013 Сообщений: 16 |
|
|
10.01.2014, 00:02 [ТС] |
11 |
|
Хм.. Странно. У меня все выглядит немного по-другому. А про заголовочный файл скажу, что никто мне не говорил, что так делать нельзя. По крайней мере, до этого момента ошибки не возникало. Что же, учтем и эти грабли. Но спасибо за указания на промахи. Искренне всем благодарна)
0 |
|
5493 / 4888 / 831 Регистрация: 04.06.2011 Сообщений: 13,587 |
|
|
10.01.2014, 00:07 |
12 |
|
Хм.. Странно. У меня все выглядит немного по-другому. Интересно было бы посмотреть.
0 |
Arduino and ENC28J60 Ethernet Controller
The number “ENC28J60” actually only refers to a chip developed by Microchip. This chip has 28 pins and contains a complete stand alone Ethernet controller for a 10BASE-T network connection with an SPI interface so microcontrollers like the Arduino can “talk” to it.
10BASE-T is the same connector you’ll find on your computer (if it has one) to connect with a wire to a network, where “10” indicates a maximum speed of 10 Mbit/sec. That might sound slow, but if you consider that it’s being used by devices like the Arduino, then you can’t really expect massive data loads anyway. I’ve found it to be very responsive.
ENC28J60 – No longer recommended …
After several years of experience with the ENC28J60, I have to say that I can no longer recommend this Ethernet Shield for any Arduino project.
Unfortunately, the card comes with it’s issues, especially when it comes to stability.
If you’re looking for a good Ethernet Controller for your Arduino projects – please consider using a W5100 or W5500 ethernet shield (you can find some here – EU, US).
Or if you want a cheap, small, yet much faster Arduino compatible microcontroller and WiFi is an option, then please consider getting an ESP8266 (EU, US) or ESP32 (EU, US).
Selecting the right Ethernet Controller …
The standard Arduino Ethernet Shield uses a all-in-one Ethernet Controller as well, and the proper libraries are included with your Arduino IDE. The used controller however is a Wiznet W5100!
In this article we focus on modules based on the MicroChip ENC28J60!
Which is NOT the same as the W5100 and is NOT compatible with it either, so other libraries will be needed.
For those in need of making cables for this, please read our “How to make your own network cables” article.
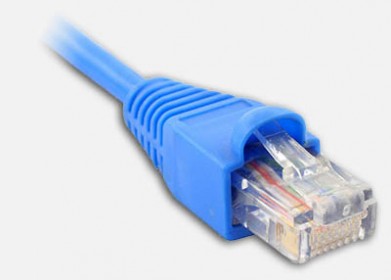
10BASE-T uses RJ45 Connectors
Choosing your ENC28J60 board
When looking for one, you’ll find that there are numerous variations available, and they pretty much all work the same, just the board and pins look different for specific purposes. The only thing that can be tricky is finding the right pins for the right library. Illustration below: Just two of many variations of the ENC28J60 modules.
I found mine at eBay for $18 which came with an Arduino Nano (left in the picture – Nano not displayed), which works just fine with, for example, an Arduino Uno as well. The connectors however are geared towards mounting an Arduino Nano of course.
My main reasons to pick this one (besides being totally unaware, at the time, that this is not the same as the Arduino Ethernet shield) were: Price, came with a Nano and size. The module and Nano combined make this thing VERY compact. Including the Arduino Nano (clone) the setup would be app 6.7 cm (~2.6″) long, 1.7 cm (~0.7″) wide, and 1.7 cm (~0.7″) tall – depending on how you use the pins at the bottom and how you mount your Nano of course. You can choose the top connectors or bottom pins (breadboard) while experimenting, but you could consider cutting off the bottom pins for your final product.
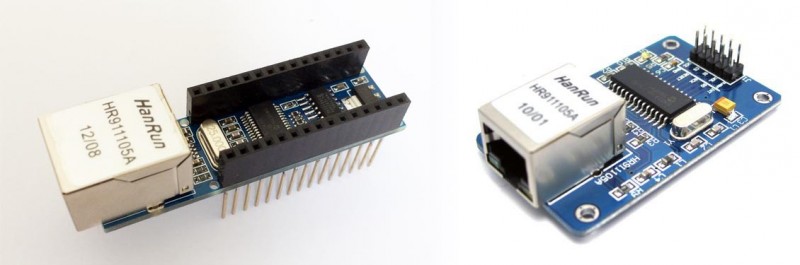
ENC28J60 – Two examples of variations
Getting the Right Library
Since I randomly picked this particular model, I had to find out the hard way that things do not seem all that easy, since it’s not compatible with the Arduino “Ethernet” library that comes with your Arduino IDE. And then I’m not even mentioning the lack of good info to determine what pins are to be used, so I had to figure that out by myself.
In the next paragraphs you’ll find my experiences with three Arduino libraries. They all work great!
UIPEthernet is great for projects that require “print” to be fully implemented and need to be a drop-in replacement for the standard “Ethernet” library.
ETHER_28j60 is great for it’s simplicity and small size, but comes with limitations.
Ethercard seems best for very advanced users, but I’m sure UIPEthernet can match it’s capabilities.
I’ve included a “Hello World!” example for all three, which could use some optimizing, where the “Hello World!” message can be viewed in your webbrowser.
Before we begin: Libraries and Pins
We will aways need power so we will always need GND and +3.3V or +5V pin.
For my eBay module I had to use the +5V (it has a voltage regulator onboard to handle that), as the 3.3V pin didn’t seem to work.
Below a table, based on a Arduino Uno, Arduino Nano and my eBay Ethernet module, with the needed pins for the three libraries I tested.
As you can see, all of them use the standard SPI pins 10, 11, 12 and 13. Except Ethercard, that seems to use pin 8 for SS, instead of the “standard” pin 10.
| Pin name | ETHER_28J60 | Ethercard | UIPEthernet | My eBay Module |
|---|---|---|---|---|
| SS | 10 | 8 (!) | 10 | 10 |
| MOSI (SI) | 11 | 11 | 11 | 11 |
| MISO (SO) | 12 | 12 | 12 | 12 |
| SCK | 13 | 13 | 13 | 13 |
The Ethernet Controller (ENC28J60) is a so called SPI device and uses the SPI pins (10, 11, 12, 13) of your Arduino.
SS stands for Slave Select, used to enable or disable the slave device (the Ethernet module in this case).
MOSI stands for Master Output Slave Input, or in other words: Arduino OUTPUT (data from Arduino to Ethernet Controller).
MISO stands for the opposite, Master Input Slave Output, or: Arduino INPUT (data from Ethernet Controller to Arduino).
SCK is the clock used for SPI timing.
The pins described here will have the “Pin name” usually printed on your Ethernet Module. My eBay module however is fully geared towards the Arduino Nano that came with it and has NO SUCH PIN NAMES for the Ethernet controller, just the pin names of the Arduino pins. Hence the extra column for those who buy the same Ethernet Module, showing the pin number.
To illustrate this, below an illustration of the “Nano Ethernet Shield” by “Deek-Robot” that I purchased from eBay.
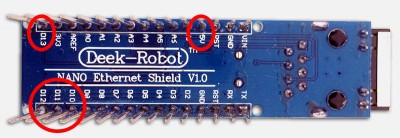
My eBay Ethernet module (Deek Robot Nano Ethershield)
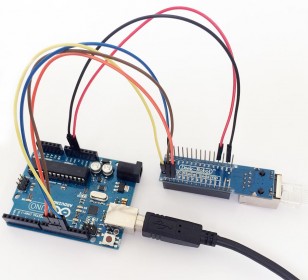
My Arduino with ENC28J60 – A wiring example
Other Examples
In this article, I’ll only show you a “Hello World!” example for these libraries. In the end “UIPEthernet” became my favorite and for that library I have written other example(s) – I’ll add more to this list as they are being published:
Data retrieval over network with Data Pull
Data retrieval over network with Data Push
Arduino Library: ETHER_28J60 and EtherShield
Caution – No longer maintained!
Just a heads-up that you may run into issues with this library. The developer stopped maintaining it.
This is the first library I found, which works great for basic purposes, but I quickly ran into the limitations of the build-in print function. Another problem is that after some digging I found that the development either has stopped development or has been very slow in the past year, which is too bad, because of the (initial) simplicity of this library.
Note that you will need both libraries to make this work!
Pros:
Below the simplicity of ETHER_28J60 … seriously: could it be any easier?
The library is also very compact, so it will save memory on your Arduino, compared to the other two libraries.
Cons:
Downside however is that this library is not compatible with the Ethernet Library code that comes with your Arduino IDE, so it’s not a drop-in replacement.
The other downside I ran into was the severely limited “print” function, when it comes to passing for example a String.
My knowledge and experience with normal C-strings is somewhat limited when functions like sprintf and printf are not there or only partially implemented (limitation of the standard Arduino library).
As development seems to have stopped, I doubt we will see a properly implemented “print” function (unless someone forks it at Github).
Download:
ETHER_28J60 and Ether shield can be downloaded from Github or you can download it from Tweaking4All.
As always: I recommend getting the latest version from Github, although I have little hope that there will be a newer version in the near future.
Download — ETHER_28J60 and Ethershield
| Filename: | ETHER-28J60-and-Ethershield.zip |
| Platform: | Undefined |
| Version: | |
| File size: | 24.1 kB |
| Date: | 2014-03-23 |
|
Download Now Send me a cup of Coffee |
1
2
3
4
5
6
7
8
9
10
11
12
13
14
15
16
17
18
19
20
21
22
23
24
25
26// A simple web server that always just says "Hello World"
#include "etherShield.h"
#include "ETHER_28J60.h"// Define MAC address and IP address - both should be unique in your network
static uint8_t mac[6] = {0x54, 0x55, 0x58, 0x10, 0x00, 0x24};
static uint8_t ip[4] = {192, 168, 1, 15};
static uint16_t port = 80; // Use port 80 - the standard for HTTPETHER_28J60 ethernet;
void setup()
{
ethernet.setup(mac, ip, port);
}void loop()
{
if (ethernet.serviceRequest())
{
ethernet.print("<H1>Hello World</H1>");
ethernet.respond();
}
delay(100);
}
Arduino Library: EtherCard
This library seems a very well respected in the Arduino community and with good reason. It seems one of the most complete implementations out there.
The code below might look a little bit more complicated, but that’s mainly because of the added HTML.
CAUTION: Ethercard seems to use pin 8 instead of pin 10!
Pros:
Definitely a big plus for this library is that complex tasks like DHCP and such are easy to use, and offers easy accessible advanced features. Definitely excellent for the pro Arduino users.
Cons:
A big downside (again) is the lack of a simple to use “print” function to sent data, and I’m fully aware that me bitching about it is based on my own limited experience with working with strings and char arrays etc., but I can imagine that I’m not the only one.
Ethercard is, like UIPEthernet, not the smallest library.
Download:
EtherCard can be found at GitHub and on their project page or you can download it from Tweaking4All.
Again: I recommend getting the latest and greatest version from Github.
Note: Source has been updated to accommodate the newer Arduine IDE version (line 10, added “const”).
1
2
3
4
5
6
7
8
9
10
11
12
13
14
15
16
17
18
19
20
21
22
23
24
25
26
27
28
29
30
31
32
33
34
35
36
37
38
39
40
41
42
43#include <EtherCard.h>
// Ethernet IP, default gateway and MAC addresses
static byte myip[] = { 192,168,1,200 };
static byte gwip[] = { 192,168,1,1 };
static byte mymac[] = { 0x74,0x69,0x69,0x2D,0x30,0x31 };byte Ethernet::buffer[500]; // tcp/ip send and receive buffer
const char page[] PROGMEM =
"HTTP/1.0 503 Service Unavailablern"
"Content-Type: text/htmlrn"
"Retry-After: 600rn"
"rn"
"<html>"
"<head><title>"
"Hello World!"
"</title></head>"
"<body>"
"<h3>Hello World! This is your Arduino speaking!</h3>"
"</body>"
"</html>";void setup(){
Serial.begin(57600);
Serial.println("n[Hello World]");if (ether.begin(sizeof Ethernet::buffer, mymac) == 0)
Serial.println( "Failed to access Ethernet controller");
ether.staticSetup(myip, gwip);ether.printIp("IP: ", ether.myip);
ether.printIp("GW: ", ether.gwip);
ether.printIp("DNS: ", ether.dnsip);
}void loop(){
// wait for an incoming TCP packet, but ignore its contents
if (ether.packetLoop(ether.packetReceive())) {
memcpy_P(ether.tcpOffset(), page, sizeof page);
ether.httpServerReply(sizeof page - 1);
}
}
Arduino Library: UIPEthernet
After testing the previous two libraries, I ran into UIPEthernet, at this moment my absolute favorite.
You might see the example code below as more complicated, but that is mainly me to blame. I modified and existing example to make a quick “Hello World” for you.
Pros:
This library is a fully compatible drop-in replacement for the standard Ethernet Library found in your Arduino IDE, which makes it easy to adapt existing examples for use with either the Arduino Ethernet shield for use with the ENC28J60 Ethernet shield. One simply changes the two include lines (“#include <Ethernet.h> ” and “#include <SPI.h> “) in standard Ethernet examples to just one include line “#include <UIPEthernet.h>“.
This library also has a complete implementation of the “print” function that works the same as the “print” function for “Serial”, keeping code simple and very easy to use.
Advanced features are available if needed, so “pro” Arduino users might enjoy this library as well.
Cons:
It will be a little bigger than ETHER_28J60.
Download:
UIPEthernet can be found on GitHub, is mentioned on the Arduino website, and optionally you can be downloaded from Tweaking4All.
I recommend getting the latest version from Github.
1
2
3
4
5
6
7
8
9
10
11
12
13
14
15
16
17
18
19
20
21
22
23
24
25
26
27
28
29
30
31
32
33
34
35
36
37
38
39
40
41
42
43
44
45
46
47
48
49
50
51
52
53
54
55
56
57
58
59
60
61
62
63
64#include <UIPEthernet.h> // Used for Ethernet
// **** ETHERNET SETTING ****
byte mac[] = { 0x54, 0x34, 0x41, 0x30, 0x30, 0x31 };
IPAddress ip(192, 168, 1, 179);
EthernetServer server(80);void setup() {
Serial.begin(9600);// start the Ethernet connection and the server:
Ethernet.begin(mac, ip);
server.begin();Serial.print("IP Address: ");
Serial.println(Ethernet.localIP());
}void loop() {
// listen for incoming clients
EthernetClient client = server.available();if (client)
{
Serial.println("-> New Connection");// an http request ends with a blank line
boolean currentLineIsBlank = true;while (client.connected())
{
if (client.available())
{
char c = client.read();// if you've gotten to the end of the line (received a newline
// character) and the line is blank, the http request has ended,
// so you can send a reply
if (c == 'n' && currentLineIsBlank)
{
client.println("<html><title>Hello World!</title><body><h3>Hello World!</h3></body>");
break;
}if (c == 'n') {
// you're starting a new line
currentLineIsBlank = true;
}
else if (c != 'r')
{
// you've gotten a character on the current line
currentLineIsBlank = false;
}
}
}// give the web browser time to receive the data
delay(10);// close the connection:
client.stop();
Serial.println(" Disconnectedn");
}
}