This informative article will demonstrate the comprehensive guide to fix VirtualBox mistakes while installing Mac OS X. Most sites producing content about the installment of Mac OS X El Capitan or macOS Sierra on VirtualBox aren’t complete and have errors. The guide may be right and operate on a single device perfectly and with no issue. However, there are plenty of devices and various types of errors. A couple of weeks ago, we made a post on the way best to set up Mac OS X El Capitan on VirtualBox, and the traffic has different sorts of issues.
Minimum System Requirements to install MacOS X on Virtualbox:
Minimum system requirements to install MacOS X on Virtualbox are: (It will help run macOS High Sierra or later versions without any problem.)
- Minimum 2 GB memory (Recommended 8GB or higher)
- Minimum 2 cores of processors (Recommended 4 cores or higher)
- Hard disk free space 40 GB (Recommended 100GB or higher)
- Your system should support Intel or AMD VT (Virtualization Technology)
- Intel/AMD VT (Virtualization Technology) Should be enabled from BIOS setup
For fast performance, try installing macOS X on SSD rather than HDD.
Required: Enable Virtualization Technology (aka Intel VT or AMD-V). See video below.
Some key points to remember before Installing Mac OS X:
1) Intel CPU works better than AMD
2) Turn OFF Antivirus programs (Windows Defender) and Windows Firewall before starting the install
3) Set Video RAM to between 64-128MB
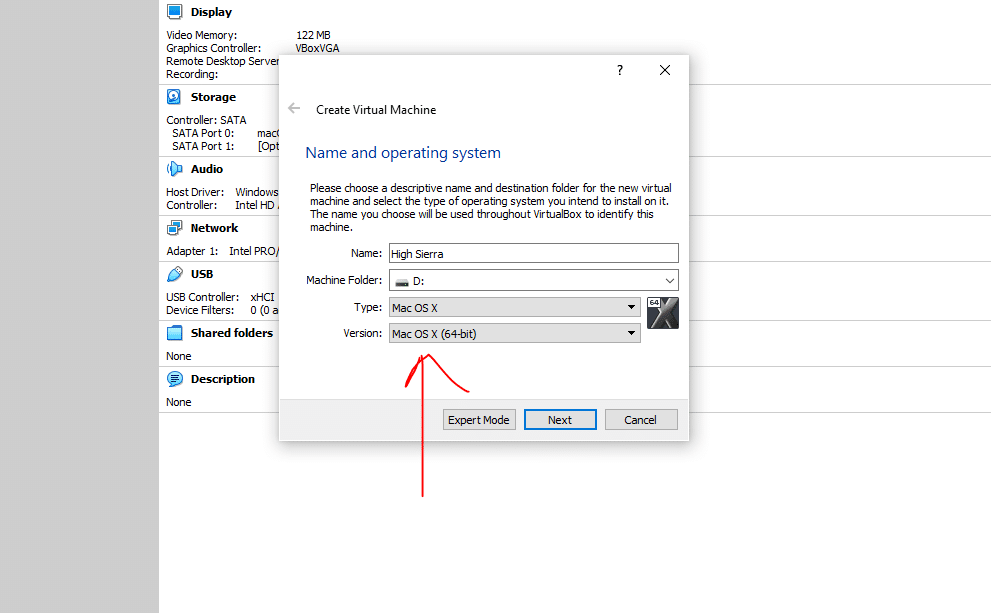
4) Use no spaces in VM name (ex: “MACOSX” not “MAC OSX”). Also, no punctuation. Also, re-verify:
VM Type: Mac OS X and Version: Mac OS X 10.11 El Capitan (64-bit)
(These are in Virtualbox Settings->General)
5) Suggest use wired Internet, not WiFi, for initial download/updates, etc.
6) Run CMD window as Administrator when entering command-line commands.
7) May need to start Virtualbox as Administrator.
 Be patient during initial boot up. It runs disk checks and other repairs… and can reboot a couple of times.
9) Be sure your HD or SSD has >80GB of free space. All the updates after initial installation gobble space.
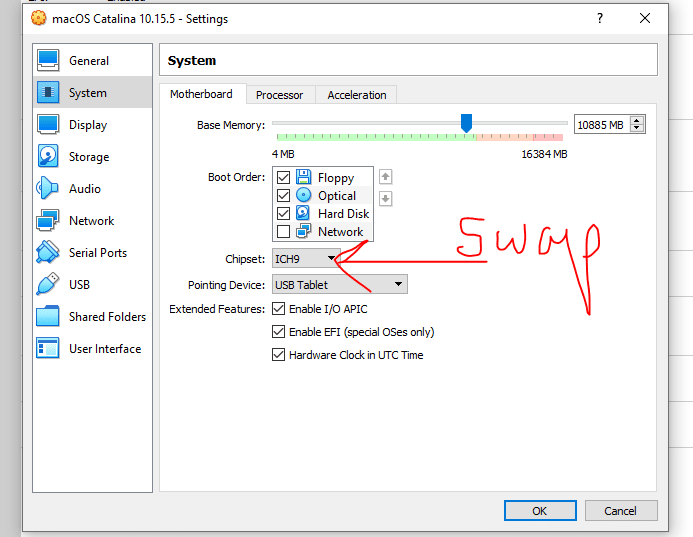
10) Black Screen? Try video RAM > 64MB and Chipset = PIIX3
11) Do not install Virtual Box Extensions “CD”
12) Before adding commands on CMD, make sure you have quit your Virtualbox.
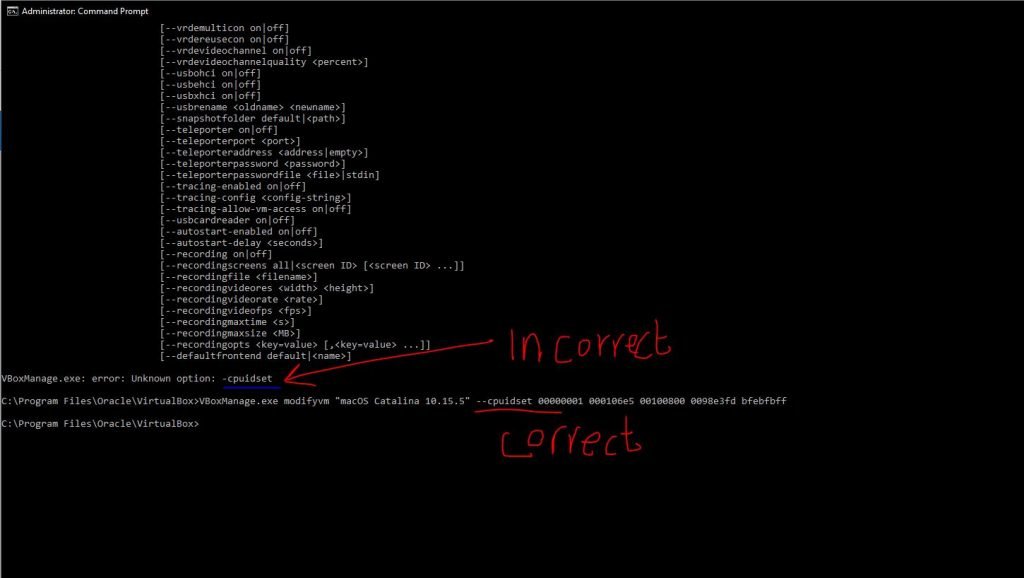
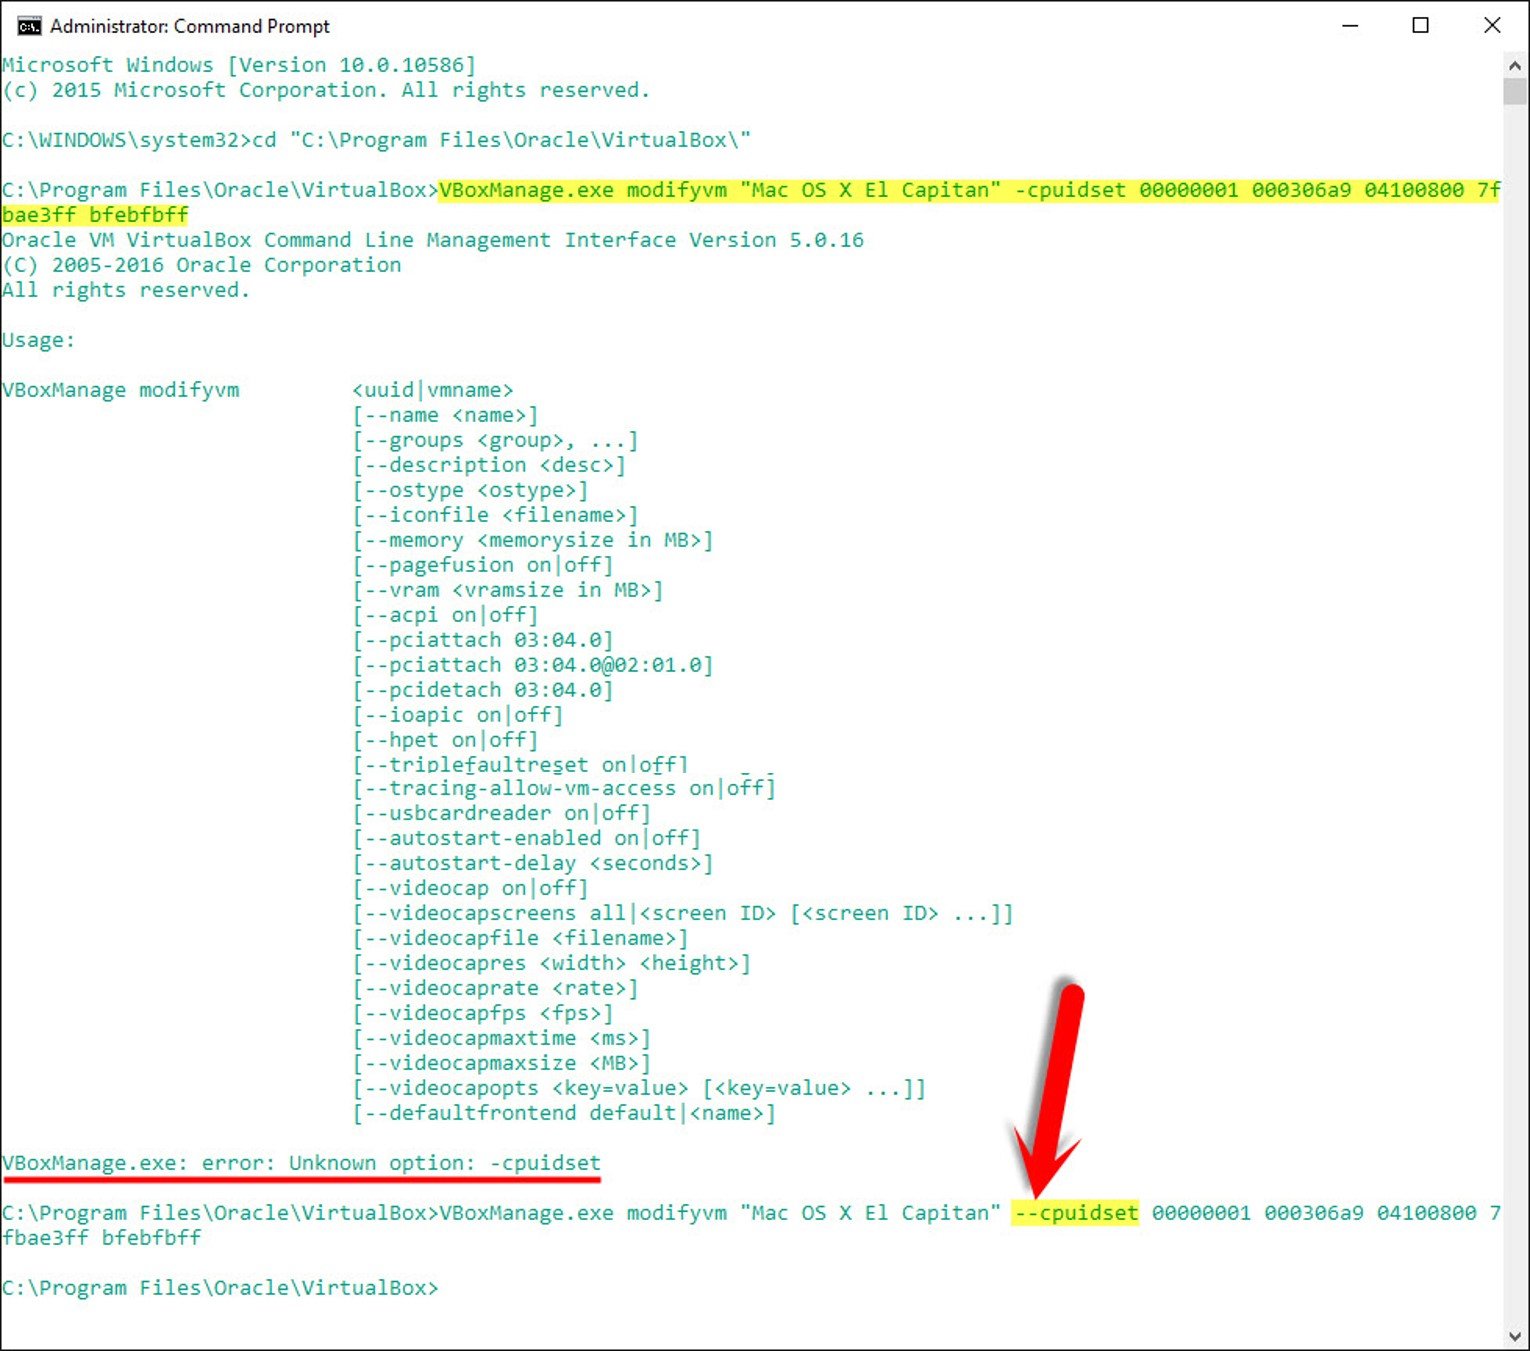
Unkown option –cpuidset
If you get this error “VBoxManage.exe: error: Unknown option. –cpuidset. The VM hangs on boot” while adding the first code in the Command Prompt. It’s because of the double hyphen. Use Double hyphen “- – “before cpuidset.
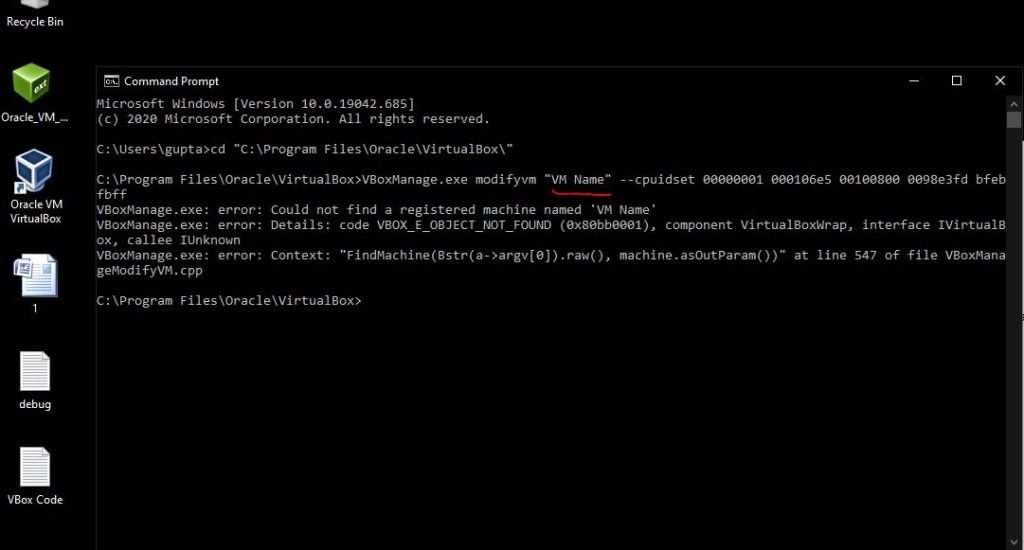
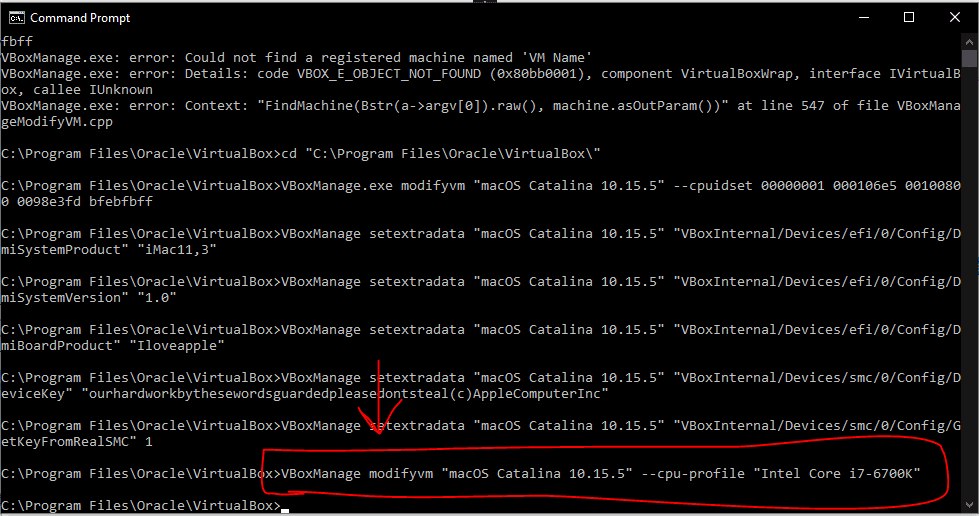
VBoxManage error: Could not find a registered machine named Your VM Name
If you get this error “VBoxManage error: Could not find a registered machine named Your VM Name“, it is because you haven’t used the correct name of your virtual machine when adding the codes on CMD.
You need to make sure you use the same VM Name you used when creating the virtual disk.
Missing Bluetooth Controller
If you get this error, make sure you close the virtual machine before adding the CMD codes.
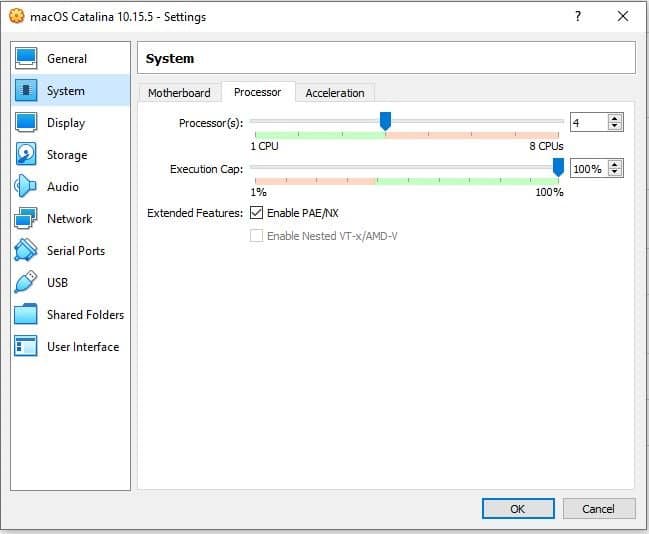
Guru Meditation error or Black Screen
This error is majorly seen because of two issues-
The critical error happens due to the guest operating system. It is trying to switch to the PAE mode, which is currently disabled by default in VirtualBox. PAE support can be enabled using the VM settings (System/Processor)”.
- Open VM VirtualBox
- File -> Settings -> System -> Processor
- Check Extended Features: Enable PAE/NX
OR,
For people with the black screen problem or Guro Meditation error, change the operating system version from macOS 10.13 High Sierra (64-bit) or macOS 10.12 Sierra (64-bit) to just the Mac OS X (64-bit). If the error still exists, switch the Video Memory Size to 128 MB from Virtual machine settings. This is a significant issue with most of the users.
This version of Mac OS X is not supported on this platform Reason: Iloveapple
Make sure Virtualization Technology (VT) is enabled from BIOS.
error: VBoxManage setextradata “OSX” “VBoxInternal/Devices/smc/0/Config/DeviceKey” “ourhardworkbythesewordsguardedpleasedontsteal(c)AppleComputerInc” and you are stuck at appleKeyStore: operation failed (pid:30 sel:7 ret:e00002c2 ‘-536870206’)
Exit VirtualBox before adding codes to CMD
Yhal Htet Aung
Try to change the inverted commons throughout the virtual codes. Since you are copying the codes, you might be using the wrong inverted commas.
So, copy the codes in your notepad file, replace all the inverted commas via your keyboard and then try again.

Invalid Virtualbox Version
Make sure you add the right virtual codes. You can download the correct version codes here-
Stuck in an infinite loop on Black Screen
Try using this command as the last command on CMD-
VBoxManage modifyvm “VM_name” –cpu-profile “Intel Core i7-6700K”
Or,
Try Motherboards Chipset – both PIIX3 and ICH9 one by one
install.nsh is not recognized as an internal command
1st method:
If you get ‘install.nsh’ is not recognized as an internal or external command, operable program, or script file. You have not attached the Virtualbox Boot Image.
See, https://www.geekrar.com/fix-macos-catalina-install-nsh-isnt-recognized-as-an-internal-error/
2nd method:
If you then get messages along the lines of ‘macOS Install DataLocked FilesBoot Filesboot.efi’ missing or not recognized:
run setup.nsh
now run, fs0:SystemLibraryCoreServicesboot.efi
and all should now spring into life.
3rd method:
- At UEFI prompt: Type exit
- You’ll be brought into an EFI text-mode GUI.
- Select Boot Maintenance Manager and click.
- Select Boot From File and click
You should see two entries in a list (they are cryptic looking PCI bus paths).
The first PCI path in the list is probably the boot partition that doesn’t contain bootable firmware. The second PCI path is probably to the recovery partition, the one you need to boot from. If the 2nd partition isn’t the recovery partition, look under the paths in the list to see if one of them is it. If the recovery partition isn’t present and valid, these instructions won’t work.
Click the 2nd entry, you should see (and then click):
macOS Install Data
Then click:
Locked Files
Then (if present), click
Boot Files
And finally click:
boot.efi
The installation will continue, or you will boot into the OS or get the Recovery utility menu (where macOS can be reinstalled from or Disk Utilities run). The ambiguity of that last statement is I did that awhile before writing this comment, and I don’t recall what I booted into first, only that it worked and was not hard to figure out what to do at that point. If you have a recovery partition, to boot directly into the Recovery Mode, turn on the Mac and immediately press and hold (⌘)-R
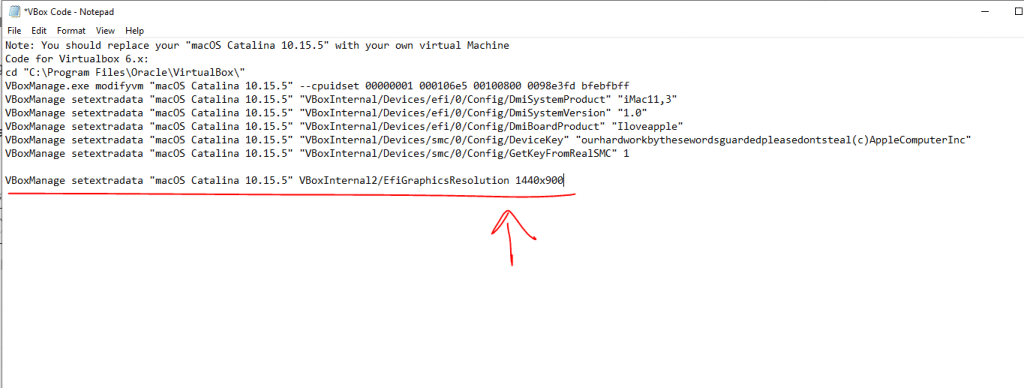
Set screen resolution
Use the following command-
cd “C:Program FilesOracleVirtualBox”
VBoxManage setextradata “VM Name” VBoxInternal2/EfiGraphicsResolution 1440×900
If you are still facing some issues, try using VMWare to install macOS on your Windows. When your current PC does not support Virtualbox and its configurations, try switching to VMWare. The process for it is relatively painless.
Share files and folders between Windows and MAC on Virtual Machines
You can go through this complete guide- How to share folders on VirtualBox & Vmware? (Windows-MAC) Step by Step Guide
I tried installing macOS Catalina on Virtual on Windows 10 on a low configration system. You can watch the video tutorial here-
In this article, I’m going to show you the complete guide to fix VirtualBox errors while installing Mac OS X. Most of the website that creating content regarding the installation of Mac OS X El Capitan or macOS Sierra on VirtualBox is not complete and have errors. The article might be correct and work on one device perfectly and without any problem. But there are lots of devices and different kinds of errors. A few months ago, we created an article on how to install Mac OS X El Capitan on VirtualBox and the visitors has got different kinds of problems.
One of our visitors “Holk” has read all the necessary comments and collected all the errors together and told the solutions. Here is his comment.
First THANXALOT to Mukhtar Jafari for all of his work! Great!
I needed more than 3 hours getting it to work. I was stuck in most of the errors mentioned above. Only with hints out of the comments I got it working. I`m merging it here so not anybody else will have this pain.
Creating the VM is easy, I´m not mentioning it here (just get vram to 128 mb!), problems were caused by the code (whatelse?!).
1) command prompt as admin
2) Mukhtar Jafari says: May 23, 2016 at 4:06 PM -> vboxmanage error
Aha, Add one more hyphen then try once again. Because when you copy and paste the code from Website
there will appear only one hyphen so use double hyphen *–* before cpuidset
3) LoThAr says: May 21, 2016 at 3:47 AM -> VBoxManage error: Could not find a registered machine named ‘”OS’
None of the solution posted worked for me, so, there is a way that cannot fail. Follow this steps:
In the DOS prompt type:
VBoxManage.exe list vms
You’ll see all your Virtual Machines (in case you have more than one). At the right of the Mac image is the GUID of the machine. Copy that GUID an replace it for the name of the VM in the command.
For example:
VBoxManage.exe list vms
“ZENTYAL2” {f5ee0212-7ca4-4710-b30e-b7e2ee881cb9}
“IE9 – Win7” {6730b42b-d555-4729-9948-711159678cac}
“Mac OS El Capitan” {9089dae0-6372-4c00-b415-b8963d54535f} “Missing Bluetooh Controller” error
You are getting the “Missing Bluetooh Controller” error because you are running the commands (Step# 5) while the Oracle VM software is open. Shut down the VM software completely and then run the commands. After the commands are ran, open up Oracle VM and start your VM session.
5) 3) Yhal Htet Aung says: May 19, 2016 at 12:53 PM -> “Missing Bluetooh Controller” error
Dude, I know what is the error. If you copy code from the website, try to change ” with your open inverted comma “. It is the error. After I changed the line with my open inverted comma for Search and Replace, then the problem solved. Make sure that you use your own open inverted comma in every single line. Try to check and replace it. Search and Replace doesn’t replace all the lines sometimes.
—————————————————————————-
These tips solved also the “considerRebuildOfPrelinkedKernel com.apple.kext.triggers triggered rebuild” error!
Conclusion: Wouldn´t it have been easier to add an ANSI-textfile with the right code to the downloads list?!
Nevertheless: Thanx to all of you!
Fix VirtualBox Errors While Installing Mac OS X
Now, I would like to shorten this whole passage into some steps. I hope you should get something from this article.
Step #1. While creating a new virtual machine, you should do the following tasks;
- Memory Size to 4 GB (Recommended)
- Disable Floppy disk
- Chipset to ICH9 or PIIX3 for some devices
- Processor minimum 2 recommended 4
- Video memory to 128 MB
Step #2. Whenever you face this problem “VBoxManage.exe: error: Unknown option. -cpuidset
The VM hangs on boot” while adding the first code in the Command Prompt. It’s because of a double hyphen. Use Double hyphen “- – “ before cpuidset.
unknown option – cpuidset
Step #3. When you see this error “VBoxManage error: Could not find a registered machine named ‘Your VM Name‘”, it’s because of your virtual machine name. You did not replace the VM name in the code. So you have replaced the VM name. And then insert the code. See the screenshot below.
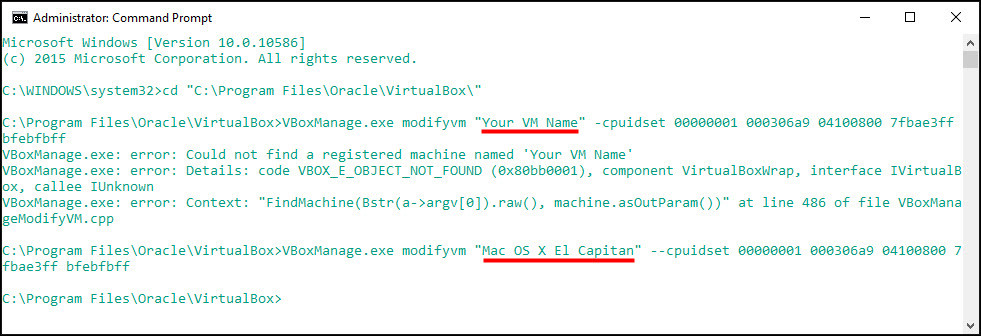
Could not find a registered machine name
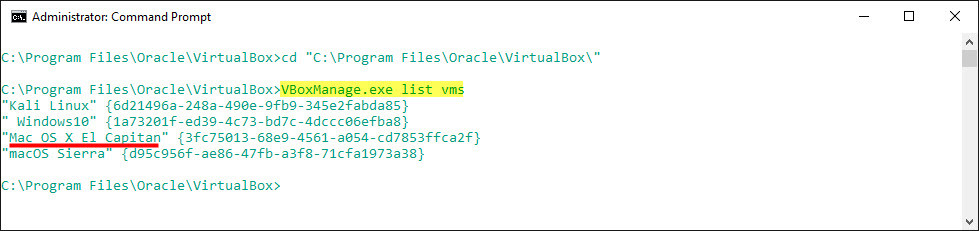
Or do it in this way. Type this command “VBoxManage.exe list vms”. You’ll see all your Virtual Machines (in case you have more than one). At the right of the Mac, image is the GUID of the machine. Copy that GUID a replace it for the name of the VM in the command.
“Kali Linux” {6d21496a-248a-490e-9fb9-345e2fabda85}
” Windows10″ {1a73201f-ed39-4c73-bd7c-4dccc06efba8}
“Mac OS X El Capitan” {3fc75013-68e9-4561-a054-cd7853ffca2f}
“macOS Sierra” {d95c956f-ae86-47fb-a3f8-71cfa1973a38}
Could not find a registered machine name
Step #4. How to fix this “Missing Bluetooth Controller…” error. When you see this error. because you are running the commands (Step# 5) while the Oracle VM software is open. Shut down the VM software completely and then run the commands. After the commands executed, open up Oracle VM and start your VM session.
If this method didn’t work. Try this method. One of our visitor “Yhal Htet Aung” have found this error. If you copy the code from the website, try to change ” with your open inverted comma “. It is the error. After I changed the line with my open inverted comma for Search and Replaced, then the problem solved. Make sure that you use your own open inverted comma in every single line. Try to check and replace it. Search and Replace doesn’t replace all the lines sometimes
These tips also solved the “considerRebuildOfPrelinkedKernel com.apple.kext.triggers triggered rebuild” error!

Fix VirtualBox Errors While Installing Mac OS X
Conclusion
These tips were for you dear visitors, and I hope you found this article helpful. If you have any questions regarding this problem or know the better solution. Please feel free to share it with us. Thanks for being with us.
Got similar error as the result of updating virtual box at the same time when the vm was running. Could not start VM. Tried:
VBoxManage showvminfo w7
VBoxManage: error: Could not find a registered machine named ‘w7’
VBoxManage: error: Details: code VBOX_E_OBJECT_NOT_FOUND (0x80bb0001), component VirtualBox, interface IVirtualBox, callee nsISupports
VBoxManage: error: Context: «FindMachine(Bstr(VMNameOrUuid).raw(), machine.asOutParam())» at line 2611 of file VBoxManageInfo.cpp
Run: VBoxManage -nologo list vms
and one of the line was
«» {2e8117bc-9551-4d2e-9831-3828569c98e4}
so I tried to replace the vm name with uuid:
VBoxManage showvminfo ‘2e8117bc-9551-4d2e-9831-3828569c98e4’
Name:
UUID: 2e8117bc-9551-4d2e-9831-3828569c98e4
Config file: /home/alexk/VirtualBox VMs/w7/w7.vbox
Access error details:
VBoxManage: error: Cannot attach medium ‘/usr/share/virtualbox/VBoxGuestAdditions.iso’ {66c6626f-8fae-4007-b15d-f5eb3fdd02a0}: medium is already associated with the current state of machine uuid {2e8117bc-9551-4d2e-9831-3828569c98e4}!
VBoxManage: error: Details: code VBOX_E_OBJECT_IN_USE (0x80bb000c), component Medium, interface IMedium
edited ~/VirtualBox VMs/w7/w7.vbox
excluded lines with 66c6626f-8fae-4007-b15d-f5eb3fdd02a0
tried again
VBoxManage showvminfo ‘2e8117bc-9551-4d2e-9831-3828569c98e4’
was all good — tried to start vm from GUI virtual box — was successfull, but I could not insert the cd with guest addition. Powered off vm; added cd/dvd — started agin — drive d: was not available, but guest additions were mounted as the drive e:
Applied — all good. Decided to add my comment as it may be useful for some body
![]()
Error finding machine! Could not find a registered machine named ‘centos’
I am pretty sure the name is correct. It it your program doesn’t support new version of VirtualBox?
this command: VBoxManage.exe startvm centos —type headless
work well, so I don’t think the problem is the name.
Version: VBoxVmService-5.2-Jujube.exe
![]()
I found where the problem is.
I have to do following steps manually:
Open «dcomcnfg.exe» , and find VboxVMService.
right-click -> proprieties -> log On -> This account -> (my login in information)
please do that automatically, thank you.
![]()
Same probleme and I was able to fix it by installing vboxvmservice 5.1 and after that installing the 5.2 version.
![]()
I have always had to edit the Log On tab in Services to get VM’s to start automatically.

![]()
Same Problem with version 6.0 (VirtualBox & VBoxVmService). It seems like a VMs that was added by a user is not visible to the system account.
I have to do following steps manually.
I have to open «dcomcnfg.exe» , and find VboxVMService.
right-click -> proprieties -> log On -> This account -> (my login in information)
I have always had to edit the Log On tab in Services to get VM’s to start automatically.
This is not a good solution (and does not work for me). What if you have to manage VMs from multiple users?
![]()
+1 On this. Same issue. See attached, using Virtual Box 6. The «log on» option isn’t an option. Like OP, running VBoxManage.exe directly successfully launches my image.

![]()
+1 On this. Same issue. See attached, using Virtual Box 6. The «log on» option isn’t an option. Like OP, running
VBoxManage.exedirectly successfully launches my image.
Same issue with VirtualBox 6.1 on VBoxVMService-6.1-Kiwi
Resolution suggested by #4 (comment) still works.
![]()
I found where the problem is.
I have to do following steps manually:
Open «dcomcnfg.exe» , and find VboxVMService.
right-click -> proprieties -> log On -> This account -> (my login in information)please do that automatically, thank you.
Fabulous! This solves my problem: my login user can’t see the correct running state of the virtual machine when using the VirtualBox management program.
It is recommended to add this usage rule to the instruction document Howto.txt
VBoxVMService : Error finding machine! Could not find a registered machine named
This is common error when you delete/kill the vboxheadless.exe service from task manager. There could be other reasons too.
1. To fix this I attempted to restart vms machines manually from vms prompt. But no success. There was errors what unable to find running service. You can find troubleshooting guide of vms service in doc folder. I am copying troubleshooting guide content in bottom of this post.
2. If above don’t work then simply remove only all machines from Virtual box manager and uninstall it. Also uninstall VBoxVMservice and re-install both of them. Now browse and add one of the machine in Oracle Virtual box and add machine details in VMService configuration file i.e.VBoxVmService.ini
Once it is done , list of machines using following commands. If no machine listed then restart the windows server and it will work.
Note : You will always see Oracle VM Virtual Box machines as «Powered Off» status. But machines would be actually running using VBoxVMService headless service.
c:vms>VmServiceControl.exe -l
VM0: VBOX_8_56_01_SHELL is running.
c:vms>VmServiceControl.exe -sd 0
VM0: VBOX_8_56_01_SHELL has been shutted down.
c:vms>VmServiceControl.exe -l
VM0: VBOX_8_56_01_SHELL is saved.
c:vms>VmServiceControl.exe -su 0
VM0: VBOX_8_56_01_SHELL has been started up.
————-VBoxVMService Troubleshooting Guide———————
##############################################################################
#
# PART I — BEFORE YOU START
#
##############################################################################
Make sure VirtualBox has been installed and your VMs can be started from VirtualBox Manager without any problem. Shutdown all the VMs and close VirtualBox Manager.
IMPORTANT: If you want to control your VMs with VRDP, enable remote display at display settings and assign a dedicated port for each individual VM (e.g. use: 3010 for Vm0, 3020 for Vm1, etc.). Do not use the standard port 3389, which is used by your host machine!
##############################################################################
#
# PART II — INSTALLATION
#
##############################################################################
Step 1. Run the VBoxVmService setup program.
Step 2. Open up VBoxVmService.ini in installation folder and modify it to fit your needs. The file contains an example setup with two virtual machines.
Key / Value pair Description
——————————————————————————
[Settings]
VBOX_USER_HOME=C:UsersYOUR_NAME_HERE.VirtualBox The actual path to your user’s .VirtualBox directory. It is usually located in your users’ personal folder.
RunWebService=no Whether or not start up VBoxWebSrv.exe, the VirtualBox HTTP web service automatically. Could be «yes» or «no». Leave it to «no» if you don’t know what it is.
WebServiceParam= If necessary, you can specify additional parameters for VBoxWebSrv.exe, like «—port» for binding to non-default port.
PauseShutdown=5000 A pause parameter to slow down the Windows shutdown process and to prevent VMs from crashing on shutdown/reboot. (5000 = 5 seconds) Note Windows has a limit to how long the service controller could wait when system reboots. The time limit is specified in the WaitToKillServiceTimeout value of the following registry key: HKEY_LOCAL_MACHINESYSTEMCurrentControlSetControl. Your PauseShutdown value should never exceed this time limit.
[Vm0]
VmName=ubuntu The name of the VM to start (case sensitive!)
ShutdownMethod=savestate The shutdown method («savestate», or «acpipowerbutton»). When «savestate» is used, the machine state is saved and will be resumed when you start VM next time. When «acpipowerbutton» is used, as long as client OS support it, the VM will get a clean shutdown. If your VM takes long time to poweroff, it’s recommanded to use savestate, which could be done very quickly.
AutoStart=yes Whether or not this VM will be started automatically, when VBoxVmService runs. Default to «yes».
[Vm1]
VmName=winxp As you can see, the above values almost repeat for every [VmX] section of the file.
ShutdownMethod=acpipowerbutton
AutoStart=no This VM will not be started automatically.
Step 3. Reboot your system.
If everything goes on right, you could now connect to your VMs with VRDP clients (or ssh clients, if you’ve configured ssh server inside your VM). If not, refer to TROUBLESHOOTING section below for how to debug.
##############################################################################
#
# PART III — UNINSTALL
#
##############################################################################
Step 1. Stop running VBoxVmService service. Run VmServiceTray.exe to stop VBoxVmService, then exit VmServiceTray.exe.
Step 2. Open Control Panel -> Programs, select Uninstall VBoxVmService.
##############################################################################
#
# PART IV — TROUBLESHOOTING
#
##############################################################################
If the service does not bring your VMs up as desired, try the following steps:
Setp 1. Check config file.
Carefully re-check the settings you made in «VBoxVmService.ini».
Setp 2. Debug with VmServiceControl.exe.
Switch to a command prompt, cd to the VBoxVmService directory and type:
VmServiceControl.exe -l [ENTER]
to list all the VMs you configured in «VBoxVmService.ini», and their current states.
If something goes wrong, reduce the number of VMs in your ini file to one (= only have the section [Settings] and the section [Vm0] in your ini-file) in your ini-file, for debugging.
The command:
VmServiceControl.exe -su 0 [ENTER]
can be used to bring up the VM you set up in the section [Vm0] of the «VBoxVmService.ini» file.
If you have successfully started a VM, you should end up with a «VBoxHeadless.exe» process, running as the impersonated user (check in task manager).
The command:
VmServiceControl.exe -sd 0 [ENTER]
can be used to stop the VM targeting [Vm0]. Afterwards, there should be no running «VBoxHeadless.exe»-process. Additionally, you should see a «VBoxSVC.exe»-process terminating shortly after a successful shutdown of «VBoxHeadless.exe».
Step 3. Read the log files
The file VBoxVmService.log logs everything imortant to VBoxVmService, like all commands it received, and their results. If something went wrong, you can find error code and/or message there.
If you see error like «Could not find a registered machine named…», check if the environment variable VBOX_USER_HOME has been setup correctly.
If you made a mistake on VBOX_USER_HOME, however, fixing it at VBoxVmService.ini is not enough. Because the value was get written into environment variable during installation. You’ll need to uninstall VBoxVmService first, then install again.
After installation and everytime when you changed VBOX_USER_HOME later, a system reboot might be required to get VBoxVmService work correctly. So give it a try if you haven’t.
If you can’t see any error in VBoxVmService.log, but the VM just don’t run as expected, check if something goes wrong from VirtualBox’s own log, which is saved to file VBoxSVC.log under your VBOX_USER_HOME folder.
Step 4. Ask for help
Refer to the project wiki at http://sourceforge.net/p/vboxvmservice/wiki/ for a list of known issues.
If you are still in trouble, you are welcome to create a support ticket at http://sourceforge.net/p/vboxvmservice/support-requests/. Please be sure to include your VBoxVmService.ini and VBoxVmService.log, so that we can help checking what might be wrong. We might be on VirtualBox’s official forums now and then, so feel free to contact us there, too.
VBoxManage.exe: error: Could not find a registered machine named ‘rac1’
Error while adding the disk for shared use:
E:rac>VBoxManage storageattach rac1 --storagectl "SATA" --port 1 --device 0 --type hdd --medium asm1.vdi --mtype shareable
VBoxManage.exe: error: Could not find a registered machine named 'rac1'
VBoxManage.exe: error: Details: code VBOX_E_OBJECT_NOT_FOUND (0x80bb0001), component VirtualBoxWrap, interface IVirtualBox, callee IUnknown
VBoxManage.exe: error: Context: "FindMachine(Bstr(a->argv[0]).raw(), machine.asOutParam())" at line 335 of file VBoxManageStorageController.cpp
Solution: Verify the name of machine present or created in Virtual Box, its case senstive so you have to give the name you created virtual machine in Oracle Virtual Box.
In my case i having machine name in upper case RAC1 that cause the problem.

I run command again with upper case will fixed the issue:
E:rac>VBoxManage storageattach RAC1 --storagectl "SATA" --port 1 --device 0 --type hdd --medium asm1.vdi --mtype shareable
Приветствую форумчан. Сегодня настраивал свою машину и получил вот такую вот ошибку. Не будьте равнодушными, помогите избавится.
VBoxManage.exe: error: Could not find a registered machine named »
VBoxManage.exe: error: Details: code VBOX_E_OBJECT_NOT_FOUND (0x80bb0001), component VirtualBoxWrap, interface IVirtualBox, callee IUnknown
VBoxManage.exe: error: Context: «FindMachine(Bstr(a->argv[0]).raw(), machine.asOutParam())» at line 797 of file VBoxManageMisc.cpp
VBoxManage.exe: error: Could not find a registered machine named »
VBoxManage.exe: error: Details: code VBOX_E_OBJECT_NOT_FOUND (0x80bb0001), component VirtualBoxWrap, interface IVirtualBox, callee IUnknown
VBoxManage.exe: error: Context: «FindMachine(Bstr(a->argv[0]).raw(), machine.asOutParam())» at line 500 of file VBoxManageModifyVM.cpp
Для продолжения нажмите любую клавишу . . .