1. Introduction
Asynchronous messaging is a type of loosely-coupled distributed communication that is becoming increasingly popular for implementing event-driven architectures. Fortunately, the Spring Framework provides the Spring AMQP project allowing us to build AMQP-based messaging solutions.
On the other hand, dealing with errors in such environments can be a non-trivial task. So in this tutorial, we’ll cover different strategies for handling errors.
2. Environment Setup
For this tutorial, we’ll use RabbitMQ which implements the AMQP standard. Also, Spring AMQP provides the spring-rabbit module which makes integration really easy.
Let’s run RabbitMQ as a standalone server. We’ll run it in a Docker container by executing the following command:
docker run -d -p 5672:5672 -p 15672:15672 --name my-rabbit rabbitmq:3-managementFor detailed configuration and project dependencies setup, please refer to our Spring AMQP article.
3. Failure Scenario
Usually, there are more types of errors that can occur in messaging-based systems compared to a monolith or single-packaged applications due to its distributed nature.
We can point out some of the types of exceptions:
- Network- or I/O-related – general failures of network connections and I/O operations
- Protocol- or infrastructure-related – errors that usually represent misconfiguration of the messaging infrastructure
- Broker-related – failures that warn about improper configuration between clients and an AMQP broker. For instance, reaching defined limits or threshold, authentication or invalid policies configuration
- Application- and message-related – exceptions that usually indicate a violation of some business or application rules
Certainly, this list of failures is not exhaustive but contains the most common type of errors.
We should note that Spring AMQP handles connection-related and low-level issues out of the box, for example by applying retry or requeue policies. Additionally, most of the failures and faults are converted into an AmqpException or one of its subclasses.
In the next sections, we’ll mostly focus on application-specific and high-level errors and then cover global error handling strategies.
4. Project Setup
Now, let’s define a simple queue and exchange configuration to start:
public static final String QUEUE_MESSAGES = "baeldung-messages-queue";
public static final String EXCHANGE_MESSAGES = "baeldung-messages-exchange";

@Bean
Queue messagesQueue() {
    return QueueBuilder.durable(QUEUE_MESSAGES)
      .build();
}

@Bean
DirectExchange messagesExchange() {
    return new DirectExchange(EXCHANGE_MESSAGES);
}

@Bean
Binding bindingMessages() {
    return BindingBuilder.bind(messagesQueue()).to(messagesExchange()).with(QUEUE_MESSAGES);
}
Next, let’s create a simple producer:
public void sendMessage() {
    rabbitTemplate
      .convertAndSend(SimpleDLQAmqpConfiguration.EXCHANGE_MESSAGES,
        SimpleDLQAmqpConfiguration.QUEUE_MESSAGES, "Some message id:" + messageNumber++);
}
And finally, a consumer that throws an exception:
@RabbitListener(queues = SimpleDLQAmqpConfiguration.QUEUE_MESSAGES)
public void receiveMessage(Message message) throws BusinessException {
    throw new BusinessException();
}
By default, all failed messages will be immediately requeued at the head of the target queue over and over again.
Let’s run our sample application by executing the next Maven command:
mvn spring-boot:run -Dstart-class=com.baeldung.springamqp.errorhandling.ErrorHandlingAppNow we should see the similar resulting output:
WARN 22260 --- [ntContainer#0-1] s.a.r.l.ConditionalRejectingErrorHandler :
  Execution of Rabbit message listener failed.
Caused by: com.baeldung.springamqp.errorhandling.errorhandler.BusinessException: null
Consequently, by default, we will see an infinite number of such messages in the output.
To change this behavior we have two options:
- Set the default-requeue-rejected option to false on the listener side – spring.rabbitmq.listener.simple.default-requeue-rejected=false
- Throw an AmqpRejectAndDontRequeueException – this might be useful for messages that won’t make sense in the future, so they can be discarded.
Now, let’s discover how to process failed messages in a more intelligent way.
5. Dead Letter Queue
A Dead Letter Queue (DLQ) is a queue that holds undelivered or failed messages. A DLQ allows us to handle faulty or bad messages, monitor failure patterns and recover from exceptions in a system.
More importantly, this helps to prevent infinite loops in queues that are constantly processing bad messages and degrading system performance.
Altogether, there are two main concepts: Dead Letter Exchange (DLX) and a Dead Letter Queue (DLQ) itself. In fact, DLX is a normal exchange that we can define as one of the common types: direct, topic or fanout.
It’s very important to understand that a producer doesn’t know anything about queues. It’s only aware of exchanges and all produced messages are routed according to the exchange configuration and the message routing key.
Now let’s see how to handle exceptions by applying the Dead Letter Queue approach.
5.1. Basic Configuration
In order to configure a DLQ we need to specify additional arguments while defining our queue:
@Bean
Queue messagesQueue() {
    return QueueBuilder.durable(QUEUE_MESSAGES)
      .withArgument("x-dead-letter-exchange", "")
      .withArgument("x-dead-letter-routing-key", QUEUE_MESSAGES_DLQ)
      .build();
}

@Bean
Queue deadLetterQueue() {
    return QueueBuilder.durable(QUEUE_MESSAGES_DLQ).build();
}
In the above example, we’ve used two additional arguments: x-dead-letter-exchange and x-dead-letter-routing-key. The empty string value for the x-dead-letter-exchange option tells the broker to use the default exchange.
The second argument is as equally important as setting routing keys for simple messages. This option changes the initial routing key of the message for further routing by DLX.
5.2. Failed Messages Routing
So, when a message fails to deliver, it’s routed to the Dead Letter Exchange. But as we’ve already noted, DLX is a normal exchange. Therefore, if the failed message routing key doesn’t match the exchange, it won’t be delivered to the DLQ.
Exchange: (AMQP default)
Routing Key: baeldung-messages-queue.dlq
So, if we omit the x-dead-letter-routing-key argument in our example, the failed message will be stuck in an infinite retry loop.
Additionally, the original meta information of the message is available in the x-death header:
x-death:
  count: 1
  exchange: baeldung-messages-exchange
  queue: baeldung-messages-queue
  reason: rejected
  routing-keys: baeldung-messages-queue
  time: 1571232954
The information above is available in the RabbitMQ management console usually running locally on port 15672.
Besides this configuration, if we are using Spring Cloud Stream we can even simplify the configuration process by leveraging configuration properties republishToDlq and autoBindDlq.
5.3. Dead Letter Exchange
In the previous section, we’ve seen that the routing key is changed when a message is routed to the dead letter exchange. But this behavior is not always desirable. We can change it by configuring DLX by ourselves and defining it using the fanout type:
public static final String DLX_EXCHANGE_MESSAGES = QUEUE_MESSAGES + ".dlx";

@Bean
Queue messagesQueue() {
    return QueueBuilder.durable(QUEUE_MESSAGES)
      .withArgument("x-dead-letter-exchange", DLX_EXCHANGE_MESSAGES)
      .build();
}

@Bean
FanoutExchange deadLetterExchange() {
    return new FanoutExchange(DLX_EXCHANGE_MESSAGES);
}

@Bean
Queue deadLetterQueue() {
    return QueueBuilder.durable(QUEUE_MESSAGES_DLQ).build();
}

@Bean
Binding deadLetterBinding() {
    return BindingBuilder.bind(deadLetterQueue()).to(deadLetterExchange());
}
This time we’ve defined a custom exchange of the fanout type, so messages will be sent to all bounded queues. Furthermore, we’ve set the value of the x-dead-letter-exchange argument to the name of our DLX. At the same time, we’ve removed the x-dead-letter-routing-key argument.
Now if we run our example the failed message should be delivered to the DLQ, but without changing the initial routing key:
Exchange: baeldung-messages-queue.dlx
Routing Key: baeldung-messages-queue
5.4. Processing Dead Letter Queue Messages
Of course, the reason we moved them to the Dead Letter Queue is so they can be reprocessed at another time.
Let’s define a listener for the Dead Letter Queue:
@RabbitListener(queues = QUEUE_MESSAGES_DLQ)
public void processFailedMessages(Message message) {
    log.info("Received failed message: {}", message.toString());
}
If we run our code example now, we should see the log output:
WARN 11752 --- [ntContainer#0-1] s.a.r.l.ConditionalRejectingErrorHandler :
  Execution of Rabbit message listener failed.
INFO 11752 --- [ntContainer#1-1] c.b.s.e.consumer.SimpleDLQAmqpContainer  :
  Received failed message:
We’ve got a failed message, but what should we do next? The answer depends on specific system requirements, the kind of the exception or type of the message.
For instance, we can just requeue the message to the original destination:
@RabbitListener(queues = QUEUE_MESSAGES_DLQ)
public void processFailedMessagesRequeue(Message failedMessage) {
    log.info("Received failed message, requeueing: {}", failedMessage.toString());
    rabbitTemplate.send(EXCHANGE_MESSAGES,
      failedMessage.getMessageProperties().getReceivedRoutingKey(), failedMessage);
}
But such exception logic is not dissimilar from the default retry policy:
INFO 23476 --- [ntContainer#0-1] c.b.s.e.c.RoutingDLQAmqpContainer        :
  Received message:
WARN 23476 --- [ntContainer#0-1] s.a.r.l.ConditionalRejectingErrorHandler :
  Execution of Rabbit message listener failed.
INFO 23476 --- [ntContainer#1-1] c.b.s.e.c.RoutingDLQAmqpContainer        :
  Received failed message, requeueing:
A common strategy may need to retry processing a message for n times and then reject it. Let’s implement this strategy by leveraging message headers:
public void processFailedMessagesRetryHeaders(Message failedMessage) {
    Integer retriesCnt = (Integer) failedMessage.getMessageProperties()
      .getHeaders().get(HEADER_X_RETRIES_COUNT);
    if (retriesCnt == null) retriesCnt = 1;
    if (retriesCnt > MAX_RETRIES_COUNT) {
        log.info("Discarding message");
        return;
    }
    log.info("Retrying message for the {} time", retriesCnt);
    failedMessage.getMessageProperties()
      .getHeaders().put(HEADER_X_RETRIES_COUNT, ++retriesCnt);
    rabbitTemplate.send(EXCHANGE_MESSAGES,
      failedMessage.getMessageProperties().getReceivedRoutingKey(), failedMessage);
}
At first, we are getting the value of the x-retries-count header, then we compare this value with the maximum allowed value. Subsequently, if the counter reaches the attempts limit number the message will be discarded:
WARN 1224 --- [ntContainer#0-1] s.a.r.l.ConditionalRejectingErrorHandler :
  Execution of Rabbit message listener failed.
INFO 1224 --- [ntContainer#1-1] c.b.s.e.consumer.DLQCustomAmqpContainer  :
  Retrying message for the 1 time
WARN 1224 --- [ntContainer#0-1] s.a.r.l.ConditionalRejectingErrorHandler :
  Execution of Rabbit message listener failed.
INFO 1224 --- [ntContainer#1-1] c.b.s.e.consumer.DLQCustomAmqpContainer  :
  Retrying message for the 2 time
WARN 1224 --- [ntContainer#0-1] s.a.r.l.ConditionalRejectingErrorHandler :
  Execution of Rabbit message listener failed.
INFO 1224 --- [ntContainer#1-1] c.b.s.e.consumer.DLQCustomAmqpContainer  :
  Discarding message
We should add that we can also make use of the x-message-ttl header to set a time after that the message should be discarded. This might be helpful for preventing queues to grow infinitely.
5.5. Parking Lot Queue
On the other hand, consider a situation when we cannot just discard a message, it could be a transaction in the banking domain for example. Alternatively, sometimes a message may require manual processing or we simply need to record messages that failed more than n times.
For situations like this, there is a concept of a Parking Lot Queue. We can forward all messages from the DLQ, that failed more than the allowed number of times, to the Parking Lot Queue for further processing.
Let’s now implement this idea:
public static final String QUEUE_PARKING_LOT = QUEUE_MESSAGES + ".parking-lot";
public static final String EXCHANGE_PARKING_LOT = QUEUE_MESSAGES + "exchange.parking-lot";

@Bean
FanoutExchange parkingLotExchange() {
    return new FanoutExchange(EXCHANGE_PARKING_LOT);
}

@Bean
Queue parkingLotQueue() {
    return QueueBuilder.durable(QUEUE_PARKING_LOT).build();
}

@Bean
Binding parkingLotBinding() {
    return BindingBuilder.bind(parkingLotQueue()).to(parkingLotExchange());
}
Secondly, let’s refactor the listener logic to send a message to the parking lot queue:
@RabbitListener(queues = QUEUE_MESSAGES_DLQ)
public void processFailedMessagesRetryWithParkingLot(Message failedMessage) {
    Integer retriesCnt = (Integer) failedMessage.getMessageProperties()
      .getHeaders().get(HEADER_X_RETRIES_COUNT);
    if (retriesCnt == null) retriesCnt = 1;
    if (retriesCnt > MAX_RETRIES_COUNT) {
        log.info("Sending message to the parking lot queue");
        rabbitTemplate.send(EXCHANGE_PARKING_LOT,
          failedMessage.getMessageProperties().getReceivedRoutingKey(), failedMessage);
        return;
    }
    log.info("Retrying message for the {} time", retriesCnt);
    failedMessage.getMessageProperties()
      .getHeaders().put(HEADER_X_RETRIES_COUNT, ++retriesCnt);
    rabbitTemplate.send(EXCHANGE_MESSAGES,
      failedMessage.getMessageProperties().getReceivedRoutingKey(), failedMessage);
}
Eventually, we also need to process messages that arrive at the parking lot queue:
@RabbitListener(queues = QUEUE_PARKING_LOT)
public void processParkingLotQueue(Message failedMessage) {
    log.info("Received message in parking lot queue");
    // Save to DB or send a notification.
}
Now we can save the failed message to the database or perhaps send an email notification.
Let’s test this logic by running our application:
WARN 14768 --- [ntContainer#0-1] s.a.r.l.ConditionalRejectingErrorHandler :
  Execution of Rabbit message listener failed.
INFO 14768 --- [ntContainer#1-1] c.b.s.e.c.ParkingLotDLQAmqpContainer     :
  Retrying message for the 1 time
WARN 14768 --- [ntContainer#0-1] s.a.r.l.ConditionalRejectingErrorHandler :
  Execution of Rabbit message listener failed.
INFO 14768 --- [ntContainer#1-1] c.b.s.e.c.ParkingLotDLQAmqpContainer     :
  Retrying message for the 2 time
WARN 14768 --- [ntContainer#0-1] s.a.r.l.ConditionalRejectingErrorHandler :
  Execution of Rabbit message listener failed.
INFO 14768 --- [ntContainer#1-1] c.b.s.e.c.ParkingLotDLQAmqpContainer     :
  Sending message to the parking lot queue
INFO 14768 --- [ntContainer#2-1] c.b.s.e.c.ParkingLotDLQAmqpContainer     :
  Received message in parking lot queue
As we can see from the output, after several failed attempts, the message was sent to the Parking Lot Queue.
6. Custom Error Handling
In the previous section, we’ve seen how to handle failures with dedicated queues and exchanges. However, sometimes we may need to catch all errors, for example for logging or persisting them to the database.
6.1. Global ErrorHandler
Until now, we’ve used the default SimpleRabbitListenerContainerFactory and this factory by default uses ConditionalRejectingErrorHandler. This handler catches different exceptions and transforms them into one of the exceptions within the AmqpException hierarchy.
It’s important to mention that if we need to handle connection errors, then we need to implement the ApplicationListener interface.
Simply put, ConditionalRejectingErrorHandler decides whether to reject a specific message or not. When the message that caused an exception is rejected, it won’t be requeued.
Let’s define a custom ErrorHandler that will simply requeue only BusinessExceptions:
public class CustomErrorHandler implements ErrorHandler {
    @Override
    public void handleError(Throwable t) {
        if (!(t.getCause() instanceof BusinessException)) {
            throw new AmqpRejectAndDontRequeueException("Error Handler converted exception to fatal", t);
        }
    }
}
Furthermore, as we are throwing the exception inside our listener method it is wrapped in a ListenerExecutionFailedException. So, we need to call the getCause method to get a source exception.
6.2. FatalExceptionStrategy
Under the hood, this handler uses the FatalExceptionStrategy to check whether an exception should be considered fatal. If so, the failed message will be rejected.
By default these exceptions are fatal:
- MessageConversionException
- MessageConversionException
- MethodArgumentNotValidException
- MethodArgumentTypeMismatchException
- NoSuchMethodException
- ClassCastException
Instead of implementing the ErrorHandler interface, we can just provide our FatalExceptionStrategy:
public class CustomFatalExceptionStrategy
      extends ConditionalRejectingErrorHandler.DefaultExceptionStrategy {
    @Override
    public boolean isFatal(Throwable t) {
        return !(t.getCause() instanceof BusinessException);
    }
}
Finally, we need to pass our custom strategy to the ConditionalRejectingErrorHandler constructor:
@Bean
public SimpleRabbitListenerContainerFactory rabbitListenerContainerFactory(
  ConnectionFactory connectionFactory,
  SimpleRabbitListenerContainerFactoryConfigurer configurer) {
      SimpleRabbitListenerContainerFactory factory =
        new SimpleRabbitListenerContainerFactory();
      configurer.configure(factory, connectionFactory);
      factory.setErrorHandler(errorHandler());
      return factory;
}

@Bean
public ErrorHandler errorHandler() {
    return new ConditionalRejectingErrorHandler(customExceptionStrategy());
}

@Bean
FatalExceptionStrategy customExceptionStrategy() {
    return new CustomFatalExceptionStrategy();
}
7. Conclusion
In this tutorial, we’ve discussed different ways of handling errors while using Spring AMQP, and RabbitMQ in particular.
Every system needs a specific error handling strategy. We’ve covered the most common ways of error handling in event-driven architectures. Furthermore, we’ve seen that we can combine multiple strategies to build a more comprehensive and robust solution.
As always, the full source code of the article is available over on GitHub.
Get started with Spring 5 and Spring Boot 2, through the Learn Spring course:
>> THE COURSE
Execution of Rabbit message listener failed, and the error handler threw an exception
The message is converted correctly but still gives an error
The RabbitMQ configuration look like this:
@Configuration
@RequiredArgsConstructor
public class RabbitConfig implements RabbitListenerConfigurer {
    private final RabbitConfigProperties properties;
    private final ObjectMapper mapper;
    public static final String ASSISTANT_STATEMENT_EXCHANGE = "assistant.statement";
    public static final String STATEMENTS_LOAD_REQUEST_QUEUE = "statements.load.request";
    public static final String LOAD_REQUEST_KEY = "load.request";


    @Bean
    public ConnectionFactory connectionFactory() {
        CachingConnectionFactory connectionFactory =
                new CachingConnectionFactory(properties.getHostname());

        connectionFactory.setUsername(properties.getUsername());
        connectionFactory.setPassword(properties.getPassword());

        return connectionFactory;
    }

    @Bean
    public AmqpAdmin amqpAdmin() {
        return new RabbitAdmin(connectionFactory());
    }

    @Bean
    public Jackson2JsonMessageConverter producerJackson2MessageConverter() {
        return new Jackson2JsonMessageConverter(mapper);
    }

    @Bean
    public RabbitTemplate rabbitTemplate() {
        RabbitTemplate rabbitTemplate = new RabbitTemplate(connectionFactory());
        rabbitTemplate.setMessageConverter(producerJackson2MessageConverter());
        return rabbitTemplate;
    }

    @Bean
    public MappingJackson2MessageConverter consumerJackson2MessageConverter() {
        return new MappingJackson2MessageConverter();
    }

    @Bean
    public MessageHandlerMethodFactory messageHandlerMethodFactory() {
        DefaultMessageHandlerMethodFactory messageHandlerMethodFactory = new DefaultMessageHandlerMethodFactory();
        messageHandlerMethodFactory.setMessageConverter(consumerJackson2MessageConverter());
        return messageHandlerMethodFactory;
    }

    @Override
    public void configureRabbitListeners(RabbitListenerEndpointRegistrar registrar) {
        registrar.setMessageHandlerMethodFactory(messageHandlerMethodFactory());
    }

    @Bean
    public DirectExchange statementExchange() {
        return ExchangeBuilder.directExchange(ASSISTANT_STATEMENT_EXCHANGE).build();
    }

    @Bean
    public Queue statementLoadRequestQueue() {
        return QueueBuilder.durable(STATEMENTS_LOAD_RESPONSE_QUEUE).build();
    }


    @Bean
    public Binding statementLoadRequestBinding() {
        return BindingBuilder.bind(statementLoadRequestQueue())
                .to(statementExchange())
                .with(LOAD_REQUEST_KEY);
    }
I also have a message sender:
@Log4j2
@Component
@RequiredArgsConstructor
public class StatementEmitter {
    private final AmqpTemplate template;
    private final DirectExchange statementExchange;
    private final ObjectMapper mapper;

    public void requestStatement(TeacherIdDto dto) {
        try {
            final String json = mapper.writeValueAsString(dto);
            Message message = MessageBuilder
                    .withBody(json.getBytes())
                    .setContentType(MessageProperties.CONTENT_TYPE_JSON)
                    .setContentEncoding("UTF-8")
                    .setDeliveryModeIfAbsentOrDefault(MessageDeliveryMode.PERSISTENT)
                    .build();
            template.convertAndSend(statementExchange.getName(), "load.request", message);
        } catch (JsonProcessingException e) {
            log.error("Object mapper error: " + e);
        }
    }
And consumer:
@Log4j2
@Component
@EnableRabbit
@RequiredArgsConstructor
public class StatementListener {

    @RabbitListener(queues = RabbitConfig.STATEMENTS_LOAD_REQUEST_QUEUE)
    public void processLoadRequest(@NotNull Message<TeacherIdDto> dto) {
        log.info(String.format("Message: %s", dto));
    }
}
Dto:
@Data
@AllArgsConstructor
@NoArgsConstructor
public class TeacherIdDto implements Serializable {
    private String teacherId;
}
If I am sending json through the sender, and my consumer processes it, I will get this error:
2022-11-15 02:37:00.581  INFO 12500 --- [ntContainer#1-1] r.c.t.rabbit.listener.StatementListener  : Message: GenericMessage [payload={teacherId=vbbvnbvnbnvbvn}, headers={amqp_receivedDeliveryMode=PERSISTENT, amqp_receivedRoutingKey=load.request, amqp_contentEncoding=UTF-8, amqp_receivedExchange=assistant.statement, amqp_deliveryTag=2, amqp_consumerQueue=statements.load.request, amqp_redelivered=false, id=93b00729-f3e6-92fe-c221-d686d00f8982, amqp_consumerTag=amq.ctag-HAq0NGeKCWigy9HyuNKkAA, amqp_lastInBatch=false, contentType=application/json, timestamp=1668469020581}]
2022-11-15 02:37:00.581  WARN 12500 --- [ntContainer#0-1] s.a.r.l.ConditionalRejectingErrorHandler : Execution of Rabbit message listener failed.

org.springframework.amqp.rabbit.support.ListenerExecutionFailedException: Failed to convert message
    at org.springframework.amqp.rabbit.listener.adapter.MessagingMessageListenerAdapter.onMessage(MessagingMessageListenerAdapter.java:156) ~[spring-rabbit-2.4.6.jar:2.4.6]
    at org.springframework.amqp.rabbit.listener.AbstractMessageListenerContainer.doInvokeListener(AbstractMessageListenerContainer.java:1670) ~[spring-rabbit-2.4.6.jar:2.4.6]
    at org.springframework.amqp.rabbit.listener.AbstractMessageListenerContainer.actualInvokeListener(AbstractMessageListenerContainer.java:1589) ~[spring-rabbit-2.4.6.jar:2.4.6]
    at org.springframework.amqp.rabbit.listener.AbstractMessageListenerContainer.invokeListener(AbstractMessageListenerContainer.java:1577) ~[spring-rabbit-2.4.6.jar:2.4.6]
    at org.springframework.amqp.rabbit.listener.AbstractMessageListenerContainer.doExecuteListener(AbstractMessageListenerContainer.java:1568) ~[spring-rabbit-2.4.6.jar:2.4.6]
    at org.springframework.amqp.rabbit.listener.AbstractMessageListenerContainer.executeListener(AbstractMessageListenerContainer.java:1512) ~[spring-rabbit-2.4.6.jar:2.4.6]
    at org.springframework.amqp.rabbit.listener.SimpleMessageListenerContainer.doReceiveAndExecute(SimpleMessageListenerContainer.java:993) ~[spring-rabbit-2.4.6.jar:2.4.6]
    at org.springframework.amqp.rabbit.listener.SimpleMessageListenerContainer.receiveAndExecute(SimpleMessageListenerContainer.java:940) ~[spring-rabbit-2.4.6.jar:2.4.6]
    at org.springframework.amqp.rabbit.listener.SimpleMessageListenerContainer.access$1600(SimpleMessageListenerContainer.java:84) ~[spring-rabbit-2.4.6.jar:2.4.6]
    at org.springframework.amqp.rabbit.listener.SimpleMessageListenerContainer$AsyncMessageProcessingConsumer.mainLoop(SimpleMessageListenerContainer.java:1317) ~[spring-rabbit-2.4.6.jar:2.4.6]
    at org.springframework.amqp.rabbit.listener.SimpleMessageListenerContainer$AsyncMessageProcessingConsumer.run(SimpleMessageListenerContainer.java:1223) ~[spring-rabbit-2.4.6.jar:2.4.6]
    at java.base/java.lang.Thread.run(Thread.java:829) ~[na:na]
Caused by: org.springframework.amqp.support.converter.MessageConversionException: Failed to convert Message content
    at org.springframework.amqp.support.converter.AbstractJackson2MessageConverter.doFromMessage(AbstractJackson2MessageConverter.java:350) ~[spring-amqp-2.4.6.jar:2.4.6]
    at org.springframework.amqp.support.converter.AbstractJackson2MessageConverter.fromMessage(AbstractJackson2MessageConverter.java:309) ~[spring-amqp-2.4.6.jar:2.4.6]
    at org.springframework.amqp.support.converter.AbstractJackson2MessageConverter.fromMessage(AbstractJackson2MessageConverter.java:292) ~[spring-amqp-2.4.6.jar:2.4.6]
    at org.springframework.amqp.rabbit.listener.adapter.AbstractAdaptableMessageListener.extractMessage(AbstractAdaptableMessageListener.java:342) ~[spring-rabbit-2.4.6.jar:2.4.6]
    at org.springframework.amqp.rabbit.listener.adapter.MessagingMessageListenerAdapter$MessagingMessageConverterAdapter.extractPayload(MessagingMessageListenerAdapter.java:366) ~[spring-rabbit-2.4.6.jar:2.4.6]
    at org.springframework.amqp.support.converter.MessagingMessageConverter.fromMessage(MessagingMessageConverter.java:132) ~[spring-amqp-2.4.6.jar:2.4.6]
    at org.springframework.amqp.rabbit.listener.adapter.MessagingMessageListenerAdapter.toMessagingMessage(MessagingMessageListenerAdapter.java:243) ~[spring-rabbit-2.4.6.jar:2.4.6]
    at org.springframework.amqp.rabbit.listener.adapter.MessagingMessageListenerAdapter.onMessage(MessagingMessageListenerAdapter.java:146) ~[spring-rabbit-2.4.6.jar:2.4.6]
    ... 11 common frames omitted
Caused by: com.fasterxml.jackson.databind.exc.MismatchedInputException: Cannot deserialize value of type `java.lang.String` from Object value (token `JsonToken.START_OBJECT`)
 at [Source: (String)"{"teacherId":"vbbvnbvnbnvbvn"}"; line: 1, column: 1]
    at com.fasterxml.jackson.databind.exc.MismatchedInputException.from(MismatchedInputException.java:59) ~[jackson-databind-2.13.3.jar:2.13.3]
    at com.fasterxml.jackson.databind.DeserializationContext.reportInputMismatch(DeserializationContext.java:1741) ~[jackson-databind-2.13.3.jar:2.13.3]
    at com.fasterxml.jackson.databind.DeserializationContext.handleUnexpectedToken(DeserializationContext.java:1515) ~[jackson-databind-2.13.3.jar:2.13.3]
    at com.fasterxml.jackson.databind.DeserializationContext.handleUnexpectedToken(DeserializationContext.java:1420) ~[jackson-databind-2.13.3.jar:2.13.3]
    at com.fasterxml.jackson.databind.DeserializationContext.extractScalarFromObject(DeserializationContext.java:932) ~[jackson-databind-2.13.3.jar:2.13.3]
    at com.fasterxml.jackson.databind.deser.std.StringDeserializer.deserialize(StringDeserializer.java:62) ~[jackson-databind-2.13.3.jar:2.13.3]
    at com.fasterxml.jackson.databind.deser.std.StringDeserializer.deserialize(StringDeserializer.java:11) ~[jackson-databind-2.13.3.jar:2.13.3]
    at com.fasterxml.jackson.databind.deser.DefaultDeserializationContext.readRootValue(DefaultDeserializationContext.java:323) ~[jackson-databind-2.13.3.jar:2.13.3]
    at com.fasterxml.jackson.databind.ObjectMapper._readMapAndClose(ObjectMapper.java:4674) ~[jackson-databind-2.13.3.jar:2.13.3]
    at com.fasterxml.jackson.databind.ObjectMapper.readValue(ObjectMapper.java:3629) ~[jackson-databind-2.13.3.jar:2.13.3]
    at org.springframework.amqp.support.converter.AbstractJackson2MessageConverter.convertBytesToObject(AbstractJackson2MessageConverter.java:411) ~[spring-amqp-2.4.6.jar:2.4.6]
    at org.springframework.amqp.support.converter.AbstractJackson2MessageConverter.convertContent(AbstractJackson2MessageConverter.java:378) ~[spring-amqp-2.4.6.jar:2.4.6]
    at org.springframework.amqp.support.converter.AbstractJackson2MessageConverter.doFromMessage(AbstractJackson2MessageConverter.java:347) ~[spring-amqp-2.4.6.jar:2.4.6]
    ... 18 common frames omitted

2022-11-15 02:37:00.582  WARN 12500 --- [ntContainer#0-1] ingErrorHandler$DefaultExceptionStrategy : Fatal message conversion error; message rejected; it will be dropped or routed to a dead letter exchange, if so configured: (Body:'{"teacherId":"vbbvnbvnbnvbvn"}' MessageProperties [headers={}, contentType=application/json, contentEncoding=UTF-8, contentLength=0, receivedDeliveryMode=PERSISTENT, priority=0, redelivered=false, receivedExchange=assistant.statement, receivedRoutingKey=load.request, deliveryTag=2, consumerTag=amq.ctag-EoV7E816ZRxiKD0a-L-iYg, consumerQueue=statements.load.response])
2022-11-15 02:37:00.582 ERROR 12500 --- [ntContainer#0-1] o.s.a.r.l.SimpleMessageListenerContainer : Execution of Rabbit message listener failed, and the error handler threw an exception

org.springframework.amqp.AmqpRejectAndDontRequeueException: Error Handler converted exception to fatal
    at org.springframework.amqp.rabbit.listener.ConditionalRejectingErrorHandler.handleError(ConditionalRejectingErrorHandler.java:146) ~[spring-rabbit-2.4.6.jar:2.4.6]
    at org.springframework.amqp.rabbit.listener.AbstractMessageListenerContainer.invokeErrorHandler(AbstractMessageListenerContainer.java:1474) ~[spring-rabbit-2.4.6.jar:2.4.6]
    at org.springframework.amqp.rabbit.listener.AbstractMessageListenerContainer.handleListenerException(AbstractMessageListenerContainer.java:1758) ~[spring-rabbit-2.4.6.jar:2.4.6]
    at org.springframework.amqp.rabbit.listener.AbstractMessageListenerContainer.executeListener(AbstractMessageListenerContainer.java:1533) ~[spring-rabbit-2.4.6.jar:2.4.6]
    at org.springframework.amqp.rabbit.listener.SimpleMessageListenerContainer.doReceiveAndExecute(SimpleMessageListenerContainer.java:993) ~[spring-rabbit-2.4.6.jar:2.4.6]
    at org.springframework.amqp.rabbit.listener.SimpleMessageListenerContainer.receiveAndExecute(SimpleMessageListenerContainer.java:940) ~[spring-rabbit-2.4.6.jar:2.4.6]
    at org.springframework.amqp.rabbit.listener.SimpleMessageListenerContainer.access$1600(SimpleMessageListenerContainer.java:84) ~[spring-rabbit-2.4.6.jar:2.4.6]
    at org.springframework.amqp.rabbit.listener.SimpleMessageListenerContainer$AsyncMessageProcessingConsumer.mainLoop(SimpleMessageListenerContainer.java:1317) ~[spring-rabbit-2.4.6.jar:2.4.6]
    at org.springframework.amqp.rabbit.listener.SimpleMessageListenerContainer$AsyncMessageProcessingConsumer.run(SimpleMessageListenerContainer.java:1223) ~[spring-rabbit-2.4.6.jar:2.4.6]
    at java.base/java.lang.Thread.run(Thread.java:829) ~[na:na]
Caused by: org.springframework.amqp.rabbit.support.ListenerExecutionFailedException: Failed to convert message
    at org.springframework.amqp.rabbit.listener.adapter.MessagingMessageListenerAdapter.onMessage(MessagingMessageListenerAdapter.java:156) ~[spring-rabbit-2.4.6.jar:2.4.6]
    at org.springframework.amqp.rabbit.listener.AbstractMessageListenerContainer.doInvokeListener(AbstractMessageListenerContainer.java:1670) ~[spring-rabbit-2.4.6.jar:2.4.6]
    at org.springframework.amqp.rabbit.listener.AbstractMessageListenerContainer.actualInvokeListener(AbstractMessageListenerContainer.java:1589) ~[spring-rabbit-2.4.6.jar:2.4.6]
    at org.springframework.amqp.rabbit.listener.AbstractMessageListenerContainer.invokeListener(AbstractMessageListenerContainer.java:1577) ~[spring-rabbit-2.4.6.jar:2.4.6]
    at org.springframework.amqp.rabbit.listener.AbstractMessageListenerContainer.doExecuteListener(AbstractMessageListenerContainer.java:1568) ~[spring-rabbit-2.4.6.jar:2.4.6]
    at org.springframework.amqp.rabbit.listener.AbstractMessageListenerContainer.executeListener(AbstractMessageListenerContainer.java:1512) ~[spring-rabbit-2.4.6.jar:2.4.6]
    ... 6 common frames omitted
Caused by: org.springframework.amqp.support.converter.MessageConversionException: Failed to convert Message content
    at org.springframework.amqp.support.converter.AbstractJackson2MessageConverter.doFromMessage(AbstractJackson2MessageConverter.java:350) ~[spring-amqp-2.4.6.jar:2.4.6]
    at org.springframework.amqp.support.converter.AbstractJackson2MessageConverter.fromMessage(AbstractJackson2MessageConverter.java:309) ~[spring-amqp-2.4.6.jar:2.4.6]
    at org.springframework.amqp.support.converter.AbstractJackson2MessageConverter.fromMessage(AbstractJackson2MessageConverter.java:292) ~[spring-amqp-2.4.6.jar:2.4.6]
    at org.springframework.amqp.rabbit.listener.adapter.AbstractAdaptableMessageListener.extractMessage(AbstractAdaptableMessageListener.java:342) ~[spring-rabbit-2.4.6.jar:2.4.6]
    at org.springframework.amqp.rabbit.listener.adapter.MessagingMessageListenerAdapter$MessagingMessageConverterAdapter.extractPayload(MessagingMessageListenerAdapter.java:366) ~[spring-rabbit-2.4.6.jar:2.4.6]
    at org.springframework.amqp.support.converter.MessagingMessageConverter.fromMessage(MessagingMessageConverter.java:132) ~[spring-amqp-2.4.6.jar:2.4.6]
    at org.springframework.amqp.rabbit.listener.adapter.MessagingMessageListenerAdapter.toMessagingMessage(MessagingMessageListenerAdapter.java:243) ~[spring-rabbit-2.4.6.jar:2.4.6]
    at org.springframework.amqp.rabbit.listener.adapter.MessagingMessageListenerAdapter.onMessage(MessagingMessageListenerAdapter.java:146) ~[spring-rabbit-2.4.6.jar:2.4.6]
    ... 11 common frames omitted
Caused by: com.fasterxml.jackson.databind.exc.MismatchedInputException: Cannot deserialize value of type `java.lang.String` from Object value (token `JsonToken.START_OBJECT`)
 at [Source: (String)"{"teacherId":"vbbvnbvnbnvbvn"}"; line: 1, column: 1]
    at com.fasterxml.jackson.databind.exc.MismatchedInputException.from(MismatchedInputException.java:59) ~[jackson-databind-2.13.3.jar:2.13.3]
    at com.fasterxml.jackson.databind.DeserializationContext.reportInputMismatch(DeserializationContext.java:1741) ~[jackson-databind-2.13.3.jar:2.13.3]
    at com.fasterxml.jackson.databind.DeserializationContext.handleUnexpectedToken(DeserializationContext.java:1515) ~[jackson-databind-2.13.3.jar:2.13.3]
    at com.fasterxml.jackson.databind.DeserializationContext.handleUnexpectedToken(DeserializationContext.java:1420) ~[jackson-databind-2.13.3.jar:2.13.3]
    at com.fasterxml.jackson.databind.DeserializationContext.extractScalarFromObject(DeserializationContext.java:932) ~[jackson-databind-2.13.3.jar:2.13.3]
    at com.fasterxml.jackson.databind.deser.std.StringDeserializer.deserialize(StringDeserializer.java:62) ~[jackson-databind-2.13.3.jar:2.13.3]
    at com.fasterxml.jackson.databind.deser.std.StringDeserializer.deserialize(StringDeserializer.java:11) ~[jackson-databind-2.13.3.jar:2.13.3]
    at com.fasterxml.jackson.databind.deser.DefaultDeserializationContext.readRootValue(DefaultDeserializationContext.java:323) ~[jackson-databind-2.13.3.jar:2.13.3]
    at com.fasterxml.jackson.databind.ObjectMapper._readMapAndClose(ObjectMapper.java:4674) ~[jackson-databind-2.13.3.jar:2.13.3]
    at com.fasterxml.jackson.databind.ObjectMapper.readValue(ObjectMapper.java:3629) ~[jackson-databind-2.13.3.jar:2.13.3]
    at org.springframework.amqp.support.converter.AbstractJackson2MessageConverter.convertBytesToObject(AbstractJackson2MessageConverter.java:411) ~[spring-amqp-2.4.6.jar:2.4.6]
    at org.springframework.amqp.support.converter.AbstractJackson2MessageConverter.convertContent(AbstractJackson2MessageConverter.java:378) ~[spring-amqp-2.4.6.jar:2.4.6]
    at org.springframework.amqp.support.converter.AbstractJackson2MessageConverter.doFromMessage(AbstractJackson2MessageConverter.java:347) ~[spring-amqp-2.4.6.jar:2.4.6]
    ... 18 common frames omitted
But if I send the same message via the RabbitMQ interface, the error does not occur
2022-11-15 02:41:08.265 INFO 12500 --- [ntContainer#1-1] r.c.t.rabbit.listener.StatementListener : Message: GenericMessage [payload={teacherId=vbbvnbvnbnvbvn}, headers={amqp_receivedDeliveryMode=PERSISTENT, amqp_receivedRoutingKey=load.request, amqp_contentEncoding=UTF-8, amqp_receivedExchange=assistant.statement, amqp_deliveryTag=4, amqp_consumerQueue=statements.load.request, amqp_redelivered=false, id=bd0ca679-bb20-4344-94e8-c3ac2dcd2712, amqp_consumerTag=amq.ctag-HAq0NGeKCWigy9HyuNKkAA, amqp_lastInBatch=false, contentType=application/json, timestamp=1668469268265}]
The body and header of the message are the same, but why does the error occur and in what place? Because the program first outputs data, and then gives an error.
Also, I had the following situation.
I force an exception during message processing. The message is returned to the queue after which it is processed without errors
This part of the reference documentation details the various components that comprise Spring AMQP.
The main chapter covers the core classes to develop an AMQP application.
This part also includes a chapter about the sample applications.
3.1 Using Spring AMQP
In this chapter, we will explore the interfaces and classes that are the essential components for developing applications with Spring AMQP.
3.1.1 AMQP Abstractions
Introduction
Spring AMQP consists of a handful of modules, each represented by a JAR in the distribution.
These modules are: spring-amqp, and spring-rabbit.
The spring-amqp module contains the org.springframework.amqp.core package.
Within that package, you will find the classes that represent the core AMQP «model».
Our intention is to provide generic abstractions that do not rely on any particular AMQP broker implementation or client library.
End user code will be more portable across vendor implementations as it can be developed against the abstraction layer only.
These abstractions are then used implemented by broker-specific modules, such as spring-rabbit.
There is currently only a RabbitMQ implementation; however the abstractions have been validated in .NET using Apache Qpid in addition to RabbitMQ.
Since AMQP operates at the protocol level in principle, the RabbitMQ client can be used with any broker that supports the same protocol version, but we do not test any other brokers at present.
The overview here assumes that you are already familiar with the basics of the AMQP specification.
If you are not, then have a look at the resources listed in Chapter 5, Other Resources
Message
The 0-8 and 0-9-1 AMQP specifications do not define a Message class or interface.
Instead, when performing an operation such as basicPublish(), the content is passed as a byte-array argument and additional properties are passed in as separate arguments.
Spring AMQP defines a Message class as part of a more general AMQP domain model representation.
The purpose of the Message class is to simply encapsulate the body and properties within a single instance so that the API can in turn be simpler.
The Message class definition is quite straightforward.
public class Message {

    private final MessageProperties messageProperties;

    private final byte[] body;

    public Message(byte[] body, MessageProperties messageProperties) {
        this.body = body;
        this.messageProperties = messageProperties;
    }

    public byte[] getBody() {
        return this.body;
    }

    public MessageProperties getMessageProperties() {
        return this.messageProperties;
    }
}
The MessageProperties interface defines several common properties such as messageId, timestamp, contentType, and several more.
Those properties can also be extended with user-defined headers by calling the setHeader(String method.
key, Object value)
Exchange
The Exchange interface represents an AMQP Exchange, which is what a Message Producer sends to.
Each Exchange within a virtual host of a broker will have a unique name as well as a few other properties:
public interface Exchange {

    String getName();

    String getExchangeType();

    boolean isDurable();

    boolean isAutoDelete();

    Map<String, Object> getArguments();

}
As you can see, an Exchange also has a type represented by constants defined in ExchangeTypes.
The basic types are: Direct, Topic, Fanout, and Headers.
In the core package you will find implementations of the Exchange interface for each of those types.
The behavior varies across these Exchange types in terms of how they handle bindings to Queues.
For example, a Direct exchange allows for a Queue to be bound by a fixed routing key (often the Queue’s name).
A Topic exchange supports bindings with routing patterns that may include the * and # wildcards for exactly-one and zero-or-more, respectively.
The Fanout exchange publishes to all Queues that are bound to it without taking any routing key into consideration.
For much more information about these and the other Exchange types, check out Chapter 5, Other Resources.
![[Note]](https://docs.spring.io/spring-amqp/docs/1.6.4.RELEASE/reference/htmlsingle/images/note.png) |
Note |
|---|---|
|
The AMQP specification also requires that any broker provide a «default» Direct Exchange that has no name. |
Queue
The Queue class represents the component from which a Message Consumer receives Messages.
Like the various Exchange classes, our implementation is intended to be an abstract representation of this core AMQP type.
public class Queue  {

    private final String name;

    private volatile boolean durable;

    private volatile boolean exclusive;

    private volatile boolean autoDelete;

    private volatile Map<String, Object> arguments;

    /**
     * The queue is durable, non-exclusive and non auto-delete.
     *
     * @param name the name of the queue.
     */
    public Queue(String name) {
        this(name, true, false, false);
    }


}
Notice that the constructor takes the Queue name.
Depending on the implementation, the admin template may provide methods for generating a uniquely named Queue.
Such Queues can be useful as a «reply-to» address or other temporary situations.
For that reason, the exclusive and autoDelete properties of an auto-generated Queue would both be set to true.
|
Note |
|---|---|
|
See the section on queues in Section 3.1.10, “Configuring the broker” for information about declaring queues using namespace support, including queue arguments. |
Binding
Given that a producer sends to an Exchange and a consumer receives from a Queue, the bindings that connect Queues to Exchanges are critical for connecting those producers and consumers via messaging.
In Spring AMQP, we define a Binding class to represent those connections.
Let’s review the basic options for binding Queues to Exchanges.
You can bind a Queue to a DirectExchange with a fixed routing key.
new Binding(someQueue, someDirectExchange, "foo.bar")
You can bind a Queue to a TopicExchange with a routing pattern.
new Binding(someQueue, someTopicExchange, "foo.*")
You can bind a Queue to a FanoutExchange with no routing key.
new Binding(someQueue, someFanoutExchange)
We also provide a BindingBuilder to facilitate a «fluent API» style.
Binding b = BindingBuilder.bind(someQueue).to(someTopicExchange).with("foo.*");
|
Note |
|---|---|
|
The BindingBuilder class is shown above for clarity, but this style works well when using a static import for the bind() method. |
By itself, an instance of the Binding class is just holding the data about a connection.
In other words, it is not an «active» component.
However, as you will see later in Section 3.1.10, “Configuring the broker”, Binding instances can be used by the AmqpAdmin class to actually trigger the binding actions on the broker.
Also, as you will see in that same section, the Binding instances can be defined using Spring’s @Bean-style within @Configuration classes.
There is also a convenient base class which further simplifies that approach for generating AMQP-related bean definitions and recognizes the Queues, Exchanges, and Bindings so that they will all be declared on the AMQP broker upon application startup.
The AmqpTemplate is also defined within the core package.
As one of the main components involved in actual AMQP messaging, it is discussed in detail in its own section (see Section 3.1.4, “AmqpTemplate”).
3.1.2 Connection and Resource Management
Introduction
Whereas the AMQP model we described in the previous section is generic and applicable to all implementations, when we get into the management of resources, the details are specific to the broker implementation.
Therefore, in this section, we will be focusing on code that exists only within our «spring-rabbit» module since at this point, RabbitMQ is the only supported implementation.
The central component for managing a connection to the RabbitMQ broker is the ConnectionFactory interface.
The responsibility of a ConnectionFactory implementation is to provide an instance of org.springframework.amqp.rabbit.connection.Connection which is a wrapper for com.rabbitmq.client.Connection.
The only concrete implementation we provide is CachingConnectionFactory which, by default, establishes a single connection proxy that can be shared by the application.
Sharing of the connection is possible since the «unit of work» for messaging with AMQP is actually a «channel» (in some ways, this is similar to the relationship between a Connection and a Session in JMS).
As you can imagine, the connection instance provides a createChannel method.
The CachingConnectionFactory implementation supports caching of those channels, and it maintains separate caches for channels based on whether they are transactional or not.
When creating an instance of CachingConnectionFactory, the hostname can be provided via the constructor.
The username and password properties should be provided as well.
If you would like to configure the size of the channel cache (the default is 25), you could call the
setChannelCacheSize() method here as well.
Starting with version 1.3, the CachingConnectionFactory can be configured to cache connections as well as just channels.
In this case, each call to createConnection() creates a new connection (or retrieves an idle one from the cache).
Closing a connection returns it to the cache (if the cache size has not been reached).
Channels created on such connections are cached too.
The use of separate connections might be useful in some environments, such as consuming from an HA cluster, in
conjunction with a load balancer, to connect to different cluster members.
Set the cacheMode to CacheMode.CONNECTION.
|
Note |
|---|---|
|
This does not limit the number of connections, it specifies how many idle open connections are allowed. |
Starting with version 1.5.5, a new property connectionLimit is provided.
When this is set, it limits the total number of connections allowed.
When set, if the limit is reached, the channelCheckoutTimeLimit is used to wait for a connection to become idle.
If the time is exceeded, an AmqpTimeoutException is thrown.
![[Important]](https://docs.spring.io/spring-amqp/docs/1.6.4.RELEASE/reference/htmlsingle/images/important.png) |
Important |
|---|---|
|
When the cache mode is Also, at the time of writing, the |
It is important to understand that the cache size is (by default) not a limit, but merely the number of channels that can be cached.
With a cache size of, say, 10, any number of channels can actually be in use.
If more than 10 channels are being used and they are all returned to the cache, 10 will go in the cache; the remainder will be physically closed.
Starting with version 1.6, the default channel cache size has been increased from 1 to 25.
In high volume, multi-threaded, environments, a small cache means that channels are created and closed at a high rate.
Increasing the default cache size will avoid this overhead.
You should monitor the channels in use via the RabbitMQ Admin UI and consider increasing the cache size further if you
see many channels being created and closed.
The cache will only grow on-demand (to suit the concurrency requirements of the application) so this change will not
impact existing low-volume applications.
Starting with version 1.4.2, the CachingConnectionFactory has a property channelCheckoutTimeout.
When this property is greater than zero, the channelCacheSize becomes a limit on the number of channels that can be created on a connection.
If the limit is reached, calling threads will block until a channel is available or this timeout is reached, in which case a AmqpTimeoutException is thrown.
![[Warning]](https://docs.spring.io/spring-amqp/docs/1.6.4.RELEASE/reference/htmlsingle/images/warning.png) |
Warning |
|---|---|
|
Channels used within the framework (e.g. |
CachingConnectionFactory connectionFactory = new CachingConnectionFactory("somehost");
connectionFactory.setUsername("guest");
connectionFactory.setPassword("guest");

Connection connection = connectionFactory.createConnection();
When using XML, the configuration might look like this:
<bean id="connectionFactory"
      class="org.springframework.amqp.rabbit.connection.CachingConnectionFactory">
    <constructor-arg value="somehost"/>
    <property name="username" value="guest"/>
    <property name="password" value="guest"/>
</bean>
|
Note |
|---|---|
|
There is also a |
A ConnectionFactory can be created quickly and conveniently using the rabbit namespace:
<rabbit:connection-factory id="connectionFactory"/>
In most cases this will be preferable since the framework can choose the best defaults for you.
The created instance will be a CachingConnectionFactory.
Keep in mind that the default cache size for channels is 25.
If you want more channels to be cached set a larger value via the channelCacheSize property.
In XML it would look like this:
<bean id="connectionFactory"
      class="org.springframework.amqp.rabbit.connection.CachingConnectionFactory">
    <constructor-arg value="somehost"/>
    <property name="username" value="guest"/>
    <property name="password" value="guest"/>
    <property name="channelCacheSize" value="50"/>
</bean>
And with the namespace you can just add the channel-cache-size attribute:
<rabbit:connection-factory
    id="connectionFactory" channel-cache-size="50"/>
The default cache mode is CHANNEL, but you can configure it to cache connections instead; in this case, we use connection-cache-size:
<rabbit:connection-factory
    id="connectionFactory" cache-mode="CONNECTION" connection-cache-size="25"/>
Host and port attributes can be provided using the namespace
<rabbit:connection-factory
    id="connectionFactory" host="somehost" port="5672"/>
Alternatively, if running in a clustered environment, use the addresses attribute.
<rabbit:connection-factory
    id="connectionFactory" addresses="host1:5672,host2:5672"/>
Here’s an example with a custom thread factory that prefixes thread names with rabbitmq-.
<rabbit:connection-factory id="multiHost" virtual-host="/bar" addresses="host1:1234,host2,host3:4567"
    thread-factory="tf"
    channel-cache-size="10" username="user" password="password" />

<bean id="tf" class="org.springframework.scheduling.concurrent.CustomizableThreadFactory">
    <constructor-arg value="rabbitmq-" />
</bean>
Configuring the Underlying Client Connection Factory
The CachingConnectionFactory uses an instance of the Rabbit client ConnectionFactory; a number of configuration properties are passed through (host, port, userName, password, requestedHeartBeat, for example) when setting the equivalent property on the
connectionTimeoutCachingConnectionFactory.
To set other properties (clientProperties for example), define an instance of the rabbit factory and provide a reference to it using the appropriate constructor of the CachingConnectionFactory.
When using the namespace as described above, provide a reference to the configured factory in the connection-factory attribute.
For convenience, a factory bean is provided to assist in configuring the connection factory in a Spring application context, as discussed in the next section.
<rabbit:connection-factory
      id="connectionFactory" connection-factory="rabbitConnectionFactory"/>
RabbitConnectionFactoryBean and Configuring SSL
Starting with version 1.4, a convenient RabbitConnectionFactoryBean is provided to enable convenient configuration of SSL properties on the underlying client connection factory, using dependency injection.
Other setters simply delegate to the underlying factory.
Previously you had to configure the SSL options programmatically.
<rabbit:connection-factory id="rabbitConnectionFactory"
    connection-factory="clientConnectionFactory"
    host="${host}"
    port="${port}"
    virtual-host="${vhost}"
    username="${username}" password="${password}" />

<bean id="clientConnectionFactory"
        class="org.springframework.xd.dirt.integration.rabbit.RabbitConnectionFactoryBean">
    <property name="useSSL" value="true" />
    <property name="sslPropertiesLocation" value="file:/secrets/rabbitSSL.properties"/>
</bean>
Refer to the RabbitMQ Documentation for information about configuring SSL.
Omit the keyStore and trustStore configuration to connect over SSL without certificate validation.
Key and trust store configuration can be provided as follows:
The sslPropertiesLocation property is a Spring Resource pointing to a properties file containing the following keys:
keyStore=file:/secret/keycert.p12
trustStore=file:/secret/trustStore
keyStore.passPhrase=secret
trustStore.passPhrase=secret
The keyStore and truststore are Spring Resources pointing to the stores.
Typically this properties file will be secured by the operating system with the application having read access.
Starting with Spring AMQP version 1.5, these properties can be set directly on the factory bean.
If both discrete properties and sslPropertiesLocation is provided, properties in the latter will override the
discrete values.
Routing Connection Factory
Starting with version 1.3, the AbstractRoutingConnectionFactory has been introduced.
This provides a mechanism to configure mappings for several ConnectionFactories and determine a target ConnectionFactory by some lookupKey at runtime.
Typically, the implementation checks a thread-bound context.
For convenience, Spring AMQP provides the SimpleRoutingConnectionFactory, which gets the current thread-bound lookupKey from the SimpleResourceHolder:
<bean id="connectionFactory"
      class="org.springframework.amqp.rabbit.connection.SimpleRoutingConnectionFactory">
	<property name="targetConnectionFactories">
		<map>
			<entry key="#{connectionFactory1.virtualHost}" ref="connectionFactory1"/>
			<entry key="#{connectionFactory2.virtualHost}" ref="connectionFactory2"/>
		</map>
	</property>
</bean>

<rabbit:template id="template" connection-factory="connectionFactory" />
public class MyService {

    @Autowired
    private RabbitTemplate rabbitTemplate;

    public void service(String vHost, String payload) {
        SimpleResourceHolder.bind(rabbitTemplate.getConnectionFactory(), vHost);
        rabbitTemplate.convertAndSend(payload);
        SimpleResourceHolder.unbind(rabbitTemplate.getConnectionFactory());
    }

}
It is important to unbind the resource after use.
For more information see the JavaDocs of AbstractRoutingConnectionFactory.
Starting with version 1.4, the RabbitTemplate supports the SpEL sendConnectionFactorySelectorExpression and receiveConnectionFactorySelectorExpression properties, which are evaluated on each AMQP protocol interaction operation (send, sendAndReceive, receive or receiveAndReply), resolving to a lookupKey value for the provided AbstractRoutingConnectionFactory.
Bean references, such as "@vHostResolver.getVHost(#root)" can be used in the expression.
For send operations, the Message to be sent is the root evaluation object; for receive operations, the queueName is the root evaluation object.
The routing algorithm is: If the selector expression is null, or is evaluated to null, or the provided ConnectionFactory isn’t an instance of AbstractRoutingConnectionFactory, everything works as before, relying on the provided ConnectionFactory implementation.
The same occurs if the evaluation result isn’t null, but there is no target ConnectionFactory for that lookupKey and the AbstractRoutingConnectionFactory is configured with lenientFallback = true.
Of course, in the case of an AbstractRoutingConnectionFactory it does fallback to its routing implementation based on determineCurrentLookupKey().
But, if lenientFallback = false, an IllegalStateException is thrown.
The Namespace support also provides the send-connection-factory-selector-expression and receive-connection-factory-selector-expression attributes on the <rabbit:template> component.
Also starting with version 1.4, you can configure a routing connection factory in a SimpleMessageListenerContainer.
In that case, the list of queue names is used as the lookup key.
For example, if you configure the container with setQueueNames("foo", "bar"), the lookup key will be "[foo,bar]" (no spaces).
Queue Affinity and the LocalizedQueueConnectionFactory
When using HA queues in a cluster, for the best performance, it can be desirable to connect to the physical broker
where the master queue resides.
While the CachingConnectionFactory can be configured with multiple broker addresses; this is to fail over and the
client will attempt to connect in order.
The LocalizedQueueConnectionFactory uses the REST API provided by the admin plugin to determine which node the
queue is mastered.
It then creates (or retrieves from a cache) a CachingConnectionFactory that will connect to just that node.
If the connection fails, the new master node is determined and the consumer connects to it.
The LocalizedQueueConnectionFactory is configured with a default connection factory, in case the physical location
of the queue cannot be determined, in which case it will connect as normal to the cluster.
The LocalizedQueueConnectionFactory is a RoutingConnectionFactory and the SimpleMessageListenerContainer uses the
queue names as the lookup key as discussed in the section called “Routing Connection Factory” above.
|
Note |
|---|---|
|
For this reason (the use of the queue name for the lookup), the |
|
Note |
|---|---|
|
The RabbitMQ management plugin must be enabled on each node. |
![[Caution]](https://docs.spring.io/spring-amqp/docs/1.6.4.RELEASE/reference/htmlsingle/images/caution.png) |
Caution |
|---|---|
|
This connection factory is intended for long-lived connections, such as those used by the |
Here is an example configuration, using Spring Boot’s RabbitProperties to configure the factories:
@Autowired
private RabbitProperties props;

private final String[] adminUris = { "http://host1:15672", "http://host2:15672" };

private final String[] nodes = { "[email protected]", "[email protected]" };

@Bean
public ConnectionFactory defaultConnectionFactory() {
    CachingConnectionFactory cf = new CachingConnectionFactory();
    cf.setAddresses(this.props.getAddresses());
    cf.setUsername(this.props.getUsername());
    cf.setPassword(this.props.getPassword());
    cf.setVirtualHost(this.props.getVirtualHost());
    return cf;
}

@Bean
public ConnectionFactory queueAffinityCF(
        @Qualifier("defaultConnectionFactory") ConnectionFactory defaultCF) {
    return new LocalizedQueueConnectionFactory(defaultCF,
            StringUtils.commaDelimitedListToStringArray(this.props.getAddresses()),
            this.adminUris, this.nodes,
            this.props.getVirtualHost(), this.props.getUsername(), this.props.getPassword(),
            false, null);
}
Notice that the first three parameters are arrays of addresses, adminUris and nodes.
These are positional in that when a container attempts to connect to a queue, it determines on which node the queue is
mastered and connects to the address in the same array position.
Publisher Confirms and Returns
Confirmed and returned messages are supported by setting the CachingConnectionFactory‘s publisherConfirms and publisherReturns properties to ‘true’ respectively.
When these options are set, Channel s created by the factory are wrapped in an PublisherCallbackChannel, which is used to facilitate the callbacks.
When such a channel is obtained, the client can register a PublisherCallbackChannel.Listener with the Channel.
The PublisherCallbackChannel implementation contains logic to route a confirm/return to the appropriate listener.
These features are explained further in the following sections.
Logging Channel Close Events
A mechanism to enable users to control logging levels was introduced in version 1.5.
The CachingConnectionFactory uses a default strategy to log channel closures as follows:
- Normal channel closes (200 OK) are not logged.
- If a channel is closed due to a failed passive queue declaration, it is logged at debug level.
-
If a channel is closed because the
basic.consumeis refused due to an exclusive consumer condition, it is logged at
INFO level. - All others are logged at ERROR level.
To modify this behavior, inject a custom ConditionalExceptionLogger into the
CachingConnectionFactory in its closeExceptionLogger property.
Also see the section called “Consumer Failure Events”.
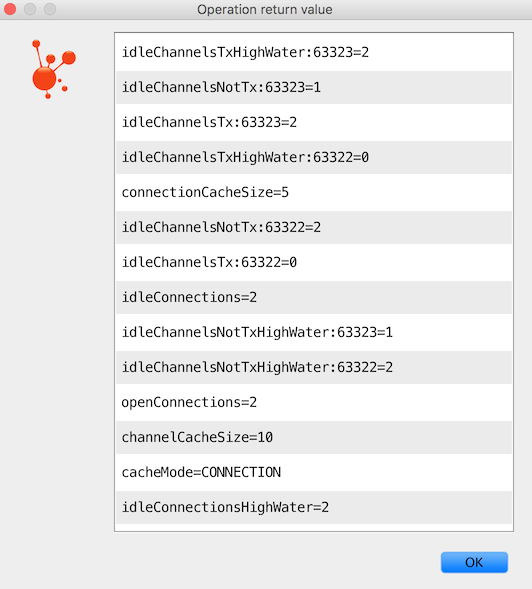
Runtime Cache Properties
Staring with version 1.6, the CachingConnectionFactory now provides cache statistics via the getCacheProperties()
method.
These statistics can be used to tune the cache to optimize it in production.
For example, the high water marks can be used to determine whether the cache size should be increased.
If it equals the cache size, you might want to consider increasing further.
Table 3.1. Cache properties for CacheMode.CHANNEL
| Property | Meaning |
|---|---|
channelCacheSize |
The currently configured maximum channels that are allowed to be idle. |
localPort |
The local port for the connection (if available). |
idleChannelsTx |
The number of transactional channels that are currently idle (cached). |
idleChannelsNotTx |
The number of non-transactional channels that are currently idle (cached). |
idleChannelsTxHighWater |
The maximum number of transactional channels that have been concurrently idle (cached). |
idleChannelsNotTxHighWater |
The maximum number of non-transactional channels have been concurrently idle (cached). |
Table 3.2. Cache properties for CacheMode.CONNECTION
| Property | Meaning |
|---|---|
openConnections |
The number of connection objects representing connections to brokers. |
channelCacheSize |
The currently configured maximum channels that are allowed to be idle. |
connectionCacheSize |
The currently configured maximum connections that are allowed to be idle. |
idleConnections |
The number of connections that are currently idle. |
idleConnectionsHighWater |
The maximum number of connections that have been concurrently idle. |
idleChannelsTx:<localPort> |
The number of transactional channels that are currently idle (cached) for this connection. |
idleChannelsNotTx:<localPort> |
The number of non-transactional channels that are currently idle (cached) for this connection. |
idleChannelsTxHighWater: <localPort> |
The maximum number of transactional channels that have been concurrently idle (cached). |
idleChannelsNotTxHighWater: <localPort> |
The maximum number of non-transactional channels have been concurrently idle (cached). |
The cacheMode property (CHANNEL or CONNECTION is also included).
Figure 3.1. JVisualVM Example
3.1.3 Adding Custom Client Connection Properties
The CachingConnectionFactory now allows you to access the underlying connection factory to allow, for example,
setting custom client properties:
connectionFactory.getRabbitConnectionFactory().getClientProperties().put("foo", "bar");
These properties appear in the RabbitMQ Admin UI when viewing the connection.
3.1.4 AmqpTemplate
Introduction
As with many other high-level abstractions provided by the Spring Framework and related projects, Spring AMQP provides a «template» that plays a central role.
The interface that defines the main operations is called AmqpTemplate.
Those operations cover the general behavior for sending and receiving Messages.
In other words, they are not unique to any implementation, hence the «AMQP» in the name.
On the other hand, there are implementations of that interface that are tied to implementations of the AMQP protocol.
Unlike JMS, which is an interface-level API itself, AMQP is a wire-level protocol.
The implementations of that protocol provide their own client libraries, so each implementation of the template interface will depend on a particular client library.
Currently, there is only a single implementation: RabbitTemplate.
In the examples that follow, you will often see usage of an «AmqpTemplate», but when you look at the configuration examples, or any code excerpts where the template is instantiated and/or setters are invoked, you will see the implementation type (e.g.
«RabbitTemplate»).
As mentioned above, the AmqpTemplate interface defines all of the basic operations for sending and receiving Messages.
We will explore Message sending and reception, respectively, in the two sections that follow.
See also the section called “AsyncRabbitTemplate”.
Adding Retry Capabilities
Starting with version 1.3 you can now configure the RabbitTemplate to use a RetryTemplate to help with handling problems with broker connectivity.
Refer to the spring-retry project for complete information; the following is just one example that uses an exponential back off policy and the default SimpleRetryPolicy which will make three attempts before throwing the exception to the caller.
Using the XML namespace:
<rabbit:template id="template" connection-factory="connectionFactory" retry-template="retryTemplate"/>

<bean id="retryTemplate" class="org.springframework.retry.support.RetryTemplate">
    <property name="backOffPolicy">
        <bean class="org.springframework.retry.backoff.ExponentialBackOffPolicy">
            <property name="initialInterval" value="500" />
            <property name="multiplier" value="10.0" />
            <property name="maxInterval" value="10000" />
        </bean>
    </property>
</bean>
Using @Configuration:
@Bean
public AmqpTemplate rabbitTemplate();
    RabbitTemplate template = new RabbitTemplate(connectionFactory());
    RetryTemplate retryTemplate = new RetryTemplate();
    ExponentialBackOffPolicy backOffPolicy = new ExponentialBackOffPolicy();
    backOffPolicy.setInitialInterval(500);
    backOffPolicy.setMultiplier(10.0);
    backOffPolicy.setMaxInterval(10000);
    retryTemplate.setBackOffPolicy(backOffPolicy);
    template.setRetryTemplate(retryTemplate);
    return template;
}
Starting with version 1.4, in addition to the retryTemplate property, the recoveryCallback option is supported on the RabbitTemplate.
It is used as a second argument for the RetryTemplate.execute(RetryCallback<T, E> retryCallback,.
RecoveryCallback<T>recoveryCallback)
|
Note |
|---|---|
|
The |
retryTemplate.execute(
    new RetryCallback<Object, Exception>() {

        @Override
        public Object doWithRetry(RetryContext context) throws Exception {
            context.setAttribute("message", message);
            return rabbitTemplate.convertAndSend(exchange, routingKey, message);
        }
    }, new RecoveryCallback<Object>() {

        @Override
        public Object recover(RetryContext context) throws Exception {
            Object message = context.getAttribute("message");
            Throwable t = context.getLastThrowable();

            return null;
        }
    });
}
In this case, you would not inject a RetryTemplate into the RabbitTemplate.
Publisher Confirms and Returns
The RabbitTemplate implementation of AmqpTemplate supports Publisher Confirms and Returns.
For returned messages, the template’s mandatory property must be set to true, or the mandatory-expression
must evaluate to true for a particular message.
This feature requires a CachingConnectionFactory that has its publisherReturns property set to true (see the section called “Publisher Confirms and Returns”).
Returns are sent to to the client by it registering a RabbitTemplate.ReturnCallback by calling setReturnCallback(ReturnCallback callback).
The callback must implement this method:
void returnedMessage(Message message, int replyCode, String replyText,
          String exchange, String routingKey);
Only one ReturnCallback is supported by each RabbitTemplate.
See also the section called “Reply Timeout”.
For Publisher Confirms (aka Publisher Acknowledgements), the template requires a CachingConnectionFactory that has its publisherConfirms property set to true.
Confirms are sent to to the client by it registering a RabbitTemplate.ConfirmCallback by calling setConfirmCallback(ConfirmCallback callback).
The callback must implement this method:
void confirm(CorrelationData correlationData, boolean ack, String cause);
The CorrelationData is an object supplied by the client when sending the original message.
The ack is true for an ack and false for a nack.
For nack s, the cause may contain a reason for the nack, if it is available when the nack is generated.
An example is when sending a message to a non-existent exchange.
In that case the broker closes the channel; the reason for the closure is included in the cause.
cause was added in version 1.4.
Only one ConfirmCallback is supported by a RabbitTemplate.
|
Note |
|---|---|
|
When a rabbit template send operation completes, the channel is closed; this would preclude the reception of confirms or returns in the case when the connection factory cache is full (when there is space in the cache, the channel is not physically closed and the returns/confirms will proceed as normal). |
Messaging integration
Starting with version 1.4 RabbitMessagingTemplate, built on top of RabbitTemplate, provides an integration with the Spring Framework messaging abstraction, i.e.
org.springframework.messaging.Message.
This allows you to send and receive messages using the spring-messaging Message<?> abstraction.
This abstraction is used by other Spring projects such as Spring Integration and Spring’s STOMP support.
There are two message converters involved; one to convert between a spring-messaging Message<?> and Spring AMQP’s Message abstraction, and one to convert between Spring AMQP’s Message abstraction and the format required by the underlying RabbitMQ client library.
By default, the message payload is converted by the provided RabbitTemplate ‘s message converter.
Alternatively, you can inject a custom MessagingMessageConverter with some other payload converter:
MessagingMessageConverter amqpMessageConverter = new MessagingMessageConverter();
amqpMessageConverter.setPayloadConverter(myPayloadConverter);
rabbitMessagingTempalte.setAmqpMessageConverter(amqpMessageConverter);
Validated User Id
Starting with version 1.6, the template now supports a user-id-expression (userIdExpression when using Java configuration).
If a message is sent, the user id property is set (if not already set) after evaluating this expression.
The root object for the evaluation is the message to be sent.
Examples:
<rabbit:template ... user-id-expression="'guest'" />

<rabbit:template ... user-id-expression="@myConnectionFactory.username" />
The first example is a literal expression; the second obtains the username property from a connection factory bean in the application context.
3.1.5 Sending messages
Introduction
When sending a Message, one can use any of the following methods:
void send(Message message) throws AmqpException;

void send(String routingKey, Message message) throws AmqpException;

void send(String exchange, String routingKey, Message message) throws AmqpException;
We can begin our discussion with the last method listed above since it is actually the most explicit.
It allows an AMQP Exchange name to be provided at runtime along with a routing key.
The last parameter is the callback that is responsible for actual creating of the Message instance.
An example of using this method to send a Message might look this this:
amqpTemplate.send("marketData.topic", "quotes.nasdaq.FOO",
    new Message("12.34".getBytes(), someProperties));
The «exchange» property can be set on the template itself if you plan to use that template instance to send to the same exchange most or all of the time.
In such cases, the second method listed above may be used instead.
The following example is functionally equivalent to the previous one:
amqpTemplate.setExchange("marketData.topic");
amqpTemplate.send("quotes.nasdaq.FOO", new Message("12.34".getBytes(), someProperties));
If both the «exchange» and «routingKey» properties are set on the template, then the method accepting only the Message may be used:
amqpTemplate.setExchange("marketData.topic");
amqpTemplate.setRoutingKey("quotes.nasdaq.FOO");
amqpTemplate.send(new Message("12.34".getBytes(), someProperties));
A better way of thinking about the exchange and routing key properties is that the explicit method parameters will always override the template’s default values.
In fact, even if you do not explicitly set those properties on the template, there are always default values in place.
In both cases, the default is an empty String, but that is actually a sensible default.
As far as the routing key is concerned, it’s not always necessary in the first place (e.g.
a Fanout Exchange).
Furthermore, a Queue may be bound to an Exchange with an empty String.
Those are both legitimate scenarios for reliance on the default empty String value for the routing key property of the template.
As far as the Exchange name is concerned, the empty String is quite commonly used because the AMQP specification defines the «default Exchange» as having no name.
Since all Queues are automatically bound to that default Exchange (which is a Direct Exchange) using their name as the binding value, that second method above can be used for simple point-to-point Messaging to any Queue through the default Exchange.
Simply provide the queue name as the «routingKey» — either by providing the method parameter at runtime:
RabbitTemplate template = new RabbitTemplate();
template.send("queue.helloWorld", new Message("Hello World".getBytes(), someProperties));
Or, if you prefer to create a template that will be used for publishing primarily or exclusively to a single Queue, the following is perfectly reasonable:
RabbitTemplate template = new RabbitTemplate();
template.setRoutingKey("queue.helloWorld");
template.send(new Message("Hello World".getBytes(), someProperties));
Message Builder API
Starting with version 1.3, a message builder API is provided by the MessageBuilder and MessagePropertiesBuilder; they provides a convenient «fluent» means of creating a message or message properties:
Message message = MessageBuilder.withBody("foo".getBytes())
    .setContentType(MessageProperties.CONTENT_TYPE_TEXT_PLAIN)
    .setMessageId("123")
    .setHeader("bar", "baz")
    .build();
or
MessageProperties props = MessagePropertiesBuilder.newInstance()
    .setContentType(MessageProperties.CONTENT_TYPE_TEXT_PLAIN)
    .setMessageId("123")
    .setHeader("bar", "baz")
    .build();
Message message = MessageBuilder.withBody("foo".getBytes())
    .andProperties(props)
    .build();
Each of the properties defined on the MessageProperties can be set.
Other methods include setHeader(String key, String value), removeHeader(String key), removeHeaders(), and copyProperties(MessageProperties properties).
Each property setting method has a set*IfAbsent() variant.
In the cases where a default initial value exists, the method is named set*IfAbsentOrDefault().
Five static methods are provided to create an initial message builder:
public static MessageBuilder withBody(byte[] body)public static MessageBuilder withClonedBody(byte[] body)


|
|
The message created by the builder will have a body that is a direct reference to the argument. |
|
|
The message created by the builder will have a body that is a new array containing a copy of bytes in the argument. |
|
|
The message created by the builder will have a body that is a new array containing the range of bytes from the argument. |
|
|
The message created by the builder will have a body that is a direct reference to the body of the argument. |
|
|
The message created by the builder will have a body that is a new array containing a copy of the argument’s body. |
public static MessagePropertiesBuilder newInstance()
|
|
A new message properties object is initialized with default values. |
|
|
The builder is initialized with, and |
|
|
The argument’s properties are copied to a new |
With the RabbitTemplate implementation of AmqpTemplate, each of the send() methods has an overloaded version that takes an additional CorrelationData object.
When publisher confirms are enabled, this object is returned in the callback described in Section 3.1.4, “AmqpTemplate”.
This allows the sender to correlate a confirm (ack or nack) with the sent message.
Publisher Returns
When the template’s mandatory property is true returned messages are provided by the callback described in Section 3.1.4, “AmqpTemplate”.
Starting with version 1.4 the RabbitTemplate supports the SpEL mandatoryExpression property, which is evaluated against each request message, as the root evaluation object, resolving to a boolean value.
Bean references, such as "@myBean.isMandatory(#root)" can be used in the expression.
Publisher returns can also be used internally by the RabbitTemplate in send and receive operations.
See the section called “Reply Timeout” for more information.
Batching
Starting with version 1.4.2, the BatchingRabbitTemplate has been introduced.
This is a subclass of RabbitTemplate with an overridden send method that batches messages according to the
BatchingStrategy; only when a batch is complete is the message sent to RabbitMQ.
public interface BatchingStrategy {

	MessageBatch addToBatch(String exchange, String routingKey, Message message);

	Date nextRelease();

	Collection<MessageBatch> releaseBatches();

}
|
Caution |
|---|---|
|
Batched data is held in memory; unsent messages can be lost in the event of a system failure. |
A SimpleBatchingStrategy is provided.
It supports sending messages to a single exchange/routing key. It has properties:
-
batchSize— the number of messages in a batch before it is sent -
bufferLimit— the maximum size of the batched message; this will preempt thebatchSizeif exceeded, and cause a partial batch to be sent -
timeout— a time after which a partial batch will be sent when there is no new activity adding messages to the batch
The SimpleBatchingStrategy formats the batch by preceding each embedded message with a 4 byte binary length.
This is communicated to the receiving system by setting the springBatchFormat message property to lengthHeader4.
|
Important |
|---|---|
|
Batched messages are automatically de-batched by listener containers (using the |
3.1.6 Receiving messages
Introduction
Message reception is always a little more complicated than sending.
There are two ways to receive a Message.
The simpler option is to poll for a single Message at a time with a polling method call.
The more complicated yet more common approach is to register a listener that will receive Messages on-demand, asynchronously.
We will look at an example of each approach in the next two sub-sections.
Polling Consumer
The AmqpTemplate itself can be used for polled Message reception.
By default, if no message is available, null is returned immediately; there is no blocking.
Starting with version 1.5, you can now set a receiveTimeout, in milliseconds, and the receive methods will block for
up to that long, waiting for a message.
A value less than zero means block indefinitely (or at least until the
connection to the broker is lost).
Version 1.6 introduced variants of the receive methods allowing the timeout to be passed in on each call.
|
Caution |
|---|---|
|
Since the receive operation creates a new |
There are four simple receive methods available.
As with the Exchange on the sending side, there is a method that requires a default queue property having been set
directly on the template itself, and there is a method that accepts a queue parameter at runtime.
Version 1.6 introduced variants to accept timeoutMillis to override receiveTimeout on a per-request basis.
Message receive() throws AmqpException;

Message receive(String queueName) throws AmqpException;

Message receive(long timeoutMillis) throws AmqpException;

Message receive(String queueName, long timeoutMillis) throws AmqpException;
Just like in the case of sending messages, the AmqpTemplate has some convenience methods for receiving POJOs instead of Message instances, and implementations will provide a way to customize the MessageConverter used to create the Object returned:
Object receiveAndConvert() throws AmqpException;

Object receiveAndConvert(String queueName) throws AmqpException;

Message receiveAndConvert(long timeoutMillis) throws AmqpException;

Message receiveAndConvert(String queueName, long timeoutMillis) throws AmqpException;
Similar to sendAndReceive methods, beginning with version 1.3, the AmqpTemplate has several convenience receiveAndReply methods for synchronously receiving, processing and replying to messages:
<R, S> boolean receiveAndReply(ReceiveAndReplyCallback<R, S> callback)
	   throws AmqpException;

<R, S> boolean receiveAndReply(String queueName, ReceiveAndReplyCallback<R, S> callback)
 	throws AmqpException;

<R, S> boolean receiveAndReply(ReceiveAndReplyCallback<R, S> callback,
	String replyExchange, String replyRoutingKey) throws AmqpException;

<R, S> boolean receiveAndReply(String queueName, ReceiveAndReplyCallback<R, S> callback,
	String replyExchange, String replyRoutingKey) throws AmqpException;

<R, S> boolean receiveAndReply(ReceiveAndReplyCallback<R, S> callback,
 	ReplyToAddressCallback<S> replyToAddressCallback) throws AmqpException;

<R, S> boolean receiveAndReply(String queueName, ReceiveAndReplyCallback<R, S> callback,
			ReplyToAddressCallback<S> replyToAddressCallback) throws AmqpException;
The AmqpTemplate implementation takes care of the receive and reply phases.
In most cases you should provide only an implementation of ReceiveAndReplyCallback to perform some business logic for the received message and build a reply object or message, if needed.
Note, a ReceiveAndReplyCallback may return null.
In this case no reply is sent and receiveAndReply works like the receive method.
This allows the same queue to be used for a mixture of messages, some of which may not need a reply.
Automatic message (request and reply) conversion is applied only if the provided callback is not an instance of ReceiveAndReplyMessageCallback — which provides a raw message exchange contract.
The ReplyToAddressCallback is useful for cases requiring custom logic to determine the replyTo address at runtime against the received message and reply from the ReceiveAndReplyCallback.
By default, replyTo information in the request message is used to route the reply.
The following is an example of POJO-based receive and reply…
boolean received =
        this.template.receiveAndReply(ROUTE, new ReceiveAndReplyCallback<Order, Invoice>() {

                public Invoice handle(Order order) {
                        return processOrder(order);
                }
        });
if (received) {
        log.info("We received an order!");
}
Asynchronous Consumer
|
Important |
|---|---|
|
Spring AMQP also supports annotated-listener endpoints through the use of the |
Message Listener
For asynchronous Message reception, a dedicated component (not the AmqpTemplate) is involved.
That component is a container for a Message consuming callback.
We will look at the container and its properties in just a moment, but first we should look at the callback since that is where your application code will be integrated with the messaging system.
There are a few options for the callback starting with an implementation of the MessageListener interface:
public interface MessageListener {
    void onMessage(Message message);
}
If your callback logic depends upon the AMQP Channel instance for any reason, you may instead use the ChannelAwareMessageListener.
It looks similar but with an extra parameter:
public interface ChannelAwareMessageListener {
    void onMessage(Message message, Channel channel) throws Exception;
}
MessageListenerAdapter
If you prefer to maintain a stricter separation between your application logic and the messaging API, you can rely upon an adapter implementation that is provided by the framework.
This is often referred to as «Message-driven POJO» support.
When using the adapter, you only need to provide a reference to the instance that the adapter itself should invoke.
MessageListenerAdapter listener = new MessageListenerAdapter(somePojo);
    listener.setDefaultListenerMethod("myMethod");
You can subclass the adapter and provide an implementation of getListenerMethodName() to dynamically select different methods based on the message.
This method has two parameters, the originalMessage and extractedMessage, the latter being the result of any conversion.
By default, a SimpleMessageConverter is configured; see the section called “SimpleMessageConverter” for more information and
information about other converters available.
Starting with version 1.4.2, the original message has properties consumerQueue and consumerTag which can be used
to determine which queue a message was received from.
Starting with version 1.5, you can configure a map of consumer queue/tag to method name, to dynamically select the
method to call.
If no entry is in the map, we fall back to the default listener method.
Container
Now that you’ve seen the various options for the Message-listening callback, we can turn our attention to the container.
Basically, the container handles the «active» responsibilities so that the listener callback can remain passive.
The container is an example of a «lifecycle» component.
It provides methods for starting and stopping.
When configuring the container, you are essentially bridging the gap between an AMQP Queue and the MessageListener instance.
You must provide a reference to the ConnectionFactory and the queue name or Queue instance(s) from which that listener should consume Messages.
Here is the most basic example using the default implementation, SimpleMessageListenerContainer :
SimpleMessageListenerContainer container = new SimpleMessageListenerContainer();
container.setConnectionFactory(rabbitConnectionFactory);
container.setQueueNames("some.queue");
container.setMessageListener(new MessageListenerAdapter(somePojo));
As an «active» component, it’s most common to create the listener container with a bean definition so that it can simply run in the background.
This can be done via XML:
<rabbit:listener-container connection-factory="rabbitConnectionFactory">
    <rabbit:listener queues="some.queue" ref="somePojo" method="handle"/>
</rabbit:listener-container>
Or, you may prefer to use the @Configuration style which will look very similar to the actual code snippet above:
@Configuration
public class ExampleAmqpConfiguration {

    @Bean
    public SimpleMessageListenerContainer messageListenerContainer() {
        SimpleMessageListenerContainer container = new SimpleMessageListenerContainer();
        container.setConnectionFactory(rabbitConnectionFactory());
        container.setQueueName("some.queue");
        container.setMessageListener(exampleListener());
        return container;
    }

    @Bean
    public ConnectionFactory rabbitConnectionFactory() {
        CachingConnectionFactory connectionFactory =
            new CachingConnectionFactory("localhost");
        connectionFactory.setUsername("guest");
        connectionFactory.setPassword("guest");
        return connectionFactory;
    }

    @Bean
    public MessageListener exampleListener() {
        return new MessageListener() {
            public void onMessage(Message message) {
                System.out.println("received: " + message);
            }
        };
    }
}
Starting with RabbitMQ Version 3.2, the broker now supports consumer priority (see Using Consumer Priorities with RabbitMQ).
This is enabled by setting the x-priority argument on the consumer.
The SimpleMessageListenerContainer now supports setting consumer arguments:
container.setConsumerArguments(Collections.
<String, Object> singletonMap("x-priority", Integer.valueOf(10)));
For convenience, the namespace provides the priority attribute on the listener element:
<rabbit:listener-container connection-factory="rabbitConnectionFactory">
    <rabbit:listener queues="some.queue" ref="somePojo" method="handle" priority="10" />
</rabbit:listener-container>
Starting with version 1.3 the queue(s) on which the container is listening can be modified at runtime; see Section 3.1.18, “Listener Container Queues”.
auto-delete Queues
When a container is configured to listen to auto-delete queue(s), or the queue has an x-expires option or the Time-To-Live policy is configured on the Broker, the queue is removed by the broker when the container is stopped (last consumer is cancelled).
Before version 1.3, the container could not be restarted because the queue was missing; the RabbitAdmin only automatically redeclares queues etc, when the connection is closed/opens, which does not happen when the container is stopped/started.
Starting with version 1.3, the container will now use a RabbitAdmin to redeclare any missing queues during startup.
You can also use conditional declaration (the section called “Conditional Declaration”) together with an auto-startup="false" admin to defer queue declaration until the container is started.
<rabbit:queue id="otherAnon" declared-by="containerAdmin" />

<rabbit:direct-exchange name="otherExchange" auto-delete="true" declared-by="containerAdmin">
    <rabbit:bindings>
        <rabbit:binding queue="otherAnon" key="otherAnon" />
    </rabbit:bindings>
</rabbit:direct-exchange>

<rabbit:listener-container id="container2" auto-startup="false">
    <rabbit:listener id="listener2" ref="foo" queues="otherAnon" admin="containerAdmin" />
</rabbit:listener-container>

<rabbit:admin id="containerAdmin" connection-factory="rabbitConnectionFactory"
    auto-startup="false" />
In this case, the queue and exchange are declared by containerAdmin which has auto-startup="false" so the elements are not declared during context initialization.
Also, the container is not started for the same reason.
When the container is later started, it uses it’s reference to containerAdmin to declare the elements.
Batched Messages
Batched messages are automatically de-batched by listener containers (using the springBatchFormat message header). Rejecting any message from a batch will cause the entire batch to be rejected.
See the section called “Batching” for more information about batching.
Consumer Failure Events
Starting with version 1.5, the SimpleMessageListenerContainer publishes application events whenever a listener
(consumer) experiences a failure of some kind.
The event ListenerContainerConsumerFailedEvent has the following properties:
-
container— the listener container where the consumer experienced the problem. -
reason— a textual reason for the failure. -
fatal— a boolean indicating whether the failure was fatal; with non-fatal exceptions, the container will attempt
to restart the consumer, according to theretryInterval. -
throwable— theThrowablethat was caught.
These events can be consumed by implementing ApplicationListener<ListenerContainerConsumerFailedEvent>.
|
Note |
|---|---|
|
System-wide events (such as connection failures) will be published by all consumers when |
If a consumer fails because one if its queues is being used exclusively, by default, as well as publishing the
event, a WARN log is issued. To change this logging behavior, provide a custom ConditionalExceptionLogger in the
SimpleMessageListenerContainer ‘s exclusiveConsumerExceptionLogger property.
See also the section called “Logging Channel Close Events”.
Fatal errors are always logged at ERROR level; this it not modifiable.
Consumer Tags
Starting with version 1.4.5, you can now provide a strategy to generate consumer tags.
By default, the consumer tag will be generated by the broker.
public interface ConsumerTagStrategy {

    String createConsumerTag(String queue);

}
The queue is made available so it can (optionally) be used in the tag.
See Section 3.1.15, “Message Listener Container Configuration”.
Annotation-driven Listener Endpoints
Introduction
Starting with version 1.4, the easiest way to receive a message asynchronously is to use the annotated listener endpoint infrastructure.
In a nutshell, it allows you to expose a method of a managed bean as a Rabbit listener endpoint.
@Component
public class MyService {

    @RabbitListener(queues = "myQueue")
    public void processOrder(String data) {
        ...
    }

}
The idea of the example above is that, whenever a message is available on the org.springframework.amqp.core.Queue «myQueue», the processOrder method is invoked accordingly (in this case, with the payload of the message).
The annotated endpoint infrastructure creates a message listener container behind the scenes for each annotated method, using a RabbitListenerContainerFactory.
In the example above, myQueue must already exist and be bound to some exchange.
Starting with version 1.5.0, the queue can be declared and bound automatically, as long as a RabbitAdmin exists
in the application context.
@Component
public class MyService {

  @RabbitListener(bindings = @QueueBinding(
        value = @Queue(value = "myQueue", durable = "true"),
        exchange = @Exchange(value = "auto.exch", ignoreDeclarationExceptions = "true"),
        key = "orderRoutingKey")
  )
  public void processOrder(String data) {
    ...
  }

  @RabbitListener(bindings = @QueueBinding(
        value = @Queue,
        exchange = @Exchange(value = "auto.exch"),
        key = "invoiceRoutingKey")
  )
  public void processInvoice(String data) {
    ...
  }

}
In the first example, a queue myQueue will be declared automatically (durable) together with the exchange, if needed,
and bound to the exchange with the routing key.
In the second example, an anonymous (exclusive, auto-delete) queue will be declared and bound.
Multiple QueueBinding entries can be provided, allowing the listener to listen to multiple queues.
Only DIRECT, FANOUT, TOPIC and HEADERS, exchange types are supported with this mechanism.
Use normal @Bean definitions when more advanced configuration is required.
Notice ignoreDeclarationExceptions on the exchange in the first example.
This allows, for example, binding to an existing exchange that might have different settings (such as internal).
By default the properties of an existing exchange must match.
Starting with version 1.6, you can now specify arguments within @QueueBinding annotations for queues, exchanges
and bindings. For example:
@RabbitListener(bindings = @QueueBinding(
        value = @Queue(value = "auto.headers", autoDelete = "true",
                        arguments = @Argument(name = "x-message-ttl", value = "10000",
                                                type = "java.lang.Integer")),
        exchange = @Exchange(value = "auto.headers", type = ExchangeTypes.HEADERS, autoDelete = "true"),
        arguments = {
                @Argument(name = "x-match", value = "all"),
                @Argument(name = "foo", value = "bar"),
                @Argument(name = "baz")
        })
)
public String handleWithHeadersExchange(String foo) {
    ...
}
Notice that the x-message-ttl argument is set to 10 seconds for the queue.
Since the argument type is not String, we have to specify its type; in this case Integer.
As with all such declarations, if the queue exists already, the arguments must match those on the queue.
For the header exchange, we set the binding arguments to match messages that have the header foo set to bar and
the header baz must be present with any value.
The x-match argument means both conditions must be satisfied.
The argument name, value, and type can be property placeholders (${...}) or SpEL expressions (#{...}).
The name must resolve to a String; the expression for type must resolve to a Class or the fully-qualified name of
a class.
The value must resolve to something that can be converted by the DefaultConversionService to the type (such as
the x-message-ttl in the above example).
If a name resolves to null or an empty String, that @Argument is ignored.
Meta-Annotations
Sometimes you may want to use the same configuration for multiple listeners.
To reduce the boilerplate configuration, you can use meta-annotations to create your own listener annotation:
@Target({ElementType.TYPE, ElementType.METHOD, ElementType.ANNOTATION_TYPE})
@Retention(RetentionPolicy.RUNTIME)
@RabbitListener(bindings = @QueueBinding(
        value = @Queue,
        exchange = @Exchange(value = "metaFanout", type = ExchangeTypes.FANOUT)))
public @interface MyAnonFanoutListener {
}

public class MetaListener {

    @MyAnonFanoutListener
    public void handle1(String foo) {
        ...
    }

    @MyAnonFanoutListener
    public void handle2(String foo) {
        ...
    }

}
In this example, each listener created by the @MyAnonFanoutListener annotation will bind an anonymous, auto-delete
queue to the fanout exchange metaFanout.
The meta-annotation mechanism is simple in that attributes on the user-defined annotation are not examined — so
you can’t override settings from the meta-annotation.
Use normal @Bean definitions when more advanced configuration is required.
Enable Listener Endpoint Annotations
To enable support for @RabbitListener annotations add @EnableRabbit to one of your @Configuration classes.
@Configuration
@EnableRabbit
public class AppConfig {

    @Bean
    public SimpleRabbitListenerContainerFactory rabbitListenerContainerFactory() {
        SimpleRabbitListenerContainerFactory factory = new SimpleRabbitListenerContainerFactory();
        factory.setConnectionFactory(connectionFactory());
        factory.setConcurrentConsumers(3);
        factory.setMaxConcurrentConsumers(10);
        return factory;
    }
}
By default, the infrastructure looks for a bean named rabbitListenerContainerFactory as the source for the factory to use to create message listener containers.
In this case, and ignoring the RabbitMQ infrastructure setup, the processOrder method can be invoked with a core poll size of 3 threads and a maximum pool size of 10 threads.
It is possible to customize the listener container factory to use per annotation or an explicit default can be configured by implementing the RabbitListenerConfigurer interface.
The default is only required if at least one endpoint is registered without a specific container factory.
See the javadoc for full details and examples.
If you prefer XML configuration, use the <rabbit:annotation-driven> element.
<rabbit:annotation-driven/>

<bean id="rabbitListenerContainerFactory"
      class="org.springframework.amqp.rabbit.config.SimpleRabbitListenerContainerFactory">
    <property name="connectionFactory" ref="connectionFactory"/>
    <property name="concurrentConsumers" value="3"/>
    <property name="maxConcurrentConsumers" value="10"/>
</bean>
Message Conversion for Annotated Methods
There are two conversion steps in the pipeline before invoking the listener.
The first uses a MessageConverter to convert the incoming Spring AMQP Message to a spring-messaging Message.
When the target method is invoked, the message payload is converted, if necessary, to the method parameter type.
The default MessageConverter for the first step is a Spring AMQP SimpleMessageConverter that handles conversion to
String and java.io.Serializable objects; all others remain as a byte[].
In the following discussion, we call this the message converter.
The default converter for the second step is a GenericMessageConverter which delegates to a conversion service
(an instance of DefaultFormattingConversionService).
In the following discussion, we call this the method argument converter.
To change the message converter, simply add it as a property to the container factory bean:
@Bean
public SimpleRabbitListenerContainerFactory rabbitListenerContainerFactory() {
    SimpleRabbitListenerContainerFactory factory = new SimpleRabbitListenerContainerFactory();
    ...
    factory.setMessageConverter(new Jackson2JsonMessageConverter());
    ...
    return factory;
}
This configures a Jackson2 converter that expects header information to be present to guide the conversion.
You can also consider a ContentTypeDelegatingMessageConverter which can handle conversion of different content types.
In most cases, it is not necessary to customize the method argument converter unless, for example, you want to use
a custom ConversionService.
In versions prior to 1.6, the type information to convert the JSON had to be provided in message headers, or a
custom ClassMapper was required.
Starting with version 1.6, if there are no type information headers, the type can be inferred from the target
method arguments.
|
Note |
|---|---|
|
This type inference only works for |
See the section called “Jackson2JsonMessageConverter” for more information.
If you wish to customize the method argument converter, you can do so as follows:
@Configuration
@EnableRabbit
public class AppConfig implements RabbitListenerConfigurer {

    ...

    @Bean
    public DefaultMessageHandlerMethodFactory myHandlerMethodFactory() {
        DefaultMessageHandlerMethodFactory factory = new DefaultMessageHandlerMethodFactory();
        factory.setMessageConverter(new GenericMessageConverter(myConversionService()));
        return factory;
    }

    @Bean
    public ConversionService myConversionService() {
        DefaultConversionService conv = new DefaultConversionService();
        conv.addConverter(mySpecialConverter());
        return conv;
    }

    @Override
    public void configureRabbitListeners(RabbitListenerEndpointRegistrar registrar) {
        registrar.setMessageHandlerMethodFactory(myHandlerMethodFactory());
    }

    ...

}
|
Important |
|---|---|
|
for multi-method listeners (see the section called “Multi-Method Listeners”), the method selection is based on the |
Programmatic Endpoint Registration
RabbitListenerEndpoint provides a model of a Rabbit endpoint and is responsible for configuring the container for that model.
The infrastructure allows you to configure endpoints programmatically in addition to the ones that are detected by the RabbitListener annotation.
@Configuration
@EnableRabbit
public class AppConfig implements RabbitListenerConfigurer {

    @Override
    public void configureRabbitListeners(RabbitListenerEndpointRegistrar registrar) {
        SimpleRabbitListenerEndpoint endpoint = new SimpleRabbitListenerEndpoint();
        endpoint.setQueueNames("anotherQueue");
        endpoint.setMessageListener(message -> {

        });
        registrar.registerEndpoint(endpoint);
    }
}
In the example above, we used SimpleRabbitListenerEndpoint which provides the actual MessageListener to invoke but you could just as well build your own endpoint variant describing a custom invocation mechanism.
It should be noted that you could just as well skip the use of @RabbitListener altogether and only register your endpoints programmatically through RabbitListenerConfigurer.
Annotated Endpoint Method Signature
So far, we have been injecting a simple String in our endpoint but it can actually have a very flexible method signature.
Let’s rewrite it to inject the Order with a custom header:
@Component
public class MyService {

    @RabbitListener(queues = "myQueue")
    public void processOrder(Order order, @Header("order_type") String orderType) {
        ...
    }
}
These are the main elements you can inject in listener endpoints:
The raw org.springframework.amqp.core.Message.
The com.rabbitmq.client.Channel on which the message was received
The org.springframework.messaging.Message representing the incoming AMQP message.
Note that this message holds both the custom and the standard headers (as defined by AmqpHeaders).
|
Note |
|---|---|
|
Starting with version 1.6, the inbound |
@Header-annotated method arguments to extract a specific header value, including standard AMQP headers.
@Headers-annotated argument that must also be assignable to java.util.Map for getting access to all headers.
A non-annotated element that is not one of the supported types (i.e.
Message and Channel) is considered to be the payload.
You can make that explicit by annotating the parameter with @Payload.
You can also turn on validation by adding an extra @Valid.
The ability to inject Spring’s Message abstraction is particularly useful to benefit from all the information stored in the transport-specific message without relying on transport-specific API.
@RabbitListener(queues = "myQueue")
public void processOrder(Message<Order> order) { ...
}
Handling of method arguments is provided by DefaultMessageHandlerMethodFactory which can be further customized to support additional method arguments.
The conversion and validation support can be customized there as well.
For instance, if we want to make sure our Order is valid before processing it, we can annotate the payload with @Valid and configure the necessary validator as follows:
@Configuration
@EnableRabbit
public class AppConfig implements RabbitListenerConfigurer {

    @Override
    public void configureRabbitListeners(RabbitListenerEndpointRegistrar registrar) {
        registrar.setMessageHandlerMethodFactory(myHandlerMethodFactory());
    }

    @Bean
    public DefaultMessageHandlerMethodFactory myHandlerMethodFactory() {
        DefaultMessageHandlerMethodFactory factory = new DefaultMessageHandlerMethodFactory();
        factory.setValidator(myValidator());
        return factory;
    }
}
Listening to Multiple Queues
When using the queues attribute, you can specify that the associated container can listen to multiple queues.
You can use a @Header annotation to make the queue name from which a message was received available to the POJO
method:
@Component
public class MyService {

    @RabbitListener(queues = { "queue1", "queue2" } )
    public void processOrder(String data, @Header(AmqpHeaders.CONSUMER_QUEUE) String queue) {
        ...
    }

}
Starting with version 1.5, you can externalize the queue names using property placeholders, and SpEL:
@Component
public class MyService {

    @RabbitListener(queues = "#{'${property.with.comma.delimited.queue.names}'.split(',')}" )
    public void processOrder(String data, @Header(AmqpHeaders.CONSUMER_QUEUE) String queue) {
        ...
    }

}
Prior to version 1.5, only a single queue could be specified this way; each queue needed a separate property.
Reply Management
The existing support in MessageListenerAdapter already allows your method to have a non-void return type.
When that’s the case, the result of the invocation is encapsulated in a message sent either in the address specified in the ReplyToAddress header of the original message or in the default address configured on the listener.
That default address can now be set using the @SendTo annotation of the messaging abstraction.
Assuming our processOrder method should now return an OrderStatus, it is possible to write it as follow to automatically send a reply:
@RabbitListener(destination = "myQueue")
@SendTo("status")
public OrderStatus processOrder(Order order) {

    return status;
}
If you need to set additional headers in a transport-independent manner, you could return a Message instead, something like:
@RabbitListener(destination = "myQueue")
@SendTo("status")
public Message<OrderStatus> processOrder(Order order) {

    return MessageBuilder
        .withPayload(status)
        .setHeader("code", 1234)
        .build();
}
The @SendTo value is assumed as a reply exchange and routingKey pair following the pattern exchange/routingKey,
where one of those parts can be omitted.
The valid values are:
foo/bar — the replyTo exchange and routingKey.
foo/ — the replyTo exchange and default (empty) routingKey.
bar or /bar — the replyTo routingKey and default (empty) exchange.
/ or empty — the replyTo default exchange and default routingKey.
Also @SendTo can be used without a value attribute.
This case is equal to an empty sendTo pattern.
@SendTo is only used if the inbound message does not have a replyToAddress property.
Starting with version 1.5, the @SendTo value can be a bean initialization SpEL Expression, for example…
@RabbitListener(queues = "test.sendTo.spel")
@SendTo("#{spelReplyTo}")
public String capitalizeWithSendToSpel(String foo) {
    return foo.toUpperCase();
}
...
@Bean
public String spelReplyTo() {
    return "test.sendTo.reply.spel";
}
The expression must evaluate to a String, which can be a simple queue name (sent to the default exchange) or with
the form exchange/routingKey as discussed above.
|
Note |
|---|---|
|
The |
For dynamic reply routing, the message sender should include a reply_to message property or use the alternate
runtime SpEL expression described below.
Starting with version 1.6, the @SendTo can be a SpEL expression that is evaluated at runtime against the request
and reply:
@RabbitListener(queues = "test.sendTo.spel")
@SendTo("!{'some.reply.queue.with.' + result.queueName}")
public Bar capitalizeWithSendToSpel(Foo foo) {
    return processTheFooAndReturnABar(foo);
}
The runtime nature of the SpEL expression is indicated with !{...} delimiters.
The evaluation context #root object for the expression has three properties:
-
request— theo.s.amqp.core.Messagerequest object. -
source— theo.s.messaging.Message<?>after conversion. -
result— the method result.
The context has a map property accessor, a standard type converter and a bean resolver, allowing other beans in the
context to be referenced (e.g. @someBeanName.determineReplyQ(request, result)).
In summary, #{...} is evaluated once during initialization, with the #root object being the application context;
beans are referenced by their names.
!{...} is evaluated at runtime for each message with the root object having the properties above and beans are
referenced with their names, prefixed by @.
Multi-Method Listeners
Starting with version 1.5.0, the @RabbitListener annotation can now be specified at the class level.
Together with the new @RabbitHandler annotation, this allows a single listener to invoke different methods, based on
the payload type of the incoming message.
This is best described using an example:
@RabbitListener(id="multi", queues = "someQueue")
public class MultiListenerBean {

    @RabbitHandler
    @SendTo("my.reply.queue")
    public String bar(Bar bar) {
        ...
    }

    @RabbitHandler
    public String baz(Baz baz) {
        ...
    }

    @RabbitHandler
    public String qux(@Header("amqp_receivedRoutingKey") String rk, @Payload Qux qux) {
        ...
    }

}
In this case, the individual @RabbitHandler methods are invoked if the converted payload is a Bar, Baz or Qux.
It is important to understand that the system must be able to identify a unique method based on the payload type.
The type is checked for assignability to a single parameter that has no annotations, or is annotated with the @Payload annotation.
Notice that the same method signatures apply as discussed in the method-level @RabbitListener described above.
Notice that the @SendTo must be specified on each method (if needed); it is not supported at the class level.
@Repeatable @RabbitListener
Starting with version 1.6, the @RabbitListener annotation is marked with @Repeatable.
This means that the annotation can appear on the same annotated element (method or class) multiple times.
In this case, a separate listener container is created for each annotation, each of which invokes the same listener
@Bean.
Repeatable annotations can be used with Java 8 or above; when using Java 7 or earlier, the same effect can be achieved
by using the @RabbitListeners «container» annotation, with an array of @RabbitListener annotations.
Proxy @RabbitListener and Generics
If your service is intended to be proxied (e.g. in case of @Transactional) there are some considerations when
the interface has generic parameters.
With a generic interface and a particular implementation, e.g.:
interface TxService<P> {

   String handle(P payload, String header);

}

static class TxServiceImpl implements TxService<Foo> {

    @Override
    @RabbitListener(...)
    public String handle(Foo foo, String rk) {
         ...
    }

}
you are forced to switch to the CGLIB target class proxy because the actual implementation of the interface
handle method is a bridge method.
In the case of transaction management, the use of CGLIB is configured using
an annotation option — @EnableTransactionManagement(proxyTargetClass = true).
And in this case, all annotations have to be declared on the target method in the implementation:
static class TxServiceImpl implements TxService<Foo> {

    @Override
    @Transactional
    @RabbitListener(...)
    public String handle(@Payload Foo foo, @Header("amqp_receivedRoutingKey") String rk) {
        ...
    }

}
Container Management
Containers created for annotations are not registered with the application context.
You can obtain a collection of all containers by invoking getListenerContainers() on the
RabbitListenerEndpointRegistry bean.
You can then iterate over this collection, for example, to stop/start all containers or invoke the Lifecycle methods
on the registry itself which will invoke the operations on each container.
You can also get a reference to an individual container using its id, using getListenerContainer(String id); for
example registry.getListenerContainer("multi") for the container created by the snippet above.
Starting with version 1.5.2, you can obtain the id s of the registered containers with getListenerContainerIds().
Starting with version 1.5, you can now assign a group to the container on the RabbitListener endpoint.
This provides a mechanism to get a reference to a subset of containers; adding a group attribute causes a
bean of type Collection<MessageListenerContainer> to be registered with the context with the group name.
Threading and Asynchronous Consumers
A number of different threads are involved with asynchronous consumers.
Threads from the TaskExecutor configured in the SimpleMessageListener are used to invoke the MessageListener when a new message is delivered by RabbitMQ Client.
If not configured, a SimpleAsyncTaskExecutor is used.
If a pooled executor is used, ensure the pool size is sufficient to handle the configured concurrency.
|
Note |
|---|---|
|
When using the default |
The Executor configured in the CachingConnectionFactory is passed into the RabbitMQ Client when creating the connection, and its threads are used to deliver new messages to the listener container.
At the time of writing, if this is not configured, the client uses an internal thread pool executor with a pool size of 5.
The RabbitMQ client uses a ThreadFactory to create threads for low-level I/O (socket) operations.
To modify this factory, you need to configure the underlying RabbitMQ ConnectionFactory, as discussed in the section called “Configuring the Underlying Client Connection Factory”.
Detecting Idle Asynchronous Consumers
While efficient, one problem with asynchronous consumers is detecting when they are idle — users might want to take
some action if no messages arrive for some period of time.
Starting with version 1.6, it is now possible to configure the listener container to publish a
ListenerContainerIdleEvent when some time passes with no message delivery.
While the container is idle, an event will be published every idleEventInterval milliseconds.
To configure this feature, set the idleEventInterval on the container:
xml
<rabbit:listener-container connection-factory="connectionFactory"
        ...
        idle-event-interval="60000"
        ...
        >
    <rabbit:listener id="container1" queue-names="foo" ref="myListener" method="handle" />
</rabbit:listener-container>
Java
@Bean
public SimpleMessageListenerContainer(ConnectionFactory connectionFactory) {
    SimpleMessageListenerContainer container = new SimpleMessageListenerContainer(connectionFactory);
    ...
    container.setIdleEventInterval(60000L);
    ...
    return container;
}
@RabbitListener
@Bean
public SimpleRabbitListenerContainerFactory rabbitListenerContainerFactory() {
    SimpleRabbitListenerContainerFactory factory = new SimpleRabbitListenerContainerFactory();
    factory.setConnectionFactory(rabbitConnectionFactory());
    factory.setIdleEventInterval(60000L);
    ...
    return factory;
}
In each of these cases, an event will be published once per minute while the container is idle.
Event Consumption
You can capture these events by implementing ApplicationListener — either a general listener, or one narrowed to only
receive this specific event.
You can also use @EventListener, introduced in Spring Framework 4.2.
The following example combines the @RabbitListener and @EventListener into a single class.
It’s important to understand that the application listener will get events for all containers so you may need to
check the listener id if you want to take specific action based on which container is idle.
You can also use the @EventListener condition for this purpose.
The events have 4 properties:
-
source— the listener container instance -
id— the listener id (or container bean name) -
idleTime— the time the container had been idle when the event was published -
queueNames— the names of the queue(s) that the container listens to
public class Listener {

    @RabbitListener(id="foo", queues="#{queue.name}")
    public String listen(String foo) {
        return foo.toUpperCase();
    }

    @EventListener(condition = "event.listenerId == 'foo'")
    public void onApplicationEvent(ListenerContainerIdleEvent event) {
        ...
    }

}
|
Important |
|---|---|
|
Event listeners will see events for all containers; so, in the example above, we narrow the events received |
|
Caution |
|---|---|
|
If you wish to use the idle event to stop the lister container, you should not call |
3.1.7 Message Converters
Introduction
The AmqpTemplate also defines several methods for sending and receiving Messages that will delegate to a MessageConverter.
The MessageConverter itself is quite straightforward.
It provides a single method for each direction: one for converting to a Message and another for converting from a Message.
Notice that when converting to a Message, you may also provide properties in addition to the object.
The «object» parameter typically corresponds to the Message body.
public interface MessageConverter {

    Message toMessage(Object object, MessageProperties messageProperties)
            throws MessageConversionException;

    Object fromMessage(Message message) throws MessageConversionException;

}
The relevant Message-sending methods on the AmqpTemplate are listed below.
They are simpler than the methods we discussed previously because they do not require the Message instance.
Instead, the MessageConverter is responsible for «creating» each Message by converting the provided object to the byte array for the Message body and then adding any provided MessageProperties.
void convertAndSend(Object message) throws AmqpException;

void convertAndSend(String routingKey, Object message) throws AmqpException;

void convertAndSend(String exchange, String routingKey, Object message)
    throws AmqpException;

void convertAndSend(Object message, MessagePostProcessor messagePostProcessor)
    throws AmqpException;

void convertAndSend(String routingKey, Object message,
    MessagePostProcessor messagePostProcessor) throws AmqpException;

void convertAndSend(String exchange, String routingKey, Object message,
    MessagePostProcessor messagePostProcessor) throws AmqpException;
On the receiving side, there are only two methods: one that accepts the queue name and one that relies on the template’s «queue» property having been set.
Object receiveAndConvert() throws AmqpException;

Object receiveAndConvert(String queueName) throws AmqpException;
|
Note |
|---|---|
|
The |
SimpleMessageConverter
The default implementation of the MessageConverter strategy is called SimpleMessageConverter.
This is the converter that will be used by an instance of RabbitTemplate if you do not explicitly configure an alternative.
It handles text-based content, serialized Java objects, and simple byte arrays.
Converting From a Message
If the content type of the input Message begins with «text» (e.g.
«text/plain»), it will also check for the content-encoding property to determine the charset to be used when converting the Message body byte array to a Java String.
If no content-encoding property had been set on the input Message, it will use the «UTF-8» charset by default.
If you need to override that default setting, you can configure an instance of SimpleMessageConverter, set its «defaultCharset» property and then inject that into a RabbitTemplate instance.
If the content-type property value of the input Message is set to «application/x-java-serialized-object», the SimpleMessageConverter will attempt to deserialize (rehydrate) the byte array into a Java object.
While that might be useful for simple prototyping, it’s generally not recommended to rely on Java serialization since it leads to tight coupling between the producer and consumer.
Of course, it also rules out usage of non-Java systems on either side.
With AMQP being a wire-level protocol, it would be unfortunate to lose much of that advantage with such restrictions.
In the next two sections, we’ll explore some alternatives for passing rich domain object content without relying on Java serialization.
For all other content-types, the SimpleMessageConverter will return the Message body content directly as a byte array.
See the section called “Java Deserialization” for important information.
Converting To a Message
When converting to a Message from an arbitrary Java Object, the SimpleMessageConverter likewise deals with byte arrays, Strings, and Serializable instances.
It will convert each of these to bytes (in the case of byte arrays, there is nothing to convert), and it will set the content-type property accordingly.
If the Object to be converted does not match one of those types, the Message body will be null.
SerializerMessageConverter
This converter is similar to the SimpleMessageConverter except it can be configured with other Spring Framework
Serializer and Deserializer implementations for application/x-java-serialized-object conversions.
See the section called “Java Deserialization” for important information.
Jackson2JsonMessageConverter
Converting to a Message
As mentioned in the previous section, relying on Java serialization is generally not recommended.
One rather common alternative that is more flexible and portable across different languages and platforms is JSON
(JavaScript Object Notation).
The converter can be configured on any RabbitTemplate instance to override its usage of the SimpleMessageConverter
default.
The Jackson2JsonMessageConverter uses the com.fasterxml.jackson 2.x library.
<bean class="org.springframework.amqp.rabbit.core.RabbitTemplate">
    <property name="connectionFactory" ref="rabbitConnectionFactory"/>
    <property name="messageConverter">
        <bean class="org.springframework.amqp.support.converter.Jackson2JsonMessageConverter">

            <property name="classMapper" ref="customClassMapper"/>
        </bean>
    </property>
</bean>
As shown above, Jackson2JsonMessageConverter uses a DefaultClassMapper by default.
Type information is added to (and retrieved from) the MessageProperties.
If an inbound message does not contain type information in the MessageProperties, but you know the expected type, you
can configure a static type using the defaultType property
<bean id="jsonConverterWithDefaultType"
      class="o.s.amqp.support.converter.Jackson2JsonMessageConverter">
    <property name="classMapper">
        <bean class="org.springframework.amqp.support.converter.DefaultClassMapper">
            <property name="defaultType" value="foo.PurchaseOrder"/>
        </bean>
    </property>
</bean>
Converting from a Message
Inbound messages are converted to objects according to the type information added to headers by the sending system.
In versions prior to 1.6, if type information is not present, conversion would fail.
Starting with version 1.6, if type information is missing, the converter will convert the JSON using Jackson
defaults (usually a map).
Also, starting with version 1.6, when using @RabbitListener annotations (on methods), the inferred type information
is added to the MessageProperties; this allows the converter to convert to the argument type of the target method.
This only applies if there is one parameter with no annotations or a single parameter with the @Payload annotation.
Parameters of type Message are ignored during the analysis.
|
Important |
|---|---|
|
By default, the inferred type information will override the inbound |
|
Note |
|---|---|
|
When converting from the |
@RabbitListener
public void foo(Foo foo) {...}

@RabbitListener
public void foo(@Payload Foo foo, @Header("amqp_consumerQueue") String queue) {...}

@RabbitListener
public void foo(Foo foo, o.s.amqp.core.Message message) {...}

@RabbitListener
public void foo(Foo foo, o.s.messaging.Message<Foo> message) {...}

@RabbitListener
public void foo(Foo foo, String bar) {...}

@RabbitListener
public void foo(Foo foo, o.s.messaging.Message<?> message) {...}
In the first four cases above the converter will attempt to convert to the Foo type.
The fifth example is invalid because we can’t determine which argument should receive the message payload.
With the sixth example, the Jackson defaults will apply due to the generic type being a WildcardType.
You can, however, create a custom converter and use the targetMethod message property to decide which type to convert
the JSON to.
|
Note |
|---|---|
|
This type inference can only be achieved when the |
MarshallingMessageConverter
Yet another option is the MarshallingMessageConverter.
It delegates to the Spring OXM library’s implementations of the Marshaller and Unmarshaller strategy interfaces.
You can read more about that library here.
In terms of configuration, it’s most common to provide the constructor argument only since most implementations of Marshaller will also implement Unmarshaller.
<bean class="org.springframework.amqp.rabbit.core.RabbitTemplate">
    <property name="connectionFactory" ref="rabbitConnectionFactory"/>
    <property name="messageConverter">
        <bean class="org.springframework.amqp.support.converter.MarshallingMessageConverter">
            <constructor-arg ref="someImplemenationOfMarshallerAndUnmarshaller"/>
        </bean>
    </property>
</bean>
ContentTypeDelegatingMessageConverter
This class was introduced in version 1.4.2 and allows delegation to a specific MessageConverter based on the content type property in the MessageProperties.
By default, it will delegate to a SimpleMessageConverter if there is no contentType property, or a value that matches none of the configured converters.
<bean id="contentTypeConverter" class="ContentTypeDelegatingMessageConverter">
    <property name="delegates">
        <map>
            <entry key="application/json" value-ref="jsonMessageConverter" />
            <entry key="application/xml" value-ref="xmlMessageConverter" />
        </map>
    </property>
</bean>
Java Deserialization
|
Important |
|---|---|
|
There is a possible vulnerability when deserializing java objects from untrusted sources. If you accept messages from untrusted sources with a By default, the white list is empty, meaning all classes will be deserialized. You can set a list of patterns, such as The patterns will be checked in order until a match is found. Set the patterns using the |
Message Properties Converters
The MessagePropertiesConverter strategy interface is used to convert between the Rabbit Client
BasicProperties and Spring AMQP MessageProperties. The default implementation
(DefaultMessagePropertiesConverter) is usually sufficient for most purposes but you can implement your own if needed.
The default properties converter will convert BasicProperties elements of type LongString to String s
when the size is not greater than 1024 bytes. Larger LongString s are not converted (see below).
This limit can be overridden with a constructor argument.
Starting with version 1.6, headers longer than the long string limit (default 1024) are now left as
LongString s by default by the DefaultMessagePropertiesConverter.
You can access the contents via the getBytes[], toString(), or getStream() methods.
Previously, the DefaultMessagePropertiesConverter «converted» such headers to a DataInputStream (actually it just
referenced the LongString‘s DataInputStream).
On output, this header was not converted (except to a String, e.g. [email protected] by calling
toString() on the stream).
Large incoming LongString headers are now correctly «converted» on output too (by default).
A new constructor is provided to allow you to configure the converter to work as before:
/**
 * Construct an instance where LongStrings will be returned
 * unconverted or as a java.io.DataInputStream when longer than this limit.
 * Use this constructor with 'true' to restore pre-1.6 behavior.
 * @param longStringLimit the limit.
 * @param convertLongLongStrings LongString when false,
 * DataInputStream when true.
 * @since 1.6
 */
public DefaultMessagePropertiesConverter(int longStringLimit, boolean convertLongLongStrings) { ... }
Also starting with version 1.6, a new property correlationIdString has been added to MessageProperties.
Previously, when converting to/from BasicProperties used by the RabbitMQ client, an unnecessary byte[] <-> String
conversion was performed because MessageProperties.correlationId is a byte[] but BasicProperties uses a
String. (Ultimately, the RabbitMQ client uses UTF-8 to convert the String to bytes to put in the protocol message).
To provide maximum backwards compatibility, a new property correlationIdPolicy has been added to the
DefaultMessagePropertiesConverter.
This takes an DefaultMessagePropertiesConverter.CorrelationIdPolicy enum argument.
By default it is set to BYTES which replicates the previous behavior.
For inbound messages:
-
STRING— just thecorrelationIdStringproperty is mapped -
BYTES— just thecorrelationIdproperty is mapped -
BOTH— both properties are mapped
For outbound messages:
-
STRING— just thecorrelationIdStringproperty is mapped -
BYTES— just thecorrelationIdproperty is mapped -
BOTH— Both properties will be considered, with the String property taking precedence
Also starting with version 1.6, the inbound deliveryMode property is no longer mapped to MessageProperties.deliveryMode, it is mapped to MessageProperties.receivedDeliveryMode instead.
Also, the inbound userId property is no longer mapped to MessageProperties.userId, it is mapped to MessageProperties.receivedUserId instead.
These changes are to avoid unexpected propagation of these properties if the same MessageProperties object is used for an outbound message.
3.1.8 Modifying Messages — Compression and More
A number of extension points exist where you can perform some processing on a message, either before it is sent to RabbitMQ, or immediately after it is received.
As can be seen in Section 3.1.7, “Message Converters”, one such extension point is in the AmqpTemplate convertAndReceive operations, where you can provide a MessagePostProcessor.
For example, after your POJO has been converted, the MessagePostProcessor enables you to set custom headers or properties on the Message.
Starting with version 1.4.2, additional extension points have been added to the RabbitTemplate — setBeforePublishPostProcessors() and setAfterReceivePostProcessors().
The first enables a post processor to run immediately before sending to RabbitMQ. When using batching (see the section called “Batching”), this is invoked after the batch is assembled and before the batch is sent. The second is invoked immediately after a message is received.
These extension points are used for such features as compression and, for this purpose, several MessagePostProcessor s are provided:
- GZipPostProcessor
- ZipPostProcessor
for compressing messages before sending, and
- GUnzipPostProcessor
- UnzipPostProcessor
for decompressing received messages.
Similarly, the SimpleMessageListenerContainer also has a setAfterReceivePostProcessors() method, allowing the decompression to be performed after messages are received by the container.
3.1.9 Request/Reply Messaging
Introduction
The AmqpTemplate also provides a variety of sendAndReceive methods that accept the same argument options that you have seen above for the one-way send operations (exchange, routingKey, and Message).
Those methods are quite useful for request/reply scenarios since they handle the configuration of the necessary «reply-to» property before sending and can listen for the reply message on an exclusive Queue that is created internally for that purpose.
Similar request/reply methods are also available where the MessageConverter is applied to both the request and reply.
Those methods are named convertSendAndReceive.
See the Javadoc of AmqpTemplate for more detail.
Starting with version 1.5.0, each of the sendAndReceive method variants has an overloaded version that takes CorrelationData.
Together with a properly configured connection factory, this enables the receipt of publisher confirms for the send side of the operation.
See the section called “Publisher Confirms and Returns” for more information.
Reply Timeout
By default, the send and receive methods will timeout after 5 seconds and return null.
This can be modified by setting the replyTimeout property.
Starting with version 1.5, if you set the mandatory property to true (or the mandatory-expression evaluates to
true for a particular message), if the message cannot be delivered to a queue an AmqpMessageReturnedException will
be thrown.
This exception has returnedMessage, replyCode, replyText properties, as well as the exchange and
routingKey used for the send.
|
Note |
|---|---|
|
This feature uses publisher returns and is enabled by setting |
RabbitMQ Direct reply-to
|
Important |
|---|---|
|
Starting with version 3.4.0, the RabbitMQ server now supports Direct reply-to; this eliminates the main reason for a fixed reply queue (to avoid the need to create a temporary queue for each request). |
Reply listeners are still supported with named queues (other than amq.rabbitmq.reply-to), allowing control of reply concurrency etc.
Starting with version 1.6 if, for some reason, you wish to use a temporary, exclusive, auto-delete queue for each
reply, set the useTemporaryReplyQueues property to true.
This property is ignored if you you set a replyAddress.
The decision whether or not to use direct reply-to can be changed to use different criteria by subclassing
RabbitTemplate and overriding useDirectReplyTo().
The method is called once only; when the first request is sent.
Message Correlation With A Reply Queue
When using a fixed reply queue (other than amq.rabbitmq.reply-to), it is necessary to provide correlation data so that replies can be correlated to requests.
See RabbitMQ Remote Procedure Call (RPC).
By default, the standard correlationId property will be used to hold the correlation data.
However, if you wish to use a custom property to hold correlation data, you can set the correlation-key attribute on the <rabbit-template/>.
Explicitly setting the attribute to correlationId is the same as omitting the attribute.
Of course, the client and server must use the same header for correlation data.
|
Note |
|---|---|
|
Spring AMQP version 1.1 used a custom property |
Reply Listener Container
When using RabbitMQ versions prior to 3.4.0, a new temporary queue is used for each reply.
However, a single reply queue can be configured on the template, which can be more efficient,
and also allows you to set arguments on that queue.
In this case, however, you must also provide a <reply-listener/> sub element.
This element provides a listener container for the reply queue, with the template being the listener.
All of the Section 3.1.15, “Message Listener Container Configuration” attributes allowed on a <listener-container/> are allowed on the element, except for
connection-factory and message-converter, which are inherited from the template’s configuration.
|
Important |
|---|---|
|
If you run multiple instances of your application or use multiple |
<rabbit:template id="amqpTemplate"
        connection-factory="connectionFactory"
        reply-queue="replies"
        reply-address="replyEx/routeReply">
    <rabbit:reply-listener/>
</rabbit:template>
While the container and template share a connection factory, they do not share a channel and therefore requests and replies are not performed within the same transaction (if transactional).
|
Note |
|---|---|
|
Prior to version 1.5.0, the |
With this configuration, a SimpleListenerContainer is used to receive the replies; with the RabbitTemplate being the MessageListener.
When defining a template with the <rabbit:template/> namespace element, as shown above, the parser defines the container and wires in the template as the listener.
|
Note |
|---|---|
|
When the template does not use a fixed |
If you define your RabbitTemplate as a <bean/>, or using an @Configuration class to define it as an @Bean, or when creating the template programmatically, you will need to define and wire up the reply listener container yourself.
If you fail to do this, the template will never receive the replies and will eventually time out and return null as the reply to a call to a sendAndReceive method.
Starting with version 1.5, the RabbitTemplate will detect if it has been
configured as a MessageListener to receive replies.
If not, attempts to send and receive messages with a reply address
will fail with an IllegalStateException (because the replies will never be received).
Further, if a simple replyAddress (queue name) is used, the reply listener container will verify that it is listening
to a queue with the same name.
This check cannot be performed if the reply address is an exchange and routing key and a debug log message will be
written.
|
Important |
|---|---|
|
When wiring the reply listener and template yourself, it is important to ensure that the template’s |
The following are examples of how to manually wire up the beans.
<bean id="amqpTemplate" class="org.springframework.amqp.rabbit.core.RabbitTemplate">
    <constructor-arg ref="connectionFactory" />
    <property name="exchange" value="foo.exchange" />
    <property name="routingKey" value="foo" />
    <property name="replyQueue" ref="replyQ" />
    <property name="replyTimeout" value="600000" />
</bean>

<bean class="org.springframework.amqp.rabbit.listener.SimpleMessageListenerContainer">
    <constructor-arg ref="connectionFactory" />
    <property name="queues" ref="replyQ" />
    <property name="messageListener" ref="amqpTemplate" />
</bean>

<rabbit:queue id="replyQ" name="my.reply.queue" />
    @Bean
    public RabbitTemplate amqpTemplate() {
        RabbitTemplate rabbitTemplate = new RabbitTemplate(connectionFactory());
        rabbitTemplate.setMessageConverter(msgConv());
        rabbitTemplate.setReplyQueue(replyQueue());
        rabbitTemplate.setReplyTimeout(60000);
        return rabbitTemplate;
    }

    @Bean
    public SimpleMessageListenerContainer replyListenerContainer() {
        SimpleMessageListenerContainer container = new SimpleMessageListenerContainer();
        container.setConnectionFactory(connectionFactory());
        container.setQueues(replyQueue());
        container.setMessageListener(amqpTemplate());
        return container;
    }

    @Bean
    public Queue replyQueue() {
        return new Queue("my.reply.queue");
    }
A complete example of a RabbitTemplate wired with a fixed reply queue, together with a «remote» listener container that handles the request and returns the reply is shown in this test case.
|
Important |
|---|---|
|
When the reply times out ( |
Prior to version 1.3.6, late replies for timed out messages were simply logged.
Now, if a late reply is received, it is rejected (the template throws an AmqpRejectAndDontRequeueException).
If the reply queue is configured to send rejected messages to a dead letter exchange, the reply can be retrieved for later analysis.
Simply bind a queue to the configured dead letter exchange with a routing key equal to the reply queue’s name.
Refer to the RabbitMQ Dead Letter Documentation for more information about configuring dead lettering.
You can also take a look at the FixedReplyQueueDeadLetterTests test case for an example.
AsyncRabbitTemplate
Version 1.6 introduced the AsyncRabbitTemplate.
This has similar sendAndReceive (and convertSendAndReceive) methods to those on the AmqpTemplate
but instead of blocking, they return a ListenableFuture.
The sendAndReceive methods return a RabbitMessageFuture; the convertSendAndReceive methods return a
RabbitConverterFuture.
You can either synchronously retrieve the result later, by invoking get() on the future, or you can register a
callback which will be called asynchronously with the result.
@Autowired
private AsyncRabbitTemplate template;

...

public void doSomeWorkAndGetResultLater() {

    ...

    ListenableFuture<String> future = this.template.convertSendAndReceive("foo");


    String reply = null;
    try {
        reply = future.get();
    }
    catch (ExecutionException e) {
        ...
    }

    ...

}

public void doSomeWorkAndGetResultAsync() {

    ...

    RabbitConverterFuture<String> future = this.template.convertSendAndReceive("foo");
    future.addCallback(new ListenableFutureCallback<String>() {

        @Override
        public void onSuccess(String result) {
            ...
        }

        @Override
        public void onFailure(Throwable ex) {
            ...
        }

    });

    ...

}
If mandatory is set, and the message can’t be delivered, the future will throw an ExecutionException with a cause of
AmqpMessageReturnedException which encapsulates the returned message and information about the return.
If enableConfirms is set, the future will have a property confirm which is itself a ListenableFuture<Boolean>
with true indicating a successful publish.
If the confirm future is false, the RabbitFuture will have a further property nackCause — the reason for the
failure, if available.
|
Important |
|---|---|
|
The publisher confirm is discarded if it is received after the reply — since the reply implies a successful |
Set the receiveTimeout property on the template to time out replies (it defaults to 30000 — 30 seconds).
If a timeout occurs, the future will be completed with an AmqpReplyTimeoutException.
The template implements SmartLifecycle; stopping the template while there are pending replies will cause the
pending Future s to be canceled.
Spring Remoting with AMQP
The Spring Framework has a general remoting capability, allowing Remote Procedure Calls (RPC) using various transports.
Spring-AMQP supports a similar mechanism with a AmqpProxyFactoryBean on the client and a AmqpInvokerServiceExporter on the server.
This provides RPC over AMQP.
On the client side, a RabbitTemplate is used as described above; on the server side, the invoker (configured as a MessageListener) receives the message, invokes the configured service, and returns the reply using the inbound message’s replyTo information.
The client factory bean can be injected into any bean (using its serviceInterface); the client can then invoke methods on the proxy, resulting in remote execution over AMQP.
|
Note |
|---|---|
|
With the default |
On the server side, the AmqpInvokerServiceExporter has both AmqpTemplate and MessageConverter properties.
Currently, the template’s MessageConverter is not used.
If you need to supply a custom message converter, then you should provide it using the messageConverter property.
On the client side, a custom message converter can be added to the AmqpTemplate which is provided to the AmqpProxyFactoryBean using its amqpTemplate property.
Sample client and server configurations are shown below.
<bean id="client"
	class="org.springframework.amqp.remoting.client.AmqpProxyFactoryBean">
	<property name="amqpTemplate" ref="template" />
	<property name="serviceInterface" value="foo.ServiceInterface" />
</bean>

<rabbit:connection-factory id="connectionFactory" />

<rabbit:template id="template" connection-factory="connectionFactory" reply-timeout="2000"
	routing-key="remoting.binding" exchange="remoting.exchange" />

<rabbit:admin connection-factory="connectionFactory" />

<rabbit:queue name="remoting.queue" />

<rabbit:direct-exchange name="remoting.exchange">
	<rabbit:bindings>
		<rabbit:binding queue="remoting.queue" key="remoting.binding" />
	</rabbit:bindings>
</rabbit:direct-exchange>
<bean id="listener"
	class="org.springframework.amqp.remoting.service.AmqpInvokerServiceExporter">
	<property name="serviceInterface" value="foo.ServiceInterface" />
	<property name="service" ref="service" />
	<property name="amqpTemplate" ref="template" />
</bean>

<bean id="service" class="foo.ServiceImpl" />

<rabbit:connection-factory id="connectionFactory" />

<rabbit:template id="template" connection-factory="connectionFactory" />

<rabbit:queue name="remoting.queue" />

<rabbit:listener-container connection-factory="connectionFactory">
	<rabbit:listener ref="listener" queue-names="remoting.queue" />
</rabbit:listener-container>
|
Important |
|---|---|
|
The |
|
Note |
|---|---|
|
By default, if the request message cannot be delivered, the calling thread will eventually timeout and a |
3.1.10 Configuring the broker
Introduction
The AMQP specification describes how the protocol can be used to configure Queues, Exchanges and Bindings on the broker.
These operations which are portable from the 0.8 specification and higher are present in the AmqpAdmin interface in the org.springframework.amqp.core package.
The RabbitMQ implementation of that class is RabbitAdmin located in the org.springframework.amqp.rabbit.core package.
The AmqpAdmin interface is based on using the Spring AMQP domain abstractions and is shown below:
public interface AmqpAdmin {


    void declareExchange(Exchange exchange);

    void deleteExchange(String exchangeName);


    Queue declareQueue();

    String declareQueue(Queue queue);

    void deleteQueue(String queueName);

    void deleteQueue(String queueName, boolean unused, boolean empty);

    void purgeQueue(String queueName, boolean noWait);


    void declareBinding(Binding binding);

    void removeBinding(Binding binding);

    Properties getQueueProperties(String queueName);

}
The getQueueProperties() method returns some limited information about the queue (message count and consumer count).
The keys for the properties returned are available as constants in the RabbitTemplate (QUEUE_NAME,
QUEUE_MESSAGE_COUNT, QUEUE_CONSUMER_COUNT).
The RabbitMQ REST API provides much more information in the QueueInfo object.
The no-arg declareQueue() method defines a queue on the broker with a name that is automatically generated.
The additional properties of this auto-generated queue are exclusive=true, autoDelete=true, and durable=false.
The declareQueue(Queue queue) method takes a Queue object and returns the name of the declared queue.
If the provided Queue‘s name property is an empty String, the broker declares the queue with a generated name and
that name is returned to the caller.
The Queue object itself is not changed.
This functionality can only be used programmatically by invoking the RabbitAdmin directly.
It is not supported for auto-declaration by the admin by defining a queue declaratively in the application context.
This is in contrast to an AnonymousQueue where the framework generates a unique (UUID) name and sets durable to
false and exclusive, autoDelete to true.
A <rabbit:queue/> with an empty, or missing, name attribute will always create an AnonymousQueue.
See the section called “AnonymousQueue” to understand why AnonymousQueue is preferred over broker-generated queue names, as well as
how to control the format of the name.
Declarative queues must have fixed names because they might be referenced elsewhere in the context, for example, in a
listener:
<rabbit:listener-container>
    <rabbit:listener ref="listener" queue-names="#{someQueue.name}" />
</rabbit:listener-container>
See the section called “Automatic Declaration of Exchanges, Queues and Bindings”.
The RabbitMQ implementation of this interface is RabbitAdmin which when configured using Spring XML would look like this:
<rabbit:connection-factory id="connectionFactory"/>

<rabbit:admin id="amqpAdmin" connection-factory="connectionFactory"/>
When the CachingConnectionFactory cache mode is CHANNEL (the default), the RabbitAdmin implementation does automatic lazy declaration of Queues, Exchanges and Bindings declared in the same ApplicationContext.
These components will be declared as s0on as a Connection is opened to the broker.
There are some namespace features that make this very convenient, e.g.
in the Stocks sample application we have:
<rabbit:queue id="tradeQueue"/>

<rabbit:queue id="marketDataQueue"/>

<fanout-exchange name="broadcast.responses"
                 xmlns="http://www.springframework.org/schema/rabbit">
    <bindings>
        <binding queue="tradeQueue"/>
    </bindings>
</fanout-exchange>

<topic-exchange name="app.stock.marketdata"
                xmlns="http://www.springframework.org/schema/rabbit">
    <bindings>
        <binding queue="marketDataQueue" pattern="${stocks.quote.pattern}"/>
    </bindings>
</topic-exchange>
In the example above we are using anonymous Queues (actually internally just Queues with names generated by the framework, not by the broker) and refer to them by ID.
We can also declare Queues with explicit names, which also serve as identifiers for their bean definitions in the context.
E.g.
<rabbit:queue name="stocks.trade.queue"/>
![[Tip]](https://docs.spring.io/spring-amqp/docs/1.6.4.RELEASE/reference/htmlsingle/images/tip.png) |
Tip |
|---|---|
|
You can provide both an id and a name attribute. |
Queues can be configured with additional arguments, for example, x-message-ttl or x-ha-policy.
Using the namespace support, they are provided in the form of a Map of argument name/argument value pairs, using the <rabbit:queue-arguments> element.
<rabbit:queue name="withArguments">
    <rabbit:queue-arguments>
        <entry key="x-ha-policy" value="all"/>
    </rabbit:queue-arguments>
</rabbit:queue>
By default, the arguments are assumed to be strings.
For arguments of other types, the type needs to be provided.
<rabbit:queue name="withArguments">
    <rabbit:queue-arguments value-type="java.lang.Long">
        <entry key="x-message-ttl" value="100"/>
    </rabbit:queue-arguments>
</rabbit:queue>
When providing arguments of mixed types, the type is provided for each entry element:
<rabbit:queue name="withArguments">
    <rabbit:queue-arguments>
        <entry key="x-message-ttl">
            <value type="java.lang.Long">100</value>
        </entry>
        <entry key="x-ha-policy" value="all"/>
    </rabbit:queue-arguments>
</rabbit:queue>
With Spring Framework 3.2 and later, this can be declared a little more succinctly:
<rabbit:queue name="withArguments">
    <rabbit:queue-arguments>
        <entry key="x-message-ttl" value="100" value-type="java.lang.Long"/>
        <entry key="x-ha-policy" value="all"/>
    </rabbit:queue-arguments>
</rabbit:queue>
|
Important |
|---|---|
|
The RabbitMQ broker will not allow declaration of a queue with mismatched arguments. |
By default, the RabbitAdmin will immediately stop processing all declarations when any exception occurs; this could cause downstream issues — such as a listener container failing to initialize because another queue (defined after the one in error) is not declared.
This behavior can be modified by setting the ignore-declaration-exceptions attribute to true on the RabbitAdmin.
This option instructs the RabbitAdmin to log the exception, and continue declaring other elements.
When configuring the RabbitAdmin using java, this property is ignoreDeclarationExceptions.
This is a global setting which applies to all elements, queues, exchanges and bindings have a similar property which
applies to just those elements.
Prior to version 1.6, this property only took effect if an IOException occurred on the channel — such as when there
is a mismatch between current and desired properties.
Now, this property takes effect on any exception, including TimeoutException etc.
In addition, any declaration exceptions result in the publishing of a DeclarationExceptionEvent, which is an
ApplicationEvent that can be consumed by any ApplicationListener in the context.
The event contains a reference to the admin, the element that was being declared, and the Throwable.
Starting with version 1.3 the HeadersExchange can be configured to match on multiple headers; you can also specify whether any or all headers must match:
<rabbit:headers-exchange name="headers-test">
    <rabbit:bindings>
        <rabbit:binding queue="bucket">
            <rabbit:binding-arguments>
                <entry key="foo" value="bar"/>
                <entry key="baz" value="qux"/>
                <entry key="x-match" value="all"/>
            </rabbit:binding-arguments>
        </rabbit:binding>
    </rabbit:bindings>
</rabbit:headers-exchange>
Starting with version 1.6 Exchanges can be configured with an internal flag (defaults to false) and such an
Exchange will be properly configured on the Broker via a RabbitAdmin (if one is present in the application context).
If the internal flag is true for an exchange, RabbitMQ will not allow clients to use the exchange.
This is useful for a dead letter exchange, or exchange-to-exchange binding, where you don’t wish the exchange to be used
directly by publishers.
To see how to use Java to configure the AMQP infrastructure, look at the Stock sample application,
where there is the @Configuration class AbstractStockRabbitConfiguration which in turn has
RabbitClientConfiguration and RabbitServerConfiguration subclasses.
The code for AbstractStockRabbitConfiguration is shown below
@Configuration
public abstract class AbstractStockAppRabbitConfiguration {

    @Bean
    public ConnectionFactory connectionFactory() {
        CachingConnectionFactory connectionFactory =
            new CachingConnectionFactory("localhost");
        connectionFactory.setUsername("guest");
        connectionFactory.setPassword("guest");
        return connectionFactory;
    }

    @Bean
    public RabbitTemplate rabbitTemplate() {
        RabbitTemplate template = new RabbitTemplate(connectionFactory());
        template.setMessageConverter(jsonMessageConverter());
        configureRabbitTemplate(template);
        return template;
    }

    @Bean
    public MessageConverter jsonMessageConverter() {
        return new JsonMessageConverter();
    }

    @Bean
    public TopicExchange marketDataExchange() {
        return new TopicExchange("app.stock.marketdata");
    }


}
In the Stock application, the server is configured using the following @Configuration class:
@Configuration
public class RabbitServerConfiguration extends AbstractStockAppRabbitConfiguration  {

    @Bean
    public Queue stockRequestQueue() {
        return new Queue("app.stock.request");
    }
}
This is the end of the whole inheritance chain of @Configuration classes.
The end result is the the TopicExchange and Queue will be declared to the broker upon application startup.
There is no binding of the TopicExchange to a queue in the server configuration, as that is done in the client application.
The stock request queue however is automatically bound to the AMQP default exchange — this behavior is defined by the specification.
The client @Configuration class is a little more interesting and is shown below.
@Configuration
public class RabbitClientConfiguration extends AbstractStockAppRabbitConfiguration {

    @Value("${stocks.quote.pattern}")
    private String marketDataRoutingKey;

    @Bean
    public Queue marketDataQueue() {
        return amqpAdmin().declareQueue();
    }

    /**
     * Binds to the market data exchange.
     * Interested in any stock quotes
     * that match its routing key.
     */
    @Bean
    public Binding marketDataBinding() {
        return BindingBuilder.bind(
                marketDataQueue()).to(marketDataExchange()).with(marketDataRoutingKey);
    }


}
The client is declaring another queue via the declareQueue() method on the AmqpAdmin, and it binds that queue to the market data exchange with a routing pattern that is externalized in a properties file.
Builder API for Queues and Exchanges
Version 1.6 introduces a convenient fluent API for configuring Queue and Exchange objects when using Java configuration:
@Bean
public Queue queue() {
    return QueueBuilder.nonDurable("foo")
        .autoDelete()
        .exclusive()
        .withArgument("foo", "bar")
        .build();
}

@Bean
public Exchange exchange() {
  return ExchangeBuilder.directExchange("foo")
      .autoDelete()
      .internal()
      .withArgument("foo", "bar")
      .build();
}
See the javadocs for org.springframework.amqp.core.QueueBuilder and org.springframework.amqp.core.ExchangeBuilder for more information.
Declaring Collections of Exchanges, Queues, Bindings
Starting with version 1.5, it is now possible to declare multiple entities with one @Bean, by returing a
collection.
Only collections where the first element is a Declarable are considered, and only Declarable elements from such
collections are processed.
@Configuration
public static class Config {

    @Bean
    public ConnectionFactory cf() {
        return new CachingConnectionFactory("localhost");
    }

    @Bean
    public RabbitAdmin admin(ConnectionFactory cf) {
        return new RabbitAdmin(cf);
    }

    @Bean
    public DirectExchange e1() {
    	return new DirectExchange("e1", false, true);
    }

    @Bean
    public Queue q1() {
    	return new Queue("q1", false, false, true);
    }

    @Bean
    public Binding b1() {
    	return BindingBuilder.bind(q1()).to(e1()).with("k1");
    }

    @Bean
    public List<Exchange> es() {
    	return Arrays.<Exchange>asList(
    			new DirectExchange("e2", false, true),
    			new DirectExchange("e3", false, true)
    	);
    }

    @Bean
    public List<Queue> qs() {
    	return Arrays.asList(
    			new Queue("q2", false, false, true),
    			new Queue("q3", false, false, true)
    	);
    }

    @Bean
    public List<Binding> bs() {
    	return Arrays.asList(
    			new Binding("q2", DestinationType.QUEUE, "e2", "k2", null),
    			new Binding("q3", DestinationType.QUEUE, "e3", "k3", null)
    	);
    }

    @Bean
    public List<Declarable> ds() {
    	return Arrays.<Declarable>asList(
    			new DirectExchange("e4", false, true),
    			new Queue("q4", false, false, true),
    			new Binding("q4", DestinationType.QUEUE, "e4", "k4", null)
    	);
    }

}
Conditional Declaration
By default, all queues, exchanges, and bindings are declared by all RabbitAdmin instances (that have auto-startup="true") in the application context.
|
Note |
|---|---|
|
Starting with the 1.2 release, it is possible to conditionally declare these elements. |
The classes representing these elements implement Declarable which has two methods: shouldDeclare() and getDeclaringAdmins().
The RabbitAdmin uses these methods to determine whether a particular instance should actually process the declarations on its Connection.
The properties are available as attributes in the namespace, as shown in the following examples.
<rabbit:admin id="admin1" connection-factory="CF1" />

<rabbit:admin id="admin2" connection-factory="CF2" />

<rabbit:queue id="declaredByBothAdminsImplicitly" />

<rabbit:queue id="declaredByBothAdmins" declared-by="admin1, admin2" />

<rabbit:queue id="declaredByAdmin1Only" declared-by="admin1" />

<rabbit:queue id="notDeclaredByAny" auto-declare="false" />

<rabbit:direct-exchange name="direct" declared-by="admin1, admin2">
	<rabbit:bindings>
		<rabbit:binding key="foo" queue="bar"/>
	</rabbit:bindings>
</rabbit:direct-exchange>
|
Note |
|---|---|
|
The |
Similarly, you can use Java-based @Configuration to achieve the same effect.
In this example, the components will be declared by admin1 but not admin2:
@Bean
public RabbitAdmin admin() {
    RabbitAdmin rabbitAdmin = new RabbitAdmin(cf1());
    rabbitAdmin.afterPropertiesSet();
    return rabbitAdmin;
}

@Bean
public RabbitAdmin admin2() {
    RabbitAdmin rabbitAdmin = new RabbitAdmin(cf2());
    rabbitAdmin.afterPropertiesSet();
    return rabbitAdmin;
}

@Bean
public Queue queue() {
    Queue queue = new Queue("foo");
    queue.setAdminsThatShouldDeclare(admin());
    return queue;
}

@Bean
public Exchange exchange() {
    DirectExchange exchange = new DirectExchange("bar");
    exchange.setAdminsThatShouldDeclare(admin());
    return exchange;
}

@Bean
public Binding binding() {
    Binding binding = new Binding("foo", DestinationType.QUEUE, exchange().getName(), "foo", null);
    binding.setAdminsThatShouldDeclare(admin());
    return binding;
}
AnonymousQueue
In general, when needing a uniquely-named, exclusive, auto-delete queue, it is recommended that the AnonymousQueue is
used instead of broker-defined queue names (using "" as a Queue name will cause the broker to generate the queue
name).
This is because:
-
The queues are actually declared when the connection to the broker is established; this is long after the beans are
created and wired together; beans using the queue need to know its name.
In fact, the broker might not even be running when the app is started. -
If the connection to the broker is lost for some reason, the admin will re-declare the
AnonymousQueuewith the same
name.
If we used broker-declared queues, the queue name would change.
Starting with version 1.5.3, you can control the format of the queue name used by AnonymousQueue s.
By default, the queue name is the String representation of a UUID; for example:
07afcfe9-fe77-4983-8645-0061ec61a47a.
You can now provide an AnonymousQueue.NamingStrategy implementation in a constructor argument:
@Bean
public Queue anon1() {
    return new AnonymousQueue(new AnonymousQueue.Base64UrlNamingStrategy());
}

@Bean
public Queue anon2() {
    return new AnonymousQueue(new AnonymousQueue.Base64UrlNamingStrategy("foo-"));
}
The first will generate a queue name prefixed by spring.gen- followed by a base64 representation of the UUID, for
example: spring.gen-MRBv9sqISkuCiPfOYfpo4g.
The second will generate a queue name prefixed by foo- followed by a base64 representation of the UUID.
The base64 encoding uses the «URL and Filename Safe Alphabet» from RFC 4648; trailing padding characters (=) are
removed.
You can provide your own naming strategy, whereby you can include other information (e.g. application, client host) in
the queue name.
Starting with version 1.6, the naming strategy can be specified when using XML configuration;
the naming-strategy attribute is present on the <rabbit:queue> element
for a bean reference that implements AnonymousQueue.NamingStrategy.
<rabbit:queue id="uuidAnon" />

<rabbit:queue id="springAnon" naming-strategy="springNamer" />

<rabbit:queue id="customAnon" naming-strategy="customNamer" />

<bean id="springNamer" class="org.springframework.amqp.core.AnonymousQueue.Base64UrlNamingStrategy" />

<bean id="customNamer" class="org.springframework.amqp.core.AnonymousQueue.Base64UrlNamingStrategy">
    <constructor-arg value="custom.gen-" />
</bean>
The first creates names with a String representation of a UUID.
The second creates names like spring.gen-MRBv9sqISkuCiPfOYfpo4g.
The third creates names like custom.gen-MRBv9sqISkuCiPfOYfpo4g.
Of course, you can provide your own naming strategy bean.
3.1.11 Delayed Message Exchange
Version 1.6 introduces support for the
Delayed Message Exchange Plugin
|
Note |
|---|---|
|
The plugin is currently marked as experimental but has been available for over a year (at the time of writing). |
To use a RabbitAdmin to declare an exchange as delayed, simply set the delayed property on the exchange bean to
true.
The RabbitAdmin will use the exchange type (Direct, Fanout etc) to set the x-delayed-type argument and
declare the exchange with type x-delayed-message.
The delayed property (default false) is also available when configuring exchange beans using XML.
<rabbit:topic-exchange name="topic" delayed="true" />
To send a delayed message, it’s simply a matter of setting the x-delay header, via the MessageProperties:
MessageProperties properties = new MessageProperties();
properties.setDelay(15000);
template.send(exchange, routingKey,
        MessageBuilder.withBody("foo".getBytes()).andProperties(properties).build());
or
rabbitTemplate.convertAndSend(exchange, routingKey, "foo", new MessagePostProcessor() {

    @Override
    public Message postProcessMessage(Message message) throws AmqpException {
        message.getMessageProperties().setDelay(15000);
        return message;
    }

});
To check if a message was delayed, use the getReceivedDelay() method on the MessageProperties.
It is a separate property to avoid unintended propagation to an output message generated from an input message.
3.1.12 RabbitMQ REST API
When the management plugin is enabled, the RabbitMQ server exposes a REST API to monitor and configure the broker.
A Java Binding for the API is now provided.
In general, you can use that API directly, but a convenience wrapper is provided to use the familiar Spring AMQP Queue, Exchange, and Binding domain objects with the API.
Much more information is available for these objects when using the com.rabbitmq.http.client.Client API directly
(QueueInfo, ExchangeInfo, and BindingInfo respectively).
The following operations are available on the RabbitManagementTemplate:
public interface AmqpManagementOperations {

    void addExchange(Exchange exchange);

    void addExchange(String vhost, Exchange exchange);

    void purgeQueue(Queue queue);

    void purgeQueue(String vhost, Queue queue);

    void deleteQueue(Queue queue);

    void deleteQueue(String vhost, Queue queue);

    Queue getQueue(String name);

    Queue getQueue(String vhost, String name);

    List<Queue> getQueues();

    List<Queue> getQueues(String vhost);

    void addQueue(Queue queue);

    void addQueue(String vhost, Queue queue);

    void deleteExchange(Exchange exchange);

    void deleteExchange(String vhost, Exchange exchange);

    Exchange getExchange(String name);

    Exchange getExchange(String vhost, String name);

    List<Exchange> getExchanges();

    List<Exchange> getExchanges(String vhost);

    List<Binding> getBindings();

    List<Binding> getBindings(String vhost);

    List<Binding> getBindingsForExchange(String vhost, String exchange);

}
Refer to the javadocs for more information.
3.1.13 Exception Handling
Many operations with the RabbitMQ Java client can throw checked Exceptions.
For example, there are a lot of cases where IOExceptions may be thrown.
The RabbitTemplate, SimpleMessageListenerContainer, and other Spring AMQP components will catch those Exceptions and convert into one of the Exceptions within our runtime hierarchy.
Those are defined in the org.springframework.amqp package, and AmqpException is the base of the hierarchy.
When a listener throws an exception, it is wrapped in a ListenerExecutionFailedException and, normally the message is
rejected and requeued by the broker.
Setting defaultRequeueRejected to false will cause messages to be discarded (or routed to a dead letter exchange).
As discussed in the section called “Message Listeners and the Asynchronous Case”, the listener can throw an AmqpRejectAndDontRequeueException to conditionally
control this behavior.
However, there is a class of errors where the listener cannot control the behavior.
When a message that cannot be converted is encountered (for example an invalid content_encoding header), some
exceptions are thrown before the message reaches user code.
With defaultRequeueRejected set to true (default), such messages would be redelivered over and over.
Before version 1.3.2, users needed to write a custom ErrorHandler, as discussed in Section 3.1.13, “Exception Handling” to avoid
this situation.
Starting with version 1.3.2, the default ErrorHandler is now a ConditionalRejectingErrorHandler which will reject
(and not requeue) messages that fail with an irrecoverable error:
-
o.s.amqp...MessageConversionException -
o.s.messaging...MessageConversionException -
o.s.messaging...MethodArgumentNotValidException -
o.s.messaging...MethodArgumentTypeMismatchException -
java.lang.NoSuchMethodException -
java.lang.ClassCastException
The first can be thrown when converting the incoming message payload using a MessageConverter.
The second may be thrown by the conversion service if additional conversion is required when mapping to a
@RabbitListener method.
The third may be thrown if validation (e.g. @Valid) is used in the listener and the validation fails.
The fourth may be thrown if the inbound message was converted to a type that is not correct for the target method.
For example, the parameter is declared as Message<Foo> but Message<Bar> is received.
The fifth and sixth were added in version 1.6.3.
An instance of this error handler can be configured with a FatalExceptionStrategy so users can provide their own rules
for conditional message rejection, e.g.
a delegate implementation to the BinaryExceptionClassifier from Spring Retry (the section called “Message Listeners and the Asynchronous Case”).
In addition, the ListenerExecutionFailedException now has a failedMessage property which can be used in the decision.
If the FatalExceptionStrategy.isFatal() method returns true, the error handler throws an AmqpRejectAndDontRequeueException.
The default FatalExceptionStrategy logs a warning message when an exception is determined to be fatal.
Since version 1.6.3 a convenient way to add user exceptions to the fatal list is to subclass ConditionalRejectingErrorHandler.DefaultExceptionStrategy and override the method isUserCauseFatal(Throwable cause) to return true for fatal exceptions.
3.1.14 Transactions
Introduction
The Spring Rabbit framework has support for automatic transaction management in the synchronous and asynchronous use cases with a number of different semantics that can be selected declaratively, as is familiar to existing users of Spring transactions.
This makes many if not most common messaging patterns very easy to implement.
There are two ways to signal the desired transaction semantics to the framework.
In both the RabbitTemplate and SimpleMessageListenerContainer there is a flag channelTransacted which, if true, tells the framework to use a transactional channel and to end all operations (send or receive) with a commit or rollback depending on the outcome, with an exception signaling a rollback.
Another signal is to provide an external transaction with one of Spring’s PlatformTransactionManager implementations as a context for the ongoing operation.
If there is already a transaction in progress when the framework is sending or receiving a message, and the channelTransacted flag is true, then the commit or rollback of the messaging transaction will be deferred until the end of the current transaction.
If the channelTransacted flag is false, then no transaction semantics apply to the messaging operation (it is auto-acked).
The channelTransacted flag is a configuration time setting: it is declared and processed once when the AMQP components are created, usually at application startup.
The external transaction is more dynamic in principle because the system responds to the current Thread state at runtime, but in practice is often also a configuration setting, when the transactions are layered onto an application declaratively.
For synchronous use cases with RabbitTemplate the external transaction is provided by the caller, either declaratively or imperatively according to taste (the usual Spring transaction model).
An example of a declarative approach (usually preferred because it is non-invasive), where the template has been configured with channelTransacted=true:
@Transactional
public void doSomething() {
    String incoming = rabbitTemplate.receiveAndConvert();

    String outgoing = processInDatabaseAndExtractReply(incoming);
    rabbitTemplate.convertAndSend(outgoing);
}
A String payload is received, converted and sent as a message body inside a method marked as @Transactional, so if the database processing fails with an exception, the incoming message will be returned to the broker, and the outgoing message will not be sent.
This applies to any operations with the RabbitTemplate inside a chain of transactional methods (unless the Channel is directly manipulated to commit the transaction early for instance).
For asynchronous use cases with SimpleMessageListenerContainer if an external transaction is needed it has to be requested by the container when it sets up the listener.
To signal that an external transaction is required the user provides an implementation of PlatformTransactionManager to the container when it is configured.
For example:
@Configuration
public class ExampleExternalTransactionAmqpConfiguration {

    @Bean
    public SimpleMessageListenerContainer messageListenerContainer() {
        SimpleMessageListenerContainer container = new SimpleMessageListenerContainer();
        container.setConnectionFactory(rabbitConnectionFactory());
        container.setTransactionManager(transactionManager());
        container.setChannelTransacted(true);
        container.setQueueName("some.queue");
        container.setMessageListener(exampleListener());
        return container;
    }

}
In the example above, the transaction manager is added as a dependency injected from another bean definition (not shown), and the channelTransacted flag is also set to true.
The effect is that if the listener fails with an exception the transaction will be rolled back, and the message will also be returned to the broker.
Significantly, if the transaction fails to commit (e.g.
a database constraint error, or connectivity problem), then the AMQP transaction will also be rolled back, and the message will be returned to the broker.
This is sometimes known as a Best Efforts 1 Phase Commit, and is a very powerful pattern for reliable messaging.
If the channelTransacted flag was set to false in the example above, which is the default, then the external transaction would still be provided for the listener, but all messaging operations would be auto-acked, so the effect is to commit the messaging operations even on a rollback of the business operation.
A note on Rollback of Received Messages
AMQP transactions only apply to messages and acks sent to the broker, so when there is a rollback of a Spring transaction and a message has been received, what Spring AMQP has to do is not just rollback the transaction, but also manually reject the message (sort of a nack, but that’s not what the specification calls it).
The action taken on message rejection is independent of transactions and depends on the defaultRequeueRejected property (default true).
For more information about rejecting failed messages, see the section called “Message Listeners and the Asynchronous Case”.
For more information about RabbitMQ transactions, and their limitations, refer to RabbitMQ Broker Semantics.
|
Note |
|---|---|
|
Prior to RabbitMQ 2.7.0, such messages (and any that are unacked when a channel is closed or aborts) went to the back of the queue on a Rabbit broker, since 2.7.0, rejected messages go to the front of the queue, in a similar manner to JMS rolled back messages. |
Using the RabbitTransactionManager
The RabbitTransactionManager is an alternative to executing Rabbit operations within, and synchronized with, external transactions.
This Transaction Manager is an implementation of the PlatformTransactionManager interface and should be used with a single Rabbit ConnectionFactory.
|
Important |
|---|---|
|
This strategy is not able to provide XA transactions, for example in order to share transactions between messaging and database access. |
Application code is required to retrieve the transactional Rabbit resources via ConnectionFactoryUtils.getTransactionalResourceHolder(ConnectionFactory, boolean) instead of a standard Connection.createChannel() call with subsequent Channel creation.
When using Spring AMQP’s RabbitTemplate, it will autodetect a thread-bound Channel and automatically participate in its transaction.
With Java Configuration you can setup a new RabbitTransactionManager using:
@Bean
public RabbitTransactionManager rabbitTransactionManager() {
    return new RabbitTransactionManager(connectionFactory);
}
If you prefer using XML configuration, declare the following bean in your XML Application Context file:
<bean id="rabbitTxManager"
      class="org.springframework.amqp.rabbit.transaction.RabbitTransactionManager">
    <property name="connectionFactory" ref="connectionFactory"/>
</bean>
3.1.15 Message Listener Container Configuration
There are quite a few options for configuring a SimpleMessageListenerContainer related to transactions and quality of service, and some of them interact with each other.
The table below shows the container property names and their equivalent attribute names (in parentheses) when using the namespace to configure a <rabbit:listener-container/>.
Some properties are not exposed by the namespace; indicated by N/A for the attribute.
Table 3.3. Configuration options for a message listener container
| Property (Attribute) |
Description | ||||||
|---|---|---|---|---|---|---|---|
(group) |
This is only available when using the namespace. |
||||||
channelTransacted (channel-transacted) |
Boolean flag to signal that all messages should be acknowledged in a transaction (either manually or automatically) |
||||||
acknowledgeMode (acknowledge) |
|
||||||
transactionManager (transaction-manager) |
External transaction manager for the operation of the listener. |
||||||
prefetchCount (prefetch) |
The number of messages to accept from the broker in one socket frame. |
||||||
shutdownTimeout (N/A) |
When a container shuts down (e.g. |
||||||
txSize (transaction-size) |
When used with |
||||||
receiveTimeout (receive-timeout) |
The maximum time to wait for each message. |
||||||
autoStartup (auto-startup) |
Flag to indicate that the container should start when the |
||||||
phase (phase) |
When autoStartup is true, the lifecycle phase within which this container should start and stop. |
||||||
adviceChain (advice-chain) |
An array of AOP Advice to apply to the listener execution. |
||||||
taskExecutor (task-executor) |
A reference to a Spring TaskExecutor (or standard JDK 1.5+ Executor) for executing listener invokers. |
||||||
errorHandler (error-handler) |
A reference to an ErrorHandler strategy for handling any uncaught Exceptions that may occur during the execution of the MessageListener. |
||||||
concurrentConsumers (concurrency) |
The number of concurrent consumers to initially start for each listener. |
||||||
maxConcurrentConsumers (max-concurrency) |
The maximum number of concurrent consumers to start, if needed, on demand. |
||||||
startConsumerMinInterval (min-start-interval) |
The time in milliseconds which must elapse before each new consumer is started on demand. |
||||||
stopConsumerMinInterval (min-stop-interval) |
The time in milliseconds which must elapse before a consumer is stopped, since the last consumer was stopped, when an idle consumer is detected. |
||||||
consecutiveActiveTrigger (min-consecutive-active) |
The minimum number of consecutive messages received by a consumer, without a receive timeout occurring, when considering starting a new consumer. |
||||||
consecutiveIdleTrigger (min-consecutive-idle) |
The minimum number of receive timeouts a consumer must experience before considering stopping a consumer. |
||||||
connectionFactory (connection-factory) |
A reference to the |
||||||
defaultRequeueRejected (requeue-rejected) |
Determines whether messages that are rejected because the listener threw an exception should be requeued or not. |
||||||
recoveryInterval (recovery-interval) |
Determines the time in milliseconds between attempts to start a consumer if it fails to start for non-fatal reasons. |
||||||
recoveryBackOff (recovery-back-off) |
Specifies the |
||||||
exclusive (exclusive) |
Determines whether the single consumer in this container has exclusive access to the queue(s). |
||||||
rabbitAdmin (admin) |
When a listener container listens to at least one auto-delete queue and it is found to be missing during startup, the container uses a |
||||||
missingQueuesFatal (missing-queues-fatal) |
Starting with version 1.3.5, When set to This was not configurable in previous versions. When set to You can also use a properties bean to set the property globally for all containers, as follows: <util:properties id="spring.amqp.global.properties"> <prop key="smlc.missing.queues.fatal">false</prop> </util:properties> This global property will not be applied to any containers that have an explicit The default retry properties (3 retries at 5 second intervals) can be overridden using the properties below. |
||||||
mismatchedQueuesFatal (mismatched-queues-fatal) |
This was added in version 1.6. If the problem is detected during recovery (e.g. after a lost connection), the container will be stopped. There must be a single
|
||||||
autoDeclare (auto-declare) |
Starting with version 1.4, When set to
|
||||||
declarationRetries (declaration-retries) |
Starting with versions 1.4.3, 1.3.9, The number of retry attempts when passive queue declaration fails. |
||||||
failedDeclarationRetryInterval (failed-declaration-retry- interval) |
Starting with versions 1.4.3, 1.3.9, The interval between passive queue declaration retry attempts. |
||||||
retryDeclarationInterval (missing-queue-retry- interval) |
Starting with versions 1.4.3, 1.3.9, If a subset of the configured queues are available during consumer initialization, the consumer starts consuming from those queues. |
||||||
consumerTagStrategy (consumer-tag-strategy) |
Starting with version 1.4.5, Previously, only broker-generated consumer tags can be used; while this is still the default, you can now provide |
||||||
idleEventInterval (idle-event-integer) |
Starting with version 1.6, |
3.1.16 Listener Concurrency
By default, the listener container will start a single consumer which will receive messages from the queue(s).
When examining the table in the previous section, you will see a number of properties/attributes that control concurrency.
The simplest is concurrentConsumers, which simply creates that (fixed) number of consumers which will concurrently process messages.
Prior to version 1.3.0, this was the only setting available and the container had to be stopped and started again to change the setting.
Since version 1.3.0, you can now dynamically adjust the concurrentConsumers property.
If it is changed while the container is running, consumers will be added or removed as necessary to adjust to the new setting.
In addition, a new property maxConcurrentConsumers has been added and the container will dynamically adjust the concurrency based on workload.
This works in conjunction with four additional properties: consecutiveActiveTrigger, startConsumerMinInterval, consecutiveIdleTrigger, stopConsumerMinInterval.
With the default settings, the algorithm to increase consumers works as follows:
If the maxConcurrentConsumers has not been reached and an existing consumer is active for 10 consecutive cycles AND at least 10 seconds has elapsed since the last consumer was started, a new consumer is started.
A consumer is considered active if it received at least one message in txSize * receiveTimeout milliseconds.
With the default settings, the algorithm to decrease consumers works as follows:
If there are more than concurrentConsumers running and a consumer detects 10 consecutive timeouts (idle) AND the last consumer was stopped at least 60 seconds ago, a consumer will be stopped.
The timeout depends on the receiveTimeout and the txSize properties.
A consumer is considered idle if it receives no messages in txSize * receiveTimeout milliseconds.
So, with the default timeout (1 second) and a txSize of 4, stopping a consumer will be considered after 40 seconds of idle time (4 timeouts correspond to 1 idle detection).
|
Note |
|---|---|
|
Practically, consumers will only be stopped if the whole container is idle for some time. |
3.1.17 Exclusive Consumer
Also starting with version 1.3, the listener container can be configured with a single exclusive consumer; this prevents other containers from consuming from the queue(s) until the current consumer is cancelled.
The concurrency of such a container must be 1.
When using exclusive consumers, other containers will attempt to consume from the queue(s) according to the recoveryInterval property, and log a WARNing if the attempt fails.
3.1.18 Listener Container Queues
version 1.3 introduced a number of improvements for handling multiple queues in a listener container.
The container must be configured to listen on at least one queue; this was the case previously too, but now queues can be added and removed at runtime.
The container will recycle (cancel and re-create) the consumers when any pre-fetched messages have been processed.
See methods addQueues, addQueueNames, removeQueues and removeQueueNames.
When removing queues, at least one queue must remain.
A consumer will now start if any of its queues are available — previously the container would stop if any queues were unavailable.
Now, this is only the case if none of the queues are available.
If not all queues are available, the container will attempt to passively declare (and consume from) the missing queue(s) every 60 seconds.
Also, if a consumer receives a cancel from the broker (for example if a queue is deleted) the consumer will attempt to recover and the recovered consumer will continue to process messages from any other configured queues.
Previously a cancel on one queue cancelled the entire consumer and eventually the container would stop due to the missing queue.
If you wish to permanently remove a queue, you should update the container before or after deleting to queue, to avoid future attempts to consume from it.
3.1.19 Resilience: Recovering from Errors and Broker Failures
Introduction
Some of the key (and most popular) high-level features that Spring AMQP provides are to do with recovery and automatic re-connection in the event of a protocol error or broker failure.
We have seen all the relevant components already in this guide, but it should help to bring them all together here and call out the features and recovery scenarios individually.
The primary reconnection features are enabled by the CachingConnectionFactory itself.
It is also often beneficial to use the RabbitAdmin auto-declaration features.
In addition, if you care about guaranteed delivery, you probably also need to use the channelTransacted flag in RabbitTemplate and SimpleMessageListenerContainer and also the AcknowledgeMode.AUTO (or manual if you do the acks yourself) in the SimpleMessageListenerContainer.
Automatic Declaration of Exchanges, Queues and Bindings
The RabbitAdmin component can declare exchanges, queues and bindings on startup.
It does this lazily, through a ConnectionListener, so if the broker is not present on startup it doesn’t matter.
The first time a Connection is used (e.g.
by sending a message) the listener will fire and the admin features will be applied.
A further benefit of doing the auto declarations in a listener is that if the connection is dropped for any reason (e.g.
broker death, network glitch, etc.) they will be applied again the next time they are needed.
|
Note |
|---|---|
|
Queues declared this way must have fixed names; either explicitly declared, or generated by the framework for |
|
Important |
|---|---|
|
Automatic declaration is only performed when the |
Failures in Synchronous Operations and Options for Retry
If you lose your connection to the broker in a synchronous sequence using RabbitTemplate (for instance), then Spring AMQP will throw an AmqpException (usually but not always AmqpIOException).
We don’t try to hide the fact that there was a problem, so you have to be able to catch and respond to the exception.
The easiest thing to do if you suspect that the connection was lost, and it wasn’t your fault, is to simply try the operation again.
You can do this manually, or you could look at using Spring Retry to handle the retry (imperatively or declaratively).
Spring Retry provides a couple of AOP interceptors and a great deal of flexibility to specify the parameters of the retry (number of attempts, exception types, backoff algorithm etc.).
Spring AMQP also provides some convenience factory beans for creating Spring Retry interceptors in a convenient form for AMQP use cases, with strongly typed callback interfaces for you to implement custom recovery logic.
See the Javadocs and properties of StatefulRetryOperationsInterceptor and StatelessRetryOperationsInterceptor for more detail.
Stateless retry is appropriate if there is no transaction or if a transaction is started inside the retry callback.
Note that stateless retry is simpler to configure and analyse than stateful retry, but it is not usually appropriate if there is an ongoing transaction which must be rolled back or definitely is going to roll back.
A dropped connection in the middle of a transaction should have the same effect as a rollback, so for reconnection where the transaction is started higher up the stack, stateful retry is usually the best choice.
Starting with version 1.3, a builder API is provided to aid in assembling these interceptors using Java (or in @Configuration classes), for example:
@Bean
public StatefulRetryOperationsInterceptor interceptor() {
	return RetryInterceptorBuilder.stateful()
			.maxAttempts(5)
			.backOffOptions(1000, 2.0, 10000)
			.build();
}
Only a subset of retry capabilities can be configured this way; more advanced features would need the configuration of a RetryTemplate as a Spring bean.
See the Spring Retry Javadocs for complete information about available policies and their configuration.
Message Listeners and the Asynchronous Case
If a MessageListener fails because of a business exception, the exception is handled by the message listener container and then it goes back to listening for another message.
If the failure is caused by a dropped connection (not a business exception), then the consumer that is collecting messages for the listener has to be cancelled and restarted.
The SimpleMessageListenerContainer handles this seamlessly, and it leaves a log to say that the listener is being restarted.
In fact it loops endlessly trying to restart the consumer, and only if the consumer is very badly behaved indeed will it give up.
One side effect is that if the broker is down when the container starts, it will just keep trying until a connection can be established.
Business exception handling, as opposed to protocol errors and dropped connections, might need more thought and some custom configuration, especially if transactions and/or container acks are in use.
Prior to 2.8.x, RabbitMQ had no definition of dead letter behaviour, so by default a message that is rejected or rolled back because of a business exception can be redelivered ad infinitum.
To put a limit in the client on the number of re-deliveries, one choice is a StatefulRetryOperationsInterceptor in the advice chain of the listener.
The interceptor can have a recovery callback that implements a custom dead letter action: whatever is appropriate for your particular environment.
Another alternative is to set the container’s rejectRequeued property to false.
This causes all failed messages to be discarded.
When using RabbitMQ 2.8.x or higher, this also facilitates delivering the message to a Dead Letter Exchange.
Or, you can throw a AmqpRejectAndDontRequeueException; this prevents message requeuing, regardless of the setting of the defaultRequeueRejected property.
Often, a combination of both techniques will be used.
Use a StatefulRetryOperationsInterceptor in the advice chain, where it’s MessageRecover throws an AmqpRejectAndDontRequeueException.
The MessageRecover is called when all retries have been exhausted.
The default MessageRecoverer simply consumes the errant message and emits a WARN message.
In which case, the message is ACK’d and won’t be sent to the Dead Letter Exchange, if any.
Starting with version 1.3, a new RepublishMessageRecoverer is provided, to allow publishing of failed messages after
retries are exhausted:
@Bean
RetryOperationsInterceptor interceptor() {
	return RetryInterceptorBuilder.stateless()
			.maxAttempts(5)
			.recoverer(new RepublishMessageRecoverer(amqpTemplate(), "bar", "baz"))
			.build();
}
The RepublishMessageRecoverer publishes the message with additional information in message headers, such as the
exception message, stack trace, original exchange and routing key.
Additional headers can be added by creating a subclass and overriding additionalHeaders().
Exception Classification for Retry
Spring Retry has a great deal of flexibility for determining which exceptions can invoke retry.
The default configuration will retry for all exceptions.
Given that user exceptions will be wrapped in a ListenerExecutionFailedException we need to ensure that the classification examines the exception causes.
The default classifier just looks at the top level exception.
Since Spring Retry 1.0.3, the BinaryExceptionClassifier has a property traverseCauses (default false).
When true it will traverse exception causes until it finds a match or there is no cause.
To use this classifier for retry, use a SimpleRetryPolicy created with the constructor that takes the max attempts, the Map of Exception s and the boolean (traverseCauses), and inject this policy into the RetryTemplate.
3.1.20 Debugging
Spring AMQP provides extensive logging, especially at DEBUG level.
If you wish to monitor the AMQP protocol between the application and broker, you could use a tool such as WireShark, which has a plugin to decode the protocol.
Alternatively the RabbitMQ java client comes with a very useful class Tracer.
When run as a main, by default, it listens on port 5673 and connects to port 5672 on localhost.
Simply run it, and change your connection factory configuration to connect to port 5673 on localhost.
It displays the decoded protocol on the console.
Refer to the Tracer javadocs for more information.
3.2 Logging Subsystem AMQP Appenders
The framework provides logging appenders for several popular logging subsystems:
- log4j (since Spring AMQP version 1.1) (deprecated)
- logback (since Spring AMQP version 1.4)
- log4j2 (since Spring AMQP version 1.6)
The appenders are configured using the normal mechanisms for the logging subsystem, available properties are specified
in the following sections.
3.2.1 Common properties
The following properties are available with all appenders:
Table 3.4. Common Appender Properties
| Property | Default | Description |
|---|---|---|
exchangeName |
logs |
Name of the exchange to publish log events to. |
exchangeType |
topic |
Type of the exchange to publish log events to — only needed if the appender declares the exchange. |
routingKeyPattern |
%c.%p |
Logging subsystem pattern format to use to generate a routing key. |
applicationId |
Application ID — added to the routing key if the pattern includes |
|
senderPoolSize |
2 |
The number of threads to use to publish log events. |
maxSenderRetries |
30 |
How many times to retry sending a message if the broker is unavailable or there is some other error. |
addresses |
A comma-delimited list of broker addresses: |
|
host |
localhost |
RabbitMQ host to connect to. |
port |
5672 |
RabbitMQ port to connect to. |
virtualHost |
/ |
RabbitMQ virtual host to connect to. |
username |
guest |
RabbitMQ user to connect as. |
password |
guest |
RabbitMQ password for this user. |
contentType |
text/plain |
|
contentEncoding |
|
|
declareExchange |
false |
Whether or not to declare the configured exchange when this appender starts. |
durable |
true |
When |
autoDelete |
false |
When |
charset |
null |
Charset to use when converting String to byte[], default null (system default charset used). |
deliveryMode |
PERSISTENT |
PERSISTENT or NON_PERSISTENT to determine whether or not RabbitMQ should persist the messages. |
generateId |
false |
Used to determine whether the |
clientConnectionProperties |
null |
A comma-delimited list of |
3.2.2 Log4j Appender
Example log4j.properties Snippet.
log4j.appender.amqp.addresses=foo:5672,bar:5672
log4j.appender.amqp=org.springframework.amqp.rabbit.log4j.AmqpAppender
log4j.appender.amqp.applicationId=myApplication
log4j.appender.amqp.routingKeyPattern=%X{applicationId}.%c.%p
log4j.appender.amqp.layout=org.apache.log4j.PatternLayout
log4j.appender.amqp.layout.ConversionPattern=%d %p %t [%c] - <%m>%n
log4j.appender.amqp.generateId=true
log4j.appender.amqp.charset=UTF-8
log4j.appender.amqp.durable=false
log4j.appender.amqp.deliveryMode=NON_PERSISTENT
log4j.appender.amqp.declareExchange=true
|
Note |
|---|---|
|
This appender is deprecated and will be removed in version 2.0. |
3.2.3 Log4j2 Appender
Example log4j2.xml Snippet.
<Appenders>
    ...
    <RabbitMQ name="rabbitmq"
        addresses="foo:5672,bar:5672" user="guest" password="guest" virtualHost="/"
        exchange="log4j2" exchangeType="topic" declareExchange="true" durable="true" autoDelete="false"
        applicationId="myAppId" routingKeyPattern="%X{applicationId}.%c.%p"
        contentType="text/plain" contentEncoding="UTF-8" generateId="true" deliveryMode="NON_PERSISTENT"
        charset="UTF-8"
        senderPoolSize="3" maxSenderRetries="5">
    </RabbitMQ>
</Appenders>
3.2.4 Logback Appender
Example logback.xml Snippet.
<appender name="AMQP" class="org.springframework.amqp.rabbit.logback.AmqpAppender">
    <layout>
        <pattern><![CDATA[ %d %p %t [%c] - <%m>%n ]]></pattern>
    </layout>
    <addresses>foo:5672,bar:5672</addresses>
    <abbreviation>36</abbreviation>
    <applicationId>myApplication</applicationId>
    <routingKeyPattern>%property{applicationId}.%c.%p</routingKeyPattern>
    <generateId>true</generateId>
    <charset>UTF-8</charset>
    <durable>false</durable>
    <deliveryMode>NON_PERSISTENT</deliveryMode>
    <declareExchange>true</declareExchange>
</appender>
3.2.5 Customizing the Messages
Each of the appenders can be subclassed, allowing you to modify the messages before publishing.
Customizing the Log Messages.
public class MyEnhancedAppender extends AmqpAppender {

    @Override
    public Message postProcessMessageBeforeSend(Message message, Event event) {
        message.getMessageProperties().setHeader("foo", "bar");
        return message;
    }

}
3.2.6 Customizing the Client Properties
Simple String Properties
Each appender supports adding client properties to the RabbitMQ connection.
log4j.
log4j.appender.amqp.clientConnectionProperties=foo:bar,baz:qux
logback.
<appender name="AMQP" ...>
    ...
    <clientConnectionProperties>foo:bar,baz:qux</clientConnectionProperties>
    ...
</appender>
log4j2.
<Appenders>
    ...
    <RabbitMQ name="rabbitmq"
        ...
        clientConnectionProperties="foo:bar,baz:qux"
        ...
    </RabbitMQ>
</Appenders>
The properties are a comma-delimited list of key:value pairs; keys and values cannot contain commas or colons.
These properties appear on the RabbitMQ Admin UI when viewing the connection.
Advanced Technique for Log4j and Logback
With the log4j and logback appenders, the appenders can be subclassed, allowing you to modify the client connection
properties before the connection is established:
Customizing the Client Connection Properties.
public class MyEnhancedAppender extends AmqpAppender {

    private String foo;

    @Override
    protected void updateConnectionClientProperties(Map<String, Object> clientProperties) {
        clientProperties.put("foo", this.foo);
    }

    public void setFoo(String foo) {
        this.foo = foo;
    }

}
For log4j2, add log4j.appender.amqp.foo=bar to log4j.properties to set the property.
For logback, add <foo>bar</foo> to logback.xml.
Of course, for simple String properties like this example, the previous technique can be used; subclasses allow
richer properties (such as adding a Map or numeric property).
With log4j2, subclasses are not supported, due to the way log4j2 uses static factory methods.
3.3 Sample Applications
3.3.1 Introduction
The Spring AMQP Samples project includes two sample applications.
The first is a simple «Hello World» example that demonstrates both synchronous and asynchronous message reception.
It provides an excellent starting point for acquiring an understanding of the essential components.
The second sample is based on a stock-trading use case to demonstrate the types of interaction that would be common in real world applications.
In this chapter, we will provide a quick walk-through of each sample so that you can focus on the most important components.
The samples are both Maven-based, so you should be able to import them directly into any Maven-aware IDE (such as SpringSource Tool Suite).
3.3.2 Hello World
Introduction
The Hello World sample demonstrates both synchronous and asynchronous message reception.
You can import the spring-rabbit-helloworld sample into the IDE and then follow the discussion below.
Synchronous Example
Within the src/main/java directory, navigate to the org.springframework.amqp.helloworld package.
Open the HelloWorldConfiguration class and notice that it contains the @Configuration annotation at class-level and some @Bean annotations at method-level.
This is an example of Spring’s Java-based configuration.
You can read more about that here.
@Bean
public ConnectionFactory connectionFactory() {
    CachingConnectionFactory connectionFactory =
        new CachingConnectionFactory("localhost");
    connectionFactory.setUsername("guest");
    connectionFactory.setPassword("guest");
    return connectionFactory;
}
The configuration also contains an instance of RabbitAdmin, which by default looks for any beans of type Exchange, Queue, or Binding and then declares them on the broker.
In fact, the «helloWorldQueue» bean that is generated in HelloWorldConfiguration is an example simply because it is an instance of Queue.
@Bean
public Queue helloWorldQueue() {
    return new Queue(this.helloWorldQueueName);
}
Looking back at the «rabbitTemplate» bean configuration, you will see that it has the helloWorldQueue’s name set as its «queue» property (for receiving Messages) and for its «routingKey» property (for sending Messages).
Now that we’ve explored the configuration, let’s look at the code that actually uses these components.
First, open the Producer class from within the same package.
It contains a main() method where the Spring ApplicationContext is created.
public static void main(String[] args) {
    ApplicationContext context =
        new AnnotationConfigApplicationContext(RabbitConfiguration.class);
    AmqpTemplate amqpTemplate = context.getBean(AmqpTemplate.class);
    amqpTemplate.convertAndSend("Hello World");
    System.out.println("Sent: Hello World");
}
As you can see in the example above, the AmqpTemplate bean is retrieved and used for sending a Message.
Since the client code should rely on interfaces whenever possible, the type is AmqpTemplate rather than RabbitTemplate.
Even though the bean created in HelloWorldConfiguration is an instance of RabbitTemplate, relying on the interface means that this code is more portable (the configuration can be changed independently of the code).
Since the convertAndSend() method is invoked, the template will be delegating to its MessageConverter instance.
In this case, it’s using the default SimpleMessageConverter, but a different implementation could be provided to the «rabbitTemplate» bean as defined in HelloWorldConfiguration.
Now open the Consumer class.
It actually shares the same configuration base class which means it will be sharing the «rabbitTemplate» bean.
That’s why we configured that template with both a «routingKey» (for sending) and «queue» (for receiving).
As you saw in Section 3.1.4, “AmqpTemplate”, you could instead pass the routingKey argument to the send method and the queue argument to the receive method.
The Consumer code is basically a mirror image of the Producer, calling receiveAndConvert() rather than convertAndSend().
public static void main(String[] args) {
    ApplicationContext context =
        new AnnotationConfigApplicationContext(RabbitConfiguration.class);
    AmqpTemplate amqpTemplate = context.getBean(AmqpTemplate.class);
    System.out.println("Received: " + amqpTemplate.receiveAndConvert());
}
If you run the Producer, and then run the Consumer, you should see the message «Received: Hello World» in the console output.
Asynchronous Example
Now that we’ve walked through the synchronous Hello World sample, it’s time to move on to a slightly more advanced but significantly more powerful option.
With a few modifications, the Hello World sample can provide an example of asynchronous reception, a.k.a.
Message-driven POJOs.
In fact, there is a sub-package that provides exactly that: org.springframework.amqp.samples.helloworld.async.
Once again, we will start with the sending side.
Open the ProducerConfiguration class and notice that it creates a «connectionFactory» and «rabbitTemplate» bean.
This time, since the configuration is dedicated to the message sending side, we don’t even need any Queue definitions, and the RabbitTemplate only has the routingKey property set.
Recall that messages are sent to an Exchange rather than being sent directly to a Queue.
The AMQP default Exchange is a direct Exchange with no name.
All Queues are bound to that default Exchange with their name as the routing key.
That is why we only need to provide the routing key here.
public RabbitTemplate rabbitTemplate() {
    RabbitTemplate template = new RabbitTemplate(connectionFactory());
    template.setRoutingKey(this.helloWorldQueueName);
    return template;
}
Since this sample will be demonstrating asynchronous message reception, the producing side is designed to continuously send messages (if it were a message-per-execution model like the synchronous version, it would not be quite so obvious that it is in fact a message-driven consumer).
The component responsible for sending messages continuously is defined as an inner class within the ProducerConfiguration.
It is configured to execute every 3 seconds.
static class ScheduledProducer {

    @Autowired
    private volatile RabbitTemplate rabbitTemplate;

    private final AtomicInteger counter = new AtomicInteger();

    @Scheduled(fixedRate = 3000)
    public void sendMessage() {
        rabbitTemplate.convertAndSend("Hello World " + counter.incrementAndGet());
    }
}
You don’t need to understand all of the details since the real focus should be on the receiving side (which we will cover momentarily).
However, if you are not yet familiar with Spring 3.0 task scheduling support, you can learn more here.
The short story is that the «postProcessor» bean in the ProducerConfiguration is registering the task with a scheduler.
Now, let’s turn to the receiving side.
To emphasize the Message-driven POJO behavior will start with the component that is reacting to the messages.
The class is called HelloWorldHandler.
public class HelloWorldHandler {

    public void handleMessage(String text) {
        System.out.println("Received: " + text);
    }

}
Clearly, that is a POJO.
It does not extend any base class, it doesn’t implement any interfaces, and it doesn’t even contain any imports.
It is being «adapted» to the MessageListener interface by the Spring AMQP MessageListenerAdapter.
That adapter can then be configured on a SimpleMessageListenerContainer.
For this sample, the container is created in the ConsumerConfiguration class.
You can see the POJO wrapped in the adapter there.
@Bean
public SimpleMessageListenerContainer listenerContainer() {
    SimpleMessageListenerContainer container = new SimpleMessageListenerContainer();
    container.setConnectionFactory(connectionFactory());
    container.setQueueName(this.helloWorldQueueName);
    container.setMessageListener(new MessageListenerAdapter(new HelloWorldHandler()));
    return container;
}
The SimpleMessageListenerContainer is a Spring lifecycle component and will start automatically by default.
If you look in the Consumer class, you will see that its main() method consists of nothing more than a one-line bootstrap to create the ApplicationContext.
The Producer’s main() method is also a one-line bootstrap, since the component whose method is annotated with @Scheduled will also start executing automatically.
You can start the Producer and Consumer in any order, and you should see messages being sent and received every 3 seconds.
3.3.3 Stock Trading
The Stock Trading sample demonstrates more advanced messaging scenarios than the Hello World sample.
However, the configuration is very similar — just a bit more involved.
Since we’ve walked through the Hello World configuration in detail, here we’ll focus on what makes this sample different.
There is a server that pushes market data (stock quotes) to a Topic Exchange.
Then, clients can subscribe to the market data feed by binding a Queue with a routing pattern (e.g.
«app.stock.quotes.nasdaq.*»).
The other main feature of this demo is a request-reply «stock trade» interaction that is initiated by the client and handled by the server.
That involves a private «replyTo» Queue that is sent by the client within the order request Message itself.
The Server’s core configuration is in the RabbitServerConfiguration class within the org.springframework.amqp.rabbit.stocks.config.server package.
It extends the AbstractStockAppRabbitConfiguration.
That is where the resources common to the Server and Client(s) are defined, including the market data Topic Exchange (whose name is app.stock.marketdata) and the Queue that the Server exposes for stock trades (whose name is app.stock.request).
In that common configuration file, you will also see that a JsonMessageConverter is configured on the RabbitTemplate.
The Server-specific configuration consists of 2 things.
First, it configures the market data exchange on the RabbitTemplate so that it does not need to provide that exchange name with every call to send a Message.
It does this within an abstract callback method defined in the base configuration class.
public void configureRabbitTemplate(RabbitTemplate rabbitTemplate) {
    rabbitTemplate.setExchange(MARKET_DATA_EXCHANGE_NAME);
}
Secondly, the stock request queue is declared.
It does not require any explicit bindings in this case, because it will be bound to the default no-name exchange with its own name as the routing key.
As mentioned earlier, the AMQP specification defines that behavior.
@Bean
public Queue stockRequestQueue() {
    return new Queue(STOCK_REQUEST_QUEUE_NAME);
}
Now that you’ve seen the configuration of the Server’s AMQP resources, navigate to the org.springframework.amqp.rabbit.stocks package under the src/test/java directory.
There you will see the actual Server class that provides a main() method.
It creates an ApplicationContext based on the server-bootstrap.xml config file.
In there you will see the scheduled task that publishes dummy market data.
That configuration relies upon Spring 3.0’s «task» namespace support.
The bootstrap config file also imports a few other files.
The most interesting one is server-messaging.xml which is directly under src/main/resources.
In there you will see the «messageListenerContainer» bean that is responsible for handling the stock trade requests.
Finally have a look at the «serverHandler» bean that is defined in «server-handlers.xml» (also in src/main/resources).
That bean is an instance of the ServerHandler class and is a good example of a Message-driven POJO that is also capable of sending reply Messages.
Notice that it is not itself coupled to the framework or any of the AMQP concepts.
It simply accepts a TradeRequest and returns a TradeResponse.
public TradeResponse handleMessage(TradeRequest tradeRequest) { ...
}
Now that we’ve seen the most important configuration and code for the Server, let’s turn to the Client.
The best starting point is probably RabbitClientConfiguration within the org.springframework.amqp.rabbit.stocks.config.client package.
Notice that it declares two queues without providing explicit names.
@Bean
public Queue marketDataQueue() {
    return amqpAdmin().declareQueue();
}

@Bean
public Queue traderJoeQueue() {
    return amqpAdmin().declareQueue();
}
Those are private queues, and unique names will be generated automatically.
The first generated queue is used by the Client to bind to the market data exchange that has been exposed by the Server.
Recall that in AMQP, consumers interact with Queues while producers interact with Exchanges.
The «binding» of Queues to Exchanges is what instructs the broker to deliver, or route, messages from a given Exchange to a Queue.
Since the market data exchange is a Topic Exchange, the binding can be expressed with a routing pattern.
The RabbitClientConfiguration declares that with a Binding object, and that object is generated with the BindingBuilder’s fluent API.
@Value("${stocks.quote.pattern}")
private String marketDataRoutingKey;

@Bean
public Binding marketDataBinding() {
    return BindingBuilder.bind(
        marketDataQueue()).to(marketDataExchange()).with(marketDataRoutingKey);
}
Notice that the actual value has been externalized in a properties file («client.properties» under src/main/resources), and that we are using Spring’s @Value annotation to inject that value.
This is generally a good idea, since otherwise the value would have been hardcoded in a class and unmodifiable without recompilation.
In this case, it makes it much easier to run multiple versions of the Client while making changes to the routing pattern used for binding.
Let’s try that now.
Start by running org.springframework.amqp.rabbit.stocks.Server and then org.springframework.amqp.rabbit.stocks.Client.
You should see dummy quotes for NASDAQ stocks because the current value associated with the stocks.quote.pattern key in client.properties is app.stock.quotes.nasdaq..
Now, while keeping the existing Server and Client running, change that property value to app.stock.quotes.nyse. and start a second Client instance.
You should see that the first client is still receiving NASDAQ quotes while the second client receives NYSE quotes.
You could instead change the pattern to get all stocks or even an individual ticker.
The final feature we’ll explore is the request-reply interaction from the Client’s perspective.
Recall that we have already seen the ServerHandler that is accepting TradeRequest objects and returning TradeResponse objects.
The corresponding code on the Client side is RabbitStockServiceGateway in the org.springframework.amqp.rabbit.stocks.gateway package.
It delegates to the RabbitTemplate in order to send Messages.
public void send(TradeRequest tradeRequest) { getRabbitTemplate().convertAndSend(tradeRequest, new MessagePostProcessor() { public Message postProcessMessage(Message message) throws AmqpException { message.getMessageProperties().setReplyTo(new Address(defaultReplyToQueue)); try { message.getMessageProperties().setCorrelationId( UUID.randomUUID().toString().getBytes("UTF-8")); } catch (UnsupportedEncodingException e) { throw new AmqpException(e); } return message; } }); }
Notice that prior to sending the message, it sets the «replyTo» address.
It’s providing the queue that was generated by the «traderJoeQueue» bean definition shown above.
Here’s the @Bean definition for the StockServiceGateway class itself.
@Bean public StockServiceGateway stockServiceGateway() { RabbitStockServiceGateway gateway = new RabbitStockServiceGateway(); gateway.setRabbitTemplate(rabbitTemplate()); gateway.setDefaultReplyToQueue(traderJoeQueue()); return gateway; }
If you are no longer running the Server and Client, start them now.
Try sending a request with the format of 100 TCKR.
After a brief artificial delay that simulates «processing» of the request, you should see a confirmation message appear on the Client.
3.4 Testing Support
3.4.1 Introduction
Writing integration for asynchronous applications is necessarily more complex than testing simpler applications.
This is made more complex when abstractions such as the @RabbitListener annotations come into the picture.
The question being how to verify that, after sending a message, the listener received the message as expected.
The framework itself has many unit and integration tests; some using mocks, others using integration testing with
a live RabbitMQ broker.
You can consult those tests for some ideas for testing scenarios.
Spring AMQP version 1.6 introduced the spring-rabbit-test jar which provides support for testing some of these more
complex scenarios.
It is anticipated that this project will expand over time but we need community feedback to make suggestions for
features needed to help with testing.
Please use JIRA or
GitHub Issues to provide such feedback.
3.4.2 Mockito Answer<?> Implementations
There are currently two Answer<?> implementations to help with testing:
The first, LatchCountDownAndCallRealMethodAnswer provides an Answer<Void> that returns null and counts down
a latch.
LatchCountDownAndCallRealMethodAnswer answer = new LatchCountDownAndCallRealMethodAnswer(2); doAnswer(answer) .when(listener).foo(anyString(), anyString()); ... assertTrue(answer.getLatch().await(10, TimeUnit.SECONDS));
The second, LambdaAnswer<T> provides a mechanism to optionally call the real method and provides an opportunity
to return a custom result, based on the InvocationOnMock and the result (if any).
public class Foo { public String foo(String foo) { return foo.toUpperCase(); } }
Foo foo = spy(new Foo()); doAnswer(new LambdaAnswer<String>(true, (i, r) -> r + r)) .when(foo).foo(anyString()); assertEquals("FOOFOO", foo.foo("foo")); doAnswer(new LambdaAnswer<String>(true, (i, r) -> r + i.getArguments()[0])) .when(foo).foo(anyString()); assertEquals("FOOfoo", foo.foo("foo")); doAnswer(new LambdaAnswer<String>(false, (i, r) -> "" + i.getArguments()[0] + i.getArguments()[0])).when(foo).foo(anyString()); assertEquals("foofoo", foo.foo("foo"));
When using Java 7 or earlier:
doAnswer(new LambdaAnswer<String>(true, new ValueToReturn<String>() { @Override public String apply(InvocationOnMock i, String r) { return r + r; } })).when(foo).foo(anyString());
3.4.3 @RabbitListenerTest and RabbitListenerTestHarness
Annotating one of your @Configuration classes with @RabbitListenerTest will cause the framework to replace the
standard RabbitListenerAnnotationBeanPostProcessor with a subclass RabbitListenerTestHarness (it will also enable
@RabbitListener detection via @EnableRabbit).
The RabbitListenerTestHarness enhances the listener in two ways — it wraps it in a Mockito Spy, enabling normal
Mockito stubbing and verification operations.
It can also add an Advice to the listener enabling access to the arguments, result and or exceptions thrown.
You can control which (or both) of these are enabled with attributes on the @RabbitListenerTest.
The latter is provided for access to lower-level data about the invocation — it also supports blocking the test
thread until the async listener is called.
|
Important |
|---|---|
|
|
Let’s take a look at some examples.
Using spy:
@Configuration @RabbitListenerTest public class Config { @Bean public Listener listener() { return new Listener(); } ... } public class Listener { @RabbitListener(id="foo", queues="#{queue1.name}") public String foo(String foo) { return foo.toUpperCase(); } @RabbitListener(id="bar", queues="#{queue2.name}") public void foo(@Payload String foo, @Header("amqp_receivedRoutingKey") String rk) { ... } } public class MyTests { @Autowired private RabbitListenerTestHarness harness;
|
|
Inject the harness into the test case so we can get access to the spy. |
|
|
Get a reference to the spy so we can verify it was invoked as expected. |
|
|
In this case, we’re only using a send operation so we need a latch to wait for the asynchronous call to the listener |
|
|
Configure the spy to invoke the |
Using the capture advice:
@Configuration @ComponentScan @RabbitListenerTest(spy = false, capture = true) public class Config { } @Service public class Listener { private boolean failed; @RabbitListener(id="foo", queues="#{queue1.name}") public String foo(String foo) { return foo.toUpperCase(); } @RabbitListener(id="bar", queues="#{queue2.name}") public void foo(@Payload String foo, @Header("amqp_receivedRoutingKey") String rk) { if (!failed && foo.equals("ex")) { failed = true; throw new RuntimeException(foo); } failed = false; } } public class MyTests { @Autowired private RabbitListenerTestHarness harness;
|
|
Inject the harness into the test case so we can get access to the spy. |
|
|
Use |
|
|
We can then verify that the argument and result was as expected. |
|
|
This time we need some time to wait for the data, since it’s an async operation on the container thread and we need |
|
|
When the listener throws an exception, it is available in the |
![]()
is it possible to subscribe only to debug in 1 consumer while all but debug in another?
something like this: log.*.!debug
![]()
You might have something else configured because of from the SimpleMessageConverter:
else if (contentType != null &&
contentType.equals(MessageProperties.CONTENT_TYPE_SERIALIZED_OBJECT)) {
try {
content = SerializationUtils.deserialize(
createObjectInputStream(new ByteArrayInputStream(message.getBody()), this.codebaseUrl));
}
catch (IOException | IllegalArgumentException | IllegalStateException e) {
throw new MessageConversionException(
"failed to convert serialized Message content", e);
}
}![]()
@tunix the severity is a linear scale, that makes no sense
![]()
So, there is indeed MessageConversionException with appropriate StackTrace
![]()
@OrangeDog couldn’t get it?
![]()
@tunix «all but debug» implies you want trace and info but not debug, which is not possible
![]()
@artembilan i can’t even remember why i had to have it configured btw..
![]()
rather you probably just want to set it to info (which logs everything info and above)
![]()
@OrangeDog yes.. i suppose the only way is to explicitly define multiple patterns (aka multiple bindings), right?
![]()
I wonder if you can put debug break point in that MessageConversionException and follow with the thrown exception to the place where it is eaten
![]()
you cannot have a logger that’s logging trace and info but not debug, full stop
![]()
There is something like this:
private boolean isCauseFatal(Throwable cause) {
return cause instanceof MessageConversionException![]()
@OrangeDog i was trying to think outside the logging context 
![]()
so, that MessageConversionException is treated as fatal and container is stopped
![]()
you could go filter out the debug lines up in your logback appender configuration, but that’s not the same thing
![]()
Gary Russell
@garyrussell
and container is stopped
No; just this message is fatal — rejected
![]()
Oh! Yes, Gary:
if (!this.causeChainContainsARADRE(t) && this.exceptionStrategy.isFatal(t)) {
throw new AmqpRejectAndDontRequeueException("Error Handler converted exception to fatal", t);
}that is different story about container…
But this logic we have in the default ConditionalRejectingErrorHandler
![]()
so does it happen because i have a custom messageconverter bean?
![]()
that messageConverter bean is injected into the RabbitListenerContainerFactory for all the @RabbitListener by Spring Boot
![]()
do you know whether spring boot creates one if none defined? because that might be the reason my creating one but i really can’t remember why..
![]()
Gary Russell
@garyrussell
Boot doesn’t create one but Spring AMQP uses the SimpleMessageConverter by default/
![]()
Anyway that doesn’t matter.
since you have different class versions in your producer and consumer you are not able to deserialize messages properly
But that the same time it isn’t an answer why your messages are not marked as ack’ed because of AmqpRejectAndDontRequeueException in case of conversion error
![]()
is there a way to get the message headers while using MessageListenerAdapter?
this is why i defined a MessageConverter bean
![]()
Gary Russell
@garyrussell
? Confused — that answer is about the legacy MessageListenerAdapter; you are using @RabbitListener which doesn’t use that adapter.
![]()
actually i’m asking this for another part of the project where i’m processing dynamic temporary queues
the producer makes sure it publishes all messages to a random queue and then sends another message to a different queue with the random queue name
![]()
Gary Russell
@garyrussell
No; the legacy adapter doesn’t provide access to the headers. You would have to implement MessageListener and invoke the converter yourself.
![]()
then on the consumer side i start the message listener container with that random queue name
![]()
@garyrussell Are there any examples on how to utilize the TestRabbitTemplate, I apologize in advance if this has already been asked.
![]()
Gary Russell
@garyrussell
Did you look at its Test Cases?
![]()
Ahh did not see that. That is what I needed! Thank you
Fantastic job on all your work
![]()
Hi all,
Is there way to wait for RabbitListener to create queues and bind to exchange? I have a bean and in post construction I want to wait for every RabbitListener to bind and do something after it. Are there any hooks for that?
![]()
Gary Russell
@garyrussell
You can use @QueueBinding annotations to cause the framework to declare/bind queues for a @RabbitListener (docs here).
However, the queues are not bound during bean instantiation; it happens lazily when the connection is established; usually when the listener containers are started; that is after all beans have been instantiated.
You really shouldn’t have any interaction with the broker in @PostCostruct methods. But if you open a connection there; the queues will be declared and bound.
It would be better, though, to implement SmartLifecyle and put your bean in a late phase so it will be started after the containers.
And put the logic in start() instead of a @PostConstruct.
![]()
Thanks for the answer. I will go with the SmartLifcycle. In which phase is safe to do my things?
![]()
I have put everything in SmartLifecycle in start() with phase 0 and it all works. Thanks again for the answer.
![]()
Gary Russell
@garyrussell
I suggest you use a phase something like Integer.MAX_VALUE - 100 which is a late phase, while leaving room for something else later, if you ever need it.
Я пытаюсь прослушать очередь RabbitMq в моем приложении Spring Boot. В моем RabbitConfig.java файле у меня есть следующие bean-компоненты:
// RabbitConfig.java
// ...Queue, exchange, binding beans, etc
@Bean
SimpleMessageListenerContainer container(ConnectionFactory connectionFactory) {
SimpleMessageListenerContainer container = new SimpleMessageListenerContainer();
container.setConnectionFactory(connectionFactory);
container.setConcurrentConsumers(2);
container.setPrefetchCount(100);
container.setQueueNames(QUEUE_NAME);
return container;
}
@Bean
public AmqpTemplate getTemplate(ConnectionFactory connectionFactory) {
final RabbitTemplate template = new RabbitTemplate(connectionFactory);
template.setMessageConverter(new Jackson2JsonMessageConverter(mapper));
return template;
}
Я создал контейнер слушателя, так как мне нужно сделать для него некоторые настройки, такие как счетчик предварительной выборки.
Я также создал еще один класс в качестве прослушивателя сообщений, который выглядит следующим образом:
@Component
public class MyMessageListener {
@RabbitListener(queues = QUEUE_NAME)
public void messageHandler(MyMessageObj message, Channel channel) throws IOException {
// process message...
}
Однако, когда я запускаю приложение, оно выдает ошибку Error Handler converted exception to fatal. Ошибка возникает из-за того, что контейнер ожидал, что messageHandler будет иметь другую подпись метода.
Я думаю, что мог сделать что-то неправильное в контейнере, потому что, когда я удаляю это, приложение может запускаться и слушать очередь, за исключением того, что я не могу настроить параметры в контейнере.
Что я сделал неправильно и что я должен сделать, чтобы контейнер правильно использовал messageHandler?
1 ответ
Не могли бы вы попробовать реализовать класс MessageListener, который реализует org.springframework.amqp.core.MessageListener и реализует метод «onMessage (сообщение сообщения)»
Если у вас есть класс @Configuration, в котором вы определили SimpleMessageListenerContainer, вам потребуется соответствующий класс, который реализует org.springframework.amqp.core.MessageListener и реализует метод «onMessage (сообщение сообщения)».
Позвольте мне знать, если это помогает.
@Configuration общедоступный класс MessageConfig {
private static String queue = "ARRQueue";
@Bean
ConnectionFactory connectionFactory(){
CachingConnectionFactory cachingConnectionFactory = new CachingConnectionFactory("localhost");
cachingConnectionFactory.setUsername("guest");
cachingConnectionFactory.setPassword("guest");
return cachingConnectionFactory;
}
@Bean
MessageListenerContainer messageListenerContainer(){
SimpleMessageListenerContainer simpleMessageListenerContainer = new SimpleMessageListenerContainer();
simpleMessageListenerContainer.setConnectionFactory(connectionFactory());
simpleMessageListenerContainer.setQueues(new Queue(queue, true));
simpleMessageListenerContainer.setMessageListener(new MessageListener());
return simpleMessageListenerContainer;
}
}
Открытый класс MessageListener реализует org.springframework.amqp.core.MessageListener {@Override public void onMessage (сообщение сообщения) {System.out.println («MessageListener.onMessage:» + new String (message.getBody ())); }
1
Rahul A R
15 Фев 2020 в 16:11
Error handler
Table of contents
- Installation
- Introduction
- Enabling error handling
- About error handlers
- Error handling
- Abstraction of PHP errors
- Handling recoverable PHP errors
- Handling fatal PHP errors
- Handling both kinds of errors
- Sophisticated error handlers
- Exception handling
- Exception handler callbacks
- Sophisticated exception handlers
- Converting errors to exceptions
Installation
composer require weew/error-handler
Introduction
This little library allows you to easily handle exceptions, recoverable and fatal errors globally in your code. Some types of errors are recoverable some are not, this kind of error handling should be used as last resort to do some logging, etc.
Enabling error handling
You can manually toggle between three kinds of errors that the error handler can handle: exceptions, recoverable and fatal errors.
$errorHandler = new ErrorHandler(); // enable exception handling $errorHandler->enableExceptionHandling(); // enable handling of recoverable php errors $errorHandler->enableRecoverableErrorHandling(); // enable handling of fatal php errors $errorHandler->enableFatalErrorHandling(); // enable handling of recoverable and fatal php errors $errorHandler->enableErrorHandling(); // enable handling of exceptions, recoverable and fatal php errors $errorHandler->enable();
You can always check whether some kind of error handling has been enabled.
$errorHandler->isExceptionHandlingEnabled(); $errorHandler->isRecoverableErrorHandlingEnabled(); $errorHandler->isFatalErrorHandlingEnabled();
About error handlers
Error handlers are small pieces of logic that you can register on the ErrorHandler. There are two different kinds of handlers: error and exception handlers. They all follow the same pattern: a handler accepts and abstraction of the occurred error / exception and returns a boolean value determining whether the error has bee handled or not. If the error has been handled, error handlers must return true, returning false is optional.
Error handling
In PHP there are two different kind of errors, the ones that you can recover from and the ones you can’t. You can differentiate between them if you want to. All PHP errors are converted to an instance of IError. It will contain all the relevant information about the occurred error and be passed down to your error handlers.
Abstraction of PHP errors
All PHP errors are converted to an instance of IError. It serves as a holder for all the relevant error information and makes it accessible trough few getter methods.
// is this kind of error recoverable or not $error->isRecoverable(); // get error type (E_WARNING, E_STRICT, etc.) $error->getCode(); // get error message $error->getMessage(); // get error file $error->getFile(); // get error line $error->getLine();
There is also a very useful ErrorType class that holds information about all kinds of PHP errors and might be used to get error type name based on the error type number, check if a particular type of error is recoverable or not, and so on.
Handling recoverable PHP errors
Creating an error handler for recoverable errors.
$errorHandler = new ErrorHandler(); $errorHandler->addRecoverableErrorHandler(function(IError $error) { return true; });
Handling fatal PHP errors
Creating an error handler for fatal errors.
$errorHandler = new ErrorHandler(); $errorHandler->addFatalErrorHandler(function(IError $error) { return true; });
Handling both kinds of errors
Creating an error handler that covers both, recoverable and fatal errors.
$errorHandler = new ErrorHandler(); $errorHandler->addErrorHandler(function(IError $error) { if ($error->isRecoverable()) { return true; } });
Sophisticated error handlers
If you do not want to work with callbacks, you can create a sophisticated error handler class. All you have to do is to implement the INativeErrorHandler interface.
class CustomErrorHandler implements INativeErrorHandler { public function handle(IError $error) { return true; } } $errorHandler = new ErrorHandler(); $errorHandler->addErrorHandler(new CustomErrorHandler());
Exception handling
Error handler allows you to define the types of exceptions you want to handle in your exception handler. There are two ways you can plug in an exception handler: using callbacks or using an implementation of the IExceptionHandler interface.
Exception handler callbacks
When using simple callables / callbacks as exception handlers, all you have to do is to define the exception type in the function signature. Error handler will then figure out what kind of exceptions are supported by your exception handler and give it only the ones it can handle. Same as with errors, exception handlers must return true in order to tell that exception has been handled.
Below is an example of an exception handler that handles only exceptions of type HttpException or it’s subclasses.
$errorHandler = new ErrorHandler(); $errorHandler->addExceptionHandler(function(HttpException $ex) { return true; });
Sophisticated exception handlers
You can add an exception handler by passing in an instance of IExceptionHandler. When an exception is thrown, error handler will ask your custom exception handler whether it supports this kind of exceptions and if so, ask your handler to handle this exception.
class CustomExceptionHandler implements IExceptionHandler { public function supports(Exception $ex) { return $ex instanceof HttpException; } public function handle(HttpException $ex) { return true; } } $errorHandler = new ErrorHandler(); $errorHandler->addExceptionHandler(new CustomExceptionHandler());
Converting errors to exceptions
When a php errors occurres, it will be converted to an instance of IError and passed down to you error handlers. This requires you to differentiate between errors and exceptions. If you prefer dealing with errors as if they were regular exceptions, you can do so by telling the error handler to convert all php errors to appropriate exceptions. Do not forget to enable exception handling, otherwise you will not be able to handle them anymore.
$errorHandler = new ErrorHandler(); $errorHandler->convertErrorsToExceptions(); $errorHandler->enableExceptionHandling(); // or $errorHandler = new ErrorHandler(true); $errorHandler->enableExceptionHandling();
Now, whenever for example an E_WARNING occurres, you’ll get a WarningException. To handle all WarningException occurrences you can create a regular exception handler.
$errorHandler->addExceptionHandler(function(WarningException $ex){ return true; });
If you want to deal with all PHP errors that are converted to an exception in the same handler, you can create an exception handler for the IErrorException interface.
$errorHandler->addExceptionHandler(function(IErrorException $ex) { // all kinds of php errors (E_WARNING, E_STRICT, etc.) can now be handled // here in form of an exception return true; });
Below is a full list of available exceptions.
| Error type | Exception name |
|---|---|
E_COMPILE_ERROR |
CompileErrorException |
E_COMPILE_WARNING |
CompileWarningException |
E_CORE_ERROR |
CoreErrorException |
E_CORE_WARNING |
CoreWarningException |
E_DEPRECATED |
DeprecatedException |
E_ERROR |
ErrorException |
E_NOTICE |
NoticeException |
E_PARSE |
ParseException |
E_RECOVERABLE_ERROR |
RecoverableErrorException |
E_STRICT |
StrictException |
E_USER_DEPRECATED |
UserDeprecatedException |
E_USER_ERROR |
UserErrorException |
E_USER_NOTICE |
UserNoticeException |
E_USER_WARNING |
UserWarningException |
E_WARNING |
WarningException |
All exceptions listed above share the same IErrorException interface that offers some getters to access the error information.
// get numeric representation of the error type (E_WARNING, E_STRICT, etc.) $ex->getErrorCode(); // get error message $ex->getErrorMessage(); // get error file $ex->getErrorFile(); // get error line $ex->getErrorLine(); // check wether the error was recoverable or not $ex->isRecoverable();
Обработка ошибок с помощью Spring AMQP
Узнайте о различных способах обработки ошибок с помощью Spring AMQP с помощью RabbitMQ.
Автор: baeldung
Дата записи
1. введение
Асинхронный обмен сообщениями-это тип слабо связанной распределенной коммуникации, который становится все более популярным для реализации архитектуры, управляемой событиями . К счастью, Spring Framework предоставляет проект Spring AMQP, позволяющий нам создавать решения для обмена сообщениями на основе AMQP.
С другой стороны, работа с ошибками в таких средах может быть нетривиальной задачей . Поэтому в этом уроке мы рассмотрим различные стратегии обработки ошибок.
2. Настройка среды
Для этого урока мы будем использовать RabbitMQ , который реализует стандарт AMQP. Кроме того, Spring AMQP предоставляет модуль spring-rabbit , который делает интеграцию очень простой.
Давайте запустим RabbitMQ как автономный сервер. Мы запустим его в контейнере Docker, выполнив следующую команду:
Для получения подробной конфигурации и настройки зависимостей проекта, пожалуйста, обратитесь к нашей статье Spring AMQP .
3. Сценарий Отказа
Обычно существует больше типов ошибок, которые могут возникнуть в системах обмена сообщениями по сравнению с монолитными или однопакетными приложениями из-за их распределенной природы.
Мы можем указать на некоторые типы исключений:
- Сеть- или Связанные с вводом-выводом/| – общие сбои сетевых соединений и операций ввода-вывода Протокол-
- или связанные с инфраструктурой -ошибки, которые обычно представляют собой неправильную конфигурацию инфраструктуры обмена сообщениями Связанные с брокером
- -сбои, предупреждающие о неправильной конфигурации между клиентами и брокером AMQP. Например, достижение определенных пределов или порога, аутентификация или недопустимая конфигурация политик Application-
- и message-related – исключения, которые обычно указывают на нарушение некоторых бизнес-или прикладных правил
Конечно, этот список отказов не является исчерпывающим, но содержит наиболее распространенные типы ошибок.
Следует отметить, что Spring AMQP обрабатывает связанные с подключением и низкоуровневые проблемы из коробки, например, применяя политики retry или requeue . Кроме того, большинство отказов и неисправностей преобразуются в AmqpException или один из его подклассов.
В следующих разделах мы в основном сосредоточимся на специфичных для приложений и высокоуровневых ошибках, а затем рассмотрим глобальные стратегии обработки ошибок.
4. Настройка проекта
Теперь давайте определим простую конфигурацию очереди и обмена для начала:
Далее, давайте создадим простого производителя:
И, наконец, потребитель, который бросает исключение:
По умолчанию все неудачные сообщения будут немедленно запрашиваться в начале целевой очереди снова и снова.
Давайте запустим наш пример приложения, выполнив следующую команду Maven:
Теперь мы должны увидеть аналогичный результирующий результат:
Следовательно, по умолчанию мы будем видеть бесконечное количество таких сообщений в выходных данных.
Чтобы изменить это поведение у нас есть два варианта:
- Установите параметр defaultrequeuerejected в значение false на стороне слушателя – spring.rabbitmq.listener.simple.default-requeue-rejected=false
- Throw an AmqpRejectAndDontRequeueException – t his может быть полезен для сообщений, которые не будут иметь смысла в будущем, поэтому их можно отбросить.
Теперь давайте узнаем, как обрабатывать неудачные сообщения более разумным способом.
5. Очередь Мертвых писем
Очередь мертвых писем (DLQ) – это очередь, содержащая недоставленные или неудачные сообщения . DLQ позволяет нам обрабатывать неисправные или плохие сообщения, отслеживать шаблоны сбоев и восстанавливаться после исключений в системе.
Что еще более важно, это помогает предотвратить бесконечные циклы в очередях, которые постоянно обрабатывают плохие сообщения и снижают производительность системы.
Всего существует два основных понятия: Обмен мертвыми письмами (DLX) и сама очередь мертвых писем (DLQ). На самом деле, DLX-это обычный обмен, который мы можем определить как один из распространенных типов : direct , topic или fanout .
Очень важно понимать, что продюсер ничего не знает об очередях. Он знает только об обменах, и все произведенные сообщения маршрутизируются в соответствии с конфигурацией обмена и ключом маршрутизации сообщений .
Теперь давайте посмотрим, как обрабатывать исключения, применяя подход очереди мертвых писем.
5.1. Базовая конфигурация
Чтобы настроить DLQ, нам нужно указать дополнительные аргументы при определении нашей очереди:
В приведенном выше примере мы использовали два дополнительных аргумента: x-dead-letter-exchange и x-dead-letter-routing-key . Пустое строковое значение для параметра x-dead-letter-exchange указывает брокеру использовать обмен по умолчанию .
Второй аргумент столь же важен, как и установка ключей маршрутизации для простых сообщений. Эта опция изменяет начальный ключ маршрутизации сообщения для дальнейшей маршрутизации по DLX.
5.2. Неудачная Маршрутизация Сообщений
Поэтому, когда сообщение не доставляется, оно направляется на обмен мертвыми письмами. Но, как мы уже отмечали, DLX-это нормальный обмен. Поэтому, если ключ маршрутизации неудачного сообщения не совпадает с обменом, он не будет доставлен в DLQ.
Таким образом, если мы опустим аргумент x-dead-letter-routing-key в нашем примере, неудачное сообщение застрянет в бесконечном цикле повторных попыток.
Кроме того, исходная метаинформация сообщения доступна в x-death heaven:
То приведенная выше информация доступна в консоли управления RabbitMQ обычно работает локально на порту 15672.
Помимо этой конфигурации, если мы используем Spring Cloud Stream , мы можем даже упростить процесс настройки, используя свойства конфигурации republishToDlq и autoBindDlq .
5.3. Обмен Мертвыми письмами
В предыдущем разделе мы видели, что ключ маршрутизации изменяется, когда сообщение направляется на обмен мертвыми буквами. Но такое поведение не всегда желательно. Мы можем изменить его, настроив DLX самостоятельно и определив его с помощью типа fanout :
На этот раз мы определили пользовательский обмен типа fan out , поэтому сообщения будут отправляться во все ограниченные очереди . Кроме того, мы установили значение аргумента x-dead-letter-exchange для имени нашего DLX. В то же время мы удалили аргумент x-dead-letter-routing-key .
Теперь, если мы запустим наш пример, неудачное сообщение должно быть доставлено в DLQ, но без изменения начального ключа маршрутизации:
5.4. Обработка Сообщений Очереди Мертвых Писем
Конечно, причина, по которой мы переместили их в очередь мертвых писем, заключается в том, что они могут быть переработаны в другое время.
Давайте определим слушателя для очереди мертвых писем:
Если мы запустим наш пример кода сейчас, то увидим вывод журнала:
Мы получили неудачное сообщение, но что нам делать дальше? Ответ зависит от конкретных системных требований, вида исключения или типа сообщения.
Например, мы можем просто запросить сообщение в исходное место назначения:
Но такая логика исключений не отличается от политики повторных попыток по умолчанию:
Общая стратегия может потребовать повторной обработки сообщения в течение n раз, а затем отклонить его. Давайте реализуем эту стратегию, используя заголовки сообщений:
Сначала мы получаем значение заголовка x-retries-count , затем сравниваем это значение с максимально допустимым значением. Впоследствии, если счетчик достигнет предельного числа попыток, сообщение будет отброшено:
Мы должны добавить, что мы также можем использовать заголовок x-message-ttl , чтобы установить время, после которого сообщение должно быть отброшено. Это может быть полезно для предотвращения бесконечного роста очередей.
5.5. Очередь на Парковку
С другой стороны, рассмотрим ситуацию, когда мы не можем просто отбросить сообщение, например, это может быть транзакция в банковской сфере. Кроме того, иногда сообщение может потребовать ручной обработки или нам просто нужно записать сообщения, которые потерпели неудачу более n раз.
Для подобных ситуаций существует понятие очереди на парковку . Мы можем переслать все сообщения из DLQ, которые вышли из строя более разрешенного количества раз, в очередь парковки для дальнейшей обработки .
Давайте теперь воплотим эту идею:
Во – вторых, давайте реорганизуем логику прослушивателя, чтобы отправить сообщение в очередь парковки:
В конце концов, нам также нужно обрабатывать сообщения, поступающие в очередь парковки:
Теперь мы можем сохранить неудачное сообщение в базе данных или, возможно, отправить уведомление по электронной почте.
Давайте проверим эту логику, запустив наше приложение:
Как видно из выходных данных, после нескольких неудачных попыток сообщение было отправлено в очередь парковки.
6. Пользовательская Обработка Ошибок
В предыдущем разделе мы видели, как обрабатывать сбои с помощью выделенных очередей и обменов. Однако иногда нам может потребоваться отловить все ошибки, например, для регистрации или сохранения их в базе данных.
6.1. Глобальный обработчик ошибок
До сих пор мы использовали по умолчанию SimpleRabbitListenerContainerFactory и эта фабрика по умолчанию использует ConditionalRejectingErrorHandler . Этот обработчик ловит различные исключения и преобразует их в одно из исключений в иерархии AmqpException .
Важно отметить, что если нам нужно обрабатывать ошибки подключения, то нам нужно реализовать интерфейс ApplicationListener .
Проще говоря, Условное отклонение ErrorHandler решает, отклонять ли конкретное сообщение или нет. Когда сообщение, вызвавшее исключение, отклоняется, оно не запрашивается.
Давайте определим пользовательский Обработчик ошибок , который будет просто запрашивать только Бизнес-исключение s:
Кроме того, поскольку мы выбрасываем исключение внутри нашего метода listener, оно оборачивается в ListenerExecutionFailedException . Итак, нам нужно вызвать метод getCause , чтобы получить исходное исключение.
6.2. Стратегия Фатальных Исключений
Под капотом этот обработчик использует стратегию Fatal Exception , чтобы проверить, следует ли считать исключение фатальным. Если это так, то неудачное сообщение будет отклонено.
По умолчанию эти исключения фатальны:
- MessageConversionException
- MessageConversionException
- MethodArgumentNotValidException
- Метод Аргумент TypeMismatchException
- NoSuchMethodException
- ClassCastException
Вместо реализации интерфейса Ierrorhandler мы можем просто предоставить нашу стратегию Фатальных исключений :
Наконец, нам нужно передать нашу пользовательскую стратегию конструктору Conditional Rejecting ErrorHandler :
7. Заключение
В этом уроке мы обсудили различные способы обработки ошибок при использовании Spring AMQP и, в частности, RabbitMQ.
Каждая система нуждается в определенной стратегии обработки ошибок. Мы рассмотрели наиболее распространенные способы обработки ошибок в архитектуре, управляемой событиями. Кроме того, мы убедились, что можем объединить несколько стратегий для создания более комплексного и надежного решения.
Как всегда, полный исходный код статьи доступен на GitHub .
Источник
Name already in use
error-handler / readme.md
- Go to file T
- Go to line L
- Copy path
- Copy permalink
Copy raw contents
Copy raw contents


Table of contents
composer require weew/error-handler
This little library allows you to easily handle exceptions, recoverable and fatal errors globally in your code. Some types of errors are recoverable some are not, this kind of error handling should be used as last resort to do some logging, etc.
Enabling error handling
You can manually toggle between three kinds of errors that the error handler can handle: exceptions, recoverable and fatal errors.
You can always check whether some kind of error handling has been enabled.
About error handlers
Error handlers are small pieces of logic that you can register on the ErrorHandler . There are two different kinds of handlers: error and exception handlers. They all follow the same pattern: a handler accepts and abstraction of the occurred error / exception and returns a boolean value determining whether the error has bee handled or not. If the error has been handled, error handlers must return true , returning false is optional.
In PHP there are two different kind of errors, the ones that you can recover from and the ones you can’t. You can differentiate between them if you want to. All PHP errors are converted to an instance of IError . It will contain all the relevant information about the occurred error and be passed down to your error handlers.
Abstraction of PHP errors
All PHP errors are converted to an instance of IError . It serves as a holder for all the relevant error information and makes it accessible trough few getter methods.
There is also a very useful ErrorType class that holds information about all kinds of PHP errors and might be used to get error type name based on the error type number, check if a particular type of error is recoverable or not, and so on.
Handling recoverable PHP errors
Creating an error handler for recoverable errors.
Handling fatal PHP errors
Creating an error handler for fatal errors.
Handling both kinds of errors
Creating an error handler that covers both, recoverable and fatal errors.
Sophisticated error handlers
If you do not want to work with callbacks, you can create a sophisticated error handler class. All you have to do is to implement the INativeErrorHandler interface.
Error handler allows you to define the types of exceptions you want to handle in your exception handler. There are two ways you can plug in an exception handler: using callbacks or using an implementation of the IExceptionHandler interface.
Exception handler callbacks
When using simple callables / callbacks as exception handlers, all you have to do is to define the exception type in the function signature. Error handler will then figure out what kind of exceptions are supported by your exception handler and give it only the ones it can handle. Same as with errors, exception handlers must return true in order to tell that exception has been handled.
Below is an example of an exception handler that handles only exceptions of type HttpException or it’s subclasses.
Sophisticated exception handlers
You can add an exception handler by passing in an instance of IExceptionHandler . When an exception is thrown, error handler will ask your custom exception handler whether it supports this kind of exceptions and if so, ask your handler to handle this exception.
Converting errors to exceptions
When a php errors occurres, it will be converted to an instance of IError and passed down to you error handlers. This requires you to differentiate between errors and exceptions. If you prefer dealing with errors as if they were regular exceptions, you can do so by telling the error handler to convert all php errors to appropriate exceptions. Do not forget to enable exception handling, otherwise you will not be able to handle them anymore.
Now, whenever for example an E_WARNING occurres, you’ll get a WarningException . To handle all WarningException occurrences you can create a regular exception handler.
If you want to deal with all PHP errors that are converted to an exception in the same handler, you can create an exception handler for the IErrorException interface.
Below is a full list of available exceptions.
| Error type | Exception name |
|---|---|
| E_COMPILE_ERROR | CompileErrorException |
| E_COMPILE_WARNING | CompileWarningException |
| E_CORE_ERROR | CoreErrorException |
| E_CORE_WARNING | CoreWarningException |
| E_DEPRECATED | DeprecatedException |
| E_ERROR | ErrorException |
| E_NOTICE | NoticeException |
| E_PARSE | ParseException |
| E_RECOVERABLE_ERROR | RecoverableErrorException |
| E_STRICT | StrictException |
| E_USER_DEPRECATED | UserDeprecatedException |
| E_USER_ERROR | UserErrorException |
| E_USER_NOTICE | UserNoticeException |
| E_USER_WARNING | UserWarningException |
| E_WARNING | WarningException |
All exceptions listed above share the same IErrorException interface that offers some getters to access the error information.
Источник