Содержание
- Учебное пособие по проверке JSF: обработка ошибок в JSF
- Отображение сообщений об ошибках при просмотре
- Встроенные компоненты проверки
- Проверка с использованием методов Backing Bean
- Пользовательские компоненты проверки с использованием интерфейса Validator
- JSF Validation Tutorial: Error Handling in JSF
- Showing Error Messages on View
- Built-in validation components
- Validation using Backing Bean methods
- Custom validation components using Validator interface
- JSF Custom Error Pages
- 1. The Deployment Descriptor
- 2. Faces Configuration File
- 3. The Error Page
- JavaBeat JSF 2.2 Examples
- JSF2 – Error Handling
- 4. ErrorHandler RequestScoped Bean
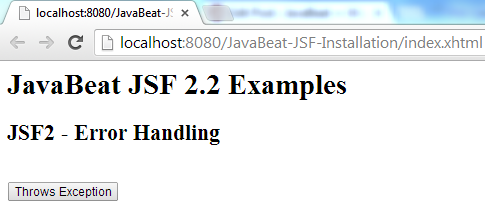
- 5. Error Prone Page
- JavaBeat JSF 2.2 Examples
- JSF2 – Error Handling
- 6. Error Prone Managed Bean
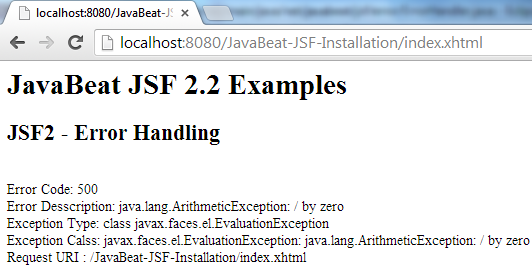
- 7. JSF Error Handling Demo
- 8. JSF Without Custom Error Page
Учебное пособие по проверке JSF: обработка ошибок в JSF
В продолжение моей предыдущей статьи о создании JSF-приложения JavaServer Faces в Eclipse я публикую следующую статью из этой серии. На этот раз мы расскажем подробнее о модели проверки JSF и обработке ошибок в JSF.
Технология JavaServer Faces поддерживает механизм проверки данных редактируемых компонентов. Каждый компонент в JavaServer Faces создает сообщения об ошибках в течение жизненного цикла JSF и присоединяет их к объекту FacesContext. Следовательно, каждое сообщение присоединяется к компоненту в дереве компонентов, и сообщение отображается в представлении в конце жизненного цикла JSF.
Отображение сообщений об ошибках при просмотре
JSF предоставляет различные теги для обработки и отображения сообщений в представлении. В эталонной реализации Sun библиотеки JSF HTML есть два тега сообщения:
h: messages используется для отображения всех сообщений одновременно. Вы можете разместить тег h: messages в начале вашей формы. Вам может потребоваться отображать только глобальные сообщения, используя тег h: messages. Для отображения только глобальных сообщений установите для атрибута globleOnly значения h: messages значение true.
Используйте h: message для отображения сообщения, прикрепленного к одному компоненту. Атрибут at = «» может использоваться для указания идентификатора компонента, чьи сообщения об ошибках нам нужно отобразить. H: сообщение используется для отображения сообщения об ошибке рядом с компонентом, который сгенерировал ошибку. Если к сообщению прикреплено более одного сообщения этот компонент, h: message будет отображать последнее сообщение.
Каждое сообщение может иметь краткое описание и подробное описание. При использовании тега h: message по умолчанию показывается подробное сообщение. При использовании тега h: messages по умолчанию отображаются сводные описания. Чтобы изменить значения по умолчанию, измените логические атрибуты showSummary и showDetail .
Вы также можете включить отображение подробного сообщения компонента в виде всплывающей подсказки. Для этого установите для атрибута подсказки тега сообщения значение true. Обратите внимание, что для включения этой опции для showDetail и showSummary должно быть установлено значение true.
Существует четыре формы проверки JSF:
1. Встроенные компоненты проверки
2. Проверка уровня приложения
3. Пользовательские компоненты проверки с использованием интерфейса Validator
4. Методы проверки в компонентах поддержки
Встроенные компоненты проверки
Эталонная реализация Sun JSF предоставляет некоторые компоненты проверки по умолчанию, которые можно использовать для проверки любого пользовательского ввода. Базовая библиотека JSF предоставляет теги для проверки ввода. Ниже приведены несколько тегов, которые можно использовать для проверки ввода.
f: validateDoubleRange : этот тег проверяет значение компонента в указанном диапазоне. Значение должно быть преобразовано в тип с плавающей точкой или саму плавающую точку.
f: validateLength : этот тег проверяет длину значения и ограничивает его в пределах указанного диапазона. Значение должно иметь тип java.lang.String.
f: validateLongRange : Проверяет, находится ли значение компонента в указанном диапазоне. Значение должно иметь числовой тип или строку, конвертируемую в long.
Пример:
Проверка с использованием методов Backing Bean
Метод базового компонента может использоваться для проверки любого поля ввода. Сначала нам нужно создать метод вспомогательного компонента, который будет вызываться в процессе проверки. Подпись метода может быть:
Как только метод вспомогательного компонента будет готов, мы можем связать его с компонентом, используя тег f: validator .
В приведенном выше фрагменте мы связали метод userBean checkUsername () с компонентом inputText. Можно связать более одного валидатора с одним компонентом.
Метод проверки базового компонента прост в реализации, но этот метод специфичен для одного приложения и не может быть повторно использован для другого приложения. Для создания универсальных валидаторов, которые можно использовать в разных приложениях, можно использовать интерфейс Validator.
Пользовательские компоненты проверки с использованием интерфейса Validator
Интерфейс Validator может быть расширен, и может быть создан специальный валидатор, который можно повторно использовать в различных приложениях в JSF. Чтобы создать собственный валидатор, нам нужно создать класс Java, который реализует интерфейс javax.faces.validator.Validator . Интерфейс Validator предоставляет метод validate (), который необходимо реализовать. Ниже приведена подпись метода validate ().
После того, как Валидатор реализован, нам нужно зарегистрировать этот валидатор в файлеface-config.xml. Для этого скопируйте следующий код вface-config.xml, предполагая, что наше имя класса валидатора — net.viralpatel.jsf.helloworld.EmailValidator.
Мы можем связать этот валидатор с любым компонентом, используя тег f: validator.
Обратите внимание, что в приведенном выше фрагменте кода атрибут validatorId тега f: validator указывает на идентификатор валидатора, который зарегистрирован в файлеface-config.xml.
Для проверки адреса электронной почты мы можем создать класс Validator как:
Таким образом, используя платформу JSF Validation, можно легко проверить вводимые пользователем данные. Мы видели разные способы проверки в JSF: валидаторы по умолчанию, методы поддержки bean-компонентов и валидация через интерфейс валидатора.
Дайте мне знать ваши комментарии об этом уроке.
Источник
JSF Validation Tutorial: Error Handling in JSF
Join the DZone community and get the full member experience.
In a continuation of my previous article on Creating JavaServer Faces JSF application in Eclipse , I am posting the next article in the series. This time we will cover details about JSF Validation Model and Handling Errors in JSF.
JavaServer Faces technology supports a mechanism for validating the data of editable components. Each component in JavaServer Faces creates Error Messages during the life cycle of JSF and attaches them to FacesContext object. Hence each message is attached to a component in the component tree and the message is displayed into the view at the end of JSF life cycle.
Showing Error Messages on View
JSF provides different tags to handle and display messages on the view. There are two message tags in Sun’s reference implementation of JSF HTML library:
h:messages is used to display all messages at once. You can place h:messages tag in start of your form. You may need to display only global messages using h:messages tag. For displaying only global messages set globleOnly attribute of h:messages to true.
Use h:message to display message attached to one component. An attibute for=”» can be used to specify the id of a component whose error messages we need to display. h:message is used to display error message next to the component that generated the error. If more then one message is attached to that component, h:message will display the last message.
Each message can have a summary description and a detailed description. When using the h:message tag, the default is to show the detail message. When using the h:messages tag, the default is to display the summary descriptions. To change the defaults, modify the boolean showSummary and showDetail attributes.
You can also enable a component’s detail message to appear as a tooltip. To do so, set tooltip attribute of message tag to true. Note that for enabling this option, showDetail and showSummary must be set to true.
There are four forms of JSF validation:
1. Built-in validation components
2. Application level validations
3. Custom validation components using Validator interface
4. Validation methods in backing beans
Built-in validation components
Sun’s reference implementation of JSF provides some default validation components that can be leveraged to implement validation of any user input. The JSF core library provides tags to validate input. The following are a few tags that can be used to validate the input.
f:validateDoubleRange : This tag checks the value of a component within specified range. The value must be convertible to floating-point type or a floating-point itself.
f:validateLength : This tag checks the length of a value and restricts it within a specified range. The value must be of type java.lang.String.
f:validateLongRange : Checks if a component value is within a specified range. The value must be of numeric type or string convertible to a long.
Example:
Validation using Backing Bean methods
A backing bean method can be used for doing validation of any input field. First we need to create the backing bean method that will get called during validation process. The signature of the method can be:
Once a backing bean method is ready we can bind it with a component using f:validator tag.
In above snippet, we have bound the checkUsername() method of userBean to the inputText component. It is possible to bind more than one validator to one component.
THe backing bean method of validation is easy to implement, but this method is specific for one application and may not be reused for different application. To create generic validators which can be used in different application, the Validator interface can be used.
Custom validation components using Validator interface
The Validator interface can be extended and a custom validator can be created which can be reused across different applications in JSF. To create a custom validator, we need to create a Java class that implements javax.faces.validator.Validator interface. The Validator interface provides a validate () method that needs to be implemented. The following is the signature of validate() method.
Once the Validator is implemented, we need to register this validator in faces-config.xml file. To do so copy following code in faces-config.xml assuming that our validator class name is net.viralpatel.jsf.helloworld.EmailValidator.
We can bind this validator to any component using f:validator tag.
Note that in the above code snippet, the validatorId attribute of f:validator tag points to the validator’s ID that is registered in faces-config.xml file.
For validating email address we can create a Validator class as:
Thus by using the JSF Validation framework, it is possible to validate user input easily. We saw different ways of validation in JSF: Default validators, backing bean methods and validation through validator interface.
Let me know your comments about this tutorial.
Opinions expressed by DZone contributors are their own.
Источник
JSF Custom Error Pages
When you run an application in the development project stage and you encounter an error, you get an error message in an undesirable form. You probably don’t want your users to see that message in such that ugly way.
To substitute a better error page, use error-page tag in the web.xml file, in that you can specify either a Java Exception or an HTTP error code. So in case the type of thrown exception has matched that type mentioned in the web.xml exception-type or the error code that generated by the server has matched error-code that mentioned in the web.xml, the JSF framework will handle it by forwarding the user into the desired view that you’ve defined for such those errors or exceptions.
1. The Deployment Descriptor
web.xml
[code lang=”xml”]
404
/faces/error.xhtml
500
/faces/error.xhtml
java.lang.Exception
/faces/error.xhtml
State saving method: ‘client’ or ‘server’
(=default). See JSF Specification 2.5.2
Faces Servlet
javax.faces.webapp.FacesServlet
1
Faces Servlet
/faces/*
Faces Servlet
*.xhtml
[/code]
- The error codes that being handled in that defined web.xml are 500 and 400.
- The exceptions that being handled in that defined web.xml is the root of exceptions that could be thrown java.lang.Exception.
- All of the defined error codes and exceptions must be handled in a compelling error page called error.xhtml.
2. Faces Configuration File
faces-config.xml
- No changes are made on the faces configuration to support the error page concept
3. The Error Page
error.xhtml
JavaBeat JSF 2.2 Examples
JSF2 – Error Handling
4. ErrorHandler RequestScoped Bean
ErrorHandler.java
[code lang=”java”]
package net.javabeat.jsf.error;
import javax.faces.bean.ManagedBean;
import javax.faces.bean.RequestScoped;
import javax.faces.context.FacesContext;
@ManagedBean
@RequestScoped
public class ErrorHandler <
public String getStatusCode() <
String val = String.valueOf((Integer)FacesContext.getCurrentInstance().getExternalContext().
getRequestMap().get(«javax.servlet.error.status_code»));
return val;
>
public String getMessage() <
String val = (String)FacesContext.getCurrentInstance().getExternalContext().
getRequestMap().get(«javax.servlet.error.message»);
return val;
>
public String getExceptionType() <
String val = FacesContext.getCurrentInstance().getExternalContext().
getRequestMap().get(«javax.servlet.error.exception_type»).toString();
return val;
>
public String getException() <
String val = (String)((Exception)FacesContext.getCurrentInstance().getExternalContext().
getRequestMap().get(«javax.servlet.error.exception»)).toString();
return val;
>
public String getRequestURI() <
return (String)FacesContext.getCurrentInstance().getExternalContext().
getRequestMap().get(«javax.servlet.error.request_uri»);
>
public String getServletName() <
return (String)FacesContext.getCurrentInstance().getExternalContext().
getRequestMap().get(«javax.servlet.error.servlet_name»);
>
- The error handler bean is defined as RequestScoped
- Several objects related to the error are placed in the Request Map and they are considered as Servlet Exception Attributes
5. Error Prone Page
index.xhtml
JavaBeat JSF 2.2 Examples
JSF2 – Error Handling
6. Error Prone Managed Bean
IndexBean.java
[code lang=”java”]
package net.javabeat.jsf;
import javax.faces.bean.ManagedBean;
import javax.faces.bean.SessionScoped;
@ManagedBean
@SessionScoped
public class IndexBean <
private String message;
public String getMessage() <
return message;
>
public void setMessage(String message) <
this.message = message;
>
public String navigate() <
// Assume an exception has been thrown by some business logic
System.out.println(10/0);
return «anonymousView»;
>
>
[/code]
7. JSF Error Handling Demo
The below snapshots show you how could a thrown exception being handled in a compelling view.
8. JSF Without Custom Error Page
The below snapshot shows you the ugly page that might be displayed for the users while they are navigating your site.
Источник
This may be too ambiguous of a question, but I’m looking for some help or best practices on handling exceptions in a JavaServer Faces application.
Right now, whenever I catch an exception, I log it and then throw another exception that I created, say MyCustomException. This custom exception takes the Throwable object that was caught and emails the stack trace to me so that I know an exception has occurred. For now, this seems to work for me as far as being notified when an exception occurs.
However, the trouble that I’m having is how to present the user with a pretty error page that lets them know that something went wrong and that I have been notified of the error. Doing some searching, I’ve come across several articles that show how to redirect a user to another page using something similar to the following:
FacesContext context = FacesContext.getCurrentInstance();
ExternalContext extContext = context.getExternalContext();

String url = extContext.encodeActionURL(extContext.getRequestContextPath() +
    "/messages.faces");

extContext.redirect(url);
But this seems to be quite a bit to basically copy and paste for each caught exception, which doesn’t exactly follow the DRY principle. In the end, I think what I would like to do is have an email sent to me whenever an exception occurs and then be able to send a message to a generic error page that then displays the message to the user.
Any ideas or best practices that I should follow? Thank you in advance for any advice you can give! I’m stumped.
Note: If it helps, I’m using JSF 2.0 and Facelets.
In continuation with my previous article on Creating JavaServer Faces JSF application in Eclipse, I am posting next article in the series. This time we will cover details about JSF Validation Model and Handling Errors in JSF. JavaServer Faces technology supports a mechanism for validating the data of editable components. Each component in JavaServer Faces, created Error Messages during the life cycle of JSF and attached them to FacesContext object. Hence each message is attached to a component in the component tree and the message is displayed into the view at the end of JSF life cycle.
Showing Error Messages on View
JSF provides different tags to handle and display messages on the view. There are two message tags in SUN’s reference implementation of JSF HTML library:
<h:message /> <h:messages />Code language: HTML, XML (xml)
h:messages is used to display all messages at once. You can place h:messages tag in start of your form. You may need to display only global messages using h:messages tag. For displaying only global messages set globleOnly attribute of h:messages to true.
Code language: HTML, XML (xml)
<h:messages globalOnly="true" />
Use h:message to display message attached to one component. An attibute for=”” can be used to specify the id of a component whose error messages we need to display. h:message is used to display error message next to the component that generated the error. If more then one message is attached to that component, h:message will display the last message.
Code language: HTML, XML (xml)
... <h:inputText id="userName" value="#{userBean.userName}" /> <h:message for="userName" /> ...
Each message can have a summary description and a detailed description. When using the h:message tag, the default is to show the detail message. When using the h:messages tag, the default is to display the summary descriptions. To change the defaults, modify the boolean showSummary and showDetail attributes.
Code language: HTML, XML (xml)
<h:message for="userName" showSummary="true"/>
<h:messages showDetail="true"/>
You can also enable component’s detail message to appear as a tooltip. To do so, set tooltip attribute of message tag to true. Note that for enabling this option, showDetail and showSummary must be set to true. There are four forms of JSF validation:
1. Built-in validation components
2. Application level validations
3. Custom validation components using Validator interface
4. Validation methods in backing beans
Built-in validation components
The SUN’s reference implementation of JSF provides some default validation components that can be leveraged to implement validation of any user inputs. The JSF’s core library provides tags to validate input. Following are few tags that can be used to validate the input. f:validateDoubleRange : This tag checks the value of component within specified range. The value must be convertible to floating-point type or a floating-point itself. f:validateLength : This tag checks the length of a value and restrict it within a specified range. The value must be of type java.lang.String. f:validateLongRange : Checks is component value is within a specified range. The value must be of numeric type or string convertible to a long. Example:
Code language: HTML, XML (xml)
<h:inputText id="Username" value="#{UserBean.userName}">
<f:validateLength minimum="6" maximum="15"/>
</h:inputText>
....
<h:inputText id="Age" value="#{UserBean.age}">
<f:validateLongRange minimum="1" maximum="120"/>
</h:inputText>
Validation using Backing Bean methods
A backing bean method can be used for doing validation of any input field. First we need to create the backing bean method that will get called during validation process. The signature of the method can be:
Code language: Java (java)
public void <METHOD_NAME> (FacesContext context, UIComponent component, Object value) { .. }
Once a backing bean method is ready we can bind it with a component using f:validator tag.
Code language: HTML, XML (xml)
<h:inputText value="#{userBean.name}" validator="#{userBean.checkUsername}">
</h:inputText>
In above snippet, we have bind checkUsername() method of userBean to component inputText. It is possible to bind more than one validators to one component. Backing bean method of validation is easy to implement, but this method is specific for one application and may not be reused for different application. To create generic validators which can be used in different application, Validator interface can be used.
Custom validation components using Validator interface
Validator interface can be extended and a custom validator can be created which can be reused across different applications in JSF. To create a custom validator, we need to create a Java class that implements javax.faces.validator.Validator interface. Validator interface provides a method validate () that needs to be implemented. Following is the signature of validate() method.
Code language: Java (java)
import javax.faces.component.UIComponent; import javax.faces.context.FacesContext; import javax.faces.validator.Validator; import javax.faces.validator.ValidatorException; ... ... public void validate(FacesContext context, UIComponent component, Object value) throws ValidatorException { }
Once the Validator is implemented, we need to register this validator in faces-config.xml file. To do so copy following code in faces-config.xml assuming that our validator class name is net.viralpatel.jsf.helloworld.EmailValidator.
Code language: HTML, XML (xml)
<validator>
<validator-id>emailValidator</validator-id>
<validator-class>net.viralpatel.jsf.helloworld.EmailValidator</validator-class>
</validator>
We can bind this validator with any component using f:validator tag.
<h:inputText id="Email" value="#{userBean.email}" required="true"> <f:validator validatorId="emailValidator" /> </h:inputText>Code language: HTML, XML (xml)
Note that in above code snippet, validatorId attribute of f:validator tag points to the validator’s ID that is registered in faces-config.xml file.
For validating email address we can create a Validator class as:
Code language: Java (java)
package net.viralpatel.jsf.helloworld; import javax.faces.application.FacesMessage; import javax.faces.component.UIComponent; import javax.faces.context.FacesContext; import javax.faces.validator.Validator; import javax.faces.validator.ValidatorException; public class EmailValidator implements Validator{ public void validate(FacesContext context, UIComponent component, Object value) throws ValidatorException { String email = (String) value; if(!email.contains("@")) { FacesMessage message = new FacesMessage(); message.setSeverity(FacesMessage.SEVERITY_ERROR); message.setSummary("Email is not valid."); message.setDetail("Email is not valid."); context.addMessage("userForm:Email", message); throw new ValidatorException(message); } } }
Thus by using JSF Validation framework, it is possible to validate user input easily. We saw different ways of validation in JSF: Default validators, backing bean methods and validation through validator interface. Let me know your comments about this tutorial. << PREVIOUS: Tutorial: Creating JavaServer Faces JSF application in Eclipse.
In a continuation of my previous article on Creating JavaServer Faces JSF application in Eclipse, I am posting the next article in the series. This time we will cover details about JSF Validation Model and Handling Errors in JSF.
JavaServer Faces technology supports a mechanism for validating the data of editable components. Each component in JavaServer Faces creates Error Messages during the life cycle of JSF and attaches them to FacesContext object. Hence each message is attached to a component in the component tree and the message is displayed into the view at the end of JSF life cycle.
Showing Error Messages on View
JSF provides different tags to handle and display messages on the view. There are two message tags in Sun’s reference implementation of JSF HTML library:
<h:message />
<h:messages />
h:messages is used to display all messages at once. You can place h:messages tag in start of your form. You may need to display only global messages using h:messages tag. For displaying only global messages set globleOnly attribute of h:messages to true.
<h:messages globalOnly="true" />
Use h:message to display message attached to one component. An attibute for=”» can be used to specify the id of a component whose error messages we need to display. h:message is used to display error message next to the component that generated the error. If more then one message is attached to that component, h:message will display the last message.
Each message can have a summary description and a detailed description. When using the h:message tag, the default is to show the detail message. When using the h:messages tag, the default is to display the summary descriptions. To change the defaults, modify the boolean showSummary and showDetail attributes.
<h:message for="userName" showSummary="true"/>
<h:messages showDetail="true"/>
You can also enable a component’s detail message to appear as a tooltip. To do so, set tooltip attribute of message tag to true. Note that for enabling this option, showDetail and showSummary must be set to true.
There are four forms of JSF validation:
1. Built-in validation components
2. Application level validations
3. Custom validation components using Validator interface
4. Validation methods in backing beans
Built-in validation components
Sun’s reference implementation of JSF provides some default validation components that can be leveraged to implement validation of any user input. The JSF core library provides tags to validate input. The following are a few tags that can be used to validate the input.
f:validateDoubleRange : This tag checks the value of a component within specified range. The value must be convertible to floating-point type or a floating-point itself.
f:validateLength : This tag checks the length of a value and restricts it within a specified range. The value must be of type java.lang.String.
f:validateLongRange : Checks if a component value is within a specified range. The value must be of numeric type or string convertible to a long.
Example:
<h:inputText id="Username" value="#{UserBean.userName}">
<f:validateLength minimum="6" maximum="15"/>
</h:inputText>
....
<h:inputText id="Age" value="#{UserBean.age}">
<f:validateLongRange minimum="1" maximum="120"/>
</h:inputText>
Validation using Backing Bean methods
A backing bean method can be used for doing validation of any input field. First we need to create the backing bean method that will get called during validation process. The signature of the method can be:
public void <METHOD_NAME> (FacesContext context, UIComponent component, Object value) { .. }
Once a backing bean method is ready we can bind it with a component using f:validator tag.
<h:inputText value="#{userBean.name}" validator="#{userBean.checkUsername}">
</h:inputText>
In above snippet, we have bound the checkUsername() method of userBean to the inputText component. It is possible to bind more than one validator to one component.
THe backing bean method of validation is easy to implement, but this method is specific for one application and may not be reused for different application. To create generic validators which can be used in different application, the Validator interface can be used.
Custom validation components using Validator interface
The Validator interface can be extended and a custom validator can be created which can be reused across different applications in JSF. To create a custom validator, we need to create a Java class that implements javax.faces.validator.Validator interface. The Validator interface provides a validate () method that needs to be implemented. The following is the signature of validate() method.
Once the Validator is implemented, we need to register this validator in faces-config.xml file. To do so copy following code in faces-config.xml assuming that our validator class name is net.viralpatel.jsf.helloworld.EmailValidator.
<validator>
<validator-id>emailValidator</validator-id>
<validator-class>net.viralpatel.jsf.helloworld.EmailValidator</validator-class>
</validator>
We can bind this validator to any component using f:validator tag.
<h:inputText id="Email" value="#{userBean.email}" required="true">
<f:validator validatorId="emailValidator" />
</h:inputText>
Note that in the above code snippet, the validatorId attribute of f:validator tag points to the validator’s ID that is registered in faces-config.xml file.
For validating email address we can create a Validator class as:
Thus by using the JSF Validation framework, it is possible to validate user input easily. We saw different ways of validation in JSF: Default validators, backing bean methods and validation through validator interface.
Let me know your comments about this tutorial.
From http://viralpatel.net/blogs/
Opinions expressed by DZone contributors are their own.
В продолжение моей предыдущей статьи о создании JSF-приложения JavaServer Faces в Eclipse я публикую следующую статью из этой серии. На этот раз мы расскажем подробнее о модели проверки JSF и обработке ошибок в JSF.
Технология JavaServer Faces поддерживает механизм проверки данных редактируемых компонентов. Каждый компонент в JavaServer Faces создает сообщения об ошибках в течение жизненного цикла JSF и присоединяет их к объекту FacesContext. Следовательно, каждое сообщение присоединяется к компоненту в дереве компонентов, и сообщение отображается в представлении в конце жизненного цикла JSF.
Отображение сообщений об ошибках при просмотре
JSF предоставляет различные теги для обработки и отображения сообщений в представлении. В эталонной реализации Sun библиотеки JSF HTML есть два тега сообщения:
<h:message /> <h:messages />
h: messages используется для отображения всех сообщений одновременно. Вы можете разместить тег h: messages в начале вашей формы. Вам может потребоваться отображать только глобальные сообщения, используя тег h: messages. Для отображения только глобальных сообщений установите для атрибута globleOnly значения h: messages значение true.
<h:messages globalOnly="true" />
Используйте h: message для отображения сообщения, прикрепленного к одному компоненту. Атрибут at = «» может использоваться для указания идентификатора компонента, чьи сообщения об ошибках нам нужно отобразить. H: сообщение используется для отображения сообщения об ошибке рядом с компонентом, который сгенерировал ошибку. Если к сообщению прикреплено более одного сообщения этот компонент, h: message будет отображать последнее сообщение.
Каждое сообщение может иметь краткое описание и подробное описание. При использовании тега h: message по умолчанию показывается подробное сообщение. При использовании тега h: messages по умолчанию отображаются сводные описания. Чтобы изменить значения по умолчанию, измените логические атрибуты showSummary и showDetail .
<h:message for="userName" showSummary="true"/> <h:messages showDetail="true"/>
Вы также можете включить отображение подробного сообщения компонента в виде всплывающей подсказки. Для этого установите для атрибута подсказки тега сообщения значение true. Обратите внимание, что для включения этой опции для showDetail и showSummary должно быть установлено значение true.
Существует четыре формы проверки JSF:
1. Встроенные компоненты проверки
2. Проверка уровня приложения
3. Пользовательские компоненты проверки с использованием интерфейса Validator
4. Методы проверки в компонентах поддержки
Встроенные компоненты проверки
Эталонная реализация Sun JSF предоставляет некоторые компоненты проверки по умолчанию, которые можно использовать для проверки любого пользовательского ввода. Базовая библиотека JSF предоставляет теги для проверки ввода. Ниже приведены несколько тегов, которые можно использовать для проверки ввода.
f: validateDoubleRange : этот тег проверяет значение компонента в указанном диапазоне. Значение должно быть преобразовано в тип с плавающей точкой или саму плавающую точку.
f: validateLength : этот тег проверяет длину значения и ограничивает его в пределах указанного диапазона. Значение должно иметь тип java.lang.String.
f: validateLongRange : Проверяет, находится ли значение компонента в указанном диапазоне. Значение должно иметь числовой тип или строку, конвертируемую в long.
Пример:
<h:inputText id="Username" value="#{UserBean.userName}">
<f:validateLength minimum="6" maximum="15"/>
</h:inputText>
....
<h:inputText id="Age" value="#{UserBean.age}">
<f:validateLongRange minimum="1" maximum="120"/>
</h:inputText>
Проверка с использованием методов Backing Bean
Метод базового компонента может использоваться для проверки любого поля ввода. Сначала нам нужно создать метод вспомогательного компонента, который будет вызываться в процессе проверки. Подпись метода может быть:
public void <METHOD_NAME> (FacesContext context, UIComponent component, Object value) { .. }
Как только метод вспомогательного компонента будет готов, мы можем связать его с компонентом, используя тег f: validator .
<h:inputText value="#{userBean.name}" validator="#{userBean.checkUsername}">
</h:inputText>
В приведенном выше фрагменте мы связали метод userBean checkUsername () с компонентом inputText. Можно связать более одного валидатора с одним компонентом.
Метод проверки базового компонента прост в реализации, но этот метод специфичен для одного приложения и не может быть повторно использован для другого приложения. Для создания универсальных валидаторов, которые можно использовать в разных приложениях, можно использовать интерфейс Validator.
Пользовательские компоненты проверки с использованием интерфейса Validator
Интерфейс Validator может быть расширен, и может быть создан специальный валидатор, который можно повторно использовать в различных приложениях в JSF. Чтобы создать собственный валидатор, нам нужно создать класс Java, который реализует интерфейс javax.faces.validator.Validator . Интерфейс Validator предоставляет метод validate (), который необходимо реализовать. Ниже приведена подпись метода validate ().
После того, как Валидатор реализован, нам нужно зарегистрировать этот валидатор в файлеface-config.xml. Для этого скопируйте следующий код вface-config.xml, предполагая, что наше имя класса валидатора — net.viralpatel.jsf.helloworld.EmailValidator.
<validator> <validator-id>emailValidator</validator-id> <validator-class>net.viralpatel.jsf.helloworld.EmailValidator</validator-class> </validator>
Мы можем связать этот валидатор с любым компонентом, используя тег f: validator.
<h:inputText id="Email" value="#{userBean.email}" required="true">
<f:validator validatorId="emailValidator" />
</h:inputText>
Обратите внимание, что в приведенном выше фрагменте кода атрибут validatorId тега f: validator указывает на идентификатор валидатора, который зарегистрирован в файлеface-config.xml.
Для проверки адреса электронной почты мы можем создать класс Validator как:
Таким образом, используя платформу JSF Validation, можно легко проверить вводимые пользователем данные. Мы видели разные способы проверки в JSF: валидаторы по умолчанию, методы поддержки bean-компонентов и валидация через интерфейс валидатора.
Дайте мне знать ваши комментарии об этом уроке.
С http://viralpatel.net/blogs/
Handling Exceptions
The standard Servlet mechanism for handling exceptions that occur on the server is to specify an error-page entry in the deployment descriptor (web.xml file) and allow the container to redirect to the configured resource. For example:
<error-page>
    <exception-type>javax.faces.application.ViewExpiredException</exception-type>
    <location>/faces/viewExpired.xhtml</location>
</error-page>
This mechanism works fine as long as the exception makes it up to the servlet container. If the exception is handled in some other way and doesn’t bubble up to the container, it renders the error-page strategy ineffective.
With JSF 2 and ICEfaces, you can decide how you want to handle exceptions both on the server and the client.
Server-side — ExceptionHandlers
With JSF 2, there is now a facility for hooking into the lifecycle and customizing how exceptions are handled. This is done using an ExceptionHandlerFactory and one or more custom ExceptionHandlers. By default, Mojarra provides implementations of both a standard ExceptionHandler for normal requests as well as an Ajax implementation for Ajax requests
Exceptions for non-Ajax requests can be handled using the error-page facility. If no error page is specified then a default page is created JSF and sent back to the client.
Exceptions for Ajax requests are contained within Ajax responses and do not trickle up to the container so the error-page strategy is not used.
If you’d like to change this behavior in some way, you can write your own ExceptionHandler and deal with the exceptions on the server as you see fit. It’s relatively simple to do. ICEfaces currently uses the technique described here to emit SessionExpired exceptions instead of ViewExpiredExceptions when appropriate.
1) Create one or more implementations of ExceptionHandlers
ExceptionHandlers are request-scoped resources — that is, there is a new one for each request. Exceptions that occur during a JSF lifecycle are generally queued to be handled by one or more of the ExceptionHandlers. Normally, you’d create an ExceptionHandler that extends ExceptionHandlerWrapper. The interesting work of finding the exceptions you’re interested in and then processing those might look like this:
public class MyExceptionHandler extends ExceptionHandlerWrapper {

    private ExceptionHandler wrapped;

    public MyExceptionHandler(ExceptionHandler wrapped) {
        this.wrapped = wrapped;
    }

    public javax.faces.context.ExceptionHandler getWrapped() {
        return wrapped;
    }

    public void handle() throws FacesException {
        Iterator events = getUnhandledExceptionQueuedEvents().iterator();

                while (events.hasNext()) {
            ExceptionQueuedEvent event = (ExceptionQueuedEvent) events.next();
            ExceptionQueuedEventContext context = (ExceptionQueuedEventContext) event.getSource();
            Throwable t = context.getException();

                        if (t instanceof MyCustomException) {
                try {
                                    } finally {
                                        events.remove();
                }
            }

                        getWrapped().handle();
        }
    }
}
2) Create an implementation of ExceptionHandlerFactory
ExceptionHandlers are created by ExceptionHandlerFactories. The basic mechanism is to create an ExceptionHandlerFactory that links into the chain of existing ExceptionHandlerFactories. Your factory is used to create the appropriate ExceptionHandler for the request. Because it’s a wrapper, we can chain them together by passing in the delegate when we create the instance. For example:
public class MyExceptionHandlerFactory extends ExceptionHandlerFactory {

    ExceptionHandlerFactory delegateFactory;

    public MyExceptionHandlerFactory(ExceptionHandlerFactory delegateFactory) {
        this.delegateFactory = delegateFactory;
    }

    public ExceptionHandler getExceptionHandler() {
        return new MyExceptionHandler(delegateFactory.getExceptionHandler());
    }
}
3) Then you need to register your factory with JSF. You can add an entry into the faces-config.xml of the .war that includes your custom ExceptionHandler(s):
<factory>
    <exception-handler-factory>
        org.company.faces.context.MyExceptionHandlerFactory
    </exception-handler-factory>
</factory>
4) Then, in your application, exceptions of interest can be done like this:
FacesContext fc = FacesContext.getCurrentInstance();
ExceptionQueuedEventContext ctxt =
        new ExceptionQueuedEventContext(fc, new MyCustomException("my bad") );
Application app = fc.getApplication();
app.publishEvent(fc, ExceptionQueuedEvent.class, ctxt);
Client-side — JavaScript Callbacks
When an exception does occur during an Ajax request, JSF will process those exceptions and send them back as Ajax responses. With stock JSF, you can register a callback and handle these errors as you see fit. This is done using the JavaScript API provided by JSF:
//Assign your error handling function to a variable
var jsfErrorCallback = function handleError(error) {
    //Handle all errors by simply redirecting to an error page
    window.location.href = "./generalError.xhtml";
}

//Register your error handler as a callback
jsf.ajax.addOnError(jsfErrorCallback);
ICEfaces uses this same technique. By default, when ICEfaces is active on the page and an error comes back as an Ajax response, a small popup is displayed with a short description of the error. For example, if a session times out and you attempt to interact with the page it will cause a ViewExpiredException when JSF attempts to restore the view:

If you would like to do something else with these errors, you can use much the same technique as described above:
//Assign your error handling function to a variable
var iceErrorCallback = function iceHandleError(statusCode, responseTxt, responseDOM) {
    //Handle all errors by simply redirecting to an error page
    window.location.href = "./generalError.xhtml";
}

//Safely check if ICEfaces is available
if (ice) {
    //Turn off the popups as we plan to handle this ourselves
    ice.configuration.disableDefaultIndicators = true;

    //Register your error handler as a callback
    ice.onServerError(iceErrorCallback);
}
When any of the default popups comes up there is also a transparent overlay rendered underneath. This overlay has a CSS class assigned so that it can be styled in concordance with the rest of the application. By default the CSS styles are as follows:
.ice-status-indicator-overlay {
    position: absolute;
    background-color: white;
    z-index: 28000;
    opacity: 0.22;
    filter: alpha(opacity = 22);
}
Providing a stylesheet with new definitions for ice-status-indicator-overlay CSS class should be enough to override the default styling.
Everyone who codes Java EE web applications needs to pay attention to exception handling. When a program encounters an error, developers can display friendly messages for end users, which increases their trust in the application. Also, by adding adequate exception handling, you can troubleshoot and debug application defects. Since version 2.0 the JavaServer Faces framework has supported an exception handling mechanism to provide a centralized place for handling exceptions in JSF applications. Here’s how you can utilize it to write professional applications.
A good example to illustrate everything that goes into proper exception handling is the guessNumber application, in which the application generates a random number within a specific range, and the user is asked to enter a number in this range. After the user enters a valid number, the application can provide three possible responses:
- If the entered number is equal to the generated number, the application congratulates the user and asks if he wants to try again.
- If the entered number is less than the generated number, the application asks the user to enter a number greater than the entered number.
- If the entered number is greater than the generated number, the application asks the user to enter a number less than the entered number.
To code the guessNumber application, we can use three pages:
- input.xhtml, in which the user enters a number.
- congratulations.xhtml, which displays the congratulations message if the user succeeds in guessing the correct number.
- error.xhtml, which is displayed if the application has an internal error.
The following code snippet shows the input.xhtml page:
<?xml version='1.0' encoding='UTF-8' ?>
<!DOCTYPE html>
<html xmlns="http://www.w3.org/1999/xhtml"
      xmlns:h="http://java.sun.com/jsf/html"
      xmlns:f="http://java.sun.com/jsf/core">

<h:head>
  <title>#{bundle['guessNumber.input_page.title']}</title>
</h:head>

<h:body>
    <h:form>
        <h:panelGrid columns="3">
            <h:outputText value="#{bundle['guessNumber.input_number']}"></h:outputText>
            <h:inputText id="inputNumber"
                         value="#{randomNumber.number}"
                         required="true">
                <f:validateLongRange minimum="0" maximum="10"/>
            </h:inputText>
            <h:message for="inputNumber"/>
        </h:panelGrid>

        <h:commandButton value="#{bundle['guessNumber.guess_now']}"
                         action="#{randomNumber.guessNumber}"/>

        <h:messages />
    </h:form>
</h:body>
</html>
Here a form contains an input text ("inputNumber") in which the user enters a number, and a command button ("Guess Now") that the user clicks in order to send the guess. The input text is required and is validated to be in the range from 0 to 10. When the command button is clicked, #{randomNumber.guessNumber} (the guessNumber action method of the RandomNumber managed bean) is executed. The code below shows the RandomNumber managed bean.
package com.wazi.guessnumber.model;

import java.io.Serializable;
import java.util.ResourceBundle;
import javax.annotation.PostConstruct;
import javax.faces.application.FacesMessage;
import javax.faces.bean.ManagedBean;
import javax.faces.bean.SessionScoped;
import javax.faces.context.FacesContext;
import javax.servlet.http.HttpSession;

@ManagedBean
@SessionScoped
public class RandomNumber implements Serializable {
    private Integer number;
    private Integer generatedNumber;

    public String guessNumber() {

        if (generatedNumber == number) {
            return "congratulations?faces-redirect=true";
        }

        FacesContext context = FacesContext.getCurrentInstance();
        ResourceBundle bundle = ResourceBundle.getBundle(
                                "com.wazi.guessnumber.messages",
                                context.getViewRoot().getLocale());

        String tip = "";

        if (generatedNumber > number) {
            tip = bundle.getString("guessNumber.use_bigger_number");
        } else {
            tip = bundle.getString("guessNumber.use_smaller_number");
        }

        context.addMessage(null, new FacesMessage(tip));

        return null;
    }

    public String reset() {
        FacesContext context = FacesContext.getCurrentInstance();
        HttpSession session = (HttpSession) context.getExternalContext().getSession(false);

        session.invalidate();

        return "input?faces-redirect=true";
    }

    public Integer getNumber() {
        return number;
    }

    public void setNumber(Integer number) {
        this.number = number;
    }

    @PostConstruct
    public void initialize() {
        generatedNumber = (int) (Math.random() * 10);

        System.out.println ("Initializing random generated number: " +
                            generatedNumber);
    }
}
The RandomNumber class is marked as a managed bean using the JSF @ManagedBean annotation and is set in the session scope using the @SessionScoped annotation. Using the @PostConstruct annotation, the initialize() method of the RandomNumber managed bean is called after the managed bean class is instantiated in order to initialize the managed bean. In the initialize() method, the generatedNumber property is set to a random number from 0 to 10.
In the guessNumber() action method, if the user-entered a number is equal to the generatedNumber property, the user is redirected to the congratulations.xhtml page. If the entered number is less than or greater than the generatedNumber property, the user is advised to enter a number that is less than or greater than the entered number.
You can add messages to be displayed by the <h:messages> tag from the JSF action methods using the FacesContext.getCurrentInstance().addMessage() API, specifying two parameters. The first parameter represents the client ID with which this message is associated (if no client ID is available you can set this parameter to null) and the second represents the FacesMessage object.
In the reset() action method, the user session is invalidated and the user is redirected to the input.xhtml page. This method is called in the congratulations.xhtml page when the user clicks on the ("Try again") command button. The following code shows the congratulations.xhtml page:
<?xml version='1.0' encoding='UTF-8' ?>
<!DOCTYPE html>
<html xmlns="http://www.w3.org/1999/xhtml"
      xmlns:h="http://java.sun.com/jsf/html"
      xmlns:f="http://java.sun.com/jsf/core">

<h:head>
  <link href="#{request.contextPath}/css/styles.css" rel="stylesheet" type="text/css"/>
  <title>#{bundle['guessNumber.cong_page.title']}</title>
</h:head>

<h:body>
    <h:form>
        <h:outputFormat value="#{bundle['guessNumber.correct_input']}"
                        class="highlighted infoMessage">

            <f:param value="#{randomNumber.number}"/>
        </h:outputFormat>
        <br/><br/>
        <h:commandButton value="#{bundle['guessNumber.try_again']}"
                         action="#{randomNumber.reset}"/>
    </h:form>
</h:body>
</html>
In the congratulations.xhtml page, the congratulations message is displayed and the user has the option to try again by clicking on the ("Try Again") button, which calls the reset method of the RandomNumber managed bean.
Applying the JSF exception-handling mechanism
Now we can apply the centralized JSF exception-handling mechanism on the guessNumber application. After we do so, the application will be able to handle different exceptions in a centralized place and display the exception information in an error page. In order to create a custom exception handler in JSF applications we need to do three things:
- Create a custom exception handler class that handles the application exceptions. This handler class should extend an exception handling wrapper class (such as the
ExceptionHandlerWrapperclass). - Create a custom exception handler factory class that is responsible for creating the instances of the exception handler class. The custom exception handler class should extend the JSF
ExceptionHandlerFactoryclass. - Finally, register the custom exception handler factory class in the faces-config.xml file.
The following code shows the CustomExceptionHandler class, which extends the ExceptionHandlerWrapper class:
package com.wazi.guessnumber.exceptions;

import java.util.Iterator;
import javax.faces.FacesException;
import javax.faces.application.NavigationHandler;
import javax.faces.context.ExceptionHandler;
import javax.faces.context.ExceptionHandlerWrapper;
import javax.faces.context.FacesContext;
import javax.faces.context.Flash;
import javax.faces.event.ExceptionQueuedEvent;
import javax.faces.event.ExceptionQueuedEventContext;

public class CustomExceptionHandler extends ExceptionHandlerWrapper {
  private ExceptionHandler wrapped;


  public CustomExceptionHandler(ExceptionHandler wrapped) {
    this.wrapped = wrapped;
  }

  @Override
  public ExceptionHandler getWrapped() {
    return wrapped;
  }

  @Override
  public void handle() throws FacesException {
    Iterator iterator = getUnhandledExceptionQueuedEvents().iterator();

    while (iterator.hasNext()) {
      ExceptionQueuedEvent event = (ExceptionQueuedEvent) iterator.next();
      ExceptionQueuedEventContext context = (ExceptionQueuedEventContext)event.getSource();

      Throwable throwable = context.getException();

      FacesContext fc = FacesContext.getCurrentInstance();

      try {
          Flash flash = fc.getExternalContext().getFlash();

          // Put the exception in the flash scope to be displayed in the error
          // page if necessary ...
          flash.put("errorDetails", throwable.getMessage());

          System.out.println("the error is put in the flash: " + throwable.getMessage());

          NavigationHandler navigationHandler = fc.getApplication().getNavigationHandler();

          navigationHandler.handleNavigation(fc, null, "error?faces-redirect=true");

          fc.renderResponse();
      } finally {
          iterator.remove();
      }
    }

    // Let the parent handle the rest
    getWrapped().handle();
  }
}
The most important method of the CustomExceptionHandler class is the handle() method, which is responsible for handling JSF application exceptions. The getUnhandledExceptionQueuedEvents() method gets all the unhandled exceptions in the JSF application. Every item in the returned Iterable object of this method represents an ExceptionQueuedEvent object. From the ExceptionQueuedEvent object you can get the ExceptionQueuedEventContext object, from which you can retrieve the Throwable object. Using the Throwable object, you can verify the exceptions you want to handle in the applications.
In our custom exception handler, we get the exception message from throwable.getMessage(). It is set to be used in the error.xhtml page in an "errorDetails" attribute that is defined in the flash scope. The flash scope, which was introduced in JSF 2.0, makes objects available only for the next request of the same browser window, which makes it useful if you want to keep information for a short time for the next request only, whether the next request will result from an HTTP redirect or a JSF form postback or simply an HTTP GET for a new page.
The NavigationHandler redirects the response to the application error page (error.xhtml), and the ExceptionQueuedEvent is removed from the Iterable object. The following code shows the error.xhtml page:
<?xml version='1.0' encoding='UTF-8' ?>
<!DOCTYPE html>
<html xmlns="http://www.w3.org/1999/xhtml"
      xmlns:h="http://java.sun.com/jsf/html">

<h:head>
  <link href="#{request.contextPath}/css/styles.css" rel="stylesheet" type="text/css"/>
  <title>#{bundle['guessNumber.error_page.title']}</title>
</h:head>

<h:body>
    <div class="highlighted errorMessage">
        <h:outputText escape="false"
                      value="#{bundle['guessNumber.error_page.content']}"/>
    </div>
    <br/><br/>
    <div class="errorDetails">
        Error details: <br/>
        #{flash.keep.errorDetails}
    </div>
</h:body>
</html>
It mainly displays the error details message (which was set from the exception handler class) using #{flash.keep.errorDetails}.
Next, we need to create CustomExceptionHandlerFactory, the custom exception handler factory class that is responsible for creating the instances of the CustomExceptionHandler class:
{scrollbar}
Error handling for MyFaces Core 2.0 and later versions
Since JSF 2.0, it is possible to provide a custom javax.faces.context.ExceptionHandler or javax.faces.context.ExceptionHandlerWrapper implementation to deal with exceptions. To do that, just create your custom class, an factory that wrap/override it and add the following into your faces-config.xml:
faces-config.xml<faces-config xmlns=»http://java.sun.com/xml/ns/javaee»
xmlns:xsi=»http://www.w3.org/2001/XMLSchema-instance»
xsi:schemaLocation=»http://java.sun.com/xml/ns/javaee http://java.sun.com/xml/ns/javaee/web-facesconfig_2_0.xsd»
version=»2.0″>
<!— … —>
<factory>
<!— … —>
<exception-handler-factory>org.apache.myfaces.context.ExceptionHandlerFactoryImpl</exception-handler-factory>
<!— … —>
</factory>
<!— … —>
</faces-config>
This is an example of an ExceptionHandlerFactory, from myfaces code:
ExceptionHandlerFactoryImpl.javapublic class ExceptionHandlerFactoryImpl extends ExceptionHandlerFactory
{
@Override
public ExceptionHandler getExceptionHandler()
{
return new SwitchAjaxExceptionHandlerWrapperImpl(
new MyFacesExceptionHandlerWrapperImpl(new ExceptionHandlerImpl()) ,
new AjaxExceptionHandlerImpl());
}
}
If you need a wrapper:
ExceptionHandlerFactoryImpl.javapublic class ExceptionHandlerFactoryImpl extends ExceptionHandlerFactory
{
@Override
public ExceptionHandler getExceptionHandler()
{
return new CustomExceptionHandlerWrapper(getWrapped().getExceptionHandler());
}
}
The most important method to override is ExceptionHandler.handle().
MyFacesExceptionHandlerWrapperImpl.javapublic class MyFacesExceptionHandlerWrapperImpl extends ExceptionHandlerWrapper
{
//…
public void handle() throws FacesException
{
//… some custom code goes here …
}
}
Take a look at MyFaces Core source code, to know in detail how ExceptionHandler implementations works.
MyFaces ExceptionHandler
MyFaces Core provide a custom ExceptionHandler to deal with exceptions and provide detailed information about it. Since 2.0.8/2.1.2 this is disabled on Production environments unless it enabled on web.xml file. Don’t forget to provide your custom error page in this scenario, to prevent show more information than necessary.
xml <context-param>
<param-name>org.apache.myfaces.ERROR_HANDLING</param-name>
<param-value>true</param-value>
</context-param>
<!— if you want to use a different resource template file than
«META-INF/rsc/myfaces-dev-error.xml» this param let you configure
it. (since 1.2.4-SNAPSHOT and 1.1.6-SNAPSHOT)—>
<context-param>
<param-name>org.apache.myfaces.ERROR_TEMPLATE_RESOURCE</param-name>
<param-value>META-INF/rsc/custom-dev-error.xml</param-value>
</context-param>
Provide an error page
If org.apache.myfaces.ERROR_HANDLING is set to «false», or if it is undefined and the project stage is «Development», the default ExceptionHandler just throws an exception. So you can still setup an error page by adding something like this in your web.xml file:
xml <error-page>
<error-code>500</error-code>
<location>/somepage.jsp</location>
</error-page>
Error handling for MyFaces Core 1.2 and earlier versions
MyFaces, from version 1.2.1 and 1.1.6, includes automatic error-handling for the full JSF-Lifecycle (taken over mostly from Facelets, with a few adoptions and additions). So for most projects during development, you will have exactly what you want with these new error-handling possibilities.
If this is not what you want, though, you can always disable or modify this error-handling with the following parameters:
xml <!— if you want to disable the behaviour completely —>
<context-param>
<param-name>org.apache.myfaces.ERROR_HANDLING</param-name>
<param-value>false</param-value>
</context-param>
<!— if you are using myfaces + facelets don’t forget to do this —>
<context-param>
<param-name>facelets.DEVELOPMENT</param-name>
<param-value>false</param-value>
</context-param>
<!— if you want to use a different resource template file than
«META-INF/rsc/myfaces-dev-error.xml» this param let you configure
it. (since 1.2.4-SNAPSHOT and 1.1.6-SNAPSHOT)—>
<context-param>
<param-name>org.apache.myfaces.ERROR_TEMPLATE_RESOURCE</param-name>
<param-value>META-INF/rsc/custom-dev-error.xml</param-value>
</context-param>
<!— if you want to choose a different class for handling the exception — the error-handler needs to include a method handleException(FacesContext fc, Exception ex)—>
<context-param>
<param-name>org.apache.myfaces.ERROR_HANDLER</param-name>
<param-value>my.project.ErrorHandler</param-value>
</context-param>
If you do this, you can now read on to get to general ways of handling server-errors.
Server errors such as HTTP 500 can occur for a number of reasons such as uncaught exceptions, missing JSFs or backing beans, bad URL and the list goes on. While we hope these only occur during development it is important to plan to catch and deal with these errors gracefully when running live with multiple users.
Several approaches have been discussed on the mailing list:
Use default handler
Myfaces has a default error handler (class javax.faces.webapp._ErrorPageWriter) that uses a jsp template file (META-INF/rsc/myfaces-dev-error.xml and META-INF/rsc/myfaces-dev-debug.xml) to handle errors.
For define a custom template file:
xml <context-param>
<param-name>org.apache.myfaces.ERROR_HANDLING</param-name>
<param-value>true</param-value>
</context-param>
<context-param>
<param-name>org.apache.myfaces.ERROR_TEMPLATE_RESOURCE</param-name>
<param-value>META-INF/rsc/mycustom-template-error.xml</param-value>
</context-param>
Use sandbox org.apache.myfaces.tomahawk.util.ErrorRedirectJSFPageHandler
This handler uses myfaces error handling feature, redirecting to a jsf page when an error occurs.
An example jsf page for redirect can be found at http://issues.apache.org/jira/browse/TOMAHAWK-1297
This class is set as a config-parameter org.apache.myfaces.ERROR_HANDLER
available on myfaces core jsf. (This does not work with RI)
The idea is extends myfaces error handling feature, making possible to redirect
to a jsf page when an error occur, using navigation rules.
If this handler is not able to handle the error, an alternate error handler
could be set in the config-parameter org.apache.myfaces.ERROR_REDIRECT_ALTERNATE_HANDLER
The info of the error in the jsf page can be found using:
#{exceptionContext.cause} : Cause retrieved from the exception
#{exceptionContext.stackTrace} : Stack trace of the exception
#{exceptionContext.exception} : Exception handled by this page
#{exceptionContext.tree} : Print the component tree of the page that cause the error
#{exceptionContext.vars} : Enviroment variables from the request
Using servlets
Mert Caliskan (http://www.jroller.com/page/mert?entry=handling_errors_with_an_errror) describes an approach which wraps the JSF servlet with a new servlet which delegates to the faces servlet but handles uncaught exceptions allowing the developer to redirect to a custom error page.
Andrea Paternesi has refined this technique for MyFaces as described here:
[http://patton-prog-tips.blogspot.com/2008/10/myfaces-handling-viewexpiredexception.html]
With JSF
Another approach is described in the book ‘Core Server Faces’ which uses the servlet engine to catch the error and delegate to a JSF error page. While not as elegant as the first approach this method has several advantages for some users
1 It uses a standard JSP approach and framework<<BR>>
2 It does not require custom servlets<<BR>>
3 It can easily be customized/changed by simply changing the error handler definition in the web.xml<<BR>>
To implement this method perform the following steps
1 define an error handling web page in web.xml
xml <error-page>
<error-code>500</error-code>
<location>/ErrorDisplay.jsf</location>
</error-page>
2 Create the error handler display. Due to a problem with the JSF 1.1 specification, the error handling page cannot use a <f:view> but must use a subview.
xml<!DOCTYPE html PUBLIC «-//W3C//DTD XHTML 1.0 Transitional//EN» «http://www.w3.org/TR/xhtml1/DTD/xhtml1-transitional.dtd»>
<f:subview id=»error»
xmlns:f=»http://java.sun.com/jsf/core»
xmlns:t=»http://myfaces.apache.org/tomahawk»
xmlns:h=»http://java.sun.com/jsf/html»>
<html>
<head>
<meta content=»no-cache» http-equiv=»Cache-Control» />
<meta content=»no-cache» http-equiv=»Pragma» />
<title>CMS — Error</title>
<t:stylesheet path=»#{SessionBean.styleSheet}» />
</head>
<body>
<h:form>
:
: set up the normal view
:
<h:outputText styleClass=»infoMessage» escape=»false» value=»#{ErrorDisplay.infoMessage}» />
<t:htmlTag value=»br» />
<h:inputTextarea style=»width: 99%;» rows=»10″ readonly=»true» value=»#{ErrorDisplay.stackTrace}» />
:
: more view stuff
:
</h:form>
</body>
</html>
</f:subview>
3 Create a backing bean in request scope which can process the error. (don’t forget to register it on faces-config.xml)
ErrorDisplay.javaimport cms.beans.framework.AbstractUIBean;
import com.c2gl.jsf.framework.ApplicationResource;
import java.io.PrintWriter;
import java.io.StringWriter;
import java.util.Map;
import javax.faces.context.FacesContext;
import javax.servlet.ServletException;
public class ErrorDisplay extends AbstractUIBean {
private static final long serialVersionUID = 3123969847287207137L;
private static final String BEAN_NAME = ErrorDisplay.class.getName();
public String getInfoMessage() {
return «An unexpected processing error has occurred. Please cut and paste the following information» + » into an email and send it to <b>» +
some email address + «</b>. If this error » + «continues to occur please contact our technical support staff at <b>» +
some phone number etc + «</b>.»;
}
public String getStackTrace() {
FacesContext context = FacesContext.getCurrentInstance();
Map requestMap = context.getExternalContext().getRequestMap();
Throwable ex = (Throwable) requestMap.get(«javax.servlet.error.exception»);
StringWriter writer = new StringWriter();
PrintWriter pw = new PrintWriter(writer);
fillStackTrace(ex, pw);
return writer.toString();
}
private void fillStackTrace(Throwable ex, PrintWriter pw) {
if (null == ex) {
return;
}
ex.printStackTrace(pw);
if (ex instanceof ServletException) {
Throwable cause = ((ServletException) ex).getRootCause();
if (null != cause) {
pw.println(«Root Cause:»);
fillStackTrace(cause, pw);
}
} else {
Throwable cause = ex.getCause();
if (null != cause) {
pw.println(«Cause:»);
fillStackTrace(cause, pw);
}
}
}
}
Also have a look at our ExceptionUtils class. It encapsulates the way how to get the real root cause
java [1] List exceptions = ExceptionUtils.getExceptions(exception);
[2] Throwable throwable = (Throwable) exceptions.get(exceptions.size()-1);
[3] String exceptionMessage = ExceptionUtils.getExceptionMessage(exceptions);
1 get a list of all exceptions — using getRootCause if available or getCause<<BR>>
2 get the initial exception<<BR>>
3 get the first exception with an message starting with the initial exception
So the new fillStackTrace become
java private void fillStackTrace(Throwable ex, PrintWriter pw)
{
if (null == ex) {
return;
}
List exceptions = ExceptionUtils.getExceptions(exception);
Throwable throwable = (Throwable) exceptions.get(exceptions.size()-1);
for (int i = 0; i<exceptions.size(); i++)
{
if (i > 0)
{
pw.println(«Cause:»);
}
throwable.printStackTrace(pw);
}
}
In the backing bean we construct a message which informs the user that something we didnt’t plan for has happened with directions on who to call, what to do etc. We don’t really care if they actually do cut-and-paste the error and email it to us as it is also in Tomcat’s logs but giving the user something to do and become part of resolving the problem is always a good idea ![]()
ViewExpiredException: No saved view state could be found for the view identifier
In some configurations, you might run into this problem exception with the error handling method shown above. This will happen if an error results in a forward, rather than redirect. The »ViewHandler» will call »response.sendError()» in case of an error, which will lookup your »<error-page>» declarations in »web.xml» and forward to the error url. If the error url is picked up by the »FacesServlet» (i.e. it’s a JSF url), a new JSF lifecycle will be started. However, since this is a forward, the request object will still contain all of the request parameters, including »»javax.faces.ViewState»», which makes the request look like a postback to the »ViewHandler». Since it’s a postback, the »ViewHandler» will expect a saved view, which is clearly not going to be there, since our »viewId» is now referencing the error page.
This problem can be solved by customizing the »ViewHandler» to use »response.sendRedirect()» instead of »response.sendError()», but that will mean that we can no longer use »web.xml» for specifying the error page mappings.
Another way to handle this would be to use an intermediate step by specifying a non-JSF URL as the error page and then somehow redirecting to the JSF error page. For example, for the 404 error code you could specify »/error/404_redirect.html»:
xml<html><head><meta http-equiv=»Refresh» content=»0; URL=/DPSV4/error/404.jsf»></head></html>
This works, but requires you to hard code the context path.
The solution I ended up with involves a »RedirectServlet»:
RedirectServlet.javapublic class RedirectServlet extends HttpServlet {
private static final String URL_PREFIX = «url=»;
@Override
protected void doGet(HttpServletRequest req, HttpServletResponse resp) throws ServletException, IOException {
String query = req.getQueryString();
if ( query.contains(URL_PREFIX) ) {
String url = query.replace(URL_PREFIX, «»);
if ( !url.startsWith(req.getContextPath()) ) {
url = req.getContextPath() + url;
}
resp.sendRedirect(url);
}
}
@Override
protected void doPost(HttpServletRequest req, HttpServletResponse resp) throws ServletException, IOException {
doGet(req, resp);
}
}
used like this in »web.xml»:
xml <servlet>
<servlet-name>Redirect Servlet</servlet-name>
<servlet-class>ca.gc.agr.ops.web.jsf.redirect.RedirectServlet</servlet-class>
</servlet>
<servlet-mapping>
<servlet-name>Redirect Servlet</servlet-name>
<url-pattern>/redirect</url-pattern>
</servlet-mapping>
<error-page>
<error-code>403</error-code>
<location>/redirect?url=/error/403.jsf</location>
</error-page>
<error-page>
<error-code>404</error-code>
<location>/redirect?url=/error/404.jsf</location>
</error-page>
<error-page>
<error-code>500</error-code>
<location>/redirect?url=/error/500.jsf</location>
</error-page>
With plain JSP
If you didn’t require any JSF functionality in your JSP page it might be worth to consider using the following error.jsp
[http://svn.apache.org/viewvc/myfaces/tomahawk/trunk/examples/simple/src/main/webapp/error.jsp?view=markup]
with this web.xml configuration
xml <error-page>
<error-code>500</error-code>
<location>/error.jsp</location>
</error-page>
This reduces the number of technologies required to show the error page which might improve the availablity of this page ![]()
Custom error handler under Apache Geronimo JavaEE server
If you would use your own error handler (org.apache.myfaces.ERROR_REDIRECT_ALTERNATE_HANDLER) under Apache Geronimo, you must set properly your deployment plan (geronimo-web.xml usualy), otherwise you will have classloading problem of your class. By default the MyFaces classes are loaded to your classpath through dependencies at org.apache.geronimo.framework.jee-specs/CAR. This is OK for common cases, but if you instruct MyFaces to use your own error handler class, you get the error because MyFaces cannot find your class in calling class.forName(). Avoid this situation is quite simple — in your deployment plan specify dependencies on myfaces-api and myfaces-impl and then modify classloading via hidden-classes setting.
A fragment of your dependency plan would be like this:
xml<dep:dependencies>
.
.
<dep:dependency>
<dep:groupId>org.apache.myfaces.core</dep:groupId>
<dep:artifactId>myfaces-api</dep:artifactId>
<dep:type>jar</dep:type>
</dep:dependency>
<dep:dependency>
<dep:groupId>org.apache.myfaces.core</dep:groupId>
<dep:artifactId>myfaces-impl</dep:artifactId>
<dep:type>jar</dep:type>
</dep:dependency>
.
.
</dep:dependencies>
<dep:hidden-classes>
<dep:filter>javax.faces</dep:filter>
<dep:filter>org.apache.myfaces</dep:filter>
</dep:hidden-classes>
This solution was tested under Apache Geronimo 2.1.3., but will probably be similar in other versions.{scrollbar}