Updated January 2023: Stop getting error messages and slow down your system with our optimization tool. Get it now at this link
- Download and install the repair tool here.
- Let it scan your computer.
- The tool will then repair your computer.
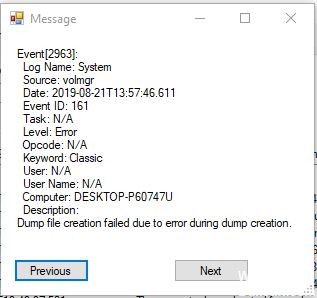
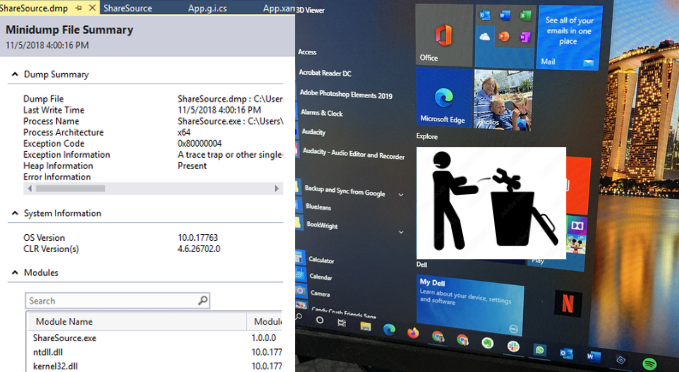
The Blue Screen of Death or BSOD usually comes for a fraction of a second, creates a few logs or dump files, as many people call it, and then suddenly restarts the computer. This process is so fast that the user often does not have the chance to read the error code correctly and probably does not have the chance to check what went wrong. Users will receive error messages such as’Dump file creation failed due to an error during dump creation’. These crash dump files are stored internally on the computer and are only accessible by an administrator.
If you encounter an error in the dump file, there are several ways to solve the problem. Read the methods below to solve your problem with the dump file.
Run Check Disk Scan
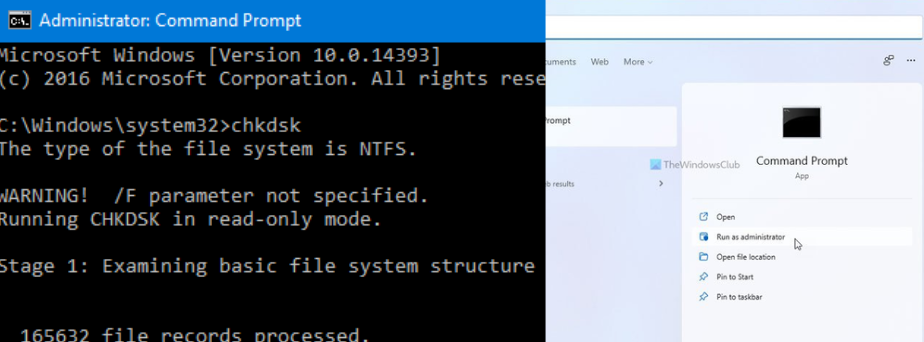
The chkdsk searches your entire hard drive to find and solve problems. It can really help to avoid major problems and long-term data loss.
- Press the Windows + R buttons to open the Run dialog box.
- Type cmd, then press Enter.
- Type the letter of the drive you want to check, followed by a colon like d:, then press Enter.
- Go to the root directory of the drive by typing cd and pressing Enter.
- Enter the following text and press Enter: chkdsk /(Enter the file system you want to check).
If you want to automatically correct file system errors, use the /f option (e. g. chkdsk /f).
If you want to correct file system errors and search for and recover the wrong sectors, use the /r option (e. g. chkdsk /r). - At the command prompt, type exit, then press Enter.
- Check if the problem is solved.
January 2023 Update:
You can now prevent PC problems by using this tool, such as protecting you against file loss and malware. Additionally it is a great way to optimize your computer for maximum performance.
The program fixes common errors that might occur on Windows systems with ease — no need for hours of troubleshooting when you have the perfect solution at your fingertips:
- Step 1 : Download PC Repair & Optimizer Tool (Windows 10, 8, 7, XP, Vista – Microsoft Gold Certified).
- Step 2 : Click “Start Scan” to find Windows registry issues that could be causing PC problems.
- Step 3 : Click “Repair All” to fix all issues.

Uninstallation of Optimizing applications
- Press Windows + R to open a Run dialog box. Then type “appwiz.cpl” and press Enter to open the Programs and Features window.
- Once in the Programs and Features window, scroll down the list of installed applications and search for the third-party application that processes temporary files.
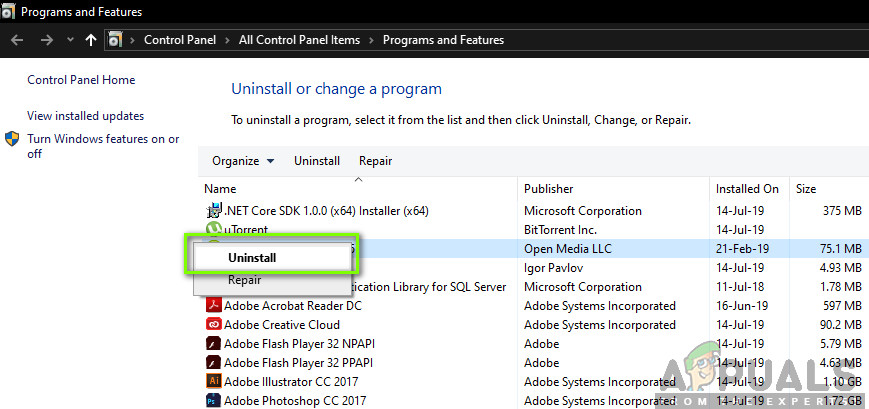
- Right-click it and select Uninstall from the new context menu that appears.
- Follow the on-screen instructions to uninstall the program
- Restart your computer and check if the problem is solved the next time you start your computer.
Run sfc/scannow

- Boot into your system
- Press the Windows key to open the Start menu.
- Type the command prompt or cmd in the search box.
- Select Run as administrator
- Enter the password
- When the prompt loads, type the sfc command and press Enter: sfc /scannow
Perform DISM
- Open Start.
- Locate the command prompt, right-click on the top result and select Run as administrator.
- Type the following command to perform a quick health check and press Enter :
DISM /Online /Cleanup-Image /CheckHealth - Enter the following command to perform an advanced DISM analysis and press Enter :
DISM /Online /Cleanup-Image /ScanHealth - Once you have completed the steps, the command is executed and checks if there are any data corruption problems that need to be fixed.
https://www.dell.com/community/Inspiron-Desktops/Recurring-BSOD-Dump-File-creation-failure/td-p/7341174
Expert Tip: This repair tool scans the repositories and replaces corrupt or missing files if none of these methods have worked. It works well in most cases where the problem is due to system corruption. This tool will also optimize your system to maximize performance. It can be downloaded by Clicking Here

CCNA, Web Developer, PC Troubleshooter
I am a computer enthusiast and a practicing IT Professional. I have years of experience behind me in computer programming, hardware troubleshooting and repair. I specialise in Web Development and Database Design. I also have a CCNA certification for Network Design and Troubleshooting.
Post Views: 267
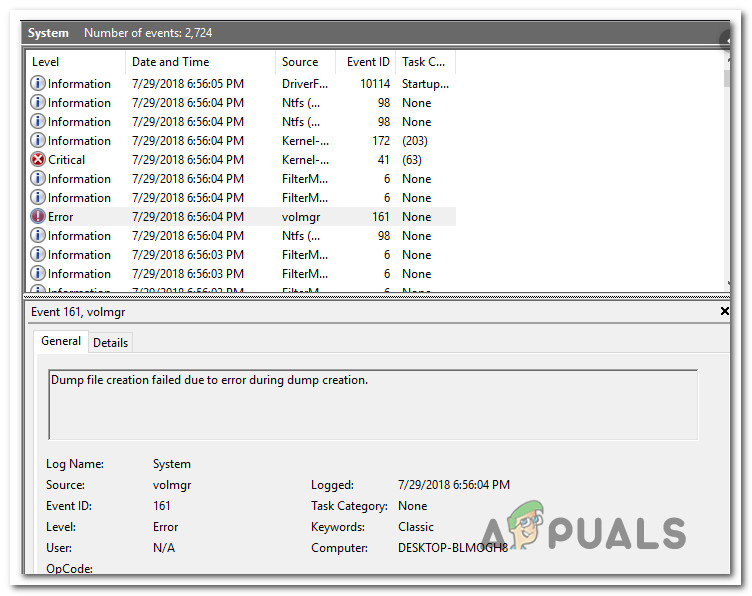
Some Windows 10 users encountered the error message «Dump file creation failed due to error during dump creation.» when checking the Event Viewer. Why do users get this error message? How to fix this problem? Read the post from MiniTool Partition Wizard and you will get the answers.
Whenever users experience a blue screen of death on their computer, they are advised to check the dump file that is usually created, which highlights what triggered the problem. However, when checking the event viewer, the user found that the dump file was not created in the first place, and the «Dump file creation failed due to an error during dump creation» error was displayed.
What Causes the Dump File Creation Failed Due to Error During Dump Creation Error?
What causes this problem? Here we have listed the reasons why the «dump file creation failed due to error during dump creation» error is generated.
- Third-Party cleanup apps: If you have a third-party app installed on your computer that is responsible for performing cleanups from time to time, this file may be erasing your dump file storage, so you’re getting «Due to an error during dump creation. , the dump file creation failed.
- Corrupted system files: Corrupted system files can also cause this specific error message. The corruption may have reached some dump dependencies so that the files can no longer be created correctly.
- Disk issues: The storage drive you are using can also become corrupted and prevent the operating system from creating dump files in the event of a BSOD.
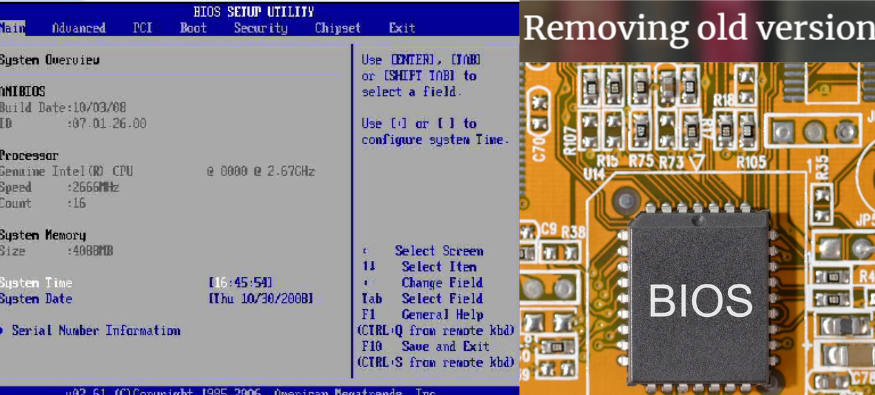
- Outdated BIOS: If your motherboard’s BIOS hasn’t been updated in a while, you may encounter this issue.
- RAM issues: Dump files are also sometimes written to RAM, which can eventually trigger related errors if RAM is not configured correctly.
Now that we know all the potential causes of the «dump file creation failed due to error during dump creation» error, please try the following solutions.
How to Fix the Dump File Creation Failed Due to Error During Dump Creation Error?
Here we summarize the following 9 methods to fix the «dump file creation failed due to error during dump creation» error. You can try them in order until the error gets solved.
Method 1: Uninstall the Cleanup App
You may encounter this error if you use a third-party application to perform cleanup functions on your computer, as the application prevents the creation of a dump file in the event of a system crash. So, if you have a third-party cleaner on your PC (CCleaner, Disk Cleanup), uninstalling it might solve the problem. Here’s how to fix it:
Step 1: Press the Win + R key to open the Run dialog box. Then type appwiz.cpl in the box and press Enter to open the Programs and Features window.
Step 2: Find the cleanup application in the list, and then right-click on it and select the Uninstall option.
Step 3: Follow the on-screen prompts to uninstall the program.
Finally, restart your computer and see if the «dump file creation failed due to error during dump creation» error issue is resolved.
Method 2: Perform DISM and SFC Scan
It turns out that this problem can also occur due to some system file corruption issues. Some affected users have managed to resolve the issue by fixing every logic or corruption bug that could cause problems with dump file creation. No matter which version of Windows you’re having, you can use two utilities, DISM and SFC, to minimize system file corruption.
While DISM uses WU to download healthy copies to replace broken copies, SFC uses locally cached archives for the same purpose. To maximize your chances of fixing file corruption issues, we recommend that you run both utilities at the same time.
To do so, here is the guide.
Step 1: Press the Win + R keys to open the Run dialog box. Then type cmd in the box and press Ctrl + Shift + Enter to open Command Prompt. When prompted by the UAC (User Account Control), click Yes to grant administrator privileges.
Step 2: In the elevated Command Prompt window, type the following command and press Enter to initiate the SFC scan: sfc /scannow.

Once you start this process, do not close the CMD prompt or restart/shutdown the computer under any circumstances. Because doing so exposes your system to further file corruption.
Once the scanning process is complete, restart your computer.
Step 3: Open the Command Prompts as administrator by following step 1.
Step 4: Then type DISM.exe /Online /Cleanup-image /Restorehealth. Then press Enter.

Step 2: After the scanning process is complete, restart your computer to check if the error has been solved.
Now close Command Prompt and check if the problem is resolved. If you still see the «Dump file creation failed due to error during dump creation» error in Event Viewer, move to the next method below.
Method 3: Check the Storage Device for Errors
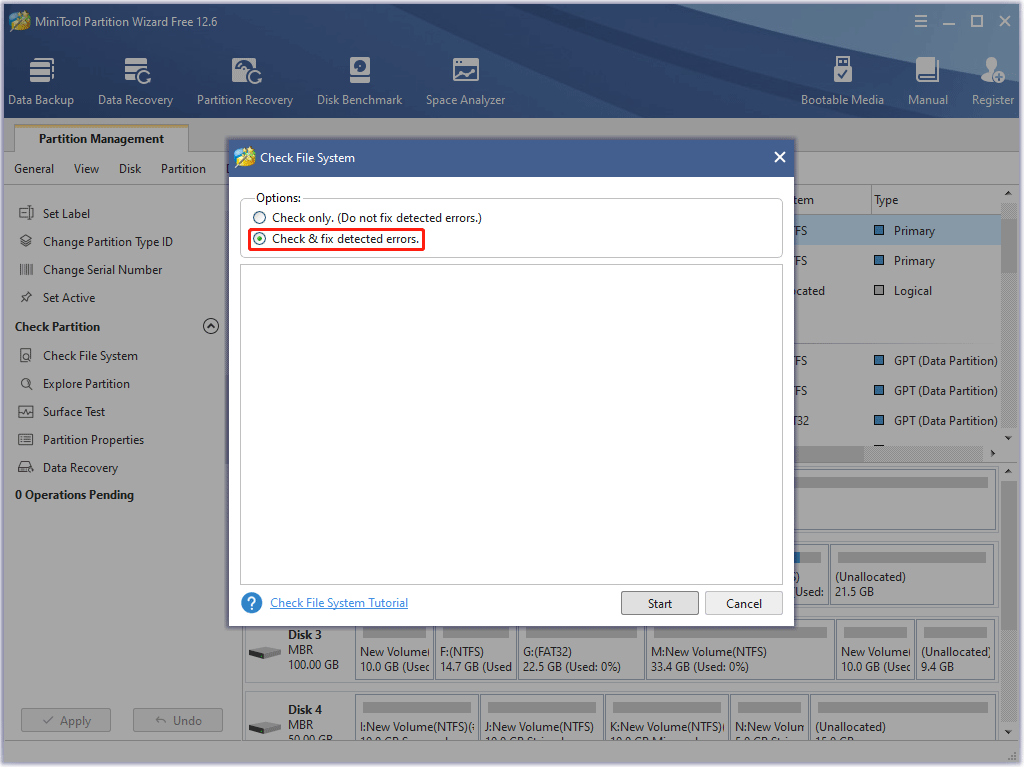
Well, if the «Dump file creation failed due to error during dump creation» error still occurs after trying the above methods, then it may indicate there are issues with the storage device. So, we highly recommend you check the device for errors using a professional tool like MiniTool Partition Wizard. Its Check File System and Surface Test features can help you check the physical and logical issues of your hard drive easily.
Free Download
Step 1: Launch the MiniTool software to get its main interface, and then select the problematic drive and click on Check File System from the left action panel.
Step 2: Select Check & fix detected errors and click on the Start button. This tool will check and repair file system errors immediately.
Step 3: In the main interface, select the drive again and click on Surface Test from the left pane.
Step 4: Click on the Start Now button in the pop-up window. After that, this tool will scan the whole external drive immediately and show you the test result.
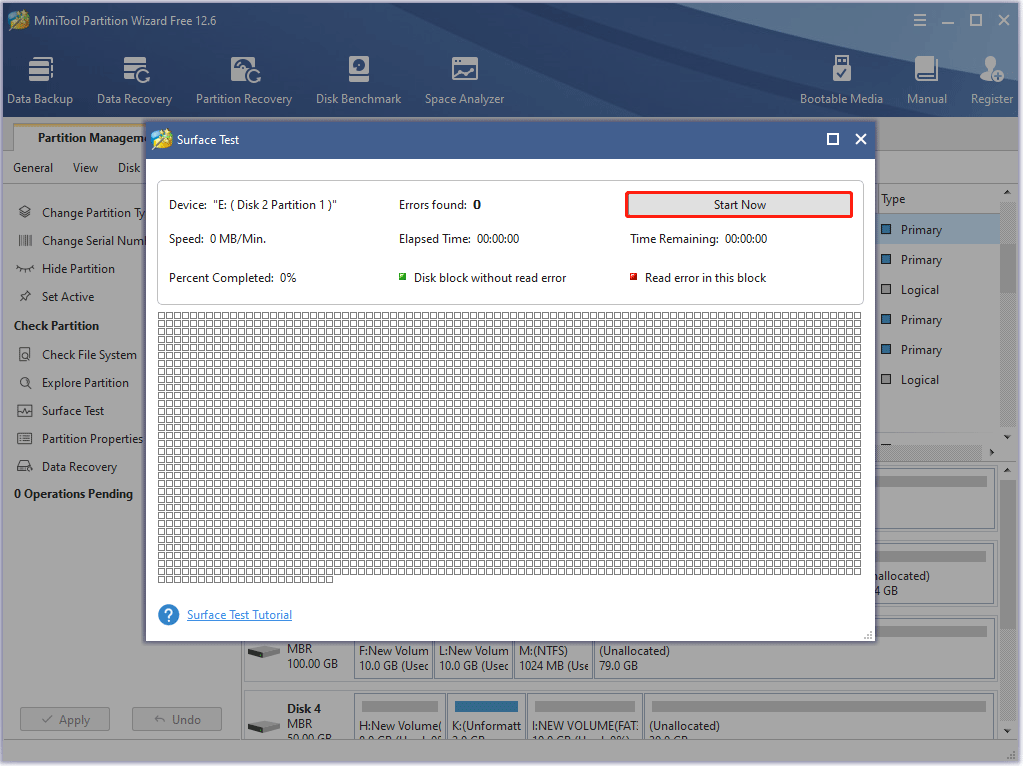
Step 5: When the hard drive error test process is completed, the disk blocks that have no read errors will be marked in green. However, if MiniTool Partition Wizard finds some hard disk errors, the blocks will be marked as red. In this case, you can either use this bad sector repair guide or consider replacing it with a new one.
Method 4: Modify the Registry
Sometimes, adding a simple registry key can fix the «Dump file creation failed due to error during dump creation» error. To do so, here is the guide.
Step 1: Press the Win + R key to open the Run dialog box. Then type regedit in the box and press Enter.
Step 2: In the Registry window, navigate to the following path:
HKEY_LOCAL_MACHINESystemCurrentControlSetControlCrashControl
Step 3: In the right side of the window, right-click the blank space and expand New, and then choose DWORD (32-bit) Value to create a new one.
Step 4: Double-click the new one and rename it as DisplayParameters. Then edit the Value data to 1 and press OK to end the process.
Finally, close the Registry Editor and restart the PC. If you still get this error, you can try the next solution.
Method 5: Disable the Automatic Restart Option
Sometimes an automatic restart on a computer can prevent the creation of a dump file by creating a misconfiguration issue. So, turning off the «Automatically restart» option might be another solution.
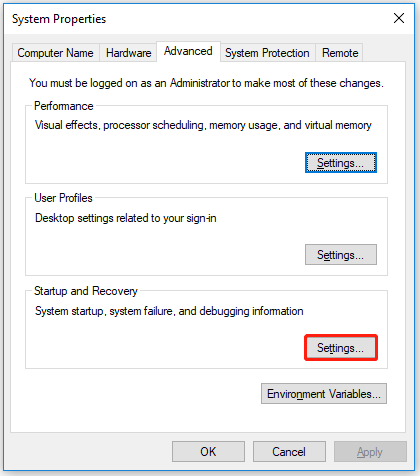
Step 1: Right-click on This PC and select the Properties option.
Step 2: Select Advanced System Settings from the left panel and the System Properties window will open up.
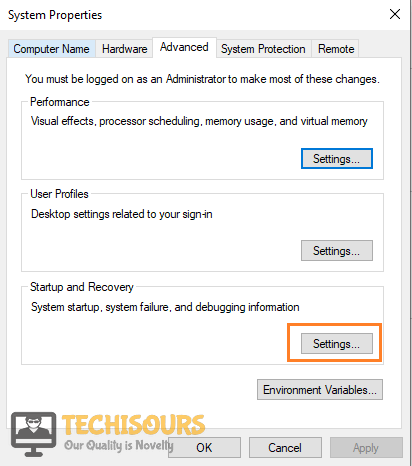
Step 3: Select the Settings button under Startup and Recovery.
Step 4: In the Startup and Recovery window, uncheck the Automatically restart box under the System failure section.
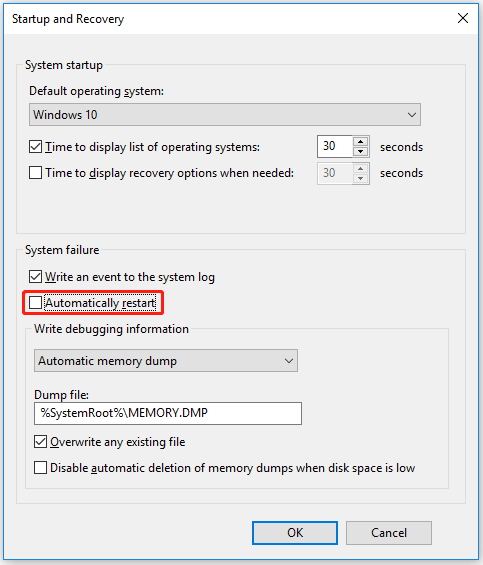
Finally, click on the OK button to apply the changes. Then restart your computer.
Method 6: Change the RAM Slot
Sometimes the RAM can be underclocked due to dust, any foreign objects or some other reasons, which can cause this error to occur. To overcome this problem, open your desktop and clear the RAM slot or replace it. This will speed things up in the BIOS and possibly fix the glitch.
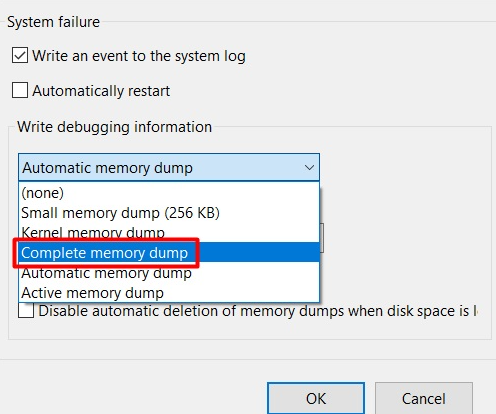
Method 7: Change Debug Settings
Your computer has some preset configurations that instruct it to do certain things in the event of a sudden crash. Sometimes these configurations can be set up in a way that prevents the computer from creating the dump file, so the «Dump file creation failed due to error during dump creation» error is triggered.
Step 1: Follow step 1 to step 4 from method 6.
Step 2: In the Startup and Recovery interface, you should select «Complete memory dump» as the «Write debugging information» option.

Step 3: Click OK to save the changes.
Then restart your PC and see if this method helps resolve the «dump file creation failed due to an error during dump creation» error.
Method 8: Update BIOS
The «Dump file creation failed due to error during dump creation» error can also be caused by an outdated and unstable BIOS version. Therefore, updating the BIOS may help resolve this issue.
Note: The process of updating the BIOS may create other issues if the instructions are not followed correctly.
The exact procedure for the BIOS interface and updating the BIOS version will vary by configuration. Regardless of your motherboard manufacturer, follow the instructions. Here are the official documentation for BIOS updates from some of the most popular motherboard manufacturers:
- Dell
- ASUS
- Acer
- Lenovo
- Sony Vayo
If updating your BIOS version doesn’t help, or this method doesn’t work for your specific problem, move to the next method below.
Method 9: Reinstall Windows
If none of the above methods fix the problem, the «Dump file creation failed due to error during dump creation» error may occur due to some underlying system file corruption issue. Bootstrap data might even be affected. In this case, the most efficient way to deal with the problem is to reset all Windows components.
It should solve your problem automatically, as reinstalling Windows will remove any misconfigurations your computer may have acquired over time.
So, here is an article you can refer to: Detailed Steps and Instructions to Reinstall Windows 10
By following the steps in this post, I successfully solved the «Dump file creation failed due to error during dump creation» error. I’d like to share this post with more friends who encounter his problem.Click to Tweet
Bottom Line
In this post, we tell you how to solve the «Dump file creation failed due to error during dump creation» error. I believe this post may help you to do that. And if you have any ideas about the subject, write them down in the comment area below. If you encounter any problem when using the MiniTool Partition Wizard software, you can contact us via [email protected].
Several Windows users have been reaching us with questions after getting continuous blue screens and being unable to identify the cause of the issue. Naturally, most affected users have tried to access the Dump file to find the culprit responsible only to discover that the dump file was not created at all. Upon checking Event Viewer, the error message that comes up is ‘Dump file creation failed due to an error during dump creation‘. Although the issue is not exclusive on Windows 10, here are very few reports of the same issue appearing on Windows 7 and Windows 10.
What is causing the ‘Dump file creation failed due to error during dump creation’ error?
We investigated this particular issue by looking at various user reports and the repair strategies that are commonly being used to fix this error message. As it turns out, the apparition of this issue can be facilitated by a multitude of factors. Here’ s a shortlist of potential culprits that can cause this issue:
- A Cleanup application is deleting the dump file – As it turns out, there are several different cleanup or system optimizing 3rd party apps that will delete/prevent the dump file from being created to improve the performance of the computer. If this scenario is applicable, you will be able to resolve the issue by uninstalling the application that is deleting the dump file.
- System File corruption – As it turns out, system file corruption can also be responsible for this particular error message. Corruption may have reached some dump dependencies, so the file can no longer be created properly. In this case, you should be able to solve the problem by resolving the corrupted items with utilities like SFC and DISM. In more severe cases, the only fix might be to perform an in-place repair.
- Outdated / Unstable BIOS – A severely outdated BIOS version or some issues stability issues can also be responsible for the dump file problem. In some cases, the BSOD can also be caused by your BIOS firmware, not just the dump problem. If this scenario applies to your current situation, you should be able to resolve the issue by updating your BIOS version to the latest version.
If you’re currently struggling to resolve this error message and repair the dump creation on your OS, this article will provide you with several different troubleshooting guides. Down below, you’ll find a collection of potential repair strategies that other affected users have successfully used to fix these issues.
For the best results, we advise you to follow the methods in the same order that we arranged them in. The potential fixes below have been ordered by efficiency and severity. Eventually, you should stumble upon a fix that resolves the ‘Dump file creation failed due to error during dump creation‘ error regardless of the culprit that’s causing the issue.
Let’s begin!
Method 1: Uninstalling clean up / optimizing applications
As it turns out, the most common culprits for the ‘Dump file creation failed due to an error during dump creation‘ error are third party applications that deal with cleaning up and optimizing your computer by deleting temporary files. CCleaner, Disk Cleanup and a few other alternatives are most commonly singled out as responsible for this particular error message.
Often, these applications will contain a background process that will automatically delete dump files and other similar files without your consent. If this scenario is applicable, you should be able to resolve the issue by uninstalling the application responsible for deleting the temporary files.
Several affected users have confirmed that the problem was fixed entirely after they uninstalled the problematic 3rd party application. Here’s a quick guide on doing this:
- Press Windows key + R to open up a Run dialog box Then, type “appwiz.cpl” and press Enter to open up the Programs and Features window.

Type appwiz.cpl and Press Enter to Open Installed Programs List - Once you’re inside the Programs and Features window, scroll down through the list of installed applications and locate the 3rd party application that deals with temporary files. When you see it, right-click on it and choose Uninstall from the newly appeared context menu.

Uninstalling the temporary file manager. - Follow the on-screen prompts to uninstall the program, then restart your computer and see if the issue is resolved at the next computer startup.

If the same issue persists and the dump file is not created after a BSOD crash, move down to the next potential fix below.
Method 2: Performing DISM and SFC scans
As it turns out, this particular issue can also occur due to some underlying system file corruption issues. Several affected users have managed to resolve the issue by fixing every logical or corruption error that might be responsible for the dump file creation problem.
Regardless of the Windows version that you’re encountering the issue on, there are two utilities that you can use to give yourself the highest chance of fixing file corruption instances that could lead to the apparition of the ‘Dump file creation failed due to error during dump creation‘ error.
While DISM uses WU to download healthy copies to replace the corrupted ones, SFC uses a locally cached archive for this same purpose. To maximize your chances of fixing the file corruption problem, we advise you to run both utilities.
Here’s a quick guide on doing this:
- Press Windows key + R to open up a Run dialog box. Next, type ‘cmd’ inside the text box and press Ctrl + Shift + Enter to open up an elevated CMD prompt. When prompted by the UAC (User Account Control), click Yes to grant administrative privileges.
Running CMD as an administrator - Once you’re inside the elevated Command Prompt, type the following command and press Enter to initiate an SFC (System File Checker) scan:
sfc /scannow
Note: Once you start this process, DO NOT close the CMD prompt or restart/shut down your computer under any circumstances until the process is complete. Doing this exposes your system to further file corruption.
- Once the process is complete, restart your computer and wait for the next startup sequence to complete.
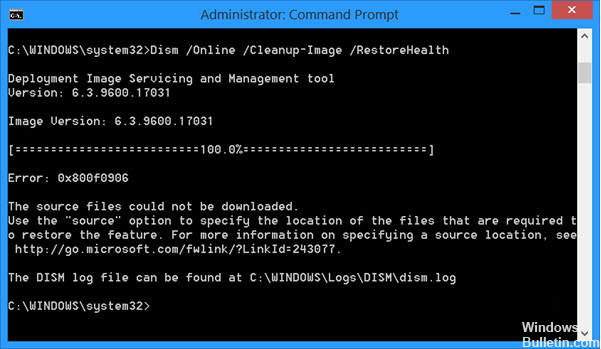
- Follow step 1 again to open up another elevated command prompt, then type the following command to initiate a DISM scan:
DISM /Online /Cleanup-Image /RestoreHealth
Note: This utility relies on WU (Windows Update) to replace corrupted instances with healthy copies. Because of this, ensure that you have a stable internet connection before starting this process.
- When the process is complete, restart your computer once again. Starting with the next booting sequence, use your computer normally and keep an eye for BSoDs. When the next one appears, check to see if the dump file was created.

If you still see the ‘Dump file creation failed due to error during dump creation‘ error in Event Viewer, move down to the next method below.
Method 3: Update BIOS
As reported by several different users, the ‘Dump file creation failed due to error during dump creation‘ error can also be caused by an outdated and unstable BIOS version. This procedure might not apply to all manufacturers, but a lot of users have reported that they managed to resolve the issue on Dell computers.
Keep in mind that the process of updating your BIOS can produce other problems in instances where the instructions are not followed correctly. So if you want to try this fix, proceed at your own risk!
BIOS interfacing and the exact process of updating the BIOS version will be different from configuration to configuration. Regardless of your motherboard manufacturer, follow the instructions to the letter. Here’s the official documentation for BIOS updating from some of the most popular motherboard manufacturers:
- Dell
- ASUS
- Acer
- Lenovo
- Sony Vayo
If you updated your BIOS version to no avail or this method does not apply to your particular issue, move down to the next method below.
Method 4: Performing a repair install
If none of the methods above have allowed you to repair the issue, chances are the ‘Dump file creation failed due to error during dump creation‘ error is occurring due to some underlying system file corruption issues. It’s even possible that the booting data is affected. In this case, the easiest way and the most efficient way of dealing with the problem is to reset all Windows components.
A radical solution would be to perform a clean install. But this procedure will also make you lose any personal data including applications, games, media, and documents.
A less destructive way of refreshing all WIndows components is to perform a repair install. This procedure will allow you to keep all your files including photos, video, games, applications, documents and everything else. The only files that will be replaced are Windows Files and booting data.
You can follow this guide (here) for step by step instructions on performing a repair install (in-place repair)

Kevin Arrows
Kevin is a dynamic and self-motivated information technology professional, with a Thorough knowledge of all facets pertaining to network infrastructure design, implementation and administration. Superior record of delivering simultaneous large-scale mission critical projects on time and under budget.
Whenever a user gets a Blue screen of death on their computers, they are advised to check the dump file that is usually created which highlights the reason due to which the issue was triggered. However, upon checking the event viewer users have found that the dump file wasn’t created in the first place and the “Dump File Creation Failed due to Error During Dump Creation” error was being displayed.

In this article, we have compiled some reasons for you to go through in order to properly understand why this issue is being triggered. We have also compiled solutions, fixes, and methods to help you completely fix the “Volmgr Dump File Creation Failed due to Error during Dump Creation” error and other variations of this error message.
What Does Windows 10 not create a Dump File?
After going through some basic troubleshooting methods, we concluded that the following were some of the most prominent reasons due to which this error occurs in the first place.
- Third-Party Cleanup Application: If you have installed a third-party application on your computer that is responsible for performing a cleanup from time to time, it is possible that this file is erasing your dump file storage due to which you are getting the ‘Dump File Creation Failed due to error during dump creation’ error.
- Damaged System Files: Sometimes, the system files can also get damaged due to which users might run into this error. Therefore, it is recommneded to perform certain scans which check your whole computer for system file damage and automatically repair if they find any damage.
- Disk Issues: The storage drive that you are using can also get damaged and prevent the operating system from being able to create a dump file in case of a BSOD. Therefore, it is recommended to try and perform a disk repair to fix any bad sectors on the drive as this can really help in fixing the “Dump File Creation Filed due to error during Dump Creation” error.
- Outdated Bios: If the Bios of your motherboard hasn’t been updated in a while, it is possible that you are running into this issue because of that. The motherboard basically runs all the instructions due to its Bios and if the Bios isn’t playing well with the hardware installed on your computer, system functions such as dump file creation can be disrupted.
- RAM Issue: The RAM that you have installed on your computer is responsible for saving some configurations in case your computer suddenly shuts down or crashes. These configurations are used by the computer upon restart. However, the dump file is also sometimes written to the RAM and if the RAM is improperly configured, it can end up triggering the error in question. Therefore, follow the solution below to properly check if your RAM is the culprit behind this error.
Now that you have been made familiar with most of the reasons behind this issue, we can finally move on towards implementing fixes to eradicate it from your computer.
Solution 1: Uninstall the Cleanup Application
If you are using a third-party app to perform cleaning functions on your computer, you might be running into this error because that app is preventing the dump file from being created when the system crashes. Therefore, in this method, we will be uninstalling the cleanup application from your computer.
- In order to carry out this task, press the “Win + R” keys simultaneously and type “appwiz.cpl” in the Run prompt.
Typing “appwiz.cpl” - Hit the Enter key to open the “Program and Features” window.
- Find the Clean Up application in the list, then right-click on the “Clean Up” application and select the “Uninstall” option.
- Finally, restart your PC and see if the dump file creation failed due to error during dump creation issue is resolved.

Solution 2: Carry Out the DISM Scan
A DISM Scan is basically responsible for repairing the disk drive on which all of our files are being stored. Disks often acquire corrupted or bad sectors due to which the “Dump file creation failed” error can often be triggered. Therefore, we will be using the command prompt to perform a DISM scan in this solution.
- Press the “Windows” key on your PC and type “Command Prompt” in the dialog box.
- From the pop-up results right-click on the command prompt application and select “Run as Administrator”.

Run Command Prompt - Now enter the following command and hit the Enter key:

DISM.exe /Online /Cleanup-image /Scanhealth
- Once the above command is executed, copy-paste the following command and again press the Enter key:
DISM.exe /Online /Cleanup-image /Restorehealth
- Now close cmd and check if the issue gets resolved.
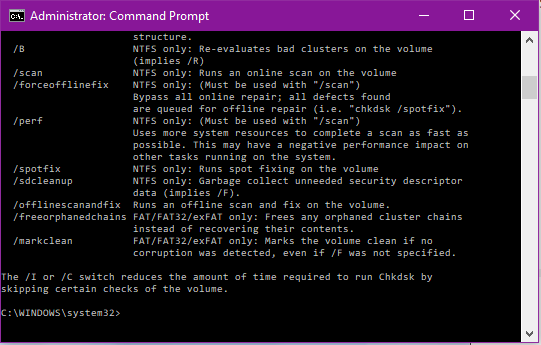
Solution 3: Perform Check Disk
Like the method above, this is also a disk check command which lets the computer sort out bad sectors and repair the storage device that you have used to store the operating system and other files.
- Press the “Windows” key on your PC and type “Command Prompt”.
- Right-click on the command prompt app from the search results and select “Run as Administrator”.
Run Command Prompt - Now enter the name of the drive you want to check i.e. “C:” and hit the enter key.
- Once the directory is open, type “cd” and press enter.
- Finally, enter the following command and windows will automatically correct the corrupted files for you:
chkdsk /f
- Now close the command prompt window and see if the dump file creation failed due to error during dump creation. volmgr crash windows 10 problem gets resolved.
Solution 4: Update BIOS and GPU firmware
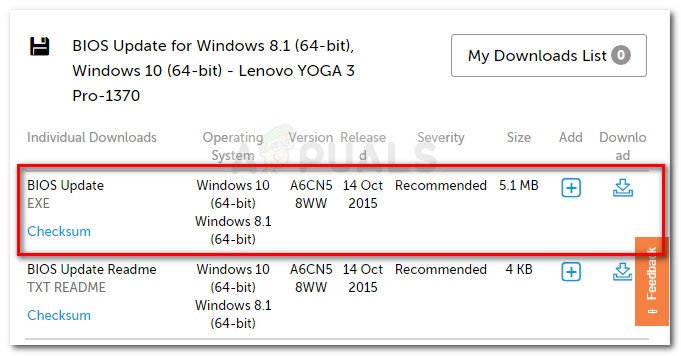
Most of the glitches occur when you use an outdated application on your PC. Once a new version of any software is released, support for previous versions is either blocked or limited. Therefore an outdated BIOS can also be one of the causes of this error. Updating the BIOS might help solve this issue. You just need to open the browser and type your “Device Name (Dell, HP, Lenovo, etc) + Windows version (7, 8, 10) + BIOS Latest Version Download”. Once downloading is complete, update your BIOS and see if it helped in solving the error. If updating BIOS didn’t solve the issue then update your GPU firmware following the same procedure.
Solution 5: Create Windows 10 Media and Reinstall Windows
This method can be used as a last resort to completely reinstall your Windows with fresh files and configurations. It should automatically get your issue sorted out because a fresh install removes any misconfigurations that your computer might have acquired over time.
- To perform this fix, download the Windows 10 media tool by clicking here.
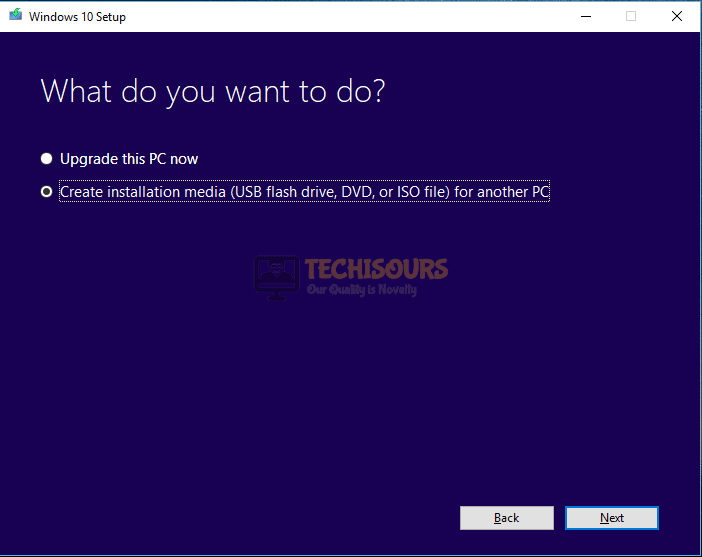
Note: You must agree to the license terms to finish the download. - Now select “Create Installation Media for Another PC” and hit the “Next” button.

Create installation media - At this step select your preferred language and architecture for windows and attach your flash drive having at least 8 GB of free space.
- Now, the installation media is created successfully so make sure you have all the necessary drivers installed.
- Turn “OFF” your PC and attach the flash drive again and afterward turn “ON” your PC and press the “F12” key to open a boot menu.
- Select “Next” and afterward click on the “Install Windows” option. Now, choose your preferred language and other settings to begin the installation.

Installation in progress

Solution 6: Modify the Registry From Command Prompt
Sometimes, adding a simple registry entry can end up fixing the ‘Dump File Creation Failed due to Error During Dump Creation’ error. This solution has been known to work for a lot of users so make sure to give it a go before you move on towards others.
- Press “Win + R” keys simultaneously on your keyboard and type “Regedit” in the command prompt window and hit the Enter key.
Typing “regedit” - Navigate to the following path in the registry editor.

HKEY_LOCAL_MACHINESystemCurrentControlSetControlCrashControl
- Once you are in the location, make a new dword “DisplayParameters” set it to “1”.
- Finally, restart your PC and check if it fixes the 161 volmgr dump file creation failed due to error during dump creation problem.
Solution 7: Change the RAM Slots
Sometimes due to dust, any foreign particle, or some other reasons, RAM might get underclocked which may lead to the occurrence of this error. In order to get over this, open your desktop and clean up the RAM slots or change the slots. This will speed up the things in BIOS and might solve the glitch.
Solution 8: Disable the Automatic Restart Option
Sometimes, the automatic restart on your computer can prevent the dump file from being created by creating a misconfiguration issue. Therefore, in this step, we will be disabling the Automatic Restart option which should allow the dump file to be created.
- Click on the “This PC” icon to open it.

Click on This PC - After that, right-click anywhere and select “Properties” from the menu bar.
- Now select “Advanced System Settings” from the left panel and the “System Properties” window will open up.
- Navigate to the “Advanced” tab and select “Settings” under “Startup and Recovery”.

Click on Settings - After that, uncheck the box associated with the “Automatically Restart” option and select “OK”.

Uncheck the Option - Finally, make sure to select “Apply” to propagate the changes.


Solution 9: Changing Debug Settings
Your computer has some pre-set configurations which instruct it to do certain things in the instance of a sudden crash. Sometimes, it is possible that these configurations have been set in such a way that they prevent the computer from creating a dump file, and due to this, the ‘Dump File Creation Failed due to Error During Dump Creation‘ error is being triggered.
- Click on the “This PC” icon to open it.
Click on This PC - After that, right-click anywhere and select “Properties” from the menu bar.
- Now select “Advanced System Settings” from the left panel and the “System Properties” window will open up.
- Navigate to the “Advanced” tab and select “Settings” under “Startup and Recovery”.
Click on Settings - Click on the dropdown icon under “System Failure” and select “Complete Memory Dump” from the list. Now select “OK”.

Choose Complete Memory Dump Option - Make sure to select “Apply” to save the changes made.
- Finally, restart your PC and see if this method helped in solving the dump file creation failed due to error during dump creation. volmgr glitch.

Hopefully, the 161 volmgr dump file creation failed due to error during dump creation issue would’ve been resolve by now but if you need any further assistance feel free to Contact Us here.
Question
Issue: How to fix “Dump File Creation Failed due to Error during Dump Creation” error in Windows?
Hello. I get the “Dump File Creation Failed due to Error during Dump Creation” error continuously. Sometimes even the blue screen of death appears. I don’t know what to do to solve this. I run Windows right now. I am afraid that once after the blue screen and reboot the machine will not work. Help me!
Solved Answer
People using Windows report the issue[1] with the unresponsive dump file feature and the BSOD[2] screen related to the “Dump File Creation Failed due to Error during Dump Creation” issue. The issue is not exclusive to the particular version of the operating system, but the Windows 10 users experience this more commonly these days.
The issue can be caused by the deleted dump files and it is an issue related to the cleanup applications and other third-party optimizers that people use. You might fix the problem if the app is getting deleted and uninstalled. Another problem that can lead to these errors can be related to general system file corruption and altered or deleted files there. Even updates or lack of the particular files after the OS upgrade.[3]
This issue can be solved by running the tool that particularly finds and fixes issues with data. File recovery can fix the problem with the “Dump File Creation Failed due to Error during Dump Creation” error in Windows, so try to check for the affected system files with a utility like SFC or the app like ReimageMac Washing Machine X9 and check if that error stops.
There are various other outdated and unstable pieces on the machine that can cause the error. Severely outdated BIOS versions or other stability problems can be responsible for a dump file problem like this. You might resolve this issue by updating the BIOS version to the latest. You can also fix the “Dump File Creation Failed due to Error during Dump Creation” error in Windows by relying on the options listed. Make sure to properly follow these steps.

1. Uninstall the cleanup software
Fix it now!
Fix it now!
To repair damaged system, you have to purchase the licensed version of Reimage Reimage.
- Press Windows key + R to open up a Run dialog box.
- Then, type appwiz.cpl and press Enter to open up the Programs and Features window.
- Scroll down through the list of installed applications and locate the one that deals with temporary files.
- Right-click on it and choose Uninstall from the newly appeared context menu.
- Follow the on-screen prompts to uninstall the program, then restart your computer.
2. Run SFC, DISM scans
Fix it now!
Fix it now!
To repair damaged system, you have to purchase the licensed version of Reimage Reimage.
3. Use System Restore
Fix it now!
Fix it now!
To repair damaged system, you have to purchase the licensed version of Reimage Reimage.
4. Run memory diagnostics
Fix it now!
Fix it now!
To repair damaged system, you have to purchase the licensed version of Reimage Reimage.
- Press Windows key + R then type in mdsched.exe hit OK.

- You can also search for the tool.
- Run the diagnostics.
- Then restart the device after the procedure.

Repair your Errors automatically
ugetfix.com team is trying to do its best to help users find the best solutions for eliminating their errors. If you don’t want to struggle with manual repair techniques, please use the automatic software. All recommended products have been tested and approved by our professionals. Tools that you can use to fix your error are listed bellow:
do it now!
Download Fix
Happiness
Guarantee
do it now!
Download Fix
Happiness
Guarantee
Compatible with Microsoft Windows
Compatible with OS X
Still having problems?
If you failed to fix your error using Reimage, reach our support team for help. Please, let us know all details that you think we should know about your problem.
Reimage — a patented specialized Windows repair program. It will diagnose your damaged PC. It will scan all System Files, DLLs and Registry Keys that have been damaged by security threats.Reimage — a patented specialized Mac OS X repair program. It will diagnose your damaged computer. It will scan all System Files and Registry Keys that have been damaged by security threats.
This patented repair process uses a database of 25 million components that can replace any damaged or missing file on user’s computer.
To repair damaged system, you have to purchase the licensed version of Reimage malware removal tool.

A VPN is crucial when it comes to user privacy. Online trackers such as cookies can not only be used by social media platforms and other websites but also your Internet Service Provider and the government. Even if you apply the most secure settings via your web browser, you can still be tracked via apps that are connected to the internet. Besides, privacy-focused browsers like Tor is are not an optimal choice due to diminished connection speeds. The best solution for your ultimate privacy is Private Internet Access – be anonymous and secure online.
Data recovery software is one of the options that could help you recover your files. Once you delete a file, it does not vanish into thin air – it remains on your system as long as no new data is written on top of it. Data Recovery Pro is recovery software that searchers for working copies of deleted files within your hard drive. By using the tool, you can prevent loss of valuable documents, school work, personal pictures, and other crucial files.
- Every time your Windows computer encounters an error, it displays a BSOD or blue screen of death.
- This screen usually appears for a split second, creates several logs or dump files, as many other people do, and then suddenly reboots the computer.
- These crash dump files are stored inside the computer and can only be viewed by the administrator.
- It turns out that various factors can contribute to this problem.
- The possible repairs listed below have been ranked by effectiveness and severity.
There was an error during the dump file creation process in the most popular articles regarding dump file creation
Every time your Windows computer encounters an error, it displays a BSOD or blue screen of death. This screen usually appears for a split second, creates several logs or dump files, as many other people do, and then suddenly reboots the computer. However, this process happens so quickly that the user often has no way to determine the error code and therefore probably has no way to check what went wrong. These crash dump files are stored inside the computer and can only be viewed by the administrator.
Crash dumps in Windows 10 can be either one of four types:
- Memory dump in full,
- Storage in the kernel,
- 256KB or less.
- Active memory files should be dumped.
What is the reason for the “Dump file creation failed due to a dump creation error”?

The user reports we looked at as well as the fix strategies commonly used to resolve this particular problem pointed to a variety of factors that can lead to this error message. Here are a few possible culprits:
Cleaning application deletes dump file: It turns out that many third-party cleaning or system optimization applications delete or prevent the creation of a dump file to improve computer performance. If this scenario applies, the problem can be solved by removing the application that deletes the dump file.
Damage to system files: It turns out that damage to system files can also be the cause of this particular error message. The corruption may have reached certain dump dependencies, preventing the file from being created correctly. In this case, you should be able to solve the problem by resolving the corrupted items with utilities such as SFC and DISM. In more serious cases the only solution may be an on-site repair.
A corrupted system file can also cause this problem. Windows users can remedy this problem by running DISM and SFC scans. The steps are as follows:
Outdated / Unstable BIOS: Seriously outdated BIOS or some stability issues can also cause a dump file problem. In some cases, BSODs can also be caused by your BIOS firmware, not just a dump problem. If this scenario applies to your current situation, you may be able to resolve the problem by updating your BIOS to the latest version.
Several Windows users have reported being unable to access the dump files. They receive an error message that says “Dump file creation failed due to an error during dump creation” when they attempt to access the dump files. Follow these simple steps to fix this problem if you experience the same problem when you access the dump files on your device.
There are a variety of troubleshooting guides in this article if you are currently experiencing this error message and want to resolve your dump creation of your operating system. In the following section you will find a list of possible repair strategies that have been successfully utilized by other interested users to resolve these problems.
Listed below are the possible repairs ranked by effectiveness and severity, so we recommend that you follow them in order for best results. No matter what the cause of the error, you should find a solution to fix the “Create dump file failed due to an error in creating the dump file” error.
How to fix the “Dump file creation failed due to dump file creation error” error?

Uninstall the cleanup application
In this method, we will remove the cleanup application from your computer if you are using one to perform cleanup functions on your computer. In this application, the dump file is not created when the computer crash.
- Then, type “appwiz.cpl” into the prompt after pressing the “Windows + R” keys simultaneously.
- The “Programs and Features” window will open after you hit the “Enter” key.
- In the list, locate the Cleanup application, right-click it, and choose Uninstall.
- In addition to restarting the computer, check if the dump file creation was affected by the error.
Performing a DISM scan
In this solution, we will use the command line to perform a DISM scan. Hard drives often have corrupted or defective sectors, resulting in the “Create dump file failed” error.
- Your computer will launch a command prompt when you click the “Windows” key.
- Choose “Run as administrator” after right-clicking the command line in the results window.
- Then press Enter to execute the following command:
Cleanup-image / Scanhealth can be run using DISM.exe. - Then, copy, paste and press Enter again the following command after running the above command:
A DISM.exe command with a clean-up-image and a scan-health parameter can be run as follows: - Check if the problem has been resolved by closing the command.
Checking the disk
The computer uses this command to look for corrupted sectors on the hard drive and restore the operating system and other files.
- Type “Command Prompt” onto your computer’s keyboard using the Windows key.
- Select “Run as administrator” from the right-click menu of the command line found in the search results.
- Press Enter once you have typed C: into the drive name box.
- Using the Enter key, open the directory by typing “cd”.
- You can fix corrupted files automatically by typing the following commands:
ccdsk /f. - It was a problem with Volmgr 10 windows that was resolved by destroying the dump file.
Updating the BIOS and GPU firmware
Most problems occur when you use an outdated application on your PC. When a new version of software is released, support for previous versions is either blocked or limited. Therefore, an outdated BIOS may also be one of the causes of this error. Updating the BIOS can help solve this problem. Just open your browser and enter “Device name (Dell, HP, Lenovo, etc.) + Windows version (7, 8, 10) + Download the latest BIOS version”. After the boot is complete, update the BIOS and check if the error has been resolved. If the BIOS update did not fix the problem, update the GPU firmware using the same procedure.
Create Windows 10 support and reinstall Windows
Reinstalling Windows from scratch can be used as a last resort to eliminate any configuration errors your computer accumulated over time. This should automatically resolve your issue since the new installation will eliminate any errors.
- Here is a link to the Windows 10 Media Tool you need to download to make this fix.
Note: You must accept the license terms to complete the download. - You can now create installation media for another PC by selecting “Create installation media for another PC”.
- Plug a USB flash drive with at least 8 GB of free space into the computer and select your preferred language and architecture for Windows.
- You must install all the necessary drivers after you have successfully created the installation media.
- You can open the boot menu by pressing the F12 key while the computer is off and the USB flash drive is connected.
- You can now start the installation by selecting “Next” and choosing “Install Windows”.
Changing the registry from the command line
There have been cases where the “Dump file creation failed due to a dump creation error” error has been fixed by adding a simple registry entry. You should try this solution before moving on to another solution.
- Then press the Enter key after typing “Regedit” in the prompt.
- The following path should be entered in the registry editor.
- HKML_LOCAL_MACHINESystemCurrentControlSetCrashControl.
- Set “DisplayParameters” to “1” after creating a new word.
- Check if the error created when creating dump file 161 volmgr has been resolved by restarting your computer.
Changing RAM slots
Underclocked RAM can be caused by dust, foreign objects, or other causes. To fix this problem, open the desktop and clean out the RAM slots or replace them with new ones. This should speed up the BIOS.
Disable the automatic reboot option
The auto-reboot of your computer may prevent you from creating the dump file as a result of improper configuration. In order to create the dump file, we will disable the auto-run option.
- To open it, click “This PC”.
- Using your right-click menu, select “Properties.”.
- You will now be able to access the “System Properties” window by selecting “Advanced System Settings” in the left pane.
- You can change your startup and recovery settings under the “Advanced” tab.
- Click “OK” after unchecking “Auto Restart”.
- You can apply your changes by selecting “Apply”.
Frequently Asked Questions
- Open regedit.exe.
- Open HKEY_LOCAL_MACHINESOFTWAREMicrosoftWindows Error ReportingLocalDumps key.
- Set DumpFolder (REG_EXPAND_SZ) to the directory where you want to create the dump.
- Optionally, you can prohibit WHO from storing many dumps by setting DumpCount (DWORD) to a low number.
Select the «Start» button and type «Disk Cleanup» in the Windows search bar. Right-click on Disk Cleanup and select Run as Administrator. When you run Disk Cleanup as Administrator, it runs in advanced mode and can delete the dump file.
A dump file is a snapshot showing the current process and modules loaded from an application at a given time. Testers also create dumps to store data from programs that have failed or are not responding, for later use in testing. The Visual Studio debugger can store-dump files for managed or native code.
You can delete these .dmp files to free up disk space, which is a good idea because they can be very large — if your computer has a blue screen, you may have MEMORY. DMP file of 800 MB or more, taking up space on your system drive. Windows will help you remove these files automatically.

Mark Ginter
Mark Ginter is a tech blogger with a passion for all things gadgets and gizmos. A self-proclaimed «geek», Mark has been blogging about technology for over 15 years. His blog, techquack.com, covers a wide range of topics including new product releases, industry news, and tips and tricks for getting the most out of your devices. If you’re looking for someone who can keep you up-to-date with all the latest tech news and developments, then be sure to follow him over at Microsoft.

Несколько пользователей Windows обращались к нам с вопросами после того, как постоянно получали синие экраны и не могли определить причину проблемы. Естественно, большинство пострадавших пользователей пытались получить доступ к файлу дампа, чтобы найти виновника, только чтобы обнаружить, что файл дампа вообще не был создан. При проверке средства просмотра событий появляется сообщение об ошибке «Не удалось создать файл дампа из-за ошибки при создании дампа‘. Хотя проблема не является исключительной для Windows 10, здесь очень мало сообщений о том, что такая же проблема возникает в Windows 7 и Windows 10.

Что вызывает ошибку «Не удалось создать файл дампа из-за ошибки во время создания дампа»?
Мы исследовали эту конкретную проблему, изучив различные пользовательские отчеты и стратегии восстановления, которые обычно используются для исправления этого сообщения об ошибке. Как выясняется, появлению этой проблемы может способствовать множество факторов. Вот краткий список потенциальных виновников, которые могут вызвать эту проблему:
- Приложение очистки удаляет файл дампа — Как оказалось, существует несколько различных приложений для очистки или оптимизации системы, которые удаляют / предотвращают создание файла дампа для повышения производительности компьютера. Если этот сценарий применим, вы сможете решить проблему, удалив приложение, которое удаляет файл дампа.
- Повреждение системного файла — Как оказалось, повреждение системного файла также может быть причиной этого конкретного сообщения об ошибке. Возможно, повреждение достигло некоторых зависимостей дампа, поэтому файл больше не может быть создан должным образом. В этом случае вы сможете решить проблему, исправив поврежденные элементы с помощью таких утилит, как SFC и DISM. В более серьезных случаях единственным решением может быть ремонт на месте.
- Устаревший / нестабильный BIOS — Сильно устаревшая версия BIOS или некоторые проблемы со стабильностью также могут быть причиной проблемы с файлом дампа. В некоторых случаях BSOD также может быть вызван прошивкой BIOS, а не только проблемой дампа. Если этот сценарий применим к вашей текущей ситуации, вы сможете решить проблему, обновив версию BIOS до последней версии.
Если вы в настоящее время пытаетесь разрешить это сообщение об ошибке и восстановить создание дампа в вашей ОС, эта статья предоставит вам несколько различных руководств по устранению неполадок. Ниже вы найдете набор потенциальных стратегий восстановления, которые другие пользователи, затронутые этой проблемой, успешно использовали для решения этих проблем.
Для достижения наилучших результатов мы советуем вам следовать методам в том же порядке, в котором мы их разместили. Возможные исправления, указанные ниже, упорядочены по эффективности и серьезности. В конце концов, вы должны наткнуться на исправление, которое устраняет «Не удалось создать файл дампа из-за ошибки при создании дампа«Ошибка независимо от причины, вызывающей проблему.
Давай начнем!
Метод 1: удаление приложений очистки / оптимизации
Как выяснилось, наиболее частые виновники «Не удалось создать файл дампа из-за ошибки при создании дампа«Error» — это сторонние приложения, которые занимаются очисткой и оптимизацией вашего компьютера путем удаления временных файлов. CCleaner, Disk Cleanup и несколько других альтернатив чаще всего выделяются как ответственные за это конкретное сообщение об ошибке.
Часто эти приложения содержат фоновый процесс, который автоматически удаляет файлы дампа и другие подобные файлы без вашего согласия. Если этот сценарий применим, вы сможете решить проблему, удалив приложение, отвечающее за удаление временных файлов.
Несколько затронутых пользователей подтвердили, что проблема была полностью устранена после удаления проблемного стороннего приложения. Вот краткое руководство, как это сделать:
- Нажмите Клавиша Windows + R чтобы открыть диалоговое окно «Выполнить». Затем введите «Appwiz.cpl» и нажмите Войти , чтобы открыть окно «Программы и компоненты».
- Как только вы окажетесь внутри Программы и особенности прокрутите список установленных приложений и найдите стороннее приложение, которое работает с временными файлами. Когда вы его увидите, щелкните его правой кнопкой мыши и выберите Удалить из появившегося контекстного меню.
- Следуйте инструкциям на экране, чтобы удалить программу, затем перезагрузите компьютер и посмотрите, будет ли проблема решена при следующем запуске компьютера.

Если та же проблема сохраняется и файл дампа не создается после сбоя BSOD, перейдите к следующему потенциальному исправлению ниже.
Метод 2: выполнение сканирования DISM и SFC
Как оказалось, эта конкретная проблема также может возникать из-за некоторых проблем с повреждением базовых системных файлов. Нескольким затронутым пользователям удалось решить проблему, исправив все логические ошибки или ошибки повреждения, которые могли быть причиной проблемы создания файла дампа.
Независимо от версии Windows, в которой вы столкнулись с проблемой, есть две утилиты, которые вы можете использовать, чтобы дать себе наибольшие шансы исправить случаи повреждения файлов, которые могут привести к появлению «Не удалось создать файл дампа из-за ошибки при создании дампа‘ ошибка.
В то время как DISM использует WU для загрузки работоспособных копий для замены поврежденных, SFC использует для этой же цели локально кэшированный архив. Чтобы максимизировать ваши шансы решить проблему с повреждением файлов, мы советуем вам запустить обе утилиты.
Вот краткое руководство, как это сделать:
- Нажмите Клавиша Windows + R открыть Бегать диалоговое окно. Затем введите ‘Cmd’ внутри текстового поля и нажмите Ctrl + Shift + Enter , чтобы открыть окно CMD с повышенными правами. По запросу UAC (Контроль учетных записей пользователей)нажмите да для предоставления административных привилегий.
- Как только вы окажетесь в командной строке с повышенными привилегиями, введите следующую команду и нажмите Enter, чтобы запустить SFC (проверка системных файлов) сканирование:
sfc / scannow
Примечание: После запуска этого процесса НЕ закрывайте приглашение CMD и не перезагружайте / не выключайте компьютер ни при каких обстоятельствах, пока процесс не будет завершен. Это подвергнет вашу систему дальнейшему повреждению файлов.
- После завершения процесса перезагрузите компьютер и дождитесь завершения следующей последовательности запуска.
- Снова выполните шаг 1, чтобы открыть другую командную строку с повышенными привилегиями, затем введите следующую команду, чтобы запустить сканирование DISM:
DISM / Онлайн / Очистка-Образ / RestoreHealth
Примечание: Эта утилита использует WU (Центр обновления Windows) для замены поврежденных экземпляров исправными копиями. По этой причине перед началом этого процесса убедитесь, что у вас стабильное интернет-соединение.
- Когда процесс будет завершен, перезагрузите компьютер еще раз. Начиная со следующей последовательности загрузки, используйте свой компьютер как обычно и следите за BSoD. Когда появится следующий, проверьте, был ли создан файл дампа.

Если вы все еще видите «Не удалось создать файл дампа из-за ошибки при создании дампа‘Ошибка в средстве просмотра событий, перейдите к следующему способу ниже.
Метод 3: обновить BIOS
Как сообщили несколько разных пользователей, «Не удалось создать файл дампа из-за ошибки при создании дампа«Ошибка также может быть вызвана устаревшей и нестабильной версией BIOS. Эта процедура может применяться не ко всем производителям, но многие пользователи сообщают, что им удалось решить проблему на компьютерах Dell.

Имейте в виду, что процесс обновления BIOS может вызвать другие проблемы в случаях, когда инструкции не выполняются правильно. Поэтому, если вы хотите попробовать это исправление, действуйте на свой страх и риск!
Интерфейс BIOS и точный процесс обновления версии BIOS будут отличаться от конфигурации к конфигурации. Независимо от производителя вашей материнской платы, четко следуйте инструкциям. Вот официальная документация по обновлению BIOS от некоторых из самых популярных производителей материнских плат:
- Dell
- ASUS
- Acer
- Lenovo
- Sony Vayo
Если вы обновили версию BIOS безрезультатно или этот метод не применим к вашей конкретной проблеме, перейдите к следующему способу ниже.
Метод 4. Выполнение ремонтной установки
Если ни один из вышеперечисленных методов не помог устранить проблему, скорее всего, «Не удалось создать файл дампа из-за ошибки при создании дампа«Ошибка возникает из-за проблем с повреждением базовых системных файлов. Возможно даже, что это повлияло на данные загрузки. В этом случае самый простой и эффективный способ решения проблемы — сбросить все компоненты Windows.
Радикальным решением было бы выполнить чистая установка. Но эта процедура также приведет к потере любых личных данных, включая приложения, игры, мультимедиа и документы.
Менее разрушительный способ обновления всех компонентов WIndows — выполнить ремонтную установку. Эта процедура позволит вам сохранить все ваши файлы, включая фотографии, видео, игры, приложения, документы и все остальное. Единственные файлы, которые будут заменены, — это файлы Windows и данные загрузки.
Вы можете следовать этому руководству (Вот) для получения пошаговых инструкций по выполнению ремонтной установки (ремонта на месте)
Contents
- 1 What are Windows Dump Files?
- 2 What kinds of Dump Files are out there, and How is it Important?
- 3 What Causes the “dump file creation failed due to error during dump creation” error?
- 3.1 1.) Presence of Cleanup Application
- 3.2 2.) File Corruption
- 3.3 3.) Old and Unstable BIOS
- 4 How to solve the “dump file creation failed due to error during dump creation” error?
- 4.1 1.) Problems with Cleanup Software
- 4.2 2.) Run chkdhk Scan
- 4.3 3.) Direct Registry Editor
- 4.4 4.) Application of Memory Dump
- 4.5 5.) Update BIOS
- 4.6 6.) Reinstallation Of Windows
- 4.7 7.) Fix RAM slots
- 4.8 8.) Run SFC and DISM Scans
- 4.9 9.) Remove the checkbox for “Auto Restart.”
- 5 FAQs on “dump file creation failed due to error during dump creation.”
- 5.1 Does the “dump file creation fail due to error during dump creation” cause BlueScreen?
- 5.2 Are there any other fixes for This Error?
- 5.3 The most common cause of this error?
- 6 Final Thought
- 7 Trending Now
What are Windows Dump Files?
You should know about Windows Dump before” dump file creation failed due to error during dump creation.” A dump file often called a memory dump data or a crash dump file, is a crucial document of data about a particular crash. It displays the tasks and devices executing at the moment of the impact and the halted Kernel-mode hierarchy.
Although crash dumps are frequently used to diagnose crashes, they also have utility for other things. These are a few such applications: Debug crashed programs, stuck programs, accidental deletion, debugger on another machine, or even debugger at a different period. Considering you are on the right page about “dump file creation failed due to error during dump creation,” a method is defined to correct any problem you have with it.
What kinds of Dump Files are out there, and How is it Important?
Now that we know, Windows will create dump files if it Encounters some serious crash problems or may be bugs. You should also know about the main types of Window dump files, which include a complete memory dump that consists of the most significant volume of information and the RAM size at the time of the crash. For instance RAM of your PC accounts for 4GB, then just after any problem, the dump file would be of 4GB size.
The second type is the kernel memory dump files, which are smaller than the first. Well, the third type is the smallest compared to both previously mentioned, which does not contain much information about the window, only having basic information about the crash.
The above 3 dump files are available to help you learn more about the reason for the computer crash. It assists users in determining why their hardware drivers are affecting the system to get a blue screen. It includes essential information such as the error message linked with a blue screen. For more information about “dump file creation failed due to error during dump creation,” read further.
It turns out that multiple problems facilitate this issue to get a harmful effect. These are some following causes:
1.) Presence of Cleanup Application
The device’s efficiency will be enhanced by using a variety of cleanup or system-optimizing 3rd party applications that will erase or stop the creation of the dump file. If this situation applies to you, users can remedy the problem by removing the program and erasing the dump files.
2.) File Corruption
This warning message may also be brought on by corrupt system files, preventing the File from being correctly produced. In this situation, you should be able to resolve the issue by using utilities such as SFC to fix the faulty objects. In more severe instances, its repair would be the only option.
3.) Old and Unstable BIOS
Any significantly old BIOS version or specific performance difficulties may blame the dump file issue. The BSOD might be triggered by your BIOS firmware in some circumstances, not merely the dumping problem. If this scenario describes your present condition, one should be able to address the problem by upgrading your BIOS to the most recent version.

How to solve the “dump file creation failed due to error during dump creation” error?
Well, for “dump file creation failed due to error during dump creation,” you can make it right by several methods like:
1.) Problems with Cleanup Software
If you have additional cleanup programs, you should deactivate them.
- Type Run on the windows search box and type “appwiz.Cpl”
- After that, open Programs and Features and uninstall the cleanup software
2.) Run chkdhk Scan
- Press the Windows key and enter ‘cmd.’ As a result, the ‘Command Prompt’ prelude will appear on the screen.
- Choose ‘Run as administrator from the menu.
- Users will consequently see the “Command Prompt” window on display.
- You must copy and paste it into the screen and press enter.
3.) Direct Registry Editor
In this method, you need to follow a process:
- Open Search Box and type run; furthermore, type ‘Regedit.’
- As a result, the ‘Registry Editor’ window will appear.
- Put the site command under it into the address box, and click on enter.
- Click anywhere to open the ‘new’ box and’ DWORD (32-bit) Value’ to make a new one.
- Rename a DisplayParameters, then click on ‘ValueData,’ make 1 on it and click OK
- Then close it and restart again.
4.) Application of Memory Dump
Open the startup and recovery by searching the windows box, “choose complete memory dump,” as write debugging information. The procedure will necessitate a restart of your computer. Then, confirm the existence of the mentioned error. If changing the system settings does not resolve the problem, users need to consider some additional remedies. It will fix “dump file creation failed due to error during dump creation” errors.
5.) Update BIOS
It can be a severe problem as an outdated BIOS can impose several other issues like It will fix “dump file creation failed due to error during dump creation” errors.
- Download the latest BIOS version from the product’s online webpage.
- The acquired package must then be extracted from its zip file and copied to an external USB flash device.
- Users then need to access the BIOS. Restart the computer and press the button recommended by the manufacturer to do this. Producer to producer, it could be different.
- Finally, install the just retrieved BIOS upgrade in place of the old BIOS.
6.) Reinstallation Of Windows
To reinstall your Windows click on the Settings option and then hit the update and security section, select the recovery option from the left side of the menu, and click on the get started option just below the reset this PC command. After which warning rises whether to keep the files or remove everything is the best option for you and go for a local reinstall. It would help if you also made some additional changes; click on the next tab. After that, click on the reset button, and you will get the installation done within an hour or so.
7.) Fix RAM slots
RAM (Random Access Memory) might occasionally be a problem for the issue to happen. If the problem persists even after you’ve tried the initial treatments, a straightforward hardware fix that you can do on your own can assist. The user needs to swap out the RAM slots to apply the repair. Your problem might not be present after using this update. It will fix “dump file creation failed due to error during dump creation” errors.
8.) Run SFC and DISM Scans
For correcting “dump file creation failed due to error during dump creation” SFC scan:
- Press the Windows key and enter ‘cmd.’ As a result, the ‘Command Prompt’ prelude will appear on the screen.
- Type sfc/scan and hit the enter button. It will fix the error.
For correcting “dump file creation failed due to error during dump creation” DISM scan:
- By pressing the Windows key, type “cmd.” The ‘Command Prompt’ preamble will appear on the screen and run as administrator.
- Copy Paste the command-“DISM.exe /On-line /Cleanup-image /Scanhealth” and afterwards “DISM.exe /On-line /Cleanup-image /Restorehealth”
- After completing the procedure, you must restart your computer and check for errors.
9.) Remove the checkbox for “Auto Restart.”
- To access the properties menu, hit the right button on “This PC” and choose this from the new displayed extensions.
Next, turn to the right side. You can access the “Advance systems options” section from here. To choose it, you must click.
The “General Properties” screen will therefore show up on the net. One can find the “Startup and Recovery” segment there. From that now, users must select the “Settings” option. - Users can access the ‘Systems failure’ portion of the newly displayed interface, which includes the ‘Auto reboot’ choice. To disable the function, users must take the checkmark out.
- Restart your Device after that. I’m hoping the mistake will go away. If not, one can use a different related fix.

FAQs on “dump file creation failed due to error during dump creation.”
Does the “dump file creation fail due to error during dump creation” cause BlueScreen?
Blue Screen can be for any reason; however, it is most familiar with this error.
Are there any other fixes for This Error?
There can be a couple of fixes like SFC and DISM scans resulting in any disruptions by this error.
The most common cause of this error?
For a user, an old and outdated version of BIOS can impose several problems.
Final Thought
Dump files will be present if Windows encounters significant crash issues or potential defects. Although crash dumps are commonly used to identify crashes, they are also helpful for other purposes. A complete memory dump that includes the most significant amount of data and the RAM size at the moment of the crash is one of the primary forms of Window dump files. With this section, a user might get the idea that “dump file creation failed due to an error during dump creation.”
Trending Now
-
Resolve Error Code E4301 Using These 4 Exciting Methods
●October 20, 2022
-
15 Incredible Ways to Fix Paramount Plus Keeps Pausing Error
by Amal Santosh●October 20, 2022
-
5 Strategies to Fix Adobe Short Media Token Validation Error Invalid Signature
by Amal Santosh●October 11, 2022
-
Fix the Apple TV 4K Turns off by Itself with 7 Wonderful Ways
by Amal Santosh●October 11, 2022