SSTP-сервер на Keenetic’е, пробую подключиться с помощью клиента SSTP-Client для Linux — http://sstp-client.sourceforge.net/
Какие бы настройки не пробовал, в логах те же ошибки.
На роутере всегда это:

В syslog такое (главную проблему выделил):
Spoiler
Feb  9 14:48:24 NetworkManager[1058]: <info>  [1518176904.2775] keyfile: update /etc/NetworkManager/system-connections/Keenetic SSTP (29c4f10a-79bc-44ba-81c4-a73886793736,"Keenetic SSTP")
Feb  9 14:48:24 NetworkManager[1058]: <info>  [1518176904.2837] vpn-connection[0x1576630,29c4f10a-79bc-44ba-81c4-a73886793736,"Keenetic SSTP",0]: VPN connection: (ConnectInteractive) reply received
Feb  9 14:48:24 NetworkManager[1058]: ** Message: pppd started with pid 2594
Feb  9 14:48:24 NetworkManager[1058]: <info>  [1518176904.2908] vpn-connection[0x1576630,29c4f10a-79bc-44ba-81c4-a73886793736,"Keenetic SSTP",0]: VPN plugin: state changed: starting (3)
Feb  9 14:48:24 pppd[2594]: Plugin /usr/lib/pppd/2.4.7/nm-sstp-pppd-plugin.so loaded.
Feb  9 14:48:24 NetworkManager[1058]: Plugin /usr/lib/pppd/2.4.7/nm-sstp-pppd-plugin.so loaded.
Feb  9 14:48:24 NetworkManager[1058]: ** Message: nm-sstp-ppp-plugin: (plugin_init): initializing
Feb  9 14:48:24 pppd[2594]: pppd 2.4.7 started by root, uid 0
Feb  9 14:48:24 NetworkManager[1058]: ** Message: nm-sstp-ppp-plugin: (nm_phasechange): status 3 / phase 'serial connection'
Feb  9 14:48:24 NetworkManager[1058]: nm_device_get_device_type: assertion 'NM_IS_DEVICE (self)' failed
Feb  9 14:48:24 NetworkManager[1058]: <info>  [1518176904.2986] manager: (ppp0): new Generic device (/org/freedesktop/NetworkManager/Devices/17)
Feb  9 14:48:24 pppd[2594]: Using interface ppp0
Feb  9 14:48:24 NetworkManager[1058]: Using interface ppp0
Feb  9 14:48:24 NetworkManager[1058]: Connect: ppp0 <--> /dev/pts/0
Feb  9 14:48:24 NetworkManager[1058]: ** Message: nm-sstp-ppp-plugin: (nm_phasechange): status 5 / phase 'establish'
Feb  9 14:48:24 pppd[2594]: Connect: ppp0 <--> /dev/pts/0
Feb  9 14:48:24 NetworkManager[1058]: <info>  [1518176904.3092] devices added (path: /sys/devices/virtual/net/ppp0, iface: ppp0)
Feb  9 14:48:24 NetworkManager[1058]: <info>  [1518176904.3092] device added (path: /sys/devices/virtual/net/ppp0, iface: ppp0): no ifupdown configuration found.

Feb  9 14:48:24 sstpc[2602]: Could not parse the HTTP headers
Feb  9 14:48:24 sstpc[2602]: HTTP handshake with server failed

Feb  9 14:48:24 pppd[2594]: Modem hangup
Feb  9 14:48:24 NetworkManager[1058]: Modem hangup
Feb  9 14:48:24 NetworkManager[1058]: ** Message: nm-sstp-ppp-plugin: (nm_phasechange): status 11 / phase 'disconnect'
Feb  9 14:48:24 NetworkManager[1058]: Connection terminated.
Feb  9 14:48:24 pppd[2594]: Connection terminated.
Feb  9 14:48:24 NetworkManager[1058]: <error> [1518176904.8621] platform-linux: do-change-link[18]: failure changing link: failure 19 (No such device)
Feb  9 14:48:24 NetworkManager[1058]: ** Message: Terminated ppp daemon with PID 2594.
Feb  9 14:48:24 NetworkManager[1058]: <warn>  [1518176904.8621] device (ppp0): failed to disable userspace IPv6LL address handling
Feb  9 14:48:24 NetworkManager[1058]: <info>  [1518176904.8673] vpn-connection[0x1576630,29c4f10a-79bc-44ba-81c4-a73886793736,"Keenetic SSTP",0]: VPN service disappeared
Feb  9 14:48:24 NetworkManager[1058]: <info>  [1518176904.8682] devices removed (path: /sys/devices/virtual/net/ppp0, iface: ppp0)
Feb  9 14:48:24 org.mate.panel.applet.MintMenuAppletFactory[1814]: "No such interface 'org.freedesktop.DBus.Properties' on object at path /org/freedesktop/NetworkManager/ActiveConnection/20"
Feb  9 14:48:24 NetworkManager[1058]: ** Message: nm-sstp-ppp-plugin: (nm_phasechange): status 1 / phase 'dead'
Feb  9 14:48:24 NetworkManager[1058]: ** Message: nm-sstp-ppp-plugin: (nm_exit_notify): cleaning up
Feb  9 14:48:24 pppd[2594]: Exit.
Настройки SSTP-Client (это по умолчанию, кроме Ignore certificate warnings. Другие разные комбинации галок тоже пробовал):
В то же время с помощью клиента VPN Client Pro для Android подключается с настройками по умолчанию и прекрасно работает, только имя и пароль ввести:
Spoiler


@Le ecureuil в чем может быть проблема у SSTP-Client?
Edited February 9, 2018 by Sergey Zozulya
-
Summary
-
Files
-
Reviews
-
Support
-
Mailing Lists
-
Tickets ▾
- Bugs
- Patches
- Feature Requests
-
News
-
Discussion
-
Donate
-
Code
Menu
▾
▴
Connection issues (socket or handshake)
Created:
2014-08-18
Updated:
2014-08-19
-

Hi all, I downloaded and compiled the sstp-client 1.0.9 on Red Hat Enterprise Linux Server release 6.4 (Santiago).
After running the command: sstpc —save-server-route —cert-warn —log-level 4 —log-stderr —user user —password pass server refuse-eap usepeerdns nodefaultroute require-mschap-v2 refuse-pap refuse-chap noauthI get the following message:
Aug 17 22:56:33 sstpc[5925]: Resolved … to …
Aug 17 22:56:33 sstpc[5925]: Connected to ..
Aug 17 22:56:33 sstpc[5925]: Unrecoverable socket error, 1
Aug 17 22:56:33 sstpc[5925]: HTTP handshake with server failed
**Error: HTTP handshake with server failed, (-1)I already some time on debugging and stracing. It looks like it has some issues with the socket or with verifying the CA certificate. I read on microtik that handshake issues are ussually due to the following:
-certificate is not yet valid — notBefore certificate date is after the current time.
-certificate has expired — notAfter certificate expiry date is before the current time.
-invalid certificate purpose — the supplied certificate cannot be used for the specified purpose.
-self signed certificate in chain — the certificate chain could be built up using the untrusted certificates but the root could not be found locally.
-unable to get issuer certificate locally — CA certificate is not imported locally.
-server’s IP address does not match certificate — server address verification is enabled, but address provided in certificate does not match server’s address.Not sure if this is the same for sstpc or that it has some issues with the socket.
If I use the above commands via pppd call sstp, I get the same error in the sstp log file.
If I look at the tcpdump I see that it reveives the certificates from the server, but then it stops and doesn’t negotiate the SSL keys.
Hopefully you can help me out.
Many thanks in advance.
-
Hi,
Are you able to provide me with the server address? I should be able to progress to the PPP negotiation without a username or password. You can also privately message me the ip / hostname. Also, please let me know if there’s a custom port number you are trying to use.- Eivind
On Monday, August 18, 2014 1:47 PM, Lourens lbordewijk@users.sf.net wrote:
Hi all, I downloaded and compiled the sstp-client 1.0.9 on Red Hat Enterprise Linux Server release 6.4 (Santiago).
After running the command: sstpc —save-server-route —cert-warn —log-level 4 —log-stderr —user user —password pass server refuse-eap usepeerdns nodefaultroute require-mschap-v2 refuse-pap refuse-chap noauth
I get the following message:
Aug 17 22:56:33 sstpc[5925]: Resolved … to …
Aug 17 22:56:33 sstpc[5925]: Connected to ..
Aug 17 22:56:33 sstpc[5925]: Unrecoverable socket error, 1
Aug 17 22:56:33 sstpc[5925]: HTTP handshake with server failed
**Error: HTTP handshake with server failed, (-1)
I already some time on debugging and stracing. It looks like it has some issues with the socket or with verifying the CA certificate. I read on microtik that handshake issues are ussually due to the following:
-certificate is not yet valid — notBefore certificate date is after the current time.
-certificate has expired — notAfter certificate expiry date is before the current time.
-invalid certificate purpose — the supplied certificate cannot be used for the specified purpose.
-self signed certificate in chain — the certificate chain could be built up using the untrusted certificates but the root could not be found locally.
-unable to get issuer certificate locally — CA certificate is not imported locally.
-server’s IP address does not match certificate — server address verification is enabled, but address provided in certificate does not match server’s address.
Not sure if this is the same for sstpc or that it has some issues with the socket.
If I use the above commands via pppd call sstp, I get the same error in the sstp log file.
If I look at the tcpdump I see that it reveives the certificates from the server, but then it stops and doesn’t negotiate the SSL keys.
Hopefully you can help me out.
Many thanks in advance.
Connection issues (socket or handshake)
Sent from sourceforge.net because you indicated interest in https://sourceforge.net/p/sstp-client/discussion/1499217/
To unsubscribe from further messages, please visit https://sourceforge.net/auth/subscriptions/-
Hi Eivind, it is for a setting up a VPN within an internal network on port 443.
I can provide you some specifics from the tcpdump file if needed.
The TLS connection stops after the Server Hello, certificate (TLSv1 Record Layer: Handshake Protocol: Multiple Handshake Messages) packet from the server.The next packet from a working connection from another system is: TLSv1 Record Layer: Handshake Protocol: Client Key Exchange.
So like I said the session key exchange is not started due to handshake or socket issues.
In another post (believe from you) I read that the server certicate validation is not mandatory. If that’s true it should be a socket issue, right?
Appreciate your help.
-
Could you forward me the .pcap file to eivnaes [ at ] yahoo.com?
- Eivind
On Monday, August 18, 2014 11:20 PM, Lourens lbordewijk@users.sf.net wrote:
Hi Eivind, it is for a setting up a VPN within an internal network on port 443.
I can provide you some specifics from the tcpdump file if needed.
The TLS connection stops after the Server Hello, certificate (TLSv1 Record Layer: Handshake Protocol: Multiple Handshake Messages) packet from the server.
The next packet from a working connection from another system is: TLSv1 Record Layer: Handshake Protocol: Client Key Exchange.
So like I said the session key exchange is not started due to handshake or socket issues.
In another post (believe from you) I read that the server certicate validation is not mandatory. If that’s true it should be a socket issue, right?
Appreciate your help.
Connection issues (socket or handshake)
Sent from sourceforge.net because you indicated interest in https://sourceforge.net/p/sstp-client/discussion/1499217/
To unsubscribe from further messages, please visit https://sourceforge.net/auth/subscriptions/
Log in to post a comment.
In person, a handshake can be used to greet someone or finalize an agreement with them. The same is true online.

When devices on a network — say, a browser and a web server — share encryption algorithms, keys, and other details about their connection before finally agreeing to exchange data, it’s called an SSL handshake. During this handshake, the browser and server might ask to see each other’s SSL certificates to verify them.
This handshake is essential for establishing a secure connection before transferring data, so it’s important to understand what an SSL handshake is and what to do if it fails.

The SSL handshake is the process in which a client and server establish the encryption algorithms and secret keys they will use to communicate with each other securely, and exchange and validate each other’s digital certificates.
Note: SSL and TLS are both cryptographic protocols that enable clients and servers operating over a network to communicate with each other securely. TLS has replaced SSL, but SSL is still a more commonly used term so we’ll continue to use it in this post.
SSL Handshake Steps
The exact steps in an SSL handshake vary depending on the version of SSL the client and server decide to use, but the general process is outlined below.
- The client says hello. This “client hello” message lists cryptographic information, including the SSL version to use to communicate with each other. It also lists which encryption algorithms it supports, which are known as Cipher Suites.
- The server responds hello. This “server hello” message contains important information, like which CipherSuite it chose, and its digital certificate. It might also request the client’s certificate.
- The client verifies the server’s certificate. It also sends several byte strings, including one for allowing both the client and the server to compute a secret key for encrypting subsequent messages, including the “finished” messages. If the server sends a client certificate request, it will also send a byte string encrypted with its own private key and digital certificate.
- The server verifies the client’s certificate. This step only takes place if client authentication is required.
- The client says “I’m finished.” This “finished” message indicates that the client has completed its part of the handshake.
- The server says “I’m finished, too.” This “finished” message indicates that the sever has completed its part of the handshake.
For the remainder of the session, the server and client can now exchange messages that are encrypted with the same secret key, which was shared in step three. This is known as symmetric encryption. You can learn more about symmetric encryption, and how it differs from asymmetric encryption, in this post.
The steps above will occur if the process goes smoothly. But what if it doesn’t? Below we’ll walk through how to resolve an “SSL Handshake Failed” error message.
What is SSL Handshake Failed?
SSL Handshake Failed is an error message that occurs when the client or server wasn’t able to establish a secure connection.
This might occur if:
- The client is using the wrong date or time.
- The client is a browser and its specific configuration is causing the error.
- The connection is being intercepted by a third party on the client-side.
- The client and server do not support the same SSL version.
- The client and server are using different Cipher Suites.
- The client or server’s certificate is invalid.
The SSL Handshake Failed error message may appear differently, depending on the client application you’re using or server you’re trying to communicate with. For example, in GitHub, it will look something like this:
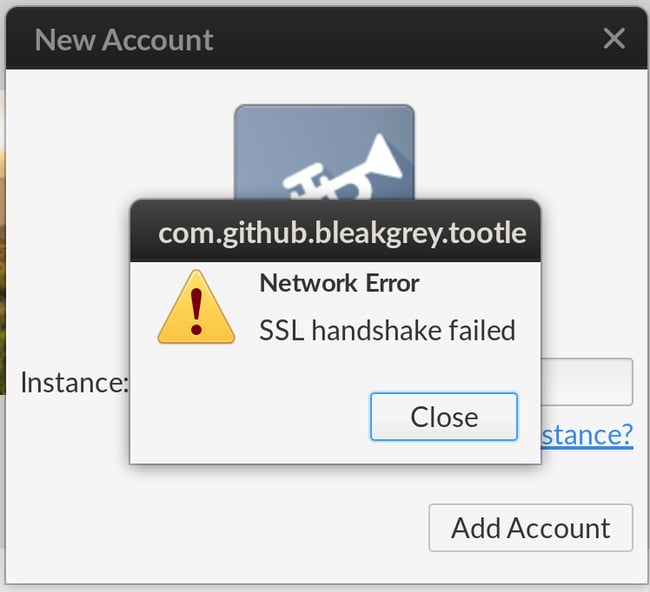
Image Source
If you’re using Cloudflare, on the other hand, an SSL Handshake Failed will appear as a 525 error that looks something like this:
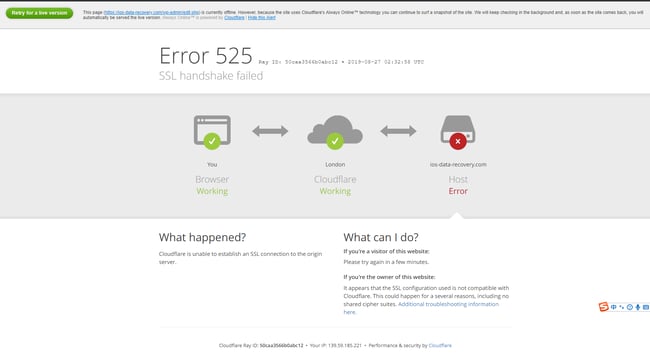
Image Source
Now that you know some of the causes of the SSL Handshake Failed error, let’s look at some solutions.
How to Fix SSL Handshake Failed
- Correct the time and date on the client device.
- Try another browser.
- Add website to allowlist.
- Update browser to use the latest SSL protocol.
- Check browser and server support for Cipher Suites.
- Verify your SSL certificate is accurate and valid.
1. Correct the time and date on the client device.
Let’s start with the easiest fix. If the system time and date is incorrect on your computer or device, then it can cause the SSL Handshake Failed error. That’s because time is essential when it comes to SSL certificates: they have finite lifespans and become invalid past their expiration date.
If you check your system time and date and it’s correct, then move on to the next step.
2. Try another browser.
It’s possible that the browser you’re using is causing the SSL Handshake Failed error. It could be your settings, browser plugins, or another issue. To see if this is the problem, just switch to another browser.
Let’s say you were trying to connect to a website using Google Chrome, and it works just fine in Safari. In that case, you’ll have to narrow down what the problem is. Go back and reset Google Chrome (or whatever browser you were using) to its default settings and disable all your plugins. Then re-configure your settings and enable your plugins one-by-one, testing your ability to connect to the website each time. You should be able to isolate the specific setting or plugin that caused the SSL Handshake Failed that way.
If you try another browser and you still see the SSL Handshake Failed error, then move on to the next step.
3. Add website to allowlist.
It’s also possible that your firewall is causing the SSL Handshake Failed error by intercepting your request for inspection. To rule it out as the cause, you can temporarily deactivate your firewall —but that can leave you vulnerable to attack.
Instead, try adding the website to your allowlist. Here’s the process for Google Chrome:
- On your admin console homepage, go to Devices > Chrome.
- Click Settings> Users & browsers.
- Leave the top organizational unit selected (it’s selected by default). This will apply the setting to all users and enrolled browsers.
- Scroll to URL Blocking and enter the website you are trying to access under Blocked URL exceptions.
- Click Save.
If you try visiting that site again and you still see the SSL Handshake Failed error, then move on to the next step.
4. Update browser to use the latest SSL protocol.
It’s possible that you’re getting the SSL Handshake Failed error because your device (the client) and server do not support the same SSL version, which is resulting in a protocol mismatch. For example, let’s say your browser only supports TLS 1.1 and your server only supports TLS 1.2 or 1.3 (the latest version). If these two try to establish a secure connection, then it will likely result in an SSL Handshake Failed error.
In that case, you’ll need to update your browser. Most updated versions of major browsers like Google Chrome have TLS 1.2 automatically enabled. However, even if it is updated, it’s important to make sure it’s configured to to support the latest TLS version.
Here’s the easiest way to check:
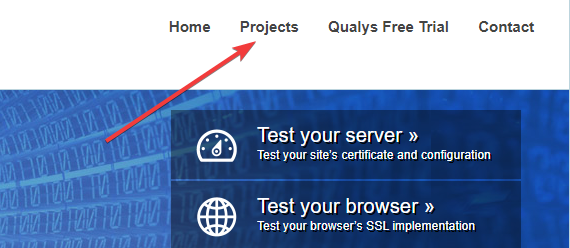
- Visit SSL Labs.
- Navigate to Projects.
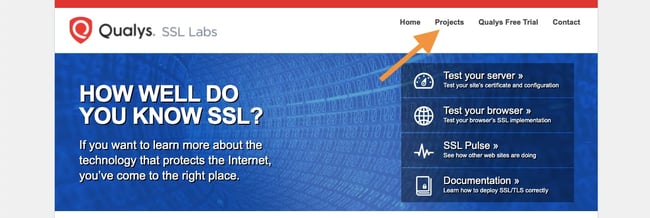
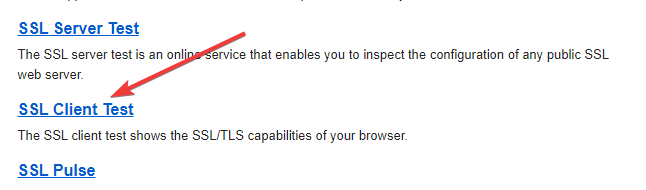
- Click SSL Client Test.

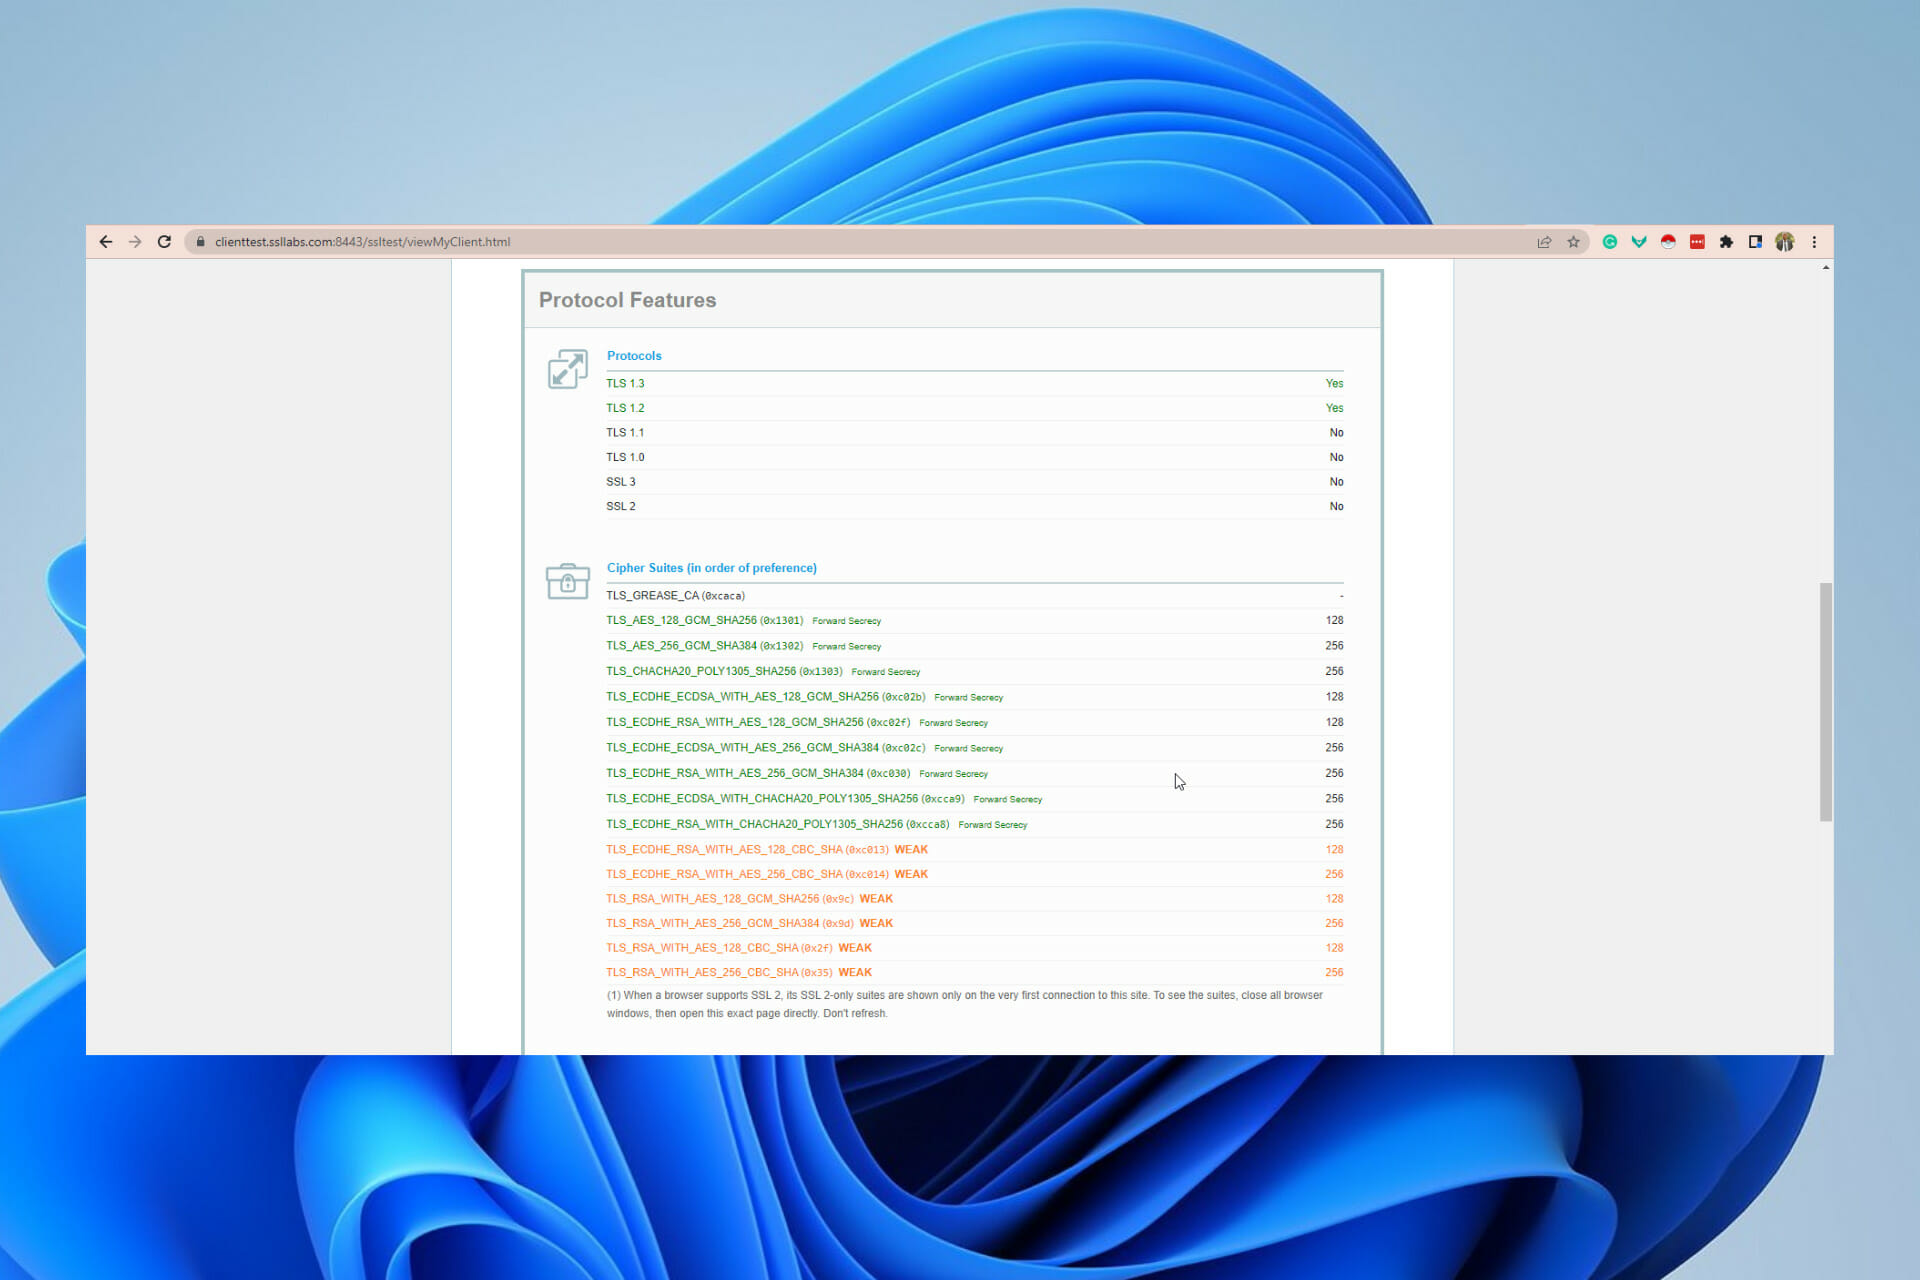
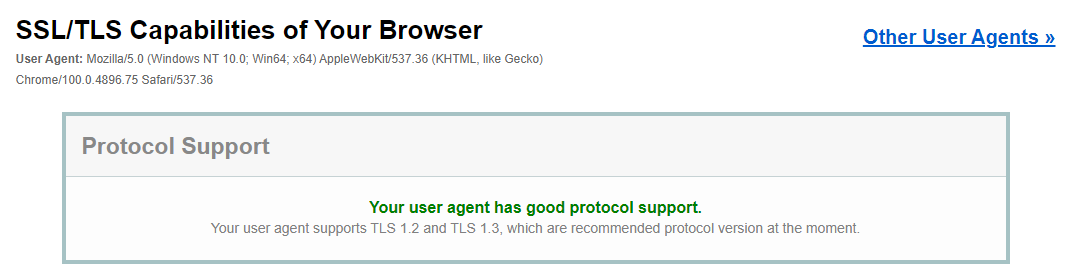
- Under Protocol Support, it will tell you whether your browser supports the latest versions of TLS.

If you verify that your browser and server are using the same protocol, then move on to the next step.
5. Check browser and server support for Cipher Suites.
Another reason you could be getting the SSL Handshake Failed error is that the client and server are using different Cipher Suites. Just like a protocol mismatch, a client and server who do not have mutual support for the same CipherSuite will not be able to establish a secure connection.
You can compare which Cipher Suites your browser support to which the server of the website you’re trying to visit supports by once again visiting SSL Labs.
- First, navigate to Projects.
- Click SSL Client Test.
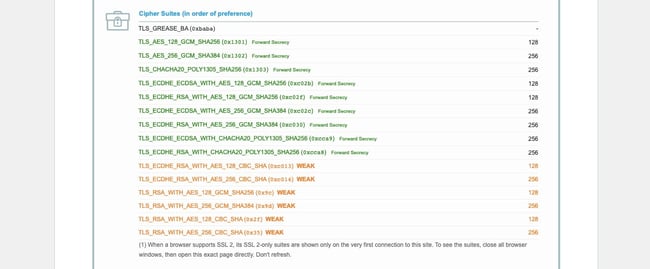
- Scroll down to Protocol Features, where it will list which Cipher Suites your browser supports, in order of preference.
- Now, open SSL Labs in another tab, and navigate to Projects.
- Click SSL Server Test.
- Type in the domain name you are trying to visit that is resulting in the SSL Handshake Failed error.
- Scroll down to Configuration, where it will list which Cipher Suites the server supports, in order of preference.
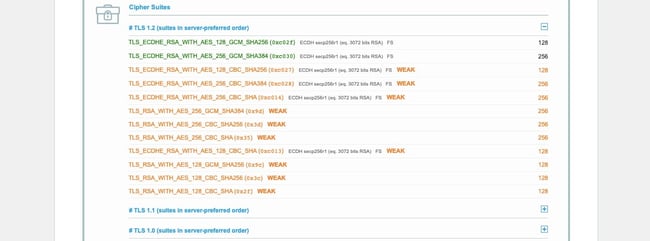
If you verify that your browser and server are using the same CipherSuite, then move on to the next step.
6. Verify your SSL certificate is accurate and valid.
Any number of issues on an SSL certificate can prevent an SSL handshake from being completed. This may result in an SSL Handshake Failed error or another error message that ultimately means the handshake failed. For example, you might see something like this:
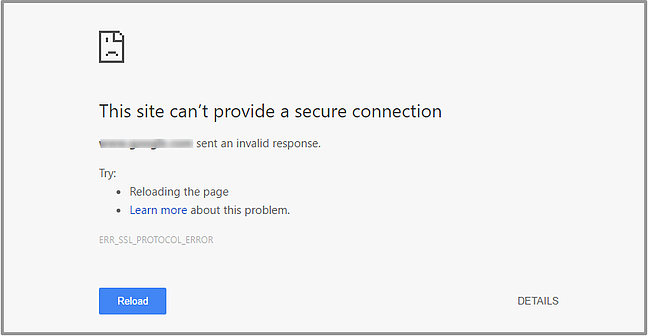
Image Source
If the SSL certificate has an incorrect host name, for example, or it’s past its expiration date, then the handshake will likely fail. So it’s important to ensure your SSL certificate is installed correctly and renewed when needed.
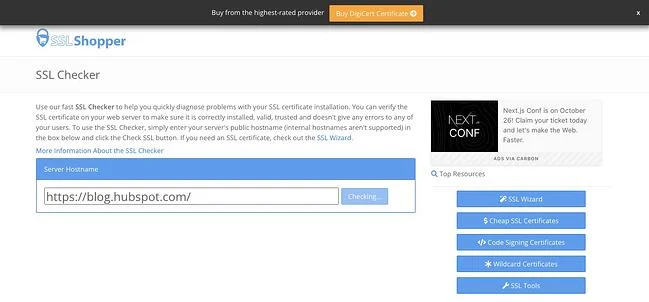
You can use an online tool like the above-mentioned SSL Server Test or SSL Shopper to test that your SSL configuration is installed, valid, and trusted in just a few minutes.
When a Client and Server Don’t Want to Shake Hands
Since an SSL handshake is an essential step in keeping data transferred over the internet secure, it’s important that users understand what the SSL Handshake Failed error means and how to fix it. By following the steps above, you should be able to resolve the issue and establish a secure connection between your device and the server you’re trying to connect to.

by Afam Onyimadu
Afam is a geek and the go-to among his peers for computer solutions. He has a wealth of experience with Windows operating systems, dating back to his introduction… read more
Published on April 14, 2022
- When there is no communication between your computer (the client) and a server, your computer may have encountered a code 1 error or a handshake failed error.
- A major cause of the code 1 error is an incorrect date and time on the client.
- Using services like the SSL labs, is a good way to confirm you are running the correct version for SSL and TLS.
- Easy migration: use the Opera assistant to transfer exiting data, such as bookmarks, passwords, etc.
- Optimize resource usage: your RAM memory is used more efficiently than in other browsers
- Enhanced privacy: free and unlimited VPN integrated
- No ads: built-in Ad Blocker speeds up loading of pages and protects against data-mining
- Gaming friendly: Opera GX is the first and best browser for gaming
- Download Opera
A handshake may be used to welcome someone or seal a deal with them in person; the same is true for the internet.
An SSL handshake occurs when devices on a network — such as a web server and a browser — discuss keys, encryption methods, and other parameters about their connection before agreeing to transmit data. During a handshake, browsers and servers may request to examine and validate each other’s SSL certificates.
It’s essential to understand what an SSL handshake is and the different ways to resolve errors around it, including the SSL code 1 error.
How can I fix an SSL code 1 handshake failed error?
1. Correct the date and time on your computer
- Right-click on the date and time on your taskbar and select adjust date and time.

- Under the date and time menu, toggle on the option to set time automatically.

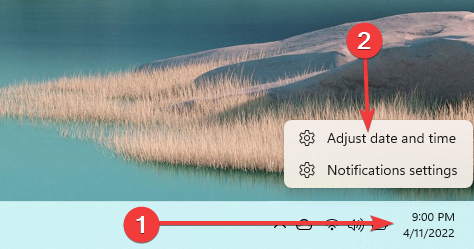
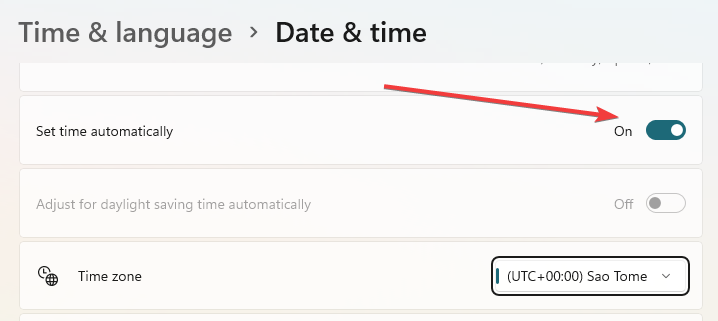
Problems associated with the SSL handshake failing might be caused by an incorrect system time and date on your PC. SSL certificates have limited lifespans and will become invalid when they’ve passed their expiry date.
If the time and date on your computer are incorrect, the certificates will always assume the time has elapsed.
2. Add the website to your allow list
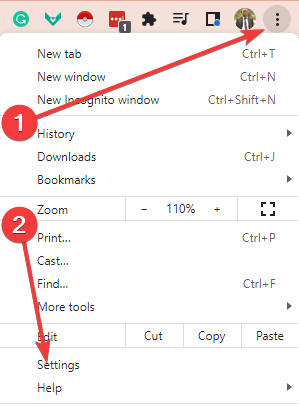
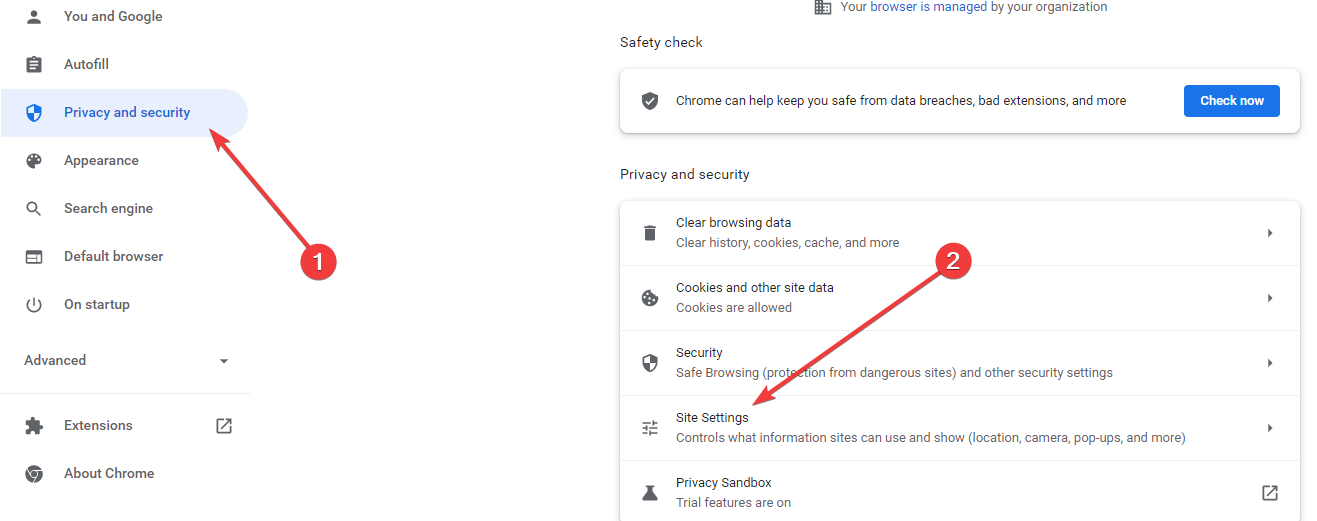
- Launch Chrome, click on the ellipses button at the top right corner, and select the settings option.

- Select privacy and security, then click on the option for site settings.

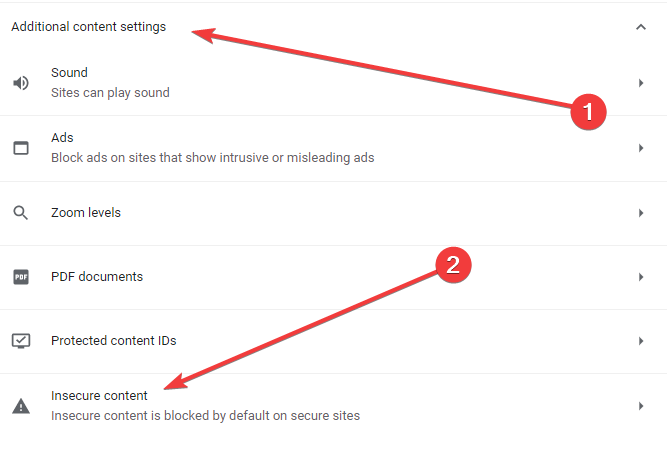
- Scroll down and expand the Additional content option, then click on insecure content.

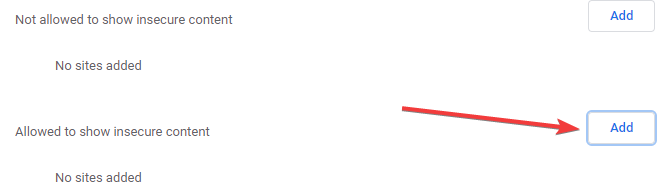
- Click on the Add button in front of Allowed to show insecure content.

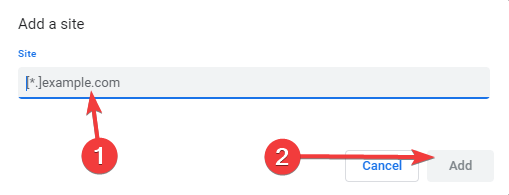
- Input the URL and click add.

Because it’s conceivable that your firewall is producing the SSL handshake failed error by blocking your inspection requests, you should attempt this solution.
Note that adding a website to the allow list may expose you to malware, and you should only try it if you are sure that the website holds no viruses.
- Inet_e_security_problem: How to Fix This Error Code
- How to Disable Guest Mode in Chrome on Windows 11
3. Verify your SSL Protocol and update your browser
3.1 Verify your browser is using the latest SSL protocol
- Visit the SSL labs website.
- Click on projects at the top right.

- Scroll down and select SSL client test.

- Under the Protocol Support menu, you will know if the browser has support for the latest SSL/TLS versions.

Note that if you’re experiencing SSL handshake failed errors, and after running this test, you realize that your client (your device) and server don’t support the same SSL version, you’ll need to upgrade your browser.
TLS 1.2 is enabled by default in most recent versions of major browsers, such as Google Chrome.
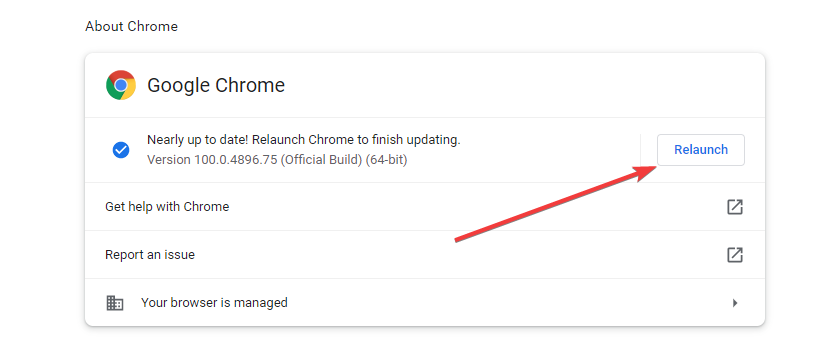
3.2 Update your browser
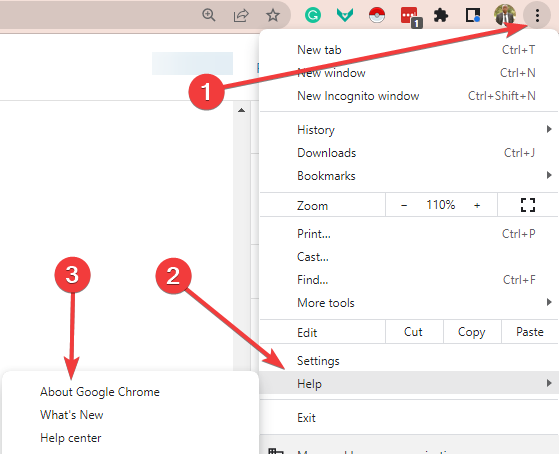
- Launch Chrome, click on the ellipses button at the top right corner, select Help, then About Google Chrome.

- If there is an update, it will start automatically, and you will have to click relaunch to complete the update.

4. Use an alternative browser
The handshake error is more common in Chrome, and using an alternative browser could help you avoid this error.
While there a many to choose from, we recommend Opera. It is built on Chromium and benefits from its extensive extension library. Opera comes with the added advantage of a VPN that lets you choose servers between the Americas, Asia, and Europe.
It is also compatible across several platforms and will be a great option regardless of your device.
⇒ Get Opera
Because an SSL handshake is a critical step in ensuring data security over the internet, this guide has shown steps to resolving your SSL handshake Code 1 error. Now you should be able to create a secure connection between a server and your device.
![]()
Newsletter
Setting up a Secure Sockets Layer (SSL) certificate for your website has never been easier. You can generate certificates for free, and many hosting providers will even set them up for you. However, if you don’t configure your certificate properly, you may encounter errors such as “SSL handshake failed”.
The “SSL handshake failed” error shows up when your browser and the server can’t establish a secure connection. This article will explain what an SSL handshake is and what to do if you fail to establish one.
Let’s get to it!
-
1
What Is an SSL Handshake? -
2
What Causes the “SSL Handshake Failed” Error -
3
How to Fix the “SSL Handshake Failed” Error (5 Ways)-
3.1
1. Update Your Local Device’s Date and Time -
3.2
2. Ensure That Your Browser Supports the Latest TLS Protocol -
3.3
3. Make Sure Your SSL Certificate Is Valid -
3.4
4. Check Your Server’s Server Name Identification (SNI) Configuration -
3.5
5. Pause Cloudflare to Test Your SSL Certificate
-
3.1
-
4
Conclusion
What Is an SSL Handshake?
As you may know, an SSL certificate validates your website’s “identity”. It does that using a cryptographic key that your browser checks to make sure the certificate is valid. Once you establish a connection, your browser can decrypt the content that the server sends it.
This process is called a “handshake”. Here’s how it works in more detail:
- You visit a website with an SSL certificate and your browser sends a request for data.
- The server sends the browser an encrypted public key.
- Your browser checks that key and sends its encrypted key back to the server.
- The server decrypts the key and sends encrypted content back to your browser.
- Your browser decrypts the content (hence completing the handshake).
All of this happens in seconds. SSL certificates and the HTTPS protocol enable your website to transmit data securely, without negatively impacting performance. That makes an SSL certificate vital for any website. However, like any element of your site, it can occasionally create unique problems.
What Causes the “SSL Handshake Failed” Error
The “SSL handshake failed” error tells you precisely what the problem is. It shows up when your browser fails to establish a connection with a website that has an SSL certificate:
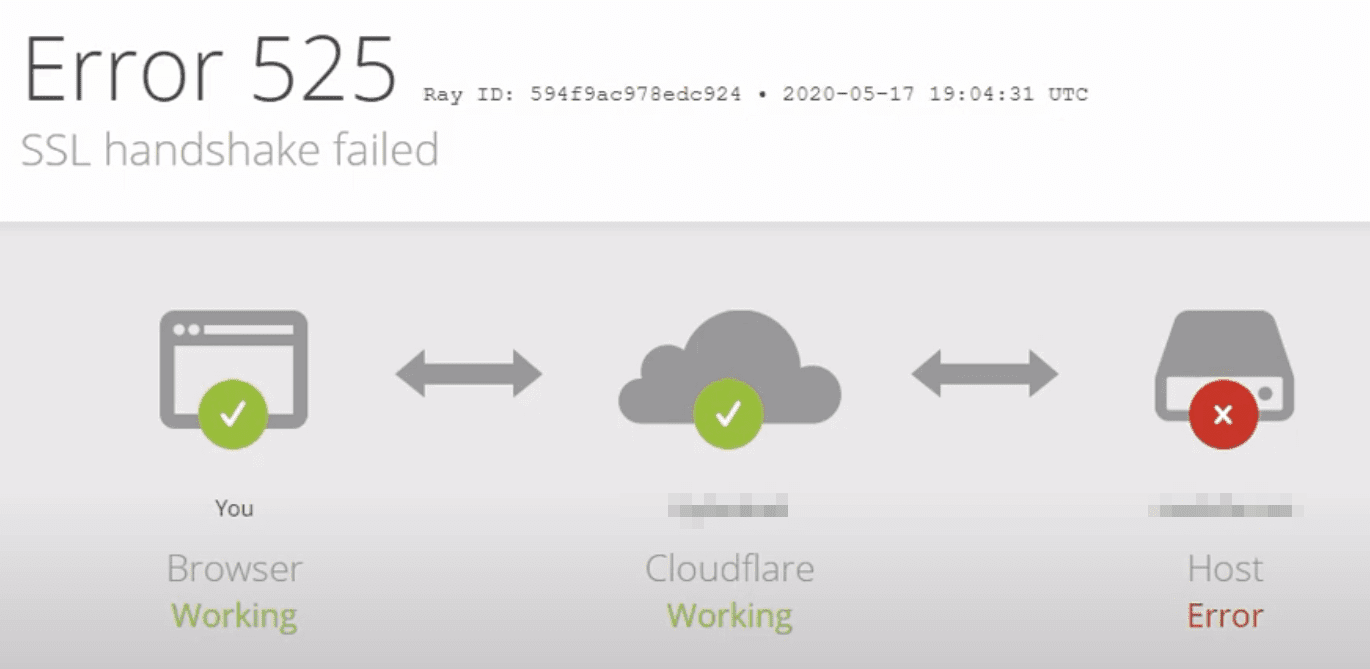
In this example from a website using Cloudflare, you can see that the “SSL handshake failed” error corresponds to the “525” code. Thus, the error can stem from both server- and client-side problems.
The most common causes of the “SSL handshake failed” error include:
- Your local device has the wrong date or time
- The browser doesn’t support the latest SSL protocol
- Your SSL certificate is invalid
- There’s a problem with your Server Name Identification (SNI) configuration
- There’s an issue with your Content Delivery Network (CDN), such as Cloudflare
That list includes two local issues, two that are related to your website’s server, and one that’s specific to a third-party service. In the next sections, we’ll explore how to tackle each of them.
How to Fix the “SSL Handshake Failed” Error (5 Ways)
Here, we’re going to start by showing you how to fix the client-side issues that can cause the “SSL handshake failed” error. Those solutions are pretty simple. In case they don’t work, however, we’ll then move on to more technical solutions you can try.
1. Update Your Local Device’s Date and Time
When your browser tries to establish an SSL handshake, it verifies the certificate against your computer’s date and time. It does this to verify that the SSL certificate is still valid.
If your local device’s date and time are off, that can lead to errors during the verification process (i.e., no handshake). Fortunately, this is an issue with a simple fix.
On a Windows device, open the Start menu and type in Date & Time settings. Select the option that appears, and a new window will pop up. Enable the setting Set time automatically, and ensure that your time zone is correct:
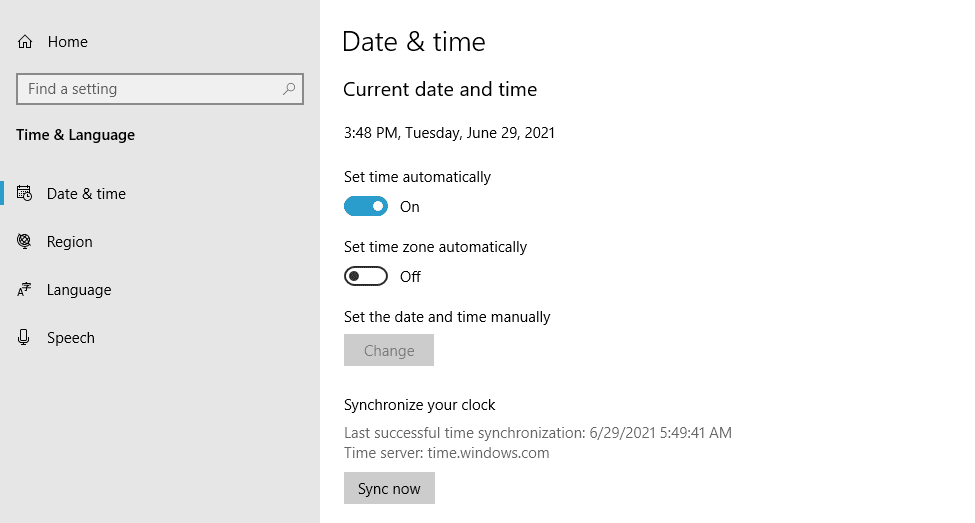
Verify that your date is now correct, and then try to reload the website.
Here’s how to fix your date and time on other Operating Systems (OSs):
- macOS
- iOS
- Android
If fixing the date and time on your local device doesn’t do the trick, you can move on to the next fix.
2. Ensure That Your Browser Supports the Latest TLS Protocol
In some cases, you may run into the “SSL handshake failed” error due to problems with your browser. The most common issue is that your browser doesn’t support the Transport Layer Security (TLS) protocol that your certificate uses.
To put it simply, both SSL and TLS are authentication protocols, and your certificate may use either one. Modern browsers support both protocols, but their older versions might not.
The easiest way to determine whether your browser is causing the issue is to use another one. If the “SSL handshake failed” error doesn’t appear in other browsers, the original one may be the problem.
To fix this issue in Windows, open the Start menu and type in Internet Options. Select the option that appears and go to the Advanced tab. Scroll down the list of settings until you find the options that correspond to SSL and TLS settings:
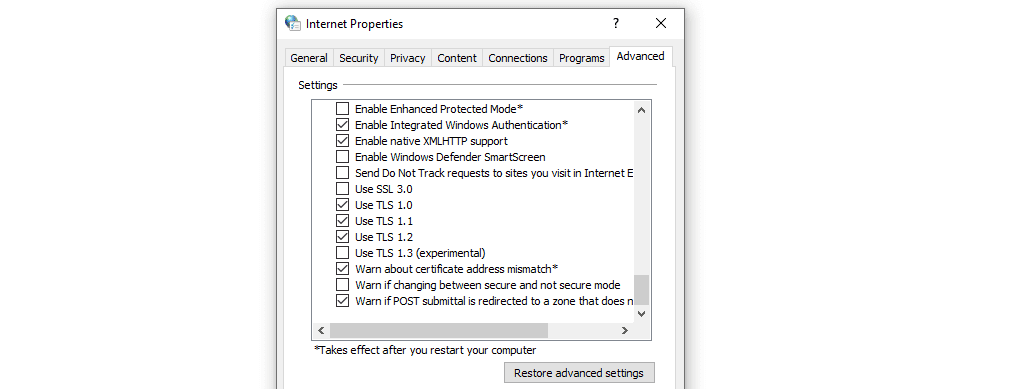
Ideally, you should un-check the box for SSL 3 and 2 (if you see those options). You only need to check the boxes for TLS 1, 1.1, and 1.2.
Then save the changes to your internet options and try re-accessing the website. Note that if you’re using macOS or iOS, TLS 1.2 should be enabled by default.
3. Make Sure Your SSL Certificate Is Valid
SSL certificates have expiration dates. That’s a built-in function that forces you to renew the certificate at some point, and validate your domain ownership.
If your SSL certificate expires, your browser won’t be able to establish a handshake. Depending on who your SSL certificate provider is, you’ll probably receive notifications well before it expires so you can renew it.
Even so, it doesn’t hurt to check if you’re not sure about your certificate’s expiration date. You can use a tool such as SSL Server Test to do so:
The service will return a lot of information about your website’s SSL certificate. If the certificate expired, you’ll see when its validity ran out:
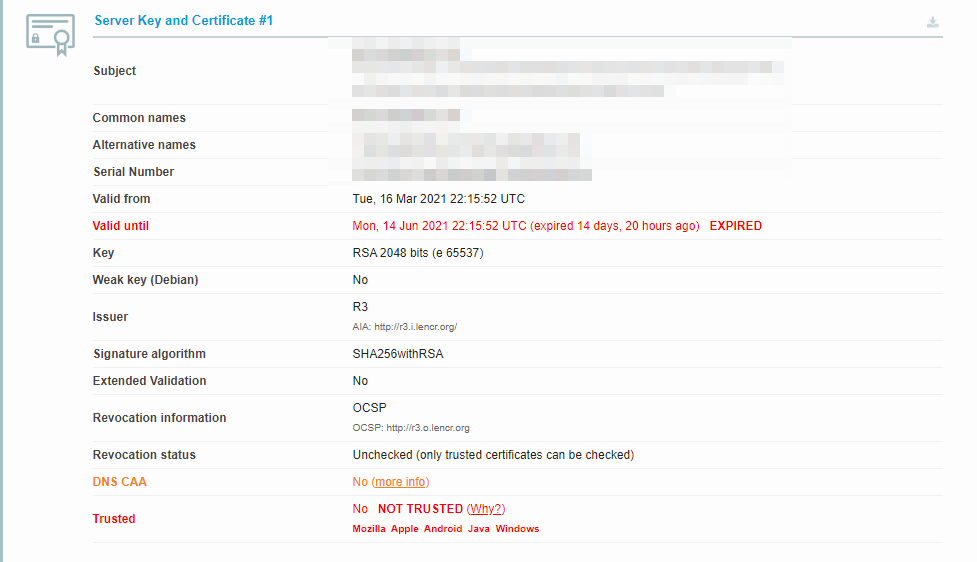
In this case, you’ll need to re-issue and install the SSL certificate on your website. Depending on who your hosting provider is, they might be able to help with that process.
4. Check Your Server’s Server Name Identification (SNI) Configuration
If you’re using a shared server to host your website, you can run into issues with multiple SSL certificates. Hosting providers use proper Server Name Identification (SNI) configuration to ensure that when visitors try to access your site, they get the correct SSL certificate (and not one from another property).
Generally speaking, most reputable hosting providers won’t present any issues with SNI configuration. Additionally, if you’re not using a shared server, you can move on to the next fix.
If you want to be 100% sure that your hosting provider isn’t presenting any issues with SNI configuration, you can contact its support for help. On a shared server, you won’t be able to access this configuration directly. If this turns out to be the problem, you may want to consider upgrading to a more robust hosting plan.
5. Pause Cloudflare to Test Your SSL Certificate
If you’re using Cloudflare, the “SSL handshake failed” error can be due to a problem with its connection to your website. The easiest way to test this is by temporarily disabling it.
Fortunately, Cloudflare offers a “pausing” feature you can use to disable the service at any time. Once you do this, we recommend clearing your browser’s cache before trying to access your website again.
If the SSL handshake error is gone, you’ll want to contact Cloudflare to see what the problem might be. While you wait for a response, keep the CDN disabled so other users can also access your website. On the other hand, if the SSL error persists, that means it’s probably due to an error with your server’s configuration (see above).
Conclusion
The “SSL handshake failed” error is relatively easy to fix, as long as you’re aware of what its potential causes are. The error might be due to an issue with your local device’s settings, your server’s configuration, or your CDN.
Here’s what you might need to do to fix the “SSL handshake failed” error:
- Update your local device’s date and time.
- Ensure that your browser supports the latest TLS protocol.
- Make sure your SSL certificate is valid.
- Check your server’s SNI configuration.
- Pause Cloudflare to test your SSL certificate.
Do you have any questions about how to fix the “SSL handshake failed” error? Let’s talk about them in the comments section below!
Featured Image via vladwel / shutterstock.com
Интернет сделал для нас удобным находить любую необходимую информацию. Вы можете посещать веб-сайты напрямую или использовать поисковую систему, например Google, для доступа к различным типам данных. Однако бывают случаи, когда мы не можем открывать веб-страницы, и этому может быть несколько причин. В некоторых случаях это может быть связано с вашим сетевым подключением. С другой стороны, еще одна распространенная проблема, которая вызывает эту проблему, — это сбой установления связи TLS.
Теперь вы можете спросить: «Что означает рукопожатие TLS?» TLS означает Transport Layer Security, протокол шифрования. Связь по этому протоколу остается конфиденциальной и безопасной. В этом посте мы собираемся объяснить, что происходит при рукопожатии TLS. Таким образом, вы лучше поймете концепцию. Более того, мы научим вас, как исправить ошибку сбоя установления связи TLS.
Как мы все знаем, когда есть форма переговоров или приветствия между двумя людьми, мы скрепляем это рукопожатием. Точно так же, когда два сервера обмениваются данными и подтверждают друг друга, они формируют рукопожатие TLS. Во время этого процесса серверы проходят проверку. Они устанавливают шифрование при обмене ключами. После подтверждения подлинности всех деталей начнется обмен данными. Вот четыре этапа рукопожатия TLS:
- Указывает версию TLS, которая будет использоваться для связи.
- Выбор алгоритма шифрования для связи.
- Открытый ключ и цифровая подпись эмитента сертификата SSL будут использоваться для проверки подлинности.
- Будут созданы сеансовые ключи, которые затем будут обмениваться между двумя серверами.
Чтобы упростить задачу, обе стороны сначала скажут «привет». Затем сервер предоставит сертификат, который клиент проверит. После того, как будет подтверждена подлинность сертификата, начнется сеанс. Перед этим будет создан ключ, который позволит обмениваться данными между серверами.
Как исправить проблемы с рукопожатием TLS
К сожалению, если проблема связана с сервером, вы ничего не можете сделать. Например, если сертификат с сервера не может быть аутентифицирован, тогда это уже не в ваших руках. Однако, если у вас возникли проблемы с браузером, который вы используете, вы все равно можете попробовать множество обходных путей. Кроме того, если вы имеете дело с несоответствием в протоколе TLS, вы можете исправить проблему в браузере.
Сбой рукопожатия TLS может быть по разным причинам. Прежде чем пытаться решить проблему, убедитесь, что вы действительно имеете дело с ошибкой рукопожатия TLS. В большинстве случаев можно соблюдать следующие правила:
- Попробуйте посетить другие сайты и посмотрите, сохраняется ли проблема.
- Если вы используете сеть Wi-Fi, попробуйте переключиться на проводную.
- Попробуйте другие сетевые подключения. Например, используйте другой маршрутизатор или переключитесь на общедоступную сеть.
После того, как вы установили причину проблемы, вы можете спросить: «Следует ли мне отключить квитирование TLS в моем браузере?» Мы понимаем ваше разочарование, но не рекомендуем этого делать. В конце концов, протокол TLS — один из лучших способов обеспечить безопасный просмотр. Действительно, вы можете продолжить просмотр веб-сайта даже с недействительным сертификатом. Однако вы никогда не должны совершать с ним какие-либо операции. Например, не отправляйте учетные данные пароля и не используйте свою кредитную карту.
С другой стороны, бывают случаи, когда сбой подтверждения TLS возникает из-за проблем с вашим браузером. В этом случае вы можете решить проблему, изменив некоторые настройки в вашем браузере. Ниже мы расскажем о некоторых из лучших обходных путей.
Решение 1. Обеспечение правильного системного времени
В большинстве случаев рукопожатие TLS не удается из-за неправильных настроек системного времени. Имейте в виду, что системное время является жизненно важным фактором при проверке того, действительно ли сертификат действителен или просрочен. Итак, если время на вашем ПК не совпадает со временем на сервере, то может показаться, что сертификаты больше не действительны. Поэтому мы рекомендуем вам установить системное время на «автоматическое». Вот шаги:
- На клавиатуре нажмите Windows Key + I. Откроется приложение «Настройки».
- В приложении «Настройки» выберите «Время и язык».
- Перейдите на правую панель и установите переключатель в разделе «Автоматически устанавливать время» в положение «Вкл.».
- Перезагрузите компьютер, затем попробуйте снова зайти на сайт, чтобы убедиться, что ошибка подтверждения TLS исчезла.
Решение 2. Изменение протокола TLS в Windows 10
Возможно, проблема связана с версией TLS, которую использует ваш браузер. Стоит отметить, что в Windows 10 и более ранних версиях операционной системы централизованы настройки протокола. Вы можете получить доступ к свойствам Интернета, чтобы переключиться на другую версию TLS. Для этого следуйте этим инструкциям:
- Запустите диалоговое окно «Выполнить», нажав клавиши Windows + R на клавиатуре.
- В диалоговом окне «Выполнить» введите «inetcpl.cpl» (без кавычек), затем нажмите «ОК».
- В окне свойств Интернета перейдите на вкладку «Дополнительно».
- Прокрутите вниз, пока не дойдете до раздела «Безопасность», где вы можете добавить или удалить протоколы TLS.
- Если веб-сайт, к которому вы пытаетесь получить доступ, требует TLS 1.2, вам необходимо его выбрать.
- Нажмите «Применить» и «ОК», чтобы сохранить внесенные изменения.
- После изменения версии TLS попробуйте снова получить доступ к тому же веб-сайту.
Когда дело доходит до протоколов TLS, IE, Chrome и Edge используют возможности Windows. Между тем Firefox управляет собственной базой данных сертификатов и протоколами TLS. Итак, если вы хотите изменить версию TLS в Firefox, выполните следующие действия:
- Запустите Firefox, затем введите «about: config» (без кавычек) в адресной строке.
- Нажмите Enter, затем щелкните поле поиска.
- Введите «TLS» (без кавычек), затем найдите security.tls.version.min.
- Вы можете изменить это на любое из следующего:
Установите TLS 1 и 1.1, введя 1 и 2.
Включите TLS 1.2, введя 3.
Установите максимальный протокол TLS 1.3, введя 4.
Решение 3. Удаление базы данных сертификатов или профиля браузера
Браузеры хранят базу данных сертификатов. Например, профили Firefox поддерживают файл cert8.db. Есть один способ узнать, что ошибка установления связи TLS связана с локальной базой данных сертификатов. Вы можете попробовать удалить файл cert8.db в Firefox. Если ошибка исчезает при перезагрузке компьютера и браузера, значит, вы определили причину.
Для Edge за обработку сертификатов отвечает диспетчер сертификатов. Вы можете удалить сертификаты, выполнив следующие действия:
- Откройте Edge, затем введите в адресной строке «edge: // settings / privacy» (без кавычек).
- Щелкните параметр «Управление сертификатами и настройками HTTPS / SSL», затем удалите сертификаты.
Если у вас возникли проблемы с поиском базы данных сертификатов, лучше всего удалить профиль браузера. Как только вы это сделаете, вы можете снова попытаться получить доступ к веб-сайту, чтобы узнать, исчезла ли ошибка TLS.
Решение 4. Сброс настроек браузера
Если ни одно из исправлений, которыми мы поделились, не может решить проблему TLS, то последнее средство — сбросить настройки браузера. Лучший способ сделать это — удалить и переустановить браузер. Как только вы это сделаете, вы можете снова попытаться получить доступ к веб-сайту, чтобы проверить, исчезла ли ошибка TLS.
В некоторых случаях время установления связи TLS истекает, и вы не можете посетить веб-сайт. Когда это происходит, вы, естественно, спросите: «Сколько времени занимает рукопожатие TLS?» Что ж, это займет несколько секунд. Если это занимает больше минуты или двух, возможно, у вас медленное сетевое соединение. С другой стороны, также возможно, что ваш браузер перегружен расширениями, надстройками и прочим мусором.
Когда это происходит, вы должны использовать надежный очиститель нежелательной почты с ПК, например Auslogics BoostSpeed. Вы можете использовать этот инструмент, чтобы легко избавиться от ненужных файлов браузера. Более того, BoostSpeed имеет функции, которые позволяют настраивать неоптимальные настройки браузера, обеспечивая плавную и быструю работу.
Какое из решений помогло вам решить проблему с подтверждением TLS?
Дайте нам знать в комментариях ниже!