 на Android")
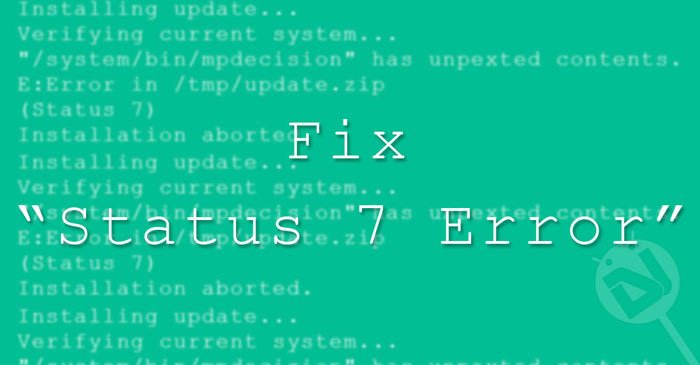
Ошибка 7 при прошивке через рекавери (TWRP, CWM Recovery). Решили установить кастомную прошивку на свой Android смартфон или планшет, вошли в кастомное TWRP Recovery, но во время установки получили ошибку 7? Не отчаивайтесь исправить данную проблему довольно просто.
Многих новичков может обескуражить какие либо действия в установке кастомной прошивки, особенно если это процедура выполняется первый раз. Одним из серьезных препятствий во время установки прошивки может стать ошибка 7 в TWRP Recovery. Серьезность этой ошибки в том, что она не позволяет вообще установить кастомную прошивку на устройство и вся ваша подготовка пойдет насмарку. Но оказывается что данную ошибку 7 в recovery довольно легко исправить не прибегая к длительным действиям! О том как избавится от данной проблемы и посвящена сегодняшняя статья!
Откуда взялась ошибка 7?
Данная ошибка может возникнуть в двух случаях:
-
Если вы попытаетесь установить прошивку не от своего устройства, такое часто возникает, когда под одним наименованием смартфона или планшета может быть множество моделей с небольшими отличиями под определенные рынки (например смартфон LG G2 имеет модели VS980, LS980, D800, D802, F320K). Убедитесь что прошивка предназначена именно для вашего устройства!
-
В скрипте установке прошивки не внесено название модели вашего Android смартфона или планшета.
Как исправить Ошибку 7 при прошивке в Recovery?
Вариант 1 (действие 1)
Если вы уже прочитали как могла возникнуть ошибка 7, то самым первым вашим действием будет проверка действительно вы скачали прошивку именно для вашей модели смартфона или планшета (проверить наименование и версию).
Если вы заметили, что скачали не ту прошивку, то скачать для своего устройства. Проблема решена! Если же это не так и прошивка верная, то переходим ко второму действию.
Вариант 2 (действие 2)
1. Установите Notepad ++
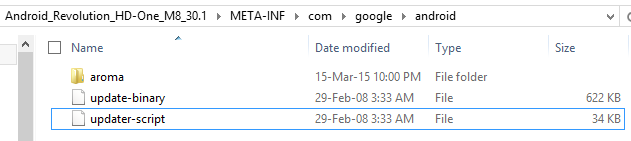
2. Открываем прошивку и переходим по пути META-INFcomgoogleandroid
3. Извлекаем файл updater-script
 на Android")
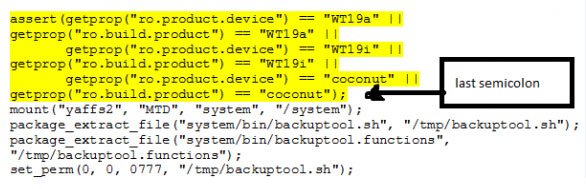
4. Удалить вначале устанавливающего скрипта строки начинающиеся на assert
 на Android")
5. Сохранить документ и забросить обратно в прошивку заменив старый файл
6. Удалить в прошивке файлы по пути META-INF — CERT.RSA, CERT.SF, MANIFEST.MF
 на Android")
7. Забросить готовую прошивку на устройство, перевести в режим Recovery и попробовать снова прошить Android
{rutube}ace43b472b1b7b2fb55e2b53ba067bf8{/rutube}
Android, being an open-source platform, encourages users to involve in different kinds of custom activities like gaining root access, installing a custom recovery and flashing custom ROMs and mods. To add variation to our mobile experience, we keep switching between stock and custom by trying ROMs, Kernels, and mods and then returning to the official firmware.
If the flashing business is your favorite pastime as an Android user, you must have gone through many sweet and a few sour experiences. We get into boot loops, encounter errors, start looking for a solution and learn new lessons. Today, we’ll see how to fix Status 7 error on Android devices. The is often reported by users who download an OTA update package and try to sideload it on their device. Status 7 might also pop up while installing a ROM via a custom recovery like ClockworkMod, PhilZ or TWRP.
Fixing Status 7 Error While Sideloading OTA Zip
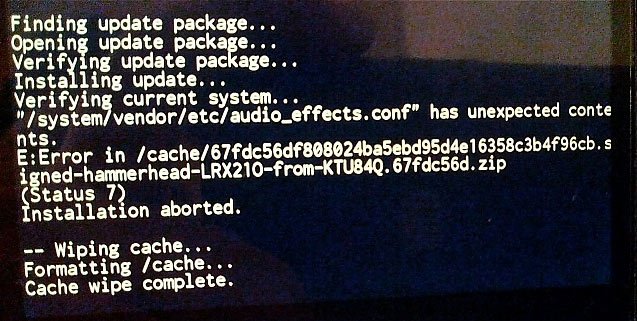
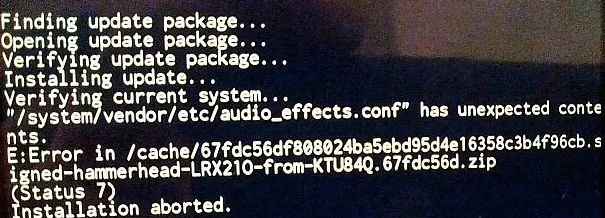
We all love new software updates from the OEM as they bring new goodies, features and improvements. But sometimes we do not receive an OTA as soon as it is out due to regional limitations. In that case, we search for the OTA zip file and get the new update by sideloading it on our device or flashing it via stock recovery. While things go nicely for some people, some users get the Status 7 error on the screen due to several reasons. Just take a look below:
Finding update package...
Opening update package...
Verifying update package...
Installing update...
Verifying current system...
"/system/app/Drive.apk" has unexpected contents.
E:Error in /tmp/update.zip
(Status 7)
Installation aborted.
OR
Installing update...
Verifying current system...
"/system/bin/mpdecision" has unexpected contents.
E:Error in /tmp/update.zip
(Status 7)
Installation aborted.
OR
Verifying current system...
/dev/block/platform/msm_sdcc.l/by-name/system has been remounted R/W; reflash device to reenable OTA updates
(Status 7)
Installation aborted.
OR
If you just take a closer look at the recovery logs given above, you’ll get an idea about what lies at the root of different instances of the Status 7 Error while installing OTA files on Android devices.
Well, this error means that the system partition has been modified, and the updater is aborting the install as a result. The first thing you should keep in mind that if you are having issues with sideloading/installing the stock OTA zip file, you must have had root access or some kind of modification on your device. If you are getting Status 7 Error when you try to install the OTA, ask a few questions to yourself:
- Did you gain root access or are the SU binaries present on the device?
- Have you flashed a custom Kernel?
- Have you installed a custom recovery like CWM/PhilZ/TWRP installed on the device?
- Do you have a custom ROM installed on the device?
- Have you deleted some system app in a fit of cleaning bloats?
- If you don’t have root, did you disable any system app from Settings> Apps?
- Have you frozen any system app using Titanium Backup or some other similar app?
- Have you installed some kind of system app or sound mod on the device?
If your answer to any of the questions asked above is in the affirmative, you must fix the cause first to be able to install the OTA successfully.
The best way to fix any possible causes of Status 7 Error is to restore your device to stock by flashing the stock firmware.
Don’t Miss: Malware on Android – Everything You Need to Know
For Nexus Users
In case you got a Nexus device and you get notified that your device has got some “unexpected contents” on it and you see a message like shown below:
Verifying current system...
"/system/<SOME>.apk" has unexpected contents.
E:Error in /tmp/update.zip
(Status 7)
Download the factory images for your device from here, and extract the downloaded file. Now open the firmware folder and you’ll see a .Zip file inside. Unzip it to find the system.img file and flash it using ADB command:
fastboot flash system system.img
To find a detailed guide on flashing factory images on Nexus devices, click here. Flashing the system will restore all system apps and you will be able to install the OTA successfully.
If you have installed Franco Kernel on your Nexus device and are having issues with installing the OTA zip, follow the quick steps given below:
- Flash stock kernel.
- Reboot your device and boot it into the recovery mode.
- Run ADB Shell on your computer and rename the following files as shown below:
/system/lib/hw/power.msm8974.so.bak ---> /system/lib/hw/power.msm8974.so
/system/bin/thermal-engine-hh-bak ---> /system/bin/thermal-engine-hh
- Now install the OTA update zip via recovery.
- Then flash the latest SuperSU.
While I have never had issues while sideloading OTAs, I remember getting Status 7 Error a couple of time while trying to install custom ROMs and install the CM update.zip package. If you encounter the Status 7 Error in CWM or TWRP recovery while installing a custom ROM, try the steps given below:
- When I had this issue, updating the CWM recovery to the latest version worked for me. So, I would recommend you to download the latest CWM/PhilZ/TWRP recovery for your device model and flash it using ADB or custom recovery.
- If you are getting an error with flashing a ROM in CWM, for instance, you can also try switching to a different recovery (TWRP/PhilZ) and the Status 7 Error should be fixed.
In many cases, Status 7 error pops up when the ROM’s updater-script file checks to see if the model of your device is compatible with the ROM you are installing. The specific part of the updater-script is called “asserts”. Thus, by removing the asserts condition from the script, you can make it bypass the check that results in Status 7 Error. Actually, this is a safety feature but sometimes the ROM developer does make device model-specific changes to the script. Here’s how to make the changes to the updater-script:
-
- Copy the ROM file to your desktop and unzip it.
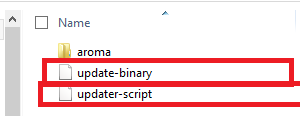
- Once unzipped, navigate to the META-INF/com/google/android directory.
- You will find two files called update-binary and updater-script.

- Now rename updater-script to updater-script.txt and open with a text file editor.
- Now remove the line starting with “assert” to next semi-colon.

- Having removed the assert part, save the changes and close the text editor.
- Rename updater-script.txt back to updater-script.
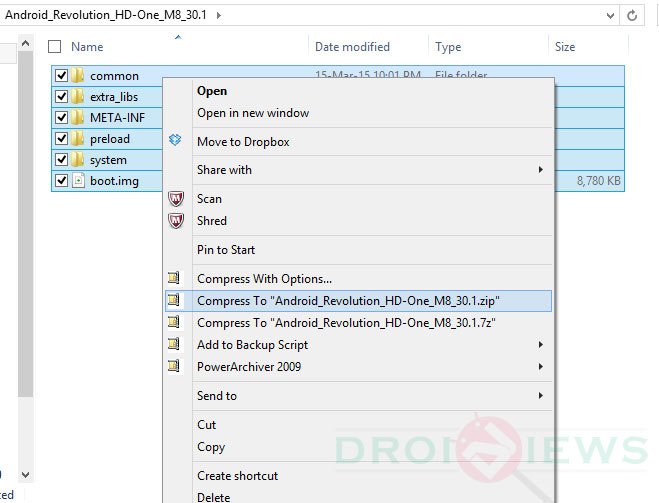
- Now return back to the ROM folder and select all files by pressing Ctrl+A on your keyboard.

- And then compress them to Zip.
- Now copy the newly zipped ROM file to your device and install it.
Done! Your ROM file should now install without giving Status 7 Error.
If you feel, I have missed something, or you have some more solutions that should be mentioned in the tutorial, please let us know. Sharing knowledge is what makes our Android community better!
We all know that the Android is considered to be the open source platform which helps the users to do custom activities like flashing custom ROMs, mods, gaining root access and installing a custom Recovery. If you enhance best mobile experience, then customization will always help you to go ahead. Most of the users are aware of flashing process for the best mobile using experience. During the time of this process, most of the people will face the better result, and sometimes they face the issues as well.

During the time of this process, you may face the things like encounter errors, boot loops and seek for the solution at the end. Here we are going to see the stuff which helps to fix the status 7 error on your Android device. It is this thing that most of the people often reporting and seeking the solution. During the time of downloading and sideload OTA update package on a device, most of them will face the issues.
Contents
- 1 [How To] Fix status 7 Error while sideloading OTA Zip
- 1.1 Fix status 7 Error while Installing Custom ROMs
- 1.1.1 Conclusion: Fix Status 7 Error When Install Custom ROMs and OTA Update
- 1.1 Fix status 7 Error while Installing Custom ROMs
[How To] Fix status 7 Error while sideloading OTA Zip
Generally, we usually show our love and eagerness when it comes to updating the software from OEM to get more exciting features, improvements, and goodies. However, most of the time, people do not receive the OTA on time due to the limitations. During the time of a process, people would like to find the OTA zip file for an update by sideloading it on a device. Some of the people may experience the smooth thing, but on the other side, some might experience the status 7 error on the display screen.
Verifying current system…
/dev/block/platform/msm_sdcc.l/by-name/system has been remounted R/W; reflash device to reenable OTA updates
(Status 7)
Installation aborted.
(Or)
Installing update…
Verifying current system…
“/system/bin/mpdecision” has unexpected contents.
E:Error in /tmp/update.zip
(Status 7)
Installation aborted.
(Or)
Finding update package…
Opening update package…
Verifying update package…
Installing update…
Verifying current system…
“/system/app/Drive.apk” has unexpected contents.
E:Error in /tmp/update.zip
(Status 7)
Installation aborted.
Status 7 Error
Apart from the above errors that you see in the display, there will also be a chance of getting further more issues while installing the stock OTA zip file or sideloading. At the same time, if you see the status 7 errors when it comes to installing the OTA, then you to find the mistakes that you have done without knowing. You also need to know about the issues before going to install the OTA. Some of the things given below may cause Status 7 errors:
- If you install a sound mod or system application on a device you can face this error.
- This error may appear while you install Custom ROMs on a device
- Without rooting it, did you disable any of the system apps by visiting Settings -> Apps.
- If you install a custom recovery on the device.
- When you flash custom kernel.
By following the above things, if you found an answer for the above thing is yes, then it is essential for you to fix it first and then get into the process of OTA installation. To fix the issue, you need to restore the device to stock by just flashing the stock firmware.
Must Read: How to Enable Face Unlock Feature on Redmi Note 4, Redmi 4/4X, and Mi Max Prime.
For Nexus Users: If you are the user of Nexus device who used to see the unexpected contents by displaying the message like.
Verifying current system…
“/system/<SOME>.apk” has unexpected contents.
E: Error in /tmp/update.zip
(Status 7)
Now it is essential for you to download the factory images for the device and make sure to extract the downloaded file. You can now open the firmware folder and get to see the .zip file. However, you can now unzip the system.img file and get ready to flash it with the help of ADB command.
- fastboot flash system system.img

fastboot flash system system img
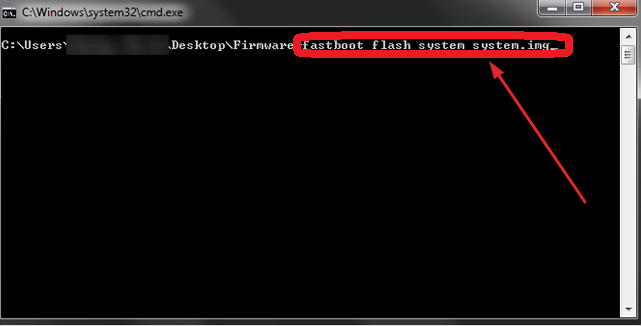
By flashing the system will be helpful for the user to restore all the system apps and get set to install the OTA.
For your information, if any of the users who have installed Franco kernel when it comes to Nexus device and facing the installing issues over OTA zip, then follow the given below steps.
- First of all, make sure to flash the stock.
- Now, it is essential for the user to reboot the device and boot it into the recovery mode.
- By following the above process, you need to run ADB shell on PC and make sure to rename the files displaying below.
- /system/lib/hw/power.msm8974.so.bak à /system/lib/hw/power.msm8974.so
- /system/bin/thermal-engine-hh-bak à /system/bin/thermal-engine-hh
- Install the OTA update zip through recovery
- Flash the latest SuperSU
You can easily install Custom ROM on any Android device without the help of PC with this article. Read More: How to Install Custom ROM on Android Without PC [Best Guide 2018].
Fix status 7 Error while Installing Custom ROMs
People who are facing the issues like getting the status 7 error when it comes to installing CM update.zip package or custom ROMs. If you see the status 7 error while installing a custom ROMs, then follow the below steps to fix it.
- First you need to download the latest TWRP/PhilZ/CWM recovery for the device and flash it by using custom recovery or ADB.
- If you are facing the issues like an error while flashing the ROM is CWM, you can now try it to switching to the recovery TWRP/PhilZ, and then the status will be fixed.
Generally, most of the time Status 7 error will appear during the time of ROMs updater-script which tries to check the model of a device which is compatible with ROM that you are installing. Asserts are there in the updater-script which is said to be the specific part. By just removing asserts from the script, you can make a way to bypass the check that executes in status 7 errors. However, ROM developer would like to do device model according to the changes to the script. Here, let’s have a look that how the changes to the updater-script.
- At first, you need to copy the ROM file to desktop and make sure to unzip it.
- After the process of unzipped, move towards META-INF/com/google/android directory.
- Now, you can see the two files such as updater-script and update-binary.

Update binary and updater script files
- You need to add “updater-script.txt” as a new name of updater-script file and then open it in a text file editor.
- You can now remove the lines from “assert” to immediate next “semi-colon.”
- By removing assert, you need to save the changes and close the text editor.
- Now, again rename the updater-script.txt with updater-script
- Make sure to get back to ROM folder and choose all the files by just pressing Ctrl+A.
- Then, you need to compress it to Zip.
- You can copy the zipped ROM file to the device and install it without any hassles.
- Finally, you are ready to install ROM file without getting a status 7
Conclusion: Fix Status 7 Error When Install Custom ROMs and OTA Update
People who all are facing the issues when it comes to flashing or sideloading the new update by getting status 7 errors, then the above process will be helpful. By following the above stuff, you can fix the issues without any delay.
- [How To] Install Substratum on Galaxy S9/S9+ Without Root.
- Access Google Lens without Root on Any Android Smartphone.

Ошибка 7 при прошивке. Довольно часто при установке пользовательских прошивок (в частности LineageOS) на рутированных смартфонах или планшетах Android можно столкнуться с «ошибкой 7». Ошибка 7 в TWRP Recovery возникает, когда в скрипте прошивки отсутствует название модели вашего телефона, или название есть, но прошивка предназначена для иной модификации устройства (многие модели смартфонов имеют несколько версий — например, для работы в сетях разных операторов, и устанавливать нужно именно «свою» прошивку).

За правильностью выбора прошивки отвечает механизм защиты «Asserts«. Скрипт проверяет модель устройства и версию прошивки по системной переменной ro.build.fingerprint, запрашиваемой у самого recovery. В случае совпадения кодов он выдает подтверждение легитимности установки, а при несовпадении (отсутствии) не подтверждает возможность этого действия. В результате вы видите ошибку 7, но зато ваш аппарат не превращается в кирпич.Бывают и такие случаи, когда даже при правильном выборе прошивки для своего устройства вы все равно получаете сообщение об ошибке 7. Они крайне редки и связаны с ошибкой разработчика прошивки.

Чтобы исправить ошибку 7 необходимо, прежде всего, убедиться в том, что вариант прошивки выбран правильно, и она предназначена именно для вашей модели и модификации Android-смартфона или планшета. Если ошибка все равно появляется, придется править файл updater-script, отвечающий за соответствие версий прошивки и устройства.
Как исправить ошибку 7 при прошивке в TWRP?
- Скопируйте ZIP-файл ROM на свой компьютер и извлеките его, используя привычный для вас архиватор (например, 7-zip).
- После распаковки найдите папку META-INF и пройдите по цепочке META-INF / com / google / android. В последней папке вы найдете два файла под названием «update-binary» и «updater-script». Нас интересует последний.
- Переименуйте «updater-script» в «updater-script.txt» и откройте свой любимый редактор текстовых файлов (как вариант, Notepad++).
- Избавьтесь от строк, начинающихся с «assert» до точки с запятой. Обычно это первая или несколько первых строк в верхней части текстового файла. Просто удалите их.
- Сохраните файл.
- Переименуйте «updater-script.txt» обратно в «updater-script».
- Обновите все файлы, которые вы распаковали.
- Скопируйте новый, отредактированный zip-файл на свой телефон.
- Переведите Android-устройство в режим recovery и попробуйте его перепрошить — ошибка 7 не должна больше вас беспокоить.
Generally, phone manufacturers will not allow you to downgrade for various reasons. The stock recovery does indeed validate the update image, so that it’s of a greater (or same) version than the installed system. With the Nexus One being a developer phone, you can unlock the bootloader and replace the recovery image with the one that doesn’t perform this check, and will allow installation of any image. The caveat is that unlocking the bootloader voids your warranty with the carrier (and sometimes the manufacturer too,) and wipes all user data off the device.
Unlocking the N1 is dead easy. Just install Android SDK and the USB drivers (located in «google-usb_driver» directory.) Then restart the phone in bootloader mode by shutting it off and powering on while holding down the trackball, hook it up to the computer via USB, and in command prompt issue the following command: C:<path to Android SDK>platform-toolsfastboot oem unlock. You will be presented with a confirmation screen with further instructions. Upon successful unlock, you can flash a custom recovery that will allow you to install any custom ROM, including downgrade to 2.2.x stock version of Android OS.
To flash ClockworkMod recovery, download the latest version for Nexus One from here, reboot into bootloader mode (power on while holding the trackball down,) and in command prompt issue command C:<path to ANdroid SDK>platform-toolsfastboot flash recovery C:<path to downloaded img>recovery-clockwork-5.0.2.0-passion.img
Reboot to bootloader mode again, and then use the Volume keys to highlight the «Recovery» option and press Power button. You are now in ClockworkMod recovery, and can flash any custom ROMs via the «Install zip from sdcard» option.
Here is a «stock» 2.2.2 ROM (with root) off XDA-developers forum.
- Forum
- Samsung Android Phones
- More Samsung Phones
- Samsung Galaxy Nexus
- Sprint Galaxy Nexus
-

Hello, I have searched all afternoon on the internet for some help with an error I’m getting. I have gotten 4 or 5 OTA updates that all end up going to screen with android laying down with red exclamation point. I pushed on power and volume up and then apply update from /cache, it starts installing and then stop and I get E: Error in tmp/sideload/package.zip (status 7). I am on 4.0.4. From my many searches I think there might be something wrong with my recovery image but my phone is not rooted or unlocked. I did buy it from ebay so I’m wondering if maybe they rooted and then unrooted before they sent the phone to me. Nothing was mentioned in the add about the phone being rooted. I have rooted phones before so I’m not a complete noob but I just can’t seem to figure this out. First off what is the OTA since I know it’s not Jelly Bean and I’m running 4.0.4. I will contact the seller but I still need to get this fixed. I really appreciate any help. Thanks
09-02-2012 03:38 PM
-
Something I just thought of. I don’t ever update my google apps, other than gmail and maps, because I don’t use them. That couldn’t be causing a problem could it?
09-02-2012 03:47 PM
-
I’ve been having the same issue. My phone was rooted with a custom recovery when I bought it. I unrooted it and applied the stock recovery back with Wug’s toolkit, yet I still get that error whenever I try to update OTA. I’m not too concerned with it though, as I believe this update is minimal, and gets rid of universal search. Now, if I can’t get Jellybean OTA, then I’ll be upset.
09-02-2012 04:27 PM
-
I don’t have the link off the top of my head at the moment, but I believe ShabbyPenguin has package available for the Sprint GNex with the stock factory images.
You may indeed have a missing/broke stock recovery. Locate these factory images and if I remember correctly he had it in both Odin form or via Fastboot command to restore to complete stock. If you find them you can try using the Fastboot command method to just flash the recovery.img
Basically.. Get the FASTBOOT after downloading and installing the Android SDK package on your computer. Once you have SDK on your computer, download the «platform-tools» which has ADB, FASTBOOT and other vital apps needed.
Then after locating the stock «recovery.img» you can place that file in your «C://android-sdk/platform-tools/» directory.
Open a command prompt from the «C://android-sdk/platform-tools/» directoryBoot into your bootloader, and connect via USB cable to your computer.
Type the following from the command prompt.
Code:
fastboot flash recovery recovery.img
It will only take a few seconds to flash the stock recovery and then you can reboot and see if your stock recovery/OTA update functions again.
09-02-2012 04:36 PM
-
I’ve flashed recovery multiple times, but I don’t think I’ve tried Shabby’s method. I’ll give it a shot.
09-02-2012 04:39 PM
-
So, I can do this without root?
Sent from my Galaxy Nexus using Android Central Forums
09-02-2012 05:32 PM
-
Okay, got as far as booting into bootloader and typing in command in the platform-tools directory and hit enter and it says waiting on device. Do I have to do anything on the phone or should it automatically flash the recovery?
09-02-2012 10:45 PM
-
Oh, looks like I have to have an unlocked bootloader to do this.
09-02-2012 11:10 PM
-
Well, I got the Jelly Bean OTA today. Downloaded it and tried to install and it went to the android laying down with red exclamation point. I pushed power button and volume up. I got this (Error: tmp/sideload/package.zip Status 7). This really sucks. I thought I had fixed my problem. I might just go to Sprint and play dumb. I’m sure they will want to just give me a refurbished phone though. Huge sad face.
09-07-2012 07:26 PM
-
-
I downloaded and began to install & got an error message.
E: failed verification whole file signature
E: failed verification signature
Installation aborted
What?09-07-2012 10:40 PM
-
E: failed verification whole-file signature
E: failed verification signature
Installation aborted
What am I doing wrong?09-08-2012 01:44 AM
-
I did try to manual update several times through CWM and I still got a status 7 error. This is so maddening.
Error: /sdcad/update.zip
Status 7
So, then I thought maybe I put the update in the wrong place. I do not have an sdcard folder on my phone. When I plug in to my computer I click on Galaxy Nexus and then Internal storage and that is where I put the update.zip. Can someone tell me if this is wrong? When CWM boots up I can select the update fine it just goes to status 7 error every time I try it.09-08-2012 08:19 AM
-
That is the correct placement of the update.zip. Internet storage/sdcard.
What is the current status of your devices before attempting this? Must be on latest 4.0.4 update (FG01) before using this zip. Any earlier versions of Android it won’t work.
09-08-2012 09:33 AM
-
That might be my problem. Looks like I’m on FD02. Can you point me to the right link to download the FG01 update. Thanks a million.
Sent from my Galaxy Nexus using Android Central Forums
09-08-2012 10:10 AM
-
I was never able to apply the last 4.0.4(FG01) OTA update because of some problem so now I am not have to flash Jelly Bean through CWM. I have been looking online for a link to download the update so I can hopefully fix this but I am not having any luck. I’m wondering if I fastboot to stock ( http://forums.androidcentral.com/spr…urn-stock.html ) if this will fix my problem. My baseband says FC12 and my build number ends in FD02. Which one should I use from the linked page? I’m ready to through this phone out the window right now.
09-09-2012 05:42 PM
-
Originally Posted by sweetthing06
I was never able to apply the last 4.0.4(FG01) OTA update because of some problem so now I am not have to flash Jelly Bean through CWM. I have been looking online for a link to download the update so I can hopefully fix this but I am not having any luck. I’m wondering if I fastboot to stock ( http://forums.androidcentral.com/spr…urn-stock.html ) if this will fix my problem. My baseband says FC12 and my build number ends in FD02. Which one should I use from the linked page? I’m ready to through this phone out the window right now.
Use the latest FH05 Jelly Bean Fast boot images or the FH05 Stock tar for Odin.
Yes this is the same as the actual official update too, your just manually applying it.
FWIW, the FC12 baseband is an older modem/radio which was never updated on your device. That COULD be one of the reasons why your having problems. Either way using the new fastboot or Odin option will get you official JB
09-09-2012 05:44 PM
-
Okay, so I use fastboot. I’m assumeing that I place each image in platform tools file and then fastboot each on in order of how the are listed? So, I didn’t need to use CWM to flash Jelly Bean?
09-09-2012 06:06 PM
-
YYYEEESSSS!!!!! FINALLY!! I am now on Jelly Bean. Now to go to the store and buy something to support you guys. Thanks for the help!!
09-09-2012 07:11 PM
-
Hello, I have searched all afternoon on the internet for some help with an error I’m getting. I have gotten 4 or 5 OTA updates that all end up going to screen with android laying down with red exclamation point. I pushed on power and volume up and then apply update from /cache, it starts installing and then stop and I get E: Error in tmp/sideload/package.zip (status 7). I am on 4.0.4. From my many searches I think there might be something wrong with my recovery image but my phone is not rooted or unlocked. I did buy it from ebay so I’m wondering if maybe they rooted and then unrooted before they sent the phone to me. Nothing was mentioned in the add about the phone being rooted. I have rooted phones before so I’m not a complete noob but I just can’t seem to figure this out. First off what is the OTA since I know it’s not Jelly Bean and I’m running 4.0.4. I will contact the seller but I still need to get this fixed. I really appreciate any help. Thanks
11-11-2012 07:28 AM
-
Sellers who have rooted their phones and then intend to sell them usually unroot and wipe data. Whoever this is did not tell you of their rooting because they either knew it would be a deal-breaker, or they thought it would not matter.
05-27-2013 10:15 PM


- Forum
- Samsung Android Phones
- More Samsung Phones
- Samsung Galaxy Nexus
- Sprint Galaxy Nexus

OTA update error
LINK TO POST COPIED TO CLIPBOARD