Each Android Studio project requires information as to what SDK is to be used, and where it is located. The overall configuration defined in the SDK Manager under the tools menu is not enough, and it is used seemly to download and install the necessary SDK, so
- make sure you have Android SDK installed.
- Now opened or create a project (open an APK file for instance),
- then follow these steps to define the SDK for the project:
- Under File -> Project Structure, select SDKs under Platform Settings.
- If you don’t have an Android SDK item in the right next pane, then click on the green
+to add one. Give it a name of Android SDK, - and edit the path to
c:usersyourusernameappdatalocalandroidsdk(or the actual location as defined under SDK Manager). - Next, still under Project Settings, select Project, and
- in the right next pane under «Project SDK» select the new project SDK that you just created.
- Save.
Your project is configured. Now open task manager and kill any existing adb.exe processes. Android Studio is now ready to work with ADB.
Test by opening the Device File Explorer (this is a vertical tab on the very right bottom edge of AS), or test by selecting the Attach debugger to Android Process button, and you should see your Android Device.
If ADB doesn’t communicate with your Android device, check to see if you have installed the Android USB driver. Also, the phone needs to be in developer mode for ADB to work with it.
Last point, I have had more success with AS/ADB when I launch AS with Administrator privileges. I hope this information is helpful to someone.
Самый эффективный, основной способ иметь неповторяющиеся случайные числа объясняется этим псевдокодом. Нет необходимости иметь вложенные циклы или хешированные запросы:
// get 5 unique random numbers, possible values 0 - 19
// (assume desired number of selections < number of choices)

const int POOL_SIZE = 20;
const int VAL_COUNT = 5;

declare Array mapping[POOL_SIZE];
declare Array results[VAL_COUNT];

declare i int;
declare r int;
declare max_rand int;

// create mapping array
for (i=0; i<POOL_SIZE; i++) {
   mapping[i] = i;
}

max_rand = POOL_SIZE-1;  // start loop searching for maximum value (19)

for (i=0; i<VAL_COUNT; i++) {
    r = Random(0, max_rand); // get random number
    results[i] = mapping[r]; // grab number from map array
    mapping[r] = max_rand;  // place item past range at selected location

    max_rand = max_rand - 1;  // reduce random scope by 1
}
Предположим, что первая итерация генерирует случайное число 3 для начала (от 0 до 19). Это сделало бы результаты [0] = сопоставление [3], т. Е. Значение 3. Затем мы присвоили отображение [3] равным 19.
На следующей итерации случайное число было 5 (из 0-18). Это дало бы результаты [1] = mapping [5], т. Е. Значение 5. Затем мы назначили отображение [5] на 18.
Теперь предположим, что следующая итерация снова выбрала 3 (из 0 — 17). результатам [2] присваивается значение отображения [3], но теперь это значение не равно 3, но 19.
Эта же защита сохраняется для всех чисел, даже если у вас есть тот же номер 5 раз подряд. Например, если генератор случайных чисел дал вам 0 пять раз подряд, результаты будут следующими: [0, 19, 18, 17, 16].
Вы никогда не получите одинаковый номер дважды.
задан Sharath 4 December 2015 в 11:37
поделиться
8 ответов
Я просто открыл sdk manager и установил все инструменты sdk для android.
ответ дан Meli 16 August 2018 в 05:50
поделиться
Я испытываю эту ошибку при обновлении Android-SDK Plateform-Tools 23.1 в Android SDK Manager
Я работаю над ubuntu 14.04 [32bit], который не поддерживает Plateform-Tools 23.1, он поддерживает только в 64-битной архитектуре операционной системы, поэтому понизите мои инструменты Plateform 23.0
, он отлично работает … !!!
ответ дан Dhruv Raval 16 August 2018 в 05:50
поделиться
Проверьте, нужно ли вам установить «Android Sdk Platform Tools» в Android SDK Manager.
Как-то после установки Android Studio из пакета (для Linux) мне не хватало каталога «platform-tools» в «Android / Sdk», где находится исполняемый файл adb. Помогли установки инструментов платформы. Это было легче найти в автономном диспетчере sdk.
ответ дан FelEnd 16 August 2018 в 05:50
поделиться
Перейти к: Настройки Android Studio> Внешний вид и amp; Поведение> Системные настройки> Android SDK:
Если путь для SDK является красным цветом, перейдите в папку SDK и нажмите
***APPLY***
ответ дан ham-sandwich 16 August 2018 в 05:50
поделиться
Я установил правильную версию sdk, которая соответствовала моей версии Android android версии
ответ дан Jakob Hartman 16 August 2018 в 05:50
поделиться
Это связано с тем, что вы удалили adb.exe (это мог быть ваш антивирус, который удалил его), которые находились в инструментах платформы в папке sdk android.
Что вам нужно сделать, так это удалить текущие платформы-инструменты в программе менеджера sdk и снова установить его снова.
ответ дан Rod_Algonquin 16 August 2018 в 05:50
поделиться
Откройте автономный диспетчер SDK и установите пакет инструментов платформы.
ответ дан sandeep reddy 16 August 2018 в 05:50
поделиться
Я также сталкиваюсь с той же проблемой при обновлении студии Android от версии 1.4 до 1.5. Когда я запускаю команду adb из терминала, я обнаружил следующую ошибку:
bash: ./adb: невозможно выполнить двоичный файл: ошибка формата Exec
После R & amp; d я обнаружил, что эта ошибка происходит из-за неподдерживаемой архитектуры. В моем случае:
Я использую 32-битный ubuntu14.04 LTS. Я заметил, что после обновления папка lib в платформенных инструментах преобразуется в lib64. Я думаю, что выше ошибка возникает из-за 32-битной архитектуры, потому что после обновления 32-разрядная поддержка удалена.
Для постоянного обновления вашего решения вы используете 64-битную архитектуру. Быстрое решение — заменить обновленную папку с инструментами платформы старым, содержащим папку lib, а не lib64.
Я думаю, что поддержка 32-битной архитектуры для разработки Android остановлена google для будущих выпусков. Но я не уверен.
ответ дан USKMobility 16 August 2018 в 05:50
поделиться
Другие вопросы по тегам:
Похожие вопросы:
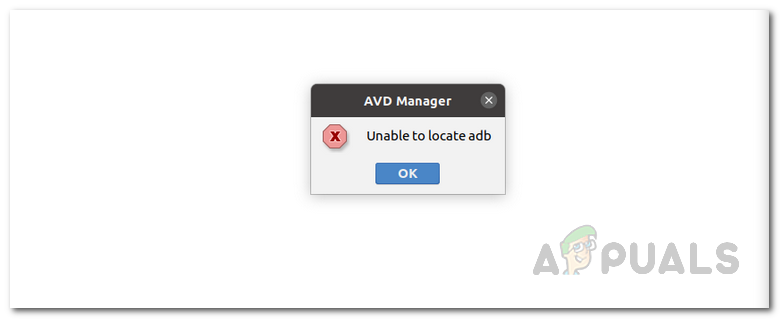
ADB stands for Android Debug Bridge and is a tool that helps you communicate with your mobile device through a command-line interface. When your android SDK is unable to find the adb.exe file inside the platform-tools folder, it throws an ‘Unable to locate ADB’ error.
Through this article, you will find many fixes for your issue of “Unable to locate ADB”.
Also read: How to create an android app?
Check the presence of adb.exe file
To check if the adb.exe file is present or not, open your File Explorer and go inside ‘C:UsersUsernameAppDataLocalAndroidSdkplatform-tools‘ folder and look for the adb.exe file.

Using SDK Manager in Android Studio IDE
After knowing if your adb.exe file is missing or not, you can install or reinstall the android SDK platform-tools using SDK Manager.
When there is no adb.exe file inside the Platform tools folder, you need to install the Android SDK Platform tools. To install the platform tools, follow the steps given below:
Step 1: Open Android Studio and click on SDK Manager.

Step 2: Click on SDK Tools, checkmark the Android SDK Platform tools, and click on Ok.

Step 3: A dialogue box appears; click on OK.

If the adb.exe file is present in the platform-tools folder, it can be possible that your adb.exe file is corrupted or not installed properly. In such a case, you can try reinstalling the platform tools.
Step 1: Open Android Studio and click on SDK Manager.

Step 2: Click on SDK Tools, uncheck the Android SDK Platform tools, and click on Ok.

Step 3: Open your File Explorer and go inside the ‘C:UsersUsernameAppDataLocalAndroidSdk‘ folder and delete the platform tools folder.

Step 4: In the android studio, open SDK Manager, go inside SDK Tools, and checkmark the Android SDK Platform tools. Click on Ok.

You can use the SDK Manager command-line tool present in the ‘C:UsersuserAppDataLocalAndroidSdktoolsbin’ folder to install or reinstall the platform tools.

When there is no adb.exe file inside the Platform-tools folder, you need to install the Android SDK Platform-tools. Open sdkmanager command-line tool and type the following command to install platform tools:
sdkmanager "platform-tools"
If the adb.exe file is present in the platform-tools folder, then in such a case, you can try reinstalling the platform tools.
Step 1: Open sdkmanager command-line tool and type the following command to uninstall platform tools:
sdkmanager --uninstall "platform-tools"
Step 2: Open your File Explorer and go inside the ‘C:UsersUsernameAppDataLocalAndroidSdk‘ folder. Delete the platform-tools folder.
Step 3: Open sdkmanager command-line tool and type the following command to install platform tools again:
sdkmanager "platform-tools"
Check your Antivirus
Your antivirus can also be a reason due to which this error might occur. Many times, antivirus applications, due to false-positive results, remove some files. It might be the same case due to which antivirus application in your system removed the adb.exe file and quarantined the file.
You can look into your antivirus chest and restore the adb.exe file and try running the application.
Also read: ADB command cheat sheet.

An avid reader and an engineering student. Love to code and read books. Always curious to learn new things 🙂
Android Studio это официальная интегрированная среда разработки для операционной системы Android от Google, созданная специально для разработки под Android. АБР (Android Debug Bridge) в основном позволяет вам общаться с подключенными устройствами к ПК с помощью команд. Теперь многие пользователи сообщают, что при попытке запустить приложение через Android Studio они сталкиваются с невозможностью найти ошибку ADB в Android Studio.
Если вы также столкнулись с той же проблемой, обязательно полностью следуйте этому руководству по устранению неполадок. Сообщение об ошибке появляется всякий раз, когда Android Studio не может найти файл ADB.exe, который должен находиться в папке Platform Tools на ПК с Windows. Если быть точным, это может произойти по нескольким причинам. Например, антивирусная программа блокирует файл ADB.exe.

Содержание страницы
-
Исправлено: невозможно найти ошибку ADB в Android Studio?
- 1. Отключите антивирусное программное обеспечение или восстановите ADB
- 2. Изменить настройки проекта в Android Studio
- 3. Установите Android SDK из SDK Manager
- 4. Переустановите инструменты платформы на ПК
Исправлено: невозможно найти ошибку ADB в Android Studio?
Принимая во внимание, что также может быть, что какие-либо настройки вашего проекта в Android Studio конфликтуют с некоторыми проблемами с ADB. Иногда поврежденные или отсутствующие файлы инструментов платформы также могут вызывать проблемы. Итак, не теряя больше времени, давайте перейдем к руководству ниже.
1. Отключите антивирусное программное обеспечение или восстановите ADB
Ваша антивирусная программа может быть одной из основных причин отказа от ADB не может найти ошибку в Android Studio. Некоторые из затронутых пользователей уже упоминали, что отключение антивирусного программного обеспечения или простое восстановление заблокированного файла ADB может быть полезным. Сделать это:
Независимо от того, используете ли вы на своем компьютере Защитник Windows по умолчанию или любую другую стороннюю антивирусную программу, просто попробуйте открыть приложение и отключить функцию защиты в реальном времени. Но обязательно разрешите / восстановите файл ADB, если антивирус уже заблокировал его.
После этого вы можете перезагрузить компьютер, чтобы применить изменения, а затем снова попробовать найти ADB в Android Studio.
2. Изменить настройки проекта в Android Studio
Иногда ваш проект может не назначать какой-либо SDK, и поэтому Android Studio не может распознать или найти файл ADB.exe. Чтобы решить эту проблему, вам необходимо изменить настройки проекта, для которых не задан SDK, в параметре «Структура проекта».
- Запустить Android Studio приложение на ПК.
- Теперь перейдите к Файл > Структура проекта.
- Здесь нажмите на Проект под Настройки проекта.
- Тогда ищите Проект у которого нет SDK и измените его на Платформа Android API XX из раскрывающегося меню.
- Если в раскрывающемся меню нет параметров, вы можете нажать на Новый кнопка для выбора Android SDK а затем выберите каталог, в котором находится Android SDK.
- После этого вы сможете выбрать Платформа Android API XX из раскрывающегося меню.
- Наконец, нажмите на Ok чтобы сохранить изменения и еще раз проверить наличие ошибки.
3. Установите Android SDK из SDK Manager
Если в этом случае конкретная версия Android SDK недоступна в вашей системе, вы также можете получить сообщение об ошибке. Вы можете установить соответствующий Android SDK из SDK Manager, который вы можете найти в Android Studio. Для этого выполните следующие действия:
- Запустить Android Studio приложение> Откройте Предпочтения окно из Файл > Настройки.
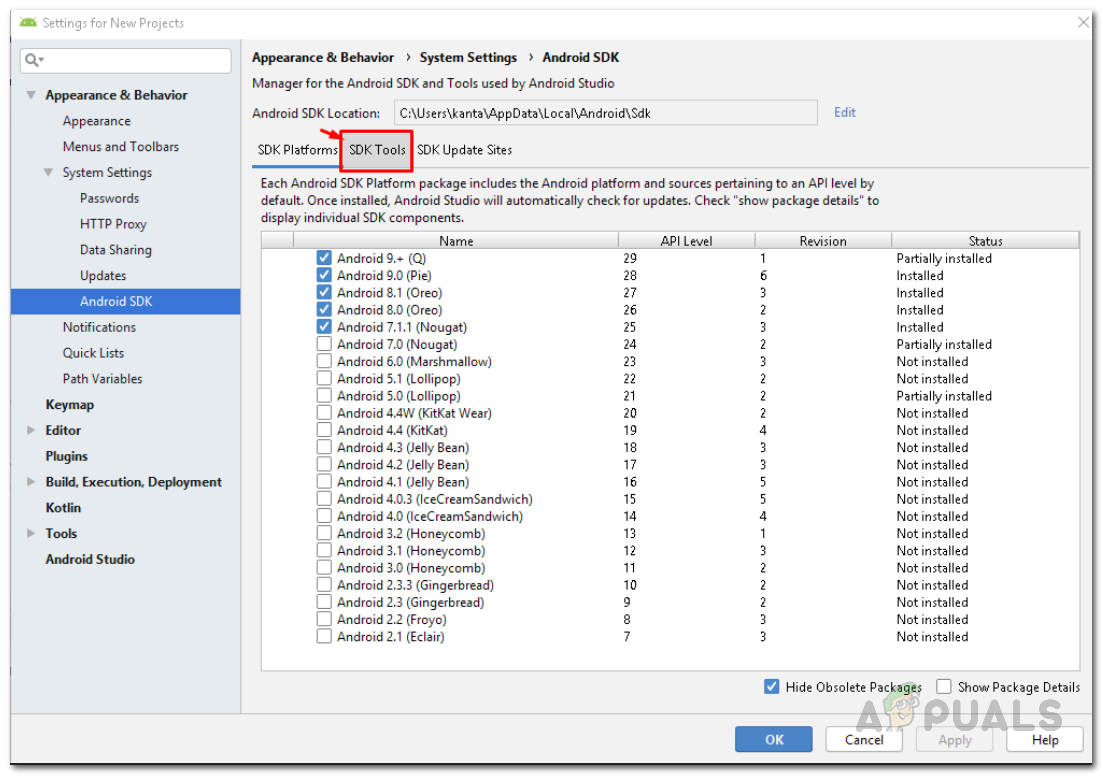
- Далее перейдите к Внешний вид и поведение> Системные настройки> Android SDK.
- От SDK Manager, перейти к Платформы SDK > Установите платформу SDK для вашей соответствующей версии Android.
- Наконец, попробуйте запустить приложение, чтобы узнать, беспокоит ли вас сообщение об ошибке.
4. Переустановите инструменты платформы на ПК
Если вы все еще сталкиваетесь с сообщением об ошибке не удается найти ADB в Android Studio, возможно, поврежденные или поврежденные файлы инструментов платформы были повреждены или отсутствуют. В качестве последнего средства вам следует попробовать удалить и переустановить инструменты платформы с помощью диспетчера SDK в Android Studio.
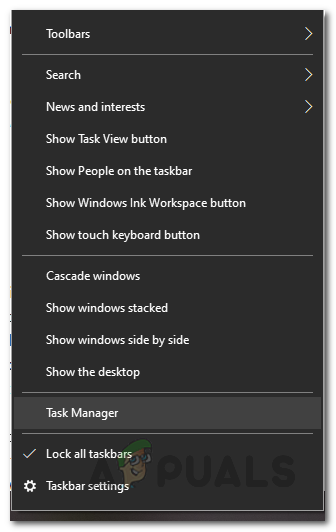
- Прежде всего, закройте Android Studio > Открыть Диспетчер задач (Ctrl + Shift + Esc).
- Теперь перейдите к Процессы > Найдите ADB.exe процесс> Выберите его и нажмите Завершить задачу.
- После этого откройте Android Studio опять таки.
- Теперь вам нужно открыть SDK Manager щелкнув значок коробки со стрелкой вниз.
- После открытия диспетчера SDK перейдите в Инструменты SDK таб.
- Прокрутите страницу вниз, пока не увидите Инструменты платформы Android SDK.
- Убедись в Снимите отметку Инструменты платформы Android SDK> Нажмите Ok.
- Он удалит инструменты платформы. Возможно, вам придется подождать, пока он завершит удаление.
- После удаления откройте SDK Manager снова> Перейдите в Инструменты SDK вкладку снова.
- Ищи Инструменты платформы Android SDK снова и отметьте это.
- Наконец, нажмите на Ok и дождитесь его завершения, а затем правильно синхронизируйте свой проект.
Это должно исправить ошибку Unable to Locate ADB на Android Studio.
Вот и все, ребята. Мы предполагаем, что это руководство было для вас полезным. Для дополнительных запросов вы можете оставить комментарий ниже.
Android Debug Bridge or ADB allows you to communicate with your devices via a command-line interface. It can be used for various purposes as it facilitates a bunch of actions including installing and debugging apps on your device. While trying to run your app via the Android Studio, you might face the “Unable to Locate ADB” error message that stops the simulation. As it turns out, the error message appears when Android Studio is not able to locate the ADB.exe file that is located in the platform-tools folder.
This can happen due to several reasons including when your antivirus software removes the adb.exe file due to a false alarm. Issues like these are pretty common with antivirus software and thus, while using one, you need to make sure that it isn’t triggering a false positive on the files that you are working with. In addition to that, your project settings can also cause this error message to pop up. To understand and establish a better understanding of the error message in question, let us discuss the different reasons the issue may arise in more detail. However, do remember that the causes include but are not limited to the ones mentioned down below.
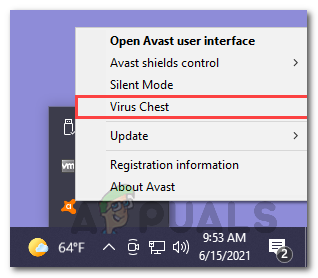
- Third-Party Antivirus — Antivirus softwares are known to cause several issues where they remove a file from your system due to a false positive. Avast antivirus has been known to cause this a lot with ADB where it locks the file in the virus chest. If this is applicable, you will have to restore the file from there and everything should be good. However, keep in mind that it may not only be limited to Avast if you are using a different third-party antivirus, but it could also likely be causing the issue and thus you should look at the files that have been quarantined by the application.
- Project Settings — As it turns out, in some cases, the error message may arise due to your project settings. The Android SDK by default does not give projects a default SDK. In such a scenario, you will have to go to the project settings and give the project an SDK which by default is set to No SDK.
- Corrupted Platform Tools — In addition to the aforementioned reasons, if your platform tools are damaged or corrupted, that might result in the error message as well. If this scenario is applicable, Windows Defender or any third-party software likely quarantines it, and as a result, you no longer have the adb.exe file in the platform-tools folder. In such a case, you will simply have to reinstall platform tools to resolve the issue.
Now that we have gone through the possible causes of the issue, let us get started by mentioning down the different workarounds that are available to you to get the issue sorted. So, without further ado, let us dive right into it.
Restore ADB From Third-Party Antivirus
As it turns out, the first thing that you should do when you face the error message in question is to check the third-party antivirus software that is installed on your system. More often than not, antivirus software can trigger false-positive and quarantine files that are not dangerous at all. In this case, the adb.exe would be the targeted file that is regarded as a dangerous or potential threat by the antivirus software and as a result removed from your system.
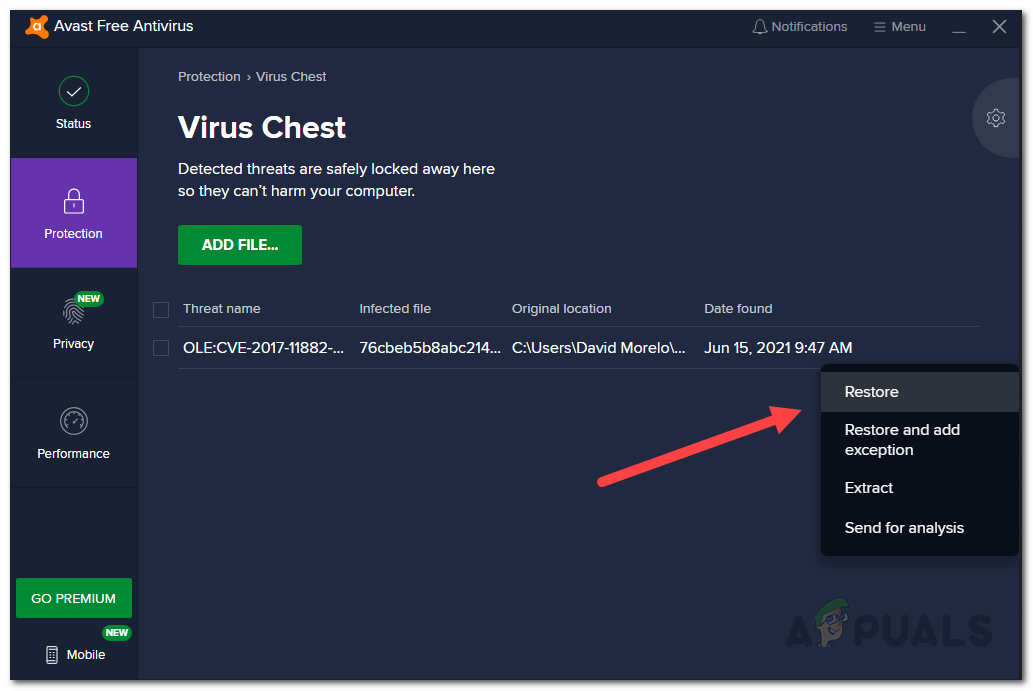
If this case applies to you, especially if you are using the Avast antivirus, you should check the virus chest of your antivirus software to see if the file has been quarantined by it. In case it is, simply restore the file and then try running the application. To do this, follow the instructions given down below:
- First of all, right-click your antivirus icon on the taskbar, and then from the menu that appears, choose Virus Chest.

Opening Virus Chest - Here, check if the ABD.exe file is present. In case it is, go ahead and click the three horizontal dots in front of the file.
- From the drop-down menu that appears, choose the Restore option. This will remove the file from Virus Chest and you will be able to use it.

Restoring File from Virus Chest - Alternatively, you can also choose the Restore and add exception option to make sure that it isn’t put away in the Virus Chest again.
Change Project Settings
If your antivirus software is not the culprit or if it doesn’t apply to you, the error message is likely being triggered due to your project settings. This happens when your project has no SDK assigned to it and as a result, it does not have access to ADB which is why you face the error message in question. To resolve this, you will have to change the default project settings which are set to No SDK by default. These settings can be found under Project Structure. To do this, follow the instructions given down below:
- First of all, make sure Android Studio is open.
- Then, make your way to File > Project Structure. Alternatively, you can click the Project Structure icon as shown in the picture down below.
- Once the Project Structure window is open, click on Project under Project Settings.
- Then, go ahead with what Project SDK is set to. If it is set to No SDK, go ahead and change it to Android API XX Platform from the drop-down menu.

Changing Default Project SDK - In case there are no options in the drop-down menu, you can click the New button, choose Android SDK and then choose the directory where Android SDK is present.
- Once you have done that, you will be able to select Android API XX Platform from the drop-down menu.
- After you have done that, click the OK button and try running your application to see if the issue persists.

Install Android SDK from SDK Manager
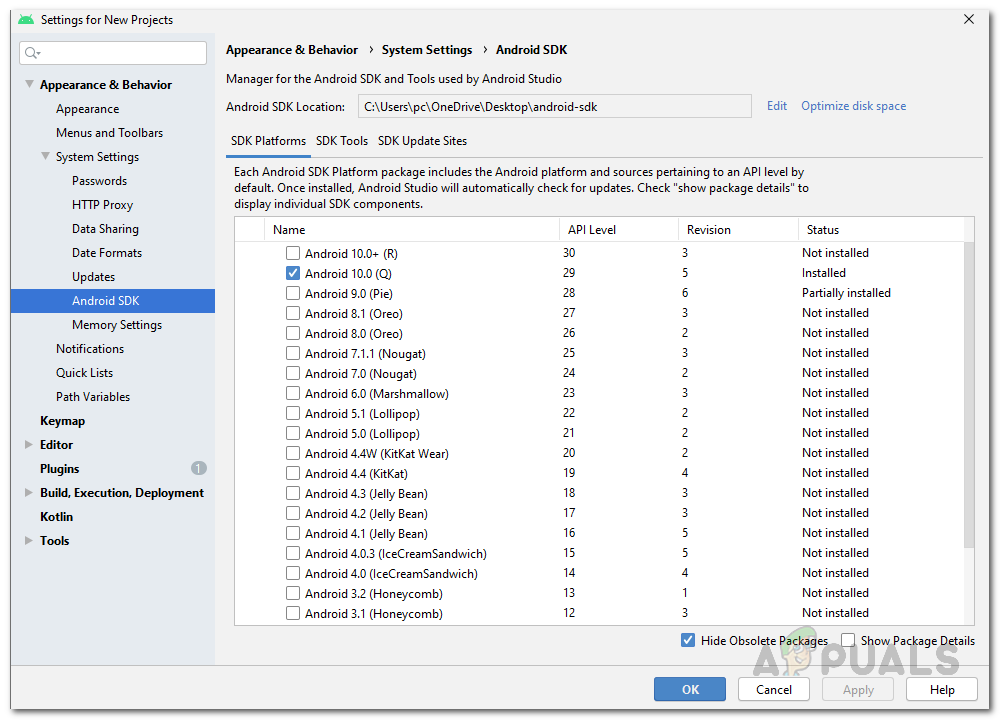
As it turns out, if you are missing the relevant Android version SDK on your system, that will also cause the error message to arise. If this case is applicable, you can easily resolve the error message by installing the respective Android SDK from the SDK Manager found in the Android Studio. To do this, follow the instructions given down below:
- In the Android Studio window, open up the Preferences window by going to File > Settings.
- Then, on the left-hand side, make your way to Appearance & Behavior > System Settings > Android SDK.

SDK Manager - Once you are in the SDK Manager, under SDK Platforms, install the SDK Platform for your respective Android version.
- After you have done that, go ahead and try running the application to see if you still face the error message.
Reinstall Platform Tools
Finally, if you are still facing the error message in question after trying the methods mentioned above, it could be that the issue is being triggered by damaged or corrupted platform tools files. If this scenario applies to you, you will have to reinstall the platform tools on your system to get rid of this error message. This can be done easily via the SDK Manager. You can uninstall platform tools via the SDK Manager and after that, you can easily install it again via a few clicks. To do this, follow the instructions given down below:
- First of all, close the Android Studio and then open up the Task Manager by right-clicking your taskbar. From the menu that appears, choose Task Manager.

Opening Task Manager - In the Task Manager window, under Processes, look for the ADB.exe process and end it.
- Once you have done that, go ahead and open up the Android Studio again.
- Now, you will have to open up the SDK Manager. For this, click the box icon with a down arrow as shown in the picture.

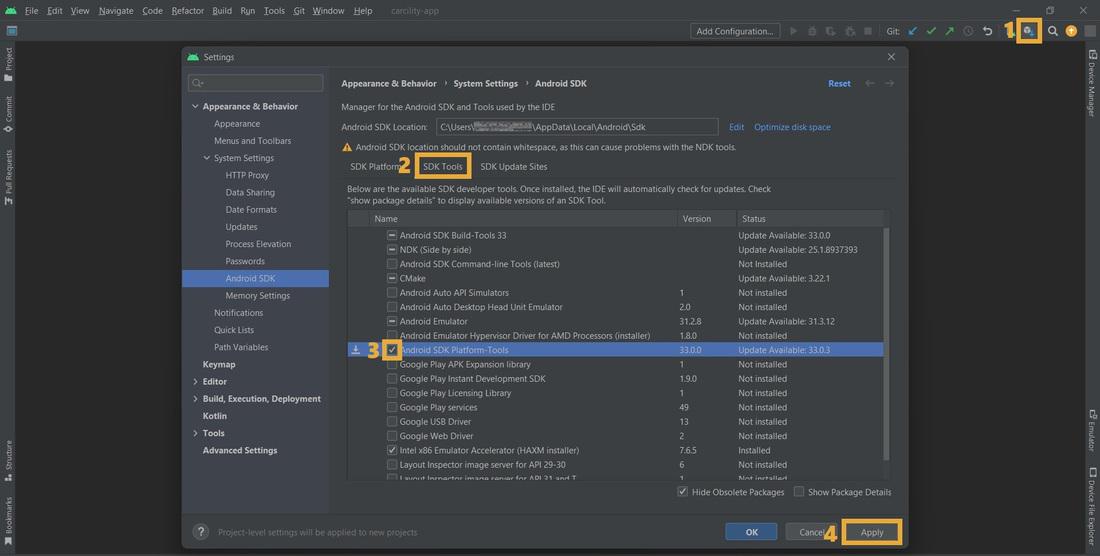
Opening SDK Manager - Once the SDK Manager is open, switch to the SDK Tools tab.

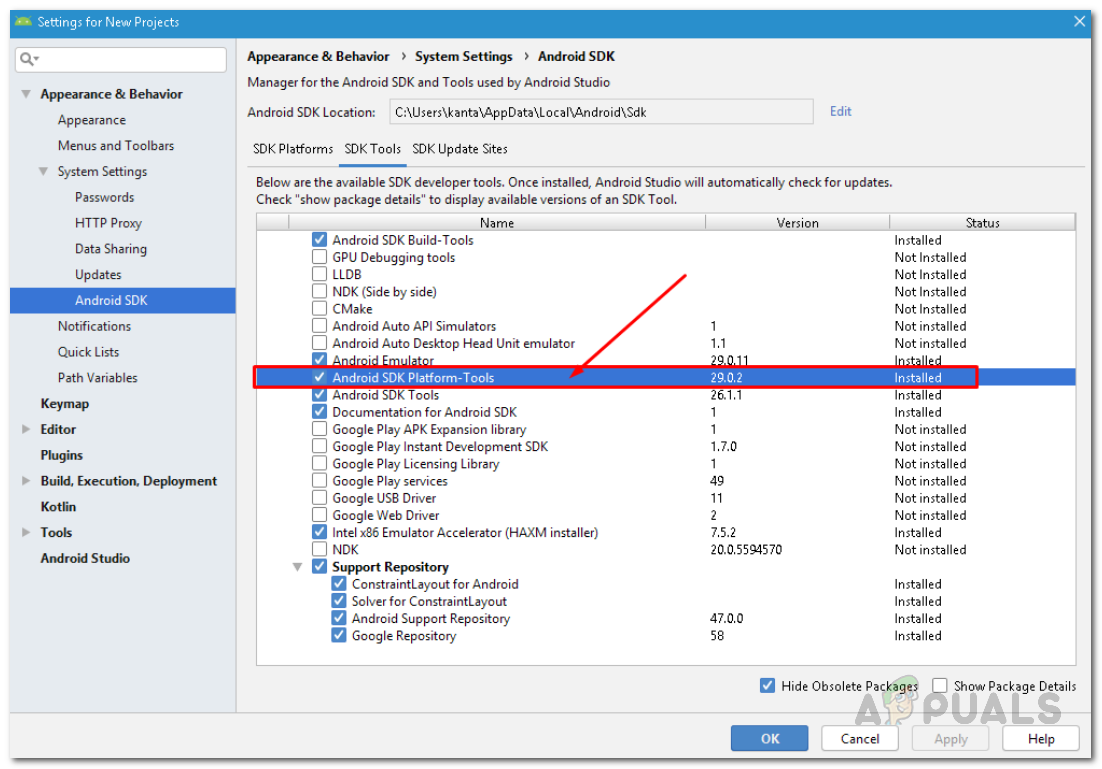
Switching to the SDK Tools Tab - In the SDK Tools tab, scroll down until you see Android SDK Platform-Tools. Uncheck it and then click OK.

Android Platform-Tools in SDK Manager - This will uninstall platform-tools from your IDE. Wait for it to finish uninstalling.
- Once it has been uninstalled and the Gradle is synced, open up the SDK Manager again and switch to the SDK Tools tab again. Here, look for Android SDK Platform-Tools again and tick it. Finally, click OK and wait for it to finish, and then sync your project.
- After all that is done, go ahead and try running your application to see if the error message pops up.


Muhammad Zubyan
Zubyan is a certified Google IT Support Professional with extensive experience spanning over 7 long years. Having worked on 1500+ computers, he gained many valuable insights and is currently able to detect and troubleshoot any Windows related issue/error no matter how complicated its root cause is. When he is not managing Appuals as a Senior Editor, he is working on his own Game Optimization program to facilitate both gamers and casual users alike.
The following error occurs when the adb file is not found within the SDK system folder. A software development kit (SDK) provides the software required to build your applications for a target platform.
Firstly check if the adb is present in the SDK folder. For this, open C:UsersUsernameAppDataLocalAndroidSdkplatform-tools and check if adb.exe is present.
Method 1: Using Android Studio IDE
Case 1: If adb is not present
Installing the platform-tools resolves the problem. For this, open Android Studio, then open SDK Manager (top-right in the toolbar), then open SDK Tools, then check-mark ✅ Android-SDK Platform-Tools and apply the changes (As shown below).
Steps to add/remove Android-SDK Platform-Tools
Case 2: If adb is present
Reinstalling the platform-tools resolves the problem. For this, open Android Studio, then open SDK Manager (top-right in the toolbar), then open SDK Tools, then uncheck ⬜ Android-SDK Platform-Tools and apply the changes (As shown above).
After this, open C:UsersUsernameAppDataLocalAndroidSdk and delete the platform-tools folder.
Then go back to Android Studio and in the SDK Tools, check-mark ✅ Android-SDK Platform-Tools and apply the changes.
Method 2: Using sdkmanager command-line tool
If Android Studio IDE is installed, follow Method 1 instead.
Case 1: If adb is not present
Installing the platform-tools resolves the problem. For this, open Terminal, switch to C:UsersUsernameAppDataLocalAndroidSdktoolsbinsdkmanager and run the following command:
sdkmanager "platform-tools"
Case 2: If adb is present
Reinstalling the platform-tools resolves the problem. For this, open Terminal, switch to C:UsersUsernameAppDataLocalAndroidSdktoolsbinsdkmanager and run the following command:
sdkmanager --uninstall "platform-tools"
After this, open C:UsersUsernameAppDataLocalAndroidSdk and delete the platform-tools folder.
Then go back to Terminal and run the following command:
sdkmanager "platform-tools"
Method 3: Check your anti-virus
Windows security might have quarantined adb.exe. Allowing adb.exe on the system resolves this problem. For this, open Windows security, then open Current threats and allow adb.exe on device (As shown below).

Step to allow adb.exe on the system