Содержание
- Error invalid ota package missing scatter
- Ошибка дополнительной проверки подписи OTA AOSP
- Error invalid ota package missing scatter
- Error invalid ota package missing scatter
Error invalid ota package missing scatter
На сайте Xiaomi появилась полная информация о двух новинках Xiaomi M2S и Xiaomi M2A, включая подробные характеристики и цены. Кроме того, изменилась цена на текущую модель Xiaomi M2 и представлена новая прошивка MIUI V5 на базе Android 4.1, теперь все смартфоны Xiaomi будут работать на ней.
Стоимость нового обновленного флагмана Xiaomi M2S составила ожидаемые 1999 юаней ($ 322), при этом имеющиеся нововведения тоже обошлись без сюрпризов. Смартфон получил новый 4-ядерный чипсет Snapdragon 600 с тактовой частотой 1,7 ГГц и 13 Мп заднюю камеру Sony Exmor серии RS. Правда, есть один нюанс: версия Xiaomi M2S на 16 Гб осталась все с той же 8 Мп камерой, улучшенную камеру получила только версия на 32 Гб, при этом ее стоимость несколько выше — 2299 юаней ($ 370). В остальном, в том числе и внешне, новая модель Xiaomi M2S ничем не отличается от текущей модели Xiaomi M2.
А вот Xiaomi M2A — это полностью новый смартфон. Дизайном он очень похож на модель Xiaomi M2S, но начинкой заметно уступает. Смартфон имеет 4,5-дюймовый HD дисплей, работает на базе двухъядерного процессора Snapdragon S4 Pro с частотой 1,7 ГГц, оснащен только 1 ГБ оперативной и 16 ГБ встроенной памяти. Кроме того, новинка получила поддержку NFC, GPS + GLONASS, WIFI Display, WIFI Direct, 8 Мп заднюю и 2 Мп передние камеры, а также аккумулятор емкостью 2030 мАч. Странно, но на официальном сайте упоминания, что флагман Xiaomi M2S получил поддержку NFC, нет. Цена смартфона ‑ всего 1499 юаней ($ 241).
Стоит отметить, что, наряду с появлением двух новинок, упала цена на текущую модель Xiaomi M2. Теперь версия на 16 ГБ стоит 1949 юаней, а версия на 32 ГБ — 2249 юаней. Как видим, разница между обновленной и текущей моделями мизерная.
Ожидается, что предзаказ на новые смартфоны начнется в ближайшее время, а первые отгрузки начнутся спустя три недели, по крайней мере, модели Xiaomi M2A.
В теме нет куратора. По вопросам наполнения шапки обращайтесь к модераторам раздела через кнопку «Жалоба» под сообщениями, на которые необходимо добавить ссылки.
Если в теме есть пользователь, желающий стать Куратором и соответствующий Требованиям для кандидатов, он может подать заявку в теме Хочу стать Куратором (предварительно изучив шапку темы и все материалы для кураторов).
Сообщение отредактировал — Serge — — 07.07.13, 23:42
Смартфон Xiaomi Mi2S опередил Samsung Galaxy S4 в синтетических тестах
09.04.2013 [20:23], Александр Будик
Одними из наиболее интересных смартфонов китайских брендов можно с уверенностью признать аппараты компании Xiaomi. Эти устройства, как правило, отличаются довольно мощной аппаратной составляющей и при этом стоят гораздо дешевле своих именитых конкурентов.
Вслед за флагманской моделью Mi2, которая за несколько месяцев успела стать хитом продаж в Китае, компания Xiaomi порадовала потребителей ещё одним интересным смартфоном — Mi2S. Что любопытно, этот аппарат в привлекательном тонком корпусе использует новейший процессор Snapdragon 600 и по синтетическим тестам даже опережает Samsung Galaxy S4 (версию на том же чипе), если верить данным источника.
Четырёхъядерный чип, установленный в Mi2S, функционирует на тактовой частоте 1,7 ГГц. В бенчмарке AnTuTu он сумел набрать 25 913 баллов, опережая Galaxy S4 на 467 пунктов. И это при цене всего $322 за 16-Гбайт версию с 8-Мп камерой и $370 за модель с 32 Гбайт памяти и 13-Мп камерой.
Как и предшественницы, новинка использует фирменную прошивку MIUI на основе Android. Из характеристик также отмечаются 2 Гбайт оперативной памяти и 4,3-дюймовый дисплей с разрешением HD 720p. Напомним, у Galaxy S4 более крупный экран с разрешением Full HD. В свою очередь, Xiaomi готовит к осени выпуск модели Mi3 с 5″ Full HD-дисплеем и чипом Snapdragon 800.
Уже даже русскоязычные перекупщики предзаказ открыли. Аппарат стал ещё вкуснее. Единственное, с таким ценообразованием у перекупщиков на 32Гб/13Мп будет стоить под 20к 😮
Источник
Ошибка дополнительной проверки подписи OTA AOSP
Я пытаюсь реализовать процесс инкрементного обновления OTA для своего пользовательского ПЗУ Android на базе Android 7.0 Nougat. Мне удалось собрать первую и вторую (модифицированную) версию прошивки, поэтому у меня есть первая и вторая target_files.zip.
Я создал инкрементный OTA zip, следуя официальному руководству ( https://source.android.com/devices/tech/ota/tools ), точнее используя эту команду: ./build/tools/releasetools/ota_from_target_files -i ПРЕДЫДУЩИЙ -tardis-target_files.zip dist_output / tardis-target_files.zip incremental_ota_update.zip # делать инкрементный из более старой версии
Я установил первую версию прошивки на устройство и попытался обновить ее с помощью incremental_ota_update.zip, выполнив следующие действия:
создал «командный» файл внутри папки / cache / recovery со следующим текстом внутри: —update_package = / cache / Update.zip
вручную скопировал incremental_ota_update.zip в папку / cache
выполнила следующую команду из моего системного приложения, которое является приложением запуска: RecoverySystem.installPackage (context, new File («/ cache / incremental_ota_update.zip»));
Устройство перезагружается само, появляется в меню восстановления с двумя вариантами: перезагрузить устройство и перезагрузить с помощью загрузчика, я нажал кнопку «перезапустить устройство». Он перезагружается, но никаких изменений не вносится, инкрементное обновление не устанавливается.
Я проверил файл журнала, и он говорит:
После этого я скопировал ota_scatter.txt из второго target_files.zip и поместил его в incremental_ota_update.zip и повторил процесс обновления, и теперь я получаю следующую ошибку:
Я не знаю, что делаю не так, если кто-нибудь может мне помочь, я буду очень признателен!
Источник
Error invalid ota package missing scatter
рут сделал при помощи ROOT_v5. При настройке параметров сети несоответствие между поставленными галками и результатом.т.е ставишь галку на предпочтении WCDMA, а при выходе из окна отображается двойной режим.а так для своей цены вещч хорошая,бралась как читалка и игрушка для ребенка 4г. С родного рекавери можно сделаь только userdata. Ставить кастомный от других моделей на авось както несерьезно.если кому нужен бэкап прошивки, найдите,чем сделать,сделаю,выложу.вопрос чем?слегка поискал,не нашел.а проповать тыком,не имея проши,не считаю разумным в моих обстоятельствах.выкладываю рут и SU.не могу дать ссылки,т.к. не помню,где брал,поэтому вот файлы
вот так делается бекап и рут заодно a так же имей правит http://goo.gl/7ryvg это ссылка на MTK Droid Root & Tools v2.4.3
у меня поднялся зверек но висит на заставке и крутится кружок и все.
Буду шаманить дальше.
Все ожил, вайп сделал. Имей пустой надо восстанавливать. Отпишусь о результате.
Имей восстановлен программой для создания бекапа сеть видит. Нет серийного номера в информации о телефоне, думаю не важен.
Завтра напишу инструкцию по оживлению сразу с рутом на борту.
Сообщение отредактировал mpnikitin09 — 17.04.13, 21:54
Установщик удалить можно только через root только наверно, не знаю как у вас..но меня он не донимает. При запуске установщика есть же меню — «Не устанавливать». Ничего лишнего не просит ставить. вот что бы я у с удовольствием удалил, так это читалку встроенную eReader Prestigio — неудобная и плохо настраиваемая. Пользуюсь Cool Reader. Но опять таки — боюсь рутовать ибо планшет, хоть и бюджетный, но превращать его в кирпич как то не айс.
. Эххх — давно я такого адреналина не хапал, сделал таки root, как отписал SpookyMulder. блин, аж руки вспотели от волнения. но всё прошло зе бест, авторам раздела — огроменное спасибо)
З.Ы. — удалил сразу читалку, установщик и ещё многое ненужное через Root Exsplorer.
Сообщение отредактировал rusline151 — 13.05.13, 12:27
Расскажи как оживил?
Просле удаления Установщика Prestigio происходит тоже самое.
Wipe не помог
Сообщение отредактировал pvp-74 — 13.05.13, 15:33
Источник
Error invalid ota package missing scatter
FAQ по созданию патча update.zip для прошивки через рекавери
Редактирование Updater-script. Информация, решения, команды, подпись патчей.
Инструкция по установке системных и пользовательских приложений с помощью recovery
Редактирование установленной прошивки и удаление системных приложений
(ключевые слова)
Напоминаю, тут не стол заказов.. Посты с просьбой собрать zip для «хххх» Recovery оффтоп
Сообщения, не относящиеся к теме обсуждения (оффтоп), удаляются без предупреждения
- Добавление нескольких пользовательских/системных приложений «за один клик» (одним патчем).
- Добавление/удаление системных приложений без root прав и вспомогательных программ.
- Изменение прошивки (замена файлов, украшательства и т.д.).
- Обновление программы или прошивки.
- Переразметка памяти (обсуждения в другой теме)
- Получение root прав SuperUser, SuperSU, Magisk
- Установленный на телефоне кастомный рекавери (CWM/TWRP)
- NotePad++ (редактор с сохранением Unix формата)
- Zip_signer (подписчик архивов)
- Архиватор ZIP
- Файл-заготовка sample.zip (либо update-binary для ручной сборки)
 Zip_signer.rar ( 13.28 КБ )sample-patch.rar ( 4.77 МБ )update-binary.rar ( 113.25 КБ )
 - Дополнительные версии бинарника. binary_all.rar ( 649.36 КБ )
- Бинарники (архив/исходники)
Исходники бинарника, основная ссылка:
https://android.google…ootable/recovery/+refs
выбираем к примеру «android-9.0.0_r18» , потом ищем папку «updater», в папке «updater» исходники бинарника
К примеру https://android.google…droid-9.0.0_r18/updater — можно глянуть все команды которые может выполнить бинари в андроид 9.0.0 (в файле install.cpp, в самом низу)
 signapk.zip ( 9.24 КБ )
 + Android update-script (Пост Няшная #63580419)
Внимание! Патчи создаются только для мод.рекавери и результативно работают только в них. В стоковых рекавери (на аппаратах «из коробки») патчи не работают.
Для того, чтобы установить новые системные приложения apk в Ваш аппарат, необходимо выполнить три шага:
- Собрать свой update.zip (из заготовки sample.zip)
- Подписать update.zip утилитой Zip_signer(Не обязательно!)
- Закинуть на флэшку и установить в аппарат через ClockWorkMod Recovery
Эти шаги являются универсальными, т.е. подойдут для выполнения других подобных операций.
ШАГ №1
Собрать новый update.zip, используя «болванку» sample.zip
Порядок использования sample.zip:
- Разархивировать архив sample.zip
- Удалить файлы подписи META-INF/CERT.RSA, CERT.SF, MANIFEST.MF (т.к. 2м шагом мы их будем создавать для своей сборки)
- Поместить в папку /data/app свое пользовательское приложение (xxxxx.apk)
- При необходимости отредактировать файл updater-script (подробнее позже)
- Заархивировать всё (META-INF и data) ZIP’ом без сжатия
ШАГ №2
Подписать update.zip с помощью утилиты Zip_signer
Порядок использования утилиты Zip_signer:
- Переименовать Ваш отредактированный (т.е. уже с приложением внутри) sample.zip в update.zip
- Поместить его в папку с программой Zip_signer
- Запустить файл zip_signer.bat
- Дождаться, пока процесс будет завершен
- В папке появится файл update-finished.zip — это и есть подписанный файл
- Переименовать update-finished.zip по своему усмотрению (согласно логике патча)
ШАГ №3
Установка нового приложения
- Перекинуть (переименованный) update-finished.zip на флэшку и установить его в аппарат через TWRP или CWM (install zip from sdcard -> chooze zip from internal sdcard -> Yes, install sample.zip)
- Перезагрузить аппарат
/ )
Внимание! Патчи создаются только для мод.рекавери и результативно работают только в них. В стоковых рекавери (на аппаратах «из коробки») патчи не работают.
Корень патча:
- папка META-INF
- папка источник установки приложений (system, data, sdcard, cache, sd-ext)
Обязательные файлы: - META-INF/com/google/android/update-binary — системное средство запуска данного патча, также создает временную рабочую папку tmp
- META-INF/com/google/android/updater-script — выполняемый скрипт по которому и происходят операции копирования и т.д.
Разберем sample.zip
Патч добавляет пользовательское приложение MyPiano в Data.
— Выводит сообщение о завершении процесса.
- busybox — приложение для выполнения командной строки, устанавливается с кастомным рекавери, находится в ramdisk/sbin. в кастомных прошивках зачастую добавляют его в system/xbin
Возможные исправления для своих целей
- Изменение прав
• package_extract_dir
Синтаксис: package_extract_dir(» «, » «);
Копирует содержимое в . Файлы в имеющиеся в перезаписываются.
Пример: package_extract_dir(«system», «/system»); Скопирует файлы из папки update.zip/system в /system
• package_extract_file
Синтаксис: package_extract_file(» «, » «);
Копирует файл в . Если файл существует, то он перезаписывается.
Пример: package_extract_file(«test.sh», «/tmp/test.sh»); Скопирует файл test.sh из update.zip в /tmp/test.sh
• format
Синтаксис: format(«MTD», » «);
Форматирует раздел (см. приложение).
Пример: format(«MTD», «system»); Полностью отформатирует /system . Примечание: форматирование удаляет данные необратимо.
Пример 2: format(«ext4», «EMMC», «/dev/block/mtdblock5», «0», «/system»);
Определение номера блока под спойлером «инфо и материалы».
• delete
Синтаксис: delete(» «[, «file2», . «fileN»]);
Удаляет файл(ы)
Пример: delete(«/system/app/Calculator.apk»); Удалит Calculator.apk из папки system/app.
• delete_recursive
Синтаксис: delete_recursive(» «[, «dir2», . «dirN»]);
Рекурсивно удаляет папку(и) со всем содержимым
Пример: delete_recursive(«/data/dalvik-cache»); Удалит папку /data/dalvik-cache со всем содержимым.
• run_program
Синтаксис: run_program(» «[, » «, » «, » «]);
Запускает программу(скрипт) .
Пример: run_program(«/tmp/install_busybox.sh»); Запустит скрипт /tmp/install_busybox.sh.
«[, . «pathtofileN»]);
Устанавливает владельца, группу и разрешения для файла или папки, как ‘chmod’, ‘chown’, и ‘chgrp’ всё в одном
Пример: set_perm(0, 2000, 0550, «/system/etc/init.goldfish.sh»); Установит владельца, группу и разрешения для файла /system/etc/init.goldfish.sh
• set_perm_recursive
Синтаксис: set_perm_recursive( , , , , «
«])
Рекурсивно устанавливает владельца, группу и разрешения для содержимого папки. — для папок, — для файлов.
Пример: set_perm_recursive(0, 0, 0755, 0644, «/system/app»); Установит права для содержимого /system/app, для папок — 0755, для файлов — 0644.
• show_progress
Синтаксис: show_progress( , );
Продвижение прогрессбара на долю за секунд. может быть нулевым для продвижения его по командe set_progress, а не по времени.
Пример: show_progress(0.100000, 1); Увеличит прогресс на 0.1 часть за 1 секунду
• set_progress
Синтаксис: set_progress( );
Устанавливает положение прогрессбара на долю , для самого последнего вызова команды show_progress.
Пример: set_progress(0.500000);
• symlink
Синтаксис: symlink(«
Создает символическую ссылку (как ‘ln-s’).
Пример: symlink(«/data/app_s», «/system/app»); Создаст символическую ссылку на папку /data/app_s для папки /system/app
«);
Монтирует в путь
. должно быть название раздела, если это «MTD», или блок памяти если это «vfat»
Пример: mount(«MTD», «userdata», «/data»);
• ui_print
Синтаксис: ui_print(» «);
Выводит на экран сообщение
Пример: ui_print(«Formatting SYSTEM. «);
• sleep
Синтаксис: sleep( );
Пауза процесса на секунд
Пример: sleep(5); — пауза 5 секунд, после чего код скрипта выполняется дальше.
• set_metadata / set_metadata_recursive
Синтаксис: set_metadata (. );
Устанавливает владельца, группу и разрешения (новая команда взамен set_perm для andriod 4.4.*)
Примеры: Android update-script (Пост #32151495)
Создание патча update.zip для прошивки через рекавери (Пост kory-vadim #81945464)
• set_metadata / set_metadata_recursive
Синтаксис:
set_metadata(«имя файла», «ключ1», «значение1», «ключ2», «значение2», . )
set_metadata_recursive(«имя директории», «ключ1», «значение1», «ключ2», «значение2», . )
Ключи:
* uid
* gid
* mode (set_perm_extd only)
* fmode (set_perm_extd_recursive only)
* dmode (set_perm_extd_recursive only)
* selabel
* capabilities
первые три (uid, gid, mode) это тоже самое что и в chmod, заполняется «uid», 0, «gid», 1000, «mode», 06754.
для установки прошивки хватает трех ключей «uid», 0, «gid», 1000, «mode», 06754.
Пример: set_metadata(«/system/xbin/shelld», «uid», 0, «gid», 1000, «mode», 06754, «capabilities», 0x0, «selabel», «u:object_r:system_file:s0»);
set_metadata_recursive(«/system/xbin», «uid», 0, «gid», 2000, «dmode», 0755, «fmode», 0755, «capabilities», «0x0», «selabel», «u:object_r:system_file:s0»);
• команды для Nexus’ов
block_image_update(«/dev/block/platform/msm_sdcc.1/by-name/system», package_extract_file(«system.transfer.list»), «system.new.dat», «system.patch.dat»);
Синтаксис: block_image_update(«Путь к блоку раздела», package_extract_file(«список информации для патча (?) «), «образ», «патч образа»);
я так понимаю, что так прошивается сильно сжатая прошивка (образ системы).
Еще ifelse
Пример: ifelse(is_mounted(«/system»), unmount(«/system»)); — если раздел сустем смонтирован дается команда на его размонтирование, если размонтиовать то нечего не происходит.
• Информация по атрибутам set_metadata и подобным командам на Android 4.4+
Android update-script (Пост blackeangel #50803606)
Описание откуда берутся «u:object_r:uncrypt_exec:s0» и подобные атрибуты. . .
• Пример скрипта который может удалятьперемещатьбекапить файлы и вести лог действий
Android Script Creator (Пост Octanium #51085030)
Используется при отсутствии busybox, либо чтоб не привязываться к его расположению в системе.
Код «перезагрузки» и «перезагрузки в рекавери» соответственно:
Когда скрипт выполняется очень быстро (1-4 секунд) я использовал следующий код:
Т.е. за 3 секунды прогресс бар доходит до 100% (постепенно).
Число «3» выбрано как [время установки скрипта]+1 сек, чтоб прогресс бар при установке гарантированно двигался и не успел дойти до 100% раньше, чем скрипт установится.
«[, . «pathtofileN»]);
Устанавливает владельца, группу и разрешения для файла или папки, как ‘chmod’, ‘chown’, и ‘chgrp’ всё в одном
Пример: set_perm(0, 2000, 0550, «/system/etc/init.goldfish.sh») Установит владельца, группу и разрешения для файла /system/etc/init.goldfish.sh
«])
Рекурсивно устанавливает владельца, группу и разрешения для содержимого папки. — для папок, — для файлов.
Пример: set_perm_recursive(0, 0, 0755, 0644, «/system/app») Установит права для содержимого /system/app, для папок — 0755, для файлов — 0644.
«);
Монтирует в путь
. должно быть название раздела, если это «MTD», или блок памяти если это «vfat»
Пример: mount(«MTD», «userdata», «/data»);
Пример монтирования на андроид 9-10
Если Вам знакомо что такое Recovery, CWM,TWRP, знаете что такое кастомные прошивки и с чем их едят, то наверняка вы сталкивались с тем что прошивка или обновление не устанавливается выводя при этом ошибку «Status #».
Источник
I’m trying to implement the incremental OTA update process for my custom Android ROM based on Android 7.0 Nougat. I’ve managed to build the first and second(modified) version of the firmware, so I have the first and second target_files.zip.
I’ve created the incremental OTA zip following the official guide (https://source.android.com/devices/tech/ota/tools), more exactly using this command:
./build/tools/releasetools/ota_from_target_files -i PREVIOUS-tardis-target_files.zip dist_output/tardis-target_files.zip incremental_ota_update.zip # make incremental from the older version
I installed the first firmware version on a device and tried to update it with the incremental_ota_update.zip with these steps:
-
created the «command» file inside /cache/recovery folder with the following text inside it: —update_package=/cache/Update.zip
-
manually copied the incremental_ota_update.zip inside the /cache folder
-
ran the following command from my system app, which is a launcher app: RecoverySystem.installPackage(context, new File(«/cache/incremental_ota_update.zip»));
The device restarts itself, arrives in the recovery menu with two options: restart device and restart with bootloader, I hit the «restart device» option.
It restarts but no changes are made, the incremental update is not installed.
I checked the log file and it says:
Opening update package...
I:read key e=3 hash=20
I:1 key(s) loaded from /res/keys
Verifying update package...
I:comment is 1738 bytes; signature 1720 bytes from end
I:signature (offset: 0x3cfdfe, length: 1714): 308206ae06092a864886f70d010702a082069f3082069b020101310b300906052...[    2.849059] I:whole-file signature verified against RSA key 0
Update package verification took 0.1 s (result 0).
Error: Invalid OTA package, missing scatter
E:install package error, result = 1
Update.zip is not correct
Installation aborted.
nand type is emmc
After this I copied the ota_scatter.txt from the second target_files.zip and put it inside the incremental_ota_update.zip and retried the update process and now I get the following error:
Opening update package...
I:read key e=3 hash=20
I:1 key(s) loaded from /res/keys
Verifying update package...
E:footer is wrong
Update package verification took 0.0 s (result 1).
E:signature verification failed
E:install package error, result = 7
Signature verification failed
Installation aborted.
nand type is emmc
I don’t know what I’m doing wrong, if anyone can help me out I will greatly appreciate it!

-
#1
Some people are having trouble with updating their Xiaomi M2 so decided to share an update procedure.
Please read this full post carefully along with notes at the end please. If you have questions/problems then please at least read the posts at the first page of this thread.
First about the xiaomi Phone partition structure
This phone unlike other phones, have two system partitions (System 1 and system 2) but it uses the same user data and user installed applications for both partitions. So it means for both systems, you just need to install the application only once and it will be available in both partitions along with application data.
There are two methods to update the M2 to new ROM.
a)- Using the updater App
b)- Using the pre-installed Recovery
Always backup your data before updating. You can use MIUI Backup application, its really great app already installed on all MIUI ROMs.
a) Using Updater App
To use this method
- Download the ROM zip file from ROM thread http://xiaomi.eu/community/link-forums/roms.73/
- Put it on your SDCard (yes Virtual)
- Open the App named Updater -> press the menu key and select installation pack.
- Then select the ROM zip file you want to install.
- It will install the ROM and will ask if you want to reboot to new system.
NOTE1:as this method is very easy, it has one disadvantage!! As M2 have two system partitions it can’t update the current system partition. It always updates the other partition i.e. if you are currently booted in system1 then it will update system 2 and if you are in system 2 then it will update system1. You can also install gapp zip in same way by selecting gapp zip file as installation pack (Gapps are not needed with MIUIandroid release — already included)
NOTE2: It’s the only way to update the system 2 partition.
b) Using pre-installed Recovery
For this method
- Download the ROM zip file from ROM thread http://miuiandroid.com/community/forums/miui-weekly-rom-releases.103/
- Rename the downloaded ROM zip file as “update.zip” and put it on the root of SDCard (virtual)
- Reboot to recovery (power off and then use Volume up + power button, release the buttons when you see MI logo),
- Select the language ,
- Select “install update.zip to system ONE”,
- Select Yes to confirm ,
- After completion reboot.
- Repeat this method to install Gapps.zip but again you have to put gapp zip in the root of SDcard and rename it as “update.zip” (Gapps are not needed with MIUIandroid release — already included)
Note:This method always updates the System One!! It can’t be used to update the system 2 partition.
Please check this thread for Complete list of Mi-2 Official ROMs its in English.
All the information is learned from this forum and official xiaomi Chinese web site.
Last edited by a moderator: Nov 11, 2014
-
#2
Thanks for collecting info from various sources/posts and combining it in one thread.
Ergo, following a) Using Updater App i will have installed ROM (for instance, latest version from this forum which allow me rooting permisssion) on System Two which mean i will have to reboot (from MI recovery) from System Two, right?
On the System One i will have previous version, which in my caise is stable MIUI version came with MI2.
I guess, every restart will start System Two version from now on
After that I can follow tutorial thread for upgrading MIUI: http://miuiandroid.com/community/threads/how-to-update-upgrade-miui.15424/
At same time, i could allways go back to previous version installed on system One, right?
Anyway, thanks for effort
-
#3
Ergo, following a) Using Updater App i will have installed ROM (for instance, latest version from this forum which allow me rooting permisssion) on System Two which mean i will have to reboot (from MI recovery) from System Two, right?
On the System One i will have previous version, which in my caise is stable MIUI version came with MI2.
I guess, every restart will start System Two version from now on
After that I can follow tutorial thread for upgrading MIUI: http://miuiandroid.com/community/threads/how-to-update-upgrade-miui.15424/
At same time, i could allways go back to previous version installed on system One, right?
Anyway, thanks for effort
1. Yes u will reboot from system 2 always unless you change it !!! and u can change it by rebooting to recovery and then selecting the reboot option . then it will give you the option from which partition you want to reboot . so if you select system one for example then from now on it will keep rebooting from system 2 unless you change it from recovery again. acutually recovery set the default boot partition.
2. as for the tutorial you mentioned, it can not update to system two . and it is for the devices which have CWM recovery not for MI2.
From my experience you can’t use two ROMs at same time from two different Forums (Origional Chinese version and translated version) and boot from any of them ! data is not cosistent . Chinese Roms are Odexed but This forum ROMs are Deodexed i think thats the problem. So you have to install both ROMs from same Source (Chinese or MIUIandroid) version can be different (old and new)
1
System One — Origional Chinese (any date version)
System Two — Origional Chinese (any date version)
No problem both are useable
2
System One — Origional Chinese (any date version)
System Two — MIUIandroid (any date version)
Chinese version will have problem Once you rebooted to MIUIandroid (you can make chinese useable by wiping all data in recovery )
3
System One — MIUIandroid (any date version)
System Two — Origional Chinese (any date version)
Chinese version will have problem Once you rebooted to MIUIandroid (you can make chinese useable by wiping all data in recovery )
4
System One — MIUIandroid (any date version)
System Two — MIUIandroid (any date version)
No problem both are useable
hope it will help !
-
#4
More then you know
Was afraid of chinese setup/language for doing something wrong
-
#5
thank you for this. Xiaomi should really make it so you can select what partition to install to in recovery. Also i though the Mi2 zip already had gapps included.
-
#6
thank you for this. Xiaomi should really make it so you can select what partition to install to in recovery. Also i though the Mi2 zip already had gapps included.
Yes gapps have to be installed separately
Edit: MI1 and MI2 miuiandroid ROMs already have the Gapps.
Sent from my Xiaomi M2
-
#7
Yes gapps have to be installed separately
Sent from my Xiaomi M2
Not on Mi2 or mi
Sent from my MI 2 using Tapatalk 2
-
#8
Not on Mi2 or mi
Sent from my MI 2 using Tapatalk 2
Thanks for correction
-
#9
Hadron, today I updated originally installed JLB3.0 (System one) to JLB5.0. (System two)
Few minutes ago i installed 2.12.7 from this forum, and it ended up on System One.
Because of that, i was able to get root permission.
Wanted to check recovery mode with ROM Manager, and rebooted my phone to recovery. But instead getting recovery screen with NO/YES options (like in iBotPeaches tutorial thread), I ended up with MI Recovery 2.0.0.(as before).
So my question is do i need to wipe all data or installing next version (automaticly to different System) will overwrite previous Chinese version?
-
#10
Hadron, today I updated originally installed JLB3.0 (System one) to JLB5.0. (System two)
Few minutes ago i installed 2.12.7 from this forum, and it ended up on System One.
Because of that, i was able to get root permission.Wanted to check recovery mode with ROM Manager, and rebooted my phone to recovery. But instead getting recovery screen with NO/YES options (like in iBotPeaches tutorial thread), I ended up with MI Recovery 2.0.0.(as before).
So my question is do i need to wipe all data or installing next version (automaticly to different System) will overwrite previous Chinese version?
Yes it will be updated. no need to data wip. just wipe cache
Unless some one made CWM recovery for Mi2 we have to use MiRecovery. You will not get that screen. Its not valid for Mi2. Screen shots are from CWM recovery.
-
#11
Hello everyone, sorry if I offer a question a bit stupid,
I am Italian, I bought the phone Xiaomi m2, it is coming, and I wanted to ask how do I install the Italian language, I ask you kindly to help me step by step ’cause I do not understand much, I’m a beginner. I do the root? how do you? or there is no ‘need.
thank you in advance, as always very kind
-
#12
Peppe, Im sure somebody will answer you (not me cause I dont use language pack) but, in mean time, you might check this site:
http://miui.nexus-lab.com/site/
…if you didnt check it so far
-
#13
Hello everyone, sorry if I offer a question a bit stupid,
I am Italian, I bought the phone Xiaomi m2, it is coming, and I wanted to ask how do I install the Italian language, I ask you kindly to help me step by step ’cause I do not understand much, I’m a beginner. I do the root? how do you? or there is no ‘need.
thank you in advance, as always very kind
1. First install the latest ROM for mi 2 from this forum. Then install the multi Lang pack with out wiping any data. Follow the first post then if you have problems ask here.
2 it’s already rooted. So no need.
hadron
Sent from my Xiaomi M2
-
#14
I was wondering what the function with the two partitions is? Is it possible to just have one partition? I am using the dev ROM from the Chinese forum since this is what I started using and was wondering how I would go about using this forums ROM instead. Also, how would I go about doing a clean install on the phone, like format all wipe & partitions etc?
-
#15
Just one question, even though subject might be for different thread…
Default ROM JLB3.0 i got with MI2, changed to 2.12.7 from this site.
Today i updated to 2.12.21.
Since those ROMs supposed to be english translated, etc,etc….i am curious why do i get this on chinese, under «share system update info»:
-

Screenshot_2012-12-22-13-18-55.png
103 KB
· Views: 622
-
#16
Just one question, even though subject might be for different thread…
Default ROM JLB3.0 i got with MI2, changed to 2.12.7 from this site.
Today i updated to 2.12.21.
Since those ROMs supposed to be english translated, etc,etc….i am curious why do i get this on chinese, under «share system update info»:
Strange! Even I am on original Chinese ROM and it’s in English.
hadron
Sent from my Xiaomi M2

-
#17
Hello, sorry, some information when I change rom, GJB from 5.0 to miuiandroid 2:12:21 and ‘better format the internal SD and then wipe before putting 12.02.21? not to have problems? thanks
-
#18
With the galaxy s2 cleaned the internal SD and then wipe to have a clear situation, then flesh the new rom
I want to avoid problems between China and the miuiandroid rom rom
Could this be the problem of compatibility ‘with games such as asphalt 7?
-
#19
Hello, sorry, some information when I change rom, GJB from 5.0 to miuiandroid 2:12:21 and ‘better format the internal SD and then wipe before putting 12.02.21? not to have problems? thanks
Internal sdcard is not a problem and you don’t need to clean it. It’s your choice if you want to do it. Important thing is to clean data partition . Wipe all data from recovery. And it’s ok . Maybe in some special case when sdcard is corrupted then its required to format.
hadron
Sent from my Xiaomi M2

-
#20
According to the info stated in the OP, user data will be shared across the 2 partitions. So does this mean that both partitions have to run the same version of Android for all apps to work?
Also, which method of updating do you guys recommend? The updater one or the manual recovery one?
So, can I safely say that the Mi-2 is actually dual-booting two ROMs? Will the phone have 2 ROMs by default when it’s first bought, in factory condition?
-
#21
According to the info stated in the OP, user data will be shared across the 2 partitions. So does this mean that both partitions have to run the same version of Android for all apps to work?
Also, which method of updating do you guys recommend? The updater one or the manual recovery one?
So, can I safely say that the Mi-2 is actually dual-booting two ROMs? Will the phone have 2 ROMs by default when it’s first bought, in factory condition?
- Yes both partition will have the same ROM when you first buy the phone
- Both method are OK but from recovery you cant update the system 2 partition and updater method always update other system partition. So depending on your situation you can choose any one.
- My experience is that if you want to use both ROMs alternatively then both partitions should have the same version of the ROM. Then transition from one partition to other is more stable. But you can put any ROM on 2nd partition problem is then you have to clear all user data from recovery when you want to use 2nd ROM.
hadron
-
#22
Thanks for the quick reply!
I guess I’ll leave the stock China ROM in Partition 1 and the MIUIAndroid ROM in Partition 2. If that’s so, to switch from Partition 1 to Partition 2, I just need to boot into recovery and reboot into Partition 2 right?
I would personally prefer the updater method. For a beginner like me, I guess it’s better to start off with a simpler method… I really appreciate Xiaomi for providing two system partitions, so I can use two different ROMs without having to install apps on each of them manually…
But just to clarify, according to the weekly update post on 21/12/12, Gapps aren’t included anymore, so I have to flash them manually right? Seems like Friday will become my favourite day soon…
-
#23
dude. is there a any program for imei changing. ı bought xiaomi m2 from ıbuygou.com. but ı cant use the phone wıth stock ımei. there is a huge tax about my phone. ı dont wanna pay extra 150 dolar. what must ı do.
-
#25
Hi, am having trouble now with updating my new xiaomi m2, hope someone can help…
My current build number is 2.11.30, and I am trying to update to 2.12.28, which is the latest version, as Google play store is giving me trouble with downloading apps.
So I tried method b) Using pre-installed Recovery, because I’m unable to find for the Updater app. After downloading the ROM zip file (275 mb) and renaming it to update.zip and placing it in the root folder of the virtual SD card, I then proceeded to boot into recovery and only saw these options: reboot system now, apply update from sdcard, apply update from cache, wipe data/factory reset, backup user data, and restore user data. From there, I went to apply update from sdcard, and selected the update.zip. However, I got Error: Invalid OTA package, missing scatter. Update.zip is not correct. Installation aborted. Can someone please advise? There wasn’t any «install/reboot system 1/2 at all….
- Forum
- Get Help & Give Help!
- Ask a Question
-
while trying to reset my AG mobile kitkat 4.4 running on Google chrome swift i was disturbed and the battery was removed and now just showing «no command» what should I do? i tried different android file they all shows «error» or «invalid ota package missing scatter»
05-09-2016 06:23 AM
-
Welcome to the forums. I think pulling the battery during the reset process is akin to disrupting a software install. You may have to reflash the stock images to get the phone operating again.
05-09-2016 10:40 AM

- Forum
- Get Help & Give Help!
- Ask a Question

how to solve «no command» «invalid ota package missing scatter what should I do?
Similar Threads
-
Replies: 1
Last Post: 05-09-2016, 09:07 AM
-
Replies: 1
Last Post: 05-09-2016, 08:48 AM
-
Replies: 2
Last Post: 05-09-2016, 06:06 AM
-
Replies: 0
Last Post: 05-09-2016, 05:53 AM
LINK TO POST COPIED TO CLIPBOARD
MTK6580A Leagoo M5 TWRP download and MTK6580A Leagoo M5 root
This guide will help you install TWRP and root MTK6580A Leagoo M5, the first step is to install TWRP custom recovery on the MTK6580A Leagoo M5. The process contains quite a few steps, but most of them take just a few seconds.
If it looks daunting, don’t worry, take each step one by one and you’ll come through with a rooted MTK6580A Leagoo M5 within just a few minutes.
1. Download
- MTK MediaTek auto preloader drivers #1 pack– These are the drivers that will allow the MTK SP Flash Tool to communicate with your mobile. Try these drivers first, as they may eliminate the need to disable Windows driver signing. If you have any issues then use the #2 pack.
- MTK MediaTek auto preloader drivers #2 pack – These are the drivers that will allow the MTK SP Flash Tool to communicate with your mobile
- Download latest SP Flash Tool – This is the tool that will be used to flash MTK6580A Leagoo M5 with TWRP
- MTK6580A Leagoo M5 root pack – This pack includes the MTK6580A Leagoo M5 TWRP, SuperSU.zip, and MTK6580A Leagoo M5 scatter file download.
(click) What’s a scatter file?
A scatter file is what tells SP Flash Tool exactly where to flash various parts of the firmware on your phone’s EMMC.
2. Install MediaTek MTK6580A MT6580A preloader drivers
If you don’t already have MTK Preloader Drivers installed, we’ll go through that step now. NOTE: If you get an unsigned driver error and can’t continue with the driver install, then go to step #3. NOTE: Use #1 pack or #2 pack. Do not need to use both.
If MTK MediaTek preloader vcom driver pack #1, click here
- Open the MTK adb vcom auto install driver pack #1 in WinRAR / unZip
- No need to extract, double click DriverInstall.exe or installdrv64.exe for x64 bit Windows
- Allow any permission requests
- At the end you should see something like this
If MTK MediaTek preloader vcom driver pack #2, click here
- Open the MTK MediaTek auto vcom driver install pack #2, and go to Win7_WinXP folder for 7 / XP, or Win8 folder for Windows 8 / Windows 10.
- No need to extract, double click DriverInstall.exe
- Allow any permission requests
- When you see “Windows can’t verify the publisher of this driver software”, click “Install this driver software anyway”
- At the end you should see something like this
3. Turn off driver signature enforcement
Do this step if:
- You don’t already have MediaTek preloader drivers installed
and
- Getting error from Windows telling you drivers are unsigned and can’t be installed with pack #1 or pack #2
Click for disable driver signature enforcement guide
To install preloader drivers, some users of 64-Bit Windows may need to disable Driver Signature Verification / Enforcement. This quick procedure will have you up and modding your phone in no time.
- Hold SHIFT while left-clicking restart. It’s the same for Windows 8.1 and Windows 10.

- Your computer will reboot and give you various options. Select “Troubleshoot”.

- Choose “Advanced options”.
- Choose “Startup settings”.
- Select “Restart”.
- Select “Disable driver signature enforcement”.

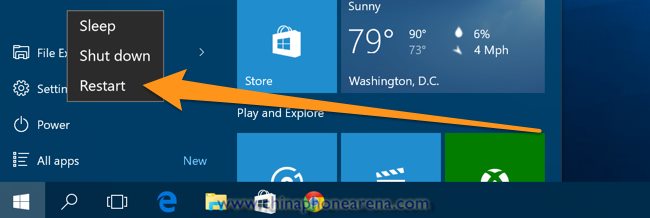
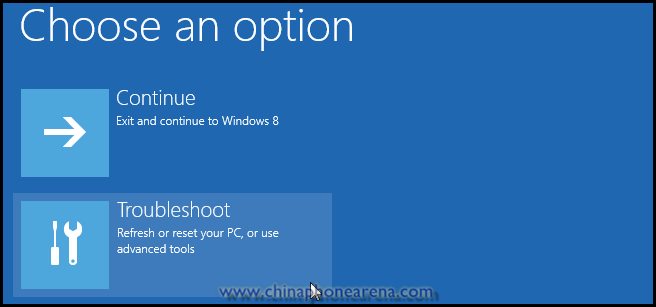
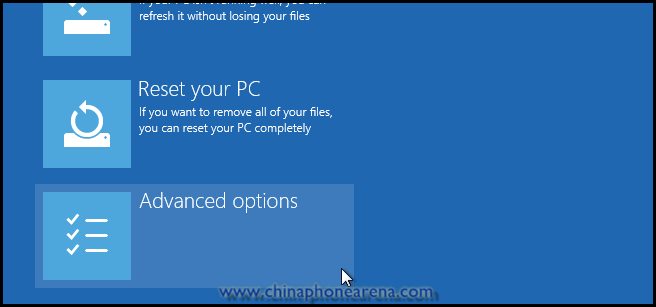
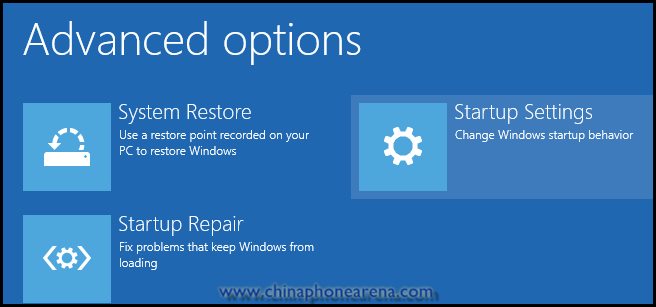
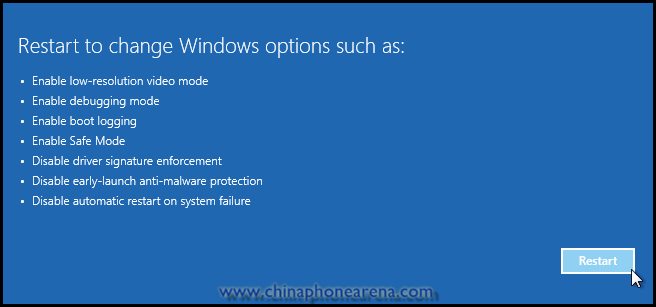

Your computer will now reboot into a mode which will allow you to install unsigned drivers, which is covered in the next steps.
Now go back to step #2 and install the MTK Preloader Drivers (GizBeat source)
4. Install and run SP Flash Tool
- After downloading the latest SP Flash Tool, extract it to a directory where you’ll know where it’s at.
- Go to the extracted folder.
- Right-click ‘flash_tool.exe’ and ‘Run as administrator’
5. Load the MTK6580A Leagoo M5 scatter
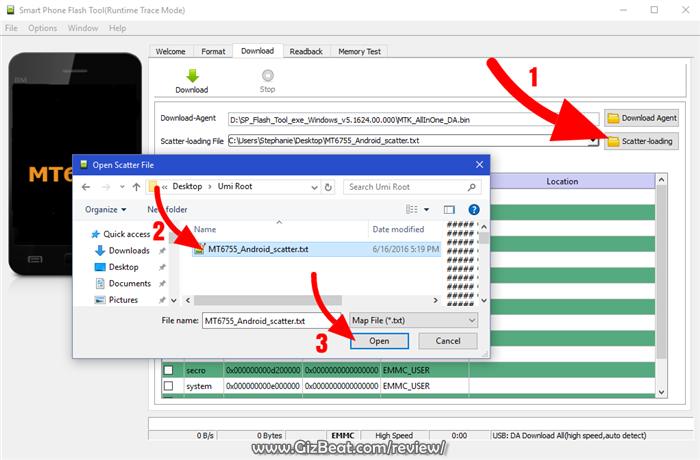
- If you haven’t already done so, extract the MTK6580A Leagoo M5 TWRP and root pack to a folder where you’ll know where it’s at.
- Select ‘scatter-loading’ from upper-right of SP Flash Tools.
- Navigate to the folder that you extracted the MTK6580A Leagoo M5 TWRP pack to
- Select ‘MT6580A_Android_scatter.txt’ for MTK6580A
- A checklist of different parts of the ROM should then show in the bottom portion of SP Flash Tools.
6. Select the MTK6580A Leagoo M5 TWRP custom recovery
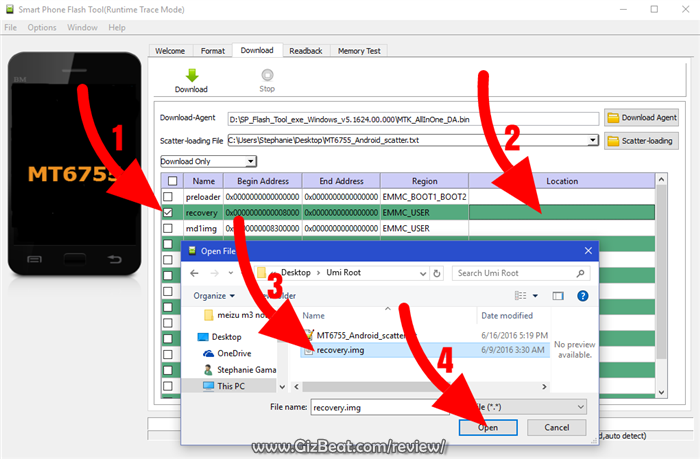
- If anything is selected besides ‘recovery.img’, deselect them all except ‘recovery.img’
- Double click the right side of the ‘recovery.img’ line in MTK SP Flash Tool
- direct SP Flash Tool to the previously extracted MTK6580A Leagoo M5 TWRP (‘recovery.img’ in the MTK6580A Leagoo M5 TWRP pack)
7. Flash MTK6580A Leagoo M5 TWRP
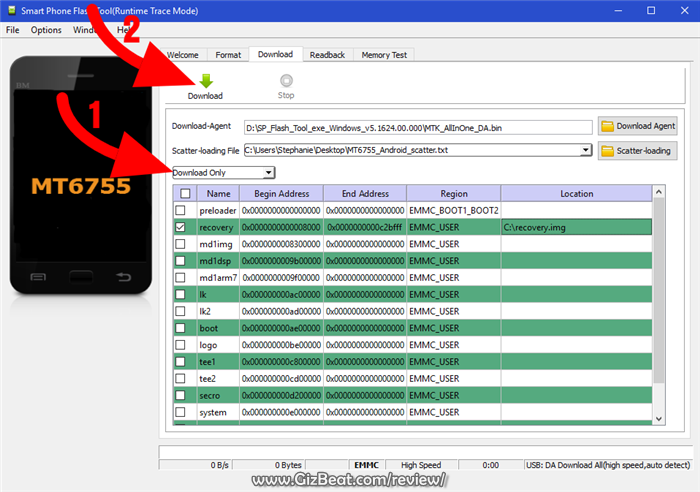
- Make sure the phone is disconnected from PC and that your phone is powered off.
- Make sure the box noted in the image above says ‘Download Only’
- Select ‘download’ from the top of SP Flash Tools.
- Connect USB cable to phone. Within a few seconds you should see a red bar come up. Wait a few more seconds and the flash should begin.
- It will all be over in just a few seconds, at which point you should see a dialog from SP Flash Tools telling you the flash is complete.


8. Boot into MTK6580A Leagoo M5 TWRP recovery and root
- Disconnect your MTK6580A Leagoo M5 from the PC.
- Hold VolumeUp+Power until you see the MTK6580A Leagoo M5 logo show, then release Power, but continue holding VolumeUp until you see the MTK6580A Leagoo M5 booted into TWRP.
- Flash / Install SuperSU.zip from the MTK6580A Leagoo M5 Root pack.
Done! Good job. You now have TWRP and a rooted MT6580 Leagoo M5.
If you have any issues, comments, successes or failures, or just want to say thanks, please comment in the comment section and let us know.
https://gizbeat.com/10809/download-leagoo-m5-twrp-and-root-leagoo-m5-root-guide/https://gizbeat.com/wp-content/uploads/Leagoo-Launched-a-New-Leagoo-M5-is-a-low-end-Smartphone-with-Specifications-450×267.jpghttps://gizbeat.com/wp-content/uploads/Leagoo-Launched-a-New-Leagoo-M5-is-a-low-end-Smartphone-with-Specifications-150×150.jpg2016-10-06T02:41:53+07:00Damian ParsonsGuidesHow ToLeagooMT6580MTK6580TutorialsMTK6580A Leagoo M5 TWRP download and MTK6580A Leagoo M5 root
This guide will help you install TWRP and root MTK6580A Leagoo M5, the first step is to install TWRP custom recovery on the MTK6580A Leagoo M5. The process contains quite a few steps, but most of them take just a…Damian Parsonshttps://plus.google.com/107879368390224447304
admin@gizbeat.comAdministratorHi, I’m Damian Parsons. I’ve been working with Android phones since the first Droid came out. I’m fascinated by computers and technology. My first BBS were ran on an old Apple IIc and Commodore 64. I work hard to bring the latest updates to you every day — without all the boring fluff. Please subscribe to keep up on the newest China tech.
See our forum -> www.chinaphonearena.comGizBeat
2014-09-04, 13:48
(This post was last modified: 2014-09-04, 18:40 by aus9.)
under construction until I remove this line please
It would help if you don’t reply as your questions comments will look funny until i finish the edits
Lets begin
Credits
siewarner testing on Windows
Athos for Windows preparation info and testing
sniper47 for his non-root CWM tutorial
What is sideload
A function to bypass normal security with luck, done in custom recovery mode
that tries to do the following
A inject a zip file into your device
B install it
Packages needed
Windows has been tested for this download…..gives you the adb command
Try link one first then second if you have any issues, both links work but first is preferred
Link 1
[Only registered and activated users can see links Click here to register]
Link 2
[Only registered and activated users can see links Click here to register]
Linux users can use normal package
android-tools-adb
NEXT, you need a zip file that contains the su command and APK
[Only registered and activated users can see links Click here to register]
I suggest you rename it so you can type in the command below as
chain.zip
Windows adb command preparation
Setting up Minimal ADB and Fastboot
1. Connect your phone to PC with USB debugging enabled, and drivers installed.
2. Run the downloaded installer package
3. Setup will prompt you for preferences.
Choose where to install/place program files.
eg
Quote:C:Program Files (x86)Minimal ADB and Fastboot
Select whether or not to add a Start Menu folder for it.
Select whether or not to create a Desktop shortcut.
4. Run ADB from the either the Start Menu entry or the shortcut (if you created one).
Run as administrator.
Optional: (To enable you to run adb commands on a command prompt from anywhere in your system)
i. Go to My Computer. Do not select anything.
ii. Right-click anywhere in the window, select Properties.
iii. A new window will open. On the left pane, select Advanced System Settings
iv. in the Advanced Tab, click on Environmental Variables
v. Under System Variables, find and select Path, and click Edit.
vi. under Variable Path, go to the end of the existing line, add this
Code:
;C:Program Files (x86)Minimal ADB and Fastboot
or your corresponding appropriate path of installation. (The folder path wherein you had the program installed (Step 3))
vii. OK on everything.
OR if Windows instructions is a minefield, just run a live Linux cd, no need to install.
Start a new post in Linux corner and have a couple of tea instead of needing stronger stuff.
ANDROID PREPARATION
You need a custom recovery installed such as CWM/CTR/TWRP
If you do not have one as yet try tutorial here
[Only registered and activated users can see links Click here to register]
Reboot into that recovery
choose install zip
choose option to sideload
Android screen should show some indication its waiting for a sideload command issued from your PC
PC PREPARATION
1) Open a terminal …Linux users have a multitude to choose from. For
Windows users, the terminal is the command c m d.exe (without the gaps)
Probably you need to find it in your file manager, more to follow, then right hand click if right handed and choose option to run it as admin
2) Windows users navigate or change directory to where you put chain.zip —-if you used the Optional method.
If you chose not to use the optional method……then chain.zip must be moved into the install directory of folder you set up at step (3) above.
Linux users should navigate to where chain.zip is, normally in Downloads.
3) start the adb command in admin mode for Windows
Linux users appear OK as local user
4) We need to ensure adb detects your Android such as example using Linux commands…..Windows commands will be similar
Code:
adb devices

* daemon not running. starting it now on port 5037 *

* daemon started successfully *

List of devices attached

0123456789ABCDEF    sideload
You can not proceed unless you see sideload in output.
On your Android do not cancel sideload (an option in CTR)
5) now we sideload
Code:
adb sideload chain.zip

sending: 'sideload'  100%
![[Image: 1zwnbcx.jpg]](http://oi62.tinypic.com/1zwnbcx.jpg)
Now check if root is working on your Android
good luck
Trouble shooting
A For Windows users you need to have the root still in zip format.
—- Not in APK format. Linux users know this instinctively. 
B Don’t try to go past adb devices command without seeing a device and that the device is in sideload mode
C Your custom recovery (like mine) was from needrom. It may be a mod and not correctly built for your actual device. 
This can be resolved but need you ….not me….to unpack it and fix the various
init*rc scripts.
These scripts are dumb….they know nothing of your true USB IDs.
Put the right ones in, and all should be good. Put the wrong ones in and
custom recovery should still work for backup and restore but not sideload.