192.168.8.1/24
Ваш сервер OpenVPN отправляет бессмысленный маршрут — он указывает, что маршрут предназначен для 24-битного префикса, но в адресе есть биты, установленные за пределами этого предела (на самом деле это полный 32-битный адрес хоста).
Вы получаете сообщение об ошибке, потому что эти параметры противоречат друг другу. Допустимое назначение: 192.168.8.1/32 для одного хоста или 192.168.8.0/24 для всей сети.
192.168.8.1/24 через 192.168.8.1
Кроме того, это циклический маршрут, который проходит сам по себе; то есть «чтобы достичь 192.168.8.1, вы должны сначала перейти к 192.168.8.1». (Когда-нибудь слышал термин улов-22?)
Существуют ситуации, когда это допустимо — это было бы приемлемо в соединениях OpenVPN в режиме Tun (соединения точка-точка), если бы также был указан интерфейс, так как тогда шлюз будет игнорироваться, но в этом примере интерфейс не указан и VPN в любом случае работает в режиме касания.
Это также было бы допустимо, если бы система уже имела маршрут по линии связи специально для 192.168.8.1/32, но неизвестно, так ли это в вашей ситуации.
Но в обычных ситуациях шлюз маршрута не является частью пункта назначения того же маршрута. В зависимости от того, что вы действительно хотите, более вероятный маршрут будет 192.168.8.0/24 via 192.168.7.1 или противоположный 192.168.7.0/24 via 192.168.8.1 (я должен угадать здесь).
Нужно ли указывать другой маршрут?
Зависит от того, что вы хотите направить и куда … И при условии, что вы сначала добавили этот маршрут вручную. Если это происходит от прошивки Netgear, лучшим вариантом может быть игнорирование (или попытка обновления прошивки).
-
Если вы хотите, чтобы VPN-клиенты могли подключаться к устройствам в основной локальной сети, маршрут, который должен распространять VPN-сервер Netgear, — это
192.168.7.0/24 via 192.168.8.1.(Обратите внимание, что маршруты, распространяемые на клиентов, — это не то же самое, что маршруты, которые использует сам маршрутизатор Netgear.)
192.168.8.1/24
Your OpenVPN server is sending a nonsensical route – it specifies that the route is for a 24-bit prefix, but the address has bits set beyond that limit (in fact it appears to be a full 32-bit host address).
You’re getting an error message because these parameters contradict each other. A valid destination would have been either 192.168.8.1/32 for a single host, or 192.168.8.0/24 for the entire network.
192.168.8.1/24 via 192.168.8.1
Additionally, it’s a cyclical route that goes through itself; i.e. «in order to reach 192.168.8.1 you must first go to 192.168.8.1». (Ever heard the term catch-22?)
There are situations where this is valid – it would be acceptable in tun-mode OpenVPN connections (point to point links) if an interface were specified as well, as the gateway would be ignored then, but in this example an interface isn’t specified, and the VPN is tap-mode anyway.
It would also be valid if the system already had an on-link route for 192.168.8.1/32 specifically, but it’s unknown whether it does in your situation.
But in normal situations, a route’s gateway is not part of the same route’s destination. Depending on what you really wanted, a more likely route would be 192.168.8.0/24 via 192.168.7.1 or the opposite 192.168.7.0/24 via 192.168.8.1 (I have to guess here).
Do I need to specify another route?
Depends on what you want to route and where… And assuming that you’ve added this route manually in the first place. If it comes from Netgear’s firmware, your best option might be to ignore it (or try a firmware upgrade).
-
If you want VPN clients to be able to reach devices in the main LAN, the route that the Netgear’s VPN server needs to distribute is
192.168.7.0/24 via 192.168.8.1.(Note that routes distributed to clients are not the same thing as routes that the Netgear router itself uses.)
- Index
- » Networking, Server, and Protection
- » [SOLVED] Creating a static route to a URL
Pages: 1
#1 2017-10-21 13:40:30
- 7thSon
- Member
- Registered: 2017-05-07
- Posts: 186
[SOLVED] Creating a static route to a URL
I have had a static route set up previously on Windows where the route has directed traffic from the desktop PC via my NAS when visiting specific web page.
What I want to achieve is: Desktop PC —-> NAS ——> WWW (Site needs to perceive visitor as the NAS VPN IP, not PC non-VPN IP).
I used to do it on windows by adding this route in a cmd:
route -p ADD web.page.ip.number MASK 255.255.255.0 192.168.1.100I would like to do the same in Arch, and I tried this:
ip route add web.page.ip.number/24 via 192.168.1.100 dev enp5s0Is that equivalent of what the windows command was doing? This command gives me an error «Invalid prefix for given prefix length.».
The NAS is set up with iptables as per this script:
#!/bin/bash

#
# Change this variable to match your private network.
#
PRIVATE_NETWORK="192.168.1.0/24"

#
# Change this variable to match your public interface - either eth0 or eth1
#
PUBLIC_INTERFACE="tun0"

#
# Set PATH to find iptables
#
PATH=/sbin:/bin:/usr/sbin:/usr/bin:/usr/syno/sbin:/usr/syno/bin

#
# Module list where KERNEL_MODULES_NAT are defined.
#
IPTABLES_MODULE_LIST="/usr/syno/etc/iptables_modules_list"
source "${IPTABLES_MODULE_LIST}"

#
# Tool to load kernel modules (modprobe does not work for me)
#
BIN_SYNOMODULETOOL="/usr/syno/bin/synomoduletool"

#
# My service name - let's make sure we don't conflict with synology
#
SERVICE="skynet_nat"

#
# iptable binary
#
IPTABLES="iptables"

start() {
    #
    # Log execution time
    #
    date

    #
    # Make sure packet forwarding is enabled.
    # 'sysctl -w net.ipv4.ip_forward=1' does not work for me
    #
    echo 1 > /proc/sys/net/ipv4/ip_forward

    #
    # Count the number of modules so that we can verify if the module
    # insertion was successful. We replace whitespaces with newlines
    # and count lines.
    #
    MODULE_COUNT=$(
        echo "${KERNEL_MODULES_NAT}" |
            gawk '{ print gensub(/s+/, "n", "g") }' |
            wc -l
    )

    #
    # Load the kernel modules necessary for NAT
    #
    "${BIN_SYNOMODULETOOL}" --insmod "${SERVICE}" ${KERNEL_MODULES_NAT}
    RV=$?

    #
    # $BIN_SYNOMODULETOOL returns the number of loaded modules as return value
    #
    [[ "${RV}" == "${MODULE_COUNT}" ]] || {
            echo >&2 "Error: Modules were not loaded. The following command failed:"
            echo >&2 "${BIN_SYNOMODULETOOL}" --insmod "${SERVICE}" ${KERNEL_MODULES_NAT}
            exit 1
        }

    #
    # Turn on NAT.
    #
    "${IPTABLES}" -t nat -A POSTROUTING -s "${PRIVATE_NETWORK}" -j MASQUERADE -o "${PUBLIC_INTERFACE}"
    RV=$?
    [[ "${RV}" == "0" ]] || {
            echo >&2 "Error: MASQUERADE rules could not be added. The following command failed:"
            echo >&2 "${IPTABLES}" -t nat -A POSTROUTING -s "${PRIVATE_NETWORK}" -j MASQUERADE -o "${PUBLIC_INTERFACE}"
            exit 1
        }

    #
    # Log current nat table
    #
    iptables -L -v -t nat
}

case "$1" in
        start)
                start
                exit
                ;;
        *)
                #
                # Help message.
                #
                echo "Usage: $0 start"
                exit 1
                ;;
esac
Any help much appreciated
Last edited by 7thSon (2017-10-21 23:25:30)
#2 2017-10-21 15:42:44
- nesk
- Member
- Registered: 2011-03-31
- Posts: 181
Re: [SOLVED] Creating a static route to a URL
Are you sure the mask you specified (/24) is correct? Can you try it without the mask and see if it works?
#3 2017-10-21 16:09:23
- djgera
- Developer

- From: Buenos Aires — Argentina
- Registered: 2008-12-24
- Posts: 723
- Website

Re: [SOLVED] Creating a static route to a URL
if you want route an specified ip address remove /24 or use redundant /32, but if you still want a /24 range, then remove correcponding bits from the ip address (ie 10.9.7.123/24 wrong, should be 10.9.7.0/24)
#4 2017-10-21 23:25:10
- 7thSon
- Member
- Registered: 2017-05-07
- Posts: 186
Re: [SOLVED] Creating a static route to a URL
Thanks for the suggestion, removing the mask worked! ![]()
I didn’t see that as an option since that was part of the Windows command.
Cheers!
As a bonus question — how do I make the static route persisten over reboots?
Last edited by 7thSon (2017-10-21 23:27:46)
#5 2017-10-22 07:30:41
- nesk
- Member
- Registered: 2011-03-31
- Posts: 181
Re: [SOLVED] Creating a static route to a URL
7thSon wrote:
As a bonus question — how do I make the static route persisten over reboots?
Depends on network management program that you use (Netctl, NetworkManager etc).
#6 2017-10-22 11:15:15
- 7thSon
- Member
- Registered: 2017-05-07
- Posts: 186
Re: [SOLVED] Creating a static route to a URL
nesk wrote:
7thSon wrote:
As a bonus question — how do I make the static route persisten over reboots?
Depends on network management program that you use (Netctl, NetworkManager etc).
I’m not using networkmanager, so I guess netctl. I didn’t install anything specific for networking.
Last edited by 7thSon (2017-10-22 11:15:25)
#7 2017-10-22 11:51:43
- progandy
- Member

- Registered: 2012-05-17
- Posts: 5,071

Re: [SOLVED] Creating a static route to a URL
7thSon wrote:
I’m not using networkmanager, so I guess netctl. I didn’t install anything specific for networking.
You guess? You should know what you used to set up your network. Did you use dhcpcd directly, put «ip» commands in your autostart, or did you configure systemd-networkd or netctl?
netctl profiles have a «Routes» array where you can add your custom routes, systemd-networkd has [Route] sections in the configuration, while dhcpcd provides hooks
Last edited by progandy (2017-10-22 11:57:48)
| alias CUTF=’LANG=en_XX.UTF-8@POSIX ‘ |
#8 2017-10-22 14:06:58
- 7thSon
- Member
- Registered: 2017-05-07
- Posts: 186
Re: [SOLVED] Creating a static route to a URL
progandy wrote:
7thSon wrote:
I’m not using networkmanager, so I guess netctl. I didn’t install anything specific for networking.
You guess? You should know what you used to set up your network. Did you use dhcpcd directly, put «ip» commands in your autostart, or did you configure systemd-networkd or netctl?
netctl profiles have a «Routes» array where you can add your custom routes, systemd-networkd has [Route] sections in the configuration, while dhcpcd provides hooks
Sorry for my vague answer, networking is really something I’m not very good at. To answer your question I used dhcpcd initally, then as far as I can recall I’ve only used «ip» commands to try different things, I’ve done minimal configuring of my network overall.
I dont recognize the netctl commands nor systemd-networkd, so I would have to say I didn’t use those after all.
Again, sorry for the confusion, its hard for me to remember what I’ve done and haven’t since I’m not too well versed in this field.
#9 2017-10-22 14:19:06
- progandy
- Member
- Registered: 2012-05-17
- Posts: 5,071
Re: [SOLVED] Creating a static route to a URL
No problem, I didn’t mean to sound harsh. You probably still use dhcpcd, then. Dhcpcd should then appear as an enabled systemd service.
systemctl list-unit-files --state=enabledHere is some information for dhcpcd and static routes:
https://wiki.archlinux.org/index.php/Dh … ute.28s.29
| alias CUTF=’LANG=en_XX.UTF-8@POSIX ‘ |
#10 2017-10-24 13:18:50
- 7thSon
- Member
- Registered: 2017-05-07
- Posts: 186
Re: [SOLVED] Creating a static route to a URL
progandy wrote:
No problem, I didn’t mean to sound harsh. You probably still use dhcpcd, then. Dhcpcd should then appear as an enabled systemd service.
systemctl list-unit-files --state=enabledHere is some information for dhcpcd and static routes:
https://wiki.archlinux.org/index.php/Dh … ute.28s.29
Thanks, I got it working by setting a dhcpcd hook as described in your link ![]()
#11 2017-10-25 07:07:10
- positronik
- Member
- Registered: 2016-02-08
- Posts: 91
Re: [SOLVED] Creating a static route to a URL
Hi, wouldn’t be better to remove the word ‘URL’ in the title since this is not actually what you’re doing here?
From my understanding this is just creating a static ipv4 route and has nothing to do with URL’s.
1
1
Поднял я тут на одной машине openvpn server, а на другой клиента создаю.
Настройки:
— сервер: https://pastebin.com/80miyJKv
— клиент: https://pastebin.com/XVu2buth
Клиент успешно находит сервер, коннектится и его лог заканчивается следующим:
...
...
Sun Dec  9 19:38:59 2018 us=136878 ROUTE_GATEWAY 192.168.1.1/255.255.255.0 IFACE=eth1 HWADDR=00:e0:4c:53:44:58
Sun Dec  9 19:38:59 2018 us=138649 TUN/TAP device tap0 opened
Sun Dec  9 19:38:59 2018 us=138944 TUN/TAP TX queue length set to 100
Sun Dec  9 19:38:59 2018 us=139173 do_ifconfig, tt->did_ifconfig_ipv6_setup=0
Sun Dec  9 19:38:59 2018 us=139558 /usr/bin/ip link set dev tap0 up mtu 1500
Sun Dec  9 19:38:59 2018 us=151381 /usr/bin/ip addr add dev tap0 10.8.0.201/24 broadcast 10.8.0.255
Sun Dec  9 19:38:59 2018 us=161408 /usr/bin/ip route add 10.8.0.1/24 via 10.8.0.1
Error: Invalid prefix for given prefix length.
Sun Dec  9 19:38:59 2018 us=170304 ERROR: Linux route add command failed: external program exited with error status: 2
Sun Dec  9 19:38:59 2018 us=170545 WARNING: this configuration may cache passwords in memory -- use the auth-nocache option to prevent this
Sun Dec  9 19:38:59 2018 us=170680 Initialization Sequence Completed
При этом на созданном интерфейсе не выставляется ip адрес:
[client]$ ip a
...
...
47: tap0: <BROADCAST,MULTICAST,UP,LOWER_UP> mtu 1500 qdisc fq_codel state UNKNOWN group default qlen 100
    link/ether 4e:d2:00:a7:0d:48 brd ff:ff:ff:ff:ff:ff
    inet6 fe80::4cd2:ff:fea7:d48/64 scope link
       valid_lft forever preferred_lft forever
Следует ли из лога, что клиент пытается вызвать настройку адреса?
Если после этого вручную повторить команду из лога, адрес настроится и все будет прекрасно работать:
[client]$ /usr/bin/ip addr add dev tap0 10.8.0.201/24 broadcast 10.8.0.255

[client]$# ip a
...
...
47: tap0: <BROADCAST,MULTICAST,UP,LOWER_UP> mtu 1500 qdisc fq_codel state UNKNOWN group default qlen 100
    link/ether 4e:d2:00:a7:0d:48 brd ff:ff:ff:ff:ff:ff
    inet 10.8.0.201/24 brd 10.8.0.255 scope global tap0
       valid_lft forever preferred_lft forever
    inet6 fe80::4cd2:ff:fea7:d48/64 scope link
       valid_lft forever preferred_lft forever

[client]$ ping 10.8.0.1
PING 10.8.0.1 (10.8.0.1) 56(84) bytes of data.
64 bytes from 10.8.0.1: icmp_seq=1 ttl=64 time=325 ms
64 bytes from 10.8.0.1: icmp_seq=2 ttl=64 time=162 ms
^C
Поскажите, на каком этапе ошибка? Настройки openvpn или действительно клиент не может вызвать ip addr? (Для тестов и сервер и клиент запускаются прямо от рута.)
Following error now, know 100% Username and password are correct:
2023-01-13 10:31:10 SENT CONTROL [nl-ams-v091.prod.surfshark.com]: ‘PUSH_REQUEST’ (status=1)
2023-01-13 10:31:10 SIGTERM[soft,auth-failure] received, process exiting
Setting OpenVPN credentials…
2023-01-13 10:31:05 SENT CONTROL [nl-ams-v091.prod.surfshark.com]: ‘PUSH_REQUEST’ (status=1)
2023-01-13 10:31:10 AUTH: Received control message: AUTH_FAILED
2023-01-13 10:31:03 [nl-ams-v091.prod.surfshark.com] Peer Connection Initiated with [AF_INET]143.244.42.74:1194
2023-01-13 10:31:03 Control Channel: TLSv1.2, cipher TLSv1.2 ECDHE-RSA-AES256-GCM-SHA384, peer certificate: 2048 bit RSA, signature: RSA-SHA256
2023-01-13 10:31:03 WARNING: ‘auth’ is used inconsistently, local=’auth SHA512′, remote=’auth [null-digest]’
2023-01-13 10:31:03 WARNING: ‘link-mtu’ is used inconsistently, local=’link-mtu 1633′, remote=’link-mtu 1581′
2023-01-13 10:31:03 VERIFY OK: depth=0, CN=nl-ams-v091.prod.surfshark.com
2023-01-13 10:31:03 ++ Certificate has EKU (str) TLS Web Server Authentication, expects TLS Web Server Authentication
2023-01-13 10:31:03 Validating certificate extended key usage
2023-01-13 10:31:03 VERIFY EKU OK
2023-01-13 10:31:03 VERIFY KU OK
2023-01-13 10:31:03 VERIFY OK: depth=2, C=VG, O=Surfshark, CN=Surfshark Root CA
2023-01-13 10:31:03 VERIFY OK: depth=1, C=VG, O=Surfshark, CN=Surfshark Intermediate CA
2023-01-13 10:31:03 TLS: Initial packet from [AF_INET]143.244.42.74:1194, sid=5d91de01 51b6fe2b
2023-01-13 10:31:03 UDP link remote: [AF_INET]143.244.42.74:1194
2023-01-13 10:31:03 UDP link local: (not bound)
2023-01-13 10:31:03 Socket Buffers: R=[212992->212992] S=[212992->212992]
2023-01-13 10:31:03 TCP/UDP: Preserving recently used remote address: [AF_INET]143.244.42.74:1194
2023-01-13 10:31:03 Incoming Control Channel Authentication: Using 512 bit message hash ‘SHA512’ for HMAC authentication
2023-01-13 10:31:03 Outgoing Control Channel Authentication: Using 512 bit message hash ‘SHA512’ for HMAC authentication
2023-01-13 10:31:03 NOTE: the current —script-security setting may allow this configuration to call user-defined scripts
2023-01-13 10:31:02 library versions: OpenSSL 3.0.2 15 Mar 2022, LZO 2.10
2023-01-13 10:31:02 OpenVPN 2.5.5 aarch64-unknown-linux-gnu [SSL (OpenSSL)] [LZO] [LZ4] [EPOLL] [PKCS11] [MH/PKTINFO] [AEAD] built on Jul 14 2022
2023-01-13 10:31:02 DEPRECATED OPTION: —cipher set to ‘AES-256-CBC’ but missing in —data-ciphers (AES-256-GCM:AES-128-GCM). Future OpenVPN version will ignore —cipher for cipher negotiations. Add ‘AES-256-CBC’ to —data-ciphers or change —cipher ‘AES-256-CBC’ to —data-ciphers-fallback ‘AES-256-CBC’ to silence this warning.
adding route to local network 192.168.1.0/24 via 172.20.0.1 dev eth0
Red Hat Training
A Red Hat training course is available for RHEL 8
Routing ensures that you can send and receive traffic between mutually-connected networks. In larger environments, administrators typically configure services so that routers can dynamically learn about other routers. In smaller environments, administrators often configure static routes to ensure that traffic can reach from one network to the next.
You need static routes to achieve a functioning communication among multiple networks if all of these conditions apply:
- The traffic has to pass multiple networks.
- The exclusive traffic flow through the default gateways is not sufficient.
Section 20.1, “Example of a network that requires static routes” describes scenarios and how the traffic flows between different networks when you do not configure static routes.
20.1. Example of a network that requires static routes
You require static routes in this example because not all IP networks are directly connected through one router. Without the static routes, some networks cannot communicate with each other. Additionally, traffic from some networks flows only in one direction.
The network topology in this example is artificial and only used to explain the concept of static routing. It is not a recommended topology in production environments.
For a functioning communication among all networks in this example, configure a static route to Raleigh (198.51.100.0/24) with next the hop Router 2 (203.0.113.10). The IP address of the next hop is the one of Router 2 in the data center network (203.0.113.0/24).
You can configure the static route as follows:
-
For a simplified configuration, set this static route only on Router 1. However, this increases the traffic on Router 1 because hosts from the data center (
203.0.113.0/24) send traffic to Raleigh (198.51.100.0/24) always through Router 1 to Router 2. -
For a more complex configuration, configure this static route on all hosts in the data center (
203.0.113.0/24). All hosts in this subnet then send traffic directly to Router 2 (203.0.113.10) that is closer to Raleigh (198.51.100.0/24).
For more details between which networks traffic flows or not, see the explanations below the diagram.
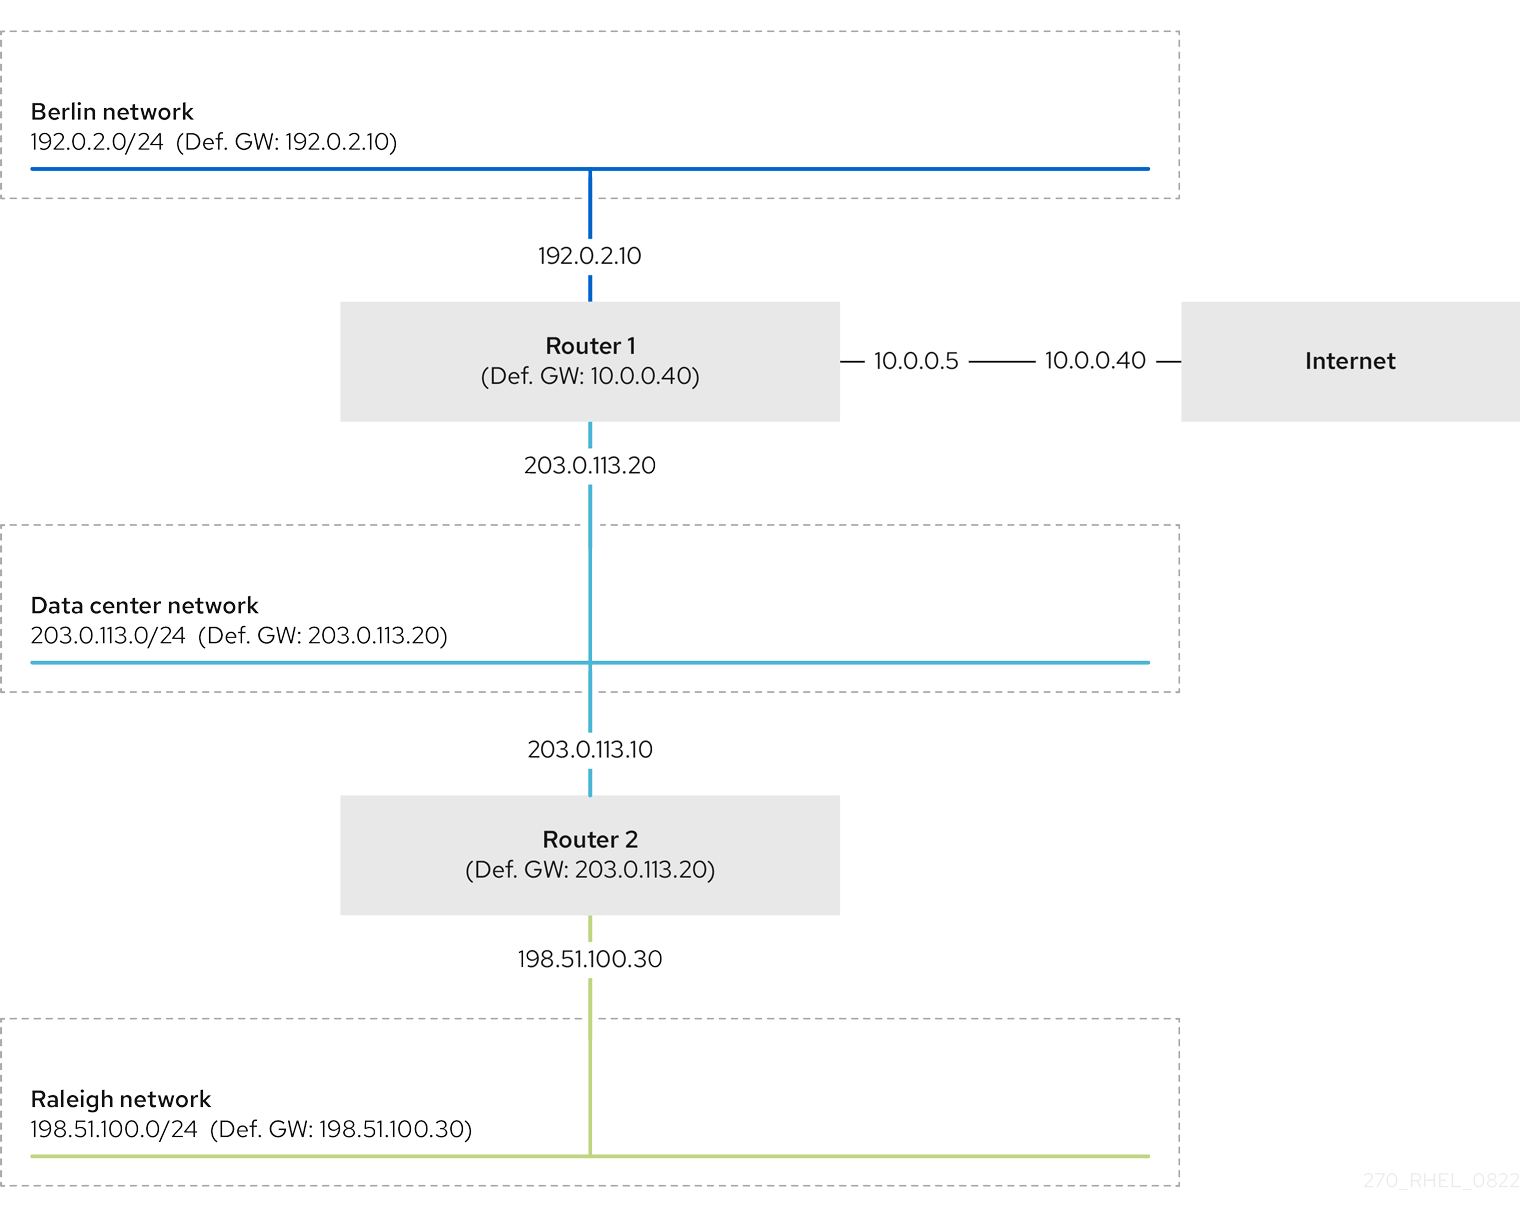
In case that the required static routes are not configured, the following are the situations in which the communication works and when it does not:
-
Hosts in the Berlin network (
192.0.2.0/24):- Can communicate with other hosts in the same subnet because they are directly connected.
-
Can communicate with the Internet because Router 1 is in the Berlin network (
192.0.2.0/24) and has a default gateway, which leads to the Internet. -
Can communicate with the data center network (
203.0.113.0/24) because Router 1 has interfaces in both the Berlin (192.0.2.0/24) and the data center (203.0.113.0/24) networks. -
Cannot communicate with the Raleigh network (
198.51.100.0/24) because Router 1 has no interface in this network. Therefore, Router 1 sends the traffic to its own default gateway (Internet).
-
Hosts in the data center network (
203.0.113.0/24):- Can communicate with other hosts in the same subnet because they are directly connected.
-
Can communicate with the Internet because they have their default gateway set to Router 1, and Router 1 has interfaces in both networks, the data center (
203.0.113.0/24) and to the Internet. -
Can communicate with the Berlin network (
192.0.2.0/24) because they have their default gateway set to Router 1, and Router 1 has interfaces in both the data center (203.0.113.0/24) and the Berlin (192.0.2.0/24) networks. -
Cannot communicate with the Raleigh network (
198.51.100.0/24) because the data center network has no interface in this network. Therefore, hosts in the data center (203.0.113.0/24) send traffic to their default gateway (Router 1). Router 1 also has no interface in the Raleigh network (198.51.100.0/24) and, as a result, Router 1 sends this traffic to its own default gateway (Internet).
-
Hosts in the Raleigh network (
198.51.100.0/24):- Can communicate with other hosts in the same subnet because they are directly connected.
-
Cannot communicate with hosts on the Internet. Router 2 sends the traffic to Router 1 because of the default gateway settings. The actual behavior of Router 1 depends on the reverse path filter (
rp_filter) system control (sysctl) setting. By default on RHEL, Router 1 drops the outgoing traffic instead of routing it to the Internet. However, regardless of the configured behavior, communication is not possible without the static route. -
Cannot communicate with the data center network (
203.0.113.0/24). The outgoing traffic reaches the destination through Router 2 because of the default gateway setting. However, replies to packets do not reach the sender because hosts in the data center network (203.0.113.0/24) send replies to their default gateway (Router 1). Router 1 then sends the traffic to the Internet. -
Cannot communicate with the Berlin network (
192.0.2.0/24). Router 2 sends the traffic to Router 1 because of the default gateway settings. The actual behavior of Router 1 depends on therp_filtersysctlsetting. By default on RHEL, Router 1 drops the outgoing traffic instead of sending it to the Berlin network (192.0.2.0/24). However, regardless of the configured behavior, communication is not possible without the static route.
In addition to configuring the static routes, you must enable IP forwarding on both routers.
20.2. How to use the nmcli command to configure a static route
To configure a static route, use the nmcli utility with the following syntax:
$ nmcli connection modify connection_name ipv4.routes "ip[/prefix] [next_hop] [metric] [attribute=value] [attribute=value] ..."
The command supports the following route attributes:
-
cwnd=n: Sets the congestion window (CWND) size, defined in number of packets. -
lock-cwnd=true|false: Defines whether or not the kernel can update the CWND value. -
lock-mtu=true|false: Defines whether or not the kernel can update the MTU to path MTU discovery. -
lock-window=true|false: Defines whether or not the kernel can update the maximum window size for TCP packets. -
mtu=n: Sets the maximum transfer unit (MTU) to use along the path to the destination. -
onlink=true|false: Defines whether the next hop is directly attached to this link even if it does not match any interface prefix. -
scope=n: For an IPv4 route, this attribute sets the scope of the destinations covered by the route prefix. Set the value as an integer (0-255). -
src=address: Sets the source address to prefer when sending traffic to the destinations covered by the route prefix. -
table=table_id: Sets the ID of the table the route should be added to. If you omit this parameter, NetworkManager uses themaintable. -
tos=n: Sets the type of service (TOS) key. Set the value as an integer (0-255). -
type=value: Sets the route type. NetworkManager supports theunicast,local,blackhole,unreachable,prohibit, andthrowroute types. The default isunicast. -
window=n: Sets the maximal window size for TCP to advertise to these destinations, measured in bytes.
If you use the ipv4.routes sub-command, nmcli overrides all current settings of this parameter.
To add a route:
$ nmcli connection modify connection_name +ipv4.routes "..."
Similarly, to remove a specific route:
$ nmcli connection modify connection_name -ipv4.routes "..."
20.3. Configuring a static route using an nmcli command
You can add a static route to an existing NetworkManager connection profile using the nmcli connection modify command.
The procedure below configures the following routes:
-
An IPv4 route to the remote
198.51.100.0/24network. The corresponding gateway with the IP address192.0.2.10is reachable through theexampleconnection. -
An IPv6 route to the remote
2001:db8:2::/64network. The corresponding gateway with the IP address2001:db8:1::10is reachable through theexampleconnection.
Prerequisites
-
The
exampleconnection profile exists and it configures this host to be in the same IP subnet as the gateways.
Procedure
-
Add the static IPv4 route to the
exampleconnection profile:# nmcli connection modify example +ipv4.routes "198.51.100.0/24 192.0.2.10"To set multiple routes in one step, pass the individual routes comma-separated to the command. For example, to add a route to the
198.51.100.0/24and203.0.113.0/24networks, both routed through the192.0.2.10gateway, enter:# nmcli connection modify example +ipv4.routes "198.51.100.0/24 192.0.2.10, 203.0.113.0/24 192.0.2.10" -
Add the static IPv6 route to the
exampleconnection profile:# nmcli connection modify example +ipv6.routes "2001:db8:2::/64 2001:db8:1::10" -
Re-activate the connection:
# nmcli connection up example
Verification
-
Display the IPv4 routes:
# ip -4 route
...
198.51.100.0/24 via 192.0.2.10 dev enp1s0
-
Display the IPv6 routes:
# ip -6 route
...
2001:db8:2::/64 via 2001:db8:1::10 dev enp1s0 metric 1024 pref medium
Additional resources
-
nmcli(1)man page -
nm-settings-nmcli(5)man page
20.4. Configuring a static route using nmtui
The nmtui application provides a text-based user interface for NetworkManager. You can use nmtui to configure static routes on a host without a graphical interface.
For example, the procedure below adds a route to the 192.0.2.0/24 network that uses the gateway running on 198.51.100.1, which is reachable through an existing connection profile.
In nmtui:
- Navigate by using the cursor keys.
- Press a button by selecting it and hitting Enter.
- Select and deselect checkboxes by using Space.
Prerequisites
- The network is configured.
- The gateway for the static route must be directly reachable on the interface.
- If the user is logged in on a physical console, user permissions are sufficient. Otherwise, the command requires root permissions.
Procedure
-
Start
nmtui:# nmtui -
Select
Edit a connection, and press Enter. - Select the connection profile through which you can reach the next hop to the destination network, and press Enter.
-
Depending on whether it is an IPv4 or IPv6 route, press the
Showbutton next to the protocol’s configuration area. -
Press the
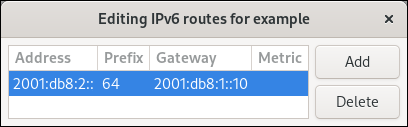
Editbutton next toRouting. This opens a new window where you configure static routes:-
Press the
Addbutton and fill in:- The destination network, including the prefix in Classless Inter-Domain Routing (CIDR) format
- The IP address of the next hop
- A metric value, if you add multiple routes to the same network and want to prioritize the routes by efficiency
- Repeat the previous step for every route you want to add and that is reachable through this connection profile.
-
Press the
OKbutton to return to the window with the connection settings.Figure 20.1. Example of a static route without metric

-
-
Press the
OKbutton to return to thenmtuimain menu. -
Select
Activate a connectionand press Enter. -
Select the connection profile that you edited, and press Enter twice to deactivate and activate it again.
Skip this step if you run
nmtuiover a remote connection, such as SSH, that uses the connection profile you want to reactivate. In this case, if you would deactivate it innmtui, the connection is terminated and, consequently, you cannot activate it again. To avoid this problem, use thenmcli connection connection_profile_name upcommand to reactivate the connection in the mentioned scenario. -
Press the
Backbutton to return to the main menu. -
Select
Quit, and press Enter to close thenmtuiapplication.

Verification
-
Verify that the route is active:
$
ip route... 192.0.2.0/24 via 198.51.100.1 dev example proto static metric 100
20.5. Configuring a static route using control-center
You can use control-center in GNOME to add a static route to the configuration of a network connection.
The procedure below configures the following routes:
-
An IPv4 route to the remote
198.51.100.0/24network. The corresponding gateway has the IP address192.0.2.10. -
An IPv6 route to the remote
2001:db8:2::/64network. The corresponding gateway has the IP address2001:db8:1::10.
Prerequisites
- The network is configured.
- This host is in the same IP subnet as the gateways.
-
The network configuration of the connection is opened in the
control-centerapplication. See Configuring an Ethernet connection using nm-connection-editor.
Procedure
-
On the
IPv4tab:-
Optional: Disable automatic routes by clicking the On button in the
Routessection of theIPv4tab to use only static routes. If automatic routes are enabled, Red Hat Enterprise Linux uses static routes and routes received from a DHCP server. -
Enter the address, netmask, gateway, and optionally a metric value of the IPv4 route:
-
Optional: Disable automatic routes by clicking the On button in the
-
On the
IPv6tab:-
Optional: Disable automatic routes by clicking the On button i the
Routessection of theIPv4tab to use only static routes. -
Enter the address, netmask, gateway, and optionally a metric value of the IPv6 route:
-
Optional: Disable automatic routes by clicking the On button i the
- Click Apply.
-
Back in the
Networkwindow, disable and re-enable the connection by switching the button for the connection to Off and back to On for changes to take effect.Restarting the connection briefly disrupts connectivity on that interface.


Verification
-
Display the IPv4 routes:
# ip -4 route
...
198.51.100.0/24 via 192.0.2.10 dev enp1s0
-
Display the IPv6 routes:
# ip -6 route
...
2001:db8:2::/64 via 2001:db8:1::10 dev enp1s0 metric 1024 pref medium
20.6. Configuring a static route using nm-connection-editor
You can use the nm-connection-editor application to add a static route to the configuration of a network connection.
The procedure below configures the following routes:
-
An IPv4 route to the remote
198.51.100.0/24network. The corresponding gateway with the IP address192.0.2.10is reachable through theexampleconnection. -
An IPv6 route to the remote
2001:db8:2::/64network. The corresponding gateway with the IP address2001:db8:1::10is reachable through theexampleconnection.
Prerequisites
- The network is configured.
- This host is in the same IP subnet as the gateways.
Procedure
-
Open a terminal, and enter
nm-connection-editor:$
nm-connection-editor -
Select the
exampleconnection profile, and click the gear wheel icon to edit the existing connection. -
On the
IPv4 Settingstab:- Click the Routes button.
-
Click the Add button and enter the address, netmask, gateway, and optionally a metric value.
- Click OK.
-
On the
IPv6 Settingstab:- Click the Routes button.
-
Click the Add button and enter the address, netmask, gateway, and optionally a metric value.
- Click OK.
- Click Save.
-
Restart the network connection for changes to take effect. For example, to restart the
exampleconnection using the command line:# nmcli connection up example

Verification
-
Display the IPv4 routes:
# ip -4 route
...
198.51.100.0/24 via 192.0.2.10 dev enp1s0
-
Display the IPv6 routes:
# ip -6 route
...
2001:db8:2::/64 via 2001:db8:1::10 dev enp1s0 metric 1024 pref medium
20.7. Configuring a static route using the nmcli interactive mode
You can use the interactive mode of the nmcli utility to add a static route to the configuration of a network connection.
The procedure below configures the following routes:
-
An IPv4 route to the remote
198.51.100.0/24network. The corresponding gateway with the IP address192.0.2.10is reachable through theexampleconnection. -
An IPv6 route to the remote
2001:db8:2::/64network. The corresponding gateway with the IP address2001:db8:1::10is reachable through theexampleconnection.
Prerequisites
-
The
exampleconnection profile exists and it configures this host to be in the same IP subnet as the gateways.
Procedure
-
Open the
nmcliinteractive mode for theexampleconnection:# nmcli connection edit example -
Add the static IPv4 route:
nmcli> set ipv4.routes 198.51.100.0/24 192.0.2.10 -
Add the static IPv6 route:
nmcli> set ipv6.routes 2001:db8:2::/64 2001:db8:1::10 -
Optionally, verify that the routes were added correctly to the configuration:
nmcli> print
...
ipv4.routes:    { ip = 198.51.100.0/24, nh = 192.0.2.10 }
...
ipv6.routes:    { ip = 2001:db8:2::/64, nh = 2001:db8:1::10 }
...
The
ipattribute displays the network to route and thenhattribute the gateway (next hop). -
Save the configuration:
nmcli> save persistent -
Restart the network connection:
nmcli> activate example -
Leave the
nmcliinteractive mode:nmcli> quit
Verification
-
Display the IPv4 routes:
# ip -4 route
...
198.51.100.0/24 via 192.0.2.10 dev enp1s0
-
Display the IPv6 routes:
# ip -6 route
...
2001:db8:2::/64 via 2001:db8:1::10 dev enp1s0 metric 1024 pref medium
Additional resources
-
nmcli(1)man page -
nm-settings-nmcli(5)man page
20.8. Configuring a static route using nmstatectl
You can add a static route to the configuration of a network connection using the nmstatectl utility.
The procedure below configures the following routes:
-
An IPv4 route to the remote
198.51.100.0/24network. The corresponding gateway with the IP address192.0.2.10is reachable through theenp1s0interface. -
An IPv6 route to the remote
2001:db8:2::/64network. The corresponding gateway with the IP address2001:db8:1::10is reachable through theenp1s0interface.
Prerequisites
-
The
enp1s0network interface is configured and is in the same IP subnet as the gateways. -
The
nmstatepackage is installed.
Procedure
-
Create a YAML file, for example
~/add-static-route-to-enp1s0.yml, with the following contents:--- routes: config: - destination: 198.51.100.0/24 next-hop-address: 192.0.2.10 next-hop-interface: enp1s0 - destination: 2001:db8:2::/64 next-hop-address: 2001:db8:1::10 next-hop-interface: enp1s0
-
Apply the settings to the system:
# nmstatectl apply ~/add-static-route-to-enp1s0.yml
Verification
-
Display the IPv4 routes:
# ip -4 route
...
198.51.100.0/24 via 192.0.2.10 dev enp1s0
-
Display the IPv6 routes:
# ip -6 route
...
2001:db8:2::/64 via 2001:db8:1::10 dev enp1s0 metric 1024 pref medium
Additional resources
-
nmstatectl(8)man page -
/usr/share/doc/nmstate/examples/directory
20.9. Configuring a static route using RHEL System Roles
You can use the network RHEL System Role to configure static routes.
When you run a play that uses the network RHEL System Role, the system role overrides an existing connection profile with the same name if the value of settings does not match the ones specified in the play. Therefore, always specify the whole configuration of the network connection profile in the play, even if, for example, the IP configuration already exists. Otherwise, the role resets these values to their defaults.
Depending on whether it already exists, the procedure creates or updates the enp7s0 connection profile with the following settings:
-
A static IPv4 address —
192.0.2.1with a/24subnet mask -
A static IPv6 address —
2001:db8:1::1with a/64subnet mask -
An IPv4 default gateway —
192.0.2.254 -
An IPv6 default gateway —
2001:db8:1::fffe -
An IPv4 DNS server —
192.0.2.200 -
An IPv6 DNS server —
2001:db8:1::ffbb -
A DNS search domain —
example.com -
Static routes:
-
198.51.100.0/24with gateway192.0.2.10 -
2001:db8:2::/64with gateway2001:db8:1::10
-
Perform this procedure on the Ansible control node.
Prerequisites
- You have prepared the control node and the managed nodes
- You are logged in to the control node as a user who can run playbooks on the managed nodes.
-
The account you use to connect to the managed nodes has
sudopermissions on them. - The hosts or host groups on which you to want run this playbook are listed in the Ansible inventory file.
Procedure
-
Create a playbook file, for example
~/add-static-routes.yml, with the following content:--- - name: Configure the network hosts: managed-node-01.example.com tasks: - name: Configure an Ethernet connection with static IP and additional routes include_role: name: rhel-system-roles.network vars: network_connections: - name: enp7s0 type: ethernet autoconnect: yes ip: address: - 192.0.2.1/24 - 2001:db8:1::1/64 gateway4: 192.0.2.254 gateway6: 2001:db8:1::fffe dns: - 192.0.2.200 - 2001:db8:1::ffbb dns_search: - example.com route: - network: 198.51.100.0 prefix: 24 gateway: 192.0.2.10 - network: 2001:db8:2:: prefix: 64 gateway: 2001:db8:1::10 state: up
-
Run the playbook:
# ansible-playbook ~/add-static-routes.yml
Verification steps
-
On the managed nodes:
-
Display the IPv4 routes:
# ip -4 route
...
198.51.100.0/24 via 192.0.2.10 dev enp7s0
-
Display the IPv6 routes:
# ip -6 route
...
2001:db8:2::/64 via 2001:db8:1::10 dev enp7s0 metric 1024 pref medium
-
Additional resources
-
/usr/share/ansible/roles/rhel-system-roles.network/README.mdfile
20.10. Creating static routes configuration files in key-value format when using the legacy network scripts
The legacy network scripts support setting statics routes in key-value format.
The procedure below configures an IPv4 route to the remote 198.51.100.0/24 network. The corresponding gateway with the IP address 192.0.2.10 is reachable through the enp1s0 interface.
Prerequisites
- The gateways for the static route must be directly reachable on the interface.
-
The
NetworkManagerpackage is not installed, or theNetworkManagerservice is disabled. -
The
network-scriptspackage is installed. -
The
networkservice is enabled.
Procedure
-
Add the static IPv4 route to the
/etc/sysconfig/network-scripts/route-enp0s1file:ADDRESS0=198.51.100.0 NETMASK0=255.255.255.0 GATEWAY0=192.0.2.10
-
The
ADDRESS0variable defines the network of the first routing entry. -
The
NETMASK0variable defines the netmask of the first routing entry. -
The
GATEWAY0variable defines the IP address of the gateway to the remote network or host for the first routing entry.If you add multiple static routes, increase the number in the variable names. Note that the variables for each route must be numbered sequentially. For example,
ADDRESS0,ADDRESS1,ADDRESS3, and so on.
-
The
-
Restart the network:
# systemctl restart network
Verification
-
Display the IPv4 routes:
# ip -4 route
...
198.51.100.0/24 via 192.0.2.10 dev enp1s0
Troubleshooting
-
Display the journal entries of the
networkunit:# journalctl -u networkThe following are possible error messages and their causes:
-
Error: Nexthop has invalid gateway: You specified an IPv4 gateway address in theroute-enp1s0file that is not in the same subnet as this router. -
RTNETLINK answers: No route to host: You specified an IPv6 gateway address in theroute6-enp1s0file that is not in the same subnet as this router. -
Error: Invalid prefix for given prefix length: You specified the remote network in theroute-enp1s0file by using an IP address within the remote network rather than the network address.
-
Additional resources
-
/usr/share/doc/network-scripts/sysconfig.txtfile
20.11. Creating static routes configuration files in ip-command format when using the legacy network scripts
The legacy network scripts support setting statics routes.
The procedure below configures the following routes:
-
An IPv4 route to the remote
198.51.100.0/24network. The corresponding gateway with the IP address192.0.2.10is reachable through theenp1s0interface. -
An IPv6 route to the remote
2001:db8:2::/64network. The corresponding gateway with the IP address2001:db8:1::10is reachable through theenp1s0interface.
IP addresses of the gateways (next hop) must be in the same IP subnet as the host on which you configure the static routes.
The examples in this procedure use configuration entries in ip-command format.
Prerequisites
- The gateways for the static route must be directly reachable on the interface.
-
The
NetworkManagerpackage is not installed, or theNetworkManagerservice is disabled. -
The
network-scriptspackage is installed. -
The
networkservice is enabled.
Procedure
-
Add the static IPv4 route to the
/etc/sysconfig/network-scripts/route-enp1s0file:198.51.100.0/24 via 192.0.2.10 dev enp1s0Always specify the network address of the remote network, such as
198.51.100.0. Setting an IP address within the remote network, such as198.51.100.1causes that the network scripts fail to add this route. -
Add the static IPv6 route to the
/etc/sysconfig/network-scripts/route6-enp1s0file:2001:db8:2::/64 via 2001:db8:1::10 dev enp1s0 -
Restart the
networkservice:# systemctl restart network
Verification
-
Display the IPv4 routes:
# ip -4 route
...
198.51.100.0/24 via 192.0.2.10 dev enp1s0
-
Display the IPv6 routes:
# ip -6 route
...
2001:db8:2::/64 via 2001:db8:1::10 dev enp1s0 metric 1024 pref medium
Troubleshooting
-
Display the journal entries of the
networkunit:# journalctl -u networkThe following are possible error messages and their causes:
-
Error: Nexthop has invalid gateway: You specified an IPv4 gateway address in theroute-enp1s0file that is not in the same subnet as this router. -
RTNETLINK answers: No route to host: You specified an IPv6 gateway address in theroute6-enp1s0file that is not in the same subnet as this router. -
Error: Invalid prefix for given prefix length: You specified the remote network in theroute-enp1s0file by using an IP address within the remote network rather than the network address.
-
Additional Resources
-
/usr/share/doc/network-scripts/sysconfig.txtfile
I’m trying to put a Windows and Kali Linux machine on the same network. I used
sudo ifconfig eth0 192.168.10.3 netmask 255.255.255.0
which worked fine but when I use
sudo route add default gw 192.168.10.1
it says SIOCADDRT: Network is unreachable
![]()
Kusalananda♦
307k35 gold badges598 silver badges896 bronze badges
asked Mar 24, 2021 at 19:59
![]()
4
If you can
ping 192.168.10.1
then try
route add default gw 192.168.10.1 eth0
where eth0 is the internet interface on the Kali machine.
If you can’t ping 192.168.10.1 then there is no router at that address.
answered Mar 24, 2021 at 21:58
![]()
2
Use the iproute2 command:
sudo ip route add 192.168.10.1/24 dev eth0
answered Mar 24, 2021 at 22:06
![]()
GAD3RGAD3R
60.9k30 gold badges126 silver badges189 bronze badges
1
What’s going wrong
When I use the provided client configuration file against OpenVPN version 2.4.9 I get the following error:
Error: Invalid prefix for given prefix length.
ERROR: Linux route add command failed: external program exited with error status: 2
The router is pushing the following control message, which is triggering the error:
PUSH: Received control message: 'PUSH_REPLY,route 10.1.10.0 255.255.255.0,route-delay 5,route-gateway dhcp,ping 10,ping-restart 120,route 10.1.10.1 255.255.255.0 10.1.10.1
The final command is what is triggering the error, as «route 10.1.10.1 255.255.255.0 10.1.10.1» is an invalid command. 10.1.10.1 cannot be the base for the /24.
Things attempted
I attempted to take this into my own hands by overriding the server’s push by adding the following to the client configuration.
route 10.1.10.0 255.255.255.0
route-delay 5
route-gateway dhcp
ping 10
ping-restart 120
route 10.1.10.0 255.255.255.0 10.1.10.1
route-nopull
This results in another, different error:
Error: Nexthop has invalid gateway.
ERROR: Linux route add command failed: external program exited with error status: 2
Which has to do with the fact that my computer doesn’t know how to talk directly to 10.1.10.1.
As far as I can tell, the VPN server on these routers is using TAP, and the device tap0. So I should be able to push the route-gateway via DHCP? However, perhaps pulling from the client side just isn’t possible?
Because I don’t have access to the server configuration directly, it is difficult to troubleshoot this problem. Does anything have any input?