Во многих статьях в интернете, документации к инструментам для разработки на Java и в книгах зачастую упоминается JAVA_HOME. Что же такое JAVA_HOME?
JAVA_HOME это переменная окружения, указывающая на директорию с установленным JDK (Java Development Kit, комплект разработчика Java). JAVA_HOME это соглашение, используемое во многих программах из экосистемы Java.
Какие программы используют JAVA_HOME
- Intellij IDEA, Eclipse, NetBeans
- Apache Maven, Apache Ant, Gradle
- Apache Tomcat
- Jenkins
Некоторые игры, написанные на Java (например, Minecraft), тоже могут требовать установленной переменной JAVA_HOME.
Ошибки, связанные с JAVA_HOME
Если переменная окружения JAVA_HOME не определена, некоторые программы могут выдавать следующие ошибки:
- Переменная среды java_home не определена
- Cannot determine a valid Java Home
- JAVA_HOME is set to an invalid directory
- JAVA_HOME is not defined correctly
- JAVA_HOME environment variable is not set
- JAVA_HOME command not found
- JAVA_HOME not found in your environment
- JAVA_HOME does not point to the JDK
При появлении таких ошибок просто установите переменную JAVA_HOME
Как установить переменную окружения JAVA_HOME в Windows
Сперва вам нужно установить JDK или JRE.
- Установите JDK, если вы занимаетесь разработкой программ на Java
- Установите JRE, если вам нужно только запустить прикладную программу на Java
После установки JDK либо JRE запишите путь установки, он понадобится.
Теперь щёлкните правой кнопкой на «Мой компьютер» → «Свойства» → «Дополнительные параметры системы» → «Переменные среды…». В разделе «Системные переменные» нажмите кнопку «Создать…» и укажите следующие данные:
| Имя переменной | JAVA_HOME |
| Значение переменной | Путь к директории JDK / JRE, например: C:Javajdk-11.0.6 |
Сохраните изменения, кликнув «OK». Теперь выберите в списке переменную окружения Path и нажмите «Изменить…». В конце списка добавьте строчку со значением «%JAVA_HOME%bin«
Для проверки откройте консоль (Win+R, cmd) и укажите последовательно укажите две команды:
echo %JAVA_HOME%
java --version
Если вы правильно установили JDK/JRE и правильно установили переменные окружения, вы увидите вывод наподобие этого:
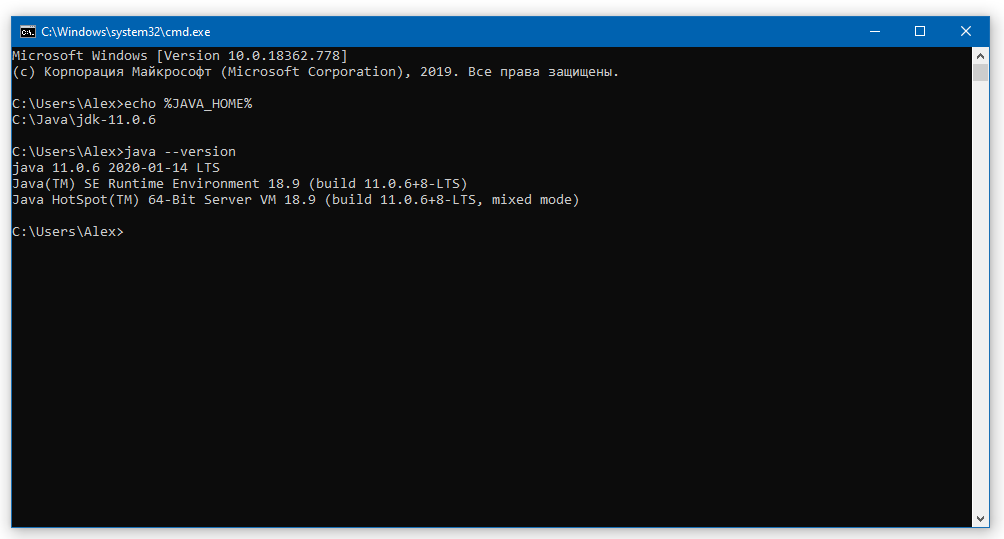
Это будет служить результатом того, что переменная JAVA_HOME установлена правильно и Java работает из командной строки.
Резюме
В данной статье мы рассказали вам, что являет собой переменная окружения JAVA_HOME, где она используется и как её корректно указать.
I have recently downloaded Maven and followed the instructions given on this this page. I already have ant installed on my machine.
Now, if I want to verify that Maven is installed perfectly or not it is giving me error that JAVA_HOME is not set correctly, but same works perfectly fine for ANT.
For Maven I tried :
1. open cmd
2. type mvn -version
3. Error appeared :
C:UsersAdmin>mvn -version

ERROR: JAVA_HOME is set to an invalid directory.
JAVA_HOME = "C:Program FilesJavajre7bin"
Please set the JAVA_HOME variable in your environment to match the
location of your Java installation

For ANT I tried and worked :
1. open cmd
2. type mvn -version
3. Apache Ant(TM) version 1.9.1 compiled on May 15 2013
I went to the directory to check that java.exe is actually there in that directory or not and it was there. I checked the environment variables they set fine. I restarted the system and checked again but same problem. Please let me know what am I missing.
asked Jun 26, 2013 at 8:44
![]()
4
JAVA_HOME should point to jdk directory and not to jre directory. Also JAVA_HOME should point to the home jdk directory and not to jdk/bin directory.
Assuming that you have JDK installed in your program files directory then you need to set the JAVA_HOME like this:
JAVA_HOME="C:Program FilesJavajdkxxx"
xxx is the jdk version
Follow this link to learn more about setting JAVA_HOME:
http://docs.oracle.com/cd/E19182-01/820-7851/inst_cli_jdk_javahome_t/index.html
answered Jun 26, 2013 at 8:47
![]()
Juned AhsanJuned Ahsan
67.1k11 gold badges96 silver badges134 bronze badges
3
Do not include bin in your JAVA_HOME env variable
answered Jun 26, 2013 at 8:47
![]()
sadhusadhu
1,4098 silver badges14 bronze badges
Follow the instruction in here.
JAVA_HOMEshould be like this
JAVA_HOME=C:Program FilesJavajdk1.7.0_07
answered Jun 26, 2013 at 8:50
![]()
1
JAVA_HOME = C:Program FilesJavajdk(JDK version number)
Example: C:Program FilesJavajdk-10
And then restart you command prompt it works.
answered Mar 31, 2018 at 19:19
![]()
2
Just remember to add quotes into the path if you have a space in your path to java home.
C:Program Filesjavajavaxxx doesn’t work
but
«C:Program Filesjavajavaxxx» does.
answered Jun 4, 2014 at 22:27
![]()
2
The JAVA_HOME should point to the JDK home rather than the JRE home if you are going to be compiling stuff, likewise — I would try and install the JDK in a directory that doesn’t include a space. Even if this is not your problem now, it can cause problems in the future!
answered Jun 26, 2013 at 8:46
![]()
nwalthamnwaltham
2,0471 gold badge21 silver badges39 bronze badges
You are pointing your JAVA_HOME to the JRE which is the Java Runtime Environment. The runtime environment doesn’t have a java compiler in its bin folder.
You should download the JDK which is the Java Development Kit. Once you’ve installed that, you can see in your bin folder that there’s a file called javac.exe. That’s your compiler.
answered Jun 26, 2013 at 8:51
![]()
JRENJREN
3,5623 gold badges26 silver badges44 bronze badges
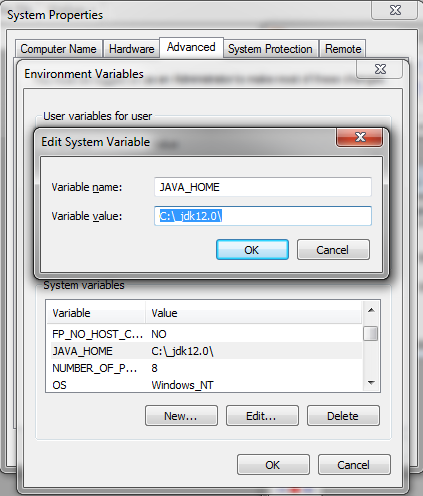
JAVA_HOME should point to jdk directory like in the image with new variable, like below
PATH should point to jdk bin like below

answered Jun 28, 2022 at 13:26
![]()
Run the below command in your terminal and restart it.
> set JAVA_HOME="C:Program FilesJavajdk-xx.xx"
xx.xx is the java version
answered Nov 17, 2022 at 23:52
![]()
codeXcodeX
4,3922 gold badges28 silver badges34 bronze badges
How to fix JAVA_HOME errors
There’s nothing worse than installing your favorite Java-based application — such as Minecraft, Maven, Jenkins or Apache Pig — only to run into a JAVA_HOME is set to an invalid directory or a JAVA_HOME is not defined correctly error as soon as you boot up the program.
Well, there’s no need to fret. Here’s how to fix the most common JAVA_HOME errors.
How to fix JAVA_HOME not found errors
It’s worth noting that there aren’t standardized JAVA_HOME error messages that people will encounter. There are many different ways that a given JAVA_HOME error might be logged.
For example, one of the most common JAVA_HOME configuration problems arises from the fact that the environment variable has never actually been set up. Such a scenario tends to trigger the following error messages:
- Error: JAVA_HOME not found in your environment
- Error: JAVA_HOME not set
- Error: JAVA_HOME is not set currently
- Error: JAVA_HOME is not set
- Error: Java installation exists but JAVA_HOME has not been set
- Error: JAVA_HOME cannot be determined from the registry
How do you fix the JAVA_HOME not found problem?
Well, you fix this by in the Windows environment variable editor where you can actually add a new system variable. If you know your way around the Windows operating system, you should be able to add the JAVA_HOME environment variable to your configuration and have it point to the installation root of your JDK within minutes. The Windows 10 setting looks like this:
Fix JAVA_HOME not found errors
As mentioned above, the JAVA_HOME variable must point to the installation root of a JDK, which means a JDK must actually be installed. If one isn’t, then you better hop to it and get that done.
The JAVA_HOME is set to an invalid directory fix
The next most common JAVA_HOME error message is JAVA_HOME is set to an invalid directory. The error message is delightfully helpful, because it tells you in no uncertain terms the environment variable does in fact exist. And, it also tells you it’s not pointing to the right place, which is helpful as well. All you need to do to fix this error is edit the JAVA_HOME variable and point it to the correct directory.
The JAVA_HOME environment variable must point to the root of the installation folder of a JDK. It cannot point to a sub-directory of the JDK, and it cannot point to a parent directory that contains the JDK. It must point directly at the JDK installation directory itself. If you encounter the JAVA_HOME invalid directory error, make sure the name of the installation folder and the value of the variable match.
An easy way to see the actual value associated with the JAVA_HOME variable is to simply echo its value on the command line. In Windows, write:
>/echo %JAVA_HOME%
C:/_JDK13.0
On an Ubuntu, Mac or Linux machine, the command uses a dollar sign instead of percentages:
:-$ echo $JAVA_HOME
/usr/lib/jvm/java-13-oracle
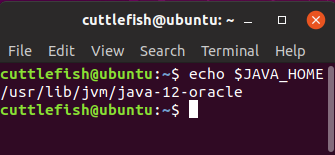
How to find JAVA_HOME in Mac or Ubuntu Linux computers.
Steer clear of the JDK bin directory
One very common developer mistake that leads to the JAVA_HOME is set to an invalid directory error is pointing JAVA_HOME to the bin sub-directory of the JDK installation. That’s the directory you use to configure the Windows PATH, but it is wrong, wrong, wrong when you set JAVA_HOME. If you point JAVA_HOME at the bin directory, you’ll need to fix that.
This misconfiguration also manifests itself with the following error messages:
- JAVA_HOME is set to an invalid directory
- Java installation exists but JAVA_HOME has been set incorrectly
- JAVA_HOME is not defined correctly
- JAVA_HOME does not point to the JDK
Other things that might trigger this error include spelling mistakes or case sensitivity errors. If the JAVA_HOME variable is set as java_home, JAVAHOME or Java_Home, a Unix, Linux or Ubuntu script will have a hard time finding it. The same thing goes for the value attached to the JAVA_HOME variable.
The JAVA_HOME does not point to the JDK error
One of the most frustrating JAVA_HOME errors is JAVA_HOME does not point to the JDK.
Here’s a little bit of background on this one.
When you download a JDK distribution, some vendors include a Java Runtime Environment (JRE) as well. And when the JAVA_HOME environment variable gets set, some people point it at the JRE installation folder and not the JDK installation folder. When this happens, we see errors such as:
- JAVA_HOME does not point to a JDK
- JAVA_HOME points to a JRE not a JDK
- JAVA_HOME must point to a JDK not a JRE
- JAVA_HOME points to a JRE
To fix this issue, see if you have both a JRE and JDK installed locally. If you do, ensure that the JAVA_HOME variable is not pointing at the JRE.
JAVA_HOME and PATH confusion
After you’ve downloaded and installed the JDK, sometimes another problem can plague developers. If you already have programs that installed their own version of the JDK, those programs could have added a reference to that specific JDK in the Linux or Windows PATH setting. Some programs will run Java using the program’s availability through the PATH first, and JAVA_HOME second. If another program has installed a JRE and put that JRE’s bin directory on the PATH, your JAVA_HOME efforts may all be for naught.
However, you can address this issue. First, check the Ubuntu or Windows PATH variable and look to see if any other JRE or JDK directory has been added to it. You might be surprised to find out that IBM or Oracle has at some prior time performed an install without your knowledge. If that’s the case, remove the reference to it from the PATH, add your own JDK’s bin directory in there, and restart any open command windows. Hopefully that will solve the issue.
Of course, there is never any end to the configurations or settings that can trigger JAVA_HOME errors. If you’ve found any creative solutions not mentioned here, please add your expert insights to the comments.
If you are running Java programs on Ubuntu using Eclipse, Maven or Netbeans etc, you’ll need to set JAVA_HOME to your path. Otherwise, your system will complain that “java_home environment variable is not set”.
In this beginner’s tutorial, I’ll show the steps to correctly set Java Home variable on Ubuntu. The steps should be valid for most other Linux distributions as well.
The process consists of these steps:
- Making sure Java Development Kit (JDK) is installed.
- Finding the correct location of JDK executable.
- Setting the JAVA_HOME variable and making the change permanent.
Step 1: Check if JDK is installed
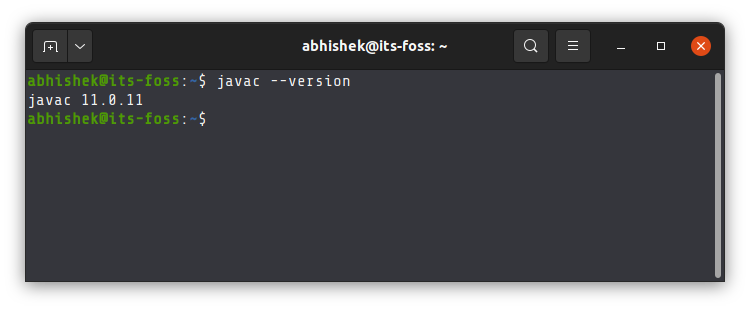
The simplest way to check if Java Development Kit (JDK) is installed on your Linux system is by running this command:
javac --versionThe above command checks the version of Java compiler. If it is installed, it will show the Java version.
If the command shows an error like javac command not found, you’ll have to install JDK.
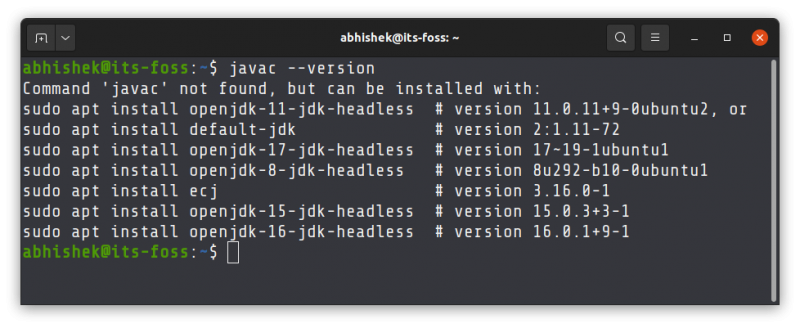
If Java Compiler is not installed on your system, install Java Development Kit using this command:
sudo apt install default-jdkThis will install the default Java version in your current Ubuntu version. If you need some other specific Java version, you’ll have to specify it while installing Java on Ubuntu.
Once you have made sure that Java Compiler is present on your system, it’s time to find its location.
Step 2: Get the location of JDK executable (Java Compiler)
The executable is usually located in the /usr/lib/jvm directory. I won’t left you on your own for a guessing game. Instead, let’s find out the path of the Java executable.
Use the which command to get the location of Java Compiler executable:
which javacThe problem here is that the location it gives is actually a symbolic link. You’ll have to follow it a couple of times:
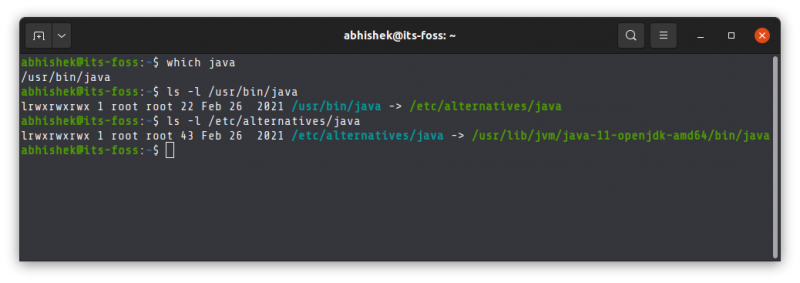
And when you find a path like /usr/lib/jvm/java-11-openjdk-amd64/bin/javac, you remove the /bin/javac from it to get something like /usr/lib/jvm/java-11-openjdk-amd64
An easier method is to follow the symbolic link and get to the actual executable file directly using this command:
readlink -f `which javac` | sed "s:/bin/javac::"The readlink command follows a symbolic link. I have used ` around which java. This is called command substitution and it replaces the command with its output. Sed is then used to replace /bin/javac by nothing and thus removing it altogether.
In my example, the location of the executable file is /usr/lib/jvm/java-11-openjdk-amd64. It could be different for you. Copy the correct path you got from the above command in your system. You know, you can copy paste in the Ubuntu terminal.
Step 3: Setting JAVA_HOME variable
Now that you have got the location, use it to set the JAVA_HOME environment variable:
export JAVA_HOME=/usr/lib/jvm/java-11-openjdk-amd64/bin/javaCheck the value of JAVA_HOME directory:
echo $JAVA_HOME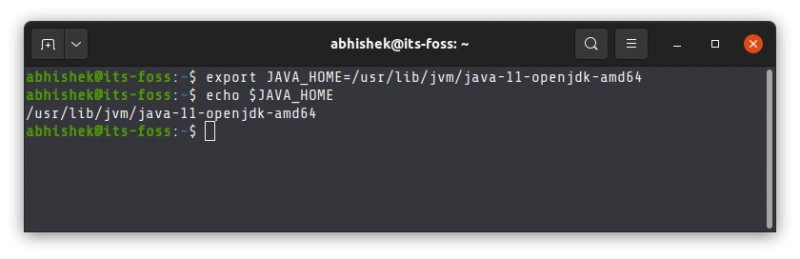
Try to run your program or project in the SAME TERMINAL and see if it works.
This is not over yet. The JAVA_HOME variable you just declared is temporary. If you close the terminal or start a new session, it will be empty again.
To set JAVA_HOME variable ‘permanently’, you should add it to the bashrc file in your home directory.
You can use the Nano editor for editing files in the Linux terminal. If you do not want that and take a simple copy-paste approach, use the following commands:
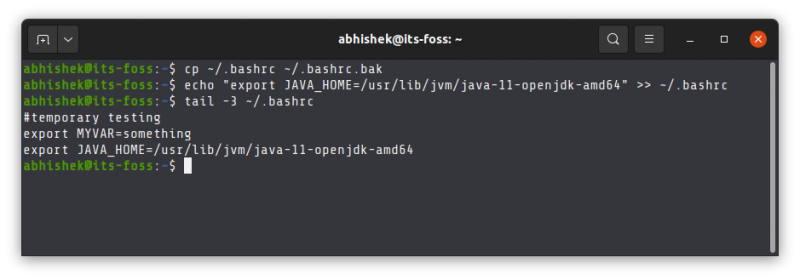
Back up your bashrc file (in case you mess it, you can get it back):
cp ~/.bashrc ~/.bashrc.bakNext, use the echo command to append the export command you used at the beginning of this section. Change the command below to use the correct path as displayed by your system in.
echo "export JAVA_HOME=/usr/lib/jvm/java-11-openjdk-amd64" >> ~/.bashrcVerify that it has been correctly added to the end of the file:
tail -3 ~/.bashrcThe above tail command will show the last 3 lines of the specified file.
Here’s the entire output of the above three commands.
Now, even if you exit the session or restart the system, the JAVA_HOME variable will still be set to the value you specified. That’s what you want, right?
Do note that if you change the default Java version in the future, you’ll have to change the value of JAVA_HOME and point it to the correct executable path.
I hope this tutorial not only helped you to set Java Home, it also taught you how you are doing it.
If you are still facing issues or have any questions or suggestions, please let me know in the comments.
I’ve installed a version of Java. How can we set the $JAVA_HOME environment variable correctly?
![]()
kiri
27k16 gold badges79 silver badges115 bronze badges
asked Aug 13, 2012 at 22:31
![]()
Gaurav AgarwalGaurav Agarwal
11k18 gold badges49 silver badges64 bronze badges
You can set your JAVA_HOME in /etc/profile as Petronilla Escarabajo suggests. But the preferred location for JAVA_HOME or any system variable is /etc/environment.
Open /etc/environment in any text editor like nano or gedit and add the following line:
JAVA_HOME="/usr/lib/jvm/open-jdk"
(java path could be different)
Use source to load the variables, by running this command:
source /etc/environment
Then check the variable, by running this command:
echo $JAVA_HOME
Update
Usually most linux systems source /etc/environment by default. If your system doesn’t do that add the following line to ~/.bashrc (Thanks @pje)
source /etc/environment
![]()
Zanna♦
68.2k55 gold badges210 silver badges320 bronze badges
answered Aug 14, 2012 at 2:17
![]()
12
To set JAVA_HOME environment variable, do the following:
- Launch Terminal by pressing Ctrl+Alt+T on your keyboard.
- Enter the following command:
$gksudo gedit /etc/environment - Depending on where you installed your Java, you will need to provide the full path. For this example, I installed Oracle JDK 7 in the
/usr/lib/jvm/java-7-oracledirectory.
Scroll to the end of the file and enter the following:
JAVA_HOME=/usr/lib/jvm/java-7-oracle
export JAVA_HOME - Save your file and exit gedit.
- Lastly, reload the system PATH with the following command:
$. /etc/environment
The above method will save you the hassle in having to run the commands every time you log in to your computer.
answered Aug 13, 2012 at 23:01
![]()
6
If you do not know the path and you only have openJDK installed, you can type
update-alternatives --config java and you should find the path. To set the variable you can write JAVA_HOME=<PATH> followed by export JAVA_HOME. Notice there’s no space when declaring the variable. To check if the variable is stored you simply type echo $JAVA_HOME to verify.
answered Aug 18, 2012 at 21:29
![]()
5
JAVA_HOME должен указывать на JDK, а не на JRE
1. Вступление
В этом руководстве мы поговорим об исключении, которое Maven выдает при неправильной настройке:JAVA_HOME should point to a JDK, not a JRE.
Maven — мощный инструмент для создания кода. Мы посмотрим изнутри, чтобы понять, почему происходит эта ошибка, и посмотрим, как ее устранить.
2. ПроблемаJAVA_HOME
После установки Maven выполняетсяwe have to set the JAVA_HOME environment variable, so the tool knows where to find the JDK commands. Цели Maven запускают соответствующие команды Java в исходном коде проекта.
Например, наиболее распространенным сценарием является компиляция кода путем выполнения командыjavac.
ЕслиJAVA_HOME is not pointing to a valid JDK installation, Maven выдает ошибку при каждом выполнении:
mvn -version

# Output...
The JAVA_HOME environment variable is not defined correctly
This environment variable is needed to run this program
NB: JAVA_HOME should point to a JDK, not a JRE
3. JDK или JRE
Как Maven проверяет путьJAVA_HOME?
Перед запуском любых целей введитеMaven checks for the existence of the java command по пути, указанномуJAVA_HOME, или запросив у ОС установку JDK по умолчанию. If the executable is not found, Maven terminates with the error.
Вот проверка исполняемого файлаmvn для Linux (Apache Maven v3.5.4):
if [ -z "$JAVA_HOME" ] ; then
    JAVACMD=`which java`
else
    JAVACMD="$JAVA_HOME/bin/java"
fi

if [ ! -x "$JAVACMD" ] ; then
    echo "The JAVA_HOME environment variable is not defined correctly" >&2
    echo "This environment variable is needed to run this program" >&2
    echo "NB: JAVA_HOME should point to a JDK not a JRE" >&2
    exit 1
fi
Эта проверка на первый взгляд может показаться разумной, но мы должны учитывать, чтоboth JDK and JRE have a bin folder and both contain an executable java file.
Следовательно, этоpossible to configure JAVA_HOME to point to a JRE installation, hiding this particular error and causing problems at a later stage.. В то время как основная цель JRE — запуск кода Java,the JDK can also compile and debug among other important differences.
По этой причине командаmvn compile не сработает, как мы увидим в следующем подразделе.
3.1. Ошибка компиляции из-за JRE вместо JDK
Как обычно с настройками по умолчанию, они очень полезны, если у нас есть «стандартная» конфигурация.
Например, если мы устанавливаем Java 11 в системе Ubuntu 18.04 и не устанавливаем переменную средыJAVA_HOME, Maven все равно с радостью найдет наш JDK и будет использовать его для различных целей, включая компиляцию.
Но если нам удалось настроить нестандартную конфигурацию (не говоря уже о том, чтобы навести беспорядок) в нашей системе, полезности Maven уже недостаточно. Это может даже вводить в заблуждение.
Предположим, у нас есть следующая конфигурация в Ubuntu 18.04:
-
JDK 11
-
JRE 8
-
JAVA_HOME — путь к установке JRE 8
Если мы сделаем нашу основную проверку:
Мы получим такой значимый результат:
Apache Maven 3.6.0 (97c98ec64a1fdfee7767ce5ffb20918da4f719f3; 2018-10-24T18:41:47Z)
Maven home: /opt/apache-maven-3.6.0
Java version: 1.8.0_191, vendor: Oracle Corporation, runtime: /usr/lib/jvm/java-8-openjdk-amd64/jre
Default locale: en, platform encoding: UTF-8
OS name: "linux", version: "4.15.0-42-generic", arch: "amd64", family: "unix"
Посмотрим, что произойдет, если мы попытаемся скомпилировать проект:
Теперь мы получаем ошибку:
[ERROR] Failed to execute goal org.apache.maven.plugins:maven-compiler-plugin:3.7.0:compile (default-compile) on project my-app: Compilation failure
[ERROR] No compiler is provided in this environment. Perhaps you are running on a JRE rather than a JDK?
3.2. Исправление ошибки компиляции на уровне проекта
Как и во многих других случаях с Maven, рекомендуется установить значимые общесистемные настройки — в этом случае мы изменим значение переменнойJAVA_HOME, как описано в разделе 5, чтобы указать на JDK вместо JRE.
Однако, если по какой-либо причине мы не можем установить значения по умолчанию,we can still override the settings on the project level. Посмотрим, как это сделать.
Сначала мы откроемpom.xml нашего проекта, перейдем в разделbuild / pluginManagement / plugins и посмотрим на запись дляmaven-compiler-plugin:
    maven-compiler-plugin
    3.7.0
Затем мы добавим в него конфигурацию, чтобы он использовал настраиваемый исполняемый файл, и пропустили поискjavac в каталогеJAVA_HOME/bin:
    maven-compiler-plugin
    3.7.0

        true
        /usr/lib/jvm/java-11-openjdk-amd64/bin/javac
В системах Unix этот исполняемый файл должен быть скриптом с соответствующими разрешениями. В системах Windows это должен быть файл.exe.
Далее попробуем снова скомпилировать проект:
Теперь сборка — включая фазу компиляции сmaven-compiler-plugin — прошла успешно.
4. Проверка конфигурацииJAVA_HOME
check if JAVA_HOME points to an actual JDK. довольно просто. Мы можем либо распечатать его содержимое в терминале, либо запустить одну из следующих команд оболочки:
4.1. ПроверкаJAVA_HOME в Linux
Просто откройте терминал и введите:
> $JAVA_HOME/bin/javac -versionЕслиJAVA_HOME указывает на JDK, результат должен выглядеть так:
ЕслиJAVA_HOME не указывает на JDK, ОС выдает сообщение об ошибке:
> bash: /bin/javac: No such file or directory4.2. ПроверкаJAVA_HOME в Windows
Откройте командную строку и введите:
%JAVA_HOME%binjavac -versionЕслиJAVA_HOME указывает на JDK, результат должен выглядеть так:
ЕслиJAVA_HOME не указывает на JDK, ОС выдает сообщение об ошибке:
> The system cannot find the path specified.5. Как решить проблему
Прежде всего, нам нужно знать, где найти наш JDK:
-
Если мы установили наш дистрибутив JDK с помощью установщика пакетов, мы сможем найти путь с помощью утилиты поиска ОС
-
Если дистрибутив был переносным, давайте проверим папку, в которую мы его извлекли.
6. Заключение
В этом кратком руководстве мы обсудили ошибку «JAVA_HOME should point to a JDK not a JRE” Maven и изучили ее первопричину.
Наконец, мы обсудили, как проверить вашу переменную средыJAVA_HOME и как убедиться, что она указывает на JDK.
This article covers the most common errors Windows users may
experience when starting DAISY Pipeline 2. If your issue isn’t listed
here, please visit our
issue tracker
to report it.
ERROR: Unable to retrieve JAVA_HOME or JAVA_HOME is not valid
DAISY Pipeline 2 uses the Windows environment variable JAVA_HOME
to find your Java installation folder. This error can occur if the
variable is not set or pointing to an incorrect path. Please follow
the steps below to set or correct your JAVA_HOME variable.
Verify Java
Before following the solution steps, first verify that you have Java
installed correctly.
Windows 10: Open the search box (press Win⊞ + S, type
About Java, and hit Enter. If nothing comes up, please
install the latest Java version from
OpenJDK.
Alternatively, open a command prompt window (press Win⊞ + R,
type cmd, and hit Enter) and enter the command: java. This will output the version of Java installed on your
-version
computer. If the command is not recognized, please install the latest
Java version from
OpenJDK:
choose the version “OpenJDK 11 (LTS)”, choose the VM “HotSpot”, choose
your platform (“Windows x32” or “Windows x64”), click “Download JRE”
and unzip the downloaded file somewhere.
Java Installation Path
You will need the path to your Java installation folder for the next
steps, which can be found through File Explorer or Command Prompt.
If you got Java from http://adoptopenjdk.net, the installation path is
where you unzipped it.
If you got Java from http://java.com, your Java installation path will
likely resemble: C:Program FilesJavajre1.8.X_XXX.
- If you have a Java Development Kit installed, replace
jre1.8.X_XXX with jdk1.8.X_XXX.
You can find your Java installation path via one of these two methods:
Command Prompt (Windows 2003+)
-
Open a command prompt window and enter the command
where java(Windows 2003+). -
Press Ctrl + M to enter “mark” mode, highlight the path to your
installation directory (e.g. jre1.8.X_XXX), and copy it.
File Explorer
Open File Explorer (Win⊞ + R, type explorer, hit
Enter), and browse for your Java installation folder. It will
likely be installed in either Program FilesJava or Program
Files (x86)Java on your OS drive.
Once you find your Java folder,
- Open to it.
- If there is a JRE installation folder (e.g. jre1.8.X_XXX), open it.
- Otherwise, open the JDK installation folder (e.g. jdk1.8.X_XXX).
- Copy the full path in the navigation bar at the top.
Setting JAVA_HOME
You can now set or correct your JAVA_HOME variable via one of two methods:
Command Prompt
- Open a Command Prompt window as administrator.
- Windows 10: press Win⊞ + S, type cmd, then press
Ctrl + Shift + Enter. - Or click Start, and click All Programs. Right-click
Command Prompt, and then click Run as administrator.
- Windows 10: press Win⊞ + S, type cmd, then press
- Enter the command
setx JAVA_HOME -m "Path". For “Path”, paste
in your Java installation path .
Control Panel
- Open the Control Panel (Win⊞ + R, type Control Panel,
press Enter), and navigate to System and Security > System. - Click on Advanced system settings link in the top left.
- Click on the Environment Variables button. A new window will pop up.
- In the bottom pane labeled System variables, click the New… button.
- For the variable name, enter JAVA_HOME.
- For the variable value, paste the path to your Java installation path.
Verify JAVA_HOME
Confirm that your JAVA_HOME variable is now set correctly.
- Open a Command Prompt window (Win⊞ + R, type cmd, hit
Enter). - Enter the command
echo %JAVA_HOME%. This should output the path
to your Java installation folder.- If it doesn’t, your JAVA_HOME variable was not set
correctly. Please make sure you’re using the correct
Java installation folder, or repeat
the steps above.
- If it doesn’t, your JAVA_HOME variable was not set
Once you have verified that your JAVA_HOME is set correctly,
DAISY Pipeline 2 should start correctly. If you experience this
problem again or any others, please visit our
issue tracker.
![]()
Download Article
The easiest ways to set the JAVA_HOME environment variable on any computer
![]()
Download Article
- Windows
- macOS
- Linux
- Video
- Tips
|
|
|
|
Are you seeing Java errors like «JAVA_HOME is not defined correctly?» or «JAVA_HOME is set to an invalid directory?» If you’ve recently installed the Java Development Kit (JDK) or the Java Runtime Environment (JRE), you’ll need to set your JAVA_HOME variables and configure the path so applications know where to find Java. This wikiHow article will show you the easiest ways to change or set the Java home path on Windows, macOS, and Linux.
Things You Should Know
- Before you can set JAVA_HOME, you’ll need the full path to your JDK or JRE installation.
- Once you set the JAVA_HOME environment variable, you can run the command
echo $JAVA_HOMEto see the new path. - To set the Java home and path on Linux or macOS permanently (even after a reboot), add the environment variables to your .bashrc or .zshrc file.
-

1
Find your Java installation directory. Assuming that you didn’t change the path for the JDK or JRE during installation is not changed, it should be in a directory under C:Program FilesJava. There are a few ways to find the full path:
- Open File Explorer, click This PC in the left panel, then navigate to C:Program FilesJava. The directory you’re looking for should have the name of the JDK version, such as C:Program FilesJavajdk-19.
- If you installed the JRE instead of the JDK, you’ll have something like C:Program FilesJavajre1.8.0_351 instead.
- You can also open the command prompt and run the command wmic product where "Name like '%%Java%%'" get installlocation,Name. This will tell you the full path of the JDK, even if you haven’t yet set JAVA_HOME.
-
2
Open your Advanced System Settings. Here’s how:
- Press the Windows key on your keyboard and type advanced system.
- Click View advanced system settings in the search results.
Advertisement
-
3
Click the Environment Variables button. You’ll see it at the bottom-right corner of the System Properties window.
-
4
Click the New… button under «User variables.» You’ll have two sections on this window—»User variables» and «System variables.» You’ll want to make sure you’re clicking New under the first box (User variables).
- If you have multiple installations of the JDK and want to change JAVA_HOME to your new installation, select the current JAVA_HOME user variable and click Edit… instead.
-
5
Type JAVA_HOME as the «Variable name.»
- If you’re editing the current JAVA_HOME path, you’ll already have JAVA_HOME here. So, you can skip this step.
-
6
Enter the full path to your JDK or JRE installation. For example, if the path is C:Program FilesJavajdk-19, enter that full path into the «Variable value» field.[1]
- If you’re adding a second path to JAVA_HOME, just type a semicolon (;) after the first path, then enter the second path.
- If you’re replacing an old JAVA_HOME path, just delete the current path and enter the new one.
-
7
Click OK. This takes you back to the Environment Variables window.
-
8
Select the Path user variable and click Edit. You should already have a variable in the «User variables» section called «Path.» To make sure you can run the Java binaries, you’ll need to edit your path to add the location of the JDK bin directory.
- If you want other users on this PC to be able to access Java binaries from the command line, repeat this step for the «Path» variable under «System variables» as well.
-
9
Append the path to your Java /bin directory to the end of the path. You’ll already have at least one directory in your path, which needs to stay in place. Here’s how to add the Java bin directory:
- Click the New button at the top.
- Enter the full path to the JRE or JDK with bin at the end. For example, C:Program FilesJavajdk-19bin or C:Program FilesJavajre1.8.0_351bin.
- Click OK.
-
10
Click OK on all subsequent windows. This updates your JAVA_HOME variable and adds the Java binaries to your path.
- You won’t need to restart your computer for the changes to take effect, but you will need to relaunch any apps that were trying to access Java.
- Open a new command prompt window and run the command echo %JAVA_HOME% to display the new path to JAVA_HOME.
- Make sure this is a new command prompt window. If you still have the same window open, the command will fail because it doesn’t have the new environment variables.


Advertisement
-
1
Open a Terminal window. To open Terminal, search for Terminal in Spotlight. Or, you can open Finder, click the Go menu, select Utilities, and choose the Terminal app.
-
2
Type /usr/libexec/java_home and press ⏎ Return. This handy utility that comes preinstalled on macOS will tell you the full path to your Java installation, which you’ll need to set JAVA_HOME.
- If you have more than one Java installation and want to see the paths to all of them, use /usr/libexec/java_home -V instead.
-
3
Copy the path and paste it somewhere handy. Highlight the path to the Java installation you want to use as JAVA_HOME, press Cmd + V to copy it, then paste it into a sticky note or text file.
-
4
Open your .zshrc file in a text editor. As long as you’re using macOS Catalina or later, you’ll be using the zsh shell by default, which means you’ll add JAVA_HOME and the path to your .zshrc file.[2]
If you’re using an earlier version of macOS (or prefer the bash shell), replace .zshrc with .bashrc in these commands instead. Here’s the easiest way to open the file:- Type cd ~ and press Return.
- Type open .zshrc and press Return. This should open the file in a text editor.
- If the file is not found, type echo > .zshrc and press Return. Then, run open .zshrc again.
-
5
Add these lines to the bottom of the file. Adding these lines ensures that JAVA_HOME will be set correctly even after you log off or open another window. If the file has existing contents, just scroll down past them to enter the following text on individual lines:
-
export JAVA_HOME=/Library/Java/JavaVirtualMachines/jdk-17.0.1.jdk/Contents/Home- Replace
/Library/Java/JavaVirtualMachines/jdk-17.0.1.jdk/Contents/Homewith the full path to the /Contents/Home directory of your Java installation if it’s different.
- Replace
export PATH=$JAVA_HOME/bin:$PATH- Save the file and exit the text editor when you’re finished.
-
-
6
Type source .zshrc and press ⏎ Return. Once you’ve edited your profile, this command ensures that your environment variables will be updated for the current terminal window (and any other windows you open from now on).
-
7
Type echo $JAVA_HOME and press ⏎ Return to confirm JAVA_HOME. You should now see the full path to JAVA_HOME.
- If you had any other windows open that were attempting to find Java binaries, close and reopen them.
- Shopping for PC accessories or office supplies? Check out our coupon site for Staples discounts or our coupon site for Office Depot.


Advertisement
-
1
Open a terminal window. If you’re logged in to your desktop environment, you can press Ctrl + Alt + T to launch a terminal window.
- This method will work in just about any version of Linux, including Ubuntu and Redhat.
-
2
Find the location of your Java installation. One way you might find the Java install location is to run the which javac command, but this will only give you a symbolic link. Instead, run this command to find the location of the executable file:
- readlink -f `which javac`
- If that doesn’t work, try running update-alternatives --list java.
- If neither of these commands works, run whereis java, which will usually result in a symbolic link like /usr/bin/java.
- Once you get the directory, find out where it links using ls -la /bin/java.
- If that points you to another directory, e.g., /etc/alternatives/java, run ls -la /etc/alternatives/java.
- At that point, you should see a much longer directory, which is actually the home to the Java binaries. For example, usr/lib/jvm/java-11-openjdk-arm64/bin/java. This is the directory you want.
-
3
Set the JAVA_HOME path. Now that you have the location of Java, you can add the path to your .bashrc file (if you’re using the bash shell), .zshrc (for the zsh shell), or the equivalent for your shell.[3]
Run both of the following commands, replacing the path with the path to your JDK or JRE installation, and «bashrc» with your shell’s login script:echo "export JAVA_HOME=/usr/lib/jvm/java-11-openjdk-arm64" >> ~/.bashrcecho "export PATH=$PATH:$JAVA_HOME/bin" >> ~/.bashrc
-
4
Type source .bashrc to apply the changes to the current terminal window. Though you’ve already set the home for Java and added the path to its binaries permanently, the changes won’t take effect in your current terminal window until you run this command.
- At this point, you can run echo $JAVA_HOME to see the location of Java on your system.


Advertisement
Ask a Question
200 characters left
Include your email address to get a message when this question is answered.
Submit
Advertisement
Video
-
In Linux, you can set JAVA__HOME for all users by editing the global .bashrc, which is located at /etc/bash.bashrc. Just use echo and replace ~/.bashrc with /etc/bash.bashrc.
-
On both Linux and macOS, you can set the Java home in your .bash_profile or .zprofile if you prefer.
Thanks for submitting a tip for review!
Advertisement
About This Article
Thanks to all authors for creating a page that has been read 293,971 times.