I have installed Rust on windows from Rust installation page. After installation I tried running the «hello world» program but got the following error.
>cargo run
Error
Compiling helloworld v0.1.0 (C:UsersDELLhelloworld)

error: linker `link.exe` not found
note: The system cannot find the file specified. (os error 2)
note: the msvc targets depend on the msvc linker but `link.exe` was not found
note: please ensure that VS 2013, VS 2015 or VS 2017 was installed with the Visual C++ option
error: aborting due to previous error
error: Could not compile `helloworld`.

To learn more, run the command again with --verbose.
Code:
fn main() {
    println!("Hello, world!");
}
asked Apr 10, 2019 at 0:34
Zobia KanwalZobia Kanwal
3,8654 gold badges15 silver badges38 bronze badges
5
I downloaded and installed the Build Tools for Visual Studio 2019. During installation I selected the C++ tools. It downloaded almost 5GB of data. I restarted the machine after installation and compiling the code worked fine:
> cargo run
Compiling helloworld v0.1.0 (C:UsersDELLhelloworld)
Finished dev [unoptimized + debuginfo] target(s) in 12.05s
  Running `targetdebughelloworld.exe`
Hello, world!
answered Apr 10, 2019 at 0:34
Zobia KanwalZobia Kanwal
3,8654 gold badges15 silver badges38 bronze badges
6
I had a similar issue «error: linking with link.exe failed: exit code: 1«
To solve it, I did
rustup toolchain install stable-x86_64-pc-windows-gnu
then
rustup default stable-x86_64-pc-windows-gnu
and
cargo build
  Compiling hello v0.1.0 (C:Userslekedevrusthello)
    Finished dev [unoptimized + debuginfo] target(s) in 1.66s
Shepmaster
364k85 gold badges1037 silver badges1300 bronze badges
answered Sep 29, 2020 at 14:23
the artistthe artist
1,1178 silver badges4 bronze badges
8
Case 1: Using C++ win compiler, to fix it you need to reinstall VS build tool C++
Download the Visual Studio 2019 Build tools from the Microsoft website:
https://visualstudio.microsoft.com/thank-you-downloading-visual-studio/?sku=BuildTools&rel=16
After the download, while installing the Build tools, make sure that you install the required components:
- C++ build tools
This will download required files. Once everything is successfully installed, reboot and re-run your rust program, and it will compile successfully.
Case2: This error can come from the fact that you use GCC to compile, to fix it (assume that you already have MinGW):
Type in cmd:
rustup uninstall toolchain stable-x86_64-pc-windows-msvcrustup toolchain install stable-x86_64-pc-windows-gnu
(or download rustup-init for the platform of your choice at https://forge.rust-lang.org/infra/other-installation-methods.html)rustup default stable-x86_64-pc-windows-gnu
Case 3: You don’t want to download Visual Studio with build tools, simply install MinGw with g++ GCC development packages, then run CASE 2
answered Jul 9, 2020 at 15:04
ocanisocanis
5574 silver badges3 bronze badges
5
Okay!
This is exactly what I did. Go to https://visualstudio.microsoft.com/visual-cpp-build-tools/ and it will download a Visual Studio Installer.
Run it as Administrator, then make sure you download all three things listed below in the screenshot, versions don’t matter, just try get latest ones.
Hit Install. Reboot Computer. You are welcome.
answered Oct 31, 2021 at 15:46
Rahul BaliRahul Bali
5928 silver badges26 bronze badges
3
The error message is very unclear because there is no need to have Vistual Studio installed to run rust code. And what does «Visual C++ option» mean exactly?
«VS 2013, VS 2015 or VS 2017» is also wrong — there’s no need to install the full Visual Studio of these particular versions.
To execute ‘cargo run’ you need to install C++ build tools from Build Tools for Visual Studio. Version 2019 is just fine. Download link:
https://visualstudio.microsoft.com/thank-you-downloading-visual-studio/?sku=BuildTools&rel=16#
It’s important to select not only the default ‘included’ C++ tools during the installation but also three ‘optional’ C++ building tools: MSVC(…), Windows 10 SDK, C++ CMake tools for Windows.
answered Mar 20, 2021 at 17:07
filiphaganfiliphagan
1972 silver badges9 bronze badges
2
If the above solutions still do not work for you (this is 2021), Rust uses msvc and gnu compilers so you can always switch to the gnu compiler:
$ rustup default stable-x86_64-pc-windows-gnu
answered Oct 18, 2021 at 15:00
4
I had the same issue and found it to be present even after installing the Build Tools. What I realized almost by accident that I was running all my cargo commands in «Developer Command Prompt for Visual Studio «. Running the same commands in a simple cmd shell ran without any issues.
What worked for me: Running the command prompt directly and not use the shortcuts created by Visual Studio.
Possible Cause: Visual Studio Command Prompt runs bat files e.g. VsDevCmd.bat before it starts the shell (to load VS related environment variables, etc.) and possibly one of the commands in that file screws up the path cargo uses to get to linker.
Someone could dig further to find the exact line that causes the issue if they really want to know.
answered Nov 15, 2019 at 3:58
Late NighterLate Nighter
691 gold badge1 silver badge6 bronze badges
1
On VS 2022, I tested both solutions.
4.39 GB = «MSVC v143 — VS 2022 C++ x64/x86 build tools» and «Windows 10 SDK»
2.86 GB = «Desktop development with C++»
Its better to just select «Desktop Development with C++».
Heres the download for VS 2022 build tools:
https://aka.ms/vs/17/release/vs_BuildTools.exe
answered Sep 5, 2022 at 19:34
Gagan SuieGagan Suie
3104 silver badges15 bronze badges
In a PowerShell terminal run:
winget install -e --id Microsoft.VisualStudio.2022.BuildTools
Then:
- open Visual Studio Installer
- press Modify
- check Desktop Development with C++
- press Modify
answered Oct 9, 2022 at 21:01
Marco LackovicMarco Lackovic
5,7646 gold badges54 silver badges53 bronze badges
I see that term C++ Build tools introduces confusion what exactly to select during the installation.
It is Desktop development with C++ component with default dependencies (see screenshot). From my experience I noticed that only two options are required (highlighted with red rectangles on the screenshot). But to be confident just go with default selection and enjoy 
answered Oct 18, 2022 at 20:48
Method 1: If You Are Using MSVC ToolChain to Compile Your Rust Program:
Install Microsoft cpp Build tool, Install it through Administrator and reboot you pc , your rust program will run correctly
https://visualstudio.microsoft.com/visual-cpp-build-tools/ .
Method 2: Use MINGW GCC Compiler , GNU based compiler and toolchain to compile your rust program
Install mingw by following this guide , https://code.visualstudio.com/docs/cpp/config-mingw
If you have MINGW than all you have to do is paste a config file containing this
[target.x86_64-pc-windows-gnu]
linker = "C:\msys2\mingw64\bin\gcc.exe"
ar = "C:\msys2\mingw64\bin\ar.exe"
in
C:Usersyourname.cargobin
Don’t forget to make gnu your default rustup compiler
rustup default stable-x86_64-pc-windows-gnu
answered Dec 5, 2022 at 2:10
Adding C:Program Files (x86)Microsoft Visual Studio2019BuildToolsVCToolsMSVC14.29.30133binHostx64x64 to PATH variable done the trick
answered Sep 22, 2021 at 11:19
FunctorPrototypeFunctorPrototype
1,1532 gold badges12 silver badges24 bronze badges
Try using Powershell outside Visual Studio, instead.
Then cargo run in src’s parent folder.
You can try also: rustc
Good luck.
answered May 18, 2020 at 3:41
I had some variables from an old Visual Studio installation in my System Variables. Removing those solved the issue.
VCHOME            C:Program Files (x86)Microsoft Visual Studio 14.0VC
VCINSTALLDIR      C:Program Files (x86)Microsoft Visual Studio 14.0VC
VS140COMNTOOLS    C:Program Files (x86)Microsoft Visual Studio 14.0Common Tool...
vsinstalldir      C:Program Files (x86)Microsoft Visual Studio 14.0VC
answered May 17, 2021 at 9:00
OvidiuOvidiu
8525 silver badges9 bronze badges
Information Technology Service Management (ITSM) Processes. 1) Service Request Management Focuses on requests and responses for the IT help-desk items. The processes should be established and uniform. To reduce the workload on agents, organization may consider implementing self service options or chat-bots. 2) Service Catalogs Generally Service Catalogs is a central location/webpage with all the details for contacting the help-desk. It may also contain the self service options and solutions for common problems/issues. 3) Knowledge,Policy and Procedures. This is the knowledge base which controls the collection, maintenance and distribution of information sharing throughout the organization. It shall include the policies, standards, guidelines and the operating procedures for each process or tasks. 4) Incident Management. Defines process on how to handle a situation when an incident happens and how to fix the situation in an accelerated and organized manner. The objective is to reduce t
Popular posts from this blog
For configuring TLS v1.2, the ASA should run software version 9.3(2) or later. In earlier versions of ASA, TLS 1.2 is not supported.If you are running the old version, it’s time to upgrade. But before that i will show you the config prior to the change. I am running ASA version 9.6.1 Now ,set the server-version to tlsv1.2, though ASA supports version tlsv1.1, its always better to configure the connection to more secure. Server here in the sense, the ASA will be act as the server and the client will connect to the ASA. #ssl server-version tlsv1.2 set the client-version to tlsv1.2, if required. #ssl client-version tlsv1.2 ssl cipher command in ASA offers 5 predefined security levels and an additional custom level. #ssl cipher tlsv1.2 high we can see the setting of each cipher levels using #show ssl cipher command. Now set the DH group to 24, which is the strongest offered as of now in the ASA. #ssl dh-group group24 An
Netmiko, developed by kirk Byers is an open source python library based on Paramiko which simplifies SSH management to network devices and is primarily used for network automation tasks. Installing Netmiko in linux is a matter o f one single command but if you need to use Netmiko in your Windows PC, follow this process. 1) Install the latest version of Python. 2) Install Anaconda, which is an opensource distribution platform that you can install in Windows and other OS’s (https://www.anaconda.com/download/) 3) From the Anaconda Shell, run “ conda install paramiko ”. 4) From the Anaconda Shell, run “ pip install scp ”. 5) Now Install the Git for Windows. (https://www.git-scm.com/downloads) . Git is required for downloading and cloning all the Netmiko library files from Github. 6) From Git Bash window, Clone Netmiko using the following command git clone https://github.com/ktbyers/netmiko” 7) Once the installation is completed, ch
When you do malware analysis of documents or office files, it is important to have Microsoft Office installed in your Lab machine. I am using flare VM and it doesn’t comes with MS Office. Since Microsoft is promoting Microsoft 365 over the offline version, finding the offline installer is not that easy. Here is the list of genuine Microsoft links to download the office .img files. Download Microsoft Office 2019 Professional Plus : https://officecdn.microsoft.com/db/492350F6-3A01-4F97-B9C0-C7C6DDF67D60/media/en-US/ProPlus2019Retail.img Download Microsoft Office 2019 Professional : https://officecdn.microsoft.com/db/492350F6-3A01-4F97-B9C0-C7C6DDF67D60/media/en-US/Professional2019Retail.img Download Microsoft Office 2019 Home and Business : https://officecdn.microsoft.com/db/492350F6-3A01-4F97-B9C0-C7C6DDF67D60/media/en-US/HomeBusiness2019Retail.img Download Microsoft Office 2019 Home and Student : https://officecdn.microsoft.com/db/492350F6-3A01-4F97-B9C0-C7C6DDF67D60/media/en-U
I am not an exploit developer but was interested to see how this vulnerability can be exploited. So i tried to replicate the infamous PrintNightmare vulnerability using the following PoCs ( https://github.com/cube0x0/CVE-2021-1675 ) and ( https://github.com/rapid7/metasploit-framework/pull/15385 ) However i had trouble with the new metasploit module (auxiliary/admin/dcerpc/cve_2021_1675_printnightmare) and i couldn’t able to exploit the machine successfully. So i tried the second PoC from cube0x0. This one has done the magic. I just followed the guidelines with couple of tweaks. First of all, i installed the impacket (cube0x0 version) which will install the required modules and files. After that i set up a samba share with an anonymous login. This is required for hosting the dll file. I edited the smb.conf with the following settings. [global] map to guest = Bad User server role = standalone server usershare allow guests = yes idmap config * : backend = tdb s
Google Cloud resources can be managed in multiple ways. It can be done using Cloud Console, SDK or by using Cloud Shell. A few basic Google Cloud shell commands are listed below. 1) List the active account name gcloud auth list 2) List the project ID gcloud config list project 3) Create a new instance using Gcloud shell gcloud compute instances create [INSTANCE_NAME] —machine-type n1-standard-2 —zone [ZONE_NAME] Use gcloud compute machine-types list to view a list of machine types available in particular zone. If the additional parameters, such as a zone is not specified, Google Cloud will use the information from your default project. To view the default project information, use gcloud compute project-info describe 4) SSH in to the machine gcloud compute ssh [INSTANCE_NAME] —zone [YOUR_ZONE] 5) RDP a windows server gcloud compute instances get-serial-port-output [INSTANCE_NAME] —zone [ZONE_NAME] 6) Command to check whether the server is ready f
While compiling programs, you may encounter this particular error. E: Unable to locate package linux-headers-5.10.0-kali5-amd64 I encountered this while compiling a C code. To fix this, i first updated my Kali machine (v2020.2a). sudo apt update -y && apt upgrade -y && apt dist-upgrade Rebooted. Then installed the headers. sudo apt install linux-headers-$(uname -r)
image courtesy : https://docs.microsoft.com Azure management groups help you manage your Azure subscriptions by grouping them together. If your organization has many subscriptions, you might need a way to efficiently manage access, policies, and compliance for those subscriptions. Azure management groups provide a level of scope above subscriptions. Azure subscriptions help you organize access to Azure resources and determine how resource usage is reported, billed, and paid for. Each subscription can have a different billing and payment setup, so you can have different subscriptions and plans by office, department, project, and so on. Resource groups are containers that hold related resources for an Azure solution. A resource group includes those resources that you want to manage as a group. You decide which resources belong in a resource group based on what makes the most sense for your organization. reference : https://docs.microsoft.com
Many of us encountered the word «Gratuitous» while exploring the network topic on ARP, The Address Resolution Protocol. Before explaining Gratuitous ARP, here is a quick review on how ARP works. ARP provides IP communication within a Layer 2 broadcast domain by mapping an IP address to a MAC address.For example, Host B wants to send information to Host A but does not have the MAC address of Host A in its ARP cache. Host B shoots a broadcast message for all hosts within the broadcast domain to obtain the MAC address associated with the IP address of Host A. All hosts within the same broadcast domain receive the ARP request, and Host A responds with its MAC address. We can see the ARP entries on our computers by entering the command arp -a . So, back to the topic on what is a Gratuitous reply, here is a better explanation. Gratuitous arp is when a device will send an ARP packet that is not a response to a request. Ideally a gratuitous ARP request is an ARP request packe
Problem: Switch not booting AOS; Going to Mini-boot prompt. Model: Alcatel-Lucent OS6850 [Note:The same procedure might be applicable for different models of Omni-Switches, However, for this illustration, i have used OS-6850 ] Reason: This problem may occurs due to corrupt AOS image files or misconfigured boot parameters. Hence switch cannot boot the images properly and will go to Mini-boot prompt. Work Around: [Note: This zmodem procedure consumes a lot to time to finish the process.] 1.) Power off your OS6850 2.) When you switched it back on, stop it before the Miniboot (there is some counter counting down from 4). Press Enter to break. 3.) You will have the following prompt » => » 4.) Enter » setenv baudrate 115200 ”. Increasing baudrate helps to increase the data transfer speed using zmodem. 5.) Enter » saveenv » 6.) Enter » boot » 7.) The switch should run now in baud rate 115200 (so you have to change your clients ter
In this episode I investigate an error with the build environment (cargo run) of my new Rust installation (missing link.exe).
I’m doing a series of 25 minute sessions where I try to get familiar with the Rust programming language. The blogposts in these series are the notes I took of the lessons learned along the way.
Warning to the reader: As always in this series, these are notes I take as I’m learning, they reflect my current understanding and may be incomplete!
Missing link.exe
In the previous episode, I ran into an issue when trying to compile the hello world project.
cargo run produced the following error:
error: linker `link.exe` not found
  |
  = note: The system cannot find the file specified. (os error 2)

note: the msvc targets depend on the msvc linker but `link.exe` was not found

note: please ensure that VS 2013 or VS 2015 was installed with the Visual C++ option

error: aborting due to previous error

error: Could not compile `hello_cargo`.

To learn more, run the command again with --verbose.
Which Visual Studio?
The error mentions, specifically, Visual Studio 2013 or Visual Studio 2015.
On my environment I only have the Community Edition of Visual Studio 2017. Maybe that is not OK or maybe my installation is missing the Visual C++ option?
A thread on the rust-lang.org forum seems to indicate the component we actually need is called Build Tools for Visual Studio 2017.
It can be downloaded from visualstudio.com: Build Tools for Visual Studio 2017
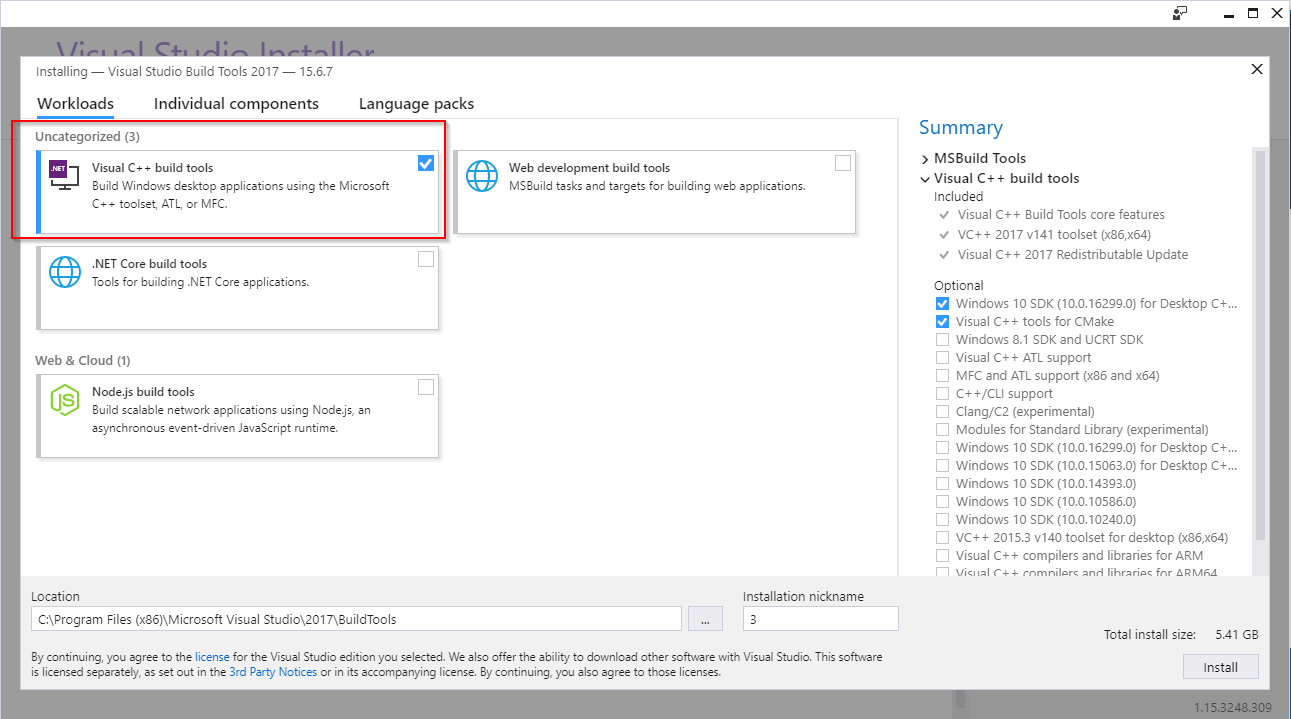
So, I install it:
In the installer, it’s called Visual C++ Build Tools.
This thing has been given three names already:
- Visual C++ option
- Build Tools for Visual Studio 2017
- Visual C++ Build Tools
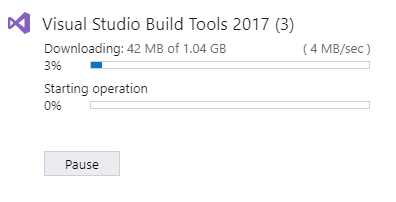
This installs about 1 GB of things on my machine:
Windows 8.1 SDK
Oh no!
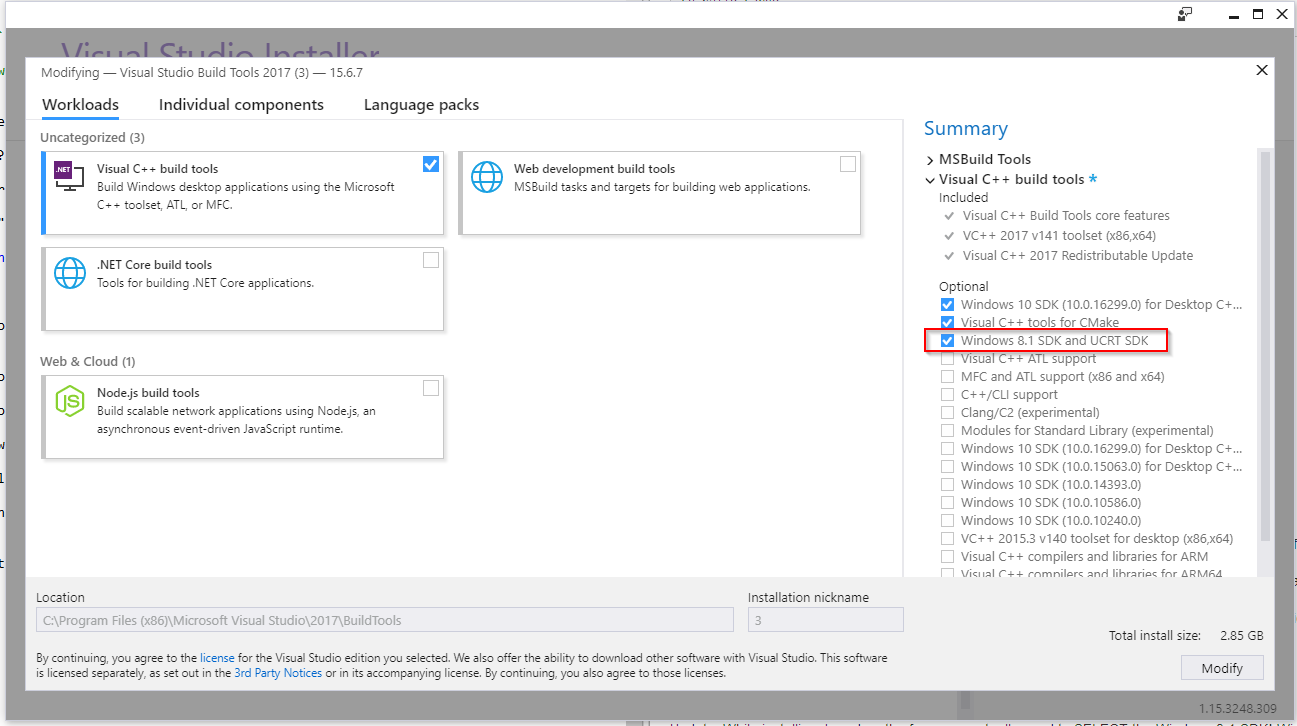
While the installation was ongoing, I read further online and learned that what is actually needed is the Windows 8.1 SDK, which is part of the Build Tools for Visual Studio 2017 but not enabled by default.
By default, only the Windows 10 SDK is selected. So I modified the install and add the Windows 8.1 SDK. Interestingly you can pause the installation and modify your original choices.
Installation Completed
After this has been installed, I retry cargo run. The output is now:
Compiling hello_cargo v0.1.0 (file:///C:/Users/username/Documents/Programming/Training/Rust/hello_cargo)
    Finished dev [unoptimized + debuginfo] target(s) in 1.10 secs
     Running `targetdebughello_cargo.exe`
Hello, world!
Success!
Build button?
I’m looking for a button or a shortcut to build the project from within Visual Studio Code, but couldn’t find anything yet.
Interestingly, when opening the project in Visual Studio Code, it asked me again to install RLS and the other thing, as seen in the previous Episode.
Conclusion
Besides Rustup and the RLS extension for Visual Studio Code you must have the Windows 8.1 SDK, part of the Build Tools for Visual Studio 2017. I don’t think you actually need Visual Studio itself installed.
Note that the Windows 8.1 SDK is not included by default, you have to check it in the installer.
After the compilation succeeded, I tried to look for a «Build» button in my Visual Studio Code environment, but couldn’t find any yet.
Next 25 minutes will be about exploring the options of the Visual Studio Code extension some more.
In this post, we will see How To Fix – “Error: Linker ‘Link.exe’ Not Found” in Rust. Below is a more detailed excerpt of the error –
error: linker `link.exe` not found
note: The system cannot find the file specified. (os error 2)
note: the msvc targets depend on the msvc linker but `link.exe` was not found
note: please ensure that VS 2013, VS 2015 or VS 2017 was installed with the Visual C++ option
error: aborting due to previous error
Go ahead and follow the below steps to fix the issue –
The error pertains as regards to what Compiler you use for your Rust Program. There are Two existing Rust toolchain for Windows. Rust uses MSVC and GNU compilers so you can switch between the compilers.
if( aicp_can_see_ads() ) {
}
- MSVC – This is the default and it requires Visual C++ installation
- GNU – This depends on GNU/MinGW-w64.
.
We will see how to fix the error based on what toolchain you use. But first use the Primitive checks.
Primitive Checks:
Some basic checks. To run the Rust Program –
- Do not use the “Developer Command Prompt for Visual Studio “.
- Instead use the CMD SHELL or Powershell.
cargo build
cargo run
If you are through the above checks, proceed ahead.
if( aicp_can_see_ads() ) {
}
Option 1:
If you are using C++ Compiler, then this is for you.
- First thing first, verify if you have VS installed with the Visual C++ option & Windows 10 SDK. This is the problem in most of the cases.
For VS:
- If not installed, go ahead and download Visual Studio from – https://visualstudio.microsoft.com. While downloading, in the Workloads tab, click on “Desktop development with C++”, and you can see all the available things to download.
- While installing select C++ tools – the download will be heavy – but go ahead.
if( aicp_can_see_ads() ) {
}
For Windows 10 SDK:
- Get it from – https://developer.microsoft.com/en-us/windows/downloads/windows-sdk/
Once Everything is successfully installed, Reboot and Re-run your Rust program and it will compile successfully.
Once both the above things are done, rerun your code and see if still the error is coming.
If all things are in place, the error should be gone by now.
if( aicp_can_see_ads() ) {
}
Option 2:
If you are using GCC (GNU Compiler Collection) Compiler, then this is for you.
You could also try the below steps. But note that with these steps – you would be changing your windows development from MSVC to GNU.
Rust uses MSVC and GNU compilers so you can switch between the compilers.
if( aicp_can_see_ads() ) {
}
I am assuming, you already have MinGW i.e. Minimalist GNU installed for your system. If not get it from (https://www.mingw-w64.org OR https://sourceforge.net/projects/mingw)
- Uninstall MVSC toolchain
rustup uninstall toolchain stable-x86_64-pc-windows-msvc
- Install the toolchain
rustup toolchain install stable-x86_64-pc-windows-gnu
For 32-bit systems
rustup toolchain install stable-i686-pc-windows-gnu
- Make GNU default.
rustup default stable-x86_64-pc-windows-gnu
if( aicp_can_see_ads() ) {
}
Once Everything is successfully installed, Reboot and Re-run your Rust program and it will compile successfully.
Hopefully this helps to solve the error.
if( aicp_can_see_ads() ) {
}
Other Interesting Reads –
-
How to Send Large Messages in Kafka ?
-
Fix Spark Error – “org.apache.spark.SparkException: Failed to get broadcast_0_piece0 of broadcast_0”
-
How to Handle Bad or Corrupt records in Apache Spark ?
-
How to use Broadcast Variable in Spark ?
-
How to log an error in Python ?
-
How to Code Custom Exception Handling in Python ?
-
How to Handle Errors and Exceptions in Python ?
-
How To Fix – “Ssl: Certificate_Verify_Failed” Error in Python ?
-
How to Send Large Messages in Kafka ?
-
Fix Spark Error – “org.apache.spark.SparkException: Failed to get broadcast_0_piece0 of broadcast_0”
-
How to Handle Bad or Corrupt records in Apache Spark ?
-
How to use Broadcast Variable in Spark ?
-
Best Practices for Dependency Problem in Spark
-
Sample Code – Spark Structured Streaming vs Spark Streaming
-
Sample Code for PySpark Cassandra Application
-
How to Enable UTF-8 in Python ?
-
How to log an error in Python ?
-
Sample Python Code To Read & Write Various File Formats (JSON, XML, CSV, Text)
-
How to Handle Errors and Exceptions in Python ?
-
How to Handle Bad or Corrupt records in Apache Spark ?
-
How To Fix – Partitions Being Revoked and Reassigned issue in Kafka ?
Error: Linker `Link.exe` Not Found" in Rust ,error linker link.exe not found rust ,link cannot be opened ,error linker cc not found ubuntu ,link.exe not found rust ,rust linker.exe not found ,rust linker link.exe not found ,error linker link.exe not found rust windows ,rust error linker link.exe not found ,linker link.exe not found rust ,error linker link.exe not found ,link cannot be opened in onedrive app ,links cannot be opened in outlook ,connection cannot be opened here outward ,hyperlink cannot be opened in excel ,hyperlink cannot be opened in outlook ,data connection cannot be opened with this prot setting ,why won't link open ,why links are not opening ,why won't links open ,what to do when link is not opening ,the connection cannot be opened because the maximumpoolsize has been reached ,swannview link cannot be opened because the developer cannot be verified ,what to do if link is not opening ,cannot open dde link to ,link cannot open file ,link cannot open file kernel32 lib ,hyperlink cannot open file ,link error cannot open file ,link cannot open input file ,cmake link cannot open file ,c++ link cannot open file ,linking.canopenurl ,link cannot open lib ,link error cannot open .lib ,hyperlink cannot open outlook ,tp link cannot open port ,connection cannot be closed when open statements or lobs exist ,link cannot be opened in the onedrive app ,the link cannot be opened , , ,link.exe download ,linker link.exe not found intellij ,error: linker link.exe not found intellij ,link.exe returned an unexpected error ,build tools for visual studio ,visual studio installer ,c++ build tools ,visual studio download , ,error linker link.exe not found in rust after installing ,error linker link.exe not found in rust agent ,error linker link.exe not found in rust android ,error linker link.exe not found in rust android studio ,error linker link.exe not found in rust api ,error linker link.exe not found in rust base ,error linker link.exe not found in rust base64 ,error linker link.exe not found in rust bin ,error linker link.exe not found in rust boot ,error linker link.exe not found in rust build ,error linker link.exe not found in rust command ,error linker link.exe not found in rust command line ,error linker link.exe not found in rust console ,error linker link.exe not found in rust console edition ,error linker link.exe not found in rust container ,error linker link.exe not found in rust desktop ,error linker link.exe not found in rust dll ,error linker link.exe not found in rust docker ,error linker link.exe not found in rust download ,error linker link.exe not found in rust file ,error linker link.exe not found in rust fix ,error linker link.exe not found in rust folder ,error linker link.exe not found in rust game ,error linker link.exe not found in rust git ,error linker link.exe not found in rust github ,error linker link.exe not found in rust gui ,error linker link.exe not found in rust host ,error linker link.exe not found in rust how to ,error linker link.exe not found in rust how to fix ,error linker link.exe not found in rust hp ,error linker link.exe not found in rust jar ,error linker link.exe not found in rust java ,error linker link.exe not found in rust js ,error linker link.exe not found in rust jsp ,error linker link.exe not found in rust jupyter ,error linker link.exe not found in rust kali ,error linker link.exe not found in rust keras ,error linker link.exe not found in rust kernel ,error linker link.exe not found in rust key ,error linker link.exe not found in rust kubernetes ,error linker link.exe not found in rust labs ,error linker link.exe not found in rust language ,error linker link.exe not found in rust library ,error linker link.exe not found in rust linux ,error linker link.exe not found in rust mac ,error linker link.exe not found in rust macbook ,error linker link.exe not found in rust maven ,error linker link.exe not found in rust module ,error linker link.exe not found in rust net core ,error linker link.exe not found in rust netbeans ,error linker link.exe not found in rust network ,error linker link.exe not found in rust no such file ,error linker link.exe not found in rust npm ,error linker link.exe not found in rust oleum ,error linker link.exe not found in rust on mac ,error linker link.exe not found in rust on ubuntu ,error linker link.exe not found in rust on windows ,error linker link.exe not found in rust or not ,error linker link.exe not found in rust path ,error linker link.exe not found in rust platform ,error linker link.exe not found in rust pro ,error linker link.exe not found in rust programming ,error linker link.exe not found in rust programming language ,error linker link.exe not found in rust qt ,error linker link.exe not found in rust quarry ,error linker link.exe not found in rust query ,error linker link.exe not found in rust quest ,error linker link.exe not found in rust queue ,error linker link.exe not found in rust reddit ,error linker link.exe not found in rust redis ,error linker link.exe not found in rust registry ,error linker link.exe not found in rust registry editor ,error linker link.exe not found in rust request ,error linker link.exe not found in rust rust ,error linker link.exe not found in rust script ,error linker link.exe not found in rust server ,error linker link.exe not found in rust terminal ,error linker link.exe not found in rust test ,error linker link.exe not found in rust test class ,error linker link.exe not found in rust testng ,error linker link.exe not found in rust try again ,error linker link.exe not found in rust ubuntu ,error linker link.exe not found in rust ubuntu 2 ,error linker link.exe not found in rust ui ,error linker link.exe not found in rust uipath ,error linker link.exe not found in rust update ,error linker link.exe not found in rust version ,error linker link.exe not found in rust virtual machine ,error linker link.exe not found in rust virtualbox ,error linker link.exe not found in rust vm ,error linker link.exe not found in rust vmware ,error linker link.exe not found in rust x64 ,error linker link.exe not found in rust x86 ,error linker link.exe not found in rust xampp ,error linker link.exe not found in rust xcode ,error linker link.exe not found in rust yahoo ,error linker link.exe not found in rust yet ,error linker link.exe not found in rust youtube ,error linker link.exe not found in rust yum ,error linker link.exe not found in rust zip ,error linker link.exe not found in rust zip file ,error linker link.exe not found in rust zone ,error linker link.exe not found in rust zoom ,error linker link.exe not found rust ,error linker link.exe not found rust windows ,link cannot be opened ,link.exe not found rust ,rust error linker link.exe not found
if( aicp_can_see_ads() ) {
}
if( aicp_can_see_ads() ) {
}
Rust is a powerful programming language, often used for systems programming where performance and correctness are high priorities. If you are new to Rust and want to learn more, The Rust Programming Language online book is a great place to start. This topic goes into detail about setting up and using Rust within Visual Studio Code, with the rust-analyzer extension.
Note: There is also another popular Rust extension in the VS Code Marketplace (extension ID: rust-lang.rust) but this extension is deprecated and rust-analyzer is the recommended VS Code Rust extension by rust-lang.org.
Installation
1. Install Rust
First you will need to have the Rust toolset installed on your machine. Rust is installed via the rustup installer, which supports installation on Windows, macOS, and Linux. Follow the rustup installation guidance for your platform, taking care to install any extra tools required to build and run Rust programs.
Note: As with installing any new toolset on your machine, you’ll want to make sure to restart your terminal/Command Prompt and VS Code instances to use the updated toolset location in your platform’s PATH variable.
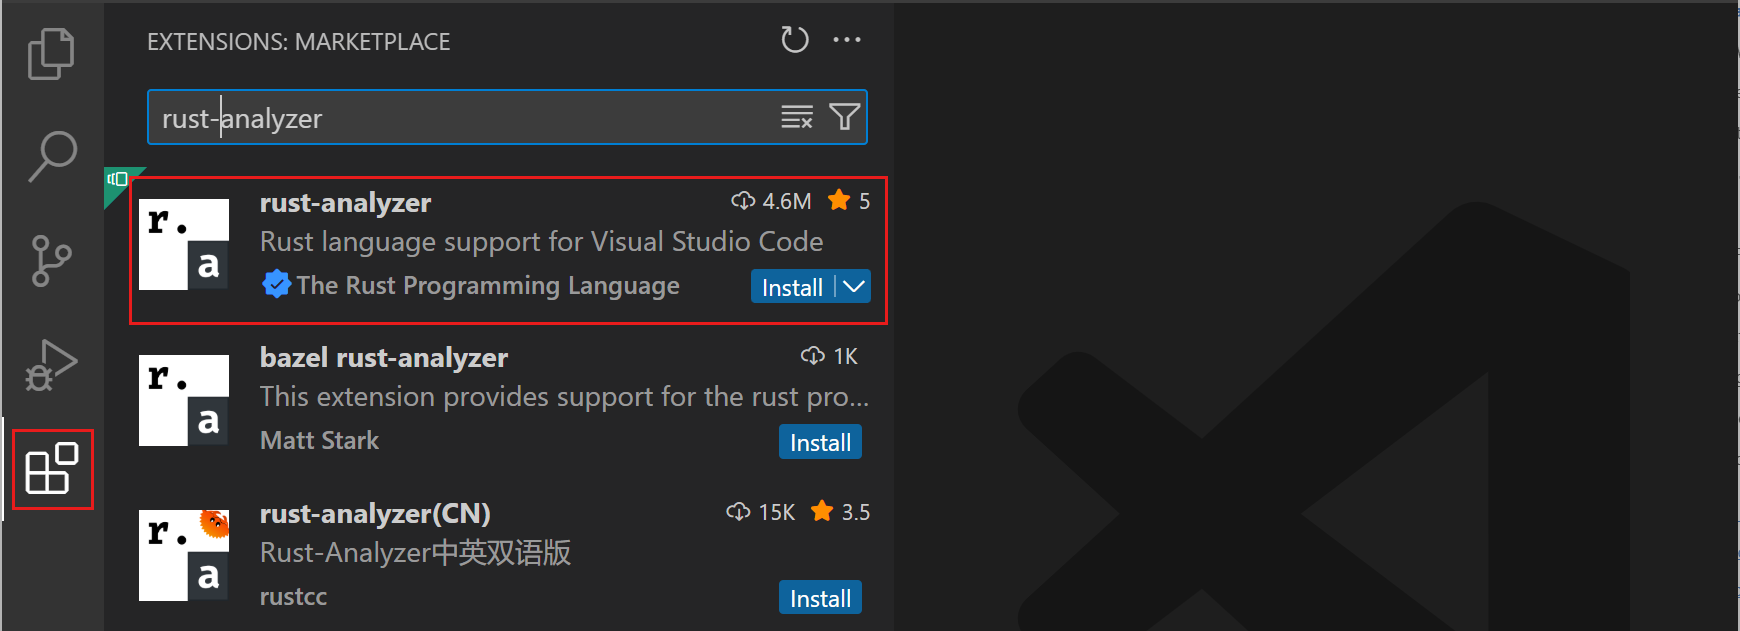
2. Install the rust-analyzer extension
You can find and install the rust-analyzer extension from within VS Code via the Extensions view (⇧⌘X (Windows, Linux Ctrl+Shift+X)) and searching for ‘rust-analyzer’. You should install the Release Version.
We’ll discuss many of rust-analyzer features in this topic but you can also refer to the extension’s documentation at https://rust-analyzer.github.io.
Check your installation
After installing Rust, you can check that everything is installed correctly by opening a new terminal/Command Prompt, and typing:
rustc --version
which will output the version of the Rust compiler. If you want more details, you can add the --verbose argument. If you run into problems, you can consult the Rust installation guide.
You can keep your Rust installation up to date with the latest version by running:
rustup update
There are new stable versions of Rust published every 6 weeks so this is a good habit.
Local Rust documentation
When you install Rust, you also get the full Rust documentation set locally installed on your machine, which you can review by typing rustup doc. The Rust documentation, including The Rust Programming Language and The Cargo Book, will open in your local browser so you can continue your Rust journey while offline.
Hello World
Cargo
When you install Rust with rustup, the toolset includes the rustc compiler, the rustfmt source code formatter, and the clippy Rust linter. You also get Cargo, the Rust package manager, to help download Rust dependencies and build and run Rust programs. You’ll find that you end up using cargo for just about everything when working with Rust.
Cargo new
A good way to create your first Rust program is to use Cargo to scaffold a new project by typing cargo new. This will create a simple Hello World program along with a default Cargo.toml dependency file. You pass cargo new the folder where you’d like to create the project.
Let’s create Hello World. Navigate to a folder where you’d like to create your project and type:
cargo new hello_world
To open your new project in VS Code, navigate into the new folder and launch VS Code via code .:
cd hello_world
code .
Note: Enable Workspace Trust for the new folder as you are the author. You can enable Workspace Trust for your entire project folder parent to avoid being prompted when you create new projects by checking the option to Trust the authors of all the files in parent folder ‘my_projects`.
cargo new creates a simple Hello World project with a main.rs source code file and Cargo.toml Cargo manifest file.
src
    main.rs
.gitignore
Cargo.toml
main.rs has the program’s entry function main() and prints «Hello, world!» to the console using println!.
fn main() {
    println!("Hello, world!");
}
This simple Hello World program doesn’t have any dependencies but you would add Rust package (crate) references under [dependencies].
Cargo build
Cargo can be used to build your Rust project. Open a new VS Code integrated terminal (⌃⇧` (Windows, Linux Ctrl+Shift+`)) and type cargo build.
cargo build
You will now have targetdebug folder with build output include an executable called hello_world.exe.
Running Hello World
Cargo can also be used to run your Rust project via cargo run.
cargo run
You can also run hello_world.exe manually in the terminal by typing .targetdebughello_world.
IntelliSense
IntelliSense features are provided by the Rust language server, rust-analyzer, which provides detailed code information and smart suggestions.
When you first open a Rust project, you can watch rust-analyzer’s progress in the lower left of the Status bar. You want to wait until rust-analyzer has completely reviewed your project to get the full power of the language server.
Inlay hints
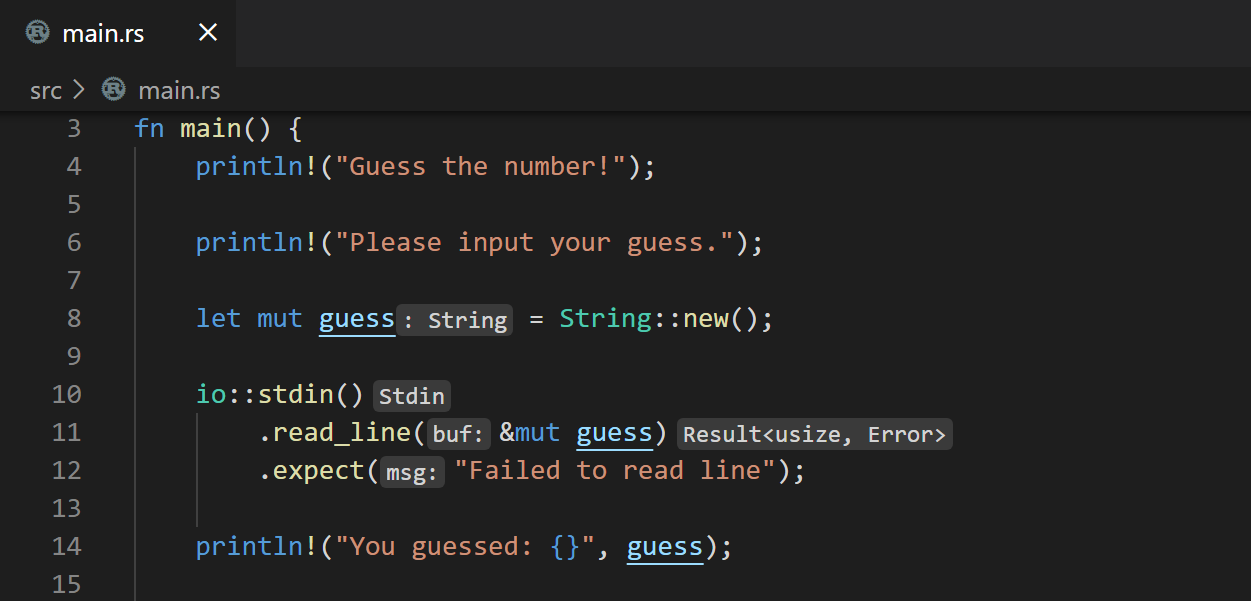
One of the first things you may notice is rust-analyzer providing inlay hints to show inferred types, return values, named parameters in light text in the editor.
While inlay hints can be helpful for understanding your code, you can also disable the feature via the Editor > Inlay Hints: Enabled setting (editor.inlayHints.enabled) or use the Rust Analyzer: Toggle Inlay Hints command to hide or display this extra information.
Hover information
Hovering on any variable, function, type, or keyword will give you information on that item such as documentation, signature, etc. You can also jump to the type definition in your own code or the standard Rust libraries.
Auto completions
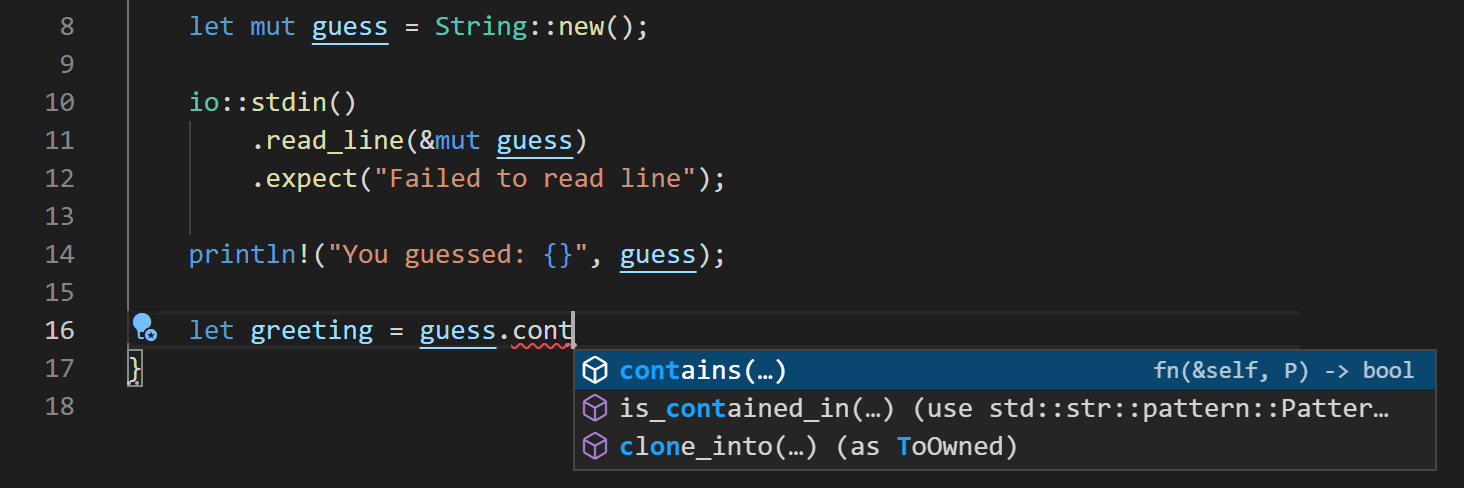
As you type in a Rust file, IntelliSense provides you with suggested completions and parameter hints.
Tip: Use ⌃Space (Windows, Linux Ctrl+Space) to trigger the suggestions manually.
Semantic syntax highlighting
rust-analyzer is able to use semantic syntax highlighting and styling due to its rich understanding of a project source code. For example, you may have noticed that mutable variables are underlined in the editor.
Being able to quickly tell which Rust variables are mutable or not can help your understanding of source code, but you can also change the styling with VS Code editor.semanticTokenColorCustomizations setting in your user settings.
In settings.json, you would add:
{
  "editor.semanticTokenColorCustomizations": {
    "rules": {
      "*.mutable": {
        "fontStyle": "", // set to empty string to disable underline, which is the default
      },
    }
  },
}
You can learn more about rust-analyzer’s semantic syntax customizations in the Editor features section of the rust-analyzer documentation.
Code navigation
Code navigation features are available in the context menu in the editor.
- Go to Definition F12 — Go to the source code of the type definition.
- Peek Definition ⌥F12 (Windows Alt+F12, Linux Ctrl+Shift+F10) — Bring up a Peek window with the type definition.
- Go to References ⇧F12 (Windows, Linux Shift+F12) — Show all references for the type.
- Show Call Hierarchy ⇧⌥H (Windows, Linux Shift+Alt+H) — Show all calls from or to a function.
You can navigate via symbol search using the Go to Symbol commands from the Command Palette (⇧⌘P (Windows, Linux Ctrl+Shift+P)).
- Go to Symbol in File — ⇧⌘O (Windows, Linux Ctrl+Shift+O)
- Go to Symbol in Workspace — ⌘T (Windows, Linux Ctrl+T)
Linting
The Rust toolset includes linting, provided by rustc and clippy, to detect issues with your source code.
The rustc linter, enabled by default, detects basic Rust errors, but you can use clippy to get more lints. To enable clippy integration in rust-analyzer, change the Rust-analyzer > Check: Command (rust-analyzer.check.command) setting to clippy instead of the default check. The rust-analyzer extension will now run cargo clippy when you save a file and display clippy warnings and errors directly in the editor and Problems view.
Quick Fixes
When the linter finds errors and warnings in your source code, rust-analyzer can often provide suggested Quick Fixes (also called Code Actions), which are available via a light bulb hover in the editor. You can quickly open available Quick Fixes via the ⌘. (Windows, Linux Ctrl+.).
Refactoring
Due to rust-analyzer’s semantic understanding of your source code, it can also provide smart renames, across your Rust files. With your cursor on a variable, select Rename Symbol from the context menu, Command Palette, or via F2.
The rust-analyzer extension also supports other code refactorings and code generation, which the extension calls Assists.
Here are just a few of the refactorings available:
- Convert if statement to guarded return
- Inline variable
- Extract function
- Add return type
- Add import
Formatting
The Rust toolset includes a formatter, rustfmt, which can format your source code to conform to Rust conventions. You can format your Rust file using ⇧⌥F (Windows Shift+Alt+F, Linux Ctrl+Shift+I) or by running the Format Document command from the Command Palette or the context menu in the editor.
You also have the option to run the formatter on each save (Editor: Format On Save) or paste (Format On Paste) to keep your Rust code properly formatted automatically while you are working.
Debugging
The rust-analyzer extension supports debugging Rust from within VS Code.
Install debugging support
To start debugging, you will first need to install one of two language extension with debugging support:
- Microsoft C++ (ms-vscode.cpptools)
- CodeLLDB (vadimcn.vscode-lldb)
If you forget to install one of these extensions, rust-analyzer will provide a notification with links to the VS Code Marketplace when you try to start a debug session.
Using Rust Analyzer: Debug
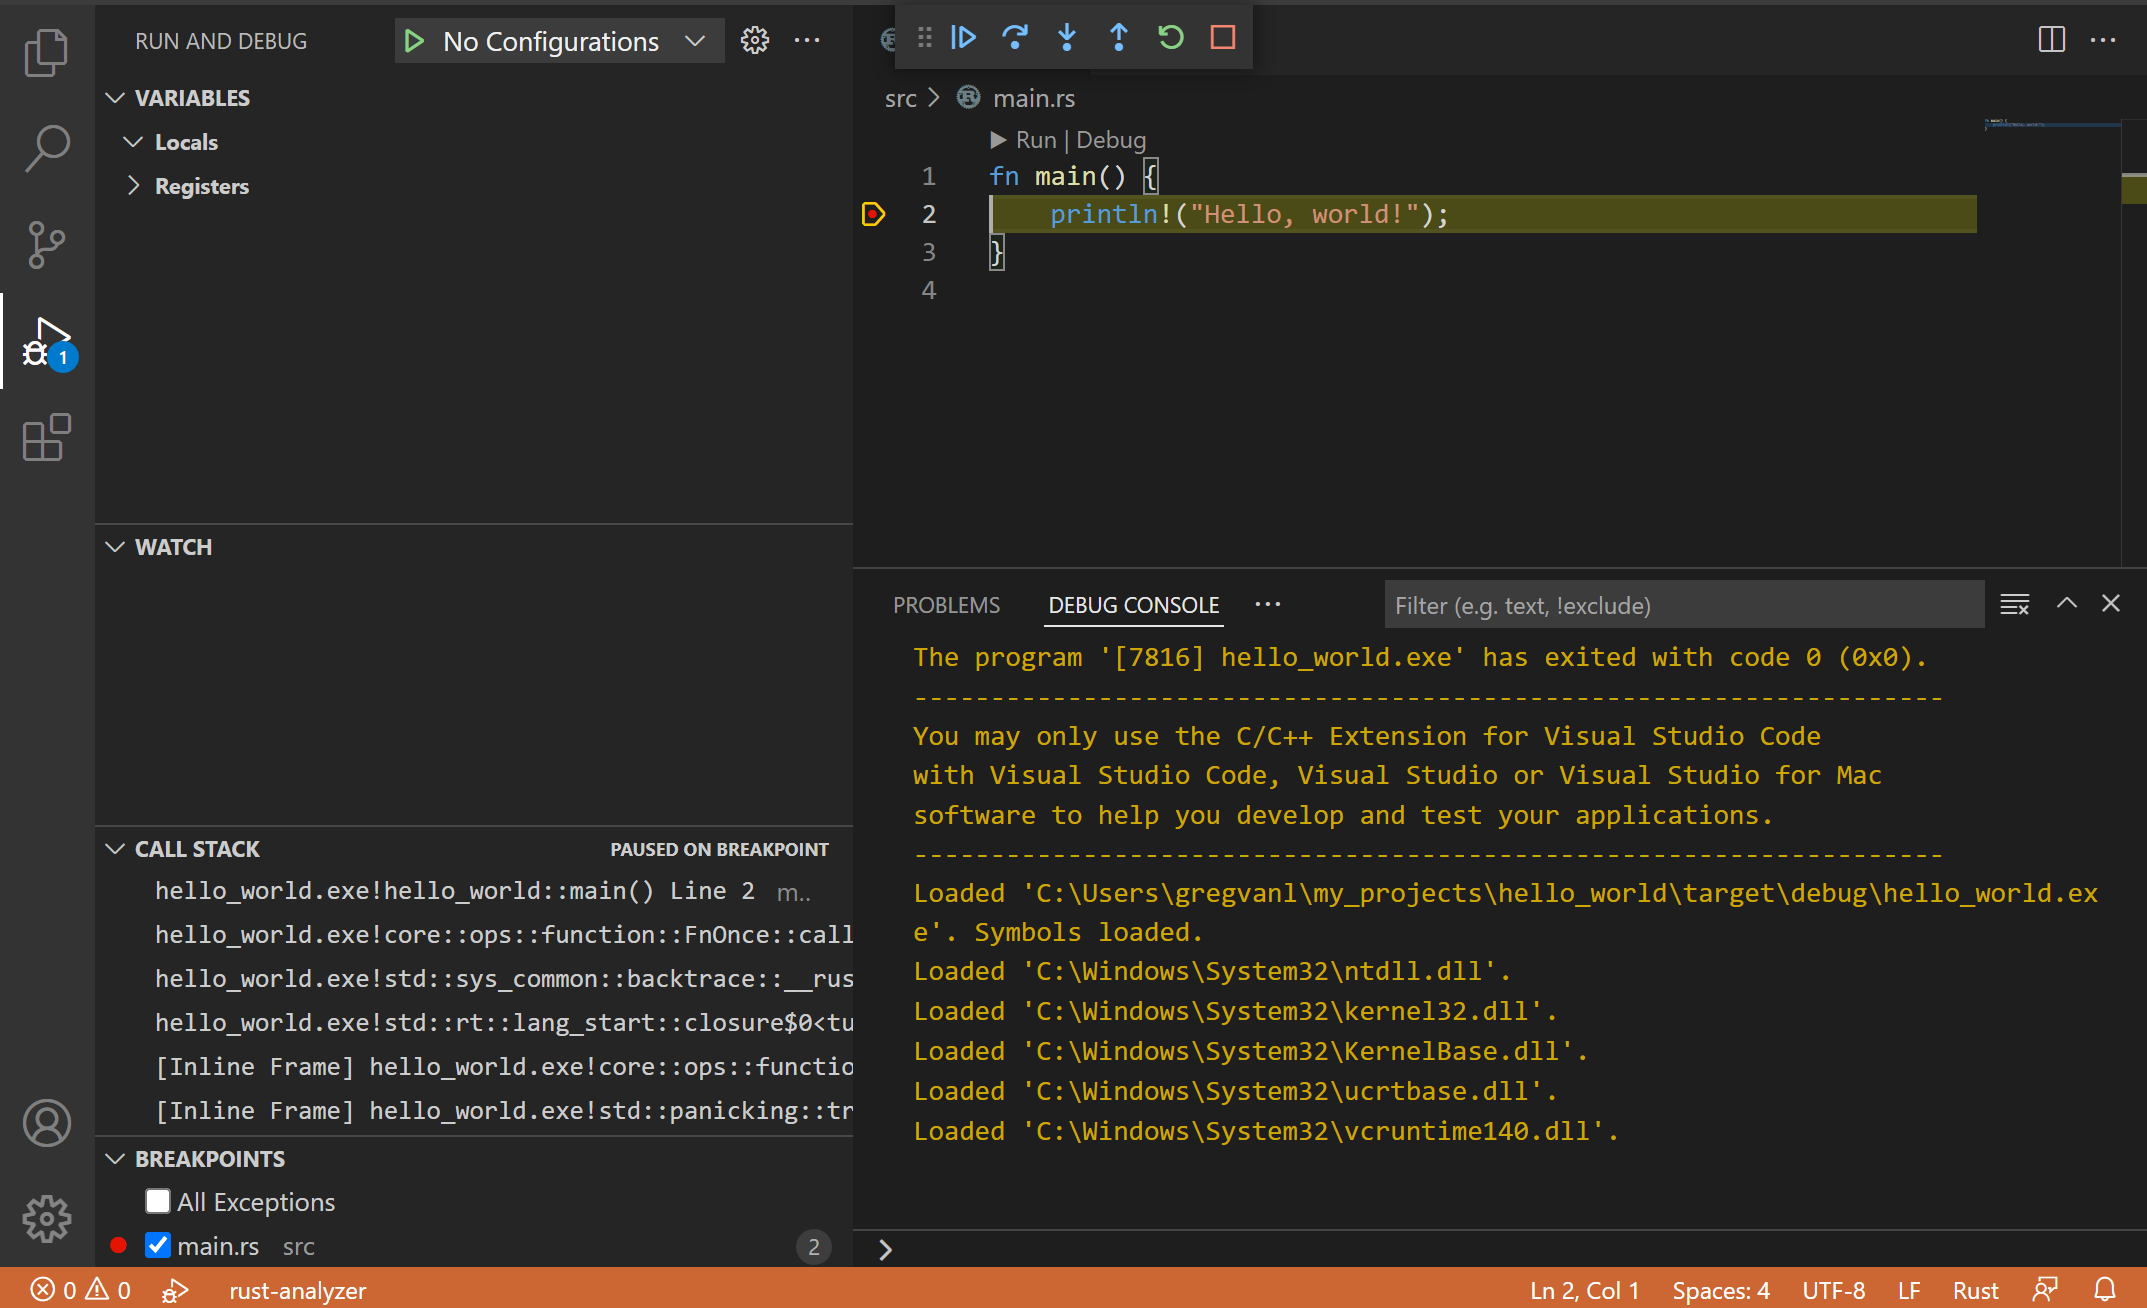
The rust-analyzer extension has basic debugging support via the Rust Analyzer: Debug command available in the Command Palette (⇧⌘P (Windows, Linux Ctrl+Shift+P)) and the Run|Debug CodeLens in the editor.
Let’s debug the Hello World program, we created earlier. First we will set a breakpoint in main.rs.
-
You’ll need to enable the setting Debug: Allow Breakpoints Everywhere, which you can find in the Settings editor (⌘, (Windows, Linux Ctrl+,)) by searching on ‘everywhere`.
-
Open
main.rsand click the left gutter in the editor to set a break point on theprintln!line. It should display as a red dot. -
To start debugging, use either the Rust Analyzer: Debug command or select the Debug CodeLens about
main().
Next steps
This has been a brief overview showing the rust-analyzer extension features within VS Code. For more information, see the details provided in the Rust Analyzer extension User Manual, including how to tune specific VS Code editor configurations.
To stay up to date on the latest features/bug fixes for the rust-analyzer extension, see the CHANGELOG. You can also try out new features and fixes by installing the rust-analyzer Pre-Release Version available in the Extensions view Install dropdown.
If you have any issues or feature requests, feel free to log them in the rust-analyzer extension GitHub repo.
If you’d like to learn more about VS Code, try these topics:
- Basic Editing — A quick introduction to the basics of the VS Code editor.
- Install an Extension — Learn about other extensions are available in the Marketplace.
- Code Navigation — Move quickly through your source code.
Common questions
Linker errors
If you see linker errors such as «error: linker link.exe not found» when you try to build your Rust program, you may be missing the necessary C/C++ toolset. Depending on your platform, you will need to install a toolset with a C/C++ linker to combine the Rust compiler output.
Windows
On Windows, you will need to also install Microsoft C++ Build Tools in order to get the C/C++ linker link.exe. Be sure to select the Desktop Development with C++ when running the Visual Studio installer.
Note: You can use the C++ toolset from Visual Studio Build Tools along with Visual Studio Code to compile, build, and verify any codebase as long as you also have a valid Visual Studio license (either Community, Pro, or Enterprise).
macOS
You may need to install the XCode toolset by running xcode-select --install in a terminal.
Linux
You may need to install the GCC toolset via the build-essential package by running sudo apt-get install build-essential in a terminal.
For further troubleshooting advice, refer to the Rust installation guide.
4/26/2022


