Содержание
- iperf3: error — failed to read /dev/urandom: Bad address #987
- Comments
- How to fix FAILED (status read failed (Too many links))
- The Reason for FAILED (status read failed (Too many links))
- How to Fix FAILED (status read failed (Too many links))
- Fix 1: Change USB Cable
- Fix 2: Use USB 2.0 Ports
- Fix 3: Use the Google ADB Drivers
- Fix 4: Use CMD over PowerShell
- Fix 5: Launch CMD inside ADB Directory
- Fix 6: Re-Verify the Files
- Fix 7: Check device is A/B partition or Single-A partition
- Verify if your device is A/B or A Slot:
- If A/B Device
- If A only Device
- Fix 8: Restart, But After a Pause
- About Chief Editor
- Sadique Hassan
- unable to open /dev/kfd read-write: Bad address #1205
- Comments
iperf3: error — failed to read /dev/urandom: Bad address #987
The text was updated successfully, but these errors were encountered:
Can you give a little more detail about the hardware platform and Linux distribution?
The root file system was compiled by myself with buildroot, the tag is 2020.02.
Target Architecture (ARM (little endian)) —>
Target Binary Format (ELF) —>
Target Architecture Variant (arm926t) —>
[ ] Enable VFP extension support
Target ABI (EABI) —>
Floating point strategy (Soft float) —>
ARM instruction set (ARM) —>
Hi,
I got the same error when I restarted the traffic after 21.5 hrs run
Hmmmmm. I acknowledge the problem, but I’ve never seen anything like this before.
Have the same one problem
dd if=/dev/urandom count=1
gives some random bytes
Fun, I’ve just stumbled upon this as well (iperf3 version 3.9, debian bookworm) after running a few times.
The error means that the region is not writable, so basically the temporary file could not be written to, and indeed I just had filled up /tmp (testing some tcpdump option filled /tmp between two tests)
truncate is not enough to guarantee the data can be written. I didn’t test but I believe fallocate should return an error if space is not available, otherwise you can just plain write 128k to the file before attempting to read urandom, or you could just assume an EFAULT error here means /tmp is full and print a better error message.
In this case (128K) I don’t see the point of using a mmap-backed memory buffer for this, but I assume for bigger buffers or very constrained environment that can work better than straight malloc, so I’ll leave a solution to you now the problem has been identified 🙂
Источник
How to fix FAILED (status read failed (Too many links))
In this guide, we will show you how to fix the FAILED (status read failed (Too many links)). Owing to the Android open source ecosystem, there are a plethora of tweaks that you could try out. Once you have unlocked the device’s bootloader, you could then flash custom ROMs, custom recoveries like TWRP or LineageOS Recovery. This in turn will allow you to flash ZIP and IMG files, take Nandroid backups, wipe device partitions, Fix recovery bootloop, etc.
Along the same lines, you could also root your device, via TWRP or by patching the stock boot.img file and then flash it via Fastboot Commands. However, while executing all these steps, a few issues are imminent. In this regard, the FAILED (status read failed (Too many links)) error seems to be among the oldest as well as the most frequently occurring ones.
So whereas there are a few errors that come with a well-defined error message, unfortunately, this one doesn’t belong to this category. The status lead failed and too many links don’t help the end-user in understanding the underlying error. But fret not. If you are facing this issue, then this guide is here to help you out. Today we will list out various methods to fix this issue once and for all. Follow along.
Table of Contents
The Reason for FAILED (status read failed (Too many links))
More often than not, the issue seems to occur while flashing a custom recovery such as TWRP. In that case, you may get an error message along the following lines:
C:android-sdk-windowsplatform-tools>fastboot flash recovery recovery.img
sending ‘recovery’ (4760 KB)…
OKAY [ 0.456s]
writing ‘recovery’…
FAILED (status read failed (Too many links))
finished. total time: 0.551s
Likewise, it could also take the shape of the following message:
fastboot boot twrp.img
Sending ‘boot.img’ (65536 KB) OKAY [ 1.541s]
Booting FAILED (Status read failed (Too many links))
fastboot: error: Command failed
One thing evident from the above two cases is the fact that it isn’t related to A/B partition devices only. This is because in the first instance, the user has an A partition device as he is flashing the recovery to the recovery partition. Then in the second instance, the user has an A/B partition device- since he/she is sending the twrp image to the boot partition (A/B devices don’t have a dedicated recovery partition, all is taken care of by the boot partition).

Furthermore, most of the time this issue occurs while booting/flashing a custom recovery. In some rare cases, it might be due to the execution of some other ADB and Fastboot commands or flashing custom binaries. With this, you might have got a perfect knowledge behind the reason for this error, let’s now turn our attention towards the more important part- how to rectify it. Well, here are the different methods that will help you fix the FAILED (status read failed (Too many links)) issue. Follow along.
How to Fix FAILED (status read failed (Too many links))
There isn’t any universal fix for the aforementioned issue. You will have to try out all the below mentioned workarounds until you are able to achieve success. We will start off with some basic fixes followed by the advanced ones. Fortunately, in this case, the basic fix should do its job more often than not.
Fix 1: Change USB Cable

The most common cause for this error is using an old, unofficial, or teared up USB cable. Therefore, we would request you to switch over to the official USB cable and retry with the steps. On the other hand, some users were facing the issue with the official USB cable itself. Hence they switched over to another cable and the error was fixed. So to summarize this fix you should try using a different USB cable and this might fix the FAILED (status read failed (Too many links)) issue.
Fix 2: Use USB 2.0 Ports

USB 3.0 Ports are known to give out too many issues. In most instances, they break down the ADB or Fastboot communication between your device and PC. Therefore, we would suggest you switch over to the USB 2.0 ports and carry out the desired task. Check if it fixes the FAILED (status read failed (Too many links)) issue.
Fix 3: Use the Google ADB Drivers

Well, as of now there are a plethora of ADB and Fastboot tools available across the web. However, just to claim that they are among the smallest in size, they tend to compromise on the performance front. As a result, they leave out a few important files. Hence we would suggest you don’t install any such tools but rather stick with the one provided by Google. Here is the link for the same: Download Google’s Android SDK Platform Tools.
Fix 4: Use CMD over PowerShell

I personally keep a safe distance from PowerShell and always stick with Comand Prompt. The reason being the fact that the former makes the matter more complicated than it should have been. For example, you might have to use a period and forward slash before executing any ADB and Fastboot command. Not doing so throws up an error or two. So it’s always good to use the Command prompt window only.
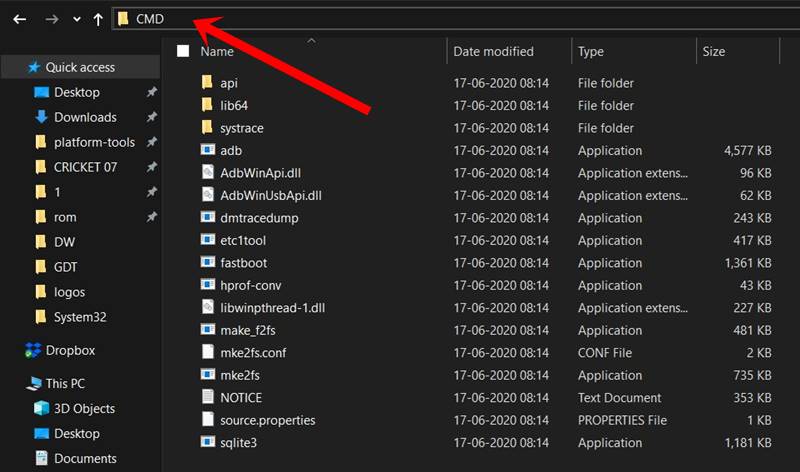
Fix 5: Launch CMD inside ADB Directory
Another pretty important point worth discussing is that you should always launch the Command Prompt inside the directory where the ADB and Fastboot binaries are present. Upon installing the Android SDK Platform Tools, you will get the platform-tools folder. And you should always launch the CMD window inside that directory only. There are two different methods for the same, let’s check them out:
The shorter method: Just head over to the platform-tools folder, type in CMD in the address bar, and hit Enter. This will launch the Command Prompt inside the ADB directory itself.
The longer method: This involves manually instructing the Command prompt to head over to the ADB directory. So search for CMD from the Start menu. Then type in CD followed by the installation directory of the platform-tools folder.
- For example, in my case, the platform-tools folder is installed in
- So the command in my case transforms to:

Fix 6: Re-Verify the Files
- First off, make sure that the file that you are about to flash is built for your specific device only, and not for its Mini, Pro, Ultra, Max, or Plus variants!
- Furthermore, all the files that you need to flash should be placed inside the platform-tools folder. This is the folder where all the Fastboot and ADB files are present.
- Likewise, make sure that you have named these files correctly. Most instructions across the web would list out the commands such as fastboot boot twrp.img or fastboot flash recovery twrp.img. However, when you download the file, it wouldn’t be simply named as twrp. Rather, apart from the twrp keyword, it would also have the version number and device code with itself.
- So it is recommended that you rename the recovery to twrp and then execute the above command. Or you could keep the name as it and then modify the command accordingly. Talking about the commands, this brings us to our next fix for the FAILED (status read failed (Too many links)) issue.
- [GUIDE] Flash ROMs/Magisk/TWRP/Kernels on A/B Partition Devices
- Everything About Magisk- Manager, Modules and More
- Best Magisk Modules of 2020 [PART-1]
- Fix Magisk Module Bootloop without TWRP Recovery
Fix 7: Check device is A/B partition or Single-A partition
As already mentioned, A/B devices don’t have the recovery partition and hence you cannot directly flash TWRP inside it. You will have to make use of the boot partition to boot up the recovery as a temporary installation and then permanently flash it right from TWRP itself. On the other hand, single partition devices still have the recovery partition and they could directly flash TWRP. In short, here’s what needs to be done:

Verify if your device is A/B or A Slot:
The easiest way of doing so is to download the Treble Check – Treble Compatibility Checking App from Play Store. Then launch the app and verify the number of slots for your device.
If A/B Device
If your device comes out to be an A/B partition, then you will have to use the following command:
Once booted to TWRP, you could then flash the TWRP ZIP for the permanent installation.
If A only Device
if your device just has a single slot, then you could directly flash it as follows:
In both these cases, make sure that you have renamed the recovery to twrp, transferred it to the platform-tools folder and the command is being executed right from the CMD window that has been launched inside the platform-tools folder only. Keep these points in mind and see if the FAILED (status read failed (Too many links)) issue has been fixed or not.
Fix 8: Restart, But After a Pause
Well, I can’t really explain the logical explanation behind this fix, but in my 8+ years of custom development experiences, there have been a few instances where a complete restart of the entire process was able to fix the underlying issue. As far as this issue is concerned, completely shut down the PC. Likewise, then turn off your device and keep it in that mode for around 5 mins. Then power both the devices on.
- Connect your device to PC with USB debugging enabled.
- Then head over to the platform-tools folder, type in CMD in the address bar, and hit Enter. This will launch the Command Prompt.
- Type in the following command in the CMD window to boot your device to Fastboot Mode
 Motorola Fastboot Mode
With this, we conclude the guide on how to fix the FAILED (status read failed (Too many links)) issue. We have shared eight different fixes for the same, any one or a combination of two or more should work out for you. Do let us know in the comments which of the above-listed methods spelled out success in your case.
About Chief Editor
Sadique Hassan
A technical geek by birth, he always has a keen interest in the Android platform right since the birth of the HTC Dream. The open-source environment always seems to intrigue him with the plethora of options available at his fingertips. “MBA by profession, blogger by choice!”
Источник
unable to open /dev/kfd read-write: Bad address #1205
after Fresh install of ubuntu 20.04 and ROCm 3.7 latest until today. when verifying installing throw
/opt/rocm/bin/rocminfo
/opt/rocm/opencl/bin/clinfo
the first command dont work even when removed the (base) of conda
my specs , acer315-42G Ryzen 5 3500u with Vega 8 , radeon 540x
The text was updated successfully, but these errors were encountered:
GFX8 GPUs
«Polaris 11» chips, such as on the AMD Radeon RX 570 and Radeon Pro WX 4100
«Polaris 12» chips, such as on the AMD Radeon RX 550 and Radeon RX 540
it have the same technology of desktop GPU , doest it mean that ROCm does not support Mobile GPUs?
Offically, there are a few cards can be supported by ROCm. And gfx803 (RX580) need PCIe Atomic support with both CPU and MotherBoard.
You can use dmesg to see whether there is error for kfd
From https://github.com/RadeonOpenCompute/ROCT-Thunk-Interface/blob/master/src/topology.c
6987 is Polaris12, 15d8 is Raven.And both cards can be added by kfd.
https://github.com/radeonopencompute/rocm said both cards are not ful support or support offically. Need amd to check these errors.
@xuhuisheng do you think it maybe a case of switchable 2 GPUs , Vega 8 and 540X , also is there somewhere i can add the device details manually so rocm be able to identify it like the topology.c file u mentioned
my Lexa GPU Notes
I have a DeskMini A300W (ASRock) with Ryzen 5 2400g and Pop!OS 20.04 (almost exactly Ubuntu). Was looking forward to using this or maybe upgrading to the new 4000 APUs as a sort of «power embedded» platform with good value that might be useful for robotics with OpenCL or HIP.
Spent multiple days trying to figure out similar issues. After resolving several previous problems such as BIOS settings and other things, currently stuck on «/dev/kfd: Bad address». Quite possibly just not supported on my motherboard/CPU, but I am not sure because the documentation seems ambiguous.
I have come to the conclusion that trying to use AMD for this type of parallel processing was a mistake. I’m just going to rent a cheap Nvidia GPU online and probably eventually buy a new computer. WiGig probably means I don’t need the portability of the APU machines anyway.
I have come to the conclusion that trying to use AMD for this type of parallel processing was a mistake. I’m just going to rent a cheap Nvidia GPU online and probably eventually buy a new computer. WiGig probably means I don’t need the portability of the APU machines anyway.
@runvnc That’s not a feasible solution. A software bug should NEVER be bypassed using hardware change; for obvious reasons. Fixing the bug takes a few lines of code (if you’re in the development of the said software), changing hardware empties your pocket pretty quick for the solution you propose. And for the most of us; it’s once in a decade opportunity to buy new hardware.
here is what I run into:
$ lsb_release -a No LSB modules are available. Distributor ID: Ubuntu Description: Ubuntu 20.04.1 LTS Release: 20.04 Codename: focal oberstet@oberstet-MS-7A40:
Источник
The issue might be with how you are using realloc. realloc(s.buffer, s.size + BUFSIZE) == NULL is not the correct way to use realloc. The return value of realloc taken from here is:
Upon successful completion with a size not equal to 0, realloc() shall
return a pointer to the (possibly moved) allocated space. If size is
0, either a null pointer or a unique pointer that can be successfully
passed to free() shall be returned. If there is not enough available
memory, realloc() shall return a null pointer and
set errno to ENOMEM.
The key part is the fact that realloc can move the allocated space and its data. So you cannot just check whether the return value is NULL. You want to do something more along the lines of:
void *tmp = realloc(s.buffer, s.size + BUFSIZE);
if (tmp == NULL) {
  perror("out of memory...");
  free(s.buffer);  // Release the memory to avoid a leak
  close(fd);
  return error;
}
s.buffer = tmp;
In other words update the pointer with the return value of realloc. If the data was not moved, realloc returns the memory addressed passed into it; if it was moved, realloc will return a new address.
Update:
Another issue that you probably aren’t experiencing is how you handle the return value of read. If read returned less than was requested than you won’t realloc more memory and further reads might read past the buffer. You might not experiencing this right now as it will only show if read doesn’t fail and doesn’t read less than the requested amount of data. A solution, which includes the realloc fix is below:
int nread = 0;
long total_read = 0;
int space_remaining = BUFSIZE;

while ((nread = read(fd, s.buffer + total_read, space_remaining)) != 0) {
        if (nread == -1) {
            if (errno == EINTR) {
                perror("error EINTR");
                continue;
            } else {
                perror("read() failed in read_file");
                close(fd);
                return error;
            }
        } else {
            printf("%ld %ld %dn", total_read, s.size, nread);
            total_read += nread;
            s.size = total_read;
            space_remaining -= nread;
            if (space_remaining == 0) {
                void *tmp = realloc(s.buffer, s.size + BUFSIZE);
                if (tmp == NULL) {
                    perror("out of memory...");
                    free(s.buffer);  // Release the memory to avoid a leak
                    close(fd);
                    return error;
                }
                s.buffer = tmp;
                space_remaining = BUFSIZE;
            }
        }
    }
The variable space_remaining is used to keep track how much space is left in the buffer. This is the amount read and is reset when the buffer’s size is increased. Since you are realloc-ing more space you do not want to do the typical (BUFSIZE-total_read) pattern that has previously been suggested, although this is the typical pattern one sees.
Again you won’t see this problem if read always returns the requested amount of data.
Fun, I’ve just stumbled upon this as well (iperf3 version 3.9, debian bookworm) after running a few times.
openat(AT_FDCWD, "/dev/urandom", O_RDONLY) = 3
read(3, "f356325354c331&>20262p I207+q^244[204Gbi231261213]!255355350M"..., 37) = 37
...
openat(AT_FDCWD, "/tmp/iperf3.E7bDQO", O_RDWR|O_CREAT|O_EXCL, 0600) = 6
unlink("/tmp/iperf3.E7bDQO")            = 0
ftruncate(6, 131072)                    = 0
mmap(NULL, 131072, PROT_READ|PROT_WRITE, MAP_PRIVATE, 6, 0) = 0x7f2766a5c000
read(3, 0x7f2766a5c000, 131072)         = -1 EFAULT (Bad address)
The error means that the region is not writable, so basically the temporary file could not be written to, and indeed I just had filled up /tmp (testing some tcpdump option filled /tmp between two tests)
truncate is not enough to guarantee the data can be written. I didn’t test but I believe fallocate should return an error if space is not available, otherwise you can just plain write 128k to the file before attempting to read urandom, or you could just assume an EFAULT error here means /tmp is full and print a better error message.
In this case (128K) I don’t see the point of using a mmap-backed memory buffer for this, but I assume for bigger buffers or very constrained environment that can work better than straight malloc, so I’ll leave a solution to you now the problem has been identified 
I have a file that is roughly 30GB. I am using,
awk ' $1 <= 2000 ' myfile.txt >> myfile_new.txt
But, I get this error after a while —
awk: read error (Bad address)
I guess this is because the file is too large. Is there any way to get past this? How else can I do this?
What I need to do is quite simple, I have to extract all records that have value less than 2000 in a column.
![]()
asked Oct 18, 2013 at 18:44
![]()
8
You’re probably using mawk, which has some optimisations that can result in errors like this when dealing with particularly large data. gawk will likely not have these issues when running it in the same way.
answered Nov 16, 2013 at 2:37
![]()
Chris DownChris Down
118k22 gold badges261 silver badges259 bronze badges
2
Perl can do it,
#!/bin/env perl
use strict;
use warnings;
while(my $ln=<>){ my($f) = split(/s/,$ln); if($f<=2000) { print $ln;} }
So can Python and Ruby,
#!/bin/env ruby
while( rec = gets() ) do
  fld = rec.match(/^(w+)s/)
  if(fld[1].to_i <= 2000) then puts rec end
end
answered Oct 18, 2013 at 20:44
![]()
ChuckCottrillChuckCottrill
1,0071 gold badge11 silver badges15 bronze badges
2
Whole Output:
Enter RTTTL filename: take_on_me.rtttl

Error while opening the file.

: Bad address
Error:
Error while opening the file.

: Bad address
Compiler command:
gcc main.c
File Contents:
TakeOnMe:d=4,o=4,b=160:8f#5,8f#5,8f#5,8d5,8p,8b,8p,8e5,8p,8e5,8p,8e5,8g#5,8g#5,8a5,8b5,8a5,8a5,8a5,8e5,8p,8d5,8p,8f#5,8p,8f#5,8p,8f#5,8e5,8e5,8f#5,8e5,8f#5,8f#5,8f#5,8d5,8p,8b,8p,8e5,8p,8e5,8p,8e5,8g#5,8g#5,8a5,8b5,8a5,8a5,8a5,8e5,8p,8d5,8p,8f#5,8p,8f#5,8p,8f#5,8e5,8e5
Code:
#include <stdio.h>

#include <stdlib.h>

#include <unistd.h>

#include <string.h>


int main(void){

	// Define Basic Variables

	int i = 0, song_name_length = 0, d = 0, o = 0, b = 0, colon_count = 0, start_of_song = 0, look_point = 0;

	char *input, file_contents[1000], ch;

	// Ask User For The Name Of The File

	printf("Enter RTTTL filename: ");

	scanf("%s", input);

	// Start Reading File

	FILE *midi = fopen(input, "r");

	if (midi == NULL){

	        perror("Error while opening the file.n");

	        exit(EXIT_FAILURE);

	}

	// Output File And Check For Identifiers

	fscanf(midi, "%s", file_contents);

	fclose(midi);

	midi = fopen(input, "r");

	while((ch = fgetc(midi)) != EOF){

	        i++;

	        if (ch == ':'){

	                colon_count++;

	                if (colon_count > 1){

	                        start_of_song = i+1;

	                }

	                if (song_name_length == 0){

	                        song_name_length = i-1;

	                        printf("Track Name: %.*sn", song_name_length, file_contents);

	                } else {

	                        printf("Track Info: Song Data Start @: %d Duration = %d Octave = %d BPM = %d nNotes:n",start_of_song, d, o , b);

	                }

	        } else {

	                if (colon_count == 1){

	                        if (ch == 'd'){

	                                d = file_contents[i+1]-48;

	                        } else if (ch == 'o'){

	                                o = file_contents[i+1]-48;

	                        } else if (ch == 'b'){

	                                b = ((file_contents[i+1]-48)*100) + ((file_contents[i+2]-48)*10) + (file_contents[i+3]-48);

	                        }

	                } else {

	                        printf("%c", ch);

	                }

	        }

	}

	ch = 0;

	printf("n");

	i = 0;

	while (i < strlen(file_contents)){

	        if((ch = file_contents[i]) == 0){

	                if (58 < ch > 47){

	                        d = ch-48;

	                }

	        } else {

			fclose(midi);

			return 0;

		}

		i++;

	}

	fclose(midi);

	return 0;

}
Наши новости: |
 Информационная доска
Данный раздел предназначен для обсуждения, а также решения технических проблем связанных с серверной частью. Обсуждения касательно игровых клиентов ведутся здесь.
1. Во время создания новой темы аккуратно оформляйте её, не допускайте грамматических ошибок.
2. Описывая проблему старайтесь, как можно больше рассказать о ней, а так же о действиях с сервером после которых она возникла, по возможности подкрепите информацию логами.
3. Если вопрос касается проблемы в работе сервера, то обязательно прикрепляйте список плагинов (введите в консоли
сервера
: meta list и amxx plugins), настройки server.cfg, логи. Так же указывайте операционную систему, версию HLDS (введите к консоли сервера: version) и где хостится сервер.
Длинную информацию скрывайте под спойлер. 
|
|

|
quece |
Сообщение
|
|
|
Решил откатится с 6132 на 5787, и сейчас сервер не запускается Сама ошибка В debug.log добавляется к startline лишь -pidfile hlds.2761.pid Amxmodx отключил в метамод, да и всё оттуда убрал. В чем может быть причина? Использовался сервер по ссылке Jony CLEAR HLDS 5787 Отредактировал: quece, — 21.7.2014, 7:11 |
|
|
|


|
OneNum |
Сообщение
|
|
Стаж: 8 лет 8 месяцев Сообщений: 68 |
Была такая проблема,не хватало WAD текстур. |
|
|
|


|
quece |
Сообщение
|
|
Стаж: 8 лет 7 месяцев Сообщений: 51 |
Цитата(OneNum @ 21.7.2014, 7:13) Была такая проблема,не хватало WAD текстур. в папке valve?)) Отредактировал: quece, — 21.7.2014, 7:18 |
|
|
|

|
quece |
Сообщение
|
|
Стаж: 8 лет 7 месяцев Сообщений: 51 |
Auto detecting CPU Console initialized. |
|
|
|
|
quece |
Сообщение
|
|
Стаж: 8 лет 7 месяцев Сообщений: 51 |
тему можно закрыть, сделал откат на 6132…осталось решить проблему со стрельбой |
|
|
|
0 пользователей и 1 гостей читают эту тему:
![]()
Как исправить ошибку «Failed to load resource error», возникающую в WordPress?
- Почему возникает эта ошибка?
- Исправляем ошибку «Failed to load resource error» в WordPress
- Замените недостающий ресурс
- Обновите файлы темы оформления или плагина
- Исправляем URL-адрес WordPress, чтобы избежать ошибки «Failed to load resource error»
Ошибка «Failed to load resource error» возникает, когда WordPress не может загрузить запрашиваемый файл.
Когда WordPress генерирует веб-страницу, в ее коде уже подключены некоторые файлы: изображения, скрипты, таблицы стилей и многое другое. Во время загрузки веб-страницы эти файлы загружаются браузером пользователя.
Если браузер не может загрузить файл, он отобразит веб-страницу без него. Кроме этого в консоли браузера появится уведомление об ошибке. Ее можно определить, используя инструменты разработчика.

Таким ресурсом может быть любой файл: изображение, скрипт JavaScript, таблица стилей CSS и т.д. Рядом с ошибкой может отображаться полезная для отладки информация. Например:
Вот несколько примеров:
- ERR_CONNECTION_REFUSED;
- Сервер ответил статусом 404 (не найдено);
- Сервер ответил статусом 500 (внутренняя ошибка сервера);
- :err_name_not_resolved.
Подобная ошибка возникает, когда в исходном коде сайта упоминается тот или иной файл, но браузер не может его загрузить.
Убедитесь, что ресурс, который не удается загрузить, действительно существует. Если отсутствующий ресурс – это изображение из публикации или со страницы блога, попробуйте найти его в библиотеке медиафайлов.

Если в библиотеке медиафайлов этот ресурс присутствует, попробуйте добавить его повторно, отредактировав публикацию или страницу. Если же в библиотеке медиафайлов ресурс недоступен, попробуйте загрузить его заново.
Иногда в библиотеке медиафайлов можно увидеть пустые блоки. В таком случае измените права доступа к файлу.
Если не удается загрузить плагин или файл темы оформления WordPress, то самый простой способ заменить его – переустановить расширение.
Чтобы отключить текущую тему оформления, перейдите в раздел панели администрирования «Внешний вид», «Темы».

Если на сайте доступна другая тема оформления, активируйте ее. Это отключит текущую тему оформления. После этого вы увидите, что ошибка устранена.
Если отсутствующим ресурсом является файл плагина, необходимо переустановите его.
Самая распространенная причина, по которой не удается загрузить ресурс – это неправильные настройки URL-адреса WordPress.
Чтобы исправить их, перейдите в раздел «Настройки», «Общие» и найдите параметры «Адрес WordPress (URL)» и «Адрес сайта (URL)».

Убедитесь, что оба URL-адреса одинаковые. Имейте в виду, что WordPress рассматривает URL-адреса с приставкой www и без приставки www как два разных адреса. Если на сайте установлен SSL-сертификат, то URL-адреса должны начинаться с https вместо http.
Не забудьте нажать кнопку «Сохранить изменения». Затем откройте сайт, чтобы убедиться, что возникшая ошибка успешно устранена.
Мы надеемся, что эта статья помогла вам исправить ошибку «Failed to load resource error», возникающую в WordPress.
Single node setup..
Since updating a few weeks ago I notice high I/O load on the server. I thought maybe a SMART extended is running or minio is healing and it will settle. But days passed and it’s still going crazy. I
## Expected Behavior
Minio should heal as normal and use «normal» system resources given there are plenty of resources and 4 disks.
Current Behavior
Running minio like this:
minio server --address :443 --certs-dir /minio/.minio/certs/ /minio/disk1 /minio/disk2 /minio/disk3 /minio/disk4
Where /minio/disk1-4 are dedicated ext4 partitions on physical drives 1-4.
The log shows 3 areas of concern:
1) It claims each of the disks has some corrupted files, example here refers to disk3 but the other disks also show up in the log
Error: Disk: /minio/disk3 returned file is corrupted
2) It claims not all disks are online
Error: Read failed. Insufficient number of disks online
But I believe they are:
Version: 2020-09-17T04:49:20Z
Network: 1/1 OK
Drives: 4/4 OK2.5 TiB Used, 11 Buckets, 24,270 Objects
4 drives online, 0 drives offline
3) It claims storage resources are insufficient
Error: Storage resources are insufficient for the read operation.
But I see plenty of RAM, space on the minio partitions and free inodes
Steps to Reproduce (for bugs)
minio server --address :443 --certs-dir /minio/.minio/certs/ /minio/disk1 /minio/disk2 /minio/disk3 /minio/disk4- Wait a few minutes then
df -ito verify there is space and inodes - Inspect system load in htop / glances. Load is normally < 1.0. Now it is > 4.0
- Inspect minio console log. Bitrot detection will start throwing errors.
- Run
mc admin info localto confirm all disk show online
Context
-
System has been in production for several years. I wonder if some schema has changed since it was originally provisioned and one of my minio updates went wrong somehow.
-
All 4 disks passed SMART short tests today.
-
minio OBD completed successfully and shows all green.

Regression
Your Environment
minio version RELEASE.2020-09-17T04-49-20Z
mc version RELEASE.2020-09-03T00-08-28Z
df -h
Filesystem            Size  Used Avail Use% Mounted on
udev                   16G     0   16G   0% /dev
tmpfs                 3.2G  1.2M  3.2G   1% /run
/dev/mapper/vg0-root   59G   37G   19G  67% /
tmpfs                  16G     0   16G   0% /dev/shm
tmpfs                 5.0M     0  5.0M   0% /run/lock
tmpfs                  16G     0   16G   0% /sys/fs/cgroup
/dev/sdc4             9.0T  1.6T  7.0T  19% /minio/disk3
/dev/sdb4             9.0T  1.6T  7.0T  18% /minio/disk2
/dev/sda4             9.0T  1.6T  7.0T  19% /minio/disk1
/dev/sdd4             9.0T  1.6T  7.0T  18% /minio/disk4
/dev/mapper/vg0-tmp    32G   49M   30G   1% /tmp
/dev/md0              2.0G  216M  1.7G  12% /boot
tmpfs                 3.2G     0  3.2G   0% /run/user/0
df -i
Filesystem              Inodes  IUsed     IFree IUse% Mounted on
udev                   4075107    578   4074529    1% /dev
tmpfs                  4083006    935   4082071    1% /run
/dev/mapper/vg0-root   3932160 158869   3773291    5% /
tmpfs                  4083006      1   4083005    1% /dev/shm
tmpfs                  4083006      3   4083003    1% /run/lock
tmpfs                  4083006     18   4082988    1% /sys/fs/cgroup
/dev/sdc4            303038464 546697 302491767    1% /minio/disk3
/dev/sdb4            303038464 478115 302560349    1% /minio/disk2
/dev/sda4            303038464 528954 302509510    1% /minio/disk1
/dev/sdd4            303038464 472993 302565471    1% /minio/disk4
/dev/mapper/vg0-tmp    2097152     24   2097128    1% /tmp
/dev/md0                131072    313    130759    1% /boot
tmpfs                  4083006     11   4082995    1% /run/user/0
free -mt
              total        used        free      shared  buff/cache   available
Mem:          31898         439       24114           1        7344       31056
Swap:         32767           0       32767
Total:        64666         439       56882
lsb_release -a
No LSB modules are available.
Distributor ID: Ubuntu
Description:    Ubuntu 18.04.5 LTS
uname -r
4.15.0-117-generic
Some fragments from the OBD json that may be relevant:
        "crawler": {
          "_": [
            {
              "key": "bitrotscan",
              "value": "off"
            }

        "compression": {
          "_": [
            {
              "key": "enable",
              "value": "off"
            },

        "backend": {
          "backendType": "Erasure",
          "onlineDisks": 4,
          "rrSCData": 2,
          "rrSCParity": 2,
          "standardSCData": 2,
          "standardSCParity": 2
        },
I can sanitize the whole thing and attach it if it helps.
Edit: This might be useful:
/mc admin config export local
region name=
storage_class standard= rrs=EC:2
# cache drives= exclude= expiry=90 quota=80 after=0 watermark_low=70 watermark_high=80 range=on
# compression enable=off extensions=.txt,.log,.csv,.json,.tar,.xml,.bin mime_types=text/*,application/json,application/xml
# etcd endpoints= path_prefix= coredns_path=/skydns client_cert= client_cert_key=
# identity_openid config_url= client_id= claim_name=policy claim_prefix= jwks_url= scopes=
# identity_ldap server_addr= sts_expiry=1h username_format= group_search_filter= group_name_attribute= group_search_base_dn= tls_skip_verify=off username_search_filter= username_search_base_dn= server_insecure=off server_starttls=off
# policy_opa url= auth_token=
# kms_vault endpoint= key_name= auth_type=approle auth_approle_id= auth_approle_secret= capath= key_version= namespace=
# kms_kes endpoint= key_name= cert_file= key_file= capath=
api requests_max=0 requests_deadline=10s ready_deadline=10s cors_allow_origin=* remote_transport_deadline=2h
crawler bitrotscan=off
# logger_webhook enable=off endpoint= auth_token=
# audit_webhook enable=off endpoint= auth_token=
# notify_webhook enable=off endpoint= auth_token= queue_limit=0 queue_dir= client_cert= client_key=
# notify_amqp enable=off url= exchange= exchange_type= routing_key= mandatory=off durable=off no_wait=off internal=off auto_deleted=off delivery_mode=0 queue_limit=0 queue_dir=
# notify_kafka enable=off topic= brokers= sasl_username= sasl_password= client_tls_cert= client_tls_key= tls_client_auth=0 sasl=off tls=off tls_skip_verify=off queue_limit=0 queue_dir= sasl_mechanism=plain version=
# notify_mqtt enable=off broker= topic= password= username= qos=0 keep_alive_interval=0s reconnect_interval=0s queue_dir= queue_limit=0
# notify_nats enable=off address= subject= username= password= token= tls=off tls_skip_verify=off cert_authority= client_cert= client_key= ping_interval=0 streaming=off streaming_async=off streaming_max_pub_acks_in_flight=0 streaming_cluster_id= queue_dir= queue_limit=0
# notify_nsq enable=off nsqd_address= topic= tls=off tls_skip_verify=off queue_dir= queue_limit=0
# notify_mysql enable=off format=namespace host= port= username= password= database= dsn_string= table= queue_dir= queue_limit=0
# notify_postgres enable=off format=namespace connection_string= table= host= port= username= password= database= queue_dir= queue_limit=0
# notify_elasticsearch enable=off url= format=namespace index= queue_dir= queue_limit=0 username= password=
# notify_redis enable=off format=namespace address= key= password= queue_dir= queue_limit=0
In case it matters: The partitions are LUKS encrypted but unlocked during preboot so minio can access them as soon as started. Running super stable for years until now.