-
#1
Hello,
I am having some issues getting the OS X installer to boot on my Fujitsu Lifebook Laptop.
I followed this guide to get where I am:
https://www.tonymacx86.com/threads/guide-booting-the-os-x-installer-on-laptops-with-clover.148093/
When I run “install_osx” from the Clover boot menu with “verbose”, I get the following:

Final few lines of the log:
Code:
Error allocating 0x99 pages at 0x0000000000100000 alloc type 2
End LoadKernelFromStream
ERROR!!! Load prelinked kernel with status 0x8000000000000009
Error loading kernel cache (0x9)
I searched the forums for these errors but couldn’t find much that seemed to pertain to my situation (or maybe I just didn’t see how it pertained). My one hunch is the errors might relate to DVMT-prealloc. Not sure though.
I apologize for my noobieness with all of this. I attached the zip from EFI as well as some pictures of my bios settings so hopefully some wonderful person can point out what I am doing wrong.
Thank you!
-
biosSettings.zip
6.9 MB
· Views: 390
-
CLOVER.zip
1.4 MB
· Views: 327
-
#3
Thank you for the reply. I believe I am currently using Rehabman’s version (v2.4 r4444).
I tried booting with -f UseKernelCache=No

And that seems to have gotten me past the loading kernel cache error, but now it hangs here:

-
#4
Hello,
I am having some issues getting the OS X installer to boot on my Fujitsu Lifebook Laptop.
I followed this guide to get where I am:
https://www.tonymacx86.com/threads/guide-booting-the-os-x-installer-on-laptops-with-clover.148093/When I run “install_osx” from the Clover boot menu with “verbose”, I get the following:

Final few lines of the log:
Code:
Error allocating 0x99 pages at 0x0000000000100000 alloc type 2
End LoadKernelFromStream
ERROR!!! Load prelinked kernel with status 0x8000000000000009
Error loading kernel cache (0x9)
I searched the forums for these errors but couldn’t find much that seemed to pertain to my situation (or maybe I just didn’t see how it pertained). My one hunch is the errors might relate to DVMT-prealloc. Not sure though.
I apologize for my noobieness with all of this. I attached the zip from EFI as well as some pictures of my bios settings so hopefully some wonderful person can point out what I am doing wrong.
Thank you!
You should not have both AptioMemoryFix.efi and OsxAptioFixDrv-64.efi.
Try each independently.
-
#5
Yes, it appears I missed the «or» while reading that part of the guide…
Should I boot using the default args (kext-dev-mode=1 dart=0 slide=0 nv_disable=1) or should I still boot with «-f UseKernelCache=No» as P1LGRIM suggested?
-
#6
I booted using the default args and tried the two files.
AptioMemoryFix.efi: same as earlier (Error loading kernel cache).
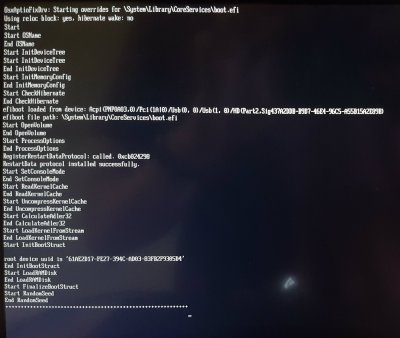
OsxAptioFixDrv-64.efi: Got past the kernel cache error, but still got stuck. Final few lines (log also attached):
Start LoadRAMDisk
End LoadRAMDisk
Start FinalizeBootStruct
Start RandomSeed
End RandomSeed
++++++++++++++++++++++++++++++++++++++++++++++++++++++++++++
Since the second one got farther, I assume that is the correct file to use. No idea what is causing this new problem though. ![]()
-

log.jpg
265.4 KB
· Views: 1,105
-
#7
I booted using the default args and tried the two files.
AptioMemoryFix.efi: same as earlier (Error loading kernel cache).
OsxAptioFixDrv-64.efi: Got past the kernel cache error, but still got stuck. Final few lines (log also attached):Since the second one got farther, I assume that is the correct file to use. No idea what is causing this new problem though.
«Problem Reporting» files are incomplete.
Read FAQ, «Problem Reporting» again. Carefully. Attach all requested files/output.
https://www.tonymacx86.com/threads/faq-read-first-laptop-frequent-questions.164990/
-
#8
Sorry about that. I only changed the one file, so I didn’t think I needed to upload the EFI again. Here it is.
Edit: Guess I also forgot to press F2 + F4 at Clover boot screen. Reading is hard. Hopefully this is what you need.
-
CLOVER-afterEdit.zip
1.4 MB
· Views: 256
Last edited: Aug 2, 2018
-
#9
I did quite a bit of searching for this error and found a few suggestions. I’ve tried:
- Putting RAM in different slots and using just one stick
- Different USB ports
- Different OsxAptioFix files (OsxAptioFix2Drv-64.efi and OsxAptioFix3Drv-64.efi)
- Double-checking and fiddling with bios settings
But none of that helped. Any ideas? Still stuck at where I was in post #6 with the same EFI/Clover folder as in the previous post.
-
CLOVER-afterEdit.zip
1.4 MB
· Views: 284
-
log.jpg
265.4 KB
· Views: 456

-
#10
Sorry about that. I only changed the one file, so I didn’t think I needed to upload the EFI again. Here it is.
Edit: Guess I also forgot to press F2 + F4 at Clover boot screen. Reading is hard. Hopefully this is what you need.
I did quite a bit of searching for this error and found a few suggestions. I’ve tried:
- Putting RAM in different slots and using just one stick
- Different USB ports
- Different OsxAptioFix files (OsxAptioFix2Drv-64.efi and OsxAptioFix3Drv-64.efi)
- Double-checking and fiddling with bios settings
But none of that helped. Any ideas? Still stuck at where I was in post #6 with the same EFI/Clover folder as in the previous post.
You should try AptioMemoryFix.efi.
Also, make sure you’re using a USB2 stick (and try all USB ports).
Clearing the HDD of all partitions (start clean) is also not a bad idea.
On 9/30/2017 at 3:12 AM, Egonaut said:
BEFORE TRYING THIS, DO THE OBVIOUS SOLUTION! REPLACE YOUR OPTIOFIX EFI FILE WITH VERSION 2, OR WITH VERSION 1.
ONLY PROCEED IF DOING THIS DOES NOT WORK.
Alright, so my first attempt at helping people that isn’t in a private discord. Hope this goes well.
No one has posted this as a direct solution to someone asking for help with this error, so I thought I’d be the one to share it.
I encountered this problem when I rebooted after making some minor changes and discovered I couldn’t boot back into the disk. All over the web, people keep suggesting clover-side tweaks and replacing kexts, and while they may solve the problem for some, absolutely nothing was working for me (and a few others), even when booting with no kernel cache at all.
No boot flags worked, no .efi files would solve it. Holding spacebar in clover, no change.
So, the solution ended up being system side, and not clover related. You needed to delete your prelinked kernel from the HDD and rebuild it. To do this, you just have to be able to get to your recovery drive or use an install USB that’ll give you access to the disk. Clover got me into my recovery drive just fine, another hint that it wasn’t related to clover — but regardless, whatever works for you.
After you’re in a terminal, type the following commands.
Df -hThis will list all of your volumes, make sure you’re targeting your installation drive.
If your volume has a space in the name, such as «Mac OS HS», you’ll need to format it as such: «Mac OS HS» — This is simply how the command line associates spaces.
touch /Volumes/[NAME HERE]/System/Library/Extensions && kextcache -u /Volumes/[NAME HERE]In my case, I replaced [NAME HERE] with my installation drive — «macOS 10.13».
Chances are, this command will give you the error «Child process [directory] has exited due to signal 10»
The line immediately after that will give you another bit of extremely important information that you need to take note of.
«Error 107 rebuilding /System/Library/PrelinkedKernels/prelinkedkernel»
That directory is what we’re going to be targeting to fix our system.
So, time to nuke it.
rm -rf [location to /prelinkedkernel/prelinkedkernel]MAKE SURE YOU DOUBLE CHECK IT IS EXACTLY WHAT WAS OUTPUT WHEN YOU TRIED THE COMMAND ABOVE.
IMPORTANT: YOU MAY RECEIVE A READ ONLY ERROR! DO NOT PANIC.
I’ve done this on multiple machines and it really is hit or miss whether or not this will appear. Regardless, the solution is simple. The following code tag only applies to if you encounter this issue.
Fsck

mount -uw /

RE-ENTER THE FOLLOWING COMMAND! You need a more specific location now.

rm -rf /Volumes/[NAME]/System/Library/PrelinkedKernels/prelinkedkernel

touch /Volumes/[NAME]/System/Library/Extensions && kextcache -u /Volumes/[Name]

Now you should be receiving "/Volumes/[NAME] locked; waiting for lock."
This is a good thing. Wait a few seconds, you'll receive "Lock acquired; proceeding."
After that, you'll be back at -bash-3.2#, and it will appear as if nothing happened.
Again, this is expected.
For people who didn’t have to use the Fsck command, simply type the following and receive the usual «Waiting for lock; Lock received» response.
touch /Volumes/[NAMEHERE]/System/Library/Extensions && kextcache -u /Volumes/[NAME HERE]Now, use your up arrow on the keyboard to re-enter this command. If nothing happens, you’re golden. If it detects kexts with invalid signatures, that’s still okay — but for future reference, don’t go the ##### approach/philosophy of installing kexts to your system drive. Take this as a warning.
Go ahead and reboot, and start your installation just like normal. You’ll now get past the 0x1 error. Congratulations!
If you get hung up anywhere, go back to clover and add “-f” to the boot flags, then boot again.
You should make it back to your desktop with no damage whatsoever. Like nothing ever happened!
Now, as for what causes this, I honestly have no idea. All I know is when you have a working system, make some kind of modication/tweak/installation that HS doesn’t agree with, you can possibly get this error on some systems. It’s rare, but exists, and unfortunately this is the only way I’ve been able to get past it. It’s not too much work, so don’t be too intimidated. You’ll have your system back in no time.
If you’d like some personalized 1-on-1 support, read my signature and contact me that way. I’m more than happy to help, or at the very least take some time out of my day to analyze your issue and give my thoughts. Thanks for reading my first guide, I’m hoping to publish some more fixes to make High Sierra as painless as possible for every user.
You’re awesome Man
My problem is resolved after reading your post. I already spend 2 days to fix the issue.
I also lost my hope to resolve the issue and decided to install the complete installation.
Now finally checked your post and read the instructions and resolved my issue.
I was getting prohibit icon during the boot. That was happened when i used kext tool and suddenly my system turnoff.
After turn on my system i was not able to boot my MAC OS.
Thanks a lot to save my time. Thanks …

I am building my first Hackintosh using Mojave 10.14.5. I used the vanilla guide as recommended on this subreddit. I am seeing errors after the Clover bootloader and before the Mojave install begins. The verbose messages read:
Start UncompressKernelCache
End UncompressKernelCache
ERROR!!! Uncompress prelinked kernel
ERROR!!! Load prelinked kernel with status 0x8000000000000007
Error loading kernel cache (0x7)
My specs are:
CPU: Core i5-9400F
GPU:Sapphire RX 580 Pulse 8GB
Motherboard/Laptop model:Gigabyte Z390 M GAMING
What guide/tool followed: Vanilla for Coffee Lake https://hackintosh.gitbook.io/-r-hackintosh-vanilla-desktop-guide/ I also used Install Disk Creator, the latest version of Clover, and Clover Configurator
What part I got an issue with: Clover bootloader into Mojave installer
What files/config I am using: recommendations from Vanilla guide
Extra Info: The CPU does not have a iGPU, but it should still work through the dGPU based on other posts. My build only has USB 3.0 and higher. I adjusted the motherboard BIOs as recommended from the vanilla guide. My SSD is not formatted yet.
Thank you for any assistance.
EDIT: I solved the problem by removing AptioMemoryFix-64.efi and adding OsxAptioFixDiv-64.efi. This could be because of the motherboard or the CPU. I also updated the BIOS on the motherboard from F4 to F6 (for support of 9th generation Intel CPUs; the motherboard ships with an outdated BIOS). Also, I did not have to include NoVPAJpeg.kext (formerly needed for CPUs lacking an internal GPU). The OS install worked fine.
New issue
Have a question about this project? Sign up for a free GitHub account to open an issue and contact its maintainers and the community.
By clicking “Sign up for GitHub”, you agree to our terms of service and
privacy statement. We’ll occasionally send you account related emails.
Already on GitHub?
Sign in
to your account
Closed
graysham opened this issue
Feb 21, 2019
· 11 comments
Closed
Kernel cache crash
#5
graysham opened this issue
Feb 21, 2019
· 11 comments
Comments
![]()
Have seen this mentioned in the troubleshooting section of the readme but with no further info. I have followed the guide letter for letter, but install crashes on boot with this eroor or occasionally seed related error. Have tried various versions of Aptio fix with no joy, have also tried unibeaat Uefi or legacy boot version as well all have crashed out the same way. Any further info anyone can offer..
![]()
Hey @graysham, I also face this error from time to time, I lately switched from OsxAptioFixDrv to OsxAptioFix2Drv I had the impression the error occurs less frequently then. To pass this error I need to restart multiple times — so my advice is to keep trying restart until it passes with showing a uuid. Also try restarts with power off. I don’t know what causes the kernel cache to crash, I noticed little system changes like hardware or Bios-settings can cause this error, but it also occurs from cold-boot too.
![]()
Hi thanks for the response, does this continue to be an issue after install or is it just leading up to install?
![]()
sorry didn’t mean to close the issue!
![]()
This continue to be an issue after install too, but it doesn’t occur often and if it most passes after the first or second restart. But finding a permanent solution would be nice! With OsxAptioFixDrv more restarts were required if I remember correctly. But I guess you tried all OsxAptioFixDrv versions? What is your clover version?
![]()
Clover I have tried the newest one and whatever version is currently bundled with unibeast. I have tried every version of aptiofix I can find and have either hit kernel
Cache error or seed related error thus far with no successful boots into install. Have removed ram apart from two in slots 1 and 3. Removed all drives except target and made sure it’s only in the gray sata slot.
![]()
Do you have exactly the same mainboard? Which version is your Bios? I will update working bios settings soon, maybe you can check out yours?
![]()
I have the normal p8p67 as opposed to the pro, bios version 3602, however have seen people who have successfully set up with this motherboard following your guide. Bios settings I have looked at yours and other guides; disabling Bluetooth, usb 3.0
![]()
Have just tried 10 reboots in a row, stuck at load prelinked kernel with status 0x800000000009
Error loading kernel cache (0x9)
That’s with Aptiofix2
![]()
Using aptiofix3 I get past kernelcache 90% of the time and hit randomseed error, any tips on that one? I have tried mapping my ram through smbios, does not seemed to have helped.
![]()
Do you use the config.plist from the repo? What SMBios do you use? iMac17,1 Intel Core i7 6700K @ 4GHz is working good for me.
![]()
I have yes used the config.plist, also using 17.1 smbios, May have to look at swapping for another motherboard
2 participants
![]()
![]()
After I ran the macOS Sierra installer to start installation, my 2010 Macbook Pro wouldn’t start anymore. It would get to the grey startup screen, flash the Apple logo for a second, and then switch to a crossed circle, and periodically restart that sequence.

I got into verbose mode by starting my computer with Cmd+V and saw error messages like:
efiboot loaded from device: Acpi(PNP0A03,0)/Pci(1F12)/SATA(0,0)/HD(Part3,Sig4B75...)
efiboot file path: SystemLibraryCoreServicesboot.efi
ERROR!!! Prelinked kernel corrupted
ERROR!!! Load prelinked kernel with status 0x000000000000001b
Error loading kernel cache (0x1b)
Error loading kernel cache (0x1b)
...
How do I get my computer back on track?
asked Sep 22, 2016 at 5:25
![]()
3
It’s still absolutely possible to boot from the recovery partition by pressing Cmd+R. This starts a stripped-down version of your current OS that’s able to connect to the Internet, perform some manipulations, and reinstall itself. I don’t know of a way to recover from this specific error without reinstalling an OS, though I speculate that grabbing the /System/Library/Kernels/kernel file from a healthy Mac and putting it on the computer could help recover.
Since I’ll be reinstalling an OS anyway, I might as well install Sierra for real. From recovery, it’s possible to run the Sierra-bundled createinstallmedia program to create an installer on a thumb drive or SD card:
"/Volumes/Macintosh HD/Applications/Install macOS Sierra.app/Contents/Resources/createinstallmedia" --volume "/Volumes/disposablethumbdrive" --applicationpath "/Volumes/Macintosh HD/Applications/Install macOS Sierra.app"
This puts a Sierra installer on the volume disposablethumbrdivre (erasing whatever it contained before) that can (probably) be used, instead of reinstalling El Capitan. This process is documented in more details on other sites.
answered Sep 22, 2016 at 5:30
![]()
zneakzneak
2,8765 gold badges30 silver badges41 bronze badges
Try to remove the corrupted ‘prelinked kernel’ first, then rebuild the kextcache.
From the Recovery HD (putting your own volume’s name instead of «Macintosh HD») try those three commands in Terminal in succession (pressing ‘enter’ after each):
rm -f /Volumes/Macintosh HD/System/Library/PrelinkedKernels/prelinkedkernel
touch /Volumes/Macintosh HD/System/Library/Extensions
kextcache -u /Volumes/Macintosh HD
See also:
man kextcache
answered Mar 29, 2017 at 11:52
![]()
RedarmRedarm
4,5433 gold badges13 silver badges31 bronze badges
2
Guys just test your memory health, maybe one of them is not working well. That was my procedure and is working.
answered May 10, 2018 at 23:12
![]()
You must log in to answer this question.
Not the answer you’re looking for? Browse other questions tagged
.
Not the answer you’re looking for? Browse other questions tagged
.
For testing purposes, I have a VM in VirtualBox currently runnning macOS 10.12 Sierra. Now that macOS 10.13 High Sierra is in Beta, I wanted to upgrade my VM to this new release. However, this proved to be difficult with the usual ways. This blog post will describe how to upgrade a Sierra VM to High Sierra.
The problem preventing the upgrade appears to be the boot sequence in VirtualBox. It looks like the EFI implementation of VirtualBox does not honor the way macOS wants to select the startup disk/volume/startup script or in whatever way that is actually supposed to work. The result is that you can click through “Install macOS 10.13 Beta.app”, but after the restart the old system comes up as if nothing happened.
Follow these steps to get around this problem:
- Boot the VM normally in VirtualBox.
- Open “Install macOS 10.13 Beta.app”, click through until you get to “Restart”.
- As soon as the screen turns black, start to hammer the F12 key. Make sure your keyboard is grabbed by the VM.
- If you managed to hit F12 at the right time, the VirtualBox EFI should pop up. If the VM starts up normally, go back to step 2.
- Now use your arrow keys to select Boot Manager and hit Return, then launch the EFI Internal Shell from there.
- Inside the shell, type the following commands:
Shell> fs1:
FS1:> cd "macOS Install Data"
FS1:macOS Install Data> cd "Locked Files"
FS1:macOS Install DataLocked Files> cd "Boot Files"
FS1:macOS Install DataLocked FilesBoot Files> boot.efi
With the last command, the system should continue booting. After a short moment, the installer will turn up and begin to upgrade your system from macOS 10.12 Sierra to macOS 10.13 High Sierra. Now you will have to wait for the macOS Installer to finish, which may take a while.
In case VirtualBox crashes with “Guru Meditation: VERR_IEM_INSTR_NOT_IMPLEMENTED” on the login screen when booting the new system, update to the latest VirtualBox test build, which implements the missing instruction.
This post was inspired by another blog post documenting similar instructions on how to enter the macOS Recovery in VirtualBox. For completeness and archival purposes, you can use the following EFI commands to boot macOS Recovery:
Shell> fs2:
FS2:> cd com.apple.recovery.boot
FS2:com.apple.recovery.boot> boot.efi
Содержание
- raimue.blog
- 49 thoughts on “ Upgrading a VM from macOS 10.12 Sierra to macOS 10.13 High Sierra in VirtualBox ”
- Leave a Reply
- Welcome!
raimue.blog
For testing purposes, I have a VM in VirtualBox currently runnning macOS 10.12 Sierra. Now that macOS 10.13 High Sierra is in Beta, I wanted to upgrade my VM to this new release. However, this proved to be difficult with the usual ways. This blog post will describe how to upgrade a Sierra VM to High Sierra.
The problem preventing the upgrade appears to be the boot sequence in VirtualBox. It looks like the EFI implementation of VirtualBox does not honor the way macOS wants to select the startup disk/volume/startup script or in whatever way that is actually supposed to work. The result is that you can click through “Install macOS 10.13 Beta.app”, but after the restart the old system comes up as if nothing happened.
Follow these steps to get around this problem:
- Boot the VM normally in VirtualBox.
- Open “Install macOS 10.13 Beta.app”, click through until you get to “Restart”.
- As soon as the screen turns black, start to hammer the F12 key. Make sure your keyboard is grabbed by the VM.
- If you managed to hit F12 at the right time, the VirtualBox EFI should pop up. If the VM starts up normally, go back to step 2.
- Now use your arrow keys to select Boot Manager and hit Return, then launch the EFI Internal Shell from there.
- Inside the shell, type the following commands:
With the last command, the system should continue booting. After a short moment, the installer will turn up and begin to upgrade your system from macOS 10.12 Sierra to macOS 10.13 High Sierra. Now you will have to wait for the macOS Installer to finish, which may take a while.
In case VirtualBox crashes with “Guru Meditation: VERR_IEM_INSTR_NOT_IMPLEMENTED” on the login screen when booting the new system, update to the latest VirtualBox test build, which implements the missing instruction.
This post was inspired by another blog post documenting similar instructions on how to enter the macOS Recovery in VirtualBox. For completeness and archival purposes, you can use the following EFI commands to boot macOS Recovery:
49 thoughts on “ Upgrading a VM from macOS 10.12 Sierra to macOS 10.13 High Sierra in VirtualBox ”
I tried this (without success) and noted the following:
I had to hold fn-F8 to get into the boot manager.
Although using the latest test build of VBox (5.1.x revision 116680) I get this message after entering the commands:
Read error 0xe
Error loading kernel cache (0xe)
I am getting the same issue as Lars is with the VM ending in
”
Read error 0xe
Error loading kernel cache (0xe)
”
After I execute the commands listed above.
Any idea on the fix?
VirtualBox 5.1.22 r115126 (Qt5.6.2) on macOS 10.12.5 host
Same issue
Read error 0xe
Error loading kernel cache (0xe)
Same issue. Error loading kernel cache.
Sorry that I did not come back to your questions. VirtualBox seems unable to boot the new macOS High Sierra Beta after migrating to APFS and there is no progress in getting that implemented. Therefore I decided to switch to VMWare Fusion instead, which I do not regret at all.
Just a note to confirm that this is working perfectly for me: Virtualbox 5.1.26
Thanks!!
I tried using latests Virtual Box (5.1.28) and current high sierra public release.
Now, there is no Locked Files folder inside of macOS Install Data, so i am not able to to boot to the new installer. Any clues?
Thanks for this blog entry. This was the smoking gun preventing me from upgrading my VirtualBox Sierra VM.
This worked great for me and allowed to create a new High Sierra VM. I was not upgrading. I had to make sure SSD was not enabled in VirtualBox preferences otherwise High Sierra would automatically want to migrate to APFS.
thanks a lot for your help
Great how-to, worked for me, but hitting F12 at the right time is very hard, so I made a snap-shot of the VM right before the reboot. That way you can avoid having to re-download the upgrade a couple of times.
I still needed to ram the F12 as fast as I could to make the EFI shell option appear.
`VBoxManage modifyvm OSX –bioslogodisplaytime 10000` –> Does not seem to work
I’m stuck here…
I had a OS X 10.12 on VMWare and started to upgraded to 10.13. When I cam back I saw the blue screen (boot menu). And failed to use your instructions, since there is no fs1 reachable in the internal shell. fs0 and blk0 to blk3. And it seems they are empty! What can I do here?
These instructions were written for VirtualBox and macOS 10.13 Developer Beta before APFS became mandatory. As far as I know, the VirtualBox EFI BIOS still does not support APFS. Personally I switched to VMWare Fusion due to this.
One thing you could try in VIrtualBox is to remove the checkbox on “Solid-state drive” in the storage settings of the VM. Then the High Sierra installer should no longer try to upgrade the disk to APFS, but leave it as HFS.
Following these steps, a message appears when run boot.efi –> “does prinf works??” and back to command line.
after that I type reboot and nothing happens, I’m in the same version.
I have the same problem as Pedro – “does printf works. ” and hangs…Any Idea what to do?
-I manually downloaded the combo update package 10.13.3 from Apple and launched it in the VM.
-The first part of update completed successfully, than it asked for restart.
-I restarted, entered the VirtualBox EFI Shell and launched boot.efi manually from the indicated path.
-After some work, message appears “macOS could not be installed on your computer – The path […]OSInstall.mpkg appears to be missing or damaged” (e.g. https://user-images.githubusercontent.com/192271/27255121-5811f2b4-538f-11e7-8117-9401bc9a7a80.png)
-I pressed Restart and the VM rebooted to High Sierra 10.13 (no update).
I think we are close to target, but some details are still missing to complete the update successfully.
Yes Yes Yes, thank, works perfectly.
first try I got kernel error like others. Tried second time and it worked don’t know what exaclty the reason for it. thanks
This was the solution I needed to upgrade from high sierra 10.13 to 10.13.4 using Virtual Box 5.2.8
Worked great! Thanks
I found the solution to “does printf works”
You can boot from instalation disk without shell, just open “boot from file” and find boot.efi on instalation disk.
@Babak Vandad: Did you see any error codes in the output? If so, was one of them ID10T?
The error
“Read error 0xe
Error loading kernel cache (0xe)”
can be solved by upgrading to the latest version of the Virtual box.
Thanks! This worked for me on VirtualBox going from 10.12 to 10.13 not in the Beta.
Thank you. Worked like a charm.
Thank you. It work with VirtualBox 5.2.8
Thank you!
It works, even it’s not worked from the first attempt.
The main cause of the fault was an old version of virtual box. With new Virtual Box (v 5.2.10) all goes well
My way of reaching 10.13.4 of Mac OS Sierra (probably you need last because of Xcode requirements)
upgrade Virtual Box to 5.2.10
do MacOs Recover
do Upgrade -> F2 …
I got this working.
Virtual Box – 5.2.12
Shell> fs1:
FS1:> cd “macOS Install Data”
FS1:macOS Install Data> cd “Locked Files”
FS1:macOS Install DataLocked Files> cd “Boot Files”
FS1:macOS Install DataLocked FilesBoot Files> boot.efi
Every time I tried the above I could not get it to work and I received the error – error loading kernel cache 0x9 VirtualBox.
I did a bit of research and others were having the same issue, however, no one could get it to work.
What I did then was the following
Ran the update, reboot the machine and F12’ed into the boot manager.
I turned off the Virtual Machine and closed VBox
I then tried the following.
Opened CMD as admin and ran the following commands, these were the same commands needed when originally installed the Mac onto Vbox
VBoxManage.exe modifyvm “Mac” –cpuidset 00000001 000306a9 04100800 7fbae3ff bfebfbff
VBoxManage setextradata “Mac” “VBoxInternal/Devices/efi/0/Config/DmiSystemProduct” “MacBookPro11,3”
VBoxManage setextradata “Mac” “VBoxInternal/Devices/efi/0/Config/DmiSystemVersion” “1.0”
VBoxManage setextradata “Mac” “VBoxInternal/Devices/efi/0/Config/DmiBoardProduct” “Mac-2BD1B31983FE1663”
VBoxManage setextradata “Mac” “VBoxInternal/Devices/smc/0/Config/DeviceKey” “ourhardworkbythesewordsguardedpleasedontsteal(c)AppleComputerInc”
VBoxManage setextradata “Mac” “VBoxInternal/Devices/smc/0/Config/GetKeyFromRealSMC” 1
Once the commands complete, I started the VM on VBox and F12’ed into boot managed and followed the same procedure
Shell> fs1:
FS1:> cd “macOS Install Data”
FS1:macOS Install Data> cd “Locked Files”
FS1:macOS Install DataLocked Files> cd “Boot Files”
FS1:macOS Install DataLocked FilesBoot Files> boot.efi
This time it worked and boot into the install/update – Took about 45 min +-
Hope that helps anyone.
I tried @Ghost’s solution and I got the “does printf work?” message.
Then I tried @Pedro’s “I found the solution to does printf work” and I *still* got the “does printf work?”
Then, I restored form snapshot, booted into the old version, started the install again, On bootup I tried Pedro’s solution to boot from file and this time it worked!
Thanks a lot to Ghost (2018-05-12 at 12:29) it worked for me with VB 5.2.12
The right first command is
VBoxManage.exe modifyvm “Mac” –cpuid-set 00000001 000306a9 04100800 7fbae3ff bfebfbff
Thanks a lot, worked with 10.14 beta. Not finished the installation yet, but the installer is up and running 👍🏼
I struggled to update macOS but finally worked it out.
You will find that any updates you apply will disappear after reboot as if they didn’t apply. You have to do the following as the update only completes after a reboot done in a certain way.
1) Download the update from the Apple website or apply from the App store.
2) When promoted to re-boot, press the F12 immediately after the restart, make sure the keyboard is captured in Virtualbox.
3) Press ESC key to stop the auto boot before the countdown finishes. You only have a few seconds to do this.
4) In the BOOT MANAGER option choose EFI Internal Shell.
5) Do the following at the shell command line:
fs1:
FS1:> cd “macOS Install Data”
FS1:macOS Install Data> cd “Locked Files”
FS1:macOS Install DataLocked Files> cd “Boot Files”
FS1:macOS Install DataLocked FilesBoot Files> boot.efi
The system should then boot and continue the install and you are done. It is very important that you do all this on the first re-boot after applying the initial update as the update files are copied ready to complete the process. Miss the first boot and you will have to start again.
worked exactly as you described it! thanks mate!
To update mac os follow the below steps. If you will try to upgrade it normaly it would be locked by Apple and you will get the old version that you are currently running. To upgrade use the bellow steps:
Follow these steps to get around this problem:
1. Boot the VM normally in VirtualBox.
2. Open “Install macOS 10.13 Beta.app”, click through until you get to “Restart”.
3. As soon as the screen turns black, start to hammer the window+r key. Make sure your keyboard is grabbed by the VM.
4. If you managed to hit window+r at the right time, the VirtualBox EFI should pop up. If the VM starts up normally, go back to step 2.
5. Now use your arrow keys to select Boot Manager and hit Return, then launch the EFI Internal Shell from there.
6. Inside the shell, type the following commands:
Shell> fs1:
FS1:> cd “macOS Install Data”
FS1:macOS Install Data> cd “Locked Files”
FS1:macOS Install DataLocked Files> cd “Boot Files”
FS1:macOS Install DataLocked FilesBoot Files> boot.efi
@Ghost’s solution worked for me. Thanks!
@kundan’s worked for me.
Thanks Rainer Müller. This worked for me just fine. I even was surprised didn’t get first “restart” .. system just restarted, I didn’t repeat from step (2) , I just restarted again and hit F12, followed procedure and in aout 90 minutes system rebooted to High Sierra … !! fantastic.
Updating from High Sierra 10.x to the latest update through the store, it won’t boot anymore.
tried F12 and the folder is not there, since it was a 2.6 Gb update.
Anyway to get this update to work?
Using VirtualBox 5.2.18. I had High Sierra 10.13.4 installed and working well, but 10.13.6 would not install from the App Store. I found this post when searching, and the steps listed worked first time. Thanks for the post!
F12 just won’t work. Don’t know what I’m doing wrong… :/
Windows+R does nothing either. I guess @kundan meant HOST+F12 so i tried that (restarting the machine upon restart). I have to press ESC right after that to enter the boot menu but after launching boot.efi i end up getting a kernel cache error.
thank you @kundan this worked perfectly. F12 is the key that I used to get in.
Has anyone got this working with Mojave?
Im getting this error:
ERROR. Load prelinked with status 0x800000000000000e
Error loading kernel cache (0xe)
I tried to upgrade to Mojave from Sierra via the appstore and it crashed my partition. EFI manager did not recognize FS1 or FS2.
This is not working in VirtualBox 5.2.18. Reboots endlessly.
I was getting the Error. Load prelinked kernel with status 0x800000000000000e while trying to upgrade to Mojave MacOs on a VirtualBox virtual machine. Turns out I had the older USB 2 compatibility in the settings for VirtualBox.
If you run into this issue turn off the VM, go into VirtualBox settings USB and select USB 3.0 controller. Restart the VM and issue should be solved.
me stuck with 10.13.2
Upgrade to mojave by following the step above leaves with
ERROR. Load prelinked with status 0x800000000000000e
Error loading kernel cache (0xe)
Has anybody been able to upgrade to Mojave yet ?
This is great, you can also get to it from “Boot Maintenance” > “Boot From File” and navigating to the boot.ini visually if that’s easier.
I finally managed to get beyond “Error loading kernel cache (0xe)”.
The solution was to entirely delete the “macOS Install Data” Folder and simply restart the update in sierra.
But this folder isn’t to delete easily.
I did:
1. Boot into macOS Recovery Mode as describled in this blog post
2. Open a Termial (Menubar: Utilities->Terminal)
3. run “csrutil disable”
4. run “rm -rf “macOS Install Data”
5. run “csrutil enable”
reboot normally, run Mojave installer again, on first reboot follow the instructions in this blog post
Thanks for this post.
I tried it like described above.
First time i ran into
“Read error 0xe
Error loading kernel cache (0xe)”
But just tried it again and second time it worked.
Leave a Reply
This site uses Akismet to reduce spam. Learn how your comment data is processed.
Welcome!
This the personal blog of Rainer Müller, also known by his nickname raimue. This is the space where I publish what does not fit into a tweet.
Источник