-
#1
System asked for updates wich required a restart. Things have been working great for a month so I was optimistic.
But now I can’t get back in again. See attatchment.
This is a new thing to me and haven’t found a solution yet searching forums.
Currently on my iphone. I still have my install USB to reach terminal if this canhelp me?
-

4341CDD2-DC5D-41FC-BF89-F640C9A2B111.jpeg
655.7 KB
· Views: 2,664

-
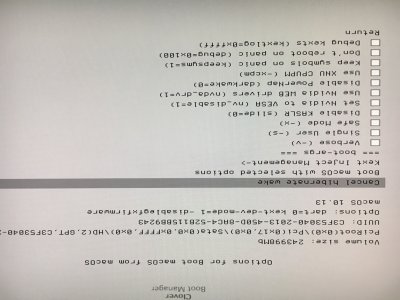
#2
Try booting with -f UseKernelCache=No
-
#3
Try booting with -f UseKernelCache=No
I tried that after seeing an older post of yours, but couldn’t find the option in the Clover menu.
-

55690F1C-83B9-474E-BA7D-03F8DF8756DC.jpeg
5.1 MB
· Views: 2,890
-
#5
Same message as screenshot in OP.
Do you think I have to update OsxAptioFix2Drv?
-
#7
Thank you @zakhej, just did it now.
I ended up having to erase HD and reinstall from my USB.
Updating apfs.efi probably would have prevented my lockout after the OS update.
-
#8
same problem. I solved thanks to the @zakhej suggestion!
-
#9
Me too, thank you very much !
Hello frustrated, what the below quoted code says is that #1, created a valid cache (that’s good) #2 when it tried to update the symlink to point to it that process failed.
to resolve that error, from ether single user mode ( -s boot mode) or the recovery partition run this list of commands.
(CAUTION: both of these modes by default will give you SUDO access to the system be very carful what you type.)
Hi!
Thanks, the links was useful. But I am not getting any solution. The tutorial there does not account for the fact that the user needs SUDO permissions.
I ran with sudo and here is what I get…(not what the OP of that tutorial gets)
This is so frustrating!!!
KernelCache ID: C79B2CECB584A805F14556B0A116AE60
symlink("../../../PrelinkedKernels/prelinkedkernel", "/Volumes/MAC SSD/System/Library/Caches/com.apple.kext.caches/Startup/kernelcache") failed 2 (No such file or directory)
iMac:~ b$
Help Please!
Thank you so much
P.S. I even re-ran without sudo code and I followed the steps and still had no luck.
<code>
fsck
mount —uw /
rm —rf «/Volumes/MAC SSD/System/Library/Prelinkedkernel/prelinkedkernel»
touch «/Volumes/MAC SSD/System/Library/Extensions» && kextcache -system-caches «/Volumes/MAC SSD/»
kextcache -u «/Volumes/MAC SSD/»
</code>
this list of commands is slightly different from the ones in the aforementioned guide, but they do basically the same thing.
the differences are that I took your Volume name to customize them, and that I forced the rebuild of your system cache after deleting the prelinkedcache. this has the effect of having the kext cache manager look for where these files are missing from and rebuilding them in my experience.
HBP
I like a moron got conned into installing High Sierra on my perfectly running hack. Impatient me installed High Sierra without letting my time machine backup finish, so I’m trying to recover it.
I made sure to upgrade Clover and my kexts (mostly fakesmc), the upgrade booted and installed fine, but now when I boot I get:
fs_get_inode_with_hint:7825: failed to load inode 8590481811 ret 22 Error loading kernel cache (0xe).
I’ve had that error before and google had some suggestions. Apparently in the process of upgrading it upgraded my FS to APFS and I didn’t want it to (I have apfs.efi in my drivers64UEFI folder).
I booted into the high sierra installer and deleted the kernelcache as advised by /u/corpnewt, ran a few kextutil commands, and no dice. I know Clover used to have an option to boot without caches, but that appears to be gone now.
I was needing to do a reinstall anyway, but thanks to APFS being case sensitive, and my Sierra install being insensitive, I’m able to see my old install’s files, but not copy them (at least that’s what I think).
Any suggestions? I have read/write access to the old install if I boot into the High Sierra installer for whatever.
Thanks.
New issue
Have a question about this project? Sign up for a free GitHub account to open an issue and contact its maintainers and the community.
By clicking “Sign up for GitHub”, you agree to our terms of service and
privacy statement. We’ll occasionally send you account related emails.
Already on GitHub?
Sign in
to your account
Closed
graysham opened this issue
Feb 21, 2019
· 11 comments
Closed
Kernel cache crash
#5
graysham opened this issue
Feb 21, 2019
· 11 comments
Comments
![]()
Have seen this mentioned in the troubleshooting section of the readme but with no further info. I have followed the guide letter for letter, but install crashes on boot with this eroor or occasionally seed related error. Have tried various versions of Aptio fix with no joy, have also tried unibeaat Uefi or legacy boot version as well all have crashed out the same way. Any further info anyone can offer..
![]()
Hey @graysham, I also face this error from time to time, I lately switched from OsxAptioFixDrv to OsxAptioFix2Drv I had the impression the error occurs less frequently then. To pass this error I need to restart multiple times — so my advice is to keep trying restart until it passes with showing a uuid. Also try restarts with power off. I don’t know what causes the kernel cache to crash, I noticed little system changes like hardware or Bios-settings can cause this error, but it also occurs from cold-boot too.
![]()
Hi thanks for the response, does this continue to be an issue after install or is it just leading up to install?
![]()
sorry didn’t mean to close the issue!
![]()
This continue to be an issue after install too, but it doesn’t occur often and if it most passes after the first or second restart. But finding a permanent solution would be nice! With OsxAptioFixDrv more restarts were required if I remember correctly. But I guess you tried all OsxAptioFixDrv versions? What is your clover version?
![]()
Clover I have tried the newest one and whatever version is currently bundled with unibeast. I have tried every version of aptiofix I can find and have either hit kernel
Cache error or seed related error thus far with no successful boots into install. Have removed ram apart from two in slots 1 and 3. Removed all drives except target and made sure it’s only in the gray sata slot.
![]()
Do you have exactly the same mainboard? Which version is your Bios? I will update working bios settings soon, maybe you can check out yours?
![]()
I have the normal p8p67 as opposed to the pro, bios version 3602, however have seen people who have successfully set up with this motherboard following your guide. Bios settings I have looked at yours and other guides; disabling Bluetooth, usb 3.0
![]()
Have just tried 10 reboots in a row, stuck at load prelinked kernel with status 0x800000000009
Error loading kernel cache (0x9)
That’s with Aptiofix2
![]()
Using aptiofix3 I get past kernelcache 90% of the time and hit randomseed error, any tips on that one? I have tried mapping my ram through smbios, does not seemed to have helped.
![]()
Do you use the config.plist from the repo? What SMBios do you use? iMac17,1 Intel Core i7 6700K @ 4GHz is working good for me.
![]()
I have yes used the config.plist, also using 17.1 smbios, May have to look at swapping for another motherboard
2 participants
![]()
![]()
For testing purposes, I have a VM in VirtualBox currently runnning macOS 10.12 Sierra. Now that macOS 10.13 High Sierra is in Beta, I wanted to upgrade my VM to this new release. However, this proved to be difficult with the usual ways. This blog post will describe how to upgrade a Sierra VM to High Sierra.
The problem preventing the upgrade appears to be the boot sequence in VirtualBox. It looks like the EFI implementation of VirtualBox does not honor the way macOS wants to select the startup disk/volume/startup script or in whatever way that is actually supposed to work. The result is that you can click through “Install macOS 10.13 Beta.app”, but after the restart the old system comes up as if nothing happened.
Follow these steps to get around this problem:
- Boot the VM normally in VirtualBox.
- Open “Install macOS 10.13 Beta.app”, click through until you get to “Restart”.
- As soon as the screen turns black, start to hammer the F12 key. Make sure your keyboard is grabbed by the VM.
- If you managed to hit F12 at the right time, the VirtualBox EFI should pop up. If the VM starts up normally, go back to step 2.
- Now use your arrow keys to select Boot Manager and hit Return, then launch the EFI Internal Shell from there.
- Inside the shell, type the following commands:
Shell> fs1:
FS1:> cd "macOS Install Data"
FS1:macOS Install Data> cd "Locked Files"
FS1:macOS Install DataLocked Files> cd "Boot Files"
FS1:macOS Install DataLocked FilesBoot Files> boot.efi
With the last command, the system should continue booting. After a short moment, the installer will turn up and begin to upgrade your system from macOS 10.12 Sierra to macOS 10.13 High Sierra. Now you will have to wait for the macOS Installer to finish, which may take a while.
In case VirtualBox crashes with “Guru Meditation: VERR_IEM_INSTR_NOT_IMPLEMENTED” on the login screen when booting the new system, update to the latest VirtualBox test build, which implements the missing instruction.
This post was inspired by another blog post documenting similar instructions on how to enter the macOS Recovery in VirtualBox. For completeness and archival purposes, you can use the following EFI commands to boot macOS Recovery:
Shell> fs2:
FS2:> cd com.apple.recovery.boot
FS2:com.apple.recovery.boot> boot.efi