Firstly, I’d like to commend you for looking at the standard error methods within PHP. Unfortunately error_log has some limitations as you found out.
This is a long answer, read on to find out about:
- Errors
- Logging the error directly vs
trigger_errorandset_error_handler - Where good errors go bad — Fatal Errors.
- Logging the error directly vs
- Exceptions
- SPL
- What to do with them?
- Code
- Setup
- Usage
TL;DR Use trigger_error for raising errors and set_error_handler for logging them.
1. Errors
When things don’t go as expected in your program, you will often want to raise an error so that someone or something is notified. An error is for a situation where the program may continue, but something noteworthy, possibly harmful or erroneous has occurred. At this point many people want to log the error immediately with their logging package of choice. I believe this is exactly the wrong thing to do. I recommend using trigger_error to raise the error so that it can be handled with a callback set by set_error_handler. Lets compare these options:
Logging the error directly
So, you have chosen your logging package. Now you are ready to spread the calls to your logger wherever an error occurs in your code. Lets look at a single call that you might make (I’ll use a similar logger to the one in Jack’s answer):
Logger::getLogger('standard')->error('Ouch, this hurts');
What do you need in place to run this code?
    Class:  Logger
    Method: getLogger
    Return: Object with method 'error'
These are the dependencies that are required to use this code. Everyone who wants to re-use this code will have to provide these dependencies. This means that a standard PHP configuration will no longer be sufficient to re-use your code. With the best case, using Dependency Injection you still require a logger object to be passed into all of your code that can emit an error.
Also, in addition to whatever the code is responsible for, it also has responsibility for logging the error. This goes against the Single Responsibility Principle.
We can see that logging the error directly is bad.
trigger_error to the rescue
PHP has a function called trigger_error which can be used to raise an error just like the standard functions do. The error levels that you use with it are defined in the error level constants. As a user you must use one of the user errors: E_USER_ERROR, E_USER_WARNING or the default value E_USER_NOTICE (other error levels are reserved for the standard functions etc.). Using a standard PHP function to raise the error allows the code to be re-used with any standard PHP installation! Our code is no longer responsible for logging the error (only making sure that it is raised).
Using trigger_error we only perform half of the error logging process (raising the error) and save the responsibility of responding to the error for the error handler which will be covered next.
Error Handler
We set a custom error handler with the set_error_handler function (see the code setup). This custom error handler replaces the standard PHP error handler that normally logs messages in the web server error log depending on the PHP configuration settings. We can still use this standard error handler by returning false within our custom error handler.
The custom error handler has a single responsibility: to respond to the error (including any logging that you want to do). Within the custom error handler you have full access to the system and can run any sort of logging that you want. Virtually any logger that uses the Observer design pattern will be ok (I’m not going to go into that as I believe it is of secondary importance). This should allow you to hook in new log observers to send the output to where you need it.
You have complete control to do what you like with the errors in a single maintainable part of your code. The error logging can now be changed quickly and easily from project to project or within a single project from page to page. Interestingly even @ suppressed errors make it to the custom error handler with an errno of 0 which if the error_reporting mask is respected should not be reported.
When Good Errors go Bad — Fatal Errors
It is not possible to continue from certain errors. The following error levels can not be handled from a custom error handler: E_ERROR, E_PARSE, E_CORE_ERROR, E_CORE_WARNING, E_COMPILE_ERROR, E_COMPILE_WARNING. When these sorts of errors are triggered by a standard function call the custom error handler is skipped and the system shuts down. This can be generated by:
call_this_function_that_obviously_does_not_exist_or_was_misspelt();
This is a serious mistake! It is impossible to recover from, and the system is about to shut down. Our only choice is to have a register_shutdown_function deal with the shutdown. However this function is executed whenever a script completes (successful, as well as unsuccessful). Using this and error_get_last some basic information can be logged (the system is almost shutdown at this point) when the last error was a fatal error. It can also be useful to send the correct status code and show an Internal Server Error type page of your choosing.
2. Exceptions
Exceptions can be dealt with in a very similar way to basic errors. Instead of trigger_error an exception will be thrown by your code (manually with throw new Exception or from a standard function call). Use set_exception_handler to define the callback you want to use to handle the exception with.
SPL
The Standard PHP Library (SPL) provides exceptions. They are my preferred way of raising exceptions because like trigger_error they are a standard part of PHP which does not introduce extra dependencies to your code.
What to do with them?
When an exception is thrown there are three choices that can be made:
- Catch it and fix it (the code then continues as if nothing bad happened).
- Catch it, append useful information and re-throw it.
- Let it bubble up to a higher level.
At each level of the stack these choices are made. Eventually once it bubbles up to the highest level the callback you set with set_exception_handler will be executed. This is where your logging code belongs (for the same reasons as the error handling) rather than spread throughout catch statements in your code.
3. Code
Setup
Error Handler
function errorHandler($errno , $errstr, $errfile, $errline, $errcontext)
{
    // Perform your error handling here, respecting error_reporting() and
    // $errno.  This is where you can log the errors.  The choice of logger
    // that you use is based on your preference.  So long as it implements
    // the observer pattern you will be able to easily add logging for any
    // type of output you desire.
}

$previousErrorHandler = set_error_handler('errorHandler');
Exception Handler
function exceptionHandler($e)
{
    // Perform your exception handling here.
}

$previousExceptionHandler = set_exception_handler('exceptionHandler');
Shutdown Function
function shutdownFunction()
{
    $err = error_get_last();

    if (!isset($err))
    {
        return;
    }

    $handledErrorTypes = array(
        E_USER_ERROR      => 'USER ERROR',
        E_ERROR           => 'ERROR',
        E_PARSE           => 'PARSE',
        E_CORE_ERROR      => 'CORE_ERROR',
        E_CORE_WARNING    => 'CORE_WARNING',
        E_COMPILE_ERROR   => 'COMPILE_ERROR',
        E_COMPILE_WARNING => 'COMPILE_WARNING');

    // If our last error wasn't fatal then this must be a normal shutdown.
    if (!isset($handledErrorTypes[$err['type']]))
    {
        return;
    }

    if (!headers_sent())
    {
        header('HTTP/1.1 500 Internal Server Error');
    }

    // Perform simple logging here.
}

register_shutdown_function('shutdownFunction');
Usage
Errors
// Notices.
trigger_error('Disk space is below 20%.', E_USER_NOTICE);
trigger_error('Disk space is below 20%.'); // Defaults to E_USER_NOTICE

// Warnings.
fopen('BAD_ARGS'); // E_WARNING fopen() expects at least 2 parameters, 1 given
trigger_error('Warning, this mode could be dangerous', E_USER_WARNING);

// Fatal Errors.
// This function has not been defined and so a fatal error is generated that
// does not reach the custom error handler.
this_function_has_not_been_defined();
// Execution does not reach this point.

// The following will be received by the custom error handler but is fatal.
trigger_error('Error in the code, cannot continue.', E_USER_ERROR);
// Execution does not reach this point.
Exceptions
Each of the three choices from before are listed here in a generic way, fix it, append to it and let it bubble up.
1 Fixable:
try
{
    $value = code_that_can_generate_exception();
}
catch (Exception $e)
{
    // We decide to emit a notice here (a warning could also be used).
    trigger_error('We had to use the default value instead of ' .
                  'code_that_can_generate_exception's', E_USER_NOTICE);
    // Fix the exception.
    $value = DEFAULT_VALUE;
}

// Code continues executing happily here.
2 Append:
Observe below how the code_that_can_generate_exception() does not know about $context. The catch block at this level has more information which it can append to the exception if it is useful by rethrowing it.
try
{
    $context = 'foo';
    $value = code_that_can_generate_exception();
}
catch (Exception $e)
{
    // Raise another exception, with extra information and the existing
    // exception set as the previous exception.
    throw new Exception('Context: ' . $context, 0, $e);
}
3 Let it bubble up:
// Don't catch it.
This will be a super long article, this subject is way more complex than it originally sounds. As always, I’ll be updating this soon with more info and possibly more examples as I figure it out better.
First off, you are not limited to just one logger in Symfony. However, the most popular is Monolog and Symfony has built in support making it easier to implement. So that is what I cover here.
One thing you might want to use a logger for is logging specific exceptions or errors to specific locations. You may also just want to log some value in your code for debugging purposes to see what is happening or being sent to a particular method/function. These are good use cases for logging.
While most errors/exceptions already display with lots of info in the browser, you may be like me and want certain things logged so you can review the entire pattern over a period of time.
The steps required to log sound sort of simple:
- Install the logger
- Configure the logger, decide how you want it to actually work. You don’t have to configure it with yaml. Doing so makes it so that you can autowire loggers instead of having to create a new object passing values in each time which will usually be the same values.
- Get the logger into your class some how( this can vary depending on whether it is a controller or a service/class)
- Use the logger to log something like an exception.
Installing
Your project might already have monolog logger installed since Symfony uses it by default to log everything. It doesn’t matter. Running the line below won’t hurt even if it is installed already.
To install the Monolog Logger you simply open your terminal, navigate to the root of your project and type the following :
composer require symfony/monolog-bundleThat is all. Now the monolog bundle is installed and you can use it after you configure it. And that is where the fun and confusion begin. Symfony uses Monolog so it may already be installed depending on how you created your project.
Handlers
First decide what types of loggers you want to use. You will probably see people using the stream type logger most often. This is really generic and is the default. I don’t like the stream handler because it just keeps growing infinitely.
I prefer storing different logs to different places. You can even store the logs in a database if you want. The good news is you can use more than one type of logger, and configure them however you want.
First off, here is a long list of handler types you can use with Monolog. This is going to be SUPER LONG. I’d rather just list it here than link to a file. This list is taken from the code on github
* Possible handler types and related configurations (brackets indicate optional params):
 *
 * - service:
 *   - id
 *
 * - stream:
 *   - path: string
 *   - [level]: level name or int value, defaults to DEBUG
 *   - [bubble]: bool, defaults to true
 *   - [file_permission]: int|null, defaults to null (0644)
 *   - [use_locking]: bool, defaults to false
 *
 * - console:
 *   - [verbosity_levels]: level => verbosity configuration
 *   - [level]: level name or int value, defaults to DEBUG
 *   - [bubble]: bool, defaults to true
 *   - [console_formatter_options]: array
 *
 * - firephp:
 *   - [level]: level name or int value, defaults to DEBUG
 *   - [bubble]: bool, defaults to true
 *
 * - browser_console:
 *   - [level]: level name or int value, defaults to DEBUG
 *   - [bubble]: bool, defaults to true
 *
 * - gelf:
 *   - publisher: {id: ...} or {hostname: ..., port: ..., chunk_size: ...}
 *   - [level]: level name or int value, defaults to DEBUG
 *   - [bubble]: bool, defaults to true
 *
 * - chromephp:
 *   - [level]: level name or int value, defaults to DEBUG
 *   - [bubble]: bool, defaults to true
 *
 * - rotating_file:
 *   - path: string
 *   - [max_files]: files to keep, defaults to zero (infinite)
 *   - [level]: level name or int value, defaults to DEBUG
 *   - [bubble]: bool, defaults to true
 *   - [file_permission]: string|null, defaults to null
 *   - [use_locking]: bool, defaults to false
 *   - [filename_format]: string, defaults to '{filename}-{date}'
 *   - [date_format]: string, defaults to 'Y-m-d'
 *
 * - mongo:
 *   - mongo:
 *      - id: optional if host is given
 *      - host: database host name, optional if id is given
 *      - [port]: defaults to 27017
 *      - [user]: database user name
 *      - pass: mandatory only if user is present
 *      - [database]: defaults to monolog
 *      - [collection]: defaults to logs
 *   - [level]: level name or int value, defaults to DEBUG
 *   - [bubble]: bool, defaults to true
 *
 * - elasticsearch:
 *   - elasticsearch:
 *      - id: optional if host is given
 *      - host: elastic search host name. Do not prepend with http(s)://
 *      - [port]: defaults to 9200
 *      - [transport]: transport protocol (http by default)
 *      - [user]: elastic search user name
 *      - [password]: elastic search user password
 *   - [index]: index name, defaults to monolog
 *   - [document_type]: document_type, defaults to logs
 *   - [level]: level name or int value, defaults to DEBUG
 *   - [bubble]: bool, defaults to true
 *
 * - redis:
 *   - redis:
 *      - id: optional if host is given
 *      - host: 127.0.0.1
 *      - password: null
 *      - port: 6379
 *      - database: 0
 *      - key_name: monolog_redis
 *
 * - predis:
 *   - redis:
 *      - id: optional if host is given
 *      - host: tcp://10.0.0.1:6379
 *      - key_name: monolog_redis
 *
 * - fingers_crossed:
 *   - handler: the wrapped handler's name
 *   - [action_level|activation_strategy]: minimum level or service id to activate the handler, defaults to WARNING
 *   - [excluded_404s]: if set, the strategy will be changed to one that excludes 404s coming from URLs matching any of those patterns
 *   - [excluded_http_codes]: if set, the strategy will be changed to one that excludes specific HTTP codes (requires Symfony Monolog bridge 4.1+)
 *   - [buffer_size]: defaults to 0 (unlimited)
 *   - [stop_buffering]: bool to disable buffering once the handler has been activated, defaults to true
 *   - [passthru_level]: level name or int value for messages to always flush, disabled by default
 *   - [bubble]: bool, defaults to true
 *
 * - filter:
 *   - handler: the wrapped handler's name
 *   - [accepted_levels]: list of levels to accept
 *   - [min_level]: minimum level to accept (only used if accepted_levels not specified)
 *   - [max_level]: maximum level to accept (only used if accepted_levels not specified)
 *   - [bubble]: bool, defaults to true
 *
 * - buffer:
 *   - handler: the wrapped handler's name
 *   - [buffer_size]: defaults to 0 (unlimited)
 *   - [level]: level name or int value, defaults to DEBUG
 *   - [bubble]: bool, defaults to true
 *   - [flush_on_overflow]: bool, defaults to false
 *
 * - deduplication:
 *   - handler: the wrapped handler's name
 *   - [store]: The file/path where the deduplication log should be kept, defaults to %kernel.cache_dir%/monolog_dedup_*
 *   - [deduplication_level]: The minimum logging level for log records to be looked at for deduplication purposes, defaults to ERROR
 *   - [time]: The period (in seconds) during which duplicate entries should be suppressed after a given log is sent through, defaults to 60
 *   - [bubble]: bool, defaults to true
 *
 * - group:
 *   - members: the wrapped handlers by name
 *   - [bubble]: bool, defaults to true
 *
 * - whatfailuregroup:
 *   - members: the wrapped handlers by name
 *   - [bubble]: bool, defaults to true
 *
 * - syslog:
 *   - ident: string
 *   - [facility]: defaults to 'user', use any of the LOG_* facility constant but without LOG_ prefix, e.g. user for LOG_USER
 *   - [logopts]: defaults to LOG_PID
 *   - [level]: level name or int value, defaults to DEBUG
 *   - [bubble]: bool, defaults to true
 *
 * - syslogudp:
 *   - host: syslogd host name
 *   - [port]: defaults to 514
 *   - [facility]: defaults to 'user', use any of the LOG_* facility constant but without LOG_ prefix, e.g. user for LOG_USER
 *   - [logopts]: defaults to LOG_PID
 *   - [level]: level name or int value, defaults to DEBUG
 *   - [bubble]: bool, defaults to true
 *   - [ident]: string, defaults to
 *
 * - swift_mailer:
 *   - from_email: optional if email_prototype is given
 *   - to_email: optional if email_prototype is given
 *   - subject: optional if email_prototype is given
 *   - [email_prototype]: service id of a message, defaults to a default message with the three fields above
 *   - [content_type]: optional if email_prototype is given, defaults to text/plain
 *   - [mailer]: mailer service, defaults to mailer
 *   - [level]: level name or int value, defaults to DEBUG
 *   - [bubble]: bool, defaults to true
 *   - [lazy]: use service lazy loading, bool, defaults to true
 *
 * - native_mailer:
 *   - from_email: string
 *   - to_email: string
 *   - subject: string
 *   - [level]: level name or int value, defaults to DEBUG
 *   - [bubble]: bool, defaults to true
 *   - [headers]: optional array containing additional headers: ['Foo: Bar', '...']
 *
 * - symfony_mailer:
 *   - from_email: optional if email_prototype is given
 *   - to_email: optional if email_prototype is given
 *   - subject: optional if email_prototype is given
 *   - [email_prototype]: service id of a message, defaults to a default message with the three fields above
 *   - [mailer]: mailer service id, defaults to mailer.mailer
 *   - [level]: level name or int value, defaults to DEBUG
 *   - [bubble]: bool, defaults to true
 *
 * - socket:
 *   - connection_string: string
 *   - [timeout]: float
 *   - [connection_timeout]: float
 *   - [persistent]: bool
 *   - [level]: level name or int value, defaults to DEBUG
 *   - [bubble]: bool, defaults to true
 *
 * - pushover:
 *   - token: pushover api token
 *   - user: user id or array of ids
 *   - [title]: optional title for messages, defaults to the server hostname
 *   - [level]: level name or int value, defaults to DEBUG
 *   - [bubble]: bool, defaults to true
 *   - [timeout]: float
 *   - [connection_timeout]: float
 *
 * - raven / sentry:
 *   - dsn: connection string
 *   - client_id: Raven client custom service id (optional)
 *   - [release]: release number of the application that will be attached to logs, defaults to null
 *   - [level]: level name or int value, defaults to DEBUG
 *   - [bubble]: bool, defaults to true
 *   - [auto_log_stacks]: bool, defaults to false
 *   - [environment]: string, default to null (no env specified)
 *
 * - sentry:
 *   - hub_id: Sentry hub custom service id (optional)
 *
 * - newrelic:
 *   - [level]: level name or int value, defaults to DEBUG
 *   - [bubble]: bool, defaults to true
 *   - [app_name]: new relic app name, default null
 *
 * - hipchat:
 *   - token: hipchat api token
 *   - room: room id or name
 *   - [notify]: defaults to false
 *   - [nickname]: defaults to Monolog
 *   - [level]: level name or int value, defaults to DEBUG
 *   - [bubble]: bool, defaults to true
 *   - [use_ssl]: bool, defaults to true
 *   - [message_format]: text or html, defaults to text
 *   - [host]: defaults to "api.hipchat.com"
 *   - [api_version]: defaults to "v1"
 *   - [timeout]: float
 *   - [connection_timeout]: float
 *
 * - slack:
 *   - token: slack api token
 *   - channel: channel name (with starting #)
 *   - [bot_name]: defaults to Monolog
 *   - [icon_emoji]: defaults to null
 *   - [use_attachment]: bool, defaults to true
 *   - [use_short_attachment]: bool, defaults to false
 *   - [include_extra]: bool, defaults to false
 *   - [level]: level name or int value, defaults to DEBUG
 *   - [bubble]: bool, defaults to true
 *   - [timeout]: float
 *   - [connection_timeout]: float
 *
 * - slackwebhook:
 *   - webhook_url: slack webhook URL
 *   - channel: channel name (with starting #)
 *   - [bot_name]: defaults to Monolog
 *   - [icon_emoji]: defaults to null
 *   - [use_attachment]: bool, defaults to true
 *   - [use_short_attachment]: bool, defaults to false
 *   - [include_extra]: bool, defaults to false
 *   - [level]: level name or int value, defaults to DEBUG
 *   - [bubble]: bool, defaults to true
 *
 * - slackbot:
 *   - team: slack team slug
 *   - token: slackbot token
 *   - channel: channel name (with starting #)
 *   - [level]: level name or int value, defaults to DEBUG
 *   - [bubble]: bool, defaults to true
 *
 * - cube:
 *   - url: http/udp url to the cube server
 *   - [level]: level name or int value, defaults to DEBUG
 *   - [bubble]: bool, defaults to true
 *
 * - amqp:
 *   - exchange: service id of an AMQPExchange
 *   - [exchange_name]: string, defaults to log
 *   - [level]: level name or int value, defaults to DEBUG
 *   - [bubble]: bool, defaults to true
 *
 * - error_log:
 *   - [message_type]: int 0 or 4, defaults to 0
 *   - [level]: level name or int value, defaults to DEBUG
 *   - [bubble]: bool, defaults to true
 *
 * - null:
 *   - [level]: level name or int value, defaults to DEBUG
 *   - [bubble]: bool, defaults to true
 *
 * - test:
 *   - [level]: level name or int value, defaults to DEBUG
 *   - [bubble]: bool, defaults to true
 *
 * - debug:
 *   - [level]: level name or int value, defaults to DEBUG
 *   - [bubble]: bool, defaults to true
 *
 * - loggly:
 *   - token: loggly api token
 *   - [level]: level name or int value, defaults to DEBUG
 *   - [bubble]: bool, defaults to true
 *   - [tags]: tag names
 *
 * - logentries:
 *   - token: logentries api token
 *   - [use_ssl]: whether or not SSL encryption should be used, defaults to true
 *   - [level]: level name or int value, defaults to DEBUG
 *   - [bubble]: bool, defaults to true
 *   - [timeout]: float
 *   - [connection_timeout]: float
 *
 * - insightops:
 *   - token: Log token supplied by InsightOps
 *   - region: Region where InsightOps account is hosted. Could be 'us' or 'eu'. Defaults to 'us'
 *   - [use_ssl]: whether or not SSL encryption should be used, defaults to true
 *   - [level]: level name or int value, defaults to DEBUG
 *   - [bubble]: bool, defaults to true
 *
 * - flowdock:
 *   - token: flowdock api token
 *   - source: human readable identifier of the application
 *   - from_email: email address of the message sender
 *   - [level]: level name or int value, defaults to DEBUG
 *   - [bubble]: bool, defaults to true
 *
 * - rollbar:
 *   - id: RollbarNotifier service (mandatory if token is not provided)
 *   - token: rollbar api token (skip if you provide a RollbarNotifier service id)
 *   - [config]: config values from https://github.com/rollbar/rollbar-php#configuration-reference
 *   - [level]: level name or int value, defaults to DEBUG
 *   - [bubble]: bool, defaults to true
 *
 * - server_log:
 *   - host: server log host. ex: 127.0.0.1:9911
 *   - [level]: level name or int value, defaults to DEBUG
 *   - [bubble]: bool, defaults to true
 *
 * All handlers can also be marked with `nested: true` to make sure they are never added explicitly to the stack
 *
 * @author Jordi Boggiano <j.boggiano@seld.be>
 * @author Christophe Coevoet <stof@notk.org>
That is a lot. Some are obvious, others you will need to google and figure out.
You can get as wild and creative as you want though.
Config location is everything
Where you place your configuration is very important. A little more hint here.
If you want to log just during Development you put the configuration inside the dev folder. /app/config/packages/dev/monolog.yaml
If you want to log only during production you put the configuration in the prod folder. /app/config/packages/prod/monolog.yaml
If you want to log in all environments you place the configuration in the main configuration folder. /app/config/packages/monolog.yaml
So if you want a specific logger that logs to a specific file to be available in all environments define it in the “packages” folder.

Here is the official documentation on how configuration works. Read it if you need more information.
An example configuration
Before getting too much further lets look at the default file I have for the configuration of monolog in the development environment.
#file name -> /config/packages/dev/monolog.yaml
monolog:
    handlers:
        main:
            type: rotating_file
            max_files: 3
            path: "%kernel.logs_dir%/%kernel.environment%.log"
            #path: php://stderr
            level: debug
            channels: ["!event"]
        # uncomment to get logging in your browser
        # you may have to allow bigger header sizes in your Web server configuration
        #firephp:
        #    type: firephp
        #    level: info
        #chromephp:
        #    type: chromephp
        #    level: info
        console:
            type: console
            process_psr_3_messages: false
            channels: ["!event", "!doctrine", "!console"]
Yours may differ, I have probably made changes to this and forgotten at this point or some changes in the Symfony code base may have happened.
After the word handlers you list each handler one tab level in. Each handler gets it’s own configuration settings. Basically you pick a handler from the long list above, then configure it properly for your needs.
For local development I prefer the rotating_file option. Since it seems like it is the only one that you can put a limit on the number of files.
The stream option just infinitely fills a single file forever and ever. Unless you have some sort of log rotator as mentioned in the documentation.
If you have the time and urge you could even store the messages in a database then create a user interface in your admin panel to view the messages then delete them. Otherwise you will need some way of limiting the logs and log sizes.
The documentation refers to this list as a stack of handlers. You can have as many as you want, like I mentioned above.
Here is the default production configuration taken from here in the Symfony docs.
# file name -> /config/packages/prod/monolog.yaml
monolog:
    handlers:
        filter_for_errors:
            type: fingers_crossed
            # if *one* log is error or higher, pass *all* to file_log
            action_level: error
            handler: file_log

        # now passed *all* logs, but only if one log is error or higher
        file_log:
            type: stream
            path: "%kernel.logs_dir%/%kernel.environment%.log"

        # still passed *all* logs, and still only logs error or higher
        syslog_handler:
            type: syslog
            level: error
The Symfony docs say the following about production logs.
In the
prodenvironment, logs are written to STDERR PHP stream, which works best in modern containerized applications deployed to servers without disk write permissions.
I’ll probably remove the line that logs locally to a file the file_log line. No need to infinitely fill a log I don’t read. You will need to decide what handlers you want in production and configure them.
Handler names
As you can see in the development configuration file above, there is a handler named “main”. You can give your handlers any name you want, but you need to tell Symfony what type it is with the type directive like you see in main.
main:
  type: rotating_file
  max_files: 3
  path: "%kernel.logs_dir%/%kernel.environment%.log"
  level: debug
  channels: ["!event"]
The word “main” can be anything you desire, but notice how you must use type, then use one of the above handler names, then provide the options. Read more about handler names here in the Symfony docs. Basically you can call the handler anything even “asdfg” as long as you use the word “type” and list the type and other required information. More on this below.
Bubble?

One property that you will see on all of the types above is “bubble” Further digging into the github monolog documentation reveals the following about it.
Handlers also have a
$bubbleproperty which defines whether they block the record or not if they handled it. In this example, setting theMailHandler‘s$bubbleargument to false means that records handled by theMailHandlerwill not propagate to theStreamHandleranymore.
Basically this means you need to define your loggers in the proper order if you want to have the handling stop at a particular logger for a particular situation. Otherwise each logger in your list does something each time and you might not want that. Like do you want errors to go to a log and also to the console during development?
One thing you may want to think about is where do you want your errors, exceptions and other logged data to be logged? This answer will be different for production vs development for sure. You may want to log just exceptions to a database in production, so that you can query it and show them in an admin user interface for example.
This part of the documentation speaks about logging to different locations.
Channels aka logging to multiple places

The documentation speaks of channels. What are these channels? In the code above for the monolog.yaml development configuration you will see this line
channels: ["!event", "!doctrine", "!console"]
Here in the documentation it says the following about channels
The Symfony Framework organizes log messages into channels. By default, there are several channels, including
doctrine,event,security,requestand more. The channel is printed in the log message and can also be used to direct different channels to different places/files.
Aha. So that is what those are. I wonder what the ! means? Does that mean it ignores those or does it mean it accepts those? Yes it does. Basically the above line would log everything except (event, doctrine and console.) Below you can see a list of all the channels.
So to clarify if you want a handler to log a message for a specific channel you can use the following syntax in the handler configuration.
channels: [security, doctrine]
If you want the handler to ignore a channel then you use this syntax in the handler configuration
channels: ["!event", "!doctrine", "!console"]
You can really get as insanely complex as you want with this logging stuff.
By the way how do you know what logging channels are available?
I prefer the following command, because these can be auto-wired :
php bin/console debug:autowiring
Scroll down and look for monolog listings. You will see something like this.(These can all be auto-wired)

These are the channels you have.Basically whenever one of these experiences an issue Symfony sends out an event and the handlers you list decide if they want to do something about it. This way using the channels and multiple handlers you can log things exactly where you want them. You can even log the same event/message multiple times in multiple locations.

As the docs mention, by default Symfony logs all events to the same location. It is up to you to change that to your projects needs.
Another useful command is the following which allows you to get detailed info about each, it also lists more, but not all are auto-wireable.
php bin/console debug:container monolog
That is interactive and you can choose one of the listings to get more information about it. I find the first method useful to find what I actually can access.
Creating Custom Channels
Sometimes you need to log a specific issue to a specific file or location. For this you need to create your own Channel. The documentation is really weak on this subject so lets dig deep into it.
I get tired of the foo bar BS so here I create a custom channel named “chicken” just so it sticks out for this example.
To create the channel you simple list it at the top of the monolog.yaml file like this.
monolog:
  channels: ['chicken']
  handlers:
    main:
      type: rotating_file
      max_files: 3
      path: "%kernel.logs_dir%/%kernel.environment%.log"
      #path: php://stderr
      level: debug
      channels: [ "!event" ]
A little confusing how you use that syntax in more than one location. In one it listens for channels in another it creates channels.

Maybe channel_list or something else to differentiate would have been better?
Placing the directive above the rest of the handler code creates the new channel or channels. I don’t know if this is a requirement, but I know it works. To create more than one channel create strings separated by commas.
Now to check if anything happened I will use this command
php bin/console debug:autowiring

Now you can see “monolog.logger.chicken” logger that was created with that one line in the monolog.yaml configuration file.

How to use the logger?
There are two ways to use the logger, one you didn’t have to do any of this to use, the other is autowiring, which is why we did all of this for. The other way is to just initiate it and pass the values to the constructor like the documentation for Monolog shows.
Even though all that configuration seems like a pain, in the end it makes things easier by allowing us to auto-wire the logger we want. This saves a lot of having to create the same boilerplate code over and over all throughout our app.
Taking another look at the output of the bin/console debug:container command from above we can see the following
Each line after the first monolog.logger contains what looks like a PHP variable. It is in fact a PHP variable, one you can use for type hinting. How this works is you type hint LoggerInterface, then use which variable you want and Symfony automagically loads it for you.

Back to the chickenLoggerExample. What I want to do with the chickenLogger is use it to log exceptions to their own exceptions log for easier viewing. This is useful in a situation like using a library to create and convert images.
class UserImageProcessor
{

    private LoggerInterface $chickenLogger;

    public function __construct(LoggerInterface $chickenLogger){
        $this->chickenLogger = $chickenLogger;
        $this->chickenLogger->debug('lets log some chickens');
    }
See in the constructor how I passed the variable $chickenLogger and now Symfony passes me the chickenLogger Channel and I can now log chickens. Logging chickens is a very handy feature in the real world.
And below is the whole monolog.yaml file I am using to log my chickens.
monolog:
  channels: ['chicken']
  handlers:
    main:
      type: rotating_file
      max_files: 3
      path: "%kernel.logs_dir%/%kernel.environment%.log"
      #path: php://stderr
      level: debug
      channels: [ "!event", "!chicken" ]

    exceptions:
      type: rotating_file
      max_files: 2
      path: "%kernel.logs_dir%/exceptions.log"
      file_permission: '765'
      level: debug
      channels: ['chicken']


    # uncomment to get logging in your browser
    # you may have to allow bigger header sizes in your Web server configuration
    #firephp:
    #    type: firephp
    #    level: info
    #chromephp:
    #    type: chromephp
    #    level: info
    console:
      type: console
      process_psr_3_messages: false
      channels: [ "!event", "!doctrine", "!console" ]
Notice I used the file permissions option. That is a handy one. See the exceptions handler is using the chicken channel. Again I could have named the “exceptions:” section anything even “chirpy-birds” symfony doesn’t care, only the directives matter.
Now when I log my chickens, the main handler section will ignore the chickens, but my exceptions section will log my chickens and so will the console. I’d have to add “!chicken” to the consoles “channels” section or I can add “bubbles: false” to the exceptions section to stop it.

Links about Loggers
Logging to Rollbar -> Helps you organize and view logs and much more.
Logging with Monolog -> A short article
Logging -> Documentation link ->overall general information
How to log messages to different files -> more from the documentations
Using the logger -> more from the docs on how to use it.
User Documentation
| Author: | Jon Parise |
|---|---|
| Contact: | jon@php.net |
Contents
- 1 Using Log Handlers
- 1.1 Creating a Log Object
- 1.1.1 The Factory Method
- 1.1.2 The Singleton Method
- 1.1.3 Direct Instantiation
- 1.2 Configuring a Handler
- 1.3 Logging an Event
- 1.4 Log Levels
- 1.5 Log Level Masks
- 1.6 Log Line Format
- 1.7 Flushing Log Events
- 1.1 Creating a Log Object
- 2 Standard Log Handlers
- 2.1 The Console Handler
- 2.1.1 Configuration
- 2.1.2 Example
- 2.2 The Display Handler
- 2.2.1 Configuration
- 2.2.2 Example
- 2.3 The Error_Log Handler
- 2.3.1 Configuration
- 2.3.2 Error_Log Types
- 2.3.3 Example
- 2.4 The File Handler
- 2.4.1 Configuration
- 2.4.2 Example
- 2.5 The Firebug Handler
- 2.5.1 Configuration
- 2.5.2 Example
- 2.6 The Mail Handler
- 2.6.1 Configuration
- 2.6.2 Example
- 2.7 The MDB2 Handler
- 2.7.1 Configuration
- 2.8 The Null Handler
- 2.8.1 Example
- 2.9 The SQL (DB) Handler
- 2.9.1 The Log Table
- 2.9.2 Configuration
- 2.9.3 Examples
- 2.10 The Sqlite Handler
- 2.10.1 Configuration
- 2.10.2 Examples
- 2.11 The Syslog Handler
- 2.11.1 Configuration
- 2.11.2 Facilities
- 2.11.3 Example
- 2.12 The Window Handler
- 2.12.1 Configuration
- 2.12.2 Example
- 2.1 The Console Handler
- 3 Composite Handlers
- 4 Log Observers
- 5 Logging From Standard Error Handlers
- 5.1 Logging PHP Errors
- 5.2 Logging PHP Assertions
- 5.3 Logging PHP Exceptions
- 5.4 Logging PEAR Errors
- 6 Custom Handlers
- 6.1 Using a Custom Handler
- 6.1.1 Method 1: Handler in the Standard Location
- 6.1.2 Method 2: Handler in a Custom Location
- 6.2 Writing New Handlers
- 6.3 Extending Existing Handlers
- 6.4 Handler Methods
- 6.4.1 bool open()
- 6.4.2 bool close()
- 6.4.3 bool flush()
- 6.4.4 bool log($message, $priority = null)
- 6.5 Utility Methods
- 6.5.1 string _extractMessage($message)
- 6.5.2 string _format($format, $timestamp, $priority, $message)
- 6.5.3 bool _isMasked($priority)
- 6.5.4 void _announce($event)
- 6.1 Using a Custom Handler
1 Using Log Handlers
The Log package is implemented as a framework that supports the notion of
backend-specific log handlers. The base logging object (defined by the Log
class) is primarily an abstract interface to the currently configured
handler.
A wide variety of handlers are distributed with the Log package, and, should
none of them fit your application’s needs, it’s easy to write your own.
1.1 Creating a Log Object
There are three ways to create Log objects:
- Using the Log::factory() method
- Using the Log::singleton() method
- Direct instantiation
1.1.1 The Factory Method
The Log::factory() method implements the Factory Pattern. It allows
for the parameterized construction of concrete Log instances at runtime. The
first parameter to the Log::factory() method indicates the name of the
concrete handler to create. The rest of the parameters will be passed on to
the handler’s constructor (see Configuring a Handler below).
The new Log instance is returned by reference.
require_once 'Log.php';

$console = Log::factory('console', '', 'TEST');
$console->log('Logging to the console.');

$file = Log::factory('file', 'out.log', 'TEST');
$file->log('Logging to out.log.');
1.1.2 The Singleton Method
The Log::singleton() method implements the Singleton Pattern. The
singleton pattern ensures that only a single instance of a given log type and
configuration is ever created. This has two benefits: first, it prevents
duplicate Log instances from being constructed, and, second, it gives all
of your code access to the same Log instance. The latter is especially
important when logging to files because only a single file handler will need
to be managed.
The Log::singleton() method’s parameters match the Log::factory()
method. The new Log instance is returned by reference.
require_once 'Log.php';

/* Same construction parameters */
$a = Log::singleton('console', '', 'TEST');
$b = Log::singleton('console', '', 'TEST');

if ($a === $b) {
    echo '$a and $b point to the same Log instance.' . "n";
}

/* Different construction parameters */
$c = Log::singleton('console', '', 'TEST1');
$d = Log::singleton('console', '', 'TEST2');

if ($c !== $d) {
    echo '$c and $d point to different Log instances.' . "n";
}
1.1.3 Direct Instantiation
It is also possible to directly instantiate concrete Log handler
instances. However, this method is not recommended because it creates a
tighter coupling between your application code and the Log package than is
necessary. Use of the factory method or the singleton method is
preferred.
1.2 Configuring a Handler
A log handler’s configuration is determined by the arguments used in its
construction. Here’s an overview of those parameters:
/* Using the factory method ... */
Log::factory($handler, $name, $ident, $conf, $maxLevel);

/* Using the singleton method ... */
Log::singleton($handler, $name, $ident, $conf, $maxLevel);

/* Using direct instantiation ... */
new Log_handler($name, $ident, $conf, $maxLevel);
| Parameter | Type | Description |
|---|---|---|
| $handler | String | The type of Log handler to construct. This parameter is only available when the factory method or the singleton method are used. |
| $name | String | The name of the log resource to which the events will be logged. The use of this value is determined by the handler’s implementation. It defaults to an empty string. |
| $ident | String | An identification string that will be included in all log events logged by this handler. This value defaults to an empty string and can be changed at runtime using the setIdent() method. |
| $conf | Array | Associative array of key-value pairs that are used to specify any handler-specific settings. |
| $level | Integer | Log messages up to and including this level. This value defaults to PEAR_LOG_DEBUG. See Log Levels and Log Level Masks. |
1.3 Logging an Event
Events are logged using the log() method:
$logger->log('Message', PEAR_LOG_NOTICE);
The first argument contains the log event’s message. Even though the event is
always logged as a string, it is possible to pass an object to the log()
method. If the object implements a getString() method, a toString()
method or Zend Engine 2’s special __toString() casting method, it will be
used to determine the object’s string representation. Otherwise, the
serialized form of the object will be logged.
The second, optional argument specifies the log event’s priority. See the
Log Levels table for the complete list of priorities. The default priority
is PEAR_LOG_INFO.
The log() method will return true if the event was successfully
logged.
«Shortcut» methods are also available for logging an event at a specific log
level. See the Log Levels table for the complete list.
1.4 Log Levels
This table is ordered by highest priority (PEAR_LOG_EMERG) to lowest
priority (PEAR_LOG_DEBUG).
| Level | Shortcut | Description |
|---|---|---|
| PEAR_LOG_EMERG | emerg() | System is unusable |
| PEAR_LOG_ALERT | alert() | Immediate action required |
| PEAR_LOG_CRIT | crit() | Critical conditions |
| PEAR_LOG_ERR | err() | Error conditions |
| PEAR_LOG_WARNING | warning() | Warning conditions |
| PEAR_LOG_NOTICE | notice() | Normal but significant |
| PEAR_LOG_INFO | info() | Informational |
| PEAR_LOG_DEBUG | debug() | Debug-level messages |
1.5 Log Level Masks
Defining a log level mask allows you to include and/or exclude specific levels
of events from being logged. The $level construction parameter (see
Configuring a Handler) uses this mechanism to exclude log events below a
certain priority, and it’s possible to define more complex masks once the Log
object has been constructed.
Each priority has a specific mask associated with it. To compute a priority’s
mask, use the static Log::MASK() method:
$mask = Log::MASK(PEAR_LOG_INFO);
To compute the mask for all priorities up to, and including, a certain level,
use the Log::MAX() static method:
$mask = Log::MAX(PEAR_LOG_INFO);
To compute the mask for all priorities greater than or equal to a certain
level, use the Log::MIN() static method:
$mask = Log::MIN(PEAR_LOG_INFO);
The apply the mask, use the setMask() method:
$logger->setMask($mask);
Masks can be be combined using bitwise operations. To restrict logging to
only those events marked as PEAR_LOG_NOTICE or PEAR_LOG_DEBUG:
$mask = Log::MASK(PEAR_LOG_NOTICE) | Log::MASK(PEAR_LOG_DEBUG);
$logger->setMask($mask);
For convenience, two special masks are predefined: PEAR_LOG_NONE and
PEAR_LOG_ALL. PEAR_LOG_ALL is especially useful for excluding only
specific priorities:
$mask = PEAR_LOG_ALL ^ Log::MASK(PEAR_LOG_NOTICE);
$logger->setMask($mask);
It is also possible to retrieve and modify a Log object’s existing mask:
$mask = $logger->getMask() | Log::MASK(PEAR_LOG_INFO);
$logger->setMask($mask);
1.6 Log Line Format
Most log handlers support configurable line formats. The following is a list
of special tokens that will be expanded at runtime with contextual information
related to the log event. Each token has an alternate shorthand notation, as
well.
| Token | Alternate | Description |
|---|---|---|
| %{timestamp} | %1$s | Timestamp. This is often configurable. |
| %{ident} | %2$s | The log handler’s identification string. |
| %{priority} | %3$s | The log event’s priority. |
| %{message} | %4$s | The log event’s message text. |
| %{file} | %5$s | The full filename of the logging file. |
| %{line} | %6$s | The line number on which the event occured. |
| %{function} | %7$s | The function from which the event occurred. |
| %{class} | %8$s | The class in which the event occurred. |
1.7 Flushing Log Events
Some log handlers (such as the console handler) support explicit
«buffering». When buffering is enabled, log events won’t actually be written
to the output stream until the handler is closed. Other handlers (such as
the file handler) support implicit buffering because they use the operating
system’s IO routines, which may buffer the output.
It’s possible to force these handlers to flush their output, however, by
calling their flush() method:
$conf = array('buffering' => true);
$logger = Log::singleton('console', '', 'test', $conf);

for ($i = 0; $i < 10; $i++) {
    $logger->log('This event will be buffered.');
}

/* Flush all of the buffered log events. */
$logger->flush();

for ($i = 0; $i < 10; $i++) {
    $logger->log('This event will be buffered.');
}

/* Implicitly flush the buffered events on close. */
$logger->close();
At this time, the flush() method is only implemented by the console
handler, the file handler, the Firebug handler, and the mail
handler.
2 Standard Log Handlers
2.1 The Console Handler
The Console handler outputs log events directly to the console. It supports
output buffering and configurable string formats.
2.1.1 Configuration
| Parameter | Type | Default | Description |
|---|---|---|---|
| stream | File | STDOUT | The output stream to use. |
| buffering | Boolean | False | Should the output be buffered until shutdown? |
| lineFormat | String | %1$s %2$s [%3$s] %4$s |
Log line format specification. |
| timeFormat | String | %b %d %H:%M:%S |
Time stamp format (for strftime). |
2.1.2 Example
$logger = Log::singleton('console', '', 'ident');
for ($i = 0; $i < 10; $i++) {
    $logger->log("Log entry $i");
}
2.2 The Display Handler
The Display handler simply prints the log events back to the browser. It
respects the error_prepend_string and error_append_string error
handling values and is useful when logging from standard error handlers.
2.2.1 Configuration
| Parameter | Type | Default | Description |
|---|---|---|---|
| lineFormat | String | <b>%3$s</b>: %4$s |
Log line format specification. |
| timeFormat | String | %b %d %H:%M:%S |
Time stamp format (for strftime). |
| error_prepend | String | PHP INI value | This string will be prepended to the line format. |
| error_append | String | PHP INI value | This string will be appended to the line format. |
| linebreak | String | <br />n | This string is used to represent a line break. |
| rawText | Boolean | False | Should message text be passed directly to the log system? Otherwise, it will be converted to an HTML-safe representation. |
2.2.2 Example
$conf = array('error_prepend' => '<font color="#ff0000"><tt>',
              'error_append'  => '</tt></font>');
$logger = Log::singleton('display', '', '', $conf, PEAR_LOG_DEBUG);
for ($i = 0; $i < 10; $i++) {
    $logger->log("Log entry $i");
}
2.3 The Error_Log Handler
The Error_Log handler sends log events to PHP’s error_log() function.
2.3.1 Configuration
| Parameter | Type | Default | Description |
|---|---|---|---|
| destination | String | » (empty) | Optional destination value for error_log(). See Error_Log Types for more details. |
| extra_headers | String | » (empty) | Additional headers to pass to the mail() function when the PEAR_LOG_TYPE_MAIL type is specified. |
| lineFormat | String | %2$s: %4$s | Log line format specification. |
| timeFormat | String | %b %d %H:%M:%S |
Time stamp format (for strftime). |
2.3.2 Error_Log Types
All of the available log types are detailed in the error_log() section of
the PHP manual. For your convenience, the Log package also defines the
following constants that can be used for the $name handler construction
parameter.
| Constant | Description |
|---|---|
| PEAR_LOG_TYPE_SYSTEM | Log events are sent to PHP’s system logger, which uses the operating system’s logging mechanism or a file (depending on the value of the error_log configuration directive). |
| PEAR_LOG_TYPE_MAIL | Log events are sent via email to the address specified in the destination value. |
| PEAR_LOG_TYPE_DEBUG | Log events are sent through PHP’s debugging connection. This will only work if remote debugging has been enabled. The destination value is used to specify the host name or IP address of the target socket. |
| PEAR_LOG_TYPE_FILE | Log events will be appended to the file named by the destination value. |
| PEAR_LOG_TYPE_SAPI | Log events will be sent directly to the SAPI logging handler. |
2.3.3 Example
$logger = Log::singleton('error_log', PEAR_LOG_TYPE_SYSTEM, 'ident');
for ($i = 0; $i < 10; $i++) {
    $logger->log("Log entry $i");
}
2.4 The File Handler
The File handler writes log events to a text file using configurable string
formats.
2.4.1 Configuration
| Parameter | Type | Default | Description |
|---|---|---|---|
| append | Boolean | True | Should new log entries be append to an existing log file, or should the a new log file overwrite an existing one? |
| locking | Boolean | False | Should advisory file locking (using flock) be used? |
| mode | Integer | 0644 | Octal representation of the log file’s permissions mode. |
| dirmode | Integer | 0755 | Octal representation of the file permission mode that will be used when creating directories that do not already exist. |
| eol | String | OS default | The end-of-line character sequence. |
| lineFormat | String | %1$s %2$s [%3$s] %4$s |
Log line format specification. |
| timeFormat | String | %b %d %H:%M:%S |
Time stamp format (for strftime). |
The file handler will only attempt to set the mode value if it was
responsible for creating the file.
2.4.2 Example
$conf = array('mode' => 0600, 'timeFormat' => '%X %x');
$logger = Log::singleton('file', 'out.log', 'ident', $conf);
for ($i = 0; $i < 10; $i++) {
    $logger->log("Log entry $i");
}
2.5 The Firebug Handler
The Firebug handler outputs log events to the Firebug console. It supports
output buffering and configurable string formats.
2.5.1 Configuration
| Parameter | Type | Default | Description |
|---|---|---|---|
| buffering | Boolean | False | Should the output be buffered until shutdown? |
| lineFormat | String | %2$s [%3$s] %4$s |
Log line format specification. |
| timeFormat | String | %b %d %H:%M:%S |
Time stamp format (for strftime). |
2.5.2 Example
$logger = Log::singleton('firebug', '', 'ident');
for ($i = 0; $i < 10; $i++) {
    $logger->log("Log entry $i");
}
2.6 The Mail Handler
The Mail handler aggregates a session’s log events and sends them in the body
of an email message using either the PEAR Mail package or PHP’s native
mail() function.
If an empty mailBackend value is specified, the mail() function will be
used instead of the PEAR Mail package.
Multiple recipients can be specified by separating their email addresses with
commas in the $name construction parameter.
2.6.1 Configuration
| Parameter | Type | Default | Description |
|---|---|---|---|
| from | String | sendmail_from INI value |
Value for the message’s From: header. |
| subject | String | [Log_mail] Log message |
Value for the message’s Subject: header. |
| preamble | String | « (empty) | Preamble for the message. |
| lineFormat | String | %1$s %2$s [%3$s] %4$s |
Log line format specification. |
| timeFormat | String | %b %d %H:%M:%S |
Time stamp format (for strftime). |
| mailBackend | String | « (empty) | Name of the Mail package backend to use. |
| mailParams | Array | (empty) | Array of parameters that will be passed to the Mail package backend. |
2.6.2 Example
$conf = array('subject' => 'Important Log Events');
$logger = Log::singleton('mail', 'webmaster@example.com', 'ident', $conf);
for ($i = 0; $i < 10; $i++) {
    $logger->log("Log entry $i");
}
2.7 The MDB2 Handler
The MDB2 handler is similar to the SQL (DB) handler, but instead of using
the PEAR DB package, it uses the MDB2 database abstraction package.
2.7.1 Configuration
| Parameter | Type | Default | Description |
|---|---|---|---|
| dsn | Mixed | » (empty) | A Data Source Name. [required] |
| options | Array | persistent | An array of MDB2 options. |
| db | Object | NULL | An existing MDB2 object. If specified, this object will be used, and dsn will be ignored. |
| sequence | String | log_id | The name of the sequence to use when generating unique event IDs. Under many databases, this will be used as the name of the sequence table. |
| identLimit | Integer | 16 | The maximum length of the ident string. Changing this value may require updates to the SQL schema, as well. |
| singleton | Boolean | false | Is true, use a singleton database object using MDB2::singleton(). |
2.8 The Null Handler
The Null handler simply consumes log events (akin to sending them to
/dev/null). Log level masks are respected, and the event will still be
sent to any registered log observers.
2.8.1 Example
$logger = Log::singleton('null');
for ($i = 0; $i < 10; $i++) {
    $logger->log("Log entry $i");
}
2.9 The SQL (DB) Handler
The SQL handler sends log events to a database using PEAR’s DB abstraction
layer.
Note: Due to the constraints of the default database schema, the SQL
handler limits the length of the $ident string to sixteen (16) characters.
This limit can be adjusted using the identLimit configuration parameter.
2.9.1 The Log Table
The default SQL table used by this handler looks like this:
CREATE TABLE log_table (
    id          INT NOT NULL,
    logtime     TIMESTAMP NOT NULL,
    ident       CHAR(16) NOT NULL,
    priority    INT NOT NULL,
    message     VARCHAR(200),
    PRIMARY KEY (id)
);
This is the «lowest common denominator» that should work across all SQL
compliant database. You may want to make database- or site-specific changes
to this schema to support your specific needs, however. For example,
PostgreSQL users may prefer to use a TEXT type for the message
field.
2.9.2 Configuration
| Parameter | Type | Default | Description |
|---|---|---|---|
| dsn | Mixed | » (empty) | A Data Source Name. [required] |
| sql | String | INSERT INTO $table (id, logtime, ident, priority, message) VALUES(?, CURRENT_TIMESTAMP, ?, ?, ?) | SQL insertion statement. |
| options | Array | persistent | An array of DB options. |
| db | Object | NULL | An existing DB object. If specified, this object will be used, and dsn will be ignored. |
| sequence | String | log_id | The name of the sequence to use when generating unique event IDs. Under many databases, this will be used as the name of the sequence table. |
| identLimit | Integer | 16 | The maximum length of the ident string. Changing this value may require updates to the SQL schema, as well. |
The name of the database table to which the log entries will be written is
specified using the $name construction parameter (see Configuring a
Handler).
2.9.3 Examples
Using a Data Source Name to create a new database connection:
$conf = array('dsn' => 'pgsql://jon@localhost+unix/logs');
$logger = Log::singleton('sql', 'log_table', 'ident', $conf);
for ($i = 0; $i < 10; $i++) {
    $logger->log("Log entry $i");
}
Using an existing DB object:
require_once 'DB.php';
$db = &DB::connect('pgsql://jon@localhost+unix/logs');

$conf['db'] = $db;
$logger = Log::singleton('sql', 'log_table', 'ident', $conf);
for ($i = 0; $i < 10; $i++) {
    $logger->log("Log entry $i");
}
2.10 The Sqlite Handler
| Author: | Bertrand Mansion |
|---|
The Sqlite handler sends log events to an Sqlite database using the native
PHP sqlite functions.
It is faster than the SQL (DB) handler because requests are made directly
to the database without using an abstraction layer. It is also interesting to
note that Sqlite database files can be moved, copied, and deleted on your
system just like any other files, which makes log management easier. Last but
not least, using a database to log your events allows you to use SQL queries
to create reports and statistics.
When using a database and logging a lot of events, it is recommended to split
the database into smaller databases. This is allowed by Sqlite, and you can
later use the Sqlite ATTACH statement to query your log database files
globally.
If the database does not exist when the log is opened, sqlite will try to
create it automatically. If the log table does not exist, it will also be
automatically created. The table creation uses the following SQL request:
CREATE TABLE log_table (
    id          INTEGER PRIMARY KEY NOT NULL,
    logtime     NOT NULL,
    ident       CHAR(16) NOT NULL,
    priority    INT NOT NULL,
    message
);
2.10.1 Configuration
| Parameter | Type | Default | Description |
|---|---|---|---|
| filename | String | » (empty) | Path to an Sqlite database. [required] |
| mode | Integer | 0666 | Octal mode used to open the database. |
| persistent | Boolean | false | Use a persistent connection. |
An already opened database connection can also be passed as parameter instead
of the above configuration. In this case, closing the database connection is
up to the user.
2.10.2 Examples
Using a configuration to create a new database connection:
$conf = array('filename' => 'log.db', 'mode' => 0666, 'persistent' => true);
$logger = Log::factory('sqlite', 'log_table', 'ident', $conf);
$logger->log('logging an event', PEAR_LOG_WARNING);
Using an existing connection:
$db = sqlite_open('log.db', 0666, $error);
$logger = Log::factory('sqlite', 'log_table', 'ident', $db);
$logger->log('logging an event', PEAR_LOG_WARNING);
sqlite_close($db);
2.11 The Syslog Handler
The Syslog handler sends log events to the system logging service (syslog on
Unix-like environments or the Event Log on Windows systems). The events are
sent using PHP’s syslog() function.
2.11.1 Configuration
| Parameter | Type | Default | Description |
|---|---|---|---|
| inherit | Boolean | false | Inherit the current syslog connection for this process, or start a new one via openlog()? |
| reopen | Boolean | false | Reopen the syslog connection for each log event? |
| maxLength | Integer | 500 | Maximum message length that will be sent to the syslog() function. Longer messages will be split across multiple syslog() calls. |
| lineFormat | String | %4$s | Log line format specification. |
| timeFormat | String | %b %d %H:%M:%S |
Time stamp format (for strftime). |
2.11.2 Facilities
| Constant | Category Description |
|---|---|
| LOG_AUTH | Security / authorization messages; LOG_AUTHPRIV is preferred on systems where it is defined. |
| LOG_AUTHPRIV | Private security / authorization messages |
| LOG_CRON | Clock daemon (cron and at) |
| LOG_DAEMON | System daemon processes |
| LOG_KERN | Kernel messages |
| LOG_LOCAL0 .. LOG_LOCAL7 |
Reserved for local use; not available under Windows. |
| LOG_LPR | Printer subsystem |
| LOG_MAIL | Mail subsystem |
| LOG_NEWS | USENET news subsystem |
| LOG_SYSLOG | Internal syslog messages |
| LOG_USER | Generic user-level messages |
| LOG_UUCP | UUCP subsystem |
2.11.3 Example
$logger = Log::singleton('syslog', LOG_LOCAL0, 'ident');
for ($i = 0; $i < 10; $i++) {
    $logger->log("Log entry $i");
}
2.12 The Window Handler
The Window handler sends log events to a separate browser window. The
original idea for this handler was inspired by Craig Davis’ Zend.com article
entitled «JavaScript Power PHP Debugging».
2.12.1 Configuration
| Parameter | Type | Default | Description |
|---|---|---|---|
| title | String | Log Output Window |
The title of the output window. |
| styles | Array | ROY G BIV (high to low) |
Mapping of log priorities to CSS styles. |
Note: The Window handler may not work reliably when PHP’s output
buffering system is enabled.
2.12.2 Example
$conf = array('title' => 'Sample Log Output');
$logger = Log::singleton('win', 'LogWindow', 'ident', $conf);
for ($i = 0; $i < 10; $i++) {
    $logger->log("Log entry $i");
}
3 Composite Handlers
It is often useful to log events to multiple handlers. The Log package
provides a compositing system that marks this task trivial.
Start by creating the individual log handlers:
$console = Log::factory('console', '', 'TEST');
$file = Log::factory('file', 'out.log', 'TEST');
Then, construct a composite handler and add the individual handlers as
children of the composite:
$composite = Log::singleton('composite');
$composite->addChild($console);
$composite->addChild($file);
The composite handler implements the standard Log interface so you can use
it just like any of the other handlers:
$composite->log('This event will be logged to both handlers.');
Children can be removed from the composite when they’re not longer needed:
$composite->removeChild($file);
4 Log Observers
Log observers provide an implementation of the observer pattern. In the
content of the Log package, they provide a mechanism by which you can examine
(i.e. observe) each event as it is logged. This allows the implementation of
special behavior based on the contents of a log event. For example, the
observer code could send an alert email if a log event contained the string
PANIC.
Creating a log observer involves implementing a subclass of the
Log_observer class. The subclass must override the base class’s
notify() method. This method is passed a hash containing the event’s
priority and event. The subclass’s implementation is free to act upon this
information in any way it likes.
Log observers are attached to Log instances via the attach() method:
$observer = Log_observer::factory('yourType');
$logger->attach($observer);
Observers can be detached using the detach() method:
$logger->detach($observer);
At this time, no concrete Log_observer implementations are distributed
with the Log package.
5 Logging From Standard Error Handlers
5.1 Logging PHP Errors
PHP’s default error handler can be overridden using the set_error_handler()
function. The custom error handling function can use a global Log instance to
log the PHP errors.
Note: Fatal PHP errors cannot be handled by a custom error handler at this
time.
function errorHandler($code, $message, $file, $line)
{
    global $logger;

    /* Map the PHP error to a Log priority. */
    switch ($code) {
    case E_WARNING:
    case E_USER_WARNING:
        $priority = PEAR_LOG_WARNING;
        break;
    case E_NOTICE:
    case E_USER_NOTICE:
        $priority = PEAR_LOG_NOTICE;
        break;
    case E_ERROR:
    case E_USER_ERROR:
        $priority = PEAR_LOG_ERR;
        break;
    default:
        $priority = PEAR_LOG_INFO;
    }

    $logger->log($message . ' in ' . $file . ' at line ' . $line,
                 $priority);
}

set_error_handler('errorHandler');
trigger_error('This is an information log message.', E_USER_NOTICE);
5.2 Logging PHP Assertions
PHP allows user-defined assert() callback handlers. The assertion callback
is configured using the assert_options() function.
function assertCallback($file, $line, $message)
{
    global $logger;

    $logger->log($message . ' in ' . $file . ' at line ' . $line,
                 PEAR_LOG_ALERT);
}

assert_options(ASSERT_CALLBACK, 'assertCallback');
assert(false);
5.3 Logging PHP Exceptions
PHP 5 and later support the concept of exceptions. A custom exception
handler can be assigned using the set_exception_handler() function.
function exceptionHandler($exception)
{
    global $logger;

    $logger->log($exception->getMessage(), PEAR_LOG_ALERT);
}

set_exception_handler('exceptionHandler');
throw new Exception('Uncaught Exception');
5.4 Logging PEAR Errors
The Log package can be used with PEAR::setErrorHandling()’s
PEAR_ERROR_CALLBACK mechanism by writing an error handling function that
uses a global Log instance. Here’s an example:
function errorHandler($error)
{
    global $logger;

    $message = $error->getMessage();

    if (!empty($error->backtrace[1]['file'])) {
        $message .= ' (' . $error->backtrace[1]['file'];
        if (!empty($error->backtrace[1]['line'])) {
            $message .= ' at line ' . $error->backtrace[1]['line'];
        }
        $message .= ')';
    }

    $logger->log($message, $error->code);
}

PEAR::setErrorHandling(PEAR_ERROR_CALLBACK, 'errorHandler');
PEAR::raiseError('This is an information log message.', PEAR_LOG_INFO);
6 Custom Handlers
There are times when the standard handlers aren’t a perfect match for your
needs. In those situations, the solution might be to write a custom handler.
6.1 Using a Custom Handler
Using a custom Log handler is very simple. Once written (see Writing New
Handlers and Extending Existing Handlers below), you have the choice of
placing the file in your PEAR installation’s main Log/ directory (usually
something like /usr/local/lib/php/Log or C:phppearLog), where it
can be found and use by any PHP application on the system, or placing the file
somewhere in your application’s local hierarchy and including it before the
the custom Log object is constructed.
6.1.1 Method 1: Handler in the Standard Location
After copying the handler file to your PEAR installation’s Log/ directory,
simply treat the handler as if it were part of the standard distributed. If
your handler is named custom (and therefore implemented by a class named
Log_custom):
require_once 'Log.php';

$logger = Log::factory('custom', '', 'CUSTOM');
6.1.2 Method 2: Handler in a Custom Location
If you prefer storing your handler in your application’s local hierarchy,
you’ll need to include that file before you can create a Log instance based on
it.
require_once 'Log.php';
require_once 'LocalHandlers/custom.php';

$logger = Log::factory('custom', '', 'CUSTOM');
6.2 Writing New Handlers
Writing a new Log handler is as simple as authoring a new class that extends
the Log class and that implements a relatively small set of standard
methods.
Every handler’s class name must start with Log_ in order for it to be
recognized by the Log package.
class Log_custom extends Log
The handler’s constructor will be called with four parameters. These values
are discussed in detail in the Configuring a Handler section.
Log_custom($name, $ident = '', $conf = array(), $level = PEAR_LOG_DEBUG)
The constructor is responsible for configuring the handler based on these
values. Handler-specific parameters are passed as part of the $conf
array. At a minimum, the handler’s constructor must set the following values
defined by the Log base class:
$this->_id = md5(microtime().rand());
$this->_name = $name;
$this->_ident = $ident;
$this->_mask = Log::UPTO($level);
The Handler Methods section below details the various standard methods that
can be implemented by a log handler. The Utility Methods section describes
some useful utility methods provided by the Log base class which may be
useful when implementing a log handler.
6.3 Extending Existing Handlers
Extending existing handlers is very similar to writing new handlers with
the exception that, instead of inheriting from the Log base class
directly, the handler extends an existing handler’s class. This is a useful
way of adding some custom behavior to an existing handler without writing an
entirely new class (in the spirit of object-oriented programming).
For example, the mail handler could be extended to support sending messages
with MIME-encoded attachments simply by authoring a new Log_mail_mime
class with a compliant constructor and a custom log() method. The rest of
the standard methods would fall back on the Log_mail base class’s
implementations.
Obviously, the specific details involved in extending an existing handler
require a good working understanding of that handler’s implementation.
6.4 Handler Methods
6.4.1 bool open()
The open() method is called to open the log resource for output. Handlers
can call open() immediately upon construction or lazily at runtime
(perhaps when the first log event is received).
The Log base class provides a protected $_opened member variable which
should be set to true when the log handler is opened and false when it
is closed. Handler methods can inspect this value to determine whether or not
the handler is currently open and ready for output.
If the open() method fails to ready the handler for output, it should
return false and set $this->_opened to false.
6.4.2 bool close()
The close() method is called to close the log resource. This method is
the analog of the open() method. It should be safe to call close()
even when the handler is not open for output.
If the close() method fails to close the handler, it should return
false. Otherwise, it should return true. The $this->_opened
flag should also be updated appropriately.
6.4.3 bool flush()
The flush() method flushes any buffered log events, as described in
Flushing Log Events. The implementation of this method will be largely
handler-specific. If the handler does not support buffered output,
implementing this method is not necessary; the Log class’s flush()
method will be called instead.
6.4.4 bool log($message, $priority = null)
The log() method is the core of every log handler. It is called whenever
the user wishes to log an event. The implementation of this method is very
handler-specific. It should return true or false, depending on
whether or not the message was successfully logged by the handler.
The log() implementation should be sure to call _announce() whenever
an event is successfully logged.
6.5 Utility Methods
These utility methods are provided by the Log base class and provide
common, useful functionality to handler implementations.
6.5.2 string _format($format, $timestamp, $priority, $message)
This method produces a formatted log line based on a format string and a set
of tokens representing the current log record and state.
6.5.3 bool _isMasked($priority)
This method checks if the given priority is included in the handler’s current
level mask. This is useful for determining whether or not a log event should
be written to the handler’s log.
6.5.4 void _announce($event)
This method informs any registered log observers that a new event has been
logged. $event is an array containing two named elements:
array('priority' => $priority, 'message' => $message)
_announce() should be called from a handler’s log() method whenever an
event is successfully logged. Otherwise, registered observers will never
become aware of the event.
Version
![]()
![]()
Error Handling
- Introduction
- Configuration
-
The Exception Handler
- Reporting Exceptions
- Exception Log Levels
- Ignoring Exceptions By Type
- Rendering Exceptions
- Reportable & Renderable Exceptions
-
HTTP Exceptions
- Custom HTTP Error Pages
Introduction
When you start a new Laravel project, error and exception handling is already configured for you. The AppExceptionsHandler class is where all exceptions thrown by your application are logged and then rendered to the user. We’ll dive deeper into this class throughout this documentation.
Configuration
The debug option in your config/app.php configuration file determines how much information about an error is actually displayed to the user. By default, this option is set to respect the value of the APP_DEBUG environment variable, which is stored in your .env file.
During local development, you should set the APP_DEBUG environment variable to true. In your production environment, this value should always be false. If the value is set to true in production, you risk exposing sensitive configuration values to your application’s end users.
The Exception Handler
Reporting Exceptions
All exceptions are handled by the AppExceptionsHandler class. This class contains a register method where you may register custom exception reporting and rendering callbacks. We’ll examine each of these concepts in detail. Exception reporting is used to log exceptions or send them to an external service like Flare, Bugsnag or Sentry. By default, exceptions will be logged based on your logging configuration. However, you are free to log exceptions however you wish.
For example, if you need to report different types of exceptions in different ways, you may use the reportable method to register a closure that should be executed when an exception of a given type needs to be reported. Laravel will deduce what type of exception the closure reports by examining the type-hint of the closure:
use AppExceptionsInvalidOrderException;
/**
* Register the exception handling callbacks for the application.
*
* @return void
*/
public function register()
{
$this->reportable(function (InvalidOrderException $e) {
//
});
}
When you register a custom exception reporting callback using the reportable method, Laravel will still log the exception using the default logging configuration for the application. If you wish to stop the propagation of the exception to the default logging stack, you may use the stop method when defining your reporting callback or return false from the callback:
$this->reportable(function (InvalidOrderException $e) {
//
})->stop();
$this->reportable(function (InvalidOrderException $e) {
return false;
});
Note
To customize the exception reporting for a given exception, you may also utilize reportable exceptions.
Global Log Context
If available, Laravel automatically adds the current user’s ID to every exception’s log message as contextual data. You may define your own global contextual data by overriding the context method of your application’s AppExceptionsHandler class. This information will be included in every exception’s log message written by your application:
/**
* Get the default context variables for logging.
*
* @return array
*/
protected function context()
{
return array_merge(parent::context(), [
'foo' => 'bar',
]);
}
Exception Log Context
While adding context to every log message can be useful, sometimes a particular exception may have unique context that you would like to include in your logs. By defining a context method on one of your application’s custom exceptions, you may specify any data relevant to that exception that should be added to the exception’s log entry:
<?php
namespace AppExceptions;
use Exception;
class InvalidOrderException extends Exception
{
// ...
/**
* Get the exception's context information.
*
* @return array
*/
public function context()
{
return ['order_id' => $this->orderId];
}
}
The report Helper
Sometimes you may need to report an exception but continue handling the current request. The report helper function allows you to quickly report an exception via the exception handler without rendering an error page to the user:
public function isValid($value)
{
try {
// Validate the value...
} catch (Throwable $e) {
report($e);
return false;
}
}
Exception Log Levels
When messages are written to your application’s logs, the messages are written at a specified log level, which indicates the severity or importance of the message being logged.
As noted above, even when you register a custom exception reporting callback using the reportable method, Laravel will still log the exception using the default logging configuration for the application; however, since the log level can sometimes influence the channels on which a message is logged, you may wish to configure the log level that certain exceptions are logged at.
To accomplish this, you may define an array of exception types and their associated log levels within the $levels property of your application’s exception handler:
use PDOException;
use PsrLogLogLevel;
/**
* A list of exception types with their corresponding custom log levels.
*
* @var array<class-string<Throwable>, PsrLogLogLevel::*>
*/
protected $levels = [
PDOException::class => LogLevel::CRITICAL,
];
Ignoring Exceptions By Type
When building your application, there will be some types of exceptions you simply want to ignore and never report. Your application’s exception handler contains a $dontReport property which is initialized to an empty array. Any classes that you add to this property will never be reported; however, they may still have custom rendering logic:
use AppExceptionsInvalidOrderException;
/**
* A list of the exception types that are not reported.
*
* @var array<int, class-string<Throwable>>
*/
protected $dontReport = [
InvalidOrderException::class,
];
Note
Behind the scenes, Laravel already ignores some types of errors for you, such as exceptions resulting from 404 HTTP «not found» errors or 419 HTTP responses generated by invalid CSRF tokens.
Rendering Exceptions
By default, the Laravel exception handler will convert exceptions into an HTTP response for you. However, you are free to register a custom rendering closure for exceptions of a given type. You may accomplish this via the renderable method of your exception handler.
The closure passed to the renderable method should return an instance of IlluminateHttpResponse, which may be generated via the response helper. Laravel will deduce what type of exception the closure renders by examining the type-hint of the closure:
use AppExceptionsInvalidOrderException;
/**
* Register the exception handling callbacks for the application.
*
* @return void
*/
public function register()
{
$this->renderable(function (InvalidOrderException $e, $request) {
return response()->view('errors.invalid-order', [], 500);
});
}
You may also use the renderable method to override the rendering behavior for built-in Laravel or Symfony exceptions such as NotFoundHttpException. If the closure given to the renderable method does not return a value, Laravel’s default exception rendering will be utilized:
use SymfonyComponentHttpKernelExceptionNotFoundHttpException;
/**
* Register the exception handling callbacks for the application.
*
* @return void
*/
public function register()
{
$this->renderable(function (NotFoundHttpException $e, $request) {
if ($request->is('api/*')) {
return response()->json([
'message' => 'Record not found.'
], 404);
}
});
}
Reportable & Renderable Exceptions
Instead of type-checking exceptions in the exception handler’s register method, you may define report and render methods directly on your custom exceptions. When these methods exist, they will be automatically called by the framework:
<?php
namespace AppExceptions;
use Exception;
class InvalidOrderException extends Exception
{
/**
* Report the exception.
*
* @return bool|null
*/
public function report()
{
//
}
/**
* Render the exception into an HTTP response.
*
* @param IlluminateHttpRequest $request
* @return IlluminateHttpResponse
*/
public function render($request)
{
return response(/* ... */);
}
}
If your exception extends an exception that is already renderable, such as a built-in Laravel or Symfony exception, you may return false from the exception’s render method to render the exception’s default HTTP response:
/**
* Render the exception into an HTTP response.
*
* @param IlluminateHttpRequest $request
* @return IlluminateHttpResponse
*/
public function render($request)
{
// Determine if the exception needs custom rendering...
return false;
}
If your exception contains custom reporting logic that is only necessary when certain conditions are met, you may need to instruct Laravel to sometimes report the exception using the default exception handling configuration. To accomplish this, you may return false from the exception’s report method:
/**
* Report the exception.
*
* @return bool|null
*/
public function report()
{
// Determine if the exception needs custom reporting...
return false;
}
Note
You may type-hint any required dependencies of thereportmethod and they will automatically be injected into the method by Laravel’s service container.
HTTP Exceptions
Some exceptions describe HTTP error codes from the server. For example, this may be a «page not found» error (404), an «unauthorized error» (401) or even a developer generated 500 error. In order to generate such a response from anywhere in your application, you may use the abort helper:
abort(404);
Custom HTTP Error Pages
Laravel makes it easy to display custom error pages for various HTTP status codes. For example, if you wish to customize the error page for 404 HTTP status codes, create a resources/views/errors/404.blade.php view template. This view will be rendered on all 404 errors generated by your application. The views within this directory should be named to match the HTTP status code they correspond to. The SymfonyComponentHttpKernelExceptionHttpException instance raised by the abort function will be passed to the view as an $exception variable:
<h2>{{ $exception->getMessage() }}</h2>
You may publish Laravel’s default error page templates using the vendor:publish Artisan command. Once the templates have been published, you may customize them to your liking:
php artisan vendor:publish --tag=laravel-errors
Fallback HTTP Error Pages
You may also define a «fallback» error page for a given series of HTTP status codes. This page will be rendered if there is not a corresponding page for the specific HTTP status code that occurred. To accomplish this, define a 4xx.blade.php template and a 5xx.blade.php template in your application’s resources/views/errors directory.
Пакет Logging является очень полезным инструментом в наборе инструментов программиста. Он может помочь вам лучше понять суть программы и обнаружить сценарии, о которых вы, возможно, даже не задумывались при разработке.
Логи предоставляют разработчикам дополнительный набор глаз, которые постоянно смотрят на поток, через который проходит приложение. Они могут хранить информацию о том, какой пользователь или IP получил доступ к приложению. Если возникает ошибка, то они могут предоставить больше информации, чем трассировка стека, сообщив вам, в каком состоянии находилась программа до того, как она достигла строки кода, где произошла ошибка.
Записывая полезные данные из нужных мест, вы можете не только легко отлаживать ошибки, но и использовать данные для анализа производительности приложения, планирования масштабирования или просмотра схем использования для планирования маркетинга.
В этой статье вы узнаете, почему использование модуля logging является лучшим способом добавления логов в ваше приложение, а также узнаете как быстро начать работу с ним.
Модуль Logging
Модуль logging в Python — это готовый к использованию, мощный модуль, предназначенный для удовлетворения потребностей как начинающих, так и корпоративных команд. Он используется большинством сторонних библиотек Python, поэтому вы можете интегрировать ваши логи с сообщениями из этих библиотек для создания единого журнала логов в вашего приложении.
Добавить logging в вашу программу на Python так же просто, как написать эту строчку:
import logging
С импортированным модулем logging вы можете использовать то, что называется «logger», для логирования сообщений, которые вы хотите видеть. По умолчанию существует 5 стандартных уровней severity, указывающих на важность событий. У каждого есть соответствующий метод, который можно использовать для логирования событий на выбранном уровне severity. Список уровней в порядке увеличения важности:
- DEBUG
- INFO
- WARNING
- ERROR
- CRITICAL
Модуль logging предоставляет вам логер по умолчанию, который позволяет вам начать работу без дополнительных настроек. Соответствующие методы для каждого уровня можно вызвать, как показано в следующем примере:
import logging

logging.debug('This is a debug message')
logging.info('This is an info message')
logging.warning('This is a warning message')
logging.error('This is an error message')
logging.critical('This is a critical message')
Вывод вышеупомянутой программы будет выглядеть так:
WARNING:root:This is a warning message
ERROR:root:This is an error message
CRITICAL:root:This is a critical message
Вывод показывают уровень важности перед каждым сообщением вместе с root, который является именем, которое модуль logging дает своему логеру по умолчанию. Этот формат, который показывает уровень, имя и сообщение, разделенные двоеточием (:), является форматом вывода по умолчанию, и его можно изменить для включения таких вещей, как отметка времени, номер строки и других деталей.
Обратите внимание, что сообщения debug() и info() не были отображены. Это связано с тем, что по умолчанию модуль ведения журнала регистрирует сообщения только с уровнем WARNING или выше. Вы можете изменить это, сконфигурировав модуль logging для регистрации событий всех уровней. Вы также можете определить свои собственные уровни, изменив конфигурации, но, как правило, это не рекомендуется, так как это может привести к путанице с журналами некоторых сторонних библиотек, которые вы можете использовать.
Базовая конфигурация
Вы можете использовать метод basicConfig (**kwargs) для настройки ведения логов:
«Вы можете заметить, что модуль logging нарушает руководство по стилю PEP8 и использует соглашения
camelCaseв именнование переменных. Это потому, что он был адоптирован из пакета Log4j (утилиты ведения логов в Java). Это известная проблема в пакете, но к тому времени, когда было решено добавить ее в стандартную библиотеку, она уже была принята пользователями, и изменение ее в соответствии с требованиями PEP8 вызовет проблемы обратной совместимости ». (Источник)
Вот некоторые из часто используемых параметров для basicConfig():
level: Корневой логер с установленным указанным уровнем важности (severity).filename: Указание файла логовfilemode: Режим открытия файла. По умолчанию это a, что означает добавление.format: Формат сообщений.
Используя параметр level, вы можете установить, какой уровень сообщений журнала вы хотите записать. Это можно сделать, передав одну из констант, доступных в классе, и это позволило бы регистрировать все вызовы logging на этом уровне или выше. Вот пример:
import logging

logging.basicConfig(level=logging.DEBUG)
logging.debug('This will get logged')
DEBUG:root:This will get logged
Теперь будут регистрироваться все события на уровне DEBUG или выше.
Аналогично, для записи логов в файл, а не в консоль, можно использовать filename и filemode, и вы можете выбрать формат сообщения, используя format. В следующем примере показано использование всех трех переменных:
import logging

logging.basicConfig(filename='app.log', filemode='w', format='%(name)s - %(levelname)s - %(message)s')
logging.warning('This will get logged to a file')
root - ERROR - This will get logged to a file
Сообщение будет записано в файл с именем app.log вместо вывода в консоль. Для filemode значение w означает, что файл журнала открывается в «режиме записи» каждый раз, когда вызывается basicConfig(), и при каждом запуске программы файл перезаписывается. Конфигурацией по умолчанию для filemode является a, которое является добавлением.
Вы можете настроить корневой logger еще больше, используя дополнительные параметры для basicConfig(), которые можно найти здесь.
Следует отметить, что вызов basicConfig() для настройки корневого logger работает, только если корневой logger не был настроен ранее. По сути, эта функция может быть вызвана только один раз.
debug(), info(), warning(), error() и crit() также автоматически вызывают basicConfig() без аргументов, если он ранее не вызывался. Это означает, что после первого вызова одной из вышеперечисленных функций вы больше не сможете изменить настройки корневого logger.
Формат вывода
Хотя вы можете передавать любую переменную, которая может быть представлена в виде строки из вашей программы в виде сообщения в ваши журналы, есть некоторые базовые элементы, которые уже являются частью LogRecord и могут быть легко добавлены в выходной формат. Если вы хотите записать идентификатор процесса ID вместе с уровнем и сообщением, вы можете сделать что-то вроде этого:
import logging

logging.basicConfig(format='%(process)d-%(levelname)s-%(message)s')
logging.warning('This is a Warning')
18472-WARNING-This is a Warning
format может принимать строку с атрибутами LogRecord в любом порядке. Весь список доступных атрибутов можно найти здесь.
Вот еще один пример, где вы можете добавить информацию о дате и времени:
import logging

logging.basicConfig(format='%(asctime)s - %(message)s', level=logging.INFO)
logging.info('Admin logged in')
2018-07-11 20:12:06,288 - Admin logged in
%(asctime)s добавляет время создания LogRecord. Формат можно изменить с помощью атрибута datefmt, который использует тот же язык форматирования, что и функции форматирования в модуле datetime, например time.strftime():
import logging

logging.basicConfig(format='%(asctime)s - %(message)s', datefmt='%d-%b-%y %H:%M:%S')
logging.warning('Admin logged out')
12-Jul-18 20:53:19 - Admin logged out
Вы можете найти больше информации о формате datetime в этом руководстве.
Логирование переменных
В большинстве случаев вам нужно будет включать динамическую информацию из вашего приложения в журналы. Вы видели, что методы ведения журнала принимают строку в качестве аргумента, и может показаться естественным отформатировать строку с переменными в отдельной строке и передать ее методу log. Но на самом деле это можно сделать напрямую, используя строку формата для сообщения и добавляя переменные в качестве аргументов. Вот пример:
import logging

name = 'John'

logging.error('%s raised an error', name)
ERROR:root:John raised an error
Аргументы, передаваемые методу, будут включены в сообщение в качестве переменных.
Хотя вы можете использовать любой стиль форматирования, f-строки, представленные в Python 3.6, являются лучшим способом форматирования строк, поскольку они могут помочь сделать форматирование коротким и легким для чтения:
import logging

name = 'John'

logging.error(f'{name} raised an error')
ERROR:root:John raised an error
Вывод стека
Модуль регистрации также позволяет вам захватывать стек выполнения в приложении. Информация об исключении может быть получена, если параметр exc_info передан как True, а функции ведения журнала вызываются таким образом:
import logging

a = 5
b = 0

try:
  c = a / b
except Exception as e:
  logging.error("Exception occurred", exc_info=True)
ERROR:root:Exception occurred
Traceback (most recent call last):
  File "exceptions.py", line 6, in <module>
    c = a / b
ZeroDivisionError: division by zero
[Finished in 0.2s]
Если для exc_info не задано значение True, выходные данные вышеприведенной программы не сообщат нам ничего об исключении, которое в реальном сценарии может быть не таким простым, как ZeroDivisionError. Представьте, что вы пытаетесь отладить ошибку в сложной кодовой базе с помощью журнала, который показывает только это:
ERROR:root:Exception occurred
Совет: если вы логируете в обработчике исключений (try..except…), используйте метод logging.exception(), который регистрирует сообщение с уровнем ERROR и добавляет в сообщение информацию об исключении. Проще говоря, вызов logging.exception() похож на вызов logging.error (exc_info = True). Но поскольку этот метод всегда выводит информацию об исключении, его следует вызывать только в обработчике исключений. Взгляните на этот пример:
import logging

a = 5
b = 0
try:
  c = a / b
except Exception as e:
  logging.exception("Exception occurred")
ERROR:root:Exception occurred
Traceback (most recent call last):
  File "exceptions.py", line 6, in <module>
    c = a / b
ZeroDivisionError: division by zero
[Finished in 0.2s]
Использование logging.exception() покажет лог на уровне ERROR. Если вы не хотите этого, вы можете вызвать любой из других методов ведения журнала от debug() до critical() и передать параметр exc_info как True.
Классы и функции
До сих пор мы видели logger по умолчанию с именем root, который используется модулем logging всякий раз, когда его функции вызываются непосредственно таким образом: logging.debug(). Вы можете (и должны) определить свой собственный logger, создав объект класса Logger, особенно если ваше приложение имеет несколько модулей. Давайте посмотрим на некоторые классы и функции в модуле.
Наиболее часто используемые классы, определенные в модуле logging, следующие:
Logger: Это класс, чьи объекты будут использоваться в коде приложения напрямую для вызова функций.LogRecord: Logger автоматически создает объект LogRecord, в котором находиться вся информация, относящаяся к регистрируемому событию, например, имя логера, функции, номер строки, сообщение и т. д.Handler: Обработчики отправляют LogRecord в требуемое место назначения вывода, такое как консоль или файл. Обработчик является основой для подклассов, таких как StreamHandler, FileHandler, SMTPHandler, HTTPHandler и других. Эти подклассы отправляют выходные данные журнала соответствующим адресатам, таким как sys.stdout или файл на диске.Formatter: Здесь вы указываете формат вывода, задавая строковый формат, в котором перечислены атрибуты, которые должны содержать выходные данные.
Из всего перечисленного мы в основном имеем дело с объектами класса Logger, которые создаются с помощью функции уровня модуля logging.getLogger(name). Многократные вызовы getLogger() с одним и тем же именем возвращают ссылку на один и тот же объект Logger, что избавляет нас от передачи объектов logger в каждую часть, где это необходимо. Вот пример:
import logging

logger = logging.getLogger('example_logger')
logger.warning('This is a warning')
This is a warning
Этот код создает пользовательский logger с именем example_logger, но в отличие от корневого logger, имя настраиваемого регистратора не является частью выходного формата по умолчанию и должна быть добавлена в конфигурацию. Конфигурирование его в формате для отображения имени logger даст вывод, подобный этому:
WARNING:example_logger:This is a warning
Опять же, в отличие от корневого logger, пользовательский logger нельзя настроить с помощью basicConfig(). Вы должны настроить его с помощью Handlers и Formatters:
Использование Handlers
Обработчики используются, когда вы хотите настроить свои собственные logger и предназначены для отправки сообщений в сконфигурированные места назначения мест, такие как стандартный поток вывода или файл или HTTP, или на вашу электронную почту через SMTP.
У созданного вами logger может быть несколько обработчиков, а это значит, что вы можете настроить его на сохранение в файл журнала, а также на отправку по электронной почте.
Подобно logger, вы также можете установить уровень severity в обработчиках. Это полезно, если вы хотите установить несколько обработчиков для одного и того же logger, но хотите иметь разные уровни severity для каждого из них. Например, вы можете захотеть, чтобы журналы с уровнем WARNING и выше регистрировались на консоли, но все с уровнем ERROR и выше также должно быть сохранены в файл. Вот пример кода, который делает это:
# logging_example.py

import logging

# Create a custom logger
logger = logging.getLogger(__name__)

# Create handlers
c_handler = logging.StreamHandler()
f_handler = logging.FileHandler('file.log')
c_handler.setLevel(logging.WARNING)
f_handler.setLevel(logging.ERROR)

# Create formatters and add it to handlers
c_format = logging.Formatter('%(name)s - %(levelname)s - %(message)s')
f_format = logging.Formatter('%(asctime)s - %(name)s - %(levelname)s - %(message)s')
c_handler.setFormatter(c_format)
f_handler.setFormatter(f_format)

# Add handlers to the logger
logger.addHandler(c_handler)
logger.addHandler(f_handler)

logger.warning('This is a warning')
logger.error('This is an error')
__main__ - WARNING - This is a warning
__main__ - ERROR - This is an error
Здесь logger.warning() создает LogRecord, который содержит всю информацию о событии, и передает ее всем имеющимся обработчикам: c_handler и f_handler.
c_handler является StreamHandler с уровнем WARNING и берет информацию из LogRecord для генерации вывода в указанном формате и выводит его на консоль. f_handler — это FileHandler с уровнем ERROR, и он игнорирует LogRecord, так как его уровень — WARNING.
Когда вызывается logger.error(), c_handler ведет себя точно так же, как и раньше, а f_handler получает LogRecord на уровне ERROR, поэтому он продолжает генерировать вывод точно так же, как c_handler, но вместо вывода на консоль, он записывает сообщение в указанный файл в этом формате:
2018-08-03 16:12:21,723 - __main__ - ERROR - This is an error
Имя logger, соответствующее переменной __name__, записывается как __main__, то есть имя, которое Python присваивает модулю, с которого начинается выполнение. Если этот файл импортируется каким-либо другим модулем, то переменная __name__ будет соответствовать его имени logging_example. Вот как это будет выглядеть:
# run.py

import logging_example
logging_example - WARNING - This is a warning
logging_example - ERROR - This is an error
Другие методы настройки
Вы можете настроить ведение журнала, как показано выше, используя функции модуля и класса или создав файл конфигурации или словарь и загрузив его с помощью fileConfig() или dictConfig() соответственно. Это полезно, если вы хотите часто менять конфигурацию ведения журнала в работающем приложении.
Вот пример файла конфигурации:
[loggers]
keys=root,sampleLogger

[handlers]
keys=consoleHandler

[formatters]
keys=sampleFormatter

[logger_root]
level=DEBUG
handlers=consoleHandler

[logger_sampleLogger]
level=DEBUG
handlers=consoleHandler
qualname=sampleLogger
propagate=0

[handler_consoleHandler]
class=StreamHandler
level=DEBUG
formatter=sampleFormatter
args=(sys.stdout,)

[formatter_sampleFormatter]
format=%(asctime)s - %(name)s - %(levelname)s - %(message)s
В приведенном выше файле есть два logger, один обработчик и один форматер. После того, как определены их имена, они настраиваются путем добавления слов logger, handler и formatter перед их именами, разделенными подчеркиванием.
Чтобы загрузить этот файл конфигурации, вы должны использовать fileConfig():
import logging
import logging.config

logging.config.fileConfig(fname='file.conf', disable_existing_loggers=False)

# Get the logger specified in the file
logger = logging.getLogger(__name__)

logger.debug('This is a debug message')
2018-07-13 13:57:45,467 - __main__ - DEBUG - This is a debug message
Путь к файлу конфигурации передается в качестве параметра методу fileConfig(), а параметр disable_existing_loggers используется для сохранения или отключения logger, которые присутствуют при вызове функции. По умолчанию установлено значение True, если не упомянуто.
Вот та же конфигурация в формате YAML для подхода с dictionary:
version: 1
formatters:
  simple:
    format: '%(asctime)s - %(name)s - %(levelname)s - %(message)s'
handlers:
  console:
    class: logging.StreamHandler
    level: DEBUG
    formatter: simple
    stream: ext://sys.stdout
loggers:
  sampleLogger:
    level: DEBUG
    handlers: [console]
    propagate: no
root:
  level: DEBUG
  handlers: [console]
Пример, который показывает, как загрузить конфигурацию из файла yaml:
import logging
import logging.config
import yaml

with open('config.yaml', 'r') as f:
    config = yaml.safe_load(f.read())
    logging.config.dictConfig(config)

logger = logging.getLogger(__name__)

logger.debug('This is a debug message')
2018-07-13 14:05:03,766 - __main__ - DEBUG - This is a debug message
Заключение
Модуль logging считается очень гибким. Его дизайн очень практичен и должен подходить для любого случая использования. Вы можете добавить базовое ведение логов в небольшой проект или даже создать собственные настраиваемые уровни журналов, классы обработчиков и многое другое, если вы работаете над большим проектом.
Если вы не использовали логирование в своих приложениях до сих пор, сейчас самое время начать. Если все сделаете правильно, ведение логов, несомненно, устранит много проблем как в процессе разработки так и в процессе эксплуатации и поможет вам найти возможности поднять ваше приложение на новый уровень.
Оригинальная статья: Abhinav Ajitsaria Logging in Python
Была ли вам полезна эта статья?
PHP offers strong methods to work with PHP error logs, which you can log manually and automate. Also, we have some third-party tools built by the open-source community to handle the PHP error logging process.
The most important thing is when and how to log errors. You can log PHP errors at your will when working in the dev mode. Either create a PHP error log file or save them as notifications on different channels, as you get the convenience of logging errors per your requirements.
This guide focuses on the basics of logs in PHP, their configuration, and where you can find them. Also, this guide details how logging helps you be more compelling when troubleshooting and monitoring your PHP applications.
- Different Types of PHP Errors
- Warning Error
- Notice Error
- Syntax Error
- Fatal Error
- Getting Started with PHP Error Logging
- Enable Error Logging in php.ini
- How Do I View PHP Logging Error?
- Method 1: Using the .htaccess File
- Method 2: Using php.ini File
- Copy PHP Error Logs to File
- Error logging in PHP Frameworks
- Error Logging In Laravel
- Automating PHP Error Logging Process
- How PHP Errors Are Logged on Cloudways
- Final Words
When working in production mode, you must create a smooth workflow to enable PHP error logging so the users don’t face any glitches during runtime execution.
Stop Wasting Time on Servers
Cloudways handle server management for you so you can focus on creating great apps and keeping your clients happy.
Different Types of PHP Errors
PHP errors occur when something is off-base within the code. They can be as complex as calling an incorrect variable or as simple as missing a semicolon. You must understand the kind of errors you face to solve them effectively. So, let’s find out more about common PHP errors.
Warning Error
PHP warning errors alert about a problem that may cause a more critical error in the long run. Warning errors do not break down the code execution and commonly occur when using a file path that doesn’t exist.
For example, if this error pops up, you must check the file name in the code or directory, as the script may not find it due to the syntax error.
For instance:
<?php
echo "Warning error"';
include ("external_file.php");
?
>
There is no file named “external_file,” so the output will display an error message box, and the execution will not break down.
Notice Error
Notice errors are minor; like warning errors, they don’t halt code execution. These errors can confuse the system in analyzing if there’s an actual mistake or if it’s just the standard code. Notice errors usually occur when the script needs access to an undefined variable.
Syntax Error
A syntax error is often caused by parsed, misused, or missing symbols. When the compiler catches the error, it terminates the script.
Parse/syntax errors are caused by:
- Unclosed brackets or quotes
- Missing or extra semicolons or parentheses
- Misspellings
Here’s an example of a parse error message:
PHP Parse error: syntax error, unexpected ‘5’ (L_NAME), expecting ‘)’ in /home/u802426761/domains/username/public_html/wp-config.php on line 32
Fatal Error
A fatal error happens when the code calls the function, but the function itself isn’t characterized. Unlike other PHP errors, a fatal error breaks down the execution and sometimes crashes the application as well. There are three types of fatal errors:
- A startup fatal error happens when the framework can’t run the code due to a mistake during installation.
- A compile-time fatal error occurs when the developer uses an undefined function, class, or non-existent variable or data.
- Runtime fatal error is similar to a compile-time fatal error, but happens during the program execution.
Here’s an example of a PHP fatal error:
PHP Fatal error: Call to undefined function get_header() in /var/www/username/public/blog/wp-content/themes/theme/index.php on line 37
Another reason for a fatal error is exceeding the execution time:
Fatal error: Maximum execution time of 30 seconds exceeded in /home/username/domains/domain.com/public_html/wp-includes/class-phpmailer.php on line 737
Getting Started with PHP Error Logging
PHP is the most widely used programming language for developing web applications. According to the BuiltWith insights, today almost.websites are using PHP as their backend language, which makes it around 75% of all the websites in the world. These stats clearly show that PHP still has a solid market share in the programming world. When you start developing an application in PHP, you use a few commands like print_r() ,var_dump() to debug errors and log on to the browser. But, that is not the safest way while working in production mode. In dev mode, you can do it, but have to disable it when initiating the migration. Hence, in dev mode, you can easily log errors in PHP with error_log() function, which sends an error message to the defined error handling routines. Let’s suppose you are connecting MySQL database with PHP and if it fails to connect with it, you can log errors in PHP like this:
<?php

// Send error message to the server log if error connecting to the database

if (!mysqli_connect("localhost","bad_user","bad_password","my_db")) {

   error_log("Failed to connect to database!", 0);

}

// Send email to administrator if we run out of FOO

if (!($foo = allocate_new_foo())) {

   error_log("Oh no! We are out of FOOs!", 1, "[email protected]");

}

?>
Enable Error Logging in php.ini
To log errors in PHP, open the php.ini file and uncomment/add the following lines of code.
error_reporting = E_ALL & ~E_NOTICE

error_reporting = E_ALL & ~E_NOTICE | E_STRICT

error_reporting = E_COMPILE_ERROR|E_RECOVERABLE_ERROR|E_ER… _ERROR

error_reporting = E_ALL & ~E_NOTICE
If you want to enable PHP error logging in individual files, add this code at the top of the PHP file.
ini_set('display_errors', 1);

ini_set('display_startup_errors', 1);

error_reporting(E_ALL);
Now, you must enable only one statement to parse the log errors in the php.ini file:
display_errors = on.
Now, you can easily see logged errors in your browser. Some of the additional commands you can write for PHP error logging include:
// Turn off all error reporting

error_reporting(0);


// Report simple running errors

error_reporting(E_ERROR | E_WARNING | E_PARSE);


// Reporting E_NOTICE can be good too (to report uninitialized variables or catch variable name misspellings ...)

error_reporting(E_ERROR | E_WARNING | E_PARSE | E_NOTICE);


// Report all errors except E_NOTICE

error_reporting(E_ALL & ~E_NOTICE);


// Report all PHP errors (see changelog)

error_reporting(E_ALL);


// Report all PHP errors

error_reporting(-1);


// Same as error_reporting(E_ALL);

ini_set('error_reporting', E_ALL);
How Do I View PHP Logging Error?
You can check the PHP error log only when it is enabled; in most cases, it is disabled by default. So, before changing code and the configuration, check the PHP info to ensure that PHP logging is enabled on your hosting account.
Method 1: Using the .htaccess File
You can enable the PHP error log by editing the .htaccess file. Find the .htaccess file in the site’s root directory using the file manager or an FTP client. However, go to the control panel’s settings or FTP client to show hidden files if the file is hidden.
Once you’ve found the .htaccess file, follow the steps below:
- Open the .htaccess file and insert the following code:
php_flag log_errors on
php_value error_reporting 32767
php_value error_log “error_log.txt - Create a file titled error_log.txt in the public_html directory
- Save and close the file
- All PHP error logs will be reported in the error_log.txt file
Now the PHP error logging is enabled, verify using the PHP info again, and the Local Value should be on. Don’t worry if the Master Value is still off, as the local value will override it.
If the website experiences any trouble, open the error_log.txt, and you’ll see the PHP error logs.
Method 2: Using php.ini File
The third method to enable the PHP error log is editing the php.ini file. It contains the default web server configuration to run PHP applications.
You can find the php.ini file by accessing the PHP info. Once you open it, press CTRL + F for Windows or Command + F for MacOS to open the search bar and look for the Loaded Configuration File section.

Another method to find the configuration file is using the command line.
Connect to the web server by using an SSH client and execute the following command:
php -i | grep php.ini
It should print output like this:
![]()
That said, here are the common directories for php.ini file depending on the operating system:
- CLI – /etc/php/7.4/cli/php.ini. Note that changing the PHP configuration in CLI won’t affect the web server.
- Apache – /etc/php/7.4/apache2/php.ini.
- Nginx or Apache with PHP-FPM – /etc/php/7.4/fpm/php.ini.
Copy PHP Error Logs to File
The above-defined practices work well when working in the dev environment. But, when you take your website live and start working in production mode, you must hide the errors from the on-screen display and log them within a backend file.
You can save these at a specific PHP error logs location whose URL is already described in the php.ini file.
PHP stores error logs in /var/log/apache2,if it uses an apache2 module. Shared hosts tend to store PHP error log files in your root directory /log subfolder. But…if you have access to the php.ini file you can do this by:
error_log = /var/log/php-scripts.log
If you’re using cPanel, the master log file, what you’re probably looking for is stored (by default) at:
/usr/local/apache/logs/error_log
If all else fails, you can check the PHP error logs location by using:
<?php phpinfo(); ?>
Error logging in PHP Frameworks
The above steps I’ve explained are for core PHP development. PHP has a variety of Model View Architecture (MVC) and micro-frameworks which have their methods on top of the core functions. Some of the best PHP MVC frameworks to build advanced web applications which include: Laravel, CodeIgniter, and Symfony.
Error Logging In Laravel
When you set up a new Laravel project, error logging and exception handling come pre-configured in it. Laravel has a separate class AppExceptionsHandler which takes care of all these issues. For logging Laravel errors, it utilizes the Monolog library which supports a variety of log handlers. Laravel configures several of these handlers for you, allowing you to choose between a single PHP error log file, rotating log files, and writing error information to the system log.
In the config/app.php file, you can configure the PHP option to log the errors on the display of the user. The value of this option can be set in the .env file under property APP_DEBUG which is an environment variable, thus setting up in the app.php file. When developing locally, the value can be set to true, and after migrating to production, it must be set to false. Otherwise, the security concern is always there as it will show error on the browser screen.
You, being the developer, can save Laravel log information on a single file, daily file, Syslog, and the errorlog. To configure these options for Laravel error logging, you must open the app.php file and edit the log option. For instance, if you want to set up daily logging for errors, you will do the following:
'log' => 'daily'
Monolog can log errors with different security warnings. By default, it adds all the errors in storage, but you can identify them as error, emergency, alert, critical, and warning. To do that, add ‘log_level‘ property in options like this:
'log_level' => env('APP_LOG_LEVEL', 'error'),
The log file is present in storage/logs. You can also log errors using log facades.
<?php

namespace AppHttpControllers;

use AppUser;

use IlluminateSupportFacadesLog;

use AppHttpControllersController;


class UserController extends Controller

{

   /**

    * Show the profile for the given user.

    *

    * @param  int $id

    * @return Response

    */

   public function showProfile($id)

   {

       Log::info('Showing user profile for user: '.$id);


       return view('user.profile', ['user' => User::findOrFail($id)]);

   }

}


The logger provides eight different logging levels, including:


Log::emergency($message);

Log::alert($message);

Log::critical($message);

Log::error($message);

Log::warning($message);

Log::notice($message);

Log::info($message);

Log::debug($message);

Error Logging In Symfony
Symfony comes with a default logger which you can inject into the controller showing different warning levels. By default, log entries are written in the var/log/dev.log file when you’re in the var/log/prod.log
use PsrLogLoggerInterface;


public function index(LoggerInterface $logger)

{

   $logger->info('I just got the logger');

   $logger->error('An error occurred');


   $logger->critical('I left the oven on!', [

       // include extra "context" info in your logs

       'cause' => 'in_hurry',

   ]);


   // ...

}
Since Symfony is the parent framework for Laravel, the warning levels of the framework are also the same.
Symfony also uses Monolog for error logging and pre-configures some basic handlers in the default monolog.yaml. Below is the example which uses syslogs to write logs on the file:
// config/packages/prod/monolog.php

$container->loadFromExtension('monolog', [

   'handlers' => [

       'file_log' => [

           'type' => 'stream',

           'path' => '%kernel.logs_dir%/%kernel.environment%.log',

           'level' => 'debug',

       ],

       'syslog_handler' => [

           'type' => 'syslog',

           'level' => 'error',

       ],

   ],

]);
Automating PHP Error Logging Process
You can do the whole work of error logging manually, but when you are working in multiple teams and larger projects, you must set up an automated workflow that can log errors in third-party services like Sentry, Slack, Blackfire, etc.
These tools can provide you a better understanding of errors and their solutions. You can also set up Slack channels to send quick notifications to the teams about any runtime incidents.
You can see this nice example in Symfony which also works similarly.
Assume you have already set up the Slack channel and webhooks as:
monolog:

   handlers:

       main:

           type:  fingers_crossed

           action_level: error

           handler:  nested

       nested:

           type: stream

           path: "%kernel.logs_dir%/%kernel.environment%.log"

           level: debug

       console:

           type: console

       slack:

           type: slack

           token: xxxx-xxxxxxxxxxx-xxxxxxxxx-xxxxxxxxxx-xxxxxx

           channel: "#name-of-channel"

           bot_name: ChooseName

           icon_emoji: :ghost:

           level: critical
The emojis are also set up in the above example, have you seen that? 😀 This shows how you can send Slack notifications to any particular channel as per your needs.
How PHP Errors Are Logged on Cloudways
When you create an account on Cloudways web hosting for PHP and launch the PHP server with the application, you can see the log folder at the root directory which takes care of the server logs. You can find both Apache and Nginx logs there, which help you to identify the potential error logs. Since Cloudways does not allow users to edit php.ini file (you can ask a live support agent to do that for you); but if you carefully see the PHP server settings, you can customize most of the error_reporting and logging settings in the platform.
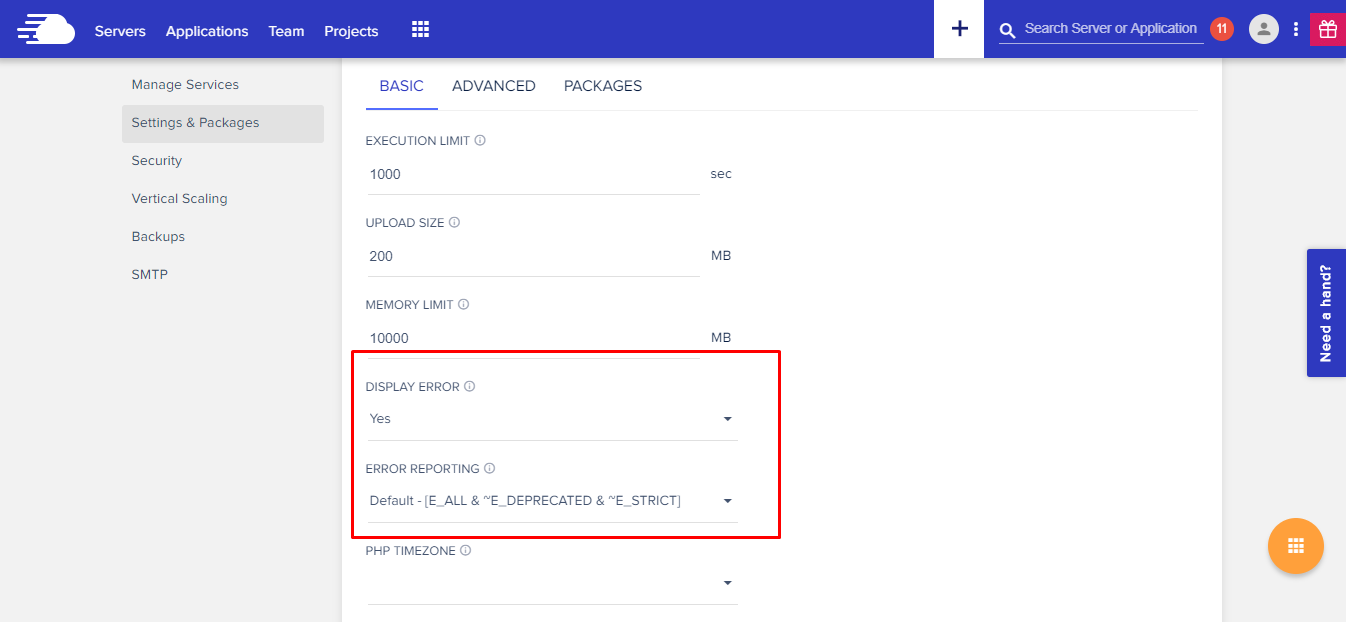
Of course, you also have access to PHP-FPM where you can add php.ini rules to log PHP errors.
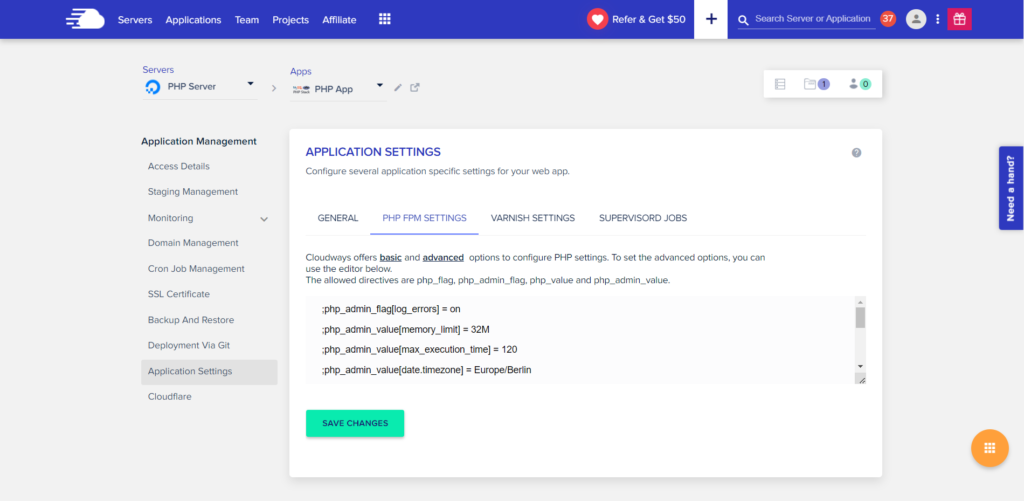
Final Words
PHP error log helps you troubleshoot problems on a website by logging the error details, including the PHP file and code line that needs fixation.
This article has demonstrated how logging errors in PHP are configured in the php.ini file. Further, it discusses the right way to log errors and how to enable and automate PHP error logging, keeping the dev work on track.
If you find this article helpful and want to share your views about the topic, feel free to write down your suggestions in the comments below.
Q: Which PHP error logging library is best to use?
A: Monolog is one of the best PHP error logging libraries available in the market. It provides advanced logging operations for different handlers including database, browser console, chats solutions, and others.
Q: What to do if the PHP error log is not working?
A: First, set the log_errors = on in the php.ini file, it can help if your PHP error logging is not working.
If it still doesn’t work, make sure that the error_log directive is set and the directory in it must be writable by the user that Apache is running under.
Share your opinion in the comment section.
COMMENT NOW
Share This Article
Customer Review at ![]()
“Cloudways hosting has one of the best customer service and hosting speed”
Sanjit C [Website Developer]

Inshal Ali
Inshal is a Content Marketer at Cloudways. With background in computer science, skill of content and a whole lot of creativity, he helps business reach the sky and go beyond through content that speaks the language of their customers. Apart from work, you will see him mostly in some online games or on a football field.
Firstly, I’d like to commend you for looking at the standard error methods within PHP. Unfortunately error_log has some limitations as you found out.
This is a long answer, read on to find out about:
- Errors
- Logging the error directly vs
trigger_errorandset_error_handler - Where good errors go bad — Fatal Errors.
- Logging the error directly vs
- Exceptions
- SPL
- What to do with them?
- Code
- Setup
- Usage
TL;DR Use trigger_error for raising errors and set_error_handler for logging them.
1. Errors
When things don’t go as expected in your program, you will often want to raise an error so that someone or something is notified. An error is for a situation where the program may continue, but something noteworthy, possibly harmful or erroneous has occurred. At this point many people want to log the error immediately with their logging package of choice. I believe this is exactly the wrong thing to do. I recommend using trigger_error to raise the error so that it can be handled with a callback set by set_error_handler. Lets compare these options:
Logging the error directly
So, you have chosen your logging package. Now you are ready to spread the calls to your logger wherever an error occurs in your code. Lets look at a single call that you might make (I’ll use a similar logger to the one in Jack’s answer):
Logger::getLogger('standard')->error('Ouch, this hurts');
What do you need in place to run this code?
    Class:  Logger
    Method: getLogger
    Return: Object with method 'error'
These are the dependencies that are required to use this code. Everyone who wants to re-use this code will have to provide these dependencies. This means that a standard PHP configuration will no longer be sufficient to re-use your code. With the best case, using Dependency Injection you still require a logger object to be passed into all of your code that can emit an error.
Also, in addition to whatever the code is responsible for, it also has responsibility for logging the error. This goes against the Single Responsibility Principle.
We can see that logging the error directly is bad.
trigger_error to the rescue
PHP has a function called trigger_error which can be used to raise an error just like the standard functions do. The error levels that you use with it are defined in the error level constants. As a user you must use one of the user errors: E_USER_ERROR, E_USER_WARNING or the default value E_USER_NOTICE (other error levels are reserved for the standard functions etc.). Using a standard PHP function to raise the error allows the code to be re-used with any standard PHP installation! Our code is no longer responsible for logging the error (only making sure that it is raised).
Using trigger_error we only perform half of the error logging process (raising the error) and save the responsibility of responding to the error for the error handler which will be covered next.
Error Handler
We set a custom error handler with the set_error_handler function (see the code setup). This custom error handler replaces the standard PHP error handler that normally logs messages in the web server error log depending on the PHP configuration settings. We can still use this standard error handler by returning false within our custom error handler.
The custom error handler has a single responsibility: to respond to the error (including any logging that you want to do). Within the custom error handler you have full access to the system and can run any sort of logging that you want. Virtually any logger that uses the Observer design pattern will be ok (I’m not going to go into that as I believe it is of secondary importance). This should allow you to hook in new log observers to send the output to where you need it.
You have complete control to do what you like with the errors in a single maintainable part of your code. The error logging can now be changed quickly and easily from project to project or within a single project from page to page. Interestingly even @ suppressed errors make it to the custom error handler with an errno of 0 which if the error_reporting mask is respected should not be reported.
When Good Errors go Bad — Fatal Errors
It is not possible to continue from certain errors. The following error levels can not be handled from a custom error handler: E_ERROR, E_PARSE, E_CORE_ERROR, E_CORE_WARNING, E_COMPILE_ERROR, E_COMPILE_WARNING. When these sorts of errors are triggered by a standard function call the custom error handler is skipped and the system shuts down. This can be generated by:
call_this_function_that_obviously_does_not_exist_or_was_misspelt();
This is a serious mistake! It is impossible to recover from, and the system is about to shut down. Our only choice is to have a register_shutdown_function deal with the shutdown. However this function is executed whenever a script completes (successful, as well as unsuccessful). Using this and error_get_last some basic information can be logged (the system is almost shutdown at this point) when the last error was a fatal error. It can also be useful to send the correct status code and show an Internal Server Error type page of your choosing.
2. Exceptions
Exceptions can be dealt with in a very similar way to basic errors. Instead of trigger_error an exception will be thrown by your code (manually with throw new Exception or from a standard function call). Use set_exception_handler to define the callback you want to use to handle the exception with.
SPL
The Standard PHP Library (SPL) provides exceptions. They are my preferred way of raising exceptions because like trigger_error they are a standard part of PHP which does not introduce extra dependencies to your code.
What to do with them?
When an exception is thrown there are three choices that can be made:
- Catch it and fix it (the code then continues as if nothing bad happened).
- Catch it, append useful information and re-throw it.
- Let it bubble up to a higher level.
At each level of the stack these choices are made. Eventually once it bubbles up to the highest level the callback you set with set_exception_handler will be executed. This is where your logging code belongs (for the same reasons as the error handling) rather than spread throughout catch statements in your code.
3. Code
Setup
Error Handler
function errorHandler($errno , $errstr, $errfile, $errline, $errcontext)
{
    // Perform your error handling here, respecting error_reporting() and
    // $errno.  This is where you can log the errors.  The choice of logger
    // that you use is based on your preference.  So long as it implements
    // the observer pattern you will be able to easily add logging for any
    // type of output you desire.
}

$previousErrorHandler = set_error_handler('errorHandler');
Exception Handler
function exceptionHandler($e)
{
    // Perform your exception handling here.
}

$previousExceptionHandler = set_exception_handler('exceptionHandler');
Shutdown Function
function shutdownFunction()
{
    $err = error_get_last();

    if (!isset($err))
    {
        return;
    }

    $handledErrorTypes = array(
        E_USER_ERROR      => 'USER ERROR',
        E_ERROR           => 'ERROR',
        E_PARSE           => 'PARSE',
        E_CORE_ERROR      => 'CORE_ERROR',
        E_CORE_WARNING    => 'CORE_WARNING',
        E_COMPILE_ERROR   => 'COMPILE_ERROR',
        E_COMPILE_WARNING => 'COMPILE_WARNING');

    // If our last error wasn't fatal then this must be a normal shutdown.
    if (!isset($handledErrorTypes[$err['type']]))
    {
        return;
    }

    if (!headers_sent())
    {
        header('HTTP/1.1 500 Internal Server Error');
    }

    // Perform simple logging here.
}

register_shutdown_function('shutdownFunction');
Usage
Errors
// Notices.
trigger_error('Disk space is below 20%.', E_USER_NOTICE);
trigger_error('Disk space is below 20%.'); // Defaults to E_USER_NOTICE

// Warnings.
fopen('BAD_ARGS'); // E_WARNING fopen() expects at least 2 parameters, 1 given
trigger_error('Warning, this mode could be dangerous', E_USER_WARNING);

// Fatal Errors.
// This function has not been defined and so a fatal error is generated that
// does not reach the custom error handler.
this_function_has_not_been_defined();
// Execution does not reach this point.

// The following will be received by the custom error handler but is fatal.
trigger_error('Error in the code, cannot continue.', E_USER_ERROR);
// Execution does not reach this point.
Exceptions
Each of the three choices from before are listed here in a generic way, fix it, append to it and let it bubble up.
1 Fixable:
try
{
    $value = code_that_can_generate_exception();
}
catch (Exception $e)
{
    // We decide to emit a notice here (a warning could also be used).
    trigger_error('We had to use the default value instead of ' .
                  'code_that_can_generate_exception's', E_USER_NOTICE);
    // Fix the exception.
    $value = DEFAULT_VALUE;
}

// Code continues executing happily here.
2 Append:
Observe below how the code_that_can_generate_exception() does not know about $context. The catch block at this level has more information which it can append to the exception if it is useful by rethrowing it.
try
{
    $context = 'foo';
    $value = code_that_can_generate_exception();
}
catch (Exception $e)
{
    // Raise another exception, with extra information and the existing
    // exception set as the previous exception.
    throw new Exception('Context: ' . $context, 0, $e);
}
3 Let it bubble up:
// Don't catch it.
Время прочтения
13 мин
Просмотры 35K
Часто вижу, что помимо обработки исключений, люди мучаются кое с чем еще, а именно с логированием.
Большинство людей не знают, что писать в логи, поэтому решают логировать все, что угодно, думая, что все подряд – это в любом случае лучше, чем ничего, и, в конечном итоге, просто создают шум. А шум – это информация, которая никак не помогает вашей команде понять, в чем дело и как решить проблему.
Более того, я не думаю, что эти люди могут уверенно пользоваться уровнями логирования, поэтому используют по умолчанию logger.info везде (если не пишут print).
Наконец, люди, похоже, не знают, как сконфигурировать логирование в Python, понятия не имеют, что такое обработчики, фильтры, методы форматирования (форматтеры) и т.д.
Цель этой статьи – разъяснить, что такое логирование и как вы должны его реализовывать. Я постараюсь привести содержательные примеры и обеспечить вас гибкими эмпирическими приемами, которые следует использовать при логировании в любом приложении, которое вы когда-либо будете создавать.
Введение
Примеры облегчают визуальное восприятие, поэтому мы будем рассматривать следующую систему:
-
Пользователи могут подключать несколько интеграций к ресурсам (например, GitHub, Slack, AWS и т.д.)
-
Ресурсы уникальны в зависимости от интеграции (например, репозитории списков с GitHub, диалоги из Slack, экземпляры списков EC2 из AWS и т.д.)
-
Каждая интеграция уникальна, имеет свой набор сложностей, конечных точек, шагов и т.д.
-
Каждая интеграция может привести к различным ошибкам, которые могут возникнуть в любое время (например, неверная аутентификация, ресурс не существует и т.д.)
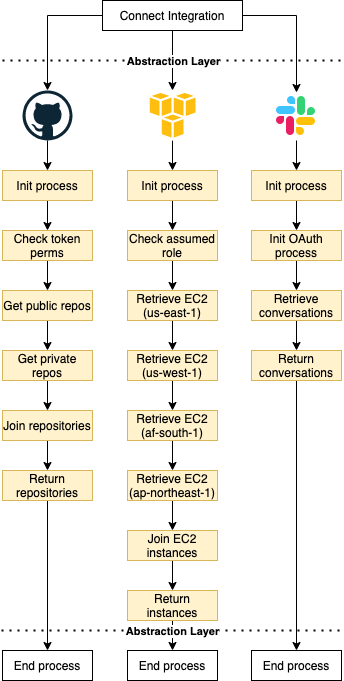
Я не буду сосредотачиваться на проблемах поддержки таких интеграций, просто пронаблюдаем за тем, как это работает.
Природа логирования: хорошее логирование имеет значение
Для начала давайте проанализируем характеристики логов.
Логи должны быть:
-
Наглядными;
-
Контекстными;
-
Реактивными.
«Наглядными» мы их называем потому, что они предоставляют вам какую-то информацию, «контекстными», потому что они дают вам общее представление о том, как обстоят дела на данный момент времени. И наконец, «реактивными» они являются потому, что они позволяют вам предпринимать действия только после того, как что-то произошло (даже если ваши логи отправляются/получаются в режиме реального времени, на самом деле вы не можете изменить то, что произошло только что).
Если вы не будете учитывать природу логов, то будете производить только шум, что снизит вашу производительность.
Дальше я приведу несколько примеров, основанных на системе, которую мы определили выше:
Если вы зададите описание, к примеру «operation connect failed», но не добавите контекст, трудно будет понять, какая из интеграций не отработала, кто пострадал, на каком этапе подключения произошел сбой, поэтому и среагировать вы не можете. В конечном итоге вы будете копаться в тонне логов без малейшего представления о том, где может быть проблема.
О, а еще не стоит недооценивать способность разработчика испортить описание. Сделать это легко, просто отправив поверхностные сообщения без какого-либо контекста, например «An error happened» или «An unexpected exception was raised». Если я прочту такое, то даже не пойму, на что повлияла ошибка, потому что не буду знать, ЧТО конкретно произошло. Так что да, можно сломать даже основной смысл логов.
Логи – это конфиденциальная информация из вашего программного обеспечения, нужная чтобы вы оставались в курсе происходящего и могли реагировать на ситуации. Любые логи, которые не дают вам такой информации – это шум.
Когда нужно логировать?
Чтобы логи оставались реактивными, вам нужно логировать «события». Сделайте их такими же понятными и удобными для чтения, как эта статья. Возможно, вы не прочитали каждую строку, которую я написал выше, но вы все равно можете продолжить дальше, пропустить ненужные разделы и сосредоточиться на том, что привлекло ваше внимание. Логи должны быть такими же.
Есть эмпирическое правило построение логов:

-
В начале соответствующих операций или потоков (например, при подключении к сторонним сервисам и т.д.);
-
При любом достигнутом прогрессе (например, успешная аутентификация, получен валидный код ответа и т.д.);
-
При завершении операции (успешном или неудачном).
Логи должны рассказывать вам историю, у каждой истории есть начало, середина и конец.
Будьте осторожны с релевантностью, добавлять логи проще, чем удалять их, ведь все, что нерелевантно – шум.
Что логировать?
Чтобы логи были наглядными и контекстными, нужно предоставлять правильный набор информации, и я не могу сказать, какая информация будет являться таковой, не зная вашего случая. Давайте вместо этого воспользуемся нашим примером.
Рассмотрим интеграцию с AWS в качестве примера. Было бы круто иметь следующие сообщения:
Хороший пример логов
|
Сообщение |
Понимание картины |
Контекст |
|
|
Началась операция с AWS |
Атрибуты лога должны позволить мне выяснить, кто его вызвал |
|
|
Был достигнут существенный прогресс |
— |
|
|
Операция с AWS завершилась |
Атрибуты лога должны позволить мне найти сущности, на которые операция произвела положительный эффект |
Пример логов об ошибках
Допустим, что извлечь экземпляры из региона af-south-1 не удалось из-за какой-то внезапной ошибки в этом регионе.
|
Сообщение |
Понимание картины |
Контекст |
|
|
Началась операция с AWS |
Атрибуты лога должны позволить мне выяснить, кто его вызвал |
|
|
Операция AWS не завершена, произошел сбой в регионе af-south-1, пострадал пользователь X |
Я должен иметь возможность увидеть трассировку стека ошибки, чтобы понять, почему извлечение не удалось |
В обоих случаях, я могу отследить, когда произошло какое-то событие (в логах есть отметки о времени), что именно произошло и кто от этого пострадал.
Я решил не указывать пользователя при начале и успешном завершении операции, потому что это не имеет значения (ведь это шум), поскольку:
-
Если я знаю, что что-то запустилось, но не знаю результата выполнения, то что я могу сделать?
-
Если все хорошо, то зачем беспокоиться?
Добавление таких данных делает логи шумными, потому что на них невозможно реагировать, делать-то с этим ничего не надо! Но я все еще должен быть в состоянии собрать детальную информацию из атрибутов (кто, когда, почему и т.д.). Если вы хотите что-то измерить, вам следует воспользоваться метриками, а не логами.
С другой стороны, логи об ошибках кажутся более подробными, и так и должно быть! Чтение таких логов дает достаточно уверенности, чтобы немедленно перейти к действиям:
-
Попросите разработчика проверить статус AWS в регионе
af-south-1, и по возможности сделайте sanity check. -
Свяжитесь с пользователем Х и сообщите ему, что вам известно о проблеме в этом регионе.
Ключевой момент следующий: вы можете отреагировать сразу и для этого вам не требуется более глубокого изучения ситуации. Вы знаете все, что вам нужно, и можете немедленно принять меры для уменьшения ущерба. Разработчикам, возможно, потребуется углубиться в трассировку стека, чтобы собрать больше контекста (в случае с ошибкой), но общая картина уже становится ясна.
Любое сообщение об ошибке, в котором отсутствует эта минимальная информация, становится шумом, поскольку у вас появляется беспокойство, но вы все еще не можете действовать. Сначала нужно углубиться в ситуацию, чтобы понять, насколько проблема серьезна.
Если вы все еще не поняли, как писать полезные сообщения, я поделюсь с вами очень простым лайфхаком:
Всегда спрашивайте себя: Что я хочу уяснить для себя, после получения такого лога?
Предоставление контекста с помощью Python
В Python атрибуты логов можно добавить с помощью дополнительного поля, например:
# Do that
logger.info("Connecting to AWS", extra={"user": "X"})
...
logger.info("Connection to AWS has been successful", extra={"user": "X"})
Контекст не отменяет необходимости в содержательных сообщениях! Поэтому я бы так не делал:
# Don't do that
logger.info("Connecting to third-party", extra={"user": "X", "third-party": "AWS"})
Сообщения должны быть четкими и не оставлять места вопросам о том, что же вообще происходит. Контекст должен обогащать ваш опыт, предоставив информацию о более глубоких деталях, и давать вам понимание, по какой причине что-то произошло.
Нечто большее, чем logger.info и logger.error
Не так-то просто понять, что происходит, когда тысячи клиентов выдают логи «Connecting to Slack». Поскольку вы выдаете логи, а вашим приложением пользуются несколько клиентов, нужно иметь возможность фильтровать информацию по релевантности.
В логах бывает много уровней (т.е. уровней релевантности). В Python у вас есть DEBUG, INFO, WARNING, ERROR, CRITICAL. Я рекомендую использовать их все.
Чтобы упростить ситуацию, вот вам новое эмпирическое правило (будьте гибкими):
|
Уровень |
Когда используется |
|
|
Для какой-то действительно повторяющейся информации. Возможно, было бы полезно выдавать весь контекст информации, но порой этого не нужно. |
|
|
Когда происходит что-то важное, достойное того, чтобы о нем было известно большую часть времени. |
|
|
Случилось что-то странное (но не прервало поток/операцию). Если проблема возникнет на более поздних этапах, такой лог может дать вам подсказку. |
|
|
Произошла ошибка, ее следует устранить как можно быстрее. |
|
|
Произошла очень серьезная ошибка, она требует немедленного вмешательства. Если не уверены в критичности ошибки, применяйте |
Для описанной системы/потоков, я бы использовал уровни логов, как определено:
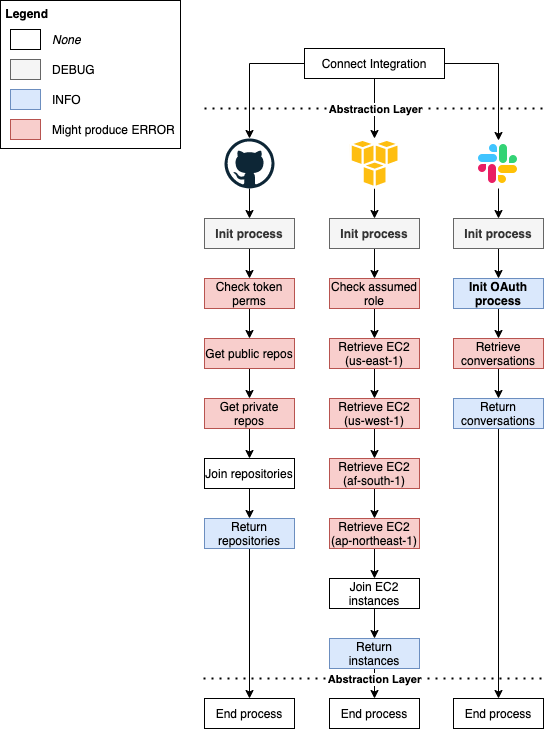
Что делать с logger.critical и logger.warning?
Для примера хочу осветить случаи, когда я бы рассмотрел возможность использования WARNING и CRITICAL.
-
WARNING– недостаточно веская причина для остановки потока, однако это предупреждение на будущее, если возникнет какая-то проблема. -
CRITICAL– самый тревожный предупреждающий лог, который вы когда-либо получите. По сути, он должен быть той самой причиной встать в три часа ночи и пойти что-то чинить.
Для этих случаев мы рассмотрим:
-
Для AWS: если какой-то регион AWS недоступен, мы можем предположить, что у пользователя там нет никаких ресурсов, поэтому можно двигаться дальше.
-
Для Slack: если OAuth завершится неудачно из-за невалидного id клиента, значит остальные пользователи столкнутся с той же проблемой, интеграция не отработает, пока мы вручную не сгенерируем новый id. Это дело кажется достаточно критичным.

Непопулярное мнение: использование DEBUG-уровня на продакшене
Да, я считаю, что логи DEBUG нужно использовать на продакшене.
Другой вариант – включить дебаг после того, как странная ошибка потребует более детального разбирательства.
Простите, но для меня такой вариант недопустим.
В реальном мире клиентам нужна быстрая реакция, командам нужно выполнять свою работу и постоянно поддерживать системы в рабочем состоянии. У меня нет времени и пропускной способности для нового деплоя или включения флага и ожидания повторения проблемы. Я должен реагировать на неожиданные проблемы в считанные секунды, а не минуты.
Правильно настройте логгер
Еще я замечаю, что люди испытывают трудности при настройке логгера (или вообще его не настраивают). Конечно, документация в Python не очень дружелюбная, но это не оправдание, чтобы вообще ее не трогать.
Есть несколько способов настроить логгер. Вы можете использовать logging.config.dictConfig, logging.config.fileConfig или вообще сделать все вручную, вызывая такие команды как setLevel, AddHandler, addFilter.
По моему опыту:
-
Использование ручных команд непросто поддерживать и понимать;
-
fileConfig– негибкая история, у вас не бывает динамических значений (без дополнительных фокусов); -
dictConfig– простая история в запуске и настройке.
Поэтому в качестве примера мы будем придерживаться dictConfig. Еще можно запустить basicConfig, но не думаю, что он вам понадобится, если вы все настроили правильно.
Я поделюсь несколькими советами и определениями, которые вам надо знать, а затем мы создадим окончательную конфигурацию на реальных примерах из проектов, над которыми я работаю.
Вот кусочек того, о чем мы будем говорить дальше:
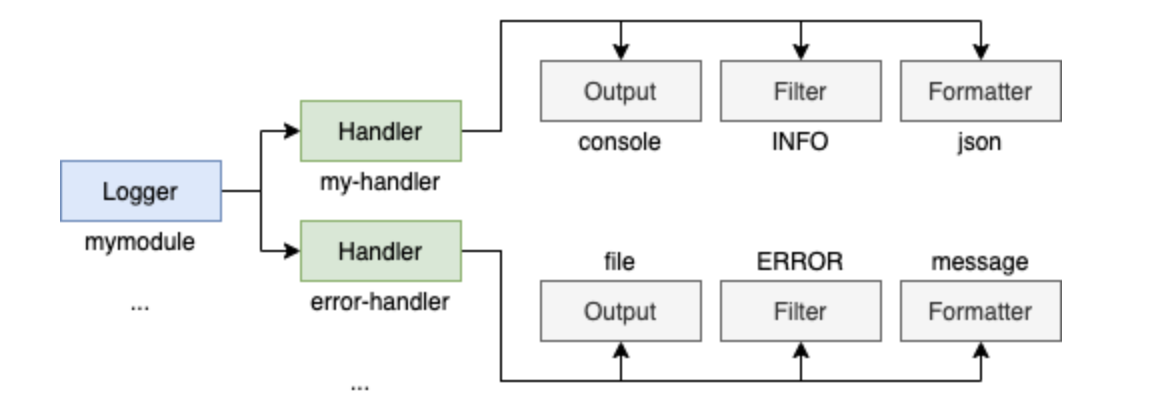
Что такое логгеры?
Логгеры – это объекты, которые вы создаете с помощью logging.getLogger, они позволяют выдавать сообщения. Каждый отдельный логгер может быть привязан к конфигурации со своим собственным набором форматтеров, фильтров, обработчиков и т.д.
Самое интересное, что логгеры образуют иерархию и все наследуются от root-логгера. Дальнейшее наследование определяется «.» (точками), например mymodule.this.that будет наследником mymodule.this.
Посмотрите:
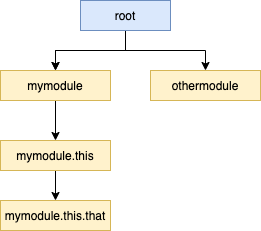
Из-за этого в документации Python есть рекомендация по использованию logger.getLogger(name), поскольку name, вернет лишь пространство имен текущего пакета.
В любом случае, придерживайтесь:
import logging

logger = logging.getLogger(__name__)

def myfunc():
    ...
    logger.info("Something relevant happened")
    ...
Внимание: Вы можете обратиться к корневому логгеру по имени root, пустой строке “” или вообще ни по чему. Да, это сбивает с толку, поэтому используйте root для многословности и ясности.
Форматируйте логи
Форматтеры вызываются для вывода конечного сообщения и отвечают за него преобразование в конечную строку.
Когда я работал в Zak (бывшем Mimic), и даже сегодня в Lumos мы форматировали логи как JSON. Он является хорошим стандартом для систем, работающих на продакшене, поскольку содержит множество атрибутов. Проще визуализировать JSON, чем обычную длинную строку, и для этого вам не нужно создавать свой собственный форматтер (ознакомьтесь с python-json-logger).
Для локальной разработки я рекомендую использовать форматирование по умолчанию для простоты.
Ваше решение будет зависеть от вида проекта. Для Tryceratops я решил использовать обычный форматтер, поскольку он проще и работает локально, там нет нужды в JSON.
Фильтруйте логи
Фильтры можно использовать либо для фильтрации логов (внезапно), либо для добавления дополнительного контекста в запись лога. Рассматривайте фильтры, как хуки, вызываемые до обработки итогового лога.
Их можно определить следующим образом:
class ContextFilter(logging.Filter):
    USERS = ['jim', 'fred', 'sheila']
    IPS = ['123.231.231.123', '127.0.0.1', '192.168.0.1']

    def filter(self, record):  # Add random values to the log record
        record.ip = choice(ContextFilter.IPS)
        record.user = choice(ContextFilter.USERS)
        return True
Адаптировано из https://docs.python.org/3/howto/logging-cookbook.html#using-filters-to-impart-contextual-information
Или их можно добавить прямо в логгер или обработчик для упрощения фильтрации по уровням (скоро будут примеры).
Обрабатывайте логи и то, как все связано
Обработчики представляют из себя комбинации форматтеров, выходных данных (потоков) и фильтров.
С ними вы можете создавать следующие комбинации:
-
Выводить все логи из
info(фильтр), а потом выводитьJSONв консоль. -
Выводить все логи, начиная с
error(фильтр) в файл, содержащий только сообщение и трассировку стека (форматтер).
Наконец логгеры указывают обработчикам.
Пример logging.dictConfig
Теперь, когда вы понимаете, что делают все эти объекты, давайте писать собственные! Как всегда, я постараюсь показать вам примеры из реальной жизни. Я буду использовать конфигурацию Tryceratops. Вы можете открыть ссылку и посмотреть самостоятельно окончательную конфигурацию.
Шаблон конфигурации логирования
Начнем с такого каркаса, создадим константу LOGGING_CONFIG:
import logging.config

LOGGING_CONFIG = {
    "version": 1,
    "disable_existing_loggers": False,
    "formatters": { },
    "handlers": { },
    "loggers": { },
    "root": { },
}

logging.config.dictConfig(LOGGING_CONFIG)
Несколько заметок:
-
Versionвсегда будет 1. Это плейсхолдер для возможных следующих релизов. На данный момент версия всего одна. -
Я рекомендую оставить значение
disable_existing_loggersв False, чтобы ваша система не поглощала другие неожиданные проблемы, которые могут возникнуть. Если вы хотите изменить другие логгеры, я бы порекомендовал их явно переписать (хоть это и скучно). -
Внешний ключ
root, как вы могли догадаться, определяет логгер верхнего уровня, от которого может наследоваться текущий.
Корневой логгер можно определить тремя разными способами, что сбивает с толку:
LOGGING_CONFIG = {
    "version": 1,
    ...
    "loggers": {
        "root": ... # Defines root logger
        "": ... # Defines root logger
    },
    "root": { }, # Define root logger
}
Выбирайте любой! Мне нравится оставлять его снаружи, поскольку так он выглядит очевиднее и подробнее говорит о том, чего я хочу, ведь корневой логгер влияет на все другие определенные логгеры.
Конфигурация логирования: форматтеры
Я дополню пример из Tryceratops примером с JSON из Lumos.
Обратите внимание, что любая конструкция %([name])[type], как %(message) или %(created), говорит форматтеру, что и как отображать.
LOGGING_CONFIG = {
    ...,
    "formatters": {
        "default": {  # The formatter name, it can be anything that I wish
            "format": "%(asctime)s:%(name)s:%(process)d:%(lineno)d " "%(levelname)s %(message)s",  #  What to add in the message
            "datefmt": "%Y-%m-%d %H:%M:%S",  # How to display dates
        },
        "simple": {  # The formatter name
            "format": "%(message)s",  # As simple as possible!
        },
        "json": {  # The formatter name
            "()": "pythonjsonlogger.jsonlogger.JsonFormatter",  # The class to instantiate!
            # Json is more complex, but easier to read, display all attributes!
            "format": """
                    asctime: %(asctime)s
                    created: %(created)f
                    filename: %(filename)s
                    funcName: %(funcName)s
                    levelname: %(levelname)s
                    levelno: %(levelno)s
                    lineno: %(lineno)d
                    message: %(message)s
                    module: %(module)s
                    msec: %(msecs)d
                    name: %(name)s
                    pathname: %(pathname)s
                    process: %(process)d
                    processName: %(processName)s
                    relativeCreated: %(relativeCreated)d
                    thread: %(thread)d
                    threadName: %(threadName)s
                    exc_info: %(exc_info)s
                """,
            "datefmt": "%Y-%m-%d %H:%M:%S",  # How to display dates
        },
    },
    ...
}
Обратите внимание, что имена, которые мы задаем (default, simple и JSON), — произвольные, но актуальные. Вскоре мы к ним обратимся.
Конфигурация логирования: обработчики
ERROR_LOG_FILENAME = ".tryceratops-errors.log"

LOGGING_CONFIG = {
    ...,
    "formatters": {
        "default": { ... },
        "simple": { ... },
        "json": { ... },
    },
    "handlers": {
        "logfile": {  # The handler name
            "formatter": "default",  # Refer to the formatter defined above
            "level": "ERROR",  # FILTER: Only ERROR and CRITICAL logs
            "class": "logging.handlers.RotatingFileHandler",  # OUTPUT: Which class to use
            "filename": ERROR_LOG_FILENAME,  # Param for class above. Defines filename to use, load it from constant
            "backupCount": 2,  # Param for class above. Defines how many log files to keep as it grows
        },
        "verbose_output": {  # The handler name
            "formatter": "simple",  # Refer to the formatter defined above
            "level": "DEBUG",  # FILTER: All logs
            "class": "logging.StreamHandler",  # OUTPUT: Which class to use
            "stream": "ext://sys.stdout",  # Param for class above. It means stream to console
        },
        "json": {  # The handler name
            "formatter": "json",  # Refer to the formatter defined above
            "class": "logging.StreamHandler",  # OUTPUT: Same as above, stream to console
            "stream": "ext://sys.stdout",
        },
    },
    ...
}
Обратите внимание, что если вы используете logging.fileConfig, иметь хорошую константу, такую как ERROR_LOG_FILENAME, невозможно. Эту же информацию можно прочитать из переменных среды, если хотите.
Также обратите внимание, что классы/параметры, которые я использую для обработчиков, создавал не я. Они из библиотеки logging, и там есть не только они!
Конфигурация логирования: логгеры и root
LOGGING_CONFIG = {
    ...,
    "formatters": {
        "default": { ... },
        "simple": { ... },
        "json": { ... },
    },
    "handlers": {
        "logfile": { ... },
        "verbose_output": { ... },
        "json": { ... },
    },
    "loggers": {
        "tryceratops": {  # The name of the logger, this SHOULD match your module!
            "level": "INFO",  # FILTER: only INFO logs onwards from "tryceratops" logger
            "handlers": [
                "verbose_output",  # Refer the handler defined above
            ],
        },
    },
    "root": {  # All loggers (including tryceratops)
        "level": "INFO",  # FILTER: only INFO logs onwards
        "handlers": [
            "logfile",  # Refer the handler defined above
            "json"  # Refer the handler defined above
        ]
    }
Давайте разберемся, что происходит:
-
В
rootмы определяем все логи, кромеDEBUG, которые будут обрабатыватьсяlogfileи обработчикамиJSON. -
Обработчик
logfileотфильтровывает только логиERRORиCRITICAL, и выводит их в файл с форматтером по умолчанию. -
JSONпринимает все входящие логи (без фильтра) и выводит их в консоль сJSON-форматтером. -
Tryceratopsпереопределяет некоторые конфигурации, унаследованные отroot, такие какlevel(несмотря на то, что это то же самое), иhandlersдля использования толькоverbose_output. -
verbose_outputпринимает все входящие логи (фильтр поDEBUG) и выводит их в консоль, используя форматтерsimple.
Имя логгера tryceratops – это очень важная часть, и оно должно соответствовать логгерам, которые я создам позже. Для нашего примера, когда я пишу: logger.getLogger(name) внутри модуля, я получаю такие имена как tryceratops.main, tryceratops.runners или tryceratops.files.discovery, и все они соответствуют созданному нами правилу.
Я определил новый набор обработчиков для tryceratops, но все другие логгеры (в том числе из сторонних библиотек) будут использовать те, которые находятся в корне.
Кроме того, обратите внимание, что я могу переписать правила по умолчанию. Через настройки или позже динамически. Например, каждый раз, когда triceratops получает подобный флаг от CLI, он обновляет конфигурацию logging чтобы включить дебаг.
Логирование – это важно, но наличие хорошо структурированных исключений и блоков try/except также важно, поэтому вы можете также прочитать, как профессионально обрабатывать и структурировать исключения в Python.
Материал подготовлен в рамках курса «Python Developer. Basic».
Всех желающих приглашаем на demo-занятие «Основы ООП». Цели занятия: научиться работать с классами и познакомиться с наследованием.
Краткое содержание:
— мутабельность экземпляров класса
— передача аргументов в инициализатор
— наследование
— переопределение методов
— обращение к методам суперкласса
>> РЕГИСТРАЦИЯ