This document provides information on how to troubleshoot linking and importing errors while importing audio files.
Identify linking and importing errors with audio files
When you try to import audio files like AVCHD (MTS), MP3, and MP4 files in your project using Premiere Pro, you could get an error message that says, «The file has an unsupported compression type.» This error is sometimes noticed with other Adobe audio and video products like After Effects and Media Encoder.
Troubleshoot importing errors
-
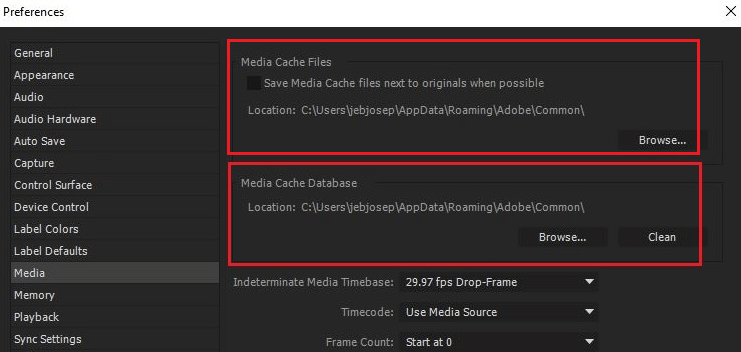
When you see an error, «The file has an unsupported compression type’, check the Media cache and the Media cache database in Premiere Pro.
-
Select Edit Menu>Preferences>Media Cache Database on Windows OS or Premiere Pro menu > Preferences > Media Cache Database on Mac OS. Make a note of this location.

Clearing media cache -
Close Premiere Pro and other Adobe audio & video applications.
-
Navigate to the Media Cache location specified under Premiere Pro > Preferences and rename the folders, Media Cache file, and Media Cache. Select Clean to clean the media cache database folder.
-
Launch Premiere Pro and attempt to import your files.
-
If you still see an issue, change the file directory where the AVCHD files reside and check if the issue gets resolved. For example, if the folder structure is:
AVCHD>BDMV>STREAM>.MTS0000
Create another folder, XYZ, and move the contents of the AVCHD folder to XYZ folder.
Ensure that the folder structure of the MTS files is identical to the original folder.
-
If the error persists, the issue could be related to activation.
-
Check if you are using a trial version of Adobe Premiere Pro. If you are using a trial version, you would experience problems with importing AVCHD and MP4 files as the required .dll files are not installed in the location, C:UsersPublicPublic DocumentsAdobeInstalledCodecs. Upgrade to a paid creative cloud membership.
-
On Windows OS, uninstall Premiere Pro.
-
Select C:UsersPublicPublic DocumentsAdobeInstalledCodecs.
-
Rename the folder, AdobeInstalledCodecs to another name.
Renaming the ‘AdobeInstalledCodecs’ folder on Windows OS -
Launch Premiere Pro and attempt to import your MTS or MP4 files.
-
On Mac OS, uninstall Premiere Pro.
-
Select Mac HD/Users/User Name/Shared and rename the folder, AdobeInstalledCodecs to another name.
Renaming the ‘AdobeInstalledCodecs’ folder on Mac OS -
Launch Premiere Pro and attempt to import your MTS or MP4 files.


Take a closer look at the Media Cache folder if Premiere Pro doesn’t allow file import
by Tashreef Shareef
Tashreef Shareef is a software developer turned tech writer. He discovered his interest in technology after reading a tech magazine accidentally. Now he writes about everything tech from… read more
Updated on December 29, 2022
Reviewed by
Alex Serban

After moving away from the corporate work-style, Alex has found rewards in a lifestyle of constant analysis, team coordination and pestering his colleagues. Holding an MCSA Windows Server… read more
- If you’re wondering how to fix unsupported compression types in Premiere Pro, you’re in the right place.
- This error occurs when trying to import an audio or video file, so you might want to tweak the extensions a bit.
- Cache piling up can also trigger the file having an unsupported compression type, so a quick cleanup should help.

XINSTALL BY CLICKING THE DOWNLOAD FILE
This software will repair common computer errors, protect you from file loss, malware, hardware failure and optimize your PC for maximum performance. Fix PC issues and remove viruses now in 3 easy steps:
- Download Restoro PC Repair Tool that comes with Patented Technologies (patent available here).
- Click Start Scan to find Windows issues that could be causing PC problems.
- Click Repair All to fix issues affecting your computer’s security and performance
- Restoro has been downloaded by 0 readers this month.
Adobe’s Premiere Pro is an industry standard when it comes to consumer-grade video editing software and most of it has to do with its wider file format support and ease of use.
However, some users have reported that they are unable to import audio files like MP3, MP4, AVI, or AVCHD due to a very particular error related to unsupported compression type in Premiere Pro.
What does unsupported compression type mean?
The full error reads the file has an unsupported compression type and occurs when you try to import any media file. However, some specific formats – such as AVI – tend to be more affected than others.
Now, the original file can be easily blamed for being incompatible with the AVI format. However, other culprits can interfere such as cache accumulation or folder-related glitches.
Let’s quickly go through some of the most common scenarios:
- The file has an unsupported compression type MP4, MP3
- This file has an unsupported compression type MkV, AVI
- Premiere Pro file has unsupported compression type
- Adobe Premiere Rush unsupported compression type
Now that you know what you’re up against, you should also know that this is a common issue and mostly occurs due to the incorrect file format. In this article, we take a look at the best possible solutions to fix it.
Why can’t I import MP3 or MP4 files in Premiere Pro?
- What does unsupported compression type mean?
- Why can’t I import MP3 or MP4 files in Premiere Pro?
- 1. Make changes to the file and/or folder
- 2. Clear Media Cache Files and Database ✅
- 3. Change the File Extension
Before we begging the actual troubleshooting, we advise you to check if you are using a trial version of Adobe Premiere Pro.
Adobe Premiere Pro may not function properly with some file formats when the trial version is active. If you have the license for the product, make sure it is activated.
1. Make changes to the file and/or folder
- Change the file directory: Before attempting to import the file, change the file location and then attempt to import the file.
- If your file is in one folder, move it to an alternative folder and try to import it from there.
- Should the issue persist, try to move the file to another disk or partition and try again.
2. Clear Media Cache Files and Database ✅
- Launch Adobe Premiere Pro.
2. Click on the Edit menu and select Preferences.
3. Select the Media tab from the left pane.
- Here, note down the location for Media Cache Files and Media Cache Database. Copy the location to a notepad or something for better accessibility.
4. Close the Adobe Premiere Pro app and any other Adobe program running on your computer.
5. Open the File Explorer and navigate to the Media Cache Files and Media Cache Database locations, one by one.
6. Rename the folders, Media Cache File, and Media Cache.
7. Now launch Adobe Premiere Pro again and go to Edit > Preferences > Media.
8. Click the Clean button for the Media Cache Database folder.
9. Close and re-launch Adobe Premiere Pro and attempt to import the file with the error and check for any improvements.
- Adobe Premiere Pro not Exporting Full Video? How We Fixed it
- FIX: Adobe Premiere Pro could not find valid editing modes
- FIX: Video driver not supported in Premiere Pro
- Unspecified Drawing Error [After Effects / Premiere Pro]
- [Fixed] This Effect Requires GPU Acceleration: 5 Quick Ways
3. Change the File Extension
- Before importing the media file, try to change the default file extension to something else.
- For instance, if you want to import a .avi file, change the extension to .mpg.
- This makes Premiere Pro use a more tolerant import format that will accept a non-standardized file as a valid import.
You can also use the best audio converter software to convert your media files to a supported format.
And if nothing seems to work, try to reinstall Premiere Pro. After uninstalling it, make sure you remove any leftover junk using registry cleaning software. Finally, you can proceed with the reinstallation.
That’s it! We hope you managed to fix the unsupported compression type Premiere Pro error with one of these solutions.
Still having issues? Fix them with this tool:
SPONSORED
If the advices above haven’t solved your issue, your PC may experience deeper Windows problems. We recommend downloading this PC Repair tool (rated Great on TrustPilot.com) to easily address them. After installation, simply click the Start Scan button and then press on Repair All.
![]()
Newsletter
Оглавление:
- Почему я не могу импортировать файлы MP3 или MP4 в Premiere Pro?
- 1. Измените расширение файла
- 2. Очистить кэш-память файлов и базу данных
- 3. Другие решения, чтобы попробовать
Видео: 8 Steps to Edit a Video in Premiere Pro (Start to Finish) 2023
Adobe Premiere Pro является отраслевым стандартом, когда речь идет о программном обеспечении для редактирования видео потребительского уровня, и в большинстве своем оно связано с более широкой поддержкой форматов файлов и простотой использования. Однако некоторые пользователи сообщают, что не могут импортировать некоторые аудиофайлы, такие как MP3, MP4 или AVCHD, из-за ошибки.
Полная ошибка гласит: «Файл имеет неподдерживаемый тип сжатия» и возникает при попытке импортирования любого медиа-файла. Это распространенная проблема, которая возникает в основном из-за неправильного формата файла. Мы рассмотрим лучшие возможные решения, чтобы исправить эту ошибку.
Почему я не могу импортировать файлы MP3 или MP4 в Premiere Pro?
1. Измените расширение файла
- Перед импортом медиа-файла попробуйте изменить расширение файла по умолчанию на что-то другое. Например, если вы хотите импортировать файл .avi, измените расширение на .mpg.
- Это заставляет Premiere Pro использовать более терпимый формат импорта, который будет принимать нестандартный файл в качестве допустимого импорта.
- Вы также можете использовать лучшее программное обеспечение для конвертации аудио, чтобы конвертировать ваши медиафайлы в поддерживаемый формат.

2. Очистить кэш-память файлов и базу данных
- Запустите Adobe Premiere Pro.
- Нажмите на меню « Правка» и выберите « Настройки».
- Перейдите на вкладку « Медиа » на левой панели.
- Здесь запишите расположение для « Media Cache Files » и « Media Cache database ». Скопируйте местоположение в блокнот или что-то для лучшего доступа.
- Закройте приложение Adobe Premiere Pro и любую другую программу Adobe, запущенную на вашем компьютере.
- Откройте «Проводник» и последовательно перейдите к папкам «Файлы мультимедийного кэша » и « База данных мультимедийного кэша ». Переименуйте папки, Media Cache File и Media Cache.
- Теперь снова запустите Adobe Premiere Pro и выберите «Правка»> «Настройки»> «Мультимедиа».
- Нажмите кнопку «Очистить» для папки «База данных Media Cache».
- Закройте и перезапустите Adobe Premiere Pro, попробуйте импортировать файл с ошибкой и проверьте наличие улучшений.

Проблема с Premiere Pro появляется только при импорте определенных аудиофайлов. Попробуйте конвертировать их с помощью этих инструментов.
3. Другие решения, чтобы попробовать
- Измените каталог файлов. Прежде чем пытаться импортировать файл, измените его местоположение, а затем попытайтесь импортировать файл. Если ваш файл находится в одной папке, переместите его в другую папку и попробуйте импортировать его оттуда. Если проблема сохраняется, попробуйте переместить файл на другой диск или раздел и повторите попытку.
- Проверьте, используете ли вы пробную версию Adobe Premiere Pro. Adobe Premiere Pro может работать неправильно с некоторыми форматами файлов, когда активна пробная версия. Если у вас есть лицензия на продукт, убедитесь, что он активирован.
- Удалите и установите заново Premiere Pro. Если ничего не работает, попробуйте переустановить программное обеспечение. После удаления убедитесь, что вы удалили все оставшиеся ненужные файлы, используя программное обеспечение для очистки реестра.


Hi Guys, Today I am Going to Show You How to Fix “The file has an unsupported compression type” in Adobe Premiere Pro?
Are you Looking for the Commonly Searched Term “How to Fix “The file has an unsupported compression type” in Adobe Premiere Pro?” (or) “How to Import MKV Files into Adobe Premiere Pro (After Adobe Removed MKV Support)?”. You are at the Right Place to Get Your Answers & Solve the Issue/Error.
Check Out This: How to Transfer a Domain Easily from One Registrar to Another (In 3 Steps)? | Step-By-Step Domain Transfer Tutorial
“After the release of Adobe Premiere CC 2019 13.1.3, Adobe removed the support for decoding MKV. So there will be no .mkv Support for Adobe Premiere Pro. If You want to Use it then Stick with Earlier Versions like (Adobe Premiere Pro CC 2018 12.1 which is way before the Adobe Premiere CC 2019 13.1.3.”
Steps For How to Fix “The file has an unsupported compression type” in Adobe Premiere Pro?
Method 1: Using Paid Plugins
The Most Simplest and Easiest Method are Using Plugins Which Provide a Wide range of formats and codec Support for Adobe Premiere Pro.
Plugin – Aescripts Autokroma Influx Plugin
Buy Plugin Here – https://aescripts.com/influx/
Aescripts Autokroma Influx Plugin Which Makes the Process Very Simpler.
Installation Notes
Step 1: Just Buy the Plugin and Install it or Copy and Paste the Plugin Folder into the following location.
C:Program FilesAdobeCommonPlug-ins7.0MediaCore
Step 2: Now Import the MKV Files into the Adobe Premiere Pro.
That’s It.
Method 2: Use Video File Converters
If you cant Pay for a plugin then use the Best Free Video File converters Like VLC Media Player, and Handbrake, XMedia Recode.
1.XMedia Recode – https://www.xmedia-recode.de/en/download.php
2.Handbrake – https://handbrake.fr/
3.VLC Media Player – https://www.videolan.org › vlc
Step 1: Just Import the MKV Files into Converters and Select the Output Formats (According to Adobe Supported file format lists) (Most Recommended Format is .MP4) and Convert it.
Step 2: Now Open Adobe Premiere Pro and Import the Converted File.
That’s It.
That’s It! You’re Done Man!
That’s All About this Post. Give Your Reviews / Reactions about this Post and Leave Comments, Ask Your Doubts, We are here to Help You!
here you go
General
ID : 1 (0x1)
Complete name : D:Videos4K Video DownloaderVTUBER Seal thinks with Portals. — Copy.mp4
Format : MPEG-TS
File size : 2.81 GiB
Duration : 2 h 25 min
Overall bit rate mode : Variable
Overall bit rate : 2 758 kb/s
FileExtension_Invalid : ts m2t m2s m4t m4s tmf ts tp trp ty
Video
ID : 257 (0x101)
Menu ID : 1 (0x1)
Format : AVC
Format/Info : Advanced Video Codec
Format profile : High@L3.1
Format settings : CABAC / 4 Ref Frames
Format settings, CABAC : Yes
Format settings, Reference frames : 4 frames
Format settings, GOP : M=4, N=60
Codec ID : 27
Duration : 2 h 25 min
Width : 1 280 pixels
Height : 720 pixels
Display aspect ratio : 16:9
Frame rate : 30.000 FPS
Color space : YUV
Chroma subsampling : 4:2:0
Bit depth : 8 bits
Scan type : Progressive
Color range : Limited
Color primaries : BT.709
Transfer characteristics : BT.709
Matrix coefficients : BT.709
Audio
ID : 256 (0x100)
Menu ID : 1 (0x1)
Format : AAC LC
Format/Info : Advanced Audio Codec Low Complexity
Format version : Version 4
Muxing mode : ADTS
Codec ID : 15-2
Duration : 2 h 25 min
Bit rate mode : Variable
Channel(s) : 1 channel
Channel layout : C
Sampling rate : 48.0 kHz
Frame rate : 46.875 FPS (1024 SPF)
Compression mode : Lossy
Delay relative to video : -47 ms
Menu
ID : 4096 (0x1000)
Menu ID : 1 (0x1)
Duration : 2 h 25 min
List : 256 (0x100) (AAC) / 257 (0x101) (AVC) / 258 (0x102) ()

Updated February 2023: Stop these error messages and fix common problems with this tool. Get it now at this link
- Download and install the software.
- It will scan your computer for problems.
- The tool will then fix the issues that were found.
Adobe Premiere Pro is undoubtedly one of the most popular and widely used video editing software. This software has many advanced features that allow the user to create amazing movies and high-quality content.
Although Adobe Premiere Pro is very popular and widely used, it is sometimes characterized by instability and unusual behavior due to constant updates and new features.
So in this article, we will look at two of the most common issues with Premiere Pro, which is that The Premiere Pro Importer reports a common error.
Most of the time there is no problem with the video, it’s a problem related to the software not being able to process and detect it.
Regular development and flexibility can be a major factor in this regard. This is why beta and half-baked software is so common in today’s digital world. This results in the following problem: Importer reports a generic error, Importer Premiere Pro reports a generic error.

The codec is not supported:
All video capture devices use different codecs. If the codec is not supported in Adobe Premiere Pro, you will not be able to import it to the timeline. In this case, you must change the video file codec.
Unsupported video file format:
Adobe Premiere is quite generous with its video file format, but for obvious reasons, it doesn’t support all video file formats. Thus, if the video you’re trying to import isn’t supported by the application, you’ll end up getting an error message.
Activation issues:
According to Adobe, activation issues can sometimes interfere with some of the importer’s functions. So make sure that the program is activated and that you are logged into your Creative Cloud account.
Video File Name:
In some cases, the video file name may also cause a problem. Some characters in the file name may be causing the problem.
How to fix the error?
Updated: February 2023
This tool is highly recommended to help you fix your error. Plus, this tool offers protection against file loss, malware, and hardware failures, and optimizes your device for maximum performance. If you already have a problem with your computer, this software can help you fix it and prevent other problems from recurring:
- Step 1 : Install the PC Repair and Optimizer Tool. (Windows 10, 8, 7, XP, Vista).
- Step 2 : Click Start Scan to determine what problems you are experiencing with your computer.
- Step 3 : Click Repair Allto resolve all problems.

Solution 1: Check the format and codec of the video file
The first thing to do when you see an error message is to check if the video format and codec are supported by Adobe. Some codecs are not supported by Adobe Premiere, for example, support for the QuickTime codec has been removed by Adobe. In this case, you need to re-encode the movie to a newer/modern codec.
Also, if the video file format is not supported by Adobe, you will not be able to import the file. Likewise, you need to change the format of the video file, which is pretty easy. See this link for a list of supported video file formats.
Solution 2: Clear the media file cache
Another option is to clear the media cache and then try to import the files. When you import video or audio files into Adobe Premiere, the program saves versions of those files that you can quickly access again for better performance. These saved versions are called media cache files. Here’s how to delete the files :
1.) Close Adobe Premiere Pro and go to the Users<username>AppDataRoamingAdobeCommon directory. Note that the AppData folder is hidden by default, so make sure it is not visible.
2.) If you are using a Mac, go to /Users//Library/Application Support/Adobe/Common.
3.) Delete the files, and then start Adobe Premiere Pro.
4.) If you have trouble finding the above path, you can also just go to Preferences and then to the Media Cache tab.

Solution 3: Move the files to another location or rename them
In some cases, the problem may be related to the specified path to the video or audio files.
In this case, you need to change the path to the files, i.e. move them to another drive or just to another folder.
Many users have reported this and it has helped them solve the problem.
You can also try just renaming the files in the same directory and then try importing the files. If that doesn’t work, just move them to a different location.
Solution 4: Reinstall Premiere Pro
If all of the above solutions don’t work for you, there may be a problem with the software installation and you may need to reinstall it. Here’s how to do it:
1.) Open Creative Cloud.
2.) Uninstall Adobe Premiere Pro, keeping the default settings (uninstall option).

3.) Then reinstall it and see if that solves the problem.
APPROVED: To fix Windows errors, click here.
Frequently Asked Questions
1) Close Premiere Pro and open it again. Then create a new project and try importing the MP4 into Premiere Pro.
2) Save the other running projects and restart your computer.
3) Disable and re-enable hardware acceleration.
If you see the «File has unsupported compression type» error message, check the media cache and media cache database in Premiere Pro. Choose Edit > Preferences > Media Cache Database in Windows or Premiere Pro > Preferences > Media Cache Database in Mac OS. Make a note of this location.
One is the «Importer reported a common error» error message. It appears when you try to import video into the Timeline using the Importer. This can be caused by many things, such as an unsupported codec or video file format.
The only real way to open files that are not supported by the software you are using is to convert the file type to a supported file. The conversion ensures that the file remains intact and you can always open it with the program you need. You can do this with the help of online conversion sites.
Post Views: 240
File Has An Unsupported Compression Type Premiere Pro
 Чтобы исправить различные проблемы с ПК, мы рекомендуем Restoro PC Repair Tool: Это программное обеспечение исправит распространенные компьютерные ошибки, защитит вас от потери файлов, вредоносных программ, сбоев оборудования и оптимизирует ваш компьютер для максимальной производительности. Устраните проблемы с ПК и удалите вирусы прямо сейчас за 3 простых шага:
- Скачать Restoro PC Repair Tool который поставляется с запатентованными технологиями (имеется патент Вот ).
- Нажмите Начать сканирование чтобы найти проблемы с Windows, которые могут вызывать проблемы с ПК.
- Нажмите Починить все для устранения проблем, влияющих на безопасность и производительность вашего компьютера
- Restoro был загружен0читатели в этом месяце.
Adobe Premiere Pro — это отраслевой стандарт, когда дело доходит до ПО для редактирования видео потребительского уровня и большая часть этого связана с поддержкой более широкого формата файлов и простотой использования. Однако некоторые пользователи сообщают, что они не могут импортировать некоторые аудиофайлы, такие как MP3, MP4 или AVCHD, из-за ошибки.
Полная ошибка читается как «файл имеет неподдерживаемый тип сжатия» и возникает при попытке импортировать любой медиафайл. Это распространенная проблема, которая чаще всего возникает из-за неправильного формата файла. В этой статье мы рассмотрим лучшие возможные решения для исправления этой ошибки.
Почему я не могу импортировать файлы MP3 или MP4 в Premiere Pro?
1. Измените расширение файла.
- Перед импортом медиафайла попробуйте изменить расширение файла по умолчанию на другое. Например, если вы хотите импортировать .avi файл, измените расширение на .mpg.
- Это заставляет Premiere Pro использовать более терпимый формат импорта, который принимает нестандартный файл в качестве допустимого импорта.
- Вы также можете использовать лучшее программное обеспечение для конвертации аудио для преобразования ваших медиафайлов в поддерживаемый формат.

2. Очистить файлы кэша мультимедиа и базу данных.
- Запуск Adobe Premiere Pro.
- Нажмите на редактировать меню и выберите Предпочтения.
- Перейти к Половина вкладка на левой панели.
- Здесь запишите местоположение ‘ Файлы кэша мультимедиа ‘ и ‘ База данных Media Cache «. Скопируйте местоположение в блокнот или что-нибудь еще для большей доступности.
- Закройте приложение Adobe Premiere Pro и любую другую программу Adobe, работающую на вашем компьютере.
- Откройте «Проводник» и перейдите к « Файлы кэша мультимедиа ‘ и ‘ База данных медиа-кэша »Расположение по одному. Переименуйте папки, Media Cache File и Media Cache.
- Теперь снова запустите Adobe Premiere Pro и перейдите в Правка> Настройки> Медиа.
- Нажмите кнопку «Очистить» для « База данных медиа-кэша ‘ папка.
- Закройте и повторно запустите Adobe Premiere Pro, попробуйте импортировать файл с ошибкой и проверьте наличие улучшений.

Проблема с Premiere Pro появляется только при импорте определенных аудиофайлов. Попробуйте преобразовать их с помощью этих инструментов.
3. Другие решения, которые стоит попробовать
- Измените каталог с файлом: перед попыткой импорта файла измените местоположение файла, а затем попытайтесь импортировать файл. Если ваш файл находится в одной папке, переместите его в другую папку и попробуйте импортировать оттуда. Если проблема не исчезнет, попробуйте переместить файл на другой диск или раздел и повторите попытку.
- Убедитесь, что вы используете пробную версию Adobe Premiere Pro. Adobe Premiere Pro может некорректно работать с некоторыми форматами файлов, когда активна пробная версия. Если у вас есть лицензия на продукт, убедитесь, что она активирована.
- Удалите и переустановите Premiere Pro. Если ничего не работает, попробуйте переустановить программное обеспечение. После удаления убедитесь, что вы удалите остатки мусора с помощью программного обеспечения для очистки реестра .

РОДСТВЕННЫЕ ИСТОРИИ, КОТОРЫЕ ВАМ МОЖЕТ ПОНРАВИТЬСЯ: