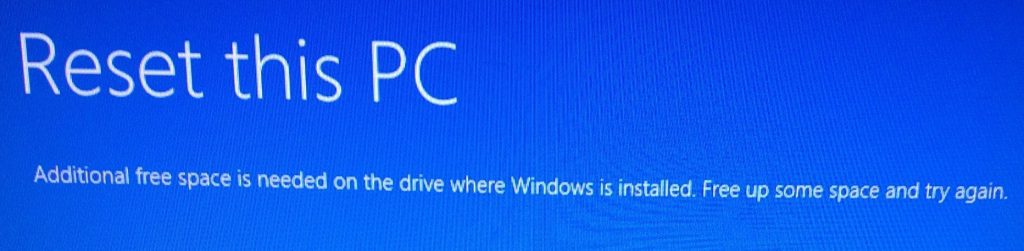
Have you ever encountered an error message saying that “Additional free space is needed on the drive where Windows is installed. Free up some space and try again” when you try to reset or refresh your PC? If so, you can follow the below guidance from MiniTool to solve the unable to refresh/wipe problem.
Not Enough Disk Space Errors When Try to Reset to Factory Settings
Case One from Microsoft Answers
“My computer is stuck in an automatic repair loop. When I try ‘refresh your PC’, it states ‘additional free space is needed on the drive where Windows is installed. Free up some space and try again.’ But, of course I can’t because I can’t get in there to free space!”
Case Two: HP Stream Not Enough Disk Space
“In short, my son set up laptop we bought and then promptly forgot the email address to login. We can’t reset it via Gmail as they can’t verify us so need to reset to factory settings and start again. I followed instructions to do this online but it came up saying not enough disk space to continue. Any ideas on how to overcome this? I eventually have a laptop we can’t use now and it is causing me a lot of stress”
Case Three from Reddit
“Hi my Acer is stuck in a repair loop. Just after a Windows update, I noticed there was no sound coming from the speakers — the driver had completely disappeared from device manager. I tried reinstalling legacy drivers to see if I could get the speakers to work… This resulted in my pc crashing and an error ‘Additional free space is needed on the drive where Windows is installed. Clear some space and try again’.”
How to Fix “Additional Free Space Is Needed on the Drive Where Windows Is Installed”?
For this kind of automatic repair failure, it is due to the low disk space of C Drive. Therefore, to get rid of this issue, just as the error message mentioned, you should free up disk space. Yet, the process of freeing up drive space is slow and sometimes it doesn’t help much. Then, you need a much quicker way to just increase the size of C Partition.
In most cases, users need to refresh or reset their PCs when they cannot access the operating system (OS). Yet, when they try to reset/refresh the machine, their computers stuck on the Windows 10/11 automatic repair loop with some errors like “Additional free space is needed on the drive where Windows is installed”. Let’s see how to escape this loop and repair Windows 10/11 (here).
Part One – Create Bootable Device
Since you are unable to get into the OS, the first thing you should do is to try to reach your system environment before you can enlarge your drive C. To boot into the failed computer, you can rely on a bootable device created from another healthy machine. Following is the guide for how to create bootable media with MiniTool Partition Wizard Pro, a professional hard disk partition manager.
Before starting, prepare a USB flash drive (no less than 16GB) or CD/DVD and plug it into a healthy computer. The USB drive or CD/DVD will be overwritten during the process of creating a bootable device, so make sure there are no important files/folders on the device.
1. Purchase, install and launch Partition Wizard on the working PC.
Buy Now
2. In the main interface of the software, click Bootable Media in the upper right.
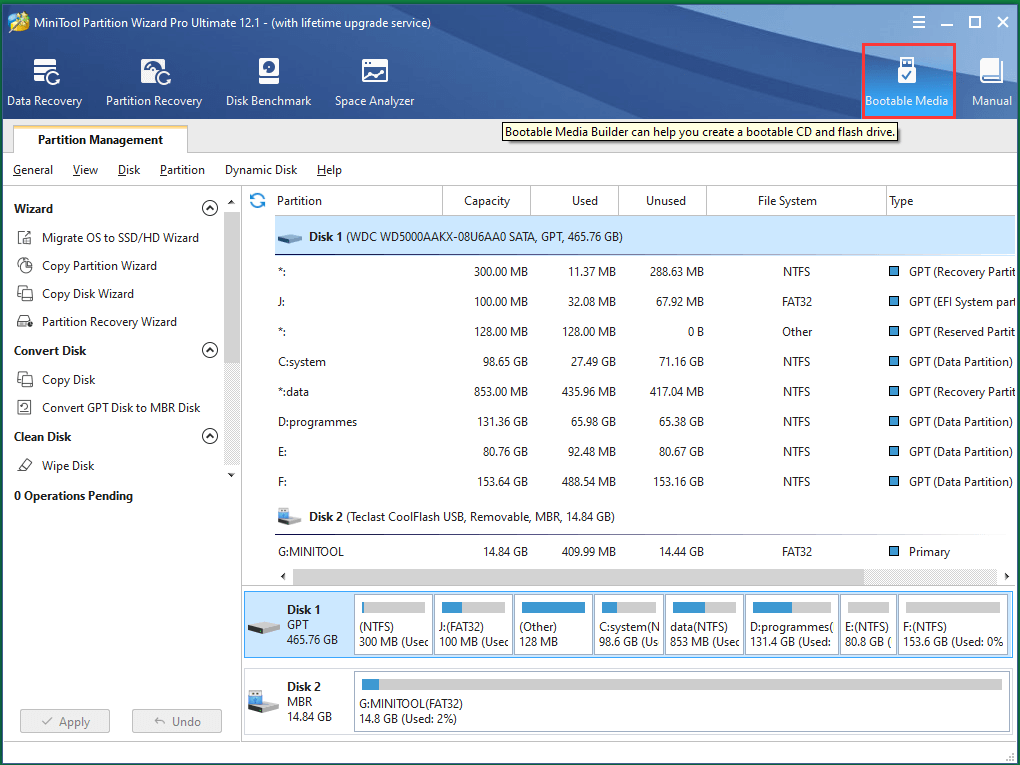
3. In the pop-up window, select WinPE-based media with MiniTool plug-in.
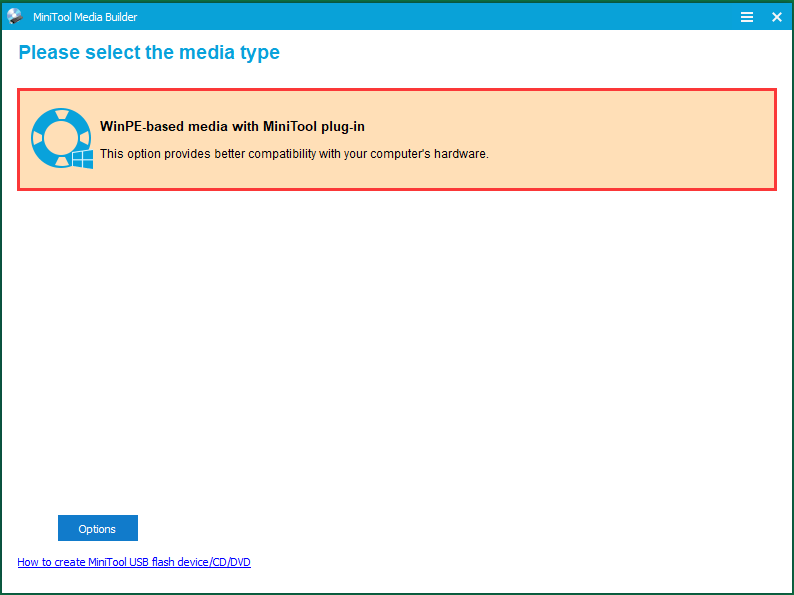
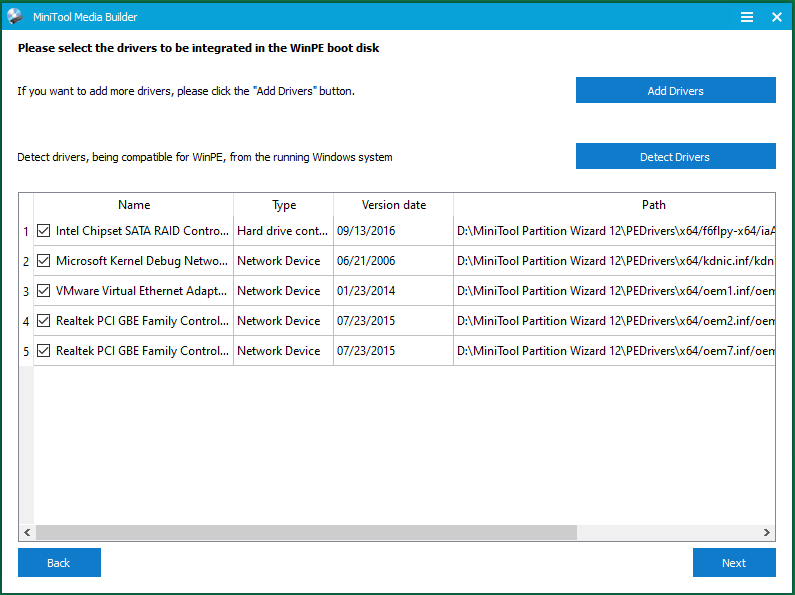
Or, you can choose Options in the lower-left to specify which drivers to be included in the bootable device.
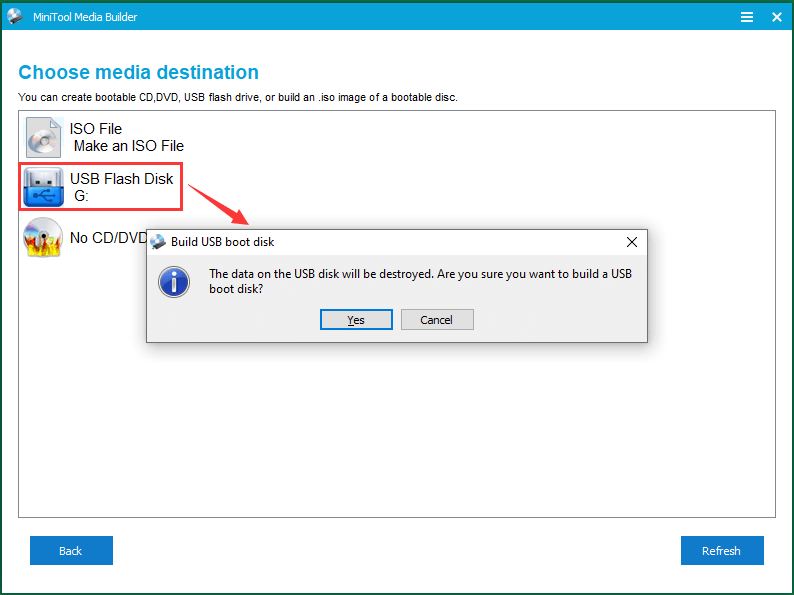
4. Select USB Flash Disk to contain the bootable data for booting up your crashed computer. The data on the USB flash disk will be destroyed. Just click Yes to confirm the warning message to continue.
5. Then, it will start to create the bootable USB flash drive. Wait until it completes. Finally, click Finish to exit the task.
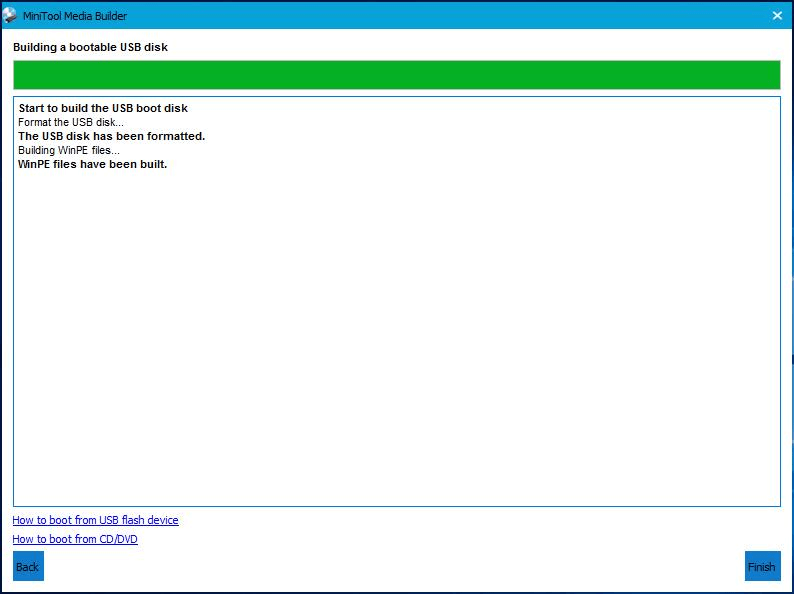
Eject the bootable USB disk from the working computer.
Part Two –Allocate Free Space to C Drive
Insert the bootable USB stick into the target computer that needs to be reset. Power on the machine and enter into its BIOS system. Choose to boot from the bootable USB drive and boot the computer up. When the PC starts up, the built-in MiniTool Partition Wizard should open by itself. Otherwise, you can manually launch it. Then, you can begin to deal with the “Additional free space is needed on the drive where Windows is installed” error.
Free Download
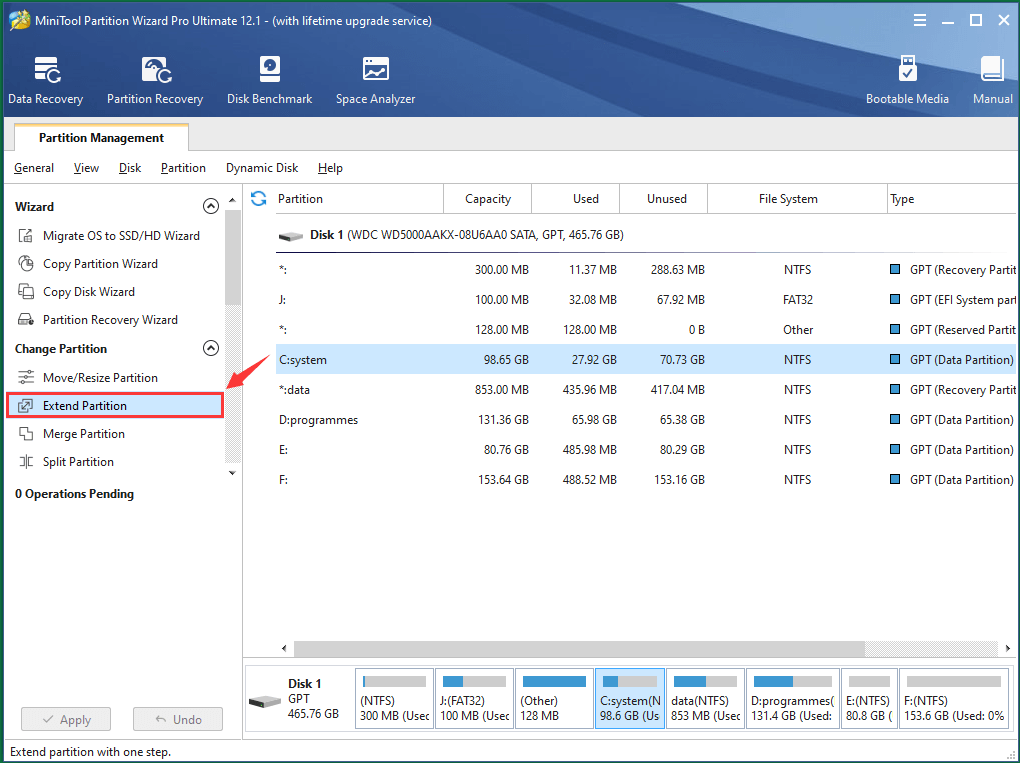
Step 1. In the main UI of the partition program, click on the system disk C to make it active. Then, select Extend Partition under Change Partition section in the left panel.
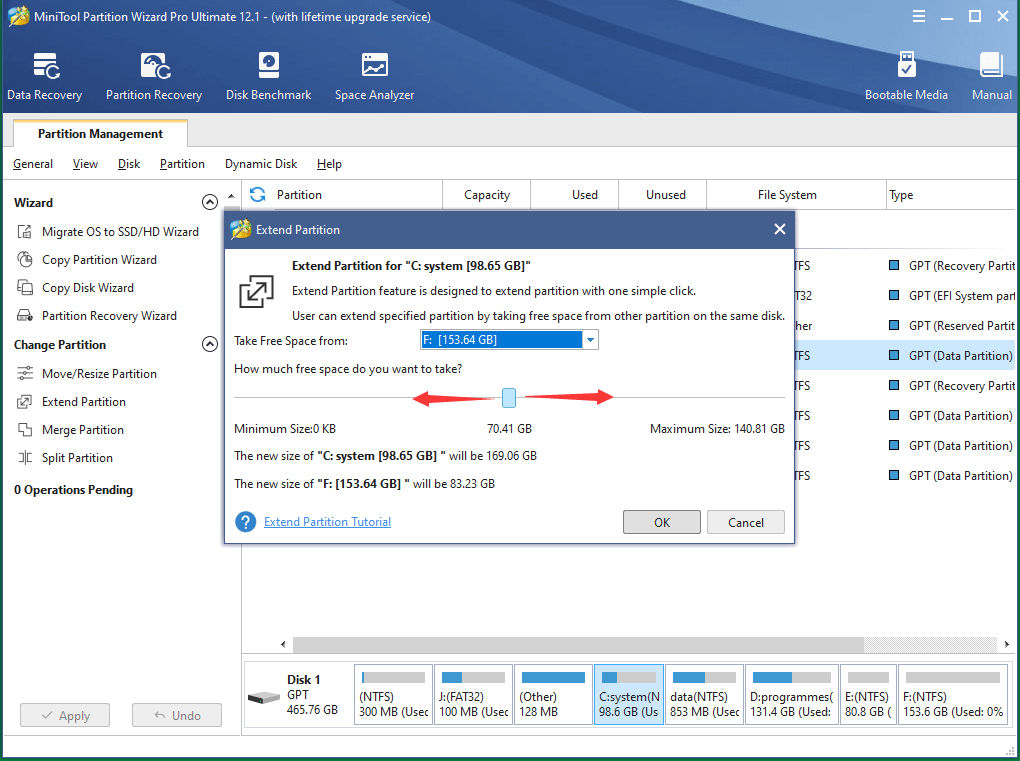
Step 2. Select a partition to take free space from for extending target disk C. You should choose a partition that has a large amount of unused disk space. Then, you can also specify how much capacity to allocate from source partition to destination partition C simply by dragging the block towards left or right.
Step 3. Preview the change for target Partition C. Finally, click Apply on the bottom left to save the change.

Wow, this post gives me a whole new solution for error “Additional free space is needed on the drive where Windows is installed”. The method has never been mentioned in the past years when the “additional space is need” error existed.Click to Tweet
Until now, you have successfully increased your system C drive. Next, just close the partition tool and shut down the computer. Then, try to reset or refresh your machine again, the process should carry out smoothly without the former error code of “Additional free space is needed on the drive where Windows is installed”.
How to Free Up Disk Space to Avoid “Not Enough Memory to Do Reset” Error
If you are in dire need to reset or refresh your computer, you should obey the above guidance to resolve low disk space problems quickly and try to reset your PC again. If you are not so anxious, you can try the following ways to free up C Drive space either for the coming computer reset or just in case of future low Disk Space Error while resetting.
Method 1. Delete Unnecessary Files
There are always many unimportant files or folders come into being on your system partition after the usage for some time, including documents, texts, notes, pictures/photos/images/graphics, videos/movies, audios/music, installation packages, applications, downloaded files, and so on. Then, to free up disk space, just delete those unwanted items.
Sometimes, the unwanted file you find (costing you some time) in a deep path is only of small size such as several KB, you may feel upset for deleting it doesn’t help much on freeing up disk space. If you are tired of searching for those trash files one by one, you can rely on the Space Analyzer feature of MiniTool Partition Wizard.
1. Click Space Analyzer on the upper menu, select Partition C and click Scan.

2. When the scan finishes, you can see a list of folders and files ranged by their sizes. Just range the items from large to small, and then the folders/files of large size will be listed in the front. Thus, you can easily pick out large unnecessary items and delete them.

3. Right-click on the item you’d like to delete and choose Delete (Permanently).

4. Usually, the user files will occupy much storage space on a computer. You can find out all the user cache files by filtering them out in the File View tab. Just input %userprofile%.cache in the File Search Filter column and click Apply. After filtering out all the cache files, just remove them out of your computer like in the above step.

Tip:
- You can also delete the temporary user files in the same way.
- In the File View tab, by default, the largest file is sys, it’s a system file that controls the hibernation of a computer. You can delete it to disable the computer’s hibernation mode while saving several GB of space.
A wonderful tool for finding out big files and folders on your computer. Knowing which items taking most of your disk space, you can manage your storage better than ever!Click to Tweet
Method 2. Move Files to Other Locations
Besides deleting unnecessary files, you can choose to move files that don’t have to be stored on Partition C to other places like other partitions on the same hard drive, other local disks or external storage devices like a USB flash drive.
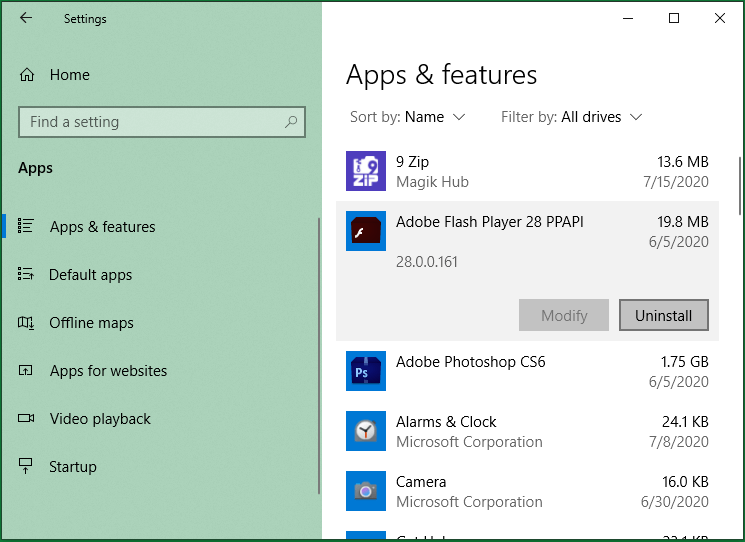
Method 3. Uninstall Unused Programs
The applications on a computer are also a group that tends to take large disk space. For those programs that you not use or hardly use, just uninstall them once and for all. For those tools that you still use, you can first uninstall them from C disk, then reinstall them on other internal locations.
Related article: 5 Solutions to Fix “Steam Not Enough Disk Space”
Method 4. Disk Cleanup for C Drive
You can rely on Disk Cleanup App on Windows 10/11 to delete the unwanted files on C partition. Search “disk cleanup” in Taskbar and select Disk Cleanup in the search list. When the APP is on, select Drive C to clean. Then, choose the files on disk C to remove:
- Downloaded Program Files
- Temporary Internet Files
- Windows error reports and feedback diagnostics files
- DirectX Shader Cache
- Delivery Optimization Files
- Downloads
- Recycle Bin
- Temporary files
- Thumbnails
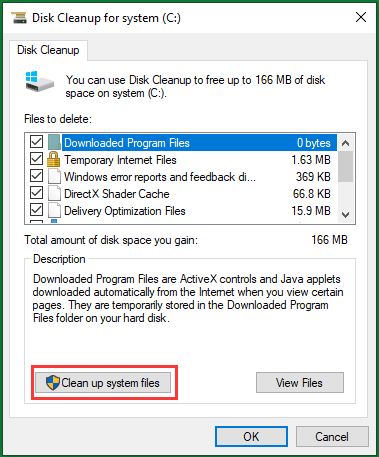
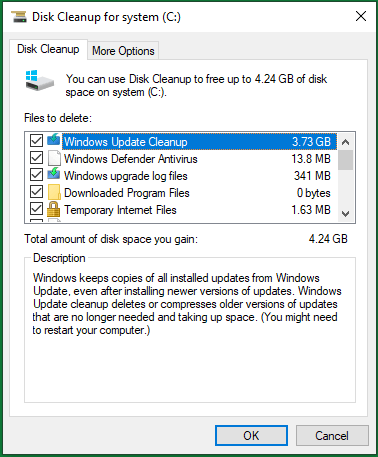
Furtherly, you can choose Clean up system files in the lower left corner to clean system files:
- Windows Update
- Windows Defender Antivirus
- Windows update log files
- Device driver packages
- Language resource files
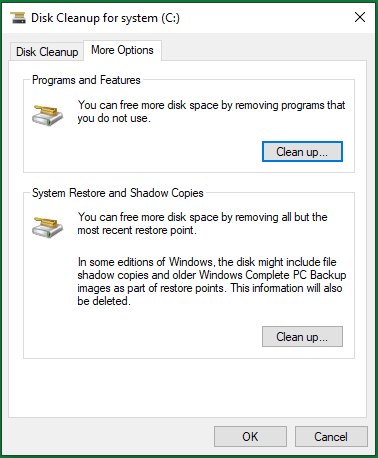
Moreover, you are able to clean up Programs, Features, System Restore and Shadow Copies by switching to the second More Options tab.
Learn more methods to free up disk space from Best Fixes: Hard Drive Is Full Without Reason in Windows 10/11/8/7.
OK, that is all about the computer reset error “Additional free space is needed on the drive where Windows is installed”. If you still have questions related to this problem, feel free to contact us either by the comment part below or by emailing us at [email protected]. We will get back to you ASAP!
“Additional Free Space Is Needed on the Drive Where Windows Is Installed” FAQ
How to check which item on the computer mostly accumulates drive space?
You can identify the storage of your computer by the following steps:
- Open Windows Settings and select System.
- Scroll down to click Storage in the left menu.
- Then, you can view the storage condition of your C drive.
How to clean up Windows 10/11 components with StartComponentCleanup?
- Search and open Task Scheduler in Taskbar.
- Go to this path in the left panel: Task Scheduler LibraryMicrosoftWindowsServicingStartComponentCleanup.
- Under Selected Item in the lower right part, click Run.
You can also launch StartComponentCleanup from the CMD with schtasks.exe /Run /TN «MicrosoftWindowsServicingStartComponentCleanup» command order.
How to factory reset Windows 10/11 on HP laptop?
- Power on the laptop.
- Press the Esc key immediately the monitor is on and repeat the press option until you enter the Start Menu.
- Then, press the F11 button to trigger System Recovery options.
- Select Troubleshoot and then choose Reset this PC.
What’s the difference among Refresh your PC, Reset your PC and Restore your PC?
- Refresh your PC will reinstall Windows while keeping personal files and settings. It also keeps the apps that preinstalled on your PC and the apps you installed during your usage.
- Reset your PC is to reinstall the system but delete all your files and settings as well as most apps (except the preinstalled apps).
- Restore your PC will restore your machine to one previous state and undo recent system changes you have made.
I have Ubuntu installed on my laptop with the following disk organization:
- 20 GB for /
- 5 GB for /home
The large root I have was intended in principle for installing large pieces of scientific software, but in fact I don’t have any of that software installed currently.
I have checked my disk space for installing ubuntu 12.04 and I have found that it takes ~15 GB. I have checked on the web that a typical installation should be ~4-6 GB.
How can it be? I don’t have big pieces of software, I have also removed the Office Suite to have more space. I keep all my data somewhere else. My installation is pretty minimal. I have already removed all the old kernel and header files, cleaned with apt-get autoremove and removed any unused piece of software with Computer Janitor.
In fact I found 4.5GB of scientific software I had forgotten about, nonetheless the installation would be 10.5 GB without those pieces of software, that seems still a lot to me. I also have the full tetex-latex installed.
The upgrade to 12.04 require 5GB of space, and I had to remove 3.5GB of that optional software I had.
Now I have the following:
Filesystem                Size  Used Avail Use% Mounted on
/dev/sda8                  20G   15G  4.3G  78% /
udev                      993M  4.0K  993M   1% /dev
tmpfs                     401M  860K  400M   1% /run
none                      5.0M     0  5.0M   0% /run/lock
none                     1003M  7.0M  996M   1% /run/shm
/dev/sda6                 5.0G  4.1G  612M  88% /home
that 15GB still look like a lot, it is 3.5GB more than v10.04
output of sudo du -hs --exclude=/proc /*
8.6M    /bin
32M     /boot
0       /cdrom
460K    /core
4.0K    /dev
20M     /etc
0       /gl_driver.so
0       /initrd.img
176M    /lib
4.4M    /lib64
16K     /lost+found
32K     /media
458M    /opt
116K    /path
19M     /root
1.1M    /run
9.3M    /sbin
4.4G    /scratch
4.0K    /selinux
200K    /srv
0       /sys
104K    /tmp
6.6G    /usr
520M    /var
0       /vmlinuz
Random reboots, BSoD, application crashes, system crashes are some very common issues that occur when the issue is with your system files. Among these issues is additional free space is needed on the drive where windows is installed. Users have reported that they are constantly getting an automatic repair boot loop. Users are unable to boot into the system. Obviously, since the loop is going on there is no way a user can get into the system and free up some space or do any other troubleshooting. With this guide, we will tell you all the important information regarding this error along with ways to fix the issue.
Causes of Additional Free Space is Needed On The Drive Where Windows Is Installed Issue
On normal usage, we usually do not get to see any errors or issues with the system, until we install any third-party application or service. Some application and their services mess with the system files, some corrupt it, some delete it while some of them infect it. When system files, registries, and boot files get affected then the real Additional Free Space is Needed On The Drive Where Windows Is Installed issues begin and get to see such errors.
- Any recent third party application installation
- Virus or malware in your system
- Un supportive driver installation
- System files corruption
- Registry Files corruption
Similar Types of Additional Free Space is Needed On The Drive Where Windows Is Installed Issue
- Not enough disk space to factory reset
- Not enough space for system restore
- Hp stream 14 factory reset not working
- How to reset the computer to factory settings
- Hp stream factory reset not enough space
- Hp stream factory reset error
- Windows installation disc
- Hp stream 14 windows 10 not enough space
- Free up disk space windows 8
Fixing system files and registries issues are very complex issues to fix, any wrong or incorrect changes might destroy the OS. So it becomes very important that the right methods and steps should be followed. We will be giving you all the correct ways to fix the Additional Free Space is Needed On The Drive Where Windows Is Installed Issue.
1. Fixing Registries & Renaming Hives (When Windows is Non Accessible)
Since you are stuck in the automatic repair loop, there is no way to access the system. But with the help of advanced repair, we still can fix the Additional Free Space is Needed On The Drive Where Windows Is Installed issue. The process might seem a little complicated but if you follow it carefully everything will be fine and your issue will be fixed.
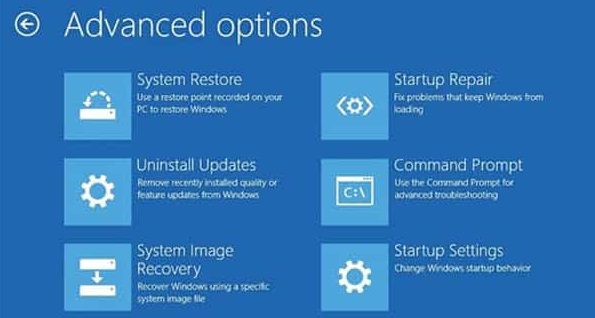
- STEP 1. Once the Automatic Repair fails to repair your PC, head to the Advanced options
- STEP 2. If you cant access Advance Options, insert the bootable media disk or bootable thumb drive
- STEP 3. From here you can access the advance option menu
- STEP 4. Now click on Troubleshoot
- STEP 5. Now click on Advanced options then choose Command Prompt
- STEP 6. You might get a prompt to enter your username and password
- STEP 7. Once you are in the Command Prompt, enter the below command to get to the config folder
cd %windir%system32config
- STEP 8. Here carefully, rename the System and Software registry hives, use the below commands
ren system system.001
ren software software.001
**NOTE: Keep in mind one thing that once you rename the Software hive, then you will no longer use the “Refresh your PC” option. If you want to use the “Refresh your PC” option, then just rename the System hive. However if the software hive is itself corrupted, then also you cant use the refresh your PC option.
- STEP 9. Now exit the command prompt, and head to the Automatic repair window
- STEP 10. Now go to Advanced options > Troubleshoot
- STEP 11. Simply choose whether to> Refresh your PC or Reset your PC
2. Using Advanced Options (When Windows Access is Available)
If you can boot into the system, then the process is quite easy. Still, you have to choose whether to refresh your PC, reset your PC, or Restore your PC. Any of the options will solve the Additional Free Space is Needed On The Drive Where Windows Is Installed issue. Follow the steps now.
A). Refresh Your PC
Refreshing your PC means that your window will be reinstalled without affecting the data or your files. Your files and application will not be deleted.
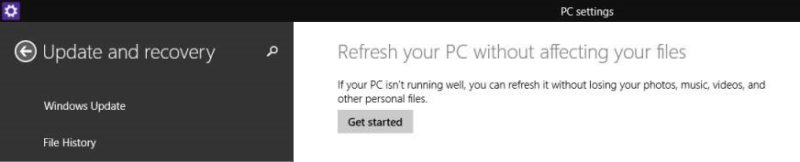
- STEP 1. Go to Settings > Change PC settings
- STEP 2. Here click on Update and recovery, and then click on Recovery
- STEP 3. Under Refresh your PC without affecting your files, click Get started
- STEP 4. Now Follow the instructions on the screen
B). Reset Your PC
Resetting your PC means that windows will reinstall but you will lose your settings, apps, and files.
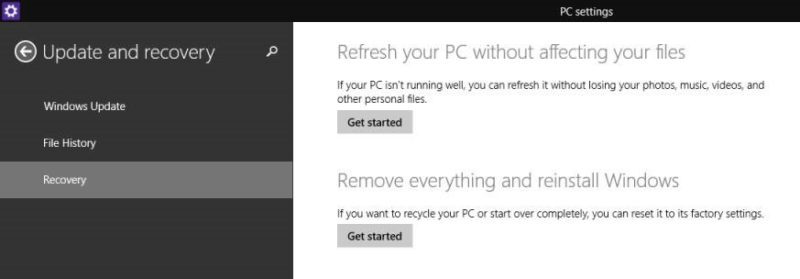
- STEP 1. Go to Settings > Change PC settings
- STEP 2. Here click on Update and recovery, and then click on Recovery
- STEP 3. Under Remove everything and reinstall Windows, click Get started
- STEP 4. Now Follow the instructions on the screen
C). Restore Your PC
Restore your PC mean that the systems will be restored to the last point of backup. All the data apps and files will be present. At the time of backup.
- STEP 1. Head to the Search bar and type Recovery and open it
- STEP 2. Click Open System Restore, then follow the instructions to restore
Conclusion:
The above troubleshooting guide, deeply tells us about all the important details regarding additional free space is needed on the drive where windows is installed issue. All the methods and causes have been explained briefly.
We hope by following the above guide your issue is solved. For more similar guides and tips follow us. Thank you!
Session ‘app’:Installation did not succeed.
The application could not be installed:INSTALL_FAILED_INSUFFICIENT_STORAGE
Retry
The device needs more free storage to install the application (extra space is needed in additional to APK size).
On the previous day, the android app running right on a device, but the same app run the second day encounter the following error Session ‘app’:Installation did not succeed.
So, when you run your app, the downloaded APK is in your device but when you do not have sufficient storage then this error happens.
The application could not be installed:INSTALL_FAILED_INSUFFICIENT_STORAGE
Retry
When clicking on “Retry” gives the same error. But the question arises in the mind that why is the error INSFUFICIENT_STORAGE problem occurring in Android.
Android Studio does not install APK files on your device due to insufficient storage issues.
We’ll solve the previous error same as the “Installation did not succeed” error, but this is a different issue. You can solve it easily.
Friends, this is the INSUFFICIENT_STORAGE issue in your device.
So, if your device hasn’t sufficient internal storage or maybe internal storage full.
When your device hasn’t had sufficient storage at a time, this error happens and the new APK can’t install on your device. If you use an emulator, also getting this type of error and solve this type.
You can solve this type of issue by increase internal storage or uninstall unnecessary APK in your device. Some APK provides a facility to moving direct SD card. So, some APK and data move to SD card and free storage.
After all is done, try running your app. However, if the same error occurs then there will still be insufficient storage, so there may still not be enough space on your device. For once, try another device that has enough space.
Summary: In this guide, we will show you 6 of the best ways to clear space for macOS Monterey.
Want to update your macOS to the latest macOS Monterey, only to find out there isn’t enough free space on your Mac? Read on, and we will guide you through 6 different ways to free up space for macOS Monterey.
How Much Space Does macOS Monterey Need?
The macOS Monterey installer is about 12GB in size. But you’ll still need some extra space to install it. According to Apple, if you’re upgrading from macOS Sierra or higher, macOS Monterey requires 26GB of available storage to upgrade. And if you’re upgrading from an earlier version, macOS Monterey requires up to 44GB of available storage.
How to Check the Available Storage Space on Mac
Now that you know the total amount of space needed to upgrade to macOS Monterey, the next thing you need to do is to check how much free disk space you have. Here are the steps:
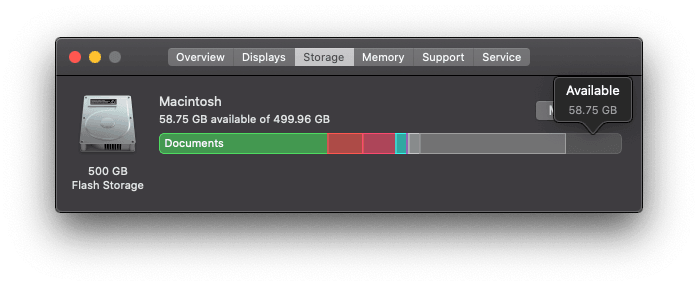
- Click the Apple Menu > About This Mac > Storage.
- After the calculation process is complete, hover your mouse over each part of the storage bar. You can see which types of files occupy most of the storage space and see how much space is available.
If you have more than 44GB of free space, then congratulations, you can go ahead and upgrade to macOS Monterey right now. But what if you don’t have enough space? How can you make enough room for the installation of macOS Monterey? Read on for some solutions.
How to Free up Space on Mac for macOS Monterey
1. Optimize Storage with Built-in Tools
Macs with macOS Sierra or later have built-in optimization tools that will let you quickly optimize storage space.
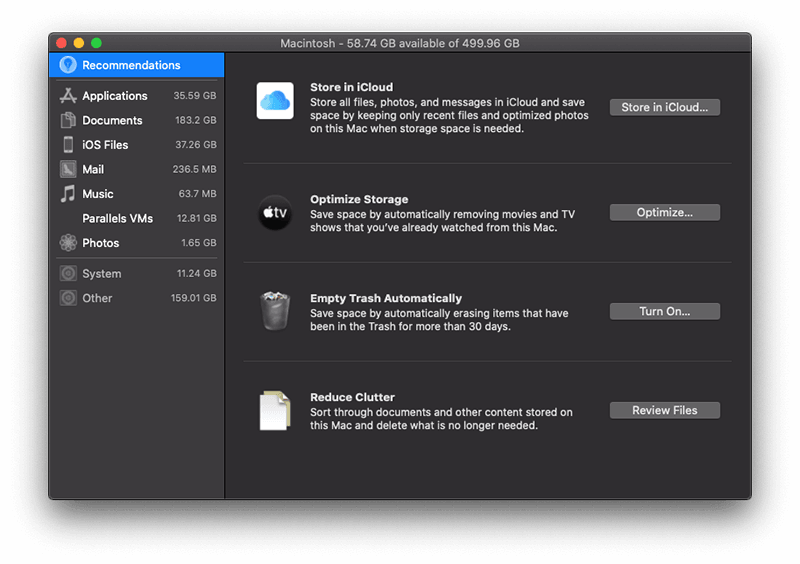
- Click the Manage button above the storage bar to open the Storage Management window.
- You will see four optimization recommendations.
- Follow the recommendations to free up some space.
- Store in iCloud – Click the Store in iCloud button to store your photos, documents, files, videos, and more in iCloud.
- Optimize Storage – Turn it on, and the macOS will automatically delete iTunes movies and TV shows that you have already watched.
- Empty Trash Automatically – If you turn this function on, the system will automatically remove files that have been in the Trash for over 30 days.
- Reduce Clutter – Click the Review Files button and manually dump unneeded bulky or duplicate files and documents into Trash.
In addition to the 4 optimization suggestions, you may also notice a category labeled «Other». It takes up a lot of your storage space, but you can’t open it. Wondering what it is and how to get rid of it? Take a look at this article: How to Delete Mac Other Storage.
2. Clear Junk Files in One Click
If you still haven’t freed up enough space to install macOS Monterey, then you can use a Mac cleaner to quickly scan and clean up your Mac.
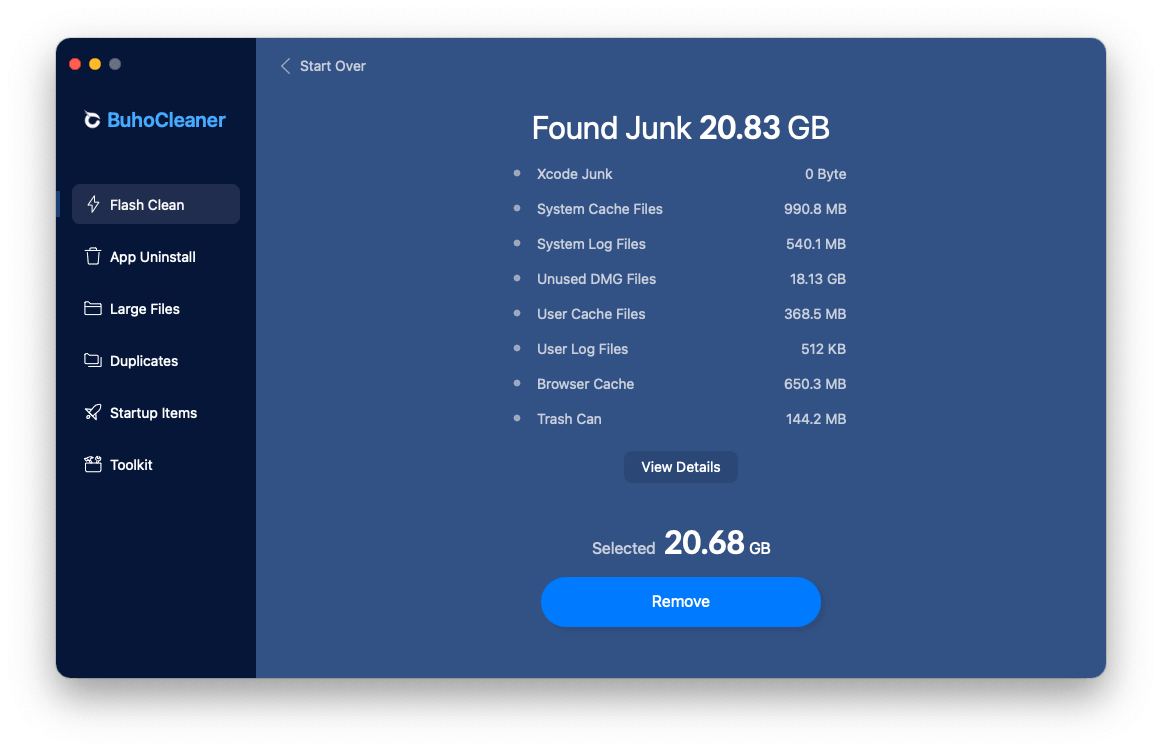
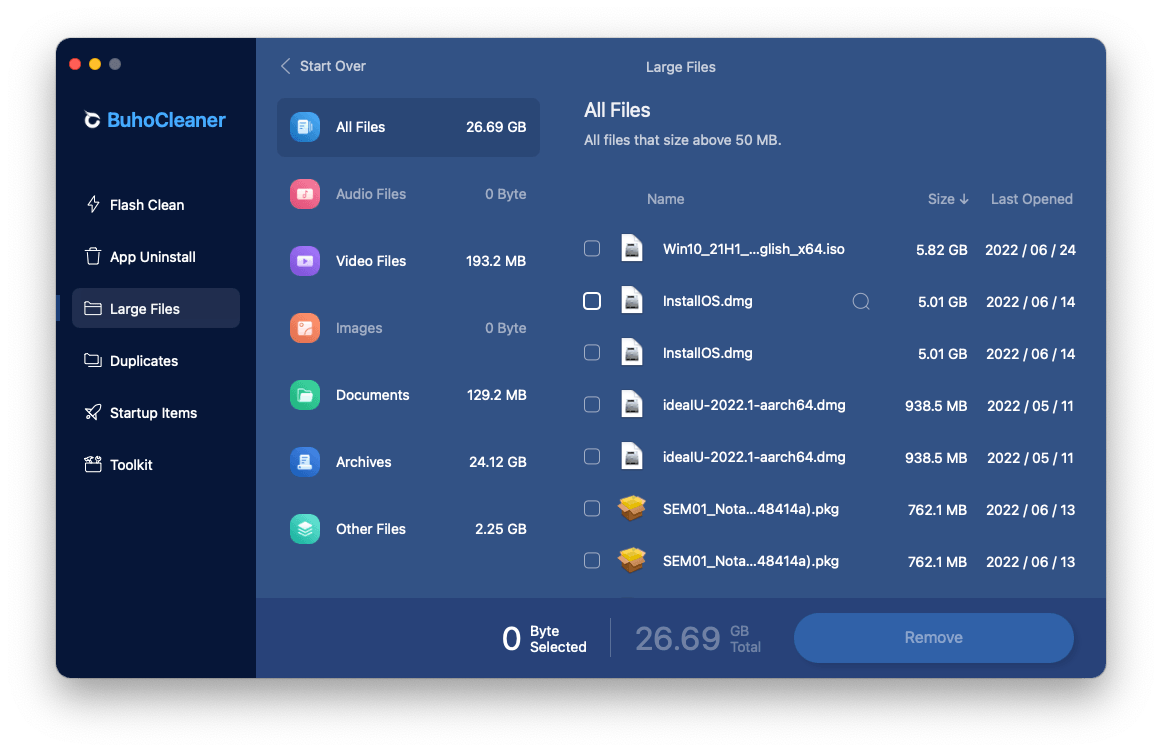
BuhoCleaner is one of the best Mac cleaning software, and it also works perfectly on macOS Monterey. Designed to be powerful yet easy to use, this tool allows you to clean and optimize your Mac like a pro. With its Flash Clean feature, you can get rid of all the junk files from your system, browser, and users in a matter of seconds.
- Just download and install it on your Mac.
- Launch it and click the Scan button.
- Wait a few seconds, and you will see all the junk files on your Mac.
- Check the boxes next to the files you want to delete and click the Remove button. It’s that easy!
3. Uninstall Apps You Don’t Use
You probably have installed a great number of applications on your Mac. Some of them may no longer be of any use. Deleting them will help you claim back some valuable storage space.
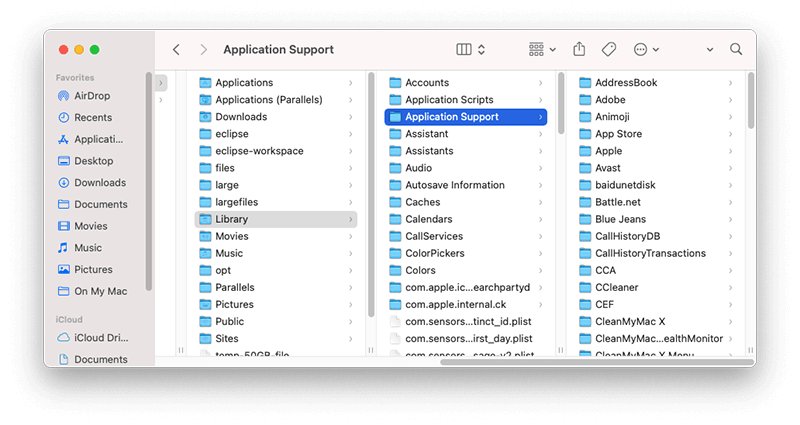
But how do you usually uninstall an app? Did you know the application is STILL on your hard drive! To completely delete it, you still need to remove its related files and empty them to the Trash. Here’s what you need to do:
- Click the Go menu in Finder and choose Library.
- Find the files associated with the application and move them to the Trash.

- Empty the Trash
A simpler approach is to use the BuhoCleaner (mentioned above) to completely uninstall any program you don’t use.Try the app for free now.
4. Delete Large and Duplicate Files
Large files and duplicate files are eating up a ton of your storage space. Finding them and deleting them is a great way to free up some space. You can remove them manually, but it will take you a whole lot of time. Thanks to a third-party tool like BuhoCleaner, now you can get rid of these storage-consuming files quickly and effortlessly.
- Download the trial version of BuhoCleaner.
- Install and launch it.
- To delete large files, select the Large Files option in the sidebar and click the Scan button.
- To delete duplicate files, switch to the Duplicates option, click the + button, and choose the folders you want to scan.
- Remove the results you don’t need.

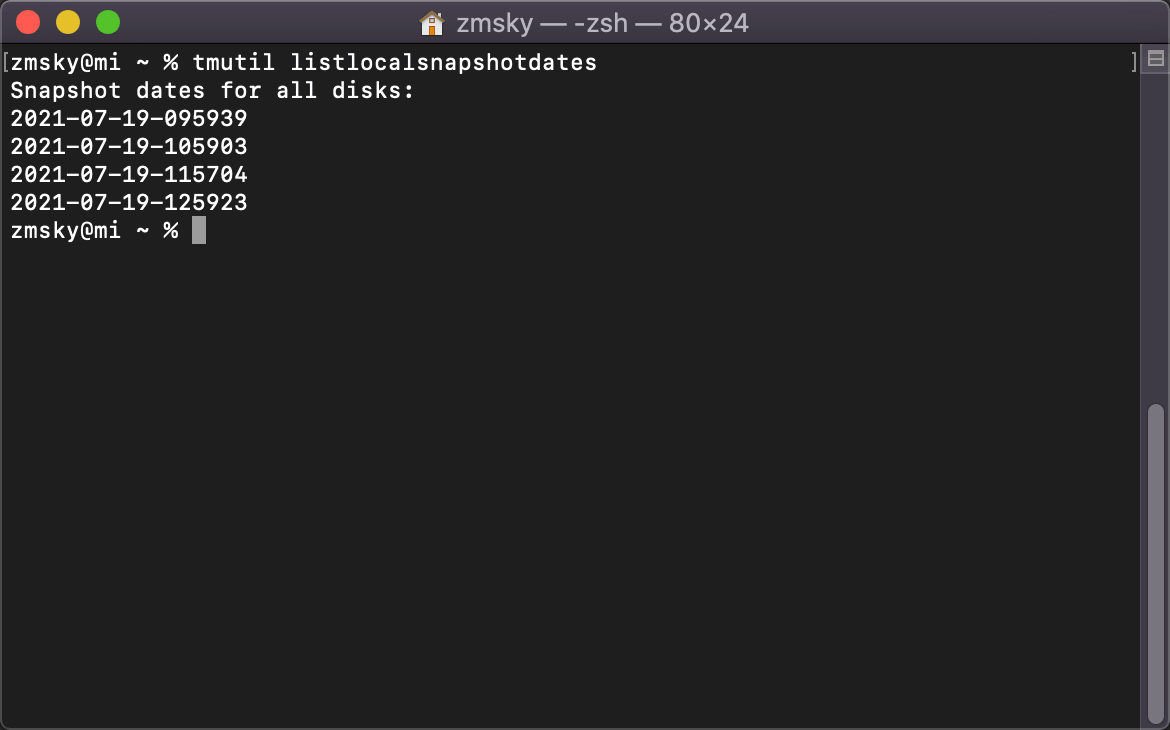
5. Delete Time Machine Backups
Your Mac will keep a copy of your Time Machine Snapshots in case your external drive can’t be accessed. However, having them there will take up some of your valuable storage space. If you are absolutely sure that they are no longer needed, delete them from your Mac to reclaim space.
Here are the steps:
-
Open Terminal via Spotlight or Launchpad.
-
In the Terminal, type and run the command:
tmutil listlocalsnapshots. (You should be able to see a list of backups sorted by date.)
-
Type the command:
tmutil deletelocalsnapshots "xxxxxxx", enter the administrator password if asked, and hit the Return button on the keyboard. («xxxxxxx» stands for the backup date of your Time Machine.) -
Repeat step 3 if you want to remove more than one Time Machine snapshot.
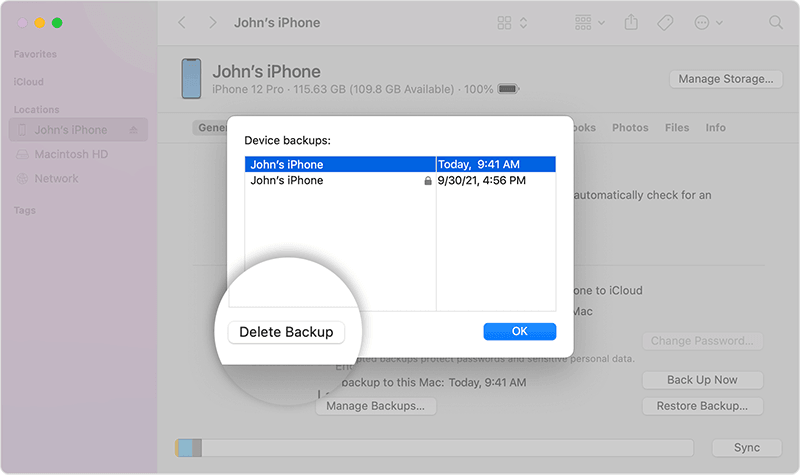
6. Remove Old iOS Backups
Those old iOS backups are no longer of any use. Deleting them will help you reclaim some space.
Here’s how to remove them from your Mac:
- Open Finder.
- Click your device in the sidebar.
- Under the General tab, click the Manage Backups button to see the backups on your Mac.
- Right-click on the backup that you don’t want and select Delete or Archive.
- Click Delete Backup, then confirm your deletion.
Conclusion
Hopefully by now, we have helped you to resolve your problem of not having enough space for the installation of macOS Monterey. As you have seen, using a third-party tool can streamline the task and help you to achieve the desired result quickly and efficiently.
And BuhoCleaner is the handy Mac cleaner that can help you to do just that. You can free up gigabytes of space with just one click! Why not go ahead and give it a try.
Содержание
- Unable to Reset, Error: ‘additional free space is needed on the drive where Windows is installed. Free up some space and try again.’
- Replies (2)
- Reset: Additional free space is needed
- Replies (5)
- Reset this PC not working. Additional free space is needed on the drive where windows is installed. free up some space and try again.
- Replies (8)
- How to free up disk space in Windows
Unable to Reset, Error: ‘additional free space is needed on the drive where Windows is installed. Free up some space and try again.’
Ive been having a similar issue. My machine will not boot into windows. I can get into the recovery menu in windows 10. I have about 6gb free. When i try to perfom a reset Im told to clear some disk space and try again. The problem is it doesnt tell you how much space you need. Also the only way to remove files via command prompt. The machine wont boot to safe mode.
You may need to consider reinstalling Windows 10 on your case since your computer is unable to boot to Safe Mode or complete a reset. We suggest that you perform a clean install by following the instructions under «Use installation media to reinstall Windows 10» found on the link below:
Let us know if you require further assistance.
Was this reply helpful?
Sorry this didn’t help.
Great! Thanks for your feedback.
How satisfied are you with this reply?
Thanks for your feedback, it helps us improve the site.
How satisfied are you with this reply?
Thanks for your feedback.
We have noticed that the post has been inactive for quite some time. We’d like to confirm if the article provided by Hector Mad resolved the issue.
If so, we highly encourage you to inform our Community by marking the post as an answer or by clicking on Helpful. This will help other members who may have the same issue as you. Otherwise, don’t hesitate to update us so we can further assist you.
Was this reply helpful?
Sorry this didn’t help.
Great! Thanks for your feedback.
How satisfied are you with this reply?
Thanks for your feedback, it helps us improve the site.
Reset: Additional free space is needed
I need to reset an Omen laptop after my son took control of it. I have no password.
When trying to reset it (removing all files), I get the following error message:
«Additional free space is needed on the drive where Windows is installed. Clear some space and try again.»
But I cannot clear space without losing in.
Moved from: Windows / Windows 10 / Install, upgrade, & activate
A corrupted boot system parameters is one of the possible reasons why you are having an additional free space is needed error when resetting your computer. I found a thread with the similar issue and one of our community members provide a solution that other members found helpful. Click on this thread and follow the steps given by bob omb.
Should you need further assistance, don’t hesitate to get back to us.
12 people found this reply helpful
Was this reply helpful?
Sorry this didn’t help.
Great! Thanks for your feedback.
How satisfied are you with this reply?
Thanks for your feedback, it helps us improve the site.
How satisfied are you with this reply?
Thanks for your feedback.
Thanks for the tip!
Unfortunately, I need an account password to access the command prompt. so that doesn’t work.
11 people found this reply helpful
Was this reply helpful?
Sorry this didn’t help.
Great! Thanks for your feedback.
How satisfied are you with this reply?
Thanks for your feedback, it helps us improve the site.
How satisfied are you with this reply?
Thanks for your feedback.
We appreciate your response. Since you do not have an account password to access the command prompt, your best options is a clean installation of Windows 10. You can download the latest Windows 10 ISO from this link. For the steps to perform a clean install or reinstall of Windows 10, you can follow the steps in this Forum Article that was provided by Andre Da Costa.
Should you have further queries, feel free to post it.
2 people found this reply helpful
Was this reply helpful?
Sorry this didn’t help.
Great! Thanks for your feedback.
How satisfied are you with this reply?
Thanks for your feedback, it helps us improve the site.
How satisfied are you with this reply?
Thanks for your feedback.
Hello Eric Bernie
I have tried every solution in both threads and I still can’t seem to restart/factory reset my pc and I want to do that because every time I want to log on it restarts in 1 minute and when I try to shut down it doesn’t show none of the options that are sleep/shut down/restart and when I try to enter my pass its just highlights the password and I’ve tried multiple threads none of them work. (Btw I’m using a teclast tablet with windows and android on it)
2 people found this reply helpful
Was this reply helpful?
Sorry this didn’t help.
Great! Thanks for your feedback.
How satisfied are you with this reply?
Thanks for your feedback, it helps us improve the site.
How satisfied are you with this reply?
Thanks for your feedback.
Have you tried performing a clean installation of Windows 10 as outlined by Andre Da Costa on his forum article? If the issue still continues after performing this procedure, I highly recommend contacting the device manufacturer for further assistance. A configuration of your tablet may need to be corrected in order to perform a Restore factory settings. Please refer to this support article on how to obtain the contact information of the device manufacturer.
Let me know if you have other questions.
5 people found this reply helpful
Was this reply helpful?
Sorry this didn’t help.
Great! Thanks for your feedback.
How satisfied are you with this reply?
Thanks for your feedback, it helps us improve the site.
Reset this PC not working. Additional free space is needed on the drive where windows is installed. free up some space and try again.
1
Are you able to get into Windows on your PC?
2
What size internal hard drive do you have on your system, is that a 32GB (29.1GB usable) storage or do you have more storage than that on your system?
Power to the Developer!
MSI GV72 — 17.3″, i7-8750H (Hex Core), 32GB DDR4, 4GB GeForce GTX 1050 Ti, 256GB NVMe M2, 2TB HDD
2 people found this reply helpful
Was this reply helpful?
Sorry this didn’t help.
Great! Thanks for your feedback.
How satisfied are you with this reply?
Thanks for your feedback, it helps us improve the site.
How satisfied are you with this reply?
Thanks for your feedback.
1. No..I m it a able to do that
2.i m not sure..but it’s more than that mostly
Was this reply helpful?
Sorry this didn’t help.
Great! Thanks for your feedback.
How satisfied are you with this reply?
Thanks for your feedback, it helps us improve the site.
How satisfied are you with this reply?
Thanks for your feedback.
1 person found this reply helpful
Was this reply helpful?
Sorry this didn’t help.
Great! Thanks for your feedback.
How satisfied are you with this reply?
Thanks for your feedback, it helps us improve the site.
How satisfied are you with this reply?
Thanks for your feedback.
Since you cannot get into Windows, or Reset Windows, please try the following to see if that allows you to get into Windows and clear up space . . .
Start your PC, just as Windows attempts to load (spinning dots), press and hold Power Button for 5 — 10 seconds to perform a Hard Shut Down
On the third start Windows will boot into the Recovery Environment and from there you can access System Repair, Safe Mode, Command Prompt . . . etc.
Please try each option one at a time, then see of Windows will boot . . .
Go to Troubleshoot — Advanced Option — Revert to previous build of Windows
if available, this is the best option . ..
Go to Troubleshoot — Advanced Option — Startup Repair
See if Windows startup can repair itself
Go to Troubleshoot — Advanced Option — System Restore
Check to see if you have a restore point you can go back to
If you do not have a Restore Point, go to Troubleshoot — Advanced Option — Startup Settings and click Restart
Upon restart, press 4 to enter Safe Mode
Power to the Developer!
MSI GV72 — 17.3″, i7-8750H (Hex Core), 32GB DDR4, 4GB GeForce GTX 1050 Ti, 256GB NVMe M2, 2TB HDD
How to free up disk space in Windows
Technical Level : Basic
If you have been using your computer for a while, you will notice your storage device (hard disk or SSD) will begin losing space over time. Factors for this includes the data we store on the drive such as our documents, photos, music, videos and other files. Limited space is especially an issue if you are using a Ultrabook which often comes with a low capacity SSD drive. There are some common work arounds for this which includes archiving older files to an external hard disk. For some persons though, this is not an option. So whats eating up that space and how can I free it up to get back some of it? Lets find out.
Instructions for this article can be applies to Windows Vista and later versions.
Windows over time will accumulate data outside of the normal types of data we store. This can include things like copies of Windows Updates, memory dump files used to diagnose and troubleshoot error messages, temporary internet files for web pages we often visit and Windows Upgrade files, commonly used to assist with installing updates for Windows. Sometimes we don’t need this type of information and removing it can free up precious disk space inaddition to improving overall system performace.
Computer Explorer displaying the amount of disk space available
The above screenshot displays amount disk space I have remaining on my system drive.
Windows setup checking for available disk space.
Having enough disk space is especially important if you are performing task such as upgrading to the new Windows 10. It is one of the the first things Windows setup checks before it starts copying files. Large programs too will often require that you have enough disk space available.
Launch Disk Cleanup, the quickest way is this:
Press Windows key + R then type: cleanmgr.exe
Windows 7/Vista/XP > Start > All Programs > Accessories > System Tools > Disk Cleanup
Windows 8/8.1/10 > Windows key + S > type disk cleanup > hit Enter on your keyboard
Windows 10 > Start > All Apps > Windows Accessories > System Tools > Disk Cleanup
Once Disk cleanup opens, select the drive where Windows is installed if its not already.
Windows will scan your hard disk for files it can clean up.
Note some of these files too can include older installations of Windows. For example, if you upgraded from Windows 7 to Windows 10 a copy will be kept at the root of the hard disk in a folder called Windows.old. Please becareful though, this folder can actually be useful if you need to go back to your previous version of Windows for whatever reason. So be mindful before deleting it. Removing it though can significantly free up disk space.
After Disk Cleanup is finished scanning, you will see the Disk Cleanup window. This window provides a list of areas of the system you can clean up safely. Before we start cleaning up the system, you will notice appears on the window called Clean up system files. Clean it and the Disk Cleanup will run a thorough check of the system again to include every file that can be removed.
| Location/Type | Description | Safe to Delete |
| Downloaded Program Files | Downloaded Program Files are ActiveX controls and Java applets downloaded automatically from the Internet when you view certain pages. They are temporarily stored in the Downloaded Program Files folder on your hard disk. | YES |
| Temporary Internet Files | The Temporary Internet Files folder contains webpages stored on your hard disk for quick viewing. Your personalized settings for webpages will be left intact. Personally, I suggest you keep this if you are on a slow connection and need the basic elements of web pages you often visit to load faster. | Keep It |
| Offline Webpages | Offline pages are webpages that are stored on your computer so you can view them without being connected to the Internet. If you delete these pages now, you can still view your favorites offline later by synchronizing them. Your personalized settings for webpages will be left intact. I also recommend you leave this alone since you might be on a slow connection and need quick access to a webpage with some specific content. | Keep It |
| Recycle Bin | The Recycle Bin contains files you have deleted from your computer. These files are not permanently removed until you empty the Recycle Bin. Sometimes you might inadvertently delete a file that you didn’t intend to delete permanently, so before you empty the contents of the Recycle Bin, do a thorough check before. | YES |
| Temporary files | Programs sometimes store temporary information in the TEMP folder. Before a program closes., it usually deletes this information. You can safely delete files that have not been modified in over a week. You can view the contents of the temp directory and see if there is anything in there you might need. Open the Run Command (Windows key + R), type in %temp% > hit OK. Sometimes program installers for common applets are stored there that you can use to reinstall such as Adobe Flash for instance if you don’t want to redownload it every time. | YES |
| Thumbnails | Windows keeps a copy of all your picture, video, and document thumbnails so they can be displayed quickly when you open a folder. If you delete these thumbnails, they will be automatically recreated as needed. I don’t see any problems deleting it if its gonna be recreated, but deleting it sometimes can correct problems with previews of photos and videos. | YES |
| Debug Dump Files | When your computer experiences a system hang because of a poorly written application or device driver, Windows intelligently creates a log of what happened. This log can be used along with other logs such as System error memory dump files to help diagnose the problem when sent to Microsoft or the developer for review. | Keep It |
| System error memory dump files | Similar to the Debug Dump files, memory error dumps happen when poorly written drivers or applications crash. It is very handy for utilities built into Windows such as Troubleshooters which help in diagnosing problems that occur in Windows. | Keep It |
The most common locations are Temporary files, Temporary Internet Files, Recycle Bin to name a few. Other not so common locations include the Thumbnail Cache which stores previews of your images allowing you load them faster when you open the Pictures Library or Windows Live Photo Gallery. This I do not recommend you delete for obvious purposes. Lets dig a little deeper. Disk Cleanup provides a list of areas where you can free up disk space and gain additional speed in some cases.
In addition to these common locations, Windows will also store information related to Error reporting and solution checking, leave these for diagnosis that can help resolve issues with applications or devices. Also, if you do an upgrade from Windows Vista or clean install, Windows 7 might store information related to servicing which are logs used to assist the installation of the operating system. Once you have checked these locations for clean up, click the OK button and these locations will be cleaned out.
As I noted earlier, the Windows.old folder is basically a backup of your old installation of Windows, which you can use to reinstall Windows if you decide to return to your previous installation. Also, its used as a last resort in case you didn’t backup your files and need to recover personal files and settings. The Windows.old folder can use up a considerable amount of your hard disk space. Its normally stored at the root of your hard disk where Windows 7 is installed. Before you delete it, make sure you check through the directories and ensure that everything migrated successfully to your current version of Windows.
Once you have determined what to remove, click OK then click the Delete Files button to begin.
Click Yes if you are ok with the action that will be taken.
System Restore – System Restore keeps a large collection of System Restore Points in addition to storing them in your System Images of Windows 7 . A friend had recently upgraded to Windows 10 and he asked me why he was low on hard disk space. He had a 320 GB drive and only had about 70 GBs of free disk space left after doing a disk cleanup. It was then I discovered that System Protection had been configured to use about 200 GBs of disk space to keep System Restore Points.
Configuring System Protection settings
To configure System Protection, click Start, type: System Protection, hit Enter. Under Protection Settings, click the Configure button. A dialog will appear with various settings for configuring Restoration and Disk space usage. Under the Disk space usage tab, you will see the current amount of space in use by System Restore while the Max usage displays the amount allocated. Use the Max usage knob to configure how much disk space you want to allocate to System Protection. In the above screenshot, you will see that I am using 21.05 GBs for Restore Points, while I have allocated 22.36 GBs of disk space for System Protection. You also have the option of deleting all Restore Points which stores System settings and previous versions of files. I suggest you leave this, since you will be able to individually restore changes to files you are working on. So for instance, if you edited an image and would like to restore it to a previous version or original version of the file.
Resources:
How to: Rollback to a previous version of Windows from Windows 10
Looks like no one’s replied in a while. To start the conversation again, simply
ask a new question.
Receiving a «There is not enough disk space available to install the product» error in App store while I clearly have enough space?
I am attempting to purchase Dues Ex: Human Revolution which requires 17GB to run, I currently have 27.34GB free.
Even though I have 10GB more than the required space I still get the «There is not enough disk space available to install the product»
Any ideas?
App Store-OTHER
Posted on Apr 30, 2012 8:54 PM
Receiving a «There is not enough disk space available to install the product» error in App store while I clearly have enough space?
Project Description
Not Enough Space to Install macOS Ventura. How To Fix?

One thing we don’t care about much is the amount of free storage space. This becomes noticeable when you’re trying to install a new macOS Ventura update or some other app which makes you wonder, where did all those GBs go?
Upgrading macOS can prove quite a challenge if you don’t have the available storage space. There’s a high chance that you’re stuck at the “There is not enough free space” error. This is fairly common,
I tried to do the Ventura update and near the end of the installation i get the message. Then i’m asked to select a startup disk. I’ve tried rebooted a few times and it always happens. I assume i’ll need to do a recovery of some sort.
– Apple Discussions Forum User
I’ve been attempting to upgrade from macOS 12.6.1 Monterey to macOS 13.0.1 Ventura on an M1 MacBook Pro with insufficient free space resulted in errors that prevented the MacBook Pro from booting. In the installer it says that I have 23.86 GB available, but in reality, I have about 38 GB available. That 38 GB keeps fluctuating too, every time I run it it changes.
– Reddit User
and a lot of users have been affected by it.
If you, too, are stuck in the same boat, don’t worry, as we’ve got the perfect fixes for you. So what are you waiting for? Jump straight in and follow the tips below to help solve the error.
How much space do you need to update macOS?
While the latest macOS Ventura installer takes around 12GB of space, it needs a lot more available space to install the update. A post from krypted confirmed that number wasn’t somehow specific to his Mac. According to his personal experience, the macOS Ventura installer clocks in at 12.19 GB, he suggests that it would be safest to add those numbers and make sure you had at least 37 GB free.
However, we recommend keeping around 40GB free as you never know what lies ahead. So, being a little on the safe side is the way to go. You can check how much storage space you have available by following the steps below:
- Firstly, go to the Apple menu.
- Next, select “About This Mac” from the list.
- Finally, go to the “Storage” tab and wait a few minutes for it to scan through everything.
To check free space carefully, we suggest use Disk Utility instead. The steps are below:
- open Disk Utility
- select the top level of your boot volume (not the Data volume underneath),
- use its free space number — 76 GB in the screenshot below.

How to free up space on Mac for macOS upgrade?
Assuming you don’t have enough space to upgrade your Mac’s OS to the latest version, here are some ways to free up your storage space and fix the “not enough space to install macOS” error message.
Note: Before proceeding with any of the steps below, make sure to delete or remove any old backups or files that you don’t need. If you know that you have some useless data sitting around, then trash it as soon as possible. However, if you don’t have any large files that need deleting, go ahead and use the tips below.
1. Back up first
Our first advice is to make sure to back up all of your systems before upgrading to Ventura, and make at least one full backup of your drive. It’s better to be safe rather than sorry, especially where the safety and security of your data are concerned.
And for the backing up, Mac owners can use Time Machine, a built-in Apple tool found on macOS, that backs up all files to an external hard drive, which you can use, you can also check our ultimate guide to Mac backup here.
2. Optimize your storage disk
macOS comes with a built-in optimization tool that can help scan for various files such as email attachments, movies, or TV shows that you’ve watched earlier and then removes them. This tool can also be found in the “Recommendations” tab, and you can get to it by:

- Head on to the Apple menu and then select the “About This Mac” option.
- Next, go to “Storage”, and click on “Manage”, and click on the “Recommendations” tab on the left panel.
- Finally, click on “Optimize Storage” and let the process be completed, as shown above in the screenshot.
3. Clean out system junk
The other big contributor to low storage space is system junk. While you might be keeping all your data organized, the OS and apps can still dump junk files that are not needed. So, once in a while, cleaning the junk can help out a tonne, and you can do this (similar to above):
- Firstly go to the Apple menu and then select the “About This Mac” option.
- Next, go to “Storage” and click on “Manage”.
- Finally, go to “Reduce Clutter” section and then click on “Review Files”.
4. Delete iPhone and iPad backups
The quickest way to gain a lot more free storage space is through deleting backups. Specifically, iPad and iPhone backups can take up a huge chunk of your storage. Here’s how you can delete those backups:

- Connect your iPhone or iPad to your Mac.
- Next, open Finder and locate the device under the “Locations” tab.
- Now, select “Manage Backups”, as shown in the screenshot above.
- Finally, choose a backup and click Delete.
5. Uninstall unused apps
Another option to get some free space is to uninstall old or unused apps. Yes, we know that it takes time and is not as exciting. However, removing unwanted apps can seriously improve your overall performance and, as a side benefit, clear some of your storage space out. You can do this by following the steps below:

- Firstly, go to Finder and select “Applications” from the left tab
- Next, look for any old or unused applications you want to remove
- Finally, uninstall the app, and voila, you have freed some storage space.
Note: Make sure to optimize your storage disk later on and do a system restart for everything to work smoothly and seamlessly.
6. Clean up the Downloads folder
The next thing you should do is to clean the “Downloads” folder. We all just download a lot of stuff and forget about it. So, cleaning it can help save a lot of space and help clean GigaBytes of data. So, the time has come, and you need to delete these files to get some storage space back. Similar to applications folder, you can do this by:
- Firstly, open Finder and go to the “Downloads ” folder.
- Next, click the “Group ” button and select the “Date Added ” tab.
- Finally, scroll down to the oldest downloads and delete the files that you don’t need.
Note: You should also delete any large unused files on other folders, as this will help free up some storage space for your macOS upgrade to work smoothly.
7. Store on iCloud
You can also store your data on iCloud and then start your upgrade process. This is a great way to preserve all your files while the upgrade process is going on. You can easily do this by:

- Go to Finder and then look for “iCloud Drive” on the left tab
- Now, copy all your files and paste them into the “iCloud Drive” folder
- Let the upload be completed, and once that’s done, delete the original files on your hard drive and continue with the upgrading process
Note: You need to have an iCloud account already on your Mac for this to work smoothly.
8. Upgrade from external drive
Finally, the last option that you can use to upgrade your Mac’s OS is to update it using an external drive. *Spoiler Warning* The process is lengthy and can get really confusing for some of you. So, I recommend following down the steps to the tiniest bit of detail so that you can successfully upgrade your Mac.

- Connect your external drive to your Mac and format it with the “GUID Partition Map” scheme.
- Next, download the macOS installer that you want to use from Apple’s page
- Now, locate the installer on Finder and run it. Next, you need to select your drive as shown in the screenshot above and continue with the on-screen instructions
- Finally, reboot your OS and press and hold the power button (Apple Silicon Macs) or the Option key (Intel Macs), and then select the external disk. This will start the upgrading process, and you can install the latest macOS version from it.
Note: Before you do anything, make a backup as if something goes wrong, you can just restore your old system, and everything will be working again. Also, make sure to have a drive with a minimum of 64GB of storage space.
9. Use a third-party cleaner
So, let’s say you don’t have time to go and delete files one by one. Well, neither do we. So, we use a third-party Mac Cleaning tool to quickly scan through different files and suggest the ones we need to delete.

You too can use a tool to do this, and we recommend CleanMyMac X as it works great and has an easy-to-use UI.
It can also help clear any system junk files, and you can also use it to uninstall and remove apps and other hidden files.
10. Wait for a new installer
Finally, if you still can’t seem to get past the “not enough free space” error while upgrading macOS and even after clearing all the required storage space, you don’t know what to do. Then my advice would simply be to wait.
Yes, it is frustrating. I know that, but macOS upgrade installers have been known to be bugged in the past, and it might just be the same case with you. While the latest macOS Ventura installer seems to be working fine for most people, it can just be a one-off with some devices.
Hence, waiting for Apple to deliver a fix is the only solution, and you would need to wait for it to come out.
Final words
Getting stuck while upgrading your Mac is frustrating. Even more so if the reason is insufficient storage space, generally, you should keep at least 40GB of space free as it allows your OS to function properly and everything to work smoothly.
So, clearing out some files and trash is the best way to go ahead. The tips above would surely help you get back on track with your macOS upgrade, and we recommend cleaning out the trash once or twice a month as this helps keep everything organized and avoids trash pileup.
With that said, we have reached the end of our guide today, and we hope that you can now clean your Mac effectively and upgrade it without any errors.
Other featured topics related to macOS
- How to Fix Slow Mac After macOS Ventura Update
- How to Clear System Data Storage on Mac
- How to Upgrade to (and Downgrade from) Monterey
- How to Fix Common Issues with macOS Monterey
- How to Make Your Computer Faster for Gaming
- macOS Monterey vs. Big Sur: Is it Worth an Upgrade?
Share This Article
Related Projects
Page load link