Содержание
- Thread: failed installation of apt-show-versions
- failed installation of apt-show-versions
- install of apt-show-versions fail
- dietmar
- dietmar
- dietmar
- apmuthu
- About
- Quick Navigation
- Get your subscription!
- Dependency problems while installing Webmin
- 3 Answers 3
- purge apt-show-versions
- set on the fly option for apt
- apt-show-versions
- webmin
- [explanations]
- Error no information about packages maybe no deb entries
- 41 thoughts on — Установка на чистую RaspberryPi, OrangePi, Asus tinker board и т.п. (скрипт)
Thread: failed installation of apt-show-versions
Thread Tools
Display
failed installation of apt-show-versions
Recently I started testing a Ubuntu 14.04 container on nitrous.io (free account).
The container info is Ubuntu 14.04.2 LTS 3.16.0-34-generic.
I have installed packages such as PHP5/Apache2/MySQL on nitrous.io Ubuntu container without encountering problems.
But when I try to install package apt-show-versions on nitrous.io Ubuntu container I hit these errors.
.
.
Setting up apt-show-versions (0.22.3) .
** initializing cache. This may take a while **
Error: No information about packages! (Maybe no deb entries?)
dpkg: error processing package apt-show-versions (—configure):
subprocess installed post-installation script returned error exit status 255
Errors were encountered while processing:
apt-show-versions
E: Sub-process /usr/bin/dpkg returned an error code (1)
Now I have searched around and followed the clue about postinstallation script error.
So reading suggestions from above I tried
export DEBIAN_FRONTEND=noninteractive
apt-get -y install apt-show-versions
But I still see .
Errors were encountered while processing:
apt-show-versions
I also tried purging, cleaning up and reinstalling as follows ..
sudo dpkg -P apt-show-versions
sudo apt-get update
sudo apt-get clean
sudo apt-get autoremove
sudo apt-get update && sudo apt-get upgrade
sudo dpkg —configure -a
sudo apt-get install -f
sudo apt-get -y install apt-show-versions
Any suggestions to troubleshoot this particular road block with apt-show-versions?
Where is the post-installation script for apt-show-versions package?
Источник
install of apt-show-versions fail
Guest
I have a problem to install the package «apt-show-versions» with dab install.
It’s the only packet with dab install to fail since 4 month in many template.
aptitude show apt-show-versions

dietmar
Proxmox Staff Member
Best regards,
Dietmar
Do you already have a Commercial Support Subscription? — If not, Buy now and read the documentation
Guest
Why dab don’t install all dependencies of a package ?
It’s possible to change this ?
But I have made an aptitude update and aptitude upgrade, the problem is doesn’t solved at this time.
dietmar
Proxmox Staff Member
dab installs all dependencies — what do you miss?
Best regards,
Dietmar
Do you already have a Commercial Support Subscription? — If not, Buy now and read the documentation
dietmar
Proxmox Staff Member
The postinst script simply calls:
# apt-show-versions -i
Error: No information about packages! (Maybe no deb entries?)
So this is obviously a bug in ‘apt-show-versions’ — because all dpkg status files are there and dpkg is configured correctly.
Best regards,
Dietmar
Do you already have a Commercial Support Subscription? — If not, Buy now and read the documentation
Guest
Thx for support.
I modified the package apt-show-versions (postinstall script), and my problem is solved.
apmuthu
Active Member
About
The Proxmox community has been around for many years and offers help and support for Proxmox VE, Proxmox Backup Server, and Proxmox Mail Gateway.
We think our community is one of the best thanks to people like you!
Quick Navigation
Get your subscription!
The Proxmox team works very hard to make sure you are running the best software and getting stable updates and security enhancements, as well as quick enterprise support. Tens of thousands of happy customers have a Proxmox subscription. Get your own in 60 seconds.
Источник
Dependency problems while installing Webmin
I’m having problems when installing Webmin for Debian Wheezy.
It turns out that, while installing the dependencies which are mentioned on these instructions from Webmin website, I receive the following error when installing apt-show-versions:
Seems like that APT is having problems to process the configuration of the package.
Acoording to «man apt»:
Configure a package which has been unpacked but not yet configured. If -a or —pending is given instead of package, all unpacked but unconfigured packages are configured.
To reconfigure a package which has already been configured, try the dpkg-reconfigure(8) command instead.
Configuring consists of the following steps:
Unpack the conffiles, and at the same time back up the old conffiles, so that they can be restored if something goes wrong.
Run postinst script, if provided by the package.
- uninstall webmin and then installing apt-show-versions
- to clean APT cache
. but none of these options have solved my problem.
What kind of solution/workaround can I apply for this issue?
3 Answers 3

I found this solution from this guy on the BeagleBoard forum page at Google Groups.
Here is the way that I chose to follow this procedure (here’s the Webmin package):
purge apt-show-versions
set on the fly option for apt
apt-show-versions
webmin
[explanations]
THE ACQUIRE GROUP
The Acquire group of options controls the download of packages as well as the various «acquire methods» responsible for the download itself (see also sources.list(5)). . .
GzipIndexes
When downloading gzip compressed indexes (Packages, Sources, or Translations), keep them gzip compressed locally instead of unpacking them. This saves quite a lot of disk space at the expense of more CPU requirements when building the local package caches.
False by default (doesn’t seem to be the case for this situation).
Источник
Error no information about packages maybe no deb entries
Скрипт установки системы MajorDoMo рассчитан на операционные системы с менеджером пакетов apt, таких как Ubuntu, Debian, Mint и на их основе, Armbian, Raspbian, на платформы как ARM так и x86.
Установка сводиться к скачиванию скрипта с github и запуска его с параметрами из терминала.
Для установки скрипта у Вас должна быть установлена система Linux и вы должны видеть командную строку терминала. Данная статья не описывает установку операционной системы Linux, только использование скрипта. перед установкой обновите пакеты введя команды:
если Вы уже устанавливали скриптом и он у Вас скачан, то надо сначала удалить старый скрипт командой
скачиваем скрипт командой
даем права на выполнение командой
Устанавливаем систему MajorDoMo
скрипт запускать под суперпользователем, если вошли под простым пользователем, то введите:
и введите пароль
для установки системы MajorDoMo введите команду

введите пароль root для создаваемой базы данных, символы пароля или звездочки не показываются, нажмите Enter, введите пароль пользователя pi, не важно создан у Вас пользователь или нет, если не создан, то скрипт создаст его сам.
Больше нигде паролей вводить не надо, в зависимости от версии mysql может выйти запрос паролей ещё раз, в этом случае оставьте поле пустым и нажмите продолжить. Осталось дождаться завершения работы скрипта, при завершении Вы увидите
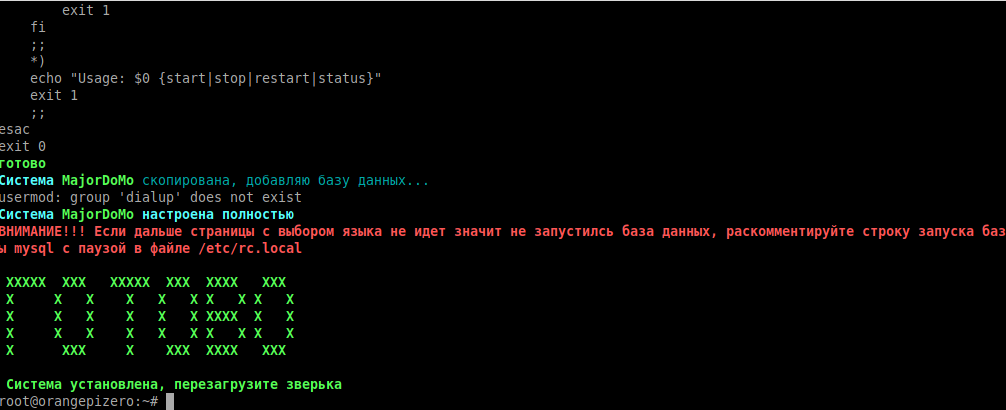
осталось перезапустить систему командой
На этом установка системы MajorDoMo окончена, можно зайти через браузер по адресу: http://md.lan
доступ по ssh можно не по айпи адресу а по имени md.lan, порт 22
Установлен так же vlc ower http, который доступен на порту 7070 пароль для входа 12345
Установка phpMyAdmin
Установить phpMyAdmin можно двумя способами: из репозитариев и из исходников, при установке из репов конфиг phpmyadmin храниться в базе данных и как следствие размер занимаемый базой данных будет больше, при установке из исходников конфиг в файле в месте установки. Скрипт установки просто скачивает последнюю версию исходников и распаковывает в папку www, для установки phpMyAdmin скриптом введите в консоли команду:
зайти в phpMyAdmin можно по адресу http://md.lan/phpmyadmin/
по умолчанию вход пользователем root в phpmyadmin запрещено, чтобы войти используйте пользователя pi
Установка Java, установка и обновление сервера Blynk
Сервер Blynk не работает без установленной Java 8 или 9, скрипт устанавливает java версии 8, для установки java выполните в консоли:
для установки или обновления до последней версии Blynk сервера выполните в консоли
перезагрузите компьютер, для настройки зайдите в браузере по адресу: https://md.lan:9443/admin
имя пользователя admin@blynk.cc пароль admin
Оптимизация работы с картой памяти
Для сохранения жизни SD карты рекомендуется все лог файлы и базы данных держать в памяти примонтировав соответствующие каталоги в файловой системе tmpfs, для того чтобы перенести всё в tmpfs и сделать соответствующие настройки выполните в терминале
Установка расширенной конфигурации.
Расширенная конфигурация представляет собой базовую конфигурацию с добавлением сцен, выключателей, некоторых скриптов и удалением некоторых элементов. Так же при установки расширенной конфигурации в mysql отключается использование таблиц innodb, это сделано для уменьшения размера файлов баз данных. Расширенная конфигурация предназначена для ознакомления, проверки звука и построения своей конфигурации. Для установки расширенной конфигурации выполните:
Если Вы будете загружать свою конфигурацию поверх расширенной, то сначала в архиве с своей конфигурацией отредактируйте файл dump.sql и замените все innodb на MyISAM либо отредактируйте конфигурационный файл mysql, обычно файл находиться тут: /etc/mysql/mariadb.conf.d/50-server.cnf, в конце файла закоментируйте строку innodb=OFF приведя к виду
перезагрузите систему и загрузите свою конфигурацию средствами MajorDoMo
Подключение часов реального времени DS3231
Подключаем часы реального времени DS3231 к порту i2c и включаем в настройках оборудования порт i2c-0, после чего выполните в консоли команду:
Решение возможных проблем.
Нет звука
Проблема замечена на Armbian OrangePi Zero и OrangePi plus 2E, возможно и на других платах.
Возможная причина в том, что в конфигурации не включен analog-codec, для его включения в консоли запустите armbian-config, выберете System — Hardware и установите галочку напротив analog-codec

сохраните и перезагрузитесь. Должно появиться аудиоустройство
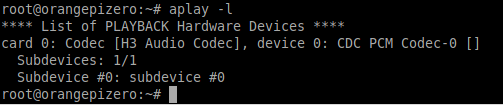
если галочка analog-codec стоит, но аудиоустройство не появилось то добавьте в файл /etc/modules добавляем строки
и перезагружаемся, аудиоустройство должно появиться.
Дальше страницы с выбором языка не идет.
Причина в том, что mysql не запустился, это связано с тем, что при запуске системы база данных копируется в раздел tmp и mysql запускается когда базы ещё не скопировались в следствии чего mysql не может запуститься. Раскоментируйте строку в /etc/rc.local с запуском mysql
После пропадания питания не сохраняются данные, сбрасывается на дефолтную конфигурацию
причина в том, что время получает позже старта системы и из-за этого восстанавливается самый близкий к текущему в системе времени, до получения времени с интернета текущее время 1970 год.
вар 1 (предпочтительнее): установить и настроить i2c часы ds3231 как написано выше
вар 2: отключаем автозапуск mysql:
в строке запуска mysql в /etc/rc.local сделем паузу запуска в 90 секунд.
вар 3: в папке /var/www создаем файл prov и сделаем его исполняемым
файл со следующим содержимым.
в rc.local добавляем перед exit 0
в свойствах делаем оригинальное свойство, у меня называется proverkabase
делаем бэкап последней версии базы данных и распаковываем файл dump.sql в /var/www
Установка на Intel Edison
Устанавливаем на Intel Edison JubiLinux, вставляем карту памяти или USB флэшку (так как размер встроенной памяти мал часть системы будем ставить на внешний носитель). Носитель должен определиться как /dev/sda1 , проверяем командой
форматируем в ext4
создаем папку, монтируем раздел флэшки и копируем
добавить в /etc/fstab после /dev/root
последнюю строку исправить и привести к виду
после этого можно приступить к установке.
Обсуждение статьи на форуме и в чате telegam.
41 thoughts on — Установка на чистую RaspberryPi, OrangePi, Asus tinker board и т.п. (скрипт)
Добрый день. Не совсем понятно начало установки на RaspberryPi. Вы пишите: «Скачаем образ Armbian с сайта под Вашу плату». Перехожу по ссылке и не могу наяти там свою плату RaspberryPi2.
Может быть плохо ищу?
нет под RaspberryPi2 Armbian, воспользуйтесь другим дистрибутивом для Вашей платы, скрипт работает с дистрибутивами на базе Ubuntu/Debian
Скрипт вроде как установился на Orange Pi Zero, но в интерфейсе дальше страницы Hello, world! 🙂 не идет. Ни выбор языка ни выбор темы не происходит, кнопка Continue>>> активна, но возвращает на эту же страницу (((
Предлагаю внести в скрипт установку RHVoice (его вроде нет в дереве репозиториев, его отдельно приходится скачивать и ставить, тоже гемор) и установку MotionEye — очень неплохая прога для видеонаблюдения (можно сказать, практически единственная под линь).
motioneye нафик с ее тормозами, когда есть rpi-webcam-interface
а базу надо потом создавать?
нет, всё создает скрипт.
привет всем!установил все по этому скрипту и все чудесно работает но с ноута могу заходить в MajorDoMo а с других устройств нет,хотя все подключены в одной локальной сети.
привет всем!установил все по этому скрипту и все чудесно работает но с ноута могу заходить в MajorDoMo а с других устройств нет,хотя все подключены в одной локальной сети.
странно, а что пишет?
привет всем!установил все по этому скрипту и не работает. Открывается
код страницы, устанавливал на чистую Raspberry.
важно какая операционная система, на Raspbian 7 пока не могу решить проблему с установкой, на более новых распбиан не могу проверить за неимением.
код значит не выполняются php, причины могут быть например в том ,что php не установился или не установилась либа апача.
Первый раз у меня все работало. Переустановил туже систему и все, каюк, мучаюсь 5 день. Система
Raspbian Stretch with desktop. 29-11-17. Еще в linux я профан((. Может обновить какие то библиотеки?
Выкрутился из положения может кому понадобится: на форуме https://majordomo.smartliving.ru/forum/viewtopic.php?f=3&t=3490&start=10#p41896 установил скриптsudo apt-get install phpmyadmin apache2 apache2-bin apache2-data apache2-utils libapache2-mod-php libapache2-mod-php7.0 php7.0-bz2 php7.0-cli php7.0-common php7.0-curl php7.0-gd php7.0-json php7.0-mbstring php7.0-mcrypt php7.0-mysql php7.0-opcache php7.0-readline php7.0-xml так как не установилась папка PHP, затем сделал все исправления в файлах как описано в форуме. Вот и все. Удачи всем.
Can’t find a ‘mysql’ client in PATH or ./bin
что это может быть?
подскажите пожалуйста.
Добрый день. В скрипт изменения внесли, а в инструкцию забыли. Обновите пожалуйста.
Поместите nameserver 8.8.8.8 в первую строку /etc/resolv.conf
Доброго дня.
Скажите, а на OPi One должно становиться?
Имею проблему с постоянным Hello World. Так понимаю, что с настройкой базы данных что-то не так? Что надо сделать?
Спасибо.
У меня та же проблема на Orange Pi Zero ((
Установка на OrangePiPlus2. Без бубина конечно не обошлось. Временно отказался от переноса на HDD, из за бубина(((
Выяснил: «Hello World» и далее ничего((( конечно причина в не старте базы. Увеличение паузы не спасало (, Отказался от оптимизации CD. MD стартует.
Имею проблемы:
Нет доступа к «Панели управления» [./admin.php], возвращает на «Главную страницу [./index.php]. Уже сломал себе голову(((
Нет доступа по poot к . /phpmyadmin неверный пароль (тот что вводился по мануалу). По “pi” вход есть. Похоже косяк в скрипте.
Прошу подсказки.
Абсолютно аналогично все. Видимо действительно проблема в скрипте.
на orange pi pc с сервером дебиан на абрахам не катит
В строке 41 25 символ некорректный. u вместо a.
в каком месте строки считать? В каком хоть слове?))
У меня при установке доходит момента установки mariadb и дальше вот это:
Enter current password for root (enter for none):
ERROR 2002 (HY000): Can’t connect to local MySQL server through socket ‘/var/run/mysqld/mysqld.sock’ (2 «No such file or directory»)
Enter current password for root (enter for none):
ERROR 2002 (HY000): Can’t connect to local MySQL server through socket ‘/var/run/mysqld/mysqld.sock’ (2 «No such file or directory»)
Enter current password for root (enter for none):
ERROR 2002 (HY000): Can’t connect to local MySQL server through socket ‘/var/run/mysqld/mysqld.sock’ (2 «No such file or directory»)
Enter current password for root (enter for none):
ERROR 2002 (HY000): Can’t connect to local MySQL server through socket ‘/var/run/mysqld/mysqld.sock’ (2 «No such file or directory»)
Enter current password for root (enter for none):
ERROR 2002 (HY000): Can’t connect to local MySQL server through socket ‘/var/run/mysqld/mysqld.sock’ (2 «No such file or directory»)
Enter current password for root (enter for none):
ERROR 2002 (HY000): Can’t connect to local MySQL server through socket ‘/var/run/mysqld/mysqld.sock’ (2 «No such file or directory»)
Enter current password for root (enter for none):
ERROR 2002 (HY000): Can’t connect to local MySQL server through socket ‘/var/run/mysqld/mysqld.sock’ (2 «No such file or directory»)
Enter current password for root (enter for none):
ERROR 2002 (HY000): Can’t connect to local MySQL server through socket ‘/var/run/mysqld/mysqld.sock’ (2 «No such file or directory»)
Enter current password for root (enter for none):
ERROR 2002 (HY000): Can’t connect to local MySQL server through socket ‘/var/run/mysqld/mysqld.sock’ (2 «No such file or directory»)
Enter current password for root (enter for none):
ERROR 2002 (HY000): Can’t connect to local MySQL server through socket ‘/var/run/mysqld/mysqld.sock’ (2 «No such file or directory»)
Enter current password for root (enter for none):
ERROR 2002 (HY000): Can’t connect to local MySQL server through socket ‘/var/run/mysqld/mysqld.sock’ (2 «No such file or directory»)
Enter current password for root (enter for none):
ERROR 2002 (HY000): Can’t connect to local MySQL server through
ERROR 1698 (28000): Access denied for user ‘root’@’localhost’
Enter current password for root (enter for none):
ERROR 1698 (28000): Access denied for user ‘root’@’localhost’
Enter current password for root (enter for none):
ERROR 1698 (28000): Access denied for user ‘root’@’localhost’
Enter current password for root (enter for none):
ERROR 1698 (28000): Access denied for user ‘root’@’localhost’
Enter current password for root (enter for none):
ERROR 1698 (28000): Access denied for user ‘root’@’localhost’
Enter current password for root (enter for none):
ERROR 1698 (28000): Access denied for user ‘root’@’localhost’
Enter current password for root (enter for none):
ERROR 1698 (28000): Access denied for user ‘root’@’localhost’
Enter current password for root (enter for none):
ERROR 1698 (28000): Access denied for user ‘root’@’localhost’
Enter current password for root (enter for none):
ERROR 1698 (28000): Access denied for user ‘root’@’localhost’
Enter current password for root (enter for none):
ERROR 1698 (28000): Access denied for user ‘root’@’localhost’
Enter current password for root (enter for none):
ERROR 1698 (28000): Access denied for user ‘root’@’localhost’
Enter current password for root (enter for none):
ERROR 1698 (28000): Access denied for user ‘root’@’localhost’
Enter current password for root (enter for none):
ERROR 1698 (28000): Access denied for user ‘root’@’localhost’
Enter current password for root (enter for none):
ERROR 1698 (28000): Access denied for user ‘root’@’localhost’
Enter current password for root (enter for none):
ERROR 1698 (28000): Access denied for user ‘root’@’localhost’
Enter current password for root (enter for none):
ERROR 1698 (28000): Access denied for user ‘root’@’localhost’
Enter current password for root (enter for none):
ERROR 1698 (28000): Access denied for user ‘root’@’localhost’
Enter current password for root (enter for none):
ERROR 1698 (28000): Access denied for user ‘root’@’localhost’
Enter current password for root (enter for none):
ERROR 1698 (28000): Access denied for user ‘root’@’localhost’
Enter current password for root (enter for none):
ERROR 1698 (28000): Access denied for user ‘root’@’localhost’
Enter current password for root (enter for none):
ERROR 1698 (28000): Access denied for user ‘root’@’localhost’
Enter current password for root (enter for none):
ERROR 1698 (28000): Access denied for user ‘root’@’localhost’
Enter current password for root (enter for none):
ERROR 1698 (28000): Access denied for user ‘root’@’localhost’
Enter current password for root (enter for none):
ERROR 1698 (28000): Access denied for user ‘root’@’localhost’
Enter current password for root (enter for none):
ERROR 1698 (2800
ERROR 1698 (28000): Access denied for user ‘root’@’localhost’
Enter current password for root (enter for none):
ERROR 1698 (28000): Access denied for user ‘root’@’localhost’
Enter current password for root (enter for none):
ERROR 1698 (28000): Access denied for user ‘root’@’localhost’
Enter current password for root (enter for none):
ERROR 1698 (28000): Access denied for user ‘root’@’localhost’
Enter current password for root (enter for none):
ERROR 1698 (28000): Access denied for user ‘root’@’localhost’
Enter current password for root (enter for none):
ERROR 1698 (28000): Access denied for user ‘root’@’localhost’
Enter current password for root (enter for none):
ERROR 1698 (28000): Access denied for user ‘root’@’localhost’
Enter current password for root (enter for none):
ERROR 1698 (28000): Access denied for user ‘root’@’localhost’
Enter current password for root (enter for none):
ERROR 1698 (28000): Access denied for user ‘root’@’localhost’
Enter current password for root (enter for none):
ERROR 1698 (28000): Access denied for user ‘root’@’localhost’
Enter current password for root (enter for none):
ERROR 1698 (28000): Access denied for user ‘root’@’localhost’
Enter current password for root (enter for none):
ERROR 1698 (28000): Access denied for user ‘root’@’localhost’
Enter current password for root (enter for none):
ERROR 1698 (28000): Access denied for user ‘root’@’localhost’
Enter current password for root (enter for none):
ERROR 1698 (28000): Access denied for user ‘root’@’localhost’
Enter current password for root (enter for none):
ERROR 1698 (2800
Скрипт не рабочий.
Постоянно Hello world
Источник

- Forum
- The Ubuntu Forum Community
- Ubuntu Official Flavours Support
- General Help
- [ubuntu] failed installation of apt-show-versions

-
failed installation of apt-show-versions
Recently I started testing a Ubuntu 14.04 container on nitrous.io (free account).
The container info is Ubuntu 14.04.2 LTS 3.16.0-34-generic.I have installed packages such as PHP5/Apache2/MySQL on nitrous.io Ubuntu container without encountering problems.
But when I try to install package apt-show-versions on nitrous.io Ubuntu container I hit these errors.…
…Setting up apt-show-versions (0.22.3) …
** initializing cache. This may take a while **
Error: No information about packages! (Maybe no deb entries?)
dpkg: error processing package apt-show-versions (—configure):
subprocess installed post-installation script returned error exit status 255
Errors were encountered while processing:
apt-show-versions
E: Sub-process /usr/bin/dpkg returned an error code (1)…
Now I have searched around and followed the clue about postinstallation script error.
http://serverfault.com/questions/227…guration-steps
So reading suggestions from above I tried
export DEBIAN_FRONTEND=noninteractive
apt-get -y install apt-show-versionsBut I still see …
Errors were encountered while processing:
apt-show-versionsI also tried purging, cleaning up and reinstalling as follows ..
sudo dpkg -P apt-show-versions
sudo apt-get update
sudo apt-get clean
sudo apt-get autoremove
sudo apt-get update && sudo apt-get upgrade
sudo dpkg —configure -a
sudo apt-get install -f
sudo apt-get -y install apt-show-versionsAny suggestions to troubleshoot this particular road block with apt-show-versions?
Where is the post-installation script for apt-show-versions package?
-
Re: failed installation of apt-show-versions
sorry i have no clue about ‘container’; but that let me thinking first of a path issue. May be dig around container/lxc+path declaration
-
Re: failed installation of apt-show-versions
What happens if you try running
Code:
sudo apt-show-versions -i -v
-
Re: failed installation of apt-show-versions
If I run sudo apt-show-versions -i -v
on my local Ubuntu
I see a stream of lines Parsinghere is one line ..
Parsing /var/lib/apt/lists/gb.archive.ubuntu.com_ubuntu_dists_trusty-updates_restricted_binary-i386_Packages… completed.
and parsing completes without errors.
…
If I now run the same command sudo apt-show-versions -i -v
on nitrous.io UbuntuI see ..
Error: No information about packages! (Maybe no deb entries?)…
[added note]
Incidentally «container» is a nitrous.io term
I have a test workspace and in nitrous.io I can install multiple pre-packaged containers such as Ubuntu, Node.js, etc.
I am starting with Ubuntu.
But apt-show-versions is a dependency for webmin.Last edited by dragonfly41; July 2nd, 2015 at 02:11 PM.
Reason: explaining «container»
-
Re: failed installation of apt-show-versions
More info … differences between local and remote Ubuntu configurations.
In nitrous.io Ubuntu
/var/lib/apt/lists all contents end in .gz
In local Ubuntu
/var/lib/apt/lists contents do not end in .gz (i.e. not compressed)In nitrous.io Ubuntu
/etc/apt/apt.conf.d02compress-indexes
02compress-indexes.saveand running sudo nano /etc/apt/apt.conf.d/02compress-indexes
I see ..
Acquire::GzipIndexes «true»;In local Ubuntu
there is no compress-indexes file.…
[added note]So something related to compressed lists in /var/lib/apt/lists?
https://bugs.debian.org/cgi-bin/bugr…cgi?bug=617856
Last edited by dragonfly41; July 2nd, 2015 at 02:36 PM.
Bookmarks
Bookmarks
Posting Permissions

I’m running an Ubuntu 16.04 container on Docker.
I exec into the container and run:
apt install apt-show-versions
I get back:
Setting up apt-show-versions (0.22.3) ...
** initializing cache. This may take a while **
Error: No information about packages! (Maybe no deb entries?)
dpkg: error processing package apt-show-versions (--configure):
 subprocess installed post-installation script returned error exit status 255
Errors were encountered while processing:
 apt-show-versions
E: Sub-process /usr/bin/dpkg returned an error code (1)
I have no problem installing this package on my host computer also running 16.04.
Anyone know what might be causing the issue?
asked May 17, 2017 at 18:02
![]()
Philip KirkbridePhilip Kirkbride
1,5093 gold badges30 silver badges50 bronze badges
Problem and solution is explain here : https://groups.google.com/forum/#!topic/beagleboard/jXb9KhoMOsk
rm /etc/apt/apt.conf.d/docker-gzip-indexes
apt-get purge apt-show-versions
rm /var/lib/apt/lists/*lz4
apt-get -o Acquire::GzipIndexes=false update
[…]
apt-get install apt-show-versions
The following NEW packages will be installed:
  apt-show-versions
0 upgraded, 1 newly installed, 0 to remove and 0 not upgraded.
Need to get 29.6 kB of archives.
After this operation, 163 kB of additional disk space will be used.
Get:1 http://archive.ubuntu.com/ubuntu xenial/universe amd64 apt-show-versions all 0.22.7 [29.6 kB]
Fetched 29.6 kB in 0s (371 kB/s)
Selecting previously unselected package apt-show-versions.
(Reading database ... 46320 files and directories currently installed.)
Preparing to unpack .../apt-show-versions_0.22.7_all.deb ...
Unpacking apt-show-versions (0.22.7) ...
Processing triggers for man-db (2.7.5-1) ...
Setting up apt-show-versions (0.22.7) ...
** initializing cache. This may take a while **
root@4127ac89e58f:/#
answered May 18, 2017 at 12:30
![]()
3
I found this solution from this guy on the BeagleBoard forum page at Google Groups.
Here is the way that I chose to follow this procedure (here’s the Webmin package):
purge apt-show-versions
apt-get purge apt-show-versions
set on the fly option for apt
apt-get -o Acquire::GzipIndexes=false update
apt-show-versions
$ apt-get install apt-show-versions
Reading package lists... Done
Building dependency tree
Reading state information... Done
apt-show-versions is already the newest version.
0 upgraded, 0 newly installed, 0 to remove and 15 not upgraded.
1 not fully installed or removed.
After this operation, 0 B of additional disk space will be used.
Do you want to continue [Y/n]? Y
Setting up apt-show-versions (0.20) ...
** initializing cache. This may take a while **
webmin
$ dpkg -i webmin_1.831_all.deb
Selecting previously unselected package webmin.
(Reading database ... 13818 files and directories currently installed.)
Unpacking webmin (from webmin_1.831_all.deb) ...
Setting up webmin (1.831) ...
Webmin install complete.
You can now login to https://e93cd8ed670b:10000/ as root with your root password,
or as any user who can use sudo to run commands as root.

$ /etc/init.d/webmin start
$ /etc/init.d/webmin status
Webmin (pid 4713) is running
[explanations]
Acoording with apt.conf man page:
…
THE ACQUIRE GROUP
The Acquire group of options controls the download of packages as well
as the various «acquire methods» responsible for the download itself
(see also sources.list(5)).
…
…GzipIndexes
When downloading gzip compressed indexes (Packages, Sources, or
Translations), keep them gzip compressed locally instead of
unpacking them. This saves quite a lot of disk space at the expense
of more CPU requirements when building the local package caches.False by default (doesn’t seem to be the case for this situation).
Probably, this version of apt-show-versions (0.20), has a different behavior when dealing with GZIP compressed indexes and then, it is necessary to configure «Acquire::GzipIndexes=false» on the fly (apt-get update), or via /etc/apt/apt.conf, in order to follow with the installation of apt-show-versions..
debz
Guest
-
#1
Hello,
I have a problem to install the package «apt-show-versions» with dab install.
It’s the only packet with dab install to fail since 4 month in many template.
Makefile
Code:
BASEDIR:=$(shell dab basedir)

all: info/init_ok
        dab bootstrap
        dab install apt-show-versions
        dab finalize

info/init_ok: dab.conf
        dab init
        touch $@

.PHONY: clean
clean:
        dab clean
        rm -f *~

.PHONY: dist-clean
dist-clean:
        dab dist-clean
        rm -f *~@
The log output : (logfile)
Code:
dab: install apt-show-versions
install: apt-show-versions
install: libapt-pkg-perl
Selecting previously deselected package apt-show-versions.
(Reading database ... 16545 files and directories currently installed.)
Unpacking apt-show-versions (from .../apt-show-versions_0.15_all.deb) ...
Selecting previously deselected package libapt-pkg-perl.
Unpacking libapt-pkg-perl (from .../libapt-pkg-perl_0.1.22+b1_amd64.deb) ...
Setting up libapt-pkg-perl (0.1.22+b1) ...
Processing triggers for man-db ...
Setting up apt-show-versions (0.15) ...
** initializing cache. This may take a while **
Error: No information about packages! (Maybe no deb entries?)
dpkg: error processing apt-show-versions (--install):
 subprocess post-installation script returned error exit status 255
Errors were encountered while processing:
 apt-show-versions
command 'vzctl exec2 90000 defenv dpkg --force-depends --force-confold --install /apt-show-versions_0.15_all.deb /libapt-pkg-perl_0.1.22+b1_amd64.deb' failed with exit code 1
aptitude show apt-show-versions
Code:
Package: apt-show-versions
New: yes
State: not installed
Version: 0.15
Priority: optional
Section: admin
Maintainer: Christoph Martin <christoph.martin@uni-mainz.de>
Uncompressed Size: 188k
Depends: perl | perl-5.005 | perl-5.004, apt, libapt-pkg-perl (>= 0.1.21), libstorable-perl
Description: lists available package versions with distribution
 apt-show-versions parses the dpkg status file and the APT lists for the installed and available package versions and
 distribution and shows upgrade options within the specific distribution of the selected package.

 This is really useful if you have a mixed stable/testing environment and want to list all packages which are from testing and
 can be upgraded in testing.
![]()
-
#2
Maybe you need to install some other packages before to generate a dpkg status file (or run apt-get update).
debz
Guest
-
#3
Why dab don’t install all dependencies of a package ?
It’s possible to change this ?
But I have made an aptitude update and aptitude upgrade, the problem is doesn’t solved at this time.
![]()
-
#4
Why dab don’t install all dependencies of a package ?
dab installs all dependencies — what do you miss?
It’s possible to change this ?
change what?
But I have made an aptitude update and aptitude upgrade, the problem is doesn’t solved at this time.
I guess you need to debug the postinst scrip of apt-show-versions to see whats missing.
![]()
-
#5
The postinst script simply calls:
# apt-show-versions -i
Error: No information about packages! (Maybe no deb entries?)
So this is obviously a bug in ‘apt-show-versions’ — because all dpkg status files are there and dpkg is configured correctly.
debz
Guest
-
#6
Thx for support.
I modified the package apt-show-versions (postinstall script), and my problem is solved.
-
#7
A nice guide to apt-show-versions is available here.
A web-based interface for system administration of UNIX
-
Summary
-
Files
-
Reviews
-
Support
-
Wiki
-
Mailing Lists
-
Tickets ▾
- Feature Requests
- Patches
- Support Requests
- Bugs
- Usermin Bugs
-
Discussion
-
External Link ▾
- Donate
- New Issue
Menu
▾
▴
-
Create Topic -
Stats Graph
Forums
-
Open Discussion
199 -
Webmin
3950 -
Usermin
99 -
webadmin-devel
37 -
Help
361 -
Virtualmin
172 -
webadmin-list
4
Help
-
Formatting Help
apt-show-versions
Created:
2018-12-23
Updated:
2019-01-01
-
There are 69 pages of topic items on «apt-show-versions» some of them dating back 5 years. The latest webmin and usermin packages both still have this error, «Error: No information about packages! (Maybe no deb entries?)», which is NOT fixed by installing the dependencies. Instead of stopping the configuration, leaving webmin not installed, you should leave the version information blank and carry on installing webmin.
And hurry up! Before Xmas (2018) would be OK.
-
Hi, Dave!
Which Webmin and Usermin version do you have installed?
.. the latest Webmin and Usermin packages both still have this error, «Error: No information about packages!
Where exactly do you have this error displayed? Could you provide a screenshot?
-
I don’t have any installed, that’s the problem.
I downloaded usermin_1.750_all.deb and webmin_1.900_all.deb from the webmin repository and the error is produced when it tries to install apt-show-versions. It leaves apt-show-versions (0.22.7) «partially installed» (installed but not configured because of the error) and webmin/usermin not installed.
$ sudo dpkg -i ./webmin_1.900_all.deb
[sudo] password for dk:
Selecting previously unselected package webmin.
(Reading database ... 97561 files and directories currently installed.)
Preparing to unpack ./webmin_1.900_all.deb ...
Unpacking webmin (1.900) ...
dpkg: dependency problems prevent configuration of webmin:
 webmin depends on apt-show-versions; however:
**  Package apt-show-versions is not installed.**

dpkg: error processing package webmin (--install):
 dependency problems - leaving unconfigured
Processing triggers for systemd (237-3ubuntu10.9) ...
Errors were encountered while processing:
 webmin
 // partially installed shows as "not installed"
$ sudo apt install apt-show-versions
Reading package lists... Done
Building dependency tree
Reading state information... Done
apt-show-versions is already the newest version (0.22.7ubuntu1).
0 upgraded, 0 newly installed, 0 to remove and 1 not upgraded.
3 not fully installed or removed.
After this operation, 0 B of additional disk space will be used.
Do you want to continue? [Y/n] y
Setting up apt-show-versions (0.22.7ubuntu1) ...
** initializing cache. This may take a while **
**Error: No information about packages! (Maybe no deb entries?)**
dpkg: error processing package apt-show-versions (--configure):
 installed apt-show-versions package post-installation script subprocess returned error exit status 255
dpkg: dependency problems prevent configuration of webmin:
 webmin depends on apt-show-versions; however:
  Package apt-show-versions is not configured yet.

dpkg: error processing package webmin (--configure):
 dependency problems - leaving unconfigured
dpkg: dependency problems prevent configuration of usermin:
 usermin depends on apt-show-versions; however:
  Package apt-show-versions is not configured yet.

dpkg: error processing package usermin (--configure):
 dependency problems - leaving unconfigured
Errors were encountered while processing:
 apt-show-versions
 webmin
 usermin
E: Sub-process /usr/bin/dpkg returned an error code (1)
$
-
I would add Webmin repo to the system’s list, instead of installing it manually.
Try the following:
- Open the repo list:
sudo nano /etc/apt/sources.list - Add the source:
deb http://download.webmin.com/download/repository sarge contrib - Install Jamie’s key:
• Download:wget http://www.webmin.com/jcameron-key.asc
• Import:sudo apt-key add jcameron-key.asc - Update repos:
sudo apt-get update - Install:
sudo apt-get install webmin usermin
Good luck and Happy New Year!
Last edit: Ilia 2019-01-01
- Open the repo list:

Log in to post a comment.
Скрипт установки системы MajorDoMo рассчитан на операционные системы с менеджером пакетов apt, таких как Ubuntu, Debian, Mint и на их основе, Armbian, Raspbian, на платформы как ARM так и x86.
Установка сводиться к скачиванию скрипта с github и запуска его с параметрами из терминала.
Для установки скрипта у Вас должна быть установлена система Linux и вы должны видеть командную строку терминала. Данная статья не описывает установку операционной системы Linux, только использование скрипта. перед установкой обновите пакеты введя команды:
|
apt update && apt upgrade —y |
если Вы уже устанавливали скриптом и он у Вас скачан, то надо сначала удалить старый скрипт командой
скачиваем скрипт командой
|
wget https://raw.githubusercontent.com/immortalserg/installmd/master/installmd |
даем права на выполнение командой
Устанавливаем систему MajorDoMo
скрипт запускать под суперпользователем, если вошли под простым пользователем, то введите:
и введите пароль
для установки системы MajorDoMo введите команду
введите пароль root для создаваемой базы данных, символы пароля или звездочки не показываются, нажмите Enter, введите пароль пользователя pi, не важно создан у Вас пользователь или нет, если не создан, то скрипт создаст его сам.
Больше нигде паролей вводить не надо, в зависимости от версии mysql может выйти запрос паролей ещё раз, в этом случае оставьте поле пустым и нажмите продолжить. Осталось дождаться завершения работы скрипта, при завершении Вы увидите
осталось перезапустить систему командой
На этом установка системы MajorDoMo окончена, можно зайти через браузер по адресу: http://md.lan
доступ по ssh можно не по айпи адресу а по имени md.lan, порт 22
Установлен так же vlc ower http, который доступен на порту 7070 пароль для входа 12345
Установка phpMyAdmin
Установить phpMyAdmin можно двумя способами: из репозитариев и из исходников, при установке из репов конфиг phpmyadmin храниться в базе данных и как следствие размер занимаемый базой данных будет больше, при установке из исходников конфиг в файле в месте установки. Скрипт установки просто скачивает последнюю версию исходников и распаковывает в папку www, для установки phpMyAdmin скриптом введите в консоли команду:
зайти в phpMyAdmin можно по адресу http://md.lan/phpmyadmin/
по умолчанию вход пользователем root в phpmyadmin запрещено, чтобы войти используйте пользователя pi
Установка Java, установка и обновление сервера Blynk
Сервер Blynk не работает без установленной Java 8 или 9, скрипт устанавливает java версии 8, для установки java выполните в консоли:
для установки или обновления до последней версии Blynk сервера выполните в консоли
перезагрузите компьютер, для настройки зайдите в браузере по адресу: https://md.lan:9443/admin
имя пользователя admin@blynk.cc пароль admin
Оптимизация работы с картой памяти
Для сохранения жизни SD карты рекомендуется все лог файлы и базы данных держать в памяти примонтировав соответствующие каталоги в файловой системе tmpfs, для того чтобы перенести всё в tmpfs и сделать соответствующие настройки выполните в терминале
перезагрузите систему.
Установка расширенной конфигурации.
Расширенная конфигурация представляет собой базовую конфигурацию с добавлением сцен, выключателей, некоторых скриптов и удалением некоторых элементов. Так же при установки расширенной конфигурации в mysql отключается использование таблиц innodb, это сделано для уменьшения размера файлов баз данных. Расширенная конфигурация предназначена для ознакомления, проверки звука и построения своей конфигурации. Для установки расширенной конфигурации выполните:
Если Вы будете загружать свою конфигурацию поверх расширенной, то сначала в архиве с своей конфигурацией отредактируйте файл dump.sql и замените все innodb на MyISAM либо отредактируйте конфигурационный файл mysql, обычно файл находиться тут: /etc/mysql/mariadb.conf.d/50-server.cnf, в конце файла закоментируйте строку innodb=OFF приведя к виду
перезагрузите систему и загрузите свою конфигурацию средствами MajorDoMo
Подключение часов реального времени DS3231
Подключаем часы реального времени DS3231 к порту i2c и включаем в настройках оборудования порт i2c-0, после чего выполните в консоли команду:
перезагрузите систему.
Решение возможных проблем.
Нет звука
Проблема замечена на Armbian OrangePi Zero и OrangePi plus 2E, возможно и на других платах.
Возможная причина в том, что в конфигурации не включен analog-codec, для его включения в консоли запустите armbian-config, выберете System — Hardware и установите галочку напротив analog-codec
сохраните и перезагрузитесь. Должно появиться аудиоустройство
если галочка analog-codec стоит, но аудиоустройство не появилось то добавьте в файл /etc/modules добавляем строки
|
sun4i_codec sun8i_codec_analog |
и перезагружаемся, аудиоустройство должно появиться.
Дальше страницы с выбором языка не идет.
Причина в том, что mysql не запустился, это связано с тем, что при запуске системы база данных копируется в раздел tmp и mysql запускается когда базы ещё не скопировались в следствии чего mysql не может запуститься. Раскоментируйте строку в /etc/rc.local с запуском mysql
После пропадания питания не сохраняются данные, сбрасывается на дефолтную конфигурацию
причина в том, что время получает позже старта системы и из-за этого восстанавливается самый близкий к текущему в системе времени, до получения времени с интернета текущее время 1970 год.
вар 1 (предпочтительнее): установить и настроить i2c часы ds3231 как написано выше
вар 2: отключаем автозапуск mysql:
|
update—rc.d mysql disable |
в строке запуска mysql в /etc/rc.local сделем паузу запуска в 90 секунд.
вар 3: в папке /var/www создаем файл prov и сделаем его исполняемым
файл со следующим содержимым.
|
#!/bin/bash # добавить в /etc/rc.local # /bin/sleep 60 && /var/www/prov # параметр в ThisComputer с названием proverkabase a=$(mysql —u root —pcubieboard —D db_terminal —B —N —e ‘SELECT * FROM properties WHERE TITLE=»proverkabase»‘) //echo «prop : «$a if [ —z «$a» ]; then echo «NO BD»; mysql —u root —pcubieboard db_terminal < /var/www/dump.sql else echo «YES BD»; fi |
в rc.local добавляем перед exit 0
|
/bin/sleep 60 && /var/www/prov |
в свойствах делаем оригинальное свойство, у меня называется proverkabase
делаем бэкап последней версии базы данных и распаковываем файл dump.sql в /var/www
Установка на Intel Edison
Устанавливаем на Intel Edison JubiLinux, вставляем карту памяти или USB флэшку (так как размер встроенной памяти мал часть системы будем ставить на внешний носитель). Носитель должен определиться как /dev/sda1 , проверяем командой
форматируем в ext4
создаем папку, монтируем раздел флэшки и копируем
|
mkdir /mnt/disk mount /dev/sda1 /mnt/disk (cd /home/.rootfs; tar —backup —c *) |tar —C /mnt/disk —xv |
добавить в /etc/fstab после /dev/root
|
/dev/sda1 /mnt/disk ext4 defaults,noatime 0 0 |
последнюю строку исправить и привести к виду
|
/mnt/disk/usr /usr none defaults,bind 1 1 |
после этого можно приступить к установке.
Обсуждение статьи на форуме и в чате telegam.
Еще одна инструкция по использованию скрипта.